Stampin’ Up! Wildlife Wonder for the Happy Inkin’ Thursday Blog Hop

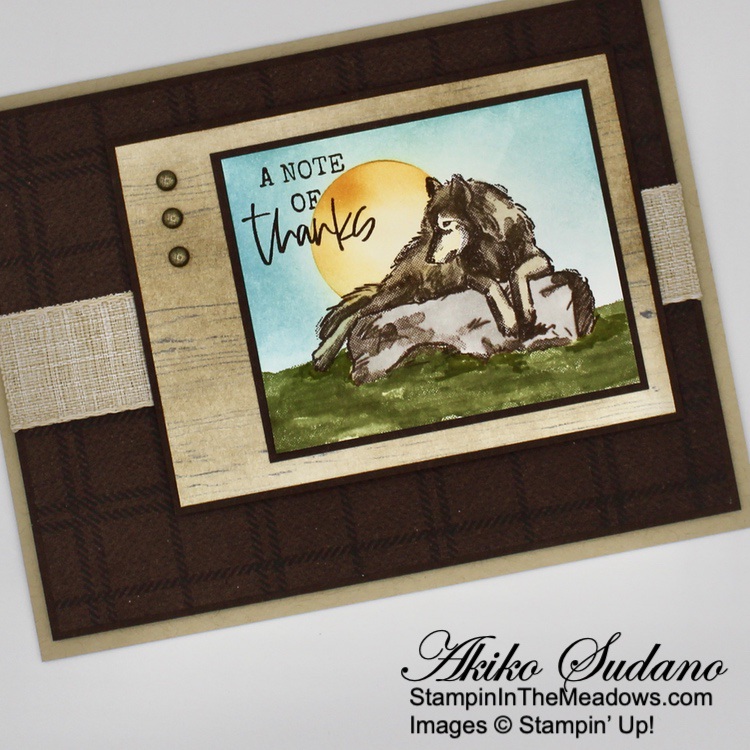
Good morning and welcome to the Happy Inkin’ Thursday Blog Hop! I made a masculine thank you card with the wonderful Stampin’ Up! Wildlife Wonder cling stamp set. You can find the supplies I used along with card stock cuts at the bottom of my post.

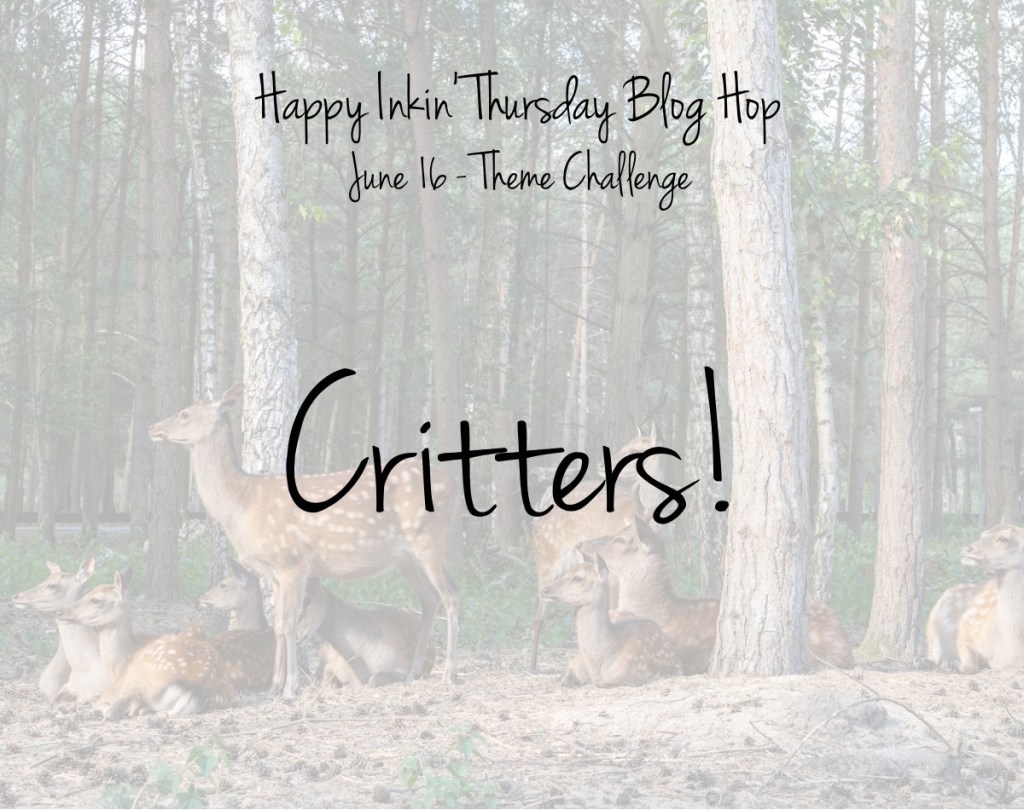
We have a theme challenge this week and we are making cards with critters! How fun!

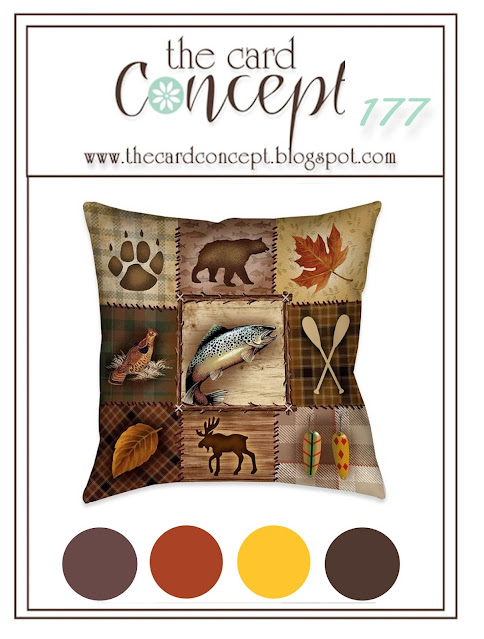
And I’m entering my card in the challenge at the Card Concept #177. The theme for this Challenge is ‘Make it Masculine’ and I was inspired by the plaids and outdoor themes in the inspiration picture to make a clean and layered card. Here is the inspiration picture:

I adhered a panel of plaid He’s the Man designer series paper to an Early Espresso mat and wrapped a length of natural ribbon around it, securing it in the back with tape. I adhered it to a Crumb Cake card base with dimensionals. I used a blending brush to blend Soft Suede ink on a wood grained panel of Heart and Home DSP and I love how it came out! I adhered that panel to an Early Espresso mat and then popped it on the card front with dimensionals.

I stamped the wolf from the Stampin’ Up! Wildlife Wonder stamp set in Early Espresso on Basic White and colored the wolf with Crumb Cake Stampin’ Blends and the rock in Gray Granite. I stamped the image again on masking paper and fussy cut it out. I covered the wolf with the mask and stamped the ground in Old Olive multiple times with the ground stamp.

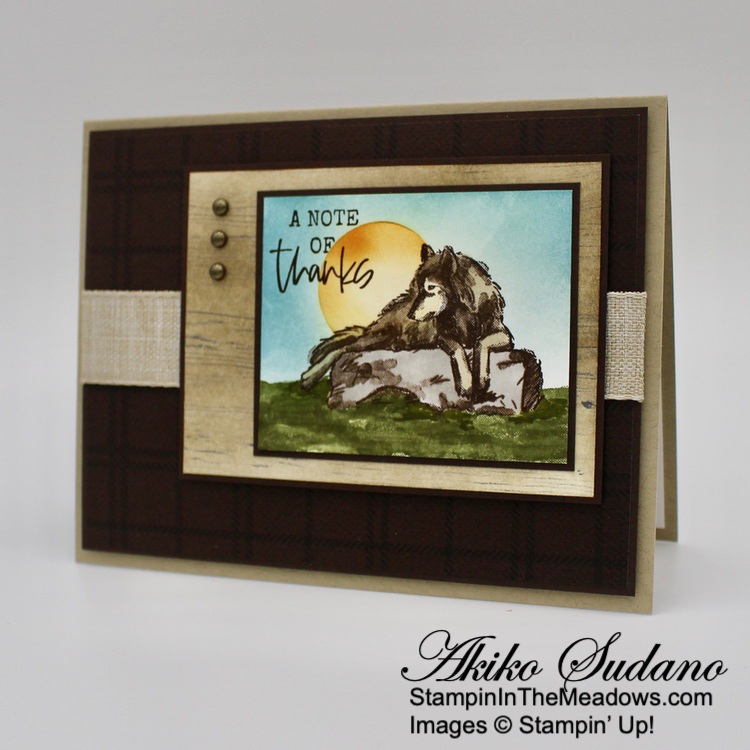
I cut a circle in another sheet of masking paper and used it to make a Mango Melody sun behind the wolf with a blending brush. I covered the sun with the circle mask and blended the sky background in Balmy Blue ink with a blending brush. I removed all the masks and stamped the sentiment from the Stampin’ Up! Wildlife Wonder Stamp set in Early Espresso ink. I adhered the wolf panel to an Early Espresso mat and adhered it to the card front with liquid glue. I finished the card with three rustic metallic dots.

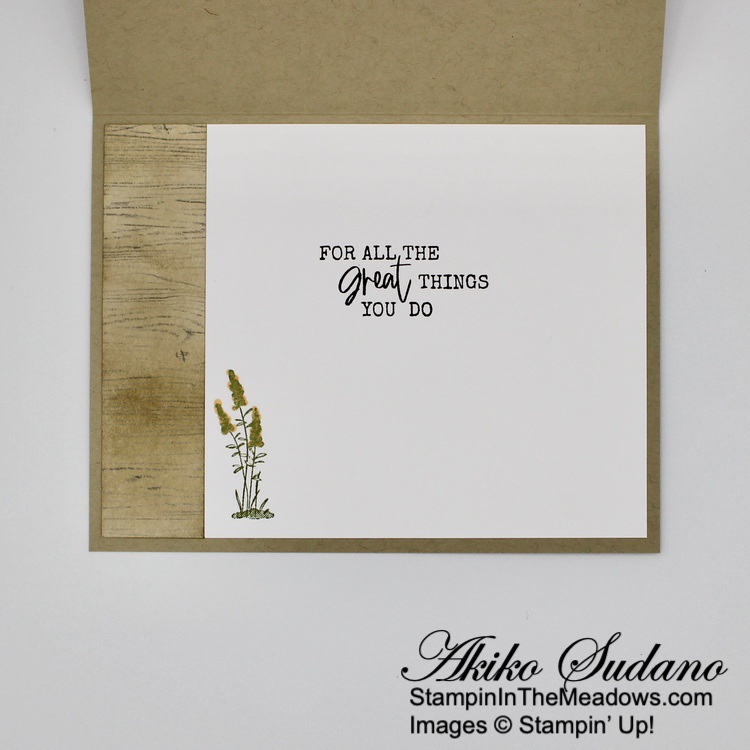
For the inside, I stamped the sentiment from the Stampin’ Up! Wildlife Wonder stamp set in Early Espresso on a Basic White panel. I stamped the plant in Old Olive and colored the tops with light Pumpkin Pie Stampin’ Blend. I blended Soft Suede on another woodgrain panel of Heart and Home DSP and adhered it to the side of the panel with liquid glue. I adhered the panel to the inside of the card with Stampin’ Seal.

The Stampin’ Up! Wildlife Wonder stamp set is another in a long line of gorgeous Stampin’ Up! natural wildlife stamp sets, and it’s another winner! These are perfect for masculine cards for any occasion and I have always enjoyed making natural backgrounds using different coloring techniques.

On with the Hop! Click on the Next Blog button to move forward to see the beautiful project Karen Ksenzakovic has created.

If you get lost along the way, here are the participants for the hop:


Current Host Code: MHHQUNTF

Use this host code when you order $50 or more and receive a free gift from me!  The free gift is your choice of any available item valued up to $10.00 in the 2022 – 2023 Annual Catalog or the January – June 2022 Mini Catalog!

If your order is over $150, please do not use the host code since you’ll receive your own Host Dollars plus I’ll still send you the free gift!  This host code can be used by anyone, no club or commitment required. Let me know if you have any questions.


If you need any stamping supplies, I’d be very happy to be your Demonstrator.  Just click on the Shop Now button on the right side of the screen to go directly to my online store or contact me if you have any questions. 

Thanks for stopping by and Happy Stamping!

Akiko

  • Visit my online store here
  • See the current Stampin’ Up! clearance rack specials here
  • Earn FREE Stampin’ Up! products through my Wildflower Frequent Shopper Program – my way of saying thank you to my online frequent shopper customers.
  • Have any questions? I’d be happy to help, click here to contact me.

Cardstock Cuts for this project:

  • Crumb Cake – 5-1/2″ x 8-1/2″ card base scored at 4-1/4″
  • Early Espresso – 4″ x 5-1/4″ (front mat), 2-7/8″ x 3-7/8″ (DSP mat), 2-3/8″ x 2-7/8″ (wolf mat)
  • Basic White – 4″ x 5-1/4″ (inside panel), 2-1/4″ x 2-3/4″ (art panel)
  • He’s The Man DSP – 3-7/8″ x 5-1/8″ (front background)
  • Heart & Home DSP – 2-3/4″ x 3-3/4″ (front wood grain panel), 1″ x 4″ (inside trim)

Stampin’ Up! products used in this project:


Stampin’ Up! Elephant Parade for the Inkin’ Krew Blog Hop

Good morning! Welcome to the June Inkin’ Krew Team Blog Hop! The theme for this month’s hop is “Happy Birthday” and I have a baby birthday card made with the sweet Stampin’ Up! Elephant Parade bundle from the new Annual Catalog. You can find the supplies I used at the bottom of my post along with the sizes of cardstock used.

I was also inspired by the pretty sketch in the Inspire.Create.Challenges #188:

I adhered a strip of Petal Pink floral Design A Daydream designer series paper to a Petal Pink mat and adhered it to another Petal Pink Design A Daydream DSP with liquid glue. I adhered the layered DSP to the front of a Petal Pink card base. I adhered a panel of leafy swirl Tea Boutique DSP to a Parakeet Party mat and adhered it to the card front with liquid glue.

I cut a Petal Pink panel with the second largest scalloped circle from the Layering Circles dies and stamped the sentiment from the Stampin’ Up! Elephant Parade cling stamp set in Garden Green on a Basic White panel. I cut it out with the second largest circle from the Stylish Shapes dies and I adhered the circles together with liquid glue.

I cut grass from Parakeet Party using the grass dies from the Elephant dies and adhered them to the layered circles. I stamped the sweet elephant from the Stampin’ Up! Elephant Parade stamp set on Basic White using Basic Gray ink and colored it with Petal Pink and Gray Granite Stampin’ Blends. I cut it out with the coordinating die and popped it on the layered circles with dimensionals.

I stamped the flower from the Stampin’ Up! Elephant Parade stamp set in Basic Gray ink and colored it with Tahitian Tide and Granny Apple Green Stampin’ Blends. I cut it out with the coordinating die and adhered it under the elephant’s trunk. I cut a Petal Pink bow and adhered it to the elephant’s head and adhered the layered circles to the card front with dimensionals. I finished it with three In Color matte dots.

For the inside of the card, I stamped the sentiments from the A Grand Kid cling stamp set in Basic Gray on a Basic White panel. I stamped the balloons from the Stampin’ Up! Elephant Parade stamp set in Basic Gray on the side of the panel in Basic Gray and colored them with Petal Pink, Parakeet Party and Tahitian Tide Stampin’ Blends before adhering it to the inside of the card.

The elephants in the Stampin’ Up! Elephant Parade bundle are so cute and sweet!! They’re perfect for children’s cards and for any occasion where you want a cute critter to send your message!

On With The Hop! Click on the Next Blog button to move forward to Karen Finkle’s project or click the Previous Blog button to move back to see the project that Tara Carpenter created.

If you get lost along the way, here are the participants for the hop:

  1. Jaimie Babarczy
  2. Carol Buckalew 
  3. Karen Ksenzakovic 
  4. Mary Deatherage 
  5. Karen Finkle 
  6. Terry Lynn Bright 
  7. Tara Carpenter 
  8. Jillian Good 
  9. Sue Prather
  10. Akiko Sudano. <– You are here
  11. Amy Koenders

Current Host Code: MHHQUNTF

Use this host code when you order $50 or more and receive a free gift from me!  The free gift is your choice of any item currently available valued up to $10.00 in the 2023 – 2023 Annual Catalog or the January-June 2022 Mini Catalog!

If your order is over $150, please do not use the host code since you’ll receive your own Host Dollars plus I’ll still send you the free gift!  This host code can be used by anyone, no club or commitment required. Let me know if you have any questions


If you need any stamping supplies, I’d be very happy to be your Demonstrator.  Just click on the Shop Now button on the right side of the screen to go directly to my online store or contact me if you have any questions. 

Thanks for stopping by and Happy Stamping!

Akiko

  • Visit my online store here
  • See the current Stampin’ Up! clearance rack specials here
  • Earn FREE Stampin’ Up! products through my Wildflower Frequent Shopper Program – my way of saying thank you to my online frequent shopper customers.
  • Have any questions? I’d be happy to help, click here to contact me.

Cardstock Cuts for this project:

  • Petal Pink – 5-1/2″ x 8-1/2″ card base scored at 4-1/4″, 3-1/4″ x 3-1/4″ (scalloped circle), 2-1/8″ x 5-1/4″ (DSP mat), 1″ x 1″ (die cut bow)
  • Parakeet Party – 2-1/8″ x 3-7/8″ (DSP mat), 1″ x 2-1/2″ (die cut grass)
  • Basic White – 4″ x 5-1/4″ (inside panel), 3″ x 3″ (die cut circle), 2″ x 2-1/4″ (die cut elephant), 1″ x 1″ (die cut flower)
  • Design a Daydream DSP – 4″ x 5-1/4″ (front background), 2″ x 5-1/4″ (front stripe)
  • Tea Boutique DSP – 2″ x 3-3/4″ (front DSP panel)

Stampin’ Up! products used in this project:


Stampin’ Up! Splendid Thoughts Sneak Peek Cards

Good Morning! Yesterday we had our Quarterly Inkin’ Krew Team meeting and three of our teammates designed cards using the beautiful new Stampin’ Up! Splendid Thoughts bundle from the upcoming July – December 2022 Mini Catalog. This beautiful bundle is part of the Splendid Day suite that also contains the beautiful Splendid Day specialty designer series paper and will be available on July 1, 2022. You can find the currently available supplies I used at the bottom of my post along with the sizes of cardstock used.

Rosie Kean from Rapid City, SD designed this gorgeous Double Z fold wedding card showing off the beautiful foil papers from the Splendid Day specialty DSP. The beautiful foils are matted on Soft Sea foam in the outer card and the inner card uses the linen paper with the Soft Sea Foam leaf panels as mats.

The card bases are Sahara Sand and the sentiments from the Stampin’ Up! Splendid Thoughts stamp set are stamped in Soft Suede. The gorgeous die cuts from the Splendid Stems dies accent the Sahara Sand fabric DSP panels and Rosie designed an optional Basic White back panel for writing a personal message. I added the Soft Sea Foam Bow and iridescent pearls to the front panel.

Karen Ksenzakovic from Somerville, NJ designed this card using all the gorgeous foliage die cuts from the Splendid Stems dies. The Soft Sea Foam card base and Pear Pizzazz mat are perfect with the subtle leafy background of the DSP and allow the beautiful bold die cuts in Soft Sea Foam, Pear Pizzazz, Rich Razzleberry and Evening Evergreen to really pop!

She finished the card front with a beautiful Soft Sea Foam bow on the linen die cut flower pot. I added the brass butterflies around the leaves. For the inside Karen also added a sentiment in addition to the stamped foliage from the Stampin’ Up! Splendid Thoughts stamp set. You can find more of Karen’s beautiful designs on her blog – Creative Stamping Designs.

Tara Carpenter from Hallsville, MO designed our last card, and it doesn’t show up very well, but it uses shimmery white card stock for the front and inside panels, so it has a beautiful subtle sparkle! She showed us how to mask off the vertical stripe and use blending brushes to apply Pale Papaya, Soft Succulent and Orchid Oasis inks to make a gorgeous multicolor stripe on the card front.

A single Soft Succulent die cut leaf wrapped in Evening Evergreen twine around the panel matted in Soft Succulent and adhered to an Evening Evergreen card base perfectly frames the blended stripe. I had the courage to stamp the sentiment (and it was straight – yay!) and finish it with three iridescent rhinestones. I carried the blended strip to the inside of the card and stamped the sentiment and leaves from the Stampin’ Up! Splendid Thoughts bundle in Evening Evergreen and stamped off Soft Succulent on the inside panel. Find more of Tara’s beautiful cards on her blog – Tarabeth Stamps.

The beautiful Stampin’ Up! Splendid Thoughts bundle and the Splendid Day specialty designer series paper will be available on July 1, 2022 and you will not regret putting it at the top of your wish list. It was fun playing with these beautiful products and making cards with Rosie, Karen and Tara during our team meeting and I’m grateful that they shared their beautiful designs with us.


Stampin’ Up! January – June 2022 Mini Catalog Last Chance Sale going on now!

The Stampin’ Up! January – June 2022 Mini Catalog is retiring on June 30 and retiring items are available while supplies last. And some items are on sale for up to 50% off!

Here are the details:

  • Not all retiring items are on sale. Discounted items are noted in the Retiring List
  • All products are available while supplies last, and there are no purchase limits.
  • Discounted items can be added to a Starter Kit and redeemed as a 50% off item or with Stampin’ Rewards.
  • Only orders opened and closed during the promotion period apply. 
  • Stamp Sets are not guaranteed during this promotion and are while supplies last.
  • The items are available while supplies last through June 30, 2022.

Order soon to make sure that you are able to get the items that you are wanting! Happy shopping!

Click HERE to download a PDF of the Retiring List items.

Click HERE to download an Excel Spreadsheet of the Retiring List items.


Stampin’ Up! Kits Collection – Buy One Get one 50% off!

The Stampin’ Up! Kits Collection is having a buy one, get one 50% off sale! The Kits Collection by Stampin’ Up! is perfect for beginner crafters with its variety and all-inclusive projects. And this is the perfect time to share a kit from the Kits Collection with a friend!

Here are the details:

  • Sale runs through 1–30 June 2022.
  • All kits in the Kits Collection by Stampin’ Up! qualify for this sale. 
  • Kit selection is based on availability.
  • You will need at least two kits in your cart for the discount to automatically apply at checkout. 
  • There are no order limits on this promotion.

The kit selection is based on availability, and new kits are continually being added. Shop the Kits Collection in my online store HERE.


Current Host Code: MHHQUNTF

Use this host code when you order $50 or more and receive a free gift from me!  The free gift is your choice of any item currently available valued up to $10.00 from the January – June 2022 Mini Catalog or the 2022-2023 Annual Catalog!

If your order is over $150, please do not use the host code since you’ll receive your own Host Dollars plus I’ll still send you the free gift!  This host code can be used by anyone, no club or commitment required. Let me know if you have any questions.


If you need any stamping supplies, I’d be very happy to be your Demonstrator.  Just click on the Shop Now button on the right side of the screen to go directly to my online store or contact me if you have any questions.  Happy Stamping!

Thanks for stopping by and have a great week!

Akiko

  • Visit my online store here
  • See the current Stampin’ Up! clearance rack specials here
  • Earn FREE Stampin’ Up! products through my Wildflower Frequent Shopper Program – my way of saying thank you to my online frequent shopper customers.
  • Have any questions? I’d be happy to help, click here to contact me.

Cardstock Cuts for this project:

  • Rosie’s Card
    • Sahara Sand – 4-1/4″ x 11″ card base scored at 2-3/4″ and 5-1/2″, 3” x 8-1/4” inner card base scored at 2-3/4” and 5- 1/2”
    • Soft Sea Foam – two 2-5/8” x 4-1/8” panels, two 4-1/8” x 5-3/8” panels, two Splendid Stems die cuts
    • Splendid Day specialty DSP – two 2-1/2″ x 4″ panels (foil), 4″ x 5-1/4″ (foil), three Splendid Stems die cuts (foil), three 2-5/8” x 2-7/8” panels (Soft Sea Foam Leaf pattern), two 2-1/2” x 2-3/4” panels (Sahara Sand fabric pattern)
    • Basic White – 4” x 5-1/4” panel
  • Karen’s Card
    • Soft Sea Foam – 4-1/4″ x 11″ card base scored at 5-1/2″, 2″ x 4″ (leaf die cut)
    • Pear Pizzazz – 3 3/4″ X 5″ (card front mat), 2″ X 2 1/2″(leaf die)
    • Rich Razzleberry – 2″ X 2″ (leaf die cut)
    • Evening Evergreen – 2″ X 3″ (leaf die cut)
    • Sahara Sand – 1 1/2″ x 2 1/2″ (flowerpot die cut)
    • Basic White – 4″ x 5-1/4″ (inside panel)
    • Splendid Day specialty DSP – 3 1/2″ X 4 3/4″ (front background), 1 1/2″ x 2 1/2″ (flowerpot die cut), 2 1/4″ X 6″ (envelope flap)
  • Tara’s Card
    • Evening Evergreen – 4-1/4″ x 11″ card base scored at 5-1/2″
    • Soft Succulent – 4 1/8″ x 5 3/8″ (front mat), 2″ x 2″ (die cut leaf)
    • Shimmery White – two 4″ x 5 1/4″ panels (front and inside panel)

Currently Available Stampin’ Up! products used in this project:


Stampin’ Up! Hello Beautiful Celebrate Card

Good Morning! Here’s a simple Celebrate card made with the fun Stampin’ Up! Hello Beautiful bundle and the beautiful retiring Abstract Beauty specialty designer series paper. You can find the supplies I used at the bottom of my post along with the sizes of cardstock used.

I adhered a panel of floral Abstract Beauty specialty designer series paper to a Crushed Curry mat with liquid glue. The Abstract Beauty specialty DSP is filled with touches of gold foil and fun abstract art designs and it goes well with the Beautiful Shapes dies. I wrapped the panel with gold trim and tied a bow on the side. I punched two Coastal Cabana leaf sprigs with the Bough Punch and adhered them to the panel with liquid glue.

I stamped the sentiment from the Stampin’ Up! Hello Beautiful bundle in Night of Navy ink on Balmy Blue card stock and cut it out with the Beautiful Shapes die. I cut a panel of gold foil with the large oval die from the Beautiful Shapes dies and adhered the small label on top with liquid glue. I love the embossed edges on these labels!! I adhered the layered label over the gold trim and leaf sprigs with dimensionals.

I adhered the panel to the front of a Night of Navy card base with dimensionals. I finished the card front with two 2021-2023 In Color Opal gems.

For the inside of the card, I stamped the flowers from the Stampin’ Up! Hello Beautiful stamp set in stamped off Melon Mambo and Crushed Curry in the top corner of a Basic White panel. I stamped the leaves in Coastal Cabana and colored the small flower centers with my Night of Navy Stampin’ Write marker. I cut a small gold foil oval and adhered it to the center of the Melon Mambo flower and adhered a strip of Abstract Beauty DSP to the bottom. I adhered the panel to the inside of the card.

Luckily the Stampin’ Up! Hello Beautiful bundle stamps and dies are not retiring, but next month they will no longer be available as a bundle with the 10% discount. The Abstract Beauty Specialty DSP is retiring and it is also a unique size – it’s 4″ x 6″. This makes it perfect for memory book scrapbooking as well as cardmaking. And it’s also on sale in the Last Chance Products promotion!! Be sure to check it out before it’s gone!


The July Paper Pumpkin Kit is Sending Good Thoughts

Set sail with across the ocean with the Sending Good Thoughts Paper Pumpkin Kit! With beautifully designed nautical imagery, a fun message in a bottle motif, and sentiments that are “shore” to please, this month’s kit is full of warmth and fun.

We also have a special game for you to play—take part in the Sea if You Know Paper Pumpkin quiz to learn more about Paper Pumpkin and this month’s kit! Plus, subscribers to the Sending Good Thoughts Paper Pumpkin Kit will be entered to win a 1-month prepaid Paper Pumpkin code! Click on the picture below to play:

The July Kit includes:

  • Supplies to create 9 cards—3 each of 3 designs—and 9 coordinating envelopes
  • Printed dry-embossed card bases and printed envelopes
    • Card size: 4-1/4″ x 5-1/2″
    • Envelope Size: 4-1/2″ x 5-3/4″
  • Twine, mini glue dots and dimensionals
  • Sending Good Thoughts Photopolymer stamp set
  • Bermuda Bay Classic Stampin’ Spot

Coordinating Colors: Balmy Blue, Basic Gray, Bermuda Bay, Fresh Freesia, Pacific Point, Poppy Parade

If you’re interested in subscribing to Paper Pumpkin, you can either sign up for a subscription where you are billed monthly for your kit or you can purchase a prepaid subscription in my Online Store. To see more information and to sign up for the monthly subscription click here. To see the options for prepaid subscriptions in my Online Store, click here.

Sign up deadline for the July 2022 kit is July 10, 2022. Note: Supplies may be limited toward the end of the subscription period.


Stampin’ Up! January – June 2022 Mini Catalog Last Chance Sale going on now!

The Stampin’ Up! January – June 2022 Mini Catalog is retiring on June 30 and retiring items are available while supplies last. And some items are on sale for up to 50% off!

Here are the details:

  • Not all retiring items are on sale. Discounted items are noted in the Retiring List
  • All products are available while supplies last, and there are no purchase limits.
  • Discounted items can be added to a Starter Kit and redeemed as a 50% off item or with Stampin’ Rewards.
  • Only orders opened and closed during the promotion period apply. 
  • Stamp Sets are not guaranteed during this promotion and are while supplies last.
  • The items are available while supplies last through June 30, 2022.

Order soon to make sure that you are able to get the items that you are wanting! Happy shopping!

Click HERE to download a PDF of the Retiring List items.

Click HERE to download an Excel Spreadsheet of the Retiring List items.


Stampin’ Up! Kits Collection – Buy One Get one 50% off!

The Stampin’ Up! Kits Collection is having a buy one, get one 50% off sale! The Kits Collection by Stampin’ Up! is perfect for beginner crafters with its variety and all-inclusive projects. And this is the perfect time to share a kit from the Kits Collection with a friend!

Here are the details:

  • Sale runs through 1–30 June 2022.
  • All kits in the Kits Collection by Stampin’ Up! qualify for this sale. 
  • Kit selection is based on availability.
  • You will need at least two kits in your cart for the discount to automatically apply at checkout. 
  • There are no order limits on this promotion.

The kit selection is based on availability, and new kits are continually being added. Shop the Kits Collection in my online store HERE.


Current Host Code: MHHQUNTF

Use this host code when you order $50 or more and receive a free gift from me!  The free gift is your choice of any item currently available valued up to $10.00 from the January – June 2022 Mini Catalog or the 2022-2023 Annual Catalog!

If your order is over $150, please do not use the host code since you’ll receive your own Host Dollars plus I’ll still send you the free gift!  This host code can be used by anyone, no club or commitment required. Let me know if you have any questions.


If you need any stamping supplies, I’d be very happy to be your Demonstrator.  Just click on the Shop Now button on the right side of the screen to go directly to my online store or contact me if you have any questions.  Happy Stamping!

Thanks for stopping by and have a great week!

Akiko

  • Visit my online store here
  • See the current Stampin’ Up! clearance rack specials here
  • Earn FREE Stampin’ Up! products through my Wildflower Frequent Shopper Program – my way of saying thank you to my online frequent shopper customers.
  • Have any questions? I’d be happy to help, click here to contact me.

Cardstock Cuts for this project:

  • Night of Navy – 4-1/4″ x 11″ card base scored at 5-1/2″
  • Crushed Curry – 4″ x 5-1/4″ (front mat)
  • Coastal Cabana – 1-1/2″ x 4-1/2″ (punched leaves)
  • Gold Foil – 1-3/4″ x 3″ (label)
  • Balmy Blue – 1-1/2″ x 2″ (label)
  • Abstract Beauty DSP – 3-7/8″ x 5-1/8″ (front background), 3/4″ x 4″ (inside trim)

Stampin’ Up! products used in this project:


Stampin’ Up! True Beauty for the Happy Inkin’ Thursday Blog Hop

Good morning and welcome to the Happy Inkin’ Thursday Blog Hop! I have a just because card to share today made with the beautiful new Stampin’ Up! True Beauty bundle with the retiring Flowering Fields designer series paper. You can find the supplies I used along with card stock cuts at the bottom of my post.

We have a sketch challenge this week and here is the sketch we are using:

I adhered an Old Olive panel of Flowering Fields designer series paper to a Mango Melody panel of the DSP with liquid glue and adhered the layered DSP to an Old Olive mat. I stamped the sentiment from the Stampin’ Up! True Beauty cling stamp set in Blackberry Bliss ink in the lower corner. I cut two berry sprigs from Blackberry Bliss card stock using the Organic Beauty dies and adhered them to the DSP panel with liquid glue.

I stamped three large roses from the Stampin’ Up! True Beauty stamp set in Poppy Parade on Basic White and cut them out with the coordinating die. I stamped three sets of leaves in Mossy Meadow and four small flowers in Mango Melody on Basic White. I cut all the leaves and small flowers out with the coordinating dies.

I arranged the flowers and leaves and adhered the leaves and small flowers to the DSP panel with glue dots. I adhered the top rose with glue dots and popped the last two flowers on with dimensionals. I adhered the panel to the front of a Poppy Parade card base with dimensionals and finished with three faux pearls.

For the inside, I cut two masks for the roses and stamped the first rose in the lower corner of a basic white panel in Poppy Parade ink. I covered it with a mask and stamped the second. I covered both roses and stamped the leaves in Mossy Meadow. I adhered the panel to the inside of the card with Stampin’ Seal.

The flowers in the Stampin’ Up! True Beauty stamp set are just beautiful – with the Distinktive look so that you get multiple shades in one stamp! And each flower has a coordinating die, so you don’t have to fussy cut – Yay!! And it goes beautifully with the retiring Flowering Fields DSP (which is currently on SALE). Be sure to check it out along with the other items in the Awash in Beauty Suite!

On with the Hop! Click on the Next Blog button to move forward to see the beautiful project Karen Ksenzakovic has created.

If you get lost along the way, here are the participants for the hop:


Current Host Code: MHHQUNTF

Use this host code when you order $50 or more and receive a free gift from me!  The free gift is your choice of any available item valued up to $10.00 in the 2022 – 2023 Annual Catalog or the January – June 2022 Mini Catalog!

If your order is over $150, please do not use the host code since you’ll receive your own Host Dollars plus I’ll still send you the free gift!  This host code can be used by anyone, no club or commitment required. Let me know if you have any questions.


If you need any stamping supplies, I’d be very happy to be your Demonstrator.  Just click on the Shop Now button on the right side of the screen to go directly to my online store or contact me if you have any questions. 

Thanks for stopping by and Happy Stamping!

Akiko

  • Visit my online store here
  • See the current Stampin’ Up! clearance rack specials here
  • Earn FREE Stampin’ Up! products through my Wildflower Frequent Shopper Program – my way of saying thank you to my online frequent shopper customers.
  • Have any questions? I’d be happy to help, click here to contact me.

Cardstock Cuts for this project:

  • Poppy Parade – 4-1/4″ x 11″ card base scored at 5-1/2″
  • Old Olive – 4″ x 5-1/4″ (front mat)
  • Blackberry Bliss 1-1/4″ x 4″ (die cut berry sprigs)
  • Basic White – 4″ x 5-1/4″ (inside panel), 2-1/2″ x 6″ (die cut roses), 2-1/2″ x 3-1/2″ (die cut leaves), 1″ x 4″ (die cut small flowers)
  • Flowering Fields DSP – 2-3/4″ x 3-7/8″ (Old Olive background), 3-7/8″ x 5-1/8″ (Mango Melody background)

Stampin’ Up! products used in this project:


Stampin’ Up! Artfully Layered Card

Good Morning! One of the prettiest sets in the retiring January-June 2022 Mini Catalog is the Stampin’ Up! Artfully Layered bundle. It coordinates with the Artfully Composed designer series paper to make fun cards with a tropical flair. You can find the supplies I used at the bottom of my post along with the sizes of cardstock used.

My card was inspired by the pretty sketch challenge in Freshly Made Sketches #538:

I embossed a Basic White panel with the Painted Texture 3D embossing folder and adhered it to the front of a Basic White card base. I adhered two strips of Artfully Composed designer series paper vertically to the left side of the card with liquid glue and adhered another strip across the top.

I cut an Evening Evergreen panel with the leaf from the Tropical Layers dies and stamped the sentiment from the Stampin’ Up! Artfully Layered cling stamp set in Evening Evergreen ink on a panel of Layering Designs vellum. I let the ink dry a bit and cut out the circle with the Stylish Shapes dies. I adhered the leaf die cut to the die cut vellum with glue dots.

I adhered the die cuts to the card front with glue dots and finished the card front with a Polished Dot.

For the inside of the card, I stamped the leaves from the Stampin’ Up! Artfully Layered stamp set in Mint Macaron and Calypso coral on a Basic White panel. I adhered the panel to an Artfully Composed DSP mat and adhered the layered panel to the inside of the card.

One of the best things about the Stampin’ Up! Artfully Layered stamp set are the fun, casual sentiments. They go great with the relaxed tropical leaf designs. These products are on the retiring list and the best part is that the dies and the DSP are on sale!! Be sure to check them out before they’re gone!


Stampin’ Up! January – June 2022 Mini Catalog Last Chance Sale going on now!

The Stampin’ Up! January – June 2022 Mini Catalog is retiring on June 30 and retiring items are available while supplies last. And some items are on sale for up to 50% off!

Here are the details:

  • Not all retiring items are on sale. Discounted items are noted in the Retiring List
  • All products are available while supplies last, and there are no purchase limits.
  • Discounted items can be added to a Starter Kit and redeemed as a 50% off item or with Stampin’ Rewards.
  • Only orders opened and closed during the promotion period apply. 
  • Stamp Sets are not guaranteed during this promotion and are while supplies last.
  • The items are available while supplies last through June 30, 2022.

Order soon to make sure that you are able to get the items that you are wanting! Happy shopping!

Click HERE to download a PDF of the Retiring List items.

Click HERE to download an Excel Spreadsheet of the Retiring List items.


Stampin’ Up! Kits Collection – Buy One Get one 50% off!

The Stampin’ Up! Kits Collection is having a buy one, get one 50% off sale! The Kits Collection by Stampin’ Up! is perfect for beginner crafters with its variety and all-inclusive projects. And this is the perfect time to share a kit from the Kits Collection with a friend!

Here are the details:

  • Sale runs through 1–30 June 2022.
  • All kits in the Kits Collection by Stampin’ Up! qualify for this sale. 
  • Kit selection is based on availability.
  • You will need at least two kits in your cart for the discount to automatically apply at checkout. 
  • There are no order limits on this promotion.

The kit selection is based on availability, and new kits are continually being added. Shop the Kits Collection in my online store HERE.


Current Host Code: MHHQUNTF

Use this host code when you order $50 or more and receive a free gift from me!  The free gift is your choice of any item currently available valued up to $10.00 from the January – June 2022 Mini Catalog or the 2022-2023 Annual Catalog!

If your order is over $150, please do not use the host code since you’ll receive your own Host Dollars plus I’ll still send you the free gift!  This host code can be used by anyone, no club or commitment required. Let me know if you have any questions.


If you need any stamping supplies, I’d be very happy to be your Demonstrator.  Just click on the Shop Now button on the right side of the screen to go directly to my online store or contact me if you have any questions.  Happy Stamping!

Thanks for stopping by and have a great week!

Akiko

  • Visit my online store here
  • See the current Stampin’ Up! clearance rack specials here
  • Earn FREE Stampin’ Up! products through my Wildflower Frequent Shopper Program – my way of saying thank you to my online frequent shopper customers.
  • Have any questions? I’d be happy to help, click here to contact me.

Cardstock Cuts for this project:

  • Basic White – 4-1/4″ x 11″ card base scored at 5-1/2″, 4-1/8″ x 5-3/8″ (embossed background), 3-1/2″ x 4-3/4″ (inside mat)
  • Evening Evergreen – 2-1/2″ x 3-1/2″ (die cut leaf cluster)
  • Layering Designs Vellum – 3″ x 3″ (die cut circle)
  • Artfully Composed DSP – 3/4″ x 4-1/2″ (front strip), 3/4″ x 4″ (front strip), 1/2″ x 3-3/4″ (front strip), 4″ x 5-1/4″ (inside mat)

Stampin’ Up! products used in this project:


Stampin’ Up! Season Of Chic Thinking of You Card

Good Morning! The new Texture Chic Suite in the 2022-2023 Annual Catalog is so beautiful and unique. It has the Stampin’ Up! Season of Chic bundle with an eclectic set of stamps and dies with sea shell, flower, leaf and snowflake motifs along with different spatter and brushstroke stamps that encourages creativity. It also has the beautiful Texture Chic specialty designer series paper with touches of gold foil and the gorgeous Distressed Gold specialty paper. I used all three for today’s shell motif thinking of you card and you can find the supplies I used at the bottom of my post along with the sizes of cardstock used.

I adhered a panel of Texture Chic specialty designer series paper to a Gray Granite mat. I used a blending brushes to apply Gray Granite ink and Petal Pink ink to two spots on a Basic White panel. I stamped the shell from the Stampin’ Up! Season of Chic photopolymer stamp set to stamp over the blended spots, using Petal Pink over the Gray Granite spot and Mango Melody over the Petal Pink spot. I cut the shells out with the coordinating die.

I stamped another Pink shell on plain Basic White and cut it out with the coordinating die and cut a panel of Distressed Gold specialty paper with the large detailed shell die. I adhered the gold shell to the Petal Pink stamped shell with liquid glue. I die cut the two small detailed shells from Petal Pink card stock and traced the long shell outline on a Basic White scrap. I used a blending Brush to apply Petal Pink ink to the shell and stamped over it with the spatter stamp from the Stampin’ Up! Season of Chic stamp set and Mango Melody ink. I fussy cut the shell and adhered it to the back of my die cut Petal Pink shell.

I cut a vellum panel with the screen die from the Chic dies and colored the back with Gray Granite and Light Pumpkin Pie Stampin’ Blends. I adhered the screen to the DSP panel with Stampin’ Seal across the middle and along the side. I stamped the sentiment from the Stampin’ Up! Season of Chic stamp set in Gray Granite ink on Basic White and cut it out with the Stylish Shapes banner die. I adhered some gold shimmer ribbon to the DSP panel with Stampin’ Seal and adhered the label on top with glue dots. I used glue dots to adhere the two smaller shells and the plain larger shells. I adhered the layered distress gold shell with dimensionals and adhered the DSP panel to the front of a Petal Pink card base with dimensionals. I finished the card front with Polished Dots.

For the inside of the card, I stamped the shell from the Stampin’ Up! Season of Chic stamp set in Petal Pink and Gray Granite in the corners of a Basic White panel. I stamped the Spatter in Mango Melody and trimmed the bottom with a strip of Texture Chic specialty DSP. I adhered the panel to the inside of the card with Stampin’ Seal.

Here in the Northeast, it’s a big beach weekend with gorgeous weather, so the shells in the Stampin’ Up! Season of Chic stamp set make a perfect card for the times. The light woodgrain DSP with the shells make the perfect background for a sun bleached look. This was a fun card to make and I hope it inspires you for summertime fun.


Stampin’ Up! January – June 2022 Mini Catalog Last Chance Sale going on now!

The Stampin’ Up! January – June 2022 Mini Catalog is retiring on June 30 and retiring items are available while supplies last. And some items are on sale for up to 50% off!

Here are the details:

  • Not all retiring items are on sale. Discounted items are noted in the Retiring List
  • All products are available while supplies last, and there are no purchase limits.
  • Discounted items can be added to a Starter Kit and redeemed as a 50% off item or with Stampin’ Rewards.
  • Only orders opened and closed during the promotion period apply. 
  • Stamp Sets are not guaranteed during this promotion and are while supplies last.
  • The items are available while supplies last through June 30, 2022.

Order soon to make sure that you are able to get the items that you are wanting! Happy shopping!

Click HERE to download a PDF of the Retiring List items.

Click HERE to download an Excel Spreadsheet of the Retiring List items.


Stampin’ Up! Kits Collection – Buy One Get one 50% off!

The Stampin’ Up! Kits Collection is having a buy one, get one 50% off sale! The Kits Collection by Stampin’ Up! is perfect for beginner crafters with its variety and all-inclusive projects. And this is the perfect time to share a kit from the Kits Collection with a friend!

Here are the details:

  • Sale runs through 1–30 June 2022.
  • All kits in the Kits Collection by Stampin’ Up! qualify for this sale. 
  • Kit selection is based on availability.
  • You will need at least two kits in your cart for the discount to automatically apply at checkout. 
  • There are no order limits on this promotion.

The kit selection is based on availability, and new kits are continually being added. Shop the Kits Collection in my online store HERE.


Current Host Code: MHHQUNTF

Use this host code when you order $50 or more and receive a free gift from me!  The free gift is your choice of any item currently available valued up to $10.00 from the January – June 2022 Mini Catalog or the 2022-2023 Annual Catalog!

If your order is over $150, please do not use the host code since you’ll receive your own Host Dollars plus I’ll still send you the free gift!  This host code can be used by anyone, no club or commitment required. Let me know if you have any questions.


If you need any stamping supplies, I’d be very happy to be your Demonstrator.  Just click on the Shop Now button on the right side of the screen to go directly to my online store or contact me if you have any questions.  Happy Stamping!

Thanks for stopping by and have a great week!

Akiko

  • Visit my online store here
  • See the current Stampin’ Up! clearance rack specials here
  • Earn FREE Stampin’ Up! products through my Wildflower Frequent Shopper Program – my way of saying thank you to my online frequent shopper customers.
  • Have any questions? I’d be happy to help, click here to contact me.

Cardstock Cuts for this project:

  • Petal Pink – 4-1/4″ x 11″ card base scored at 5-1/2″, 1-1/2″ x 2″ (die cut seashells)
  • Gray Granite – 3-7/8″ x 5-1/8″ (front mat)
  • Distress Gold specialty paper – 1-3/4″ x 1-3/4″ (detailed large shell)
  • Vellum – 3″ x 4″
  • Basic White – 4″ x 5-1/4″ (inside panel), 4″ x 5″ (stamped shells)
  • Textured Chic DSP – 3-3/4″ x 5″ (front background), 1/2″ x 4″ (inside trim)

Stampin’ Up! products used in this project:


Stampin’ Up! Cup of Tea for the Happy Inkin’ Thursday Blog Hop

Good morning and welcome to the Happy Inkin’ Thursday Blog Hop! I’m using the pretty Stampin’ Up! Cup of Tea bundle with the Tea Boutique 6″ x 6″ designer series paper for a Get Well card. You can find the supplies I used along with card stock cuts at the bottom of my post.

We have a color challenge this week and we are using the new 2022-2024 In Colors for our color palette:

And over at Hand Stamped Sentiments, they have a color challenge using the same colors, Hand Stamped Sentiments Color Challenge #390, so I’m entering my card there too.

I embossed an Orchid Oasis panel with the Gingham embossing folder and adhered it to the front of an Orchid Oasis card base. I adhered a panel of teapot Tea Boutique 6″ x 6″ DSP to the card front with liquid glue and adhered a panel of Sweet Sorbet Tea Boutique DSP on top. I cut a Tahitian Tide panel with the solid teacup die and cut a Basic White panel with the leafy detail teacup die. I put a panel of adhesive sheet behind the Basic White panel before cutting it, so I pulled the backing off the adhesive sheet and adhered the detailed die cut to the solid cup.

I stamped the small teabag tag from the Stampin’ Up! Cup of Tea photopolymer stamp set in Starry Sky and cut it out with the coordinating die. I adhered a short length of white baker’s twine to the back of the tag and cup with glue dots. I stamped the large leaf in Parakeet Party, the flower in Petal Pink and two small leaf clusters in Garden Green. I cut all these out with the coordinating dies and adhered the leaves to the card front with glue dots.

I adhered the teacup and tag to the card front with dimensionals along with the flower. I cut the solid and detailed lemon wedge from Crushed Curry and adhered them together before adhering them to the card front with glue dots. I finished the card front with In Color dots.

For the inside, I stamped the large leaf cluster from the Stampin’ Up! Cup of Tea stamp set in Parakeet Party on a Basic White panel. I stamped the small leaves in Garden Green and the sentiment in Orchid Oasis. I adhered a strip of DSP to the bottom and finished the panel with another die cut Petal Pink flower. I adhered the panel to the inside of the card with Stampin’ Seal.

A cup of hot tea with lemon and honey is always good when you have a cold in the Winter, so the Stampin’ Up! Cup of Tea bundle is perfect for a get well card. But in the hot summer, it’s the thought that counts, along with florals in the beautiful, bold new In Colors.

On with the Hop! Click on the Next Blog button to move forward to see the beautiful project Karen Ksenzakovic has created.

If you get lost along the way, here are the participants for the hop:


Current Host Code: MHHQUNTF

Use this host code when you order $50 or more and receive a free gift from me!  The free gift is your choice of any available item valued up to $10.00 in the 2022 – 2023 Annual Catalog or the January – June 2022 Mini Catalog!

If your order is over $150, please do not use the host code since you’ll receive your own Host Dollars plus I’ll still send you the free gift!  This host code can be used by anyone, no club or commitment required. Let me know if you have any questions.


If you need any stamping supplies, I’d be very happy to be your Demonstrator.  Just click on the Shop Now button on the right side of the screen to go directly to my online store or contact me if you have any questions. 

Thanks for stopping by and Happy Stamping!

Akiko

  • Visit my online store here
  • See the current Stampin’ Up! clearance rack specials here
  • Earn FREE Stampin’ Up! products through my Wildflower Frequent Shopper Program – my way of saying thank you to my online frequent shopper customers.
  • Have any questions? I’d be happy to help, click here to contact me.

Cardstock Cuts for this project:

  • Orchid Oasis – 4-1/4″ x 11″ card base scored at 5-1/2″, 4-1/8″ x 5-3/8″ (embossed panel)
  • Tahitian Tide – 2″ x 2-1/2″ (die cut teacup)
  • Crushed Curry – 1-1/2″ x 1-1/2″ (lemon die cuts)
  • Basic White – 4″ x 5-1/4″ (inside panel), 2″ x 2-1/2″ (detail teacup die cut), 3″ x 5″ (die cut leaves and flowers)
  • Tea Boutique 6″ x 6″ DSP – 2-1/2″ x 5″ (teapot panel), 2″ x 3-1/2″ (Sweet Sorbet panel), 1/2″ x 4″ (inside trim)

Stampin’ Up! products used in this project:


Stampin’ Up! Vintage Tools Birthday Card

Good Morning! I love the new Stampin’ Up! Vintage Tools cling stamp set – it reminds me of the old tools that my Husband’s father left to him! It’s a great set for making masculine cards, especially for the handyman or wannabe handyman. I paired it with a rustic print in the pretty new Texture Chic specialty designer series paper for today’s card. You can find the supplies I used at the bottom of my post along with the sizes of cardstock used.

I adhered a panel of Texture Chic specialty designer series paper to a Basic Black mat with liquid glue and adhered it to the front of an Evening Evergreen card base with dimensionals.

I stamped the tools from the Stampin’ Up! Vintage Tools stamp set in Memento Tuxedo black ink on a Sahara Sand panel. I colored the tools with the light Gray Granite and light Soft Suede Stampin’ Blends and fussy cut the tools out with my paper snips. I stamped the sentiment in Memento Tuxedo Black ink on another Sahara Sand panel.

I adhered the fussy cut tools to the panel with liquid glue and stamped some vintage tacks over the screwdriver in Memento Tuxedo Black. I finished the panel with three rustic dots and adhered the panel to a Basic Black mat before adhering it to the card front.

For the inside of the card, I stamped the the sentiment from the Stampin’ Up! Vintage Tools stamp set in Memento Tuxedo Black on a Basic White panel. I stamped some more tacks in Memento Tuxedo Black and stamped the sentiment from the Cottage Rose stamp set in Evening Evergreen. I trimmed the bottom with a strip of Texture Chic specialty DSP and adhered the panel to the inside of the card with Stampin’ Seal.

I could also stamp the tools directly on the cardstock and color it, but it gives the card front a little dimension and texture. The panel of Texture Chic DSP reminded me antique boards, so I thought it would go well with the Stampin’ Up! Vintage Tools stamp set.


Current Host Code: MHHQUNTF

Use this host code when you order $50 or more and receive a free gift from me!  The free gift is your choice of any item valued up to $10.00 from the January – June 2022 Mini Catalog or the 2022-2023 Annual Catalog!

If your order is over $150, please do not use the host code since you’ll receive your own Host Dollars plus I’ll still send you the free gift!  This host code can be used by anyone, no club or commitment required. Let me know if you have any questions.


If you need any stamping supplies, I’d be very happy to be your Demonstrator.  Just click on the Shop Now button on the right side of the screen to go directly to my online store or contact me if you have any questions.  Happy Stamping!

Thanks for stopping by and have a great week!

Akiko

  • Visit my online store here
  • See the current Stampin’ Up! clearance rack specials here
  • Earn FREE Stampin’ Up! products through my Wildflower Frequent Shopper Program – my way of saying thank you to my online frequent shopper customers.
  • Have any questions? I’d be happy to help, click here to contact me.

Cardstock Cuts for this project:

  • Evening Evergreen – 4-1/4″ x 11″ card base scored at 5-1/2″
  • Sahara Sand – 3-1/2″ x 3-3/4″ (front panel), 2-1/2″ x 5″ (fussy cut tools)
  • Basic Black – 3-7/8″ x 5-1/8″ (front mat), 3-5/8″ x 3-7/8″ (tool mat)
  • Basic White – 3-3/4″ x 5″ (inside panel)
  • Textured Chic DSP – 3-7/8″ x 5-1/8″ (front background), 1/2″ x 3-3/4″ (inside trim)

Stampin’ Up! products used in this project:


Stampin’ Up! Happy And Heartfelt Card

Good Morning! The new Abigail Rose designer series paper has so many pretty images and for today, I paired the tulip print with a gorgeous die cut butterfly and the fun Stampin’ Up! Happy and Heartfelt sentiment cling stamp set for a simple encouragement card. You can find the supplies I used at the bottom of my post along with the sizes of cardstock used.

I adhered a panel of the beautiful Abigail Rose designer series paper to an Early Espresso mat. I wrapped it with a length of white crinkle ribbon and tied a bow. I adhered it to the front of a Basic White Card Base.

I cut a Basic White panel with the largest butterfly from the Brilliant Wings dies. I stamped the sentiment from the Stampin’ Up! Happy and Heartfelt stamp set in Versamark ink on an Early Espresso panel. I sprinkled it with white embossing powder and shook off the excess. I heat set the powder until it was shiny and cut it out with the second smallest circle from the Stylish Shapes dies.

I adhered the die cut circle and the butterfly to the card front with glue dots and finished the card with a clear faceted elegant gem on the butterfly body.

For the inside of the card, I stamped the the sentiment from the Stampin’ Up! Color and Contour stamp set in Early Espresso on a Basic White panel. I inked up the small butterfly from the Butterfly Brilliance stamp in Early Espresso and stamped off twice before stamping next to the sentiment. I trimmed the bottom with a strip of Abigail Rose DSP and adhered the panel to an Early Espresso mat before adhering it to the inside of the card with Stampin’ Seal.

I love the fun sentiments in the Stampin’ Up! Happy and Heartfelt stamp set! They are unique and casual and go with any designer series paper.


Today is the Last Day for the In Color Starter Kit bonus!

Ready to start your Stampin’ Up! business in style? Then sign up between May 3 – 31, 2022 to be a demonstrator and get $66.50 in FREE 2022-2024 In Color® products!

The Starter Kit is only $99 + tax!!  And if you join between May 3-31, you’ll get:

  • $125 Stampin’ Up! merchandise of your choice
  • $66.50 in 2022-2024 In Color merchandise
    • 2022–2024 In Color Grid Paper – item 160009
    • 2022-2024 In Color 8-1/2″ x 11″ Card Stock – item 159204
    • 2022-2024 In Color Ink Pad Collection – item 161108
    • 2022-2024 In Color 6″ x 6″ Designer Series Paper – item 159253
  • Free business supplies and catalogs
  • Free random past Paper Pumpkin Kit
  • Free shipping!!

Read more about Stampin’ Up! Demonstrator benefits on my Join My Team page and click the button at the bottom to join. Contact me if you have any questions and I’ll be happy to tell you more!


Current Host Code: MHHQUNTF

Use this host code when you order $50 or more and receive a free gift from me!  The free gift is your choice of any item valued up to $10.00 from the January – June 2022 Mini Catalog or the 2022-2023 Annual Catalog!

If your order is over $150, please do not use the host code since you’ll receive your own Host Dollars plus I’ll still send you the free gift!  This host code can be used by anyone, no club or commitment required. Let me know if you have any questions.


If you need any stamping supplies, I’d be very happy to be your Demonstrator.  Just click on the Shop Now button on the right side of the screen to go directly to my online store or contact me if you have any questions.  Happy Stamping!

Thanks for stopping by and have a great week!

Akiko

  • Visit my online store here
  • See the current Stampin’ Up! clearance rack specials here
  • Earn FREE Stampin’ Up! products through my Wildflower Frequent Shopper Program – my way of saying thank you to my online frequent shopper customers.
  • Have any questions? I’d be happy to help, click here to contact me.

Cardstock Cuts for this project:

  • Basic White – 4-1/4″ x 11″ card base scored at 5-1/2″, 3-7/8″ x 5-1/8″ (inside panel), 3″ x 4″ (die cut butterfly)
  • Early Espresso – two 4″ x 5-1/4″ panels (front and inside mat), 2″ x 2″ (label)
  • Abigail Rose DSP – 3-7/8″ x 5-1/8″ (front background), 1/2″ x 3-7/8″ (inside trim)

Stampin’ Up! products used in this project: