Stampin’ Up! Brewed For You Oktoberfest Card with Video Tutorial

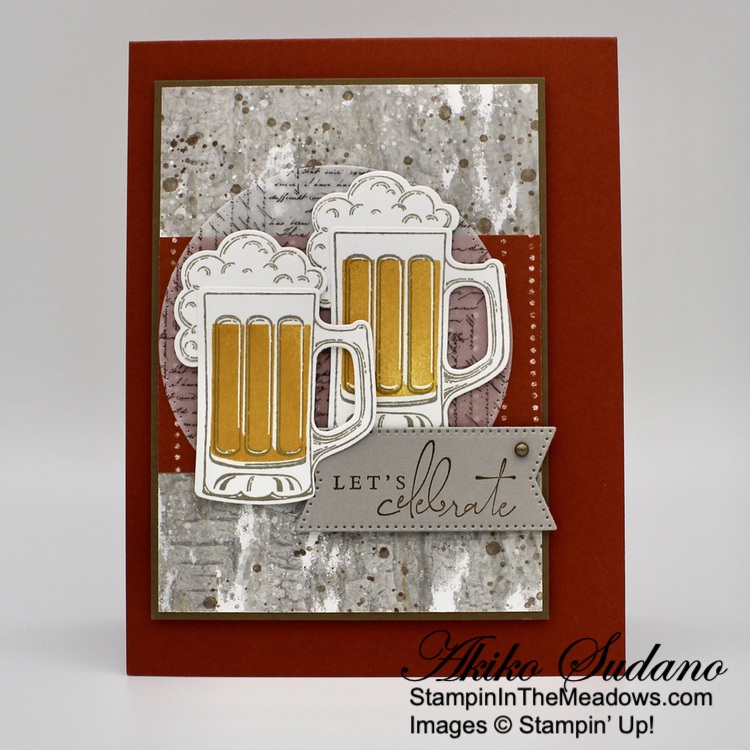
Good Morning! Here is the Stampin’ Up! Brewed For You Oktoberfest card that I made during my Facebook Live yesterday afternoon. Oktoberfest is a great excuse to gather with friends over beer and German food (which I love!) in the Fall and the Brewed For You bundle is perfect for this occasion! You can find the supplies I used at the bottom of my post along with the sizes of cardstock used.

You can watch my Facebook live from yesterday afternoon HERE. I have also posted it to my YouTube Channel and you can view it HERE.

Adhere a panel of Boughs of Holly designer series paper to a Soft Suede mat with liquid glue. Adhere a strip of Cajun Craze Rustic Harvest DSP across the panel with liquid glue. Cut a panel of Layering Designs vellum with the largest circle die from the Stylish Shapes dies. Adhere the vellum to the panel with Stampin’ Seal. Adhere the panel to the front of a Cajun Craze Card base with dimensionals.

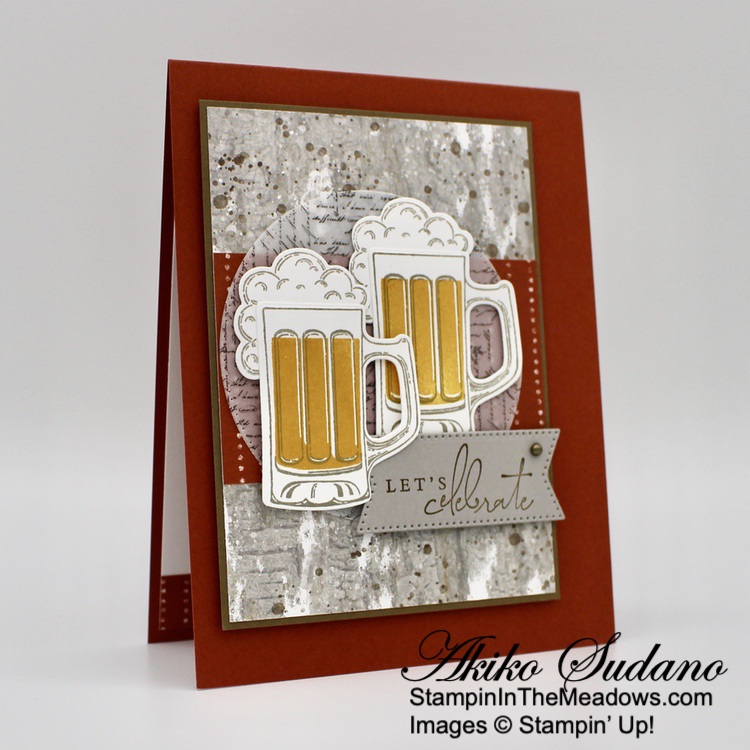
Stamp two of the mugs from the Stampin’ Up! Brewed For You photopolymer stamp set in Gray Granite on Basic White. Use the mug fill stamp to add Crushed Curry to the middle of each mug. Stamp the mug foam stamp twice in Gray Granite on Basic White. Cut out the mugs and foam with the coordinating dies. Use dots of liquid glue to adhere the foam to the back of the mugs. Adhere the top mug to the card with glue dots. Adhere the second mug to the card with dimensionals.

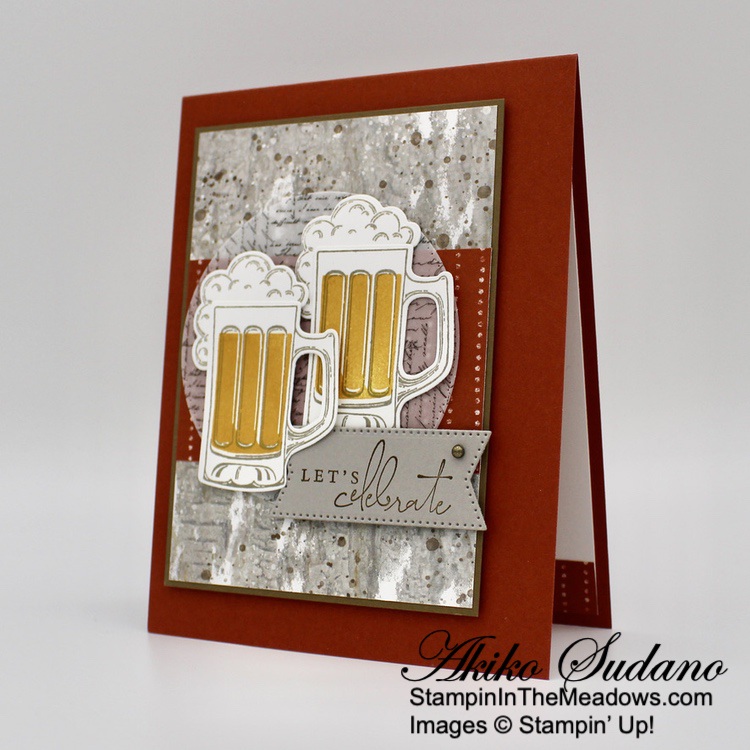
Stamp the sentiment from the Splendid Thoughts cling stamp set in Soft Suede ink on Gray Granite card stock. Cut it out with the short thick banner die from the Stylish Shapes dies. Adhere the label to the card front with dimensionals and finish with a small rustic dot.

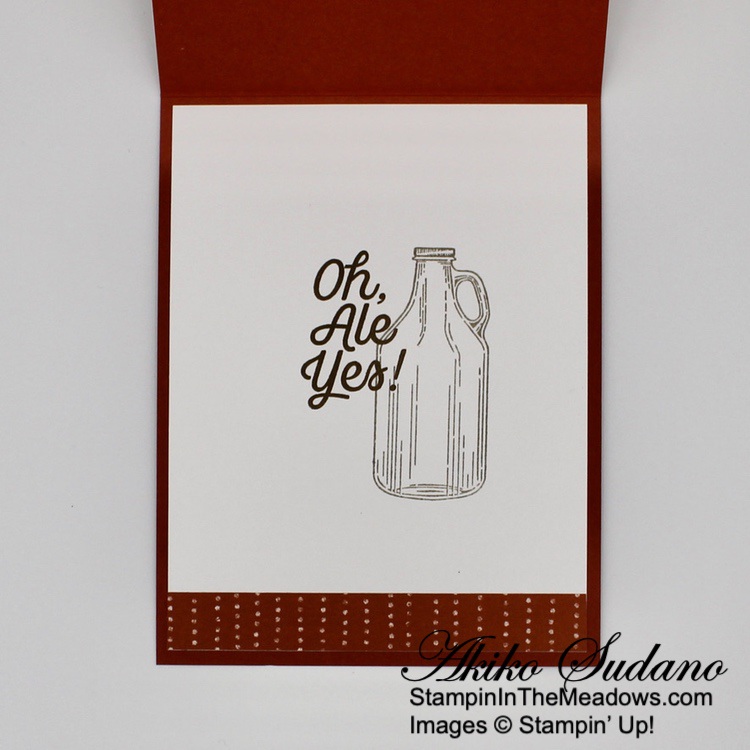
For the inside of the card, stamp the sentiment from the Stampin’ Up! Brewed For You stamp set in Soft Suede ink on a Basic White panel. Stamp the large jug next to the sentiment in Gray Granite ink. Trim the bottom of the panel with a strip of Rustic Harvest DSP and adhere the panel to the inside of the card with Stampin’ Seal.

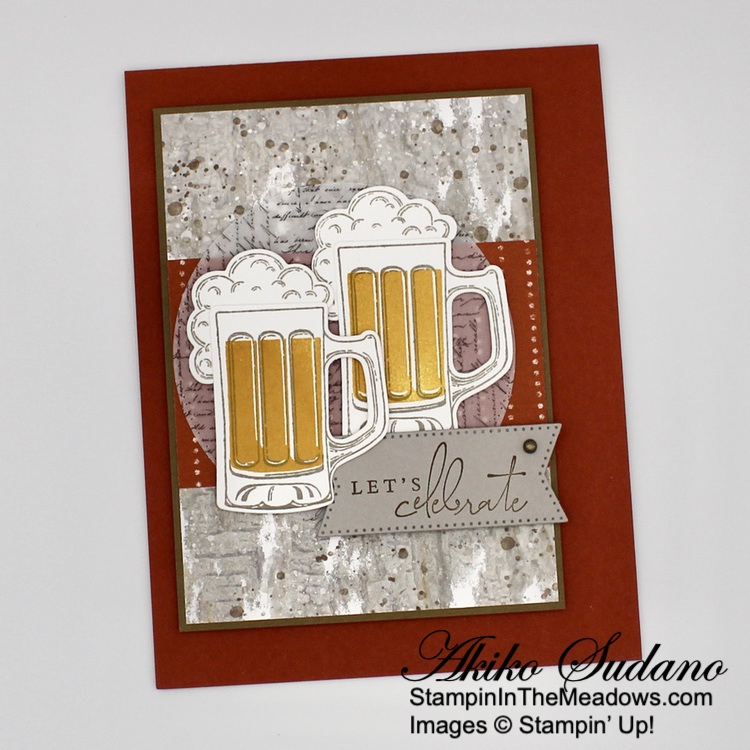
The Stampin’ Up! Brewed For You bundle is perfect for making masculine cards, but I think that Oktoberfest can also be enjoyed by us gals! But if there’s a man in your life with a Fall birthday, this is the perfect bundle to pull out for a birthday card!


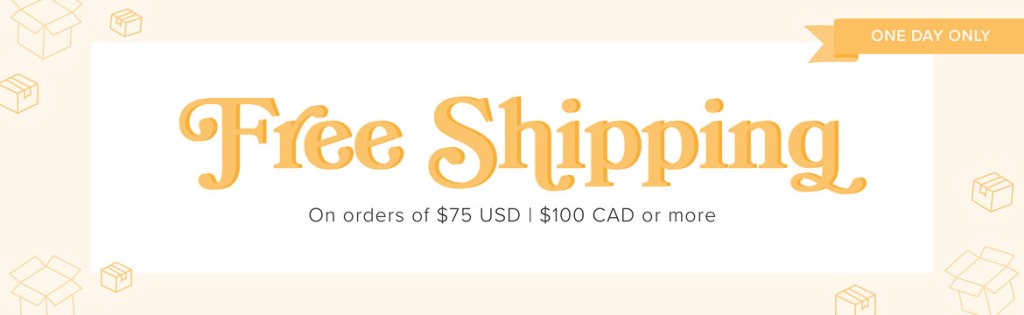
Free Shipping from Stampin’ Up! on Tomorrow Only!

Yay! On October 4, 2022, Stampin’ Up! is offering FREE shipping on orders totaling $75 or more. This incredible deal lasts for 24 hours only!

Ordering Information:

  • Free shipping applies after the qualifying amount has been met.
  • The minimum qualifying amount to receive free shipping is $75 (before tax).
  • Free shipping only applies during the 24-hour period the promotion is live; this means that the order must be opened and closed on October 4, 2022.
  • With the exception of month-to-month Paper Pumpkin subscriptions, all Stampin’ Up! products qualify for the promotion.
    • Prepaid Paper Pumpkin subscriptions are eligible for FREE shipping under the same rules as all other Stampin’ Up! items during the promotion.
    • Month-to-month Paper Pumpkin subscriptions are NOT eligible for free shipping. Subscriptions billed and shipped this month will be charged for the normal amount ($23.50 shipping included) + tax.
  • The free shipping promotion does not cover the additional cost for expedited shipping.
  • Free Shipping will only be offered on October 4, 2022 beginning at 12:00 AM (MT) and ending at 11:59 PM (MT).

It’s a great time to stock up and save!


Starter Kit + Starts on October 4, 2022!

Stampin’ Up! has a new Joining promotion starting on tomorrow! New team members will get even MORE FREE products in their customizable Starter Kit. Between October 4–31 2022, those who sign up can get $125 $155 worth of products for only $99 + free business supplies + free shipping + all the fun being a part of Stampin’ Up!

What are the benefits of being a Stampin’ Up! Demonstrator?

  • You can choose any items you want for your Starter Kit – Choose $125 $155 worth of products for $99.
  • Demonstrators receive a minimum 20% discount on products.
  • Support from Stampin’ Up!
  • Support from me and the rest of the Inkin’ Krew Team
  • Early Access to new products

See my Join My Team page for all the benefits and to get started. Or Contact Me at apsudano@stampininthemeadows.com if you want to chat.


The October Paper Pumpkin Kit is Ho Ho Ho!

Send merry and bright cards this holiday season with the Ho Ho Ho Paper Pumpkin Kit! With classic Christmas colors and holly jolly sentiments, the cards in this kit are sure to bring the Christmas spirit.

Word from the North Pole is that this kit coordinates with next month’s Paper Pumpkin tag kit and the special add-on product! With so much coordination between products, it will be a breeze to create cohesive holiday crafts for all your gifting needs. Make this season the most wonderful time of the year for your loved ones—and for yourself 

The October Kit includes:

  • Supplies to create 9 cards—3 each of 3 designs—and 9 coordinating envelopes
    • Card Size: 4-1/4″ x 5-1/2″
  • Printed card bases, envelopes and die cuts
  • Iridescent foil die cut snowflakes, vellum and Vanilla epoxy dots
  • Adhesive dots and mini dimensionals
  • Exclusive Ho Ho Ho photopolymer stamp set
  • Early Espresso Classic Stampin’ Spot

Coordinating Colors: Bermuda Bay, Cherry Cobbler, Crumb Cake, Early Espresso, Shaded Spruce, Sweet Sorbet, Very Vanilla

If you’re interested in subscribing to Paper Pumpkin, you can either sign up for a subscription where you are billed monthly for your kit or you can purchase a prepaid subscription in my Online Store. To see more information and to sign up for the monthly subscription click here. To see the options for prepaid subscriptions in my Online Store, click here.

Sign up deadline for the October 2022 kit is October 10, 2022. Note: Supplies may be limited toward the end of the subscription period.


Current Host Code: HHFMZPFH

Use this host code when you order $50 or more and receive a free gift from me!  The free gift is your choice of any item currently available valued up to $10.00 from the July-December 2022 Mini Catalog or the 2022-2023 Annual Catalog!

If your order is over $150, please do not use the host code since you’ll receive your own Host Dollars plus I’ll still send you the free gift!  This host code can be used by anyone, no club or commitment required. Let me know if you have any questions.


If you need any stamping supplies, I’d be very happy to be your Demonstrator.  Just click on the Shop Now button on the right side of the screen to go directly to my online store or contact me if you have any questions.  Happy Stamping!

Thanks for stopping by and have a great week!

Akiko

  • Visit my online store here
  • See the current Stampin’ Up! clearance rack specials here
  • Earn FREE Stampin’ Up! products through my Wildflower Frequent Shopper Program – my way of saying thank you to my online frequent shopper customers.
  • Have any questions? I’d be happy to help, click here to contact me.

Cardstock Cuts for this project:

  • Cajun Craze – 5-1/2″ x 8-1/2″ card base scored at 4-1/4″
  • Soft Suede – 3-3/8″ x 4-5/8″ (front mat)
  • Gray Granite – 1-1/4″ x 3″ (label)
  • Layering Designs Vellum – 3-1/4″ x 3-1/4″ (die cut circle)
  • Basic White – 4” x 5-1/4” (inside panel), 2-1/2″ x 6″ (die cut beer and foam)
  • Rustic Harvest DSP – 2″ x 3-1/4″ (front stripe), 1/2″ x 4″ (inside trim)
  • Boughs of Holly DSP – 4-1/4″ x 4-1/2″ (front background)

Stampin’ Up! products used in this project:


Stampin’ Up! Wildlife Wonder for the Happy Inkin’ Thursday Blog Hop

Good morning and welcome to the Happy Inkin’ Thursday Blog Hop! I made a masculine thank you card with the wonderful Stampin’ Up! Wildlife Wonder cling stamp set. You can find the supplies I used along with card stock cuts at the bottom of my post.

We have a theme challenge this week and we are making cards with critters! How fun!

And I’m entering my card in the challenge at the Card Concept #177. The theme for this Challenge is ‘Make it Masculine’ and I was inspired by the plaids and outdoor themes in the inspiration picture to make a clean and layered card. Here is the inspiration picture:

I adhered a panel of plaid He’s the Man designer series paper to an Early Espresso mat and wrapped a length of natural ribbon around it, securing it in the back with tape. I adhered it to a Crumb Cake card base with dimensionals. I used a blending brush to blend Soft Suede ink on a wood grained panel of Heart and Home DSP and I love how it came out! I adhered that panel to an Early Espresso mat and then popped it on the card front with dimensionals.

I stamped the wolf from the Stampin’ Up! Wildlife Wonder stamp set in Early Espresso on Basic White and colored the wolf with Crumb Cake Stampin’ Blends and the rock in Gray Granite. I stamped the image again on masking paper and fussy cut it out. I covered the wolf with the mask and stamped the ground in Old Olive multiple times with the ground stamp.

I cut a circle in another sheet of masking paper and used it to make a Mango Melody sun behind the wolf with a blending brush. I covered the sun with the circle mask and blended the sky background in Balmy Blue ink with a blending brush. I removed all the masks and stamped the sentiment from the Stampin’ Up! Wildlife Wonder Stamp set in Early Espresso ink. I adhered the wolf panel to an Early Espresso mat and adhered it to the card front with liquid glue. I finished the card with three rustic metallic dots.

For the inside, I stamped the sentiment from the Stampin’ Up! Wildlife Wonder stamp set in Early Espresso on a Basic White panel. I stamped the plant in Old Olive and colored the tops with light Pumpkin Pie Stampin’ Blend. I blended Soft Suede on another woodgrain panel of Heart and Home DSP and adhered it to the side of the panel with liquid glue. I adhered the panel to the inside of the card with Stampin’ Seal.

The Stampin’ Up! Wildlife Wonder stamp set is another in a long line of gorgeous Stampin’ Up! natural wildlife stamp sets, and it’s another winner! These are perfect for masculine cards for any occasion and I have always enjoyed making natural backgrounds using different coloring techniques.

On with the Hop! Click on the Next Blog button to move forward to see the beautiful project Karen Ksenzakovic has created.

If you get lost along the way, here are the participants for the hop:


Current Host Code: MHHQUNTF

Use this host code when you order $50 or more and receive a free gift from me!  The free gift is your choice of any available item valued up to $10.00 in the 2022 – 2023 Annual Catalog or the January – June 2022 Mini Catalog!

If your order is over $150, please do not use the host code since you’ll receive your own Host Dollars plus I’ll still send you the free gift!  This host code can be used by anyone, no club or commitment required. Let me know if you have any questions.


If you need any stamping supplies, I’d be very happy to be your Demonstrator.  Just click on the Shop Now button on the right side of the screen to go directly to my online store or contact me if you have any questions. 

Thanks for stopping by and Happy Stamping!

Akiko

  • Visit my online store here
  • See the current Stampin’ Up! clearance rack specials here
  • Earn FREE Stampin’ Up! products through my Wildflower Frequent Shopper Program – my way of saying thank you to my online frequent shopper customers.
  • Have any questions? I’d be happy to help, click here to contact me.

Cardstock Cuts for this project:

  • Crumb Cake – 5-1/2″ x 8-1/2″ card base scored at 4-1/4″
  • Early Espresso – 4″ x 5-1/4″ (front mat), 2-7/8″ x 3-7/8″ (DSP mat), 2-3/8″ x 2-7/8″ (wolf mat)
  • Basic White – 4″ x 5-1/4″ (inside panel), 2-1/4″ x 2-3/4″ (art panel)
  • He’s The Man DSP – 3-7/8″ x 5-1/8″ (front background)
  • Heart & Home DSP – 2-3/4″ x 3-3/4″ (front wood grain panel), 1″ x 4″ (inside trim)

Stampin’ Up! products used in this project:


Stampin’ Up! Let’s Set Sail Card with Video Tutorial

Good Morning! I pulled out the Stampin’ Up! Let’s Set Sail bundle for the first time this weekend to make a card and I love it! I love the little sailboat with it’s sleek, cool modern design and the coordinating punch totally kicks it up! So I made this card yesterday afternoon for my Facebook Live. You can find the supplies I used in my video at the bottom of my post along with the sizes of cardstock used.

Here is the link to the Facebook Live video from yesterday. I also posted a copy of the video in my YouTube channel and you can view it here.

I started with the background, making a mask for coloring the sun with one of the Layering Circles dies and copy paper. I laid the mask on a Basic White panel and inked up a blending brush with Daffodil Delight ink and blended the ink through the circle to make a sun. I applied Tahitian Tide ink to another blending brush and blended it around the rest of the panel, avoiding the sun and applying the ink darker on the bottom of the panel.

I stamped the bottom of the panel with the Gentle Waves stamp in Starry Sky ink and cut the panel out with a Stitched Rectangle die. I adhered the panel to a Starry Sky mat. I stamped the sails from the Stampin’ Up! Let’s Set Sail photopolymer stamp set in Sweet Sorbet ink on Basic White and cut them out with the Sail Boat Builder punch. I stamped the boat and mast in Soft Suede on Basic White, punched it out and adhered it to the panel with liquid glue. I popped the sails on the mast with dimensionals and stamped the birds in Basic Gray. I adhered a panel of Layering Designs vellum to the front of a Tahitian Tide card base and popped the sailboat panel on top with dimensionals.

I punched the end of a strip of Tahitian Tide with the Banners Pick A Punch and stamped the sentiment from the Stampin’ Up! Let’s Set Sail stamp set in Starry Sky ink. I wrapped a length of white baker’s twine around the end of the banner and tied a knot. I adhered the banner to the card with dimensionals and finished it with a faceted dot.

For the inside of the card, I stamped the sailboat in the same colors as the card front on a Basic White panel. I stamped the sea with the Gentle Waves stamp and brushed Tahitian tide ink over the waves. I stamped the birds in Basic Gray and adhered the panel to the inside of the card.

The Stampin’ Up! Let’s Set Sail bundle is a fun little set that is great for masculine cards, but can be used for many occasions calling for summer fun. The bold graphic is wonderful and the sentiments are positive, encouraging and inspiring. Be sure to check it out!


Use this host code when you order $50 or more and receive a free gift from me!  The free gift is your choice of any item valued up to $10.00 from the January – June 2022 Mini Catalog or the 2022-2023 Annual Catalog!

If your order is over $150, please do not use the host code since you’ll receive your own Host Dollars plus I’ll still send you the free gift!  This host code can be used by anyone, no club or commitment required. Let me know if you have any questions.


If you need any stamping supplies, I’d be very happy to be your Demonstrator.  Just click on the Shop Now button on the right side of the screen to go directly to my online store or contact me if you have any questions.  Happy Stamping!

Thanks for stopping by and have a great week!

Akiko

  • Visit my online store here
  • See the current Stampin’ Up! clearance rack specials here
  • Earn FREE Stampin’ Up! products through my Wildflower Frequent Shopper Program – my way of saying thank you to my online frequent shopper customers.
  • Have any questions? I’d be happy to help, click here to contact me.

Cardstock Cuts for this project:

  • Tahitian Tide – 4-1/4″ x 11″ card base scored at 5-1/2″, 13/16″ x 2-5/8″ (label)
  • Starry Sky – 2-3/4″ x 4-1/8″ (front mat)
  • Layering Designs Vellum (front background)
  • Basic White – 3-3/4″ x 5″ (inside panel), 3″ x 4-1/4″ (die cut rectangle), 1-1/2″ x 3-1/2″ (sails), 2″ x 2-3/4″ (boat)

Currently Available Stampin’ Up! products used in this project:


Stampin’ Up! Your Biggest Fan for the Inkin’ Krew Blog Hop

Good morning! Welcome to the May Inkin’ Krew Team Blog Hop! The theme for this month’s hop is “For the Men/Boys” so I made a Father’s Day card with the Stampin’ Up! Your Biggest Fan bundle and the fun Hey Sports Fan designer series paper. The Sports Event dies in the bundle can be used to cut out some of the images in the DSP, so can have fun mixing and matching the images in the stamp set and the DSP. You can find the supplies I used at the bottom of my post along with the sizes of cardstock used.

I adhered a panel of the balls and bats Hey Sports Fan designer series paper to the front of an Evening Evergreen card base with liquid glue. I adhered a strip of the baseball field DSP across the card front.

I cut a panel of Night of Navy wood grain Hey Sports Fan DSP with the large ticket die from the Stampin’ Up! Your Biggest Fan bundle and adhered it to the card front with liquid glue. I cut a Poppy Parade strip of the DSP with the small ticket strip die and adhered it with glue dots.

I stamped the double ticket stamp from the Stampin’ Up! Your Biggest Fan photopolymer stamp set with in Poppy Parade on Vary Vanilla. I stamped the Most Valuable Dad sentiment in Night of Navy and the Happy Father’s Day sentiment in Evening Evergreen.

I cut out the stamped image with the coordinating die and adhered it to the card front with glue dots. I finished with resin stars and a Poppy Parade striped baker’s twine bow.

For the inside of the card, I stamped the sentiment from the Stampin’ Up! Your Biggest Fan stamp set in Poppy Parade on a Very Vanilla panel. I stamped Night of Navy stars and trimmed the bottom with a strip of baseball field DSP. I cut a Best Day Ever ticket from the Hey Sports Fan DSP and adhered it to the bottom of the panel and adhered it to the inside of the card.

The Stampin’ Up! Your Biggest Fan bundle is perfect for masculine cards for the sports enthusiast, especially the baseball fan. And watching a Sunday afternoon baseball game is a perfect way to spend Father’s Day!

On With The Hop! Click on the Next Blog button to move forward to Karen Finkle’s project or click the Previous Blog button to move back to see the project that Tara Carpenter created.

If you get lost along the way, here are the participants for the hop:

  1. Karen Ksenzakovic 
  2. Mary Deatherage 
  3. Tara Carpenter 
  4. Akiko Sudano  <– you are here
  5. Karen Finkle 
  6. Jillian Good 
  7. Jaimie Babarczy 
  8. Amy Koenders 

Current Host Code: ZFMCWFCA

Use this host code when you order $50 or more and receive a free gift from me!  The free gift is your choice of any item currently available valued up to $10.00 in the 2023 – 2023 Annual Catalog or the January-June 2022 Mini Catalog!

If your order is over $150, please do not use the host code since you’ll receive your own Host Dollars plus I’ll still send you the free gift!  This host code can be used by anyone, no club or commitment required. Let me know if you have any questions


If you need any stamping supplies, I’d be very happy to be your Demonstrator.  Just click on the Shop Now button on the right side of the screen to go directly to my online store or contact me if you have any questions. 

Thanks for stopping by and Happy Stamping!

Akiko

  • Visit my online store here
  • See the current Stampin’ Up! clearance rack specials here
  • Earn FREE Stampin’ Up! products through my Wildflower Frequent Shopper Program – my way of saying thank you to my online frequent shopper customers.
  • Have any questions? I’d be happy to help, click here to contact me.

Cardstock Cuts for this project:

  • Evening Evergreen – 4-1/4″ x 11″ card base scored at 5-1/2″
  • Very Vanilla – 4″ x 5-1/4″ (inside panel), 2″ x 3-1/2″ (die cut ticket)
  • Hey Sports Fan DSP – 4″ x 5-1/4″ (front background), 2″ x 4″ (front stripe), 2-1/2″ x 4-1/4″ (die cut large ticket), 1/2″ x 4-1/2″ (die cut small ticket strip), 1/2″ x 4″ (inside trim), Best Day Ever die cut ticket

Stampin’ Up! products used in this project:


Stampin’ Up! Biggest Wish Birthday Card

Good Morning! Today I have a simple Masculine Birthday Card made with the Stampin’ Up! Biggest Wish photopolymer stamp set. I paired it with the In Good Taste designer series paper which I totally love because it has so many textures such as the concrete and elegant dark wood that I used on today’s card. And it’s on sale now for a 15% discount!! Yay!! You can find the supplies I used at the bottom of my post along with the sizes of cardstock used.

I used my Stamparatus to help stamp the sentiments on the panel of concrete In Good Taste designer series paper. I wanted an ombre gray look in my sentiments that I achieved with Smoky Slate, Basic Gray and Tuxedo Memento Black inks. I lined up the Happy sentiment from the Stampin’ Up! Biggest Wish stamp set in my Stamparatus so that I could move the plate up the hinges and the words would line up straight. I stamped the bottom Happy in Gray Granite twice and stamped off Memento Tuxedo Black, the middle in Smoky Slate twice and the top one is in stamped off Smoky Slate several times.

I stamped the birthday sentiment from the Stampin’ Up! Biggest Wish stamp set in Versamark ink and sprinkled it with black embossing powder. I heat set the embossing powder until it was shiny and it gives me a dark, shiny raised sentiment to finish my ombre effect. I adhered the panel to a Basic Gray mat with liquid glue.

I adhered the dark woodgrain strip of In Good Taste DSP to a Basic Gray Mat so that the mat showed on one side. I adhered the strip to the concrete stamped panel and wrapped it twice with black twine, tying it in a knot to secure it. I added three large Bronze Brushed Metallic dots from the new Jul-Dec 2021 Mini Catalog (available August 3) and popped the panel on the front of an Early Espresso card base.


For the inside of the card, I stamped sentiment from the Happiest of Birthdays in Memento Tuxedo Black ink on a Basic White panel and trimmed the bottom with a strip of the concrete In Good Taste DSP. I adhered the panel to a Basic Gray mat and then adhered it to the inside of the card.

The Stampin’ Up! Biggest Wish stamp set is so versatile and can be used for so many different occasions. And large strong sentiments like the ones in this set are perfect for masculine cards!


Stampin’ In The Meadows New Product Shares

The Stampin’ In The Meadows New Product Shares for the upcoming July – December 2021 Mini Catalog are now open!! I am offering shares of new designer series papers and ribbons and embellishments or both! Full details including prices and lists of all the items included are on my New Catalog Product Shares Page. I have included an order form at the bottom of the page and you can go there to sign up or you can contact me if you have any questions. Deadline to sign up for a share is August 1, 2021.


Stampin’ Up! Designer Series Paper Sale is Going on Now!

We all love gorgeous Designer Series Paper, and during this incredible sale, you can enjoy a 15% discount on select papers from the 2021–2022 Annual Catalog! Now is a great time to stock up and save on some of Stampin’ Up!’s most beautiful paper designs! Get all the details on my Promotions Page or click on the image below for a printable PDF Flyer:


Current Host Code: ZQAFXXXK

Use this host code when you order $50 or more and receive a free gift from me!  The free gift is your choice of any item valued up to $10.00 in the 2021 – 2022 Annual Catalog!

If your order is over $150, please do not use the host code since you’ll receive your own Host Dollars plus I’ll still send you the free gift!  This host code can be used by anyone, no club or commitment required. Let me know if you have any questions.


If you need any stamping supplies, I’d be very happy to be your Demonstrator.  Just click on the Shop Now button on the right side of the screen to go directly to my online store or contact me if you have any questions. 

Thanks for stopping by and Happy Stamping!

Akiko

  • Visit my online store here
  • See the current Stampin’ Up! clearance rack specials here
  • Earn FREE Stampin’ Up! products through my Wildflower Frequent Shopper Program – my way of saying thank you to my online frequent shopper customers.
  • Have any questions? I’d be happy to help, click here to contact me.

Cardstock Cuts for this project:

  • Early Espresso – 4-1/4″ x 11″ card base scored at 5-1/2″
  • Basic Gray – two 4″ x 5-1/4″ panels (front and inside mats), 15/16″ x 5-1/8″ (front strip mat)
  • Basic White – 3-7/8″ x 5-1/8″ panel (inside panel)
  • In Good Taste DSP – 3-7/8″x 5-1/8″ (cement background), 7/8″ x 5-1/8″ (wood grain strip), 1/2″ x 3-7/8″ (inside trim)

Stampin’ Up! products used in this project:


Stampin’ Up! Handsomely Suited Father’s Day Card

Good morning! I remember the days when my boys were young that we always got a new tie for my husband for Father’s day. He had to wear ties to work and was really bad about spilling his coffee, so a new tie was always good. The problem was that I liked the newer styles and he liked the more conservative styles, so I usually picked the wrong tie. So I love a tie Father’s Day card and the Stampin’ Up! Handsomely Suited bundle is perfect! You can find the supplies I used at the bottom of my post along with the sizes of cardstock used.

I embossed a Balmy Blue panel with the Tasteful Textile 3D embossing folder and adhered it to a Basic Black mat. I used three different patterns of the Well Suited designer series paper to cut the long tie and knot from the Suit & Tie dies – don’t forget to turn the knot sideways before cutting! I adhered the knots to the top of the ties and then adhered the ties to the embossed panel.

I stamped the sentiment from the Stampin’ Up! Handsomely Suited cling stamp set on Basic Black with Versamark ink and sprinkled it with white embossing powder. I shook off the excess and heated it with my heat tool until it was shiny and popped it on the ties with dimensionals.

I popped the panel on the front of a Basic Gray card base with dimensionals and added tie-tacks to each of the ties with the gray pearls from the Pastel Pearls.


For the inside of the card, I stamped the sentiment from the Stampin’ Up! Handsomely Suited stamp set in Memento Tuxedo Black ink on a Basic White panel. I adhered a strip of Well Suited DSP to the bottom and adhered the panel to the inside of the card.

The Stampin’ Up! Handsomely Suited bundle is great for masculine cards with wonderful sentiments and classic suited stamps and dies. I have also seen so many creative non-suit cards made with the dies – polo shirts, flannel shirts (with suspenders even!), Hawaiian shirts, scrubs, cammos, and even Harry Potter inspired cards! And though the bundle pricing with the 10% discount will go away when the Mini Catalog closes at the end of June, the stamps and dies are carried over into the new 2021-2022 Annual Catalog.


Current Host Code: YGDSB9H4

Use this host code when you order $50 or more and receive a free gift from me!  The free gift is your choice of any item valued up to $10.00 in the 2021 – 2022 Annual Catalog or in the Jan-Jun 2021 Mini Catalog!

If your order is over $150, please do not use the host code since you’ll receive your own Host Dollars plus I’ll still send you the free gift!  This host code can be used by anyone, no club or commitment required.  Let me know if you have any questions.


If you need any stamping supplies, I’d be very happy to be your Demonstrator.  Just click on the Shop Now button on the right side of the screen to go directly to my online store or contact me if you have any questions. 

Thanks for stopping by and Happy Stamping!

Akiko

  • Visit my online store here
  • See the current Stampin’ Up! clearance rack specials here
  • Earn FREE Stampin’ Up! products through my Wildflower Frequent Shopper Program – my way of saying thank you to my online frequent shopper customers.
  • Have any questions? I’d be happy to help, click here to contact me.

Cardstock Cuts for this project:

  • Basic Gray – 4-1/4″ x 11″ card base scored at 5-1/2″
  • Balmy Blue – 3-5/8″ x 4-5/8″ (front background)
  • Basic Black – 3-3/4″ x 4-3/4″ (mat), 1/2″ x 3″ (label)
  • Basic White – 4″ x 5-1/4″ x 5″ (inside panel)
  • Well Suited DSP – three 1″ x 5-1/4″ strips (ties), 1/2″ x 4″ (inside trim)

Stampin’ Up! products used in this project:


Stampin’ Up! Soar Confidently For the Inkin’ Krew Blog Hop

Good morning! Welcome to the Inkin’ Krew Monthly Blog Hop! The theme for this month’s hop is “For The Men/Boys” and I made a card with the Stampin’ Up! Soar Confidently stamp set. I love the vintage airships in this stamp set – they’re perfect for masculine cards. You can find the supplies I used at the bottom of my post along with the sizes of cardstock used.

I stamped the biplane from the Stampin’ Up! Soar Confidently cling stamp set in Early Espresso ink on a Very Vanilla Panel. I stamped the sentiment in the lower left hand corner, also using Early Espresso ink and adhered the panel to a Soft Suede mat.

I the layered panel to a panel of wood grained In Good Taste designer series paper. I adhered the layered DSP panel to a Soft Suede mat and wrapped a strand of linen thread around the bottom twice tying a knot.

I adhered the panel to the front of a Soft Suede card base with dimensionals and finished off the front with three gold metallic pearls.


For the inside of the card, I stamped the biplane from the Stampin’ Up! Soar Confidently stamp set in Sahara Sand ink on a Very Vanilla panel after stamping off. I adhered a strip of the In Good Taste designer series paper to the bottom and stamped the sentiment from the Handsomely Suited stamp set in Early Espresso ink on the bottom. I adhered the panel to the inside of the card.

I love the Stampin’ Up! Soar Confidently stamp set – the vintage images are wonderful and the sentiments are great. I think the sentiment I used would be great for expressing encouragement, congratulations and just general well wishes for a young man. There’s also a sentiment for Father’s Day.

On With The Hop! Click on the Next Blog button to move forward to Sue Prather’s project or click the Previous Blog button to move back to see the project that Donna Leonard created.

If you get lost along the way, here are the participants for the hop:


Current Host Code: YGDSB9H4

Use this host code when you order $50 or more and receive a free gift from me!  The free gift is your choice of any item valued up to $10.00 in the 2021 – 2022 Annual Catalog or in the Jan-Jun 2021 Mini Catalog!

If your order is over $150, please do not use the host code since you’ll receive your own Host Dollars plus I’ll still send you the free gift!  This host code can be used by anyone, no club or commitment required.  Let me know if you have any questions.


If you need any stamping supplies, I’d be very happy to be your Demonstrator.  Just click on the Shop Now button on the right side of the screen to go directly to my online store or contact me if you have any questions. 

Thanks for stopping by and Happy Stamping!

Akiko

  • Visit my online store here
  • See the current Stampin’ Up! clearance rack specials here
  • Earn FREE Stampin’ Up! products through my Wildflower Frequent Shopper Program – my way of saying thank you to my online frequent shopper customers.
  • Have any questions? I’d be happy to help, click here to contact me.

Cardstock Cuts for this project:

  • Soft Suede – 4-1/4″ x 11″ card base scored at 5-1/2″, 4″ x 5-1/4″ (DSP mat), 2-1/2″ x 3-7/8″ (bi-plane panel mat)
  • Very Vanilla – 3-3/4″ x 5″ (inside panel), 2-3/8″ x 3-7/8″ (bi-plane panel),
  • In Good Taste DSP – 3-7/8″ x 5-1/8″ (front background),1/2″ x 4″ (inside trim)

Stampin’ Up! products used in this project:


Stampin’ Up! Beautiful World Congratulations Card

Happy St Patrick’s Day! Last week I made a very feminine floral congratulations card, and today I’m sharing a more masculine card made with the Stampin’ Up! Beautiful World bundle and the World of Good specialty designer series paper. The old world map theme of these products are so classic and make such elegant masculine cards. You can find the supplies I used at the bottom of my post along with the sizes of cardstock used.

My card was also inspired by the current sketch challenge in Sunday Stamps SSC252.

I thought the grid layout would go well with the map themes in the World of Good DSP so I chose one for the background and adhered it to the front of a Crumb Cake card base. I chose another one to make the pattern for the sketch on the left side and adhered the pieces to my card front.

I used the World Map dies to cut the globe out of Misty Moonlight and Crumb Cake and the globe stand from Early Espresso and adhered them together with dots of liquid glue. I stamped the sentiment from the Stampin’ Up! Beautiful World cling stamp set in Early Espresso on a strip of Misty Moonlight and cut it out with the label die from the Floral Gallery Dies.

I adhered the label to the card front with liquid glue and popped the globe and globe stand on with dimensionals – And the card front is done!!

For the inside of the card, I stamped the sentiment from the Stampin’ Up! Beautiful World stamp set in Early espresso and the globe in Crumb Cake. I trimmed the bottom with a strip of World of Good DSP and adhered the panel to the inside of the card.

The Stampin’ Up! Beautiful World bundle is perfect for masculine cards and the globe dies are incredibly detailed! It’s the perfect bundle for Congratulations cards – and graduation season is just around the corner!

As a side note, today is also my two year Blogaversary! Two years ago I started Stampin In The Meadows blog with this post and and 465 posts later, I’m here. I’ve learned so much in this journey! Thanks to all my followers!! ❤️


FREE SHIPPING ALL DAY TODAY!!

Woo Hoo!! Stampin’ Up! is offering FREE SHIPPING on orders of $50 or more (before shipping and taxes) today only! This incredible deal ends tonight at 12 PM Mountain Time, so head over to my Online Store to shop NOW!


Butterfly Brilliance is Available Now!

Bring in the beauty of nature with the artistic designs of the Butterfly Brilliance Bundle and coordinating designer series paper, along with textured specialty paper that will put a pop of brilliance on every project. The Butterfly Brilliance Collection is available now!! Click on the image below to download a PDF with all the details.

Note that the Butterfly Brilliance bundle is an early release from the 2021-2022 Annual Catalog that will be available in May! Unfortunately the beautiful Butterfly Bijou and Natural Touch specialty paper are only available while supplies last during the Butterfly Bouquet promotion period March 2, 2021 – May 3, 2021. So get them while supplies last!

Stampin’ Up! Hey Chick and Hey Birthday Chick Bundles are Available Now!

What’s better than one fantastic bundle? Two fantastic (coordinating) bundles! The Hey Chick Stamp Set (a 2017 Sale-A-Bration set) has returned and brought along three new friends: The Chick Dies and a brand-new bundle that includes the Hey Birthday Chick Stamp Set and the Birthday Chick Dies. These playful images are so fun to stamp. You’ll love sending the punny cards you make to all your friends. Click on the image below to download a PDF with all the details on these fun bundles!


Current Host Code: 9WJYHP76

Use this host code when you order $50 or more and receive a free gift from me!  The free gift is your choice of any item valued up to $10.00 in the 2019 – 2020 Annual Catalog or in the Jan-Jun 2021 Mini Catalog!

If your order is over $150, please do not use the host code since you’ll receive your own Host Dollars plus I’ll still send you the free gift!  This host code can be used by anyone, no club or commitment required.  Let me know if you have any questions.


If you need any stamping supplies, I’d be very happy to be your Demonstrator.  Just click on the Shop Now button on the right side of the screen to go directly to my online store or contact me if you have any questions.  Happy Stamping!

Thanks for stopping by and have a great week!

Akiko

  • Visit my online store here
  • See the current Stampin’ Up! clearance rack specials here
  • Earn FREE Stampin’ Up! products through my Wildflower Frequent Shopper Program – my way of saying thank you to my online frequent shopper customers.
  • Sign up for my weekly newsletter here
  • Have any questions? I’d be happy to help, click here to contact me.

Cardstock Cuts for this project:

  • Crumb Cake – 4-1/4″ x 11″ card base scored at 5-1/2″, 2″ x 2″ (detailed globe die cut)
  • Early Espresso – 2-1/4″ x 2-3/4″ (globe stand die cut)
  • Misty Moonlight – 2″ x 2″ (globe die cut)
  • Basic White – 4″ x 5-1/4″ panel (inside panel
  • World of Good DSP – 4″ x 5-1/4″ panel (background panel), 1/2″ x 4″ (inside trim), 3″ x 4-1/2″ (grid blocks – two cut at 1-1/2″ x 1-1/2″ and two cut at 1-1/2″ x 3″)

Stampin’ Up! products used in this project:


Stampin’ Up! Birds & Branches Anniversary Card Video Tutorial

Good Morning! I hope you had a good weekend. Today I’m sharing a Stampin’ Up! Birds & Branches anniversary card that I made during my Facebook Live yesterday afternoon. This sweet bundle is perfect to welcome spring, but I chose muted neutral colors so that it would look more masculine since it’s for my special man. You can find the supplies I used at the bottom of my post along with the sizes of cardstock used.

Here is the Facebook Live video showing how I made the card:

I posted a copy of the video in my YouTube channel here so you can view it there if you prefer.

I cut a panel of Gray Granite with the circular leafy window die from the Stampin’ Up! Birds & Branches bundle and embossed the panel with the Tasteful Textile 3D embossing folder. I used the largest circle die from the Layering Circles dies to cut a circle in the same place on a slightly larger Gray Granite panel and adhered these together. I do this because the embossing softens the card stock and I want it to be sturdy so I can pop it off the card base with dimensionals. I cut a panel of Soft Suede with the branch die and adhered it to the layered panel, trimming off the end.

I embossed a small Basic White panel with the Woodland embossing folder and used my blending brush to color it with Soft Suede ink. I adhered the panel to the front of a Soft Suede card base and popped the layered window panel on top with dimensionals. I love the shadows that the leafy cutout cast on the embossed woodland inset! I stamped the detailed birds from the Stampin’ Up! Birds & Branches photopolymer stamp set in Misty Moonlight ink on Basic White and stamped their wings on top. Then I cut them out with their corresponding dies and popped them on the branch with dimensionals.

I stamped the sentiment from the Many Mates cling stamp set in Soft Suede ink on Gray Granite and cut it out with the Label Me Fancy punch. I adhered some Misty Moonlight ribbon on the card and topped it with the label. If finished the card with silver metallic pearls.

For the inside, I the sentiments from the Forever & Always stamp set in Misty Moonlight and Soft Suede inks on a Basic White panel. I brushed some Soft Suede ink on an embossed strip of Basic White and adhered it to the bottom with liquid glue before adhering the panel to the inside of the card.

The Stampin’ Up! Birds & Branches bundle is really sweet and versatile bundle with lots of different bird stamps – they are 3-step photopolymer stamps so you can color the birds in many different ways. It also has branches with leaves and flowers and a beautiful nest and eggs. And the dies are really fabulous cutting out the stamped images and so much more! It’s perfect for making cards with Spring Themes!


Bring in the beauty of nature with the artistic designs of the Butterfly Brilliance Bundle and coordinating designer series paper, along with textured specialty paper that will put a pop of brilliance on every project. The Butterfly Brilliance Collection is available now!! Click on the image below to download a PDF with all the details.

Note that the Butterfly Brilliance bundle is an early release from the 2021-2022 Annual Catalog that will be available in May! Unfortunately the beautiful Butterfly Bijou and Natural Touch specialty paper are only available while supplies last during the Butterfly Bouquet promotion period March 2, 2021 – May 3, 2021. So get them while supplies last!

Stampin’ Up! Hey Chick and Hey Birthday Chick Bundles are Available Now!

What’s better than one fantastic bundle? Two fantastic (coordinating) bundles! The Hey Chick Stamp Set (a 2017 Sale-A-Bration set) has returned and brought along three new friends: The Chick Dies and a brand-new bundle that includes the Hey Birthday Chick Stamp Set and the Birthday Chick Dies. These playful images are so fun to stamp. You’ll love sending the punny cards you make to all your friends. Click on the image below to download a PDF with all the details on these fun bundles!


Current Host Code: 9WJYHP76

Use this host code when you order $50 or more and receive a free gift from me!  The free gift is your choice of any item valued up to $10.00 in the 2019 – 2020 Annual Catalog or in the Jan-Jun 2021 Mini Catalog!

If your order is over $150, please do not use the host code since you’ll receive your own Host Dollars plus I’ll still send you the free gift!  This host code can be used by anyone, no club or commitment required.  Let me know if you have any questions.


If you need any stamping supplies, I’d be very happy to be your Demonstrator.  Just click on the Shop Now button on the right side of the screen to go directly to my online store or contact me if you have any questions.  Happy Stamping!

Thanks for stopping by and have a great week!

Akiko

  • Visit my online store here
  • See the current Stampin’ Up! clearance rack specials here
  • Earn FREE Stampin’ Up! products through my Wildflower Frequent Shopper Program – my way of saying thank you to my online frequent shopper customers.
  • Sign up for my weekly newsletter here
  • Have any questions? I’d be happy to help, click here to contact me.

Cardstock Cuts for this project:

  • Soft Suede – 5-1/2″ x 8-1/2″ card base scored at 4-1/4″, 2″ x 4-1/4″ (branch die cut)
  • Gay Granite – 3-7/8″ x 5-1/8″ (embossed front background), 4″ x 5-1/4″ (front mat), 1-1/2″ x 3″ (label)
  • Basic White – 4″ x 5-1/4″ (inside panel), 1/2″ x 4″ (embossed inside trim), 1″ x 4-1/2″ (die cut birds), 3-1/4″ x 3-1/4″ (embossed inset panel)

Stampin’ Up! products used in this project:


Stampin’ Up! Handsomely Suited Video Tutorial

Good Monday Morning! I hope that it’s the start of a wonderful week for you! This is the card I made during my Facebook Live video tutorial yesterday afternoon featuring the Stampin’ Up! Handsomely Suited bundle along with the Well Suited designer series paper. I fell in love with this bundle at first sight. I’ve always liked cards that look like clothes and with lots of guys in my family, I need to make lots of masculine cards. And the suit card that you can make with this bundle is perfect! It makes a beautiful (handsome?) card and it does so very easily! You can find the supplies I used at the bottom of my post along with the sizes of cardstock used.

Here is the Facebook Live video showing how I made the card:

I posted a copy of the video in my YouTube channel here so you can view it there if you prefer.

I lined up a panel of the Well Suited grey pinstripe designer series paper on my grid paper and placed the large V die from the Stampin’ Up! Handsomely Suited bundle so that it lined up at the 1″ and 3-1/4″ mark on the ruler and secured it with some washiest tape. This gives you a well centered jacket. I ran it through my die cutting machine to cut the jacket. I adhered it to the front of a Thick Basic White card base with liquid glue just around the outside edge, leaving the V open so I could tuck the tie underneath.

Using the Stampin’ Up! Handsomely Suited dies, I cut the collar piece from Basic White and the two tie pieces from the Well Suited designer series paper. I cut the knot in a different direction from the long tie and adhered it to the top of the tie with liquid glue. I adhered the collar to the top of the card aligning it even with the top of the card and centered in the opening. I applied the liquid glue only to the top edge so that I could slip the tie under the bottom of the collar.

I applied a little liquid to the tie and slipped it under the jacket and then tucking it under the collar. I slid it into position so it was straight and pressed. I adhered the jacket lapel and the chest pocket with liquid glue and adhered two Basic Gray buttons, one near the top of the V and one at the bottom. I finished the tie with a silver metallic pearl tie tac.

For the inside, I didn’t want to use the Stampin’ Up! Handsomely Suited great Father’s Day sentiment (It’s way too early), so I stamped the Thank You sentiment from the Pallet Thoughts stamp set in Memento Tuxedo Black ink on a Basic White panel. I trimmed the bottom with the same Well Suited DSP as the tie and adhered the panel to a Night of Navy mat before adhering it to the inside of the card.

The Stampin’ Up! Handsomely Suited bundle is a wonderful set for making masculine cards. I’m really impressed at how great the suit looks and how easy it was to put together. It’s definitely a bundle you need if you make a lot of masculine cards.


Stampin’ Up! Sale A Bration is going on Now!

Sale A Bration is Stampin’ Up!’s biggest event of the year with three ways to earn FREE products – SHOP – HOST – JOIN!

SHOP

During Sale-A-Bration, for every $50 or $100 you spend, you can choose between two purchasing levels of free products! Depending on the amount you spend, you’ll be able to mix ‘n’ match the Sale-A-Bration items you earn and you can choose from stunning stamp sets and designer series papers. There are 8 free products available to pick from at the $50 level and 2 free products to pick from at the $100 level. Click on the Sale A Bration brochure to the right to see these products.

HOST

Stampin’ Up! is offering an exclusive host stamp set called Punch Party and you can get it for FREE with an order of $300 or greater placed during Sale-a-bration or by hosting a workshop with orders totaling $300 or greater during Sale-a-bration!  And this is on top of the normal Stampin’ Rewards you get when you host a workshop!

JOIN

There’s no better time to Join Stampin’ Up! than during Sale A Bration! And joining is easy! You purchase your Starter kit for $99 by choosing $125 in Stampin’ Up! products (and shipping is FREE). If you join during Sale A Bration, you get an additional five FREE full size packs of 6″ x 6″ Designer Series Paper from the upcoming 2021-2022 Annual Catalog with your Starter Kit (the current 6″ x 6″ designer series paper goes for $11.50 per pack!). 

See my Join My Team page for all the benefits starting with a minimum 20% discount!  Contact me if you have any questions.  Click here to purchase your Starter Kit.

Contact me if you need a copy of the new Jan-Jun Mini Catalog and Sale A Bration brochure, and I’ll be happy to send you one!


Tomorrow Is the Last Day For FREE SHIPPING

This week is my 2 year anniversary with Stampin’ Up! and to celebrate I am offering FREE standard shipping on all orders over $50 through tomorrow, February 9th. 

To get free shipping, you will need to:

  • Place an order at my Online Store between now and Monday February 9th using my current Host Code JNWPB7A4.
  • Send me an email at apsudano@stampininthemeadows.com of how you would like your shipping charges refunded to you, PayPal or check.
  • Once your order is processed and shipped, I will refund your standard shipping charges.

Your order will also qualify you for my thank you gift and for Wildflower Points! Orders over $150 will also qualify you for Stampin’ Rewards, so if your order is $150 or more, don’t use my host code so that you don’t miss out on your own Stampin’ Rewards from Stampin’ Up! Have fun shopping!


February Host Code: JNWPB7A4

Use this host code when you order $50 or more and receive a free gift from me!  The free gift is your choice of any item valued up to $10.00 in the 2019 – 2020 Annual Catalog or in the Aug-Dec 2020 Mini Catalog!  That includes some of the Host Exclusive stamp sets!

If your order is over $150, please do not use the host code since you’ll receive your own Host Dollars plus I’ll still send you the free gift!  This host code can be used by anyone, no club or commitment required.  Let me know if you have any questions.


If you need any stamping supplies, I’d be very happy to be your Demonstrator.  Just click on the Shop Now button on the right side of the screen to go directly to my online store or contact me if you have any questions.  Happy Stamping!

Thanks for stopping by and have a great week!

Akiko

  • Visit my online store here
  • See the current Stampin’ Up! clearance rack specials here
  • Earn FREE Stampin’ Up! products through my Wildflower Frequent Shopper Program – my way of saying thank you to my online frequent shopper customers.
  • Sign up for my weekly newsletter here
  • Have any questions? I’d be happy to help, click here to contact me.

Cardstock Cuts for this project:

  • Thick Basic White – 4-1/4″ x 11″ card base scored at 5-1/2″, 4″ x 5-1/4″ (embossed background)
  • Basic White – 3-7/8″ x 5-1/8″ (inside panel), 1-1/4″ x 2-1/2″ (shirt collar)
  • Night of Navy – 4″ x 5-1/4″ (inside mat)
  • Basic Gray – 1″ x 1″ (buttons)
  • Well Suited DSP – 4-1/4″ x 5-1/2″ (front panel suit), 3-1/2″ x 4-3/4″ (suit collar), 1″ x 5″ (tie) 1/2″ x 3-7/8″ (inside trim)

Stampin’ Up! products used in this project: