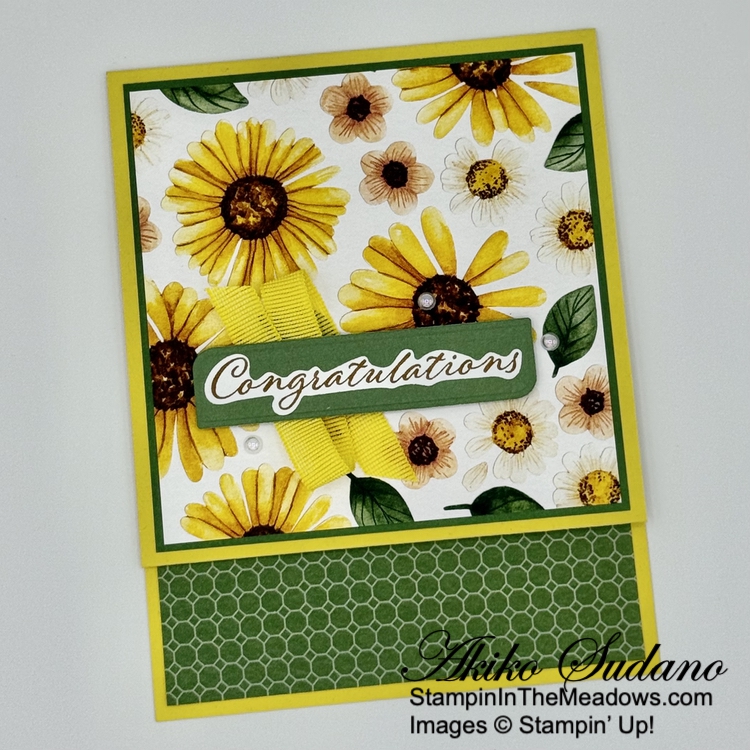
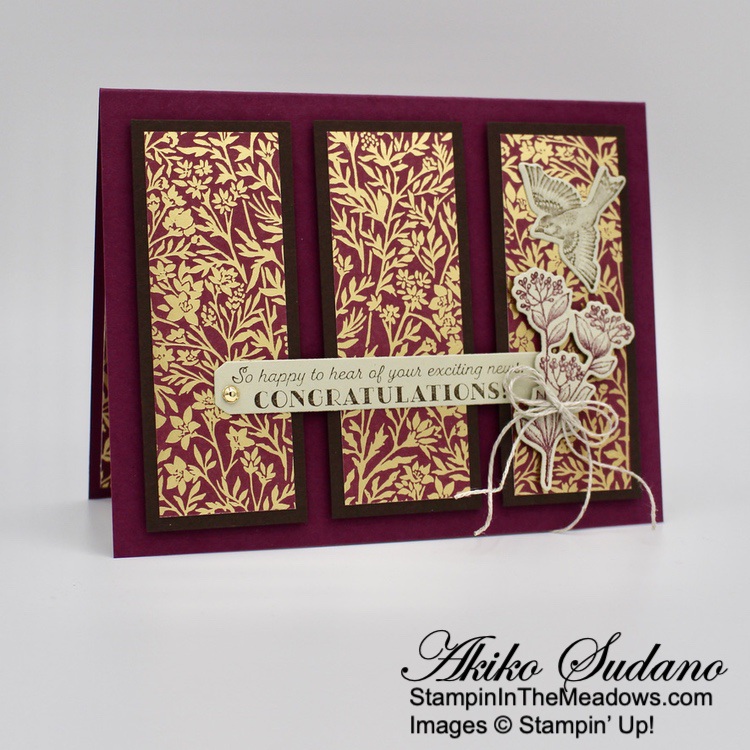
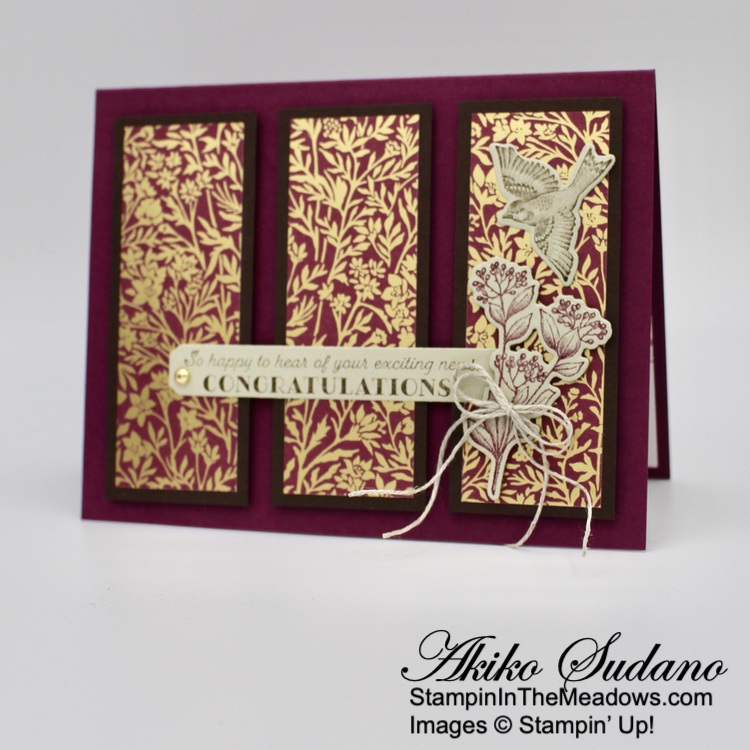
Good Morning! It’s Graduation season and I always like to make feminine Congratulations cards for the young ladies getting diplomas and degrees. With all the pretty new floral designer series papers that have just come out, there are so many fresh options to use with the Stampin’ Up! Wonderful Thoughts stamp set and dies for a quick card or gift card holder. You can find the products I used at the bottom of my post along with the card stock sizes.
I folded the 1-1/4″ end of the Darling Duckling card base to the inside and adhered the ends with Tear-N-Tape to make a pocket for a standard gift card.
I adhered a panel of the Floral Impressions DSP to the dark side of a Garden Green two tone mat and adhered it to the front of the card with liquid glue.
I stamped the sentiment from the Stampin’ Up! Wonderful Thoughts stamp set using Pecan Pie ink on Basic White and cut it out with the coordinating die. I cut the large background die from the light side of the Garden Green two tone card stock and adhered the word to the background. I adhered Darling Duckling ribbon to the card with Stampin’ Seal and popped the layered label on top with dimensionals. I finished with three pearls.
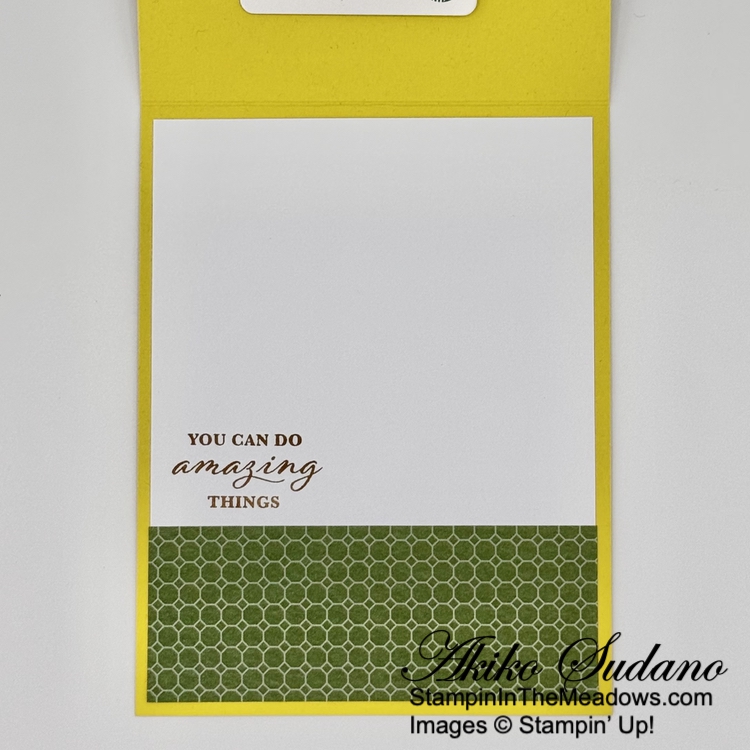
For the inside of the card, I adhered a panel of Garden Green Floral Impressions DSP to the bottom of a Basic White panel. I stamped the sentiment from the Stampin’ Up! Wonderful Thoughts stamp set using Pecan Pie ink and adhered the panel to the inside of the card with Stampin’ Seal.
I love how the inside panel DSP trim peeks out when the card is closed. The coordinating word stamps and dies in the Stampin’ Up! Wonderful Thoughts stamps and dies make the gift card holder both easy and fancy. And the wonderful floral and coordinating geometric patterns in the Floral impressions DSP makes it pretty!
If you need any stamping supplies, I’d be very happy to be your Demonstrator. Just click on the Shop Now Button on the right side of the screen to go directly to my Online store or contact me if you have any questions. Happy Stamping!
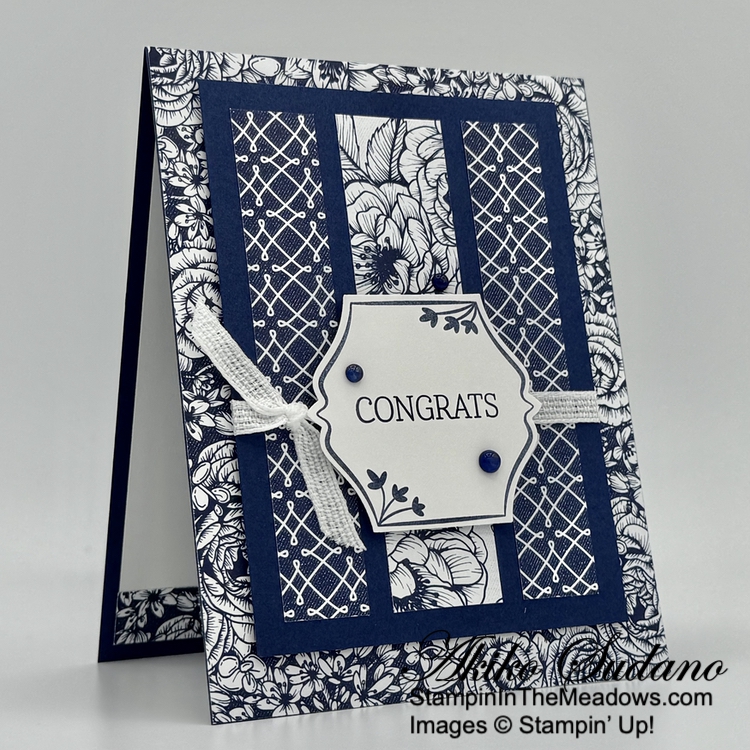
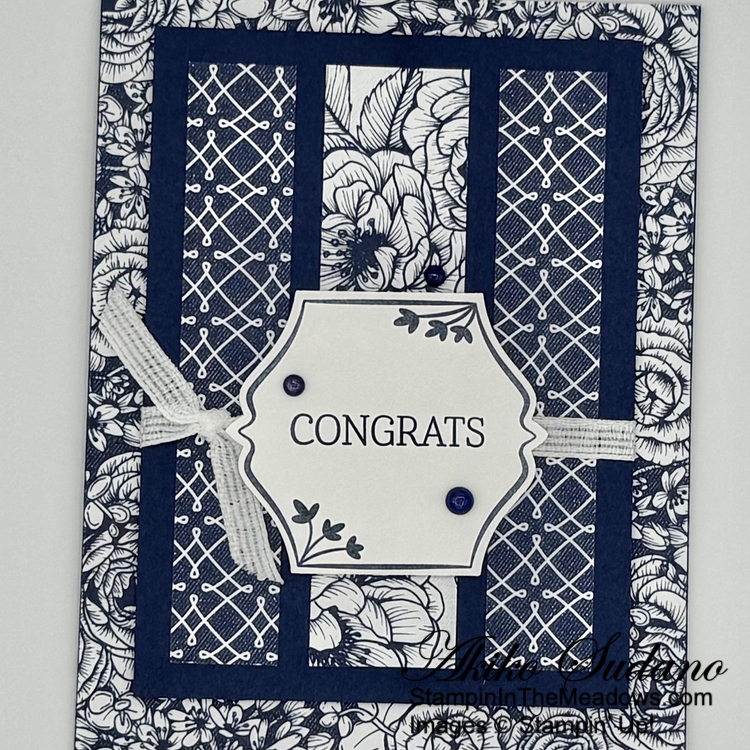
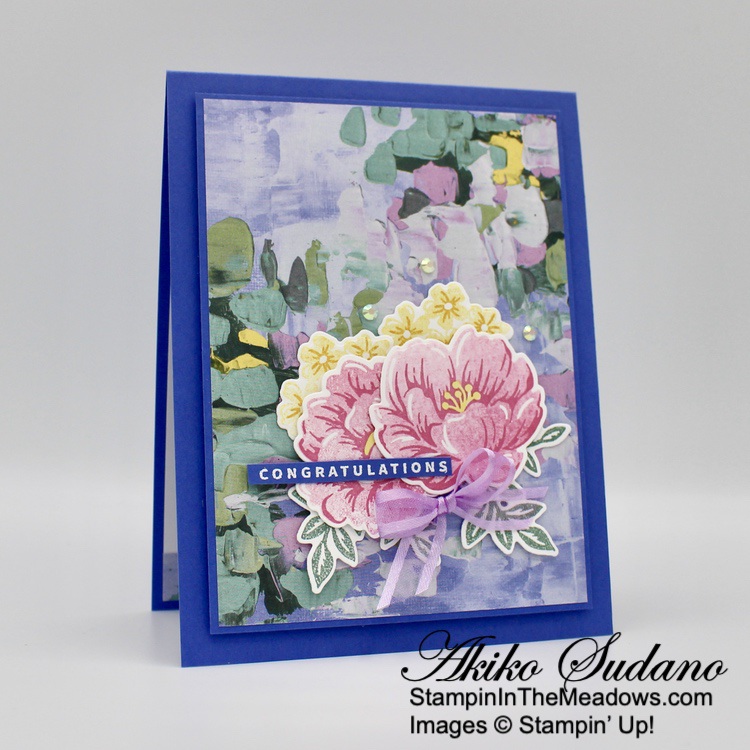
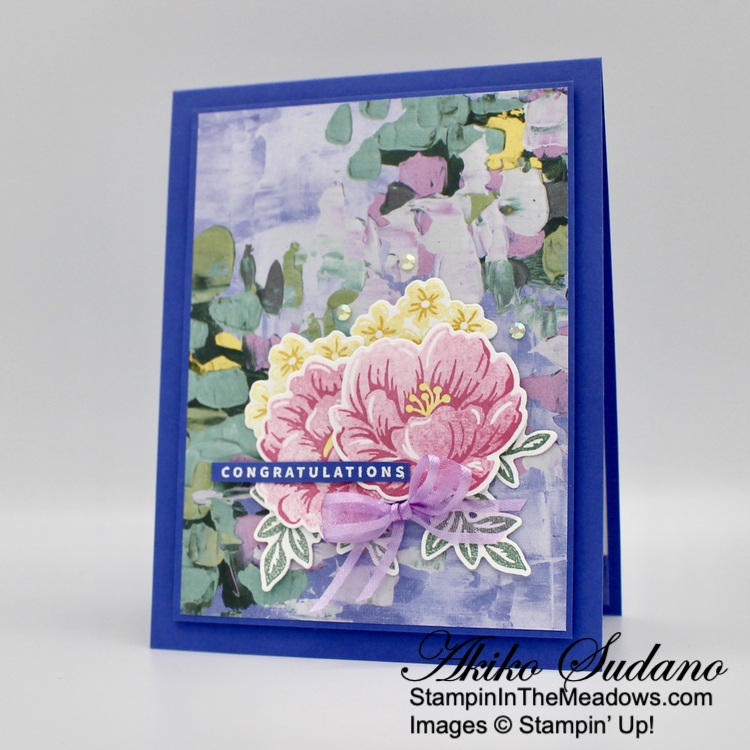
Good Morning! The Stampin’ Up! Bright Borders stamp set is a pretty all occasion stamp stamp set that coordinates with the new To The Point label punch. I used it with the Serene Love designer series paper to make a simple blue and white congratulations card. You can find the products I used at the bottom of my post along with the card stock sizes.
I adhered a panel of Serene Love designer series paper to the front of a Night of Navy card base with liquid glue.
I cut three strips of the Serene Love DSP and adhered them to a Night of Navy panel, a floral strip in the middle and graphic strips on the ends. I wrapped the panel with white ribbon (available March 4 with the new Online Exclusives) and tied a knot. I adhered the panel to the card front with dimensionals.
I stamped the frame from the Stampin’ Up! Bright Borders stamp set using Night of Navy ink on Basic White. I stamped the sentiment in the middle in Night of Navy and punched the label out with the To The Point label punch. I adhered the label to the card with dimensionals and finished it with Night of Navy dots.
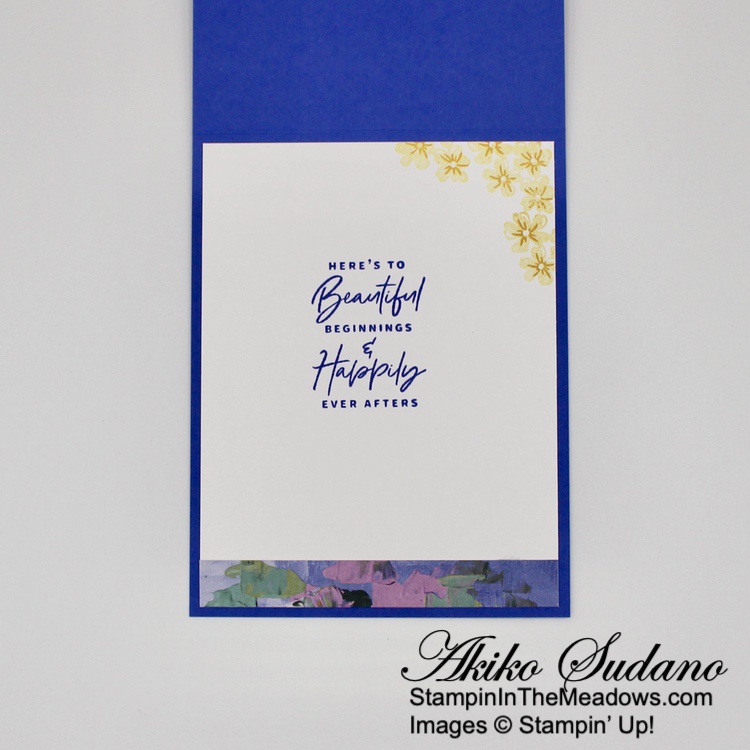
For the inside panel, I stamped the sentiment from the Stampin’ Up! Bright Borders stamp set using Night of Navy ink on a Basic White panel. I trimmed the bottom with DSP and adhered it to the inside of the card with Stampin’ Seal.
I love that the Stampin’ Up! Bright Borders coordinates with the To The Point label punch. I think a stamped border is a great, easy way to dress up a punched label and the sentiments are so versatile. This simple design really shows off the different designs of the pretty Serene Love designer series paper which is a wonderful deal on the Last Chance Products list, so be sure to check it out.
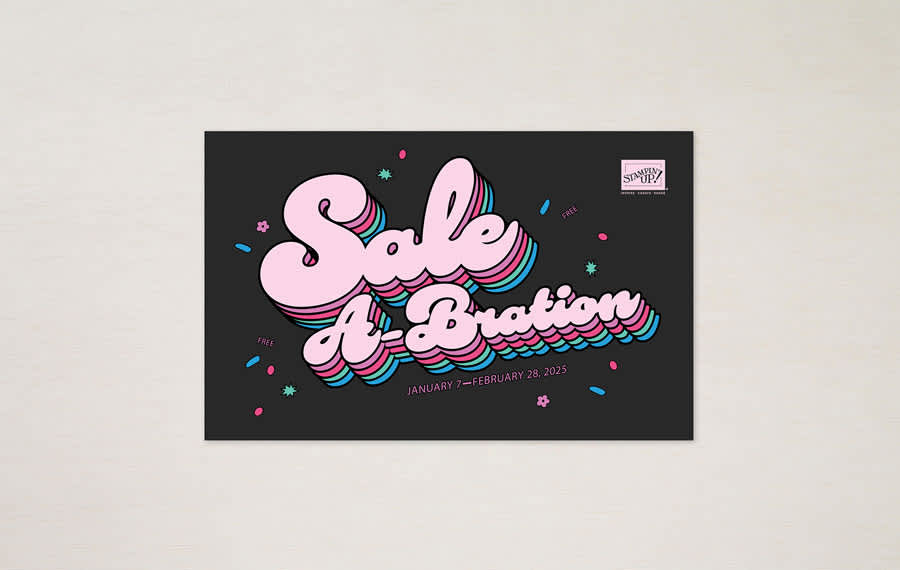
Final Days For Sale-A-Bration!!
Sale-A-Bration is the biggest Stampin’ Up! promotion of the year and it’s coming to an end. The best part of Sale-A-Bration is that you earn FREE items for every $60 worth of products you purchase. There are items that you get for $60 and there are items you can get for $120. All the details are in the Sale-A-Bration Brochure. Click on the picture of the brochure below to download a copy to view the items and details.
Another benefit of Sale-A-Bration is when you host a workshop with sales over $300 or have an individual order over $300, you get to choose an additional $30 worth of products from the Stampin’ Up! catalog or Online Store for FREE!
And Sale-A-Bration is the best time to join Stampin’ Up! as a new Demonstrator. During Sale-A-Bration, new Demonstrators who purchase a starter kit by choosing $125 worth of products for only $99 (includes shipping) have two FREE bonus options to add to your starter kit.
Option 1: Your choice of TWO marker sets from our Stampin’ Write Marker Assortments (Brights, Neutrals, Regals, Subtles), PLUS the Handmade Designs stamp set, a beautiful stamp set exclusively designed to work with them.
Option 2: Your Choice of an additional $30 in FREE products
Sale-A-Bration runs through February 28, 2025. Visit my Online Store to start shopping now.
Current Host Code: CCXFTCJQ
Use this host code when you order $50 or more and receive a Thank You gift from me! The free gift is your choice of any item currently available valued up to $10.00.
If your order is over $150, please do not use the host code since you’ll receive your own Host Dollars plus I’ll still send you the Thank You gift! This host code can be used by anyone, no club or commitment required. Let me know if you have any questions.
If you need any stamping supplies, I’d be very happy to be your Demonstrator. Just click on the Shop Now Button on the right side of the screen to go directly to my Online store or contact me if you have any questions. Happy Stamping!
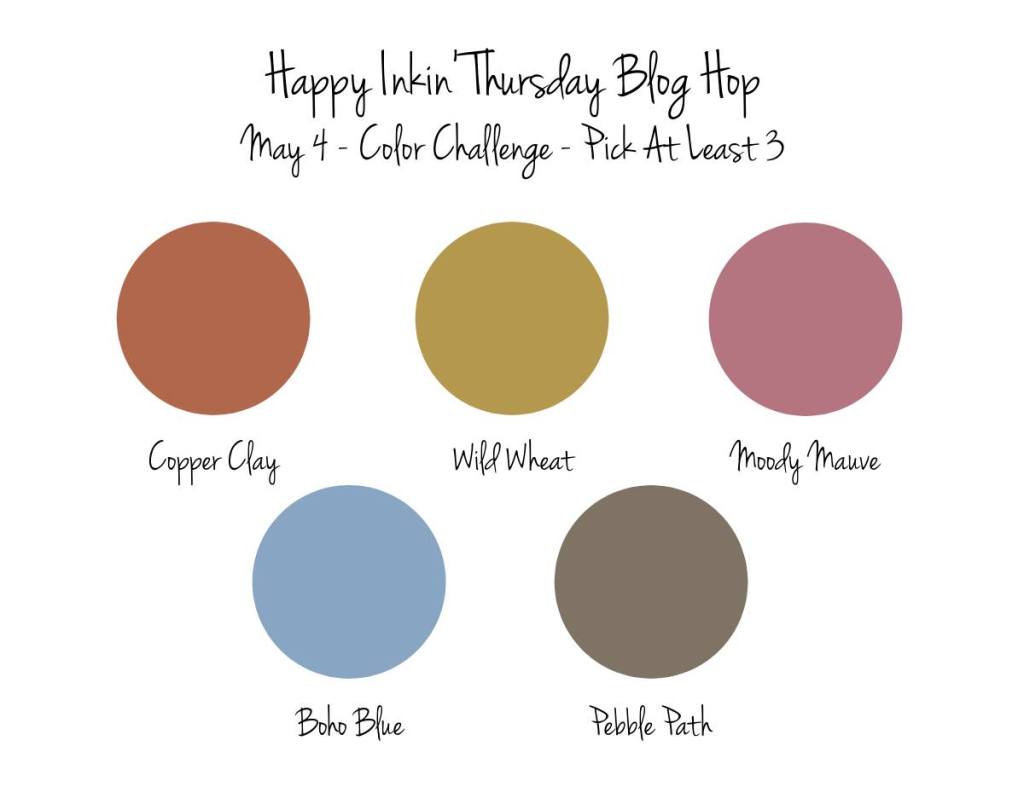
Good Morning and welcome to the Happy Inkin’ Thursday Blog Hop! I used the pretty Stampin’ Up! Inked and Tiled bundle for a congratulations card today, and I used both the beautiful stamp set and both punches! You can find the supplies I used along with card stock cuts at the bottom of my post.
We have a color challenge for our Blog Hop this week – perfect with the Inked Botanicals 6″ x 6″ designer series paper:
I stamped the large leaf from the Stampin’ Up! Inked and Tiled cling stamp set using stamped off Lost Lagoon ink randomly on a plaid panel of Inked Botanicals 6″ x 6″ designer series paper. I adhered a panel of Crushed Curry Inked Botanicals DSP across the front with liquid glue and adhered the layered pannel to the front of a Lost Lagoon card base.
I embossed a Pool Party panel with the Cane Weave 3D embossing folder and adhered it to a Calypso Coral mat. I used the punches from the Stampin’ Up! Inked and Tiled bundle to punch 6 shapes from different designs in the Inked Botanicals DSP. I arranged them on the embossed panel and adhered the ‘x’ punched shapes with liquid glue. I adhered the star punched shapes with dimensionals to the embossed panel.
I popped the embossed panel onto the card front with dimensionals. I stamped the sentiment from the Stampin’ Up! Inked and Tiled stamp set in Lost Lagoon ink on a Daffodil Delight strip. I punched the ends with the ‘x’ punch and adhered a folded length of Pool Party ribbon to the back with glue dots. I adhered the label to the card front with dimensionals and finished with iridescent pastel gems.
For the inside of the card, I stamped the small flower from the Stampin’ Up! Inked and Tiled stamp set using stamped off Calypso Coral ink randomly around the edges of a Basic White panel. I trimmed the bottom with a strip of Inked Botanicals DSP and adhered the panel to the inside of the card with Stampin’ Seal.
I love how the punches in the Stampin’ Up! Inked and Tiled bundle fit together – it’s like a quilt pattern. What a great way to show off the different designs in pretty designer series paper!
On with the Hop! Click on the Next Blog button to move forward to see the beautiful project Karen Ksenzakovichas created.
If you get lost along the way, here are the participants for the hop:
Stampin’ Up! is bringing back a favorite promotion—BONUS DAYS! Because do you know what’s a great deal? Getting rewarded for all the crafting supplies you’re already going to buy! When you shop between July 6 – July 31, 2023 and spend $50, you will earn a $5 coupon! Make sure you save all your coupons because you can redeem them (and we mean ALL of them) between August 1 – August 31, 2023. There’s no limit to how many coupons you can earn!
Promotion Details:
Earning Period: July 6, 2023 – July 31, 2023
Earn a $5 coupon for every $50 spent (before shipping and tax).
All coupon codes will be emailed right after a qualifying purchase has been made.
If you earn multiple codes from a single order, you will receive one email with multiple codes. If you earn multiple codes from multiple orders, you will receive separate emails for each code earned.
All order types qualify for this promotion.
Orders that are started before the promotion begins will not count toward earning coupon codes. For example, if you add items to your cart before 6 July and wait to purchase until that date or later, then those items will not qualify towards earning coupons. You must add items to your cart and complete your purchase during the earning period.
There is no limit to the number of coupon codes participants can earn per order or throughout the duration of the earning period.
Ordering Deadline: July 31, 2023 at 11:59 p.m. (MT)
Redemption Period: August 1 – August 31, 2023
There is no limit to the number of coupon codes participants can redeem on an order during the redemption period. If using multiple codes, they must be separated by a space.
Coupons may be redeemed one time only.
Coupon codes may be redeemed for any product (excluding Starter Kits, demonstrator supply items, and Paper Pumpkin month-to-month subscriptions).
New prepaid Paper Pumpkin codes may be discounted using Bonus Days coupon codes.
Let me know if you have any questions, and have fun shopping!
Current Host Code: P7SWY6DS
Use this host code when you order $50 or more and receive a free gift from me! The free gift is your choice of any item currently available valued up to $10.00!
If your order is over $150, please do not use the host code since you’ll receive your own Host Dollars plus I’ll still send you the free gift! This host code can be used by anyone, no club or commitment required. Let me know if you have any questions.
If you need any stamping supplies, I’d be very happy to be your Demonstrator. Just click on the Shop Now button on the right side of the screen to go directly to my online store or contact me if you have any questions.
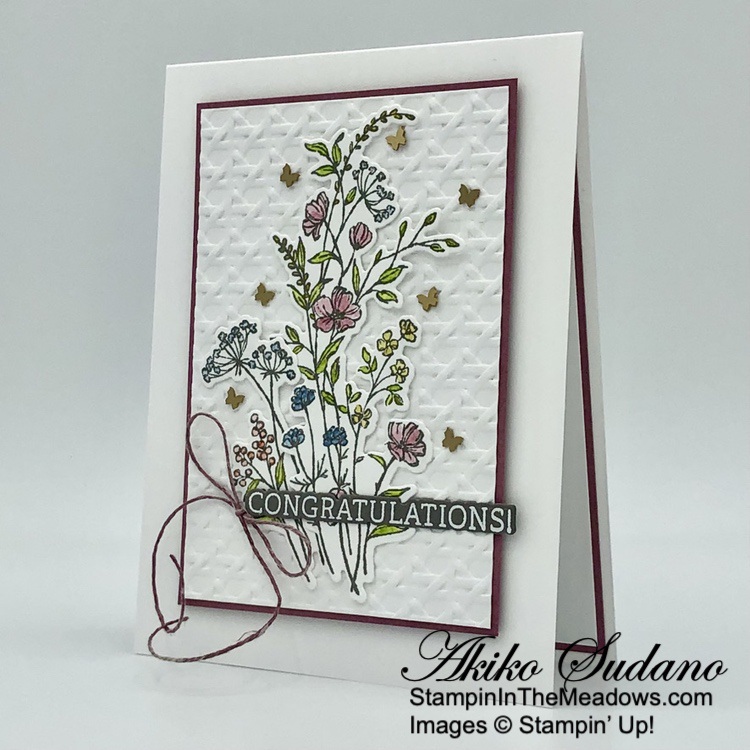
Good Morning and welcome to the Happy Inkin’ Thursday Blog Hop! The Stampin’ Up! Dainty Delight cling stamp set and dies are a wonderful floral set that carried over from the last mini catalog. The sweet stamped flowers are so petite and there are dies that cut them out. I paired the flowers with the Charming Sentiments photopolymer stamp set and Sentiment Silhouettes dies for a Congratulations card. You can find the currently available supplies I used along with card stock cuts at the bottom of my post.
We have a color challenge for our Blog Hop this week, and it’s to use the new 2023-2025 In Colors! Yay!!
I embossed a Basic White panel with the Cane Weave 3D embossing folder and adhered it to a Moody Mauve mat. I popped the layered panel on the front of a Thick Basic White card base. I stamped the two flower bunches from the Stampin’ Up! Dainty Delight stamp set on a Basic White panel using Pebbled Path ink. I cut the flowers out with the coordinating dies.
I used a small water painter to color the flowers using Boho Blue, Moody Mauve, Copper Clay, Wild Wheat and Granny Apple Green inks. The images are small so it works out fine to color on the Basic White card stock, but I did keep the water painter more on the dry side and didn’t let the water puddle on the paper. I also kept a paper towel handy to dry the brush and to flush and clean the tip between colors. After coloring, I adhered the flowers to the card with glue dots.
I stamped the sentiment from the Charming Sentiments in Versamark ink on a Pebbled Path panel and sprinkled it with white embossing powder. I shook off the excess and heated the powder with my heat tool. I cut out the sentiment with the coordinating die and adhered it to the card with glue dots. I colored a length of Linen Thread with the dark Moody Mauve Stampin’ Blend and made a bow. I adhered the bow to the card with a glue dot and finished the card with Brushed Butterfly gems.
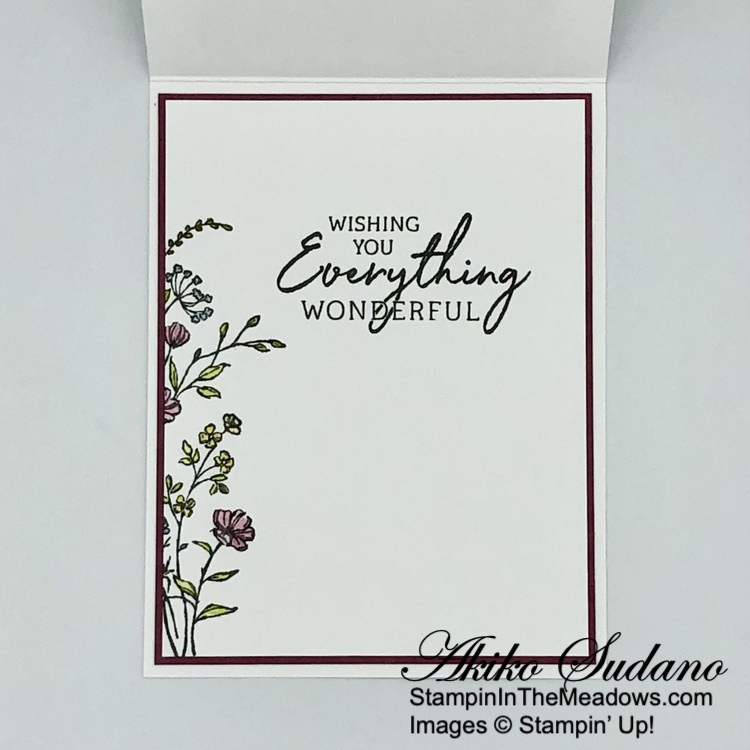
For the inside of the card, I stamped the large flower bunch from the Stampin’ Up! Dainty Delight stamp set in Pebbled Path ink on the side of a Basic White panel. I used the small water painter to color the flowers the same as the card front. I stamped the sentiment from the Charming Sentiments stamp set in Pebbled Path ink on the center of the panel and adhered it to a Moody Mauve mat before adhering it to the inside of the card with Stampin’ Seal.
It’s Graduation time, so I was thinking of a sweet congratulations card for a young woman graduating with a bright future when I made this card. I love the look that the new In Colors give to the sweet flowers with the water color technique!
On with the Hop! Click on the Next Blog button to move forward to see the beautiful project Karen Ksenzakovichas created.
If you get lost along the way, here are the participants for the hop:
Use this host code when you order $50 or more and receive a free gift from me! The free gift is your choice of any item valued up to $10.00 from the 2023-2024 Annual Catalog!
If your order is over $150, please do not use the host code since you’ll receive your own Host Dollars plus I’ll still send you the free gift! This host code can be used by anyone, no club or commitment required. Let me know if you have any questions.
If you need any stamping supplies, I’d be very happy to be your Demonstrator. Just click on the Shop Now button on the right side of the screen to go directly to my online store or contact me if you have any questions.
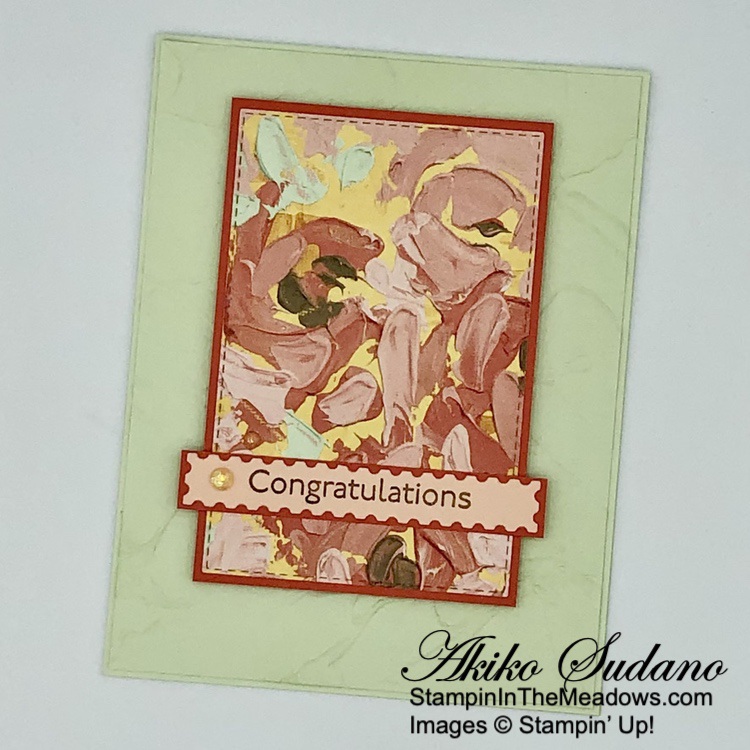
Good Morning! I love how the designer series papers from the January – April Mini Catalog go so well with the stamps and bundles from the Annual Catalog. Yesterday, I made a cute card with the A Fish & A Wish stamp bundle and the By The Bay DSP and today I’m combining the wonderful Stampin’ Up! Art Gallery stamp set with the beautiful Fancy Flora 6″ x 6″ designer series paper for another simple card. Both of these have a modern, impressionistic style that works perfect together. You can find the supplies I used at the bottom of my post along with the sizes of cardstock used.
I embossed a panel of Soft Sea Foam with the Painted Texture 3D embossing folder and used a blending brush to apply Soft Sea Foam ink lightly around the outside. This emphasized the embossed texture and provided a subtle contrast to the card base. I adhered the embossed panel to the front of a Soft Sea Foam card base.
I cut a panel of Fancy Flora 6″ x 6″ designer series paper with the 4th largest Stitched Rectangle Die. I adhered the die cut rectangle to a Calypso Coral mat with liquid glue and adhered the layered panel to the card front with dimensionals.
I stamped the sentiment from the Stampin’ Up! Art Gallery photopolymer stamp set in Soft Suede ink on Petal Pink and cut it out with the large label from the Floral Gallery dies using the two step method so that it would be extend wider than the DSP layer. I adhered it to a Calypso Coral mat and then to the card front with liquid glue. I finished the card front with Pale Papaya opal rounds.
For the inside of the card, I stamped the detailed large flower from the Stampin’ Up! Art Gallery stamp set in Calypso Coral ink on a Basic White panel. I inked up the filler stamp with Petal Pink ink and stamped over the detailed flower – this was the easy way for me to line the two images up. I stamped the large stem and leaves in Sea Foam ink under the flower and stamped another leaf to extend the left leaf. I colored the center with the light Daffodil Delight Stampin’ Blend. I used the same technique to stamp part of another flower on the side of the panel before adhering it to the inside of the card with Stampin’ Seal.
I really love how the stamped flowers on the inside of the card pick up on the flowers in the Fancy Flora DSP on the card front. And the simple font on the sentiment doesn’t detract from the artistry of the DSP or the stamped flowers. I should note that the Stampin’ Up! Art Gallery stamp set is great for it’s sentiments!
Stampin’ Up! Online Exclusives Available Now!
An exciting new Stampin’ Up! shopping experience has just started – the Stampin’ Up! Online Exclusives. You won’t find these products in any catalog, which means fresh products, more often, to spark your creativity and expand your crafting collection and all from the convenience of the Online Store. And there’s no end date for the sales period! Some products will be reordered when inventory is low, and others will only be available while supplies last. This way Stampin’ Up! can offer even more new products throughout the year and respond more quickly to relevant trends and your needs. New products mean new inspiration and new ways to express your creativity!
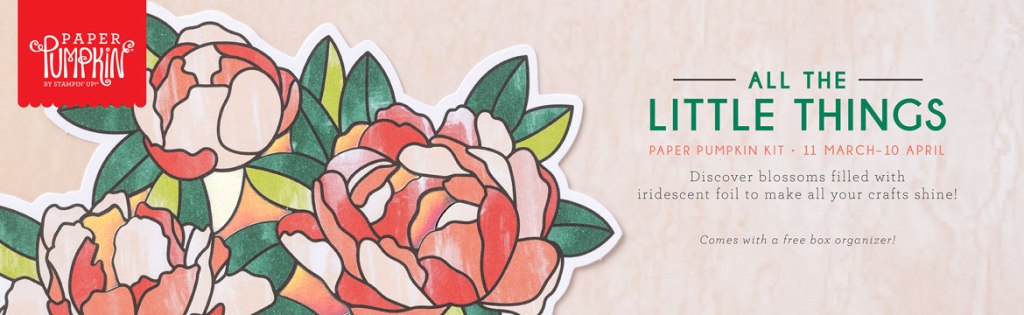
The April Paper Pumpkin Kit is All The Little Things!
Good things take time, but you can start creating them now with the All the Little Things Paper Pumpkin kit! This kit includes nine cards, three each of three designs, with elegant designs and bright colors. The iridescent foil is the shining detail to bring your crafts together. You can make a card for anyone and for any occasion!
And don’t wait, because anyone who subscribes to this month’s kit will get a FREE box organizer! This organizer fits perfectly inside your Paper Pumpkin box and is great for keeping your supplies from past kits organized, so you know right where everything is!
The April Kit Includes:
All the supplies you need to create 9 cards: 3 each of 3 designs and coordinating envelopes.
Finished card size: 5-1/2″ x 4-1/4″
1 photopolymer stamp set with celebratory sentiments.
1 Shaded Spruce Stampin’ Spot.
Precut cherry blossom paper pieces with iridescent foil.
If you’re interested in subscribing to Paper Pumpkin, you can either sign up for a subscription where you are billed monthly for your kit or you can purchase a prepaid subscription in my Online Store. To see more information and to sign up for the monthly subscription click here. To see the options for prepaid subscriptions in my Online Store, click here.
Sign up deadline for the April 2023 kit is April 10, 2023. Note: Supplies may be limited toward the end of the subscription period.
Current Host Code: FWMXBD76
Use this host code when you order $50 or more and receive a Thank You gift from me! The free gift is your choice of any item valued up to $10.00 in the 2022-2023 Annual Catalog or the January-April 2023 Mini Catalog!
If your order is over $150, please do not use the host code since you’ll receive your own Host Dollars plus I’ll still send you the Thank You gift! This host code can be used by anyone, no club or commitment required. Let me know if you have any questions.
If you need any stamping supplies, I’d be very happy to be your Demonstrator. Just click on the Shop Now button on the right side of the screen to go directly to my online store or contact me if you have any questions. Happy Stamping!
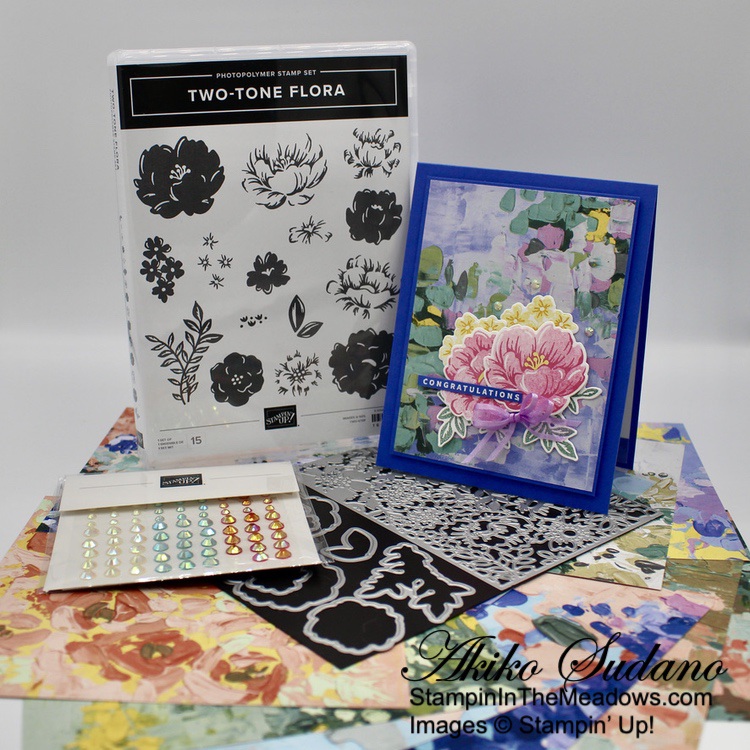
Good Morning! Today I have another sneak peek of the beautiful Stampin’ Up! Two-Tone Flora bundle from the upcoming January-April 2023 Mini Catalog that will be available on January 5, 2023. This gorgeous bundle is part of the Fancy Flora suite and I also used the Fancy Flora 6″ x 6″ designer series paper and the Something Fancy stamp set from that suite in todays card. You can find the currently available supplies I used at the bottom of my post along with the sizes of cardstock used.
I adhered a panel of Fancy Flora 6″ x 6″ designer series paper to an Orchid Oasis mat with liquid glue and adhered it to the front of an Orchid Oasis card base with dimensionals. I stamped the two large flowers from the Stampin’ Up! Two-Tone Flora photopolymer stamp set in Polished Pink ink on Basic White. I stamped the detailed stamps first and then stamped the background stamps in stamped off Polished Pink and lined up the flower centers – I found this pretty easy to do. I cut them out with the coordinating dies and colored the centers with the light Daffodil Delight Stampin’ Blend marker.
I stamped two sets of the leaf clusters from the Stampin’ Up! Two-Tone Flora stamp set in Soft Succulent ink on Basic White and cut them out with the coordinating die. I adhered them to the card front with glue dots. I stamped two sets of the two-stem small flower clusters in Daffodil Delight ink, by stamping the detail stamp full strength and the background stamp in stamped off Daffodil Delight. These were easy to line up by using the flower centers as well. I cut them out with the coordinating die and adhered them to the card front with glue dots. I adhered two large Polished Pink roses on top with dimensionals.
I stamped the sentiment from the Something Fancy stamp set in Versamark ink on Orchid Oasis. I sprinkled it with white embossing powder and shook off the excess. I heated the powder with my heat tool until it was bright and shiny and cut it out with my paper snips and adhered it with dimensionals and glue dots. I made a bow with Fresh Freesia ribbon and adhered it with glue dots. I finished the card front with three iridescent pastel gems.
For the inside of the card, I stamped the small flower clusters from the Stampin’ Up! Two-Tone Flora stamp set in Daffodil Delight just like the card front in the corner of a Basic White panel. I stamped the sentiment from the Something Fancy stamp set in Orchid Oasis in the middle and trimmed the bottom of the panel with a strip of Fancy Flora 6″ x 6″ DSP. I adhered the panel to the inside of the card with Stampin’ Seal.
The stamped floral images come out so pretty and they are fairly easy to line up. And the Fancy Flora 6″ x 6″ designer series paper is also pretty, reminiscent of an impressionist oil painting. Here is my card with the Stampin’ Up! Two-Tone Flora bundle, the gems and some of the pretty DSP.
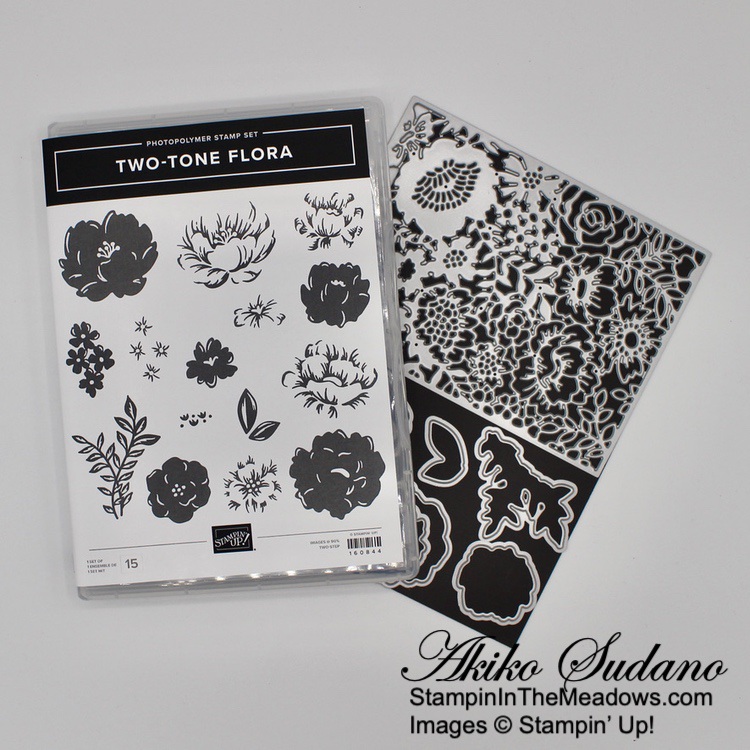
Here is the stamp set and dies in the bundle:
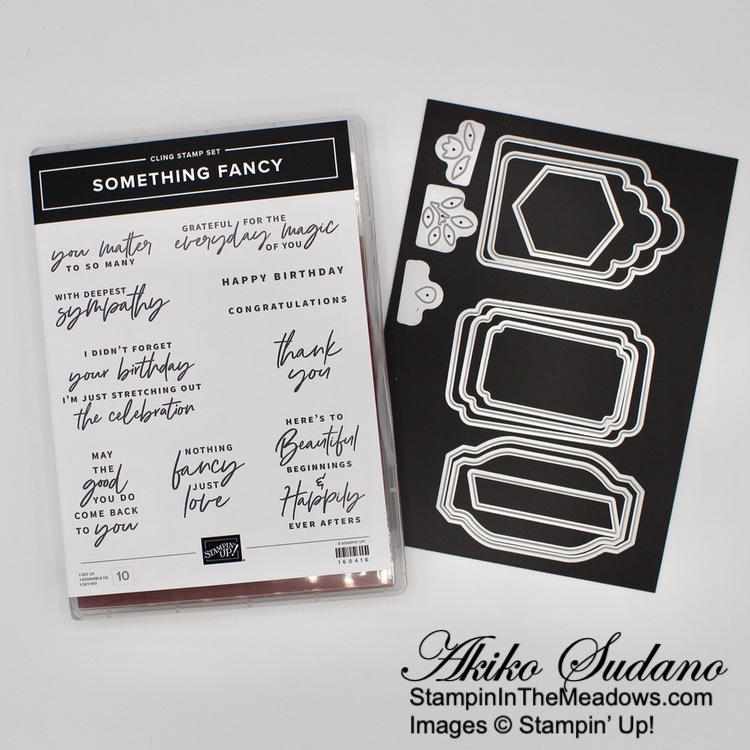
And here is the other stamp bundle in the Fancy Flora suite, the Something Fancy bundle. I love the dies in this sentiment bundle!
I love the traditional floral look of the two-step stamped flowers in the Stampin’ Up! Two-Tone Flora bundle and actually all the gorgeous items in the Fancy Flora suite. It will all be available on January 5, 2023!
The July–December 2022 Mini Catalog will be retiring soon! It’s always bittersweet to see a classic Stampin’ Up! catalog take a trip to retirement. But, we’re looking forward to all the new products on their way—and we hope you are, too!
Stock up on your favorite products before they’re gone for good! Save up to 60% on essential craft supplies. What are you waiting for? Start shopping! After all, this selection of Last Chance Products is only available while supplies last – and many items have already sold out!!
Note that while some of the bundles are on the retiring list, the individual stamps and dies/punched may be carried over. These items are marked with three asterisks on the retiring lists. Also, if one of the items in the bundle is deeply discounted, the total price may be less than the bundled price, so pull out your calculators to double check.
Click HERE to download an Excel Spreadsheet of the Retiring Last Chance Items.
Click HERE to download a PDF of the Retiring Last Chance Items.
Click HERE to download a PDF of the Carryover List of items.
Shop early to get the items you want before they’re gone for good! Click HERE to shop in my Online Store 24×7!
The Fitting Florets Collection is Now Available!
Add just the right touch of elegance to any occasion, including Christmas and seasonal celebrations, with the sweet Fitting Florets Collection. From color schemes to sentiments and embellishments to dies, these unique products blend together so that your cards and crafts fit whatever occasion you might need. Send birthday wishes, express your gratitude, or spread Christmas cheer—with so many options to mix and match you’ll be set no matter the celebration all year!
The beautiful Framed Florets bundle is an early release from the upcoming January-June 2023 Mini catalog. The Framed & Festive cling stamp set, Fitting Florets designer series paper and gold adhesive backed swirls are only available during this promotion. Click on the picture below to download a flyer with the details.
Note: Sadly the Gold Adhesive-Backed Swirls have sold out.
Current Host Code: N6Z4VWV3
Use this host code when you order $50 or more and receive a free gift from me! The free gift is your choice of any item currently available valued up to $10.00!
If your order is over $150, please do not use the host code since you’ll receive your own Host Dollars plus I’ll still send you the free gift! This host code can be used by anyone, no club or commitment required. Let me know if you have any questions.
If you need any stamping supplies, I’d be very happy to be your Demonstrator. Just click on the Shop Now button on the right side of the screen to go directly to my online store or contact me if you have any questions. Happy Stamping!
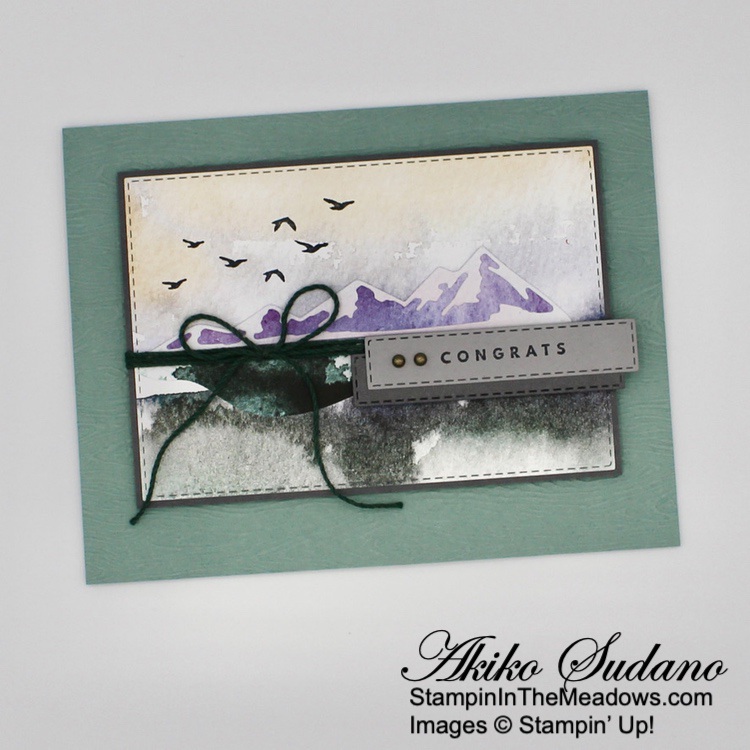
Good morning and welcome to the Happy Inkin’ Thursday Blog Hop! The Stampin’ Up! Celebrating You cling stamp set is a sentiments only stamp set that has a pretty set of fonts and covers lots of special occasions. I need a graduation card for a friend’s son who enjoys the outdoors, both winter and summer, so I pulled out the On The Horizon 6″ x 6″ designer series paper and Horizon dies to create an outdoors scene. You can find the supplies I used along with card stock cuts at the bottom of my post.
We have a sketch challenge this week and here is the pretty sketch we are using:
I embossed a Soft Succulent panel with the Timber 3D embossing folder and adhered it to the front of a Soft Succulent card base. I wanted to use the mountains in the Horizon dies, so I cut a 1″ strip of purple New Horizons 6″ x 6″ DSP for the background mountain and a 1″ strip of whitish DSP for the snow detail. I wanted to use the curvy ground die in green, so I cut a 1″ strip of green DSP for the ground. Once I had my strips for these elements, I used them to select the background panel that coordinated with the strips I chose.
I cut the background panel with the third largest Stitched Rectangle Die. I cut the purple strip with the mountain background die and the whitish strip with the detailed mountain die. I adhered the whitish die cut to the purple die cut so that it looks like a snowy mountain. I cut the green strip with the curvy ground die and adhered the layered mountain and ground die cuts to the background. I stamped the birds from the On the Horizon cling stamp set in Memento Tuxedo Black and adhered the die cut panel to a Basic Gray mat.
I stamped the sentiment from the Stampin’ Up! On Celebrating You stamp set in Memento Tuxedo Black on Smoky Slate and cut it out with the small long skinny stitched rectangle die. I cut a Basic Gray panel with the same die and adhered it to the back of the label with glue dots. I looped Evening Evergreen Baker’s twine three times around the scene and tied a bow. I adhered the labels to the scene with dimensionals and popped the scene on the card front with dimensionals. I finished the label with two rustic metallic dots.
For the inside, I cut a 3/4″ strip of the background DSP and cut a bit more of the mountain, ground and snow die cuts using the leftovers from the card front. I adhered them to the background strip and stamped some birds over the mountain. I trimmed the excess with my paper snips and adhered the strip to a Basic White panel. I stamped the sentiment from the Stampin’ Up! Celebrating You stamp set in Memento Tuxedo Black and adhered the panel to the inside of the card.
It was so fun to play with the On The Horizon bundle for mountain card and it goes perfectly with the Stampin’ Up! Celebrating You stamp set for graduating Senior!
On with the Hop! Click on the Next Blog button to move forward to see the beautiful project Karen Ksenzakovichas created.
If you get lost along the way, here are the participants for the hop:
Use this host code when you order $50 or more and receive a free gift from me! The free gift is your choice of any available item valued up to $10.00 in the 2022 – 2023 Annual Catalog or the January – June 2022 Mini Catalog!
If your order is over $150, please do not use the host code since you’ll receive your own Host Dollars plus I’ll still send you the free gift! This host code can be used by anyone, no club or commitment required. Let me know if you have any questions.
If you need any stamping supplies, I’d be very happy to be your Demonstrator. Just click on the Shop Now button on the right side of the screen to go directly to my online store or contact me if you have any questions.
See the current Stampin’ Up! clearance rack specials here
Earn FREE Stampin’ Up! products through my Wildflower Frequent Shopper Program – my way of saying thank you to my online frequent shopper customers.
Have any questions? I’d be happy to help, click here to contact me.
Cardstock Cuts for this project:
Soft Succulent – 5-1/2″ x 8-1/2″ card base scored at 5-1/2″, 4-1/4″ x 5-1/2″ (embossed panel)
Basic Gray – 3-1/8″ x 4-1/2″ (front mat), 1″ x 3″ (label mat)
Smoky Slate – 1″ x 3″ (label)
Basic White – 3-3/4″ x 5″ (inside panel)
New Horizons 6″ x 6″ DSP – 3-1/2″ x 4-1/4″ (stitched rectangle background), 1″ x 6″ (snowy mountain die cuts), 1″ x 6″ (purple mountain background die cuts), 1″ x 6″ (green ground die cuts), 3/4″ x 4″ (inside background trim)
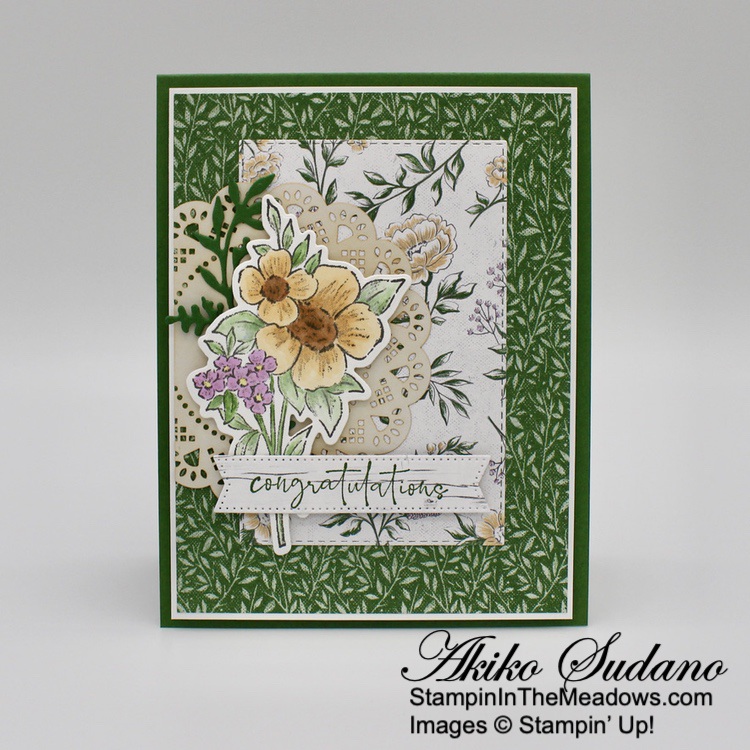
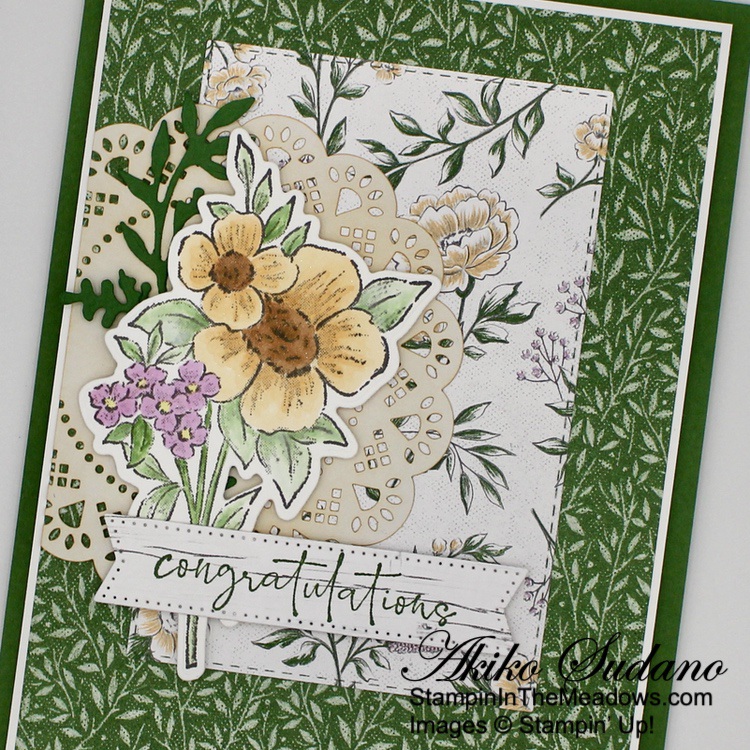
Good Morning! I used the Stampin’ Up! Blessings of Home bundle with the Heart & Home designer series paper for a feminine Congratulations card. And I used the sentiments from the Happy and Heartfelt cling stamp set for my greetings – I love their quirky casualness! You can find the supplies I used at the bottom of my post along with the sizes of cardstock used.
I adhered a panel of Heart & Home designer series paper to a Basic White mat and popped it to the front of a Garden Green card base with dimensionals. I cut another panel with the fourth a Stitched Rectangle die and adhered it to the card front with liquid glue. I applied Pale Papaya ink to a blending brush and colored the back of a Heart & Home doily. I trimmed an end and adhered it to the card front with liquid glue.
I cut two sprigs from Garden Green using the Flowers of Home dies and adhered them with liquid glue. I stamped the pretty flower from the Stampin’ Up! Blessings of Home cling stamp set in Basic Gray ink on Basic White and colored the flowers with Pale Papaya, Daffodil Delight and Fresh Freesia Stampin’ Blends. I used the new Natural Tones Medium markers (SU500 and SU600) to color the Pale Papaya flower centers. Since there isn’t a Garden Green Stampin’ Blends combo pack, I used a blender pen and Garden Green ink pad to color the leaves. The Basic Gray ink was pretty dry so it didn’t smear, so I was glad, but I used a light touch. I cut out the flower with the coordinating die and adhered it to the card front with dimensionals.
I stamped the sentiment from the Happy and Heartfelt stamp set in Garden Green on a strip of woodgrain Heart & Home DSP and cut it out with the Stylish Shapes banner die. I finished the card front with some Wink of Stella to add sparkle to the flowers.
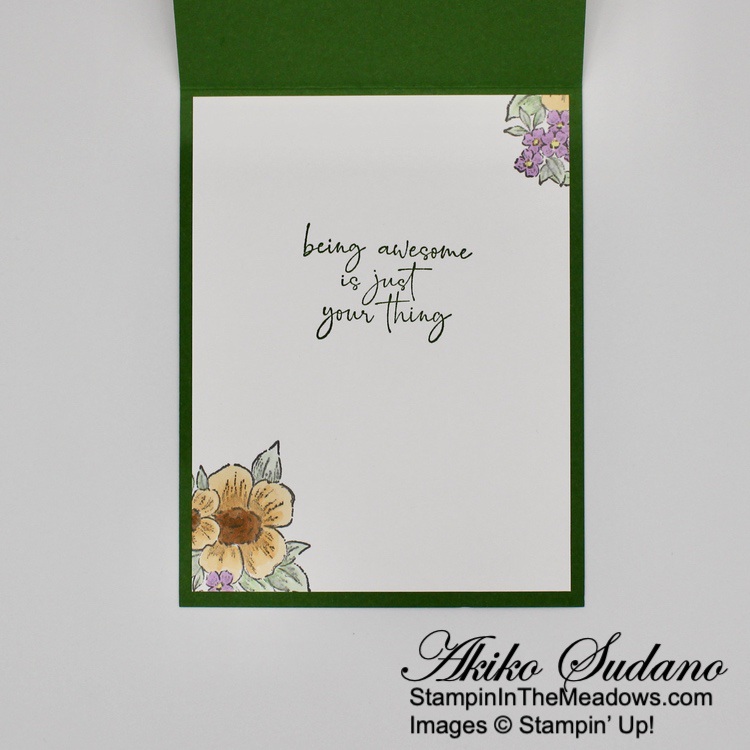
For the inside of the card, I stamped the sentiment from the Happy & Heartfelt stamp set in Garden Green on a Basic White panel. I stamped the flowers in the corners in Basic Gray and colored them the same way as I colored the flowers on the front. I ahdered the panel to the inside of the card with Stampin’ Seal.
The flowers from the Stampin’ Up! Blessings of Home stamp set are beautiful and perfect for many occasions. With graduations coming up, it’s a good time to think about congratulations cards, and I hope you like these sentiments as much as I do.
Join me for a Facebook Live this Afternoon!
I’m planning to go live on my Facebook Page at 1:00 ET this afternoon to make a card. Join me as I use the Stampin’ Up! He’s The Man bundle create a fun Father’s Day card. Look forward to seeing you then!
Stampin’ In The Meadows Double Wildflower points ordering special!
To celebrate the launch of the new Stampin’ Up! 2022-2023 Annual Catalog, I am offering a Double Wildflower points ordering special through May 10.
If you don’t know about my Wildflower Points frequent shopper program, here’s how it works:
For each $50 that you order from my online store (before shipping) you will earn one Wildflower point.
You will earn one Wildflower point for each friend that you refer when they place their first order of $50+ from my online store.
When you have earned 8 Wildflower points you will get a FREE product order valued up to $40.00, your choice and mailed directly to you!
With DOUBLE Wildflower points you get 2 points for each $50 order, 4 points for each $100 order, and so on, reaching your FREE order faster!!
For complete details on my Wildflower Rewards, scroll to the bottom of my Customer Rewards page or contact me.
May is a Great Time to Join Stampin’ Up!
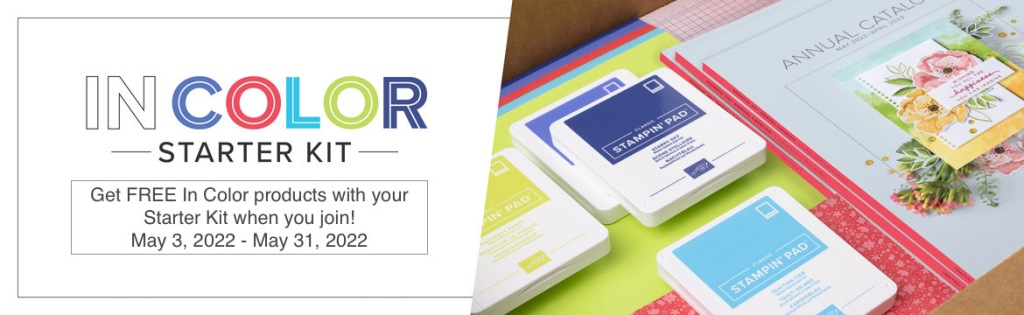
Ready to start your Stampin’ Up! business in style? Then sign up between May 3 – 31, 2022 to be a demonstrator and get $66.50 in FREE 2022-2024 In Color® products!
The Starter Kit is only $99 + tax!! And if you join between May 3-31, you’ll get:
$125 Stampin’ Up! merchandise of your choice
$66.50 in 2022-2024 In Color merchandise
2022–2024 In Color Grid Paper – item 160009
2022-2024 In Color 8-1/2″ x 11″ Card Stock – item 159204
2022-2024 In Color Ink Pad Collection – item 161108
2022-2024 In Color 6″ x 6″ Designer Series Paper – item 159253
Free business supplies and catalogs
Free random past Paper Pumpkin Kit
Free shipping!!
Read more about Stampin’ Up! Demonstrator benefits on my Join My Team page and click the button at the bottom to join. Contact me if you have any questions and I’ll be happy to tell you more!
Current Host Code: ZFMCWFCA
Use this host code when you order $50 or more and receive a free gift from me! The free gift is your choice of any item valued up to $10.00 from the January – June 2022 Mini Catalog or the 2022-2023 Annual Catalog!
If your order is over $150, please do not use the host code since you’ll receive your own Host Dollars plus I’ll still send you the free gift! This host code can be used by anyone, no club or commitment required. Let me know if you have any questions.
If you need any stamping supplies, I’d be very happy to be your Demonstrator. Just click on the Shop Now button on the right side of the screen to go directly to my online store or contact me if you have any questions. Happy Stamping!
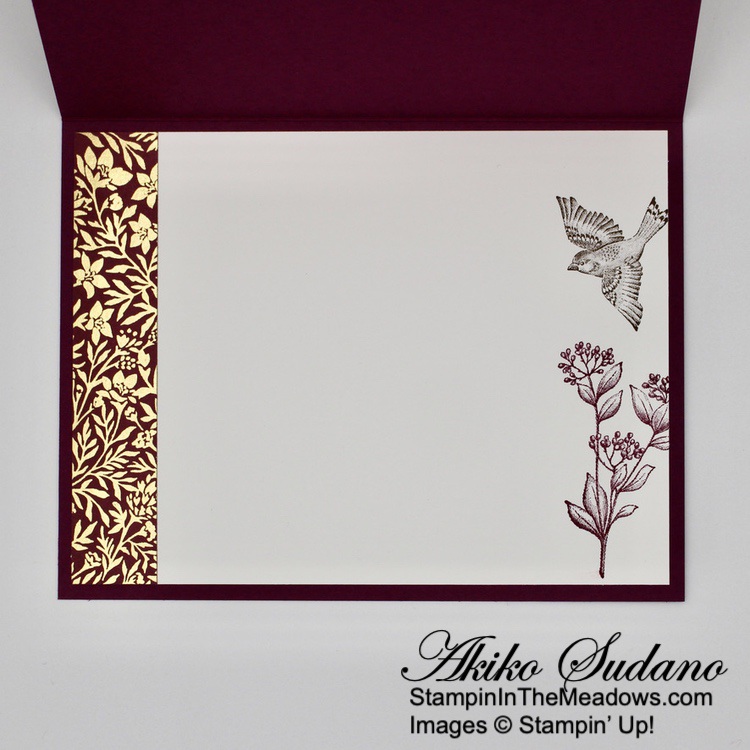
Good Morning! Today I’m sharing a Congratulations card made with the pretty Stampin’ Up! Beauty Of Tomorrow bundle and the gorgeous Blackberry Beauty specialty designer series paper. You can find the supplies I used at the bottom of my post along with the sizes of cardstock used.
I adhered each panel of the Rich Razzleberry and gold foil Blackberry Beauty specialty DSP to an Early Espresso mat with liquid glue and adhered them to the front of a Rich Razzleberry card base with dimensionals. I stamped the sentiment from the Many Messages cling stamp on Sahara Sand and cut it out with the Messages die.
I stamped the flowers from the Stampin’ Up! Beauty Of Tomorrow cling stamp set in Rich Razzleberry ink on Sahara Sand and cut it out with the coordinating die. I stamped the bird in Early Espresso on Sahara Sand and cut it out with the coordinating die.
I adhered the label across the DSP panels with glue dots. I adhered the flowers over the label with dimensionals and adhered the bird on top with glue dots. I made a double bow from Linen Thread and adhered it to the flowers with a glue dot. I finished the card by adhering a small Gilded Gem on the label.
For the inside of the card, I stamped the the the flowers from the Stampin’ Up! Beauty of Tomorrow stamp set in Rich Razzleberry in the corner of a Basic White panel. I stamped the bird in Early Espresso over the flower and adhered a strip of Blackberry Beauty DSP to the side. I adhered the panel to the inside of the card.
The pretty natural images in the Stampin’ Up! Beauty Of Tomorrow stamp set compliment the elegance of the Blackberry Beauty specialty designer series paper. And they’re both perfect for making beautiful cards for special occasions.
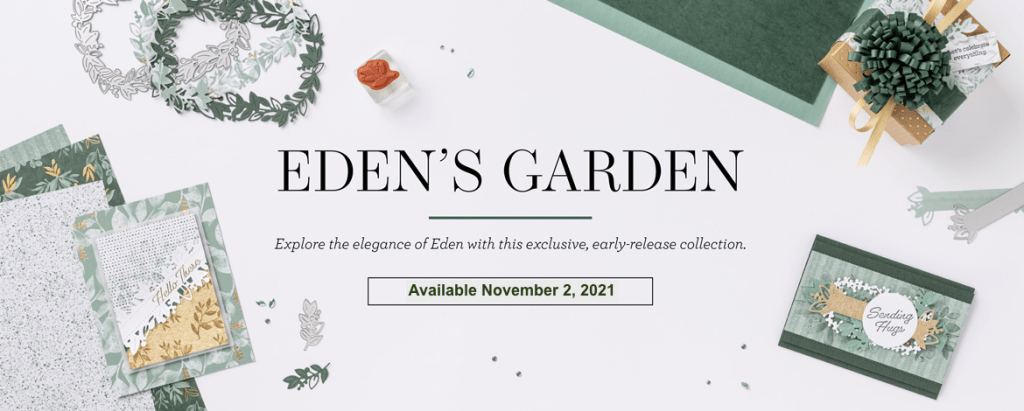
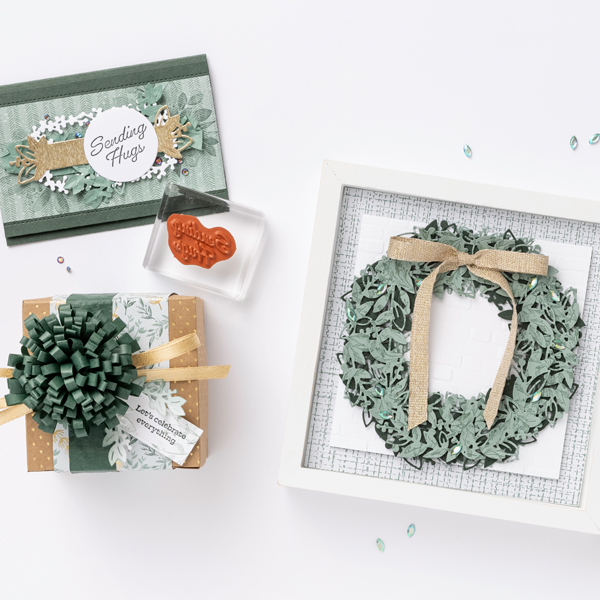
Eden’s Garden Is Coming on November 2!
Enter and explore Eden with the Eden’s Garden Collection! This delightful and desirable collection includes early-release products from the January–June 2022 Mini Catalog—a bundle of stamps and dies that’s blooming with beauty and bounty. Plus, exclusive products you can’t uncover anywhere else—a pack of paper patterned with green and gold, a set of specialty sheets for gift-giving and textured touches, and a sparkling set of gleaming gems!
Click on the image below to download a flyer with the details:
Current Host Code: 29VEKU9M
Use this host code when you order $50 or more and receive a free gift from me! The free gift is your choice of any item valued up to $10.00 in the 2021-2022 Annual Catalog or the July – December 2021 Mini Catalog!
If your order is over $150, please do not use the host code since you’ll receive your own Host Dollars plus I’ll still send you the free gift! This host code can be used by anyone, no club or commitment required. Let me know if you have any questions.
If you need any stamping supplies, I’d be very happy to be your Demonstrator. Just click on the Shop Now button on the right side of the screen to go directly to my online store or contact me if you have any questions. Happy Stamping!
Good Morning! Today is the big day when the new July – December 2021 Mini Catalog launches and the Second Sale A Bration begins! I used one of the new Sale A Bration products in my card today, the Beautifully Penned designer series paper that you can get for free with a $50 purchase (before shipping and handling). I paired it with the Stampin’ Up! Hand Penned Petals bundle, and it coordinates beautifully! You can find the supplies I used at the bottom of my post along with the sizes of cardstock used.
I adhered a panel of the Sale A Bration Beautifully Penned designer series paper to a Basic Black mat and wrapped a length of Glittered Black Organdy ribbon around the panel, securing it in the back. I adhered it to the front of a Basic Black card base.
I cut the floral die cut from the Penned Flowers Dies from Basic Black and the outline from Vellum card stock and adhered the black die cut to the vellum with glue dots. I stamped the sentiment from the Stampin’ Up! Hand Penned Petals photopolymer stamp set in Versamark ink and sprinkled it with black embossing powder. I heat set the embossing powder with my heat tool and cut it out with the small Hippo & Friends die when it was cool. I also cut the two leaf clusters from Basic Black card stock.
I adhered the label to the black and Vellum floral die cut with glue dots and used black dimensionals to adhere them both to the card front. I used glue dots to adhere the leaves to the card front, tucking them under the label. I tied a bow with another length of black glittered organdy ribbon and adhered it with a glue dot and finished the card front with seven rhinestones.
For the inside of the card, I stamped the floral cluster from the Stampin’ Up! Hand Penned Petals stamp set in Memento Tuxedo Black ink in the corners of a Basic White panel. I stamped the sentiment and adhered a strip of Beautifully Penned DSP to the bottom of the panel. I adhered the panel to the inside of the card.
Monotone Black and White cards are so striking and the Stampin’ Up! Hand Penned stamp set works beautifully with this palette. The Beautifully Penned designer series paper is a great Sale A Bration choice at the $50 purchase level!
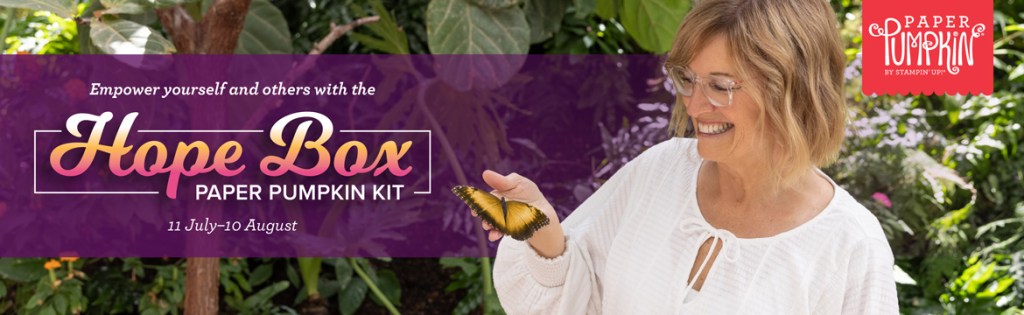
The August Paper Pumpkin Kit is The Hope Box!
Empower yourself and others with the Hope Box Paper Pumpkin Kit! Created from the heart and soul of Stampin’ Up! cofounder, Shelli, the Hope Box Paper Pumpkin Kit reminds us why life is precious. This month’s Paper Pumpkin kit includes supplies to create nine encouraging cards and coordinating envelopes in an inspiring color palette, and a specially designed Hope Box!
Coordinating Colors: Bermuda Bay, Blackberry Bliss, Bumblebee, Melon Mambo, Petal Pink, Pool Party, and Poppy Parade
If you’re interested in subscribing to Paper Pumpkin, you can either sign up for a subscription where you are billed monthly for your kit or you can purchase a prepaid subscription in my Online Store. To see more information and to sign up for the monthly subscription click here. To see the options for prepaid subscriptions in my Online Store, click here.
Sign up deadline for the August 2021 kit is August 10, 2021. Note: Supplies may be limited toward the end of the subscription period.
Current Host Code: UDT2QRD7
Use this host code when you order $50 or more and receive a free gift from me! The free gift is your choice of any item valued up to $10.00 in the 2021 – 2022 Annual Catalog or the July – December 2021 Mini Catalog!
If your order is over $150, please do not use the host code since you’ll receive your own Host Dollars plus I’ll still send you the free gift! This host code can be used by anyone, no club or commitment required. Let me know if you have any questions.
If you need any stamping supplies, I’d be very happy to be your Demonstrator. Just click on the Shop Now button on the right side of the screen to go directly to my online store or contact me if you have any questions.


![Wonderful Thoughts Photopolymer Stamp Set (English) [ 161899 ]](https://assets1.tamsnetwork.com/images/EC042017NF/161899s.jpg "Wonderful Thoughts Photopolymer Stamp Set (English) [ 161899 ]")
![Wonderful Thoughts Dies (English) [ 161491 ]](https://assets1.tamsnetwork.com/images/EC042017NF/161491s.jpg "Wonderful Thoughts Dies (English) [ 161491 ]")
![Floral Impressions 12" X 12" (30.5 X 30.5 Cm) Designer Series Paper [ 165603 ]](https://assets1.tamsnetwork.com/images/EC042017NF/165603s.jpg "Floral Impressions 12\" X 12\" (30.5 X 30.5 Cm) Designer Series Paper [ 165603 ]")
![Darling Duckling 8 1/2" X 11" Cardstock [ 165622 ]](https://assets1.tamsnetwork.com/images/EC042017NF/165622s.jpg "Darling Duckling 8 1/2\" X 11\" Cardstock [ 165622 ]")
![Garden Green 12" X 12" (30.5 X 30.5 Cm) Two Tone Cardstock [ 166665 ]](https://assets1.tamsnetwork.com/images/EC042017NF/166665s.jpg "Garden Green 12\" X 12\" (30.5 X 30.5 Cm) Two Tone Cardstock [ 166665 ]")
![Basic White 8 1/2" X 11" Cardstock [ 166780 ]](https://assets1.tamsnetwork.com/images/EC042017NF/166780s.jpg "Basic White 8 1/2\" X 11\" Cardstock [ 166780 ]")
![Pecan Pie Classic Stampin' Pad [ 161665 ]](https://assets1.tamsnetwork.com/images/EC042017NF/161665s.jpg "Pecan Pie Classic Stampin' Pad [ 161665 ]")
![Iridescent Pearl Basic Jewels [ 158987 ]](https://assets1.tamsnetwork.com/images/EC042017NF/158987s.jpg "Iridescent Pearl Basic Jewels [ 158987 ]")
![Darling Duckling 3/8" (1 Cm) Faux Linen Ribbon [ 165272 ]](https://assets1.tamsnetwork.com/images/EC042017NF/165272s.jpg "Darling Duckling 3/8\" (1 Cm) Faux Linen Ribbon [ 165272 ]")


![Tear & Tape Adhesive [ 154031 ]](https://assets1.tamsnetwork.com/images/EC042017NF/154031s.jpg "Tear & Tape Adhesive [ 154031 ]")


")

 Designer Series Paper")


")

 Designer Series Paper")


 Grosgrain Ribbon")


")

")


")


 Designer Series Paper")


 Open Weave Ribbon")


")
")

 Designer Series Paper")


")
")


 Designer Series Paper")


")
")


 Specialty Designer Series Paper")


")


 Designer Series Paper")


 Glittered Organdy Ribbon")


