Stampin’ Up! Layers Of Beauty for the Happy Inkin’ Thursday Blog Hop

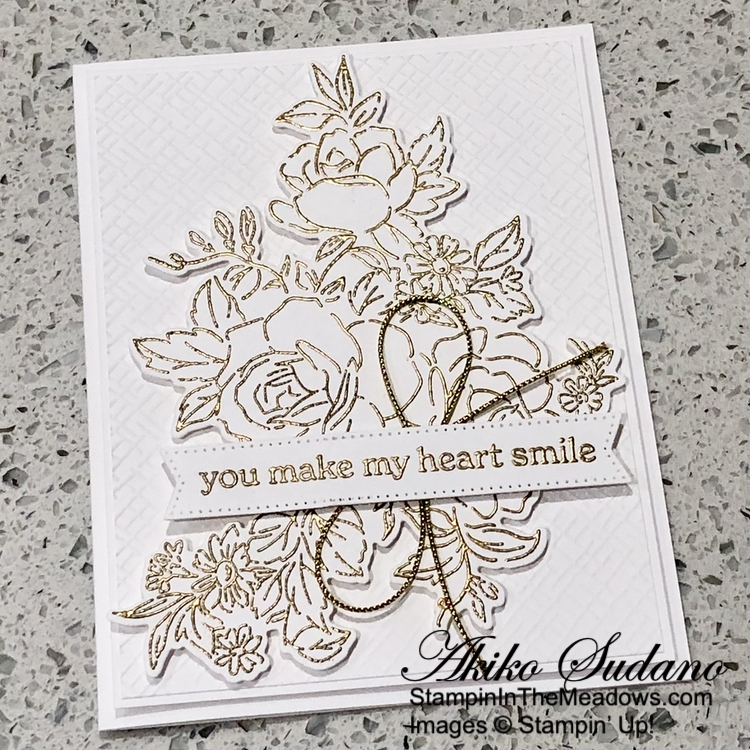
Good Morning and welcome to the Happy Inkin’ Thursday Blog Hop! One of the new floral bundles in the upcoming 2025-2025 Annual Catalog is the Stampin’ Up! Layers Of Beauty bundle. This is a set of line image photopolymer stamps and dies and it also includes a set of masks that you can use to color the flowers! I used the large bouquet to make a CAS card using gold embossed outline flowers. You can find currently available supplies I used along with card stock cuts at the bottom of my post.

We have a pretty theme challenge this week and I had to make a sneak peek of an upcoming new stamp set that will be available on May 1, 2024:

I embossed a Basic White panel with the Cross Hatch 3D embossing folder and adhered it to a Basic White mat with liquid glue. I popped it on the front of a Thick Basic White card base with dimensionals.

I stamped the large bouquet from the Stampin’ Up! Layers Of Beauty stamp set using Versamark ink on a Basic White panel. I sprinkled it with gold embossing powder and shook off the excess. I heated the powder with my heat tool until it was bright and shiny. Be careful to heat all the powder because since it’s a large image, it’s easy to miss a spot. After it cooled, I cut it out with the coordinating die. I adhered the die cut flower bouquet to the card front with dimensionals.

I stamped the sentiment from the Stampin’ Up! Layers of Beauty stamp set using Versamark ink on a Basic White strip. I sprinkled it with gold embossing powder and shook off the excess. I heated the powder with my heat tool until it was bright and shiny and cut it out with the long skinny Stylish Shapes banner die using the two step method. I used gold trim to make a bow and adhered it with a glue dot and popped the label on top with dimensionals.

For the inside of the card, I stamped some floral images from the Stampin’ Up! Layers Of Beauty stamp set in Versamark ink in the corners of a Basic White panel. I sprinkled them with gold embossing powder and shook off the excess. I heated the powder with my heat tool until they were bright and shiny and adhered the panel to the inside of the card with Stampin’ Seal.

Gold embossing is so elegant and easy to do, especially with a large beautiful floral image like this one from the new Stampin’ Up! Layers Of Beauty bundle. Here is a picture of the stamp set and dies that I used for today’s card (I didn’t include the masks that are also included in the bundle):

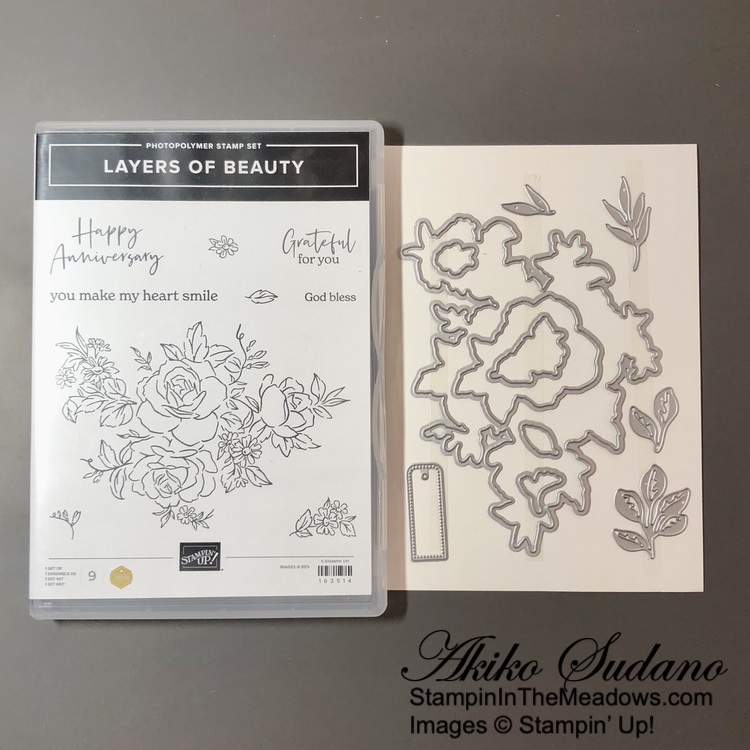
The pretty line images in the Stampin’ Up! Layers Of Beauty bundle can be colored in so many ways and there is a die that will cut out the large flower by itself. I’m glad that it also has smaller stamped images and accessory dies. It will all be available with the new Stampin’ Up! 2024-2025 Annual Catalog opens on May 1, 2024.

On with the Hop! Click on the Next Blog button to move forward to see the beautiful project Karen Ksenzakovic has created.

If you get lost along the way, here are the participants for the hop:


Current Host Code: YEPTJAZ9

Use this host code when you order $50 or more and receive a free gift from me!  The free gift is your choice of any item currently available valued up to $10.00!

If your order is over $150, please do not use the host code since you’ll receive your own Host Dollars plus I’ll still send you the free gift!  This host code can be used by anyone, no club or commitment required. Let me know if you have any questions.


If you need any stamping supplies, I’d be very happy to be your Demonstrator.  Just click on the Shop Now button on the right side of the screen to go directly to my online store or contact me if you have any questions. 

Thanks for stopping by and Happy Stamping!

Akiko

  • Visit my online store here
  • See the current Stampin’ Up! clearance rack specials here
  • Earn FREE Stampin’ Up! products through my Wildflower Frequent Shopper Program – my way of saying thank you to my online frequent shopper customers.
  • Have any questions? I’d be happy to help, click here to contact me.

Cardstock Cuts for this project:

  • Thick Basic White – 5-1/2″ x 8-1/2″ card base, scored at 4-1/4″
  • Basic White – three 4″ x 5-1/4″ panels (inside panel, front mat and flower bouquet), 3-7/8″ x 5-1/8″ (embossed background), 1″ x 4″ (label)

Stampin’ Up! products used in this project:


Stampin’ Up! Textured Floral for the Happy Inkin’ Thursday Blog Hop

Good Morning and welcome to the Happy Inkin’ Thursday Blog Hop! Today’s card features the pretty Stampin’ Up! Textured Floral bundle with the Inked Botanicals 6″ x 6″ designer series paper. You can find the supplies I used along with card stock cuts at the bottom of my post.

We have a sketch challenge for our Blog Hop this week:

I adhered a floral panel of Inked Botanicals 6″ x 6″ designer series paper to the front of a Lost Lagoon card base with liquid glue. I cut a Petal Pink panel with the Radiating Stitches die and adhered it to the card front. I cut the small leaf branch from the Stampin’ Up! Textured Floral dies from Lost Lagoon card stock and adhered it to the die cut panel with liquid glue.

I stamped the small leaf from the Stampin’ Up! Textured Floral photopolymer stamp set in Lost Lagoon ink and cut it out with the coordinating die. I adhered it to the card with liquid glue. I stamped the large flower in Daffodil Delight ink on Basic White and the flower center in Crumb Cake . I cut the flower out with the coordinating die and adhered it to the card with dimensionals. I stamped the small flower in Calypso Coral and Crumb Cake on Basic White and cut it out with the coordinating die. I adhered it to the card with glue dots and dimensionals.

I stamped the sentiment from the Stampin’ Up! Textured Floral stamp set in Lost Lagoon ink on Pool Party card stock. I cut fishtails on the ens and adhered it to the card with dimensionals. I finished the card front with Iridescent Pastel gems.

For the inside of the card, I stamped the small flower from the Stampin’ Up! Textured Floral stamp set in Calypso Coral on Basic White. I stamped the center inn Crumb Cake and trimmed the bottom of the panel with a strip of Inked Botanicals DSP. I adhered the panel to the inside of the card with Stampin’ Seal.

The Stampin’ Up! Textured Floral bundle is a pretty two step floral stamping set with water-color like images. The sentiments are pretty and it has dies that cut out the stamped flowers and leaves. Plus, there are pretty foliage dies that go wonderfully with the stamped images!

On with the Hop! Click on the Next Blog button to move forward to see the beautiful project Karen Ksenzakovic has created.

If you get lost along the way, here are the participants for the hop:


Current Host Code: P7SWY6DS

Use this host code when you order $50 or more and receive a free gift from me!  The free gift is your choice of any item currently available valued up to $10.00!

If your order is over $150, please do not use the host code since you’ll receive your own Host Dollars plus I’ll still send you the free gift!  This host code can be used by anyone, no club or commitment required. Let me know if you have any questions.


If you need any stamping supplies, I’d be very happy to be your Demonstrator.  Just click on the Shop Now button on the right side of the screen to go directly to my online store or contact me if you have any questions. 

Thanks for stopping by and Happy Stamping!

Akiko

  • Visit my online store here
  • See the current Stampin’ Up! clearance rack specials here
  • Earn FREE Stampin’ Up! products through my Wildflower Frequent Shopper Program – my way of saying thank you to my online frequent shopper customers.
  • Have any questions? I’d be happy to help, click here to contact me.

Cardstock Cuts for this project:

  • Lost Lagoon – 4-1/4″ x 11″ card base scored at 5-1/2″, 2″ x 3-1/4″ (die cut leaves)
  • Petal Pink – 3″ x 4-1/4″ (die cut rectangle)
  • Pool Party – 3/4″ x 3-3/4″ (label)
  • Basic White – 4″ x 5-1/4″ (inside panel), 2-1/2″ x 4″(stamped flowers and leaves)
  • Inked Botanicals 6″ x 6″ DSP – 4″ x 5-1/4 (front background), 3/4″ x 4″ (inside trim)

Stampin’ Up! products used in this project:


Stampin’ Up! Wonderful World Smile Card

Good Morning! I used the pretty Stampin’ Up! Wonderful World Sale-A-Bration bundle with the sentiments from the Hydrangea Haven stamp set to make a dainty, sweet smile card. You can find the supplies I used at the bottom of my post along with the sizes of cardstock used.

I cut a panel of Stampin’ Up! Wonderful World designer series paper with the angled scalloped edge die from the Basic Borders die and I cut a slightly longer panel of Basic White with the same die. I adhered the die cuts together and wrapped a length of Sweet Sorbet shimmer ribbon around the panels and tied a bow. I adhered the panel to the front of a Blushing Bride card base.

I stamped a Basic White panel with the sentiment from the Hydrangea Haven photopolymer stamp set in Blackberry Bliss ink. The sweet font in these sentiments go so well with the floral designs in the DSP! I cut the sentiment with the smallest Scalloped Contours die and popped it on the card front with dimensionals.

I cut a Fresh Freesia panel with the small detailed butterfly from the Brilliant Wings dies and adhered it to the label with a glue dot. The butterfly is the perfect accent to the pretty flowers in the background! I finished the card front with three Fine Sparkle gems.

For the inside of the card, I stamped sentiment from the Hydrangea Haven stamp set in Blackberry Bliss on a Basic White panel. I stamped the leaf sprig from the Stampin’ Up! Wonderful World cling stamp set next to the sentiment in Pear Pizzazz and I used my Stamparatus with Polished Pink and Pear Pizzazz Stampin’ Write Markers to stamp the flower in the lower corner. I trimmed the bottom with a strip of DSP and adhered the panel to the inside of the card.

The Stampin’ Up! Wonderful World bundle is a pretty cling stamp set with coordinating designer series paper that is free with a $100 order (before shipping and taxes) during Sale-A-Bration. It coordinates well with other Stampin’ Up! sets like the Hydrangea Haven stamp set that I used for the sentiments in today’s card.


Sale-A-Bration is Going on Now!

With Sale-A-Bration going on through August 31, and the new Mini Catalog, now is a great time to stock up on supplies for Holiday card making and gifts. For every $50 or $100 in orders (before shipping and taxes) you get to choose a free item from nine available stamp sets, dies and papers. And there are extra bonuses for Hosting and Joining Too. Click HERE to download the Sale-A-Bration brochure to learn more. Please note that Sale-A-Bration items are only available while supplies last, so shop early to get the bonus item you really want!


The August Paper Pumpkin Kit is Sweet Sunflowers!

The Sweet Sunflowers Paper Pumpkin Kit includes elegant watercolor designs hand-crafted by Stampin’ Up! artists to take your crafting to the next level! Try out the Twist technique with a sunflower stamp that you can stamp, twist, and stamp again, perfect for a fuller and more detailed floral image. And the kit includes Gold Foil Honeycomb Sheets as a FREE gift that will add a bee-utiful golden touch to your projects!

The August Kit includes:

  • Supplies to create 9 cards—3 each of 3 designs—and 9 coordinating envelopes
    • Card size: 4-1/4″ x 5-1/2″
    • Envelope Size: 4-1/2″ x 5-3/4″
  • An all-occasion stamp set to express words of gratitude, friendship, greetings and beautiful wildflower designed images.
  • Specialty Vellum honeycomb shape pre-cut pieces.
  • 2 Classic Stampin’ Spots (Crushed Curry and Soft Suede) for a Two-Step stamping experience with a twist!
  • Paper pieces and embellishments with watercolor designs and images.
  • FREE GIFT: 8 Gold Foil Honeycomb Sheets

Coordinating Colors: Blackberry Bliss, Crushed Curry, Evening Evergreen, Melon Mambo, Mossy Meadow, Night of Navy, Pumpkin Pie, Soft Suede

If you’re interested in subscribing to Paper Pumpkin, you can either sign up for a subscription where you are billed monthly for your kit or you can purchase a prepaid subscription in my Online Store. To see more information and to sign up for the monthly subscription click here. To see the options for prepaid subscriptions in my Online Store, click here.

Sign up deadline for the August 2022 kit is August 10, 2022. Note: Supplies may be limited toward the end of the subscription period.


Current Host Code: QNGMH7CB

Use this host code when you order $50 or more and receive a free gift from me!  The free gift is your choice of any item currently available valued up to $10.00 from the July – December 2022 Mini Catalog or the 2022-2023 Annual Catalog!

If your order is over $150, please do not use the host code since you’ll receive your own Host Dollars plus I’ll still send you the free gift!  This host code can be used by anyone, no club or commitment required. Let me know if you have any questions.


If you need any stamping supplies, I’d be very happy to be your Demonstrator.  Just click on the Shop Now button on the right side of the screen to go directly to my online store or contact me if you have any questions.  Happy Stamping!

Thanks for stopping by and have a great week!

Akiko

  • Visit my online store here
  • See the current Stampin’ Up! clearance rack specials here
  • Earn FREE Stampin’ Up! products through my Wildflower Frequent Shopper Program – my way of saying thank you to my online frequent shopper customers.
  • Have any questions? I’d be happy to help, click here to contact me.

Cardstock Cuts for this project:

  • Blushing Bride – 4-1/4″ x 11″ card base scored at 5-1/2″
  • Fresh Freesia – 2″ x 2-1/2″ (die cut butterfly)
  • Basic White – 4″ x 5-1/4″ (inside panel), 4-1/8″ x 4-5/8″ (background), 1-1/2″ x 3″ (label)
  • Wonderful World DSP – 3/4″ x 4″ (inside trim), 4-1/8″ x 4-1/2″ (front background)

Stampin’ Up! products used in this project:


Stampin’ Up! Hello Ladybug Smile Card

Happy Friday! Last weekend I used the Stampin’ Up! Hello Ladybug bundle to make a fun fold card for my Facebook Live and I’m using it again for a friendship and encouragement card for today. The ladybug is so cute and the other stamps in the photopolymer stamp set give you lots of options for your card designs. You can find the supplies I used at the bottom of my post along with the sizes of cardstock used.

I started cutting out a panel of Basic White with the second largest Scalloped Contours die and adhering a panel of the pretty Sale-A-Bration Sunshine and Rainbows designer series paper to it with liquid glue. I adhered the panel to the front of a Pool Party card base. I stamped the large leaf from the Stampin’ Up! Hello Ladybug stamp set in Granny Apple Green on a Basic White panel and fussy cut it out with my paper snips. I adhered it to the card front.

I stamped 3 large flowers from the Stampin’ Up! Hello Ladybug stamp set in Daffodil Delight on Basic White and punched them out with the Medium Daisy Punch. I adhered them together with liquid glue and added an iridescent gemstone to the center before adhering them to the card front with a dimensional. I punched the ladybug body from Pattern Party DSP and Basic Black card stock and adhered them together. I stamped the wings in Real Red, punched them out with the Butterfly Builder punch and adhered them to the butterfly body. I added black matte dots to the wings and adhered the ladybug to the card front with dimensionals.

I stamped the sentiment from the Daisy Lane stamp set in Real Red on Basic White and cut it out with the Tasteful Labels die. I adhered the label to the card front with liquid glue, tucking it under the leaf. I finished the card with a black and white twine bow.

I stamped the small bunch of flowers from the Stampin’ Up! Hello Ladybug stamp set in Daffodil Delight ink in the corners of a Basic White panel and the sweet sentiment from the Daisy Lane stamp set in Real Red. I trimmed the bottom with a strip of Sunshine and Rainbows DSP and adhered the panel to the inside of the card.

The Stampin’ Up! Hello Ladybug bundle is so cute and versatile. It’s perfect for many occasions, so be sure to check it out! Thanks for stopping by and have a great weekend!


Sale-A-Bration is ending soon – Feb 28 2022!

Sale-A-Bration is one of Stampin’ Up!’s biggest promotions of the year with fun for everyone!  There are fantastic Sale-A-Bration specials for Shopping, Hosting and Joining! See my Promotions Page for more details or contact me and I’ll be happy to tell you more! But hurry because these specials are only available through February 28, 2022 or while supplies last!


Current Host Code: 3QYMGKQY

Use this host code when you order $50 or more and receive a free gift from me!  The free gift is your choice of any item valued up to $10.00 in the 2021-2022 Annual Catalog or the January – June 2022 Mini Catalog!

If your order is over $150, please do not use the host code since you’ll receive your own Host Dollars plus I’ll still send you the free gift!  This host code can be used by anyone, no club or commitment required. Let me know if you have any questions.


If you need any stamping supplies, I’d be very happy to be your Demonstrator.  Just click on the Shop Now button on the right side of the screen to go directly to my online store or contact me if you have any questions.  Happy Stamping!

Thanks for stopping by and have a great week!

Akiko

  • Visit my online store here
  • See the current Stampin’ Up! clearance rack specials here
  • Earn FREE Stampin’ Up! products through my Wildflower Frequent Shopper Program – my way of saying thank you to my online frequent shopper customers.
  • Have any questions? I’d be happy to help, click here to contact me.

Cardstock Cuts for this project:

  • Pool Party – 4-1/4″ x 11″ card base scored at 5-1/2″
  • Basic Black – 2″ x 2″ (ladybug)
  • Basic White – 4″ x 5-1/4″ (inside panel), 3-1/2″ x 4-3/4″ (scalloped rectangle), 2″ x 2-1/2″ (label), 2″ x 6″ (flower), 2-1/2″ x 2-1/2″ (leaf), 2″ x 2″ (ladybug wings)
  • Sunshine & Rainbows DSP – 2-5/8″ x 4″ (scalloped panel background), 1/2″ x 4″ (inside trim)
  • Pattern Party DSP – 2″ x 2″ (ladybug)

Stampin’ Up! products used in this project:


Stampin’ Up! Honeybee Home Miss You Card

Good Morning! The Stampin’ Up! Honeybee Home bundle is one of the prettiest sets of floral stamps and dies. I paired it with the pretty Heart & Home designer series paper and Many Messages stamp to make a simple card. You can find the supplies I used at the bottom of my post along with the sizes of cardstock used.

I adhered a panel of Heart & Home designer series paper to a Basic White mat and adhered them both to the front of Fresh Freesia card base. I cut another panel of Heart & Home DSP with the Stitched Rectangle die and adhered it to a garden green mat with liquid glue.

I stamped the floral image from the Stampin’ Up! Honeybee Home cling stamp set in Basic Gray ink and colored it with Stampin’ Blends. I used Fresh Freesia on the flowers and the leaves with Light Shaded Spruce and Light Mossy Meadow – this gives me a color that is real close to Garden Green. I cut the flower out with the coordinating die and popped it on the card front with dimensionals.

I stamped the sentiment from the Many Messages cling stamp in Evening Evergreen and cut it out with the Stitched Rectangle die. I adhered it to the card front with dimensionals and finished the card with three brass butterflies and a white baker’s twine bow.

For the inside of the card, I stamped the sentiment from the Stampin’ Up! Honeybee Home stamp set in Evening Evergreen on a Basic White panel. I cut a Fresh Freesia panel with the floral die from the Honeybee Blooms dies and adhered it to the bottom of the panel with liquid glue. I adhered a strip of Heart & Home DSP to the bottom and adhered the panel to the inside of the card.

The Stampin’ Up! Honeybee Home bundle is part of the Heart & Home Suite with pretty florals and fresh Shabby Chic designs that are perfect for many occasions. The sentiments in the stamp set are beautiful and there are a variety of sweet floral dies that are great with a variety of card making artistic techniques.


Current Host Code: 2YHH339E

Use this host code when you order $50 or more and receive a free gift from me!  The free gift is your choice of any item valued up to $10.00 in the 2021-2022 Annual Catalog or the January – June 2022 Mini Catalog!

If your order is over $150, please do not use the host code since you’ll receive your own Host Dollars plus I’ll still send you the free gift!  This host code can be used by anyone, no club or commitment required. Let me know if you have any questions.


If you need any stamping supplies, I’d be very happy to be your Demonstrator.  Just click on the Shop Now button on the right side of the screen to go directly to my online store or contact me if you have any questions.  Happy Stamping!

Thanks for stopping by and have a great week!

Akiko

  • Visit my online store here
  • See the current Stampin’ Up! clearance rack specials here
  • Earn FREE Stampin’ Up! products through my Wildflower Frequent Shopper Program – my way of saying thank you to my online frequent shopper customers.
  • Have any questions? I’d be happy to help, click here to contact me.

Cardstock Cuts for this project:

  • Fresh Freesia – 4-1/4″ x 11″ card base scored at 5-1/2″, 2″ x 2″ (inside die cut flower)
  • Garden Green – 1-3/4″ x 3-3/4″ (front mat)
  • Basic White- two 3-3/4″ x 5″ panels (inside panel and front mat), 1-1/2″ x 4″ (die cut flower), 3/4″ x 2-1/2″ (label)
  • Heart & Home DSP – 3-5/8″ x 4-7/8″ (front background), 1/2″ x 3-3/4″ (inside trim)

Stampin’ Up! products used in this project:


Stampin’ Up! Hydrangea Haven for the Inkin’ Krew Blog Hop

Good morning! Welcome to the Inkin’ Krew Monthly Blog Hop! The theme for this month’s hop is “Celebrate Summer” and since I love flowers that bloom in the summer, I decided to use the beautiful Stampin’ Up! Hydrangea Haven bundle for my card today. You can find the supplies I used at the bottom of my post along with the sizes of cardstock used.

I cut out the large scalloped rectangle from the Scalloped Contours dies from Basic White and the second largest from Fresh Freesia. I adhered a panel of Fresh Freesia gingham from the Pansy Petals designer series paper to the Fresh Freesia scalloped die cut with liquid and then adhered them both to the Basic White die cut. I popped them onto the front of a Fresh Freesia card base.

I stamped the outline hydrangea from the Stampin’ Up! Hydrangea Haven stamp set in Basic Gray on a Basic White panel. I stamped the filler stem and leaves in Garden Green and the filler flower with Fresh Freesia. I cut out the flower with the coordinating die. I used the dark Fresh Freesia Stampin’ Blend to color the background to the flower, adding dimension and then I covered the flower with clear Wink of Stella for a touch of sparkle. I adhered the flower to the card front with dimensionals.

I stamped the sentiment from the Stampin’ Up! Hydrangea Haven stamp set in Basic Gray on a Fresh Freesia panel. I cut it out with the little tag die and looped white crinkle ribbon through the loop and tied a bow. I trimmed the ends of the bow and popped the tag on the card front with dimensionals. I finished the card front with 5 clear elegant gems.

For the inside of the card, I stamped the little outline flowers from the Stampin’ Up! Hydrangea Haven stamp set in Basic Gray around the two corners. I used the filler stamp to add Fresh Freesia and then added some depth with the dark Fresh Freesia Stampin’ Blend. I stamped the sweet sentiment in Basic Gray and trimmed the bottom with the gingham from Pansy Petals DSP. I adhered the panel to the inside of the card with Stampin’ Seal.

I’m so glad that the Stampin’ Up! Hydrangea Haven bundle was carried over in the 2021-2022 Annual Catalog with the 10% savings. It’s such a pretty set and doesn’t the flower look great in Fresh Freesia? There are so many colors of hydrangea in bloom these days and and it makes the landscape so pretty!

On With The Hop! Click on the Next Blog button to move forward to Amy Koender’s project or click the Previous Blog button to move back to see the project that Donna Leonard created.

If you get lost along the way, here are the participants for the hop:

  1. Tara Carpenter
  2. Jaimie Babarczy
  3. Mary Deatherage
  4. Karen Ksenzakovic
  5. Karen Finkle
  6. Terry Lynn Bright
  7. Jillian Good
  8. Donna Leonard
  9. Akiko Sudano <– You are here
  10. Amy Koenders


Current Host Code: ZQAFXXXK

Use this host code when you order $50 or more and receive a free gift from me!  The free gift is your choice of any item valued up to $10.00 in the 2021 – 2022 Annual Catalog!

If your order is over $150, please do not use the host code since you’ll receive your own Host Dollars plus I’ll still send you the free gift!  This host code can be used by anyone, no club or commitment required.  Let me know if you have any questions.


If you need any stamping supplies, I’d be very happy to be your Demonstrator.  Just click on the Shop Now button on the right side of the screen to go directly to my online store or contact me if you have any questions. 

Thanks for stopping by and Happy Stamping!

Akiko

  • Visit my online store here
  • See the current Stampin’ Up! clearance rack specials here
  • Earn FREE Stampin’ Up! products through my Wildflower Frequent Shopper Program – my way of saying thank you to my online frequent shopper customers.
  • Have any questions? I’d be happy to help, click here to contact me.

Cardstock Cuts for this project:

  • Fresh Freesia – 4-1/4″ x 11″ card base scored at 5-1/2″, 3-1/2″ x 5″ (scalloped rectangle), 1″ x 1-1/2″ (label)
  • Basic White – 4″ x5-1/4″ (inside panel), 4-1/4″ x 5-1/2″ (scalloped rectangle), 3-1/2″ x 4-1/2″ (hydrangea)
  • Pansy Petals DSP – 1/2″ x 4″ (inside trim), 2-11/16″ x 3-15-16″ (front background)

Stampin’ Up! products used in this project:

Product List

Stampin’ Up! Hello Dear Friend Card Kit

Good morning! One of the prettiest kits from the Jan-Jun 2021 Mini Catalog is the Stampin’ Up! Hello Dear Friend Card Kit. This card kit makes 12 cards – 3 each of 4 designs and is an all inclusive card kit. So it has everything you need to make the cards, including a stamp block! I finally made some of the cards in my kit and they are sooo pretty!!

I pretty much followed the instructions included in the Stampin’ Up! Hello Dear Friend card kit. The copper foil and vellum touches make these cards stand out. There are two A2 designs and two mini card designs with coordinating envelopes with printed liners. Here are close ups of the cards I made.

I love the watercolor florals in this kit!

The geometric copper foil vellum contrasts nicely with the soft flowers.

The envelopes for the mini cards have cute side flaps.

These are the stamps that are included in the Stampin’ Up! Hello Dear Friend card kit. I used the little flower and leaves to decorate the insides. Aren’t the sentiments wonderful!

Card kits are perfect for beginning stampers and for anyone needing to make a last minute card real quick. You can follow the instructions that come in the kit, or you can express your creativity and create alternative designs by combining the elements in the kits with favorite items from your stash. The Stampin’ Up! coordinating colors are listed with the instructions, so you know that it will be a perfect match!

Have you seen the new Kits Collection in the Stampin’ Up! Online Store? In addition to the monthly subscription kit, Paper Pumpkin, Stampin’ Up! now has a wide variety of all-inclusive kits that are only available while supplies last. New kits are added regularly and there are a range of styles and options – even kits without stamping! I have them pictured below and you can check them out here in my Online Store for the complete details!

Join me for a Facebook Live this afternoon!

I’ll be away tomorrow so I’m planning to go live on my Facebook Page at 1:00 ET today instead. I’ve missed so many videos with my recent vacation. I will be making a simple card with the fun Oh Snap stamp set! Look forward to seeing you then!


Connect, Craft & Collect $25 Ends Monday!!!

The Connect, Craft & Collect $25 promotion is underway! Through June 14, 2021, qualifying Stampin’ Up! orders and parties over $250 will receive an extra $25 in BONUS Stampin’ Rewards!

Here is the Host Dollars chart for the promotion:

Full details can be found on my Stampin’ Up! Promotions page. Let me know if you have any questions.

The Extra $25 Bonus ends on June 14!


January – June 2021 Mini Catalog Last Chance Products Sale Going on Now!

Last chance products from the January–June 2021 Mini Catalog are available while supplies last so shop early for the best selection! Many items will sell out fast, so don’t delay – head over to my Online Store to start shopping now! 

Click Here to download a PDF of the LAST CHANCE retiring items from the Jan-Jun 2021 Mini Catalog.

Click Here to down load an Excel file with the LAST CHANCE retiring items from the Jan-Jun 2021 Mini Catalog


Current Host Code: VZMG92YZ

Use this host code when you order $50 or more and receive a free gift from me!  The free gift is your choice of any item valued up to $10.00 in the 2021 – 2022 Annual Catalog or in the Jan-Jun 2021 Mini Catalog!

If your order is over $150, please do not use the host code since you’ll receive your own Host Dollars plus I’ll still send you the free gift!  This host code can be used by anyone, no club or commitment required.  Let me know if you have any questions.


If you need any stamping supplies, I’d be very happy to be your Demonstrator.  Just click on the Shop Now button on the right side of the screen to go directly to my online store or contact me if you have any questions. 

Thanks for stopping by and Happy Stamping!

Akiko

  • Visit my online store here
  • See the current Stampin’ Up! clearance rack specials here
  • Earn FREE Stampin’ Up! products through my Wildflower Frequent Shopper Program – my way of saying thank you to my online frequent shopper customers.
  • Have any questions? I’d be happy to help, click here to contact me.

Stampin’ Up! products used in this project:

Stampin’ Up! Kits Collection sets that are currently available:


Stampin’ Up! Birds & Branches for the Happy Inkin’ Thursday Blog Hop

Good Morning and welcome to the Happy Inkin’ Thursday Blog Hop! I used the pretty Stampin’ Up! Birds & Branches bundle to make a smile card for today’s Hop. You can find the supplies used to create this card at the bottom of my post along with the sizes of cardstock used.

We have a theme challenge this week and our theme is:

Seeing new birds flying in the backyard always makes me feel excited for Spring, and it’s always exciting to see a nest with eggs! So I started by embossing a Pool Party panel with the Subtle 3D embossing folder and adhering it to the front of a Pool Party card base. I cut a Basic White panel with the second largest scalloped rectangle die from the Stitched So Sweetly dies and lightly brushed it with Pool Party ink using my Blending Brush.

I stamped the bird from the Stampin’ Up! Birds & Branches photopolymer stamp set in Misty Moonlight ink and stamped the wing in Misty Moonlight on top. I colored the breast with the Light Pumpkin Pie Stampin’ Blend and used the color Lifter to blend the edge. I cut the bird out with the coordinating die. I stamped the eggs in Balmy Blue on Basic White and cut them out with the coordinating die. I stamped the nest in Sahara Sand ink on Sahara Sand card stock and cut it out with the coordinating die.

I cut the branch from Soft Suede card stock and cut the leaves from Old Olive. I placed the die on the Old Olive card stock to cut the leaves, avoiding the branches as much as possible and had to run it through the die cutting machine a couple of times to get all the leaves. Then I fussy cut the leaves to clean them up and adhered them to the branches. I cut the flowers from the Always dies and adhered them to the branch. I added a champagne rhinestone to each flower center.

I adhered the eggs and nest to the scalloped rectangle with liquid glue. Then popped the bird on the edge of the nest with dimensionals. I adhered the panel to the card front with liquid glue and adhered the branch on top with tiny dots of liquid glue. I stamped the sentiment from the Lovely You cling stamp set on Basic White and cut it out with the smallest scalloped rectangle from the Stitched So Sweetly dies. I folded a length of Pool Party ribbon and adhered it to the card and popped the label on top with dimensionals. I finished the label with another champagne rhinestone.

For the inside of the card, I stamped the branches from the Stampin’ Up! Birds & Branches stamp set in stamped off Soft Suede ink on a Basic White panel. I stamped the leaves in stamped off Old Olive and adhered the panel to the inside of the card.

The Stampin’ Up! Birds & Branches stamp bundle is so cute and so versatile! I hope this card reminds you of Spring and makes you smile!

On with the Hop! Click the Next button below to visit Karen Ksenzakovic’s blog.

And just in case you get lost along the way, here’s a list of the team members participating in the hop today:


Current Host Code: 9WJYHP76

Use this host code when you order $50 or more and receive a free gift from me!  The gift is your choice of any item valued up to $10.00 in the 2020-2021 Annual Catalog or in the 2021 January-June Mini Catalog!

If your order is over $150, please do not use the host code since you’ll receive your own Host Dollars plus I’ll still send you the free gift!  This host code can be used by anyone, no commitment required.  Let me know if you have any questions.


If you need any stamping supplies, I’d be very happy to be your Demonstrator.  Just click on the Shop Now Button on the right side of the screen to go directly to my online store or contact me if you have any questions.  Happy Stamping!

Thanks for visiting!

Akiko

  • Visit my online store here
  • See the current Stampin’ Up! clearance rack specials here
  • Earn FREE Stampin’ Up! products through my Wildflower Frequent Shopper Program – my way of saying thank you to my frequent shopper online customers.
  • Sign up for my weekly newsletter here
  • Have any questions? I’d be happy to help, click here to contact me.

Cardstock Cuts for this project:

  • Pool Party – 4-1/4″ x 11″ card base scored at 5-1/2″, 4-1/4″ x 5-1/2″ (embossed panel)
  • Sahara Sand – 2″ x 3-1/2″ (nest)
  • Blushing Bride – 1″ x 1-1/2″ (flowers)
  • Soft Suede – 2-1/4″ x 5″ (branch)
  • Old Olive – 1-1/2″ x 3″ (leaves)
  • Basic White – 4″ x 5-1/4″ (inside panel), 2-3/4″ x 4″ (scalloped rectangle die cut), 2-1/4″ x 4″ (bird, eggs, label die cuts)

Stampin’ Up! products used in this project:


Stampin’ Up! Hydrangea Haven Card

Good Morning! Today I have a sweet friendship note card made with the pretty Stampin’ Up! Hydrangea Haven stamp set and the beautiful Hydrangea Hill designer series paper. I also added a special touch – the Hydrangea Hill Mercury Glass acetate as a label mat! You can find the supplies used to create this card at the bottom of my post along with the sizes of cardstock used.

I embossed a Purple Posy panel with the Ornate Floral 3D embossing folder and adhered it to the front of a Purple Posy card base with liquid glue. I cut a panel of Hydrangea Hill designer series paper with the Stitched Rectangles Dies and adhered it to a Highland Heather mat before popping it on the card front with dimensionals.

I stamped the sweet sentiment from the Stampin’ Up! Hydrangea Haven photopolymer stamp set in Gorgeous Grape ink on a small Purple Posy panel and cut it out with the smallest Stitched Rectangles Die. I cut a panel of the Highland Heather Mercury Glass acetate with the next largest Stitched Rectangle die and adhered it to the back of the Purple Posy label with glue dots. Don’t forget to pull off the protective plastic!

I ran some Stampin’ Seal across the lower right corner of the Hydrangea Hill Die cut and folded a length of Gorgeous Grape ribbon across it. I adhered the layered label on top of the ribbon with dimensionals and finished the ribbon with a Highland Heather Pastel Pearl.

For the inside of the card, I adhered a strip of the Hydrangea Hill DSP to the bottom of a Basic White panel. I adhered the panel to a Highland Heather mat and then adhered it all to the inside of the card.

The Stampin’ Up! Hydrangea Haven bundle is just beautiful with the Hydrangea Hill DSP. And it goes with so many colors – purple, blue and pink!


Stampin’ Up! Sale A Bration is going on Now!

Sale A Bration is Stampin’ Up!’s biggest event of the year with three ways to earn FREE products – SHOP – HOST – JOIN!

SHOP

During Sale-A-Bration, for every $50 or $100 you spend, you can choose between two purchasing levels of free products! Depending on the amount you spend, you’ll be able to mix ‘n’ match the Sale-A-Bration items you earn and you can choose from stunning stamp sets and designer series papers. There are 8 free products available to pick from at the $50 level and 2 free products to pick from at the $100 level. Click on the Sale A Bration brochure to the right to see these products.

HOST

Stampin’ Up! is offering an exclusive host stamp set called Punch Party and you can get it for FREE with an order of $300 or greater placed during Sale-a-bration or by hosting a workshop with orders totaling $300 or greater during Sale-a-bration!  And this is on top of the normal Stampin’ Rewards you get when you host a workshop!

JOIN

There’s no better time to Join Stampin’ Up! than during Sale A Bration! And joining is easy! You purchase your Starter kit for $99 by choosing $125 in Stampin’ Up! products (and shipping is FREE). If you join during Sale A Bration, you get an additional five FREE full size packs of 6″ x 6″ Designer Series Paper from the upcoming 2021-2022 Annual Catalog with your Starter Kit (the current 6″ x 6″ designer series paper goes for $11.50 per pack!). 

See my Join My Team page for all the benefits starting with a minimum 20% discount!  Contact me if you have any questions.  Click here to purchase your Starter Kit.

Contact me if you need a copy of the new Jan-Jun Mini Catalog and Sale A Bration brochure, and I’ll be happy to send you one!


January Host Code: 4YZ2J366

Use this host code when you order $50 or more and receive a free gift from me!  The gift is your choice of any item valued up to $10.00 in the 2020-21 Annual Catalog or the Jan-Jun 2021 Mini Catalog.

If your order is over $150, please do not use the host code since you’ll receive your own Host Dollars plus I’ll still send you the free gift!  This host code can be used by anyone, no commitment required.  Let me know if you have any questions.


If you need any stamping supplies, I’d be very happy to be your Demonstrator.  Just click on the Shop Now Button on the right side of the screen to go directly to my Online store or contact me if you have any questions.  Happy Stamping!

Thanks for stopping by and have a great day!

Akiko

  • Visit my Online store here
  • See the current Stampin’ Up! clearance rack specials here
  • Earn FREE Stampin’ Up! products through my Wildflower Frequent Shopper Program – my way of saying thank you to my frequent shopper online customers.
  • Sign up for my monthly newsletter here
  • Have any questions? I’d be happy to help, click here to contact me.

Cardstock Cuts for this project:

  • Purple Posy – 4-1/4″ x 11″ card base scored at 5-1/2″, 4-1/4″ x 5-1/2″ (embossed front background), 1-1/4″ x 2-3/4″ (label)
  • Highland Heather – 3-1/8″ x 4-1/2″ (front DSP panel mat), 3-7/8″ x 5-1/8″ (inside panel mat)
  • Basic White – 3-3/4″ x 5″ (inside panel)
  • Hydrangea Hill Mercury Glass Acetate – 1-3/4″ x 3-1/4″ (label mat)
  • Hydrangea Hill DSP – 3-1/4″ x 4-5/8″ (front panel), 1/2″ x 3-3/4″ (inside trim)

Stampin’ Up! products used in this project:


Stampin’ Up! Daisy Lane Fall Card Video Tutorial

Good Morning! Today I’m sharing a fall card made with the Stampin’ Up! Daisy Lane stamp set accented with leaves from the Gathered Leaves Dies. You can find the supplies used to create this card at the bottom of my post along with the sizes of cardstock used.

Here is the Facebook Live video showing how I made the card:

I will post an edited version of how I made the card in my YouTube channel later this week so you can view a quickie version.

My card layout uses Freshly Made Sketches 457 – this is a good one, check it out.

Adhere a panel of Plaid Tidings 6″ x 6″ designer series paper to the front of an Early Espresso Card base (don’t forget that the Plaid Tidings DSP is on sale this month! 😊). Stamp the Birch cling background stamp in Early Espresso ink on a Bumblebee panel and emboss it with the Tasteful Textile 3D embossing folder. Adhere it to an Early Espresso mat and pop it on the card front with dimensionals.

Adhere a berry branch from the Forever Gold Laser cut specialty paper to the embossed panel. Cut the Gathered Leaves dies from Cajun Craze, Pumpkin Pie and Pear Pizzazz card stock. Adhere the leaves to the card front. Stamp three small daisies from the Stampin’ Up! Daisy Lane stamp set in Bumblebee ink on Bumblebee card stock. Sponge the centers with Cajun Craze ink and sponge Pumpkin Pie ink around the petals, leaving just the tips. Punch out the three petal clusters with the medium daisy punch. Gently bend the petals back on one cluster, back and forward on the second and all forward on the last cluster. Adhere the clusters together with liquid glue.

Cut the center from gold foil using the flower center die from the Poinsettias Dies and adhere it to the middle of the flower. Pop the flower on the card front with a dimensional. Adhere a gold trim bow under the flower. Stamp the sentiment from the Stampin’ Up! Daisy Lane stamp set in Early Espresso ink on a strip of Pumpkin Pie and trim the ends. Adhere it to a strip of early Espresso and pop it on the card front with dimensionals. Finish the card front with three Gilded Gems.

Stamp and emboss a strip of Bumblebee card stock to match the front panel and adhere it to the bottom of a Whisper White panel. Cut a small Gathered Leaves Die leaf from Pumpkin Pie and adhere it to the top corner of the card.

The Stampin’ Up! Daisy Lane stamp set and the coordinating punches are perfect for creating fall floral cards – just change up the colors to coordinate with your favorite fall designer series paper. This is perfect for birthdays and other occasions when a pumpkin just won’t do.


Stampin’ Up! Designer Series Paper Sale Going on Now!

Stampin’ Up! has beautiful Designer Series Paper and during the Month of October they’re putting a select list of those on sale with a 15% discount! This is a fantastic opportunity for you to stock up and save on paper. And the sale includes some of the designs from the August-December 2020 Mini Catalog too! Get the details on my Promotions Page or click on the image above to download a printable PDF with all the selections.  Click Here to shop the Designer Series Paper Sale in My Online Store now!


October 16-31 Host Code: 3VJWYCTP

Use this host code when you order $50 or more and receive a free gift from me!  The free gift is your choice of any item valued up to $10.00 in the 2019 – 2020 Annual Catalog or in the Aug-Dec 2020 Mini Catalog!  That includes some of the Host Exclusive stamp sets!

If your order is over $150, please do not use the host code since you’ll receive your own Host Dollars plus I’ll still send you the free gift!  This host code can be used by anyone, no club or commitment required.  Let me know if you have any questions.


If you need any stamping supplies, I’d be very happy to be your Demonstrator.  Just click on the Shop Now button on the right side of the screen to go directly to my online store or contact me if you have any questions.  Happy Stamping!

Thanks for stopping by and have a great week!

Akiko

  • Visit my online store here
  • See the current Stampin’ Up! clearance rack specials here
  • Earn FREE Stampin’ Up! products through my Wildflower Frequent Shopper Program – my way of saying thank you to my online frequent shopper customers.
  • Sign up for my weekly newsletter here
  • Have any questions? I’d be happy to help, click here to contact me.

Cardstock Cuts for this project:

  • Early Espresso – 4-1/4″ x 11″ card base scored at 5-1/2″, 3/8″ x 2-1/2″ (label mat), 2-5/8″ x 5-1/8″ (embossed panel mat)
  • Bumblebee – 2-1/2″ x 5″ (embossed front panel), 1/4″ x 4″ (embossed inside trim), 2″ x 6″ (stamped and punched daisy clusters)
  • Cajun Craze – 2″ x 2″ (large die cut leaf)
  • Pumpkin Pie – 2″ x 3-1/2″ (medium and small die cut leaves), 1/4″ x 3-1/2″ (label)
  • Pear Pizzazz – 1-1/2″ x 1-1/2″ (small die cut leaf)
  • Gold Foil – 1″ x 1″ (flower center)
  • Whisper White – 4″ x 5-1/4″ (inside panel), 3-7/8″ x 5-1/8″ (front mat), 3/4″ x 6″ (die cut sprigs), 1-1/2″ x 2-1/2″ (punched label)
  • Plaid Tidings DSP – 3-1/4″ x 4-1/4″ (front background)

Stampin’ Up! products used in this project: