Stampin’ Up! Flowing Flowers Thank You Card

Good Morning! The Stampin’ Up! Flowing Flowers cling stamp set is one of my favorites in the new January – June Mini Catalog. The stamps are Distinktive stamps, so you get various shades of ink color in one stamp. The medium flower has several elements – a flower, leaves and background spatter and I wanted to make each element a different color. So I used an old technique called ‘huffing’ to stamp the flower and I am happy with the result. You can find the supplies I used at the bottom of my post along with the sizes of cardstock used.

The huffing technique is where you use markers to ink the stamps and then breath heavily (or huff) on the stamp to re-moisten the ink before stamping. So I pulled out my 2021-2023 In Color Stampin’ Write markers and colored the stamp with the brush end of the markers. I colored the flower Polished Pink, the leaves Soft Succulent and the background spatter Pale Papaya. Then I huffed all over the stamp and stamped the flower on a Basic white panel. I also stamped the image on printer paper and fussy cut it out to make a mask and covered the stamped image with the mask before inking the stamp again and stamping the next flowers.

After stamping the medium flower from the Stampin’ Up! Flowing Flowers stamp set three times, I cleaned off the stamp and inked up the leaves with my Soft Succulent marker to add more leaves to the arrangement. I cleaned it up again and inked just the spatter with my Pale Papaya marker to fill in more spatter until I was happy with the arrangement.

I inked up the sentiment stamp from the Stampin’ Up! Flowing Flowers stamp set in Basic Gray and stamped it on the front panel. I embossed the panel with the Tasteful Textile 3D embossing folder to add texture and adhered the panel to a Polished Pink mat. I adhered the layered panel to the front of a Soft Succulent card base.

I cut a panel Soft Succulent Shimmer Vellum with the small detailed butterfly from the Brilliant Wings dies and adhered it to the card with a glue dot. I added a Soft Succulent In Color jewel to the butterfly and three Polished Pink jewels to each of the flowers.

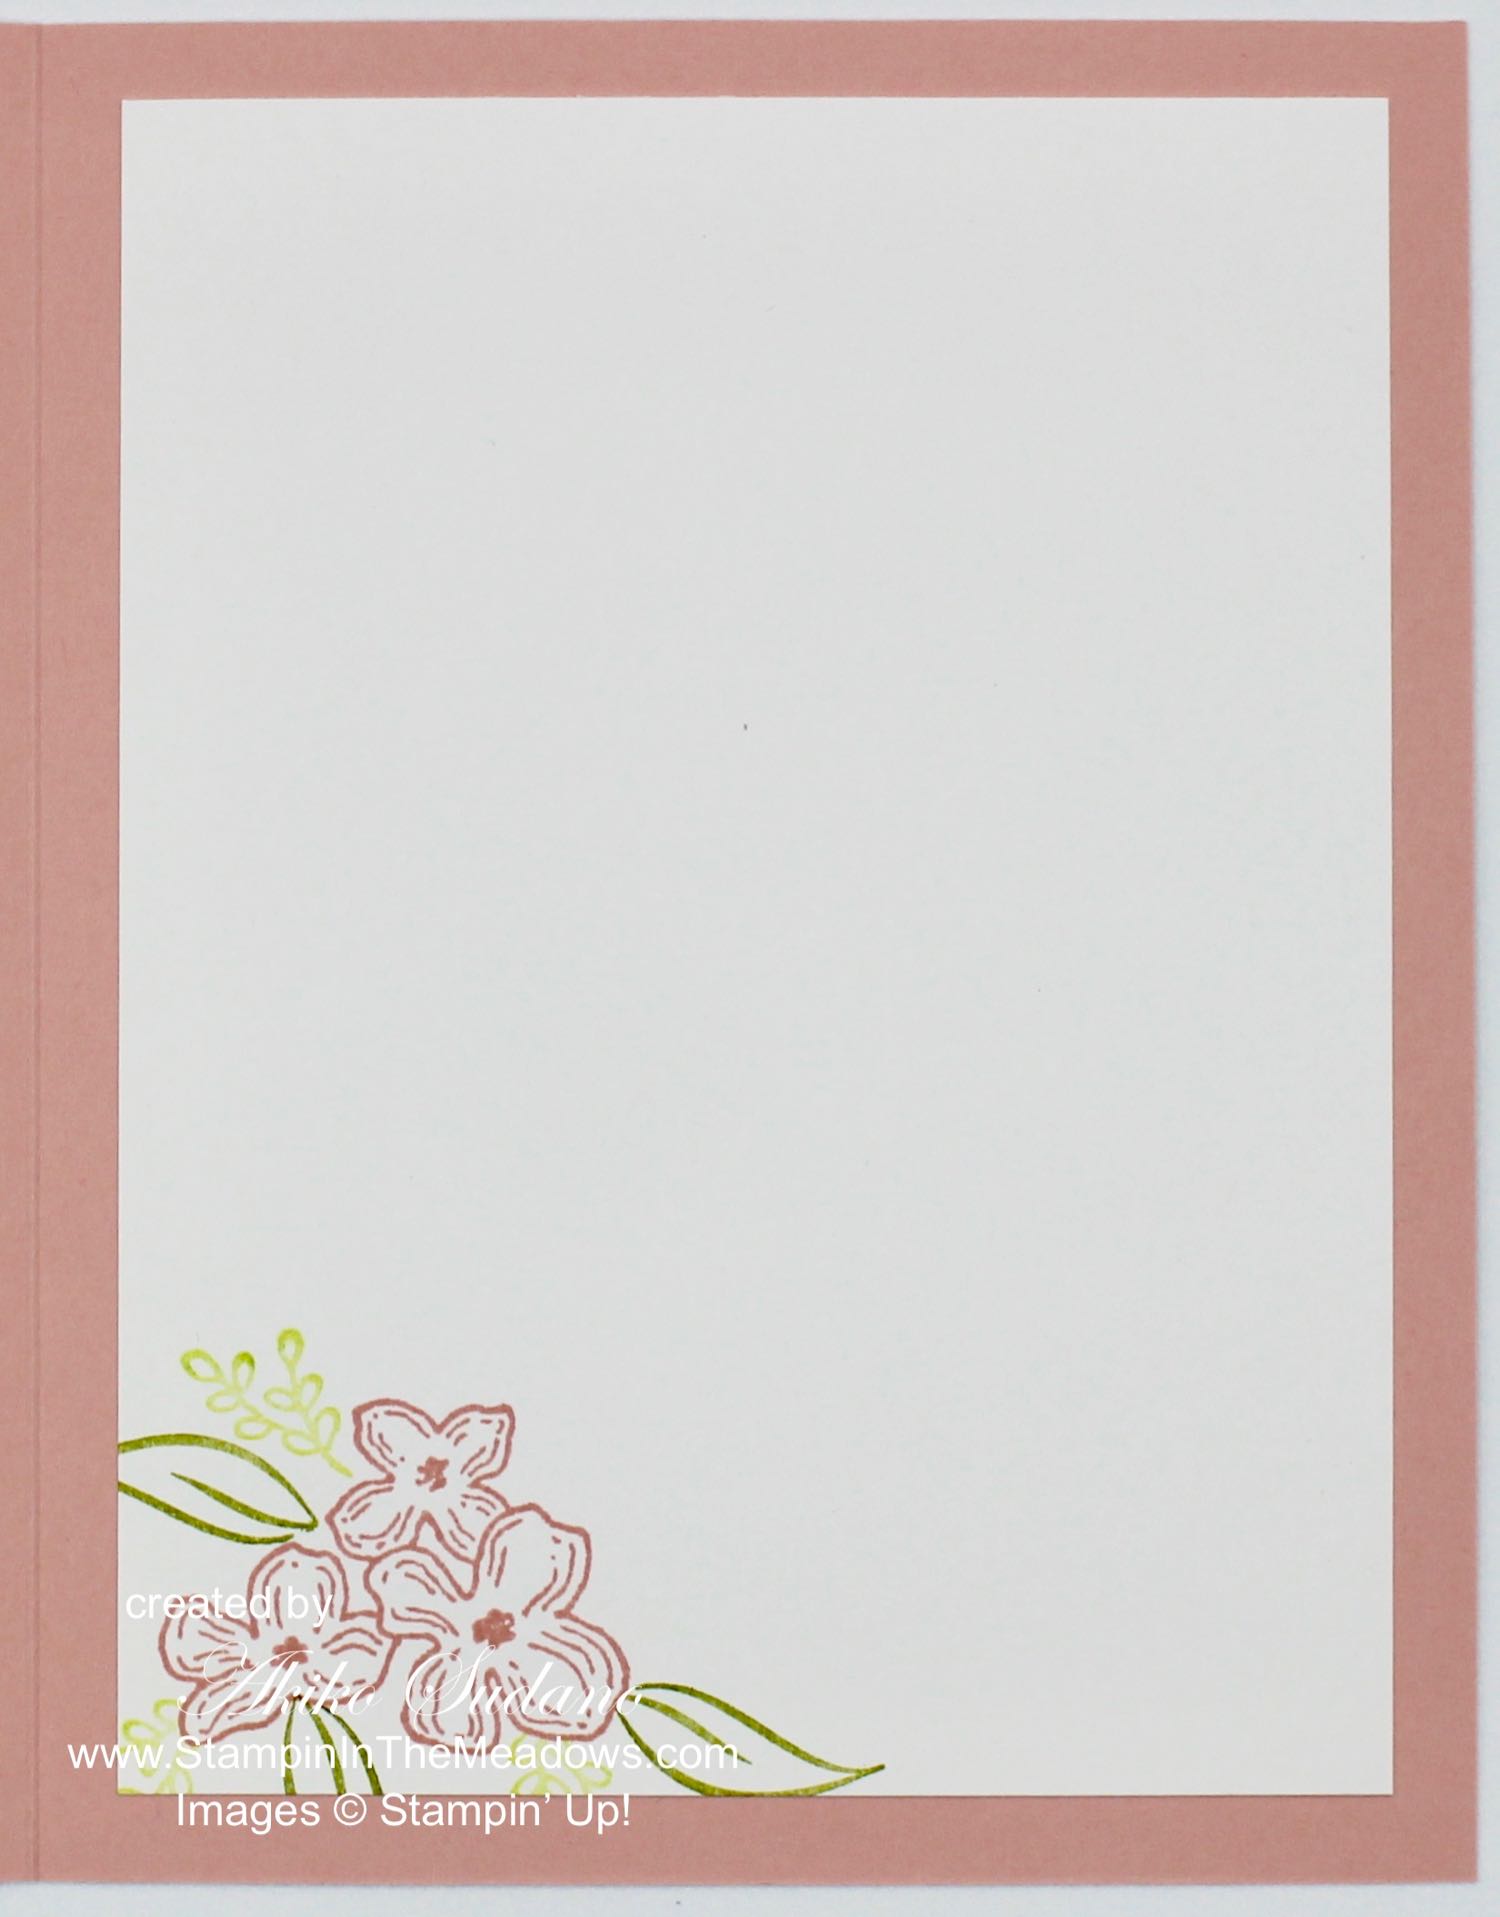
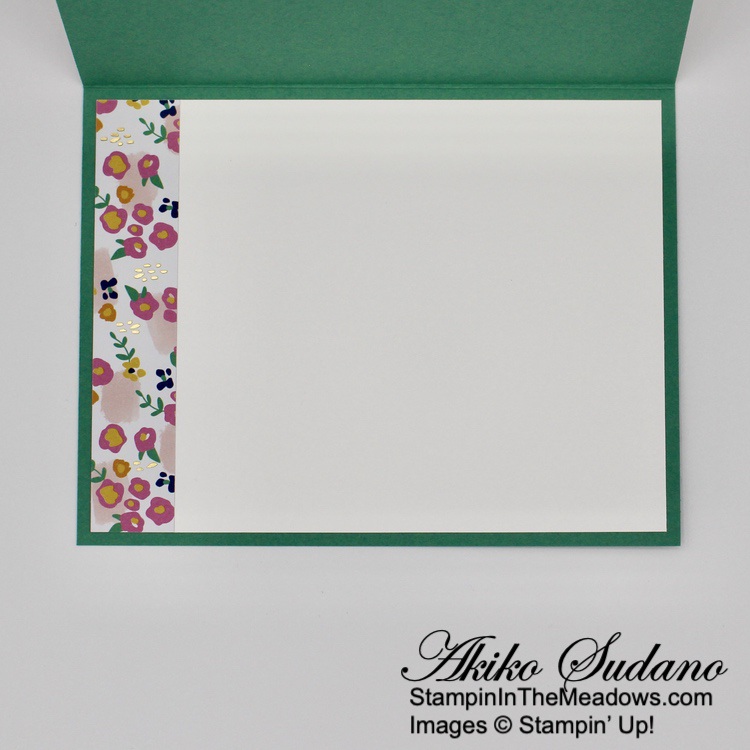
I inked up the medium flower stamp from the Stampin’ Up! Flowing Flowers stamp set with my Polished Pink, Soft succulent and Pale Papaya Stampin’ Write markers again. I huffed on the stamp and stamped the image in the bottom corner of a Basic White panel. I cleaned off the stamp and used my Pale Papaya marker and mask to add more spatter to the edges and then adhered the panel to the inside of my card.

I love the Stampin’ Up! Flowing Flowers stamp set and have seen several techniques for getting a multicolor image such as inking the stamp with sponge daubers, blending brushes, or using the Stamparatus and they all have pros and cons. And then I remembered huffing and found this the easiest to do for this layout. What I really like is the creativity of trying different techniques and having so many options!


Sale-A-Bration is Ending on Monday!

Sale-A-Bration is one of Stampin’ Up!’s biggest promotions of the year with fun for everyone!  There are fantastic Sale-A-Bration specials for Shopping, Hosting and Joining! See my Promotions Page for more details or contact me and I’ll be happy to tell you more! But hurry because these specials are only available through February 28, 2022 or while supplies last!


All Together Collection Available Through May 2, 2022

Loving hands and heartfelt words are the best way to show you care. With hand designs that illustrate coming together in friendship and solidarity, the All Together Collection will help you create cardmaking and paper crafting projects that reflect the people you know and love. And the All Together Collection includes early-release products from the 2022–2023 Annual Catalog—an exciting new range of natural Stampin’ Blends! Click on the picture below to download a PDF with all the details or click HERE to shop the collection in my Online Store.


Current Host Code: MPMDW6BG

Use this host code when you order $50 or more and receive a free gift from me!  The free gift is your choice of any item valued up to $10.00 in the 2021-2022 Annual Catalog or the January – June 2022 Mini Catalog!

If your order is over $150, please do not use the host code since you’ll receive your own Host Dollars plus I’ll still send you the free gift!  This host code can be used by anyone, no club or commitment required. Let me know if you have any questions.


If you need any stamping supplies, I’d be very happy to be your Demonstrator.  Just click on the Shop Now button on the right side of the screen to go directly to my online store or contact me if you have any questions.  Happy Stamping!

Thanks for stopping by and have a great week!

Akiko

  • Visit my online store here
  • See the current Stampin’ Up! clearance rack specials here
  • Earn FREE Stampin’ Up! products through my Wildflower Frequent Shopper Program – my way of saying thank you to my online frequent shopper customers.
  • Have any questions? I’d be happy to help, click here to contact me.

Cardstock Cuts for this project:

  • Soft Succulent – 4-1/4″ x 11″ card base scored at 5-1/2″
  • Polished Pink – 4″ x 5-1/4″
  • 2021-2023 In Color Shimmer Vellum – 1-1/2″ x 2″ (die cut butterfly)
  • Basic White – 4″ x 5-1/4″ (inside panel)

Stampin’ Up! products used in this project:


Stampin’ Up! In The Moment Sneak Peek II

Good Morning! I don’t know about you, but with Christmas just around the corner and so much left to do, I am totally stressed! Plus, I’m visiting my son and his family and they’ll be moving next month, so there’s even more that needs to be done! For these times, the new Stampin’ Up! In The Moment stamp set is perfect for reminders of calmer times. You can find the supplies I used at the bottom of my post along with the sizes of cardstock used.

I found a pretty panel of the new Abstract Beauty specialty designer series paper that will be available in the upcoming January-June 2022 Mini Catalog for the background and I wanted to use a different technique to color the relaxing image from the Stampin’ Up! In The Moment stamp set – coloring it with Watercolor Pencils! Here’s how I did that. I first stamped the image on Shimmery White paper using Jet Black Stazon Ink. I colored different sections of the image with the Water Color pencils – Night of Navy for the pants, Coastal Cabana for the blanket, Early Espresso and Cajun Craze for the puppy, Flirty Flamingo for the pillows and cup, Calypso Coral for the sox, Rich Razzleberry for the bed and Crushed Curry, Basic Gray for the book, Daffodil Delight & Cajun Craze for her hair.

After coloring, I used a blender pen to smooth and blend the color in each section. I wiped the excess color from the blender pen with a paper towel before starting the next section to keep the colors from bleeding. I adhered the panel to a Night of Navy mat when finished. I stamped the sentiment from the Enjoy the Moment stamp set on the side of a strip of Vellum using Night of navy ink and let it dry – Vellum takes a little longer to dry and you can use your heat tool to speed it up if needed. I adhered the Vellum to the back of the matted art panel after it dried.

I adhered the pretty Abstract Beauty specialty designer series paper to the front of a Just Jade card base with liquid glue and adhered a folded strip of Just Jade gingham ribbon to the front with glue dots where the sentiment would be. I adhered the layered art panel to the card front with dimensionals under the card stock and used a glue dot behind the sentiment.

For the inside of the card, I stamped the sentiment from the Stampin’ Up! In The Moment stamp set in Crumb Cake ink on the side of a Basic White panel. I trimmed the bottom with a strip of embossed Kraft paper and adhered the panel to the inside of the card with Stampin’ Seal. I finished the card front with a small Gilded Gem to pick up the gold foil accents in the pretty DSP.

I think the Stampin’ Up! In The Moment stamp set will definitely be a favorite. This pretty set and the beautiful Artistic Beauty specialty DSP will be available in the upcoming new January – June 2022 Mini Catalog when it goes live on January 4, 2022. Try using different coloring techniques for your images! It changes things up and keeps stamping fun!

Here’s a picture of the pretty stamp set and the DSP. A note about the Abstract Beauty specialty DSP – it is a new size!! It will come in a 4″ x 6″ size with 48 sheets of 12 different double sided designs, and one side will have touches of gold foil! And it’s so pretty!! Remember the date – January 4, 2022!


Last Chance Products Sale Going on Now!

The July–December 2021 Mini Catalog will be retiring soon and several products have already sold out! It’s always bittersweet to see a classic Stampin’ Up! catalog take a trip to retirement. But, we’re looking forward to all the new products on their way—and we hope you are, too!

Stock up on your favorite products before they’re gone for good! After all, this selection of Last Chance Products is only available through January 3, 2022 or while supplies last.

Click Here to download a PDF with the retiring products.

Click Here to download a PDF with the carry over list of products.

Click Here to Shop the Last Chance Products in my Online Store now!


January’s Paper Pumpkin Kit is Kisses & Hugs!

We all know that roses are red and violets are blue—it’s time that love-themed cards got an upgrade! The Kisses & Hugs Paper Pumpkin Kit will help you express that forever kind of love with heart-shaped cards that would make Cupid jealous.

The Kisses & Hugs kit is not bound to just Valentine’s Day, it works for all love occasions year-round like anniversaries, weddings, birthdays, or those “just because” days.

Details:

  • Contains enough supplies to create 10 cards and coordinating envelopes.
  • Perfect for all love occasions throughout the year like Valentine’s Day, anniversaries, weddings, honeymoons, birthdays, and more!
  • Includes an exclusive stamp set and a Gray Granite Classic Stampin’ Spot.
  • Create matching treats with the coordinating Kisses & Hugs Mini Treat Boxes (item 160147)

f you’re interested in subscribing to Paper Pumpkin, you can either sign up for a subscription where you are billed monthly for your kit or you can purchase a prepaid subscription in my Online Store. To see more information and to sign up for the monthly subscription click here. To see the options for prepaid subscriptions in my Online Store, click here.

Sign up deadline for the January 2022 kit is January 10, 2022. Supplies may be limited toward the end of the subscription period.


Current Host Code: H6UDQF6U

Use this host code when you order $50 or more and receive a free gift from me!  The free gift is your choice of any item valued up to $10.00 in the 2021-2022 Annual Catalog or the July – December 2021 Mini Catalog!

If your order is over $150, please do not use the host code since you’ll receive your own Host Dollars plus I’ll still send you the free gift!  This host code can be used by anyone, no club or commitment required. Let me know if you have any questions.


If you need any stamping supplies, I’d be very happy to be your Demonstrator.  Just click on the Shop Now button on the right side of the screen to go directly to my online store or contact me if you have any questions.  Happy Stamping!

Thanks for stopping by and have a great week!

Akiko

  • Visit my online store here
  • See the current Stampin’ Up! clearance rack specials here
  • Earn FREE Stampin’ Up! products through my Wildflower Frequent Shopper Program – my way of saying thank you to my online frequent shopper customers.
  • Have any questions? I’d be happy to help, click here to contact me.

Cardstock Cuts for this project:

  • Just Jade – 5-1/2″ x 8-1/2″ card base scored at 4-1/4″
  • Shimmery White – 2-7/8″ x 2-7/8″ (art panel)
  • Night of Navy – 3″ x 3″ (art panel mat)
  • Vellum – 1-1/2″ x 4-1/4″ (label)
  • Basic White – 4″ x 5-1/4″ (inside panel)
  • Abstract Beauty 4″ x 6″ specialty DSP – 4″ x 5-1/4″ (front background), 3/4″ x 4″ (inside trim)

Stampin’ Up! products used in this project:


Stampin’ Up! Hand Penned Petals Congratulations Card

Good Morning! The purpose of today’s card is to highlight the the beautiful Hand Penned designer series paper. And of course I used the pretty Stampin’ Up! Hand Penned Petals bundle for this feminine congratulations card. You can find the supplies I used at the bottom of my post along with the sizes of cardstock used.

I adhered a panel of the pretty Hand Penned designer series paper to the front of a Pool Party card base. I cut a Blushing Bride panel with the second largest scalloped rectangle from the Stitched So Sweetly dies. I cut the floral die cut from the Penned Flowers dies in the Stampin’ Up! Hand Penned Petals bundle from Basic white and adhered it to the Blushing Bride scalloped rectangle with tiny dots of liquid glue.

I wrapped the scalloped rectangle die cut with a length of silver and Misty Moonlight twine and made a bow and then popped it onto the card front with dimensionals. I stamped the sentiment from the Stampin’ Up! Hand Penned Petals photopolymer stamp set in Misty Moonlight ink on Blushing Bride and cut it out with the smallest scalloped rectangle from the Stitched So Sweetly dies.

I adhered the label to the card front using glue dots and dimensionals. I finished the card front with three Soft Succulent jewels.


For the inside of the card, I stamped the flower from the Stampin’ Up! Hand Penned Petals stamp set in stamped off Blushing Bride ink on a Basic White panel. I stamped the sentiment in Misty Moonlight ink over the flowers. I adhered the panel to the inside of the card.

The Stampin’ Up! Hand Penned Petals bundle is so beautiful and the Hand Penned designer series paper has many of the same images. It’s my current favorite and it’s going on sale tomorrow!


Today is the Last Day for the January – June 2021 Mini Catalog Last Chance Products Sale!

Many favorites have already sold out on the Last Chance sale, but some pretty items are still available. So don’t delay – head over to my Online Store to start shopping now! 


Stampin’ Up! Designer Series Paper Sale Starts Tomorrow!

We all love gorgeous Designer Series Paper, and during this incredible sale, you can enjoy a 15% discount on select papers from the 2021–2022 Annual Catalog! Now is a great time to stock up and save on some of Stampin’ Up!’s most beautiful paper designs! Get all the details on my Promotions Page or click on the image below for a printable PDF Flyer:


Current Host Code: ZQAFXXXK

Use this host code when you order $50 or more and receive a free gift from me!  The free gift is your choice of any item valued up to $10.00 in the 2021 – 2022 Annual Catalog!

If your order is over $150, please do not use the host code since you’ll receive your own Host Dollars plus I’ll still send you the free gift!  This host code can be used by anyone, no club or commitment required. Let me know if you have any questions.


If you need any stamping supplies, I’d be very happy to be your Demonstrator.  Just click on the Shop Now button on the right side of the screen to go directly to my online store or contact me if you have any questions. 

Thanks for stopping by and Happy Stamping!

Akiko

  • Visit my online store here
  • See the current Stampin’ Up! clearance rack specials here
  • Earn FREE Stampin’ Up! products through my Wildflower Frequent Shopper Program – my way of saying thank you to my online frequent shopper customers.
  • Have any questions? I’d be happy to help, click here to contact me.

Cardstock Cuts for this project:

  • Pool Party – 4-1/4″ x 11″ card base scored at 5-1/2″
  • Blushing Bride2-3/4″ x 4″ (scalloped rectangle), 1″ x 2″ (label)
  • Basic White – 3-3/4″ x 5″ panel (inside panel), 2-1/4″ x 3-1/4″ (floral die cut)
  • Hand Penned DSP – 3-1/2″ x 4-3/4″

Stampin’ Up! products used in this project:


Stampin’ Up! Hello Dear Friend Card Kit

Good morning! One of the prettiest kits from the Jan-Jun 2021 Mini Catalog is the Stampin’ Up! Hello Dear Friend Card Kit. This card kit makes 12 cards – 3 each of 4 designs and is an all inclusive card kit. So it has everything you need to make the cards, including a stamp block! I finally made some of the cards in my kit and they are sooo pretty!!

I pretty much followed the instructions included in the Stampin’ Up! Hello Dear Friend card kit. The copper foil and vellum touches make these cards stand out. There are two A2 designs and two mini card designs with coordinating envelopes with printed liners. Here are close ups of the cards I made.

I love the watercolor florals in this kit!

The geometric copper foil vellum contrasts nicely with the soft flowers.

The envelopes for the mini cards have cute side flaps.

These are the stamps that are included in the Stampin’ Up! Hello Dear Friend card kit. I used the little flower and leaves to decorate the insides. Aren’t the sentiments wonderful!

Card kits are perfect for beginning stampers and for anyone needing to make a last minute card real quick. You can follow the instructions that come in the kit, or you can express your creativity and create alternative designs by combining the elements in the kits with favorite items from your stash. The Stampin’ Up! coordinating colors are listed with the instructions, so you know that it will be a perfect match!

Have you seen the new Kits Collection in the Stampin’ Up! Online Store? In addition to the monthly subscription kit, Paper Pumpkin, Stampin’ Up! now has a wide variety of all-inclusive kits that are only available while supplies last. New kits are added regularly and there are a range of styles and options – even kits without stamping! I have them pictured below and you can check them out here in my Online Store for the complete details!

Join me for a Facebook Live this afternoon!

I’ll be away tomorrow so I’m planning to go live on my Facebook Page at 1:00 ET today instead. I’ve missed so many videos with my recent vacation. I will be making a simple card with the fun Oh Snap stamp set! Look forward to seeing you then!


Connect, Craft & Collect $25 Ends Monday!!!

The Connect, Craft & Collect $25 promotion is underway! Through June 14, 2021, qualifying Stampin’ Up! orders and parties over $250 will receive an extra $25 in BONUS Stampin’ Rewards!

Here is the Host Dollars chart for the promotion:

Full details can be found on my Stampin’ Up! Promotions page. Let me know if you have any questions.

The Extra $25 Bonus ends on June 14!


January – June 2021 Mini Catalog Last Chance Products Sale Going on Now!

Last chance products from the January–June 2021 Mini Catalog are available while supplies last so shop early for the best selection! Many items will sell out fast, so don’t delay – head over to my Online Store to start shopping now! 

Click Here to download a PDF of the LAST CHANCE retiring items from the Jan-Jun 2021 Mini Catalog.

Click Here to down load an Excel file with the LAST CHANCE retiring items from the Jan-Jun 2021 Mini Catalog


Current Host Code: VZMG92YZ

Use this host code when you order $50 or more and receive a free gift from me!  The free gift is your choice of any item valued up to $10.00 in the 2021 – 2022 Annual Catalog or in the Jan-Jun 2021 Mini Catalog!

If your order is over $150, please do not use the host code since you’ll receive your own Host Dollars plus I’ll still send you the free gift!  This host code can be used by anyone, no club or commitment required.  Let me know if you have any questions.


If you need any stamping supplies, I’d be very happy to be your Demonstrator.  Just click on the Shop Now button on the right side of the screen to go directly to my online store or contact me if you have any questions. 

Thanks for stopping by and Happy Stamping!

Akiko

  • Visit my online store here
  • See the current Stampin’ Up! clearance rack specials here
  • Earn FREE Stampin’ Up! products through my Wildflower Frequent Shopper Program – my way of saying thank you to my online frequent shopper customers.
  • Have any questions? I’d be happy to help, click here to contact me.

Stampin’ Up! products used in this project:

Stampin’ Up! Kits Collection sets that are currently available:


Stampin’ Up! Wrapped Bouquet for the Happy Inkin’ Thursday Blog Hop

Good Morning and welcome to the Happy Inkin’ Thursday Blog Hop! How are you loving the new Stampin’ Up! 2021-2022 Annual Catalog? Today’s card is made with the Stampin’ Up! Wrapped Bouquet bundle from the Jan-Jun Mini Catalog, but it does use all the new 2021-2023 In Colors! And it celebrates Mother’s Day because you have to give flowers for Mother’s Day! You can find the supplies used to create this card at the bottom of my post along with the sizes of cardstock used.

We have a color challenge this week that uses the new 2021 – 2023 In Colors – How Fun!

My card is also inspired by the current challenge at The Card Concept #154 – Happy Mother’s Day. It is a Clean and Layered card that reminds me of the beautiful bouquet in their Inspiration Picture:

I embossed a panel of Pale Papaya with the Ornate Floral 3D embossing folder and adhered it to the front of a Pale Papaya card base. I cut a panel of the Hand-Penned designer series paper with the largest circle from the Circle Layering dies and cut the largest scalloped circle from Soft Succulent card stock. I adhered these together and adhered them to the card front, leaving the lower left corner free to tuck the label under later.

I stamped the bouquet from the Stampin’ Up! Wrapped Bouquet cling stamp set in Evening Evergreen on a Basic White panel and colored the flowers with the Polished Pink, Pale Papaya and Fresh Freesia Stampin’ Blends. I cut it out with the coordinating die. I also cut the newspaper from Sahara Sand and stamped the newsprint stamp in Memento Tuxedo Black ink on both sides. I folded it along the score lines and secured it on the inside with glue dots. I tucked the flowers inside and adhered them with glue dots. I cut the leaves from Evening Evergreen card stock – one set of broad leaves, one set of long leaves and two of the small curled ferns. I arranged the leaves and flowers on the circle and adhered the leaves with glue dots and the flowers with dimensionals.

I stamped the sentiment from the Stampin’ Up! Wrapped Bouquet stamp set in Evening Evergreen ink on a Fresh Freesia panel and cut it out with the die from the Stitched So Sweetly dies. I adhered it to the card front with glue dots, tucking it under the layered circle. I added three 2021-2023 In Color jewels in Polished Pink and used the Pale Papaya jewels in the flower centers. I finished it off with the Pale Papaya bow.

For the inside of the card, I stamped the bouquet form the Stampin’ Up! Wrapped Bouquet stamp set in Evening Evergreen ink along the border of a Basic White panel. I stamped the sentiment in Evening Evergreen as well and colored the flowers with the Polished Pink, Pale Papaya and Fresh Freesia Stampin’ Blends like the bouquet on the card front. I adhered the panel to the inside of the card.

The Stampin’ Up! Wrapped Bouquet is a wonderfully different bundle and I’m really impressed at how easily it goes together with beautiful results. This is a bouquet that will impress any Mother for Mother’s Day!

On with the Hop! Click the Next button below to visit Karen Ksenzakovic’s blog.

And just in case you get lost along the way, here’s a list of the team members participating in the hop today:


Current Host Code: YGDSB9H4

Use this host code when you order $50 or more and receive a free gift from me!  The gift is your choice of any item valued up to $10.00 in the 2021-2022 Annual Catalog or in the 2021 January-June Mini Catalog!

If your order is over $150, please do not use the host code since you’ll receive your own Host Dollars plus I’ll still send you the free gift!  This host code can be used by anyone, no commitment required.  Let me know if you have any questions.


If you need any stamping supplies, I’d be very happy to be your Demonstrator.  Just click on the Shop Now Button on the right side of the screen to go directly to my online store or contact me if you have any questions.  Happy Stamping!

Thanks for visiting!

Akiko

  • Visit my online store here
  • See the current Stampin’ Up! clearance rack specials here
  • Earn FREE Stampin’ Up! products through my Wildflower Frequent Shopper Program – my way of saying thank you to my frequent shopper online customers.
  • Have any questions? I’d be happy to help, click here to contact me.

Cardstock Cuts for this project:

  • Pale Papaya – 4-1/4″ x 11″ card base scored at 5-1/2″, 4-1/4″ x 5-1/2″ (embossed background)
  • Fresh Freesia – 1-3/4″ x 2-1/2″ (label)
  • Soft Succulent – 3-1/2″ x 3-1/2″ (scalloped circle die cut)
  • Sahara Sand – 2-1/2″ x 2-1/2″ (newspaper wrapping)
  • Evening Evergreen – 2″ x 6″ (die cut leaves)
  • Basic White – 4″ x 5-1/4″ (inside panel), 2-3/4″ x 3″ (flowers)
  • Hand-Penned DSP – 3-1/4″ x 4-3/4″ (die cut circle)

Stampin’ Up! products used in this project:


Stampin’ Up! Prized Peony Birthday Card for the Inkin’ Krew Blog Hop

Good Morning! Welcome to another Inkin’ Krew Monthly Blog Hop! The theme for this month’s hop is For The Ladies/Girls and I made a flowery Petal Pink Birthday Card with the Stampin’ Up! Prized Peony bundle. I also used the Parisian Flourish embossing folder and Ornate Layers die for extra feminine frills! You can find the supplies used to create this card at the bottom of my post along with the sizes of cardstock used.

I embossed a Basic White panel with the Parisian Flourish 3D embossing folder and adhered it to the front of a Petal Pink card base. I used the fancy large Ornate Layers die to cut a panel of Petal Pink background paper from the Peony Garden designer series paper and adhered it to the card on the embossed panel.

I stamped the sentiment from the Best Year cling stamp set in Versamark Ink on a Vellum strip and sprinkled it with silver embossing powder. I heated the sentiment with my heat tool until it was shiny and wrapped the vellum strip around a floral Peony Garden panel, securing it in the back with liquid glue. I adhered the panel to the die cut panel on the card front.

I cut two sets of peony flowers using the Peony dies from the Stampin’ Up! Prized Peonies bundle from Basic White. I also cut four Basic White flower centers and colored them with the light Daffodil Delight Stampin’ Blends. I used a blending brush to apply Petal Pink ink to the flower die cuts, coloring the smallest pieces the darkest and the bottoms of the outer petals the darkest too. I inserted two flower centers in each of the smallest die cut flowers, securing them with liquid glue. I inserted each flower into the slot of the next largest flower, securing them with liquid glue until I had two assembled peonies.

I die cut one of each of the leaves die cuts, using Mossy Meadow for the solid leaves and Old Olive for the details. I assembled the leaves, adhering them with liquid glue and adhered them to the card with glue dots. I positioned the peonies and adhered the top one to the card with glue dots and the bottom one with dimensionals and glue dots where it overlapped the top peony. I finished the card front with rhinestones.

For the inside of the card, I stamped the peony from the Stampin’ Up! Prized Peony cling stamp set in stamped off Petal Pink ink on a Basic White panel. I stamped the sentiment from the Best Year stamp set in Smoky Slate ink and trimmed the bottom with a strip of Peony Garden DSP. I adhered the panel to the inside of the card. I also stamped the bottom left corner of a Basic White envelope with the peony in full strength Petal Pink.

The Peonies in my garden are sprouting up and I can’t wait to see them bloom! And I’m glad that the Stampin’ Up Prized Peonies are returning in the new 2021 – 2022 Annual Catalog so they can be enjoyed for longer.

On With The Hop! Click on the Next Blog button to move forward to Terry Lynn Bright’s project or click the Previous Blog button to move back to see the project that Karen Ksenzakovic created.

If you get lost along the way, here are the participants for the hop:


Current Host Code: ARFDXWP4

Use this host code when you order $50 or more and receive a free gift from me!  The gift is your choice of any item valued up to $10.00 in the 2020-21 Annual Catalog or the Jan-Jun 2021 Mini Catalog.

If your order is over $150, please do not use the host code since you’ll receive your own Host Dollars plus I’ll still send you the free gift!  This host code can be used by anyone, no commitment required.  Let me know if you have any questions.


If you need any stamping supplies, I’d be very happy to be your Demonstrator.  Just click on the Order Stampin’ Up! Online Now button on the right side of the screen to go directly to my online store or contact me if you have any questions.  Happy Stamping!

Thanks for visiting!

Akiko

  • Visit my online store here
  • See the current Stampin’ Up! clearance rack specials here
  • Earn FREE Stampin’ Up! products through my Wildflower Frequent Shopper Program – my way of saying thank you to my frequent shopper online customers.
  • Have any questions? I’d be happy to help, click here to contact me.

Cardstock Cuts for this project:

  • Petal Pink – 4-1/4″ x 11″ card base scored at 5-1/2″
  • Mossy Meadow – 1″ x 4-1/2″ (die cut leaves)
  • Old Olive – 1″ x 4-1/2″ (die cut leaves)
  • Vellum – 3/4″ x 2-3/4″ (label)
  • Basic White – two 4″ x 5-1/4″ (embossed front background and inside panel), 5″ x 8-1/2″ (die cut flowers)
  • Peony Garden DSP – 3-1/2″ x 5″ (fancy frame), 2-1/4″ x 3-5/8″ (floral panel), 1/2″ x 4″ (inside trim)

Stampin’ Up! products used in this project:


Stampin’ Up! Hippo Happiness for the Happy Inkin’ Thursday Blog Hop

Good Morning! Welcome to the Happy Inkin’ Thursday Blog Hop! I am sharing a whimsical, sparkly unicorn card made with the cute Stampin’ Up! Hippo Happiness bundle. You can find the supplies used to create this card at the bottom of my post along with the sizes of cardstock used.

We have a sketch challenge this week, and here is the sketch we are using:

I used the damask decorative mask to apply shimmery white embossing paste on a panel of Artistry Blooms designer series paper and let it dry. I adhered the embossed panel to a Gorgeous Grape mat and popped it to the front of a Purple Posy card base. I adhered another panel of striped Artistry Blooms DSP to another Gorgeous Grape mat and adhered it to the embossed panel with liquid glue.

I stamped the little unicorn from the Stampin’ Up! Hippo Happiness photopolymer stamp set in Melon Mambo ink on a panel of Whisper White. This is a three step stamping process. I started by stamping the body without the tail full strength and then stamping the second stamp with the mane and tail after stamping off. This way it’s lighter and you can line it up easier. The third step is the eyes, nose and mouth stamp which was done in Memento Tuxedo black ink. I cut it out with the coordinating die from the Hippo and Friends Dies and colored it with the Wink of Stella Glitter brush so that it would sparkle. I cut out a horn from silver foil and adhered it to the unicorn.

I stamped three balloons in Magenta Madness, Bumblebee and Highland Heather and cut them out with the coordinating die. I cut the large octagon die from Purple Posy card stock. I stamped the sentiment from the Stampin’ Up! Hippo Happiness stamp set in Gorgeous Grape ink, the fairy dust stars in Highland Heather ink and the balloon strings in Gorgeous Grape ink. I popped the unicorn and balloons on the panel with dimensionals and popped the panel on the card front with more dimensionals.

I finished it off with three Rich Razzleberry sequins and a die cut Gorgeous Grape squiggle.

I stamped more fairy dust stars on a Whisper White panel for the inside of the card and trimmed the bottom with strip of shimmery embossed DSP. I adhered the panel to a Gorgeous Grape mat and then to the inside of the card.

I just love this little unicorn with her shiny horn and carefree smile!

On with the Hop! Click the Next button below to visit Karen Ksenzakovic’s blog.

And just in case you get lost along the way, here’s a list of the team members participating in the hop today:


August 16 – 31 Host Code: TV9N9BHQ

Use this host code when you order $50 or more and receive a free gift from me!  The gift is your choice of any item valued up to $10.00 in the 2019-20 Annual Catalog or in the 2020 January-June Mini Catalog!  That includes some of the Host Exclusive stamp sets!

If your order is over $150, please do not use the host code since you’ll receive your own Host Dollars plus I’ll still send you the free gift!  This host code can be used by anyone, no commitment required.  Let me know if you have any questions.


If you need any stamping supplies, I’d be very happy to be your Demonstrator.  Just click on the Shop Now Button on the right side of the screen to go directly to my online store or contact me if you have any questions.  Happy Stamping!

Thanks for visiting!

Akiko

  • Visit my online store here
  • See the current Stampin’ Up! clearance rack specials here
  • Earn FREE Stampin’ Up! products through my Wildflower Frequent Shopper Program – my way of saying thank you to my frequent shopper online customers.
  • Sign up for my weekly newsletter here
  • Have any questions? I’d be happy to help, click here to contact me.

Cardstock Cuts for this project:

  • Purple Posy – 4-1/4″ x 11″ card base scored at 5-1/2″, 2-3/4″ x 3-3/4″ (octagon die cut)
  • Gorgeous Grape – (2) 4″ x 5-1/4″ (front and inside mats), 2-7/8″ x 3-9/16″ (DSP mat), 1/2″ x 3″ (squiggle die cut)
  • Silver Foil – 1/2″ x 1/2″ (unicorn horn)
  • Whisper White – 3-7/8″ x 5-1/8″ (inside panel), 2-1/2″ x 3″ (unicorn and balloon die cuts)
  • Artistry Blooms DSP – 3-7/8″ x 5-1/8″ (front background), 1/2″ x 5-1/8″ (inside trim), 2-3/4″ x 3-1/2″ (front striped panel)

Stampin’ Up! products used in this project:


Stampin’ Up! Abstract Impressions Birthday Card

Good Morning! Today I am participating in another Amy’s Inkin’ Krew Team Blog Hop! The theme for this month’s Blog Hop is Birthday and I can’t wait to see everyone’s Stampin’ Up! Birthday projects.

I am sharing a feminine grunge/vintage birthday card using the Stampin’ Up! Abstract Impressions stamp set . I love this set and the colorful DSP that came out with it in last year’s Annual Catalog, so it was a challenge to come up with another color scheme and vintage look for this stamp set. So here’s my card.

My card’s layout was inspired by the Try Stampin’ On Tuesday Challenge 411 where the optional theme of grunge/vintage made me look at this stamp set in a new light.

I decided to give it a try because there are so many beautiful vintage themes and inspiration in the new 2019-2020 Annual Catalog. I decided that I needed to use the beautiful new Stitched Lace Die as the background and of course I needed to have Blushing Bride cardstock peeking through the lace. I also used some Sahara Sand ink and sponged the edge of the lace to add a little grungy age to the lace.

Continuing with the Blushing Bride color theme, I used the Stampin’ Up! Abstract Impression roses and leaves stamps to create a DSP with the look of vintage roses. The roses have three stamps that layer on top of each other and I took the thickest one and randomly stamped the flower on a strip of whisper white. I stamped off each time to get a lighter base. I took the second stamp and stamped over the first images, again stamping off each time. Finally I took the third stamp with the thinnest lines and stamped full strength on each flower. Then I did the same thing with the leaves, first using the thickest image and stamping off with Old Olive ink, followed by the thinner lined image. I finished off the panel by lightly sponging with Sahara Sand all over.

I cut a square frame using the two largest Stitched Shapes square framelits. Then I stamped the flower picture using the Stampin’ Up! Abstract Impressions posy flowers and stems. I stamped the stems in Old Olive after stamping off once and stamped the flowers using the new In Color Seaside Spray, again stamping off once. The seaside spray goes really well with the blushing bride to give the old fashioned shabby pink and blue look. I finally stamped the ‘Happy Birthday’ greeting from the Stampin’ Up! Piece of Cake stamp set in Sahara Sand ink, and again lightly sponged the image with Sahara Sand before gluing it to the frame with multipurpose liquid glue.

To assemble the card front, I glued the lacy background to Blushing Bride and attached it to a Crumb Cake card base with dimensionals. I added a bit of the newly retired very vanilla lace ribbon to the bottom of the stamped vintage rose panel and adhered it to the lacy background with snail. I trimmed a little piece of the stamped vintage rose panel to make a fishtail banner and added some more lace and the pink cord from the Hugs from Shelley Paper Pumpkin kit to make a little tassel to hang from the bottom of the picture frame. I attached this to the lacy background with dimensionals and trimmed the flowers with faux pearls.

On the inside of the card, I added another strip of the vintage rose panel and sponged the edges of a Whisper White panel with Sahara Sand. I attached this to a Blushing Bride mat and finally to the card base with snail adhesive.

I was pleased with how old fashioned this card looked, and I think it came out pretty too! I’m glad to have found a new look for this versatile stamp set!

Thanks for stopping by and enjoy everyone’s wonderful projects on the blog hop!

Akiko


Thanks again for visiting! Click on the Next Blog button to move forward to see Amy Koenders’ project or click the Previous Blog button to move back to see the project that Sue Prather created.

If you get lost along the way, here are the participants for the hop:


June 1 – 15 Host Code: FK7YAMPQ

Use this host code when you order and receive a free gift from me!  If your order is over $150, please do not use this code, but you’ll still get the free gift.  The free gift is your choice of any item valued up to $10.00 in the 2018-19 Annual Catalog or in the 2019 Occasions Catalog!  That includes some of the Host Exclusive stamp sets!


If you need any stamping supplies, I’d be very happy to be your Demonstrator.  Just click on the Shop Now button on the right side of the screen to go directly to my online store or contact me if you have any questions.  Happy Stamping!

  • Visit my online store here
  • See the current Stampin’ Up! clearance rack specials here
  • Earn FREE Stampin’ Up! products through my Wildflower Frequent Shopper Program – my way of saying thank you to my frequent shopper online customers.
  • Have any questions? I’d be happy to help, click here to contact me.

Cardstock Cuts for this project:

  • Crumb Cake – 5 1/2″ x 8 1/2″
  • Whisper White – 5 1/8″ x 3 7/8″, 5″ x 3 3/4″, 2″ x 4 1/2″, 2 1/2″ x 2 1/2″
  • Blushing Bride – (2) 5 1/8″ x 3 7/8″, 3″ x 3″

Stampin’ Up! products used in this project:


Floral Frames Birthday Card

Today’s card is a flowery birthday card using the Floral Frames Bundle and the Delightfully Detailed Laser Cut DSP.

I cut the small floral panel from the Delightfully Detailed laser cut specialty paper and adhered it to a blushing bride card base using the fine tipped glue pen. This made a pretty background for the Floral Frames die cut.

Then I started assembling the frame. This die set has a circular main frame die with some leaves branching out and some sets of leaves. When you die cut them, they leave a light embossed look, giving each leaf texture. They’re really pretty. I cut the frame out of Pear Pizzazz and the other leaves out of Lemon Lime Twist and Old Olive. The three light greens go well with the Blushing Bride.

I adhered these to the card with multipurpose glue. I stamped the Happy Birthday greeting from the All That You Are stamp set in Blushing Bride ink on Whisper White cardstock and die cut it with one of the circles from the Stitched Shapes die cut set. I centered it on the circle frame and popped it up with a couple of dimensionals.

I stamped the flowers from the Floral Frames stamp set in Blushing Bride ink on Blushing Bride cardstock and die cut them with the matching dies. I adhered them using glue dots and dimensionals. I added pearls to the flower centers and made a bow from some old pink and white ribbon from my stash and adhered it with a glue dot.

I stamped the inside corner with a trio of the flowers in Blushing Bride. I masked the flowers and stamped the leaves. The big leaves are from the All That You Are stamp set, stamped in Old Olive and the little sprigs are from the Floral Frames, stamped in Lemon Lime Twist.

The die cuts in this retiring set are really pretty with three different leaf sets that work great in a variety of bouquet arrangements.


May 1 – 15 Host Code: 4KT9DVDU

Use this host code when you order and receive a free gift from me!  If your order is over $150, please do not use this code, but you’ll still get the free gift.  The free gift is your choice of any item valued up to $10.00 in the 2018-19 Annual Catalog or in the 2019 Occasions Catalog!  That includes some of the Host Exclusive stamp sets!


If you need any stamping supplies, I’d be very happy to be your Demonstrator.  Just click on the Shop Now button on the right side of the screen to go directly to my online store or contact me if you have any questions.  Happy Stamping!

  • Visit my online store here
  • See the current Stampin’ Up! clearance rack specials here
  • Earn FREE Stampin’ Up! products through my Wildflower Frequent Buyer Program – my way of saying thank you to my frequent buyer online customers.
  • Have any questions? I’d be happy to help, click here to contact me.

Stampin’ Up! products used in this project:


Bloom by Bloom Congratulations

Today’s card is a feminine congratulations card that is bold and beautiful using the Bloom by Bloom stamp set.

Using thick Whisper White as a card base, I trimmed a piece of the Happiness Blooms Memories and More card pack to make the background. On a panel of Whisper White cardstock, I stamped the bold tulip flower in Lovely Lipstick and Garden Green. I matted it with Night of Navy cardstock and used the Night of Navy baker’s twine to wrap the panel and tie a bow.

I used clear Wink of Stella to add some shimmer to the flower and used dimensionals to pop the flower panel on the card base.

I cut a banner from a piece of Night of Navy scrap and stamped the congratulations greeting from the Well Said stamp set in Versamark ink and sprinkled it with white embossing powder and heat set.

I used Whisper White cardstock for the inside of the card, trimmed it with the remaining Happiness Blooms Memories and More card and a floral sticker and matted it in Night of Navy before adding it to the card base.

Both the Bloom and Bloom stamp set and Happiness Blooms Memories and More card pack are on the retirement list, so we will have to say good bye to them soon. Before then, I’m going to enjoy using them to make bold, strong and vibrant floral cards.

Thanks for visiting!


April 16 – 30 Host Code: X2NF4DNX

Use this host code when you order and receive a free gift from me!  If your order is over $150, please do not use this code, but you’ll still get the free gift.  The free gift is your choice of any item valued up to $10.00 in the 2018-19 Annual Catalog or in the 2019 Occasions Catalog!  That includes some of the Host Exclusive stamp sets!


If you need any stamping supplies, I’d be very happy to be your Demonstrator.  Just click on the Shop Now button on the right side of the screen to go directly to my online store or contact me if you have any questions.  Happy Stamping!

  • Visit my online store here
  • See the current Stampin’ Up! clearance rack specials here
  • Earn FREE Stampin’ Up! products through my Wildflower Frequent Buyer Program – my way of saying thank you to my frequent buyer online customers.
  • Have any questions? I’d be happy to help, click here to contact me.

Stampin’ Up! products used in this project: