Stampin’ Up! Bloom by Bloom You are Amazing Card

Good Morning! Today’s card uses some of my favorite items from the retiring Stampin’ Up 2018 – 2019 Annual Catalog and the 2019 Occasions Catalog to say good bye. Today is the last day to order from these catalogs. The Stampin’ Up! Bloom by Bloom stamp set first caught my eye because of the big, bold, beautiful flowers. The ‘amazing’ word die from the Stampin’ Up! Celebrate You thinlits has such a stylish font that makes any card special.

I started by stamping the little flowers from the Stampin’ Up! Bloom by Bloom photopolymer stamp set on a Whisper White square in Calypso Coral, Call Me Clover and Pineapple Punch. I stamped the sentiment which came from an old Sale-A-Bration set Amazing You in Night of Navy. I die cut the flowers using a circle from the stitched shapes set along with a scalloped circle from calypso coral. I attached these using snail adhesive.

I die cut the fancy ‘amazing’ word die from the Stampin’ Up! Celebrate You thinlits from a piece of Night of Navy cardstock and glued it to the bottom of the flower panel using the fine tipped glue pen.

Then I attached a strip of the Happiness Blooms floral DSP to the Call Me Clover mat and then the Happiness Blooms striped DSP next to it. I have a hard time lining things up straight, so I did the wider DSP first, because it’s easier to make fine adjustments with the thinner one if needed. I next attached the panel to a Calypso Coral Card base and finally the floral circle with the die cut word to the DSP panel. All of these were done using snail adhesive, so the card is pretty flat. To finish off the front, I added 3 Night of Navy enamel dots from the Happiness Blooms Enamel Dots to the circle with the flowers.

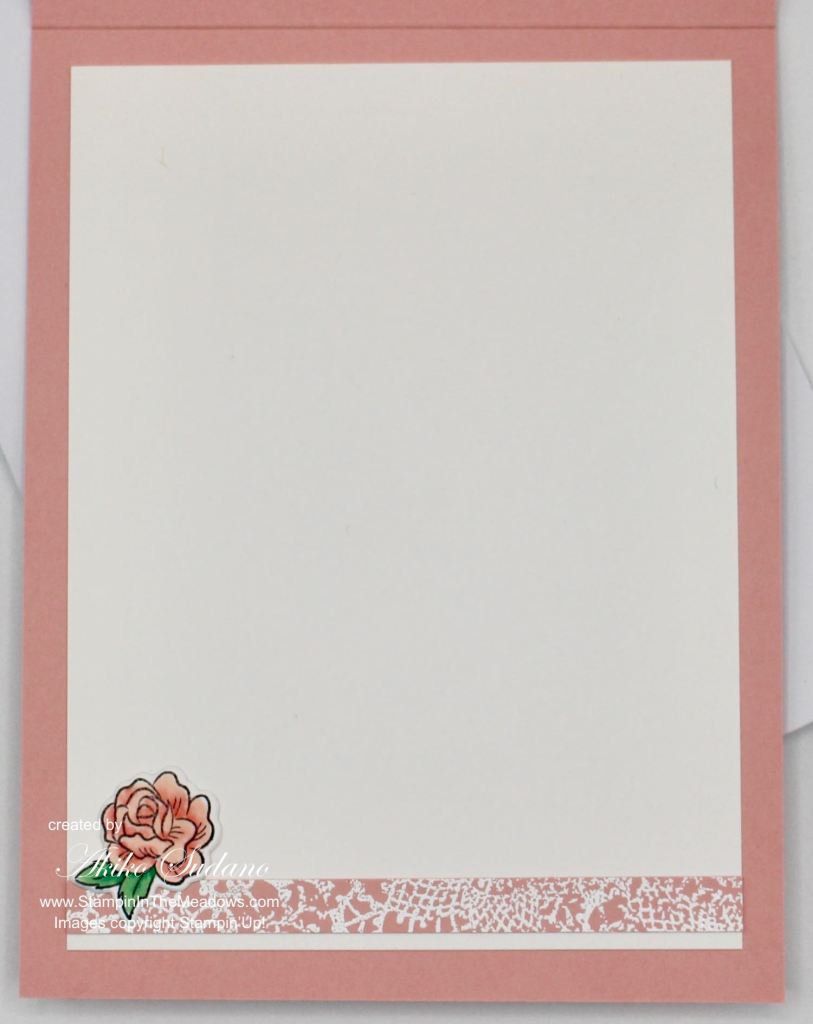
On the inside of the card, I added a strip of the Happiness Blooms floral DSP to the left side of a Whisper White panel and matted it in Call Me Clover before attaching it to the inside card base.

It’s sad to say good-bye to the Stampin’ Up! Bloom by Bloom stamp set as the catalogs close out. But there are so many pretty new things in the new 2019 – 2020 Annual Catalog which starts tomorrow. I haven’t posted many sneak peeks, but there are lots of them on the internet and I can’t wait to get started!

Thanks for stopping by and have a great week!

Akiko


June 1 – 15 Host Code: FK7YAMPQ

Use this host code when you order and receive a free gift from me!  If your order is over $150, please do not use this code, but you’ll still get the free gift.  The free gift is your choice of any item valued up to $10.00 in the 2018-19 Annual Catalog or in the 2019 Occasions Catalog!  That includes some of the Host Exclusive stamp sets!


If you need any stamping supplies, I’d be very happy to be your Demonstrator.  Just click on the Shop Now button on the right side of the screen to go directly to my online store or contact me if you have any questions.  Happy Stamping!

  • Visit my online store here
  • See the current Stampin’ Up! clearance rack specials here
  • Earn FREE Stampin’ Up! products through my Wildflower Frequent Shopper Program – my way of saying thank you to my frequent shopper online customers.
  • Have any questions? I’d be happy to help, click here to contact me.

Cardstock Cuts for this project:

  • Calypso Coral – 5 1/2″ x 8 1/2″ card base, 3″ square scrap for scalloped circle
  • Whisper White – 4 7/8″ x 3 5/8″ for inside, 2 3/4″ square scrap for circle
  • Call Me Clover – (2) 5″ x 3 3/4″ for mats
  • Night of Navy – 2″ x 3 1/2″ scrap for word
  • Happiness Blooms DSP – 1/2″ x 4 7/8″, 2″ x 4 7/8″ floral, 1/2″ x 4 7/8″ stripe

Stampin’ Up! products used in this project:


Stampin’ Up! All That You Are Hello Card

Good Morning! Today’s card is another happy gingham card using the Stampin’ Up! All That You Are Stamp Set and the Stampin’ Up! Gingham Gala Designer Series Paper or DSP. Both of these items are from the 2019 Occasions Catalog and are being retired so they are currently available while supplies last through June 3.

For this card, I used an old technique called ‘Stained Glass’. This is where you emboss a line stamp design on vellum and use a marker to color the back. This gives a soft look that mimics stained glass because you can sort of see through the vellum. In this case, I used white embossing powder to outline the image and colored the back with Old Olive Stampin’ Blends and a yellow and berry copic markers. You can also use regular markers with this technique. One thing to remember is that markers take longer to dry on vellum, so be careful not to smudge your coloring while it’s drying.

I stamped the big flower image from the Stampin’ Up! All That You Are Stamp set on a piece of vellum using versamark ink after using the embossing buddy. I sprinkled it with white embossing powder and heat set. I colored the back using yellow and berry copics and the dark Old Olive Stampin’ Blend and put it aside to dry. I stamped the ‘hello beautiful’ sentiment from the Stampin’ Up! Butterfly Gala stamp set on a piece of Whisper White using Old Olive ink. I used the label die cuts from a retired Stampin’ Up set called Special Reason since it fit the sentiment perfectly. I die cut the larger label in Daffodil Delight and used the smaller label to die cut the Whisper White stamped sentiment. I adhered the labels together using multipurpose liquid glue.

I adhered a piece of the Daffodil Delight paper from the Gingham Gala DSP to an Old Olive mat with snail. I cut a banner bottom in the dried vellum panel and used a glue dot hidden behind the label to secure the vellum to the gingham paper. I ran a line of multipurpose liquid glue at the top where the ribbon would be tied and set a stamp block on top to secure it while it dried.

One of the challenges of using vellum is that it is transparent, so glue shows through, so you need to attach the vellum in places where it will be hidden. After the glue dried I tied the ribbon around the top. I used dimensionals to attach the panel to a Daffodil Delight Card base and again to attach the label.

For the inside of the card, I embossed one of the single flowers from the Stampin’ Up! All That You Are stamp set in white on Daffodil Delight cardstock and two of the leaves in white on Old Olive cardstock. I fussy cut these with the paper snips. I adhered a strip of the Daffodil Delight gingham paper to the bottom of the inside Whisper White panel and matted it with Old Olive. I attached the flower and leaves using multipurpose liquid glue and adhered the panel to the inside of the card using snail.

I love the look and texture that vellum adds to a card, and though it can be tricky to work with, the end result is worth the extra effort.

Thanks for looking and have a great weekend!

Akiko

Evening Update

I found out that at TGIF Challenges! the new challenge from yesterday is #TGIFC213 All About that Gingham.

How perfect! Click on the picture above to check out the other entries and get more gingham inspiration. Thanks.

Akiko


Don’t forget that the new Stampin’ Up! 2019- 2020 Annual Catalog becomes active on June 4, 2019. On June 4, ordering will be unavailable from midnight to noon (MT) while we transition the system to the new catalog. Ordering will be available again no later than noon (MT).

Until then, make sure you pick up products that you want from the 2019 Occasions Catalog and 2018 – 2019 Annual Catalog that are retiring. See the details here.


May 16 – 31 Host Code: MU6CCTMM

Use this host code when you order and receive a free gift from me!  If your order is over $150, please do not use this code, but you’ll still get the free gift.  The free gift is your choice of any item valued up to $10.00 in the 2018-19 Annual Catalog or in the 2019 Occasions Catalog!  That includes some of the Host Exclusive stamp sets!


If you need any stamping supplies, I’d be very happy to be your Demonstrator.  Just click on the Shop Now button on the right side of the screen to go directly to my online store or contact me if you have any questions.  Happy Stamping!

  • Visit my online store here
  • See the current Stampin’ Up! clearance rack specials here
  • Earn FREE Stampin’ Up! products through my Wildflower Frequent Shopper Program – my way of saying thank you to my frequent shopper online customers.
  • Have any questions? I’d be happy to help, click here to contact me.

Cardstock Cuts for this project:

  • Daffodil Delight – 4 1/4″ x 11″ card base, (2) 2 1/2″ x 3″ scraps for label and flower
  • Old Olive – 5 1/8″ x 3 7/8″, 3 5/8″ x 4 7/8″ for mats, 1″ x 2″ scrap for leaves
  • Whisper White – 5″ x 3 3/4″ for inside, 2″ x 2 1/2″ scrap for label
  • Gingham Gala DSP – 3 1/2″ x 4 3/4″, 1/2″ x 3 3/4″
  • Vellum – 3″ x 4 1/2″

Stampin’ Up! products used in this project:


Stampin’ Up! Butterfly Gala Just a Note Card

Good morning! Today’s card uses the beautiful Stampin’ Up! Butterfly Gala stamp set with the Butterfly Duet Punch.

I started out by stamping a bunch of butterflies from the Stampin’ Up! Butterfly Gala stamp set on Thick Whisper White cardstock using Memento Tuxedo Black ink and coloring them with Stampin’ Blends and copic markers. I used light pastel colors – the light Flirty Flamingo and Calypso Coral Stampin’ Blends along with yellow, green and blue copics. I randomly colored the butterfly wings so that each butterfly is different. The nice thing about these stamps is that you get a large and small butterfly with each stamp and they line up perfectly with the punch.

After stamping and coloring the butterflies, I punched them out and stamped the little butterfly bodies. I then arranged them on the Gingham Gala DSP in Grapefruit Grove with some of the butterflies going over the edge. I attached the butterflies to the paper with mini glue dots in the centers and trimmed the butterflies that went over the edge. Using the Thick Whisper White really gives the butterflies dimension on the paper! I then mounted it on a basic black mat and popped it on a Grapefruit Grove card base with dimensionals.

I took a scrap of basic black and stamped the ‘a little note’ sentiment from the Stampin’ Up! Butterfly Gala stamp set in Versamark ink and sprinkled some white embossing powder before heat setting. The font is real sweet and goes well with the casual and lighthearted gingham background and colorful butterflies. I wrapped the banner with some whisper white baker’s twine and tied a bow before popping it on the card with dimensionals.

On the inside of the card I took a piece of the gingham DSP and adhered it to the bottom of a piece of Whisper White with multipurpose liquid glue and attached three of the little butterflies with glue dots. I matted the inside piece in Basic Black and attached it to the card base with snail.

We went to our first cookout of the year Saturday and it was a perfect day. This card reminds me of summer picnics with all the butterflies and gingham.

The Gingham Gala DSP is currently available in the 2019 Occasions Catalog and will be retiring on June 3 or when supplies run out. The Stampin’ Up! Butterfly Gala stamp set and Butterfly Duet Punch are currently sold as a bundle for 10% off. Both of these items are carried over into the 2019 – 2020 Annual Catalog (Yay!!) but will no longer be available as a bundle at the discounted price. These are perfect for butterfly lovers!

Thanks for visiting and have a great week!


May 16 – 31 Host Code: MU6CCTMM

Use this host code when you order and receive a free gift from me!  If your order is over $150, please do not use this code, but you’ll still get the free gift.  The free gift is your choice of any item valued up to $10.00 in the 2018-19 Annual Catalog or in the 2019 Occasions Catalog!  That includes some of the Host Exclusive stamp sets!


If you need any stamping supplies, I’d be very happy to be your Demonstrator.  Just click on the Shop Now button on the right side of the screen to go directly to my online store or contact me if you have any questions.  Happy Stamping!

  • Visit my online store here
  • See the current Stampin’ Up! clearance rack specials here
  • Earn FREE Stampin’ Up! products through my Wildflower Frequent Shopper Program – my way of saying thank you to my frequent shopper online customers.
  • Have any questions? I’d be happy to help, click here to contact me.

Cardstock Cuts for this project:

  • Grapefruit Grove – 4 1/4″ x 11″ card base
  • Whisper White – 5″ x 3 3/4″ for inside
  • Thick Whisper White – 5 1/2″ x 8 1/2″ for butterflies
  • Gingham Gala DSP – 3 1/2″ x 4 3/4″, 1/2″ x 3 3/4″
  • Basic Black – 5 1/8″ x 3 7/8″, 3 5/8″ x 4 7/8″ for mats, 3/4″ x 3″ scrap for label banner

Stampin’ Up! products used in this project:


Best Catch Father’s Day Card

Good Morning! Today’s post is part of the Amy’s Inkin’ Krew Monthly Team Blog Hop for May 14.

I have been around fishing all my life, so I love the Best Catch stamp set and it’s wonderful images and dies. Trout season opened a while back, but the fathers I know who love fishing would love a Father’s Day card with a fishing theme, so here it is.

Starting with a Tranquil Tide card base and a Crumb cake mat, I sponged a background scene with a colorful morning sunrise on a piece of Naturals White cardstock which gives it a rustic look. For the water, I lightly sponged it with the retired color Island Indigo. The land in the background is made by tearing paper to make a ragged edge mask and I sponged it in Memento Tuxedo Black and Mossy Meadow. The sun is done with a 3/4 circle punch mask in Daffodil Delight; and the rest of the sky has a touch of Calypso Coral and Daffodil Delight fading into Soft Sky, Dapper Denim and Night of Navy.

I stamped the fisherman on the background with Soft Suede ink as well as the Happy Father’s Day sentiment. I used the sentiment from the retired Guy Greetings stamp set, because I wanted something specific to Father’s Day, and this is my go-to greeting for that purpose.

I die cut the two of the grass & cattails out of Mossy Meadow and Old Olive. I colored the tips of the cattails with Soft Suede and adhered them to the image with multipurpose glue.

I stamped the trout image on thick whisper white cardstock and colored it with markers. I used copic markers because I don’t have enough of the new Stampin’ Blends. Building up my Stampin’ Blends supply is a high priority for me! Then, using the direct to paper technique, I covered the image with Versamark ink. I sprinkled it with clear embossing powder and set it with the heat tool. This gives it a glossy look like a wet fish and really makes the colors pop. I adhered the shiny trout on top of the grasses with dimensionals.

The inside of the card also has a Crumb Cake mat and is decorated with a fish hook and die cut fishing hat. I stamped the hook in Soft Suede after stamping off twice and I stamped the fishing hat in Soft Suede on a scrap of Crumb Cake and colored a Dapper Denim stripe.

Who plans celebrate Father’s Day by taking their Dad fishing? I’m glad that this stamp set and matching dies are carrying over into the new catalog! I didn’t even use the wonderful fishing creel basket, so I guess I’ll have to do another fisherman card.


Thanks for visiting! Click on the Next Blog button to move forward to Shirley Gentry’s project or click the Previous Blog button to move back to see the project that Karen Finkle created.

If you get lost along the way, here are the participants for the hop:


May 1 – 15 Host Code: 4KT9DVDU

May 15 – 31 Host Code: MU6CCTMM

Use this host code when you order and receive a free gift from me!  If your order is over $150, please do not use this code, but you’ll still get the free gift.  The free gift is your choice of any item valued up to $10.00 in the 2018-19 Annual Catalog or in the 2019 Occasions Catalog!  That includes some of the Host Exclusive stamp sets!


If you need any stamping supplies, I’d be very happy to be your Demonstrator.  Just click on the Shop Now button on the right side of the screen to go directly to my online store or contact me if you have any questions.  Happy Stamping!

  • Visit my online store here
  • See the current Stampin’ Up! clearance rack specials here
  • Earn FREE Stampin’ Up! products through my Wildflower Frequent Buyer Program – my way of saying thank you to my frequent shopper online customers.
  • Have any questions? I’d be happy to help, click here to contact me.

Cardstock Cuts for this project:

  • Tranquil Tide – 5 1/2″ x 8 1/2″
  • Crumb Cake – (2) 5″ x 3 3/4″, 1″ x 2″ scrap for hat
  • Naturals White – (2) 4 3/4″ x 3 1/2″
  • Thick Whisper White – 2 1/2″ x 2 1/2″ scrap for trout
  • Mossy Meadow – 2 1/4″ x 3″ scrap for grass and cattail die cut
  • Old Olive – 2 1/4″ x 3″ scrap for grass and cattail die cut

Stampin’ Up! products used in this project:


Cake Soiree and All My Love DSP For You Card

Good Morning! The star of today’s card is the All My Love DSP, along with the roses from the Cake Soiree stamp and die set. As a bonus, the font is so beautiful!

The layout for the card is inspired by Freshly Made Sketches #386. I was surprised and pleased at how the sharp angles of the sketch complement the soft floral themes in the DSP and rose die cuts.

Starting with the DSP with the roses and Crumb Cake background, I cut a rectangle. Then, I placed the large rectangle die from the Stitched Rectangles dies on an angle at the bottom. I was careful, not to overlap the top of the die with the top edge of the paper, because I didn’t want it to be cut. Then I ran it through my die cutting machine and got a lovely stitched edge on the bottom. I then adhered it to the Lovely Lipstick mat and carefully trimmed the angled bottom on my paper cutter.

I die cut the large rose from the Cake Soiree die cuts in Whisper White and Flirty Flamingo. I used one of the leftover pieces to trace the image on a piece of Whisper White. Then I colored it using the Flirty Flamingo Stampin’ Blends. I colored the center with the dark marker. Then using the light marker, I blended the color outward and colored the rest. I then cut it out with paper snips and adhered it to the back of the white die cut with the fine tipped glue pen. I left the Flirty Flamingo die cut without a backing.

Then I stamped the solid rose using Flirty Flamingo on Whisper White. First, I inked up the stamp and stamped it off. Then, using an ink dauber, I added more ink to the center of the stamp. This gave me an image with a darker center. I used the matching die to cut it out. I was really pleased at how well these roses matched the DSP!

I die cut a stitched circle from Crumb Cake, and stamped the sentiment in Lovely Lipstick. I die cut a scalloped circle from Lovely Lipstick and mounted it to the back of the stitched circle. I die cut some of the open leaves using some old Pistachio Pudding scraps and attached them to the back of the solid rose with a glue dot. I then arranged the roses and and added pearl accents, popping the center rose with dimensionals. I adhered the circle to the card front using dimensionals.

The inside of the card is pretty simple, only being accented with a strip of the floral DSP and matted with Lovely Lipstick.

In using this stamp set, I felt that I should make a cake card because the cake is so beautiful. But the roses go well with the DSP and make a nice statement on their own. I will just have cake cards later! Thanks for stopping by!


May 1 – 15 Host Code: 4KT9DVDU

Use this host code when you order and receive a free gift from me!  If your order is over $150, please do not use this code, but you’ll still get the free gift.  The free gift is your choice of any item valued up to $10.00 in the 2018-19 Annual Catalog or in the 2019 Occasions Catalog!  That includes some of the Host Exclusive stamp sets!


If you need any stamping supplies, I’d be very happy to be your Demonstrator.  Just click on the Shop Now button on the right side of the screen to go directly to my online store or contact me if you have any questions.  Happy Stamping!

  • Visit my online store here
  • See the current Stampin’ Up! clearance rack specials here
  • Earn FREE Stampin’ Up! products through my Wildflower Frequent Buyer Program – my way of saying thank you to my frequent shopper online customers.
  • Have any questions? I’d be happy to help, click here to contact me.

Cardstock Cuts for this project:

  • Crumb Cake – 4 1/4″ x 11″ card base, 2 1/2″ square scrap for stitched circle label
  • Lovely Lipstick – 3 7/8″ x 4 1/4″, 3 1/2″ x 5″, 2 3/4″ square scrap for scalloped circle label
  • Flirty Flamingo – 2″ square scrap for rose die cut
  • Whisper White – 3 3/8″ x 4 7/8″, 3 2″ square scraps for rose die cuts
  • All My Love DSP – 3 3/4″ x 4″, 3 3/8″ x 1/2″

Stampin’ Up! products used in this project:


Bloom by Bloom Congratulations

Today’s card is a feminine congratulations card that is bold and beautiful using the Bloom by Bloom stamp set.

Using thick Whisper White as a card base, I trimmed a piece of the Happiness Blooms Memories and More card pack to make the background. On a panel of Whisper White cardstock, I stamped the bold tulip flower in Lovely Lipstick and Garden Green. I matted it with Night of Navy cardstock and used the Night of Navy baker’s twine to wrap the panel and tie a bow.

I used clear Wink of Stella to add some shimmer to the flower and used dimensionals to pop the flower panel on the card base.

I cut a banner from a piece of Night of Navy scrap and stamped the congratulations greeting from the Well Said stamp set in Versamark ink and sprinkled it with white embossing powder and heat set.

I used Whisper White cardstock for the inside of the card, trimmed it with the remaining Happiness Blooms Memories and More card and a floral sticker and matted it in Night of Navy before adding it to the card base.

Both the Bloom and Bloom stamp set and Happiness Blooms Memories and More card pack are on the retirement list, so we will have to say good bye to them soon. Before then, I’m going to enjoy using them to make bold, strong and vibrant floral cards.

Thanks for visiting!


April 16 – 30 Host Code: X2NF4DNX

Use this host code when you order and receive a free gift from me!  If your order is over $150, please do not use this code, but you’ll still get the free gift.  The free gift is your choice of any item valued up to $10.00 in the 2018-19 Annual Catalog or in the 2019 Occasions Catalog!  That includes some of the Host Exclusive stamp sets!


If you need any stamping supplies, I’d be very happy to be your Demonstrator.  Just click on the Shop Now button on the right side of the screen to go directly to my online store or contact me if you have any questions.  Happy Stamping!

  • Visit my online store here
  • See the current Stampin’ Up! clearance rack specials here
  • Earn FREE Stampin’ Up! products through my Wildflower Frequent Buyer Program – my way of saying thank you to my frequent buyer online customers.
  • Have any questions? I’d be happy to help, click here to contact me.

Stampin’ Up! products used in this project:


Geared Up Garage Birthday Card

Today’s card is a masculine birthday card using the Geared Up Garage Stamp Cling Bundle from the Stampin’ Up! 2019 Occasions catalog.

My card is inspired by Freshly Made Sketches #383.

I started with a Basic Gray card base and used the oil stain stamp on the top of the card to give it texture.

I added a strip of the hubcap paper from the Classic Garage DSP. I didn’t want to use the silver foil for the gears because I wanted a more worn look instead of shiny, so I used some gray shimmer paper from Michaels and die cut the big gears for the black frame and the scallops on the right edge. I love the look of frames on cards, and how the gears allow the background to come through.

I stamped and colored the sports car red of course, and die cut it and popped it on the gear frame with dimensionals.

I put the greetings on the inside of the card, adding the ‘Happy Birthday’ from the Birthday Banners stamp set. The retro look of this font goes great with the vintage sports car. I also added a red gas can and some extra nuts and oil stains.


April 1 – 15 Host Code: RS7NK2EY

April 16 – 30 Host Code: X2NF4DNX

Use this host code when you order and receive a free gift from me!  If your order is over $150, please do not use this code, but you’ll still get the free gift.  The free gift is your choice of any item valued up to $10.00 in the 2018-19 Annual Catalog or in the 2019 Occasions Catalog!  That includes some of the Host Exclusive stamp sets!


If you need any stamping supplies, I’d be very happy to be your Demonstrator.  Just click on the Shop Now button on the right side of the screen to go directly to my online store or contact me if you have any questions.  Happy Stamping!

  • Visit my online store here
  • See the current Stampin’ Up! clearance rack specials here
  • Earn free Stampin’ Up! products – Join my Wildflower Frequent Buyer Program – My way of saying thank you to my online frequent buyer customers.
  • Have any questions? I’d be happy to help, click here to contact me

Stampin’ Up! products used in this project:


Bloom by Bloom Thank You Card

Today I have another Thank You card using the Bloom by Bloom photopolymer stamp set and Happiness Blooms memories and more card pack, both from the current Occasions Catalog.

I just love the bold modern flowers from this set because they remind me of mod flowers that were popular in the the 70’s. And the shine!! I was surprised when I opened the memories and more card pack to see the shiny cardstock, so I was inspired to make the main flowers shiny too by using clear embossing powder.

I started by using a Calypso Coral card base and a strip from one of the shiny memories and more cards. I matted the strip with pineapple punch and and attached it to the bottom of the card with snail adhesive. I used a scrap of Call Me Clover cardstock and die cut the ‘thanks’ greeting from the Well Written framelits from the Occasions Catalog and glued it to the panel with the fine tipped glue pen.

I then stamped the large tulip image three times with Calypso Coral ink on thick whisper white cardstock. I used the stamparatus to do my stamping because I stamped each image twice to make sure I had a solid image. This stamp has thick stamped images, so it is sometimes hard to get a good image by stamping once. The stamparatus is great for this because it easily allows me to stamp directly over the image without error. I then cleaned off the stamp without removing it and inked it with versamark and stamped perfectly twice again over the Calypso Coral. I then sprinkled the image with clear embossing powder and heat set to get a nice shine. I fussy cut the flowers, adhered them to the card with dimensionals and added the Night of Navy enamel dots above each flower.

The inside of the card is matted in Night of Navy and decorated with the Calypso Coral tulip stickers from the memories and more pack.

I hope you liked this cheerful, fun thank you card! I really enjoyed thinking of the 70’s – flower power, bell bottomed jeans and tie died shirts – while making it.


March 18 – 31 Host Code: DPE6TH9A

Use this host code when you order and receive a free gift from me!  If your order is over $150, please do not use this code, but you’ll still get the free gift.  The free gift is your choice of any item valued up to $10.00 in the 2018-19 Annual Catalog or in the 2019 Occasions Catalog!  That includes some of the Host Exclusive stamp sets!


There are just a few days left of Sale-A-Bration, the biggest Stampin’ Up! promotion of the year. Click the image above to learn more and see the current Sale-A-Bration items.


Stampin’ Up! products used in this project:


If you need any stamping supplies, I’d be very happy to be your Demonstrator.  Just click on the Shop Now button on the right side of the screen to go directly to my online store or contact me if you have any questions.  Happy Stamping!

  • Visit my online store here
  • See the current Stampin’ Up! clearance rack specials here
  • Have any questions? I’m happy to help, click here to contact me

Climbing Roses Thank You Card

Today’s card is a feminine pink thank you card full of lace and roses.

It is made with the Climbing Roses bundle from the Occasions Catalog including the Climbing Roses cling stamp set and Rose Trellis Thinlits. The lace doily stamp from the Annual Catalog hostess set Very Vintage is also used to create the embossed background.

I wanted to use soft feminine colors and I chose blushing bride, but I did not have a good match for background DSP (designer series paper). As a new demonstrator, my inventory is a little limited. So I made my own “DSP” by using the lace doily stamp in the Very Vintage hostess set (which I did have!). I randomly stamped it on blushing bride using versamark and heat embossed it in white. I cut the blushing bride cardstock to 5 1/2 x 4 1/4 because I did not know how large I wanted the background panel to be. It turned out great, because when I did figure it out I had smaller strips of matching paper to trim the inside of the card. The picture below shows how I did this:

Stamp on larger piece of cardstock and trim to size. Use leftovers to trim inside of card.

I stamped and colored the large rose image from the Climbing Roses stamp set and die cut it with the coordinating die. I also stamped, colored and die cut several pieces of the smaller rose to accent the label and inside. I had to use the trellis and label die cuts because these are beautiful pieces and make great card elements. While the label and trellis were glued directly to the card, the large rose die cut was popped with dimensionals.

See how I used the leftover from my lace doily background on the inside. I also added one of the single rose die cuts.

I was happy with how pretty this card came out. The Stampin’ Up! products I used are listed below. Thanks for looking!


March 18 – 31 Host Code: DPE6TH9A

Use this host code when you order and receive a free gift from me!  If your order is over $150, please do not use this code, but you’ll still get the free gift.  The free gift is your choice of any item valued up to $10.00 in the 2018-19 Annual Catalog or in the 2019 Occasions Catalog!  That includes some of the Host Exclusive stamp sets!


Stampin’ Up! products used in this project:


If you need any stamping supplies, I’d be very happy to be your Demonstrator.  Just click on the Order Stampin’ Up! Online Now button on the right side of the screen to go directly to my online store or contact me if you have any questions.  Happy Stamping!

Piece of Cake Birthday Card

Today’s card features a fancy double layer birthday cake using the new Piece of Cake Photopolymer stamp set in the Stampin’ Up! 2019 Occasions Catalog.

My card is inspired by Freshly Made Sketches #379.

I started with a Coastal Cabana card base and added a white panel embossed with an older dotted embossing folder. I added a striped panel and die cut pinked circle made from the How Sweet it is DSP.

To make the focal element, I stamped the cake on white cardstock and colored it to match the colors in the How Sweet It Is DSP. The cake stand is punched from coastal cabana cardstock with the Cake Builder Punch and both are attached to a white die cut stitched circle. It’s finished with a baker’s twine bow and Melon Mambo scalloped circle and popped on the striped panel. The card is finished with a happy birthday banner.

The inside of the card is simply decorated using a strip from the How Sweet It Is DSP and Melon Mambo mat.


March 18 – 31 Host Code: DPE6TH9A

Use this host code when you order and receive a free gift from me!  If your order is over $150, please do not use this code, but you’ll still get the free gift.  The free gift is your choice of any item valued up to $10.00 in the 2018-19 Annual Catalog or in the 2019 Occasions Catalog!  That includes some of the Host Exclusive stamp sets!


Stampin’ Up! products used in this project:


If you need any stamping supplies, I’d be very happy to be your Demonstrator.  Just click on the Order Stampin’ Up! Online Now button on the right side of the screen to go directly to my online store or contact me if you have any questions.  Happy Stamping!