Stampin’ Up! Stippled Roses Thank You Card

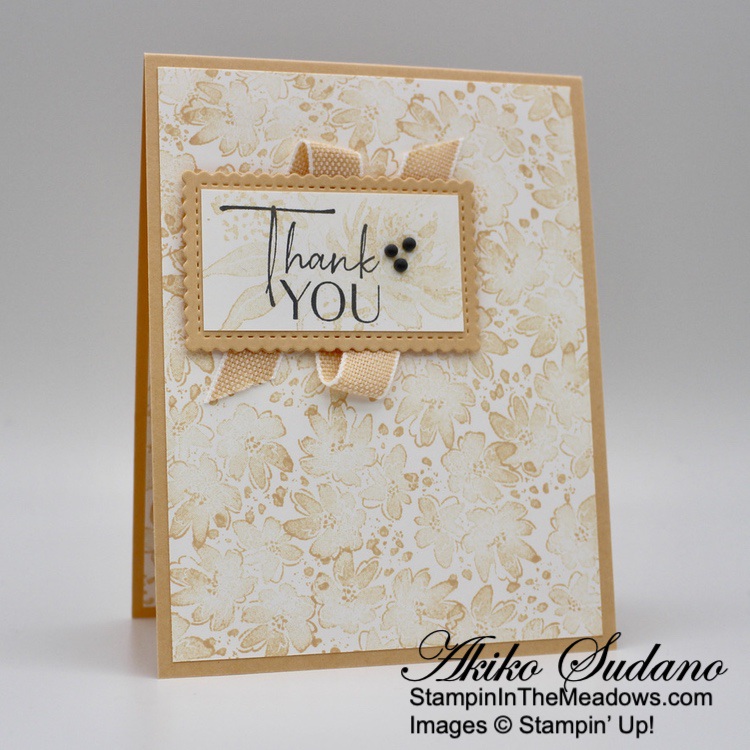
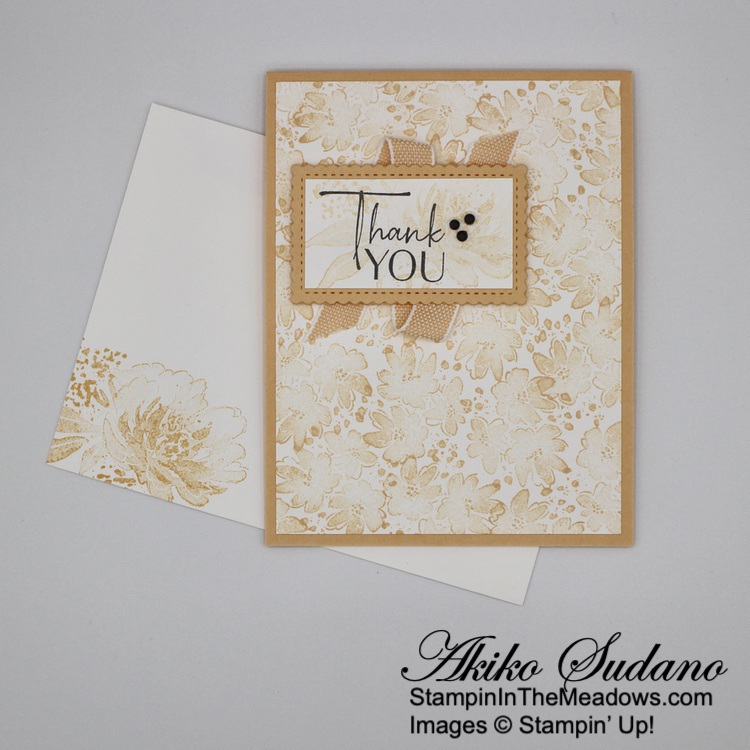
Good Morning! I’m using the Stampin’ Up! Stippled Roses bundle from the new January-April Mini Catalog and the Softly Stippled Sale-A-Bration designer series paper for a thank you card. I love how the images in this pattern resemble the roses in the stamp set! You can find the products I used at the bottom of my post along with the card stock sizes.

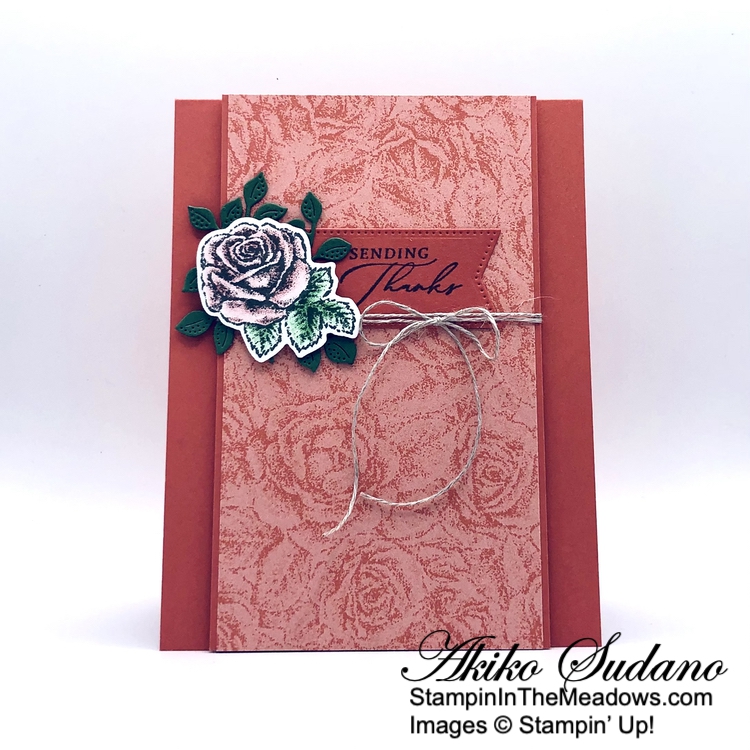
My card’s design was inspired by the pretty sketch in Global Design Project #426:

I adhered a panel of Calypso Coral rose patterned Softly Stippled designer series paper to a Calypso Coral mat with liquid glue. I stamped the sentiment from the Stampin’ Up! Stippled Roses stamp set using Pebbled Path ink on Calypso coral and cut it out with a banner die from the Stylish Shapes dies. I adhered it to the DSP panel with liquid glue and wrapped it with linen thread, making a bow.

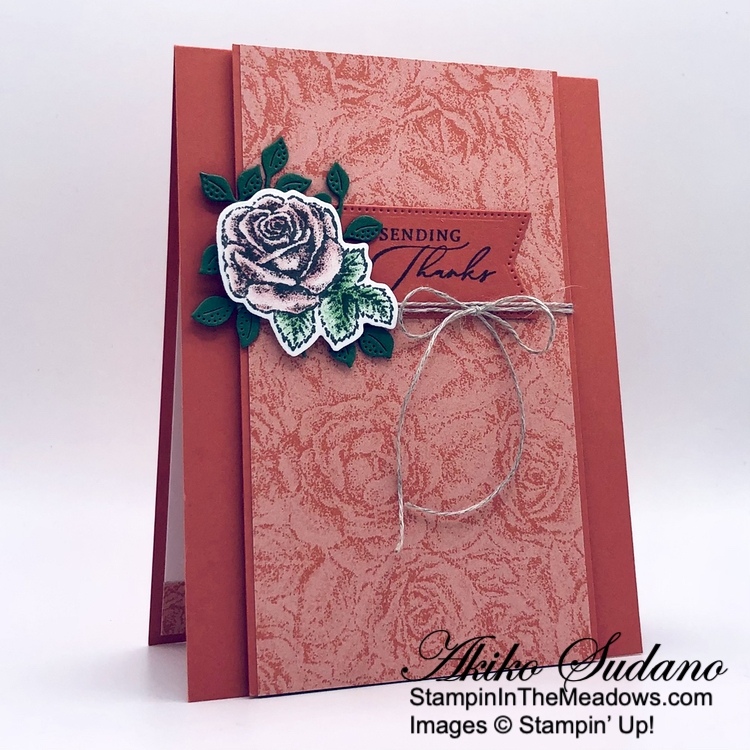
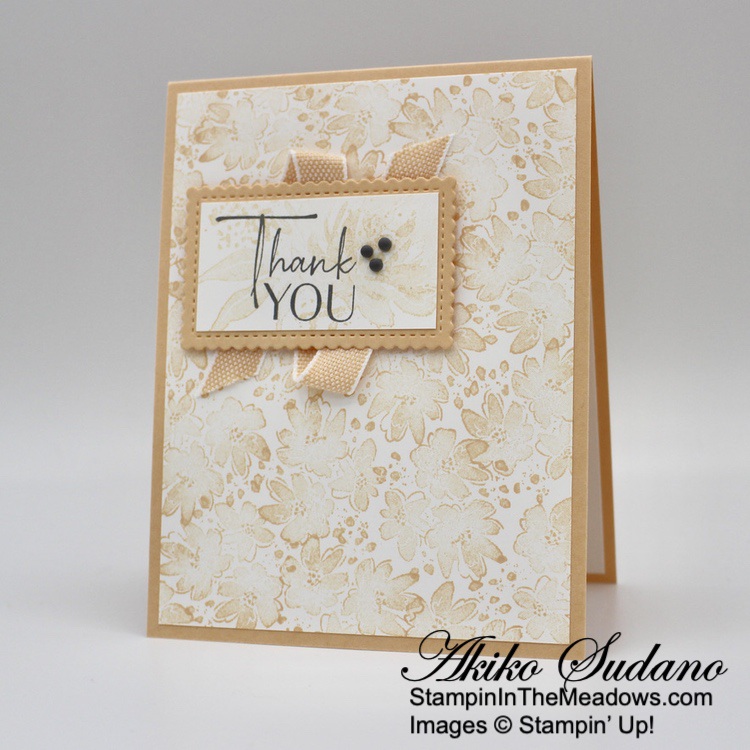
I adhered the DSP panel to the front of a Calypso Coral Card base withh dimensionals. I cut a small leaf spray from Garden Green using a die from the Stampin’ Up! Stippled Roses dies and adhered it to the card with glue dots, tucking it under the linen thread and covering the left side of the banner. 

I stamped the small rose from the Stampin’ Up! Stippled Roses stamp set in Pebbled Path ink on Basic White and colored it with Watercolor Pencils. I colored the flower all over lightly with the Calypso Coral Pencil. I colored the darker areas again to intensify the color and blend it out into the rest of the petal. I colored the leaves in Garden Green using the same method. I cut the flower out with the coordinating die and popped it on the card with dimensionals.

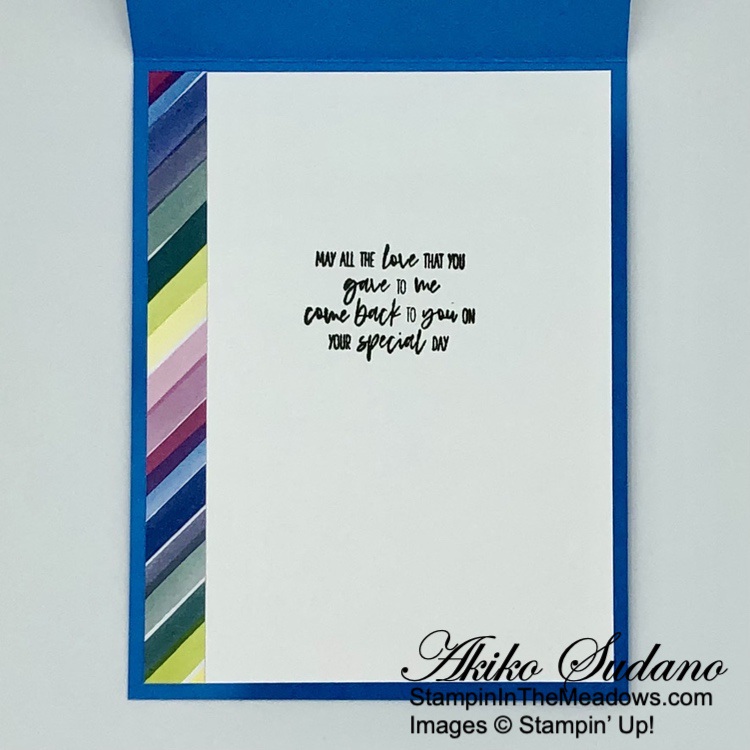
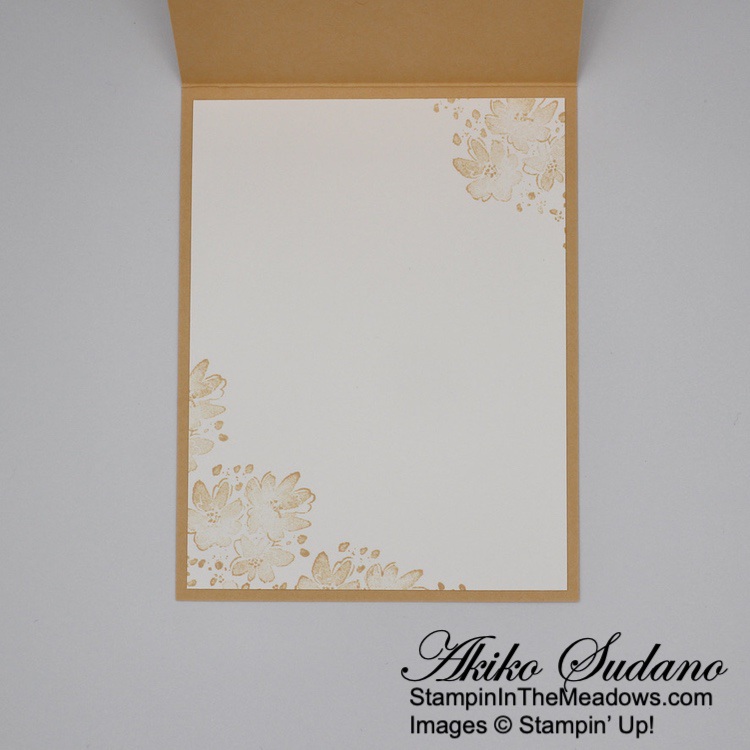
For the inside of the card, I stamped the small rose from the Stampin’ Up! Stippled Roses stamp set in Pebbled Path ink in the top corner of a Basic White panel. I colored it using Calypso Coral and Garden Green watercolor pencils and trimmed the bottom with a strip of Softly Stippled DSP. I adhered the panel to the inside of the card with Stampin’ Seal.

The images and sentiments from the Stampin’ Up! Stippled Roses bundle are just gorgeous and it’s wonderful to have them also in the Sale-A-Bration Softly Stippled DSP! I’ve been pleased at all the different ways to stamp and color the images from the stamp set – it’s pretty versatile!


Sale-A-Bration Is Going On Now!

Sale-A-Bration is Stampin’ Up!’s best promotion of the year with specials for Shopping, Hosting and Joining!

Shopping

Choose a FREE Sale-A-Bration item from the Sale-A-Bration Brochure with every $50 or $100 you spend (before tax and shipping). The Sale-A-Bration brochure has eleven items available for free with orders of $50 or greater and three items you can pick from with orders of $100 or greater! The free Sale-A-Bration items are stackable, so if you place an order of $150, you can choose to add three $50 items or one $100 item and one $50 item to your order! The Sale-A-Bration items are only available while supplies last, so order early if there are items that you are really wanting! 

Hosting

Host a party of $300 or more and get an additional $30 in Stampin’ Rewards! Normally a $300 party will result in $36 in Stampin’ Rewards for the host, but during Sale-A-Bration a $300 party will result in $66 in Stampin’ Rewards! Stampin’ Rewards are redeemed to get free items from any current catalog. And if you have a large enough shopping list, you will get the Sale-A-Bration Host rewards in a single order (and that’s in addition to the Sale-A-Bration shopping items)! 

If you’d like to set up a host code to see if you can collect $300 in orders, I’d be happy to help you with that!  Reach out to me at apsudano@stampininthemeadows.com.

Joining

Sale-A-Bration is one of the best times to join Stampin’ Up! as a new demonstrator and there are two fantastic options for purchasing your Starter Kit during Sale-A-Bration

Option 1: 

Customers who join our fun crafting community as a new demonstrator can get $125 worth of product PLUS our Stampin’ Glass Mat Studio* (a $60 USD) for just $99! The Glass Mat Studio includes a 17″ x 14″ safety-tempered glass mat, a gray 8-1/4″ x 8-1/4″ lint-free, reusable cleaning cloth and a 8-3/4″ x 6″ white 4-palette silicone mat.

Option 2:

Customers who want to join Stampin’ Up! during Sale-A-Bration but are interested in a different join option can instead get $125 worth of product PLUS an additional $30 worth of product of their choice when they join for $99. That’s $155 in products for $99! 

Once you join, you’ll get at least a 20% discount on all of your Stampin’ Up! merchandise purchases AND you get to order early from upcoming catalogs!  There is NO COMMITMENT and NO REQUIREMENT TO SELL to anyone.  You can join and just get the discount for yourself!  Contact me at apsudano@stampininthhemeadows.com if you’d like more information about joining or purchasing the Starter Kit! 

Click on the image below to open a PDF of the Sale-A-Bration Brochure to see all the Sale-A-Bration items and get additional details:


Current Host Code: 4X6DDWUC

Use this host code when you order $50 or more and receive a Thank You gift from me!  The free gift is your choice of any item currently available valued up to $10.00.

If your order is over $150, please do not use the host code since you’ll receive your own Host Dollars plus I’ll still send you the Thank You gift!  This host code can be used by anyone, no club or commitment required. Let me know if you have any questions.


If you need any stamping supplies, I’d be very happy to be your Demonstrator.  Just click on the Shop Now Button on the right side of the screen to go directly to my Online store or contact me if you have any questions.  Happy Stamping!

Thanks for stopping by and have a great day!

Akiko

  • Visit my online store here
  • See the current Stampin’ Up! clearance rack specials here
  • Earn FREE Stampin’ Up! products through my Wildflower Frequent Shopper Program – my way of saying thank you to my online frequent shopper customers.
  • Have any questions? I’d be happy to help, click here to contact me.

Cardstock Cuts for this project:

  • Calypso Coral – 4-1/4″ x 11″ card base, scored at 5-1/2″, 2″ x 3″ (label), 3-1/4″ x 5-1/2″ (DSP mat)
  • Garden Green – 2-1/2″ x 3-1/4″ (leaf spray die cut)
  • Basic White – 4 x 5-1/4″ (inside panel), 2-1/4″ x 3″ (flower)
  • Softly Stippled DSP – 1/2″ x 4″ (inside trim), 3-1/8″ x 5-1/2″ (front background)

Stampin’ Up! products used in this project:


Stampin’ Up! Places in the Heart Mother’s Day Card and Video Tutorial

Good Morning! Mother’s Day is a couple of weeks away so I used the sweet Stampin’ Up! Places in the Heart cling stamp set to make a Mother’s day card during my Facebook Live yesterday afternoon. I used it with the new Bright and Beautiful 6″ x 6″ designer series paper and you can find the currently available supplies I used at the bottom of my post along with the sizes of cardstock used.

You can watch my FB Live video on my Facebook page HERE. I also posted the video to my YouTube Channel and you can view it HERE.

I adhered a panel of striped Bright and Beautiful 6″ x 6″ designer series paper to the side of a lighter patterned panel of the DSP and adhered them both to the front of an Azure Afternoon card base with liquid glue. Azure Afternoon is one of the new core colors that is coming with the color refresh tomorrow!

I stamped the scene from the Stampin’ Up! Places in the Heart stamp set in Pebbled Path ink (one of the new 20223-2025 In Colors) and colored it with Stampin’ Blends. I used light Bubble Bath, light Petal Pink, light Pecan Pie, light Wild Wheat on the Mom and light Lemon Lime Twist, light Pecan Pie, light Smoky Slate and light Petal Pink on the child. I used a blending brush and mask to apply Azure Afternoon ink to the sky and used light Pretty Peacock Stampin’ Blend on the ground. I cut it out with the fourth largest Deckled Rectangle die.

I stamped the sentiment from the Welcoming Windows photopolymer stamp set in the sky and adhered it to an Azure Afternoon mat. I adhered a Lemon Lime Twist bow to the back with a glue dot and popped it on the card front with dimensionals. I finished the card front with pink Loose Frosted Gems.

For the inside of the card, I stamped the sentiment from the Stampin’ Up! Places in the Heart stamp set in Pebbled Path ink on a Basic White panel and trimmed the side with a strip of Bright and Beautiful DSP. I adhered the panel to the inside of the card with Stampin’ Seal.

So many of the inks, blends and card stocks I used are new colors that will be available on Tuesday when the new catalog launches. The new colors are also used in the Bright and Beautiful 6″ x 6″ DSP, and along with the sweet Stampin’ Up! Places In The Heart stamp set they make for a colorful, bright and beautiful Mother’s day card.


Last Chance Products Sale Ends Today!

This Last Chance Products promotion includes two lists of products that will no longer be available once the catalogs retire today. There will be one for the 2022-2023 Annual Catalog and one for the January-April 2023 Mini Catalog. For these retiring catalogs, you can find carryover products in the upcoming 2023-2024 Annual Catalog.

Items on the retiring list are only available while supplies last, so order soon to make sure that you are able to get the items that you are wanting! Some of the items will have sale prices listed with discounts up to 60% off.

The last day to order from these catalogs is TODAY!

Click HERE to download a PDF of the Retiring Last Chance Products from the 2022-2023 Annual Catalog.

Click HERE to download a PDF of the Retiring Last Chance Products from the January-April 2023 Mini Catalog.


New 2023-2024 Annual Catalog Opens Tomorrow!

The new Stampin’ Up! 2023-2024 Annual Catalog debuts tomorrow! I have sent out catalogs to my current customers. If you would like a copy, simply place an order and I will be happy to send you one, too!!

Get the complete details on the new 2023-2025 In Colors and the Color Refresh on my Stampin’ Up! Promotions Page.


Current Host Code: 6EDCPU4T

Use this host code when you order $50 or more and receive a Thank You gift from me!  The free gift is your choice of any item valued up to $10.00 currently available!

If your order is over $150, please do not use the host code since you’ll receive your own Host Dollars plus I’ll still send you the Thank You gift!  This host code can be used by anyone, no club or commitment required. Let me know if you have any questions.


If you need any stamping supplies, I’d be very happy to be your Demonstrator.  Just click on the Shop Now button on the right side of the screen to go directly to my online store or contact me if you have any questions.  Happy Stamping!

Thanks for stopping by and have a great week!

Akiko

  • Visit my online store here
  • See the current Stampin’ Up! clearance rack specials here
  • Earn FREE Stampin’ Up! products through my Wildflower Frequent Shopper Program – my way of saying thank you to my online frequent shopper customers.
  • Have any questions? I’d be happy to help, click here to contact me.

Cardstock Cuts for this project:

  • Azure Afternoon – 4-1/4″ x 11″ card base scored at 5-1/2″, 2-3/4″ x 4-1/8″ (art panel mat)
  • Basic White – 4″ x 5-1/4″ (inside panel),3″ x 4-1/4″ (art panel)
  • Bright and Beautiful 6″ x 6″ DSP – 4″ x 5-1/4″ (front background), 1-1/4″ x 5-1/4″ (front side strip), 1/2″ x 5-1/4″ (inside trim)

Stampin’ Up! products used in this project:


Stampin’ Up! Sentimental Park Thank You Card and Video Tutorial

Good Morning! The Stampin’ Up! Sentimental Park bundle is a wonderful photopolymer stamp set with gorgeous floral dies for making fancy labels. It’s full of sentiments for all occasions and some pretty florals that coordinate with the beautiful Regency Park 6″ x 6″ designer series paper. I used the bundle to make a simple gate fold thank you card during my Facebook Live yesterday and you can find the supplies I used at the bottom of my post along with the sizes of cardstock used.

You can watch my FB Live video on my Facebook page HERE. I also posted the video to my YouTube Channel and you can view it HERE.

I adhered plain panels of Regency Park 6″ x 6″ designer series paper to the back of floral panels to use as contrasting mats and adhered the panels to each side of the front of a gate fold card base.

I cut the layered label dies from the Stampin’ Up! Sentimental Park dies from Basic White. I stamped the sentiment in Night of Navy ink on the smaller one and slipped it into the larger floral label die cut. I love how the layered panels give the look of a double stitched edge!

I cut the small solid and outline flowers from the Stampin’ Up! Sentimental Park dies from Night of Navy card stock and Mango Melody Regency Park DSP and adhered them to the label. For the outline flowers, I applied adhesive sheets to the back of the DSP before die cutting and removed the backing from the die cut flowers before adhering them. I decorated the flower centers with rhinestones and adhered the label to the left side of the gate fold card front, being careful to apply adhesive to only one side of the card.

For the inside of the card, I stamped the small flowers from the Stampin’ Up! Sentimental Park stamp set in Night of Navy on the bottom of a Basic White panel. I used a Daffodil Delight Stampin’ Blend to color the centers and adhered the panel to a Regency Park mat before adhering the panel to the inside of the card. Here’s the finished card with the samples I made for my video.

The layered label from the Stampin’ Up! Sentimental Park bundle is gorgeous and pretty much all you need to make a beautiful card. Luckily the stamp set and dies are returning in the upcoming 2023 – 2024 Annual Catalog, but the bundle discount will no longer be offered. And sadly, the Regency Park DSP will be retiring soon, so now is the time to pick it up before it’s gone for good.


New 2023-2024 Annual Catalog Coming Soon!

The new Stampin’ Up! 2023-2024 Annual Catalog will debut on May 2, 2023! The Demonstrator pre-order is happening now, so there will be sneak peeks of wonderful new products and colors! I have sent out catalogs to my current customers. If you would like a copy, simply place an order and I will be happy to send you one, too!!

Get the complete details on the new 2023-2025 In Colors and the Color Refresh on my Stampin’ Up! Promotions Page.


Last Chance Products Sale Going On Now!

This Last Chance Products promotion includes two lists of products that will no longer be available once the catalogs retire on May 1, 2023. There will be one for the 2022-2023 Annual Catalog and one for the January-April 2023 Mini Catalog. For these retiring catalogs, you can find carryover products in the upcoming 2023-2024 Annual Catalog.

Items on the retiring list are only available while supplies last, so order soon to make sure that you are able to get the items that you are wanting! Some of the items will have sale prices listed with discounts up to 60% off.

Several wonderful retiring items have already sold out!

The last day to order from these catalogs will be May 1, 2023.

Click HERE to download a PDF of the Retiring Last Chance Products from the 2022-2023 Annual Catalog.

Click HERE to download a PDF of the Retiring Last Chance Products from the January-April 2023 Mini Catalog.


Current Host Code: 6EDCPU4T

Use this host code when you order $50 or more and receive a Thank You gift from me!  The free gift is your choice of any item valued up to $10.00 currently available!

If your order is over $150, please do not use the host code since you’ll receive your own Host Dollars plus I’ll still send you the Thank You gift!  This host code can be used by anyone, no club or commitment required. Let me know if you have any questions.


If you need any stamping supplies, I’d be very happy to be your Demonstrator.  Just click on the Shop Now button on the right side of the screen to go directly to my online store or contact me if you have any questions.  Happy Stamping!

Thanks for stopping by and have a great week!

Akiko

  • Visit my online store here
  • See the current Stampin’ Up! clearance rack specials here
  • Earn FREE Stampin’ Up! products through my Wildflower Frequent Shopper Program – my way of saying thank you to my online frequent shopper customers.
  • Have any questions? I’d be happy to help, click here to contact me.

Cardstock Cuts for this project:

  • Night of Navy – 5-1/2″ x 8-1/2″ card base scored at 2-1/8″ and 6-3/8″, 1″ x 2″ (die cut flowers)
  • Basic White – 3-7/8″ x 5-1/8″ (inside panel), 4-1/2″ x 5-1/4″ (die cut label layers)
  • Regency Park 6″ x 6″ DSP – 4″ x 5-1/4″ (inside mat), two 1-7/8″ x 5-1/4″ panels (front mats), two 1-3/4″ x 5-1/8″ panels (front background panels), 1″ x 2″ (die cut flowers)

Stampin’ Up! products used in this project:


Stampin’ Up! Something Fancy Thank You Cards

Good Morning! Here’s a sneak peek of some new products from the upcoming January – April Mini Catalog. I used the Stampin’ Up! Something Fancy bundle to make some cheery Thank You cards! I paired this bundle with the new Cane Weave 3D embossing folder and the Sale-A-Bration Dandy Designs designer series paper. These new products will be available on January 5, 2023. You can find the currently available supplies I used at the bottom of my post along with the sizes of cardstock used.

I wanted to focus on the pretty patterns in the Sale-A-Bration Dandy Designs designer series paper. This is an item that you can get for FREE with a $100 order during Sale-A-Bration starting January 5, 2023. It has 48 sheets of 12″ x 12″ double sided paper – 4 each of 12 designs. I only used 4 of the designs and paired them with coordinating cardstock and stamped in Memento Tuxedo Black ink to keep it simple.

I stamped the sentiment from the Stampin’ Up! Something Fancy cling stamp set in Memento Tuxedo Black ink on card stock. I cut it out with the hexagon die from the bundle. I used the large tag and teardrop dies from the bundle to cut a panel of Dandy Designs Sale-A-Bration DSP and adhered the hexagon label to it with dimensionals. I used the new Cane Weave 3D embossing folder to emboss another card stock panel and adhered it to the front of a Basic White note card with liquid glue. I used liquid glue to adhere the tag to the card front and finished it with a bow made with a coordinating ribbon and a glossy dot. I left the inside of the card blank – the note cards are pretty substantial so the card doesn’t look flimsy, and it leaves plenty of room for a personal note. Plus the note cards come with perfectly sized envelopes!

Here is a picture of most of the new supplies I used. I love that new cane weave embossing folder, it’s another great subtle texture background! Here’s the Stampin’ Up! Something Fancy bundle.

There are sentiments for lots of occasions and I love the casual elegance of the new script font. The coordinating label dies are also perfect – there are so many sizes and shape options that are going to be great for layering! And they will be great with other sentiments in your stash as well!

Tag cards are always fun and this one is easy to put together. But it’s also full of texture with the embossed background, dimension and embellishments. The January – April 2023 Mini Catalog and Sale-A-Bration start on January 5, 2023.


The July–December 2022 Mini Catalog will be retiring soon! It’s always bittersweet to see a classic Stampin’ Up! catalog take a trip to retirement. But, we’re looking forward to all the new products on their way—and we hope you are, too!

Stock up on your favorite products before they’re gone for good! Save up to 60% on essential craft supplies. What are you waiting for? Start shopping! After all, this selection of Last Chance Products is only available while supplies last – and many items have already sold out!!

Note that while some of the bundles are on the retiring list, the individual stamps and dies/punches may be carried over. These items are marked with three asterisks on the retiring lists. Also, if one of the items in the bundle is deeply discounted, the total price may be less than the bundled price, so pull out your calculators to double check.

Click HERE to download an Excel Spreadsheet of the Retiring Last Chance Items.

Click HERE to download a PDF of the Retiring Last Chance Items.

Click HERE to download a PDF of the Carryover List of items.

Shop early to get the items you want before they’re gone for good! Click HERE to shop in my Online Store 24×7!


The Fitting Florets Collection is Now Available!

Add just the right touch of elegance to any occasion, including Christmas and seasonal celebrations, with the sweet Fitting Florets Collection. From color schemes to sentiments and embellishments to dies, these unique products blend together so that your cards and crafts fit whatever occasion you might need. Send birthday wishes, express your gratitude, or spread Christmas cheer—with so many options to mix and match you’ll be set no matter the celebration all year!

The beautiful Framed Florets bundle is an early release from the upcoming January-June 2023 Mini catalog. The Framed & Festive cling stamp set, Fitting Florets designer series paper and gold adhesive backed swirls are only available during this promotion. Click on the picture below to download a flyer with the details.

Note: Sadly the Gold Adhesive-Backed Swirls have sold out.


Current Host Code: N6Z4VWV3

Use this host code when you order $50 or more and receive a free gift from me!  The free gift is your choice of any item currently available valued up to $10.00!

If your order is over $150, please do not use the host code since you’ll receive your own Host Dollars plus I’ll still send you the free gift!  This host code can be used by anyone, no club or commitment required. Let me know if you have any questions.


If you need any stamping supplies, I’d be very happy to be your Demonstrator.  Just click on the Shop Now button on the right side of the screen to go directly to my online store or contact me if you have any questions.  Happy Stamping!

Thanks for stopping by and have a great week!

Akiko

  • Visit my online store here
  • See the current Stampin’ Up! clearance rack specials here
  • Earn FREE Stampin’ Up! products through my Wildflower Frequent Shopper Program – my way of saying thank you to my online frequent shopper customers.
  • Have any questions? I’d be happy to help, click here to contact me.

Cardstock Cuts for this project:

  • Basic White Note Cards and Envelopes – scored card base
  • Card Stock (Pale Papaya, Fresh Freesia, Pool Party and Balmy Blue) – 3″ x 4-1/2″ panels (embossed panel), 1-3/4″ x 3″ (hexagon label)
  • Dandy Designs DSP – 2-1/2″ x 3-1/2″ (die cut tag)

Stampin’ Up! products used in this project:


Stampin’ Up! Wildlife Wonder for the Happy Inkin’ Thursday Blog Hop

Good morning and welcome to the Happy Inkin’ Thursday Blog Hop! I made a masculine thank you card with the wonderful Stampin’ Up! Wildlife Wonder cling stamp set. You can find the supplies I used along with card stock cuts at the bottom of my post.

We have a theme challenge this week and we are making cards with critters! How fun!

And I’m entering my card in the challenge at the Card Concept #177. The theme for this Challenge is ‘Make it Masculine’ and I was inspired by the plaids and outdoor themes in the inspiration picture to make a clean and layered card. Here is the inspiration picture:

I adhered a panel of plaid He’s the Man designer series paper to an Early Espresso mat and wrapped a length of natural ribbon around it, securing it in the back with tape. I adhered it to a Crumb Cake card base with dimensionals. I used a blending brush to blend Soft Suede ink on a wood grained panel of Heart and Home DSP and I love how it came out! I adhered that panel to an Early Espresso mat and then popped it on the card front with dimensionals.

I stamped the wolf from the Stampin’ Up! Wildlife Wonder stamp set in Early Espresso on Basic White and colored the wolf with Crumb Cake Stampin’ Blends and the rock in Gray Granite. I stamped the image again on masking paper and fussy cut it out. I covered the wolf with the mask and stamped the ground in Old Olive multiple times with the ground stamp.

I cut a circle in another sheet of masking paper and used it to make a Mango Melody sun behind the wolf with a blending brush. I covered the sun with the circle mask and blended the sky background in Balmy Blue ink with a blending brush. I removed all the masks and stamped the sentiment from the Stampin’ Up! Wildlife Wonder Stamp set in Early Espresso ink. I adhered the wolf panel to an Early Espresso mat and adhered it to the card front with liquid glue. I finished the card with three rustic metallic dots.

For the inside, I stamped the sentiment from the Stampin’ Up! Wildlife Wonder stamp set in Early Espresso on a Basic White panel. I stamped the plant in Old Olive and colored the tops with light Pumpkin Pie Stampin’ Blend. I blended Soft Suede on another woodgrain panel of Heart and Home DSP and adhered it to the side of the panel with liquid glue. I adhered the panel to the inside of the card with Stampin’ Seal.

The Stampin’ Up! Wildlife Wonder stamp set is another in a long line of gorgeous Stampin’ Up! natural wildlife stamp sets, and it’s another winner! These are perfect for masculine cards for any occasion and I have always enjoyed making natural backgrounds using different coloring techniques.

On with the Hop! Click on the Next Blog button to move forward to see the beautiful project Karen Ksenzakovic has created.

If you get lost along the way, here are the participants for the hop:


Current Host Code: MHHQUNTF

Use this host code when you order $50 or more and receive a free gift from me!  The free gift is your choice of any available item valued up to $10.00 in the 2022 – 2023 Annual Catalog or the January – June 2022 Mini Catalog!

If your order is over $150, please do not use the host code since you’ll receive your own Host Dollars plus I’ll still send you the free gift!  This host code can be used by anyone, no club or commitment required. Let me know if you have any questions.


If you need any stamping supplies, I’d be very happy to be your Demonstrator.  Just click on the Shop Now button on the right side of the screen to go directly to my online store or contact me if you have any questions. 

Thanks for stopping by and Happy Stamping!

Akiko

  • Visit my online store here
  • See the current Stampin’ Up! clearance rack specials here
  • Earn FREE Stampin’ Up! products through my Wildflower Frequent Shopper Program – my way of saying thank you to my online frequent shopper customers.
  • Have any questions? I’d be happy to help, click here to contact me.

Cardstock Cuts for this project:

  • Crumb Cake – 5-1/2″ x 8-1/2″ card base scored at 4-1/4″
  • Early Espresso – 4″ x 5-1/4″ (front mat), 2-7/8″ x 3-7/8″ (DSP mat), 2-3/8″ x 2-7/8″ (wolf mat)
  • Basic White – 4″ x 5-1/4″ (inside panel), 2-1/4″ x 2-3/4″ (art panel)
  • He’s The Man DSP – 3-7/8″ x 5-1/8″ (front background)
  • Heart & Home DSP – 2-3/4″ x 3-3/4″ (front wood grain panel), 1″ x 4″ (inside trim)

Stampin’ Up! products used in this project:


Stampin’ Up! Welcoming Window for the Happy Inkin’ Thursday Blog Hop

Good morning and welcome to the Happy Inkin’ Thursday Blog Hop! I was happy to bring out the pretty Stampin’ Up! Welcoming Window bundle for our color challenge this week, and I was glad that I got so many of our colors in the card – the only one I missed was Petal Pink. You can find the supplies I used along with card stock cuts at the bottom of my post.

We have a Color Challenge this week and here’s the pretty color palette we are using:

I stamped the grass from the Paradise Palms cling stamp set across the bottom of a panel of brick Bloom Where You’re Planted designer series paper in Pear Pizzazz and adhered it to the front of a Poppy Parade card base. I stamped three of the wide pots from the Stampin’ Up! Welcoming Window photopolymer stamp set in Pumpkin Pie ink on Basic White and cut them out with the coordinating die.

I stamped four of the bushy plant greens from the Stampin’ Up! Welcoming Window stamp set in Pear Pizzazz on Basic White. I stamped three of the flower stamps that go with the bushy plant in Highland Heather and stamped the fourth in Poppy Parade and cut all four out with the coordinating die. I adhered the pots to the card in the grass with glue dots, and adhered the Highland Heather flowers on top with dimensionals. I stamped the window and two of the shutters in Crumb Cake ink on Basic White and cut them out with the coordinating dies. I adhered them to the card front with glue dots. I cut a panel of Crumb Cake with the shelf die and adhered it to the card front with dimensionals.

I stamped the pitcher in Pool Party, cut it out with the coordinating die and adhered it to the card with glue dots. I popped the Poppy Parade flowers on the vase with dimensionals. I stamped the sentiment from the Stampin’ Up! Welcoming Window stamp set in Poppy Parade on a panel of Bloom Where You’re Planted DSP and cut it out with the little tag die from the Hydrangea dies. I cut a piece of Basic White with the same die and adhered it to the back of the DSP die cut and looped a length of Linen Thread through the tag before adhering it to the card front.

For the inside, I stamped the pitcher from the Stampin’ Up! Welcoming Window stamp set in Pool Party ink on the bottom of a Basic White panel. I stamped the bushy plant greens in Pear Pizzazz and the coordinating flowers in Poppy Parade on top of the pitcher and adhered the panel to the inside of the card with Stampin’ Seal.

The Stampin’ Up! Welcoming Window bundle is so versatile with stamped and die cut windows and lots of accessories and great sentiments – especially for Spring! And it’s on sale with Savings are in Bloom going on this month!!

On with the Hop! Click on the Next Blog button to move forward to see the beautiful project Karen Ksenzakovic has created.

If you get lost along the way, here are the participants for the hop:


Savings Are In Bloom During March!

During the month of March, you can snag the Mini Stampin’ Cut & Emboss Machine at a 20% discount! This miniature machine is compatible with a large selection of Stampin’ Up! embossing folders and dies. Build your craft collection and combine the Mini Stampin’ Cut & Emboss Machine with any (or all!) of the select stamp-and-die bundles that are also available for 20% off during the month of March!

Click on the image below to download a PDF with all the details, including all the stamp bundles that will be on sale and the discounted prices! Click HERE to shop for these discounted items in my Online Store.


Last Day to Sign up for March Paper Pumpkin Kit – Beyond the Horizon!

The Beyond the Horizon Paper Pumpkin Kit includes watercolor prints and designs inspired by the beautiful nature around us to create nine cards and coordinating envelopes. And this month’s kit includes another FREE stamp set inside (yes—that’s two stamp sets in one kit!) as Paper Pumpkin’s way of saying THANK YOU!

Here are the Details:

  • This month’s kit contains enough elements to create 9 cards—3 each of 3 designs—and 9 coordinating envelopes.
    • Card size – 4-1/4″ x 5-1/2″
    • Envelope size – 4-1/2″ x 5-3/4″
  • This kit includes printed card bases, die-cut paper pieces, embellishments, adhesive, and more!
  • The Beyond the Horizon kit includes a Misty Moonlight Stampin’ Spot.
  • Elegant watercolor designs curated by our in-house artists to take your crafting to the next level
  • This kit’s stamp set is perfect for any occasion. With sentiments that say “thanks”, “hello”, “thinking of you,” and so many more, you’ll be able to use this stamp set year round.
  • And if you thought one stamp set was great just wait—this month’s kit comes with a BONUS stamp set for FREE! 
  • This kit perfectly coordinates with the New Horizon Suite in the Jan-June Mini catalog.

Coordinating Colors:  Bumblebee, Calypso Coral, Evening Evergreen, Misty Moonlight, Night of Navy, Old Olive, Pale Papaya

f you’re interested in subscribing to Paper Pumpkin, you can either sign up for a subscription where you are billed monthly for your kit or you can purchase a prepaid subscription in my Online Store. To see more information and to sign up for the monthly subscription click here. To see the options for prepaid subscriptions in my Online Store, click here.


Current Host Code: MPMDW6BG

Use this host code when you order $50 or more and receive a free gift from me!  The free gift is your choice of any item valued up to $10.00 in the 2021 – 2022 Annual Catalog or the January – June 2022 Mini Catalog!

If your order is over $150, please do not use the host code since you’ll receive your own Host Dollars plus I’ll still send you the free gift!  This host code can be used by anyone, no club or commitment required. Let me know if you have any questions.


If you need any stamping supplies, I’d be very happy to be your Demonstrator.  Just click on the Shop Now button on the right side of the screen to go directly to my online store or contact me if you have any questions. 

Thanks for stopping by and Happy Stamping!

Akiko

  • Visit my online store here
  • See the current Stampin’ Up! clearance rack specials here
  • Earn FREE Stampin’ Up! products through my Wildflower Frequent Shopper Program – my way of saying thank you to my online frequent shopper customers.
  • Have any questions? I’d be happy to help, click here to contact me.

Cardstock Cuts for this project:

  • Poppy Parade – 4-1/4″ x 11″ card base scored at 5-1/2″
  • Crumb Cake – 1″ x 3″ (die cut shelf)
  • Basic White – 4″ x 5-1/4″ (inside panel), 1-1/4″ x 1-1/4″ (tag), 1-1/2″ x 1-1/2″ (pitcher), 1-1/4″ x 3″ (die cut pots), 2″ x 6″ (die cut bushy flowers), 3″ x 4-1/2″ (die cut window and shutters)
  • Bloom Where You’re Planted DSP – 4″ x 5-1/4″ (front background), 1-1/4″ x 1-1/4″ (tag)

Stampin’ Up! products used in this project:


Stampin’ Up! On the Horizon for the Happy Inkin’ Thursday Blog Hop

Good morning and welcome to the Happy Inkin’ Thursday Blog Hop! For today’s card, I used the wonderful Stampin’ Up! On The Horizon bundle with the beautiful New Horizons 6″ x 6″ designer series paper to make a masculine thank you card with an outdoors landscape. You can find the supplies I used at the bottom of my post along with the sizes of cardstock used.

We have a sketch challenge this week. Here is the pretty sketch we are using:

I embossed a panel of Gray Granite with the Timeworn Type embossing folder and adhered it to the front of a Gray Granite card base. I stamped the grass stamp from the Stampin’ Up! On The Horizon cling stamp set in Evening Evergreen on a panel of New Horizons 6″ x 6″ designer series paper. I stamped the birds in the sky with Basic Gray ink and adhered the image to a Misty Moonlight mat.

I stamped stamped a Basic White panel with the wood stamp from the Stampin’ Up! On The Horizon stamp set using stamped off Gray Granite ink and cut it out with the fence die from the Horizon Dies. I used a sponge dauber to add more Gray Granite ink to distress the fence, giving it a weathered look. I used the grass die to cut three clumps from an Evening Evergreen panel of the New Horizons 6″ x 6″ DSP. I trimmed the end off the first and adhered it to the DSP over the stamped grass. I gently curved the fence and applied liquid glue to the first and last slat and adhered it to the panel over the grasses. I trimmed the end off the second die cut grass and adhered it under the fence with dimensionals.

I inked up the thanks part of the sentiment from the Stampin’ Up! On The Horizon stamp set in Misty Moonlight ink and stamped it on a Gray Granite panel. I cut it out with the Messages die and adhered it to the panel with glue dots. I adhered the panel to the card front with dimensionals and adhered some Pebbles Enamel Shapes to the bottom around the fence and grasses.

For the inside, I stamped the grass stamp from the Stampin’ Up! On The Horizon stamp set in Evening Evergreen ink in the corner of a Basic White panel. I stamped the birds in the top corner using Basic Gray ink. I adhered a strip of New Horizons 6″ x 6″ DSP to the bottom and adhered the last grass die cut on top. I adhered the panel to the inside of the card.

The Stampin’ Up! On the Horizon bundle is a lot of fun with it’s unique dies and great sentiments. And with the beautiful New Horizons 6″ x 6″ DSP, it is so easy to make beautiful watercolor landscape or seascape cards and be creative!

On with the Hop! Click on the Next Blog button to move forward to see the beautiful project Karen Ksenzakovic has created.

If you get lost along the way, here are the participants for the hop:


Earn Free Products During Sale-A-Bration: Jan 4 – Feb 28 2022!

Sale-A-Bration is one of Stampin’ Up!’s biggest promotions of the year with fun for everyone!  There are fantastic Sale-A-Bration specials for ShoppingHosting and Joining! See my  Promotions Page for more details or contact me and I’ll be happy to tell you more! But hurry because these specials are only available through February 28, 2022 or while supplies last!


Current Host Code: 3QYMGKQY

Use this host code when you order $50 or more and receive a free gift from me!  The free gift is your choice of any item valued up to $10.00 in the 2021 – 2022 Annual Catalog or the January – June 2022 Mini Catalog!

If your order is over $150, please do not use the host code since you’ll receive your own Host Dollars plus I’ll still send you the free gift!  This host code can be used by anyone, no club or commitment required. Let me know if you have any questions.


If you need any stamping supplies, I’d be very happy to be your Demonstrator.  Just click on the Shop Now button on the right side of the screen to go directly to my online store or contact me if you have any questions. 

Thanks for stopping by and Happy Stamping!

Akiko

  • Visit my online store here
  • See the current Stampin’ Up! clearance rack specials here
  • Earn FREE Stampin’ Up! products through my Wildflower Frequent Shopper Program – my way of saying thank you to my online frequent shopper customers.
  • Have any questions? I’d be happy to help, click here to contact me.

Cardstock Cuts for this project:

  • Gray Granite – 4-1/4″ x 11″ card base scored at 5-1/2″, 4-1/4″ x 5-1/2″ (embossed background), 1″ x 2″ (label)
  • Misty Moonlight – 3″ x 4-3/4″ (front mat)
  • Basic White – 4″ x 5-1/4″ (inside panel), 2″ x 2″ (die cut fence)
  • New Horizons 6″ x 6″ DSP – 2-3/8″ x 4-5/8″ (art panel), 2-1/2″ x 3″ (die cut grasses), 1/2″ x 4″ (inside trim)

Stampin’ Up! products used in this project:


Stampin’ Up! Amazing Silhouettes Thank You Card Video Tutorial

Good Morning! It’s been a while since I’ve done a video tutorial, so this is a bit rough. But I used the pretty Stampin’ Up! Amazing Silhouettes bundle to make a simple thank you card in cheery Granny Apple Green. I love the layered word dies that come in the bundle and I paired it with the pretty Sale-A-Bration Friendly Hello designer series paper. You can find the supplies I used at the bottom of my post along with the sizes of cardstock used.

Here is the video of my Facebook Live from yesterday afternoon. I also posted a copy of the video in my YouTube channel and you can view it here if you prefer.

I adhered a panel of the pretty Granny Apple Green Friendly Hello designer series paper to the front of a Granny Apple Green card base. I stamped the tree from the Stampin’ Up! Amazing Silhouettes cling stamp set in Granny Apple Green on a Basic White panel. I embossed the panel with the Painted Texture 3D Embossing Folder and adhered it to a Granny Apple Green mat.

I used the thanks word dies from the Stampin’ Up! Amazing Silhouettes bundle to cut Granny Apple Green and Basic White panels. I adhered them together with liquid glue and adhered them to the stamped and embossed panel.

I used dimensionals to adhere the tree and die cut word to the card front and finished it with three Elegant Faceted gems to add sparkle.

For the inside of the card, I stamped the leaf cluster from the Sale-A-Bration Friendly Hello stamp set in Granny Apple Green in the corner of a Basic White panel. I adhered a strip of Friendly Hello DSP to the bottom and adhered the panel to the inside of the card. And then I finished the envelope by stamping the tree silhouette on the side of the envelope!

I love the Stampin’ Up! Amazing Silhouettes bundle! As you can see, it’s pretty easy to make simple yet impressive cards with it!


Earn Free Products During Sale-A-Bration: Jan 4 – Feb 28 2022!

Sale-A-Bration is one of Stampin’ Up!’s biggest promotions of the year with fun for everyone!  There are fantastic Sale-A-Bration specials for Shopping, Hosting and Joining! And it’s happening through February 28, 2022!

SHOP 

During Sale-A-Bration you get to choose a FREE Sale-A-Bration product with every $50 or $100 you spend (before Shipping and tax). There are 7 items that are available for free with every $50 you spend and 2 items that are available for free with every $100 you spend.

HOST

Host a party during Sale-A-Bration and both you and your guests can earn FREE Sale-A-Bration products! Plus, place any party or personal order of $300 or more and receive the exclusive Calming Camellia cling stamp set for FREE! And you can even host a virtual party! Drop me an email at apsudano@stampininthemeadows.com if you are interested in setting up a host code for yourself to see if you can collect $300 in orders from yourself and your stamping friends to get that FREE stamp set!  I’m happy to set up a code just for you!

JOIN

And there is an awesome joining special during Sale-A-Bration! When you join as a Stampin’ Up! Demonstrator, you pay $99 for your starter kit and you get to choose $125 in product from any current catalog plus your starter kit ships for free! And if you join during Sale-A-Bration you get to pick two additional stamp sets to add to your starter kit for free! Contact me if you have any questions about joining and I’ll be happy to tell you more!


Current Host Code: 3QYMGKQY

Use this host code when you order $50 or more and receive a free gift from me!  The free gift is your choice of any item valued up to $10.00 in the 2021-2022 Annual Catalog or the January – June 2022 Mini Catalog!

If your order is over $150, please do not use the host code since you’ll receive your own Host Dollars plus I’ll still send you the free gift!  This host code can be used by anyone, no club or commitment required. Let me know if you have any questions.


If you need any stamping supplies, I’d be very happy to be your Demonstrator.  Just click on the Shop Now button on the right side of the screen to go directly to my online store or contact me if you have any questions.  Happy Stamping!

Thanks for stopping by and have a great week!

Akiko

  • Visit my online store here
  • See the current Stampin’ Up! clearance rack specials here
  • Earn FREE Stampin’ Up! products through my Wildflower Frequent Shopper Program – my way of saying thank you to my online frequent shopper customers.
  • Have any questions? I’d be happy to help, click here to contact me.

Cardstock Cuts for this project:

  • Granny Apple Green – 5-1/2″ x 8-1/2″ card base scored at 4-1/4″, 2-1/2″ x 5″ (front mat), 1-1/4″ x 3-1/2″ (die cut thanks word)
  • Basic White – 4″ x 5-1/4″ (inside panel), 2-3/8″ x 4-7/8″ (tree panel), 1-1/4″ x 3-1/2″ (die cut thanks word)
  • Friendly Hello DSP – 4-1/8″ x 5-3/8″ (front background), 1/2″ x 4″ (inside trim)

Stampin’ Up! products used in this project:


Stampin’ Up! Flowing Flowers Thank You Card

Good Morning! I am back home in PA and trying to get back into the swing of things. So I kept it kind of simple for today’s card with the Stampin’ Up! Flowing Flowers stamp set. This is a pretty floral stamp set with gorgeous sentiments and I did a lot of stamping!! You can find the supplies I used at the bottom of my post along with the sizes of cardstock used.

I started by randomly stamping the little bunch of flowers stamp in Pale Papaya ink all over a basic white panel. I adhered the panel to the front of a Pale Papaya card base with liquid glue.

I inked up the medium flower from the Stampin’ Up! Flowing Flowers stamp set in Pale Papaya ink and stamped it off once. Then I stamped it on a small Basic White Panel and stamped the sentiment in Basic Gray ink over the flower. I cut a panel of Pale Papaya with the Stitched So Sweetly die and adhered the stamped panel to the die cut scalloped rectangle with liquid glue.

I wrapped a length of Pale Papaya ribbon over some Stampin’ Seal and then adhered the label over the ribbon with dimensionals. I finished the label with three Basic Gray Matte dots.

I stamped the small bunch of flowers from the Stampin’ Up! Flowing Flowers stamp set in Pale Papaya ink in the corners of a Basic White panel. I adhered the panel to the inside of the card.

And then I even finished the envelope by stamping the medium flower from the Stampin’ Up! Flowing Flowers stamp set in the bottom corner in Pale Papaya ink! I love the shading that you get with the Distinktive stamps in this set. It gives dimension and texture to your stamping, even without using different ink colors. And it’s quick and easy!


Earn Free Products During Sale-A-Bration: Jan 4 – Feb 28 2022!

Sale-A-Bration is one of Stampin’ Up!’s biggest promotions of the year with fun for everyone!  There are fantastic Sale-A-Bration specials for Shopping, Hosting and Joining! And it’s happening through February 28, 2022!

SHOP 

During Sale-A-Bration you get to choose a FREE Sale-A-Bration product with every $50 or $100 you spend (before Shipping and tax). There are 7 items that are available for free with every $50 you spend and 2 items that are available for free with every $100 you spend.

HOST

Host a party during Sale-A-Bration and both you and your guests can earn FREE Sale-A-Bration products! Plus, place any party or personal order of $300 or more and receive the exclusive Calming Camellia cling stamp set for FREE! And you can even host a virtual party! Drop me an email at apsudano@stampininthemeadows.com if you are interested in setting up a host code for yourself to see if you can collect $300 in orders from yourself and your stamping friends to get that FREE stamp set!  I’m happy to set up a code just for you!

JOIN

And there is an awesome joining special during Sale-A-Bration! When you join as a Stampin’ Up! Demonstrator, you pay $99 for your starter kit and you get to choose $125 in product from any current catalog plus your starter kit ships for free! And if you join during Sale-A-Bration you get to pick two additional stamp sets to add to your starter kit for free! Contact me if you have any questions about joining and I’ll be happy to tell you more!


Current Host Code: 3QYMGKQY

Use this host code when you order $50 or more and receive a free gift from me!  The free gift is your choice of any item valued up to $10.00 in the 2021-2022 Annual Catalog or the July – December 2021 Mini Catalog!

If your order is over $150, please do not use the host code since you’ll receive your own Host Dollars plus I’ll still send you the free gift!  This host code can be used by anyone, no club or commitment required. Let me know if you have any questions.


If you need any stamping supplies, I’d be very happy to be your Demonstrator.  Just click on the Shop Now button on the right side of the screen to go directly to my online store or contact me if you have any questions.  Happy Stamping!

Thanks for stopping by and have a great week!

Akiko

  • Visit my online store here
  • See the current Stampin’ Up! clearance rack specials here
  • Earn FREE Stampin’ Up! products through my Wildflower Frequent Shopper Program – my way of saying thank you to my online frequent shopper customers.
  • Have any questions? I’d be happy to help, click here to contact me.

Cardstock Cuts for this project:

  • Pale Papaya – 4-1/4″ x 11″ card base scored at 5-1/2″, 2″ x 3″ (scalloped rectangle)
  • Basic White – two 4″ x 5-1/4″ panels (front background and inside panel), 1-1/4″ x 2-3/8″ (label)

Stampin’ Up! products used in this project:


Stampin’ Up! Welcoming Woods Thank You Card

Good Morning! Have you seen the beautiful Stampin’ Up! Welcoming Woods photopolymer stamp set? I finally got a chance to play with it this week and I love it!! I have seen several cards with a beautiful sunset and I wanted to make one and I am so happy with how it came out and how easy it was to do! You can find the supplies I used at the bottom of my post along with the sizes of cardstock used.

I was inspired by the As You See It Challenge #260 – Perpendicular for my card design:

I started by using Blending Brushes to apply So Saffron, Pumpkin Pie, Cajun Craze inks on a Basic White panel, blending them darker towards the bottom of the panel. Then I blended Pool Party, Bermuda Bay and Misty Moonlight to create the sky. This was so pretty and so easy! I stamped the trees from the Stampin’ Up! Welcoming Woods stamp set twice across the panel in Soft Suede to create the woods and cut it out with the third largest Stitched Rectangles die.

I stamped the leaves from the Stampin’ Up! Welcoming Woods stamp set in Pumpkin Pie and stamped the ground in Evening Evergreen. Note that I masked the tree from the second stamping each time so the ground would be behind the trees. I adhered the panel to a Sahara Sand mat. I stamped the sentiment in Evening Evergreen on a Sahara Sand strip and adhered it to a strip of Sahara Sand Tidings of Christmas DSP. I finished the panel with a small Cajun Craze leaf die cut from the Intricate Leaves dies and a Linen Thread bow.

I embossed a Soft Suede panel with the Bark 3D embossing folder and adhered a strip of Tidings of Christmas DSP to the side with liquid glue. I adhered the panel to the front of a Sahara Sand card base with liquid glue and adhered the art panel on top with dimensionals.

For the inside of the card, I stamped the last tree from the Stampin’ Up! Welcoming Woods stamp set in Soft Suede on the side of a Basic White panel. I stamped some Pumpkin Pie leaves by the tree and in the top corner and adhered another strip of Christmas Tidings DSP to the bottom. I adhered the panel to the inside of the card.

I drove on some of the country roads by my house this morning and saw so many of the trees starting to change color, so the pretty Fall Foliage is on it’s way! The Stampin’ Up! Welcoming Woods stamp set perfectly captures that look and feel. And this stamp set has some of the most beautiful sentiments!


Current Host Code: 29VEKU9M

Use this host code when you order $50 or more and receive a free gift from me!  The free gift is your choice of any item valued up to $10.00 in the 2021-2022 Annual Catalog or the July – December 2021 Mini Catalog!

If your order is over $150, please do not use the host code since you’ll receive your own Host Dollars plus I’ll still send you the free gift!  This host code can be used by anyone, no club or commitment required. Let me know if you have any questions.


If you need any stamping supplies, I’d be very happy to be your Demonstrator.  Just click on the Shop Now button on the right side of the screen to go directly to my online store or contact me if you have any questions.  Happy Stamping!

Thanks for stopping by and have a great week!

Akiko

  • Visit my online store here
  • See the current Stampin’ Up! clearance rack specials here
  • Earn FREE Stampin’ Up! products through my Wildflower Frequent Shopper Program – my way of saying thank you to my online frequent shopper customers.
  • Have any questions? I’d be happy to help, click here to contact me.

Cardstock Cuts for this project:

  • Sahara Sand – 5-1/2″ x 8-1/2″ card base scored at 4-1/4″, 3-1/8″ x 4-1/2″ (front mat), 1/2″ 3-1/4″ (front label)
  • Cajun Craze – 1″ x 1″ (die cut leaf)
  • Soft Suede – 3-3/4″ x 5″ (front embossed panel after embossing)
  • Basic White – 3-3/4″ x 5″ (inside panel)
  • Tidings of Christmas DSP – 1″ x 3-3/4″ (front strip), 1/2″ x 3-1/2″ (label backing), 1/2″ x 5″ (inside trim)

Stampin’ Up! products used in this project:

Welcoming Woods Photopolymer Stamp Set
$21.00
Stitched Rectangles Dies
$35.00
Intricate Leaves Dies
$28.00
Bark 3 D Embossing Folder
$10.00
Tidings Of Christmas 6" X 6" (15.2 X 15.2 Cm) Designer Series Paper
$11.50
Sahara Sand 8-1/2" X 11" Cardstock
$8.75
Cajun Craze 8-1/2" X 11" Cardstock
$8.75
Soft Suede 8-1/2" X 11" Cardstock
$8.75
Basic White 8 1/2" X 11" Cardstock
$9.75
So Saffron Classic Stampin' Pad
$7.50
Pumpkin Pie Classic Stampin' Pad
$7.50
Cajun Craze Classic Stampin' Pad
$7.50
Pool Party Classic Stampin' Pad
$7.50
Bermuda Bay Classic Stampin' Pad
$7.50
Misty Moonlight Classic Stampin' Pad
$7.50
Soft Suede Classic Stampin' Pad
$7.50
Evening Evergreen Classic Stampin' Pad
$7.50
Blending Brushes
$12.00
Linen Thread
$5.00
Stampin' Dimensionals
$4.00
Multipurpose Liquid Glue
$4.00
Mini Glue Dots
$5.25
Stampin' Seal
$8.00
Stampin' Cut & Emboss Machine
$120.00