Stampin’ Up! Magical Meadow for the Happy Inkin’ Thursday Blog Hop

Good Morning and welcome to the Happy Inkin’ Thursday Blog Hop! I’m not ready for Winter yet, but I was inspired by this beautiful scene in the One Horse Open Sleigh designer series paper and use the Stampin’ Up! Magical Meadow bundle to make a Winter Wishes card. You can find the supplies I used along with card stock cuts at the bottom of my post.

We have a pretty sketch challenge this week:

I adhered a panel of the One Horse Open Sleigh DSP to the front of a Boho Blue card base with liquid glue and adhered a dark wood grain panel of the DSP over it.

I cut two of the twiggy sprigs from the Stampin’ Up! Magical Meadow dies from dark silver foil and adhered them to the card with glue dots. I trimmed the bottoms with paper snips. I cut an Old Olive panel with the leafy sprig die and used white Pearlized Enamel Effects to apply the berries. After it dried, I adhered it to the card with glue dots and trimmed the bottom.

I stamped the sentiment from the Stampin’ Up! Magical Meadow cling stamp set in Misty Moonlight ink on a Basic White panel. I used the pretty circle die from the Labels Aglow dies to cut it out. I folded a length of Lemon Lolly ribbon and adhered it to the back of the label before adhering the label to the card with dimensionals. I tucked the trimmed sprigs under the right side of the label and finished the card front with white iridescent sequins.

For the inside of the card, I stamped the sentiment from the Stampin’ Up! Magical Meadow stamp set in Misty Moonlight ink on a Basic White panel. I stamped the leaf sprig in stamped off Old Olive in the top corner and trimmed the bottom with a strip of One Horse Open Sleigh DSP. I adhered the panel to the inside of the card with Stampin’ Seal.

Another card featuring the beautiful images in the One Horse Open Sleigh designer series paper pack. Doesn’t it go well with the Stampin’ Up! Magical Meadow bundle?

On with the Hop! Click on the Next Blog button to move forward to see the beautiful project Karen Ksenzakovic has created.

If you get lost along the way, here are the participants for the hop:


Current Host Code: ATSGGVYD

Use this host code when you order $50 or more and receive a free gift from me!  The free gift is your choice of any item currently available valued up to $10.00!

If your order is over $150, please do not use the host code since you’ll receive your own Host Dollars plus I’ll still send you the free gift!  This host code can be used by anyone, no club or commitment required. Let me know if you have any questions.


If you need any stamping supplies, I’d be very happy to be your Demonstrator.  Just click on the Shop Now button on the right side of the screen to go directly to my online store or contact me if you have any questions. 

Thanks for stopping by and Happy Stamping!

Akiko

  • Visit my online store here
  • See the current Stampin’ Up! clearance rack specials here
  • Earn FREE Stampin’ Up! products through my Wildflower Frequent Shopper Program – my way of saying thank you to my online frequent shopper customers.
  • Have any questions? I’d be happy to help, click here to contact me.

Cardstock Cuts for this project:

  • Boho Blue – 4-1/4″ x 11″” card base scored at 5-1/2″
  • Old Olive – 1-1/2″ x 4″ (die cut leaf sprig)
  • Silver Foil – 1-1/2″ x 6″ (die branches)
  • Basic White – 4″ x 5-1/4″ (inside panel), 2″ x 2″ (label)
  • One Horse Open Sleigh 6″ x 6″ DSP – 4″ x 5-1/4″ (front background), 1″ x 3-1/2″ (front stripe), 1/2″ x 4″ (inside trim)

Stampin’ Up! products used in this project:


Stampin’ Up! Dainty Delight for the Happy Inkin’ Thursday Blog Hop

Good Morning and welcome to the Happy Inkin’ Thursday Blog Hop! Here’s a card made with the beautiful Stampin’ Up! Dainty Delight bundle and the pretty Country Floral Lane designer series paper. You can find the supplies I used along with card stock cuts at the bottom of my post.

We have a color challenge in the Blog Hop and here is the color palette we are using this week:

I adhered a panel of Country Floral Lane designer series paper to a Basic White mat. I stamped the sentiment from the Stampin’ Up! Dainty Delight cling stamp set in Mossy Meadow ink on a Basic White panel and cut it out with the third largest circle die from the Stylish Shapes dies.

I cut the Mossy Meadow panel with the large leaf vine die from the Stampin’ Up! Dainty Delight dies. I cut a Sweet Sorbet panel with the 4-flower die and cut a stem and two small leaf pairs from Mint Macaron. I adhered the flowers and leaves to the stem with glue dots and adhered them to the vine with glue dots. I cut two of the Queen Anne’s Lace type flowers from Mint Macaron, trimmed the stems and tucked them in the vine adhering them with glue dots. I cut three daisy like flowers from Petal Pink and adhered Crushed Curry flower centers to them before adhering them with glue dots.

I made a bow with Balmy Blue and White ribbon and adhered it with a glue dot. I finished the label with In Color Opal rounds and adhered the panel to the front of a Balmy Blue card base with dimensionals.

For the inside of the card, I stamped the the large bouquet from the Stampin’ Up! Dainty Delight stamp set in Mossy Meadow ink on the side of a Basic White panel. I colored the flowers with Petal Pink, Sweet Sorbet and Mint Macaron Stampin’ Blends and trimmed the bottom with a strip of Country Floral Lane DSP before adhering it to the inside of the card with Stampin’ Seal.

The Stampin’ Up! Dainty Delight bundle has beautiful die cut and stamped wild flowers on a smaller scale. The die cut flowers have beautiful debossed details and the stamped flowers have coordinating dies so you have the option of cutting them out. And the sentiments are beautiful too!

On with the Hop! Click on the Next Blog button to move forward to see the beautiful project Karen Ksenzakovic has created.

If you get lost along the way, here are the participants for the hop:


Current Host Code: ZYNDU2N9

Use this host code when you order $50 or more and receive a free gift from me!  The free gift is your choice of any available item valued up to $10.00 in the 2022-2023 Annual Catalog or the January-April 2023 Mini Catalog!

If your order is over $150, please do not use the host code since you’ll receive your own Host Dollars plus I’ll still send you the free gift!  This host code can be used by anyone, no club or commitment required. Let me know if you have any questions.


If you need any stamping supplies, I’d be very happy to be your Demonstrator.  Just click on the Shop Now button on the right side of the screen to go directly to my online store or contact me if you have any questions. 

Thanks for stopping by and Happy Stamping!

Akiko

  • Visit my online store here
  • See the current Stampin’ Up! clearance rack specials here
  • Earn FREE Stampin’ Up! products through my Wildflower Frequent Shopper Program – my way of saying thank you to my online frequent shopper customers.
  • Have any questions? I’d be happy to help, click here to contact me.

Cardstock Cuts for this project:

  • Balmy Blue – 4-1/4″ x 11″ card base scored at 5-1/2″
  • Mossy Meadow – 2-1/4″ x 5-1/4″ (large leaf vine die cut)
  • Mint Macaron – 3″ x 3″ (leaf and flower die cuts)
  • Petal Pink- 1-1/4″ x 3-1/2″ (flower die cuts)
  • Sweet Sorbet – 1″ x 2-1/2″ (flower die cuts)
  • Crushed Curry – 1″ x 2″ (flower centers)
  • Basic White – two 4″ x 5-1/4″ (front mat and inside panel), 2-1/2″ x 2-1/2″ (die cut circle)
  • Country Floral Lane DSP – 3-7/8″ x 5-1/8″ (front background), 1/2″ x 4″ (inside trim)

Stampin’ Up! products used in this project:


Stampin’ Up! Nature’s Prints with Video Tutorial

Good Morning! One of the prettiest packs of designer series paper currently available is the Splendid Day specialty DSP with it’s colored foils and floral prints. I wanted to use it for a special card and so I paired it with the beautiful sentiments and label dies from the Stampin’ Up! Nature’s Prints bundle. And then I realized that the flower from the new Framed Florets bundle went perfect with the DSP, so I pulled it in as well. You can find the supplies I used at the bottom of my post along with the sizes of cardstock used.

You can watch my Facebook live from yesterday afternoon HERE. I have also posted it to my YouTube Channel and you can view it HERE.

I embossed a panel of Petal Pink card stock with the Timeworn Type 3D embossing folder and adhered it to the front of a Petal Pink card base. I adhered panels of the beautiful Splendid Day specialty designer series paper to a Petal Pink panel with Stampin’ Seal. I cut a Basic White and Rose Gold foil panel with the leaf sprigs from the Splendid Stems dies (I cut two from the Rose Gold foil, saving one for the inside panel) and adhered them to the layered DSP panel with glue dots.

I folded a short length of Rose Gold and White striped ribbon and adhered it together with glue dots. I adhered it next to the sprigs on the layered DSP panel. I stamped the sentiment from the Stampin’ Up! Nature’s Prints cling stamp set in Versamark ink on a Basic White panel. I sprinkled it with copper embossing powder and shook off the excess. I heated the powder with my heat tool until it was bright and shiny and cut the sentiment out with the pretty label die. I adhered it to the panel with dimensionals over the ribbon and sprigs. I adhered the panel to the card front with dimensionals.

I stamped two flowers from the Framed Florets photopolymer stamp set in Versamark ink and sprinkled them with copper embossing powder. I shook off the excess powder and heated the flowers with my heat tool until they were bright and shiny. I cut them out with the coordinating die and saved one for the inside of the card. I adhered the second one to the card front with dimensionals and glue dots and finished the card with three champagne rhinestone jewels.

For the inside of the card, I inked up the large fern from the Stampin’ Up! Nature’s Prints stamp set in Petal Pink ink and stamped it off. Then I stamped it in the corner of a Basic White panel. I adhered the Rose Gold foil die cut sprig over the fern with dots of liquid glue. I adhered a strip of Splendid Day specialty DSP to the bottom of the panel and adhered the second flower on top with liquid glue. I adhered the panel to the inside of the card with Stampin’ Seal.

The gorgeous floral foil from the Splendid Day specialty designer series paper works well with the Rose Gold foil, copper embossing powder and rose gold striped ribbon. And the beautiful sentiments and label die from the Stampin’ Up! Nature’s Prints bundle are the perfect finish. Foils and embossing are easy ways to make an extra special card for any extra special occasion or loved one.


The Fitting Florets Collection is Now Available!

Add just the right touch of elegance to any occasion, including Christmas and seasonal celebrations, with the sweet Fitting Florets Collection. From color schemes to sentiments and embellishments to dies, these unique products blend together so that your cards and crafts fit whatever occasion you might need. Send birthday wishes, express your gratitude, or spread Christmas cheer—with so many options to mix and match you’ll be set no matter the celebration all year!

The beautiful Framed Florets bundle is an early release from the upcoming January-June 2023 Mini catalog. The Framed & Festive cling stamp set, Fitting Florets designer series paper and gold adhesive backed swirls are only available during this promotion. Click on the picture below to download a flyer with the details.

Watch this video that showcases the new and exclusive products from the Fitting Florets Collection:

The Fitting Florets collection is available now to Stampin’ Up! Demonstrators. And if you decide to join Stampin’ Up! this month, you can add items from this collection to your Starter Kit! Contact me if you have any questions.


Current Host Code: F7CW3QU3

Use this host code when you order $50 or more and receive a free gift from me!  The free gift is your choice of any item currently available valued up to $10.00 from the July-December 2022 Mini Catalog or the 2022-2023 Annual Catalog!

If your order is over $150, please do not use the host code since you’ll receive your own Host Dollars plus I’ll still send you the free gift!  This host code can be used by anyone, no club or commitment required. Let me know if you have any questions.


If you need any stamping supplies, I’d be very happy to be your Demonstrator.  Just click on the Shop Now button on the right side of the screen to go directly to my online store or contact me if you have any questions.  Happy Stamping!

Thanks for stopping by and have a great week!

Akiko

  • Visit my online store here
  • See the current Stampin’ Up! clearance rack specials here
  • Earn FREE Stampin’ Up! products through my Wildflower Frequent Shopper Program – my way of saying thank you to my online frequent shopper customers.
  • Have any questions? I’d be happy to help, click here to contact me.

Cardstock Cuts for this project:

  • Petal Pink – 4-1/4″ x 11″ card base scored at 5-1/2″, 4-1/4″ x 5-1/2″ (embossed background), 3-1/4″ x 4-1/8″ (DSP mat), 1-1/4” x 2-1/2” (die cut flowers)
  • Basic White – 4″ x 5-1/4” (inside panel), 1-3/4” x 3-3/4” (label), 1-1/4” x 2-1/2” (die cut sprig)
  • Rose Gold Foil – 1-1/4″ x 5″ (two die cut sprigs)
  • Splendid Day specialty DSP – 3″ x 4″ panel cut into 1″ x 4″ strips (floral background strips), 1/2” x 4” (inside trim)

Stampin’ Up! products used in this project:


Stampin’ Up! Fond Of Autumn for the Happy Inkin’ Thursday Blog Hop

Good morning and welcome to the Happy Inkin’ Thursday Blog Hop! Today I used the pretty Stampin’ Up! Fond Of Autumn bundle with the Rustic Harvest designer series paper for an Autumn Wishes card. You can find the supplies I used along with card stock cuts at the bottom of my post.

We have a fun color challenge this week. The Rustic Harvest DSP was perfect for this and I popped it with Sweet Sorbet.

I adhered a panel of Rustic Harvest designer series paper to a Basic Black card base with liquid glue. I cut the large floral dies from the Stampin’ Up! Fond Of Autumn bundle from Basic White using both the detailed die and the outline die. I cut the outline die from a Basic Black panel and adhered them together with liquid glue. I adhered the die cut to the card front with liquid glue.

I stamped the sentiment from the Stampin’ Up! Fond Of Autumn photopolymer stamp set in Versamark ink on Basic Black. I sprinkled it with white embossing powder and shook off the excess. I heat set the powder with my heat tool until it was shiny. I cut it out with the Stylish Shapes banner die and adhered it to the card front with dimensionals.

I stamped the flower from the Stampin’ Up! Fond Of Autumn stamp set in Memento Tuxedo Black ink and colored it with Sweet Sorbet and Basic Black Stampin’ Blends. I cut it out with the coordinating die. I adhered a folded length of black and white gingham ribbon and adhered it to the card front with glue dots. I adhered the flower over the ribbon and label with dimensionals and finished with three white dots.

For the inside of the card, I stamped the flower from the Stampin’ Up! Fond Of Autumn stamp set in Memento Tuxedo Black ink on a Basic White panel. I colored it with Sweet Sorbet and Basic Black Stampin’ Blends. I trimmed the bottom with a strip of Rustic Harvest DSP and adhered the panel to the inside of the card.

The Stampin’ Up! Fond Of Autumn bundle is really pretty and perfect for fall cards! I can’t wait to play with it again!

Click on the Next Blog button to move forward to see the beautiful project Karen Ksenzakovic has created.

If you get lost along the way, here are the participants for the hop:


Current Host Code: JSUNSU6D

Use this host code when you order $50 or more and receive a free gift from me!  The free gift is your choice of any available item valued up to $10.00 in the 2022-2023 Annual Catalog or the July-December 2022 Mini Catalog!

If your order is over $150, please do not use the host code since you’ll receive your own Host Dollars plus I’ll still send you the free gift!  This host code can be used by anyone, no club or commitment required. Let me know if you have any questions.


If you need any stamping supplies, I’d be very happy to be your Demonstrator.  Just click on the Shop Now button on the right side of the screen to go directly to my online store or contact me if you have any questions. 

Thanks for stopping by and Happy Stamping!

Akiko

  • Visit my online store here
  • See the current Stampin’ Up! clearance rack specials here
  • Earn FREE Stampin’ Up! products through my Wildflower Frequent Shopper Program – my way of saying thank you to my online frequent shopper customers.
  • Have any questions? I’d be happy to help, click here to contact me.

Cardstock Cuts for this project:

  • Basic Black – 4-1/4″ x 11″ card base scored at 5-1/2″, 3-1/4″ x 4-1/2″ (die cut flowers background), 1″ x 3-1/4″ (label)
  • Basic White – 4″ x 5-1/4″ (inside panel), 3-1/2″ x 4-1/2″ (die cut flowers), 1-1/2″ x 2″ (die cut flower)
  • Rustic Harvest DSP – 4-1/8″ x 5-3/8″ (front background), 1/2″ x 4″ (inside trim)

Stampin’ Up! products used in this project:


Stampin’ Up! Nature’s Prints Best Wishes Card

Good Morning! I hope you had a wonderful weekend. Today I have a simple card made with the Nature’s Prints bundle and Sun Prints designer series paper. And I really made it special by adding the beautiful die cut from the Artistic dies. It’s not really a fall theme card, but I hope you like it. You can find the supplies I used at the bottom of my post along with the sizes of cardstock used.

I embossed a beautiful panel of Sun Prints designer series paper with the Timeworn Type 3D embossing folder and adhered it to the front of a Night of Navy card base.

I cut a panel of white glimmer paper with the beautiful floral die from the Artistic dies and adhered it to the card front with tiny dots of liquid glue. It’s too bad you can’t see the sparkle from the glimmer paper, because it pops the white flowers in the DSP even more than normal!

I stamped the sentiment from the Stampin’ Up! Nature’s Prints cling stamp set in Versamark ink on Night of Navy. I sprinkled it with white embossing powder and shook off the excess. I heated the powder with my heat tool until it was shiny and then cut the sentiment out with the pretty label die. I accented the label with an iridescent pearl and adhered the label to the card front with dimensionals. I love the shiny embossed sentiment with the glimmer die cut!

For the inside of the card, I inked up the flower stamp from the Stampin’ Up! Nature’s Prints stamp set in Night of Navy ink and stamped it off 3 times. I stamped the flower in the corner of a Basic White panel. I embossed a strip of Sun Prints DSP with the Timeworn Type 3D embossing folder and adhered it to the bottom of the panel. I adhered the panel to the inside of the card with Stampin’ Seal.

The pretty floral die from the Artistic dies goes beautiful with the elegant Sun Prints DSP! And I love it with the sentiment and label die from the Stampin’ Up! Nature’s Prints bundle.


Perfect Partners – Exclusive Dies Available This Month!

Stampin’ Up! created six new die sets that coordinate with stamp sets in the 2022–2023 Annual Catalog and the July–December 2022 Mini Catalog. These coordinating dies will only be available during this promotion and will not be offered in any catalog.  Click on the picture below to open a flyer with all the details on the dies.

These stamp sets and dies are available separately or as a bundle. By buying the bundle, you will save 10% off the retail price.

Sales Period: September 1, 2022 – September 30, 2022 (while supplies last)


September Weekly Deals Going On Now!

Every week in the month of September Stampin’ Up! is offering a selection of discounted products. Discounts and product selection will vary from week to week. New products will be added each week on September 1, 8, 15, and 22.

Check my Online Store to see the this week’s deals!


Current Host Code: JSUNSU6D

Use this host code when you order $50 or more and receive a free gift from me!  The free gift is your choice of any item currently available valued up to $10.00 from the July-December 2022 Mini Catalog or the 2022-2023 Annual Catalog!

If your order is over $150, please do not use the host code since you’ll receive your own Host Dollars plus I’ll still send you the free gift!  This host code can be used by anyone, no club or commitment required. Let me know if you have any questions.


If you need any stamping supplies, I’d be very happy to be your Demonstrator.  Just click on the Shop Now button on the right side of the screen to go directly to my online store or contact me if you have any questions.  Happy Stamping!

Thanks for stopping by and have a great week!

Akiko

  • Visit my online store here
  • See the current Stampin’ Up! clearance rack specials here
  • Earn FREE Stampin’ Up! products through my Wildflower Frequent Shopper Program – my way of saying thank you to my online frequent shopper customers.
  • Have any questions? I’d be happy to help, click here to contact me.

Cardstock Cuts for this project:

  • Night of Navy – 4-1/4″ x 11″ card base scored at 5-1/2″, 1-3/4″ x 3-1/2″ (label)
  • White Glimmer – 3-3/4″ x 4-1/4″ (floral die cut)
  • Basic White – 4” x 5-1/4” (inside panel)
  • Sun Prints DSP – 4″ x 5-1/4″ (front background), 1/2″ x 4″ (inside trim)

Stampin’ Up! products used in this project:


Stampin’ Up! Nature’s Prints Best Wishes Card

Good Morning! Here’s a simple monotone Best Wishes card made with the Stampin’ Up! Nature’s Prints bundle and the gorgeous Sun Prints designer series paper. My card is in shades of Gray Granite and Basic White with touches of sparkle in the glitter ribbon and rhinestone gems. You can find the supplies I used at the bottom of my post along with the sizes of cardstock used.

I embossed a panel of Sun Prints designer series paper with the Fern 3D embossing folder and adhered the panel to a Gray Granite mat with liquid glue. I popped it on the front of a Gray Granite card base with dimensionals.

I cut a Basic White panel with the wreath from the Natural Prints dies and adhered it to the card front with glue dots. I stamped the sentiment from the Stampin’ Up! Nature’s Prints cling stamp set in Versamark ink on Gray Granite. I sprinkled it with white embossing powder and shook off the excess. I heated the powder until it was shiny and cut it out with the label die.

I popped the label on the card front with dimensionals. I made a bow with white organdy glitter ribbon and adhered it with a glue dot and added clear rhinestones all around the wreath.

For the inside of the card, I stamped the sprig from the Stampin’ Up! Nature’s Prints stamp set in Gray Granite on the side of a Basic White panel. I adhered the panel to the inside of the card.

The Stampin’ Up! Nature’s Prints bundle has beautiful images of ferns and wildflowers along with the sweetest sentiments. The label die is gorgeous with an embossed border and the the other dies will cut the stamped images and the pretty wreath. It’s perfect paired with the Sun Prints designer series paper, or with the Pretty Prints DSP for additional color options.


Sale-A-Bration is Going on Now!

With Sale-A-Bration going on through August 31, and the new Mini Catalog, now is a great time to stock up on supplies for Holiday card making and gifts. For every $50 or $100 in orders (before shipping and taxes) you get to choose a free item from nine available stamp sets, dies and papers. And there are extra bonuses for Hosting and Joining Too. Click HERE to download the Sale-A-Bration brochure to learn more. Please note that Sale-A-Bration items are only available while supplies last, so shop early to get the bonus item you really want!


The July Paper Pumpkin Kit is Sending Good Thoughts

Set sail with across the ocean with the Sending Good Thoughts Paper Pumpkin Kit! With beautifully designed nautical imagery, a fun message in a bottle motif, and sentiments that are “shore” to please, this month’s kit is full of warmth and fun.

The July Kit includes:

  • Supplies to create 9 cards—3 each of 3 designs—and 9 coordinating envelopes
  • Printed dry-embossed card bases and printed envelopes
    • Card size: 4-1/4″ x 5-1/2″
    • Envelope Size: 4-1/2″ x 5-3/4″
  • Twine, mini glue dots and dimensionals
  • Sending Good Thoughts Photopolymer stamp set
  • Bermuda Bay Classic Stampin’ Spot

Coordinating Colors: Balmy Blue, Basic Gray, Bermuda Bay, Fresh Freesia, Pacific Point, Poppy Parade

If you’re interested in subscribing to Paper Pumpkin, you can either sign up for a subscription where you are billed monthly for your kit or you can purchase a prepaid subscription in my Online Store. To see more information and to sign up for the monthly subscription click here. To see the options for prepaid subscriptions in my Online Store, click here.

Sign up deadline for the July 2022 kit is July 10, 2022. Note: Supplies may be limited toward the end of the subscription period.


Current Host Code: QNGMH7CB

Use this host code when you order $50 or more and receive a free gift from me!  The free gift is your choice of any item currently available valued up to $10.00 from the January – June 2022 Mini Catalog or the 2022-2023 Annual Catalog!

If your order is over $150, please do not use the host code since you’ll receive your own Host Dollars plus I’ll still send you the free gift!  This host code can be used by anyone, no club or commitment required. Let me know if you have any questions.


If you need any stamping supplies, I’d be very happy to be your Demonstrator.  Just click on the Shop Now button on the right side of the screen to go directly to my online store or contact me if you have any questions.  Happy Stamping!

Thanks for stopping by and have a great week!

Akiko

  • Visit my online store here
  • See the current Stampin’ Up! clearance rack specials here
  • Earn FREE Stampin’ Up! products through my Wildflower Frequent Shopper Program – my way of saying thank you to my online frequent shopper customers.
  • Have any questions? I’d be happy to help, click here to contact me.

Cardstock Cuts for this project:

  • Gray Granite – 5-1/2″ x 8-1/2″ card base scored at 4-1/4″, 3-3/8″ x 3-7/8″ (front mat), 2″ x 4″ (label)
  • Basic White – 3-1/2″ x 4-3/4″ (inside panel), 3-1/4″ x 3-1/4″ (die cut wreath)
  • Sun Prints DSP – 3-1/4″ x 3-3/4″ (front background)

Stampin’ Up! products used in this project:


Stampin’ Up! Cottage Rose Best Wishes Card

Good Morning! I used the one of the pretty floral pattern papers from the Abigail Rose designer series paper with the wonderful Stampin’ Up! Cottage Rose bundle to make a simple Best Wishes card. You can find the supplies I used at the bottom of my post along with the sizes of cardstock used.

I adhered a panel of Abigail Rose designer series paper to an Early Espresso mat. I cut the double flower from Petal Pink card stock using the Cottage Flowers dies in the Stampin’ Up! Cottage Rose bundle. I adhered the flower to the DSP panel with liquid glue and wrapped it with a pink ribbon and tied a bow.

I stamped the sentiment from the Stampin’ Up! Cottage Rose cling stamp set in Early Espresso ink on a Crumb Cake panel and cut it out with the die from the Painted Labels dies. I adhered the label to the DSP panel with glue dots and popped the panel and label on the front of a Petal Pink card base with dimensionals.

I finished the card front with three Polished Dots.

For the inside of the card, I stamped the the large rose from the Stampin’ Up! Cottage Rose stamp set in Petal Pink on a Basic White panel after stamping off once. I trimmed the bottom with a strip of Abigail Rose DSP and adhered the panel to the inside of the card.

The Abigail Rose DSP has a rustic, homespun look that goes well with the elegance of the images in the Stampin’ Up! Cottage Rose bundle. I love the browns with the Petal Pink, the die cut outline flower really pops. Thanks for taking a look!


Current Host Code: ZFMCWFCA

Use this host code when you order $50 or more and receive a free gift from me!  The free gift is your choice of any item valued up to $10.00 from the January – June 2022 Mini Catalog or the 2022-2023 Annual Catalog!

If your order is over $150, please do not use the host code since you’ll receive your own Host Dollars plus I’ll still send you the free gift!  This host code can be used by anyone, no club or commitment required. Let me know if you have any questions.


If you need any stamping supplies, I’d be very happy to be your Demonstrator.  Just click on the Shop Now button on the right side of the screen to go directly to my online store or contact me if you have any questions.  Happy Stamping!

Thanks for stopping by and have a great week!

Akiko

  • Visit my online store here
  • See the current Stampin’ Up! clearance rack specials here
  • Earn FREE Stampin’ Up! products through my Wildflower Frequent Shopper Program – my way of saying thank you to my online frequent shopper customers.
  • Have any questions? I’d be happy to help, click here to contact me.

Cardstock Cuts for this project:

  • Petal Pink – 4-1/4″ x 11″ card base scored at 5-1/2″, 2-1/4″ x 2-1/4″ (die cut flowers)
  • Crumb Cake – 3-1/4″ x 3″ (label)
  • Early Espresso – 3-1/4″ x 4-1/8″ (front mat)
  • Basic White – 3-3/4″ x 5″ (inside panel)
  • Abigail Rose DSP – 3-1/8″ x 4″ (front background), 1/2″ x 3-3/4″ (inside trim)

Stampin’ Up! products used in this project:


Stampin’ Up! Happiness Abounds Best Wishes Card

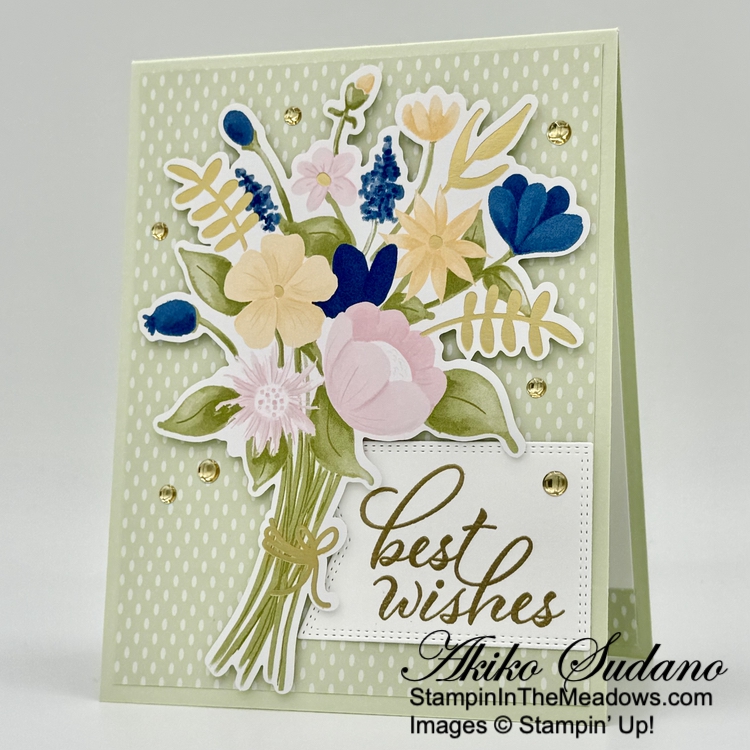
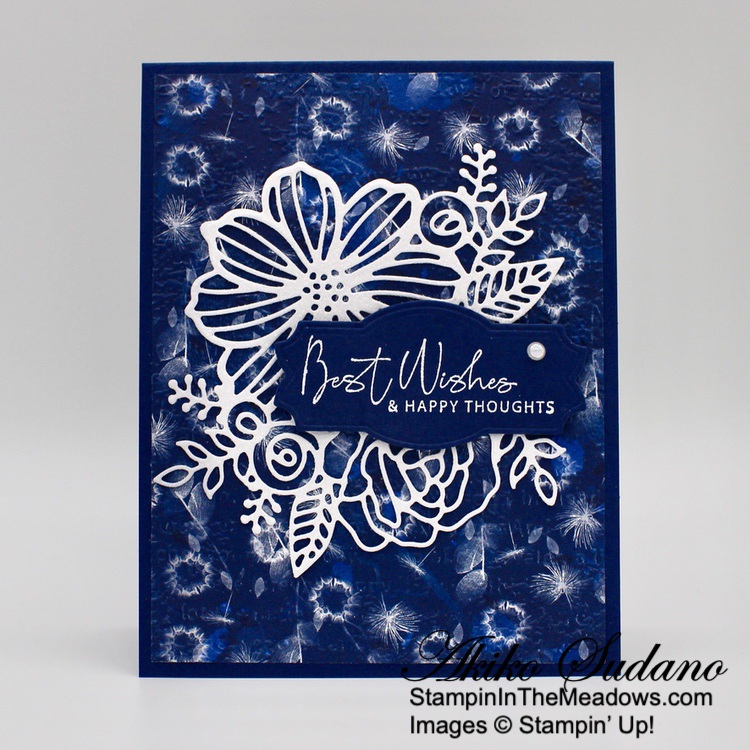
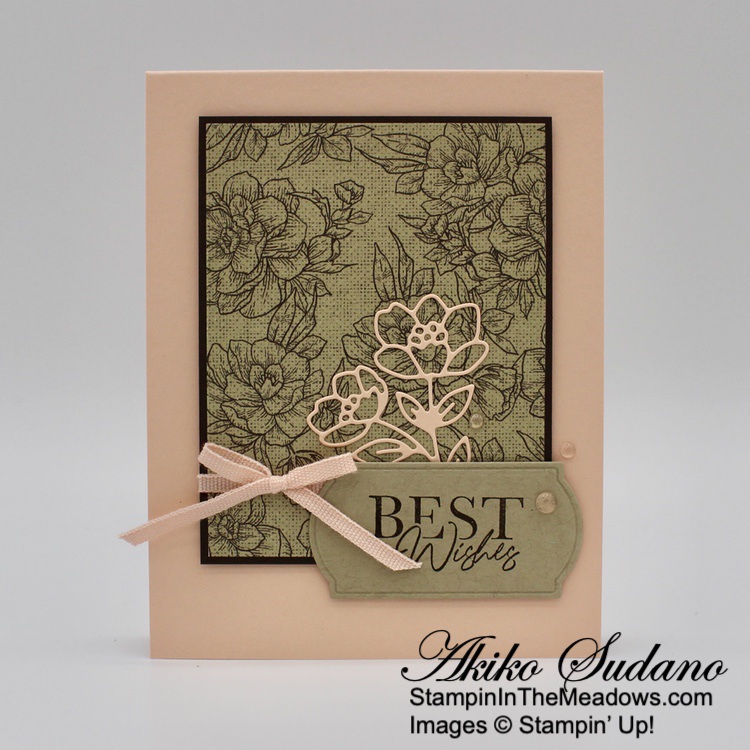
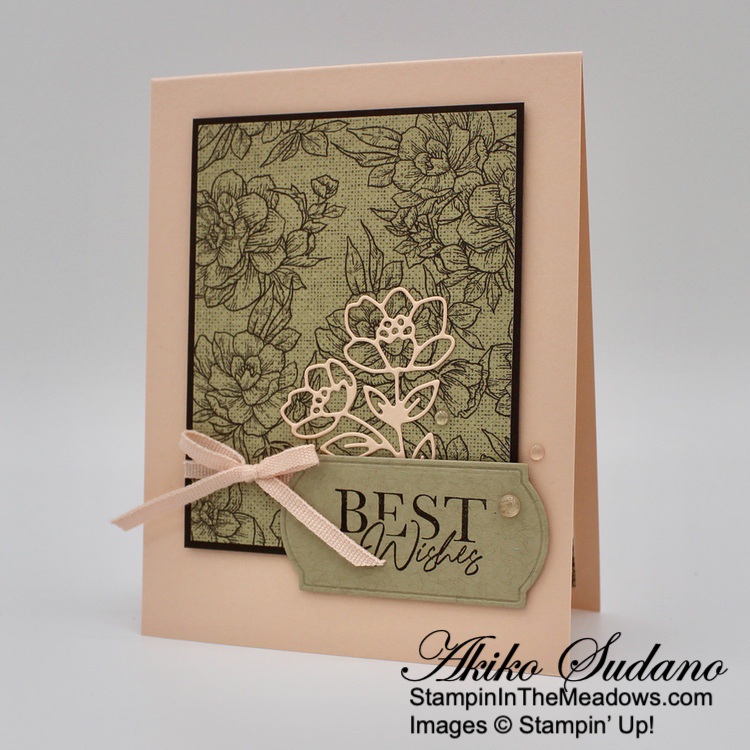
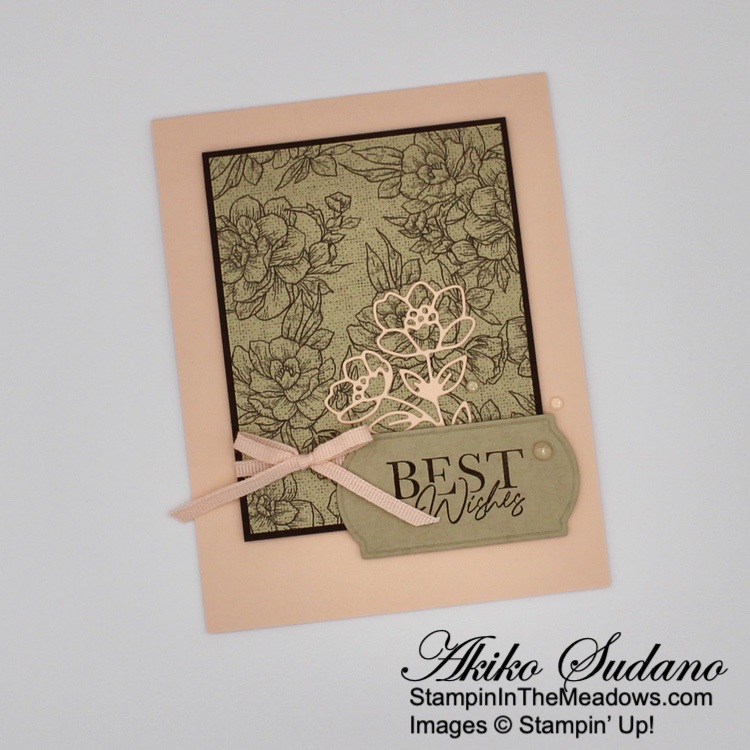
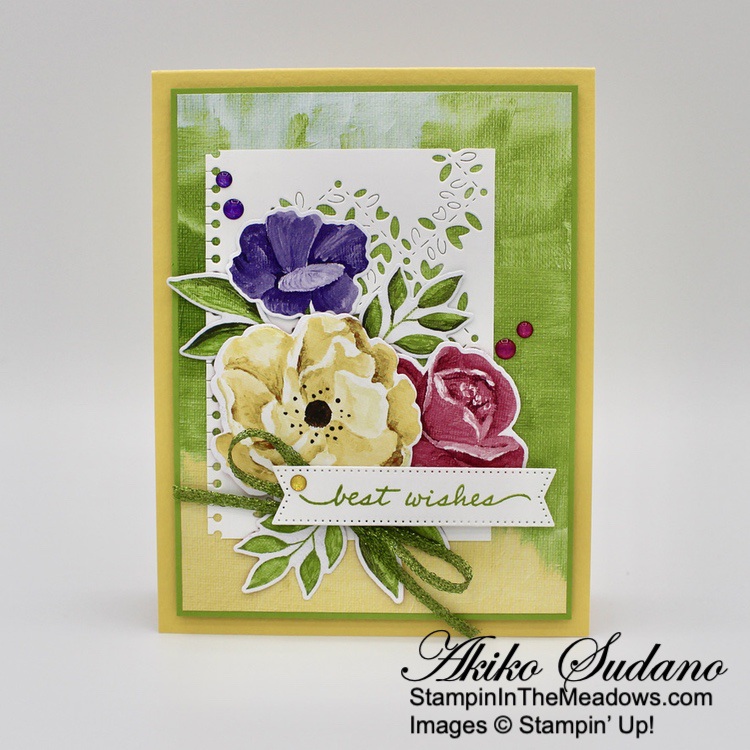
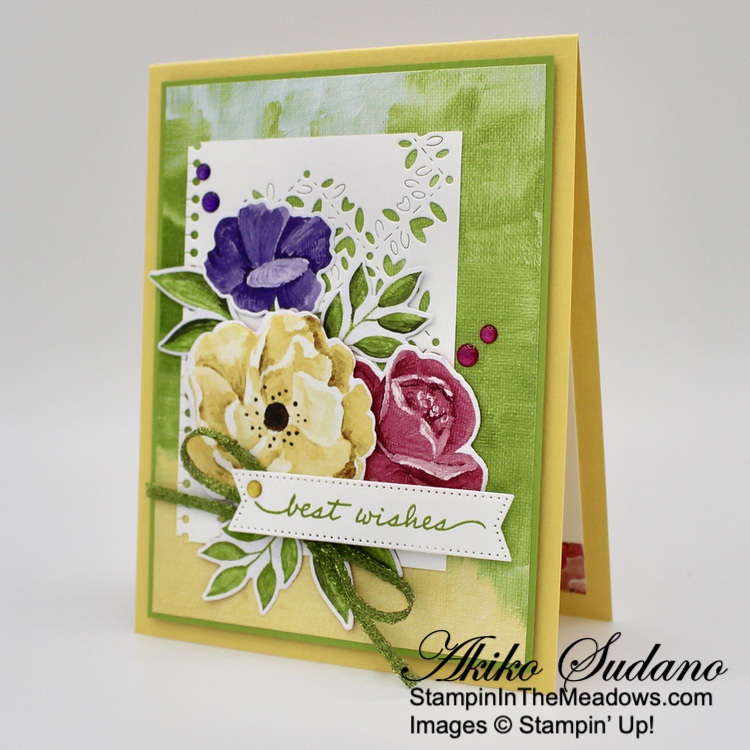
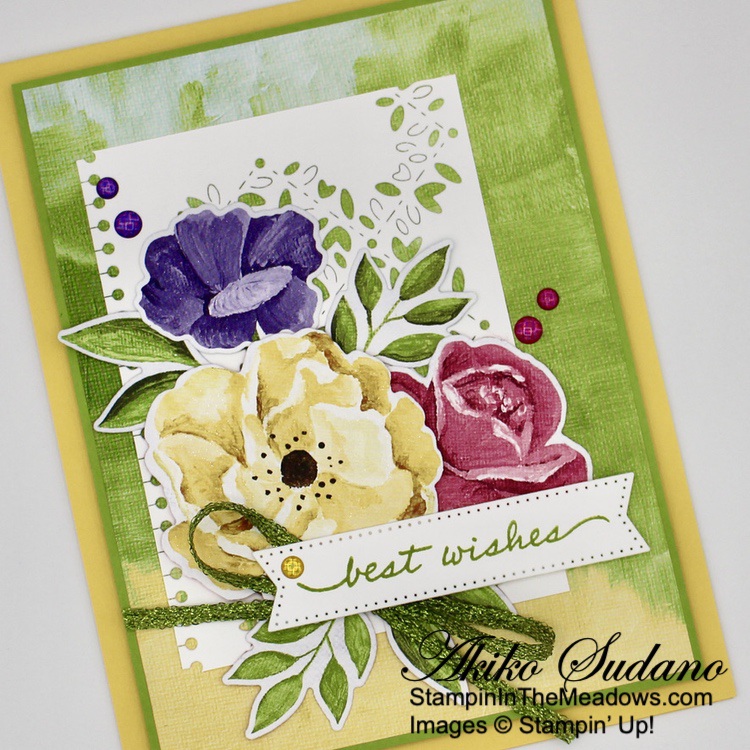
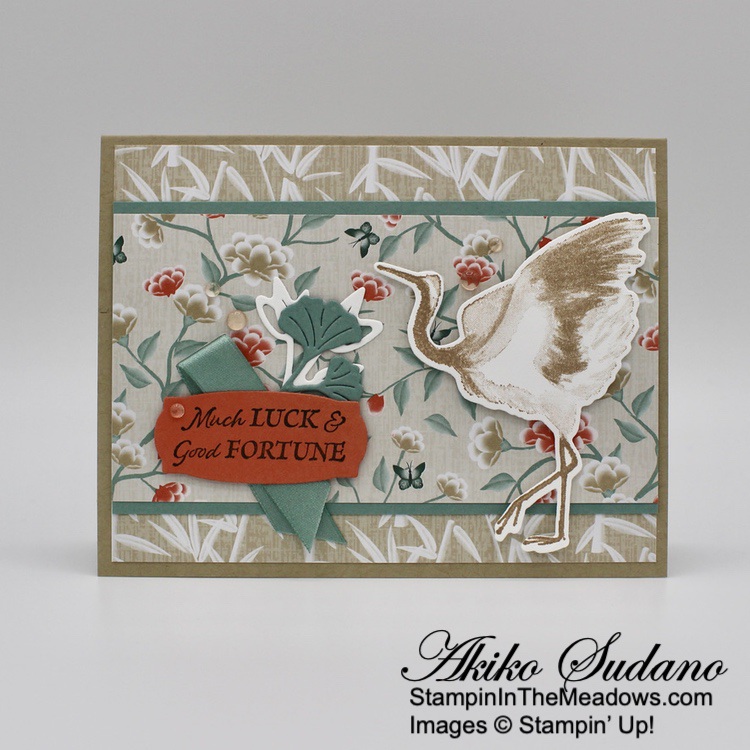
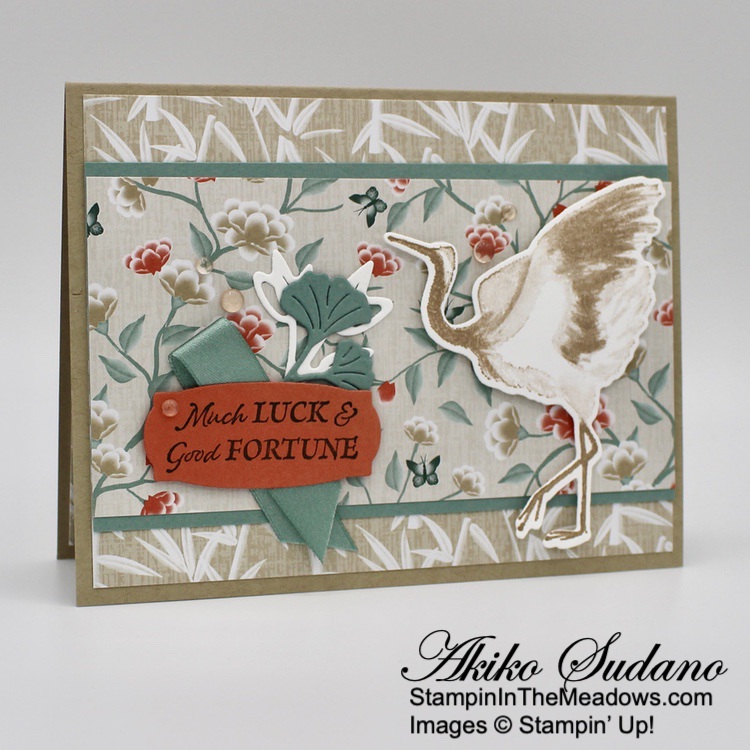
Good Morning! I used the gorgeous Hues of Happiness designer series paper with the wonderful Stampin’ Up! Happiness Abounds bundle to make today’s Best Wishes card. This sentiment is great for a birthday, wedding or any special occasion. You can find the supplies I used at the bottom of my post along with the sizes of cardstock used.

I adhered a panel of Hues of Happiness designer series paper to a Granny Apple Green mat and popped it on the front of a Daffodil Delight card base. I cut a Basic White panel with the spiral notebook die from the Stampin’ Up! Happiness Abounds bundle and then cut it again with the eyelet lattice die. I adhered it to the card front with liquid glue.

I cut three flowers and four leaf clusters from the Hues of Happiness DSP – I love that the gorgeous flowers in this DSP can be cut with Blossoming Happiness dies. I adhered the large flower to the card front with dimensionals and adhered the other flowers and leaves around it with glue dots. I made a loopy bow with the pretty Parakeet Party metallic ribbon and adhered it under the flower.

I stamped the sentiment from the Stampin’ Up! Happiness Abounds photopolymer stamp set in Granny Apple Green on a Basic White strip and cut it out with the small banner die from the Stylish Shapes dies. I adhered it to the card with dimensionals and glue dots and finished the card with beautiful Glossy Dots. I finished by giving the flowers some sparkle with Wink of Stella.

For the inside of the card, I stamped the the sentiment from the Stampin’ Up! Happiness Abounds stamp set in Granny Apple Green on a Basic White panel. I stamped the little bouquet in Memento Tuxedo Black and colored it with Stampin’ Blends – Granny Apple Green, Melon Mambo, Highland Heather and Daffodil delight. I trimmed the bottom with a strip of Hues of Happiness DSP and adhered it to the inside of the card with Stampin’ Seal.

The Stampin’ Up! Happiness Abounds bundle goes beautifully with the Hues of Happiness DSP, but also has beautiful outline flower stamps that can be colored and cut out with the dies. And the sentiments are beautiful and can be used for both the inside and outside of the card. This is a must have set for flower lovers!


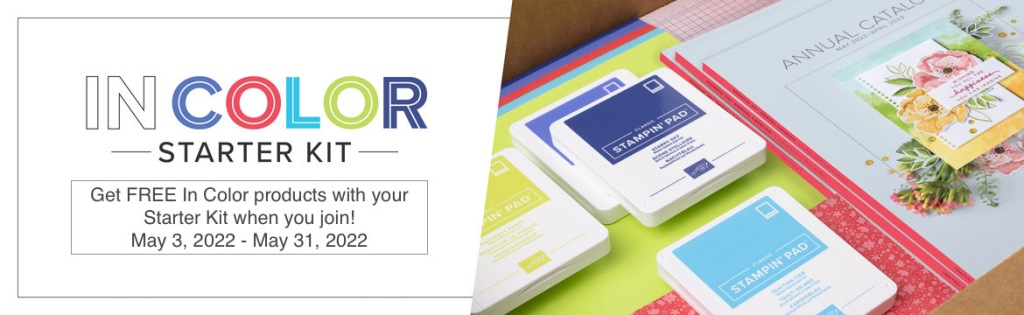
May is a Great Time to Join Stampin’ Up!

Ready to start your Stampin’ Up! business in style? Then sign up between May 3 – 31, 2022 to be a demonstrator and get $66.50 in FREE 2022-2024 In Color® products!

The Starter Kit is only $99 + tax!!  And if you join between May 3-31, you’ll get:

  • $125 Stampin’ Up! merchandise of your choice
  • $66.50 in 2022-2024 In Color merchandise
    • 2022–2024 In Color Grid Paper – item 160009
    • 2022-2024 In Color 8-1/2″ x 11″ Card Stock – item 159204
    • 2022-2024 In Color Ink Pad Collection – item 161108
    • 2022-2024 In Color 6″ x 6″ Designer Series Paper – item 159253
  • Free business supplies and catalogs
  • Free random past Paper Pumpkin Kit
  • Free shipping!!

Read more about Stampin’ Up! Demonstrator benefits on my Join My Team page and click the button at the bottom to join. Contact me if you have any questions and I’ll be happy to tell you more!


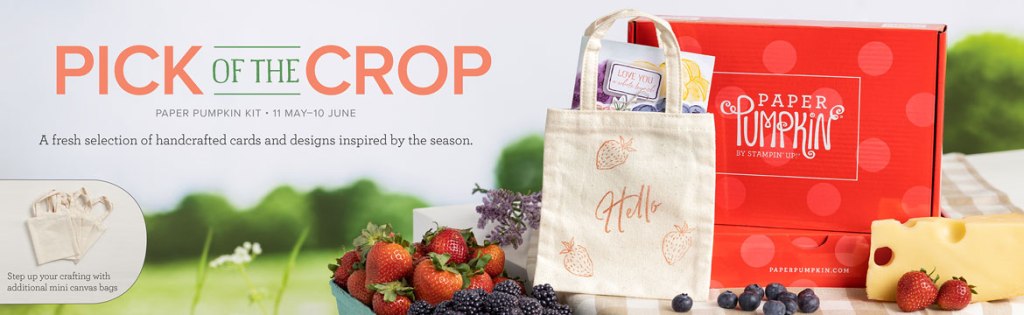
The June Paper Pumpkin Kit is the Pick of the Crop!

Give your card collection a reFRESH with this month’s Paper Pumpkin Kit! We’re talking FRESH ideas, designs, cards, and crafts. Each month we strive to deliver a seasonal selection, and this month is no different. Plus, we’ve got an add-on you can purchase to expand on this month’s kit.

This kit’s stamp set is perfect for expressing your love, gratitude, and style. With sentiments that say “Love you a whole bunch”, “You’re the pick of the crop”, “You are the sweetest,” and so many more, you’ll be able to use this photopolymer stamp set for all of your summer projects.

This kit includes supplies to create 9 card – 3 each of 3 designs and 9 coordinating envelopes:

  • Calypso Coral Classic Stampin’ Spot®
  • Printed card bases a, die-cut paper pieces, vellum, adhesive, and more!
    • Card size: 4-1/4″ x 5-1/2″
    • Envelope Size: 4-1/2″ x 5-3/4″
  • A 5-3/8″ x 6″ mini shopping bag
    • Stamp or color the bag for a personalized touch
    • It holds a couple of cards for a fun twist on card packaging
  • Additional shopping bags can be purchased starting June 13, 2022
    • Item 161922 – contains 4 mini canvas bags

Coordinating Colors:  Blackberry Bliss, Cajun Craze, Calypso Coral, Crushed Curry, Garden Green, Night of Navy, Soft Succulent

If you’re interested in subscribing to Paper Pumpkin, you can either sign up for a subscription where you are billed monthly for your kit or you can purchase a prepaid subscription in my Online Store. To see more information and to sign up for the monthly subscription click here. To see the options for prepaid subscriptions in my Online Store, click here.

Sign up deadline for the June 2022 kit is June 10, 2022. Note: Supplies may be limited toward the end of the subscription period.


Current Host Code: ZFMCWFCA

Use this host code when you order $50 or more and receive a free gift from me!  The free gift is your choice of any item valued up to $10.00 from the January – June 2022 Mini Catalog or the 2022-2023 Annual Catalog!

If your order is over $150, please do not use the host code since you’ll receive your own Host Dollars plus I’ll still send you the free gift!  This host code can be used by anyone, no club or commitment required. Let me know if you have any questions.


If you need any stamping supplies, I’d be very happy to be your Demonstrator.  Just click on the Shop Now button on the right side of the screen to go directly to my online store or contact me if you have any questions.  Happy Stamping!

Thanks for stopping by and have a great week!

Akiko

  • Visit my online store here
  • See the current Stampin’ Up! clearance rack specials here
  • Earn FREE Stampin’ Up! products through my Wildflower Frequent Shopper Program – my way of saying thank you to my online frequent shopper customers.
  • Have any questions? I’d be happy to help, click here to contact me.

Cardstock Cuts for this project:

  • Daffodil Delight – 4-1/4″ x 11″ card base scored at 5-1/2″
  • Granny Apple Green – 3-7/8″ x 5-1/8″ (front mat)
  • Basic White – 3-3/4″ x 5″ (inside panel), 1-1/4″ x 3-3/4″ (label), 2-3/4″ x 3-3/4″ (die cut background panel)
  • Hues of Happiness DSP – 3-3/4″ x 5″ (front background), 1/2″ x 3-3/4″ (inside trim), 3 die cut flowers, 4 die cut leaf clusters

Stampin’ Up! products used in this project:


Stampin’ Up! Crane of Fortune for the Happy Inkin’ Thursday Blog Hop

Good morning and welcome to the Happy Inkin’ Thursday Blog Hop! Today I used the pretty Stampin’ Up! Crane of Fortune bundle with the Symbols of Fortune specialty designer series paper for a Good Luck card. You can find the supplies I used along with card stock cuts at the bottom of my post.

We have a Sketch Challenge this week and here is the pretty sketch we are using:

I adhered a panel of Symbols of Fortune specialty designer series paper to the front of a Crumb Cake card base. I adhered a Soft Succulent mat to the back of another panel of the DSP and adhered that to the card front with liquid glue.

I stamped the pretty crane from the Stampin’ Up! Crane of Fortune cling stamp set in Crumb Cake ink on a Basic White panel and adhered it to the card front with dimensionals. I cut a leaf sprig from the leftover and two sets of ginkgo leaves from Soft Succulent. I adhered the leaf sprig and a gingko leaf die cut to the card front with glue dots.

I stamped the sentiment from the Stampin’ Up! Crane Of Fortune stamp set in evening Evergreen on Calypso Coral and cut it out with the Messages die. I folded a short length of Soft Succulent ribbon and adhered it to the back of the label and adhered the label to the card front with dimensionals. I finished the card with pretty Polished Dots.

For the inside, I stamped the dragonflies from the Stampin’ Up! Crane Of Fortune stamp set in Crumb Cake in the top corner of a Basic White panel. I adhered a strip of Symbols of Fortune DSP to the side and adhered the gingko leaf die cut with glue dots. I adhered the panel to the inside of the card.

Today’s hop sketch is really nice for showing off pretty designer series papers. And this lovely crane goes perfectly with this DSP, they did a really nice job of shading with this stamp!

On with the Hop! Click on the Next Blog button to move forward to see the beautiful project Karen Ksenzakovic has created.

If you get lost along the way, here are the participants for the hop:


Today is the Last Day for Savings are In Bloom!

Today is the last day to get select bundles and the Stampin’ UP! Mini Cut & Emboss machine at a 20% discount!

Click on the image below to download a PDF with all the details, including all the stamp bundles that will be on sale and the discounted prices! Click HERE to shop for these discounted items in my Online Store.


2021 – 2022 Annual Catalog Last Chance Sale is Going on Now!

Many items have already sold out, so stock up on your favorite products before they’re gone for good! Save up to 50% on essential craft supplies. What are you waiting for? Start shopping! After all, this selection of Last Chance Products is only available while supplies last.

Here are the details:

  • Not all retiring items are on sale. Discounted items are noted in the Retiring List PDF or in Last Chance Products pages of my Online Store
  • All products are available while supplies last, and there are no purchase limits.
  • Discounted items can be added to a Starter Kit and redeemed as a 50% off item or with Stampin’ Rewards.
  • Only orders opened and closed during the promotion period apply. 
  • Stamp Sets are not guaranteed during this promotion.
  • The items are available while supplies last through May 2, 2022.

Order soon to make sure that you are able to get the items that you are wanting! Let me know if you have any questions.  Happy shopping!

Click HERE to download a PDF of the Retiring List items.

Head over to my Online Store to shop now.


Current Host Code: 6Y7ZDRM7

Use this host code when you order $50 or more and receive a free gift from me!  The free gift is your choice of any item valued up to $10.00 in the 2021 – 2022 Annual Catalog or the January – June 2022 Mini Catalog!

If your order is over $150, please do not use the host code since you’ll receive your own Host Dollars plus I’ll still send you the free gift!  This host code can be used by anyone, no club or commitment required. Let me know if you have any questions.


If you need any stamping supplies, I’d be very happy to be your Demonstrator.  Just click on the Shop Now button on the right side of the screen to go directly to my online store or contact me if you have any questions. 

Thanks for stopping by and Happy Stamping!

Akiko

  • Visit my online store here
  • See the current Stampin’ Up! clearance rack specials here
  • Earn FREE Stampin’ Up! products through my Wildflower Frequent Shopper Program – my way of saying thank you to my online frequent shopper customers.
  • Have any questions? I’d be happy to help, click here to contact me.

Cardstock Cuts for this project:

  • Crumb Cake – 5-1/2″ x 8-1/2″ card base scored at 4-1/4″
  • Soft Succulent – 3″ x 5-1/4″ (DSP mat), 1-1/4″ x 2-1/2″ (ginko die cuts)
  • Calypso Coral – 1-1/4″ x 2-1/2″ (label)
  • Basic White – 4″ x 5-1/4″ (inside panel), 3″ x 3-1/4″ (crane and leaf die cuts)
  • Symbols of Fortune DSP – 4″ x 5-1/4″ (front background), 2-3/4″ x 5-1/4″ (front stripe), 3/4″ x 4″ (inside trim)

Stampin’ Up! products used in this project:


Stampin’ Up! Snowbody Better Card

Good Morning! Today I have a fun card with a cute group of snow people from the Stampin’ Up! Snowbody Better cling stamp set. No, we haven’t had any snow yet, but this is such a cute set, I had to break it out!! Plus I wanted to use it with the pretty Sale A Bration Penguin Playmates DSP before Sale A Bration ends in a couple of days! You can find the supplies I used at the bottom of my post along with the sizes of cardstock used.

I embossed a panel of the Misty Moonlight striped designer series paper from the Penguin Playmates designer series paper with the Tasteful Textile 3D embossing folder – it’s hard to see, but it gives the DSP a special feel in person. I adhered the panel to a Basic White mat.

I stamped the fun group of snow people from the Stampin’ Up! Snowbody Better cling stamp set in Memento Tuxedo Black ink on a Basic White panel and colored it with Stampin’ Blends. I used Balmy Blue, Granny Apple Green, Real Red, Highland Heather, Soft Suede, Bermuda Bay, Pumpkin Pie and Smoky Slate. i outlined the image and the inside of the snow people with my light Pool Party Stampin’ Blend to give it some chilly contrast. I adhered the snow people to a Basic White mat and then adhered them to the striped DSP panel.

I wrapped the panel with a length of Misty Moonlight and silver Baker’s twine and made a bow on the side. I stamped the sentiment from the Stampin’ Up! Snowbody Better stamp set in VersaMark ink on a Misty moonlight strip and sprinkled it with white embossing powder. I shook off the excess and heat set the powder with my heat tool. I cut the sentiment out with the Messages die and adhered it to the snow people panel with dimensionals over the twine. I adhered the panel to the front of a Misty Moonlight card base and adhered silver metallic pearls to the snow people panel.

For the inside of the card, I stamped some snowflakes in Pool Party around the top of a Basic White panel. I stamped the sentiment from the Stampin’ Up! Snowbody Better stamp set in Misty Moonlight and the bird and snowball in Memento Tuxedo Black. I colored the bird and snowflake ribbon with my Real Red Stampin’ Blend and adhered a strip of embossed Misty Moonlight striped DSP to the bottom. I adhered the panel to the inside of the card.

The Stampin’ Up! Snowbody Better stamp set is really cute and it’s a perfect set for sending winter time greetings. I’m not ready for snow yet, but these happy little guys are great for getting in the mood for winter fun.


3 More Days Left for Sale A Bration!

Sale A Bration ends September 30, so hurry to get in on Stampin’ Up!’s best promotion. Click on the picture below to view the Sale A Bration brochure:


Current Host Code: U6K4RBB4

Use this host code when you order $50 or more and receive a free gift from me!  The free gift is your choice of any item valued up to $10.00 in the 2021 – 2022 Annual Catalog or the July – December 2021 Mini Catalog!

If your order is over $150, please do not use the host code since you’ll receive your own Host Dollars plus I’ll still send you the free gift!  This host code can be used by anyone, no club or commitment required. Let me know if you have any questions.


If you need any stamping supplies, I’d be very happy to be your Demonstrator.  Just click on the Shop Now button on the right side of the screen to go directly to my online store or contact me if you have any questions. 

Thanks for stopping by and Happy Stamping!

Akiko

  • Visit my online store here
  • See the current Stampin’ Up! clearance rack specials here
  • Earn FREE Stampin’ Up! products through my Wildflower Frequent Shopper Program – my way of saying thank you to my online frequent shopper customers.
  • Have any questions? I’d be happy to help, click here to contact me.

Cardstock Cuts for this project:

  • Misty Moonlight – 4-1/4″ x 11″ card base scored at 5-1/2″, 3/4″ x 3-1/4″ (label)
  • Basic White – two 4″ x 5-1/4″ panels (inside panel and front mat), 3-1/4″ x 3-5/8″ (snow people panel), 3-3/8″ x 3-3/4″ (snow people mat)
  • Penguin Playmates DSP – 3-7/8″ x 5-1/8″ (front background), 1/2″ x 4″ (inside trim)

Stampin’ Up! products used in this project:

Snowbody Better Cling Stamp Set
$21.00
Tasteful Textile 3 D Embossing Folder
$9.00
Penguin Playmates 12" X 12" (30.5 X 30.5 Cm) Designer Series Paper
$0.00
Misty Moonlight 8-1/2" X 11" Cardstock
$8.75
Basic White 8 1/2" X 11" Thick Cardstock
$8.25
Tuxedo Black Memento Ink Pad
$6.00
Misty Moonlight Classic Stampin' Pad
$7.50
Pool Party Classic Stampin' Pad
$7.50
Versamark Pad
$9.50
Real Red Stampin' Blends Combo Pack
$9.00
Balmy Blue Stampin' Blends Combo Pack
$9.00
Granny Apple Green Stampin' Blends Combo Pack
$9.00
Soft Suede Stampin' Blends Combo Pack
$9.00
Smoky Slate Stampin' Blends Combo Pack
$9.00
Pumpkin Pie Stampin' Blends Combo Pack
$9.00
Highland Heather Stampin' Blends Combo Pack
$9.00
Pool Party Stampin' Blends Combo Pack
$9.00
Basics Embossing Powders
$18.00
Metallic Pearls
$7.00
Flowers For Every Season Ribbon Combo Pack
$10.00
Heat Tool (Us And Canada)
$30.00
Multipurpose Liquid Glue
$4.00
Stampin' Dimensionals
$4.00
Stampin' Seal
$8.00
Stampin' Cut & Emboss Machine
$120.00