Stampin’ Up! Feathered Flight for the Inkin’ Krew Blog Hop

Good Morning! Welcome to the May Inkin’ Krew Team Blog Hop! The theme for this month’s hop is “For the Boys/Men” so I pulled out my Feathered Flight stamp set to make a simple, masculine thinking of you card. The beautiful Thoughtful Journey 6″ x 6″ designer series paper makes a wonderful background for the ducks in the stamp set. You can find the supplies I used along with card stock cuts at the bottom of my post.

I stamped the small flying ducks from the Stampin’ Up! Feathered Flight cling stamp set using Wild Wheat ink on a panel of Thoughtful Journey designer series paper. I adhered the stamped DSP to a Misty Moonlight mat using liquid glue.

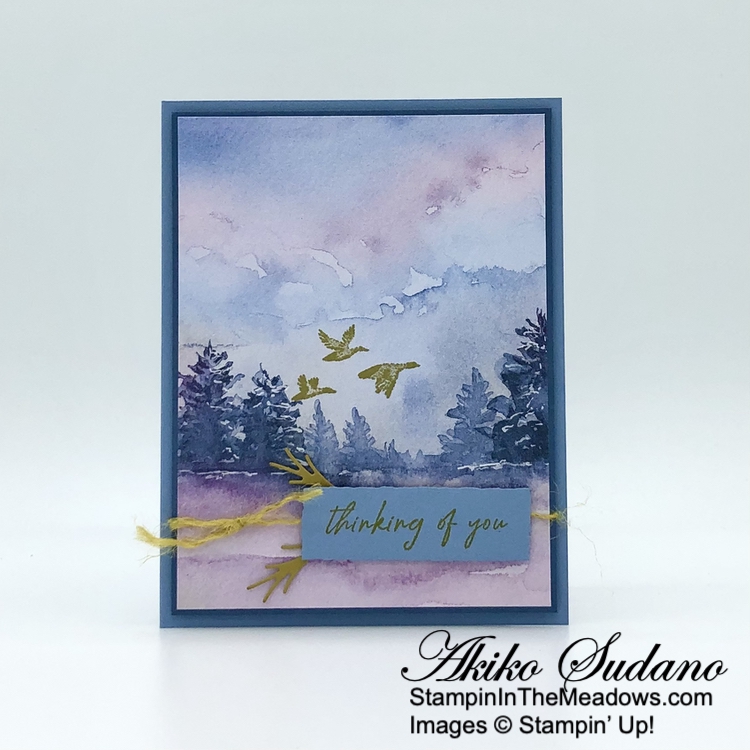
I separated a length of Wild Wheat jute and wrapped a single strand around the DSP panel and tied a knot. I adhered the panel to the front of a Boho Blue card base with dimensionals.

I cut two pine sprigs from the Encircled In Nature dies and adhered them to the card with glue dots, tucking them under the jute.

I stamped the sentiment from the Stampin’ Up! Feathered Flight stamp set using Wild Wheat ink on a Boho Blue panel. I cut out the sentiment with the Deckled Rectangles dies using a two step method, lining up one corner and cutting two sides and then cutting the opposite corner and the remaining sides. I adhered the label to the card using dimensionals over the jute and die cut sprigs.

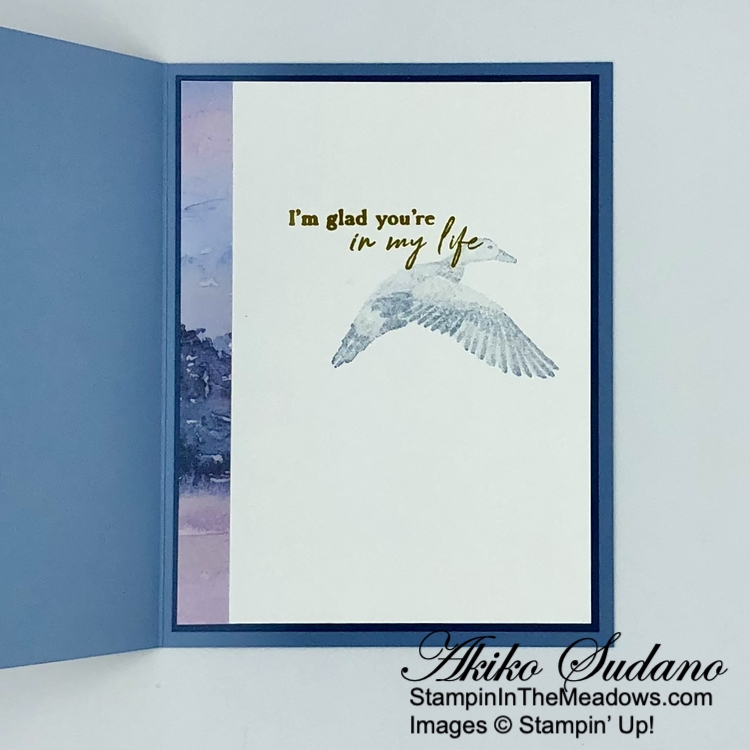
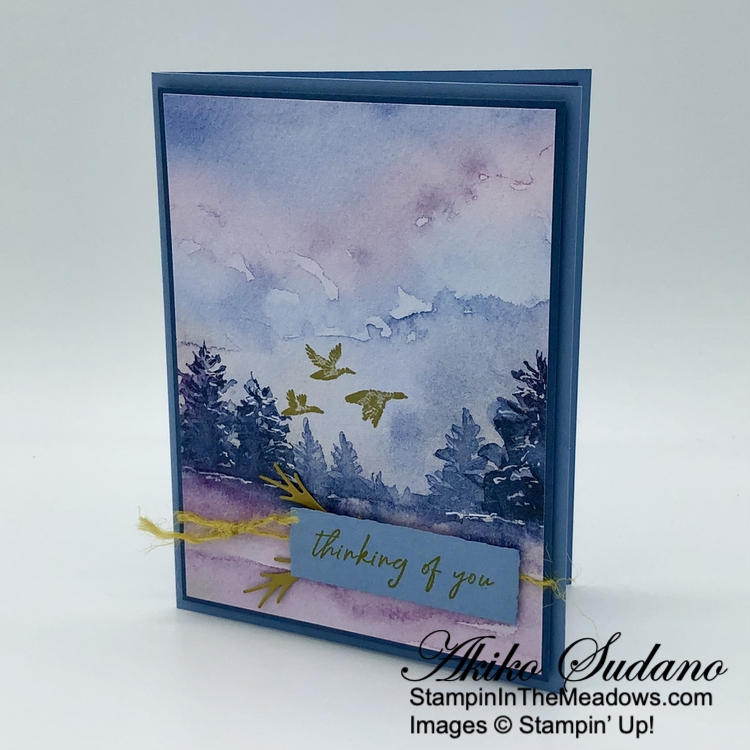
For the inside of the card, I stamped the sentiment from the Stampin’ Up! Feathered Flight stamp set in Wild Wheat ink on a Basic White panel. I used twice stamped off Misty Moonlight ink to stamp the large duck and trimmed the side with DSP. I adhered the panel to a Misty Moonlight mat and then to the inside of the card with Stampin’ Seal.

The Thoughtful Journey 6″ x 6″ designer series paper is so beautiful and I love how it looks with the flying ducks from the Stampin’ Up! Feathered Flight stamp set. A quiet, beautiful morning in the woods with a loved one!

On With The Hop! Click on the Next Blog button to move forward to Carol Buckalew’s project or click the Previous Blog button to move back to see the project that Ann Louise Fodgaard created.

If you get lost along the way, here are the participants for the hop:


Current Host Code: SSMUTY4A

Use this host code when you order $50 or more and receive a Thank You gift from me!  The free gift is your choice of any currently available item valued up to $10.00.

If your order is over $150, please do not use the host code since you’ll receive your own Host Dollars plus I’ll still send you the Thank You gift!  This host code can be used by anyone, no club or commitment required. Let me know if you have any questions.


If you need any stamping supplies, I’d be very happy to be your Demonstrator.  Just click on the Shop Now button on the right side of the screen to go directly to my online store or contact me if you have any questions.  Happy Stamping!

Thanks for stopping by and have a great week!

Akiko

  • Visit my online store here
  • See the current Stampin’ Up! clearance rack specials here
  • Earn FREE Stampin’ Up! products through my Wildflower Frequent Shopper Program – my way of saying thank you to my online frequent shopper customers.
  • Have any questions? I’d be happy to help, click here to contact me.

Cardstock Cuts for this project:

  • Boho Blue – 5-1/2″ x 8-1/2″ card base scored at 4-1/4″, 1″ x 3″ (label)
  • Misty Moonlight – two 4″ x 5-1/4″ panels (front mat and inside mat)
  • Wild Wheat – 1-3/4″ x 2-3/4″ (die cut pine sprigs)
  • Basic White – 3-7/8″ x 5-1/8″ (inside panel)
  • Thoughtful Journey 6″ x 6″ DSP – 3-7/8″ x 5-1/8″ (front background), 1/2″ x 5-1/8″ (inside trim)

Stampin’ Up! products used in this project:

Stampin’ Up! Magnolia Mood Birthday Card

Good Morning! The Stampin’ Up! Magnolia Mood bundle has some of the best images and dies for magnolias ever. These magnificent trees and flowers are special to me because of my memories of living in the South in my youth and having these in my yard. So I had to have this bundle when it came out in the Online Exclusives. You can find the products I used at the bottom of my post along with the card stock sizes.

I adhered a panel of Country Woods designer series paper to an Early Espresso mat with liquid glue and popped it on the front of a Basic Beige card base. I cut the large floral die from the Stampin’ Up! Magnolia Mood dies from Mossy Meadow card stock and adhered it to the card with glue dots.

I stamped the large bouquet from the Stampin’ Up! Magnolia Mood stamp set on a Basic White panel using Memento Tuxedo Black ink. I stamped the seed pod as well and colored the images with Stampin’ Blends. I used light Mossy Meadow on the top of the leaves and light Old Olive and Wild Wheat on the undersides. I used dark Daffodil Delight on the flower center and the seed pod and also shaded the seed pod with light Wild Wheat. I used light Petal Pink on the flower petals and used Wink of Stella on the flowers and seed pod to add a touch of sparkle. I cut the flowers out with the coordinating dies and popped the large flower on the card with dimensionals and adhered the seed pod with glue dots.

I cut some extra leaves from Mossy Meadow using the leaf dies from the Stampin’ Up! Magnolia Mood dies and tucked them under the flowers, adhering them with glue dots. I stamped the sentiment using Mossy Meadow ink on Pool Party and cut it out with the long label die from the Wonderful Thoughts dies. I adhered the label to the card with dimensionals and finished with Shiny Sequins.

For the inside of the card I stamped the sentiment from the Stampin’ Up! Magnolia Mood stamp set in Mossy Meadow ink on a Basic White panel. I stamped the flowers in Memento Tuxedo Black ink and colored it with Mossy Meadow and Petal Pink Stampin’ Blends . I adhered the panel to the inside of the card with Stampin’ Seal.

The images in the Stampin’ Up! Magnolia Mood stamp set are gorgeous!! The dies are modern and fun and compliment the stamped images nicely. The set is a must have for anyone who likes magnolias!


Stampin’ Up! May Joining Special!

Exciting News! Between May 1 and May 31, anyone who becomes a Stampin’ Up! demonstrator will receive four 2024–2026 In Color products in their Starter Kit for FREE! This is one of our richest offerings yet!

Promotion Details:

  • Dates: May 1, 2024 – May 31, 2024
  • New Demonstrators will receive the following products in their Starter Kit at no additional cost:
    • 2024–2026 In Color Classic Stampin’ Pad Bundle
    • 2024–2026 In Color 8-1/2″ x 11″ Cardstock
    • 2024–2026 In Color 6″ x 6″ Designer Series Paper
    • 2024–2026 In Color Stampin’ Write Markers
  • New team members may not use their team leader’s shipping address to ship their kit. 
  • New team members may only pay for their kit using a credit card on which they are listed as an authorized user. 
  • All orders should be closed by 31 May. 
  • New demonstrators who submit their Independent Demonstrator Agreement (IDA) before 1 May or after 31 May will not be eligible for this Starter Kit offer.

Click on the picture below to download a flyer to see more:

In addition to the In Color products, new Demonstrators will pick $125 USD worth of products of their choice for $99! When you join, the In Color products will be automatically added to your Starter Kit. You will also receive free business supplies with your order and free shipping. Not to mention all the fun that comes with being a part of our wonderful crafting community. Click the button below to Join Now, or get additional details on my Join My Team page


Current Host Code: SSMUTY4A

Use this host code when you order $50 or more and receive a Thank You gift from me!  The free gift is your choice of any item currently available valued up to $10.00.

If your order is over $150, please do not use the host code since you’ll receive your own Host Dollars plus I’ll still send you the Thank You gift!  This host code can be used by anyone, no club or commitment required. Let me know if you have any questions.


If you need any stamping supplies, I’d be very happy to be your Demonstrator.  Just click on the Shop Now Button on the right side of the screen to go directly to my Online store or contact me if you have any questions.  Happy Stamping!

Thanks for stopping by and have a great day!

Akiko

  • Visit my online store here
  • See the current Stampin’ Up! clearance rack specials here
  • Earn FREE Stampin’ Up! products through my Wildflower Frequent Shopper Program – my way of saying thank you to my online frequent shopper customers.
  • Have any questions? I’d be happy to help, click here to contact me.

Cardstock Cuts for this project:

  • Basic Beige – 5-1/2″ x 8-1/2″ card base, scored at 4-1/4″
  • Early Espresso – 4″ x 5-1/4″ (front mat)
  • Mossy Meadow – 4″ x 4-1/2″ (die cut flowers and leaves)
  • Pool Party – 1″ x 3-1/4″ (label)
  • Basic White – 4″ x 5-1/4″ (inside panel), 3-1/4″ x 3-3/4″ (large die cut flower), 2-1/4″ x 2-1/2″ (seed pod)
  • Country Woods DSP – 3-7/8″ x 5-1/8″ (front background)

Stampin’ Up! products used in this project:


Stampin’ Up! Simply Zinnia for the Happy Inkin’ Thursday Blog Hop

Good Morning and welcome to the Happy Inkin’ Thursday Blog Hop! The Stampin’ Up! Simply Zinnia bundle is one of the Online Exclusives and it’s such a beautiful set. I’ve used it with the Flowering Zinnias designer series paper for a very colorful Mother’s Day card that is full of flowers. You can find the supplies I used along with card stock cuts at the bottom of my post.

We have a fun sketch challenge this week:

I adhered a panel of Flowering Zinnias designer series paper to the front of a Flirty Flamingo card base with liquid glue. I cut two banners from Petal Pink Glimmer paper using the Nested Essentials dies and adhered them to the card with glue dots.

I used the largest circle die from the Everyday Details dies to cut a Highland Heather panel. I stamped tree single flowers from the Stampin’ Up! Simply Zinnia stamp set using Memento Tuxedo Black ink on Basic White. I colored the flowers with Stampin’ Blends – using Petal Pink, Flirty Flamingo and Melon Mambo for the petals and Peach Pie and Lemon Lolly for the centers. I cut them out with the coordinating die and adhered the Petal Pink and Flirty Flamingo flowers to the die cut circle with glue dots and the Melon Mambo flower with dimensionals.

I stamped four leaf clusters from the Stampin’ Up! Simply Zinnia stamp set using Memento Tuxedo Black ink on Basic White and colored two with Lemon Lime Twist and two with Mossy Meadow Stampin’ Blends. I cut them out with the coordinating die and adhered them to the Highland Heather circle with glue dots, tucking them under the flowers. I stamped the sentiment from the Flower Cart stamp set using Melon Mambo ink on Petal Pink card stock and cut it out with the long label die from the Autumn Leaves dies. I adhered it to the circle with glue dots and dimensionals. I adhered the Highland Heather circle to the card with dimensionals and added bling with adhesive sequins.

For the inside of the card, I stamped the flower from the Stampin’ Up! Simply Zinnia stamp set in Melon Mambo ink on a Basic White panel. I stamped the sentiment from the Flower Cart stamp set in Mossy Meadow ink and trimmed the bottom with DSP. I adhered the panel to the inside of the card with Stampin’ Seal.

Those stamped flowers in the Stampin’ Up! Simply Zinnia bundle are just gorgeous colored with Stampin’ Blends. And Happy Mother’s Day – Do something special for yourself!

On with the Hop! Click on the Next Blog button to move forward to see the beautiful project Karen Ksenzakovic has created.

If you get lost along the way, here are the participants for the hop:


Current Host Code: YEPTJAZ9

Use this host code when you order $50 or more and receive a free gift from me!  The free gift is your choice of any item currently available valued up to $10.00!

If your order is over $150, please do not use the host code since you’ll receive your own Host Dollars plus I’ll still send you the free gift!  This host code can be used by anyone, no club or commitment required. Let me know if you have any questions.


If you need any stamping supplies, I’d be very happy to be your Demonstrator.  Just click on the Shop Now button on the right side of the screen to go directly to my online store or contact me if you have any questions. 

Thanks for stopping by and Happy Stamping!

Akiko

  • Visit my online store here
  • See the current Stampin’ Up! clearance rack specials here
  • Earn FREE Stampin’ Up! products through my Wildflower Frequent Shopper Program – my way of saying thank you to my online frequent shopper customers.
  • Have any questions? I’d be happy to help, click here to contact me.

Cardstock Cuts for this project:

  • Flirty Flamingo – 4-1/4″ x 11″ card base, scored at 5-1/2″
  • Highland Heather – 3-1/2″ x 3-1/2″ (die cut circle)
  • Petal Pink Glimmer – 1-1/4″ x 4″ (banners)
  • Petal Pink – 1-1/2″ x 3″ (label)
  • Basic White – 4″ x 5-1/4″ (inside panel), 2-3/4″ x 6-1/2″ (die cut flowers), 2″ x 6″ (die cut leaf clusters)
  • Flowering Zinnias DSP – 4-1/4″ x 5-1/2″ (front background), 1/2″ x 4″ (inside trim)

Stampin’ Up! products used in this project:


Stampin’ Up! Frog & Friends Kit

Good Morning! We’ve been in Tucson for the past couple of weeks and last weekend, we had the pleasure of an overnight visit from our grandkids! Since we’re always looking for something to keep them busy, I picked up the Stampin’ Up! Frog & Friends Kit and my 6 year old granddaughter Amelia put it together!

I prepped everything by popping out the arms, legs and fins and cutting the strings. All the pieces are pre-loaded with tape strips, so all you have to do is pull off the coverings and stick the pieces on. The frog is the first one we assembled.

I watched the video (link below) ahead of time so I could understand how they went together. The goldfish was the second piece she put together. I put the instruction pictures in front of her with the pieces and she followed them pretty well. She pulled off the tape tabs and stuck the pieces together – the place where each arm/fin/eye goes is pretty clearly labeled.

The last one she did was the shark. I did line up the side tape since it’s not supposed to be folded the whole way and this was the most difficult part to line up. But I told Amelia to press hard after it was lined up and across the bottom and all the taped sections are still holding.

Here’s a quick video that Stampin’ Up! has put together showing how to put together the game pieces along with the contents of the kit. Playing the game is actually a little harder, but the pieces are bright and colorful and cute.

The Stampin’ Up! Kits Collections has all inclusive paper crafting kits that are easy and quick. The projects range from cards to fun kids projects and home decor items and contain everything you need to complete the project including stamps, stamp pads and stamp blocks. Click on the picture below to shop for the Stampin’ Up! Frog & Friends Kit in my Online Store:


Last Chance Products on Sale Now!

The retiring lists for the 2023-2024 Annual Catalog and the January-April 2024 Mini Catalog have been announced and some products are on sale with discounts up to 60%. These lists detail the products that will no longer be available once the catalogs retire on April 30. Items are only available while supplies last and some items are already sold out. So check it out to see if there is anything you want while it’s still available. And don’t forget the retiring 2022-2024 In Colors!

Click HERE to go to my online store to shop now.


Stampin’ Up! May Joining Special!

Exciting News! Between May 1, 2024 and May 31, 2024, anyone who becomes a Stampin’ Up! demonstrator will receive four 2024–2026 In Color products in their Starter Kit for FREE! This is one of the richest offerings yet!

Promotion Details:

  • Dates: May 1, 2024 – May 31, 2024
  • New Demonstrators will receive the following products in their Starter Kit at no additional cost:
    • 2024–2026 In Color Classic Stampin’ Pad Bundle
    • 2024–2026 In Color 8-1/2″ x 11″ Cardstock
    • 2024–2026 In Color 6″ x 6″ Designer Series Paper
    • 2024–2026 In Color Stampin’ Write Markers
  • New team members may not use their team leader’s shipping address to ship their kit. 
  • New team members may only pay for their kit using a credit card on which they are listed as an authorized user. 
  • All orders should be closed by 31 May. 
  • New demonstrators who submit their Independent Demonstrator Agreement (IDA) before 1 May or after 31 May will not be eligible for this Starter Kit offer.

Click on the picture below to download a flyer to see more:

In addition to the new In Color products, new Demonstrators will pick $125 USD worth of products of their choice for $99! When you join, the In Color products will be automatically added to your Starter Kit. You will also receive free business supplies with your order and free shipping. Not to mention all the fun that comes with being a part of our wonderful crafting community. Click the button below to Join Now, or get additional details on my Join My Team page


Stampin’ Up! 2023-2024 Annual Catalog coming May 1, 2024!

It’s sad to see items retiring, but the new Stampin’ Up! 2024-2025 Annual Catalog will be here soon! April 30 is the last day to order from the current 2023-2024 Annual Catalog and May 1 is when ordering from the new Annual Catalog begins!

And with the new Annual Catalog are the new 2024-2026 In Colors! Introducing Peach Pie, Petunia Pop, Pretty In Pink, Shy Shamrock and Summer Splash:


New Kits In Kits Collection!

The Kits Collection by Stampin’ Up! provides different options and a range of project types that allow you to choose the crafting experiences that best fits your style and needs. There’s a variety of kits to choose from and these all-inclusive project kits have everything you need in one box! You can find these kits in the Online Store.

The new kits for April are the By Your Side Kit and the Hooray For Honeycomb Kit. Click on the pictures below to see the details of the kits in the Online Store.


Current Host Code: YEPTJAZ9

Use this host code when you order $50 or more and receive a Thank You gift from me!  The free gift is your choice of any item currently available valued up to $10.00.

If your order is over $150, please do not use the host code since you’ll receive your own Host Dollars plus I’ll still send you the Thank You gift!  This host code can be used by anyone, no club or commitment required. Let me know if you have any questions.


If you need any stamping supplies, I’d be very happy to be your Demonstrator.  Just click on the Shop Now Button on the right side of the screen to go directly to my Online store or contact me if you have any questions.  Happy Stamping!

Thanks for stopping by and have a great day!

Akiko

  • Visit my online store here
  • See the current Stampin’ Up! clearance rack specials here
  • Earn FREE Stampin’ Up! products through my Wildflower Frequent Shopper Program – my way of saying thank you to my online frequent shopper customers.
  • Have any questions? I’d be happy to help, click here to contact me.

Stampin’ Up! Simply Zinnia Thank You Card

Good morning! I used the pretty Stampin’ Up! Simply Zinnia bundle with the Flowering Zinnias designer series paper to make a simple Thank You card for today. You can find the products I used at the bottom of my post along with the card stock sizes.

I adhered a panel of Flowering Zinnias designer series paper to a contrasting panel of the DSP with liquid glue and adhered them both to an Old Olive mat. I wrapped a length of Lemon Lime twist ribbon around the panel and made a bow on one side and adhered it to the front of a Melon Mambo card base.

I stamped the sentiment from the Stampin’ Up! Simply Zinnia stamp set in Mossy Meadow ink on a Basic White panel and cut it out with the small rectangle die from the Something Fancy dies. I adhered it to the card with dimensionals.

I made a little die cut flower bud and stems using the Stampin’ Up! Simply Zinnia dies. I cut the stem from Lemon Lime card stock and the flower from Real Red card stock and adhered them together with liquid glue. I used glue dots and dimensionals to adhere them to the card. I finished the card with three Melon Mambo glossy dots.

For the inside of the card, I stamped the large zinnia stamp from the Stampin’ Up! Simply Zinnia stamp set in twice stamped off Melon Mambo ink on a Basic White panel. I trimmed the bottom with DSP and adhered the panel to the inside of the card with Stampin’ Seal.

The Stampin’ Up! Simply Zinnia bundle is part of the Online Exclusives. It has beautiful images and sentiments and gorgeous die cuts to make dimensional flowers.


Last Chance Products Sale Ending Soon!

The retiring lists for the 2023-2024 Annual Catalog and the January-April 2024 Mini Catalog and annual catalog are part of the Last Chance Products Sale. Some products are discounted and all items are only available while supplies last. Many items have already sold out. The Last Chance Products sale ends on April 30.

Click HERE to go to my online store to shop now.


Stampin’ Up! May Joining Special!

Exciting News! Between May 1, 2024 and May 31, 2024, anyone who becomes a Stampin’ Up! demonstrator will receive four 2024–2026 In Color products in their Starter Kit for FREE! This is one of the richest offerings yet!

Promotion Details:

  • Dates: May 1, 2024 – May 31, 2024
  • New Demonstrators will receive the following products in their Starter Kit at no additional cost:
    • 2024–2026 In Color Classic Stampin’ Pad Bundle
    • 2024–2026 In Color 8-1/2″ x 11″ Cardstock
    • 2024–2026 In Color 6″ x 6″ Designer Series Paper
    • 2024–2026 In Color Stampin’ Write Markers
  • New team members may not use their team leader’s shipping address to ship their kit. 
  • New team members may only pay for their kit using a credit card on which they are listed as an authorized user. 
  • All orders should be closed by 31 May. 
  • New demonstrators who submit their Independent Demonstrator Agreement (IDA) before 1 May or after 31 May will not be eligible for this Starter Kit offer.

Click on the picture below to download a flyer to see more:

In addition to the new In Color products, new Demonstrators will pick $125 USD worth of products of their choice for $99! When you join, the In Color products will be automatically added to your Starter Kit. You will also receive free business supplies with your order and free shipping. Not to mention all the fun that comes with being a part of our wonderful crafting community. Click the button below to Join Now, or get additional details on my Join My Team page


Current Host Code: YEPTJAZ9

Use this host code when you order $50 or more and receive a Thank You gift from me!  The free gift is your choice of any item currently available valued up to $10.00.

If your order is over $150, please do not use the host code since you’ll receive your own Host Dollars plus I’ll still send you the Thank You gift!  This host code can be used by anyone, no club or commitment required. Let me know if you have any questions.


If you need any stamping supplies, I’d be very happy to be your Demonstrator.  Just click on the Shop Now Button on the right side of the screen to go directly to my Online store or contact me if you have any questions.  Happy Stamping!

Thanks for stopping by and have a great day!

Akiko

  • Visit my online store here
  • See the current Stampin’ Up! clearance rack specials here
  • Earn FREE Stampin’ Up! products through my Wildflower Frequent Shopper Program – my way of saying thank you to my online frequent shopper customers.
  • Have any questions? I’d be happy to help, click here to contact me.

Cardstock Cuts for this project:

  • Melon Mambo – 4-1/4″ x 11″ card base, scored at 5-1/2″
  • Old Olive – 4″ x 5-1/4″ (front mat)
  • Real Red – 1″ x 2″ (die cut zinnia buds)
  • Lemon Lime Twist – 2″ x 2″ (stem and leaf die cut)
  • Basic White – 4″ x 5-1/4″ (inside panel)
  • Flowering Zinnias DSP – 3-7/8″ x 5-1/8″ (front background), 1-1/2″ x 3-7/8″ (top front panel), 1/2″ x 4″ (inside trim)

Stampin’ Up! products used in this project:


Stampin’ Up! Happy Houseplants Kit

Good Morning! The Stampin’ Up! Happy Houseplants Kit is a Home Decor kit that was recently added to the Stampin’ Up! Kits Collection. It makes four 7″ x 7″ pictures of pretty houseplants and includes clean white frames and mats for each picture.

The frames do include plexiglass covers and I wanted to use them. So I was careful to only use a single layer of dimensionals, replacing some of the dimensionals with glue dots (note that the glue dots were from my stash).

I also placed a dimensional in each corner of the mats to pop them up and give the plants some room. I love the clean white look – it makes the plants really pop. But I’m tempted to add embellishments. Maybe later.

The frames have a built in hanger along with stand, so you can put them on a bookshelf or hang them on the wall. I’m going to hang them, but I need to get the hooks first.

The last picture still ended up flattened, so maybe I’ll end up removing the plexiglass frames. The nice thing is that I can take my time and change it up later.

I made the pictures pretty much according to the instructions, but since the kit uses Stampin’ Up! colors, you can use other items from your stash to make alternative designs if you feel creative. Here’s a quick video that Stampin’ Up! has put together showing how to put together the pictures along with the contents.

The Stampin’ Up! Kits Collections has all inclusive paper crafting kits that are easy and quick. The projects range from cards to fun kids projects and home decor items and contain everything you need to complete the project including stamps, stamp pads and stamp blocks. Click on the picture below to shop for the Stampin’ Up! Happy Houseplants Kit in my Online Store:


Last Chance Products on Sale Now!

The retiring lists for the 2023-2024 Annual Catalog and the January-April 2024 Mini Catalog have been announced and some products are on sale with discounts up to 60%. These lists detail the products that will no longer be available once the catalogs retire on April 30. Items are only available while supplies last and some items are already sold out. So check it out to see if there is anything you want while it’s still available. And don’t forget the retiring 2022-2024 In Colors!

Click HERE to go to my online store to shop now.

Click HERE to download a PDF of the retiring items from the Annual Catalog.

Click HERE to download an excel spreadsheet of the Annual Catalog retiring items.

Click HERE to download a PDF of the retiring items from the Mini Catalog.

Click HERE to download an excel spreadsheet of the Mini Catalog retiring items.


Stampin’ Up! 2023-2024 Annual Catalog coming May 1, 2024!

It’s sad to see items retiring, but the new Stampin’ Up! 2024-2025 Annual Catalog will be here soon! April 30 is the last day to order from the current 2023-2024 Annual Catalog and May 1 is when ordering from the new Annual Catalog begins!

And with the new Annual Catalog are the new 2024-2026 In Colors! Introducing Peach Pie, Petunia Pop, Pretty In Pink, Shy Shamrock and Summer Splash:


New Kits In Kits Collection!

The Kits Collection by Stampin’ Up! provides different options and a range of project types that allow you to choose the crafting experiences that best fits your style and needs. There’s a variety of kits to choose from and these all-inclusive project kits have everything you need in one box! You can find these kits in the Online Store.

The new kits for April are the By Your Side Kit and the Hooray For Honeycomb Kit. Click on the pictures below to see the details of the kits in the Online Store.


Current Host Code: YEPTJAZ9

Use this host code when you order $50 or more and receive a Thank You gift from me!  The free gift is your choice of any item currently available valued up to $10.00.

If your order is over $150, please do not use the host code since you’ll receive your own Host Dollars plus I’ll still send you the Thank You gift!  This host code can be used by anyone, no club or commitment required. Let me know if you have any questions.


If you need any stamping supplies, I’d be very happy to be your Demonstrator.  Just click on the Shop Now Button on the right side of the screen to go directly to my Online store or contact me if you have any questions.  Happy Stamping!

Thanks for stopping by and have a great day!

Akiko

  • Visit my online store here
  • See the current Stampin’ Up! clearance rack specials here
  • Earn FREE Stampin’ Up! products through my Wildflower Frequent Shopper Program – my way of saying thank you to my online frequent shopper customers.
  • Have any questions? I’d be happy to help, click here to contact me.

Stampin’ Up! Simply Zinnia for the Inkin’ Krew Blog Hop

Good Morning! Welcome to the March Inkin’ Krew Team Blog Hop! The theme for this month’s hop is “For the Ladies/Girls” and I finally got my Stampin’ Up! Simply Zinnia bundle and used it to make a Mother’s Day card. You can find the supplies I used along with card stock cuts at the bottom of my post.

I adhered a panel of Flowering Zinnias designer series paper to the front of an Old Olive card base. I cut a Basic White panel with the third largest deckled rectangles dies and embossed it with the Zinnia 3D embossing folder before adhering it to the card front wiht liquid glue.

I made a die cut zinnia flower with the Stampin’ Up! Simply Zinnia dies using Blackberry Bliss and Berry Burst petals and Mossy Meadow stems and leaves. I cut a Blackberry Bliss flower back and three Berry Burst petal clusters (1 large and 2 small) and adhered them together with liquid glue. I arranged them so that the petals on each layer fell between the petals on the lower level as much as possible. I cut the flower center from Crushed Curry and Lemon Lolly and adhered them.

I used the Stampin’ Up! Simply Zinnia dies to cut a stem from Mossy Meadow and adhered it to the back of the flower and adhered the flower & stem to the card. I adhered a die cut leaf to each side of the stem with glue dots. I stamped the sentiment from the Perennial Postage stamp set using Mossy Meadow ink on Basic White and cut it out with the fancy label die from the All That dies. I podded it on the card with dimensionals.

I used my dark Berry Burst Stampin’ Blend marker to color a length of Silver & White sheer ribbon and made a bow. I adhered the bow to the card with a glue dot and finished with Berry Burst Tinsel gems.

For the inside of the card, I stamped the sentiment from the Perennial Postage stamp set in Mossy Meadow ink on Basic White. I stamped the large zinnia from the Stampin’ Up! Simply Zinnia stamp set in Stamped off Berry Burst ink next to the sentiment. I covered it with a mask and stamped the leaves using Lemon Lime Twist ink. I trimmed the bottom with DSP and adhered the panel to the inside of the card with Stampin’ Seal.

The Stampin’ Up! Simply Zinnia bundle is so pretty and I was so happy to finally get my set. I’ve had zinnias in my summer gardens for years, and I remember my Mom having them in her garden, too. So I think they’re perfect for Mother’s Day.

On With The Hop! Click on the Next Blog button to move forward to Mary Deatherage’s project or click the Previous Blog button to move back to see the project that Ann Louise Fodgaard created.

If you get lost along the way, here are the participants for the hop:

  1. Carol Buckalew 
  2. Nel Thames 
  3. Karen Ksenzakovic 
  4. Shirley Gentry 
  5. Ann Louise Fodgaard 
  6. Akiko Sudano  <– You Are Here
  7. Mary Deatherage 
  8. Karen Finkle
  9. Tara Carpenter
  10. Amy Koenders

Current Host Code: 9WAA9JP9

Use this host code when you order $50 or more and receive a Thank You gift from me!  The free gift is your choice of any currently available item valued up to $10.00.

If your order is over $150, please do not use the host code since you’ll receive your own Host Dollars plus I’ll still send you the Thank You gift!  This host code can be used by anyone, no club or commitment required. Let me know if you have any questions.


If you need any stamping supplies, I’d be very happy to be your Demonstrator.  Just click on the Shop Now button on the right side of the screen to go directly to my online store or contact me if you have any questions.  Happy Stamping!

Thanks for stopping by and have a great week!

Akiko

  • Visit my online store here
  • See the current Stampin’ Up! clearance rack specials here
  • Earn FREE Stampin’ Up! products through my Wildflower Frequent Shopper Program – my way of saying thank you to my online frequent shopper customers.
  • Have any questions? I’d be happy to help, click here to contact me.

Cardstock Cuts for this project:

  • Old Olive – 5-1/2″ x 8-1/2″ card base scored at 4-1/4″
  • Blackberry Bliss – 2-1/4″ x 2-1/2″ (flower backing die cut)
  • Berry Burst – three 2″ x 2-1/2″ panels (flower petal die cuts)
  • Mossy Meadow – 1/2″ x 4″ (flower stem), 1-1/4″ x 2-1/2″ (leaves)
  • Crushed Curry – 1″ x 1″ (flower center)
  • Lemon Lolly – 1″ x 1″ (flower center)
  • Basic White – 4″ x 5-1/4″ (inside panel), 3-1/2″ x 4-3/4″ (embossed panel), 2-1/4″ x 3″ (label)
  • Flowering Zinnias DSP – 4″ x 5-1/4″ (front background), 1/2″ x 4″ (inside trim)

Stampin’ Up! products used in this project:

Stampin’ Up! Garden Meadow Hello Card

Good morning! Today I have a simple Hello card made with the Stampin’ Up! Garden Meadow stamp set and the pretty Meandering Meadows 6″ x 6″ designer series paper. You can find the products I used at the bottom of my post along with the card stock sizes.

I adhered a panel of the Garden Meadow 6″ x 6″ designer series paper to Daffodil Delight and Shaded Spruce mats and popped them on the front of a Parakeet Party card base with dimensionals.

I stamped the sentiment from the Stampin’ Up! Garden Meadow stamp set in Shaded Spruce ink on a Parakeet Party panel and cut it out with the large circle die from the Radiating Stitches dies.

I tied a length of Parakeet Party metallic ribbon in a bow and adhered it to the back of the label with a glue dot and popped the label on the card front with dimensionals. I finished the card with three Parakeet Party iridescent pearls.

For the inside of the card, I stamped the little wildflower image from the Stampin’ Up! Garden Meadow stamp set in Shaded Spruce ink on a Basic White panel. I used the Daffodil Delight Stampin’ Blends to color the flower and dabbed the dark Mossy Meadow and Dark Fresh Freesia Stampin’ Blends around the flowers to add interest and match the front DSP. I trimmed the bottom with DSP and adhered the panel to the inside of the card with Stampin’ Seal.

The Stampin’ Up! Garden Meadow bundle has sweet garden themed images and pretty sentiments. The beautiful Meandering Meadows 6″ x 6″ DSP has gorgeous woodland and wildflower images that make beautiful scenic cards quite easily. Both of these products are part of the Online Exclusive collection so will be around for a while. But the pretty Parakeet Party products are part of the 2022-2024 In Color collection that is retiring at the end of the month.


Current Catalogs Retiring Lists Announced!

There is a retiring list for the 2023-2024 Annual Catalog and the January-April 2024 Mini Catalog and annual catalog. These lists detail the products that will no longer be available once the catalogs are gone on April 30. Items are only available while supplies last. Note – The Sale Prices don’t start until April 9th.

Click HERE to download a PDF of the retiring items from the Annual Catalog.

Click HERE to download an excel spreadsheet of the Annual Catalog retiring items.

Click HERE to download a PDF of the retiring items from the Mini Catalog.

Click HERE to download an excel spreadsheet of the Mini Catalog retiring items.

Click HERE to go to my online store to shop now.

Introducing the new 2024-2026 In Colors: Peach Pie, Petunia Pop, Pretty In Pink, Shy Shamrock and Summer Splash.


The April Paper Pumpkin Kit is Delicate Wings!

Send elegant words of encouragement and support to those you love.

  • Makes 9 cards: 3 each of 3 designs with 9 coordinating envelopes
  • Precut paper pieces & butterfly designs
  • Champagne foil images, sentiments, and labels
  • Basic Gray Classic Stampin’ Spot

Coordinating Colors: Lost Lagoon, Moody Mauve, Basic Beige, Basic Gray, Basic Black, champagne foil

And there’s a new coordinating add-on – the Thanks and Beyond dies. These dies coordinate with the Delicate Wings kit and will also coordinate with the May and June kits.

If you’re interested in subscribing to Paper Pumpkin, you can either sign up for a subscription where you are billed monthly for your kit or you can purchase a prepaid subscription in my Online Store. To see more information and to sign up for the monthly subscription click here. To see the options for prepaid subscriptions in my Online Store, click here.

Sign up deadline for the April 2024 kit is April 10, 2024. Note: Supplies may be limited toward the end of the subscription period.


Current Host Code: 9WAA9JP9

Use this host code when you order $50 or more and receive a Thank You gift from me!  The free gift is your choice of any item currently available valued up to $10.00.

If your order is over $150, please do not use the host code since you’ll receive your own Host Dollars plus I’ll still send you the Thank You gift!  This host code can be used by anyone, no club or commitment required. Let me know if you have any questions.


If you need any stamping supplies, I’d be very happy to be your Demonstrator.  Just click on the Shop Now Button on the right side of the screen to go directly to my Online store or contact me if you have any questions.  Happy Stamping!

Thanks for stopping by and have a great day!

Akiko

  • Visit my online store here
  • See the current Stampin’ Up! clearance rack specials here
  • Earn FREE Stampin’ Up! products through my Wildflower Frequent Shopper Program – my way of saying thank you to my online frequent shopper customers.
  • Have any questions? I’d be happy to help, click here to contact me.

Cardstock Cuts for this project:

  • Parakeet Party – 5-1/2″ x 8-1/2″ card base, scored at 4-1/4″, 1-3/4″ x 1-3/4″ (label)
  • Daffodil Delight – 3-5/8″ x 4-7/8″ (front mat)
  • Shaded Spruce – 3-3/4″ x 5″ (front mat)
  • Basic White – 4″ x 5-1/4″ (inside panel)
  • Meandering Meadow 6″ x 6″ DSP – 3-1/2″ x 4-3/4″ (front background), 1/2″ x 5-1/4″ (inside trim)

Stampin’ Up! products used in this project:

Product List

Stampin’ Up! Latte Love Friendship Card

Good Morning! Have you had your coffee yet? I used the Online Exclusive Stampin’ Up! Latte Love bundle to make a fun coffee card today! I paired it with the pretty Inked Botanicals 6″ x 6″ designer series paper to change things up and I think it works well! You can find the products I used at the bottom of my post along with the card stock sizes.

I stamped the coffee rings and drips from the Stampin’ Up! Latte Love stamp set using Pecan Pie ink all over a panel of Inked Botanicals 6″ x 6″ designer series paper and adhered it to another panel of the DSP. I adhered the layered DSP to the front of a Calypso Coral card base. I adhered a plaid panel of the DSP to a Lost Lagoon mat and popped it on the card front with dimensionals.

I used the Stampin’ Up! Latte Love dies to make the cute French Press carafe. I used Rose Gold for the frame and cut a Window Sheet panel for the glass carafe – it’s hard to see but it looks so cool in person. I applied adhesive sheets to the back of the Rose Gold foil so it would stick to the Window Sheet. I cut an Early Espresso panel and adhered it with glue dots, hidden by the frame. I stamped the coffee cup using Calypso Coral ink on Basic White and colored it with Calypso Coral Stampin’ Blends. I stamped the oval coffee disk in stamped off Crumb Cake (I need creamer in my coffee) and cut it out with the coordinating die. I adhered it to the top of the coffee cup. I popped the French press and coffee cup on the card with dimensionals.

I stamped the spoon from the Stampin’ Up! Latte Love stamp set using Smoky Slate ink on Smoky Slate card stock and cut it out with the coordinating die. I stamped the sentiment in Early Espresso ink and cut it out with the Stylish Shapes banner die using the two step method . I adhered the spoon and label to the card with glue dots and finished with coffee swirl dots.

For the inside of the card, I cut four panels of the Inked Botanicals 6″ x 6″ DSP using the small cup die in the Stampin’ Up! Latte Love dies. I cut four Pecan Pie small coffee ovals and adhered them to the cups with liquid glue. I adhered the cups to the bottom of a Basic White panel and adhered the panel to the Inside of the card with Stampin’ Seal.

This was such a fun card to make – I love the carafes! And with the spatter and coffee ring stamps in the Stampin’ Up! Latte Love stamp set, you can give a coffee theme to lots of different DSPs. And I love the cute little die cut cups in different patterns. So, what color is your coffee – Early Espresso, Pecan Pie or Crumb Cake?


Current Catalogs Retiring Lists Announced!

There is a retiring list for the 2023-2024 Annual Catalog and the January-April 2024 Mini Catalog and annual catalog. These lists detail the products that will no longer be available once the catalogs are gone on April 30. Items are only available while supplies last. Note – The Sale Prices don’t start until April 9th.

Click HERE to download a PDF of the retiring items from the Annual Catalog.

Click HERE to download an excel spreadsheet of the Annual Catalog retiring items.

Click HERE to download a PDF of the retiring items from the Mini Catalog.

Click HERE to download an excel spreadsheet of the Mini Catalog retiring items.

Click HERE to go to my online store to shop now.

Stampin’ Up! 2023-2024 Annual Catalog coming May 1, 2024!

It’s sad to see items retiring, but the new Stampin’ Up! 2024-2025 Annual Catalog will be here soon! Here are a few details about the transition to the new catalog:

  • April 2: Demonstrator preorder for the new 2024-2025 Annual Catalog begins and I will be ordering catalogs for my customers and sending them out
  • April 30 – last day to order from the January-April 2024 Mini Catalog and 2023-2024 Annual Catalog
  • May 1 – ordering from the new Annual Catalog begins!!

If you’ve ordered from me during the last year, you’re on my list to receive a catalog. If you are not a current customer of mine but would like to be and would like to get a copy of the upcoming catalog, simply place an order through my online store and I’ll be happy to send you a copy of the catalog too!


Current Host Code: 9WAA9JP9

Use this host code when you order $50 or more and receive a Thank You gift from me!  The free gift is your choice of any item currently available valued up to $10.00.

If your order is over $150, please do not use the host code since you’ll receive your own Host Dollars plus I’ll still send you the Thank You gift!  This host code can be used by anyone, no club or commitment required. Let me know if you have any questions.


If you need any stamping supplies, I’d be very happy to be your Demonstrator.  Just click on the Shop Now Button on the right side of the screen to go directly to my Online store or contact me if you have any questions.  Happy Stamping!

Thanks for stopping by and have a great day!

Akiko

  • Visit my online store here
  • See the current Stampin’ Up! clearance rack specials here
  • Earn FREE Stampin’ Up! products through my Wildflower Frequent Shopper Program – my way of saying thank you to my online frequent shopper customers.
  • Have any questions? I’d be happy to help, click here to contact me.

Cardstock Cuts for this project:

  • Calypso Coral – 4-1/4″ x 11″ card base scored at 5-1/2″
  • Lost Lagoon – 3-1/8″ x 4-1/8″ panels (DSP mats), 1-1/4″ x 2-1/2″ (label)
  • Rose Gold Foil – 2″ x 3-1/2″ (french press frame)
  • Window Sheet – 1-3/4″ x 2-3/4″ (french press glass)
  • Smoky Slate – 1″ x 2-1/4″ (spoon)
  • Pecan Pie – 1″ x 1-1/2″ (small coffee ovals)
  • Early Espresso – 1″ x 1-1/4″ (french press coffee)
  • Basic White – 4″ x 5-1/5″ (inside panel panel), 2-1/2″ x 2-1/2″ (coffee cup and large coffee oval)
  • Inked Botanicals 6″ x 6″ DSP – 4″ x 5-1/4″ (front background), 2″ x 5-1/4″ (center stripe), 3″ x 4″ (plaid focal panel), four die cut cups

Stampin’ Up! products used in this project:


Stampin’ Up! Feathered Flight for the Happy Inkin’ Thursday Blog Hop

Good Morning and welcome to the Happy Inkin’ Thursday Blog Hop! The Stampin’ Up! Feathered Flight Cling Stamp set is an Online Exclusive with beautiful ducks and sweet sentiments and I used it to make a masculine birthday card. You can find the supplies I used along with card stock cuts at the bottom of my post.

We have a sketch challenge this week:

I embossed a panel of Very Vanilla with the Timber 3D embossing folder and adhered it to the front of a Thick Very Vanilla card base. I stamped the large flying duck from the Stampin’ Up! Feathered Flight stamp set in Pecan Pie ink on a Very Vanilla panel and cut it out with one of the Deckled Circles dies. I cut a Pecan Pie panel with the next largest die and adhered the duck to the front. I adhered the layered circles to the card front with liquid glue.

I cut a Mossy Meadow panel with the large branch die from the Dainty Delight dies and cut it in half. I adhered the branches to the card with glue dots.

I stamped the sentiment from the Something Fancy stamp set using Pecan Pie ink on Very Vanilla. I cut it out with the Something Fancy angled label die and adhered it to the card with dimensionals. I finished the card with cork rounds on the label and in the branches.

For the inside of the card, I stamped the sentiment from the So Sincere stamp set in Pecan Pie ink on Very Vanilla. I stamped the small ducks from the Stampin’ Up! Feathered Flight stamp set next to the sentiment and the pond in the lower corner. I adhered the panel to a PEcan Pie mat before adhering it to the inside of the card with Stampin’ Seal.

The shading on the stamps in the Stampin’ Up! Feathered Flight stamp set is fantastic, making it easy to create monotone images easily! And it’s perfect for making outdoors themed masculine cards.

On with the Hop! Click on the Next Blog button to move forward to see the beautiful project Karen Ksenzakovic has created.

If you get lost along the way, here are the participants for the hop:


Current Host Code: XR9HAEK4

Use this host code when you order $50 or more and receive a free gift from me!  The free gift is your choice of any item currently available valued up to $10.00!

If your order is over $150, please do not use the host code since you’ll receive your own Host Dollars plus I’ll still send you the free gift!  This host code can be used by anyone, no club or commitment required. Let me know if you have any questions.


If you need any stamping supplies, I’d be very happy to be your Demonstrator.  Just click on the Shop Now button on the right side of the screen to go directly to my online store or contact me if you have any questions. 

Thanks for stopping by and Happy Stamping!

Akiko

  • Visit my online store here
  • See the current Stampin’ Up! clearance rack specials here
  • Earn FREE Stampin’ Up! products through my Wildflower Frequent Shopper Program – my way of saying thank you to my online frequent shopper customers.
  • Have any questions? I’d be happy to help, click here to contact me.

Cardstock Cuts for this project:

  • Thick Very Vanilla – 5-1/2″ x 8-1/2″ card base, scored at 4-1/4″
  • Pecan Pie – 4″ x 4″ panels (deckled circle mat), 4″ x 5-1/4″ (inside mat)
  • Mossy Meadow – 2″ x 5″ (die cut branch)
  • Very Vanilla 4-1/4″ x 5-1/2″ (embossed background), 3-7/8″ x 5-1/8″ (inside panel), 4″ x 4″ (bird panel), 1″ x 3″ (label)

Stampin’ Up! products used in this project: