Stampin’ Up! Places in the Heart Mother’s Day Card and Video Tutorial

Good Morning! Mother’s Day is a couple of weeks away so I used the sweet Stampin’ Up! Places in the Heart cling stamp set to make a Mother’s day card during my Facebook Live yesterday afternoon. I used it with the new Bright and Beautiful 6″ x 6″ designer series paper and you can find the currently available supplies I used at the bottom of my post along with the sizes of cardstock used.

You can watch my FB Live video on my Facebook page HERE. I also posted the video to my YouTube Channel and you can view it HERE.

I adhered a panel of striped Bright and Beautiful 6″ x 6″ designer series paper to the side of a lighter patterned panel of the DSP and adhered them both to the front of an Azure Afternoon card base with liquid glue. Azure Afternoon is one of the new core colors that is coming with the color refresh tomorrow!

I stamped the scene from the Stampin’ Up! Places in the Heart stamp set in Pebbled Path ink (one of the new 20223-2025 In Colors) and colored it with Stampin’ Blends. I used light Bubble Bath, light Petal Pink, light Pecan Pie, light Wild Wheat on the Mom and light Lemon Lime Twist, light Pecan Pie, light Smoky Slate and light Petal Pink on the child. I used a blending brush and mask to apply Azure Afternoon ink to the sky and used light Pretty Peacock Stampin’ Blend on the ground. I cut it out with the fourth largest Deckled Rectangle die.

I stamped the sentiment from the Welcoming Windows photopolymer stamp set in the sky and adhered it to an Azure Afternoon mat. I adhered a Lemon Lime Twist bow to the back with a glue dot and popped it on the card front with dimensionals. I finished the card front with pink Loose Frosted Gems.

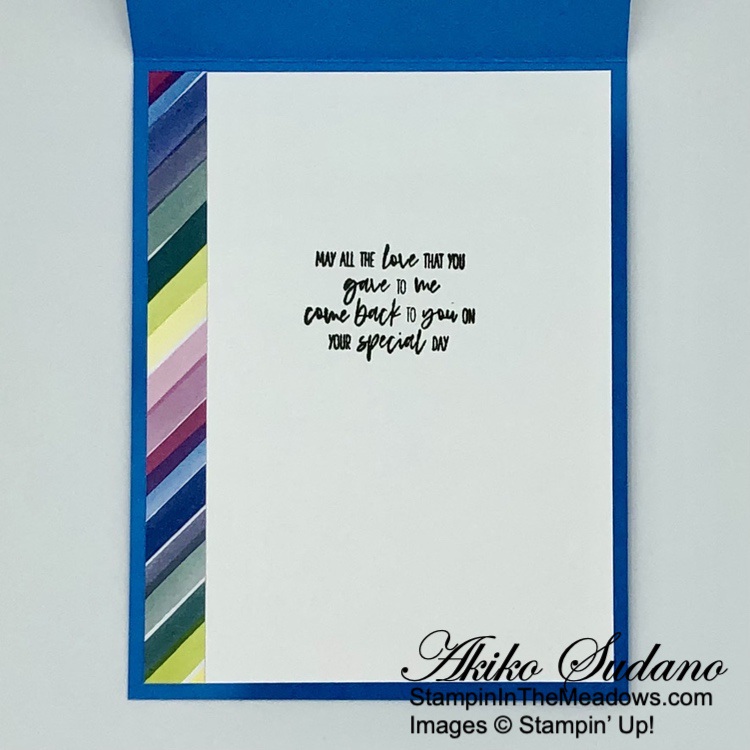
For the inside of the card, I stamped the sentiment from the Stampin’ Up! Places in the Heart stamp set in Pebbled Path ink on a Basic White panel and trimmed the side with a strip of Bright and Beautiful DSP. I adhered the panel to the inside of the card with Stampin’ Seal.

So many of the inks, blends and card stocks I used are new colors that will be available on Tuesday when the new catalog launches. The new colors are also used in the Bright and Beautiful 6″ x 6″ DSP, and along with the sweet Stampin’ Up! Places In The Heart stamp set they make for a colorful, bright and beautiful Mother’s day card.


Last Chance Products Sale Ends Today!

This Last Chance Products promotion includes two lists of products that will no longer be available once the catalogs retire today. There will be one for the 2022-2023 Annual Catalog and one for the January-April 2023 Mini Catalog. For these retiring catalogs, you can find carryover products in the upcoming 2023-2024 Annual Catalog.

Items on the retiring list are only available while supplies last, so order soon to make sure that you are able to get the items that you are wanting! Some of the items will have sale prices listed with discounts up to 60% off.

The last day to order from these catalogs is TODAY!

Click HERE to download a PDF of the Retiring Last Chance Products from the 2022-2023 Annual Catalog.

Click HERE to download a PDF of the Retiring Last Chance Products from the January-April 2023 Mini Catalog.


New 2023-2024 Annual Catalog Opens Tomorrow!

The new Stampin’ Up! 2023-2024 Annual Catalog debuts tomorrow! I have sent out catalogs to my current customers. If you would like a copy, simply place an order and I will be happy to send you one, too!!

Get the complete details on the new 2023-2025 In Colors and the Color Refresh on my Stampin’ Up! Promotions Page.


Current Host Code: 6EDCPU4T

Use this host code when you order $50 or more and receive a Thank You gift from me!  The free gift is your choice of any item valued up to $10.00 currently available!

If your order is over $150, please do not use the host code since you’ll receive your own Host Dollars plus I’ll still send you the Thank You gift!  This host code can be used by anyone, no club or commitment required. Let me know if you have any questions.


If you need any stamping supplies, I’d be very happy to be your Demonstrator.  Just click on the Shop Now button on the right side of the screen to go directly to my online store or contact me if you have any questions.  Happy Stamping!

Thanks for stopping by and have a great week!

Akiko

  • Visit my online store here
  • See the current Stampin’ Up! clearance rack specials here
  • Earn FREE Stampin’ Up! products through my Wildflower Frequent Shopper Program – my way of saying thank you to my online frequent shopper customers.
  • Have any questions? I’d be happy to help, click here to contact me.

Cardstock Cuts for this project:

  • Azure Afternoon – 4-1/4″ x 11″ card base scored at 5-1/2″, 2-3/4″ x 4-1/8″ (art panel mat)
  • Basic White – 4″ x 5-1/4″ (inside panel),3″ x 4-1/4″ (art panel)
  • Bright and Beautiful 6″ x 6″ DSP – 4″ x 5-1/4″ (front background), 1-1/4″ x 5-1/4″ (front side strip), 1/2″ x 5-1/4″ (inside trim)

Stampin’ Up! products used in this project:


Stampin’ Up! Sentimental Park Thank You Card and Video Tutorial

Good Morning! The Stampin’ Up! Sentimental Park bundle is a wonderful photopolymer stamp set with gorgeous floral dies for making fancy labels. It’s full of sentiments for all occasions and some pretty florals that coordinate with the beautiful Regency Park 6″ x 6″ designer series paper. I used the bundle to make a simple gate fold thank you card during my Facebook Live yesterday and you can find the supplies I used at the bottom of my post along with the sizes of cardstock used.

You can watch my FB Live video on my Facebook page HERE. I also posted the video to my YouTube Channel and you can view it HERE.

I adhered plain panels of Regency Park 6″ x 6″ designer series paper to the back of floral panels to use as contrasting mats and adhered the panels to each side of the front of a gate fold card base.

I cut the layered label dies from the Stampin’ Up! Sentimental Park dies from Basic White. I stamped the sentiment in Night of Navy ink on the smaller one and slipped it into the larger floral label die cut. I love how the layered panels give the look of a double stitched edge!

I cut the small solid and outline flowers from the Stampin’ Up! Sentimental Park dies from Night of Navy card stock and Mango Melody Regency Park DSP and adhered them to the label. For the outline flowers, I applied adhesive sheets to the back of the DSP before die cutting and removed the backing from the die cut flowers before adhering them. I decorated the flower centers with rhinestones and adhered the label to the left side of the gate fold card front, being careful to apply adhesive to only one side of the card.

For the inside of the card, I stamped the small flowers from the Stampin’ Up! Sentimental Park stamp set in Night of Navy on the bottom of a Basic White panel. I used a Daffodil Delight Stampin’ Blend to color the centers and adhered the panel to a Regency Park mat before adhering the panel to the inside of the card. Here’s the finished card with the samples I made for my video.

The layered label from the Stampin’ Up! Sentimental Park bundle is gorgeous and pretty much all you need to make a beautiful card. Luckily the stamp set and dies are returning in the upcoming 2023 – 2024 Annual Catalog, but the bundle discount will no longer be offered. And sadly, the Regency Park DSP will be retiring soon, so now is the time to pick it up before it’s gone for good.


New 2023-2024 Annual Catalog Coming Soon!

The new Stampin’ Up! 2023-2024 Annual Catalog will debut on May 2, 2023! The Demonstrator pre-order is happening now, so there will be sneak peeks of wonderful new products and colors! I have sent out catalogs to my current customers. If you would like a copy, simply place an order and I will be happy to send you one, too!!

Get the complete details on the new 2023-2025 In Colors and the Color Refresh on my Stampin’ Up! Promotions Page.


Last Chance Products Sale Going On Now!

This Last Chance Products promotion includes two lists of products that will no longer be available once the catalogs retire on May 1, 2023. There will be one for the 2022-2023 Annual Catalog and one for the January-April 2023 Mini Catalog. For these retiring catalogs, you can find carryover products in the upcoming 2023-2024 Annual Catalog.

Items on the retiring list are only available while supplies last, so order soon to make sure that you are able to get the items that you are wanting! Some of the items will have sale prices listed with discounts up to 60% off.

Several wonderful retiring items have already sold out!

The last day to order from these catalogs will be May 1, 2023.

Click HERE to download a PDF of the Retiring Last Chance Products from the 2022-2023 Annual Catalog.

Click HERE to download a PDF of the Retiring Last Chance Products from the January-April 2023 Mini Catalog.


Current Host Code: 6EDCPU4T

Use this host code when you order $50 or more and receive a Thank You gift from me!  The free gift is your choice of any item valued up to $10.00 currently available!

If your order is over $150, please do not use the host code since you’ll receive your own Host Dollars plus I’ll still send you the Thank You gift!  This host code can be used by anyone, no club or commitment required. Let me know if you have any questions.


If you need any stamping supplies, I’d be very happy to be your Demonstrator.  Just click on the Shop Now button on the right side of the screen to go directly to my online store or contact me if you have any questions.  Happy Stamping!

Thanks for stopping by and have a great week!

Akiko

  • Visit my online store here
  • See the current Stampin’ Up! clearance rack specials here
  • Earn FREE Stampin’ Up! products through my Wildflower Frequent Shopper Program – my way of saying thank you to my online frequent shopper customers.
  • Have any questions? I’d be happy to help, click here to contact me.

Cardstock Cuts for this project:

  • Night of Navy – 5-1/2″ x 8-1/2″ card base scored at 2-1/8″ and 6-3/8″, 1″ x 2″ (die cut flowers)
  • Basic White – 3-7/8″ x 5-1/8″ (inside panel), 4-1/2″ x 5-1/4″ (die cut label layers)
  • Regency Park 6″ x 6″ DSP – 4″ x 5-1/4″ (inside mat), two 1-7/8″ x 5-1/4″ panels (front mats), two 1-3/4″ x 5-1/8″ panels (front background panels), 1″ x 2″ (die cut flowers)

Stampin’ Up! products used in this project:


Stampin’ Up! Country Bouquet Valentine Card

Good Morning! I just love the hearts in the Stampin’ Up! Country Bouquet bundle and the beautiful Country Floral Lane designer series paper. These are my favorite Valentine’s day items in a long time. And I had to pull them out for another Valentine’s day card, this time for a fun fold! You can find the supplies I used at the bottom of my post along with the sizes of cardstock used.

I adhered a panel of Country Floral Lane designer series paper to the front of a Sweet Sorbet card base. The card base is 1″ shorter in the front than the back, so I adhered another strip to the inside of the back panel. I adhered another large floral pattern panel to a Sweet Sorbet mat and adhered it to the front panel with dimensionals and let it extend a little below the card front.

I punched a Sweet Sorbet Heart and a pair of Mossy Meadow leaves from another sheet of Country Floral Lane DSP. I punched three additional large hearts from Basic White card stock and adhered them together with liquid glue and topped them with the DSP heart. This gave me a nice thick heart for the card front! I stamped the sentiment from the Stampin’ Up! Country Bouquet stamp set in Sweet Sorbet on a small strip of Basic White. I trimmed the end to make a flag and adhered it to the card front with liquid glue.

I adhered the punched DSP leaves to the card front with liquid and then adhered the layered heart over the leaves and label. I wrapped the card with Sweet Sorbet baker’s twine and made a bow and finished with three gold adhesive sequins.

I stamped the sentiment from the Stampin’ Up! Country Bouquet stamp set in Sweet Sorbet on Basic White and stamped the solid tiny hearts in Petal Pink ink. I adhered the panel to the inside of the card above the Country Floral Lane DSP.

A really simple card made with the pretty papers from the Country Floral Lane designer series paper with a little help from the Stampin’ Up! Country Bouquet stamp set. It really makes it easy to get ready for Valentine’s day!


Sale-A-Bration is Stampin’ Up!’s best promotion of the year with specials for shopping, hosting and joining! It will run through February 28, 2023 and will be the only Sale-A-Bration this year!

SHOP

Orders placed during Sale-A-Bration will receive FREE products for orders of $50 or more(before shipping and taxes). There are 7 items that are available for free with orders of $50 or greater and 2 items that are available for free with orders of $100 or greater. The free Sale-A-Bration items are stackable, so if you place an order of $150, you can choose to add 3 $50 items or a $100 item and a $50 item to your order! And that’s in addition to the regular host rewards! The Sale-A-Bration items are only available while supplies last, so order early if there are items that you are really wanting! 

HOST

There’s also a host exclusive stamp set on page 16 of the Sale-A-Bration Brochure that is ONLY AVAILABLE to those ordering $300 or greater in a single order or who host a party with sales of $300 or greater during Sale-a-bration.  If you’d like to set up a host code to see if you can collect $300 in orders to earn that stamp set, I’d be happy to help you with that!  Reach out to me at apsudano@stampininthemeadows.com.

JOIN

Stampin’ Up! has three great joining promotion options during Sale-a-bration!

OPTION 1: Pay $129 and receive the exclusive Boho Blue Mini Machine (a $63 value) + choose $175 in Stampin’ Up! Products for your Starter Kit*.

OPTION 2: Pay $129 and receive the original white Mini Machine (a $63 value) + choose $175 in Stampin’ Up! Products for your Starter Kit*.

OPTION 3: Pay $99 and choose $175 in Stampin’ Up! Products for your Starter Kit*.

Once you join, you’ll get at least a 20% discount on all of your Stampin’ Up! merchandise purchases AND you get to order early from upcoming catalogs!  There is NO COMMITMENT and NO REQUIREMENT TO SELL to anyone.  You can join and just get the discount for yourself!  Contact me at apsudano@stampininthhemeadows.com if you’d like more information about joining or purchasing the Starter Kit! 

*That’s $50 more product than the standard Starter Kit offer!


Current Host Code: ZYNDU2N9

Use this host code when you order $50 or more and receive a free gift from me!  The free gift is your choice of any item currently available valued up to $10.00!

If your order is over $150, please do not use the host code since you’ll receive your own Host Dollars plus I’ll still send you the free gift!  This host code can be used by anyone, no club or commitment required. Let me know if you have any questions.


If you need any stamping supplies, I’d be very happy to be your Demonstrator.  Just click on the Shop Now button on the right side of the screen to go directly to my online store or contact me if you have any questions.  Happy Stamping!

Thanks for stopping by and have a great week!

Akiko

  • Visit my online store here
  • See the current Stampin’ Up! clearance rack specials here
  • Earn FREE Stampin’ Up! products through my Wildflower Frequent Shopper Program – my way of saying thank you to my online frequent shopper customers.
  • Have any questions? I’d be happy to help, click here to contact me.

Cardstock Cuts for this project:

  • Sweet Sorbet – 5-1/2″ x 7-1/2″ card base scored at 3-1/4″, 2-1/2″ x 4″ (heart panel)
  • Basic White – 2-1/2″ x 5″ (inside panel), 1/2″ x 1-1/2″ (label), 1″ x 4-1/2″ (punched hearts)
  • Country Floral Lane DSP – 2-3/4″ x 5″ (front background), 1″ x 5″ (inside trim), 2-1`/4″ x 3-3/4″ (heart panel background), punched heart and leaves

Stampin’ Up! products used in this project:


Stampin’ Up! Friendly Hello Birthday Card

Good Morning! Today I’m bringing you a Double Easel fun fold card made with the Sale-A-Bration Stampin’ Up! Friendly Hello bundle This is a beautiful set of coordinating stamps and designer series paper that you can get for FREE with a $100 purchase during Sale-A-Bration! You can find the supplies I used at the bottom of my post along with the sizes of cardstock used.

I adhered the Stampin’ Up! Friendly Hello designer series paper panels to each scored section of the Basic Black panel, burnished the score lines, and adhered the folded Basic Black panel to the front of the Fresh Freesia card base. I cut a panel of the DSP with the second largest Scalloped Contours die and adhered it to the card front.

I traced the outline of the die from one of the Tasteful Labels dies on a Basic Black panel and fussy cut it out with my paper snips. I used the die to cut a panel of the Stampin’ Up! Friendly Hello DSP with the bird and flowers, and adhered it to the fussy cut Basic Black mat. I stamped the bird image from the Stampin’ Up! Friendly Hello stamp set in Memento Tuxedo Black and colored it with Pool Party, Fresh Freesia and Pale Papaya Stampin’ Blends. I fussy cut the bird and flowers and adhered them to the die cut with dimensionals. I adhered the die cut to the card front with Tear & Tape and finished the flowers with Pale Papaya rhinestones.

I stamped the double flower from the Stampin’ Up! Friendly Hello stamp set in Memento Tuxedo Black ink on Basic White. I colored the flowers with Fresh Freesia and Pale Papaya Stampin’ Blends. I stamped the leaves in Granny Apple Green and fussy cut the leaves and flowers. I adhered the flowers and leaves to the scalloped rectangle die cut panel with liquid glue.

I stamped the sentiment from the Sale-A-Bration Special Moments photopolymer stamp set in Basic Black on Fresh Freesia and cut it out with the Ornate Labels die. I adhered it to the card front and finished the card with a glittered Black Organdy bow.

I stamped the sentiment from the Special Moments stamp set in Memento Tuxedo Black on a Basic White panel. I stamped the large flowers from the Stampin’ Up! Friendly Hello stamp set in the corners in Basic Black and the leaves in Granny Apple Green. I colored the flowers with Fresh Freesia and Pale Papaya Stampin Blends and adhered the panel to the inside of the card. I also stamped a Basic White envelope with the flowers and leaves and colored it with Stampin’ Blends to match the inside panel.

The Stampin’ Up! Friendly Hello bundle is a wonderful Sale-A-Bration item that you can get for free with a $100 order. The designer series paper is so beautiful and the stamp set has pretty images and sentiments that can be used with it or on their own. But hurry, because Sale-A-Bration ends on February 28, 2022!


Earn Free Products During Sale-A-Bration: Jan 4 – Feb 28 2022!

Sale-A-Bration is one of Stampin’ Up!’s biggest promotions of the year with fun for everyone!  There are fantastic Sale-A-Bration specials for Shopping, Hosting and Joining! See my Promotions Page for more details or contact me and I’ll be happy to tell you more! But hurry because these specials are only available through February 28, 2022 or while supplies last!

All Together Collection Available Through May 2, 2022

Loving hands and heartfelt words are the best way to show you care. With hand designs that illustrate coming together in friendship and solidarity, the All Together Collection will help you create cardmaking and paper crafting projects that reflect the people you know and love. Click on the picture below to download a brochure with all the details or click HERE to start shopping the All Together Collection now in My Online Store.


Current Host Code: 3QYMGKQY

Use this host code when you order $50 or more and receive a free gift from me!  The free gift is your choice of any item valued up to $10.00 in the 2021-2022 Annual Catalog or the January – June 2022 Mini Catalog!

If your order is over $150, please do not use the host code since you’ll receive your own Host Dollars plus I’ll still send you the free gift!  This host code can be used by anyone, no club or commitment required. Let me know if you have any questions.


If you need any stamping supplies, I’d be very happy to be your Demonstrator.  Just click on the Shop Now button on the right side of the screen to go directly to my online store or contact me if you have any questions.  Happy Stamping!

Thanks for stopping by and have a great week!

Akiko

  • Visit my online store here
  • See the current Stampin’ Up! clearance rack specials here
  • Earn FREE Stampin’ Up! products through my Wildflower Frequent Shopper Program – my way of saying thank you to my online frequent shopper customers.
  • Have any questions? I’d be happy to help, click here to contact me.

Cardstock Cuts for this project:

  • Fresh Freesia – 4-1/4″ x 11″ card base scored at 5-1/2″, 1-1/4″ x 3-1/2 (label)
  • Basic Black – 4″ x 10-1/4″ scored at 2-1/2″ and 5″ (double easel), 3″ x 4″ (die cut mat)
  • Basic White – 4″ x 5-1/4″ (inside panel), 2-3/4″ x 3-3/3″ (bird and flowers), 1-3/4″ x 3″ (double flowers), 1-1/2″ x 1-1/2″ (leaves)
  • Friendly Hello DSP – 3-7/8″ x 5-1/8″ (large background panel), two 2-3/8″ x 3-7/8″ panels (small background panels), 2-3/4″ x 3-3/4″ (die cut bird), 3-1/2″ x 4-3/4″ (die cut scalloped rectangle)

Stampin’ Up! products used in this project:


Stampin’ Up! Hello Ladybug Video Tutorial

Good Morning! The Stampin’ Up! Hello Ladybug bundle is so adorable. With the bold, graphic ladybug stamps and coordinating Ladybug Builder Punch, it is so easy to make a bunch of cute little bugs to decorate cards and tags. I made this cute little fun fold card during my Facebook Live yesterday afternoon. You can find the supplies I used at the bottom of my post along with the sizes of cardstock used.

Here is the video of my Facebook Live from yesterday afternoon. I also posted a copy of the video in my YouTube channel and you can view it here if you prefer.

I a panel of pretty multicolor Flowering Fields designer series paper to a So Saffron panel. I adhered another Mango Melody Flowering Fields Panel to the front of my mini card. I adhered my mini card to the DSP panel with Tear & Tape adhesive. I stamped the leaf from the Stampin’ Up! Hello Ladybug photopolymer stamp set in Pear Pizzazz on Basic White and fussy cut it with a small white border. I adhered the leaf to the mini card front with liquid glue.

I stamped the large flower from the Stampin’ Up! Hello Ladybug stamp set three times in Highland Heather ink and cut them out with the Medium Daisy Punch. I curved the petals and adhered the clusters together with liquid glue and adhered it to the card front with dimensionals, finishing the center with an iridescent rhinestone. I stamped two ladybug wings with Poppy Parade ink on Basic White and punched them out with the Ladybug Builder Punch. I punched out two ladybug bodies from Pattern Party DSP and Basic Black card stock. I inked the edges of the Pattern Party bodies with my black Stamp & Write marker and adhered them to the Basic Black cardstock bodies. I adhered the wings with liquid glue and adhered Black Matte Dots to the wing spots.

I adhered the ladybugs to the card front with dimensionals, letting them hang over the sides of the mini card. I stamped the hello sentiment from the Stampin’ Up! Hello Ladybug stamp set in Poppy Parade on Basic White and trimmed it with my paper snips. I adhered the label to the card front on top of the leaf.

For the inside of the card, I stamped the sentiment from the Stampin’ Up! Hello Ladybug stamp set in Poppy Parade on a basic White panel. I trimmed the bottom with a strip of the Flowering Fields DSP and adhered the panel to the inside of the card.

The Stampin’ Up! Hello Ladybug bundle is the cutest! You can punch out the ladybug from colored card stock, stamped card stock and designer series paper for a wide range of styles. The bold stamps compliment the punched bugs and the sentiments are perfect for expressions of friendship, support and good wishes.


Earn Free Products During Sale-A-Bration: Jan 4 – Feb 28 2022!

Sale-A-Bration is one of Stampin’ Up!’s biggest promotions of the year with fun for everyone!  There are fantastic Sale-A-Bration specials for Shopping, Hosting and Joining! See my Promotions Page for more details or contact me and I’ll be happy to tell you more! But hurry because these specials are only available through February 28, 2022 or while supplies last!


Current Host Code: 3QYMGKQY

Use this host code when you order $50 or more and receive a free gift from me!  The free gift is your choice of any item valued up to $10.00 in the 2021-2022 Annual Catalog or the January – June 2022 Mini Catalog!

If your order is over $150, please do not use the host code since you’ll receive your own Host Dollars plus I’ll still send you the free gift!  This host code can be used by anyone, no club or commitment required. Let me know if you have any questions.


If you need any stamping supplies, I’d be very happy to be your Demonstrator.  Just click on the Shop Now button on the right side of the screen to go directly to my online store or contact me if you have any questions.  Happy Stamping!

Thanks for stopping by and have a great week!

Akiko

  • Visit my online store here
  • See the current Stampin’ Up! clearance rack specials here
  • Earn FREE Stampin’ Up! products through my Wildflower Frequent Shopper Program – my way of saying thank you to my online frequent shopper customers.
  • Have any questions? I’d be happy to help, click here to contact me.

Cardstock Cuts for this project:

  • So Saffron – 3-1/4″ x 8-1/2″ mini card base scored at 4-1/4″, 4-1/4″ x 5-1/2″ card base panel
  • Basic Black – 2″ x 5″ (ladybugs)
  • Basic White – 3″ x 4″ (inside panel), 2″ x 4″ (ladybug wings), 2″ x 6″ (flower), 2-1/2″ x 2-1/2″ (leaf), 3/8″ x 1″ (label)
  • Flowering Fields DSP – 4″ x 5-1/4″ (floral background panel), 3″ x 4″ (front panel), 1/2″ x 3″ (floral inside trim)
  • Pattern Party DSP – 2″ x 5″ (ladybugs)

Stampin’ Up! products used in this project:


Stampin’ Up! Plentiful Plants for the Happy Inkin’ Thursday Blog Hop

Good morning and welcome to the Happy Inkin’ Thursday Blog Hop! For today card, I used the beautiful Stampin’ Up! Plentiful Plants bundle to make a Love You card. Do you have indoor plants? I used to have lots of them, but I’ve lost my green thumb these days. It’s sad because they really brighten things up on dreary winter days. I’ll have to look into this again. But anyway, you can find the supplies I used at the bottom of my post along with the sizes of cardstock used.

We have a special challenge this week – we’re all making fun fold cards! My fun fold is an accordion card inspired by Cindy Brumbaugh at CindyLeeBee Designs.

I adhered panels of Bloom Where You’re Planted designer series paper to each of the scored panels of the Just Jade card base. I stamped the sentiment from the Stampin’ Up! Plentiful Plants photopolymer stamp set in Evening Evergreen in the top corner of the brick design Bloom Where You’re Planted DSP and adhered it to the right side of the scored Cinnamon Cider mini card. I stamped the leaf spray in Just Jade on the top corner of the wood panelling design Bloom Where You’re Planted DSP and adhered it to the right side of the Cinnamon Cider mini card.

I stamped the sentiment from the Stampin’ Up! Plentiful Plants stamp set in Evening Evergreen ink in the top corner of a Basic White panel and stamped the other top corner with a vine in Garden Green ink. I adhered the panel to a Just Jade mat and adhered it to the inside of the card. I adhered strips of Tear & Tape to the edges of the Cinnamon Cider mini card and pulled off the covers and adhered it to the first inside fold by lining it up with the inside panel. I closed the folds and pulled the covers off the Tear & Tape and folded the Cinnamon Cider mini card over the front flap to adhere it.

I stamped the 5 leaf cluster from the Stampin’ Up! Plentiful Plants stamp set in Garden Green on Basic White and cut it out with the coordinating die. I stamped the large pot in Cajun Craze and fussy cut it with my paper snips. I cut a panel of Sahara Sand with the hanging basket die and adhered the plant and pot to the basket with liquid glue. I adhered the basket to the card front with liquid glue. I cut a Cinnamon Cider panel with the vase die and adhered it with liquid glue. I cut an Evening Evergreen panel with the leafy die and adhered it on top of the pot with liquid glue. I finished the front with 3 metallic butterflies from the upcoming Jan-Jun 2022 Mini Catalog (available Jan 4, 2022).

I stamped the 3 leaf plant in Garden Green on Basic White and cut it out with the coordinating die. I stamped the planter in Cinnamon cider and cut it out with the coordinating die. I adhered the plant to the back of the planter and adhered them both to the inside flap of the card. I adhered a die cut Sahara Sand vase next to the plant

I adhered some more empty Sahara Sand die cut vases to the bottom of the inside panel under the Basic White panel, so that they kind of peek out when the card is folded closed.

This fun fold is 1/4″ narrower than a standard A2 card, but it still fits in a standard envelope, with plenty of room for the accordion fold and card front embellishments. And it was so much fun using the different patterns in the Bloom Where You’re Planted DSP and the Stampin’ Up! Plentiful Plants bundle to make a verdant card to inspire winter indoor gardens!

On with the Hop! Click on the Next Blog button to move forward to see the beautiful project Karen Ksenzakovic has created.

If you get lost along the way, here are the participants for the hop:


Current Host Code: 2YHH339E

Use this host code when you order $50 or more and receive a free gift from me!  The free gift is your choice of any item valued up to $10.00 in the 2021 – 2022 Annual Catalog or the July – December 2021 Mini Catalog including some of the host stamp sets!

If your order is over $150, please do not use the host code since you’ll receive your own Host Dollars plus I’ll still send you the free gift!  This host code can be used by anyone, no club or commitment required. Let me know if you have any questions.


If you need any stamping supplies, I’d be very happy to be your Demonstrator.  Just click on the Shop Now button on the right side of the screen to go directly to my online store or contact me if you have any questions. 

Thanks for stopping by and Happy Stamping!

Akiko

  • Visit my online store here
  • See the current Stampin’ Up! clearance rack specials here
  • Earn FREE Stampin’ Up! products through my Wildflower Frequent Shopper Program – my way of saying thank you to my online frequent shopper customers.
  • Have any questions? I’d be happy to help, click here to contact me.

Cardstock Cuts for this project:

  • Just Jade – 5-1/2″ x 11″ card base scored at 1-3/4″, 3-1/2″, 5-1/4″, and 7″, 3″ x 3-3/4″ (inside mat)
  • Cinnamon Cider – 3-3/4″ x 6″ mini card scored at 3″, 1″ x 1″ (die cut pot)
  • Evening Evergreen – 1-1/4″ x 1-1/2″ (die cut plant)
  • Sahara Sand – 1-3/4″ x 4-1/4″ (die cut plant hanger and small pots)
  • Basic White – 2-3/4″ x 3-1/2″ (inside panel), 2″ x 6″ (stamped plants and pots)
  • Bloom Where You’re Planted DSP – 3-3/4″ x 5-1/4″ (inside background), four 1-1/2″ x 5-1/4″ strips (accordion fold panels), two 2-3/4″ x 3-1/2″ panels (mini card panels)

Stampin’ Up! products used in this project: