Stampin’ Up! Hello Ladybug Smile Card

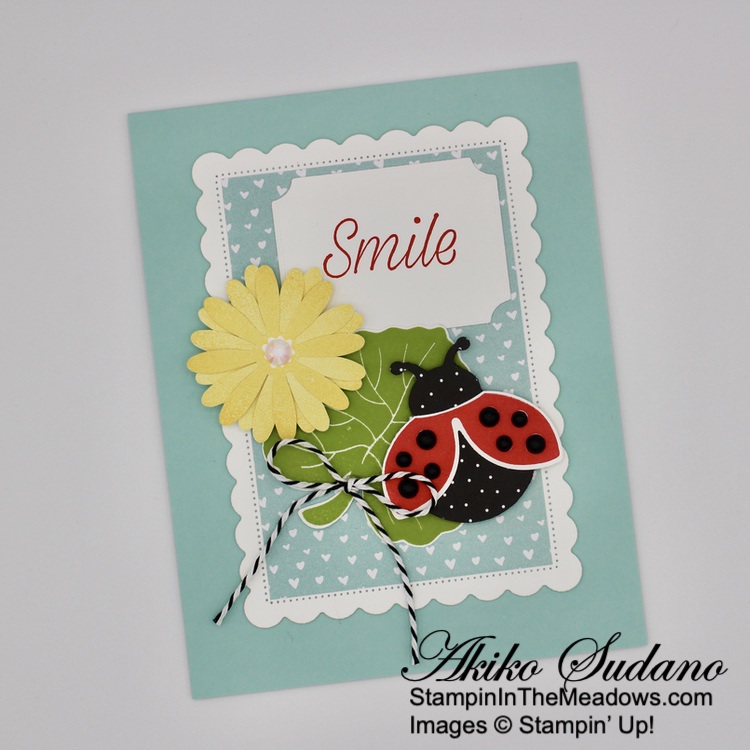
Happy Friday! Last weekend I used the Stampin’ Up! Hello Ladybug bundle to make a fun fold card for my Facebook Live and I’m using it again for a friendship and encouragement card for today. The ladybug is so cute and the other stamps in the photopolymer stamp set give you lots of options for your card designs. You can find the supplies I used at the bottom of my post along with the sizes of cardstock used.

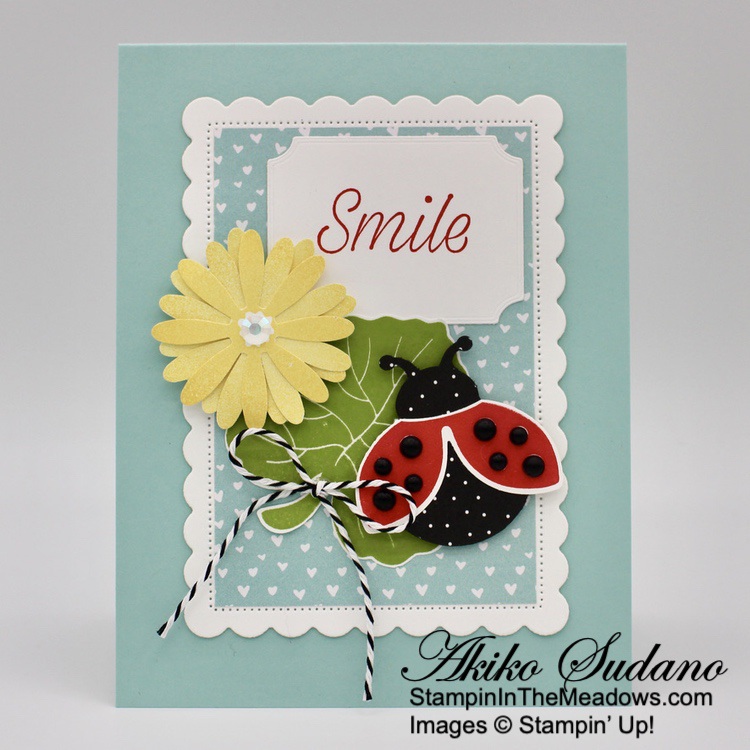
I started cutting out a panel of Basic White with the second largest Scalloped Contours die and adhering a panel of the pretty Sale-A-Bration Sunshine and Rainbows designer series paper to it with liquid glue. I adhered the panel to the front of a Pool Party card base. I stamped the large leaf from the Stampin’ Up! Hello Ladybug stamp set in Granny Apple Green on a Basic White panel and fussy cut it out with my paper snips. I adhered it to the card front.

I stamped 3 large flowers from the Stampin’ Up! Hello Ladybug stamp set in Daffodil Delight on Basic White and punched them out with the Medium Daisy Punch. I adhered them together with liquid glue and added an iridescent gemstone to the center before adhering them to the card front with a dimensional. I punched the ladybug body from Pattern Party DSP and Basic Black card stock and adhered them together. I stamped the wings in Real Red, punched them out with the Butterfly Builder punch and adhered them to the butterfly body. I added black matte dots to the wings and adhered the ladybug to the card front with dimensionals.

I stamped the sentiment from the Daisy Lane stamp set in Real Red on Basic White and cut it out with the Tasteful Labels die. I adhered the label to the card front with liquid glue, tucking it under the leaf. I finished the card with a black and white twine bow.

I stamped the small bunch of flowers from the Stampin’ Up! Hello Ladybug stamp set in Daffodil Delight ink in the corners of a Basic White panel and the sweet sentiment from the Daisy Lane stamp set in Real Red. I trimmed the bottom with a strip of Sunshine and Rainbows DSP and adhered the panel to the inside of the card.

The Stampin’ Up! Hello Ladybug bundle is so cute and versatile. It’s perfect for many occasions, so be sure to check it out! Thanks for stopping by and have a great weekend!


Sale-A-Bration is ending soon – Feb 28 2022!

Sale-A-Bration is one of Stampin’ Up!’s biggest promotions of the year with fun for everyone!  There are fantastic Sale-A-Bration specials for Shopping, Hosting and Joining! See my Promotions Page for more details or contact me and I’ll be happy to tell you more! But hurry because these specials are only available through February 28, 2022 or while supplies last!


Current Host Code: 3QYMGKQY

Use this host code when you order $50 or more and receive a free gift from me!  The free gift is your choice of any item valued up to $10.00 in the 2021-2022 Annual Catalog or the January – June 2022 Mini Catalog!

If your order is over $150, please do not use the host code since you’ll receive your own Host Dollars plus I’ll still send you the free gift!  This host code can be used by anyone, no club or commitment required. Let me know if you have any questions.


If you need any stamping supplies, I’d be very happy to be your Demonstrator.  Just click on the Shop Now button on the right side of the screen to go directly to my online store or contact me if you have any questions.  Happy Stamping!

Thanks for stopping by and have a great week!

Akiko

  • Visit my online store here
  • See the current Stampin’ Up! clearance rack specials here
  • Earn FREE Stampin’ Up! products through my Wildflower Frequent Shopper Program – my way of saying thank you to my online frequent shopper customers.
  • Have any questions? I’d be happy to help, click here to contact me.

Cardstock Cuts for this project:

  • Pool Party – 4-1/4″ x 11″ card base scored at 5-1/2″
  • Basic Black – 2″ x 2″ (ladybug)
  • Basic White – 4″ x 5-1/4″ (inside panel), 3-1/2″ x 4-3/4″ (scalloped rectangle), 2″ x 2-1/2″ (label), 2″ x 6″ (flower), 2-1/2″ x 2-1/2″ (leaf), 2″ x 2″ (ladybug wings)
  • Sunshine & Rainbows DSP – 2-5/8″ x 4″ (scalloped panel background), 1/2″ x 4″ (inside trim)
  • Pattern Party DSP – 2″ x 2″ (ladybug)

Stampin’ Up! products used in this project:


Stampin’ Up! Daisy Garden Friendship Card

Good Morning! Summer is really here this week and the summer flowers are blooming! I was inspired by the coneflowers in my garden to color the daisies in the Stampin’ Up! Daisy Garden cling stamp set with Rich Razzleberry Stampin’ Blends for this friendship card. You can find the supplies I used at the bottom of my post along with the sizes of cardstock used.

I stamped the Stampin’ Up! Daisy Garden background cling stamp in Memento Tuxedo Black in on a Basic White panel and colored it with Stampin’ Blends. I colored the flower petals with light Rich Razzleberry and the flower centers with dark Soft Suede and light Cinnamon Cider. I colored the leaves with dark Old Olive and the sky using Light Balmy Blue. I made little circles all over the sky with the Balmy Blue, giving the sky a mottled look.

I cut the daisy image with the 4th largest Stitched Rectangle die and adhered it to a Blackberry Bliss mat. I split a length of white twine and colored each half with Stampin’ Blends – light Balmy Blue and dark Rich Razzleberry. I wrapped them around the panel and tied a bow. I stamped the sentiment from the Many Messages stamp set in Memento Tuxedo Black ink on an Old Olive panel and cut it out with the Messages die. I adhered the label to the daisy panel with glue dots just above the twine. I love this little label because it doesn’t hide much of the daisy panel!

I embossed a panel of Fresh Freesia shimmer vellum with the Pretty Flowers embossing folder and adhered it to the front of a Blackberry Bliss card base. I used Stampin’ Seal Adhesive just under the area where the stamped daisy panel would cover it. I popped the stamped panel on top of the embossed vellum with dimensionals and finished the card front by adhering a gold bumblebee trinket to one of the flowers with a glue dot.


For the inside of the card, I stamped the flower from the Daisy Lane stamp set in Memento Tuxedo Black ink in the lower corner of a Basic White panel. I covered the flower with a mask and stamped the stem in Memento Tuxedo Black. I colored the flower the same as the flowers on the front. I love how the Daisy Lane flowers are in the same style as the Daisy Garden flowers! I stamped the sentiment from the Daisy lane stamp set in Rich Razzleberry ink next to the flower and adhered the panel to the inside of the card.

I love the Stampin’ Up! Daisy Garden stamp set because the flowers are so cheerful and perfect for summer cards! And its great that the flowers coordinate with the Daisy Lane stamp set because it makes them both more versatile and the sentiments in the Daisy Lane stamp set are just fantastic! And here are the coneflowers blooming in my garden – at least the ones the deer didn’t get yet. LOL.


Tomorrow is the Last Day for the January – June 2021 Mini Catalog Last Chance Products Sale!

Many favorites have already sold out on the Last Chance sale, but some pretty items are still available. So don’t delay – head over to my Online Store to start shopping now! 


Stampin’ Up! Designer Series Paper Sale Starts Thursday, July 1!

We all love gorgeous Designer Series Paper, and during this incredible sale, you can enjoy a 15% discount on select papers from the 2021–2022 Annual Catalog! Now is a great time to stock up and save on some of Stampin’ Up!’s most beautiful paper designs! Get all the details on my Promotions Page or click on the image below for a printable PDF Flyer:


Current Host Code: ZQAFXXXK

Use this host code when you order $50 or more and receive a free gift from me!  The free gift is your choice of any item valued up to $10.00 in the 2021 – 2022 Annual Catalog!

If your order is over $150, please do not use the host code since you’ll receive your own Host Dollars plus I’ll still send you the free gift!  This host code can be used by anyone, no club or commitment required. Let me know if you have any questions.


If you need any stamping supplies, I’d be very happy to be your Demonstrator.  Just click on the Shop Now button on the right side of the screen to go directly to my online store or contact me if you have any questions. 

Thanks for stopping by and Happy Stamping!

Akiko

  • Visit my online store here
  • See the current Stampin’ Up! clearance rack specials here
  • Earn FREE Stampin’ Up! products through my Wildflower Frequent Shopper Program – my way of saying thank you to my online frequent shopper customers.
  • Have any questions? I’d be happy to help, click here to contact me.

Cardstock Cuts for this project:

  • Blackberry Bliss – 4-1/4″ x 11″ card base scored at 5-1/2″, 2-3/4″ x 4-1/8″ panel (daisy mat)
  • 2021-2023 In Color Shimmer Vellum – 3-7/8″ x 5-1/8″ (embossed background)
  • Old Olive – 1/2″ x 3″ (label)
  • Basic White – 4″ x 5-1/4″ panel (inside panel), 3-4/4″ x 5″ (daisy panel)

Stampin’ Up! products used in this project:


Stampin’ Up! Daisy Lane Fall Card Video Tutorial

Good Morning! Today I’m sharing a fall card made with the Stampin’ Up! Daisy Lane stamp set accented with leaves from the Gathered Leaves Dies. You can find the supplies used to create this card at the bottom of my post along with the sizes of cardstock used.

Here is the Facebook Live video showing how I made the card:

I will post an edited version of how I made the card in my YouTube channel later this week so you can view a quickie version.

My card layout uses Freshly Made Sketches 457 – this is a good one, check it out.

Adhere a panel of Plaid Tidings 6″ x 6″ designer series paper to the front of an Early Espresso Card base (don’t forget that the Plaid Tidings DSP is on sale this month! 😊). Stamp the Birch cling background stamp in Early Espresso ink on a Bumblebee panel and emboss it with the Tasteful Textile 3D embossing folder. Adhere it to an Early Espresso mat and pop it on the card front with dimensionals.

Adhere a berry branch from the Forever Gold Laser cut specialty paper to the embossed panel. Cut the Gathered Leaves dies from Cajun Craze, Pumpkin Pie and Pear Pizzazz card stock. Adhere the leaves to the card front. Stamp three small daisies from the Stampin’ Up! Daisy Lane stamp set in Bumblebee ink on Bumblebee card stock. Sponge the centers with Cajun Craze ink and sponge Pumpkin Pie ink around the petals, leaving just the tips. Punch out the three petal clusters with the medium daisy punch. Gently bend the petals back on one cluster, back and forward on the second and all forward on the last cluster. Adhere the clusters together with liquid glue.

Cut the center from gold foil using the flower center die from the Poinsettias Dies and adhere it to the middle of the flower. Pop the flower on the card front with a dimensional. Adhere a gold trim bow under the flower. Stamp the sentiment from the Stampin’ Up! Daisy Lane stamp set in Early Espresso ink on a strip of Pumpkin Pie and trim the ends. Adhere it to a strip of early Espresso and pop it on the card front with dimensionals. Finish the card front with three Gilded Gems.

Stamp and emboss a strip of Bumblebee card stock to match the front panel and adhere it to the bottom of a Whisper White panel. Cut a small Gathered Leaves Die leaf from Pumpkin Pie and adhere it to the top corner of the card.

The Stampin’ Up! Daisy Lane stamp set and the coordinating punches are perfect for creating fall floral cards – just change up the colors to coordinate with your favorite fall designer series paper. This is perfect for birthdays and other occasions when a pumpkin just won’t do.


Stampin’ Up! Designer Series Paper Sale Going on Now!

Stampin’ Up! has beautiful Designer Series Paper and during the Month of October they’re putting a select list of those on sale with a 15% discount! This is a fantastic opportunity for you to stock up and save on paper. And the sale includes some of the designs from the August-December 2020 Mini Catalog too! Get the details on my Promotions Page or click on the image above to download a printable PDF with all the selections.  Click Here to shop the Designer Series Paper Sale in My Online Store now!


October 16-31 Host Code: 3VJWYCTP

Use this host code when you order $50 or more and receive a free gift from me!  The free gift is your choice of any item valued up to $10.00 in the 2019 – 2020 Annual Catalog or in the Aug-Dec 2020 Mini Catalog!  That includes some of the Host Exclusive stamp sets!

If your order is over $150, please do not use the host code since you’ll receive your own Host Dollars plus I’ll still send you the free gift!  This host code can be used by anyone, no club or commitment required.  Let me know if you have any questions.


If you need any stamping supplies, I’d be very happy to be your Demonstrator.  Just click on the Shop Now button on the right side of the screen to go directly to my online store or contact me if you have any questions.  Happy Stamping!

Thanks for stopping by and have a great week!

Akiko

  • Visit my online store here
  • See the current Stampin’ Up! clearance rack specials here
  • Earn FREE Stampin’ Up! products through my Wildflower Frequent Shopper Program – my way of saying thank you to my online frequent shopper customers.
  • Sign up for my weekly newsletter here
  • Have any questions? I’d be happy to help, click here to contact me.

Cardstock Cuts for this project:

  • Early Espresso – 4-1/4″ x 11″ card base scored at 5-1/2″, 3/8″ x 2-1/2″ (label mat), 2-5/8″ x 5-1/8″ (embossed panel mat)
  • Bumblebee – 2-1/2″ x 5″ (embossed front panel), 1/4″ x 4″ (embossed inside trim), 2″ x 6″ (stamped and punched daisy clusters)
  • Cajun Craze – 2″ x 2″ (large die cut leaf)
  • Pumpkin Pie – 2″ x 3-1/2″ (medium and small die cut leaves), 1/4″ x 3-1/2″ (label)
  • Pear Pizzazz – 1-1/2″ x 1-1/2″ (small die cut leaf)
  • Gold Foil – 1″ x 1″ (flower center)
  • Whisper White – 4″ x 5-1/4″ (inside panel), 3-7/8″ x 5-1/8″ (front mat), 3/4″ x 6″ (die cut sprigs), 1-1/2″ x 2-1/2″ (punched label)
  • Plaid Tidings DSP – 3-1/4″ x 4-1/4″ (front background)

Stampin’ Up! products used in this project:


Stampin’ Up! Ornate Style Friendship Card Video Tutorial

Good Morning! On Saturday we had our Inkin’ Krew Ornate Garden Facebook Event where we shared lots of projects made with the new Stampin’ Up! Ornate Garden Suite. Did you get a chance to tune in? We had several Facebook Live video tutorials and I shared the tutorial for this card. I used the Stampin’ Up! Ornate Style bundle along with the Ornate Garden specialty designer series paper and the Grace’s Garden and Daisy Lane stamp sets. You can find the supplies used to create this card at the bottom of my post along with the sizes of cardstock used.

Unfortunately I can’t link to the Facebook video ☹️, but it is on my YouTube Channel and you can view it here.

I stamped the sentiment from the Grace’s Garden photopolymer stamp set in Early Espresso ink on a small panel of So Saffron vellum. Be careful because the ink will take longer to dry on the vellum and will be easy to smear if you handle it too early, so I put it aside to let it dry. Using the Leaf Punch, I punched a leaf cluster from Old Olive card stock. I stamped three of the small petal clusters from the Daisy Lane cling stamp set with So Saffron ink after stamping off. I cut them out with the Medium Daisy Punch. I gently curved the petals on the daisies with my fingers, curving the bottom layer up, the top layer down and the middle layer alternating up and down. I adhered the layers with a dot of multipurpose liquid in the center and topped it off with a large gold faceted gem.

I cut the fancy frame from the Ornate Layers Dies from Terracotta Tile card stock. After cleaning the gazillion little pieces that were cut out – this is such an ornate frame and I love it! – I aligned the 3rd smallest of the Stitched Rectangles Dies in the center and cut out the center. I love how these dies leave a stitched edge on both the inside and outside! With the frame ready, I began to assemble my card base.

I adhered a panel of the Ornate Garden specialty designer series paper to a Terracotta Tile card base with multipurpose liquid glue. I adhered the frame to the vellum with pieces of dimensionals. The dimensionals on the side will extend beyond the vellum to adhere it to the card base, but the top and bottom won’t, so I added a strip of multipurpose liquid glue to the back of the vellum that is hidden by the frame. I adhered it to the card base. I adhered the leaf with multipurpose liquid glue and the flower with glue dots. I finished it off with a Terracotta Tile bow.

For the inside of the card, I stamped the little flourish from the Stampin’ Up! Ornate Style cling stamp set in Early Espresso ink at the top of a Whisper White panel. I added a strip of the Ornate Garden specialty DSP to the bottom and adhered the panel to the inside of the card.

Now, I have to admit that I did some surgery to my card after the video ended. In realtime, I stamped the sentiment too hight and crooked as you can see in the picture here. So I snipped the dimensionals behind the frame and trimmed the vellum (luckily it was just stuck down behind the frame. I then re-stamped the sentiment properly and re-attached the frame to the vellum and then adhered it to the card base. It looks much better and from the pictures above, I don’t think you can tell that it needed to be fixed!

I hope that you enjoyed the Inkin’ Krew Ornate Garden event if you got a chance to join it Saturday afternoon. And I hope you got a lot of inspiration and ideas on how you will use the products in the Ornate Garden Suite. If you didn’t, the group will still be there and you can check out the postings and watch the videos on replay. Here is the link to the group where you can join and we will get you approved as soon as we can: https://www.facebook.com/groups/1833741716756137/. Now to end my post with a better picture…


Stampin’ Up! Ornate Garden Suite Early Release available for ordering NOW!

Stampin’ Up! has a beautiful new early release product suite from the upcoming Annual Catalog and it’s available to order now!! Click the image below to see a PDF brochure of all the products that are available with this beautiful suite or go to the Ornate Garden page in my Online Store to place your order now.


April 16 – 30 Host Code: SJ9ZJ46Z

Use this host code when you order $50+ and receive a free gift from me!  If your order is over $150, please do not use this code, but you’ll still get the free gift.  The free gift is your choice of any item valued up to $10.00 in the 2019 – 2020 Annual Catalog or in the 2020 Mini Catalog!  That includes some of the Host Exclusive stamp sets!

If your order is over $150, please do not use the host code since you’ll receive your own Host Dollars plus I’ll send you the free gift!  This host code can be used by anyone, no club or commitment required.  Let me know if you have any questions.


If you need any stamping supplies, I’d be very happy to be your Demonstrator.  Just click on the Shop Now button on the right side of the screen to go directly to my online store or contact me if you have any questions.  Happy Stamping!

Thanks for stopping by and have a great week!

Akiko

  • Visit my online store here
  • See the current Stampin’ Up! clearance rack specials here
  • Earn FREE Stampin’ Up! products through my Wildflower Frequent Shopper Program – my way of saying thank you to my online frequent shopper customers.
  • Sign up for my weekly newsletter here
  • Have any questions? I’d be happy to help, click here to contact me.

Cardstock Cuts for this project:

  • Terracotta Tile – 4-1/4″ x 11″ card base scored at 5-1/2″
  • Old Olive – 1-1/2″ x 3″ (leaf cluster punch)
  • Perennial Essence vellum card stock – 2-1/8″ x 3-5/8″ (So Saffron vellum panel)
  • Whisper White – 4″ x 5-1/4″ (inside panel), 2″ x 6″ (punched daisy petals)
  • Ornate Garden Designer Series Paper – 4-1/4″ x 5-1/2″ (card front background), 1/2″ x 4″ (inside trim)

Stampin’ Up! products used in this project:


Stampin’ Up! Daisy Lane Simply Thankful Card for the Inkin’ Krew Blog Hop

Good Morning! Welcome to The October Inkin’ Krew Monthly Blog Hop!

Our theme for this month is Giving Thanks and I’ve made a card using the Stampin’ Up! Daisy Lane stamp set and the wonderful sentiment from the Stampin’ Up! Country Home stamp set. These daisies remind me of the purple mums that are all over the place at this time of year and make me feel like Fall. You can find the supplies used to create this card at the bottom of my post along with the sizes of cardstock used.

I started by die cutting two pieces of Sahara Sand card stock using the second largest of the Stitched Rectangles dies. On one of them, I took the third largest of the Stitched Rectangle dies and cut out the middle to make a frame. Then I cut a panel of green leafy paper from the Magnolia Lane designer series paper using the same die. Then I adhered the frame to the second Sahara Sand die cut and adhered the green leaf DST to the inside.

Then I used the middle of the Sahara Sand frame to cut the label die from the Wild Rose dies. I stamped the sentiment from the Country Home stamp set in Versamark ink and sprinkled it with gold embossing powder. I heat set it and then adhered it to the background panel with liquid glue.

I stamped the large maple leaf from the Gather Together stamp set in Early Espresso ink on a panel of Very Vanilla. I then colored it with the Old Olive and Calypso Coral Stampin’ Blends and cut it out with the coordinating die. I also cut two maple leaves from Old Olive cardstock and one maple leaf from Cajun Craze cardstock using the smaller maple leaf die from the Gathered Leaves dies. Then I cut three berry branches in Gold Glimmer paper using the berry die from the Frosted Bouquet dies.

I stamped six small daisies from the Stampin’ Up! Daisy Lane stamp set in Rich Razzleberry ink on Rich Razzleberry card stock. Using a bone folder, I gently rounded the ends of the petals and glued three petal clusters together for each flower. I accented the centers with the gold Designer Elements. I arranged the leaves and berries on the panel and adhered them with liquid glue. I adhered the flowers with glue dots. I then used dimensionals to attach the decorated panel to a Cajun Craze card base.

I decided that I had to give the inside of the card the same frame treatment as the card front. So I cut another frame in Sahara Sand just like the front and attached it to the inside of the card with liquid glue. I then adhered a strip of the Magnolia Lane DSP to the bottom of a Very Vanilla panel and cut it out with the third largest die from the Stitched Rectangles dies. I adhered this to the inside of the card with liquid glue.

There you have it – a pretty fall card with flowers from the Stampin’ Up! Daisy Lane stamp set, turning maple leaves and touches of gold to express the thankful sentiments that abound at this time of year. Thanks for visiting! Click on the Next Blog button to move forward to Sue Prather’s project or click the Previous Blog button to move back to see the project that Shirley Gentry created.

If you get lost along the way, here are the participants for the hop:

I hope you enjoy all the projects that the team has created today. Have a great week!

Akiko


October 1 – 15 Host Code: 44YKETNJ

Use this host code when you order and receive a free gift from me!  If your order is over $150, please do not use this code, but you’ll still get the free gift.  The free gift is your choice of any item valued up to $10.00 in the 2018-19 Annual Catalog or in the 2019 Occasions Catalog!  That includes some of the Host Exclusive stamp sets!


If you need any stamping supplies, I’d be very happy to be your Demonstrator.  Just click on the Shop Now button on the right side of the screen to go directly to my online store or contact me if you have any questions.  Happy Stamping!

  • Visit my online store here
  • See the current Stampin’ Up! clearance rack specials here
  • Earn FREE Stampin’ Up! products through my Wildflower Frequent Shopper Program – my way of saying thank you to my frequent shopper online customers.
  • Have any questions? I’d be happy to help, click here to contact me.

Cardstock Cuts for this project:

  • Cajun Craze – 5 1/2″ x 8 1/2″, 2″ x 2″
  • Sahara Sand – (3) 3 3/4″ x 5″
  • Very Vanilla – 3 3/4″ x 5″, 3 1/2″ x 3 1/2″
  • Old Olive – 2″ x 4″
  • Rich Razzleberry – 4″ x 6″
  • Magnolia Lane DSP – 3 3/4″ x 5″, 1/2″ x 5″
  • Gold Glimmer – 2″ x 6 1/2″

Stampin’ Up! products used in this project:


Stampin’ Up! Daisy Lane Smile Card

Good Morning! I hope you had a good weekend and are ready for the weekday grind. Today I have a card with a cheery Monday morning message, “Smile … It’s your time to shine!“. The card is made with the new Stampin’ Up! Daisy Lane cling bundle. You can find the products used at the bottom of the post.

The layout for today’s card is inspired by Freshly Made Sketches #395. This simple sketch gave me a great opportunity to showcase the wonderful large Stitched Label in vellum. And the striped paper is just enough to break up the patterned background.

And the colors are inspired by Hand Stamped Sentiments Color Challenge #318. This combination is so fresh and summery and it gave me another opportunity to stamp patterned paper.

Be sure to check out the fantastic entries in these challenges for more card making inspiration.

I started today’s card by making another faux DSP – designer series paper or patterned paper. I used the daisy stamps from the Stampin’ Up! Daisy Lane and Stampin’ Up! Daisy Delight stamp sets and the leaf branch from the Stampin’ Up! Free as a Bird stamp set. On a sheet of Whisper White cardstock, I randomly stamped the large daisy in Petal Pink, the small daisy in Calypso Coral and the leaves in Mint Macaron. I lightly sponged each image in the respective colors and then I sponged the rest with So Saffron. Then I ran it through the Subtle embossing folder to add texture. The embossing really made it special!

I cut an extended piece of the striped paper from the Magnolia Lane DSP using the 1″ Stitched Rectangle die. I die cut the large fancy Stitched Label die from vellum and heat embossed the Smile sentiment from the Stampin’ Up! Daisy Lane stamp set on Mink Macaron and die cut it using the smaller Stitched label Die.

I stamped three of the small daisies in Petal Pink on Whisper White and punched them out with the Medium Daisy Punch and curled the ends before attaching them together. I finished the daisy off with a non-SU clear enamel dot from my stash that I colored with the dark Calypso Coral Stampin’ Blends and finally a Mint Macaron leaf branch from the Flourish dies. I arranged all the elements on the card front, matted it in Mint Macaron and then popped it on a Thick Whisper White card base with dimensionals.

For the inside of the card, I stamped the shine sentiment from the Stampin’ Up! Daisy Lane stamp set, added a strip of faux DSP and matted it in Mint Macaron.

Isn’t that a pretty and cheerful way to start a summer week? Thanks for visiting and I hope that you have a week where you do shine!

Akiko


Don’t forget that we are in the earning period of Bonus Days where you get a coupon for $5 to redeem in August for every $50 you spend (before shipping and taxes) in July. See the full details on the Stampin’ Up! Promotions Page.


July 1 – 15 Host Code: 6X3A6D6C

Use this host code when you order and receive a free gift from me!  If your order is over $150, please do not use this code, but you’ll still get the free gift.  The free gift is your choice of any item valued up to $10.00 in the 2018-19 Annual Catalog or in the 2019 Occasions Catalog!  That includes some of the Host Exclusive stamp sets!


If you need any stamping supplies, I’d be very happy to be your Demonstrator.  Just click on the Shop Now button on the right side of the screen to go directly to my online store or contact me if you have any questions.  Happy Stamping!

  • Visit my online store here
  • See the current Stampin’ Up! clearance rack specials here
  • Earn FREE Stampin’ Up! products through my Wildflower Frequent Shopper Program – my way of saying thank you to my frequent shopper online customers.
  • Have any questions? I’d be happy to help, click here to contact me.

Cardstock Cuts for this project:

  • Thick Whisper White – 4 1/4″ x 11″
  • Mint Macaron – (2) 4 7/8″ x 5 1/8″, scraps for label and leaf branch
  • Whisper White – 3 5/8″ x 4 7/8″, 4 1/4″ x 5 1/2″, scraps for daisy
  • Magnolia Lane DSP – 1 1/4″ x 3 3/4″
  • Vellum – 3″ x 3 1/2″

Stampin’ Up! products used in this project:


Stampin’ Up! Daisy Lane with Perennial Essence DSP Friendship Card

Good Morning! Today I have a clean and simple – CAS – card that uses the new Stampin’ Up! Daisy Lane cling stamp set, the new Perennial Essence Designer Series paper and the Stampin’ Up! Well Written dies.

This card was inspired by Freshly Made Sketches #394 and I really tried to keep it simple in keeping with the CAS philosophy. Check out the FMS394 designer inspiration and other challenge entries. You can find supplies used to create this card at the bottom of my post along with the sizes of cardstock used.

I started by cutting a strip of the pretty Perennial Essence DSP and matting it with Flirty Flamingo cardstock.

I then made the pretty daisy by stamping the small daisy from the Stampin’ Up! Daisy Lane cling stamp set in Versamark ink on Vellum cardstock. I then dusted it with white embossing powder and heat set. I punched it with the Medium Daisy punch. I did this twice so that I had two sets of flower petals. I used my bone folder to gently curl the petals back and attached them together using a glue dot. The flower is finished with one of the Perennial Essence Floral Centers embellishments. Look at that shine!

I next die cut the word ‘friend’ using the Stampin’ Up! Well Written dies in Flirty Flamingo and adhered it to the DSP with the fine tipped glue pen. I attached the daisy with a glue dot and attached the DSP panel to a Thick Whisper White card base with dimensionals. That’s it!

The inside is pretty simple too – I accented the whisper white with a strip of the Stampin’ Up! Perennial Essence DSP and added a flirty flamingo mat before attaching it to the card base with snail.

This was a quick card and I was so tempted to dress it up more with ribbon or leaves but decided to leave it be and let the daisy and DSP take the spotlight. What do you think?

A simple pretty friendship card that that can be used for any occasion. Thanks for stopping by and have a great weekend!

Akiko


June 16 – 30 Host Code: 3ZXWQ49Y

July 1 – 15 Host Code: 6X3A6D6C

Use this host code when you order and receive a free gift from me!  If your order is over $150, please do not use this code, but you’ll still get the free gift.  The free gift is your choice of any item valued up to $10.00 in the 2018-19 Annual Catalog or in the 2019 Occasions Catalog!  That includes some of the Host Exclusive stamp sets!


If you need any stamping supplies, I’d be very happy to be your Demonstrator.  Just click on the Shop Now button on the right side of the screen to go directly to my online store or contact me if you have any questions.  Happy Stamping!

  • Visit my online store here
  • See the current Stampin’ Up! clearance rack specials here
  • Earn FREE Stampin’ Up! products through my Wildflower Frequent Shopper Program – my way of saying thank you to my frequent shopper online customers.
  • Have any questions? I’d be happy to help, click here to contact me.

Cardstock Cuts for this project:

  • Thick Whisper White – 5 1/2″ x 8 1/2″
  • Whisper White – 3 1/2″ x 4 3/4″
  • Flirty Flamingo – 3 3/4″ x 5″, 2″ x 5 1/2″
  • Vellum – (2) 2 1/2″ square scraps
  • Perennial Essence DSP – 1 7/8″ x 5 1/2″, 1/2″ x 4 3/4″

Stampin’ Up! products used in this project: