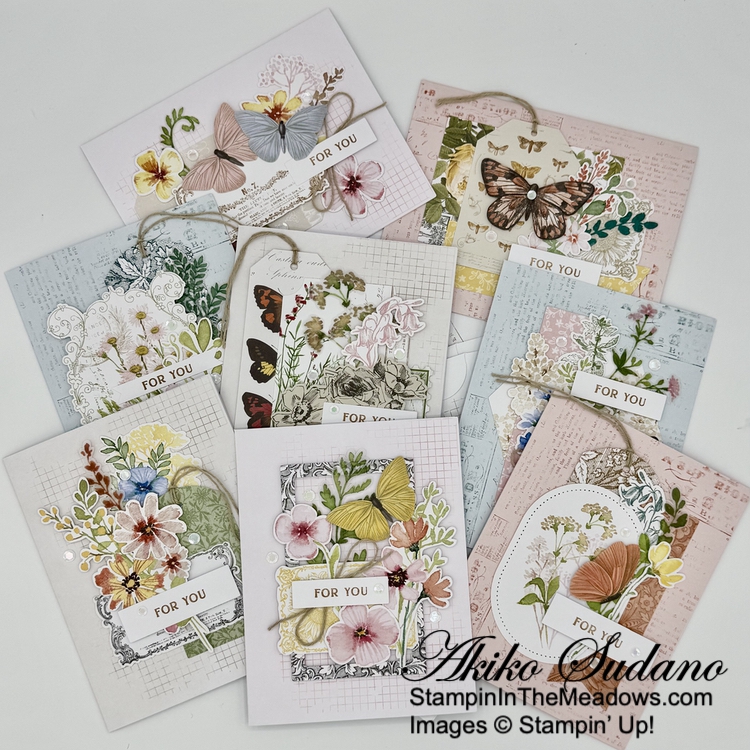
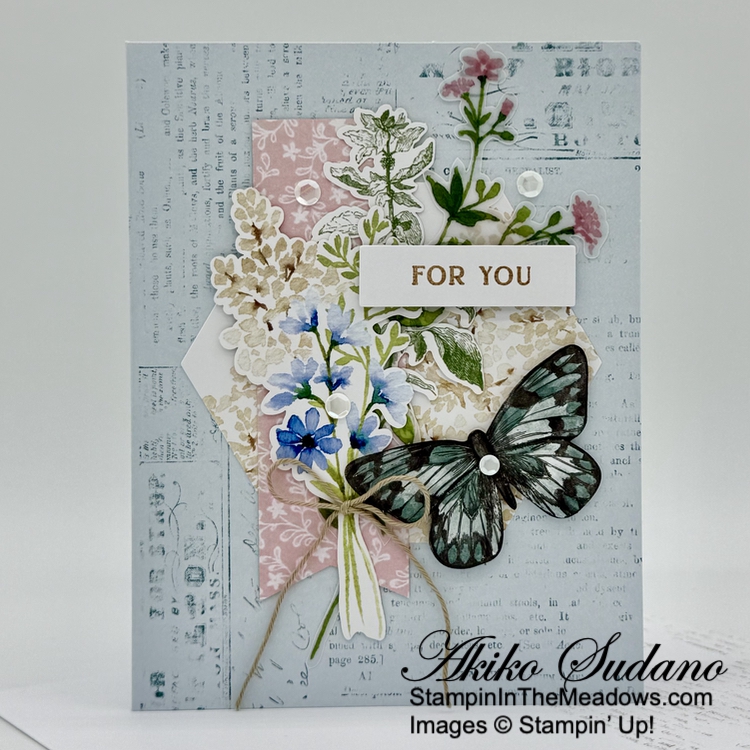
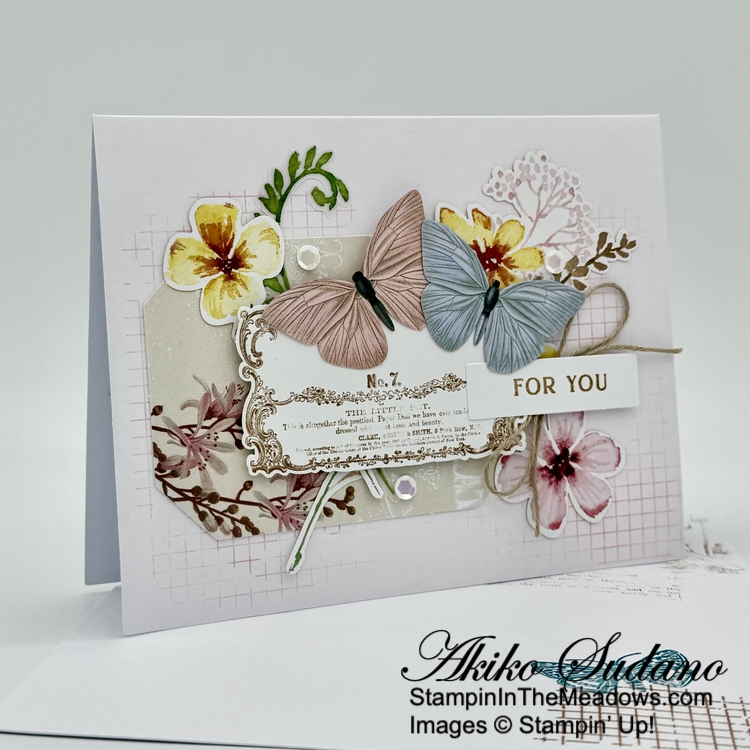
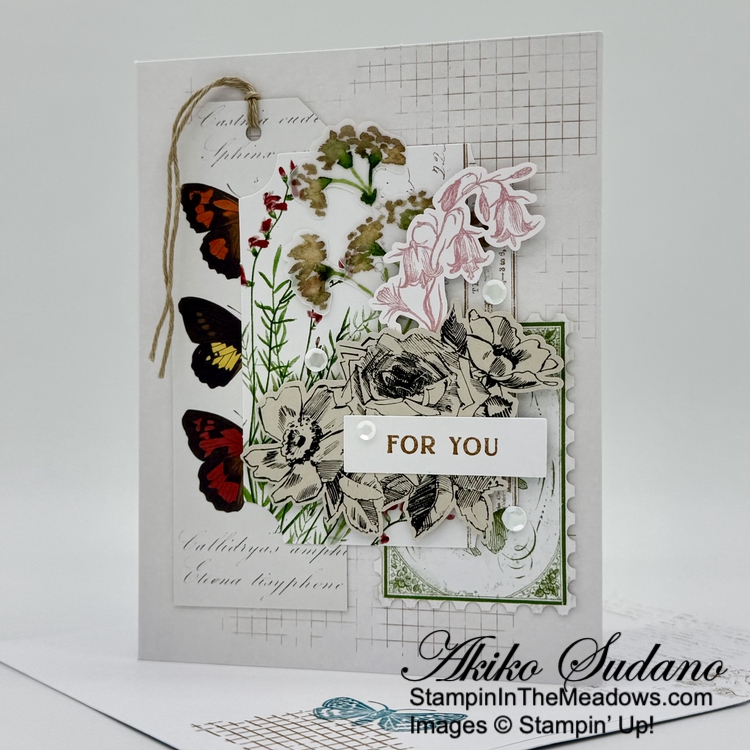
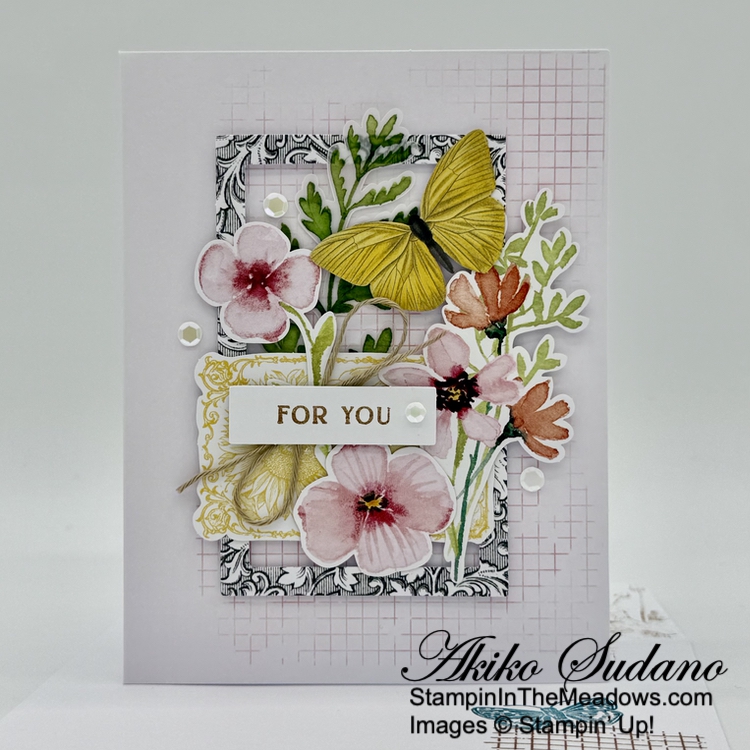
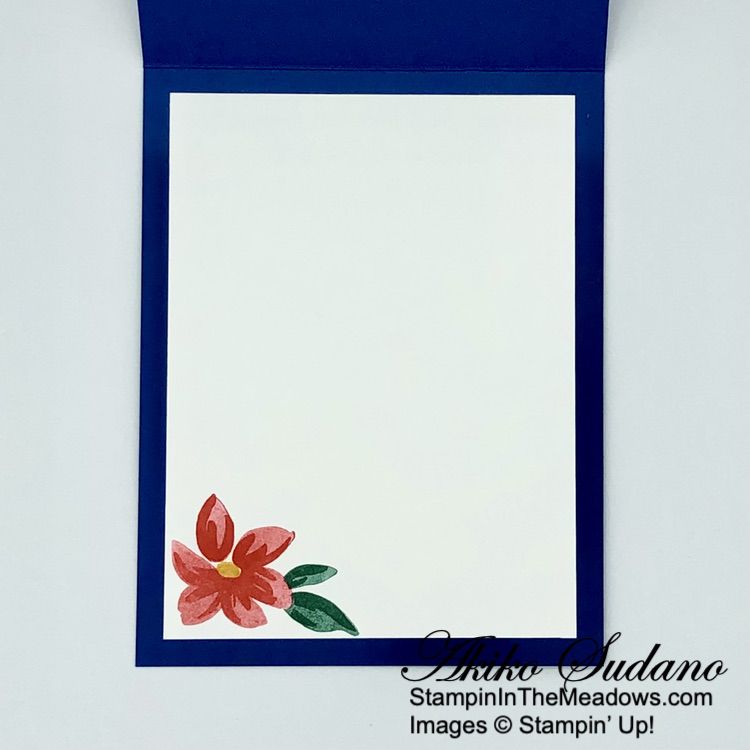
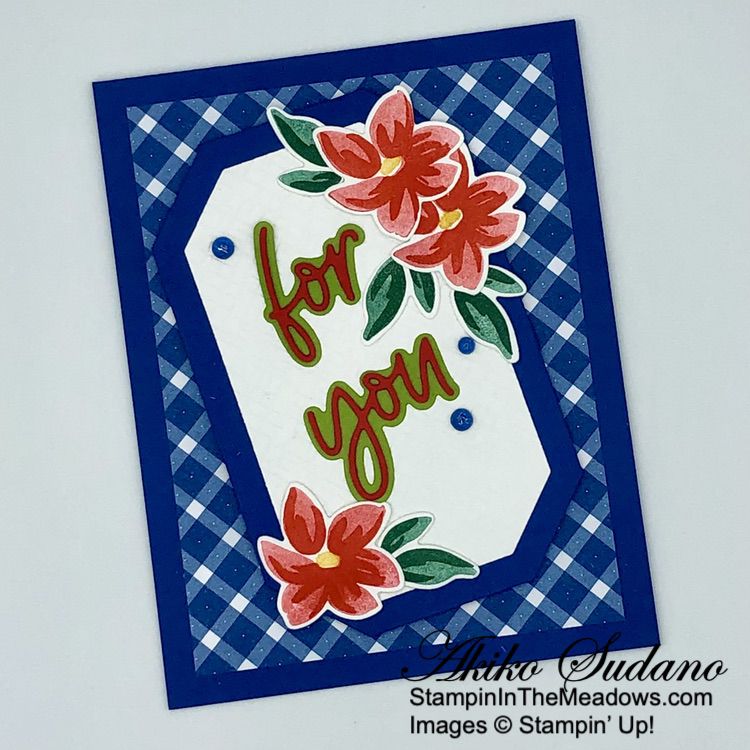
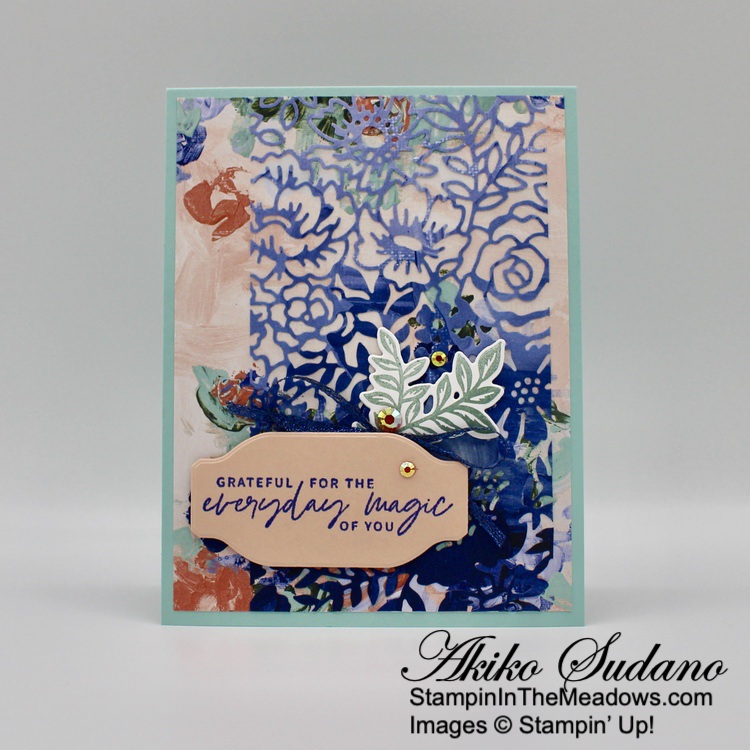
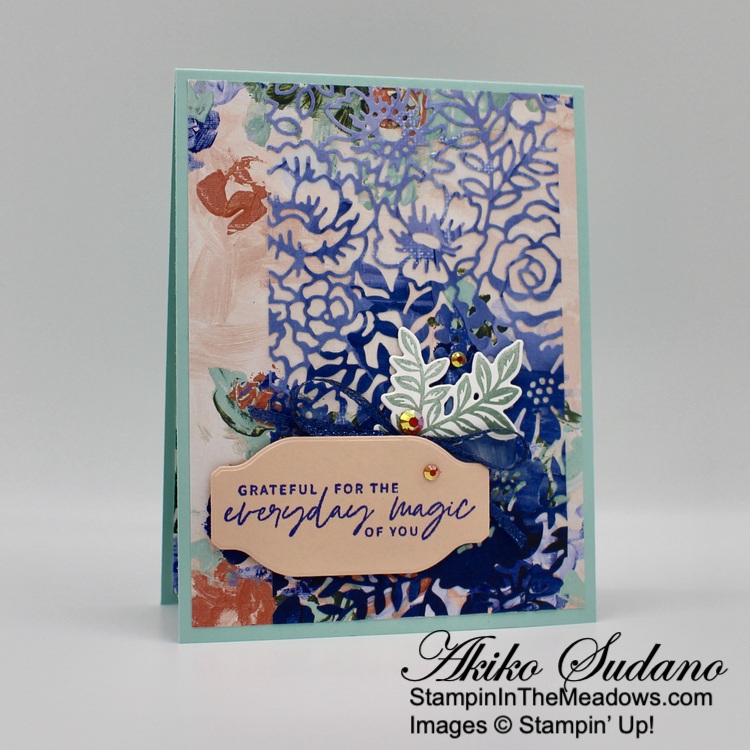
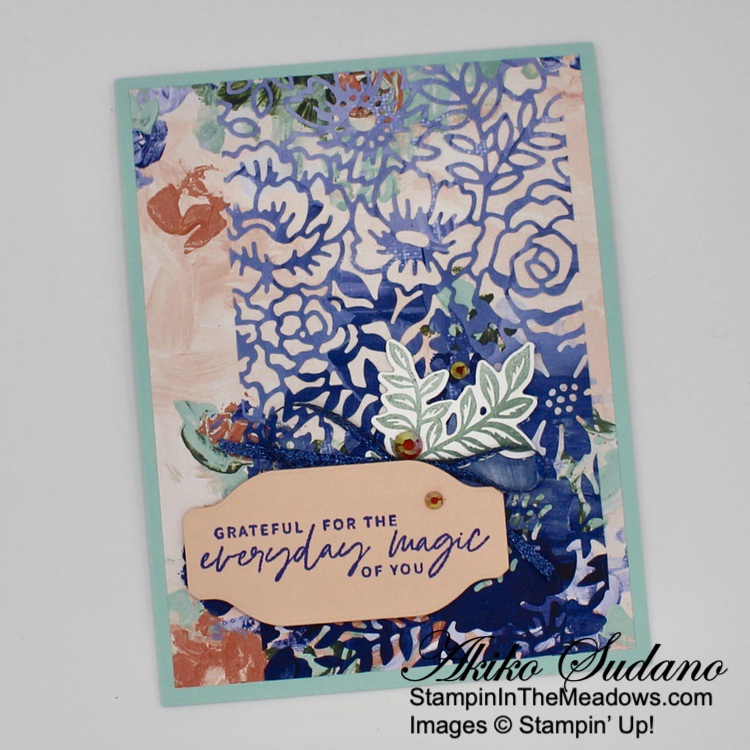
Good Morning and Happy March! Hopefully Spring arrives soon. I used the beautiful Stampin’ Up! Heirloom Arrangements kit for today’s cards and it was so much fun and creative relaxation to arrange the die cuts and make the cards!
The kit comes with detailed instructions for two cards and shows examples that are pretty easy to re-create for the rest. There are several die cuts left over, and I just added them to the existing designs so they were all used. I did add baker’s twine and sequins from my stash to each of the cards and used Pretty Peacock ink to stamp the butterfly with the Pecan Pie grid. Here’s a closer look at each of my cards.
Aren’t the vintage die cuts from the Stampin’ Up! Heirloom Arrangements kit so pretty? There are other sentiments in the stamp set, but I decided to only use the ‘for you‘ sentiment on the cards. I love how you can make each card unique and that there are 8 cards. This kit was just added to the Stampin’ Up! Kits Collection last month and is only available in the Online Store. New kits are added each month in a variety of styles to meet different crafting tastes and needs. Be sure to check them out.
Last Month To Earn Wildflower Rewards Points
There are exciting changes coming to the Stampin’ Rewards program in April, so sadly, this means my Wildflower Points Frequent Shopper Program is coming to an end. March 2025 is the last month to earn Wildflower Points and all Wildflower Rewards earned must be redeemed before December 31, 2025. If you have any questions about your current Wildflower Points status, please contact me.
Stay tuned for the exciting new Stampin’ Rewards program that will begin April 15, 2025!
Current Host Code: CCXFTCJQ
Use this host code when you order $50 or more and receive a Thank You gift from me – a pack of pretty Tinsel Gems Three-Pack (item 161624).
161624 – Tinsel Gems Three-Pack
When I am notified of your order, I will pack your embellishments and send them to your shipping address along with a handmade thank you card!
If you need any stamping supplies, I’d be very happy to be your Demonstrator. Just click on the Shop Now Button on the right side of the screen to go directly to my Online store or contact me if you have any questions. Happy Stamping!
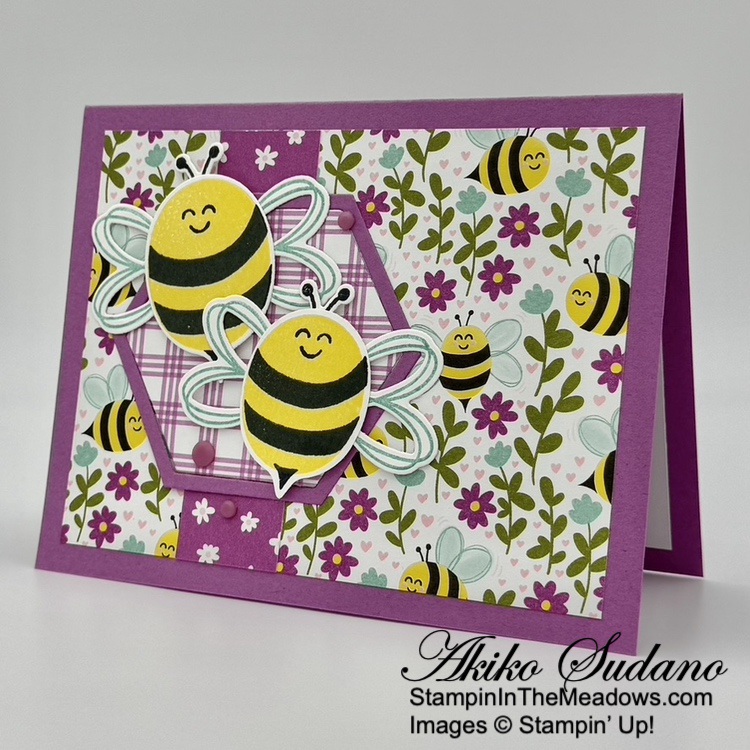
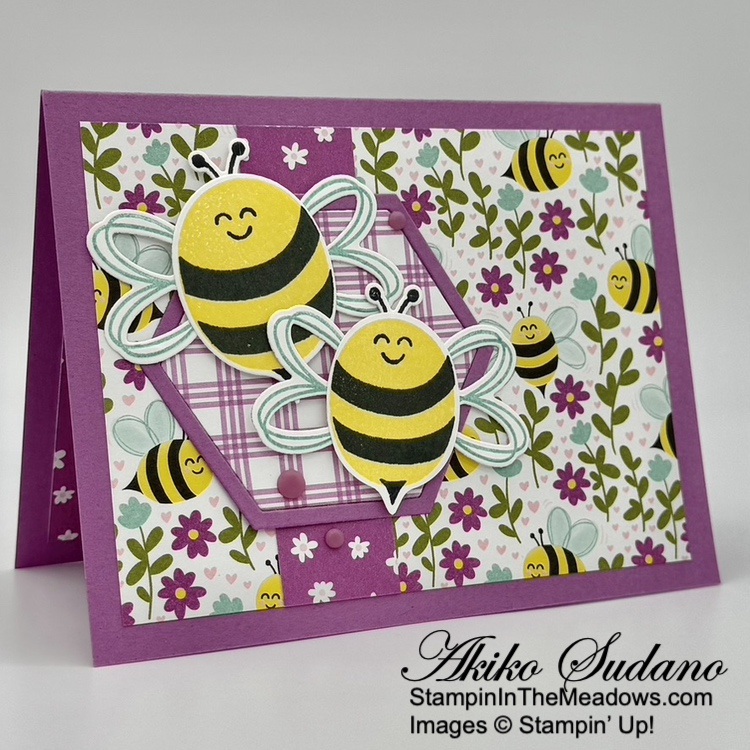
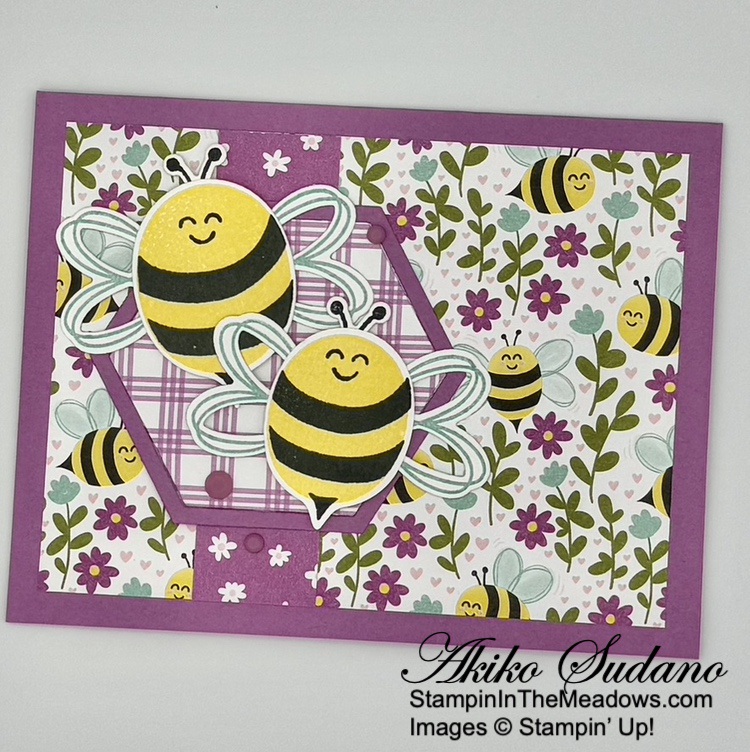
Happy Valentine’s Day! The Stampin’ Up! Meant To Bee bundle is from the new Scrapbooking Brochure and it coordinates with the fun Bee My Valentine stamp set and punch from last year. I used both of them for today’s card along with the new Cute As Can Be designer series paper. You can find the products I used at the bottom of my post along with the card stock sizes.
I adhered a strip of Cute As Can Be DSP to another panel of the DSP and then adhered the layered panel to the front of a Petunia Pop card base. I used the small octagon die from the Stampin’ Up! Meant To Bee bundle to cut a Petunia Pop panel and a plaid DSP panel and adhered them to the card with liquid glue – the DSP in the middle with the card stock around it.
I stamped the large bee from the Stampin’ Up! Meant To Bee stamp set using Daffodil Delight and Memento Tuxedo Black inks and cut it out with the coordinating die. I stamped the bee from the Stampin’ Up! Bee My Valentine stamp set in the same colors and punched it out with the coordinating punch. Between the two stamp sets, you can create three different sized bees!
I stamped the bee faces and antenna for both bees using the stamps from the Stampin’ Up! Meant To Bee stamp set in Memento Tuxedo black ink. I stamped the wings (I used the small wings) using Pool Party. I cut the antenna and wings out with the coordinating dies and adhered them to the back of the bees with liquid glue. I adhered the bees to the front of the card with dimensionals and finished it with Petunia Pop dots.
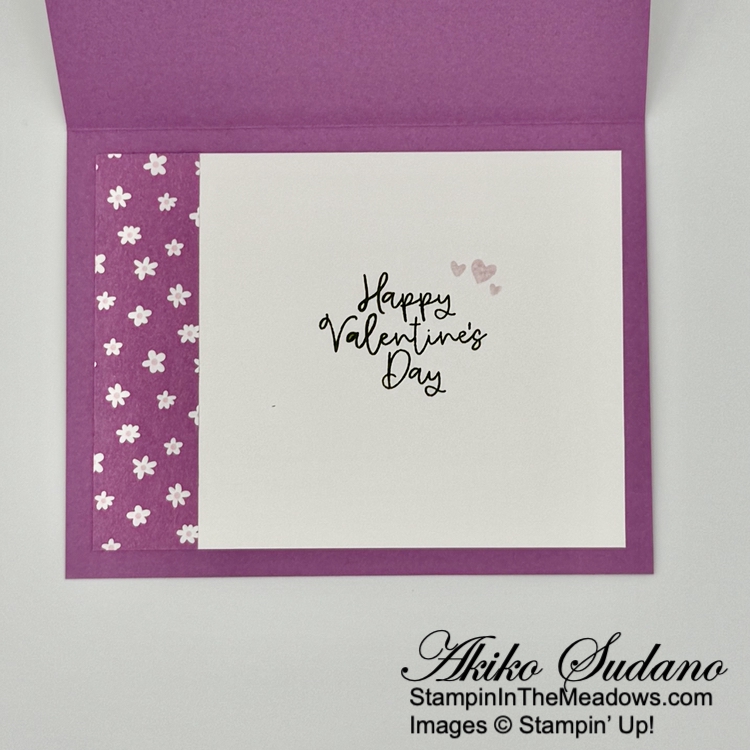
For the inside panel, I stamped the sentiment from the Bee My Valentine stamp set using Old Olive ink and the little hearts in Bubble Bath. I trimmed the side with DSP and adhered the panel to the inside of the card with Stampin’ Seal.
The Stampin’ Up! Meant To Bee bundle has a great set of nested octagon dies and sentiments that are wonderful for memory keeping and scrapbooking. Everything can be used for card making too and I love how it coordinates with last year’s Bee My Valentine bundle. The Cute As Can Bee DSP designs are the same as last years with the fresh new colors. And I love how it all coordinates for Valentines Day and Spring!
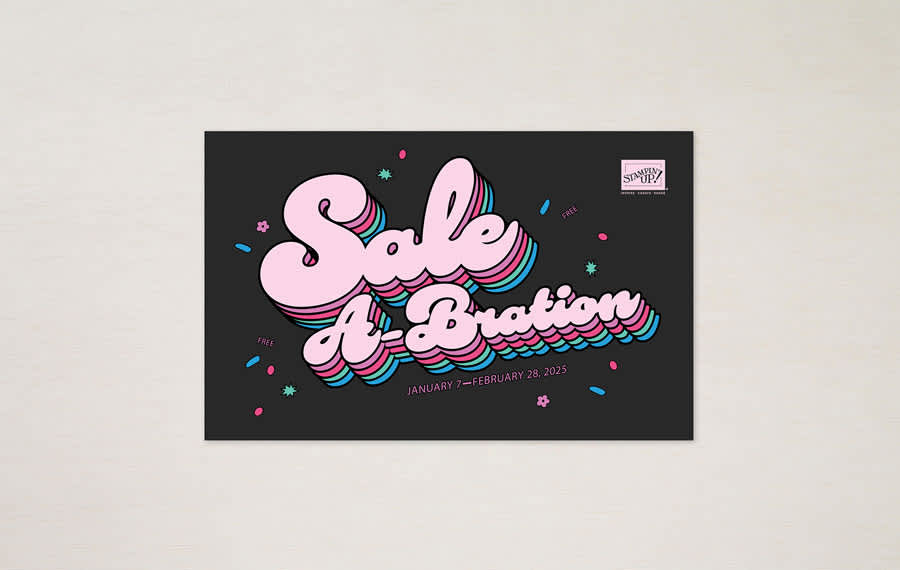
Sale-A-Bration Is Going On Now!!
Sale-A-Bration is the biggest Stampin’ Up! promotion of the year. The best part of Sale-A-Bration is that you earn FREE items for every $60 worth of products you purchase. There are items that you get for $60 and there are items you can get for $120. All the details are in the Sale-A-Bration Brochure. Click on the picture of the brochure below to download a copy to view the items and details.
Another benefit of Sale-A-Bration is when you host a workshop with sales over $300 or have an individual order over $300, you get to choose an additional $30 worth of products from the Stampin’ Up! catalog or Online Store for FREE!
And Sale-A-Bration is the best time to join Stampin’ Up! as a new Demonstrator. During Sale-A-Bration, new Demonstrators who purchase a starter kit by choosing $125 worth of products for only $99 (includes shipping) have two FREE bonus options to add to your starter kit.
Option 1: Your choice of TWO marker sets from our Stampin’ Write Marker Assortments (Brights, Neutrals, Regals, Subtles), PLUS the Handmade Designs stamp set, a beautiful stamp set exclusively designed to work with them.
Option 2: Your Choice of an additional $30 in FREE products
Sale-A-Bration runs through February 28, 2025. Visit my Online Store to start shopping now.
Current Host Code: FYMGA4AN
Use this host code when you order $50 or more and receive a Thank You gift from me! The free gift is your choice of any item currently available valued up to $10.00.
If your order is over $150, please do not use the host code since you’ll receive your own Host Dollars plus I’ll still send you the Thank You gift! This host code can be used by anyone, no club or commitment required. Let me know if you have any questions.
If you need any stamping supplies, I’d be very happy to be your Demonstrator. Just click on the Shop Now Button on the right side of the screen to go directly to my Online store or contact me if you have any questions. Happy Stamping!
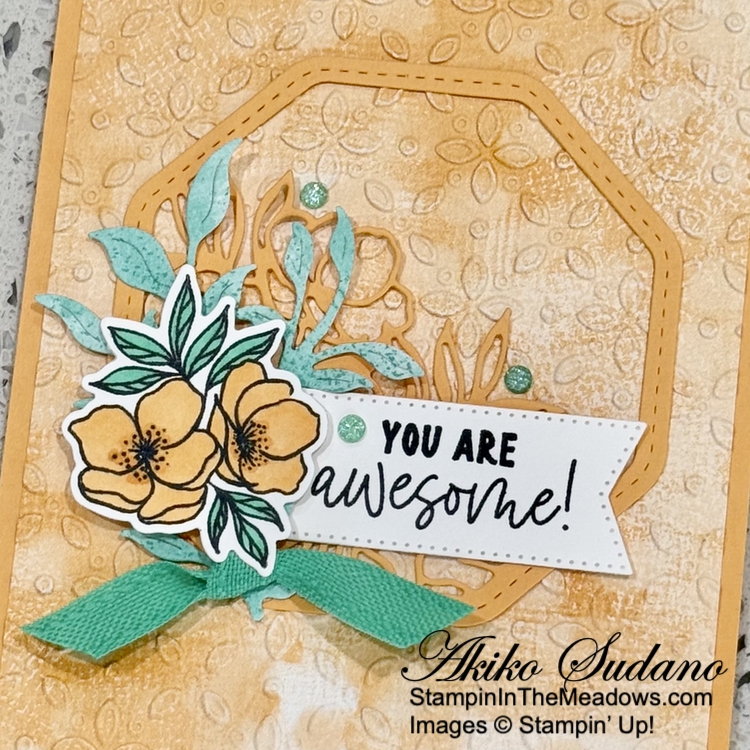
Good Morning! I just received the beautiful Stampin’ Up! Memorable Blooms bundle and I just had to use it. I combined the bundle with the Unbounded Beauty designer series paper from the current Annual Catalog to kind of combine the old with the new and I hope you like the results. You can find the products I used at the bottom of my post along with the card stock sizes.
I embossed panel of Peach Pie Unbounded Beauty designer series paper with the Eyelet 3D embossing folder and adhered it to the front of a Peach Pie card base with liquid glue. I cut Peach Pie card stock with the nested floral frames dies from the Stampin’ Up! Memorable Blooms dies. This is a very detailed die, so I had to use a card stock shim and run it through my cut & emboss machine several times to get a good cut (this die cutting machine has lighter pressure than my other one). I adhered the die cut frame to my card with liquid glue applied to the frame and larger sections of the die cut flowers.
I cut the leaf sprig from the Stampin’ Up! Memorable Blooms dies from Shy Shamrock Unbounded Beauty DSP. I trimmed the bottom to make it shorter and trimmed it again to look like the top of another sprig. I adhered the die cuts to the card with glue dots. I stamped the small flowers from the Stampin’ Up! Memorable Blooms stamp set using Memento Tuxedo Black ink on Basic White. I colored it with light Peach Pie and Shy Shamrock Stampin’ Blends. I used the dark Peach Pie Stampin’ Blend to highlight the center dots.
I stamped the sentiment from the Stampin’ Up! Memorable Blooms stamp set using Memento Tuxedo Black ink on Basic white and cut it out with the short fat banner die from the Stylish Shapes die. I adhered it to the card with glue dots and popped the flowers on top with dimensionals. I finished with Shy Shamrock shimmer gems and ribbon.
For the inside panel, I stamped the small flower from the Stampin’ Up! Memorable Blooms stamp set using stamped off Peach Pie ink on a Basic White panel. I trimmed the bottom with embossed DSP and adhered the panel to the inside of the card with Stampin’ Seal.
Isn’t the frame from the Stampin’ Up! Memorable Blooms bundle just gorgeous!! There are two dies that make up the frame and the outer die cuts a pattern along the outside so you can make a fancy octagonal opening for a peek-a-boo effect. The flowers are pretty and the sentiments are pretty great too!
Sale-A-Bration Is Going On Now!!
Sale-A-Bration is the biggest Stampin’ Up! promotion of the year. The best part of Sale-A-Bration is that you earn FREE items for every $60 worth of products you purchase. There are items that you get for $60 and there are items you can get for $120. All the details are in the Sale-A-Bration Brochure. Click on the picture of the brochure below to download a copy to view the items and details.
Another benefit of Sale-A-Bration is when you host a workshop with sales over $300 or have an individual order over $300, you get to choose an additional $30 worth of products from the Stampin’ Up! catalog or Online Store for FREE!
And Sale-A-Bration is the best time to join Stampin’ Up! as a new Demonstrator. During Sale-A-Bration, new Demonstrators who purchase a starter kit by choosing $125 worth of products for only $99 (includes shipping) have two FREE bonus options to add to your starter kit.
Option 1: Your choice of TWO marker sets from our Stampin’ Write Marker Assortments (Brights, Neutrals, Regals, Subtles), PLUS the Handmade Designs stamp set, a beautiful stamp set exclusively designed to work with them.
Option 2: Your Choice of an additional $30 in FREE products
Sale-A-Bration runs through February 28, 2025. Visit my Online Store to start shopping now.
The February 2025 Paper Pumpkin Kit is Hello Spring!
Say goodbye to chilly days and let a little sunshine in with the Hello Spring Paper Pumpkin Kit! This kit comes with all the components to create cheerful, garden-inspired cards, including printed card bases, precut paper pieces featuring lush green herbs, bronze foil for an eye-catching sheen, and earthy linen thread. Seed packet envelopes bring a special touch of botanical whimsy. These handmade cards are sure to delight gardening enthusiasts and anyone with a green thumb!
Details:
Makes 9 cards: 3 each of 3 designs
Precut pieces with bronze foil
Unique spring-themed envelopes
Petunia Pop Classic Stampin’ Spot
Coordinating Colors: Basic Beige, Bubble Bath, Lemon Lime Twist, Lost Lagoon, Old Olive, Petunia Pop
And the coordinating add-on is the Spring is in the Air dies – item #166237 for $12 (available while supplies last).
If you’re interested in subscribing to Paper Pumpkin, you can either sign up for a subscription where you are billed monthly for your kit or you can purchase a prepaid subscription in my Online Store. To see more information and to sign up for the monthly subscription click here. To see the options for prepaid subscriptions in my Online Store, click here.
Sign up deadline for the February 2025 kit is February 10, 2025. Note: Supplies may be limited toward the end of the subscription period.
Current Host Code: FYMGA4AN
Use this host code when you order $50 or more and receive a Thank You gift from me! The free gift is your choice of any item currently available valued up to $10.00.
If your order is over $150, please do not use the host code since you’ll receive your own Host Dollars plus I’ll still send you the Thank You gift! This host code can be used by anyone, no club or commitment required. Let me know if you have any questions.
If you need any stamping supplies, I’d be very happy to be your Demonstrator. Just click on the Shop Now Button on the right side of the screen to go directly to my Online store or contact me if you have any questions. Happy Stamping!
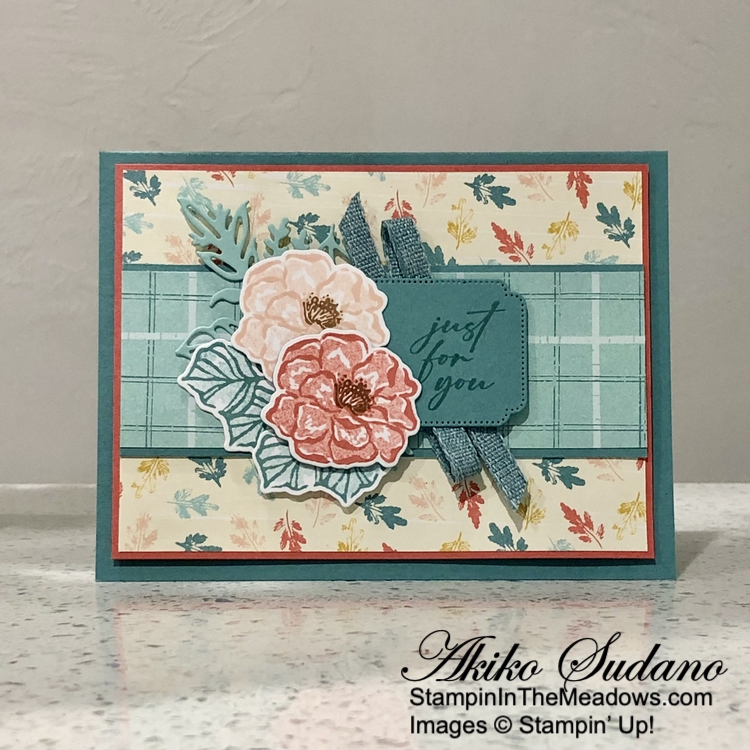
Good Morning and Happy Tax Day! We filed ours just in time this weekend – need to do better next year. Anyway, here’s another sneak peek of the new Stampin’ Up! Flowers of Beauty bundle from the upcoming Stampin’ Up! 2024-2025 Annual Catalog. I paired it with the pretty retiring Inked Botanicals 6″ x 6″ designer series paper to show that it’s pretty in many different color palettes. You can find the currently available products I used at the bottom of my post along with the card stock sizes.
I adhered a panel of Inked Botanicals 6″ x 6″ designer series paper to a Calypso Coral mat with liquid glue. I adhered another strip of the DSP to a Lost Lagoon mat before adhering it to the panel. I popped the layered DSP panel onto the front of a Lost Lagoon card base with dimensionals.
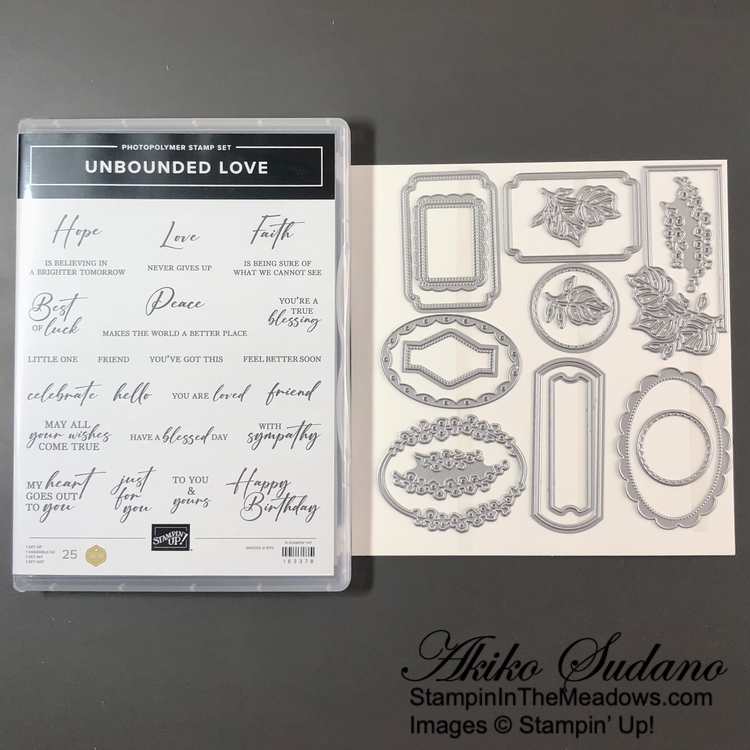
I stamped the sentiment from the new Unbounded Love stamp set in Lost Lagoon ink on the side of a Lost Lagoon panel and cut it out with one of the dies from the Unbounded Love dies. These new products will be available when the new Stampin’ Up! Annual Catalog launches on May 1, 2024. I cut a sprig from the Stampin’ Up! Flowers of Beauty dies from Pool Party card stock and adhered it to the card with Lost Lagoon ribbon with Stampin’ Seal. I adhered the label over the ribbon and part of the die cut sprig.
I stamped two of the large flowers from the new Stampin’ Up! Flowers of Beauty stamp set using Calypso Coral and Petal Pink inks on Basic White. I stamped the outlines full strength and the filler in stamped off ink. I stamped the flower centers using Pecan Pie ink and cut them out with the coordinating die. I used the same technique to stamp two leaf clusters using Lost Lagoon ink. I adhered the leaves to the card with glue dots, tucking them under the label and adhered the flowers with glue dots and dimensionals. I wish I had my iridescent pastel gems to add some bling – they would have been perfect!
For the inside of the card, I stamped the leaf cluster from the Stampin’ Up! Flowers of Beauty stamp set using Lost Lagoon ink in the corner of a Basic White panel. I trimmed the bottom with a strip of DSP and adhered the panel to the inside of the card with Stampin’ Seal.
The new Stampin’ Up! Flowers of Beauty bundle will be available on May 1, 2024. The two step stamp set has really pretty flower and leaf stamps that are really easy to line up and work so well by using a full strength ink on the detailed outline stamp and stamped off ink on the filler. And I love that the filler stamps have highlights that easily give you nice texture and dimension! And while they go beautifully with the Unbounded Beauty designer series paper like my card the other day, they also work beautifully with other designer series papers that you may already have. Here’s a picture of the bundle:
And here’s a picture of the pretty Unbounded Love bundle that will also be available on May 1, 2024:
Last Chance Products on Sale Now!
The retiring lists for the 2023-2024 Annual Catalog and the January-April 2024 Mini Catalog have been announced and some products are on sale with discounts up to 60%. These lists detail the products that will no longer be available once the catalogs retire on April 30. Items are only available while supplies lastand some items are already sold out. So check it out to see if there is anything you want while it’s still available. And don’t forget the retiring 2022-2024 In Colors!
Click HERE to download a PDF of the retiring items from the Annual Catalog.
Click HERE to download an excel spreadsheet of the Annual Catalog retiring items.
Click HERE to download a PDF of the retiring items from the Mini Catalog.
Click HERE to download an excel spreadsheet of the Mini Catalog retiring items.
Stampin’ Up! 2023-2024 Annual Catalog coming May 1, 2024!
It’s sad to see items retiring, but the new Stampin’ Up! 2024-2025 Annual Catalog will be here soon! April 30 is the last day to order from the current 2023-2024 Annual Catalog and May 1 is when ordering from the new Annual Catalog begins!
And with the new Annual Catalog are the new 2024-2026 In Colors! Introducing Peach Pie, Petunia Pop, Pretty In Pink, Shy Shamrock and Summer Splash:
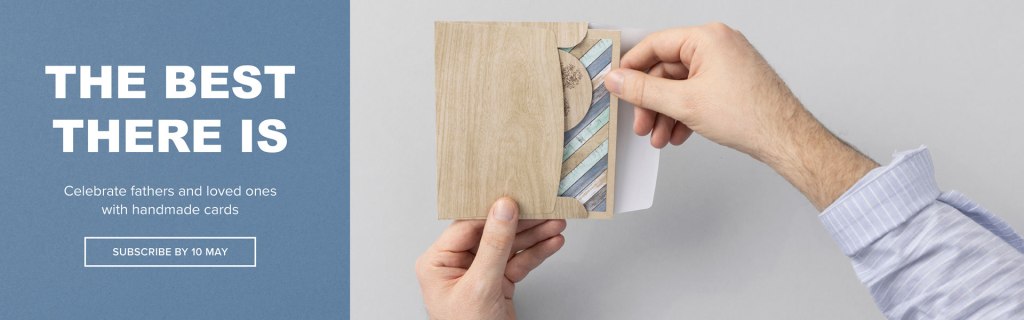
The May Paper Pumpkin Kit is The Best There Is!
Make cards for Father’s Day and more to express your gratitude and admiration!
Makes 9 cards: 3 each of 3 designs with 9 coordinating envelopes
Precut paper, accent pieces & labels
Woodgrain textures and masculine earthy tones
Misty Moonlight Classic Stampin’ Spot
Coordinating Colors: Wild Wheat, Pool Party, Misty Moonlight, Early Espresso, Crumb Cake, Basic Beige
And the coordinating add-on is the Thanks and Beyond dies. These dies coordinate with the Best There Is kit and will also coordinate with the June kit.
If you’re interested in subscribing to Paper Pumpkin, you can either sign up for a subscription where you are billed monthly for your kit or you can purchase a prepaid subscription in my Online Store. To see more information and to sign up for the monthly subscription click here. To see the options for prepaid subscriptions in my Online Store, click here.
Sign up deadline for the May 2024 kit is May 10, 2024. Note: Supplies may be limited toward the end of the subscription period.
Current Host Code: YEPTJAZ9
Use this host code when you order $50 or more and receive a Thank You gift from me! The free gift is your choice of any item currently available valued up to $10.00.
If your order is over $150, please do not use the host code since you’ll receive your own Host Dollars plus I’ll still send you the Thank You gift! This host code can be used by anyone, no club or commitment required. Let me know if you have any questions.
If you need any stamping supplies, I’d be very happy to be your Demonstrator. Just click on the Shop Now Button on the right side of the screen to go directly to my Online store or contact me if you have any questions. Happy Stamping!
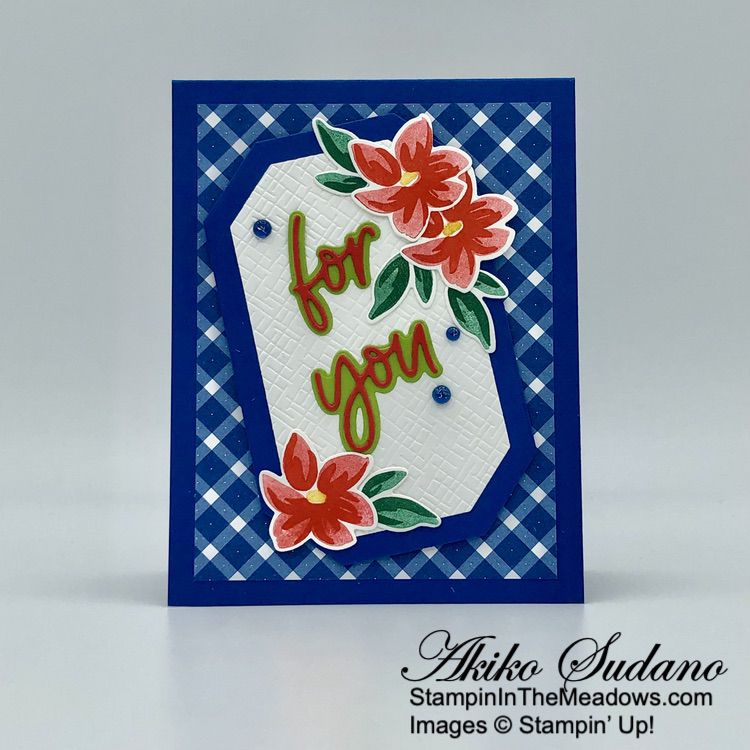
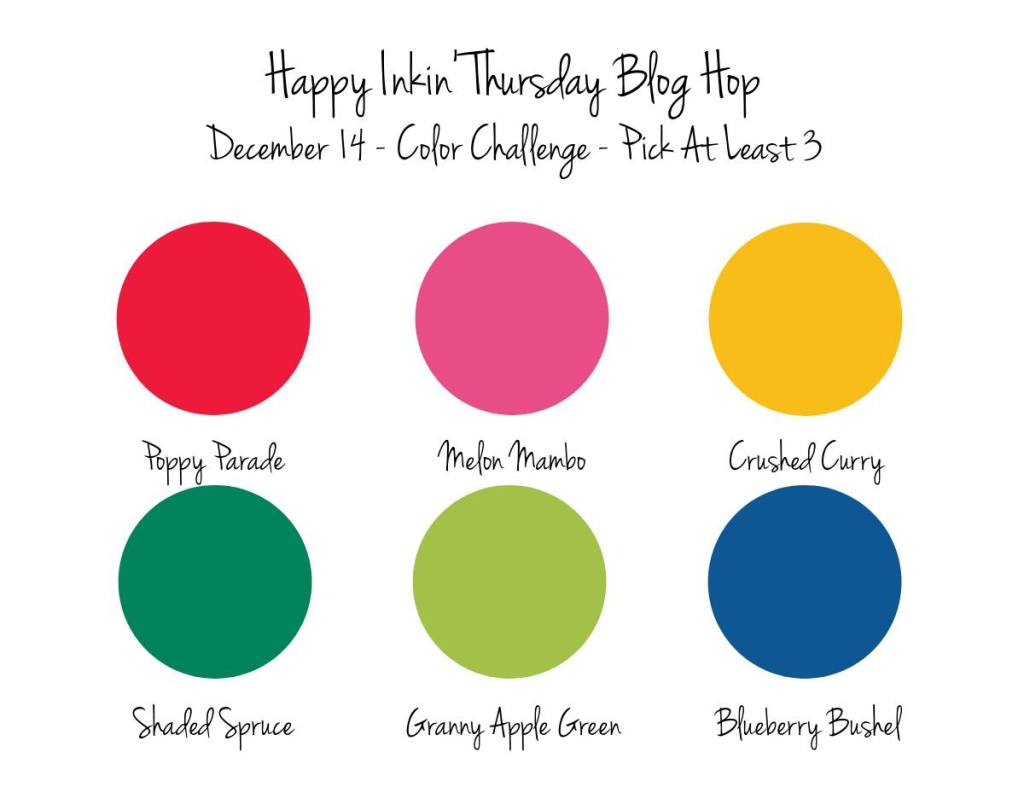
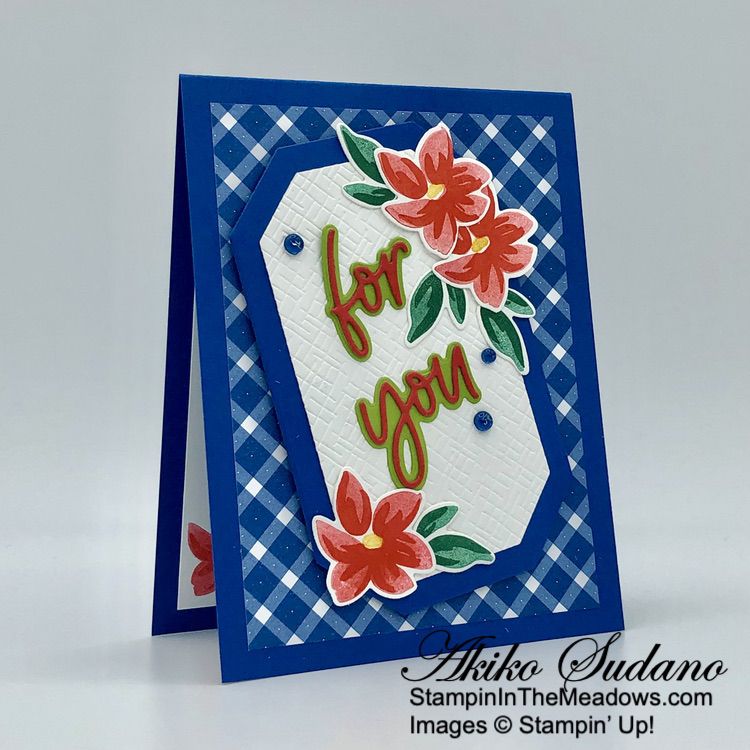
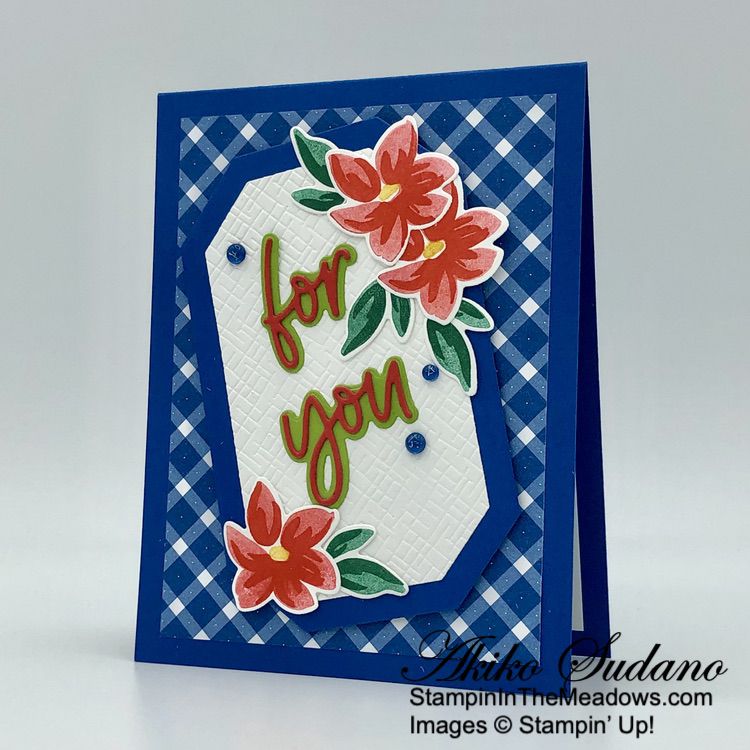
Good Morning and welcome to the Happy Inkin’ Thursday Blog Hop! Here’s a colorful For You card that can be used to send good wishes for many happy occasions. I used the fun Stampin’ Up! Love For You stamp set and dies from the current Annual catalog with the pretty Glorious Gingham 6″ x 6″ designer series paper. You can find the supplies I used along with card stock cuts at the bottom of my post.
We have a sketch challenge this week and I managed to use 5 of the 6 colors:
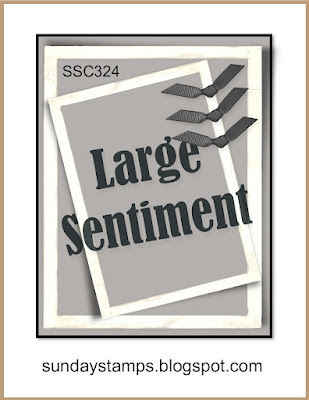
And I was inspired by the sketch in Sunday Stamps Challenges SSC324 Be Bold.
I adhered a panel of Blueberry Bushel Glorious Gingham designer series paper to the front of a Blueberry Bushel card base with liquid glue. I cut Basic White and Blueberry Bushel panels with the Countryside Corners dies and embossed the Basic White panel with the cross hatch design from the Basics Embossing Folders before adhering them together.
I cut the sentiments from the Stampin’ Up! Love For You dies from Poppy Parade and Granny Apple Green card stocks and adhered the detailed words on the backgrounds. I adhered the words to the embossed die cut with liquid glue. The flowers and leaves in the stamp set are two-step stamping designs, so I stamped them in Poppy Parade and Shaded Spruce. I stamped the background stamps first in stamped-off colors and then the detailed stamps full strength. I stamped the flower centers in Crushed Curry. Then I cut them out with the coordinating dies and adhered them to the embossed panel with glue dots.
I adhered the decorated panel to the card front with dimensionals on a diagonal – so fun! I finished with Blueberry Bushel Tinsel Gems.
For the inside of the card, I stamped the flower from the Stampin’ Up! Love For You stamp set in Poppy Parade ink using the same methods as the flowers on the card front. I covered the flower with a mask and stamped the leaves in Shaded Spruce. I adhered the panel to the inside of the card with Stampin’ Seal.
The Stampin’ Up! Love For You stamp and dies are a fun set. I love the word dies and there are so many different ways you can combine them. I look forward to using this set for a Valentine’s card soon!
On with the Hop! Click on the Next Blog button to move forward to see the beautiful project Karen Ksenzakovichas created.
If you get lost along the way, here are the participants for the hop:
Use this host code when you order $50 or more and receive a free gift from me! The free gift is your choice of any item currently available valued up to $10.00!
If your order is over $150, please do not use the host code since you’ll receive your own Host Dollars plus I’ll still send you the free gift! This host code can be used by anyone, no club or commitment required. Let me know if you have any questions.
If you need any stamping supplies, I’d be very happy to be your Demonstrator. Just click on the Shop Now button on the right side of the screen to go directly to my online store or contact me if you have any questions.
Good Morning! I finally pulled out my Stampin’ Up! Desert Details bundle for today’s card and I am in love! This beautiful cling stamp set with dies has wonderful Native American art and desert theme images that are so unique and beautiful! You can find the supplies I used at the bottom of my post along with the sizes of cardstock used.
I cut a panel of Soft Succulent Dry Brushed Metallic specialty designer series paper with both of the fancy rectangle dies in the Stampin’ Up! Desert Details dies to make a frame. I adhered the frame to a panel of Delicate Desert designer series paper with liquid glue and adhered them both to a Pale Papaya mat. I adhered the layered panel to the front of a Gray Granite card base with dimensionals.
I cut two Soft Succulent agave plants from the Stampin’ Up! Desert Details dies and used small pieces of scotch tape to keep the centers secure. I cut one in the middle (to keep the long frond on the card) and adhered all three to the card front with liquid glue. I stamped the large desert flower with Pale Papaya ink and two of the small flowers in So Saffron ink on Basic White and cut them out with the coordinating dies. I adhered the flowers together with glue dots and adhered them to the card front with dimensionals. I used the small flower stamp to apply Soft Succulent ink to a length of white crinkle ribbon, made a bow and adhered it to the card front with a glue dot.
I stamped the sentiment in Soft Succulent ink on a strip of Pale Papaya. I cut a panel of Delicate Desert DSP with the fancy diamond die from the Stampin’ Up! Desert Details dies and adhered it to the back of the label with liquid glue. I adhered the layered label to the card front with dimensionals. I added more bling with the Gold Faceted sequins on the label, frame and around the flowers.
For the inside of the card, I stamped the small flower from the Stampin’ Up! Desert Details stamp set in Pale Papaya ink in the corner of a Basic White panel. I adhered a strip of Delicate Desert DSP to the bottom and adhered the panel to the inside of the card with Stampin’ Seal.
The shine from the dry brush metallic paper and the fun sequins is a beautiful contrast to the rustic desert designs. I love the natural feel of the Stampin’ Up! Desert Details bundle designs and I also love the fun sentiments.
Sale-A-Bration is Stampin’ Up!’s best promotion of the year with specials for shopping, hosting and joining! It will run through February 28, 2023 and will be the only Sale-A-Bration this year!
SHOP
Orders placed during Sale-A-Bration will receive FREE products for orders of $50 or more(before shipping and taxes). There are 7 items that are available for free with orders of $50 or greater and 2 items that are available for free with orders of $100 or greater. The free Sale-A-Bration items are stackable, so if you place an order of $150, you can choose to add 3 $50 items or a $100 item and a $50 item to your order! And that’s in addition to the regular host rewards! The Sale-A-Bration items are only available while supplies last, so order early if there are items that you are really wanting!
HOST
There’s also a host exclusive stamp set on page 16 of the Sale-A-Bration Brochure that is ONLY AVAILABLE to those ordering $300 or greater in a single order or who host a party with sales of $300 or greater during Sale-a-bration. If you’d like to set up a host code to see if you can collect $300 in orders to earn that stamp set, I’d be happy to help you with that! Reach out to me at apsudano@stampininthemeadows.com.
JOIN
Stampin’ Up! has three great joining promotion options during Sale-a-bration!
OPTION 1: Pay $129 and receive the exclusive Boho Blue Mini Machine (a $63 value) + choose $175 in Stampin’ Up! Products for your Starter Kit*.
OPTION 2: Pay $129 and receive the original white Mini Machine (a $63 value) + choose $175 in Stampin’ Up! Products for your Starter Kit*.
OPTION 3: Pay $99 and choose $175 in Stampin’ Up! Products for your Starter Kit*.
Once you join, you’ll get at least a 20% discount on all of your Stampin’ Up! merchandise purchases AND you get to order early from upcoming catalogs! There is NO COMMITMENT and NO REQUIREMENT TO SELL to anyone. You can join and just get the discount for yourself! Contact me at apsudano@stampininthhemeadows.com if you’d like more information about joining or purchasing the Starter Kit!
*That’s $50 more product than the standard Starter Kit offer!
Current Host Code: Y7X69NCW
Use this host code when you order $50 or more and receive a free gift from me! The free gift is your choice of any item valued up to $10.00 in the 2022-2023 Annual Catalog or the January-April 2023 Mini Catalog!
If your order is over $150, please do not use the host code since you’ll receive your own Host Dollars plus I’ll still send you the free gift! This host code can be used by anyone, no club or commitment required. Let me know if you have any questions.
If you need any stamping supplies, I’d be very happy to be your Demonstrator. Just click on the Shop Now button on the right side of the screen to go directly to my online store or contact me if you have any questions. Happy Stamping!
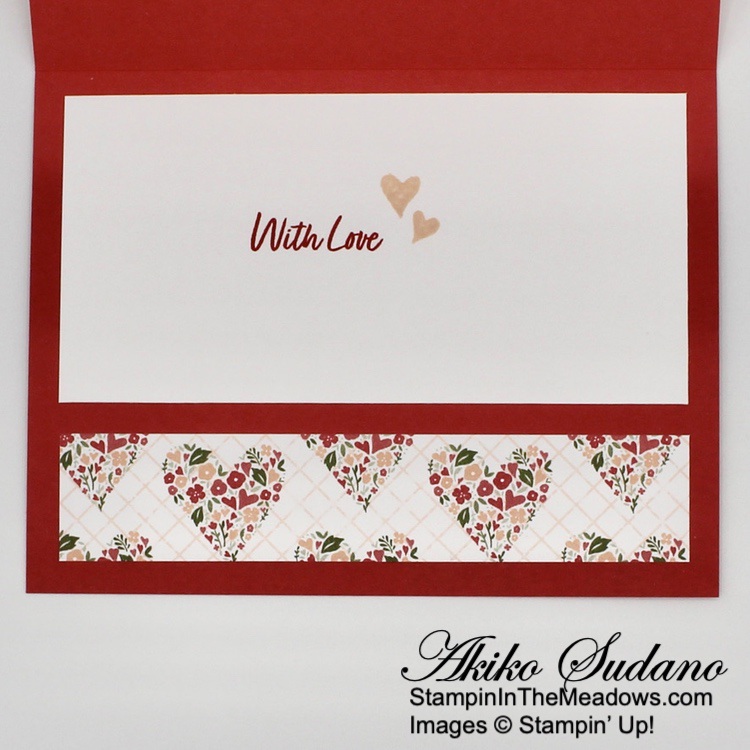
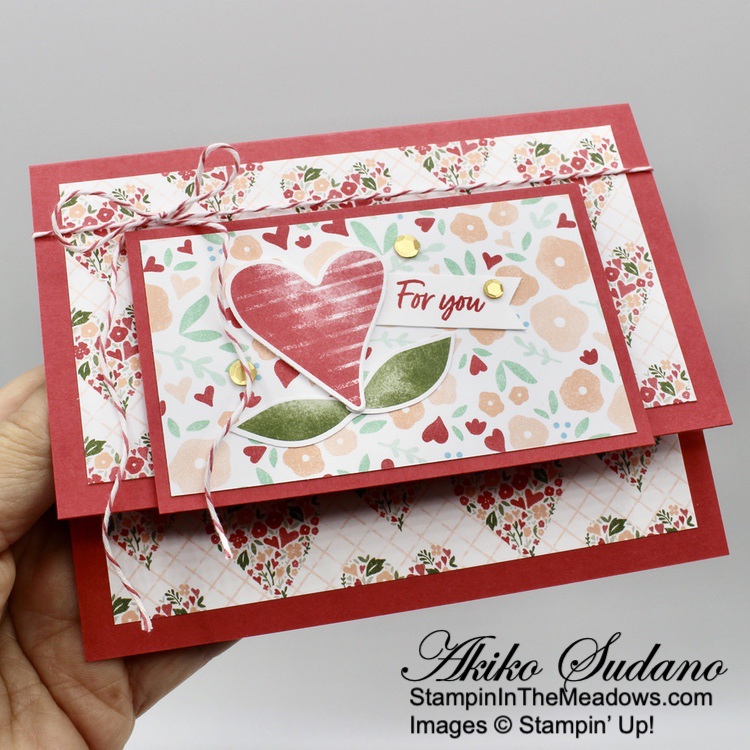
Good Morning! I just love the hearts in the Stampin’ Up! Country Bouquet bundle and the beautiful Country Floral Lane designer series paper. These are my favorite Valentine’s day items in a long time. And I had to pull them out for another Valentine’s day card, this time for a fun fold! You can find the supplies I used at the bottom of my post along with the sizes of cardstock used.
I adhered a panel of Country Floral Lane designer series paper to the front of a Sweet Sorbet card base. The card base is 1″ shorter in the front than the back, so I adhered another strip to the inside of the back panel. I adhered another large floral pattern panel to a Sweet Sorbet mat and adhered it to the front panel with dimensionals and let it extend a little below the card front.
I punched a Sweet Sorbet Heart and a pair of Mossy Meadow leaves from another sheet of Country Floral Lane DSP. I punched three additional large hearts from Basic White card stock and adhered them together with liquid glue and topped them with the DSP heart. This gave me a nice thick heart for the card front! I stamped the sentiment from the Stampin’ Up! Country Bouquet stamp set in Sweet Sorbet on a small strip of Basic White. I trimmed the end to make a flag and adhered it to the card front with liquid glue.
I adhered the punched DSP leaves to the card front with liquid and then adhered the layered heart over the leaves and label. I wrapped the card with Sweet Sorbet baker’s twine and made a bow and finished with three gold adhesive sequins.
I stamped the sentiment from the Stampin’ Up! Country Bouquet stamp set in Sweet Sorbet on Basic White and stamped the solid tiny hearts in Petal Pink ink. I adhered the panel to the inside of the card above the Country Floral Lane DSP.
A really simple card made with the pretty papers from the Country Floral Lane designer series paper with a little help from the Stampin’ Up! Country Bouquet stamp set. It really makes it easy to get ready for Valentine’s day!
Sale-A-Bration is Stampin’ Up!’s best promotion of the year with specials for shopping, hosting and joining! It will run through February 28, 2023 and will be the only Sale-A-Bration this year!
SHOP
Orders placed during Sale-A-Bration will receive FREE products for orders of $50 or more(before shipping and taxes). There are 7 items that are available for free with orders of $50 or greater and 2 items that are available for free with orders of $100 or greater. The free Sale-A-Bration items are stackable, so if you place an order of $150, you can choose to add 3 $50 items or a $100 item and a $50 item to your order! And that’s in addition to the regular host rewards! The Sale-A-Bration items are only available while supplies last, so order early if there are items that you are really wanting!
HOST
There’s also a host exclusive stamp set on page 16 of the Sale-A-Bration Brochure that is ONLY AVAILABLE to those ordering $300 or greater in a single order or who host a party with sales of $300 or greater during Sale-a-bration. If you’d like to set up a host code to see if you can collect $300 in orders to earn that stamp set, I’d be happy to help you with that! Reach out to me at apsudano@stampininthemeadows.com.
JOIN
Stampin’ Up! has three great joining promotion options during Sale-a-bration!
OPTION 1: Pay $129 and receive the exclusive Boho Blue Mini Machine (a $63 value) + choose $175 in Stampin’ Up! Products for your Starter Kit*.
OPTION 2: Pay $129 and receive the original white Mini Machine (a $63 value) + choose $175 in Stampin’ Up! Products for your Starter Kit*.
OPTION 3: Pay $99 and choose $175 in Stampin’ Up! Products for your Starter Kit*.
Once you join, you’ll get at least a 20% discount on all of your Stampin’ Up! merchandise purchases AND you get to order early from upcoming catalogs! There is NO COMMITMENT and NO REQUIREMENT TO SELL to anyone. You can join and just get the discount for yourself! Contact me at apsudano@stampininthhemeadows.com if you’d like more information about joining or purchasing the Starter Kit!
*That’s $50 more product than the standard Starter Kit offer!
Current Host Code: ZYNDU2N9
Use this host code when you order $50 or more and receive a free gift from me! The free gift is your choice of any item currently available valued up to $10.00!
If your order is over $150, please do not use the host code since you’ll receive your own Host Dollars plus I’ll still send you the free gift! This host code can be used by anyone, no club or commitment required. Let me know if you have any questions.
If you need any stamping supplies, I’d be very happy to be your Demonstrator. Just click on the Shop Now button on the right side of the screen to go directly to my online store or contact me if you have any questions. Happy Stamping!
Good Morning and welcome to the Happy Inkin’ Thursday Blog Hop! The upcoming January-April Mini Catalog has so many pretty new bundles and one of my favorites is the Stampin’ Up! Two-Tone Flora bundle. It is part of the Fancy Flora Suite that is pictured on the front of the catalog. I used many products in this suite for today’s card and they will all be available on January 5, 2023 when the catalog goes live. You can find the currently available supplies I used along with card stock cuts at the bottom of my post.
We have a sketch challenge this week and here is the pretty card sketch we are using this week:
I cut a panel of ombre Orchid Oasis Fancy Flora 6″ x 6″ designer series paper with the large background die from the Stampin’ Up Two-Tone Flora dies and adhered it to another panel of Fancy Flora DSP with dots of liquid glue. A few pieces are separated from the main panel and need to be adhered individually. I adhered the panel to the front of a Pool Party card base.
I stamped the leaf spray from the Stampin’ Up! Two-Tone Flora photopolymer stamp set in Soft Succulent ink on Basic White and cut it out with the coordinating die. I adhered it to the card front with glue dots and made a loopy bow with Starry Sky metallic ribbon and adhered it on the leaf spray.
I stamped the sentiment from the Something Fancy cling stamp set in Orchid Oasis ink on Petal Pink card stock. I cut it out with the pretty label die from the Something Fancy dies and adhered it to the card with dimensionals. I finished the card with three Calypso Coral iridescent jewels.
For the inside of the card, I stamped the leaves from the Stampin’ Up! Two-Tone Flora stamp set in Soft Succulent and Evening Evergreen in the corners of a Basic White panel and trimmed the bottom with a strip of Fancy Flora 6″ x 6″ DSP. I stamped the medium flower detail stamp in Orchid Oasis and stamped the solid flower over it in stamped off Orchid Oasis. I stamped the details of the small flower in Calypso Coral and the background in Petal Pink. I cut the flowers out with the coordinating dies and adhered them to the corners of the panel. I trimmed the flowers and adhered the panel to the inside of the card with Stampin’ Seal.
The Fancy Flora Suite is beautiful and I really love the Stampin’ Up! Two-Tone Flora bundle! The two-step stamping flowers are fun to make and easy to do and they come out beautiful! I love that they all have coordinating dies and the beautiful floral background die is really gorgeus!
On with the Hop! Click on the Next Blog button to move forward to see the beautiful project Karen Ksenzakovichas created.
If you get lost along the way, here are the participants for the hop:
Use this host code when you order $50 or more and receive a free gift from me! The free gift is your choice of any available item valued up to $10.00 in the 2022-2023 Annual Catalog or the July-December 2022 Mini Catalog!
If your order is over $150, please do not use the host code since you’ll receive your own Host Dollars plus I’ll still send you the free gift! This host code can be used by anyone, no club or commitment required. Let me know if you have any questions.
If you need any stamping supplies, I’d be very happy to be your Demonstrator. Just click on the Shop Now button on the right side of the screen to go directly to my online store or contact me if you have any questions.
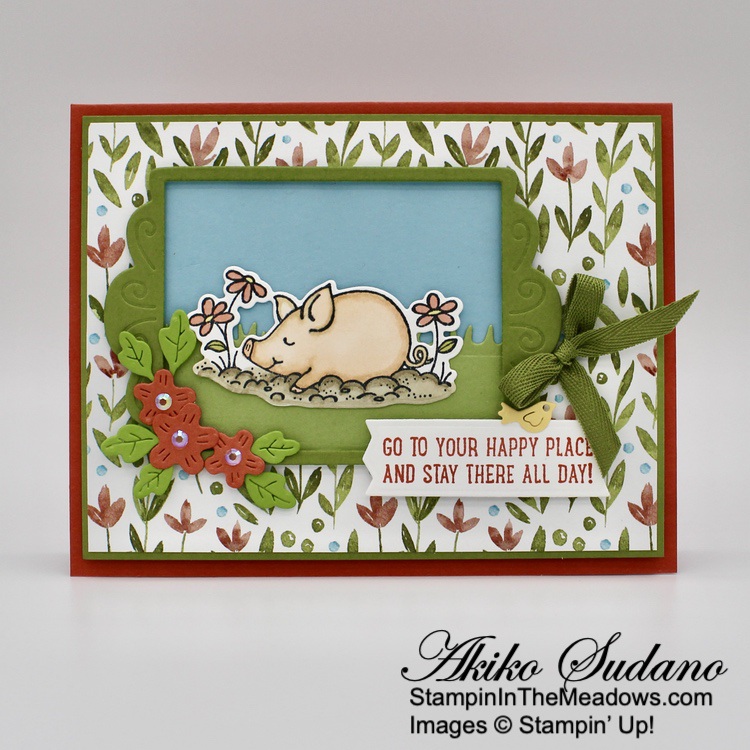
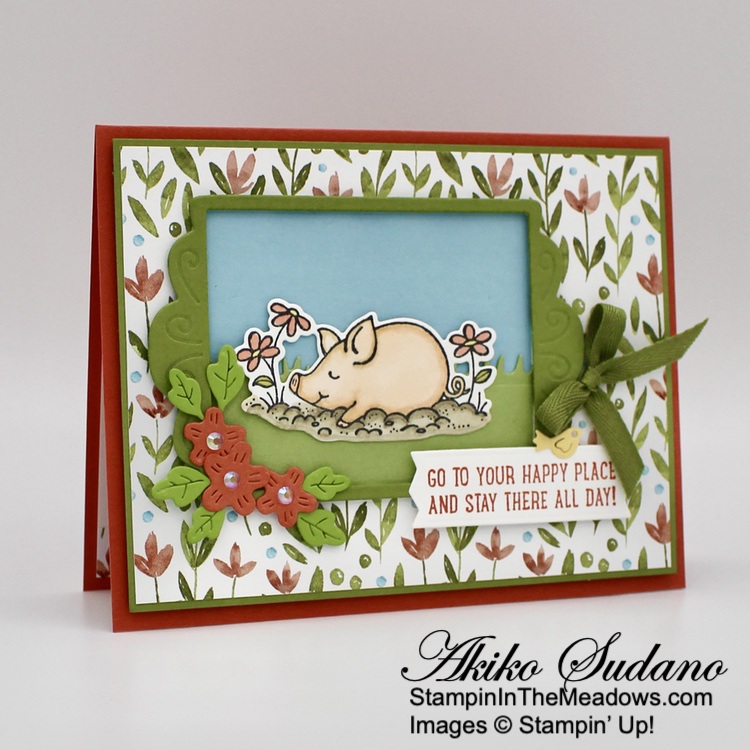
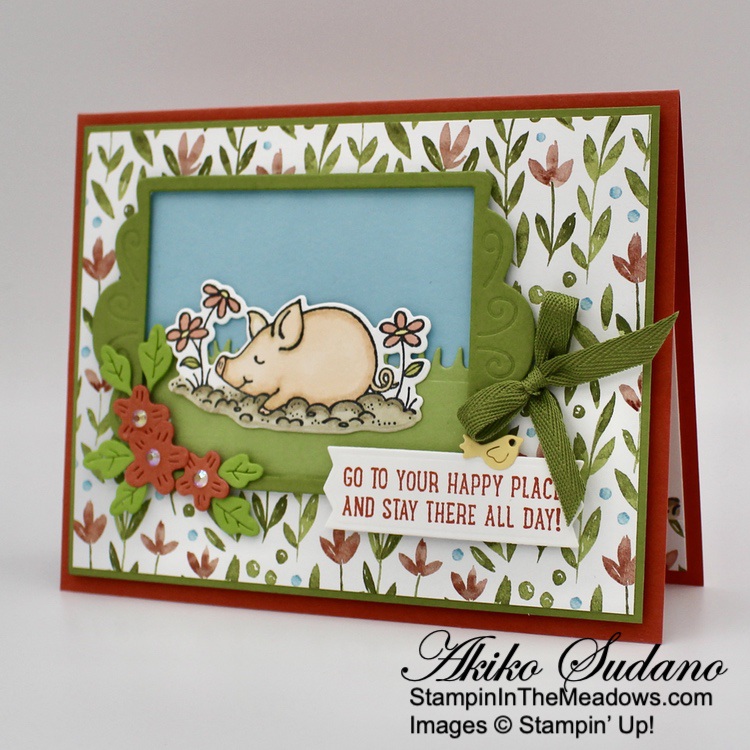
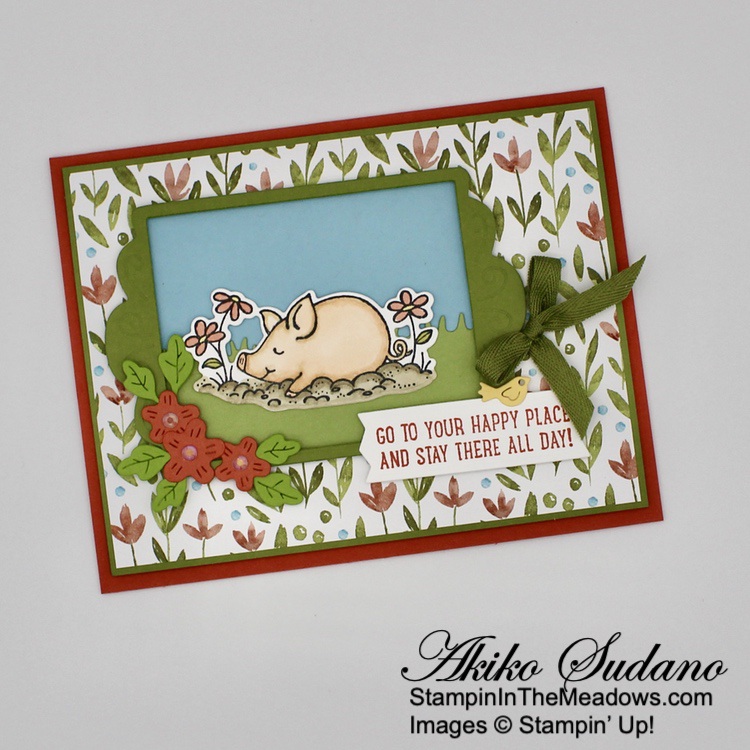
Good Morning! Have you seen the Perfect Partners promotion? Well I picked up the cute Playful Piggies dies to go with the Stampin’ Up! This Birthday Piggy cling stamp set for today’s card. You can find the supplies I used at the bottom of my post along with the sizes of cardstock used.
I adhered a panel of Awash in Beauty designer series paper to a Pear Pizzazz mat and then popped it on a Calypso Coral card base with Dimensionals. I cut a Pear Pizzazz panel with the new grass die from the Stampin’ Up! This Birthday Piggy bundle (YES! you can get the new dies with the stamp set in a bundle for a 10% discount this month!) and adhered it to a Balmy Blue panel. I cut the cute frame from the Fabulous Frames dies from Old Olive and cut up some dimensionals to adhere the background to the frame to make the picture. Then I added some glue dots to the background and adhered the picture to the card front.
I stamped the sweet piggy from the Stampin’ Up! This Birthday Piggy stamp set in Memento Tuxedo Black ink on Basic White and colored it with Petal Pink, Crumb Cake, Calypso Coral, Daffodil Delight and Old Olive Stampin Blends. I cut it out with the coordinating die and adhered it to the picture with glue dots. I stamped the sentiment in Calypso Coral on Basic White and cut it out with the cute label die. I adhered it to the card with bits of dimensionals and glue dots.
I cut the flowers and leaves from Calypso Coral and Granny Apple Green card stock using the Playful Piggy dies and the little bird from So Saffron. I adhered them to the card with glue dots and dimensionals. I adhered some iridescent gemstones to the flower centers and tucked an Old Olive bow under the frame to finish the card.
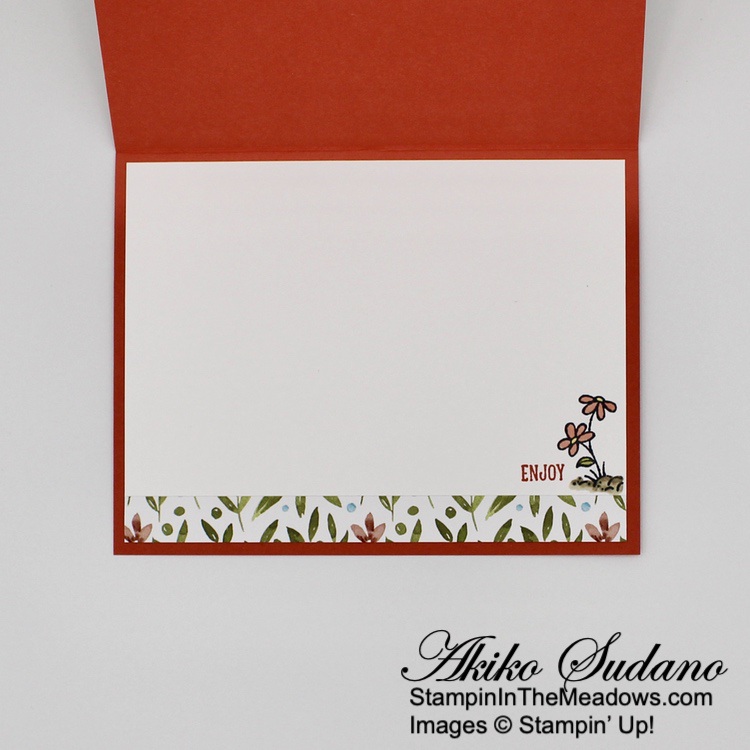
For the inside of the card, I stamped the flowers and leaves from the Stampin’ Up! This Birthday Piggy stamp set using Memento Tuxedo Black ink in the corner of a Basic White panel and colored it with Calypso Coral, Old Olive and Crumb Cake Stampin’ Blends. I stamped the sentiment in Calypso Coral and trimmed the bottom with a strip of Awash in Beauty DSP. I adhered the panel to the inside of the card.
I love this little piggy wallowing in the mud! This scene from the Stampin’ Up! This Birthday Piggy stamp set just reminded me of a wonderful lazy day with no responsibilities except having fun doing what you want. I hope your day is like that!
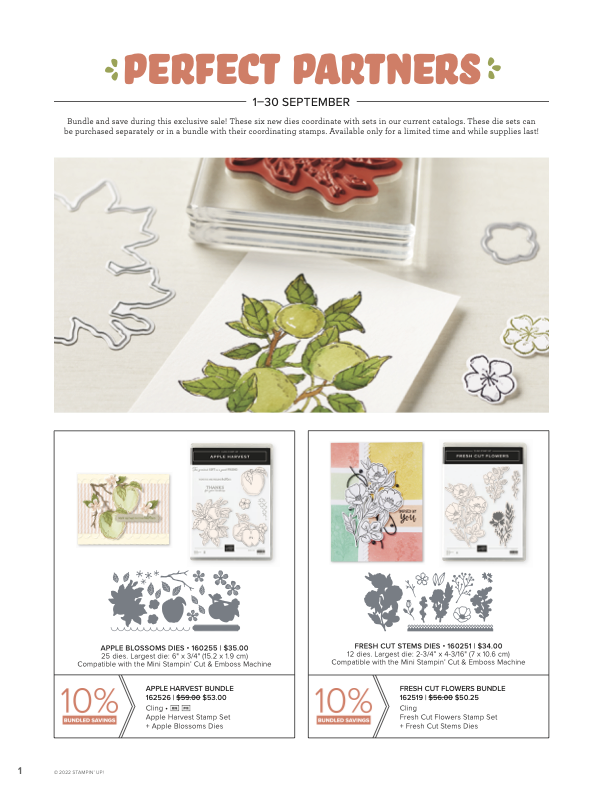
Perfect Partners – Exclusive Dies Available This Month!
Stampin’ Up! created six new die sets that coordinate with stamp sets in the 2022–2023 Annual Catalog and the July–December 2022 Mini Catalog. These coordinating dies will only be available during this promotion and will not be offered in any catalog. Click on the picture below to open a flyer with all the details on the dies.
These stamp sets and dies are available separately or as a bundle. By buying the bundle, you will save 10% off the retail price.
Sales Period: September 1, 2022 – September 30, 2022 (while supplies last)
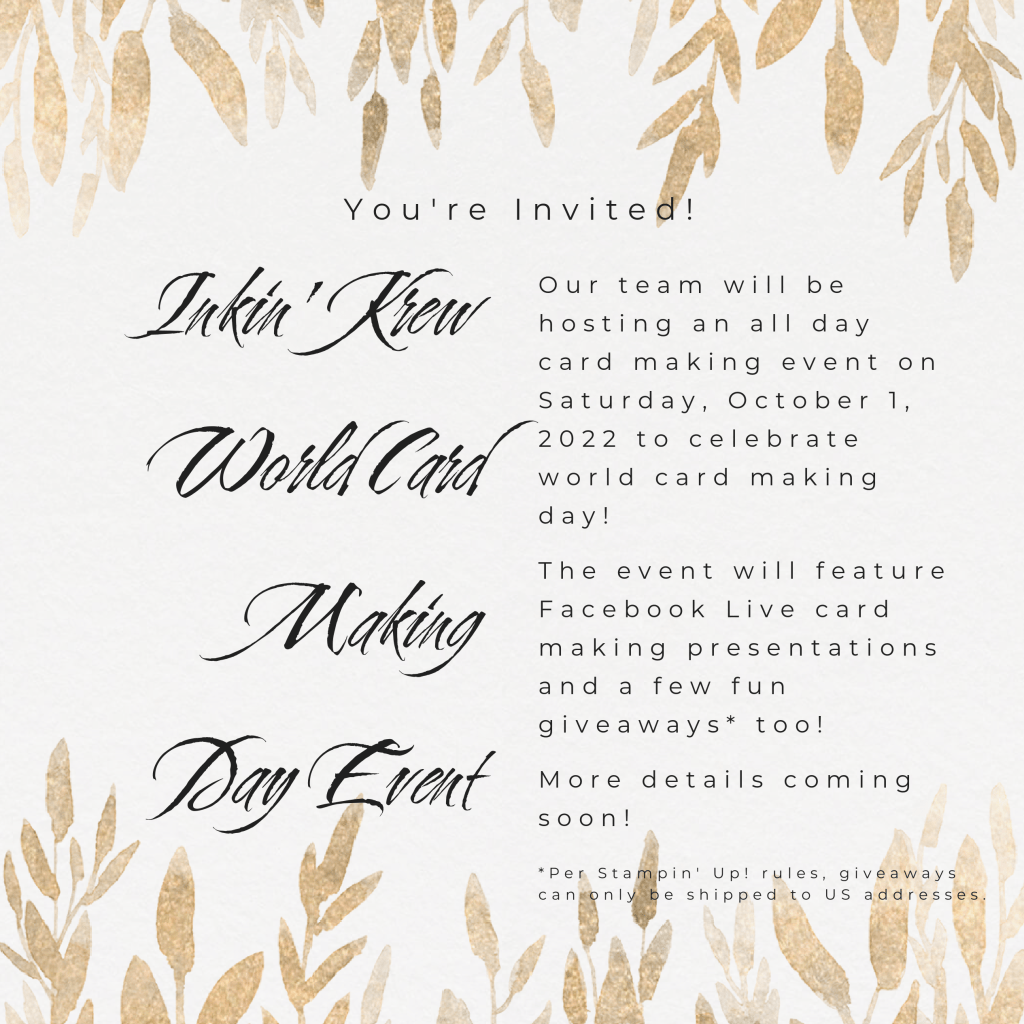
Save The Date – World Card Making Day is October 1!!
Stampin’ Up! and The Inkin’ Krew have fun events planned to celebrate!
Inkin’ Krew World Card Making Day Event – 9 AM ET Until 9 PM ET, Saturday, October 1!
We’re doing it again!! Our team will be hosting a fun all-day event featuring card making presentations live on the event Facebook page as well as some fun giveaways! All are welcome to join us! We’ll be setting up a Facebook page to host the event and we’ll be sharing the link to the page in late September. Can’t wait to stamp with you all then!!
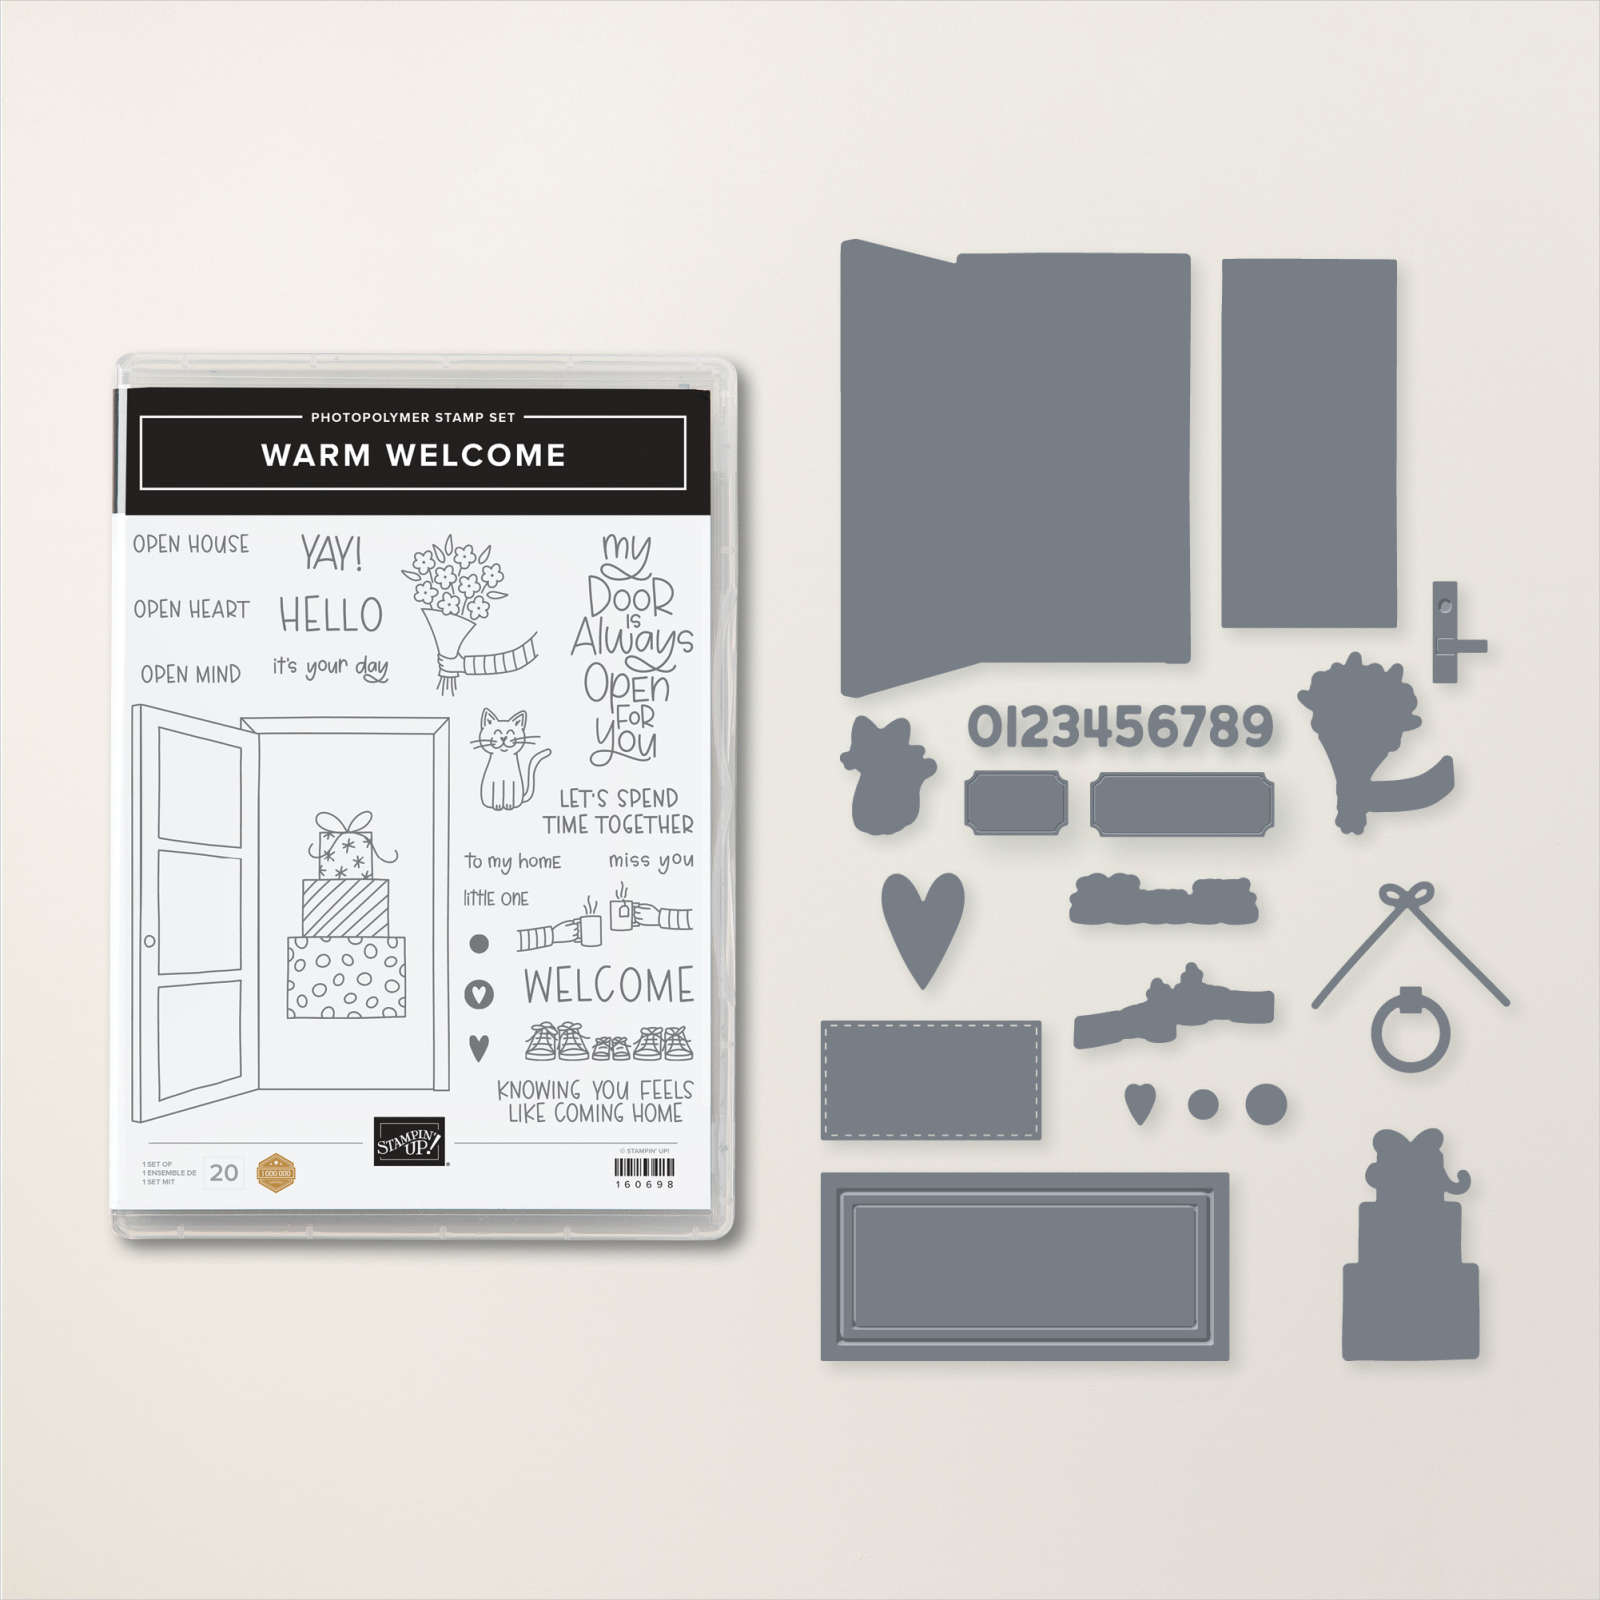
Stampin’ Up! Free Virtual Craft Along Event
Stampin’ Up! is also hosting a free, virtual card making event on October 1 from 2:00–5:00 pm (MT)! In just under three hours, Stampin’ Up will make three unique cards with the Cottage Rose Bundle, Cottage Wreath Bundle and the Warm Welcome Bundle (an early release from the Jan-Jun 2023 Mini Catalog). Everyone is invited and welcome, and registration is not required, but it is encouraged to stay up to date.
Click HERE to register for the Stampin’ Up! 3 Hour Event.
As an added bonus, when you order any of the three bundles used for the event, you’ll get a FREE gift of Iridescent Pearl Basic Jewels! (Note that even if you order all three bundles, you’ll only receive one Iridescent Pearls gift) Click HERE to download a brochure with ordering details and check out the early release of the Warming Welcome bundle for this event:
Let me know if you have any questions.
September Weekly Deals Going On Now!
Every week in the month of September Stampin’ Up! is offering a selection of discounted products. Discounts and product selection will vary from week to week. New products will be added each week on September 1, 8, 15, and 22.
Check my Online Store to see the this week’s deals!
Current Host Code: JSUNSU6D
Use this host code when you order $50 or more and receive a free gift from me! The free gift is your choice of any item currently available valued up to $10.00 from the July-December 2022 Mini Catalog or the 2022-2023 Annual Catalog!
If your order is over $150, please do not use the host code since you’ll receive your own Host Dollars plus I’ll still send you the free gift! This host code can be used by anyone, no club or commitment required. Let me know if you have any questions.
If you need any stamping supplies, I’d be very happy to be your Demonstrator. Just click on the Shop Now button on the right side of the screen to go directly to my online store or contact me if you have any questions. Happy Stamping!
Good Morning! The Rings Of Love designer series paper is a pretty pack of patterned paper that you can get for FREE with an order of $50 (before shipping and taxes) during Sale-A-Bration! It goes well with the awesome new Stampin’ Up! Ringed With Nature bundle from the new Mini Catalog and I used them both for today’s card. You can find the supplies I used at the bottom of my post along with the sizes of cardstock used.
I embossed a panel of Crumb Cake with the Painted Posies 3D embossing folder and adhered it to the front of a Crumb Cake card base with liquid glue.
I cut a panel of Rings of Love designer series paper with the 4th largest Stitched Rectangles die and adhered it to the front of a Night of Navy mat. I adhered the panel to the card with dimensionals.
I stamped the sentiment from the Stampin’ Up! Ringed with Nature stamp set in Night of Navy ink on a Crumb Cake panel. I punched it out with the Double Oval punch and punched a Night of Navy Scalloped oval. I adhered the two punched pieces together and popped them on the card with dimensionals. I made a quad loop bow from linen thread and adhered it under the label with a glue dot. I finished the label with Starry Sky matte dots.
For the inside of the card, I trimmed the bottom of a Basic White panel with a strip of the Rings of Love DSP and adhered the panel to the inside of the card with Stampin’ Seal.
The Stampin’ Up! Ringed With Nature stamp set has so many pretty images that go great with the beautiful Rings of Love Sale-A-Bration designer series paper. And it has lots of nice sentiments, so you will have a lot of creative fun with both of these products!
Sale-A-Bration is Going on Now and New Items have been added!
Sale-A-Bration is going strong and some of the items have already sold out! But there’s good news – additional items have been added to the list of things you can get for FREE with at least a $50 order!
With Sale-A-Bration going on through August 31, and the new Mini Catalog, now is a great time to stock up on supplies for Holiday card making and gifts. For every $50 or $100 in orders (before shipping and taxes) you get to choose a free item from nine available stamp sets, dies and papers. And there are extra bonuses for Hosting and Joining Too. Click HERE to download the Sale-A-Bration brochure to learn more. Please note that Sale-A-Bration items are only available while supplies last, so shop early to get the bonus item you really want!
Click HERE to download the flyer with the details on the additional items that have been added.
Current Host Code: 3XYTPTZC
Use this host code when you order $50 or more and receive a free gift from me! The free gift is your choice of any item currently available valued up to $10.00 from the July-December 2022 Mini Catalog or the 2022-2023 Annual Catalog!
If your order is over $150, please do not use the host code since you’ll receive your own Host Dollars plus I’ll still send you the free gift! This host code can be used by anyone, no club or commitment required. Let me know if you have any questions.
If you need any stamping supplies, I’d be very happy to be your Demonstrator. Just click on the Shop Now button on the right side of the screen to go directly to my online store or contact me if you have any questions. Happy Stamping!


")


")
")

 Designer Series Paper")


")


 Designer Series Paper")


 Bordered Ribbon")


 Designer Series Paper")


 Bordered Ribbon")


")
")


 Designer Series Paper")


")
 Designer Series Paper")


 Specialty Designer Series Paper")


 Crinkled Seam Binding Ribbon")


")
 Designer Series Paper")


 Metallic Woven Ribbon")


")
")


 Designer Series Paper")


")


 Designer Series Paper")


