Stampin’ Up! Leaves of Holly Sneak Peek

Good Morning! I’m so excited about the new Stampin’ Up! July – December 2022 Mini Catalog opening on Friday! There are so many wonderful new bundles and returning holiday products, and it’s coming out in July so we have an extra month to prepare for the holidays! Today I have a sneak peek of a new holiday bundle call the Stampin’ Up! Leaves of Holly bundle. I’ve got the card stock cuts at the bottom of today’s post and links to any products currently available.

And I’m joining some of the ladies on the Inkin’ Krew Team in a Blog Hop to celebrate the upcoming July-December Mini Catalog! We’ve each chosen a different bundle for our projects, so be sure to check out everyone’s projects and take a tour of many of the upcoming new goodies!

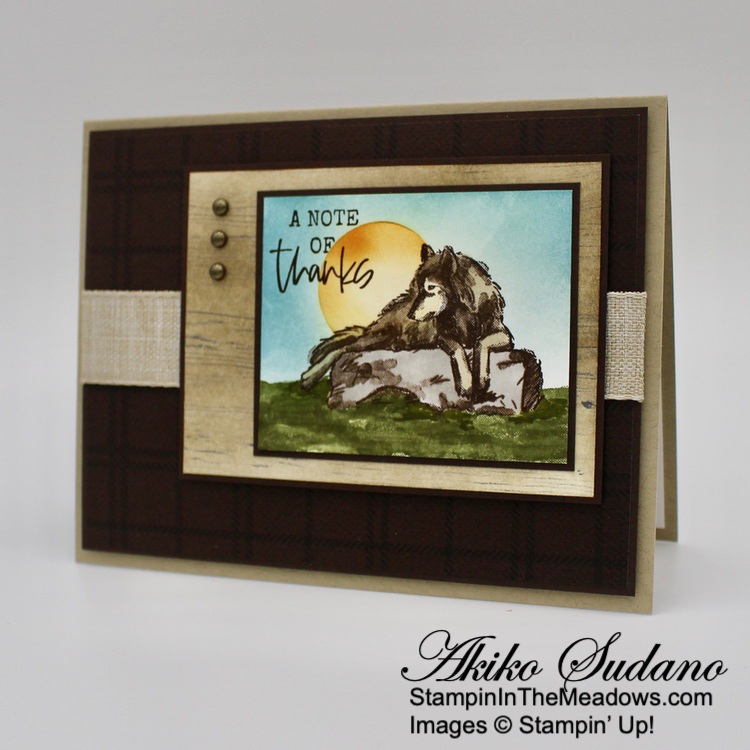
I adhered a panel of the pretty new Boughs of Holly designer series paper to a Basic White mat and adhered it to the front of a Gray Granite card base with dimensionals.

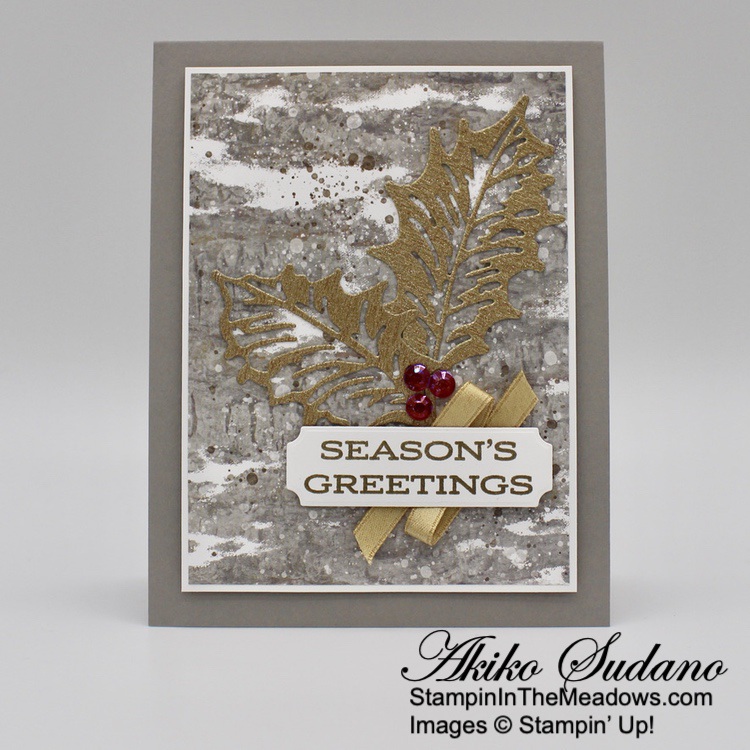
I cut the two detailed holly berry leaf dies from the Stampin’ Up! Leaves of Holly bundle from gold metallic specialty paper and adhered them to the card front with glue dots. I colored three large iridescent gems with my Cherry Cobbler Stampin’ Blend and adhered them to the card front by the leaves.

I stamped the sentiment from the Stampin’ Up! Leaves of Holly photopolymer stamp set in Versamark ink on a Basic White panel. I sprinkled it with gold embossing powder and shook off the excess. I heated the powder with my heat tool until it was shiny and cut it out with the small label die.

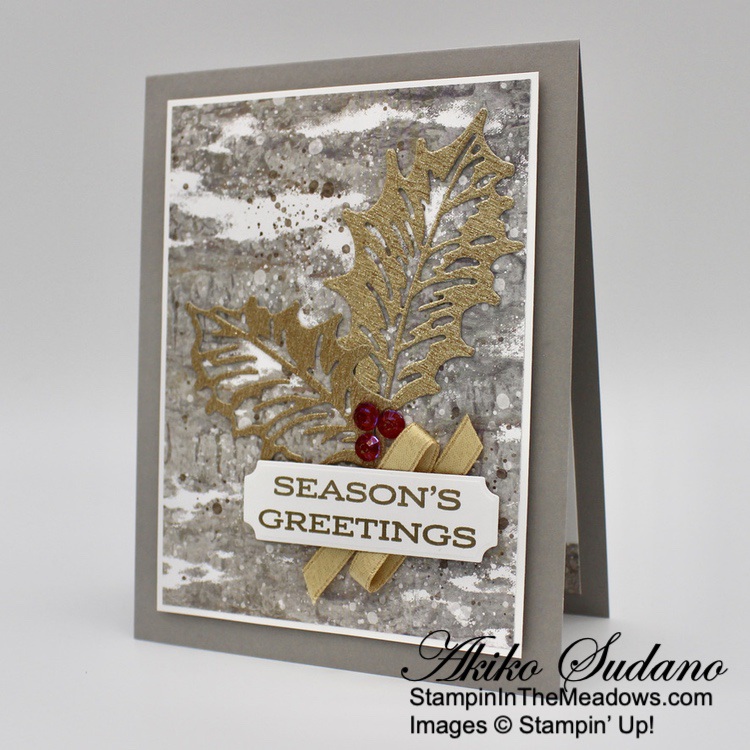
I ran some Stampin’ Seal at the base of the leaves and adhered some folded gold shimmer ribbon to the card front. I adhered the label over the ribbon to the card front with dimensionals.

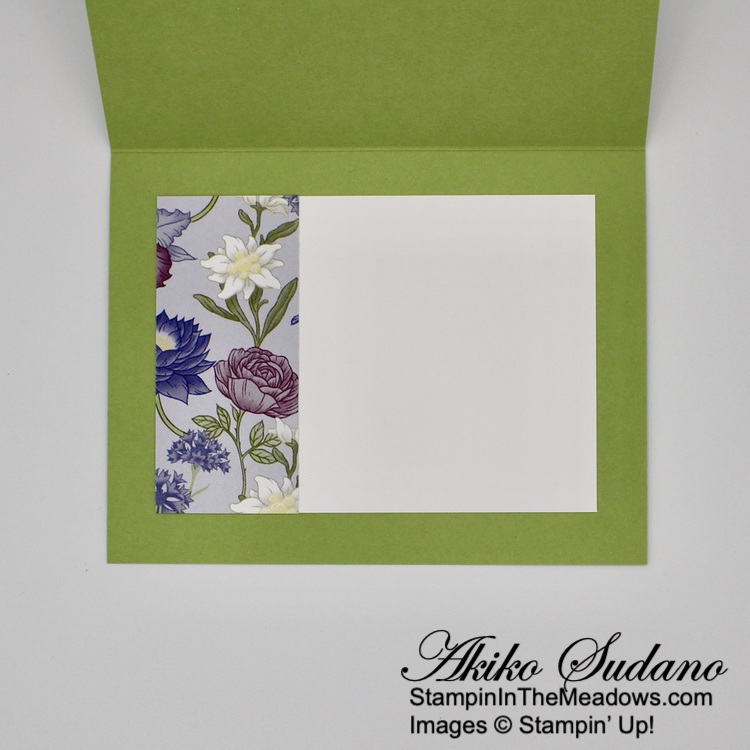
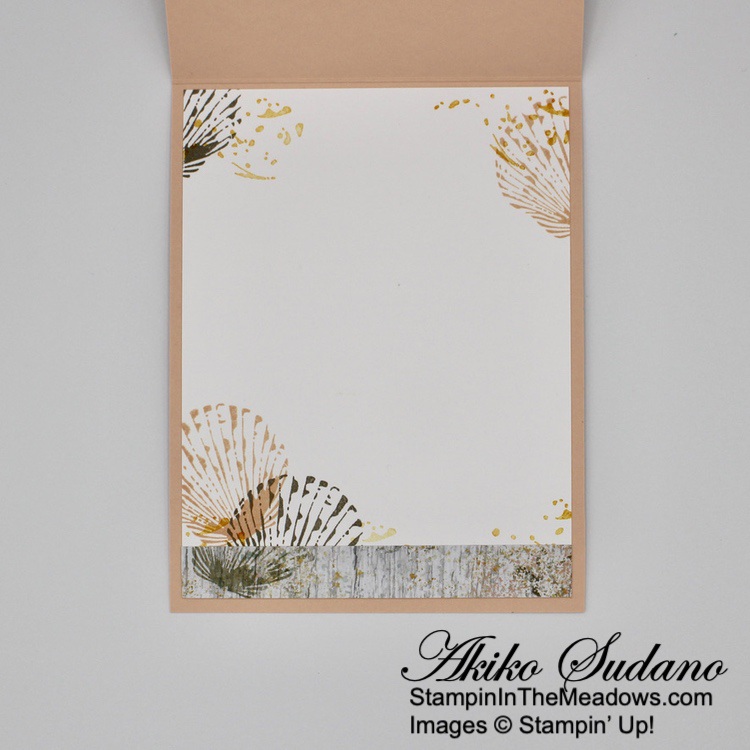
For the inside of the card, I stamped the large holly leaf from the Stampin’ Up! Leaves of Holly stamp set in stamped off Soft Succulent ink on a Basic White panel. I stamped the sentiment in Evening Evergreen ink over the leaf and trimmed the bottom with a strip of Boughs of Holly DSP before adhering the panel to the inside of the card.

The Stampin’ Up! Leaves of Holly bundle is so versatile with large, bold holly leaves that can be die cut or stamped. The dies can be used to cut out the leaves for layering the dies or for cutting out the stamped images and there are pretty labels for the wonderful sentiments. Here’s a picture of the Leaves of Holly stamp set with the coordinating Holly Berry dies and the beautiful Boughs of Holly DSP with my card.

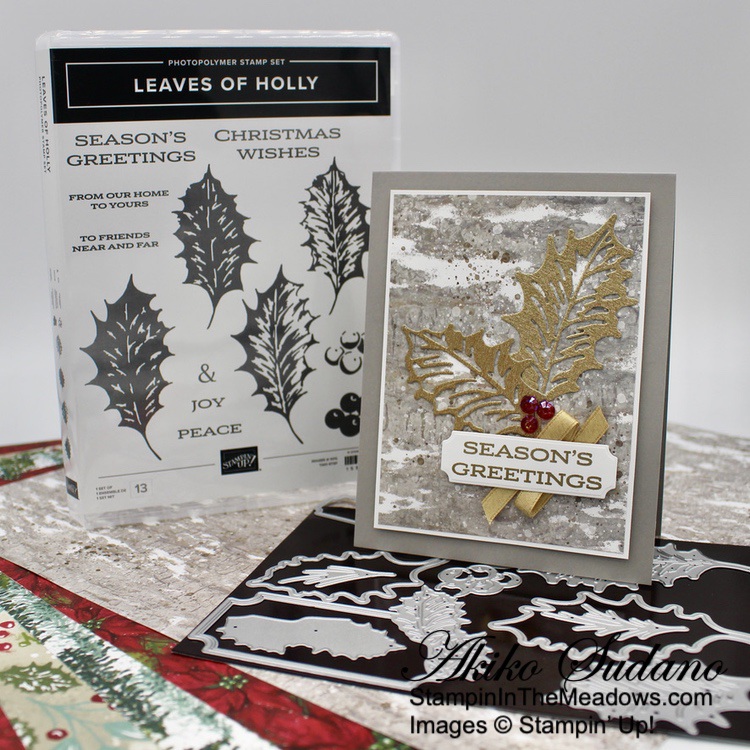
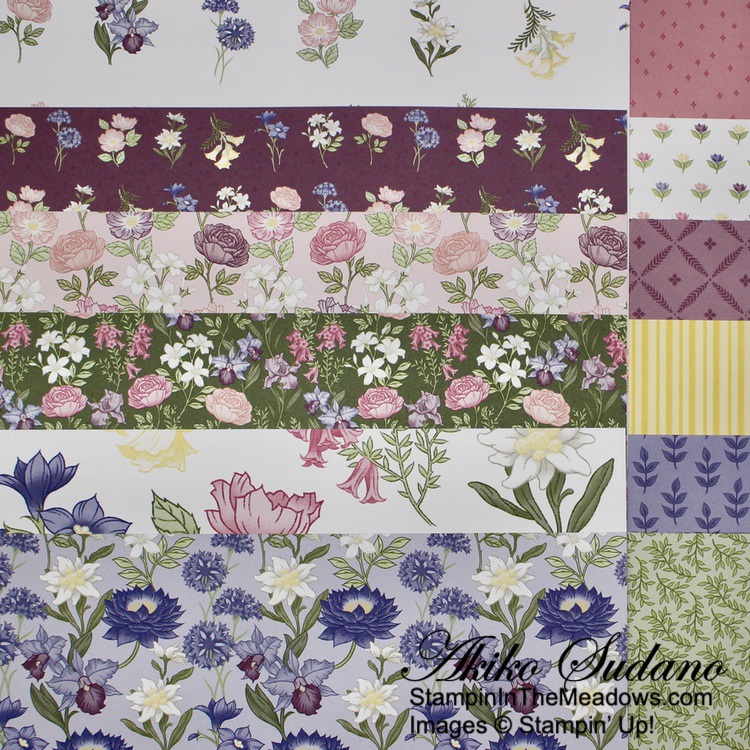
And here’s a close up of the beautiful papers in the Boughs of Holly designer series paper. This will be gorgeous with a lot of Christmas stamp sets!

The Stampin’ Up! Leaves of Holly bundle and Boughs of Holly DSP will be available on July 1 when the new July-December 2022 Mini Catalog goes live. And don’t forget that Sale-A-Bration Part 2 will start then too!

On With The Hop! Click on the Next Button to see Tara Carpenter’s pretty card and the Previous Button to see Karen Ksenzakovic’s pretty card.

And here’s the list of hoppers for today in case you get lost along the way:


Current Host Code: QNGMH7CB

Use this host code when you order $50 or more and receive a free gift from me!  The free gift is your choice of any currently available item valued up to $10.00!

If your order is over $150, please do not use the host code since you’ll receive your own Host Dollars plus I’ll still send you the free gift!  This host code can be used by anyone, no club or commitment required. Let me know if you have any questions.


If you need any stamping supplies, I’d be very happy to be your Demonstrator.  Just click on the Shop Now button on the right side of the screen to go directly to my online store or contact me if you have any questions.  Happy Stamping!

Thanks for stopping by and have a great week!

Akiko

  • Visit my online store here
  • See the current Stampin’ Up! clearance rack specials here
  • Earn FREE Stampin’ Up! products through my Wildflower Frequent Shopper Program – my way of saying thank you to my online frequent shopper customers.
  • Have any questions? I’d be happy to help, click here to contact me.

Cardstock Cuts for this project:

  • Gray Granite – 4-1/4″ x 11″ card base scored at 5-1/2″
  • Gold and Rose Gold Specialty paper – 2″ x 6″
  • Basic White- 3-3/4″ x 5″ (inside panel), 3-5/8″ x 4-7/78 (front mat), 1″ x 3″ (label)
  • Boughs of Holly DSP – 3-1/2″ x 4-3/4″ (front background), 1/2″ x 3-3/4″ (inside trim)

Stampin’ Up! products used in this project:


Stampin’ Up! Wonderful World Sneak Peek for the Happy Inkin’ Thursday Blog Hop

Good morning and welcome to the Happy Inkin’ Thursday Blog Hop! On July 1, Sale-A-Bration Part 2 will start and today’s card has a sneak peek of one of the prettiest items – the Stampin’ Up! Wonderful World bundle.  This bundle consists of a pretty floral cling stamp set and beautiful coordinating designer series paper. You can find the currently available supplies I used along with card stock cuts at the bottom of my post.

We have a sketch challenge this week and here is the fun sketch we are using:

I adhered the two sheets of Stampin’ Up! Wonderful World designer series paper together with liquid glue so that they were on an angle.  I adhered the layered DSP to the front of a Pear Pizzazz card base with liquid glue. I used the Banners Pick A Punch to cut the ends of three additional strips of DSP and adhered them to the front with liquid glue.  I stamped the sentiment from the Ranunculus Romance stamp set in Rick Razzleberry on the right side of a thin strip of Basic White. I punched the end and adhered it to the card front with liquid glue.

I used my Stamparatus and Rick Razzleberry and Pear Pizzazz Stampin’ Write markers to stamp the pretty rose from the Stampin’ Up! Wonderful World stamp set on Basic White.  I mounted my stamp on the top and secured the card stock on the bottom of the Stamparatus.  I colored the flower with the brush tip of the Rich Razzleberry marker, huffed on the stamp and closed the lid.  I colored the stem and leaves with the brush tip of the Pear Pizzazz Stampin’ Write marker, huffed on the stamp and closed the lid.  I love how well the Stamparatus works with this technique to give me two colors on one stamp!

I fussy cut the flower with my paper snips and adhered it to the card front with bits of dimensional.  I finished the card front with a white crinkle ribbon bow and three beautiful iridescent pearls.

For the inside, I adhered a panel of the Wonderful World DSP to the side of a Basic White panel and adhered it to the inside of the card.

A simple floral card for any occasion! Here is the pretty Stampin’ Up! Wonderful World cling stamp set:

And here is the pretty designer series paper pack:

You get both of these as a bundle as a Sale-A-Bration free item. The pretty Stampin’ Up! Wonderful World stamp bundle will be available starting July 1 with Sale-A-Bration as a free item with a $100 order (before tax and shipping). Here is a picture of the upcoming July-December 2022 Mini Catalog and July-August Sale-A-Bration Brochure:

On with the Hop! Click on the Next Blog button to move forward to see the beautiful project Karen Ksenzakovic has created.

If you get lost along the way, here are the participants for the hop:


Current Host Code: MHHQUNTF

Use this host code when you order $50 or more and receive a free gift from me!  The free gift is your choice of any available item valued up to $10.00 in the 2022 – 2023 Annual Catalog or the January – June 2022 Mini Catalog!

If your order is over $150, please do not use the host code since you’ll receive your own Host Dollars plus I’ll still send you the free gift!  This host code can be used by anyone, no club or commitment required. Let me know if you have any questions.


If you need any stamping supplies, I’d be very happy to be your Demonstrator.  Just click on the Shop Now button on the right side of the screen to go directly to my online store or contact me if you have any questions. 

Thanks for stopping by and Happy Stamping!

Akiko

  • Visit my online store here
  • See the current Stampin’ Up! clearance rack specials here
  • Earn FREE Stampin’ Up! products through my Wildflower Frequent Shopper Program – my way of saying thank you to my online frequent shopper customers.
  • Have any questions? I’d be happy to help, click here to contact me.

Cardstock Cuts for this project:

  • Pear Pizzazz – 5-1/2″ x 8-1/2″ card base scored at 4-1/4″
  • Basic White – 3-3/4″ x 4-1/2″ (inside panel), 1/4″ x 3-1/4″ (label), 2″ x 2-1/2″ (fussy cut flower)
  • Wonderful World DSP – two 3-1/4″ x 4-1/2″ panels (front DSP panels), 1-1/2″ x 3-1/4″ (inside trim), 3/4″ x 3-1/4″ (front banner), 1/2″ x 3″ (front banner), 1/2″ x 2-1/2″ (front banner)

Stampin’ Up! products used in this project:


Stampin’ Up! Honeybee Home Hello Card

Good Morning! One of the prettiest bundles in the retiring January-June 2022 Mini Catalog is the Stampin’ Up! Honeybee Home bundle. And happily, the bundle is carried over in the current Annual Catalog, but sadly the coordinating Heart & Home designer series paper is on the retiring list. It is such a pretty paper pack, so I wanted to pull it out for a simple card to show off the pretty DSP. And I paired it with the gorgeous Hello There sentiment from the Nature’s Prints cling stamp set. You can find the supplies I used at the bottom of my post along with the sizes of cardstock used.

I adhered a panel of floral Heart & Home designer series paper to a Garden Green leafy panel and adhered them both to a Garden Green mat. I embossed a panel of Vellum with the Hive 3D embossing folder and adhered the layered DSP panel to the front with liquid glue.

I cut a panel of Fresh Freesia with the floral die from the Honeybee Blooms dies and I cut the grass blades from Garden green. I adhered the die cuts to the corner of the DSP. I stamped the sentiment from the Nature’s Prints stamp set on Basic White and cut it out with the Stylish Shapes stitched circle die. I adhered the die cut circle to the layered panel with dimensionals.

Now that I had my main elements on my panel, I adhered the layered vellum panel to the front of a Pale Papaya card base with liquid glue applied to the places covered by card stock. I stamped the pretty bee from the Stampin’ Up! Honeybee Home cling stamp set in Basic Gray on Basic White and colored it with the light Pale Papaya Stampin’ Blend. I cut it out with the coordinating die and adhered it to the card front with glue dots. I finished the card front with three iridescent gemstones and a white crinkle ribbon bow.

For the inside of the card, I stamped the little bee and wildflowers from the Stampin’ Up! Honeybee Home stamp set in Basic Gray on a Basic White panel. I adhered the panel to a Garden Green leafy Heart & Home DSP mat and adhered the layered panel to the inside of the card.

Flowers and bees make the perfect summertime hello card!


Free Shipping from Stampin’ Up! on June 21 Only!

Yay! On June 21 only, Stampin’ Up! is offering FREE shipping on orders subtotaling $75 or more. This incredible deal lasts for 24 hours only!

Ordering Information:

  • Free shipping applies after the qualifying amount (per market) has been met.
  • The minimum qualifying amount to receive free shipping is $75 (before tax).
  • Free shipping only applies during the 24-hour period the promotion is live in each market; this means that the order must be opened and closed on 21 June 2022.
  • With the exception of month-to-month Paper Pumpkin subscriptions, all Stampin’ Up! products qualify for the promotion.
    • Prepaid Paper Pumpkin subscriptions are eligible for FREE shipping under the same rules as all other Stampin’ Up! items during the promotion.
    • Month-to-month Paper Pumpkin subscriptions are NOT eligible for free shipping. Subscriptions billed and shipped this month will be charged for the normal amount ($23.50 USD shipping included) + tax.
  • The free shipping promotion does not cover the additional cost for expedited shipping.
  • Free Shipping will only be offered on June 21, 2022 beginning at 12:00 AM (MT) and ending at 11:59 PM (MT).

Stampin’ Up! January – June 2022 Mini Catalog Last Chance Sale going on now!

The Stampin’ Up! January – June 2022 Mini Catalog is retiring on June 30 and retiring items are available while supplies last. And some items are on sale for up to 50% off!

Here are the details:

  • Not all retiring items are on sale. Discounted items are noted in the Retiring List
  • All products are available while supplies last, and there are no purchase limits.
  • Discounted items can be added to a Starter Kit and redeemed as a 50% off item or with Stampin’ Rewards.
  • Only orders opened and closed during the promotion period apply. 
  • Stamp Sets are not guaranteed during this promotion and are while supplies last.
  • The items are available while supplies last through June 30, 2022.

Order soon to make sure that you are able to get the items that you are wanting! Happy shopping!

Click HERE to download a PDF of the Retiring List items.

Click HERE to download an Excel Spreadsheet of the Retiring List items.


Stampin’ Up! Kits Collection – Buy One Get one 50% off!

The Stampin’ Up! Kits Collection is having a buy one, get one 50% off sale! The Kits Collection by Stampin’ Up! is perfect for beginner crafters with its variety and all-inclusive projects. And this is the perfect time to share a kit from the Kits Collection with a friend!

Here are the details:

  • Sale runs through 1–30 June 2022.
  • All kits in the Kits Collection by Stampin’ Up! qualify for this sale. 
  • Kit selection is based on availability.
  • You will need at least two kits in your cart for the discount to automatically apply at checkout. 
  • There are no order limits on this promotion.

The kit selection is based on availability, and new kits are continually being added. Shop the Kits Collection in my online store HERE.


Current Host Code: MHHQUNTF

Use this host code when you order $50 or more and receive a free gift from me!  The free gift is your choice of any item currently available valued up to $10.00 from the January – June 2022 Mini Catalog or the 2022-2023 Annual Catalog!

If your order is over $150, please do not use the host code since you’ll receive your own Host Dollars plus I’ll still send you the free gift!  This host code can be used by anyone, no club or commitment required. Let me know if you have any questions.


If you need any stamping supplies, I’d be very happy to be your Demonstrator.  Just click on the Shop Now button on the right side of the screen to go directly to my online store or contact me if you have any questions.  Happy Stamping!

Thanks for stopping by and have a great week!

Akiko

  • Visit my online store here
  • See the current Stampin’ Up! clearance rack specials here
  • Earn FREE Stampin’ Up! products through my Wildflower Frequent Shopper Program – my way of saying thank you to my online frequent shopper customers.
  • Have any questions? I’d be happy to help, click here to contact me.

Cardstock Cuts for this project:

  • Pale Papaya – 4-1/4″ x 11″ card base scored at 5-1/2″
  • Fresh Freesia – 1-1/2″ x 2-1/2″ (die cut flowers)
  • Garden Green – 1-1/2″ x 2-3/4″ (die cut grasses), 3-1/8″ x 3-1/8″ (front mat)
  • Vellum – 3-1/2″ x 4-3/4″ (embossed panel)
  • Basic White – 3-1/2″ x 4-3/4″ (inside panel), 2-1/4″ x 2-1/4″ (label), 1″ x 1″ (die cut bee)
  • Heart & Home DSP – 2-7/8″ x 2-7/8″ (floral panel), 3″ x 3″ (front mat), 3-7/8″ x 5-1/8″ (inside mat)

Stampin’ Up! products used in this project:


Stampin’ Up! He’s All That Father’s Day Card

Good Morning! Tomorrow is Father’s Day so I had to make a Father’s Day card with one of the best bundles for masculine cards in the 2022-2023 Annual Catalog, the Stampin’ Up! He’s All That bundle. And of course I paired it with the fun He’s the Man designer series paper, and used the BBQ theme for today’s card. You can find the supplies I used at the bottom of my post along with the sizes of cardstock used.

I cut a Cajun Craze panel with the fourth largest Deckled Rectangles die and adhered a panel of striped Cajun Craze He’s the Man designer series paper to the front. I cut two argyle shapes from Early Espresso using the dies from the Stampin’ Up! He’s All That bundle and adhered them to the corners of the panel. I popped the He’s the Man DSP BBQ sentiment die cut and adhered it to an Early Espresso plaid panel and popped it on the die cut panel with dimensionals.

I adhered the fun Early Espresso BBQ fixins DSP to the front and inside sections of the Crushed Curry card base with liquid glue. I cut a Basic White panel with the second largest Deckled Rectangle die and stamped the sentiment from the Stampin’ Up! He’s All That cling stamp set on the panel in Early Espresso ink. I stamped the No. 1 stamp in Crushed Curry and adhered the panel to the inside of the card, centering it on the DSP panel.

I adhered the layered Cajun Craze panel to the short front flap with Tear and Tape, centering it on the Basic White inside Deckled Rectangle. I adhered the arrow from the He’s the Man DSP to the front with dimensionals and glue dots so that it points to the sentiment. I finished the arrow with rustic dots.

I finished the inside by adhering the die cut grill and stars from the He’s the Man DSP to the inside of the card.

The BBQ theme paper and die cuts from the He’s the Man designer series paper are perfect for Father’s Day and summer birthdays! And they go perfect with the stamps and dies from the Stampin’ Up! He’s All That bundle. Although for Father’s Day, I’ll probably be the one doing the grilling.


The July Paper Pumpkin Kit is Sending Good Thoughts

Set sail with across the ocean with the Sending Good Thoughts Paper Pumpkin Kit! With beautifully designed nautical imagery, a fun message in a bottle motif, and sentiments that are “shore” to please, this month’s kit is full of warmth and fun.

We also have a special game for you to play—take part in the Sea if You Know Paper Pumpkin quiz to learn more about Paper Pumpkin and this month’s kit! Plus, subscribers to the Sending Good Thoughts Paper Pumpkin Kit will be entered to win a 1-month prepaid Paper Pumpkin code! Click on the picture below to play:

The July Kit includes:

  • Supplies to create 9 cards—3 each of 3 designs—and 9 coordinating envelopes
  • Printed dry-embossed card bases and printed envelopes
    • Card size: 4-1/4″ x 5-1/2″
    • Envelope Size: 4-1/2″ x 5-3/4″
  • Twine, mini glue dots and dimensionals
  • Sending Good Thoughts Photopolymer stamp set
  • Bermuda Bay Classic Stampin’ Spot

Coordinating Colors: Balmy Blue, Basic Gray, Bermuda Bay, Fresh Freesia, Pacific Point, Poppy Parade

If you’re interested in subscribing to Paper Pumpkin, you can either sign up for a subscription where you are billed monthly for your kit or you can purchase a prepaid subscription in my Online Store. To see more information and to sign up for the monthly subscription click here. To see the options for prepaid subscriptions in my Online Store, click here.

Sign up deadline for the July 2022 kit is July 10, 2022. Note: Supplies may be limited toward the end of the subscription period.


Stampin’ Up! January – June 2022 Mini Catalog Last Chance Sale going on now!

The Stampin’ Up! January – June 2022 Mini Catalog is retiring on June 30 and retiring items are available while supplies last. And some items are on sale for up to 50% off!

Here are the details:

  • Not all retiring items are on sale. Discounted items are noted in the Retiring List
  • All products are available while supplies last, and there are no purchase limits.
  • Discounted items can be added to a Starter Kit and redeemed as a 50% off item or with Stampin’ Rewards.
  • Only orders opened and closed during the promotion period apply. 
  • Stamp Sets are not guaranteed during this promotion and are while supplies last.
  • The items are available while supplies last through June 30, 2022.

Order soon to make sure that you are able to get the items that you are wanting! Happy shopping!

Click HERE to download a PDF of the Retiring List items.

Click HERE to download an Excel Spreadsheet of the Retiring List items.


Stampin’ Up! Kits Collection – Buy One Get one 50% off!

The Stampin’ Up! Kits Collection is having a buy one, get one 50% off sale! The Kits Collection by Stampin’ Up! is perfect for beginner crafters with its variety and all-inclusive projects. And this is the perfect time to share a kit from the Kits Collection with a friend!

Here are the details:

  • Sale runs through 1–30 June 2022.
  • All kits in the Kits Collection by Stampin’ Up! qualify for this sale. 
  • Kit selection is based on availability.
  • You will need at least two kits in your cart for the discount to automatically apply at checkout. 
  • There are no order limits on this promotion.

The kit selection is based on availability, and new kits are continually being added. Shop the Kits Collection in my online store HERE.


Current Host Code: MHHQUNTF

Use this host code when you order $50 or more and receive a free gift from me!  The free gift is your choice of any item currently available valued up to $10.00 from the January – June 2022 Mini Catalog or the 2022-2023 Annual Catalog!

If your order is over $150, please do not use the host code since you’ll receive your own Host Dollars plus I’ll still send you the free gift!  This host code can be used by anyone, no club or commitment required. Let me know if you have any questions.


If you need any stamping supplies, I’d be very happy to be your Demonstrator.  Just click on the Shop Now button on the right side of the screen to go directly to my online store or contact me if you have any questions.  Happy Stamping!

Thanks for stopping by and have a great week!

Akiko

  • Visit my online store here
  • See the current Stampin’ Up! clearance rack specials here
  • Earn FREE Stampin’ Up! products through my Wildflower Frequent Shopper Program – my way of saying thank you to my online frequent shopper customers.
  • Have any questions? I’d be happy to help, click here to contact me.

Cardstock Cuts for this project:

  • Crushed Curry – 5-1/2″ x 6-3/8″ card base scored at 4-1/4″
  • Cajun Craze – 3″ x 4-1/4″ (deckled rectangle)
  • Early Espresso – 2″ x 3″ (argyle die cuts)
  • Basic White – 3-3/4″ x 5″ (inside panel)
  • He’s The Man DSP – two 1-7/8″ x 5-1/4″ panels (front and inside flaps), 4″ x 5-1/4″ (inside background), 2-1/8″ x 3-1/2″ (Cajun Craze stripe), 1-7/8″ x 2-1/2″ (Early Espresso plaid), arrow, grill, stars and label die cuts

Stampin’ Up! products used in this project:


Stampin’ Up! Wildlife Wonder for the Happy Inkin’ Thursday Blog Hop

Good morning and welcome to the Happy Inkin’ Thursday Blog Hop! I made a masculine thank you card with the wonderful Stampin’ Up! Wildlife Wonder cling stamp set. You can find the supplies I used along with card stock cuts at the bottom of my post.

We have a theme challenge this week and we are making cards with critters! How fun!

And I’m entering my card in the challenge at the Card Concept #177. The theme for this Challenge is ‘Make it Masculine’ and I was inspired by the plaids and outdoor themes in the inspiration picture to make a clean and layered card. Here is the inspiration picture:

I adhered a panel of plaid He’s the Man designer series paper to an Early Espresso mat and wrapped a length of natural ribbon around it, securing it in the back with tape. I adhered it to a Crumb Cake card base with dimensionals. I used a blending brush to blend Soft Suede ink on a wood grained panel of Heart and Home DSP and I love how it came out! I adhered that panel to an Early Espresso mat and then popped it on the card front with dimensionals.

I stamped the wolf from the Stampin’ Up! Wildlife Wonder stamp set in Early Espresso on Basic White and colored the wolf with Crumb Cake Stampin’ Blends and the rock in Gray Granite. I stamped the image again on masking paper and fussy cut it out. I covered the wolf with the mask and stamped the ground in Old Olive multiple times with the ground stamp.

I cut a circle in another sheet of masking paper and used it to make a Mango Melody sun behind the wolf with a blending brush. I covered the sun with the circle mask and blended the sky background in Balmy Blue ink with a blending brush. I removed all the masks and stamped the sentiment from the Stampin’ Up! Wildlife Wonder Stamp set in Early Espresso ink. I adhered the wolf panel to an Early Espresso mat and adhered it to the card front with liquid glue. I finished the card with three rustic metallic dots.

For the inside, I stamped the sentiment from the Stampin’ Up! Wildlife Wonder stamp set in Early Espresso on a Basic White panel. I stamped the plant in Old Olive and colored the tops with light Pumpkin Pie Stampin’ Blend. I blended Soft Suede on another woodgrain panel of Heart and Home DSP and adhered it to the side of the panel with liquid glue. I adhered the panel to the inside of the card with Stampin’ Seal.

The Stampin’ Up! Wildlife Wonder stamp set is another in a long line of gorgeous Stampin’ Up! natural wildlife stamp sets, and it’s another winner! These are perfect for masculine cards for any occasion and I have always enjoyed making natural backgrounds using different coloring techniques.

On with the Hop! Click on the Next Blog button to move forward to see the beautiful project Karen Ksenzakovic has created.

If you get lost along the way, here are the participants for the hop:


Current Host Code: MHHQUNTF

Use this host code when you order $50 or more and receive a free gift from me!  The free gift is your choice of any available item valued up to $10.00 in the 2022 – 2023 Annual Catalog or the January – June 2022 Mini Catalog!

If your order is over $150, please do not use the host code since you’ll receive your own Host Dollars plus I’ll still send you the free gift!  This host code can be used by anyone, no club or commitment required. Let me know if you have any questions.


If you need any stamping supplies, I’d be very happy to be your Demonstrator.  Just click on the Shop Now button on the right side of the screen to go directly to my online store or contact me if you have any questions. 

Thanks for stopping by and Happy Stamping!

Akiko

  • Visit my online store here
  • See the current Stampin’ Up! clearance rack specials here
  • Earn FREE Stampin’ Up! products through my Wildflower Frequent Shopper Program – my way of saying thank you to my online frequent shopper customers.
  • Have any questions? I’d be happy to help, click here to contact me.

Cardstock Cuts for this project:

  • Crumb Cake – 5-1/2″ x 8-1/2″ card base scored at 4-1/4″
  • Early Espresso – 4″ x 5-1/4″ (front mat), 2-7/8″ x 3-7/8″ (DSP mat), 2-3/8″ x 2-7/8″ (wolf mat)
  • Basic White – 4″ x 5-1/4″ (inside panel), 2-1/4″ x 2-3/4″ (art panel)
  • He’s The Man DSP – 3-7/8″ x 5-1/8″ (front background)
  • Heart & Home DSP – 2-3/4″ x 3-3/4″ (front wood grain panel), 1″ x 4″ (inside trim)

Stampin’ Up! products used in this project:


Stampin’ Up! Elephant Parade for the Inkin’ Krew Blog Hop

Good morning! Welcome to the June Inkin’ Krew Team Blog Hop! The theme for this month’s hop is “Happy Birthday” and I have a baby birthday card made with the sweet Stampin’ Up! Elephant Parade bundle from the new Annual Catalog. You can find the supplies I used at the bottom of my post along with the sizes of cardstock used.

I was also inspired by the pretty sketch in the Inspire.Create.Challenges #188:

I adhered a strip of Petal Pink floral Design A Daydream designer series paper to a Petal Pink mat and adhered it to another Petal Pink Design A Daydream DSP with liquid glue. I adhered the layered DSP to the front of a Petal Pink card base. I adhered a panel of leafy swirl Tea Boutique DSP to a Parakeet Party mat and adhered it to the card front with liquid glue.

I cut a Petal Pink panel with the second largest scalloped circle from the Layering Circles dies and stamped the sentiment from the Stampin’ Up! Elephant Parade cling stamp set in Garden Green on a Basic White panel. I cut it out with the second largest circle from the Stylish Shapes dies and I adhered the circles together with liquid glue.

I cut grass from Parakeet Party using the grass dies from the Elephant dies and adhered them to the layered circles. I stamped the sweet elephant from the Stampin’ Up! Elephant Parade stamp set on Basic White using Basic Gray ink and colored it with Petal Pink and Gray Granite Stampin’ Blends. I cut it out with the coordinating die and popped it on the layered circles with dimensionals.

I stamped the flower from the Stampin’ Up! Elephant Parade stamp set in Basic Gray ink and colored it with Tahitian Tide and Granny Apple Green Stampin’ Blends. I cut it out with the coordinating die and adhered it under the elephant’s trunk. I cut a Petal Pink bow and adhered it to the elephant’s head and adhered the layered circles to the card front with dimensionals. I finished it with three In Color matte dots.

For the inside of the card, I stamped the sentiments from the A Grand Kid cling stamp set in Basic Gray on a Basic White panel. I stamped the balloons from the Stampin’ Up! Elephant Parade stamp set in Basic Gray on the side of the panel in Basic Gray and colored them with Petal Pink, Parakeet Party and Tahitian Tide Stampin’ Blends before adhering it to the inside of the card.

The elephants in the Stampin’ Up! Elephant Parade bundle are so cute and sweet!! They’re perfect for children’s cards and for any occasion where you want a cute critter to send your message!

On With The Hop! Click on the Next Blog button to move forward to Karen Finkle’s project or click the Previous Blog button to move back to see the project that Tara Carpenter created.

If you get lost along the way, here are the participants for the hop:

  1. Jaimie Babarczy
  2. Carol Buckalew 
  3. Karen Ksenzakovic 
  4. Mary Deatherage 
  5. Karen Finkle 
  6. Terry Lynn Bright 
  7. Tara Carpenter 
  8. Jillian Good 
  9. Sue Prather
  10. Akiko Sudano. <– You are here
  11. Amy Koenders

Current Host Code: MHHQUNTF

Use this host code when you order $50 or more and receive a free gift from me!  The free gift is your choice of any item currently available valued up to $10.00 in the 2023 – 2023 Annual Catalog or the January-June 2022 Mini Catalog!

If your order is over $150, please do not use the host code since you’ll receive your own Host Dollars plus I’ll still send you the free gift!  This host code can be used by anyone, no club or commitment required. Let me know if you have any questions


If you need any stamping supplies, I’d be very happy to be your Demonstrator.  Just click on the Shop Now button on the right side of the screen to go directly to my online store or contact me if you have any questions. 

Thanks for stopping by and Happy Stamping!

Akiko

  • Visit my online store here
  • See the current Stampin’ Up! clearance rack specials here
  • Earn FREE Stampin’ Up! products through my Wildflower Frequent Shopper Program – my way of saying thank you to my online frequent shopper customers.
  • Have any questions? I’d be happy to help, click here to contact me.

Cardstock Cuts for this project:

  • Petal Pink – 5-1/2″ x 8-1/2″ card base scored at 4-1/4″, 3-1/4″ x 3-1/4″ (scalloped circle), 2-1/8″ x 5-1/4″ (DSP mat), 1″ x 1″ (die cut bow)
  • Parakeet Party – 2-1/8″ x 3-7/8″ (DSP mat), 1″ x 2-1/2″ (die cut grass)
  • Basic White – 4″ x 5-1/4″ (inside panel), 3″ x 3″ (die cut circle), 2″ x 2-1/4″ (die cut elephant), 1″ x 1″ (die cut flower)
  • Design a Daydream DSP – 4″ x 5-1/4″ (front background), 2″ x 5-1/4″ (front stripe)
  • Tea Boutique DSP – 2″ x 3-3/4″ (front DSP panel)

Stampin’ Up! products used in this project:


Stampin’ Up! True Beauty for the Happy Inkin’ Thursday Blog Hop

Good morning and welcome to the Happy Inkin’ Thursday Blog Hop! I have a just because card to share today made with the beautiful new Stampin’ Up! True Beauty bundle with the retiring Flowering Fields designer series paper. You can find the supplies I used along with card stock cuts at the bottom of my post.

We have a sketch challenge this week and here is the sketch we are using:

I adhered an Old Olive panel of Flowering Fields designer series paper to a Mango Melody panel of the DSP with liquid glue and adhered the layered DSP to an Old Olive mat. I stamped the sentiment from the Stampin’ Up! True Beauty cling stamp set in Blackberry Bliss ink in the lower corner. I cut two berry sprigs from Blackberry Bliss card stock using the Organic Beauty dies and adhered them to the DSP panel with liquid glue.

I stamped three large roses from the Stampin’ Up! True Beauty stamp set in Poppy Parade on Basic White and cut them out with the coordinating die. I stamped three sets of leaves in Mossy Meadow and four small flowers in Mango Melody on Basic White. I cut all the leaves and small flowers out with the coordinating dies.

I arranged the flowers and leaves and adhered the leaves and small flowers to the DSP panel with glue dots. I adhered the top rose with glue dots and popped the last two flowers on with dimensionals. I adhered the panel to the front of a Poppy Parade card base with dimensionals and finished with three faux pearls.

For the inside, I cut two masks for the roses and stamped the first rose in the lower corner of a basic white panel in Poppy Parade ink. I covered it with a mask and stamped the second. I covered both roses and stamped the leaves in Mossy Meadow. I adhered the panel to the inside of the card with Stampin’ Seal.

The flowers in the Stampin’ Up! True Beauty stamp set are just beautiful – with the Distinktive look so that you get multiple shades in one stamp! And each flower has a coordinating die, so you don’t have to fussy cut – Yay!! And it goes beautifully with the retiring Flowering Fields DSP (which is currently on SALE). Be sure to check it out along with the other items in the Awash in Beauty Suite!

On with the Hop! Click on the Next Blog button to move forward to see the beautiful project Karen Ksenzakovic has created.

If you get lost along the way, here are the participants for the hop:


Current Host Code: MHHQUNTF

Use this host code when you order $50 or more and receive a free gift from me!  The free gift is your choice of any available item valued up to $10.00 in the 2022 – 2023 Annual Catalog or the January – June 2022 Mini Catalog!

If your order is over $150, please do not use the host code since you’ll receive your own Host Dollars plus I’ll still send you the free gift!  This host code can be used by anyone, no club or commitment required. Let me know if you have any questions.


If you need any stamping supplies, I’d be very happy to be your Demonstrator.  Just click on the Shop Now button on the right side of the screen to go directly to my online store or contact me if you have any questions. 

Thanks for stopping by and Happy Stamping!

Akiko

  • Visit my online store here
  • See the current Stampin’ Up! clearance rack specials here
  • Earn FREE Stampin’ Up! products through my Wildflower Frequent Shopper Program – my way of saying thank you to my online frequent shopper customers.
  • Have any questions? I’d be happy to help, click here to contact me.

Cardstock Cuts for this project:

  • Poppy Parade – 4-1/4″ x 11″ card base scored at 5-1/2″
  • Old Olive – 4″ x 5-1/4″ (front mat)
  • Blackberry Bliss 1-1/4″ x 4″ (die cut berry sprigs)
  • Basic White – 4″ x 5-1/4″ (inside panel), 2-1/2″ x 6″ (die cut roses), 2-1/2″ x 3-1/2″ (die cut leaves), 1″ x 4″ (die cut small flowers)
  • Flowering Fields DSP – 2-3/4″ x 3-7/8″ (Old Olive background), 3-7/8″ x 5-1/8″ (Mango Melody background)

Stampin’ Up! products used in this project:


Stampin’ Up! Season Of Chic Thinking of You Card

Good Morning! The new Texture Chic Suite in the 2022-2023 Annual Catalog is so beautiful and unique. It has the Stampin’ Up! Season of Chic bundle with an eclectic set of stamps and dies with sea shell, flower, leaf and snowflake motifs along with different spatter and brushstroke stamps that encourages creativity. It also has the beautiful Texture Chic specialty designer series paper with touches of gold foil and the gorgeous Distressed Gold specialty paper. I used all three for today’s shell motif thinking of you card and you can find the supplies I used at the bottom of my post along with the sizes of cardstock used.

I adhered a panel of Texture Chic specialty designer series paper to a Gray Granite mat. I used a blending brushes to apply Gray Granite ink and Petal Pink ink to two spots on a Basic White panel. I stamped the shell from the Stampin’ Up! Season of Chic photopolymer stamp set to stamp over the blended spots, using Petal Pink over the Gray Granite spot and Mango Melody over the Petal Pink spot. I cut the shells out with the coordinating die.

I stamped another Pink shell on plain Basic White and cut it out with the coordinating die and cut a panel of Distressed Gold specialty paper with the large detailed shell die. I adhered the gold shell to the Petal Pink stamped shell with liquid glue. I die cut the two small detailed shells from Petal Pink card stock and traced the long shell outline on a Basic White scrap. I used a blending Brush to apply Petal Pink ink to the shell and stamped over it with the spatter stamp from the Stampin’ Up! Season of Chic stamp set and Mango Melody ink. I fussy cut the shell and adhered it to the back of my die cut Petal Pink shell.

I cut a vellum panel with the screen die from the Chic dies and colored the back with Gray Granite and Light Pumpkin Pie Stampin’ Blends. I adhered the screen to the DSP panel with Stampin’ Seal across the middle and along the side. I stamped the sentiment from the Stampin’ Up! Season of Chic stamp set in Gray Granite ink on Basic White and cut it out with the Stylish Shapes banner die. I adhered some gold shimmer ribbon to the DSP panel with Stampin’ Seal and adhered the label on top with glue dots. I used glue dots to adhere the two smaller shells and the plain larger shells. I adhered the layered distress gold shell with dimensionals and adhered the DSP panel to the front of a Petal Pink card base with dimensionals. I finished the card front with Polished Dots.

For the inside of the card, I stamped the shell from the Stampin’ Up! Season of Chic stamp set in Petal Pink and Gray Granite in the corners of a Basic White panel. I stamped the Spatter in Mango Melody and trimmed the bottom with a strip of Texture Chic specialty DSP. I adhered the panel to the inside of the card with Stampin’ Seal.

Here in the Northeast, it’s a big beach weekend with gorgeous weather, so the shells in the Stampin’ Up! Season of Chic stamp set make a perfect card for the times. The light woodgrain DSP with the shells make the perfect background for a sun bleached look. This was a fun card to make and I hope it inspires you for summertime fun.


Stampin’ Up! January – June 2022 Mini Catalog Last Chance Sale going on now!

The Stampin’ Up! January – June 2022 Mini Catalog is retiring on June 30 and retiring items are available while supplies last. And some items are on sale for up to 50% off!

Here are the details:

  • Not all retiring items are on sale. Discounted items are noted in the Retiring List
  • All products are available while supplies last, and there are no purchase limits.
  • Discounted items can be added to a Starter Kit and redeemed as a 50% off item or with Stampin’ Rewards.
  • Only orders opened and closed during the promotion period apply. 
  • Stamp Sets are not guaranteed during this promotion and are while supplies last.
  • The items are available while supplies last through June 30, 2022.

Order soon to make sure that you are able to get the items that you are wanting! Happy shopping!

Click HERE to download a PDF of the Retiring List items.

Click HERE to download an Excel Spreadsheet of the Retiring List items.


Stampin’ Up! Kits Collection – Buy One Get one 50% off!

The Stampin’ Up! Kits Collection is having a buy one, get one 50% off sale! The Kits Collection by Stampin’ Up! is perfect for beginner crafters with its variety and all-inclusive projects. And this is the perfect time to share a kit from the Kits Collection with a friend!

Here are the details:

  • Sale runs through 1–30 June 2022.
  • All kits in the Kits Collection by Stampin’ Up! qualify for this sale. 
  • Kit selection is based on availability.
  • You will need at least two kits in your cart for the discount to automatically apply at checkout. 
  • There are no order limits on this promotion.

The kit selection is based on availability, and new kits are continually being added. Shop the Kits Collection in my online store HERE.


Current Host Code: MHHQUNTF

Use this host code when you order $50 or more and receive a free gift from me!  The free gift is your choice of any item currently available valued up to $10.00 from the January – June 2022 Mini Catalog or the 2022-2023 Annual Catalog!

If your order is over $150, please do not use the host code since you’ll receive your own Host Dollars plus I’ll still send you the free gift!  This host code can be used by anyone, no club or commitment required. Let me know if you have any questions.


If you need any stamping supplies, I’d be very happy to be your Demonstrator.  Just click on the Shop Now button on the right side of the screen to go directly to my online store or contact me if you have any questions.  Happy Stamping!

Thanks for stopping by and have a great week!

Akiko

  • Visit my online store here
  • See the current Stampin’ Up! clearance rack specials here
  • Earn FREE Stampin’ Up! products through my Wildflower Frequent Shopper Program – my way of saying thank you to my online frequent shopper customers.
  • Have any questions? I’d be happy to help, click here to contact me.

Cardstock Cuts for this project:

  • Petal Pink – 4-1/4″ x 11″ card base scored at 5-1/2″, 1-1/2″ x 2″ (die cut seashells)
  • Gray Granite – 3-7/8″ x 5-1/8″ (front mat)
  • Distress Gold specialty paper – 1-3/4″ x 1-3/4″ (detailed large shell)
  • Vellum – 3″ x 4″
  • Basic White – 4″ x 5-1/4″ (inside panel), 4″ x 5″ (stamped shells)
  • Textured Chic DSP – 3-3/4″ x 5″ (front background), 1/2″ x 4″ (inside trim)

Stampin’ Up! products used in this project:


Stampin’ Up! Cup of Tea for the Happy Inkin’ Thursday Blog Hop

Good morning and welcome to the Happy Inkin’ Thursday Blog Hop! I’m using the pretty Stampin’ Up! Cup of Tea bundle with the Tea Boutique 6″ x 6″ designer series paper for a Get Well card. You can find the supplies I used along with card stock cuts at the bottom of my post.

We have a color challenge this week and we are using the new 2022-2024 In Colors for our color palette:

And over at Hand Stamped Sentiments, they have a color challenge using the same colors, Hand Stamped Sentiments Color Challenge #390, so I’m entering my card there too.

I embossed an Orchid Oasis panel with the Gingham embossing folder and adhered it to the front of an Orchid Oasis card base. I adhered a panel of teapot Tea Boutique 6″ x 6″ DSP to the card front with liquid glue and adhered a panel of Sweet Sorbet Tea Boutique DSP on top. I cut a Tahitian Tide panel with the solid teacup die and cut a Basic White panel with the leafy detail teacup die. I put a panel of adhesive sheet behind the Basic White panel before cutting it, so I pulled the backing off the adhesive sheet and adhered the detailed die cut to the solid cup.

I stamped the small teabag tag from the Stampin’ Up! Cup of Tea photopolymer stamp set in Starry Sky and cut it out with the coordinating die. I adhered a short length of white baker’s twine to the back of the tag and cup with glue dots. I stamped the large leaf in Parakeet Party, the flower in Petal Pink and two small leaf clusters in Garden Green. I cut all these out with the coordinating dies and adhered the leaves to the card front with glue dots.

I adhered the teacup and tag to the card front with dimensionals along with the flower. I cut the solid and detailed lemon wedge from Crushed Curry and adhered them together before adhering them to the card front with glue dots. I finished the card front with In Color dots.

For the inside, I stamped the large leaf cluster from the Stampin’ Up! Cup of Tea stamp set in Parakeet Party on a Basic White panel. I stamped the small leaves in Garden Green and the sentiment in Orchid Oasis. I adhered a strip of DSP to the bottom and finished the panel with another die cut Petal Pink flower. I adhered the panel to the inside of the card with Stampin’ Seal.

A cup of hot tea with lemon and honey is always good when you have a cold in the Winter, so the Stampin’ Up! Cup of Tea bundle is perfect for a get well card. But in the hot summer, it’s the thought that counts, along with florals in the beautiful, bold new In Colors.

On with the Hop! Click on the Next Blog button to move forward to see the beautiful project Karen Ksenzakovic has created.

If you get lost along the way, here are the participants for the hop:


Current Host Code: MHHQUNTF

Use this host code when you order $50 or more and receive a free gift from me!  The free gift is your choice of any available item valued up to $10.00 in the 2022 – 2023 Annual Catalog or the January – June 2022 Mini Catalog!

If your order is over $150, please do not use the host code since you’ll receive your own Host Dollars plus I’ll still send you the free gift!  This host code can be used by anyone, no club or commitment required. Let me know if you have any questions.


If you need any stamping supplies, I’d be very happy to be your Demonstrator.  Just click on the Shop Now button on the right side of the screen to go directly to my online store or contact me if you have any questions. 

Thanks for stopping by and Happy Stamping!

Akiko

  • Visit my online store here
  • See the current Stampin’ Up! clearance rack specials here
  • Earn FREE Stampin’ Up! products through my Wildflower Frequent Shopper Program – my way of saying thank you to my online frequent shopper customers.
  • Have any questions? I’d be happy to help, click here to contact me.

Cardstock Cuts for this project:

  • Orchid Oasis – 4-1/4″ x 11″ card base scored at 5-1/2″, 4-1/8″ x 5-3/8″ (embossed panel)
  • Tahitian Tide – 2″ x 2-1/2″ (die cut teacup)
  • Crushed Curry – 1-1/2″ x 1-1/2″ (lemon die cuts)
  • Basic White – 4″ x 5-1/4″ (inside panel), 2″ x 2-1/2″ (detail teacup die cut), 3″ x 5″ (die cut leaves and flowers)
  • Tea Boutique 6″ x 6″ DSP – 2-1/2″ x 5″ (teapot panel), 2″ x 3-1/2″ (Sweet Sorbet panel), 1/2″ x 4″ (inside trim)

Stampin’ Up! products used in this project:


Stampin’ Up! Vintage Tools Birthday Card

Good Morning! I love the new Stampin’ Up! Vintage Tools cling stamp set – it reminds me of the old tools that my Husband’s father left to him! It’s a great set for making masculine cards, especially for the handyman or wannabe handyman. I paired it with a rustic print in the pretty new Texture Chic specialty designer series paper for today’s card. You can find the supplies I used at the bottom of my post along with the sizes of cardstock used.

I adhered a panel of Texture Chic specialty designer series paper to a Basic Black mat with liquid glue and adhered it to the front of an Evening Evergreen card base with dimensionals.

I stamped the tools from the Stampin’ Up! Vintage Tools stamp set in Memento Tuxedo black ink on a Sahara Sand panel. I colored the tools with the light Gray Granite and light Soft Suede Stampin’ Blends and fussy cut the tools out with my paper snips. I stamped the sentiment in Memento Tuxedo Black ink on another Sahara Sand panel.

I adhered the fussy cut tools to the panel with liquid glue and stamped some vintage tacks over the screwdriver in Memento Tuxedo Black. I finished the panel with three rustic dots and adhered the panel to a Basic Black mat before adhering it to the card front.

For the inside of the card, I stamped the the sentiment from the Stampin’ Up! Vintage Tools stamp set in Memento Tuxedo Black on a Basic White panel. I stamped some more tacks in Memento Tuxedo Black and stamped the sentiment from the Cottage Rose stamp set in Evening Evergreen. I trimmed the bottom with a strip of Texture Chic specialty DSP and adhered the panel to the inside of the card with Stampin’ Seal.

I could also stamp the tools directly on the cardstock and color it, but it gives the card front a little dimension and texture. The panel of Texture Chic DSP reminded me antique boards, so I thought it would go well with the Stampin’ Up! Vintage Tools stamp set.


Current Host Code: MHHQUNTF

Use this host code when you order $50 or more and receive a free gift from me!  The free gift is your choice of any item valued up to $10.00 from the January – June 2022 Mini Catalog or the 2022-2023 Annual Catalog!

If your order is over $150, please do not use the host code since you’ll receive your own Host Dollars plus I’ll still send you the free gift!  This host code can be used by anyone, no club or commitment required. Let me know if you have any questions.


If you need any stamping supplies, I’d be very happy to be your Demonstrator.  Just click on the Shop Now button on the right side of the screen to go directly to my online store or contact me if you have any questions.  Happy Stamping!

Thanks for stopping by and have a great week!

Akiko

  • Visit my online store here
  • See the current Stampin’ Up! clearance rack specials here
  • Earn FREE Stampin’ Up! products through my Wildflower Frequent Shopper Program – my way of saying thank you to my online frequent shopper customers.
  • Have any questions? I’d be happy to help, click here to contact me.

Cardstock Cuts for this project:

  • Evening Evergreen – 4-1/4″ x 11″ card base scored at 5-1/2″
  • Sahara Sand – 3-1/2″ x 3-3/4″ (front panel), 2-1/2″ x 5″ (fussy cut tools)
  • Basic Black – 3-7/8″ x 5-1/8″ (front mat), 3-5/8″ x 3-7/8″ (tool mat)
  • Basic White – 3-3/4″ x 5″ (inside panel)
  • Textured Chic DSP – 3-7/8″ x 5-1/8″ (front background), 1/2″ x 3-3/4″ (inside trim)

Stampin’ Up! products used in this project: