Stampin’ Up! Hippo Happiness Baby Card

Good Morning!  Today I have something something completely different – a Baby Card made with the Stampin’ Up! Hippo Happiness bundle! You can find the supplies used to create this card at the bottom of my post along with the sizes of cardstock used. 
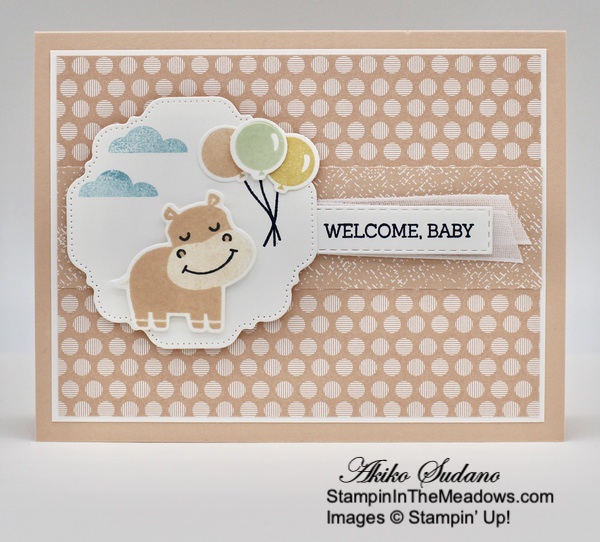
Adhere a strip of the textured Petal Pink paper from the Subtles 6″ x 6″ designer series paper pack to the Petal Pink dotted panel.  Adhere the layered DSP panel to a Whisper White mat and then to the front of a Petal Pink card base with liquid glue. Cut the fancy stitched panel from the Hippo and Friends Dies in the Stampin’ Up! Hippo Happiness bundle from Whisper White.  Stamp the balloons in Soft Sea Foam, Petal Pink and So Saffron on Whisper White and cut them out with the coordinating die.  Stamp the hippo from the Stampin’ Up! Hippo Happiness photopolymer stamp set in Memento Tuxedo Black and Petal Pink on Whisper White.  Hint:  Stamp the darkest ink first and the lightest last for easier alignment.  Stamp the face in Memento Tuxedo Black, then the partial body in Petal Pink and the full body in stamped off Petal Pink.  Cut out the Hippo with the coordinating die. 
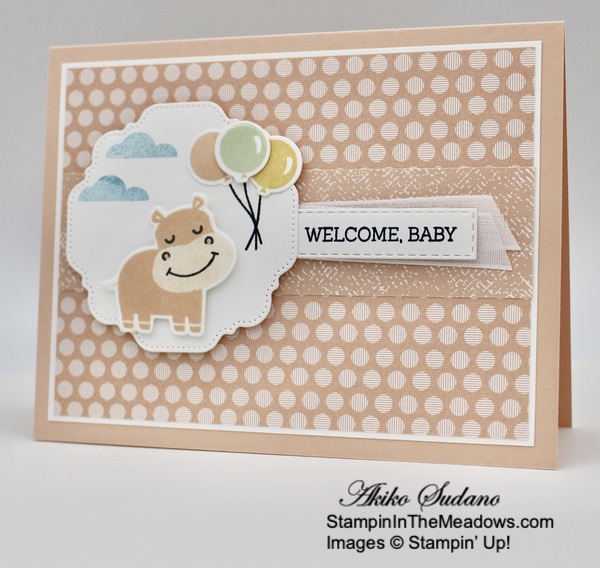
Stamp the balloon strings from the Stampin’ Up! Hippo Happiness stamp set in Memento Tuxedo Black and the clouds from the Moving Along stamp set in stamped off Balmy Blue on the fancy Whisper White die cut.  Adhere the balloons with glue dots and dimensionals and adhere the hippo with dimensionals.  Stamp the sentiment from the Moving Along stamp set in Memento Tuxedo Black ink on Whisper White and cut it out with the small skinny Stitched Rectangles die.  Adhere it to a folded Whisper White ribbon and then to the card front with glue dots.  Pop the hippo fancy panel on the card front with dimensionals. 
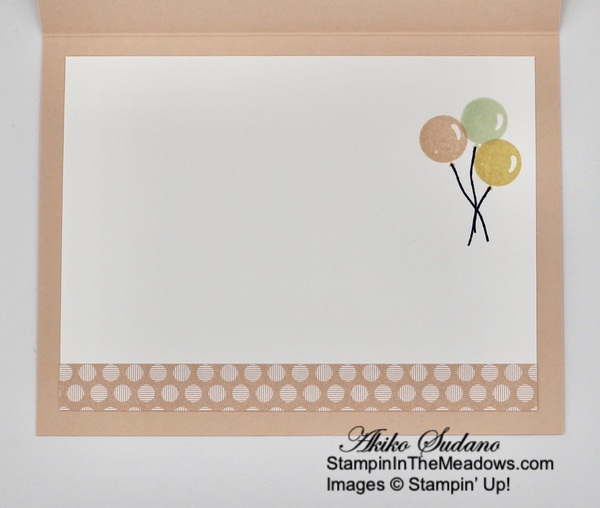
For the inside, stamp the balloons in Petal Pink, So Saffron and Soft Sea Foam on a Whisper White panel.  Adhere a strip of Petal Pink Subtles 6″ x 6″ DSP to the bottom of the panel and adhere the panel to the inside of the card.

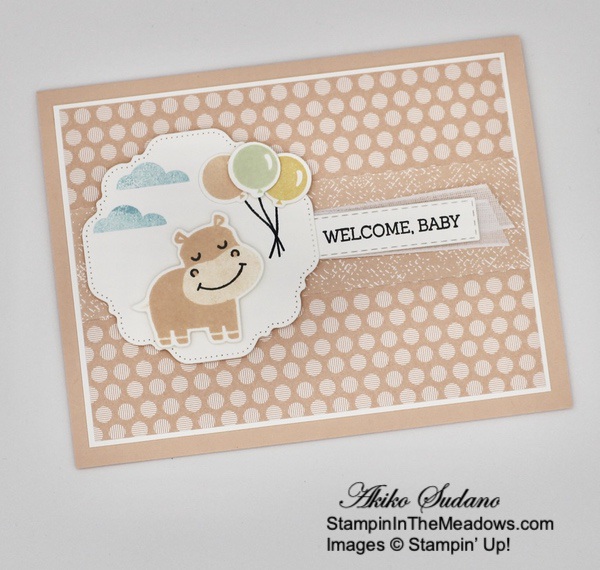
The Stampin’ Up! Hippo Happiness bundle has the cutest two step stamping little critters and some great background die cuts that are perfect for children’s cards.  And the Subtles 6″ x 6″ DSP pack with the dots is a perfect compliment.  This is for a baby girl, but the card can also be done in So Saffron or Pear Pizzazz for a gender neutral card or in Balmy Blue or Pool Party for a baby boy.

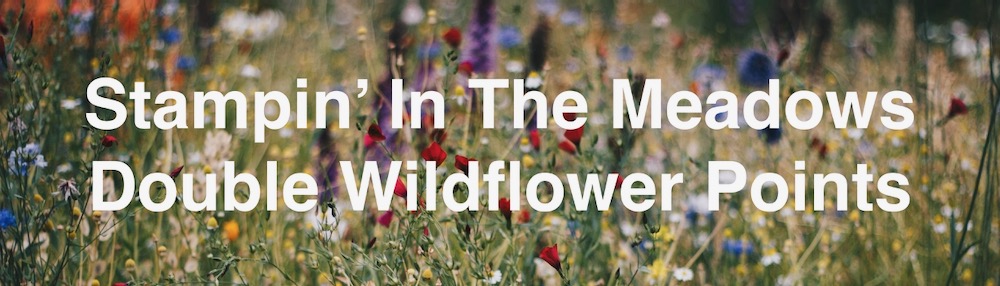
Stampin’ In The Meadows Double Wildflower Points Ends Today!

In celebration of the inspirational Stampin’ Up! OnStage@Home event last weekend, I am offering a Double Wildflower points ordering special through November 15.

If you don’t know about my Wildflower Points frequent shopper program, here’s how it works:

  • For each $50 that you order from my online store (before shipping) you will earn one Wildflower point.
  • You will earn one Wildflower point for each friend that you refer when they place their first order of $50+ from my online store.
  • When you have earned 8 Wildflower points you will get a FREE product order valued up to $40.00, your choice and mailed directly to you!

With DOUBLE Wildflower points you get 2 points for each $50 order, 4 points for each $100 order, and so on, reaching your FREE order faster!!

For complete details on my Wildflower Rewards, scroll to the bottom of my Customer Rewards page or contact me. To start shopping now, head over to my Online Store!


December’s cute and cuddly Paper Pumpkin kit—called “Beary Comforting”—is designed to uplift your loved ones as this beary tough year finally comes to a close. After a year like 2020, we all could use a big bear hug! With the help of this bear-themed kit, you can create 12 unbearably cute cards featuring warm and fuzzy friends, sweet stamps, and meaningful messages. Near or far, send your friends and family the extra comfort, love, and encouragement they need with this month’s Paper Pumpkin kit!

If you’re interested in subscribing to Paper Pumpkin, you can either sign up for a subscription where you are billed monthly for your kit or you can purchase a prepaid subscription in my online store. To see more information and to sign up for the monthly subscription click here. To see the options for prepaid subscriptions in my online store, click here.

Sign up deadline for the December 2020 kit is December 10, 2020. Supplies may be limited toward the end of the subscription period.

November 14-30 Host Code: N7E9DGB9

Use this host code when you order $50 or more and receive a free gift from me!  The gift is your choice of any item valued up to $10.00 in the 2019-20 Annual Catalog or in the 2020 January-June Mini Catalog!  That includes some of the Host Exclusive stamp sets!

If your order is over $150, please do not use the host code since you’ll receive your own Host Dollars plus I’ll still send you the free gift!  This host code can be used by anyone, no commitment required.  Let me know if you have any questions.

If you need any stamping supplies, I’d be very happy to be your Demonstrator.  Just click on the Shop Now Button on the right side of the screen to go directly to my online store or contact me if you have any questions.  Happy Stamping!

Thanks for visiting!

Akiko

  • Visit my online store here
  • See the current Stampin’ Up! clearance rack specials here
  • Earn FREE Stampin’ Up! products through my Wildflower Frequent Shopper Program – my way of saying thank you to my frequent shopper online customers.
  • Sign up for my weekly newsletter here
  • Have any questions? I’d be happy to help, click here to contact me.

Cardstock Cuts for this project:

  • Petal Pink – 5-1/2″ x 8-1/2″ card base scored at 4-1/4″
  • Whisper White – 3-3/4″ x 5″ (inside panel), 3-7/8″ x 5-1/8″ (front mat), 2″ x 2-1/2″ (hippo die cut), 2-3/4″ x 2-3/4″ (stitched die cut), 3/4″ x 3″ (balloon die cuts), 1″ x 2-1/2″ (label)
  • Subtles 6″ x 6″  DSP – 3-3/4″ x 5″ (front background), 1-1/4″ x 5″ (textured strip), 1/2″ x 5″ (inside trim)

Stampin’ Up! products used in this project:


Stampin’ Up! Cherish The Season Christmas Card

Good Morning!  Today I am sharing another Christmas card made with the pretty Stampin’ Up! Cherish the Season stamp set and the beautiful trees from the Pine Woods Dies.  But what makes the card is the beautiful Feels Like Frost 6″ x 6″ specialty designer series paper! You can find the supplies used to create this card at the bottom of my post along with the sizes of cardstock used.

Stamp the sentiment from the Stampin’ Up! Cherish the Season stamp set in Misty Moonlight ink on the panel of Feels Like Frost 6″ x 6″ specialty designer series paper.  Adhere the panel to a Misty Moonlight mat.  Adhere the strip of Feels Like Frost DSP to the Whisper White strip and cut the top with the hilly die from the Pine Woods Dies.

Cut the trees from the Pine Woods Dies from Whisper White card stock and lightly brush on Frost White Shimmer Paint to give the trees shimmer and shine.  Arrange the trees on the DSP panel and adhere with liquid glue.  Adhere the die cut ground on top of the trees with dimensionals.

Brush the snow bank with clear Wink of Stella to give it some sparkle and add snowflake adhesive embellishments to the sky and the tree.  Pop the panel on the front of a Misty Moonlight card base with dimensionals.

For the inside, adhere a strip of Feels like Frost 6″ x 6″ DSP to the side of a Whisper White panel.  Stamp the pine branches from the Stampin’ Up! Cherish The Season stamp set in the corners using Seaside Spray ink and lightly color with Purple Posy Stampin’ Blends.  Stamp the sentiment in Misty Moonlight ink and adhere the panel to the inside of the card.

November 1-15 Host Code: N7E9DGB9

Use this host code when you order $50 or more and receive a free gift from me!  The gift is your choice of any item valued up to $10.00 in the 2019-20 Annual Catalog or in the 2020 January-June Mini Catalog!  That includes some of the Host Exclusive stamp sets!

If your order is over $150, please do not use the host code since you’ll receive your own Host Dollars plus I’ll still send you the free gift!  This host code can be used by anyone, no commitment required.  Let me know if you have any questions.

If you need any stamping supplies, I’d be very happy to be your Demonstrator.  Just click on the Shop Now Button on the right side of the screen to go directly to my online store or contact me if you have any questions.  Happy Stamping!

Thanks for visiting!

Akiko

  • Visit my online store here
  • See the current Stampin’ Up! clearance rack specials here
  • Earn FREE Stampin’ Up! products through my Wildflower Frequent Shopper Program – my way of saying thank you to my frequent shopper online customers.
  • Sign up for my weekly newsletter here
  • Have any questions? I’d be happy to help, click here to contact me.

Cardstock Cuts for this project:

  • Misty Moonlight – 4-1/4″ x 11″ card base scored at 5-1/2″, 3-7/8″ x 5-1/8″ (DSP mat)
  • Whisper White – 3-3/4″ x 5″ (inside panel), 3-1/2″ x 5-1/2″ (die cut trees), 1″ x 3-3/4″ (DSP backing)
  • Feels Like Frost 6″ x 6″  DSP – 3-3/4″ x 5″ (front background), 1″ x 3-3/4″ (die cut snow bank strip), 3/8″ x 5″ (inside trim)

Stampin’ Up! products used in this project:

Stampin’ Up! Peaceful Nativity for the Happy Inkin’ Thursday Blog Hop

Hello and welcome to the Happy Inkin’ Thursday Blog Hop! For today’s hop, I used the beautiful Stampin’ Up! Peaceful Nativity bundle and colored the images with Stampin’ Blends to make a traditional Christmas Card. You can find the supplies used to create this card at the bottom of my post along with the sizes of cardstock used.

We have a sketch challenge this week, and here is the sketch we are using for our projects:

Tear the top of the speckled Crumb Cake strip of Gilded Autumn DSP and adhere it to the bottom of the blue Artistry Blooms DSP.  Doesn’t the Artistry Blooms paper look like a pretty night sky?  Adhere the layered DSP to a Soft Suede mat and cut out the manger back from another Soft Suede panel using the Nativity Dies from the Stampin’ Up! Peaceful Nativity Stamp set.  Adhere the panel to the layered DSP.

Stamp the manger, sheep, donkey, baby Jesus, Joseph and Mary from the Stampin’ Up! Peaceful Nativity cling stamp set in Memento Tuxedo Black ink on Whisper White.  Color the images with Stampin’ Blends – Petal Pink, Soft Suede, Balmy Blue, Misty Moonlight, Crumb Cake, Gray Granite, Mango Melody and Cinnamon Cider. Cut the images out with the coordinating dies.  Cut out the Palm Trees from Crumb Cake and the tops of the trees from Mossy Meadow.  Trim the Mossy Meadow tree tops and adhere them to the Crumb Cake trees.  Adhere the trees to the layered DSP panel on either side of the manger.

Adhere the baby Jesus, Joseph and Mary to the manger with liquid glue.  Pop the manger, sheep and donkey on the panel with dimensionals.  Stamp the sentiment from the Stampin’ Up! Peaceful Nativity stamp set in Soft Suede ink on a small Crumb Cake panel.  Adhere the ribbon behind the label with glue dots and pop it on the panel with dimensionals.  Cut out the star from Gold Foil and adhere it to the top of the manger.  Emboss a Crumb Cake panel with the Old World Paper 3D embossing folder and adhere it to the front of a Crumb Cake card base.  Adhere the layered DSP panel to the card front with liquid glue and finish the card front with clear Wonderful Gems on the star and label.

I really did something different with the inside panel because I wanted it to reflect the long art panel on the card front.  So I stamped the sheep and donkey along the bottom of the inside of the card and stars in the top corner.  I stamped the sentiments from the Stampin’ Up! Peaceful Nativity in Soft Suede ink on a Whisper White panel and stamped more stars in Bumblebee next to the sentiment before adhering it to the inside of the card.  What do you think?

I love Nativity Christmas cards and the Stampin’ Up! Peaceful Nativity is a beautiful bundle for making these cards.

On with the Hop! Click the Next button below to visit Karen Ksenzakovic’s blog.

And just in case you get lost along the way, here’s a list of the team members participating in the hop today:


November 1-15 Host Code: N7E9DGB9

Use this host code when you order $50 or more and receive a free gift from me!  The gift is your choice of any item valued up to $10.00 in the 2019-20 Annual Catalog or in the 2020 January-June Mini Catalog!  That includes some of the Host Exclusive stamp sets!

If your order is over $150, please do not use the host code since you’ll receive your own Host Dollars plus I’ll still send you the free gift!  This host code can be used by anyone, no commitment required.  Let me know if you have any questions.


If you need any stamping supplies, I’d be very happy to be your Demonstrator.  Just click on the Shop Now Button on the right side of the screen to go directly to my online store or contact me if you have any questions.  Happy Stamping!

Thanks for visiting!

Akiko

  • Visit my online store here
  • See the current Stampin’ Up! clearance rack specials here
  • Earn FREE Stampin’ Up! products through my Wildflower Frequent Shopper Program – my way of saying thank you to my frequent shopper online customers.
  • Sign up for my weekly newsletter here
  • Have any questions? I’d be happy to help, click here to contact me.

Cardstock Cuts for this project:

  • Crumb Cake – 5-1/2″ x 8-1/2″ card base scored at 4-1/4″, 4-1/4″ x 5-1/2″ (embossed background, 3/4″ x 1″ (label), 2″ x 3″ (die cut palm trees)
  • Soft Suede – 3-1/8″ x 5-1/2″ (front mat), 2-3/4″ x 3-1/2″ (manger back)
  • Gold Foil – 1″ x 1″ (star)
  • Mossy Meadow – 1″ x 3″ (die cut palm leaves)
  • Whisper White – 3″ x 5″ (inside panel), 3″  5-1/2″ (die cuts)
  • Artistry Blooms DSP – 3″ x 5-1/2″ (front background)
  • Gilded Autumn DSP – 1″ x 5-1/2″ (ground)

Stampin’ Up! products used in this project:


Stampin’ Up! Dragonfly Garden Good Things Card Sneak Peek

Good Morning! Today I have a sneak peek of another card made with the pretty Stampin’ Up! Dragonfly Garden cling stamp set. Today’s card features the pretty stamped wildflower image from the stamp set colored with Stampin’ Blends. You can find the currently available supplies used to create this card at the bottom of my post along with the sizes of cardstock used.

stampin-up-dragonfly-garden-stampininthemeadows.com-05

I cut a panel of Calypso Coral Dandy Garden designer series paper and adhered it to a Whisper White mat and then to the front of a Mossy Meadow card base.

stampin-up-dragonfly-garden-stampininthemeadows.com-06

I stamped the sentiment from the Stampin’ Up! Dragonfly Garden stamp set in Mossy Meadow on a Whisper White panel and stamped the wildflower image twice in Memento Tuxedo Black. I colored the flowers with Calypso Coral, Mossy Meadow, Purple Posy, Mango Melody, Soft Suede and Crumb Cake Stampin’ Blends. I adhered the panel to a Calypso Coral mat.

stampin-up-dragonfly-garden-stampininthemeadows.com-07

I wrapped some of the new Mossy Meadow braided linen trim around the panel and tied a knot. I popped the panel on the card front with dimensionals and accented the image with three adhesive sequins.

stampin-up-dragonfly-garden-stampininthemeadows.com-09

I stamped the small dragonflies from the Stampin’ Up! Dragonfly Garden stamp set in Calypso Coral in the top corner and stamped the wildflower image on the side of a Whisper White panel. I colored the flowers the same as the flowers on the card front and trimmed the bottom of the panel with the same Dandy Garden DSP as the card front.

stampin-up-dragonfly-garden-stampininthemeadows.com-08

The Stampin’ Up! Dragonfly Garden bundle and Dandy Garden DSP are beautiful new products from the new January – June 2021 Mini Catalog and will be available on January 5, 2021.

Stampin' Up! Dragonfly Garden - StampinInTheMeadows-00


Stampin’ In The Meadows Double Wildflower Points This Week!

In celebration of the inspirational Stampin’ Up! OnStage@Home event last weekend, I am offering a Double Wildflower points ordering special through November 15.

If you don’t know about my Wildflower Points frequent shopper program, here’s how it works:

  • For each $50 that you order from my online store (before shipping) you will earn one Wildflower point.
  • You will earn one Wildflower point for each friend that you refer when they place their first order of $50+ from my online store.
  • When you have earned 8 Wildflower points you will get a FREE product order valued up to $40.00, your choice and mailed directly to you!

With DOUBLE Wildflower points you get 2 points for each $50 order, 4 points for each $100 order, and so on, reaching your FREE order faster!!

This offer ends on Sunday November 15, 2020.

For complete details on my Wildflower Rewards, scroll to the bottom of my Customer Rewards page or contact me. To start shopping now, head over to my Online Store!


FREE Bonus Curvy Celebrations Project Tutorials With Videos!!

You don’t have to wait for January 5 to get some of the new products from the upcoming catalog because the Quite Curvy Bundle is now available as an early release as part of Curvy Celebrations! A group of us worked together to create 5 awesome tutorials using the Curvy Celebrations special release products with videos!  You can get this set of exclusive tutorials when you purchase either the Quite Curvy Variety Bundle (item 158396) or the Quite Curvy Bundle (item 156228) from me between now and January 4!


November 1-15 Host Code: N7E9DGB9

Use this host code when you order $50 or more and receive a free gift from me!  The gift is your choice of any item valued up to $10.00 in the 2020-21 Annual Catalog or the Aug – Dec 2020 Mini Catalog. This includes some of the host exclusive sets!

If your order is over $150, please do not use the host code since you’ll receive your own Host Dollars plus I’ll still send you the free gift!  This host code can be used by anyone, no commitment required.  Let me know if you have any questions.


If you need any stamping supplies, I’d be very happy to be your Demonstrator.  Just click on the Shop Now Button on the right side of the screen to go directly to my Online store or contact me if you have any questions.  Happy Stamping!

Thanks for stopping by and have a great day!

Akiko

  • Visit my Online store here
  • See the current Stampin’ Up! clearance rack specials here
  • Earn FREE Stampin’ Up! products through my Wildflower Frequent Shopper Program – my way of saying thank you to my frequent shopper online customers.
  • Sign up for my monthly newsletter here
  • Have any questions? I’d be happy to help, click here to contact me.

Cardstock Cuts for this project:

  • Mossy Meadow – 5-1/2″ x 8-1/2″ card base scored at 4-1/4″
  • Whisper White – 4″ x 5-1/4″ (inside panel), 3-1/8″ x 5-1/8″ (DSP mat), 2-7/8″ x 3-7/8″ (art panel)
  • Calypso Coral – 3″ x 4″ (art panel mat)
  • Dandy Garden 6″ x 6″ DSP – 3″ x 5″ (front panel), 1/2″ x 4″ (inside trim)

Stampin’ Up! products used in this project:


Stampin’ Up! Snowflake Wishes for the Inkin’ Krew Blog Hop

Good Morning! Welcome to the Inkin’ Krew Monthly Blog Hop! Our talented team has created projects this month with the theme of Christmas or Happy Holidays so if you are just starting your Christmas cards, you are going to find lots of great ideas! I’ve used the Stampin’ Up! Snowflake Wishes stamp bundle to make a simple red and white snowflake Christmas card. You can find the supplies used to create this card at the bottom of my post along with the sizes of cardstock used.

I embossed a panel of Real Red card stock with the Winter Snow embossing folder and adhered it to a Whisper White mat.

Stampin' Up! Snowflake Wishes - StampinInTheMeadows-02

I die cut the snowflakes from the So Many Snowflakes Dies from the Stampin’ Up! Snowflake Wishes bundle out of Whisper White and adhered them to the embossed panel. I cut two large, one medium and four small snowflakes.

I stamped the sentiment from the Stampin’ Up! Snowflake Wishes photopolymer stamp set in Real Red ink on a Whisper White and adhered it to a Real Red mat. I popped it on the embossed panel with dimensionals.

I popped the layered panel with the snowflakes on the front of a Real Red card base with dimensionals. I accented the embossed panel with white Elegant Faceted Gems.

I stamped the sentiment and snowflakes from the Stampin’ Up! Snowflake Wishes stamp set in Real Red ink on a Whisper White panel. I adhered the panel to the inside of the card.

Such a simple Christmas card made with the beautiful Stampin’ Up! Snowflake Wishes bundle and the Winter Snow embossing folder. I love red and white snowflake Christmas cards – they provide a little twist on blue/sliver/white snowflake cards and are so festive! And these snowflakes are so beautiful and intricate that they make every card just beautiful!!

On with the hop! Be sure to check out each project that our talented team has created. Click on the Next Blog button to move forward to Donna Leonard’s project or click the Previous Blog button to move back to see the project that Terry Lynn Bright created.

If you get lost along the way, here are the participants for the hop:


November 1-15 Host Code: N7E9DGB9

Use this host code when you order $50 or more and receive a free gift from me!  The gift is your choice of any item valued up to $10.00 in the 2020-21 Annual Catalog or the Aug–Dec 2020 Mini Catalog. This includes some of the host exclusive sets!

If your order is over $150, please do not use the host code since you’ll receive your own Host Dollars plus I’ll still send you the free gift!  This host code can be used by anyone, no commitment required.  Let me know if you have any questions.


If you need any stamping supplies, I’d be very happy to be your Demonstrator.  Just click on the Order Stampin’ Up! Online Now button on the right side of the screen to go directly to my online store or contact me if you have any questions.  Happy Stamping!

Thanks for visiting!

Akiko

  • Visit my online store here
  • See the current Stampin’ Up! clearance rack specials here
  • Earn FREE Stampin’ Up! products through my Wildflower Frequent Shopper Program – my way of saying thank you to my frequent shopper online customers.
  • Sign up for my weekly newsletter here
  • Have any questions? I’d be happy to help, click here to contact me.

Cardstock Cuts for this project:

  • Real Red – 5-1/2″ x 8-1/2″ card base scored at 4-1/4″, 3-1/8″ x 4-3/8″ (embossed panel), 3/4″ x 3-1/8″ (label mat)
  • Whisper White – 3-1/4″ x 4-1/2″ (embossed panel mat), 5/8″ x 3-1/8″ (label), 3-3/4″ x 5″ (inside panel), 3″ x 6″ (snowflake die cuts)

Stampin’ Up! products used in this project:


Stampin’ Up! Dragonfly Garden Sneak Peek

Good morning! I enjoyed attending the Stampin’ Up! OnStage@Home event this past weekend. Even though it was virtual this year, it was fun to play with some new products and it was informative too! We got to see the new products from the upcoming January – June 2021 Mini Catalog and Sale-A-Bration that all starts on January 5, 2021. So today I am giving you a sneak peek by sharing the Stamp & Share projects I made during OnStage with the Stampin’ Up! Dragonfly Garden bundle and the beautiful Dandy Garden 6″ x 6″ designer series paper. You can find the currently available supplies used to create these cards at the bottom of my post along with the sizes of cardstock used.

This first card uses the Misty Moonlight shades of the beautiful Dandy Garden 6″ x 6″ designer series paper (available Jan 5, 2021). I stamped the small dragonflies from the Stampin’ Up! Dragonfly Garden cling stamp set (available Jan 5, 2021) on one side of a Whisper White panel using Bumblebee ink and then I randomly stamped the large dragonflies in Misty Moonlight ink. I stamped the wings in Bumblebee ink on the large dragonflies and adhered the striped Dandy Garden DSP (available Jan 5, 2021) strip across the panel. I adhered the panel to the front of a Misty Moonlight card base and adhered the two vertical strips of Dandy Garden DSP (available Jan 5, 2021). I stamped the sentiment in Misty Moonlight ink and the dragonfly wings in Bumblebee ink on a small Bumblebee panel. I wrapped it in Misty Moonlight/Silver/White twine and made a bow and popped it on the card front with dimensionals. I used the Dragonflies punch (available Jan 5, 2021) to punch a Misty Moonlight dragonfly from the Dandy Garden 6″ x 6″ DSP (available Jan 5, 2021). I love how the the two Misty Moonlight DSP strips look like a mat for the Bumblebee panel!

On the second card, I stamped the little dragonflies from the Stampin’ Up! Dragonfly Garden stamp set (available Jan 5, 2021) in Mossy Meadow ink in a diagonal on the front of the Mossy Meadow card base. I adhered a Bumblebee panel and adhered the Bumblebee and Mossy Meadow strips of Dandy Garden 6″ x 6″ DSP (available Jan 5, 2021) on top of the panel. I stamped the large dragonflies with Bumblebee ink and sentiment with Mossy Meadow ink on a Whisper White panel and popped it on the card front with dimensionals. I stamped another large dragonfly in Bumblebee ink on Whisper White and punched it out and popped it on the panel with dimensionals. I finished the card front with three of the cutest ladybug trinkets (available Jan 5, 2021).

On the final card I stamped the beautiful wildflowers and sentiment from the Stampin’ Up! Dragonfly Garden stamp set in Mossy Meadow ink on a Smoky Slate panel. I adhered three square panels of Dandy Garden 6″ x 6″ DSP (available Jan 5, 2021) to the side and wrapped the panel with Mossy Meadow braided linen trim (available Jan 5, 2021) and made a bow. I punched three small dragonflies from Whisper White, adhered them to the panel and popped the panel on the front of a Blackberry Bliss card base with dimensionals. I finished the card front with three rhinestone jewels.

I finished the inside of each card by stamping images from the Stampin’ Up! Dragonfly Garden stamp set to coordinate with the card fronts and trimming the bottom of the Whisper White panels with the Dandy Garden 6″ x 6″ DSP.

The card designs we made during OnStage were very different from my usual style, but I thought they were really pretty and I want to try out some of these sketches with current products for Christmas Cards! And isn’t the Stampin’ Up! Dragonfly Garden stamp bundle awesome! Be sure to look for these products out when the new January – June 2021 Mini Catalog launches on January 5, 2021.

Here are some more goodies that we got for OnStage – a great bag, cute notebooks, pen & stickers and another great sneak peek stamp set. I just love being a Stampin’ Up! Demonstrator! Contact me if you think you might be interested in joining up, and I’ll be happy to tell you more!


In celebration of the inspirational Stampin’ Up! OnStage@Home event last weekend, I am offering a Double Wildflower points ordering special through November 15.

If you don’t know about my Wildflower Points frequent shopper program, here’s how it works:

  • For each $50 that you order from my online store (before shipping) you will earn one Wildflower point.
  • You will earn one Wildflower point for each friend that you refer when they place their first order of $50+ from my online store.
  • When you have earned 8 Wildflower points you will get a FREE product order valued up to $40.00, your choice and mailed directly to you!

With DOUBLE Wildflower points you get 2 points for each $50 order, 4 points for each $100 order, and so on, reaching your FREE order faster!!

This offer ends on Sunday November 15, 2020.

For complete details on my Wildflower Rewards, scroll to the bottom of my Customer Rewards page or contact me. To start shopping now, head over to my Online Store!


FREE Bonus Curvy Celebrations Project Tutorials With Videos When You Purchase The Bundle From Me!!

You don’t have to wait for January 5 to get some of the new products from the upcoming catalog because the Quite Curvy Bundle is now available as an early release as part of Curvy Celebrations! A group of us worked together to create 5 awesome tutorials using the Curvy Celebrations special release products with videos!  You can get this set of exclusive tutorials when you purchase either the Quite Curvy Variety Bundle (item 158396) or the Quite Curvy Bundle (item 156228) from me between now and January 4!


November 1-15 Host Code: N7E9DGB9

Use this host code when you order $50 or more and receive a free gift from me!  The gift is your choice of any item valued up to $10.00 in the 2020-21 Annual Catalog or the Aug – Dec 2020 Mini Catalog. This includes some of the host exclusive sets!

If your order is over $150, please do not use the host code since you’ll receive your own Host Dollars plus I’ll still send you the free gift!  This host code can be used by anyone, no commitment required.  Let me know if you have any questions.


If you need any stamping supplies, I’d be very happy to be your Demonstrator.  Just click on the Shop Now Button on the right side of the screen to go directly to my Online store or contact me if you have any questions.  Happy Stamping!

Thanks for stopping by and have a great day!

Akiko

  • Visit my Online store here
  • See the current Stampin’ Up! clearance rack specials here
  • Earn FREE Stampin’ Up! products through my Wildflower Frequent Shopper Program – my way of saying thank you to my frequent shopper online customers.
  • Sign up for my monthly newsletter here
  • Have any questions? I’d be happy to help, click here to contact me.

Cardstock Cuts for this project:

  • Misty Moonlight Dragonfly Friendship Card
    • Misty Moonlight – 5-1/2″ x 8-1/2″ card base scored at 4-1/4″
    • Whisper White – 4″ x 5-1/4″ (front background panel), 3-3/4″ x 5″ (inside panel)
    • Bumblebee – 2″ x 2-3/4″ (art panel)
    • Dandy Garden 6″ x 6″ DSP – 1″ x 4″ (horizontal strip), two 1-1/4″ x 3-1/4″ (vertical strips), large dragonfly punch
  • Mossy Meadow Inspiration Card
    • Mossy Meadow – 5-1/2″ x 8-1/2″ card base scored at 4-1/4″
    • Whisper White – two 2-1/2″ x 3-1/2″ (punched dragonfly and art panel), 3-3/4″ x 5″ (inside panel)
    • Bumblebee – 2-3/4″ x 3-3/4″ (mat)
    • Dandy Garden 6″ x 6″ DSP – three 3/4″ x 3-3/4″ (horizontal strips – cut one from each pattern)
  • Blackberry Bliss Thank You Card
    • Blackberry Bliss – 5-1/2″ x 8-1/2″ card base scored at 4-1/4″
    • Smoky Slate – 4″ x 5-1/4″ (art panel)
    • Whisper White – 1″ x 5″ (punched dragonflies), 3-3/4″ x 5″ (inside panel)
    • Dandy Garden 6″ x 6″ DSP – three 2″ x 2″ (layered squares – cut one from each pattern)

Stampin’ Up! products used in this project:


Stampin’ Up! Moving Along Birthday Card

Good morning! Today I have a fun birthday card made with the Stampin’ Up! Moving Along stamp set – a cute transportation themed set that is great for making children’s cards. I used the train and helicopter stamps to make the cute little scene. You can find the supplies used to create this card at the bottom of my post along with the sizes of cardstock used.

I started out by creating a fun whimsical background with the 2020-2022 In Color designer series paper. I cut a strip of each with the circle designs and adhered them to the front of a Bermuda Bay card base.

I stamped the images from the Stampin’ Up! Moving Along photopolymer stamp set on a Thick Whisper White panel in Memento Tuxedo Black, Bermuda Bay, Magenta Madness, Bumblebee, Cinnamon Cider, Granny Apple Green, Balmy Blue and Misty Moonlight ink. I used the two step stamping technique to color the helicopter and train, and it was pretty easy with the photopolymer stamps. I cut the image out with the Stitched Rectangles Die and popped it on the card front with dimensionals.

I stamped the little banner in Memento Tuxedo Black ink and colored it with the Balmy Blue Stampin Blend. I stamped the sentiment in Misty Moonlight ink and fussy cut it out. I adhered it to the back of the helicopter. I finished off the card by wrapping a length of Linen Thread around the top of the card and tying a bow.

For the inside, I stamped the balloons and string from the Hippo Happiness stamp set in Bumblebee, Granny Apple Green and Magenta Madness on a Whisper White panel. I stamped the sentiments from the A Grand Kid cling stamp set on the inside of the card in Bermuda Bay and Cinnamon Cider inks and adhered the panel to the inside of the card.

The Stampin’ Up! Moving Along stamp set has cute images that are really great for children’s cards. And the two-step stamps give you the flexibility to stamp the images in different colors as opposed to coloring them. I need to use the cute car next time! Check it out in my Online Store by clicking on the picture below:


FREE Bonus Curvy Celebrations Project Tutorials With Videos When You Purchase The Bundle From Me!!

The Curvy Celebrations special products are now available, and a group of us worked together to create 5 awesome tutorials using the Curvy Celebrations special release products with videos!  You can get this set of exclusive tutorials when you purchase either the Quite Curvy Variety Bundle (item 158396) or the Quite Curvy Bundle (item 156228) from me between now and January 4!


November 1-15 Host Code: N7E9DGB9

Use this host code when you order $50 or more and receive a free gift from me!  The gift is your choice of any item valued up to $10.00 in the 2020-21 Annual Catalog or the Aug – Dec 2020 Mini Catalog. This includes some of the host exclusive sets!

If your order is over $150, please do not use the host code since you’ll receive your own Host Dollars plus I’ll still send you the free gift!  This host code can be used by anyone, no commitment required.  Let me know if you have any questions.


If you need any stamping supplies, I’d be very happy to be your Demonstrator.  Just click on the Shop Now Button on the right side of the screen to go directly to my Online store or contact me if you have any questions.  Happy Stamping!

Thanks for stopping by and have a great day!

Akiko

  • Visit my Online store here
  • See the current Stampin’ Up! clearance rack specials here
  • Earn FREE Stampin’ Up! products through my Wildflower Frequent Shopper Program – my way of saying thank you to my frequent shopper online customers.
  • Sign up for my monthly newsletter here
  • Have any questions? I’d be happy to help, click here to contact me.

Cardstock Cuts for this project:

  • Bermuda Bay – 5-1/2″ x 8-1/2″ card base scored at 4-1/4″
  • Thick Whisper White – 2-3/4″ x 4-1/4″ (art piece)
  • Whisper White – 4″ x 5-1/4″ (inside panel), 3/4″ x 2-1/2″ (banner)
  • 2020-2022 In Color 6″ x 6″ DSP – 1″ x 3-1/2″ strip of each color (strip layer)

Stampin’ Up! products used in this project:


Stampin’ Up! Curvy Christmas Card

Good morning! Today is the start of the Curvy Celebrations, so I made a Christmas Card using the pretty new Stampin’ Up! Curvy Christmas stamp set that is available starting today! You can find the supplies used to create this card at the bottom of my post along with the sizes of cardstock used.

I cut a panel of Classic Christmas designer series paper with the curvy dotted die from the Curvy Dies so that the dots are on the top. I adhered the top pair to the top of a Whisper White panel and stamped the curvy trees from the Stampin’ Up Curvy Christmas stamp set in Shaded Spruce ink on the Whisper White panel. I stamped the sentiment in Real Red ink under the trees.

I layered the Real Red and Whisper White panels so that the tops were even and aligned the cut DSP and die so that the curves would match. I removed the DSP and cut the Real Red and Whisper White cards stock together. I aligned the curves and adhered the Whisper White curve on top of the Real Red and finished with the DSP on top. I trimmed the bottom even with the DSP layer and adhered the layers on the bottom of the stamped Whisper White panel.

I adhered the layered panel to a Whisper White mat and popped it on the front of a Shaded Spruce card base with dimensionals. I decorated the card front with a Bumblebee star and Real Red bow.

For the inside, I stamped the sentiment from the Stampin’ Up! Curvy Christmas stamp set in Real Red ink. I stamped some stars in Bumblebee ink and some trees at the bottom in Shaded Spruce ink. I trimmed the bottom with a strip of Classic Christmas DSP and adhered the panel to a Real Red mat. I adhered to layered panel to the inside of the card.

The Stampin’ Up! Curvy Christmas stamp set is so much fun with the curvy images and sentiments. And they go so well with the Curvy Dies!


Create with Stampin’ Up! Curvy Celebrations!

The Stampin’ Up! Curvy Celebrations starts today and runs through January 4, 2021. This will include the Quite Curvy bundle, which is an early release of the upcoming January – June 2021 Mini Catalog along with the Curvy Christmas stamp set and Classic Christmas 6″ x 6″ designer series paper. Click on the picture above to view PDF Flyer with all the details. And here are all the products available!

Curvy Celebrations Bonus Online Class Tutorial

As a bonus, a group of us worked together to create 5 awesome tutorials using the Curvy Celebrations special release products with video tutorials!  You can get this set of exclusive tutorials from me when you purchase either the Quite Curvy Variety Bundle (item 158396) or the Quite Curvy Bundle (item 156228) between now and January 4!


November 1-15 Host Code: N7E9DGB9

Use this host code when you order $50 or more and receive a free gift from me!  The gift is your choice of any item valued up to $10.00 in the 2020-21 Annual Catalog or the Aug – Dec 2020 Mini Catalog. This includes some of the host exclusive sets!

If your order is over $150, please do not use the host code since you’ll receive your own Host Dollars plus I’ll still send you the free gift!  This host code can be used by anyone, no commitment required.  Let me know if you have any questions.


If you need any stamping supplies, I’d be very happy to be your Demonstrator.  Just click on the Shop Now Button on the right side of the screen to go directly to my Online store or contact me if you have any questions.  Happy Stamping!

Thanks for stopping by and have a great day!

Akiko

  • Visit my Online store here
  • See the current Stampin’ Up! clearance rack specials here
  • Earn FREE Stampin’ Up! products through my Wildflower Frequent Shopper Program – my way of saying thank you to my frequent shopper online customers.
  • Sign up for my monthly newsletter here
  • Have any questions? I’d be happy to help, click here to contact me.

Cardstock Cuts for this project:

  • Shaded Spruce – 5-1/2″ x 8-1/2″ card base scored at 4-1/4″
  • Real Red – 2-1/4″ x 4-3/4″ (die cut front panel), 3-7/8″ x 5-1/8″ (inside mat)
  • Whisper White – 3-1/2″ x 4-3/4″ (stamped front panel), 3-5/8″ x 4-7/8″ (front mat), 2-1/8″ x 4-3/4″ (die cut front panel), 3-3/4″ x 5″ (inside panel)
  • Classic Christmas 6″ x 6″ DSP – 2″ x 4-3/4″ (front), 1/2″ x 5″ (inside trim)

Stampin’ Up! products used in this project:


Stampin’ Up! Dove of Hope Floral Christmas Card Video Tutorial

Good Morning! Today I’m sharing another Christmas card – a floral card made with the Stampin’ Up! Dove of Hope bundle that I made during my Facebook Live video tutorial yesterday afternoon. So you might think that the Dove of Hope cling stamp set isn’t a floral stamp set, but look closely and you will spot the doves. You can find the supplies used to create this card at the bottom of my post along with the sizes of cardstock used.

Here is the Facebook Live video showing how I made the card:

I will post an edited version of how I made the card in my YouTube channel later this week so you can view a quickie version.

I started by randomly stamping the doves from the Stampin’ Up! Dove of Hope stamp set in Crumb Cake ink on a crumb cake panel and adhered it to a Real Red mat. This gives me a textured background for my flowers like you would get if you embossed it or used designer series paper. I die cut the petals from the Magnolia Memory Dies using Whisper White card stock, I cut two of each petal cluster giving me six total. I gently curled the petals up with my fingers and adhered them together with liquid glue.

I cut two small centers from the Magnolia Memory Dies and adhered them together. I bent the stamens up and adhered it to the center of the Whisper White flower. I cut two large flowers from the Wreath Builder Dies from Real Red card stock and three large leaves from the Magnolia Memory Dies from Mossy Meadow card stock. I cut a label using the Stitched Nested Labels Dies from Crumb Cake card stock and stamped the sentiment from the Stampin’ Up! Dove of Hope stamp set in Real Red ink in the lower left corner. I adhered a Mossy Meadow die cut leaf sprig from the Detailed Dove Dies to the label.

I popped the label to the stamped panel with dimensionals. I adhered the leaves and Real Red flowers with liquid glue and popped the large Magnolia Memory Dies Whisper White flower on with dimensionals. I made a bow with Real Red braided twine and adhered it with a glue dot and finished the flowers with resin dots. I popped the finished panel on the front of a Crumb Cake card base with dimensionals.

I stamped the sentiment from the Stampin’ Up! Dove of Hope stamp set in Real Red ink on a Whisper White panel. I stamped a dove in the upper corner and adhered a die cut sprig under the sentiment. I adhered the panel to the inside of the card.

I love rustic Christmas cards with Crumb Cake card card stock! They have such a natural homespun feel. And I love floral Christmas cards because they’re different, but express the joy of the holiday. And I’m so glad to be able to use the pretty flower from the Magnolia Memory Dies! Have a great week!!


Stampin’ Up! Curvy Celebrations Coming Tomorrow!

The Stampin’ Up! Curvy Celebrations starts on November 3, 2020 and runs through January 4, 2021. This will include the Quite Curvy bundle, which is an early release of the upcoming January – June 2021 Mini Catalog along with the Curvy Christmas stamp set and Classic Christmas 6″ x 6″ designer series paper. Click on the picture above to view PDF Flyer with all the details.


November 1-15 Host Code: N7E9DGB9

Use this host code when you order $50 or more and receive a free gift from me!  The free gift is your choice of any item valued up to $10.00 in the 2019 – 2020 Annual Catalog or in the Aug-Dec 2020 Mini Catalog!  That includes some of the Host Exclusive stamp sets!

If your order is over $150, please do not use the host code since you’ll receive your own Host Dollars plus I’ll still send you the free gift!  This host code can be used by anyone, no club or commitment required.  Let me know if you have any questions.


If you need any stamping supplies, I’d be very happy to be your Demonstrator.  Just click on the Shop Now button on the right side of the screen to go directly to my online store or contact me if you have any questions.  Happy Stamping!

Thanks for stopping by and have a great week!

Akiko

  • Visit my online store here
  • See the current Stampin’ Up! clearance rack specials here
  • Earn FREE Stampin’ Up! products through my Wildflower Frequent Shopper Program – my way of saying thank you to my online frequent shopper customers.
  • Sign up for my weekly newsletter here
  • Have any questions? I’d be happy to help, click here to contact me.

Cardstock Cuts for this project:

  • Crumb Cake – 4-1/4″ x 11″ card base scored at 5-1/2″, 3-3/4″ x 5″ (stamped background), 2″ x 3-1/2″ (label)
  • Mossy Meadow – 1″ x 6-1/2″ (die cut leaves)
  • Bumblebee – 1″ x 2″ (flower centers)
  • Whisper White – 4″ x 5-1/4″ panel (inside panel), 4-1/2″ x 6″ (die cut flower petals)

Stampin’ Up! products used in this project:


Stampin’ Up! Festive Post Happy Haunting Card

Happy Halloween! Of course I have a Halloween card today and it’s made with the Stampin’ Up! Festive Post stamp set along with the Rectangular Postage Stamp punch. You can find the supplies used to create this card at the bottom of my post along with the sizes of cardstock used.

I used the Rectangle Postage Stamp punch to punch out two pieces of the Blackberry Bliss spider paper from the Magic In This Night designer series paper pack. I stamped the witches’ brooms from the Stampin’ Up! Festive Post stamp set in Memento Tuxedo black ink on the punched DSP. I punched two pieces of Blackberry Bliss card stock with the same punch and adhered the stamped DSP to the front. I die cut the pretty spider from the Little Treat Box Dies from the fun Black Glitter paper and the spider web from the Peek-a-Hoot dies from vellum and adhered it to the punched layered papers.

I stamped the date sentiment from the Stampin’ Up! Festive Post stamp set in Memento Tuxedo Black ink on a Pumpkin Pie panel and punched it out with the Rectangle Postage Stamp punch. I adhered a strip of the gothic spider web paper to the panel of the black striped Magic in this Night DSP paper and then adhered them both to a Basic Black mat I adhered it to the front of a Basic Black card base with dimensionals.

I adhered the three punched postage stamps to the card front with dimensionals, with the Pumpkin Pie in the middle.

For the inside of the card, I stamped the the sentiment from the Celebration Tidings in Memento Tuxedo Black ink on a Whisper White panel. I adhered another spiderweb and spider next to the sentiment and trimmed the bottom with a strip of the black striped Magic in this Night DSP. I adhered the panel to the inside of the card.

The Stampin’ Up! Festive Post stamp set has cute images for Christmas and Valentine’s Day as well as Halloween. And they fit perfectly with the Rectangle Postage Stamp punch, for a cute look. Check it out in my Online Store by clicking on the picture below:


Today is the Last Day for the Stampin’ Up! Designer Series Paper Sale!

Stampin’ Up! has beautiful Designer Series Paper and during the Month of October they’re putting a select list of those on sale with a 15% discount! This is a fantastic opportunity for you to stock up and save on paper. And the sale includes some of the designs from the August-December 2020 Mini Catalog too! Get the details on my Promotions Page or click on the image above to download a printable PDF with all the selections. Click Here to shop the Designer Series Paper Sale in My Online Store now! BUT HURRY – TODAY IS THE LAST DAY!


Stampin’ Up! Curvy Celebrations Coming November 3!

The Stampin’ Up! Curvy Celebrations starts on November 3, 2020 and runs through January 4, 2021. This will include the Quite Curvy bundle, which is an early release of the upcoming January – June 2021 Mini Catalog along with the Curvy Christmas stamp set and Classic Christmas 6″ x 6″ designer series paper. Click on the picture above to view PDF Flyer with all the details.


October 16-31 Host Code: 3VJWYCTP

November 1-15 Host Code: N7E9DGB9

Use this host code when you order $50 or more and receive a free gift from me!  The gift is your choice of any item valued up to $10.00 in the 2020-21 Annual Catalog or the Aug – Dec 2020 Mini Catalog. This includes some of the host exclusive sets!

If your order is over $150, please do not use the host code since you’ll receive your own Host Dollars plus I’ll still send you the free gift!  This host code can be used by anyone, no commitment required.  Let me know if you have any questions.


If you need any stamping supplies, I’d be very happy to be your Demonstrator.  Just click on the Shop Now Button on the right side of the screen to go directly to my Online store or contact me if you have any questions.  Happy Stamping!

Thanks for stopping by and have a great day!

Akiko

  • Visit my Online store here
  • See the current Stampin’ Up! clearance rack specials here
  • Earn FREE Stampin’ Up! products through my Wildflower Frequent Shopper Program – my way of saying thank you to my frequent shopper online customers.
  • Sign up for my monthly newsletter here
  • Have any questions? I’d be happy to help, click here to contact me.

Cardstock Cuts for this project:

  • Basic Black – 5-1/2″ x 8-1/2″ card base scored at 4-1/4″, 4″ x 5-1/4″ (front mat)
  • Pumpkin Pie – 1-1/2″ x 2-1/4″ (center punch)
  • Blackberry Bliss – 2-1/4″ x 3″ (side punches backing)
  • Whisper White – 4″ x 5-1/4″ (inside panel)
  • Vellum – 1-3/4″ x 5″ (spider webs)
  • Black glitter – 1″ x 3-1/4″ (spider die cuts)
  • Magic in this Night DSP – 3-7/8″ x 5-1/8″ (front background), 1″ x 5-1/8″ (front DSP strip), 2-1/4″ x 3″ (side punches) 1/2″ x 5-1/4″ (inside trim)

Stampin’ Up! products used in this project: