Stampin’ Up! Cheerful Daisies You Made My Day Card

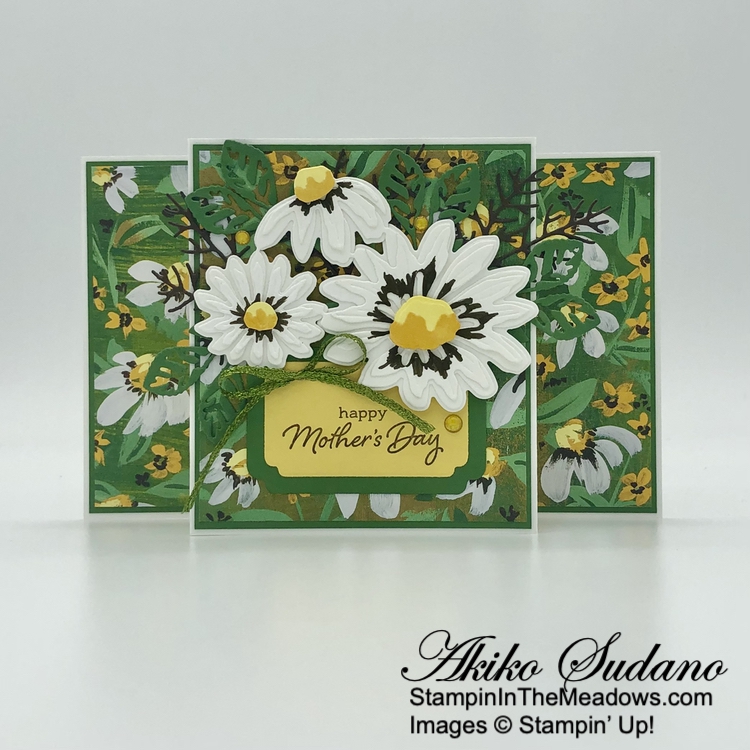
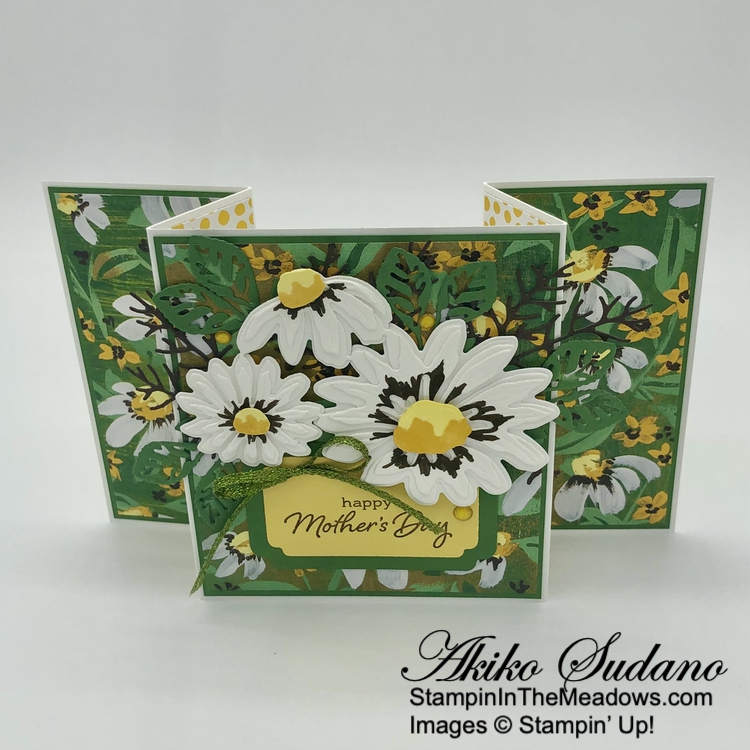
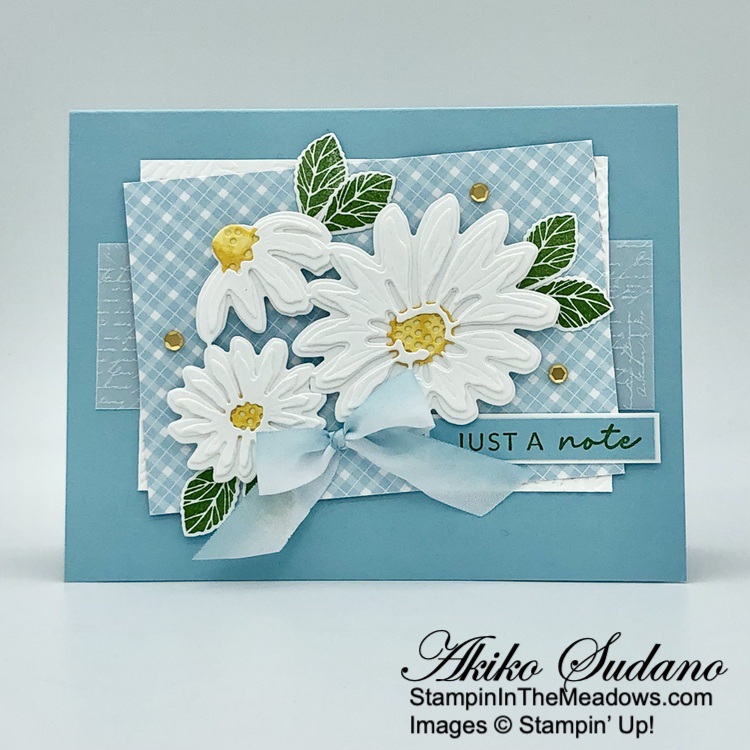
Good Morning! I am so much in love with the new Basic Beige neutral from the Stampin’ Up! 2024-2025 Annual Catalog, and I had to use it for another card today. I used the Stampin’ Up! Cheerful Daisy stamps and dies with the Meandering Meadows 6″ x 6″ designer series paper with a Basic Beige card base – what do you think? You can find the products I used at the bottom of my post along with the card stock sizes.

I embossed a panel of Basic Beige with the Fern 3D embossing folder and adhered it to a Basic Beige card base. I adhered a panel of Meandering Meadows 6″ x 6″ designer series paper to a Garden Green mat and wrapped a length of Linen Thread around it twice before tying a bow. I adhered the DSP panel to the card front with dimensionals.

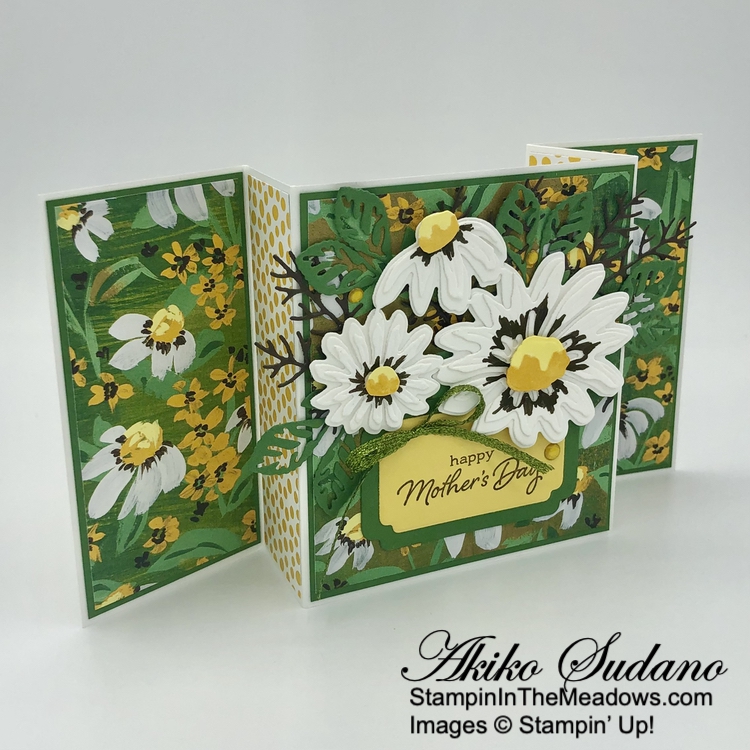
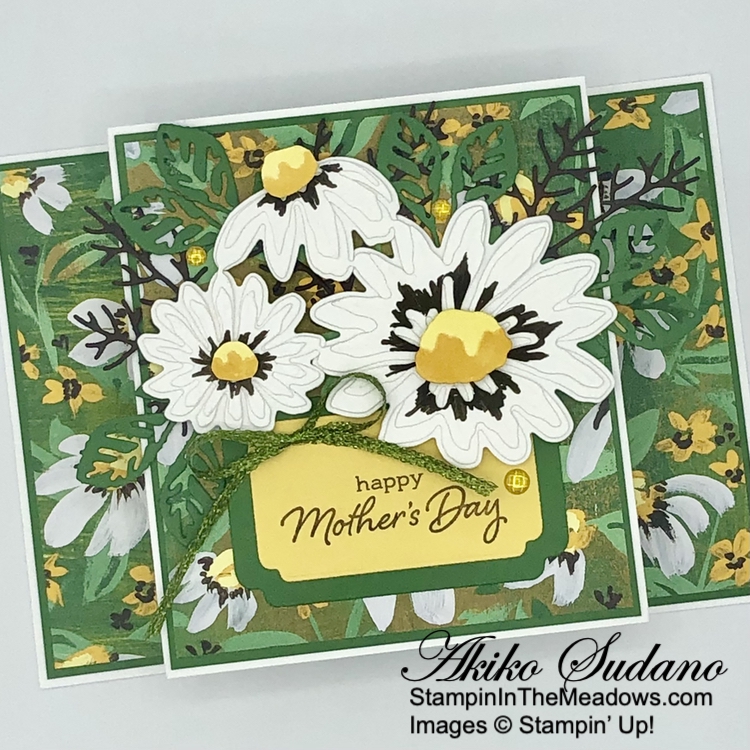
I used the large triple flower die from the Stampin’ Up! Cheerful Daisies dies to cut the leaves from Garden Green card stock. I adhered the leaves to the card with a glue dot, tucking it under the bow. I used the same die to cut the medium flower and trimmed the connected petals. I colored the center with a dark Daffodil Delight Stampin’ Blend. I used the medium detailed die to cut another Basic White panel and gently rolled the petals upward. I adhered it to the larger petal cluster with dots of liquid glue and adhered it to the card with dimensionals.

I stamped the sentiment from the Stampin’ Up! Cheerful Daisies stamp set in Garden Green ink on a Granny Apple Green strip. I cut it out with the angle label die from the Something Fancy dies using a two step method and adhered it to the card with glue dots and dimensionals. I finished the card with three iridescent green pearls.

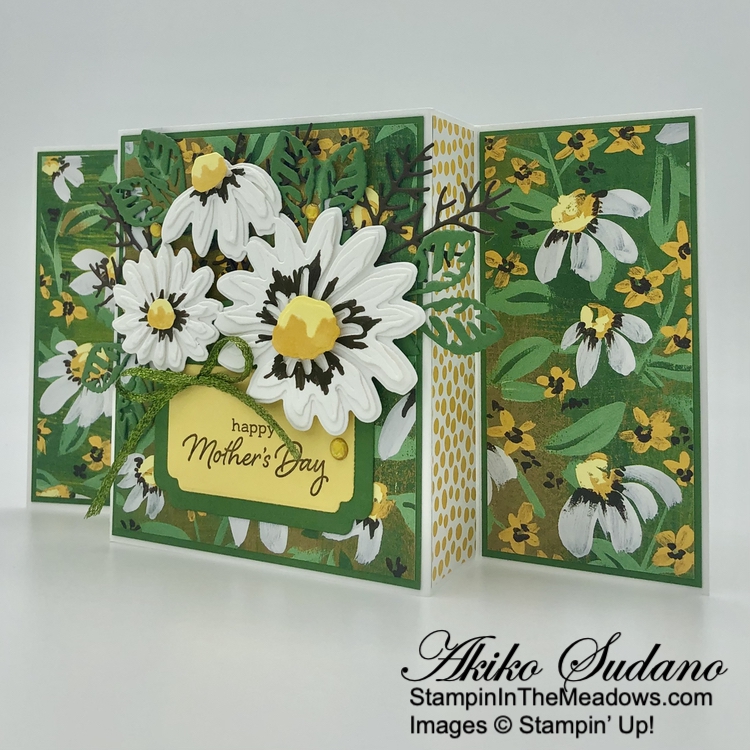
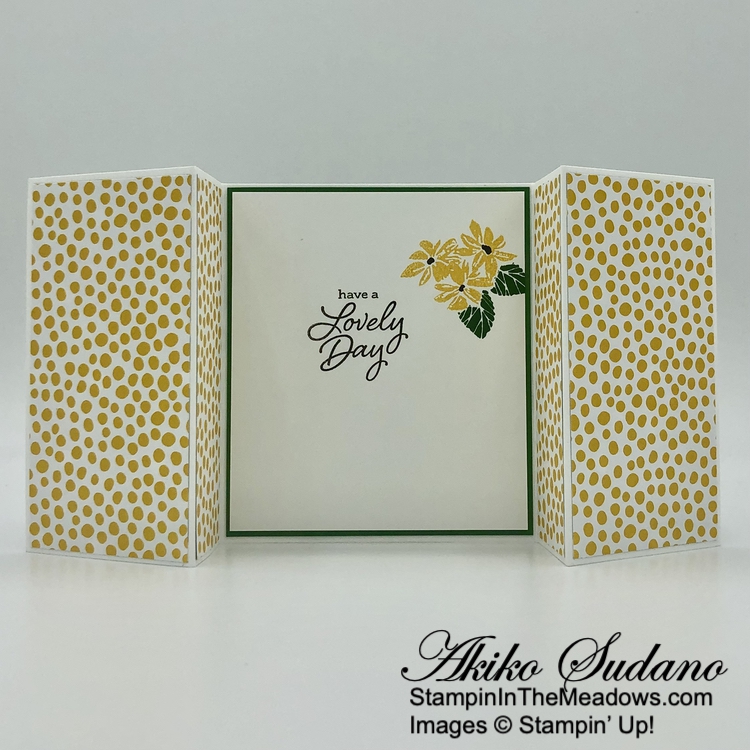
I left the inside of the card blank, simply adhering a strip of DSP to the bottom of a Basic White panel. I adhered the panel to the inside of the card with Stampin’ Seal. I like the contrast of a Basic White inside panel with the Basic Beige frame, it’s subtle, but nto washed out.

The Basic Beige card base is perfect with the bold colors in the DSP image. I think it picks up some green from the image and mat and it goes well with the subtle pinks and blues in the sky. I love how the die cut daisy pops and picks up the daisies in the field. And I’m so glad that the Stampin’ Up! Cheerful Daisies stamp set and dies are carried over to the new catalog. I’m ready to go out and pick some!


Stampin’ Up! May Joining Special!

Exciting News! Between May 1 and May 31, anyone who becomes a Stampin’ Up! demonstrator will receive four 2024–2026 In Color products in their Starter Kit for FREE! This is one of our richest offerings yet!

Promotion Details:

  • Dates: May 1, 2024 – May 31, 2024
  • New Demonstrators will receive the following products in their Starter Kit at no additional cost:
    • 2024–2026 In Color Classic Stampin’ Pad Bundle
    • 2024–2026 In Color 8-1/2″ x 11″ Cardstock
    • 2024–2026 In Color 6″ x 6″ Designer Series Paper
    • 2024–2026 In Color Stampin’ Write Markers
  • New team members may not use their team leader’s shipping address to ship their kit. 
  • New team members may only pay for their kit using a credit card on which they are listed as an authorized user. 
  • All orders should be closed by 31 May. 
  • New demonstrators who submit their Independent Demonstrator Agreement (IDA) before 1 May or after 31 May will not be eligible for this Starter Kit offer.

Click on the picture below to download a flyer to see more:

In addition to the In Color products, new Demonstrators will pick $125 USD worth of products of their choice for $99! When you join, the In Color products will be automatically added to your Starter Kit. You will also receive free business supplies with your order and free shipping. Not to mention all the fun that comes with being a part of our wonderful crafting community. Click the button below to Join Now, or get additional details on my Join My Team page


Retired Items Sale List Updated

I’ve updated my list of Retired Stampin’ Up! Items for Sale to include items from the recently retired catalogs.


Current Host Code: YEPTJAZ9

Use this host code when you order $50 or more and receive a Thank You gift from me!  The free gift is your choice of any item currently available valued up to $10.00.

If your order is over $150, please do not use the host code since you’ll receive your own Host Dollars plus I’ll still send you the Thank You gift!  This host code can be used by anyone, no club or commitment required. Let me know if you have any questions.


If you need any stamping supplies, I’d be very happy to be your Demonstrator.  Just click on the Shop Now Button on the right side of the screen to go directly to my Online store or contact me if you have any questions.  Happy Stamping!

Thanks for stopping by and have a great day!

Akiko

  • Visit my online store here
  • See the current Stampin’ Up! clearance rack specials here
  • Earn FREE Stampin’ Up! products through my Wildflower Frequent Shopper Program – my way of saying thank you to my online frequent shopper customers.
  • Have any questions? I’d be happy to help, click here to contact me.

Cardstock Cuts for this project:

  • Basic Beige – 4-1/4″ x 11″ card base, scored at 5-1/2″, 4-1/8″ x 5-3/8″ (embossed panel)
  • Garden Green – 3-1/8″ x 4-5/8″ (DSP mat), 1-1/2″ x 2″ (die cut leaves)
  • Granny Apple Green – 3/4″ x 3-1/2″ (label)
  • Basic White – 4″ x 5-1/4″ (inside panel), two 1-1/2″ x 2″ (die cut flower petal clusters)
  • Meandering Meadows 6″ x 6″ DSP – 4″ x 4-1/2″ (front DSP panel), 1/2″ x 4″ (inside trim)

Stampin’ Up! products used in this project:


Stampin’ Up! Cheerful Daisies Mother’s Day Card

Happy St. Patrick’s Day! Last weekend we had our quarterly Inkin’ Krew Team meeting and Carol Buckalew demonstrated a beautiful Center Pop Out card made with the pretty Simply Zinnia bundle (you can see her pretty card here). I CASE’d her card and used the Stampin’ Up! Cheerful Daisies bundle with the Fresh As A Daisy designer series paper to make a Mother’s Day card. You can find the products I used at the bottom of my post along with the card stock sizes.

I carefully scored a Thick Basic White card base and burnished the score lines and adhered the panels of Fresh As A Daisy designer series paper to Garden Green mats with liquid glue. I adhered each layered DSP panel to the front center and side panels of my card base.

I adhered panels of Delightfully Eclectic DSP to the middle panels to add some interest because the white was too stark. Then I cut out all the flower dies from the Stampin’ Up! Cheerful Daisies dies from Basic White. I made each flower three layers, so I cut one of each of the dies and I cut one large center and two small ones. I used the light Lemon Lolly and Dark Daffodil Delight Stampin’ Blends to color the centers so that they looked like the DSP flowers. Then I used the Early Espresso Stampin’ Write Marker make highlights on the top, detailed die cuts for each flower. I cut off the leaves from the center section with my paper snips and adhered the detailed die cuts to the top and the larger die cuts to the back of each flower. I trimmed one of the small flower centers with my paper snips and popped them on the flowers with dimensionals.

I used the medium rectangle label die from the Something Fancy dies to cut a Garden Green panel for the label mat. I stamped the sentiment from the Flower Cart stamp set in Early Espresso ink on Daffodil Delight and cut it out with the smallest rectangle label die from the Something Fancy dies. I adhered the labels together and adhered it to the center section of the card base.

I cut three twig clusters using the Stampin’ Up! Cheerful Daisies dies and adhered them to the top of the center section of the card with tiny dots of liquid glue. I adhered the flowers with dimensionals. I used the leaf cluster section of the large die to cut out four sets of leaves from Garden Green. I adhered the leaves to the card, tucking them under the flowers. I finished with a Parakeet Party metallic bow and three Daffodil Delight glossy dots.

For the inside of the card, I used the back of the center section. I stamped the sentiment from the Flower Cart stamp set in Early Espresso ink on a Basic White panel. I stamped the flower cluster from the Stampin’ Up! Cheerful Daisies stamp set in Daffodil Delight ink. I accented the centers with my Early Espresso Stampin’ Write marker and cut out a mask using the coordinating die. I covered the flowers with the mask and stamped two leaves using Garden Green ink. I adhered the panel to a Garden Green mat and then adhered it to the center space in the back. I finished by adhering panels of Delightfully Eclectic DSP to the remaining back panels.

I loved making this fun fold card and it was really pretty simple. I was happy to pull out the beautiful Stampin’ Up! Cheerful Daisy bundle and Fresh As A Daisy DSP to make it. Daisies are simple flowers, so they’re perfect to give on Mother’s Day. And there’s so much green on this card that it’s perfect for St. Patrick’s Day! Enjoy!!


Your Day To Shine and Frog & Friends Added to Kits Collection!

The Kits Collection by Stampin’ Up! provides different options and a range of project types that allow you to choose the crafting experiences that best fits your style and needs. There’s a variety of kits to choose from and these all-inclusive project kits have everything you need in one box! You can Find these kits in the Online Store.

The new kits for March are the Your Day To Shine Kit and the Frog & Friends Kit. Click on the images below to see the details in the Online Store.

Your Day To Shine Kit
Frog & Friends Kit

Current Host Code: XR9HAEK4

Use this host code when you order $50 or more and receive a Thank You gift from me!  The free gift is your choice of any item currently available valued up to $10.00.

If your order is over $150, please do not use the host code since you’ll receive your own Host Dollars plus I’ll still send you the Thank You gift!  This host code can be used by anyone, no club or commitment required. Let me know if you have any questions.


If you need any stamping supplies, I’d be very happy to be your Demonstrator.  Just click on the Shop Now Button on the right side of the screen to go directly to my Online store or contact me if you have any questions.  Happy Stamping!

Thanks for stopping by and have a great day!

Akiko

  • Visit my online store here
  • See the current Stampin’ Up! clearance rack specials here
  • Earn FREE Stampin’ Up! products through my Wildflower Frequent Shopper Program – my way of saying thank you to my online frequent shopper customers.
  • Have any questions? I’d be happy to help, click here to contact me.

Cardstock Cuts for this project:

  • Thick Basic White – 4-1/4″ x 11″ card base scored at 2-1/4″, 3-5/8″, 7-3/8″ and 8-3/4″
  • Garden Green – two 3-5/8″ x 4-1/8″ panels (front and back center panel mats), two 2-1/8″ x 4-1/8″ panels (side DSP mats), 2″ x 3″ (label mat), 1-1/2″ x 6″ (die cut leaves)
  • Daffodil Delight – 1-3/4″ x 3″ (label)
  • Early Espresso – 2-1/2″ x 4-1/2″ (die cut twigs)
  • Basic White – 3-1/2″ x 4″ (back center panel), 4″ x 8″ panel (floral die cuts)
  • Fresh As A Daisy DSP – 3-1/2″ x 4″ (center panel background), two 2″ x 4″ (side panels)
  • Delightfully Eclectic DSP – four 1-1/4″ x 4-1/8″ panels (front and back middle panels), two 2-1/8″ x 4-1/8″ panels (back side panels)

Stampin’ Up! products used in this project:


Stampin’ Up! Cheerful Daisies Sorry Card

Good Morning! The new Fresh As A Daisy designer series paper is a pretty designer series paper pack with a sheet that has several smaller panels. I used the panel with the Copper Clay background to make a quick and easy card. You can find the supplies I used at the bottom of my post along with the sizes of cardstock used.

I embossed a Copper Clay strip with the cross hatch embossing folder from the Basics 3D embossing folders and adhered it to the front of a Boho Blue card base with liquid glue. I trimmed the Fresh as a Daisy Panel and adhered it to a Basic White mat and adhered it to the card front with dimensionals.

I stamped the sentiment from the Stampin’ Up! Cheerful Daisies photopolymer stamp set using Boho Blue ink on Basic White panel and cut it out with the label die.

I adhered a length of Boho Blue ribbon to the card with Stampin’ Seal and adhered the label on top of the ribbon with dimensionals. I finished the card with Boho Blue faceted Dots

For the inside of the card, I trimmed the bottom of a Basic White panel with a strip of the Fresh As A Daisy DSP. I adhered the panel to a Copper Clay mat and adhered the layered panel to the inside of the card with Stampin’ Seal.

The sentiment from the Stampin’ Up! Cheerful Daisies stamp set is sweet and cute and perfect for a lighthearted apology. The Fresh As A Daisy DSP is the perfect backdrop!


Designer Series Paper Sale Going on Now!

We all love beautiful Designer Series Paper, and in June, you can enjoy a 15% discount on select Designer Series Papers from our new 2023–2024 Annual Catalog and Online Exclusives. Whether you’re a scrapbooker, a card maker or simply a paper lover, this is a great time to stock up and save on gorgeous paper so you have artistic and versatile paper designs on hand for your next projects!

Here are the Details:

  • Sales Period: June 1, 2021 – June 30, 2023
  • All order types qualify for this promotion. 
  • There is no limit to how many packages of Designer Series Paper may be purchased during this promotion.
  • Only select Designer Series Papers are available at a 15% discount during this promotion.
  • Orders must be placed—and closed—during the promotion period for the 15% discount to apply.
  • Designer Series Paper ordered as part of a Starter Kit or with Stampin’ Rewards qualify for the 15% discount.
  • Designer Series Papers are from the new 2023–2024 Annual Catalog (p. 129–132) and Online Exclusives

Click on the image below to download a PDF with the list of designer series papers that are on sale and their sale prices:


Starter Kit+ Joining Special Going on Now!

It’s a fabulous time to join Stampin’ Up! New team members will get even more FREE products in their customizable Starter Kit. Between 1–30 June, those who sign up can get $125 $155 USD worth of products for only $99 + free business supplies + free shipping + all the fun being a part of Stampin’ Up!

Starter Kit+ Promotion Details:

  • Promotion Dates: 1–30 JUNE 2023
  • When new team members purchase their Starter Kit, they will be able to redeem $125 $155 of Starter Kit eligible products for just $99.
  • New demonstrators who submit their Independent Demonstrator Agreement (IDA) before June 1 or after June 30 will not be eligible for this offer.

You can read about the benefits of being a Demonstrator on my Join My Team page. These include a minimum 20% discount on products and access to new products a month before the catalog release. Contact me if you have any questions about the benefits of being a Demonstrator and I’ll be happy to tell you all about it!


Current Host Code: 9SKETT74

Use this host code when you order $50 or more and receive a Thank You gift from me!  The free gift is your choice of any item valued up to $10.00 from the 2023-2024 Annual Catalog.

If your order is over $150, please do not use the host code since you’ll receive your own Host Dollars plus I’ll still send you the Thank You gift!  This host code can be used by anyone, no club or commitment required. Let me know if you have any questions.


If you need any stamping supplies, I’d be very happy to be your Demonstrator.  Just click on the Shop Now button on the right side of the screen to go directly to my online store or contact me if you have any questions.  Happy Stamping!

Thanks for stopping by and have a great week!

Akiko

  • Visit my online store here
  • See the current Stampin’ Up! clearance rack specials here
  • Earn FREE Stampin’ Up! products through my Wildflower Frequent Shopper Program – my way of saying thank you to my online frequent shopper customers.
  • Have any questions? I’d be happy to help, click here to contact me.

Cardstock Cuts for this project:

  • Boho Blue – 5-1/2″ x 8-1/2″ card base scored at 4-1/4″
  • Copper Clay – 3-3/4″ x 5″ (inside mat), 1″ x 5-1/1″ (embossed strip)
  • Basic White – 3-5/8″ x 4-7/8″ (inside panel), 3-3/8″ x 4-5/8″ (front mat), 1-1/2″ x 3″ (label)
  • Fresh As A Daisy DSP – 3-1/4″ x 4-1/2″ (front panel), 3/4″ x 4-7/8″ (inside trim)

Stampin’ Up! products used in this project:


Stampin’ Up! Cheerful Daisies CAS Card

Good Morning! The pretty Stampin’ Up! Cheerful Daisies bundle is a versatile bundle that is so fun to play with and I was inspired by the colorful Gerbera Daisies in the stores to make a card full of colorful flowers. I stamped the petals in each flower in two different colors to create this CAS (clean and simple) card. You can find the supplies I used at the bottom of my post along with the sizes of cardstock used.

I embossed a Basic White panel with the Painted Posies 3D embossing folder and trimmed it to 4-1/8″ x 5-3/8″ to compensate for the embossing shrinkage. I adhered it to the front of a Thick Basic White card base with liquid glue.

I stamped the large daisies from the Stampin’ Up! Cheerful Daisies photopolymer stamp set three times on Basic White. One daisy uses Real Red for the detail stamp and Sweet Sorbet for the filler. Another uses Daffodil Delight for the detail stamp and Lemon Lolly for the filler. The last uses Melon Mambo and Bubble Bath. I stamped the centers all in stamped off Pecan Pie and cut them out with the large outline die. I adhered the pink and yellow flowers with glue dots and popped the red one on with dimensionals.

I stamped the sentiment from the Stampin’ Up! Cheerful Daisies stamp set in Versamark ink on Basic Black. I sprinkled it with white embossing powder and shook off the excess. I heated it with my heat tool until it was bright and shiny and trimmed the ends with my paper snip. I tied a bow with white baker’s twine and adhered it to the card and adhered the label on top with glue dots and dimensionals. I finished the card with rhinestone jewels.

For the inside of the card, I stamped the large daisy from the Stampin’ Up! Cheerful Daisies stamp set in Real Red and Sweet Sorbet in the bottom corner of a Basic White panel. I stamped the center in stamped off Pecan Pie and I adhered the panel to the inside of the card with Stampin’ Seal.

The Stampin’ Up! Cheerful Daisies stamp set makes beautiful flowers, even without the fancy die cuts. The two step stamping is pretty easy to do and it’s a lot of fun to play with different color combinations. I think this would have been pretty with all red daisies too – maybe next time.


Starts Tomorrow – SAVE 15% ON SELECT DESIGNER SERIES PAPERS!

We all love beautiful Designer Series Paper, and in June, you can enjoy a 15% discount on select Designer Series Papers from our new 2023–2024 Annual Catalog and Online Exclusives. Whether you’re a scrapbooker, a card maker or simply a paper lover, this is a great time to stock up and save on gorgeous paper so you have artistic and versatile paper designs on hand for your next projects!

Here are the Details:

  • Sales Period: June 1, 2021 – June 30, 2023
  • All order types qualify for this promotion. 
  • There is no limit to how many packages of Designer Series Paper may be purchased during this promotion.
  • Only select Designer Series Papers are available at a 15% discount during this promotion.
  • Orders must be placed—and closed—during the promotion period for the 15% discount to apply.
  • Designer Series Paper ordered as part of a Starter Kit or with Stampin’ Rewards qualify for the 15% discount.
  • Designer Series Papers are from the new 2023–2024 Annual Catalog (p. 129–132) and Online Exclusives

Click on the image below to download a PDF with the list of designer series papers that are on sale and their sale prices:


Starts Tomorrow – Starter Kit+ Joining Special!

It’s a fabulous time to join Stampin’ Up! New team members will get even more FREE products in their customizable Starter Kit. Between 1–30 June, those who sign up can get $125 $155 USD worth of products for only $99 + free business supplies + free shipping + all the fun being a part of Stampin’ Up!

Starter Kit+ Promotion Details:

  • Promotion Dates: 1–30 JUNE 2023
  • When new team members purchase their Starter Kit, they will be able to redeem $125 $155 of Starter Kit eligible products for just $99.
  • New demonstrators who submit their Independent Demonstrator Agreement (IDA) before June 1 or after June 30 will not be eligible for this offer.

You can read about the benefits of being a Demonstrator on my Join My Team page. These include a minimum 20% discount on products and access to new products a month before the catalog release. Contact me if you have any questions about the benefits of being a Demonstrator and I’ll be happy to tell you all about it!

Current Host Code: TUMGKET9

Use this host code when you order $50 or more and receive a Thank You gift from me!  The free gift is your choice of any item valued up to $10.00 from the 2023-2024 Annual Catalog.

If your order is over $150, please do not use the host code since you’ll receive your own Host Dollars plus I’ll still send you the Thank You gift!  This host code can be used by anyone, no club or commitment required. Let me know if you have any questions.


If you need any stamping supplies, I’d be very happy to be your Demonstrator.  Just click on the Shop Now button on the right side of the screen to go directly to my online store or contact me if you have any questions.  Happy Stamping!

Thanks for stopping by and have a great week!

Akiko

  • Visit my online store here
  • See the current Stampin’ Up! clearance rack specials here
  • Earn FREE Stampin’ Up! products through my Wildflower Frequent Shopper Program – my way of saying thank you to my online frequent shopper customers.
  • Have any questions? I’d be happy to help, click here to contact me.

Cardstock Cuts for this project:

  • Basic White Thick – 4-1/4″ x 11″ card base scored at 5-1/2″
  • Basic Black – 3/8″ x 3″ (label),
  • Basic White – 4-1/4″ x 5-1/2″ (embossed background), 4″ x 5-1/4″ (inside panel), 2-1/2″ x 8-1/2″ (die cut flowers)

Stampin’ Up! products used in this project:


Stampin’ Up! Cheerful Daisies Friendship Card

Good Morning! The Stampin’ Up! Cheerful Daisies bundle is such a special set, with both beautiful stamped and die cut flowers that are so artistic! Today’s card is inspired by a package that is in the new 2023-2024 Annual Catalog, but I made it into a card using the beautiful Fresh As A Daisy designer series paper. You can find the supplies I used at the bottom of my post along with the sizes of cardstock used.

I adhered a panel of striped Vellum Basics to a panel of Fresh As A Daisy designer series paper with Stampin’ Seal, and adhered it to the front of a Boho Blue card base. I cut the large triple flower die from the Stampin’ Up! Cheerful Daisies dies from a Copper Clay panel and cut each of the background flower dies from Boho Blue. I adhered the Boho Blue die cuts to the back of the large Copper Clay die cut with liquid glue. I cut each of the small detailed flower dies from Basic White and used a Blending Brush to apply Copper Clay ink to the centers – be careful as a little ink goes a long way with this intense color.

I adhered the colored detailed flower dies to the top of the Copper Clay die cut with liquid glue. I cut three of the branch sprigs from the Stampin’ Up! Cheerful Daisies dies from Crushed Curry card stock and adhered them to the card front with glue dots. I adhered the layered die cut flower on top with dimensionals. I stamped six leaves in Crushed Curry ink on Basic White and adhered them to the card with glue dots, tucking them under the flowers.

I stamped the sentiment from the Stampin’ Up! Cheerful Daisies stamp set in Boho Blue ink on Basic White and cut it out with the label die. I cut a length of Boho Blue ribbon in half and made a loopy bow. I adhered the bow to the card with a glue dot and adhered the label on top with dimensionals. I finished the card with Boho Blue In Color dots – love the shine they have!!

For the inside of the card, I stamped the little flower cluster from the Stampin’ Up! Cheerful Daisies stamp set in stamped off Boho Blue ink in the corner of a Basic White panel. I used a light Copper Clay Stampin’ Blend to color the flower centers and trimmed the bottom with a strip of Fresh As A Daisy DSP. I adhered the panel to the inside of the card with Stampin’ Seal.

I love these daisy flower die cuts from the Stampin’ Up! Cheerful Daisies bundle!! But the stamped flowers are pretty too, so I think I need to focus on stamping some daisies for my next daisy card. Earlier today, I drove past a house that had a huge bed of daisies blooming! It was such a welcome sight after a dreary winter. I didn’t realize that they bloomed this early, but the good news is that we’ll be able to enjoy them all Summer!


Current Host Code: TUMGKET9

Use this host code when you order $50 or more and receive a Thank You gift from me!  The free gift is your choice of any currently available item valued up to $10.00.

If your order is over $150, please do not use the host code since you’ll receive your own Host Dollars plus I’ll still send you the Thank You gift!  This host code can be used by anyone, no club or commitment required. Let me know if you have any questions.


If you need any stamping supplies, I’d be very happy to be your Demonstrator.  Just click on the Shop Now button on the right side of the screen to go directly to my online store or contact me if you have any questions.  Happy Stamping!

Thanks for stopping by and have a great week!

Akiko

  • Visit my online store here
  • See the current Stampin’ Up! clearance rack specials here
  • Earn FREE Stampin’ Up! products through my Wildflower Frequent Shopper Program – my way of saying thank you to my online frequent shopper customers.
  • Have any questions? I’d be happy to help, click here to contact me.

Cardstock Cuts for this project:

  • Boho Blue – 4-1/4″ x 11″ card base scored at 5-1/2″, 3″ x 4-1/4″ (die cut flowers)
  • Copper Clay – 3-1/4″ x 4″ (die cut large flower cluster)
  • Crushed Curry – 1-1/2″ x 6″ (die cut twigs)
  • Vellum Basics – 2-3/4″ x 4″ (front background)
  • Basic White – 4″ x 5-1/4″ (inside panel), 3″ x 3-1/2″ (die cut flowers), 2″ x 3-1/2″ (die cut leaves), 1-1/2″ x 3″ (label)
  • Fresh As A Daisy DSP – 4″ x 5-1/4″ (front background), 1/2″ x 4″ (inside trim)

Stampin’ Up! products used in this project:


Stampin’ Up! Cheerful Daisies Friendship Card

Good Morning! I CASE’d today’s card from one of the pretty Stampin’ Up! Cheerful Daisies cards on the cover of the new 2023-2024 Annual Catalog. I changed the size, stepped it up with additional embellishments and used the largest daisy in the pack instead of the smaller one. You can find the currently available supplies I used at the bottom of my post along with the sizes of cardstock used.

I embossed a panel of Bright and Beautiful designer series paper with the Timeworn Type 3D embossing folder and adhered it to the front of a Blueberry Bushel card base. I stamped the outline of the large daisy from the Stampin’ Up! Cheerful Daisies photopolymer stamp set in Berry Burst ink on a Basic White panel. I inked up the filler stamp with Berry Burst ink and stamped off twice before stamping over the petals. I stamped the large flower center in Lemon Lolly ink and cut out the flower with the coordinating die.

I cut a Berry Burst panel with the large detailed petals die from the Stampin’ Up! Cheerful Daisies dies and adhered it to the flower with dots of liquid glue. I stamped the stem and leaves using Pretty Peacock ink on Basic White and cut them out with the coordinating dies. I adhered the stem and leaves to the card front with liquid glue and popped the flower on with dimensionals.

I stamped the sentiment from the Stampin’ Up! Cheerful Daisies stamp set in Pretty Peacock ink on Basic White and punched the end with the Banners Pick A Punch. I made a bow with silver metallic ribbon and adhered it to the back of the label before adhering the label to the card with dimensionals. I finished the card with silver metallic pearls.

For the inside of the card, I stamped the detailed side view flower from the Stampin’ Up! Cheerful Daisies stamp set in Berry Burst ink and stamped the filler stamp in twice stamped off Berry Burst ink on the bottom of a Basic White panel. I stamped the small flower center in Lemon Lolly ink and covered the flower with a mask before stamping the leaves and stem in Pretty Peacock ink. I adhered the panel to the inside of the card with Stampin’ Seal.

The stamps and dies in the Stampin’ Up! Cheerful Daisies bundle are different, beautiful and so versatile. They can be used in so many ways, and they’re available today! So head over to my Online
Store to check it out with all the other new goodies right away!


Current Host Code: TUMGKET9

Use this host code when you order $50 or more and receive a Thank You gift from me!  The free gift is your choice of any item valued up to $10.00 from the 2023-2024 Annual Catalog.

If your order is over $150, please do not use the host code since you’ll receive your own Host Dollars plus I’ll still send you the Thank You gift!  This host code can be used by anyone, no club or commitment required. Let me know if you have any questions.


If you need any stamping supplies, I’d be very happy to be your Demonstrator.  Just click on the Shop Now button on the right side of the screen to go directly to my online store or contact me if you have any questions.  Happy Stamping!

Thanks for stopping by and have a great week!

Akiko

  • Visit my online store here
  • See the current Stampin’ Up! clearance rack specials here
  • Earn FREE Stampin’ Up! products through my Wildflower Frequent Shopper Program – my way of saying thank you to my online frequent shopper customers.
  • Have any questions? I’d be happy to help, click here to contact me.

Cardstock Cuts for this project:

  • Blueberry Bushel – 4-1/4″ x 11″ card base scored at 5-1/2″
  • Berry Burst – 2″ x 2-1/2″ (top layer die cut flower petals)
  • Basic White – 4″ x 5-1/4″ (inside panel), 3″ x 4-1/4″ (die cut flowers and stems), 1″ x 2″ (label)
  • Bright and Beautiful DSP – 3″ x 4-1/4″ (front background)

Stampin’ Up! products used in this project:


Stampin’ Up! Cheerful Daisies for the Happy Inkin’ Thursday Blog Hop

Good Morning and welcome to the Happy Inkin’ Thursday Blog Hop! The Stampin’ Up! Cheerful Daisies bundle is a beautiful floral set that will be available next week when the new 2023-2024 Annual Catalog launches. I paired it with the retiring Country Gingham 6″ x 6″ designer series paper for a note card. You can find the currently available supplies I used along with card stock cuts at the bottom of my post.

We have a sketch challenge for our Blog Hop this week:

I adhered a panel of retiring Layering Designs vellum to the front of a Balmy Blue card base with Stampin’ Seal. I embossed a Basic White panel with the Fern 3D embossing folder and adhered it to the card front. I adhered a Balmy Blue panel of Country Gingham 6″ x 6″ designer series paper on top of the embossed panel and there’s the card sketch for the challenge!

I cut all the dies for the three layered daisy flowers in the Stampin’ Up! Cheerful Daisies dies from Basic White. I used Daffodil Delight Stampin’ Blends to color the flower centers on the large multi-flower die cut and cut the leaves off with my paper snips. I adhered the back die cut layers to each flower with liquid glue and recolored the centers with the light Daffodil Delight Stampin’ Blend. I adhered the top detailed die cut layers to each flower and adhered the flowers to the card with dimensionals.

I stamped six leaves from the Stampin’ Up! Cheerful Daisies photopolymer stamp set in Garden Green ink on Basic White and cut them out with the coordinating die. I adhered them to the card front with a glue dot. I stamped the sentiment from the Happy Labels stamp set in Garden Green ink on Balmy Blue. I adhered it to a Basic White mat and adhered it to the card with glue dots. I finished the card with a Balmy Blue and white bow and gold sequins.

For the inside of the card, I trimmed the side of a Basic White panel with a strip of Country Garden DSP and adhered the panel to the inside of the card with Stampin’ Seal. This leaves plenty of room for a personal note.

Here’s the Stampin’ Up! Cheerful Daisies bundle – the photopolymer stamp set and coordinating dies. It will be available on Tuesday, May 2 when the 2023-2024 Annual Catalog opens for orders!

I love the fresh look of white daisies against a blue background and the retiring Country Gingham 6″ x 6″ DSP is the perfect backdrop for the beautiful die cut daisies from the new Stampin’ Up! Cheerful Daisies bundle.

On with the Hop! Click on the Next Blog button to move forward to see the beautiful project Karen Ksenzakovic has created.

If you get lost along the way, here are the participants for the hop:


Current Host Code: 6EDCPU4T

Use this host code when you order $50 or more and receive a free gift from me!  The free gift is your choice of any currently available item valued up to $10.

If your order is over $150, please do not use the host code since you’ll receive your own Host Dollars plus I’ll still send you the free gift!  This host code can be used by anyone, no club or commitment required. Let me know if you have any questions.


If you need any stamping supplies, I’d be very happy to be your Demonstrator.  Just click on the Shop Now button on the right side of the screen to go directly to my online store or contact me if you have any questions. 

Thanks for stopping by and Happy Stamping!

Akiko

  • Visit my online store here
  • See the current Stampin’ Up! clearance rack specials here
  • Earn FREE Stampin’ Up! products through my Wildflower Frequent Shopper Program – my way of saying thank you to my online frequent shopper customers.
  • Have any questions? I’d be happy to help, click here to contact me.

Cardstock Cuts for this project:

  • Balmy Blue – 5-1/2″ x 8-1/2″ card base scored at 4-1/4″, 3/8″ x 2″ (label)
  • Layering Designs Vellum – 1-1/2″ x 5″ (front strip)
  • Basic White – 4″ x 5-1/4″ (inside panel), 3″ x 4-1/4″ (embossed panel), 1/2″ x 2-1/8″ (label mat), 5-1/2″ x 7″ (daisy and leaves die cuts)
  • Country Gingham 6″ x 6″ DSP – 3″ x 4-1/4″ (front background), 3/4″ x 4″ (inside trim)

Stampin’ Up! products used in this project:


Stampin’ Up! Cheerful Daisies Sneak Peek with Video Tutorial

Good Morning! I got some of my Demonstrator pre-order for the upcoming Stampin’ Up! 2023-2024 Annual Catalog and it included the new Stampin’ Up! Cheerful Daisies bundle. So I used it to give you an little sneak peek of this beautiful bundle. You can find the currently available supplies I used at the bottom of my post along with the sizes of cardstock used. The new items will be available on May 2, 2023 when the catalog is open for customer orders!

I also made a video tutorial for this card and posted it to my YouTube Channel and you can view it HERE.

I adhered a panel of Fresh As A Daisy designer series paper (available May 2, 2023) to a Garden Green mat with liquid glue. This panel features daisies against a Bubble Bath (one of the new Subtles) background. I adhered it to a panel of Moody Mauve (one of the new 2023-2025 In Colors) Fresh As A Daisy DSP and then adhered it to a Garden Green mat. I wrapped it with a length of Garden Green Baker’s Twine and made a bow. Then, I popped the layered panels to the front of a Pebbled Path (another of the new 2023-2025 In Colors) card base.

I cut a Basic White panel with the large multi flower die, the detailed large flower die and the flower center die from the Stampin’ Up! Cheerful Daisies dies. I cut another panel with the leaves portion of the large die. I used a Blending Brush to apply Bubble Bath ink to the detailed die cut and a water painter to apply Garden Green ink to the leaves and Crushed Curry ink to the flower center. I stamped the stem in Garden Green ink and cut it out with the coordinating die.

I adhered the layers of the large flower with glue dots and adhered it to the card front with dimensionals. I adhered the stems and leaves to the card with glue dots, tucking them under the flower and twine. I finished the card front with Wild Wheat (another new 2023-2025 In Color) dots (available May 2, 2023).

For the inside of the card, I stamped the sentiment from the Stampin’ Up! Cheerful Daisies stamp set in Pebbled Path ink on a Basic White panel. I stamped the detailed flower in twice stamped off Pebbled Path ink and the filler flower in stamped off Bubble Bath ink. I stamped the flower center in stamped off Crushed Curry ink and stamped the leaves and stem in stamped off Garden Green ink. I adhered the panel to the inside of the card with Stampin’ Seal.

I love this new Stampin’ Up! Cheerful Daisies stamp set! It has a bit of a retro look and the layered die cuts are wonderful! The sentiments are sweet and the two-step stamps coordinate with the dies, so there is a lot of versatility in how they can be used. Here is my card with the new Cheerful Daisies Bundle:

And here are the sheets in the Free As A Daisy designer series paper. Don’t you love the back sides of the sheet? And there are so many of the new colors being used, so it’s so fresh!

The Stampin’ Up! Cheerful Daisies bundle and the Fresh As A Daisy designer series paper will be available on May 2, 2023. And so will the new card stock and ink pads for the new colors – Pebbled Path, Moody Mauve, Wild Wheat and Bubble Bath. I can’t wait!!


New 2023-2024 Annual Catalog Coming Soon!

The new Stampin’ Up! 2023-2024 Annual Catalog will debut on May 2, 2023! The Demonstrator pre-order will occur during April, so there will be sneak peeks of wonderful new products and colors! I received catalogs for my current customers and will be sending them out early next week. If you would like a copy, simply place an order and I will be happy to send you one, too!

Get the complete details on the new 2023-2025 In Colors and the Color Refresh on my Stampin’ Up! Promotions Page.


Last Chance Products Sale Going On Now!

This Last Chance Products promotion includes two lists of products that will no longer be available once the catalog retires. There will be one for the 2022-2023 Annual Catalog and one for the January-April 2023 Mini Catalog. For these retiring catalogs, you can find carryover products in the upcoming 2023-2024 Annual Catalog.

Several wonderful retiring items have already sold out!

A few things to know about the retiring lists and the Last Chance products:

  • Items on the retiring list are only available while supplies last, so order soon to make sure that you are able to get the items that you are wanting!
  • The 2021-2023 In Color items, ink pads, refills, Stampin’ Blends and cardstock are usually some of the first items to sell out (The Soft Succulent Stampin’ Blends are already gone!!).
  • There will be retiring colors as part of the Color Refresh, and these items will likely sell out early as well!
  • Some of the items will have sale prices listed with discounts up to 60% off.
  • The last day to order from these catalogs will be May 1, 2023.

Note that while some of the bundles are on the retiring list, the individual stamps and dies/punched may be carried over. Also, if one of the items in a retiring bundle is deeply discounted, the total price may be less than the bundled price, so pull out your calculators to double check.

Click HERE to download a PDF of the Retiring Last Chance Products from the 2022-2023 Annual Catalog.

Click HERE to download a PDF of the Retiring Last Chance Products from the January-April 2023 Mini Catalog.

Shop early to get the items you want before they’re gone for good!


Current Host Code: XPRMTP4D

Use this host code when you order $50 or more and receive a Thank You gift from me!  The free gift is your choice of any item valued up to $10.00 in the 2022-2023 Annual Catalog or the January-April 2023 Mini Catalog!

If your order is over $150, please do not use the host code since you’ll receive your own Host Dollars plus I’ll still send you the Thank You gift!  This host code can be used by anyone, no club or commitment required. Let me know if you have any questions.


If you need any stamping supplies, I’d be very happy to be your Demonstrator.  Just click on the Shop Now button on the right side of the screen to go directly to my online store or contact me if you have any questions.  Happy Stamping!

Thanks for stopping by and have a great week!

Akiko

  • Visit my online store here
  • See the current Stampin’ Up! clearance rack specials here
  • Earn FREE Stampin’ Up! products through my Wildflower Frequent Shopper Program – my way of saying thank you to my online frequent shopper customers.
  • Have any questions? I’d be happy to help, click here to contact me.

Cardstock Cuts for this project:

  • Pebbled Path – 5-1/2″ x 8-1/2″ card base scored at 4-1/4″
  • Garden Green – 4″ x 5-1/4″ (front mat), 3-7/8″ x 4-1/8″ (daisy mat)
  • Basic White – 4″ x 5-1/4″ (inside panel), 3″ x 8-1/2″ (flower, stem and leaves die cuts)
  • Fresh As A Daisy DSP – 3-7/8″ x 5-1/8″ (front background), 3-7/8″ x 4″ (daisy panel)

Stampin’ Up! products used in this project: