Stampin’ Up! Cherry Blossoms Birthday Card for the Inkin’ Krew Blog Hop

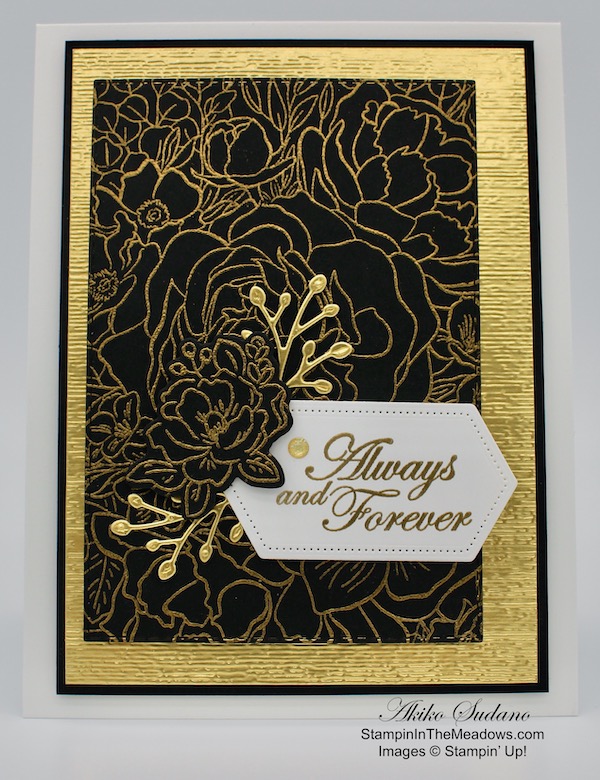
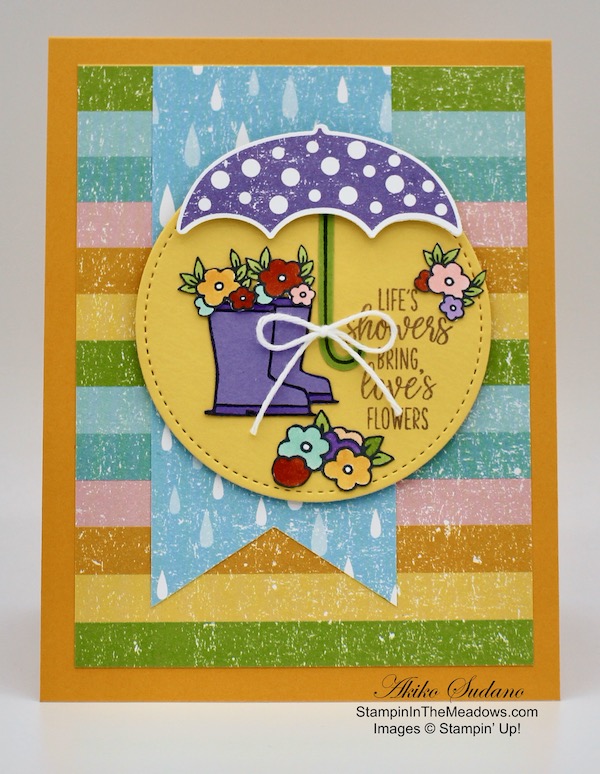
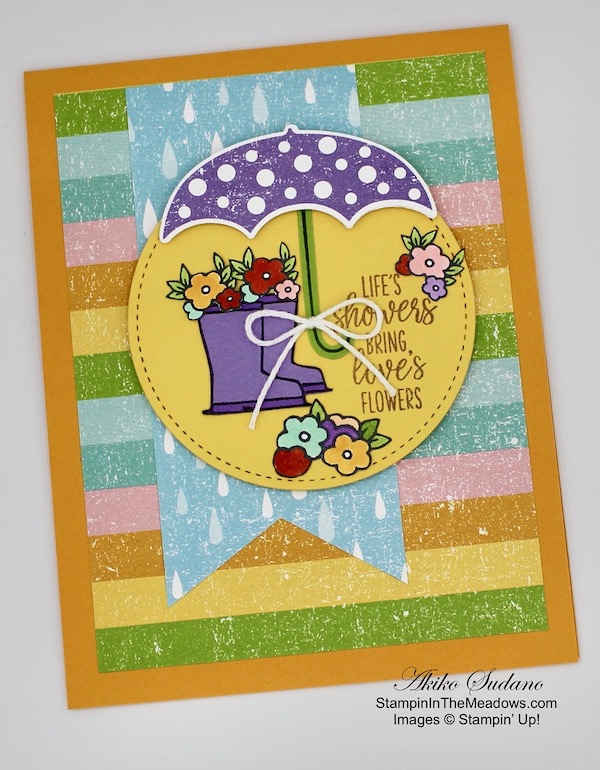
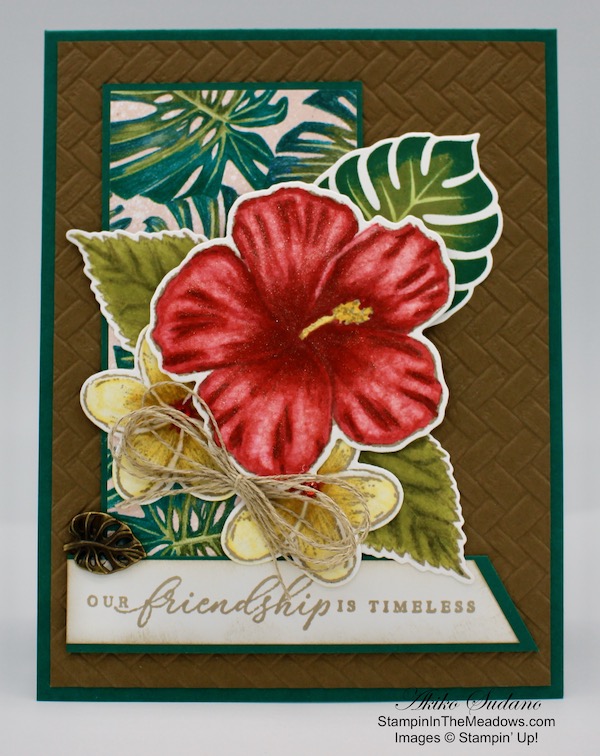
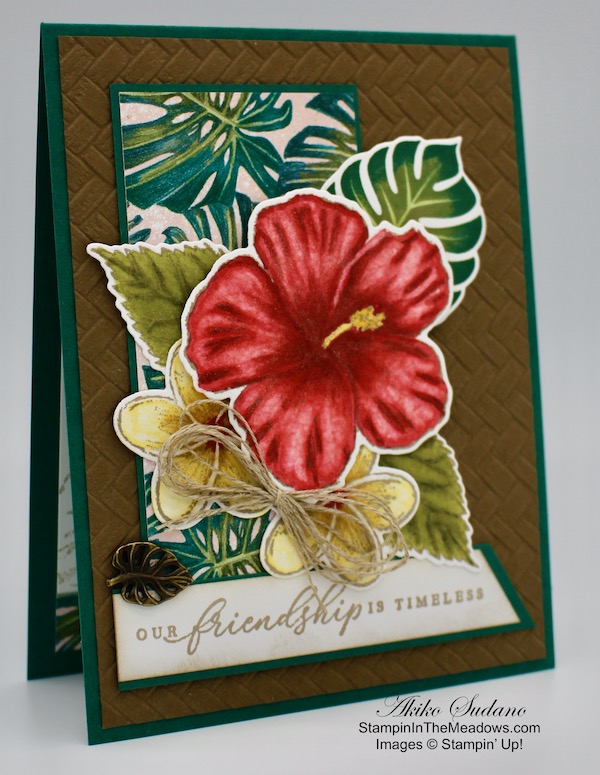
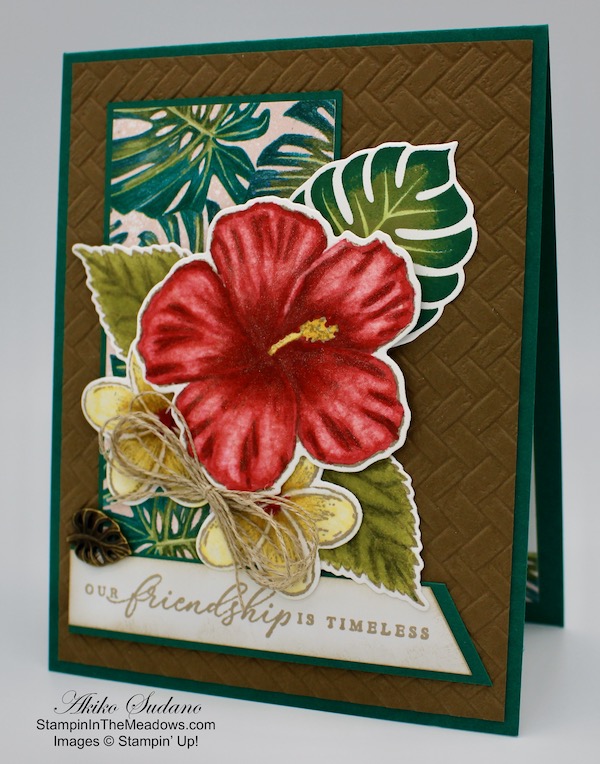
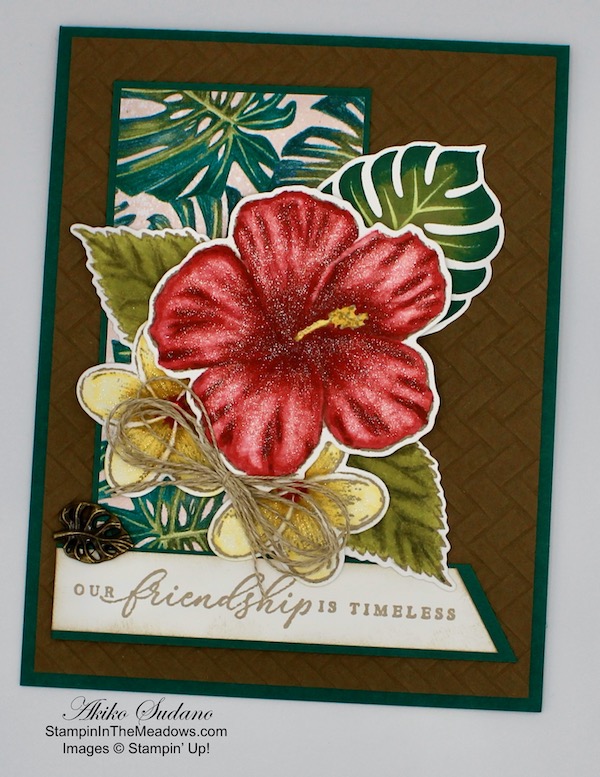
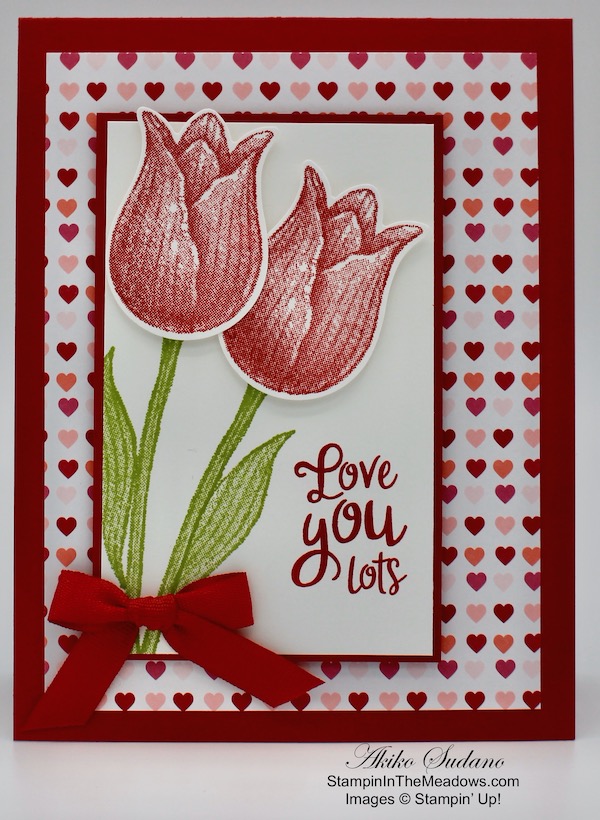
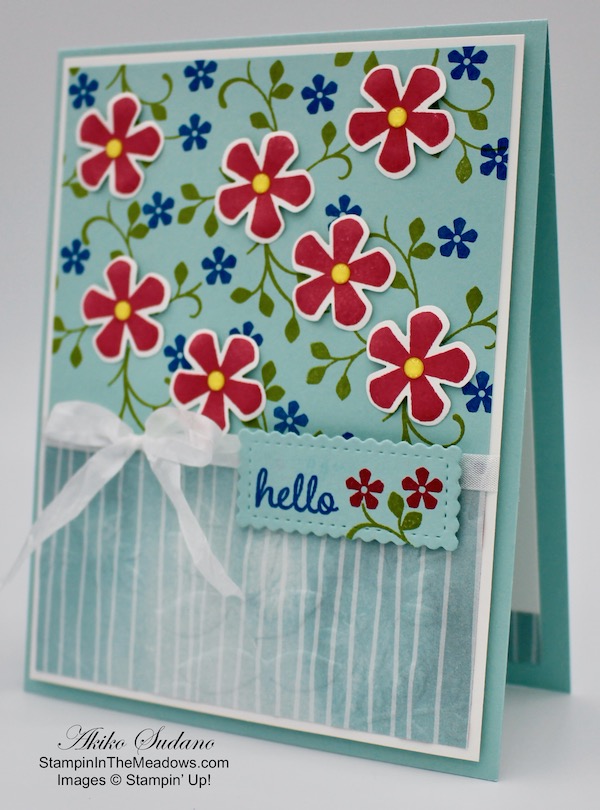
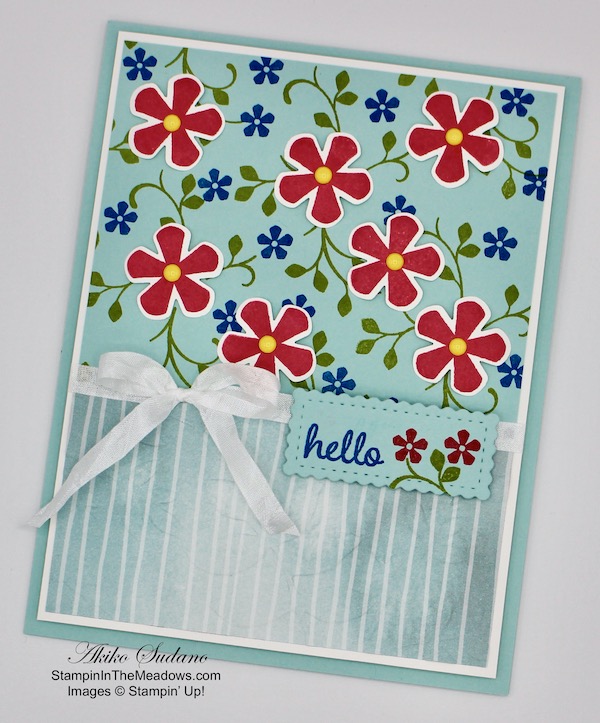
Good Morning! Welcome to another Inkin’ Krew Monthly Blog Hop! The theme for this month’s hop is Birthday and I made a pretty pink birthday card with the Stampin’ Up! Cherry Blossoms dies to share.

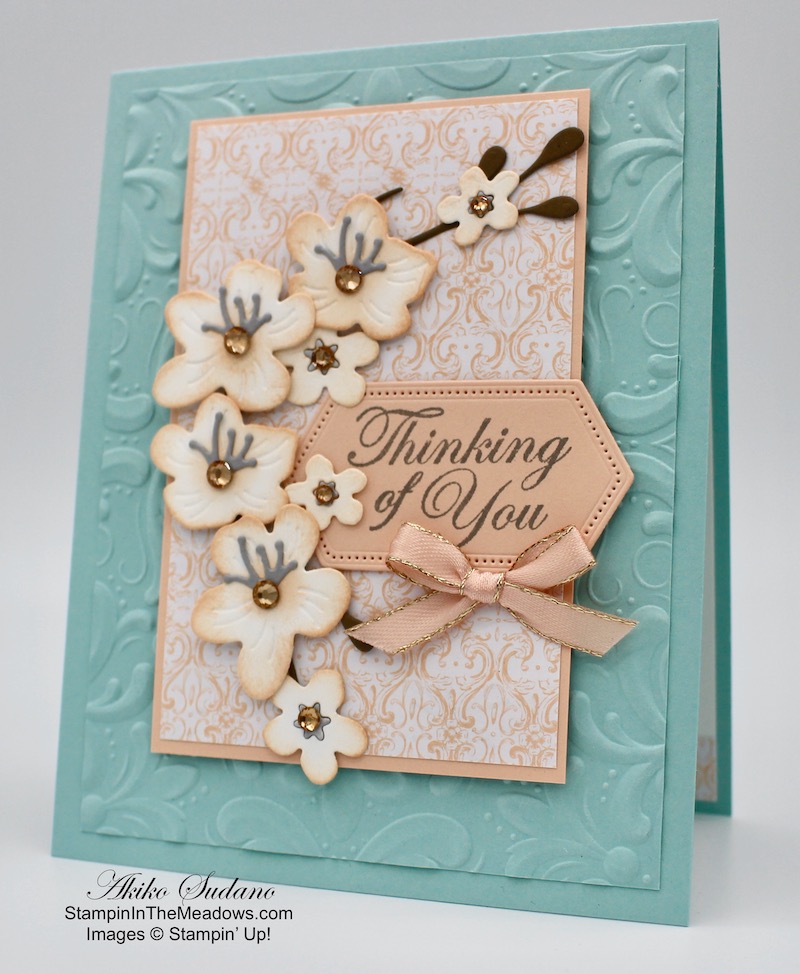
I started by embossing a panel of Petal Pink card stock with the Parisian Flourish embossing folder and adhering it to a Petal Pink card base with snail.

To make the flowers, I cut out three sets of the two largest petals and three sets of the two smallest petals from Whisper White card stock using the Stampin’ Up Cherry Blossom dies. Note that the small petals have two flower clusters on each die, so I ended up with six of each of the smaller petal clusters and three of each of the larger petal clusters. I sponged the edges of each petal cluster with Petal Pink ink and curled the edges up with my bone folder. I assembled three large flowers with multipurpose liquid glue, layering four flowers from largest on the bottom to smallest on top, turning each so that the petals fall between the petals on the layer below. I assembled three small flowers starting with a 1/4″ x 1/4″ scrap of Whisper White and layering the two smallest petal clusters on top of it with multipurpose liquid glue, turning each layer so the petals fall between the petals below.

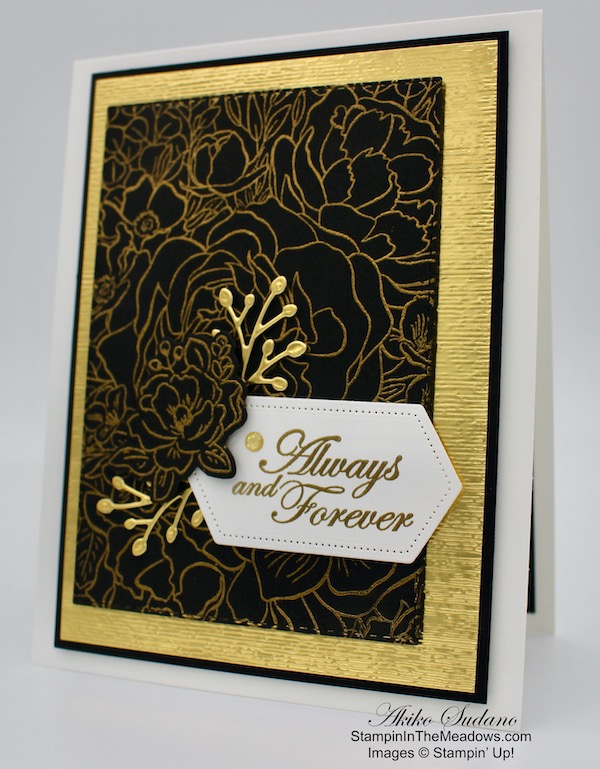
I cut five sets of the large embossed leaves and three sets of the smallest embossed leaves. I adhered three leaves on the back of each of the large flowers and two leaves on the back of the small flowers with multipurpose liquid glue. I adhered champagne rhinestones in the center of each flower. I cut a Sahara Sand branch using the die from the Stampin’ Up! Cherry Blossoms dies.

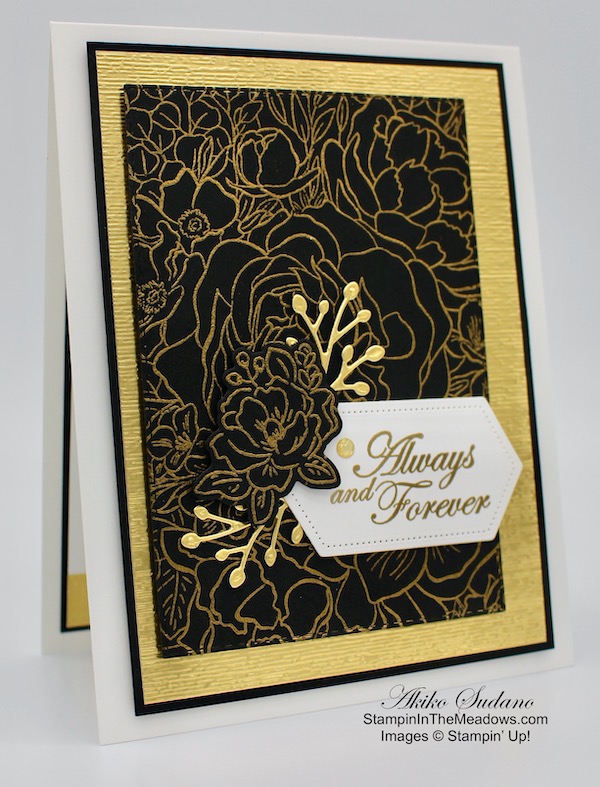
I stamped the Happy Birthday sentiment from the Magnolia Blooms stamp set in Petal Pink ink on a Whisper White panel. I cut it out with the small label die from the Painted Labels dies. I arranged the flowers and branch on the card with the label and adhered everything down with glue dots. I tied a length of Petal Pink ribbon and adhered it with a glue dot.

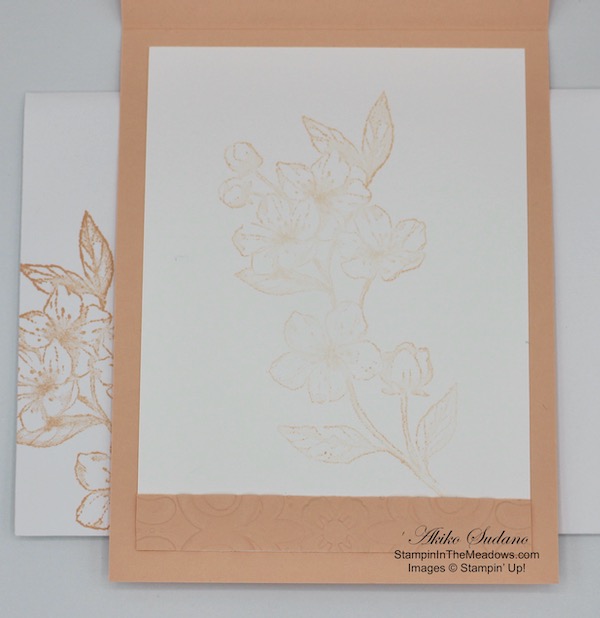
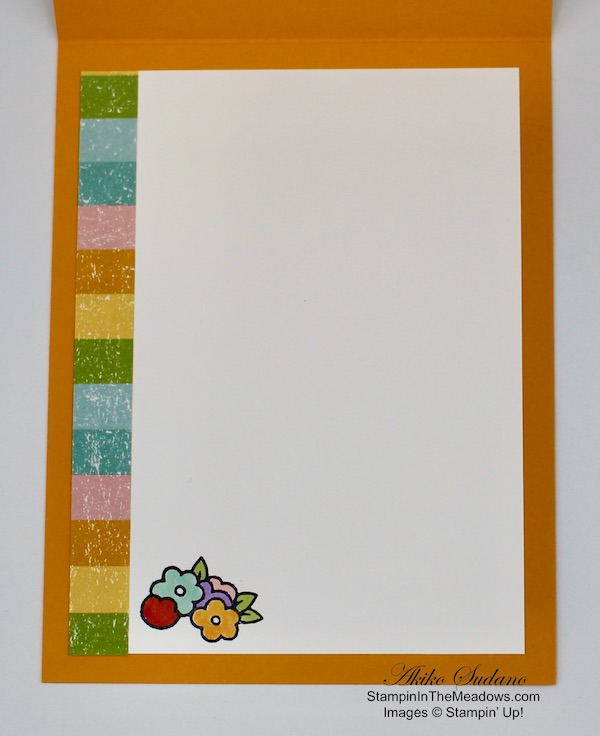
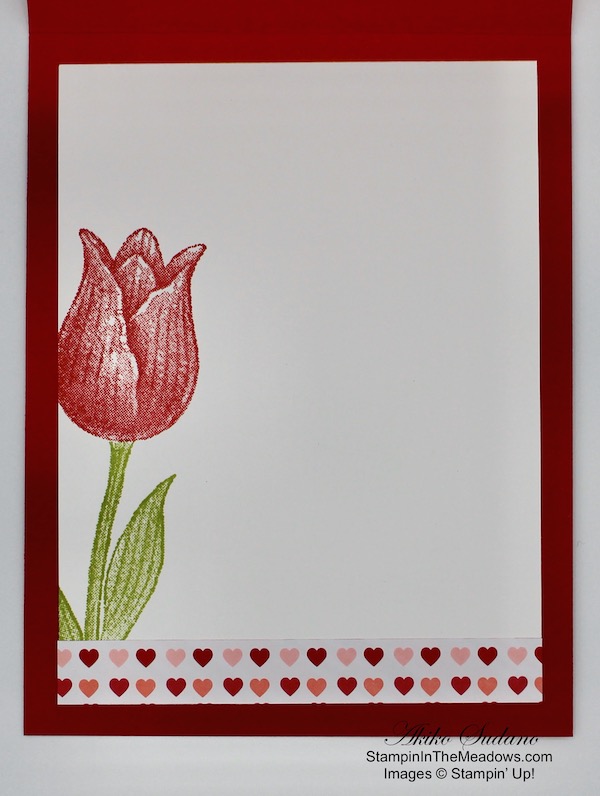
I stamped the large floral branch from the Forever Blossoms cling stamp set in Petal Pink ink on a Whisper White panel. I embossed a strip of Petal Pink with the Parisian Flourish embossing folder and adhered it to the bottom. I adhered the panel to the inside of the card with snail. I stamped the floral branch on a medium Whisper White envelope to coordinate with the card.


Let’s visit the other beautiful projects in the Blog Hop. Click on the Next Blog button to move forward to Mary Deatherage’s project or click the Previous Blog button to move back to see the project that Connie Troyer created.

If you get lost along the way, here are the participants for the hop:


February 1 – 15 Host Code: ZSQEMEKE

Use this host code when you order $50 or more and receive a free gift from me!  The gift is your choice of any item valued up to $10.00 in the 2019-20 Annual Catalog or in the 2020 January-June Mini Catalog!  That includes some of the Host Exclusive stamp sets!

If your order is over $150, please do not use the host code since you’ll receive your own Host Dollars plus I’ll send you the free gift!  This host code can be used by anyone, no commitment required.  Let me know if you have any questions.


If you need any stamping supplies, I’d be very happy to be your Demonstrator.  Just click on the Order Stampin’ Up! Online Now button on the right side of the screen to go directly to my online store or contact me if you have any questions.  Happy Stamping!

Thanks for visiting!

Akiko

  • Visit my online store here
  • See the current Stampin’ Up! clearance rack specials here
  • Earn FREE Stampin’ Up! products through my Wildflower Frequent Shopper Program – my way of saying thank you to my frequent shopper online customers.
  • Sign up for my weekly newsletter here
  • Have any questions? I’d be happy to help, click here to contact me.

Cardstock Cuts for this project:

  • Petal Pink – 4 1/4″ x 11″ scored at 5 1/2″ (card base), 3 7/8″ x 5 1/8″ (embossed background), 1/2″ x 3 3/4″ (inside embossed trim)
  • Old Olive – 1″ x 6″ (leaf die cuts)
  • Sahara Sand – 2 1/2″ x 5″ (branch die cut)
  • Whisper White – 3 3/4″ x 5″ (inside panel), (2) 1″ x 5″ & (2) 1 1/4″ x 5″ (flower die cuts), 2″ x 3″ (label)

Stampin’ Up! products used in this project:


Stampin’ Up! Heartfelt Valentine’s Day Card

Good Morning! Today I am sharing a video that I did yesterday during my Sunday Facebook Live session. This is my last Valentine’s Day card and it is inspired by a pretty note card that I found on Pinterest. I am using the Stampin’ Up! Heartfelt bundle along with the From My Heart specialty designer series paper.

Here’s the Facebook Live video showing how to make this pretty card:

I also posted the video to my YouTube channel and you can view it here.

I was inspired to make this card when I saw a pretty card by Mary Fish on Pinterest, so I CASE’d (Copy And Share Everything) it. Here’s her original note card.

Using the Heart Punch Pack, I punched the Real Red scalloped foil heart with the scalloped heart punch and the Flirty Flamingo and Real Red foil heart with the regular heart punch and adhered them together. I punched an additional scalloped heart from thick Whisper White card stock to give the heart stiffness and adhered it to the back. I stamped the sentiment from the Stampin’ Up! Heartfelt stamp set in Real Red ink on a panel of Thick Whisper White that was cut out with the Stitched so Sweetly dies. I wrapped a length of Real Red stitched ribbon around the panel and secured it in the back. I popped the heart on the panel with dimensionals and finished the panel with some faceted dots and a bow.

I cut a panel of the From My Heart designer series paper with the Stitched Rectangle dies and adhered it to a Flirty Flamingo mat. I adhered the panel to a Real Red card base and then adhered the decorated Whisper White panel on top.

For the inside of the card, I added a strip of the From My Heart designer series paper to the bottom of a Whisper White panel. I stamped two Real Red and a Flirty Flamingo heart from the Stampin’ Up! Heartfelt stamp set in the corner. I adhered the panel to the inside of the card with snail.

All the Stampin’ Up! Valentine’s Day sets in the new Mini Catalog are great this year! The From My Heart specialty designer series paper is the prettiest Valentine’s Day paper ever and so all the Valentines for this year are sure to please!


Double Wildflower Points Ordering Bonus

I am in the middle of celebrating my anniversary as a Stampin’ Up! Demonstrator! And in addition to Sale-A-Bration and the Coordination Products Release, I am offering DOUBLE Wildflower Points on orders through February 15. If you don’t know about my Wildflower Points program, here’s how it works:

  • For each $50 that you order from my online store (before S & H) you will earn one Wildflower point.
  • You will earn one Wildflower point for each friend that you refer when they place their first order of $50+ from my online store.
  • When you have earned 8 Wildflower points you will get a FREE product order valued up to $40.00, your choice and mailed directly to you!

With DOUBLE points you get 2 points for each $50 order, 4 points for each $100 order, and so on, reaching your FREE order faster!!

This offer ends on Saturday February 15, 2020.

For complete details on my Wildflower Rewards, scroll to the bottom of my Customer Rewards page or contact me.


Today is the Sign Up Deadline for the February 2020 Paper Pumpkin: The Lovely Day

February’s Paper Pumpkin kit is coming, and love is in the air! The Lovely Day kit is versatile, elegant, and the perfect way to help your customers celebrate birthdays and other grand occasions.

  • Kit details: Makes nine cards and envelopes
  • Card size: 4-1/4” x 5-1/2” (10.8 x 14 cm)
  • Envelope size: 4-1/2” x 5-3/4” (11.4 x 14.6 cm)
  • Coordinating Stampin’ Up! colors: Petal Pink, Pool Party, Pretty Peacock, Rich Razzleberry, Rococo Rose, and Old Olive

AND … the February Paper Pumpkin kit coordinates perfectly with the Happy Birthday to You Stamp Set (item 152308), which is available as part of Stampin’ Up!’s Sale-A-Bration promotion. You can get it for FREE by reaching the qualifying purchase amount of $50.

If you’re interested in subscribing to Paper Pumpkin, you can either sign up for a subscription where you are billed monthly for your kit or you can purchase a prepaid subscription in my online store. To see more information and to sign up for the monthly subscription click here. To see the options for prepaid subscriptions in my online store, click here.

Sign up deadline for the February 2020 kit is today!


February 1 – 15 Host Code: ZSQEMEKE

Use this host code when you order $50+ and receive a free gift from me!  If your order is over $150, please do not use this code, but you’ll still get the free gift.  The free gift is your choice of any item valued up to $10.00 in the 2019-2020 Annual Catalog or in the 2020 January-June Mini Catalog!  That includes some of the Host Exclusive stamp sets!

If your order is over $150, please do not use the host code since you’ll receive your own Host Dollars plus I’ll send you the free gift!  This host code can be used by anyone, no club or commitment required.  Let me know if you have any questions.


If you need any stamping supplies, I’d be very happy to be your Demonstrator.  Just click on the Shop Now button on the right side of the screen to go directly to my online store or contact me if you have any questions.  Happy Stamping!

Thanks for stopping by and have a great week!

Akiko

  • Visit my online store here
  • See the current Stampin’ Up! clearance rack specials here
  • Earn FREE Stampin’ Up! products through my Wildflower Frequent Shopper Program – my way of saying thank you to my frequent shopper online customers.
  • Have any questions? I’d be happy to help, click here to contact me.

Cardstock Cuts for this project:

  • Real Red – 5 1/2″ x 8 1/2″ scored at 4 1/4″ (card base)
  • Flirty Flamingo – 3 1/8″ x 4 1/2″ (front mat)
  • Thick Whisper White – 2 3/4″ x 3 3/4″ (scalloped rectangle die cut), 3″ x 3″ (scalloped heart punch)
  • Whisper White – 3 3/4″ x 5″ (inside panel)
  • From My Heart DSP – 3 1/4″ x 4 1/2″ (die cut panel), 1/2″ x 5″ (inside trim), foil hearts for punching

Stampin’ Up! products used in this project:


Stampin’ Up! Breathtaking Bouquet Wedding Card for the Happy Inkin’ Thursday Blog Hop

Good Morning! Welcome to another Happy Inkin’ Thursday Blog Hop! I made an elegant wedding card with the new Stampin’ Up! Breathtaking Bouquet stamp set to share today.

We have a color challenge this week, and here is the color palette we are using:

I started by stamping the Stampin’ Up! Breathtaking Bouquet background stamp set on a panel of Basic Black card stock using VersaMark Ink. I sprinkled it with Gold embossing powder and heat set. I cut it out with the third largest of the Stitched Rectangles dies. I cut a panel of Gold Foil and ran it through the Subtle embossing folder and adhered it to a Basic Black mat. I popped the embossed gold foil on a Thick Whisper White card base with dimensionals. I popped the floral embossed basic black die cut panel on the card front with dimensionals.

I stamped the sentiment from the Forever Blossoms stamp set in VersaMark Ink on a panel of Whisper White. I sprinkled Gold embossing powder on it and heat set. I cut it out with a Stitched Nested Label die. I stamped the top of the birthday cake from the Happy Birthday to You Sale-A-Bration stamp set twice on a panel of Basic Black card stock in VersaMark Ink. I sprinkled them with Gold embossing powder and heat set. I cut each cluster with the coordinating die from the Birthday Dies and I fussy cut the top flower in each cluster. I put one aside for the inside of the card.

I cut the leaf spray from the Birthday dies on a panel of Gold foil giving me two dies. I adhered the dies and label to the card front with glue dots. I adhered the Happy Birthday to You flower to the card front with dimensionals. I finished the card front with a gold glitter enamel dot.

For the inside, I stamped the sentiment from Forever Blossoms on a Whisper White panel using VersaMark Ink. I sprinkled it with Gold embossing powder and heat set. I added a strip of Gold foil that was embossed with the Subtle embossing folder to the bottom and adhered the panel to a Basic Black mat. I adhered the panel to the inside of the card with snail. I finished the inside with the second Happy Birthday to You embossed flower.

It’s fun to use Foil in making cards, and it is so elegant and beautiful when embossed. Good thing there are Weddings to have an excuse to be so extravagant!

On with the Hop! Click the Next button below to visit Karen Ksenzakovic’s blog.

And just in case you get lost along the way, here’s a list of the team members participating in the hop today:


February 1 – 15 Host Code: ZSQEMEKE

Use this host code when you order $50 or more and receive a free gift from me!  The gift is your choice of any item valued up to $10.00 in the 2019-20 Annual Catalog or in the 2019 Holiday Catalog!  That includes some of the Host Exclusive stamp sets!

If your order is over $150, please do not use the host code since you’ll receive your own Host Dollars plus I’ll send you the free gift!  This host code can be used by anyone, no commitment required.  Let me know if you have any questions.


If you need any stamping supplies, I’d be very happy to be your Demonstrator.  Just click on the Shop Now button on the right side of the screen to go directly to my online store or contact me if you have any questions.  Happy Stamping!

Thanks for visiting!

Akiko

  • Visit my online store here
  • See the current Stampin’ Up! clearance rack specials here
  • Earn FREE Stampin’ Up! products through my Wildflower Frequent Shopper Program – my way of saying thank you to my frequent shopper online customers.
  • Sign up for my weekly newsletter here
  • Have any questions? I’d be happy to help, click here to contact me.

Cardstock Cuts for this project:

  • Thick Whisper White – 4 1/4″ x 11″ scored at 5 1/2″ (card base)
  • Whisper White – 3 3/4″ x 5″ (inside panel), 1 3/4″ x 3 1/2″ (label)
  • Basic Black – 3 3/4″ x 5″ (embossed panel), 3 7/8″ x 5 1/8″ (inside mat), 2 1/2″ x 6″ (die cuts), 3 3/4″ x 5 1/8″ (front mat)
  • Gold Foil – 3 5/8″ x 5″ (front embossed background), 1/2″ x 3 3/4″ (inside trim), 2″ x 2″ (die cuts)

Stampin’ Up! products used in this project:


Stampin’ Up! Sending You Thoughts and Sending Flowers Congratulations Card

Good Morning! Today is Coordination Products Release Day!! And to celebrate, I have a special spring congratulations card made with a the Stampin’ Up! Sending Flowers die set that is part of the new items available today. You can find the supplies used to create this card at the bottom of my post along with the sizes of cardstock used.

I cut a panel of the striped Pleased as Punch designer series paper, which is also available today in the Coordination Product Release, and adhered it to a Granny Apple Green card base.

I cut the pretty circular floral die from the Stampin’ Up! Sending Flowers dies from Thick Whisper White Card Stock. I colored the stems and leaves on each flower with the Light Granny Apple Green Stampin’ Blend. I cut two sets of flowers each from Highland Heather, Blushing Bride, Pool Party and Daffodil Delight card stock. I adhered the die cut flowers on each stem of the frame with tiny dots of multipurpose liquid glue. I adhered the die cut panel on the card front with dimensionals, carefully trimming and placing a piece of a dimensional behind each flower. I accented each of the petal flowers with a pearl.

I cut the scalloped label from Pool Party card stock using the scalloped label die from the Stampin’ Up! Sending Flowers dies. I stamped the Congratulation! sentiment from the Stampin’ Up! Sending You Thoughts Sale-A-Bration stamp set in Granny Apple Green ink on a strip of Daffodil Delight card stock. I cut it out with the banner die from the Sending Flowers dies using the two step technique so that it would be shorter than normal. I adhered the labels together with snail and adhered it to the card with snail. I stamped the Whisper White crinkle ribbon with Pool Party ink and the small splotch stamp in the Painted Petals stamp set. I tied a bow and adhered it to the label with a glue dot. I finished the label with a pearl on the other end.

I decorated the inside by adhering some of the leftover die cut flowers on the bottom of a Whisper White panel. I adhered the panel to the inside of the card. A cheerful Spring themed congratulations card is great for many occasions – new baby, graduation, engagement, promotion – all wonderful causes for celebration!

The Stampin’ Up! Sending You Thoughts Sale-A-Bration stamp set is FREE with a $50 purchase during Sale-A-Bration which is going on now. It has lots of cute sentiments that can be used for many occasions. The Stampin’ Up! Sending Flowers die set and Pleased as Punch designer series paper are finally available today for the first time as part of the Coordination Release! This special release has products that coordinate with Sale-A-Bration items or items in the new Catalog.


February 1 – 15 Host Code: ZSQEMEKE

Use this host code when you order $50 or more and receive a free gift from me!  The gift is your choice of any item valued up to $10.00 in the 2019-20 Annual Catalog or in the 2019 Holiday Catalog!  That includes some of the Host Exclusive stamp sets!

If your order is over $150, please do not use the host code since you’ll receive your own Host Dollars plus I’ll send you the free gift!  This host code can be used by anyone, no commitment required.  Let me know if you have any questions.


If you need any stamping supplies, I’d be very happy to be your Demonstrator.  Just click on the Shop Now button on the right side of the screen to go directly to my online store or contact me if you have any questions.  Happy Stamping!

Thanks for stopping by and have a great day!

Akiko

  • Visit my online store here
  • See the current Stampin’ Up! clearance rack specials here
  • Earn FREE Stampin’ Up! products through my Wildflower Frequent Shopper Program – my way of saying thank you to my frequent shopper online customers.
  • Sign up for my weekly newsletter here
  • Have any questions? I’d be happy to help, click here to contact me.

Cardstock Cuts for this project:

  • Granny Apple Green – 4 1/4″ x 11″ scored at 5 1/2″ (card base)
  • Thick Whisper White – 4″ x 4 1/4″ (circular die cut)
  • Blushing Bride – 2″ x 2 1/4″ (flower die cuts)
  • Daffodil Delight – 2″ x 2 1/4″ (flower die cuts), 1″ x 3 1/2″ (label)
  • Highland Heather – 2″ x 2 1/4″ (flower die cuts)
  • Pool Party – 2″ x 2 1/4″ (flower die cuts), 1″ x 3 1/2″ (label)
  • Whisper White – 3 3/4″ x 5″ (inside)

Stampin’ Up! products used in this project:


Stampin’ Up! Under My Umbrella Life’s Showers Bring Love’s Flowers Card

Good Morning! Today I am sharing a video that I did yesterday during my Sunday Facebook Live session. I made a card using the new Stampin’ Up! Under My Umbrella stamp bundle along with the Pleased as Punch designer series paper that will be available tomorrow in the Coordination Product Release.

Here’s the Facebook Live video showing how to make this pretty card:

I also posted the video to my YouTube channel and you can view it here.

Using the Umbrella Builder Punch, I punched the umbrella from the Pleased as Punch designer series paper. I punched another umbrella from Thick Whisper White card stock and adhered it to the back of the purple umbrella to give it more stiffness. I stamped the umbrella handle from the Stampin’ Up! Under My Umbrella stamp set in Memento Tuxedo Black ink on a scrap of Granny Apple Green card stock and punched it out with the Umbrella Builder Punch.

I cut a stitched circle with the Stitched Shapes dies from Daffodil Delight card stock and stamped the sentiment from the Stampin’ Up! Under My Umbrella stamp set in Highland Heather ink. I stamped the boots in Memento Tuxedo Black ink on Highland Heather card stock and fussy cut it out. I stamped several flower clusters in Memento Tuxedo Black ink on Whisper White. I colored them with Light Granny Apple Green, Dark Calypso Coral, Dark Pool Party, Dark Mango Melody, Light Flirty Flamingo and Light Highland Heather Stampin’ Blends and fussy cut them. I adhered the boots, flowers and umbrella handle to the stitched circle with multipurpose liquid glue and the umbrella with dimensionals. I finished off the circle with a Whisper White Baker’s Twine bow.

I cut a panel of striped Pleased as Punch DSP and adhered it to a Mango Melody card base with snail. I cut a banner with the raindrop paper and adhered it to the striped paper. I popped the circle on the card front with dimensionals.

I added a strip of the striped Pleased as Punch paper to the side of a Whisper White panel and stamped a flower cluster next to it. I colored the flowers with Stampin’ Dimensionals to match the flowers on the front. I adhered the panel to the inside of the card with snail.

Valentine’s Day is just around the corner and this card could be used as a non-traditional card. Or the pretty colors are a big relief from the drab of winter and say hurry up Spring! The groundhog did not see his shadow yesterday and it means we’re in for an early Spring – that would be nice! Or if you have a bridal or baby shower coming up, then Love’s Flowers are definitely called for!


February 1 – 15 Host Code: ZSQEMEKE

Use this host code when you order $50+ and receive a free gift from me!  If your order is over $150, please do not use this code, but you’ll still get the free gift.  The free gift is your choice of any item valued up to $10.00 in the 2018-19 Annual Catalog or in the 2019 Occasions Catalog!  That includes some of the Host Exclusive stamp sets!

If your order is over $150, please do not use the host code since you’ll receive your own Host Dollars plus I’ll send you the free gift!  This host code can be used by anyone, no club or commitment required.  Let me know if you have any questions.


If you need any stamping supplies, I’d be very happy to be your Demonstrator.  Just click on the Shop Now button on the right side of the screen to go directly to my online store or contact me if you have any questions.  Happy Stamping!

Thanks for stopping by and have a great week!

Akiko

  • Visit my online store here
  • See the current Stampin’ Up! clearance rack specials here
  • Earn FREE Stampin’ Up! products through my Wildflower Frequent Shopper Program – my way of saying thank you to my frequent shopper online customers.
  • Have any questions? I’d be happy to help, click here to contact me.

Cardstock Cuts for this project:

  • Mango Melody – 4 1/4″ x 11″ scored at 5 1/2″ (card base)
  • Daffodil Delight – 3 1/2″ x 3 1/2″ (circle die cut)
  • Whisper White – 3 3/4″ x 5″ (inside panel), 1 1/2″ x 5″ (fussy cut flowers)
  • Granny Apple Green – 1 x 2 1/2″ (umbrella handle)
  • Highland Heather – 2″ x 2″ (boots)
  • Thick Whisper White – 1 1/2″ x 2 1/2″ (umbrella)
  • Pleased as Punch DSP – 3 3/4″ x 5″ (card front background), 2″ x 4 1/2″ (raindrop banner), 1/2″ x 5″ (inside trim)

Stampin’ Up! products used in this project:


Stampin’ Up! Cherry Blossoms Thinking of You Card

Good Morning! Today I am thinking Spring and bringing you a Thinking of You card made with the Stampin’ Up! Cherry Blossoms dies that are part of the Parisian Blossoms suite and Forever Blossoms bundle in the new Mini Catalog. You can find the supplies used to create this card at the bottom of my post along with the sizes of cardstock used.

I embossed a panel of Pool Party card stock with the beautiful Parisian Flourish embossing folder and adhered it to a Pool Party card base with snail. I cut a panel of the Parisian Blossoms specialty designer series paper and adhered it to a Petal Pink mat. I cut one of each of the flowers in the Stampin’ Up! Cherry Blossoms dies from Whisper White card stock. Note that the smaller dies cut two flowers in each die and that there are two dies of each for the larger flowers. I cut a total of 8 flowers and for the smaller flowers, I was careful to save the centers. I sponged the edges of each flower with Petal Pink ink along with the centers of the larger flowers. I cut two sets of the stamen center dies from Smoky Slate card stock (note that the die cuts two stamen centers at a time).

I adhered a stamen to the center of each of the larger flowers with multipurpose liquid glue. I colored the tiny centers of the smaller flowers with the Light Smoky Slate Stampin’ Blend. I stuck a glue dot behind each of the small flowers and adhered the centers to the flowers. I cut a branch from the Stampin’ Up! Cherry Blossoms die set from Soft Suede card stock. I stamped the Thinking of You sentiment from the Good Morning Magnolia stamp set in Smoky Slate ink on a scrap of Petal Pink card stock. The font is the same as the font in the Parisian Blossoms suite, so it goes well with the set and gives you alternative sentiments to use while keeping the same elegant feel. I cut the sentiment out with one of the Stitched Nested Labels dies.

I arranged the branch and label on the Parisian Blossoms DSP panel and adhered them with multipurpose liquid glue. I arranged the flowers and adhered the large ones with dimensionals and the small ones with glue dots. I finished off each flower center with a Champagne rhinestone and added a bow to the label made with the metallic edge Petal Pink ribbon. I adhered the Parisian Blossoms panel on the card front with dimensionals.

I kept the inside of the card simple with plenty of space to write a personal message. I adhered a strip of the Parisian Blossoms specialty designer series paper to the bottom of a Whisper White panel and attached it to the inside of the card.

The Parisian Blossoms suite is so beautiful and the Stampin’ Up! Cherry Blossoms dies allow you to create elegant and beautiful dimensional floral cards. With the unique shapes of each flower, you have a lot of movement and flexibility in arranging them on the branch.


January 16 – 31 Host Code: EFVWTZUQ

February 1 – 15 Host Code: ZSQEMEKE

Use this host code when you order $50 or more and receive a free gift from me!  The gift is your choice of any item valued up to $10.00 in the 2019-20 Annual Catalog or in the 2019 Holiday Catalog!  That includes some of the Host Exclusive stamp sets!

If your order is over $150, please do not use the host code since you’ll receive your own Host Dollars plus I’ll send you the free gift!  This host code can be used by anyone, no commitment required.  Let me know if you have any questions.


If you need any stamping supplies, I’d be very happy to be your Demonstrator.  Just click on the Shop Now button on the right side of the screen to go directly to my online store or contact me if you have any questions.  Happy Stamping!

Thanks for stopping by and have a great day!

Akiko

  • Visit my online store here
  • See the current Stampin’ Up! clearance rack specials here
  • Earn FREE Stampin’ Up! products through my Wildflower Frequent Shopper Program – my way of saying thank you to my frequent shopper online customers.
  • Sign up for my weekly newsletter here
  • Have any questions? I’d be happy to help, click here to contact me.

Cardstock Cuts for this project:

  • Pool Party – 4 1/4″ x 11″ scored at 5 1/2″ (card base), 4″ x 5 1/4″ (embossed panel)
  • Whisper White – 4″ x 5 1/4″ (inside panel), 2″ x 5″ (flower die cuts)
  • Petal Pink – 3 1/2″ x 4 1/4″ (front mat), 1 1/2″ x 3 1/2″ (label)
  • Smoky Slate – 1″ x 2″ (stamen die cuts)
  • Soft Suede – 3″ x 5″ (branch die cut)
  • Parisian Blossoms DSP – 3 3/8″ x 4 1/8″ (front panel), 1/2″ x 4″ (inside trim)

Stampin’ Up! products used in this project:


Stampin’ Up! Timeless Tropical Friendship Card

Good Morning! Today I have a tropical friendship card made with the beautiful flowers from the Stampin’ Up! Timeless Tropical stamp bundle. You can find the supplies used to create this card at the bottom of my post along with the sizes of cardstock used.

I started by embossing a panel of Soft Suede card stock with the new Coastal Weave 3d Embossing folder. I adhered it to a Shaded Spruce Card base with snail. I took a piece of Timeless Oasis designer series paper and adhered it to a Shaded Spruce mat and then to the card base with snail. I stamped the large hibiscus, two plumeria flowers and two leafs from the Stampin’ Up! Timeless Tropical stamp set using Sahara Sand ink on Thick Whisper White card stock. I colored the hibiscus flower with the Real Red Stampin’ Blends. I colored the smaller plumeria flowers with Daffodil Delight Stampin’ Blends with small touches of Light Real Red in the center. I highlighted the flower petals by using the Stampin’ Blends Color Lifter to remove color from the flower petals, brushing back and forth in a linear fashion on the hibiscus and brushing in circular motions on the plumeria flower tips. I colored the leaves with the Old Olive Stampin’ Blends, using the dark marker to highlight the leaf veins.

I stamped the monstera leaf from the Tropical Chic stamp set using the Stamparatus so that it would resemble the leaves on the Tropical Oasis DSP. I first stamped the leaf in Old Olive ink on Thick Whisper White card stock. I wiped the stamp and then inked the edges with Shaded Spruce ink. I used a sponge dauber to blend the ink on the stamp to remove the harsh edge and closed the Stamparatus. This resulted in a two tone look that goes pretty well with the way the leaves are colored on the DSP. I cut out all the flowers and leaves using their coordinating dies. I stamped the sentiment from the Stampin’ Up! Timeless Tropical stamp set on a strip of Whisper white using Sahara Sand ink. I trimmed the end of the label to make an angle and then sponged the edges to give it a vintage look. I adhered it to a Shaded Spruce mat.

I arranged the flowers, leaves and label on the card front. I adhered the label with glue dots. Then I adhered the leaves with glue dots. I added the small plumeria flowers next with glue dots. I finally added the large hibiscus flower with dimensionals. I brushed clear Wink of Stella over the flowers to give them some shimmer. I added two red rhinestones to the plumeria flower centers. I made a bow with Linen Thread and adhered it with a glue dot and finished off the card front with a little monstera leaf embellishment from the Tropical Oasis trinkets.

On the inside, I stamped the hibiscus flower from the Timeless Tropical stamp set on a Whisper White panel in Sahara Sand ink after stamping off. I trimmed the bottom with a strip of the Tropical Oasis designer series paper. I adhered the panel to the inside of the card with snail.

The Stampin’ Up! Timeless Tropical bundle has the most beautiful tropical images and dies that coordinate with them. Tropical themed cards are perfect escapes during the cold winter, and this set is perfect for creating them. And the set also brings a bit of nostalgia with the vintage feel in the images and sentiments, evoking memories of warmer times, which help us get through the cold winter.


January 16 – 31 Host Code: EFVWTZUQ

Use this host code when you order $50 or more and receive a free gift from me!  The gift is your choice of any item valued up to $10.00 in the 2019-20 Annual Catalog or in the 2019 Holiday Catalog!  That includes some of the Host Exclusive stamp sets!

If your order is over $150, please do not use the host code since you’ll receive your own Host Dollars plus I’ll send you the free gift!  This host code can be used by anyone, no commitment required.  Let me know if you have any questions.


If you need any stamping supplies, I’d be very happy to be your Demonstrator.  Just click on the Shop Now button on the right side of the screen to go directly to my online store or contact me if you have any questions.  Happy Stamping!

Thanks for stopping by and have a great day!

Akiko

  • Visit my online store here
  • See the current Stampin’ Up! clearance rack specials here
  • Earn FREE Stampin’ Up! products through my Wildflower Frequent Shopper Program – my way of saying thank you to my frequent shopper online customers.
  • Sign up for my weekly newsletter here
  • Have any questions? I’d be happy to help, click here to contact me.

Cardstock Cuts for this project:

  • Shaded Spruce – 4 1/4″ x 11″ scored at 5 1/2″ (card base), 2 1/8″ x 4 1/2″ (mat), 3/4″ x 4″ (label)
  • Thick Whisper White – 3 1/2″ x 6″ (flower die cuts), 3″ x 4″ (leaf die cuts)
  • Whisper White – 3 3/4″ x 5″ (inside), 3/8″ x 4″ (label)
  • Tropical Oasis DSP – 2″ x 4 3/8″ (front panel), 1/2″ x 3 3/4″ (inside trim)

Stampin’ Up! products used in this project:


Stampin’ Up! Timeless Tulips Love You Card

Good Morning! Today I am sharing a video that I did yesterday during my Sunday Facebook Live session. When I saw all the tulips showing up in the grocery store flower shop, I immediately thought of the Stampin’ Up! Timeless Tulips stamp bundle. But I had to make it a Valentine’s Day Card because it’s just around the corner, so I decided on red tulips with heart designer series paper – the new From my Heart specialty designer series paper.

Here’s the Facebook Live video showing how to make this pretty card:

I also posted the video to my YouTube channel and you can view it here.

I started by stamping the tulip flowers on thick Whisper White card stock in Real Red ink. I cut them out with the Tulip Builder punch that comes in the Timeless Tulips bundle. I stamped the sentiment from the Stampin’ Up! Heartfelt stamp set in Real Red ink on a small Whisper White Panel. I stamped the stems and leaves from the Stampin’ Up! Timeless Tulips stamp set in Granny Apple Green. I adhered the panel to a Real Red mat with snail and adhered the Tulips to the card with dimensionals. I finished the panel with a Real Red bow.

I adhered a panel of the Heart DSP from the From My Heart specialty designer series paper to a Real Red card base. I popped the decorated tulip panel on with dimensionals.

I stamped the large tulip flower in Real Red ink on the left side of a Whisper White panel for the inside of the card. I stamped the stem and leaves in Granny Apple Green. I adhered a strip of the Heart DSP to the bottom of the panel with multipurpose liquid glue. I adhered the panel to the inside of the card with snail.

Valentine’s Day is less than 4 weeks away and the products in the new January-June 2020 Mini Catalog create the cutest cards to say Love You Lots!


January 16 – 31 Host Code: EFVWTZUQ

Use this host code when you order $50+ and receive a free gift from me!  If your order is over $150, please do not use this code, but you’ll still get the free gift.  The free gift is your choice of any item valued up to $10.00 in the 2018-19 Annual Catalog or in the 2019 Occasions Catalog!  That includes some of the Host Exclusive stamp sets!

If your order is over $150, please do not use the host code since you’ll receive your own Host Dollars plus I’ll send you the free gift!  This host code can be used by anyone, no club or commitment required.  Let me know if you have any questions.


If you need any stamping supplies, I’d be very happy to be your Demonstrator.  Just click on the Shop Now button on the right side of the screen to go directly to my online store or contact me if you have any questions.  Happy Stamping!

Thanks for stopping by and have a great week!

Akiko

  • Visit my online store here
  • See the current Stampin’ Up! clearance rack specials here
  • Earn FREE Stampin’ Up! products through my Wildflower Frequent Shopper Program – my way of saying thank you to my frequent shopper online customers.
  • Have any questions? I’d be happy to help, click here to contact me.

Cardstock Cuts for this project:

  • Real Red – 4 1/4″ x 11″ scored at 5 1/2″ (card base), 2 5/8″ x 4 1/8″ (art panel mat)
  • Whisper White – 3 3/4″ x 5″ (inside panel), 2 1/2″ x 4″ (art panel)
  • Thick Whisper White – 2 1/2″ x 4 1/2″ (tulips)
  • From my Heart DSP – 3 3/4″ x 5″ (card front background), 1/2″ x 3 3/4″ (inside trim)

Stampin’ Up! products used in this project:


Stampin’ Up! Thoughtful Blooms Hello Card

Good Morning and Happy Friday! Today’s card is a cheerful hello card made with the Sale-A-Bration Thoughtful Blooms stamp set along with the Sale-A-Bration Small Bloom punch. You can find the supplies used to create this card at the bottom of my post along with the sizes of cardstock used.

I stamped several of the large solid blooms from the Stampin’ Up! Thoughtful Blooms stamp set on strips of Whisper White card stock in Melon Mambo ink. The Thoughtful Blooms stamp set is available FREE during Sale-A-Bration with a $50 purchase. I cut them out with the Small Bloom punch which is also a FREE Sale-A-Bration item with a $100 purchase.

I stamped the vines and leaves from the Stampin’ Up! Thoughtful Blooms stamp set on a panel of Pool Party card stock using Granny Apple Green ink. I stamped the small solid flowers with Pacific Point ink. Then I used the bone folder and curled the petals on the Melon Mambo flowers back and adhered them on the stamped panel with glue dots. I added Pineapple Punch dots to the centers.

I embossed a panel of the Pool Party striped Peaceful Poppies designer series paper with the Layered Leaves embossing folder. I adhered the floral Pool Party panel to the top of a Whisper White mat and the embossed DSP to the bottom with snail. I tied a length of Whisper White crinkle seam binding around the middle and made a bow. I adhered the layered panel to a Pool Party card base with dimensionals. I stamped the hello sentiment from the Timeless Tulips stamp set in Pacific Point ink on a strip of Pool Party. I added some small Melon Mambo flowers and a leaf sprig from the Stampin’ Up! Thoughtful Blooms stamp set and cut it out with the small scalloped rectangle from the stitched so sweetly dies. I popped it on the card front with dimensionals.

For the inside of the card, I stamped a Melon Mambo flower with some Granny Apple Green leaves and vines and Pacific Point small flowers. I used my Pineapple Punch Stampin’ Write marker to color the flower centers and finished it off with a strip of embossed Pool Party striped DSP. I adhered it to the inside of the card with snail.

The Stampin’ Up! Thoughtful Blooms stamp set is a sweet set with lots of different sized flowers and leaves. I only used the solid stamps, it has some great options for two-step stamping to produce multi colored flowers. It’s a great FREE Sale-A-Bration option at the $50 level.


Stampin’ Up! Sale-A-Bration is going on now!

Sale-A-Bration Shopping Benefits

You earn FREE products for every $50 you spend (before shipping and taxes) during Sale-A-Bration. The Sale-A-Bration brochure has the products that you can choose to add to your order. And the more you spend, the more FREE products you can earn. There are two qualifying levels with spending thresholds, giving you flexibility to choose what you want.

For example, if you spend $150, then you can then choose three level 1 items or one level 1 and one level 2.

Head over to my online store to shop now.

There are also extra benefits for hosting and joining that are exclusive to Sale-A-Bration and you can read about them on my Promotions Page.


January 16 – 31 Host Code: EFVWTZUQ

Use this host code when you order $50 or more and receive a free gift from me!  The gift is your choice of any item valued up to $10.00 in the 2019-20 Annual Catalog or in the 2019 Holiday Catalog!  That includes some of the Host Exclusive stamp sets!

If your order is over $150, please do not use the host code since you’ll receive your own Host Dollars plus I’ll send you the free gift!  This host code can be used by anyone, no commitment required.  Let me know if you have any questions.


If you need any stamping supplies, I’d be very happy to be your Demonstrator.  Just click on the Shop Now button on the right side of the screen to go directly to my online store or contact me if you have any questions.  Happy Stamping!

Thanks for stopping by and have a great day!

Akiko

  • Visit my online store here
  • See the current Stampin’ Up! clearance rack specials here
  • Earn FREE Stampin’ Up! products through my Wildflower Frequent Shopper Program – my way of saying thank you to my frequent shopper online customers.
  • Sign up for my weekly newsletter here
  • Have any questions? I’d be happy to help, click here to contact me.

Cardstock Cuts for this project:

  • Pool Party – 4 1/4″ x 11″ scored at 5 1/2 (card base), 3 3/4″ x 3 7/8″ (floral panel 1″ x 3″ (label)
  • Whisper White – 3 3/4″ x 5″ (inside panel) 4″ x 5 1/4″ (front mat), (3) 1″ x 5″ strips (punched flowers)
  • Peaceful Poppies DSP (Pool Party striped) – 2″ x 3 7/8″ (embossed front), 1/2″ x 3 3/4″ (inside trim)

Stampin’ Up! products used in this project:


Stampin’ Up! Heartfelt for the Happy Inkin’ Thursday Blog Hop

Good Morning! Welcome to another Happy Inkin’ Thursday Blog Hop! I have another Valentine’s Day Card made with the cute Stampin’ Up! Heartfelt bundle and the From My Heart specialty designer series paper.

We have a sketch challenge this week and we’re still working to inspire you for Valentine’s Day, so here is the sketch we are using:

I started by punching two hearts from the From My Heart Specialty DSP. The first is the Flirty Flamingo and Real Red fancy foil heart using the regular heart punch and the second is the red foil scalloped heart using the scalloped heart punch. Both of these punches are included in the Heartfelt bundle and they fit perfectly together. I adhered the two foil hearts together with multipurpose liquid glue and adhered them to a Flirty Flamingo heart doily with dimensionals.

I cut two rectangles using other paper from the From My Heart Specialty DSP pack using the Stitched Rectangle die and adhered them together at an angle with multipurpose liquid glue. I ran a panel of Flirty Flamingo Card Stock through the Parisian Flourish embossing folder and adhered it to a Flirty Flamingo card base. I adhered the From My Heart DSP panels to the center and then the layered hearts on top.

I stamped the sentiment from the Stampin’ Up Heartfelt stamp set on a strip of Real Red card stock with Versamark ink. I sprinkled it with white embossing powder and heat set. I cut it out with the long label from the Stitched Rectangles dies and adhered it to the card with dimensionals and multipurpose liquid glue. I finished the card front with 9 From My Heart faceted gems adhered to the heart DSP above the layered heart.

I stamped the heart with the Happy Valentine’s Day sentiment from the Stampin’ Up! Heartfelt stamp set on a panel of Whisper White using Flirty Flamingo ink. I trimmed the bottom with a strip of the heart DSP and adhered it to a Real Red mat before adhering it to the inside of the card.

The From My Heart specialty designer series paper is so pretty – I have loved all the cards I have made with it. And I love the punch pack in the Stampin’ Up! Heartfelt bundle, with the scalloped punch sized perfectly to match the regular punch.

On with the Hop! Click the Next button below to visit Karen Ksenzakovic’s blog.

And just in case you get lost along the way, here’s a list of the team members participating in the hop today:


January 16 – 31 Host Code: EFVWTZUQ

Use this host code when you order $50 or more and receive a free gift from me!  The gift is your choice of any item valued up to $10.00 in the 2019-20 Annual Catalog or in the 2019 Holiday Catalog!  That includes some of the Host Exclusive stamp sets!

If your order is over $150, please do not use the host code since you’ll receive your own Host Dollars plus I’ll send you the free gift!  This host code can be used by anyone, no commitment required.  Let me know if you have any questions.


If you need any stamping supplies, I’d be very happy to be your Demonstrator.  Just click on the Shop Now button on the right side of the screen to go directly to my online store or contact me if you have any questions.  Happy Stamping!

Thanks for visiting!

Akiko

  • Visit my online store here
  • See the current Stampin’ Up! clearance rack specials here
  • Earn FREE Stampin’ Up! products through my Wildflower Frequent Shopper Program – my way of saying thank you to my frequent shopper online customers.
  • Sign up for my weekly newsletter here
  • Have any questions? I’d be happy to help, click here to contact me.

Cardstock Cuts for this project:

  • Flirty Flamingo – 4 1/4″ x 11″ scored at 5 1/2″ (card base), 4 1/4″ x 5 1/2″ (embossed panel)
  • Real Red – 4″ x 5 1/4″ (inside mat), 1″ x 3″ (label)
  • Whisper White – 3 7/8″ x 5 1/8″ (inside panel)
  • From My Heart specialty DSP – (2) 3″ x 4 1/4″ (die cut stitched rectangles), 1/2″ x 3 7/8″ (inside trim), foil hearts for punches

Stampin’ Up! products used in this project: