Stampin’ Up! Little Ladybug Hello Card

Good Morning! Today is the last day of Sale-A-Bration, so I have a card made with the cute Stampin’ Up! Little Ladybug cling stamp set. It is also the last day for the Coordination Products Release which includes the Ladybug Dies that I also used. You can find the supplies used to create this card at the bottom of my post along with the sizes of cardstock used.

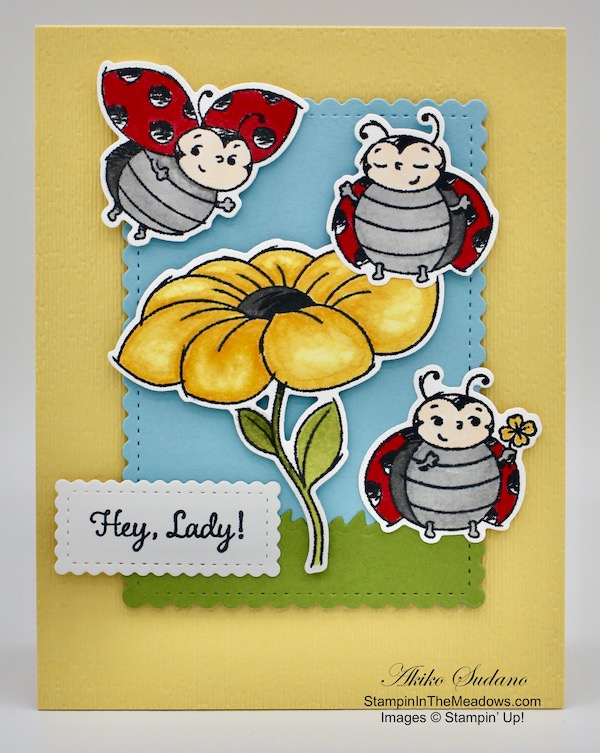
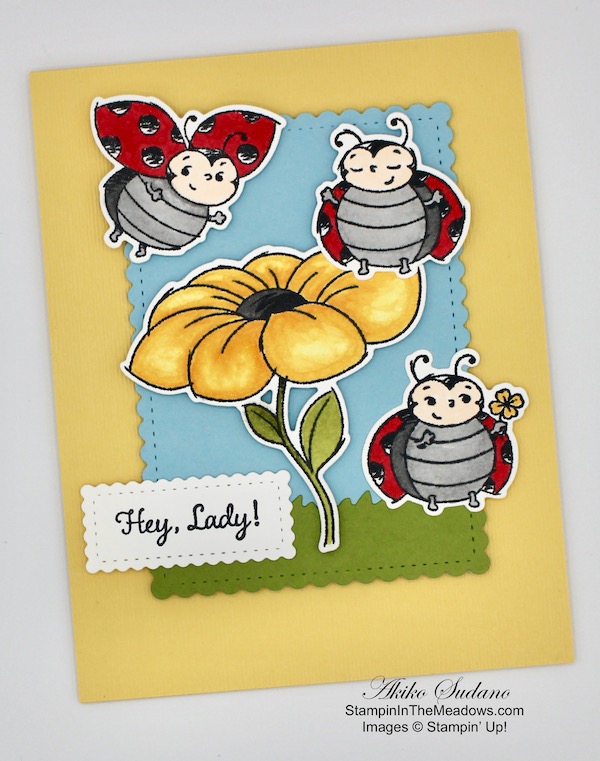
I embossed a panel of So Saffron card stock with the Subtle embossing folder and adhered it to a So Saffron card base with liquid glue. I cut a Balmy Blue panel with the large scalloped rectangle from the Stitched So Sweetly Dies. I cut one end of a strip of Old Olive with the grass die from the Special Day Dies and cut the other sides with the same Stitched So Sweetly scalloped rectangle die. I adhered the grass to the bottom of the Balmy Blue die cut with liquid glue. I adhered the panel to the card base with dimensionals.

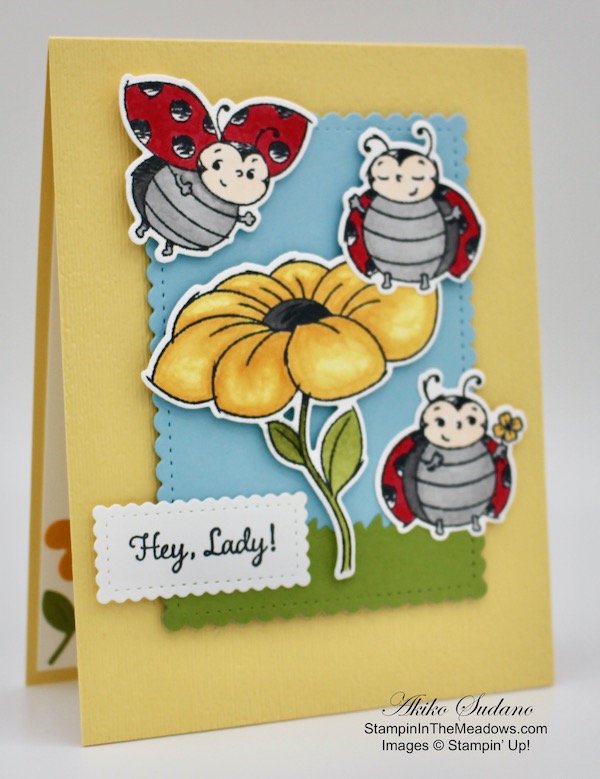
I stamped the large flower from the Stampin’ Up! Little Ladybug cling stamp set in Memento Tuxedo Black ink on a Whisper White panel. I colored it with Mango Melody, Old Olive and Smoky Slate Stampin’ Blends and cut it out with the coordinating die from the Ladybug Dies. I stamped the Hey, Lady sentiment in Memento Tuxedo Black ink on a strip of Whisper White and cut it out with the smallest Stitched So Sweetly scalloped rectangle die. I adhered the flower with dimensionals and adhered the label with a dimensional and liquid glue where the label overlapped the larger die cut.

I stamped all four ladybugs from the Stampin’ Up! Little Ladybug stamp set in Memento Tuxedo Black ink on Whisper White. I colored them with Light Real Red, Light Petal Pink and both Smoky Slate Stampin’ Blends and cut them out with the coordinating dies. I colored the little flower with the light Mango Melody Blend. I adhered the ladybug holding the flower with liquid glue and the other two ladybugs with dimensionals.

I saved the last ladybug for the inside of the card. I also cut a flower using the dies from the Ladybug Dies using Mango Melody, Old Olive and Basic Black card stock and adhered it to the bottom of a Whisper White panel with liquid glue. I added the last ladybug next to the flower and adhered the panel to the inside of the card.

The Stampin’ Up! Little Ladybug stamp set is a Sale-A-Bration special that is FREE for Hosts with workshops totaling $300 or more (or an order of $300 or more), but today is the last day for the offer.


March 16 – 31 Host Code: RSAF3R27

April 1 – 15 Host Code: N39D7TBK

Use this host code when you order $50 or more and receive a free gift from me!  The gift is your choice of any item valued up to $10.00 in the 2019-20 Annual Catalog or in the 2020 January-June Mini Catalog!  That includes some of the Host Exclusive stamp sets!

If your order is over $150, please do not use the host code since you’ll receive your own Host Dollars plus I’ll send you the free gift!  This host code can be used by anyone, no commitment required.  Let me know if you have any questions.


If you need any stamping supplies, I’d be very happy to be your Demonstrator.  Just click on the Shop Now button on the right side of the screen to go directly to my online store or contact me if you have any questions.  Happy Stamping!

Thanks for stopping by and have a great day!

Akiko

  • Visit my online store here
  • See the current Stampin’ Up! clearance rack specials here
  • Earn FREE Stampin’ Up! products through my Wildflower Frequent Shopper Program – my way of saying thank you to my frequent shopper online customers.
  • Sign up for my weekly newsletter here
  • Have any questions? I’d be happy to help, click here to contact me.

Cardstock Cuts for this project:

  • So Saffron – 4-1/4″ x 11″ card base scored at 5-1/2, 4″ x 5-1/2″ (embossed card front)
  • Balmy Blue – 3-1/4″ x 4-1/2″ (die cut panel)
  • Old Olive – 1″ x 3-1/4″ (grass die cut), 1″ x 1-1/2″ (inside flower stem)
  • Mango Melody – 1″ x 1″ (inside flower)
  • Basic Black – 1″ x 1″ (inside flower center)
  • Whisper White – 4″ x 5-1/4″ (inside panel), 4″ x 4″ (die cut flower), 4-1/2″ x 4-1/2″ (ladybug lie cuts), 1″ x 2-1/2″ (label)

Stampin’ Up! products used in this project:


Stampin’ Up! Dino Days Birthday Card

Good Morning! Today I’m sharing a birthday card made with the Stampin’ Up! Dino Days photopolymer stamp set and the Dinoroar designer series paper. You can find the supplies used to create this card at the bottom of my post along with the sizes of cardstock used.

The card design was inspired by the Paper Players Sketch Challenge #483. Here is the sketch:

I cut two strips of the geometric Dinoroar designer series paper and adhered them to the background DSP and to a Garden Green card base.

I stamped the sentiment from the Stampin’ Up! Dino Days stamp set in Garden Green ink on a Whisper White panel. I used the dinosaur footprint stamp to stamp a trail in Crumb Cake ink and cut it out with the largest stitched oval from the Stitched Shapes Dies. I cut grass in Garden Green using the Special Day Dies and then cut the bottom with the same stitched oval die. I adhered the grass to the bottom of the oval with multipurpose liquid glue. I cut a mat from Lovely Lipstick card stock using the largest scalloped label in the Layering Ovals dies and adhered it to the back of the oval panel.

I stamped two dinosaurs from the Stampin’ Up! Dino Days stamp set in Balmy Blue ink on Whisper White. I stamped two sets of the back fins in Lovely Lipstick ink on Whisper White. I cut these pieces out with the coordinating dies and adhered them together. I colored the eyes with a black journaling pen. I adhered one of the dinosaurs on the oval panel with dimensionals. Then I adhered the oval panel on the card front with dimensionals.

I adhered a strip of the geometric Dino Roar DSP to a Whisper White panel and adhered the second dinosaur on top. I adhered the panel to the inside of the card.

The Stampin’ Up! Dino Days bundle includes the Dino Days photopolymer stamp set and the coordinating Dino Dies. The Dinoroar designer series paper was just added to the Sale-A-Bration FREE with $50 purchase list – Yay!! And did you know that some of the dinosaur images in the Dinoroar DSP can also be cut with the Dino Dies?


March 16 – 31 Host Code: RSAF3R27

Use this host code when you order $50 or more and receive a free gift from me!  The gift is your choice of any item valued up to $10.00 in the 2019-20 Annual Catalog or in the 2020 January-June Mini Catalog!  That includes some of the Host Exclusive stamp sets!

If your order is over $150, please do not use the host code since you’ll receive your own Host Dollars plus I’ll send you the free gift!  This host code can be used by anyone, no commitment required.  Let me know if you have any questions.


If you need any stamping supplies, I’d be very happy to be your Demonstrator.  Just click on the Shop Now button on the right side of the screen to go directly to my online store or contact me if you have any questions.  Happy Stamping!

Thanks for stopping by and have a great day!

Akiko

  • Visit my online store here
  • See the current Stampin’ Up! clearance rack specials here
  • Earn FREE Stampin’ Up! products through my Wildflower Frequent Shopper Program – my way of saying thank you to my frequent shopper online customers.
  • Sign up for my weekly newsletter here
  • Have any questions? I’d be happy to help, click here to contact me.

Cardstock Cuts for this project:

  • Garden Green – 5-1/2″ x 8-1/2″ card base scored at 4-1/4, 1-1/2″ x 4″ (die cut grass)
  • Lovely Lipstick – 3″ x 4-1/4″ (scalloped oval mat)
  • Whisper White – 4″ x 5-1/4″ (inside panel), 4-1/4″ x 6″ (die cus – dinosaurs and oval)
  • Dinoroar DSP – 4″ x 5-1/4″ (front panel), (3) 1/2″ x 4″ (geometric strips)

Stampin’ Up! products used in this project:


Stampin’ Up! Positive Thoughts for the Happy Inkin’ Thursday Blog Hop

Good Morning! Welcome to another Happy Inkin’ Thursday Blog Hop! I made a card with the Stampin’ Up! Positive Thoughts cling stamp set and the coordinating Nature’s Thoughts Dies from the Coordination Products Release. You can find the supplies used to create this card at the bottom of my post along with the sizes of cardstock used.

We have a sketch challenge this week, and here is the sketch we are using:

I started by embossing a panel of Mint Macaron card stock with the Coastal Weave 3D embossing folder and the 3D embossing folder plate and adhering it to the bottom of a panel of Garden Lane designer series paper with multipurpose liquid glue. I adhered the layered DSP to a Soft Suede card base. I stamped the Hugs Prayers Love sentiment from the Stampin’ Up! Positive Thoughts stamp set with Versamark Ink on a Sahara Sand panel and sprinkled it with gold embossing powder. I heat set the embossing powder. I stamped the fern three times on the panel with Mint Macaron ink, once full strength and twice after stamping off. I cut the panel out with the fancy stitched rectangle die from the Nature’s Thoughts Dies and sponged the edges with Soft Suede ink to give it a distressed look.

I stamped the fern from the Stampin’ Up! Positive Thoughts stamp set in Pear Pizzazz ink on a Whisper White panel. I cut it out with the coordinating die. I stamped the flower in Blushing Bride ink on a Whisper White panel and cut it out with the coordinating die. I cut the flower center out of Blushing Bride card stock with the die from the Nature’s Thoughts dies and pushed up the little die cuts. I also cut out two of the sprigs from Rococo Rose card stock. I lightly sponged all the die cuts with Soft Suede ink.

I adhered the flower center to the stamped flower with multipurpose liquid glue and added a Rococo Rose faceted dot. I arranged the leaves and buds on the embossed panel and adhered them with multipurpose liquid glue. I folded and trimmed a length of white linen ribbon and adhered it with glue dots. I popped the layered flower on with dimensionals and added a linen thread bow. I finished it off with a gold foil butterfly cut with the small butterfly die from the Nature’s Thoughts dies. I adhered the panel to the card front with dimensionals.

I stamped the corners of a Whisper White panel with the fern stamp in Mint Macaron ink after stamping off. I trimmed the bottom with a strip of the Garden Lane DSP and adhered it to the inside of the card with snail.

The Stampin’ Up! Positive Thoughts cling stamp set has so many beautiful natural images and I love all the cards I have seen using it. And it’s so appropriate to our times. Take care!

On with the Hop! Click the Next button below to visit Karen Ksenzakovic’s blog.

And just in case you get lost along the way, here’s a list of the team members participating in the hop today:


March 16 – 31 Host Code: RSAF3R27

Use this host code when you order $50 or more and receive a free gift from me!  The gift is your choice of any item valued up to $10.00 in the 2019-20 Annual Catalog or in the 2020 January-June Mini Catalog!  That includes some of the Host Exclusive stamp sets!

If your order is over $150, please do not use the host code since you’ll receive your own Host Dollars plus I’ll send you the free gift!  This host code can be used by anyone, no commitment required.  Let me know if you have any questions.


If you need any stamping supplies, I’d be very happy to be your Demonstrator.  Just click on the Shop Now button on the right side of the screen to go directly to my online store or contact me if you have any questions.  Happy Stamping!

Thanks for visiting!

Akiko

  • Visit my online store here
  • See the current Stampin’ Up! clearance rack specials here
  • Earn FREE Stampin’ Up! products through my Wildflower Frequent Shopper Program – my way of saying thank you to my frequent shopper online customers.
  • Sign up for my weekly newsletter here
  • Have any questions? I’d be happy to help, click here to contact me.

Cardstock Cuts for this project:

  • Soft Suede – 5-1/2″ x 8-1/2″ card base scored at 4-1/4
  • Mint Macaron – 1-1/2″ x 5-1/4″ (embossed background)
  • Sahara Sand – 3″ x 4-1/2″ (die cut background)
  • Rococo Rose – 1-1/4″ x 2-1/2″ (floral die cuts)
  • Blushing Bride – 1-1/2″ x 1-1/2″ (die cut flower center)
  • Gold Foil – 1″ x 1″ (die cut butterfly)
  • Whisper White – 4″ x 5-1/4″ (inside panel), 2-3/4″ x 4-1/2″ (die cut stamped fern and flower)
  • Garden Lane DSP – 4″ x 5-1/4″ (front panel), 1/2″ x 5-1/4″ (inside trim)

Stampin’ Up! products used in this project:


Stampin’ Up! To A Wild Rose Hello Card

Good Morning! Did you hear that they added new items to Saale-A-Bration? We are in the final week and ten items from the Annual Catalog have been tagged as FREE Sale-A-Bration items with a minimum $50 purchase. And today’s card uses two of these items. You can find the supplies used to create this card at the bottom of my post along with the sizes of cardstock used. Important: Note that the Sale-A-Bration item numbers are different!!

I cut a panel of the Woven Threads designer series paper and adhered it to a Rococo Rose card base. I cut another panel of Woven Threads DSP using the large label from the Wild Rose Dies and adhered it to the front with snail. I stamped the outline rose from the Stampin’ Up! To A Wild Rose photopolymer stamp set in Rococo Rose ink on a Whisper White panel. Then I stamped the fuller image in Rococo Rose after stamping off once. Finally I stamped the smallest image in Rococo Rose after stamping off once. I used the matching die cut to cut it out. With the Wild Rose Dies, I cut out two leaf clusters from Mossy Meadow and two bud clusters from Rococo Rose.

I stamped the hello sentiment from the Stampin’ Up! To A Wild Rose stamp set on a Whisper White panel with Rococo Rose ink and cut it out with the smallest Stitched Nested Labels die. I arranged the die cuts on the large label and adhered the leaf and bud clusters and label with multipurpose liquid glue and the rose with dimensionals. I finished off the front with a lace ribbon bow and a Rococo Rose faceted gem

I decorated the inside by adding a strip of the Woven Threads DSP to the bottom of a Whisper White Panel and adhering it to the inside of the card.

The Wild Rose Dies and Woven Threads designer series paper are two of the new items that were added to Sale-A-Bration. Important: Note that the Sale-A-Bration item numbers are different!! Click on the image to see a PDF with all the new items or visit my Online Store to see all the Sale-A-Bration items:

Sale-A-Bration Runs through March 31, so hurry to take advantage of these great deals!!


March 16 – 31 Host Code: RSAF3R27

Use this host code when you order $50 or more and receive a free gift from me!  The gift is your choice of any item valued up to $10.00 in the 2019-20 Annual Catalog or in the 2020 January-June Mini Catalog!  That includes some of the Host Exclusive stamp sets!

If your order is over $150, please do not use the host code since you’ll receive your own Host Dollars plus I’ll send you the free gift!  This host code can be used by anyone, no commitment required.  Let me know if you have any questions.


If you need any stamping supplies, I’d be very happy to be your Demonstrator.  Just click on the Shop Now button on the right side of the screen to go directly to my online store or contact me if you have any questions.  Happy Stamping!

Thanks for stopping by and have a great day!

Akiko

  • Visit my online store here
  • See the current Stampin’ Up! clearance rack specials here
  • Earn FREE Stampin’ Up! products through my Wildflower Frequent Shopper Program – my way of saying thank you to my frequent shopper online customers.
  • Sign up for my weekly newsletter here
  • Have any questions? I’d be happy to help, click here to contact me.

Cardstock Cuts for this project:

  • Rococo Rose – 4-1/4″ x 11″ card base scored at 5-1/2, 1″ x 4″ (bud die cuts)
  • Mossy Meadow – 2″ x 4″ (leaves die cuts)
  • Whisper White – 4″ x 5-1/4″ (inside panel), 3″ x 3″ (rose), 1-1/2″ x 2-1/2″ (label)
  • Woven Threads DSP – 4″ x 5-1/4″ (background), 1/2″ x 4″ (inside trim), 2-3/4″ x 4″ (large label)

Stampin’ Up! products used in this project:


Stampin’ Up! Vibrant Vases with Flowering Foils Just For You Card

Good Morning! Today I am sharing another pretty card made with the Sale-A-Bration Flowering Foils specialty designer series paper and featuring the lovely sentiment from the Stampin’ Up! Vibrant Vases photopolymer stamp set. You can find the supplies used to create this card at the bottom of my post along with the sizes of cardstock used.

My card layout was inspired by Sunday Stamps SSC226. Check out the inspiration and other entries for this pretty sketch.

I started by embossing a panel of Whisper White card stock with the Scripty embossing folder. I adhered it to a Whisper white mat and wrapped a length of Metallic Edge Petal Pink ribbon around it, securing it in the back.

I picked a flower from the large floral paper in the Flowering Foils specialty designer series paper and colored it with Petal Pink, So Saffron, and Old Olive Stampin’ Blends. I fussy cut the flower and adhered it to the card front with multipurpose liquid glue. I adhered the panel to the front of a Petal Pink card base with dimensionals.

I stamped the just for you sentiment from the Stampin’ Up! Vibrant Vases stamp set on a panel of Thick Whisper White card stock in Versamark Ink. I sprinkled it with copper embossing powder and heat set. I cut it out with the small scalloped rectangle from the Stitched So Sweetly Dies and adhered it to the card front with dimensionals. I made a bow with a length of the Metallic Edge Petal Pink ribbon and adhered it to the top of the card with glue dots. I added a Champagne rhinestone to the label.

I colored another flower from the Flowering Foils specialty designer series paper and trimmed it before adhering it to the bottom corner of a Whisper White panel. I adhered the panel to the inside of the card with snail.

The sentiments in the Stampin’ Up! Vibrant Vases stamp set are done with a very elegant font that goes well with the Sale-A-Bration Flowering Foils DSP. The shine of the foil outline images is wonderful and the paper is so easy to color with the Stampin’ Blends, making for a very special card.


March 16 – 31 Host Code: RSAF3R27

Use this host code when you order $50 or more and receive a free gift from me!  The gift is your choice of any item valued up to $10.00 in the 2019-20 Annual Catalog or in the 2020 January-June Mini Catalog!  That includes some of the Host Exclusive stamp sets!

If your order is over $150, please do not use the host code since you’ll receive your own Host Dollars plus I’ll send you the free gift!  This host code can be used by anyone, no commitment required.  Let me know if you have any questions.


If you need any stamping supplies, I’d be very happy to be your Demonstrator.  Just click on the Shop Now button on the right side of the screen to go directly to my online store or contact me if you have any questions.  Happy Stamping!

Thanks for stopping by and have a great day!

Akiko

  • Visit my online store here
  • See the current Stampin’ Up! clearance rack specials here
  • Earn FREE Stampin’ Up! products through my Wildflower Frequent Shopper Program – my way of saying thank you to my frequent shopper online customers.
  • Sign up for my weekly newsletter here
  • Have any questions? I’d be happy to help, click here to contact me.

Cardstock Cuts for this project:

  • Petal Pink – 4-1/4″ x 11″card base scored at 5-1/2″
  • Whisper White – 3-3/4″ x 5″ (embossed background), 3-7/8″ x 5-1/8″ (mat), 4″ x 5-1/4″ (inside panel)
  • Thick Whisper White – 1-1/2″ x 2-1/2″ (label)
  • Flowering Foils DSP – enough to fussy cut a full single large flower for the front and a part of a flower for the inside.

Stampin’ Up! products used in this project:


Stampin’ Up! Well Dressed Anniversary Card

Happy St. Patrick’s Day!

Today I am all about Anniversaries! Today is the 1 year anniversary of my first blog post and I have a masculine anniversary card made with the Stampin’ Up! Well Dressed cling stamp set for my DH to celebrate our 44th anniversary this weekend. You can find the supplies used to create this card at the bottom of my post along with the sizes of cardstock used.

The layout for today’s card was inspired by the wonderful sketch at Fab Friday 185. Here is their sketch:

I stamped the tie from the Stampin’ Up! Well Dressed Sale-A-Bration cling stamp set on a panel of Whisper white in Night of Navy ink. Next to it, I stamped the wing tip shoe in Early Espresso ink and the fountain pen in Garden Green ink. Whew, good thing that the background plaid had green so I could add a touch of green for St. Patrick’s Day! I adhered the panel to a Night of Navy mat. I stamped the fedora hat in Soft Suede ink on a scrap of Crumb Cake card stock and fussy cut it out with my paper snips. Then I adhered it to stamped square with multipurpose liquid glue.

I cut a panel of the wood grained paper from the Pressed Petals specialty designer series paper and adhered it to a Soft Suede mat. I adhered the stamped panel on top with dimensionals. I tied a length of denim ribbon and adhered it to the side with glue dots. I stamped the Happy Anniversary label with stamps from the Well Said cling stamp set in Night of Navy ink on a Whisper White panel. I adhered it to a Soft Suede mat. I adhered the label to the panel with dimensionals under the bottom edge and multipurpose liquid glue under the top. I finished off the panel with a gold metallic pearl tie tack!

I adhered a panel of the blue plaid Country Club designer series paper to a Night of Navy card base. I adhered the decorated art panel to the card front with multipurpose liquid glue.

I stamped the sentiment from the Well Said stamp set in Night of Navy on a Whisper White panel. I stamped another fountain pen from the Stampin’ Up! Well Dressed stamp set in Garden Green ink and trimmed the bottom with more of the Country Club DSP. I adhered it to the inside of the card with snail.

The Stampin’ Up! Well Dressed cling stamp set is a Sale-A-Bration stamp set that is FREE with a $50 purchase. It is part of the Sale-A-Bration Second Release and will be available through the end of the month or until supplies last.

I don’t think we’ll be doing anything special this weekend for our anniversary, but at least he’ll get a nice handmade card!

As for my blog, in the past year, I have really enjoyed myself. I managed to write 168 blog posts and I finally hit 200 followers. I am so grateful for all of my supporters! On to year 2!


Two Weeks Left for Sale-A-Bration!

Sale-A-Bration has been very exciting this year with lots of beautiful products and special releases. But there are only two weeks left to participate in the best Stampin’ Up! deals of the year! While a few of the products have sold out, there’s still lots of great items left, including the stamp set used in today’s post. You can check out all the items still available in my Online Store and read on to learn more. There are three ways to enjoy Sale-A-Bration benefits: Shop – Host – Join.

Sale-A-Bration Shopping Benefits

You earn FREE products for every $50 you spend (before shipping and taxes) during Sale-A-Bration. The Sale-A-Bration brochure has the products that you can choose to add to your order. And the more you spend, the more FREE products you can earn. There are two qualifying levels with spending thresholds, giving you flexibility to choose what you want.

For example, if you spend $150, then you can then choose three level 1 items or one level 1 and one level 2.

Head over to my online store to shop now.

Sale-A-Bration Host Benefits

Hosts with orders of $300 or more (before shipping and taxes) can receive the exclusive Little Ladybug Stamp Set (Item 152384).

  • Customer, workshop, and online orders qualify.
  • There is no limit as to how many qualifying orders you can place throughout the promotion.
  • Only one Little Ladybug Stamp Set can be redeemed per order. 
  • Only the host of the order will receive the free stamp set.
  • To qualify, orders must be opened from January 3, and closed by March 31.

Sale-A-Bration Joining Benefits

Recruits who join Stampin’ Up! as an independent Stampin’ Up! demonstrator between January 3–March 31, 2020, will receive the Mini Paper Cutter, a 6″ x 6″ Designer Series Paper sampler, and your choice of stamp set (Host stamp sets and Sale-A-Bration stamp sets not included.). 

  • The 6″ x 6″ Designer Series Paper Sampler in the Join offering has samples from the Lily Impressions Designer Series Paper (Sale-A-Bration brochure), Peaceful Poppies Designer Series Paper (January–June 2020 Mini Catalog), Country Club Designer Series Paper (January–June 2020 Mini Catalog), Birthday Bonanza Designer Series Paper (January–June 2020 Mini Catalog), Tropical Oasis Designer Series Paper (January–June 2020 Mini Catalog), Best Dress 6″ x 6″ Designer Series Paper (January–June 2020 Mini Catalog). 
  • 12 double-sided designs (two double-sided sheets from six different Designer Series Paper packs) QTY: 48 sheets total (four each of 12 designs)
  • Mini Paper Cutter Dimensions: 7-5/8″ x 5-3/8″ x 1-1/4″

For more details on the benefits of joining Stampin’ Up! as a Demonstrator, see my Join My Team page. There is a Join My Team button at the bottom where you can start the process. Please contact me if you have any questions. I’ll be happy to tell you more.


March 16 – 31 Host Code: RSAF3R27

Use this host code when you order $50 or more and receive a free gift from me!  The gift is your choice of any item valued up to $10.00 in the 2019-20 Annual Catalog or in the 2020 January-June Mini Catalog!  That includes some of the Host Exclusive stamp sets!

If your order is over $150, please do not use the host code since you’ll receive your own Host Dollars plus I’ll send you the free gift!  This host code can be used by anyone, no commitment required.  Let me know if you have any questions.


If you need any stamping supplies, I’d be very happy to be your Demonstrator.  Just click on the Shop Now button on the right side of the screen to go directly to my online store or contact me if you have any questions.  Happy Stamping!

Thanks for stopping by and have a great day!

Akiko

  • Visit my online store here
  • See the current Stampin’ Up! clearance rack specials here
  • Earn FREE Stampin’ Up! products through my Wildflower Frequent Shopper Program – my way of saying thank you to my frequent shopper online customers.
  • Sign up for my weekly newsletter here
  • Have any questions? I’d be happy to help, click here to contact me.

Cardstock Cuts for this project:

  • Night of Navy – 4-1/4″ x 11″ card base scored at 5-1/2″, 2-7/8″ x 2-7/8″ (stamped panel mat)
  • Soft Suede – 3-3/4″ x 3-3/4″ (wood grained DSP mat), 7/8″ x 1-1/8″ (label mat)
  • Crumb Cake – 1-1/2″ x 2-1/2″ (fedora hat)
  • Whisper White – 4″ x 5-1/4″ (inside panel), 2-3/4″ x 2-3/4″ (stamped panel), 3/4″ x 1″ (label)
  • Country Club DSP – 4-1/4″ x 5″ (front background), 1/2″ x 4″ (inside trim)
  • Pressed Petals DSP – 3-5/8″ x 3-5/8″ (wood grained panel)

Stampin’ Up! products used in this project:


Stampin’ Up! Happy Birthday To You With Flowering Foils Card

Good Morning! Today I have a simple but elegant birthday card made with Sale-A-Bration items – the Stampin’ Up! Happy Birthday to You cling stamp set and the Stampin’ Up! Flowering Foils specialty designer series paper. You can find the supplies used to create this card at the bottom of my post along with the sizes of cardstock used.

I cut a panel of the beautiful Stampin’ Up! Floral Foils specialty designer series paper and adhered it to a panel of copper foil. The Stampin’ Up Flowering Foils specialty designer series paper has rose gold and silver foil designs on a white background and is FREE with a $50 purchase. I then adhered the panel to a thick Whisper White card base with dimensionals.

I stamped the sentiment from the Stampin’ Up! Happy Birthday to You Sale-A-Bration stamp set in Versamark Ink on a panel of Whisper White. I sprinkled it with copper embossing powder and heat set. I adhered it to a strip of copper foil and adhered it to the card front with dimensionals. I finished the card front off with a length of polka dot tulle ribbon.

The inside is also pretty simple. I just adhered a strip of the Stampin’ Up Flowering Foils specialty designer series paper to the bottom of a whisper white panel and adhered it to a copper foil mat before adhering it to the inside of the card.

A designer series paper with foil really steps up the card making game. The touch of shine makes it so elegant and beautiful with little effort. Using the copper foil as a mat along with the copper embossing powder ties it all together and it is an excellent match with the rose gold in the Stampin’ Up! Flowering Foils specialty designer series paper. And don’t forget that both the stamp set and the designer series paper are each Sale-A-Bration items that you can get for FREE with a $50 purchase.


15 Days Left for Sale-A-Bration!

Sale-A-Bration has been very exciting this year with lots of beautiful products and special releases. But there are only 15 days left to participate in the best Stampin’ Up! deals of the year! While a few of the products have sold out, there’s still lots of great items left, including the stamp set and designer series paper used in today’s post. You can check out all the items still available in my Online Store and read on to learn more. There are three ways to enjoy Sale-A-Bration benefits: Shop – Host – Join.

Sale-A-Bration Shopping Benefits

You earn FREE products for every $50 you spend (before shipping and taxes) during Sale-A-Bration. The Sale-A-Bration brochure has the products that you can choose to add to your order. And the more you spend, the more FREE products you can earn. There are two qualifying levels with spending thresholds, giving you flexibility to choose what you want.

For example, if you spend $150, then you can then choose three level 1 items or one level 1 and one level 2.

Head over to my online store to shop now.

Sale-A-Bration Host Benefits

Hosts with orders of $300 or more (before shipping and taxes) can receive the exclusive Little Ladybug Stamp Set (Item 152384).

  • Customer, workshop, and online orders qualify.
  • There is no limit as to how many qualifying orders you can place throughout the promotion.
  • Only one Little Ladybug Stamp Set can be redeemed per order. 
  • Only the host of the order will receive the free stamp set.
  • To qualify, orders must be opened from January 3, and closed by March 31.

Sale-A-Bration Joining Benefits

Recruits who join Stampin’ Up! as an independent Stampin’ Up! demonstrator between January 3–March 31, 2020, will receive the Mini Paper Cutter, a 6″ x 6″ Designer Series Paper sampler, and your choice of stamp set (Host stamp sets and Sale-A-Bration stamp sets not included.). 

  • The 6″ x 6″ Designer Series Paper Sampler in the Join offering has samples from the Lily Impressions Designer Series Paper (Sale-A-Bration brochure), Peaceful Poppies Designer Series Paper (January–June 2020 Mini Catalog), Country Club Designer Series Paper (January–June 2020 Mini Catalog), Birthday Bonanza Designer Series Paper (January–June 2020 Mini Catalog), Tropical Oasis Designer Series Paper (January–June 2020 Mini Catalog), Best Dress 6″ x 6″ Designer Series Paper (January–June 2020 Mini Catalog). 
  • 12 double-sided designs (two double-sided sheets from six different Designer Series Paper packs) QTY: 48 sheets total (four each of 12 designs)
  • Mini Paper Cutter Dimensions: 7-5/8″ x 5-3/8″ x 1-1/4″

For more details on the benefits of joining Stampin’ Up! as a Demonstrator, see my Join My Team page. There is a Join My Team button at the bottom where you can start the process. Please contact me if you have any questions. I’ll be happy to tell you more.


March 16 – 31 Host Code: RSAF3R27

Use this host code when you order $50 or more and receive a free gift from me!  The gift is your choice of any item valued up to $10.00 in the 2019-20 Annual Catalog or in the 2020 January-June Mini Catalog!  That includes some of the Host Exclusive stamp sets!

If your order is over $150, please do not use the host code since you’ll receive your own Host Dollars plus I’ll send you the free gift!  This host code can be used by anyone, no commitment required.  Let me know if you have any questions.


If you need any stamping supplies, I’d be very happy to be your Demonstrator.  Just click on the Shop Now button on the right side of the screen to go directly to my online store or contact me if you have any questions.  Happy Stamping!

Thanks for stopping by and have a great day!

Akiko

  • Visit my online store here
  • See the current Stampin’ Up! clearance rack specials here
  • Earn FREE Stampin’ Up! products through my Wildflower Frequent Shopper Program – my way of saying thank you to my frequent shopper online customers.
  • Sign up for my weekly newsletter here
  • Have any questions? I’d be happy to help, click here to contact me.

Cardstock Cuts for this project:

  • Thick Whisper White – 4-1/4″ x 11″ card base scored at 5-1/2″
  • Whisper White – 3-7/8″ x 5-1/8″ (inside panel), 1″ x 3-7/8″ (front label)
  • Copper foil – (2) 4″ x 5-1/4″ panels (mats), 1-1/8″ x 3-7/8″ (label mat)
  • Flowering Foils DSP – 3-7/8″ x 5-1/8″ (front), 1/2″ x 3-7/8″ (inside trim)

Stampin’ Up! products used in this project:


Stampin’ Up! Thoughtful Blooms Thank You Card

Good Morning! Today I have thank you card made with the pretty Stampin’ Up! Thoughtful Blooms photopolymer stamp set and the coordinating Small Bloom punch. Both of these items are Sale-A-Bration items that are FREE with a qualifying purchase. You can find the supplies used to create this card at the bottom of my post along with the sizes of cardstock used.

This card was inspired by the color palette in the Fab Friday #184 Challenge. Check out the inspiration cards and other challenge entries:

I started with a panel of Pretty Peacock Woven Heirlooms designer series paper and adhering it to a Pretty Peacock mat. I adhered the panel to a Mint Macaron card base with dimensionals. I stamped four flowers from the Stampin’ Up! Thoughtful Blooms stamp set using Rococo Rose ink on a panel of Petal Pink card stock. I punched them out with the Small Bloom punch.

I stamped the large leafy swirl from the Stampin’ Up! Thoughtful Blooms stamp set in Mint Macaron on a panel of Thick Whisper White card stock. I cut it out with the second largest Stitched So Sweetly die. I stamped the small flowers in Rococo Rose ink and the thank you sentiment in Mint Macaron ink. I wrapped it in Mint Macaron twine and made a bow. I adhered Rococo Rose faceted gems to the Petal Pink flowers and adhered them to the panel with dimensionals. I finished it off with a Pretty Peacock faceted gem and adhered it to the card front with dimensionals.

I decorated the inside by stamping the sentiment from the Stampin’ Up! Thoughtful Blooms stamp set in Mint Macaron ink on a Whisper White panel. I stamped part of the large swirl in the upper right corner, also using Mint Macaron ink and added two Rococo Rose small flowers. I stamped the center of the last punched flower with Rococo Rose and adhered it to the panel with multipurpose liquid glue. I trimmed the bottom with a strip of the Woven Threads DSP and adhered it to the inside of the card.

The Stampin’ Up Thoughtful Blooms stamp set is a Sale-A-Bration stamp set that is FREE with a $50 purchase. The Small Blooms punch coordinates with the stamps and is also a Sale-A-Bration item that is FREE with a $100 purchase. Sale-A-Bration is going strong, but will end on March 31 and these items are still available!


Three Weeks Left for Sale-A-Bration!

Sale-A-Bration has been very exciting this year with lots of beautiful products and special releases. But there are only three weeks left to participate in the best Stampin’ Up! deals of the year! While a few of the products have sold out, there’s still lots of great items left, including the stamp set and punch used in today’s post. You can check out all the items still available in my Online Store and read on to learn more. There are three ways to enjoy Sale-A-Bration benefits: Shop – Host – Join.

Sale-A-Bration Shopping Benefits

You earn FREE products for every $50 you spend (before shipping and taxes) during Sale-A-Bration. The Sale-A-Bration brochure has the products that you can choose to add to your order. And the more you spend, the more FREE products you can earn. There are two qualifying levels with spending thresholds, giving you flexibility to choose what you want.

For example, if you spend $150, then you can then choose three level 1 items or one level 1 and one level 2.

Head over to my online store to shop now.

Sale-A-Bration Host Benefits

Hosts with orders of $300 or more (before shipping and taxes) can receive the exclusive Little Ladybug Stamp Set (Item 152384).

  • Customer, workshop, and online orders qualify.
  • There is no limit as to how many qualifying orders you can place throughout the promotion.
  • Only one Little Ladybug Stamp Set can be redeemed per order. 
  • Only the host of the order will receive the free stamp set.
  • To qualify, orders must be opened from January 3, and closed by March 31.

Sale-A-Bration Joining Benefits

Recruits who join Stampin’ Up! as an independent Stampin’ Up! demonstrator between January 3–March 31, 2020, will receive the Mini Paper Cutter, a 6″ x 6″ Designer Series Paper sampler, and your choice of stamp set (Host stamp sets and Sale-A-Bration stamp sets not included.). 

  • The 6″ x 6″ Designer Series Paper Sampler in the Join offering has samples from the Lily Impressions Designer Series Paper (Sale-A-Bration brochure), Peaceful Poppies Designer Series Paper (January–June 2020 Mini Catalog), Country Club Designer Series Paper (January–June 2020 Mini Catalog), Birthday Bonanza Designer Series Paper (January–June 2020 Mini Catalog), Tropical Oasis Designer Series Paper (January–June 2020 Mini Catalog), Best Dress 6″ x 6″ Designer Series Paper (January–June 2020 Mini Catalog). 
  • 12 double-sided designs (two double-sided sheets from six different Designer Series Paper packs) QTY: 48 sheets total (four each of 12 designs)
  • Mini Paper Cutter Dimensions: 7-5/8″ x 5-3/8″ x 1-1/4″

For more details on the benefits of joining Stampin’ Up! as a Demonstrator, see my Join My Team page. There is a Join My Team button at the bottom where you can start the process. Please contact me if you have any questions. I’ll be happy to tell you more.


March 1 – 15 Host Code: BQCVV2RG

Use this host code when you order $50 or more and receive a free gift from me!  The gift is your choice of any item valued up to $10.00 in the 2019-20 Annual Catalog or in the 2020 January-June Mini Catalog!  That includes some of the Host Exclusive stamp sets!

If your order is over $150, please do not use the host code since you’ll receive your own Host Dollars plus I’ll send you the free gift!  This host code can be used by anyone, no commitment required.  Let me know if you have any questions.


If you need any stamping supplies, I’d be very happy to be your Demonstrator.  Just click on the Shop Now button on the right side of the screen to go directly to my online store or contact me if you have any questions.  Happy Stamping!

Thanks for stopping by and have a great day!

Akiko

  • Visit my online store here
  • See the current Stampin’ Up! clearance rack specials here
  • Earn FREE Stampin’ Up! products through my Wildflower Frequent Shopper Program – my way of saying thank you to my frequent shopper online customers.
  • Sign up for my weekly newsletter here
  • Have any questions? I’d be happy to help, click here to contact me.

Cardstock Cuts for this project:

  • Mint Macaron – 4-1/4″ x 11″ card base scored at 5-1/2
  • Pretty Peacock – 4″ x 5-1/4″ (front mat)
  • Thick Whisper White – 3″ x 4-1/4″ (front scalloped die cut panel)
  • Petal Pink – 1″ x 4-1/4″ (punched flowers)
  • Whisper White – 4″ x 5-1/4″ (inside panel)
  • Woven Threads DSP – 3-7/8″ x 5-1/8″ (front background), 3/4″ x 4″ (inside trim)

Stampin’ Up! products used in this project:


Stampin’ Up! Lovely Lily Pad Happy For You Card for the Happy Inkin’ Thursday Blog Hop

Good Morning! Welcome to another Happy Inkin’ Thursday Blog Hop! For my card today, I’ve used a lot of Sale-A-Bration Products, including the Stampin’ Up! Lovely Lily Pad stamp set, Lily Pad Dies and the Lily Impressions designer series paper.

We have a color challenge this week, and here is the bold and beautiful color palette I am using for my card:

I started by adhering a panel of the Sale-A-Bration Lily Impressions designer series paper on a Bermuda Bay Card base with snail. I cut the large label from the Stitched Label Dies in Bermuda Bay card stock. I cut two large outline lilies and one small outline lily from the Sale-A-Bration Lily Pad Dies in Lovely Lipstick card stock. I cut two medium solid flowers and one small flower from the Lily Pad Dies in Petal Pink Vellum. I cut two large leaf clusters and one small leaf cluster from the Lily Pad Dies in Granny Apple Green card stock. I trimmed the stems from the large leaf clusters.

I stamped the large lily pad from the Stampin’ Up! Lovely Lily Pad Sale-A-Bration stamp set in Granny Apple Green ink on Granny Apple Green card stock and cut it out with the coordinating die from the Lily Pad Dies. I adhered the lily pad to the large stitched label with multipurpose liquid glue. I made three flower clusters by layering the Lovely Lipstick outline flower on the Petal Pink vellum flower and topping it off with a leaf cluster. I adhered them together with multipurpose liquid glue, being careful to keep the glue behind the cardstock. I accented each flower with a Lovely Lipstick enamel dot and adhered them to the label with dimensionals. Again, I was careful to place the dimensionals behind the cardstock, and ended up cutting small, skinny pieces. I adhered the label to the card base with dimensionals.

I cut the decorative die cut strip from the Lily Pad Dies in Bermuda Bay card stock. I trimmed it to 4″ and adhered it to the card front with multipurpose liquid glue. I stamped the sentiment from the A Little Lace stamp set in Versamark Ink on Lovely Lipstick and sprinkled it with white embossing powder. I heat set the sentiment and cut it out with the die from the Stitched Label Dies. I adhered it to the card base over the decorative strip with dimensionals. I finished it off with a Lovely Lipstick enamel dot.

On the inside of the card, I stamped the small lily bud from the Stampin’ Up! Lovely Lily Pad stamp set in Lovely Lipstick ink, after stamping off twice, on the bottom of a Whisper White panel. I stamped the small leaf cluster under it in Granny Apple Green ink after stamping off once. I added a strip of the Lily Impressions designer series paper and adhered it to the inside of the card.

The Stampin’ Up! Lovely Lily Pad photopolymer stamp set and Lily Impressions designer series paper are FREE with a $50 purchase during Sale-A-Bration. The Lily Pad Dies are FREE with a $100 purchase.

And did you see that there is a new Sale-A-Bration Second Release out with 3 new Sale-A-Bration stamp sets and two new designer series paper packs? Check out my Promotions Page for full Sale-A-Bration Details.

On with the Hop! Click the Next button below to visit Karen Ksenzakovic’s blog.

And just in case you get lost along the way, here’s a list of the team members participating in the hop today:


March 1 – 15 Host Code: BQCVV2RG

Use this host code when you order $50 or more and receive a free gift from me!  The gift is your choice of any item valued up to $10.00 in the 2019-20 Annual Catalog or in the 2020 January-June Mini Catalog!  That includes some of the Host Exclusive stamp sets!

If your order is over $150, please do not use the host code since you’ll receive your own Host Dollars plus I’ll send you the free gift!  This host code can be used by anyone, no commitment required.  Let me know if you have any questions.


If you need any stamping supplies, I’d be very happy to be your Demonstrator.  Just click on the Shop Now button on the right side of the screen to go directly to my online store or contact me if you have any questions.  Happy Stamping!

Thanks for visiting!

Akiko

  • Visit my online store here
  • See the current Stampin’ Up! clearance rack specials here
  • Earn FREE Stampin’ Up! products through my Wildflower Frequent Shopper Program – my way of saying thank you to my frequent shopper online customers.
  • Sign up for my weekly newsletter here
  • Have any questions? I’d be happy to help, click here to contact me.

Cardstock Cuts for this project:

  • Bermuda Bay – 4-1/4″ x 11″ card base scored at 5-1/2″, 4 1/4″ x 5″ (die cuts)
  • Lovely Lipstick – 3-1/2″ x 4-1/2″ (die cuts)
  • Granny Apple Green – 2″ x 3-1/2″ (die cuts)
  • Whisper White – 4″ x 5-1/4″ (inside panel)
  • Lily Impressions DSP – 4″ x 5-1/4″ (background), 1/2″ x 4″ (inside trim)
  • Petal Pink Vellum – 3″ x 3″

Stampin’ Up! products used in this project:


Stampin’ Up! Well Dressed Birthday Card

Good Morning! Today I have a masculine birthday card made with the new Stampin’ Up! Well Dressed cling stamp set. This stamp set is one of the new Sale-A-Bration second release products that is FREE with a $50 order and it is available starting today! You can find the supplies used to create this card at the bottom of my post along with the sizes of cardstock used.

I embossed a Sahara Sand panel with the Pinewood Planks embossing folder. I adhered it to a Basic Gray card base with Snail. I adhered a panel of the gray argyle paper from the Country Club designer series paper to a Basic Black mat and then adhered them both to the embossed panel.

I stamped the fedora from the Stampin’ Up! Well Dressed stamp set with Memento Tuxedo Black ink on a Whisper White panel. I colored it with the Gray Granite Stampin’ Blends and fussy cut the hat with my paper snips. I stamped the umbrella from the Stampin’ Up! Well Dressed stamp set with Memento Tuxedo Black ink on a Whisper White panel and fussy cut it with my paper snips.

I stamped the sentiment from the Perennial Birthday stamp set in Memento Tuxedo Black ink on a Whisper White Panel. I cut it out with the Stitched Rectangle die and adhered it to the argyle paper with snail. I adhered the fedora and umbrella with dimensionals. I finished the card front with a silver metallic pearl.

I stamped the Happy Birthday sentiment from the Perennial Birthday stamp set in Memento Tuxedo Black ink on a Whisper White panel. I stamped the keys from the Stampin’ Up! Well Dressed stamp set next to the sentiment and trimmed the bottom with the Country Club argyle designer series paper before adhering the panel to the inside of the card.

Masculine cards are so hard, yet so essential!! I hope you have a gentleman in your life who would fit the dapper images in this new Sale-A-Bration stamp set. And be sure to head to my online store to check out the new Sale-A-Bration products that are available until the end of the month or while supplies last.


Sale-A-Bration Second Release Going on Now!

It’s the first day for Customers to get the Sale-A-Bration Second Release products. Yay!!! The second release consists of three additional stamp sets and two beautiful designer series paper packs that you can get for FREE with a $50 minimum purchase. Click on the picture below to see these new items and read on to get a refresher on the Sale-A-Bration details:

There are three ways to enjoy Sale-A-Bration benefits: Shop – Host – Join.

Sale-A-Bration Shopping Benefits

You earn FREE products for every $50 you spend (before shipping and taxes) during Sale-A-Bration. The Sale-A-Bration brochure has the products that you can choose to add to your order. And the more you spend, the more FREE products you can earn. There are two qualifying levels with spending thresholds, giving you flexibility to choose what you want.

For example, if you spend $150, then you can then choose three level 1 items or one level 1 and one level 2.

Head over to my online store to shop now.

Sale-A-Bration Host Benefits

Hosts with orders of $300 or more can receive the exclusive Little Ladybug Stamp Set (Item 152384).

  • Customer, workshop, and online orders qualify.
  • There is no limit as to how many qualifying orders you can place throughout the promotion.
  • Only one Little Ladybug Stamp Set can be redeemed per order. 
  • Only the host of the order will receive the free stamp set.
  • To qualify, orders must be opened from January 3, and closed by March 31.

Sale-A-Bration Joining Benefits

Recruits who join Stampin’ Up! as an independent Stampin’ Up! demonstrator between January 3–March 31, 2020, will receive the Mini Paper Cutter, a 6″ x 6″ Designer Series Paper sampler, and your choice of stamp set (Host stamp sets and Sale-A-Bration stamp sets not included.). 

  • The 6″ x 6″ Designer Series Paper Sampler in the Join offering has samples from the Lily Impressions Designer Series Paper (Sale-A-Bration brochure), Peaceful Poppies Designer Series Paper (January–June 2020 Mini Catalog), Country Club Designer Series Paper (January–June 2020 Mini Catalog), Birthday Bonanza Designer Series Paper (January–June 2020 Mini Catalog), Tropical Oasis Designer Series Paper (January–June 2020 Mini Catalog), Best Dress 6″ x 6″ Designer Series Paper (January–June 2020 Mini Catalog). 
  • 12 double-sided designs (two double-sided sheets from six different Designer Series Paper packs) QTY: 48 sheets total (four each of 12 designs)
  • Mini Paper Cutter Dimensions: 7-5/8″ x 5-3/8″ x 1-1/4″

And to sweeten the Joining offer, you can add items from the Sale-A-Bration second release to your Starter Kit if you join before March 3, 2020. 

For more details on the benefits of joining Stampin’ Up! as a Demonstrator, see my Join My Team page. There is a Join My Team button at the bottom where you can start the process. Please contact me if you have any questions. I’ll be happy to tell you more.


March 1 – 15 Host Code: BQCVV2RG

Use this host code when you order $50 or more and receive a free gift from me!  The gift is your choice of any item valued up to $10.00 in the 2019-20 Annual Catalog or in the 2020 January-June Mini Catalog!  That includes some of the Host Exclusive stamp sets!

If your order is over $150, please do not use the host code since you’ll receive your own Host Dollars plus I’ll send you the free gift!  This host code can be used by anyone, no commitment required.  Let me know if you have any questions.


If you need any stamping supplies, I’d be very happy to be your Demonstrator.  Just click on the Shop Now button on the right side of the screen to go directly to my online store or contact me if you have any questions.  Happy Stamping!

Thanks for stopping by and have a great day!

Akiko

  • Visit my online store here
  • See the current Stampin’ Up! clearance rack specials here
  • Earn FREE Stampin’ Up! products through my Wildflower Frequent Shopper Program – my way of saying thank you to my frequent shopper online customers.
  • Sign up for my weekly newsletter here
  • Have any questions? I’d be happy to help, click here to contact me.

Cardstock Cuts for this project:

  • Basic Gray – 4-1/4″ x 11″ card base scored at 5-1/2″
  • Sahara Sand – 4″ x 5-1/4″ (embossed background)
  • Whisper White – 4″ x 5 1/4″ (inside panel), 4″ x 3″ (label, hat & umbrella)
  • Basic Black – 2-1/8″ x 4″ (front trim mat)
  • Country Club DSP – 2″ x 4″ (front trim), 1/2″ x 4″ (inside trim)

Stampin’ Up! products used in this project: