Stampin’ Up! Sailing Home Birthday Card

Good Morning! Today I have a nautical masculine birthday card made with the Stampin’ Up! Sailing Home stamp bundle. Nautical theme cards are great staples for making masculine cards and the Stampin’ Up! Sailing Home bundle has great images and dies to let you easily create wonderful cards! You can find the supplies used to create this card at the bottom of my post along with the sizes of cardstock used.

I embossed a panel of Sahara Sand card stock with the Subtle embossing folder and adhered it to a Night of Navy card base with multipurpose liquid glue. I adhered a strip of the striped Come Sail Away designer series paper and adhered it to a Night of Navy mat before adhering it to the card front. I colored two strips of the nautical instrument Come Sail Away DSP with the Light Crumb Cake Stampin’ Blend. I adhered the thicker strip to a Night of Navy mat. I cut two long rope die cuts with the die from the Smooth Sailing Dies from Soft suede. I adhered one to the top of the layered instrument DSP panel and trimmed the ends before adhering it to the card panel with multipurpose liquid glue.

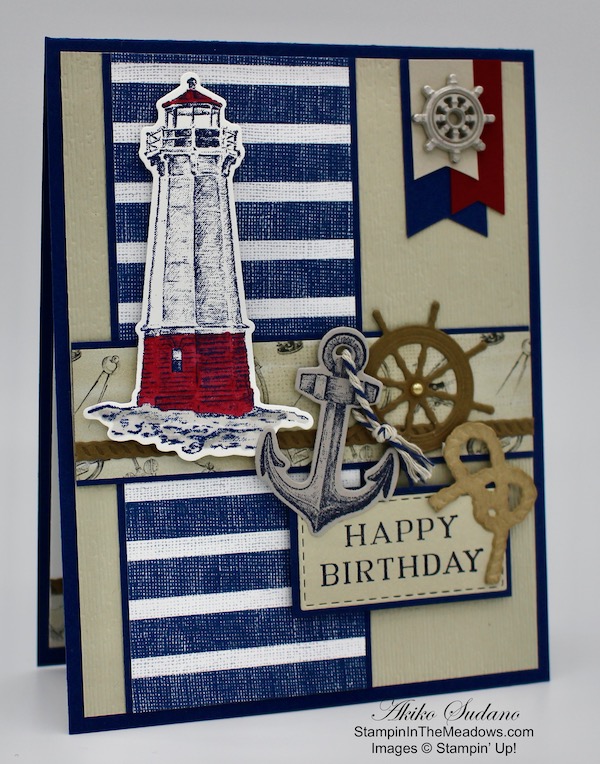
I stamped the lighthouse image from the Stampin’ Up! Sailing Home cling stamp set in Night of Navy on a Whisper White panel. I colored it with the Light Cherry Cobbler and Gray Granite Stampin’ Blends and cut it out with the coordinating die from the Smooth Sailing Dies. I popped it on the card with dimensionals. I stamped the Happy Birthday sentiment from the Perennial Birthday cling stamp set on a Sahara Sand panel in Night of Navy ink. I cut it out with the stitched rectangle die using the two step partial die cut method so that it was shorter than the die. I adhered it to a Night of Navy mat and to the card with dimensionals.

Using the Smooth Sailing Dies, I made the little die cut accents above the label – so much fun! I cut the coiled rope from Crumb Cake card stock and sponged the edges with Soft Suede ink. I cut the ship wheel from Soft suede card stock and accented the center with a gold metallic pearl. I stamped the anchor from the Stampin’ Up! Sailing Home stamp set in Night of Navy ink on Gray Granite card stock, cut it out with the anchor die and tied the twine around the top. Then I arranged the items on the card and adhered the wheel with multipurpose liquid glue and the anchor and rope with dimensionals. Then I cut the little pennants in the top corner and adhered them with multipurpose liquid glue and topped them off with a ship wheel trinket.

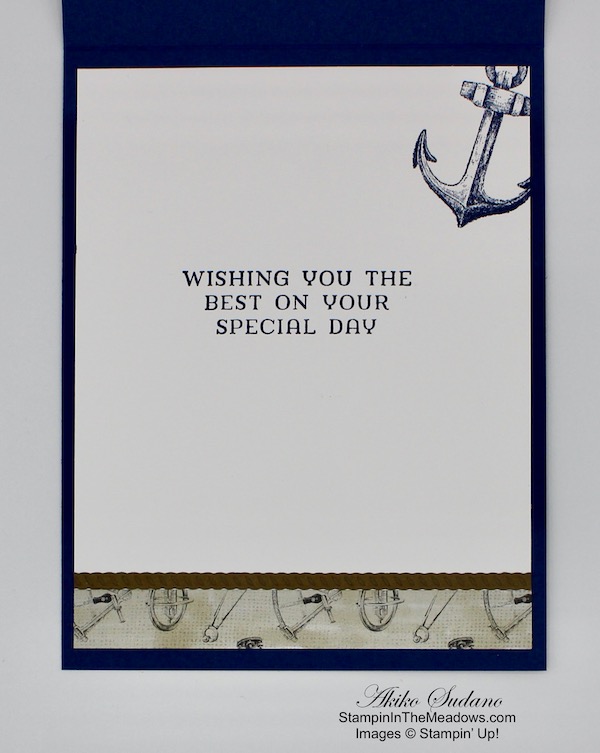
I stamped the sentiment from the Perennial Birthday stamp set in the middle of a Whisper White panel using Night of Navy ink. I stamped the anchor in the top corner in Night of Navy and added the colored DSP to the bottom. I adhered the last die cut rope across the top of the DSP trim and snipped the ends. Then I adhered the panel to the inside of the card with multipurpose liquid glue.

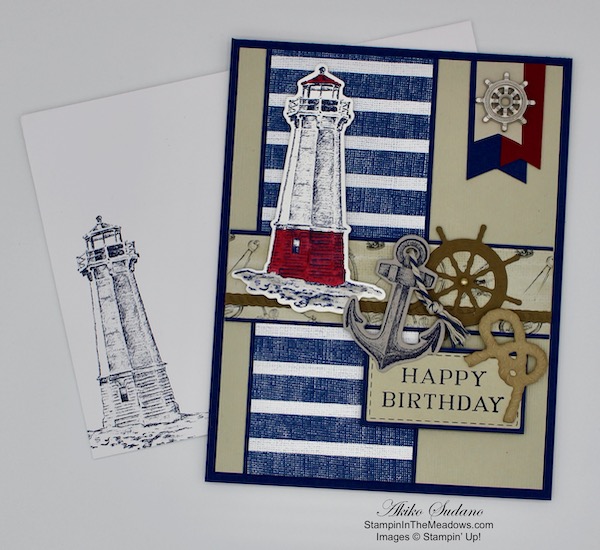
I decorated a Whisper White envelope to match the card by stamping the lighthouse in Night of Navy ink on the side. This is the best nautical stamp set ever and I am so happy that it is not on the retirement list!! Some of the accessories are being retried though, so if you enjoy nautical cards, head over to my Online Store to get them before they’re gone!


April 16 – 30 Host Code: SJ9ZJ46Z

Use this host code when you order $50 or more and receive a free gift from me!  The gift is your choice of any item valued up to $10.00 in the 2019-20 Annual Catalog or in the 2020 January-June Mini Catalog!  That includes some of the Host Exclusive stamp sets!

If your order is over $150, please do not use the host code since you’ll receive your own Host Dollars plus I’ll send you the free gift!  This host code can be used by anyone, no commitment required.  Let me know if you have any questions.


If you need any stamping supplies, I’d be very happy to be your Demonstrator.  Just click on the Shop Now button on the right side of the screen to go directly to my Online store or contact me if you have any questions.  Happy Stamping!

Thanks for stopping by and have a great day!

Akiko

  • Visit my Online store here
  • See the current Stampin’ Up! clearance rack specials here
  • Earn FREE Stampin’ Up! products through my Wildflower Frequent Shopper Program – my way of saying thank you to my frequent shopper online customers.
  • Sign up for my weekly newsletter here
  • Have any questions? I’d be happy to help, click here to contact me.

Cardstock Cuts for this project:

  • Night of Navy – 4-1/4″ x 11″ card base scored at 5-1/2″, 2-1/8″ x 5-1/5″ (vertical DSP mat), 1-1/8″ x 4″ (horizontal DSP mat), 1″ x 2″ (label mat), 3/4″ x 1-1/2″ (pennant)
  • Sahara Sand – 4″ x 5-1/4″ (embossed background), 1-1/4″ x 2-1/2″ (label), 3/4″ x 1-1/4″ (pennant)
  • Crumb Cake – 1-1/4″ x 2″ scrap (coil rope die cut)
  • Cherry Cobbler – 1/2″ x 1-3/8″ scrap (pennant)
  • Gray Granite – 1-3/4″ x 2-1/4″ scrap (anchor die cut)
  • Soft Suede – 2″ x 2″ (ship wheel die cut), 1″ x 5″ strip (2 long rope die cuts)
  • Whisper White – 4″ x 5-1/4″ (inside panel), 2-1/2″ x 4″ (light house die cut)
  • Come Sail Away DSP – 2″ x 5-1/4″ (front vertical stripe), 1″ x 4″ (front horizontal stripe), 1/2″ x 4″ (inside trim)

Stampin’ Up! products used in this project:


Stampin’ Up! Making a Difference: Share Sunshine

Did you know that Stampin’ Up! is committed to making a difference in our global communities and caring about people first? That’s one of the things that I admire about this company, and this morning they announced a product giveback opportunity to support organizations that are helping COVID-19 frontline responders and communities vulnerable to the pandemic as part of their Making a Difference Program!

They have a new Share Sunshine PDF Download and 100% of the proceeds will be donated to COVID-19 efforts.

The Share Sunshine PDF Download is a digital stamp set that’s packed with both lighthearted and heartfelt sentiments and imagery relevant to the unique COVID-19 and social distancing situation we’re currently experiencing–including many ideas that came from you! You can use the download in your cardmaking and papercrafting projects. Simply print the imagery on cardstock and cut it out using our Paper Trimmer, punches, or dies. Since we are physically distanced from each other, now is a perfect time to share sunshine with our friends and family by sending cards!

Here are the details:

  • Product: Share Sunshine PDF Download.
  • Price: $12.00
  • Dates: April 28 – June 2, 2020
  • To maximize our donations, 100% of the PDF download sales go to the charities as the sole beneficiaries of each purchase—that means every cent goes to these organizations!
  • The Share Sunshine PDF Download is for personal use only. When you purchase the PDF download, please remember not to share it with others, as this takes away from the organizations we are trying to support.

Stampin’ Up! will donate the proceeds of this sale to the following organizations:

The World Health Organization’s COVID-Solidarity Response Fund – This fund supports the Strategic Preparedness and Response Plan, which includes: 

  • Tracking and understanding the spread of the virus.
  • Ensuring patients get the care they need.
  • Buying and shipping essential protective gear for frontline workers.
  • Generating awareness for the general public on ways to prevent the spread of the disease. 
  • Accelerating efforts to develop vaccines, tests and treatments.

Learn more about WHO here.

United Way Worldwide’s COVID-19 Community Response and Recovery Fund – This fund supports communities across the world struggling to cope with COVID-19. United Way is working to protect the most vulnerable by helping them access food, shelter, vital information, and more through United Way’s global network.

Learn more about United Way here.

Click Here to Purchase the Share Sunshine PDF Download.

Please note:  Since this is a special promotion from Stampin’ Up! and isn’t orderable through the regular online store, I will not be notified when you order this set and it can’t be added in with your regular orders through the online store. 

Get your digital download today and make a difference!!


April 16 – 30 Host Code: SJ9ZJ46Z

Use this host code when you order $50 or more and receive a free gift from me!  The gift is your choice of any item valued up to $10.00 in the 2019-20 Annual Catalog or in the 2020 January-June Mini Catalog!  That includes some of the Host Exclusive stamp sets!

If your order is over $150, please do not use the host code since you’ll receive your own Host Dollars plus I’ll send you the free gift!  This host code can be used by anyone, no commitment required.  Let me know if you have any questions.


If you need any stamping supplies, I’d be very happy to be your Demonstrator.  Just click on the Shop Now button on the right side of the screen to go directly to my Online store or contact me if you have any questions.  Happy Stamping!

Thanks for stopping by and have a great day!

Akiko

  • Visit my Online store here
  • See the current Stampin’ Up! clearance rack specials here
  • Earn FREE Stampin’ Up! products through my Wildflower Frequent Shopper Program – my way of saying thank you to my frequent shopper online customers.
  • Sign up for my weekly newsletter here
  • Have any questions? I’d be happy to help, click here to contact me.

Stampin’ Up! April Paper Pumpkin Kit – My Wonderful Family

Good Morning! Last week I received my Stampin’ Up! April Paper Pumpkin Kit and put it together. The theme for the April is My Wonderful Family and it is full of sweet sentiments and pretty tree and leaf images! Have you seen postings on Social Media for the kit and alternative projects? They are wonderful! I decided to make one of the cards according to the instructions and I added some extra touches to the other. You can find the additional supplies I used to make this project at the bottom of my post along with the sizes of cardstock used. I also have links to purchase the Prepaid Paper Pumpkin subscription plans from my Online Store.

The first card is a cute gatefold card and the envelope flap coordinates with the bottom panel! I stamped the tree leaves twice in Pear Pizzazz ink on each card. I punched out the die cuts, and stamped the sentiments in the Pear Pizzazz ink on the banners. I adhered the banners to the Crushed Curry banners with dimensionals and then adhered the banners to the top part of the card with glue dots. I popped two birds in the trees with dimensionals and added 5 Crushed Curry pearls to the tree.

The second card is a Z-fold card, also with a coordinating envelope flap. I decided that I needed to reinforce the sweet sentiment panel, so I added a panel of Mint Macaron card stock behind it (Note that I needed to trim the sentiment panel to 3-1/2″ x 4-1/2″ so that I didn’t have to deal with 1/32 inch measurements (ugh!) – so much easier and you can’t tell the difference). I also noticed that the little leaf stamp matches the paper, so I decided to stamp the image randomly on the left side of the card in Mint Macaron ink. I also decided that I loved the sentiment from the first card and wanted to continue using it, and luckily it fit one of the frames in the Ornate Frames Dies, so I cut 4 of them from Whisper White and stamped the sentiment in Pear Pizzazz. The final touch was to use the Mint Macaron bow at the bottom of the branch. To assemble the cards, I adhered the layered sentiment panel to the folded card base with glue dots. I adhered the pretty leaf branch with dimensionals and the label on top with dimensionals and glue dots. I added the butterfly and bow with glue dots and finished it off with three Mint Macaron pearls.

Here’s the video that Paper Pumpkin posted on YouTube to show how to put the cards together. They do a pretty good job of showing you how to put the kit together and it’s a quick watch.

Here’s the pretty stamp set and Pear Pizzazz ink spot that comes in the kit:

And here’s the rest of the contents. As usual, there are plenty of extra die cuts that can be used on other projects!

And the Paper Pumpkin team has designed alternative projects that use the stamp set and extra die cuts that are included in the package along with other coordinating Stampin’ Up! products that you might have in your stash.

The Stampin’ Up! April 2020 Paper Pumpkin kit was a sweet kit with the fun fold cards and focus on family. Sadly the May 2020 Paper Pumpkin kit has sold out. I can’t wait for the previews of the June 2020 kit!


April 16 – 30 Host Code: SJ9ZJ46Z

Use this host code when you order $50 or more and receive a free gift from me!  The gift is your choice of any item valued up to $10.00 in the 2019-20 Annual Catalog or in the 2020 January-June Mini Catalog!  That includes some of the Host Exclusive stamp sets!

If your order is over $150, please do not use the host code since you’ll receive your own Host Dollars plus I’ll send you the free gift!  This host code can be used by anyone, no commitment required.  Let me know if you have any questions.


If you need any stamping supplies, I’d be very happy to be your Demonstrator.  Just click on the Shop Now button on the right side of the screen to go directly to my Online store or contact me if you have any questions.  Happy Stamping!

Thanks for stopping by and have a great day!

Akiko

  • Visit my Online store here
  • See the current Stampin’ Up! clearance rack specials here
  • Earn FREE Stampin’ Up! products through my Wildflower Frequent Shopper Program – my way of saying thank you to my frequent shopper online customers.
  • Sign up for my weekly newsletter here
  • Have any questions? I’d be happy to help, click here to contact me.

Cardstock Cuts for this project:

These are additions to the items that came in the kit.

  • Mint Macaron – (4) 3-5/8″ x 4-5/8″ panels (mat for Z-fold card)
  • Whisper White – (4) 1-1/2″ x 3-1/2″ panels (labels for Z-fold card)

Stampin’ Up! products used in this project:


Stampin’ Up! Tea Together Mother’s Day Card Video Tutorial

Good Morning! Today I’m sharing a card that I made yesterday afternoon during my Facebook Live Tutorial. The lovely Stampin’ Up! Tea Together cling stamp set and coordinating Tea Time Dies only came out last year, but they are on the retiring list – and the dies come with a 60% discount!! It’s a sweet set and with two weeks to Mother’s Day, it seemed the right stamp set to play with. You can find the supplies used to create this card at the bottom of my post along with the sizes of cardstock used.

Here is the Facebook Live video showing how I made the card:

I also posted the video to my YouTube Channel and you can view it here.

I started by running a panel of Highland Heather card stock through the Parisian Flourish embossing folder and adhering it to the left side of a Whisper White panel. I adhered a strip of Highland Heather gingham next to it. I cut a Whisper White lacy border using the die from the Ornate Borders Dies and adhered it between the layers. I popped the layered panel on a Highland Heather card base with dimensionals.

I stamped the sentiment from the Stampin’ Up! Tea Together cling stamp set in Highland Heather ink on a Whisper White panel. I cut it out with the Stitched So Sweetly die and adhered it to the card with liquid glue. I accented it with two Highland Heather glitter enamel dots.

I stamped the teapot and teacup from the Stampin’ Up! Tea Together stamp set in Basic Gray ink on Whisper White card stock and cut them out with the coordinating dies. I adhered a pearlized doily to the card front with multipurpose liquid glue and adhered the teapot and teacup with dimensionals and some liquid glue behind the teacup where it overlapped the teapot. I finished off the front with some tied off polka dot tulle ribbon.

I stamped the sweet sentiment from the Stampin’ Up! Tea Together stamp set on the side of a Whisper White panel in Highland Heather ink. Next to it, I stamped the large rose in Basic Gray ink. I colored the rose with Highland Heather Stampin’ Blends and the leaves with Light Granny Apple Green Stampin’ Blend. I added a strip of Highland heather to the bottom and adhered the panel to the inside of the card.

So many products used in today’s card are on the current retiring list and I was worried that not all of them would still be available at publication time. Sadly, I just learned that the gingham paper that is part of the Subtles 6″ x 6″ DSP is sold out. Many products are going quickly, so hurry over to my Online Store to check out what you’ve been waiting to buy before it’s gone!


Stampin’ Up! 2019-20 Annual Catalog and January-June 2020 Mini Catalog Retiring Lists Have Posted!

Stampin’ Up has posted the retirement lists for the 2019-2020 Annual Catalog and January-June 2020 Mini Catalog today in preparation for the release of the new 2020-2021 Annual Catalog. The items on the lists are only available while supplies last from now through June 2!  And some of the items are available at a discount!!

Click on the picture below to head over to my Online Store to shop the retiring products:

Have fun shopping and let me know if you have any questions!


Stampin’ Up! Ornate Garden Suite Early Release available for ordering NOW!

Stampin’ Up! has a beautiful new early release product suite from the upcoming Annual Catalog and it’s available to order now!! Click the image below to see a PDF brochure of all the products that are available with this beautiful suite or go to the Ornate Garden page in my Online Store to place your order now.


April 16 – 30 Host Code: SJ9ZJ46Z

Use this host code when you order $50+ and receive a free gift from me!  If your order is over $150, please do not use this code, but you’ll still get the free gift.  The free gift is your choice of any item valued up to $10.00 in the 2019 – 2020 Annual Catalog or in the 2020 Mini Catalog!  That includes some of the Host Exclusive stamp sets!

If your order is over $150, please do not use the host code since you’ll receive your own Host Dollars plus I’ll send you the free gift!  This host code can be used by anyone, no club or commitment required.  Let me know if you have any questions.


If you need any stamping supplies, I’d be very happy to be your Demonstrator.  Just click on the Shop Now button on the right side of the screen to go directly to my online store or contact me if you have any questions.  Happy Stamping!

Thanks for stopping by and have a great week!

Akiko

  • Visit my online store here
  • See the current Stampin’ Up! clearance rack specials here
  • Earn FREE Stampin’ Up! products through my Wildflower Frequent Shopper Program – my way of saying thank you to my online frequent shopper customers.
  • Sign up for my weekly newsletter here
  • Have any questions? I’d be happy to help, click here to contact me.

Cardstock Cuts for this project:

  • Highland Heather – 4-1/4″ x 11″ card base scored at 5-1/2″, 2-3/4″ x 5-1/8″ (embossed panel)
  • Whisper White – 4″ x 5-1/4″ (inside panel), 3-7/8″ x 5-1/8″ (front mat), 4″ x 7″ (teapot, teacup and label die cuts), 1/2″ x 5″ (lace border die cut)
  • Subtles 6″ x 6″ Designer Series Paper – 1″ x 5″ (gingham front trim), 1/2″ x 4″ (gingham inside trim)

Stampin’ Up! products used in this project:


Stampin’ Up! Timeless Tropical Friendship Card for the Happy Inkin’ Thursday Blog Hop

Good Morning! Welcome to another Happy Inkin’ Thursday Blog Hop! For today’s card, I used the sweet sentiment from the Free as a Bird stamp set and the flowers from the Stampin’ Up! Timeless Tropical bundle to make a note card for your BFF. You can find the supplies that I used to create this card at the bottom of my post along with the sizes of cardstock.

We have a sketch challenge this week, and here is the sketch we are using:

I embossed a panel of Mossy Meadow card stock with the Coastal Weave embossing folder and adhered it to a So Saffron card base with multipurpose liquid glue. I cut a panel of the Tropical Oasis designer series paper and adhered it to a real red mat before popping it on the card base with dimensionals. I stamped the sentiment from the Free As A Bird cling stamp set in Mossy Meadow ink on a Whisper White strip and cut it out with the small long Stitched Rectangle die. I adhered it to a Real Red mat and then to the flowers with multipurpose liquid glue.

I stamped the frangipani flower and large leaf from the Stampin’ Up! Timeless Tropical stamp set in Sahara Sand ink on Whisper White. I colored the flower with the Light Real Red, Light Flirty Flamingo, Light Mango Melody and Light Daffodil Delight Stampin’ Blends. I also used the Stampin’ Blend Color Lifter to create highlights on the flower petals. I used the Light and Dark Old Olive Stampin Blends to color the leaves. I cut the flower and leaf out with the coordinating die from the In The Tropics dies.

I die cut three long leaves from Old Olive cardstock, a set of three flowers from So Saffron and Real Red card stock and five of the small leaves from Shaded Spruce card stock. I arranged the die cuts on the card front and adhered them with multipurpose liquid glue and dimensionals where they were half on the floral panel and half off. Note that some were adhered to the embossed panel with multipurpose liquid glue. I finished off the frangipani flower with a large red rhinestone and the little red flowers with yellow rhinestones from the Holiday Rhinestones. I added small Red Rhinestones to the yellow flowers.

For the inside of the card, I adhered a strip of the Tropical Oasis DSP to the bottom of a Whisper White panel. I stamped three partial frangipani flowers from the Stampin’ Up! Timeless Tropical stamp set in Real Red after stamping off twice. I adhered the panel to the inside of the card with multipurpose liquid glue.

I’m happy the Stampin’ Up! Timeless Tropical and Free As A Bird stamp sets will be carried over to the new 2020-2021 Annual Catalog, but they won’t be available as a bundle with the 10% discount.

On with the Hop! Click the Next button below to visit Karen Ksenzakovic’s blog.

And just in case you get lost along the way, here’s a list of the team members participating in the hop today:


April 16 – 30 Host Code: SJ9ZJ46Z

Use this host code when you order $50 or more and receive a free gift from me!  The gift is your choice of any item valued up to $10.00 in the 2019-20 Annual Catalog or in the 2020 January-June Mini Catalog!  That includes some of the Host Exclusive stamp sets!

If your order is over $150, please do not use the host code since you’ll receive your own Host Dollars plus I’ll send you the free gift!  This host code can be used by anyone, no commitment required.  Let me know if you have any questions.


If you need any stamping supplies, I’d be very happy to be your Demonstrator.  Just click on the Shop Now button on the right side of the screen to go directly to my online store or contact me if you have any questions.  Happy Stamping!

Thanks for visiting!

Akiko

  • Visit my online store here
  • See the current Stampin’ Up! clearance rack specials here
  • Earn FREE Stampin’ Up! products through my Wildflower Frequent Shopper Program – my way of saying thank you to my frequent shopper online customers.
  • Sign up for my weekly newsletter here
  • Have any questions? I’d be happy to help, click here to contact me.

Cardstock Cuts for this project:

  • So Saffron – 5-1/2″ x 8-1/2″ card base scored at 4-1/4″, 1″ x 2″ (3 flower die cuts)
  • Mossy Meadow – 4″ x 5-1/4″ (embossed background)
  • Old Olive – 1″ x 3-1/2″ (3 long leaf die cuts)
  • Shaded Spruce – 1″ x 4″ (5 small leaf die cuts)
  • Real Red – 1″ x 2″ (3 flower die cuts), 5/8″ x 2-5/8″ (label mat), 2-5/8″ x 3-7/8″ (floral mat)
  • Whisper White – 4″ x 5-1/4″, (inside panel), 2″ x 3-3/4″ (flower and leaf die cuts)
  • Tropical Oasis DSP – 2-1/2″ x 3-3/4″ (front panel), 1/2″ x 5-1/4″ (inside trim)

Stampin’ Up! products used in this project:


Stampin’ Up! 2019-20 Annual Catalog and January-June 2020 Mini Catalog Retiring Lists Have Posted!

Stampin’ Up has posted the retirement lists for the 2019-2020 Annual Catalog and January-June 2020 Mini Catalog today in preparation for the release of the new 2020-2021 Annual Catalog. The items on the lists are only available while supplies last from now through June 2!  And some of the items are available at a discount!!

Promotion Dates: April 22, 2020 – June 2, 2020

Here are the details:

  • There is no minimum purchase required.
  • All retiring items are only available while supplies last and will be discontinued after June 2.
  • Due to high demand, retiring stamp sets will have guaranteed availability until May 15; all other products are not guaranteed and are available while supplies last only.
  • Retiring items are eligible for Stampin’ Rewards with qualifying orders.
  • Retiring host sets can only be purchased using Stampin’ Rewards from a qualifying party.
  • Discounts may vary by market depending on inventory levels.
  • If you or buy product at retail price and it is later discounted, Stampin’ Up! will not refund the difference.
  • If there is a product you want, we recommend buying it as soon as possible; as mentioned above, products are not guaranteed and are only available while supplies last. 
  • If you start an order before a discount is announced, the order will not include the discounted pricing. If you want to order a product that has been discounted, you will need to start the order after the discounts are announced.
  • Order deadline to get the retiring products:  June 2, 2020; 11:50 PM (MT)

Click on the picture below to head over to my Online Store to shop the retiring products:

Please note, some of the bundle items may be carrying over into the new 2020-2021 Annual Catalog.  However, the bundle pricing will go away, so get them while you can at the discounted price!!

For a printable PDF of the 2019 – 2020 Annual Catalog retiring products click here.

For a printable PDF of the 2020 January-June Mini catalog retiring products click here.

Let me know if you have any questions about the retiring lists!

New 2020 – 2021 Annual Catalog

Ordering from the new 2020 – 2021 Annual Catalog will be begin on June 3, 2020. I will be ordering the new catalogs at the beginning of May and if you have placed an order with me, I will mail you one as soon as I get them. Be sure to watch for sneak peeks on social media!


April 16 – 30 Host Code: SJ9ZJ46Z

Use this host code when you order and receive a free gift from me!  The gift is your choice of any item valued up to $10.00 in the 2019-20 Annual Catalog or in the 2020 January-June Mini Catalog!  That includes some of the Host Exclusive stamp sets!

If your order is over $150, please do not use the host code since you’ll receive your own Host Dollars plus I’ll send you the free gift!  This host code can be used by anyone, no commitment required.  Let me know if you have any questions.


If you need any stamping supplies, I’d be very happy to be your Demonstrator.  Just click on the Shop Now button on the right side of the screen to go directly to my Online store or contact me if you have any questions.  Happy Stamping!

  • Visit my Online store here
  • See the current Stampin’ Up! clearance rack specials here
  • Earn FREE Stampin’ Up! products through my Wildflower Frequent Shopper Program – my way of saying thank you to my frequent shopper online customers.
  • Sign up for my weekly newsletter here
  • Have any questions? I’d be happy to help, click here to contact me.

Stampin’ Up! Ornate Style Note Tote

Good Morning! Today I have another project using products from the beautiful new Ornate Garden Suite in combination with the Dressed to Impress Suite. It’s a note tote! I made the sweet little tote bag from the All Dressed Up Dies out of Ornate Garden specialty designer series paper and stuffed it with four 3×3 note cards and envelopes from the Best Dressed Note Cards and Envelopes. The colors go well together and it is way too cute! You can find the supplies used to create this card at the bottom of my post along with the sizes of cardstock used.

I made the All Dressed Up tote in a Sunday afternoon Facebook Live video tutorial and you can see the post here. I made today’s tote in the same way using the Ornate Garden specialty designer series paper – and this sheet has gold foil flowers on the inside – but used Terracotta Tile buttons instead of buckles. I used Early Espresso for the handles and So Saffron for the pocket which I decorated with the small flower cluster from the Stampin’ Up! Ornate Style cling stamp set and a fussy cut single flower. The single flower is stamped in Early Espresso on Whisper White and colored with Calypso Coral, Flirty Flamingo and Old Olive Stampin’ Blends. It is finished with a Metallic Gold pearl to match the gold foil flowers inside the tote.

The Daffodil Delight note cards from the Best Dressed 3×3 Note Cards and Envelopes are perfect to go in the tote and they match the Ornate Garden DSP pretty well. I stamped the daisy flower from the Stampin’ Up! Ornate Style stamp set on four note cards in Early Espresso ink. I also stamped the daisy on the pretty coordinating printed envelopes in Early Espresso ink. I colored each note card flower center with Calypso Coral Stampin’ Write marker and the leaves with the Old Olive Stampin’ Write marker. I did not use Stampin’ Blends because they would have bled through the back and I wanted to keep the cards to a single layer. Do you like how the printed watercolor splash makes the petals look yellow?

I stamped the bottom of each note card with a different saying from the Ornate Thanks photopolymer stamp set in Early Espresso ink. This way you have a coordinating set of note cards that can be used for different occasions! Actually, I stamped the sentiments first so that I could position the flower appropriately relative to the sentiment.

This project really shows off the versatility of all the different sentiments in the Ornate Thanks stamp set and how well this suite can be combines with other Stampin’ Up! products. And I can think of at least one bag in my closet that looks like this one. Unfortunately, it doesn’t have gold foil in the lining.


Stampin’ Up! Ornate Garden Suite Early Release available for ordering NOW!

Stampin’ Up! has a beautiful new early release product suite from the upcoming Annual Catalog and it’s available to order now!! Click the image below to see a PDF brochure of all the products that are available with this beautiful suite or go to the Ornate Garden page in my Online Store to place your order now.


April 16 – 30 Host Code: SJ9ZJ46Z

Use this host code when you order $50 or more and receive a free gift from me!  The gift is your choice of any item valued up to $10.00 in the 2019-20 Annual Catalog or in the 2020 January-June Mini Catalog!  That includes some of the Host Exclusive stamp sets!

If your order is over $150, please do not use the host code since you’ll receive your own Host Dollars plus I’ll send you the free gift!  This host code can be used by anyone, no commitment required.  Let me know if you have any questions.


If you need any stamping supplies, I’d be very happy to be your Demonstrator.  Just click on the Shop Now button on the right side of the screen to go directly to my Online store or contact me if you have any questions.  Happy Stamping!

Thanks for stopping by and have a great day!

Akiko

  • Visit my Online store here
  • See the current Stampin’ Up! clearance rack specials here
  • Earn FREE Stampin’ Up! products through my Wildflower Frequent Shopper Program – my way of saying thank you to my frequent shopper online customers.
  • Sign up for my weekly newsletter here
  • Have any questions? I’d be happy to help, click here to contact me.

Cardstock Cuts for this project:

  • Early Espresso – 1-1/2″ x 6-1/2″ (tote straps)
  • Terracotta Tile – 1″ x 2-1/2″ (buttons)
  • So Saffron – 1-1/2″ x 2″ (tote pocket)
  • Whisper White – 1″ x 1-1/2″ (fussy cut flower)
  • Ornate Garden DSP – 5″ x 11″ (tote bag)

Stampin’ Up! products used in this project:


Stampin’ Up! A Little Lace Hello Card

Good Morning! Have you heard of the Scrappy Strip technique? Well, I’ll tell you about it because today’s card uses the Scrappy Strip Technique along with the Stampin’ Up! A Little Lace cling stamp set. You can find the supplies used to create this card at the bottom of my post along with the sizes of cardstock used.

The Scrappy Strip technique was developed by Australian Stampin’ Up! Demonstrators Kylie and Bruno Bertucci earlier this year and is really simple, but so dramatic. And since tomorrow Stampin’ Up will announce the retiring list and carryover list and preview the new 2020-2021 Annual Catalog to Demonstrators, I decided to make my Scrappy Strip card using the beautiful, bold 2018-2020 In Colors because they will be on the retiring list!

I started by cutting 3-4 strips each of Blueberry Bushel, Lovely Lipstick, Call Me Clover, Pineapple Punch, Grapefruit Grove and Whisper White card stock. Start with 5-1/2″ wide panels and randomly cut the strips so that one end is thicker than the other. I used widths between 1/4″ and 1/2″ and had strips left over. Adhere the first strip even with the short edge of a 4-1/2″ x 5-1/2″ panel of Basic Black card stock using multipurpose liquid glue. Add glue to the back of the next strip and place it next to the first strip with a small black space between the two strips. Continue adhering strips until the Basic Black panel is covered. The edge of the strips will extend beyond the edge of the Basic black panel and that’s ok. Arrange the colors so that it is pleasing to your taste. When one end gets too angled, flip the strip so that the thick end is on the other side. You can see in this picture how I’ve started adhering the strips to the Basic Black card stock.

When the panel is covered, trim the excess strips with a paper trimmer or paper snips. Trim off a 1/2″ strip for the inside of the card, and trim the rest of the panel so that it is 3-7/8″ x 5-1/8″. Adhere it to a 4″ x 5-1/4″ Basic Black mat with multipurpose liquid glue, and then to a Basic Black card base with dimensionals.

I wanted to use the sentiment from the Stampin’ Up! A Little Lace stamp set, so I stamped it in VersaMark Ink on a strip of Basic Black card stock. I sprinkled it with white embossing powder and heat set until it was shiny. I trimmed the end and adhered it to the card front with multipurpose liquid glue.

I adhered the 1/2″ Scrappy Strip panel to the bottom of a Whisper White panel and trimmed the ends. I then adhered it to the inside of my card with multipurpose liquid glue.

The Scrappy Strip technique makes cards that look like a piece of modern art! And the bold Stampin’ Up! 2018-2020 In Colors are a perfect contrast for the black background. And it’s so sad to see them go. But once once the products – ink, markers, refills, paper and embellishments – are sold out, they will sadly no longer be available. So if there is something you still need from the 2018-2020 In Color product line to complete your stash, head quickly to my Online Store to stock up before they’re gone.


April 16 – 30 Host Code: SJ9ZJ46Z

Use this host code when you order $50 or more and receive a free gift from me!  The gift is your choice of any item valued up to $10.00 in the 2019-20 Annual Catalog or in the 2020 January-June Mini Catalog!  That includes some of the Host Exclusive stamp sets!

If your order is over $150, please do not use the host code since you’ll receive your own Host Dollars plus I’ll send you the free gift!  This host code can be used by anyone, no commitment required.  Let me know if you have any questions.


If you need any stamping supplies, I’d be very happy to be your Demonstrator.  Just click on the Shop Now button on the right side of the screen to go directly to my Online store or contact me if you have any questions.  Happy Stamping!

Thanks for stopping by and have a great day!

Akiko

  • Visit my Online store here
  • See the current Stampin’ Up! clearance rack specials here
  • Earn FREE Stampin’ Up! products through my Wildflower Frequent Shopper Program – my way of saying thank you to my frequent shopper online customers.
  • Sign up for my weekly newsletter here
  • Have any questions? I’d be happy to help, click here to contact me.

Cardstock Cuts for this project:

  • Basic Black – 5-1/2″ x 8-1/2″ card base scored at 4-1/4″, 4″ x 5-1/4″ (front mat), 4-1/2″ x 5-1/5″ (Scrappy Strip base), 1/2″ x 3-1/2″ (label)
  • For the following colors, you need approximately 4″ x 5-1/2″ so that you can easily cut the strips with your paper trimmer
    • Blueberry Bushel, Pineapple Punch, Lovely Lipstick, Call Me Clover, Grapefruit Grove Whisper White
  • Whisper White – 3-7/8″ x 5-1/8″ (inside panel)

Stampin’ Up! products used in this project:


Stampin’ Up! Ornate Style Friendship Card Video Tutorial

Good Morning! On Saturday we had our Inkin’ Krew Ornate Garden Facebook Event where we shared lots of projects made with the new Stampin’ Up! Ornate Garden Suite. Did you get a chance to tune in? We had several Facebook Live video tutorials and I shared the tutorial for this card. I used the Stampin’ Up! Ornate Style bundle along with the Ornate Garden specialty designer series paper and the Grace’s Garden and Daisy Lane stamp sets. You can find the supplies used to create this card at the bottom of my post along with the sizes of cardstock used.

Unfortunately I can’t link to the Facebook video ☹️, but it is on my YouTube Channel and you can view it here.

I stamped the sentiment from the Grace’s Garden photopolymer stamp set in Early Espresso ink on a small panel of So Saffron vellum. Be careful because the ink will take longer to dry on the vellum and will be easy to smear if you handle it too early, so I put it aside to let it dry. Using the Leaf Punch, I punched a leaf cluster from Old Olive card stock. I stamped three of the small petal clusters from the Daisy Lane cling stamp set with So Saffron ink after stamping off. I cut them out with the Medium Daisy Punch. I gently curved the petals on the daisies with my fingers, curving the bottom layer up, the top layer down and the middle layer alternating up and down. I adhered the layers with a dot of multipurpose liquid in the center and topped it off with a large gold faceted gem.

I cut the fancy frame from the Ornate Layers Dies from Terracotta Tile card stock. After cleaning the gazillion little pieces that were cut out – this is such an ornate frame and I love it! – I aligned the 3rd smallest of the Stitched Rectangles Dies in the center and cut out the center. I love how these dies leave a stitched edge on both the inside and outside! With the frame ready, I began to assemble my card base.

I adhered a panel of the Ornate Garden specialty designer series paper to a Terracotta Tile card base with multipurpose liquid glue. I adhered the frame to the vellum with pieces of dimensionals. The dimensionals on the side will extend beyond the vellum to adhere it to the card base, but the top and bottom won’t, so I added a strip of multipurpose liquid glue to the back of the vellum that is hidden by the frame. I adhered it to the card base. I adhered the leaf with multipurpose liquid glue and the flower with glue dots. I finished it off with a Terracotta Tile bow.

For the inside of the card, I stamped the little flourish from the Stampin’ Up! Ornate Style cling stamp set in Early Espresso ink at the top of a Whisper White panel. I added a strip of the Ornate Garden specialty DSP to the bottom and adhered the panel to the inside of the card.

Now, I have to admit that I did some surgery to my card after the video ended. In realtime, I stamped the sentiment too hight and crooked as you can see in the picture here. So I snipped the dimensionals behind the frame and trimmed the vellum (luckily it was just stuck down behind the frame. I then re-stamped the sentiment properly and re-attached the frame to the vellum and then adhered it to the card base. It looks much better and from the pictures above, I don’t think you can tell that it needed to be fixed!

I hope that you enjoyed the Inkin’ Krew Ornate Garden event if you got a chance to join it Saturday afternoon. And I hope you got a lot of inspiration and ideas on how you will use the products in the Ornate Garden Suite. If you didn’t, the group will still be there and you can check out the postings and watch the videos on replay. Here is the link to the group where you can join and we will get you approved as soon as we can: https://www.facebook.com/groups/1833741716756137/. Now to end my post with a better picture…


Stampin’ Up! Ornate Garden Suite Early Release available for ordering NOW!

Stampin’ Up! has a beautiful new early release product suite from the upcoming Annual Catalog and it’s available to order now!! Click the image below to see a PDF brochure of all the products that are available with this beautiful suite or go to the Ornate Garden page in my Online Store to place your order now.


April 16 – 30 Host Code: SJ9ZJ46Z

Use this host code when you order $50+ and receive a free gift from me!  If your order is over $150, please do not use this code, but you’ll still get the free gift.  The free gift is your choice of any item valued up to $10.00 in the 2019 – 2020 Annual Catalog or in the 2020 Mini Catalog!  That includes some of the Host Exclusive stamp sets!

If your order is over $150, please do not use the host code since you’ll receive your own Host Dollars plus I’ll send you the free gift!  This host code can be used by anyone, no club or commitment required.  Let me know if you have any questions.


If you need any stamping supplies, I’d be very happy to be your Demonstrator.  Just click on the Shop Now button on the right side of the screen to go directly to my online store or contact me if you have any questions.  Happy Stamping!

Thanks for stopping by and have a great week!

Akiko

  • Visit my online store here
  • See the current Stampin’ Up! clearance rack specials here
  • Earn FREE Stampin’ Up! products through my Wildflower Frequent Shopper Program – my way of saying thank you to my online frequent shopper customers.
  • Sign up for my weekly newsletter here
  • Have any questions? I’d be happy to help, click here to contact me.

Cardstock Cuts for this project:

  • Terracotta Tile – 4-1/4″ x 11″ card base scored at 5-1/2″
  • Old Olive – 1-1/2″ x 3″ (leaf cluster punch)
  • Perennial Essence vellum card stock – 2-1/8″ x 3-5/8″ (So Saffron vellum panel)
  • Whisper White – 4″ x 5-1/4″ (inside panel), 2″ x 6″ (punched daisy petals)
  • Ornate Garden Designer Series Paper – 4-1/4″ x 5-1/2″ (card front background), 1/2″ x 4″ (inside trim)

Stampin’ Up! products used in this project:


Stampin’ Up! Ornate Style Get Well Card

Good Morning! In preparation for tomorrow’s Inkin Krew Ornate Garden Facebook Event, I have a card today using the Stampin’ Up! Ornate Style stamp bundle in combination with the get well sentiment from the Timeless Tulips stamp set. You can find the supplies used to create this card at the bottom of my post along with the sizes of cardstock used.

I cut an panel of the Mint Macaron background Ornate Garden specialty designer series paper with the large frame die from the Ornate Layers Dies and sponged the edge with Sahara Sand ink to give it a distressed look. I adhered it to a Mint Macaron card base with multipurpose liquid glue. I stamped the large floral bouquet from the Stampin’ Up! Ornate Style stamp set in Early Espresso ink on a Whisper White panel. I colored it with Rococo Rose, So Saffron, Old Olive, Dark Mango Melody and Bronze Stampin’ Blends. I colored the background with the light Mint Macaron Stampin’ Blend using a circular motion to give it a mottled look and cut out the panel with a Stitched Rectangle Die.

I adhered the floral panel to an Early Espresso mat with multipurpose liquid glue and then to the card front with dimensionals. I stamped the get well soon sentiment from the Timeless Tulips stamp set in VersaMark Ink on a strip of Early Espresso card stock. I sprinkled it with gold embossing powder and heat set until it was shiny. I trimmed the end and trimmed the end of a strip of the gold foil Mint Macaron paper from the Ornate Garden DSP. I adhered the two strips together with multipurpose liquid glue and adhered them to the card front.

I made a bow with the new Mint Macaron ribbon and adhered it with glue dots and finished the card front with three gold faceted gems.

I decorated the inside by stamping the little flower from the Stampin’ Up! Ornate Style stamp set in Early Espresso ink in the corner of a Whisper White panel. I colored it with So Saffron, Old Olive and Dark Mango Melody Stampin’ Blends. I added a strip of the Ornate Garden specialty designer series paper on the bottom and adhered the panel to the inside of the card.

The Stampin’ Up! Ornate Style cling stamp set comes bundled with the Ornate Layers Dies at a 10% discount. This bundle is one of the items in the Ornate Garden Early Release and will be in the new 2020-2021 Annual Catalog.


Inkin’ Krew Facebook Live Event Group is now open!

We are all excited about the Inkin’ Krew Ornate Garden Facebook Event tomorrow! Our Facebook page is all set up for the event and it’s open for joining!  Click this link to go to the group and then click the “join” button and we’ll get you approved ASAP: https://www.facebook.com/groups/1833741716756137/

Here is the schedule of events that we have planned:

Everyone is welcome to join us! Let me know if you have any questions.


April 16 – 30 Host Code: SJ9ZJ46Z

Use this host code when you order $50 or more and receive a free gift from me!  The gift is your choice of any item valued up to $10.00 in the 2019-20 Annual Catalog or in the 2020 January-June Mini Catalog!  That includes some of the Host Exclusive stamp sets!

If your order is over $150, please do not use the host code since you’ll receive your own Host Dollars plus I’ll send you the free gift!  This host code can be used by anyone, no commitment required.  Let me know if you have any questions.


If you need any stamping supplies, I’d be very happy to be your Demonstrator.  Just click on the Shop Now button on the right side of the screen to go directly to my online store or contact me if you have any questions.  Happy Stamping!

Thanks for stopping by and have a great day!

Akiko

  • Visit my online store here
  • See the current Stampin’ Up! clearance rack specials here
  • Earn FREE Stampin’ Up! products through my Wildflower Frequent Shopper Program – my way of saying thank you to my frequent shopper online customers.
  • Sign up for my weekly newsletter here
  • Have any questions? I’d be happy to help, click here to contact me.

Cardstock Cuts for this project:

  • Mint Macaron – 4-1/4″ x 11″ card base scored at 5-1/2″
  • Early Espresso – 3-1/8″ x 4-1/2″ (floral bouquet mat), 1/2″ x 3″ (banner label)
  • Whisper White – 4″ x 5-1/4″ (inside panel), 3-1/2″ x 5″ (floral panel)
  • DSP – 4-1/4″ x 5-1/2″ (die cut front background), 1/2″ x 4″ (inside trim), 1/2″ x 3″ (banner label accent)

Stampin’ Up! products used in this project: