Stampin’ Up! Ornate Style for the Happy Inkin’ Thursday Blog Hop

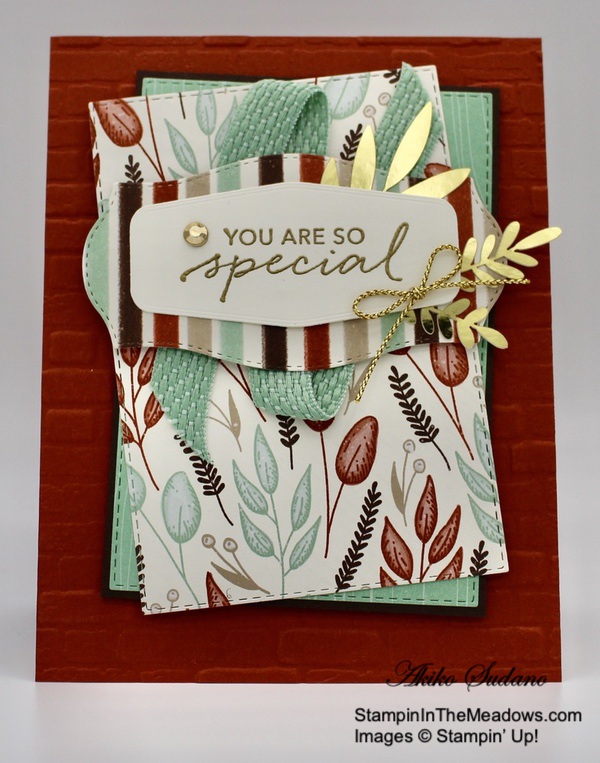
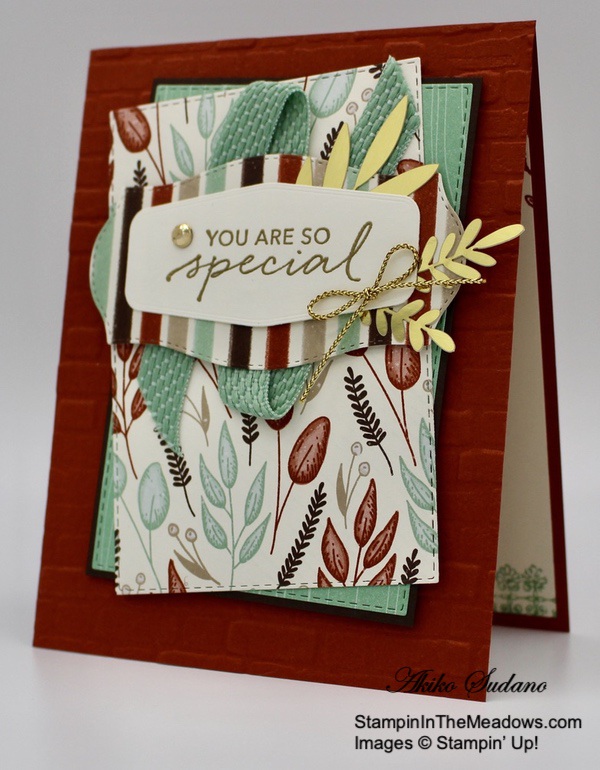
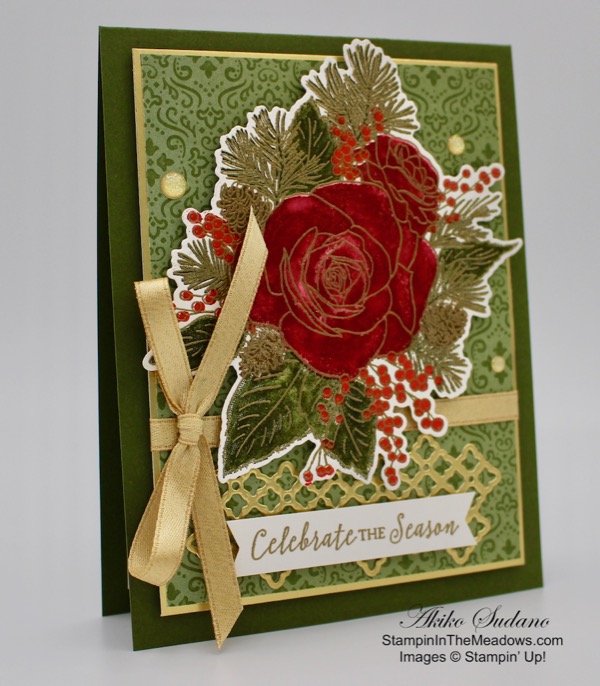
Good Morning! Welcome to another Happy Inkin’ Thursday Blog Hop! I just put out some purple mums by my front door and I wanted to pull out the Stampin’ Up! Ornate Style bundle so I could color it to match my mums. Then I saw that the our theme for this week is ‘Plaid’ and I thought that the plaid and flowers would be perfect together! This is what I came up with.

We have a theme challenge this week, and here is the theme we are using for our projects:

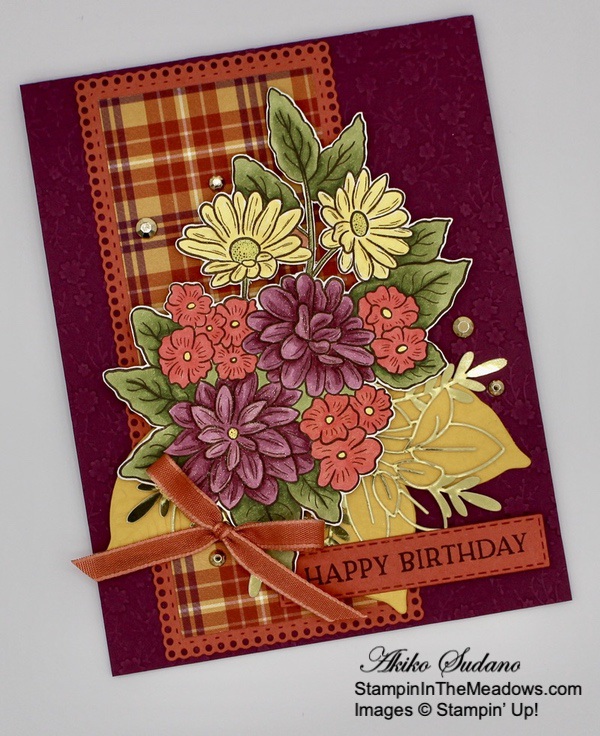
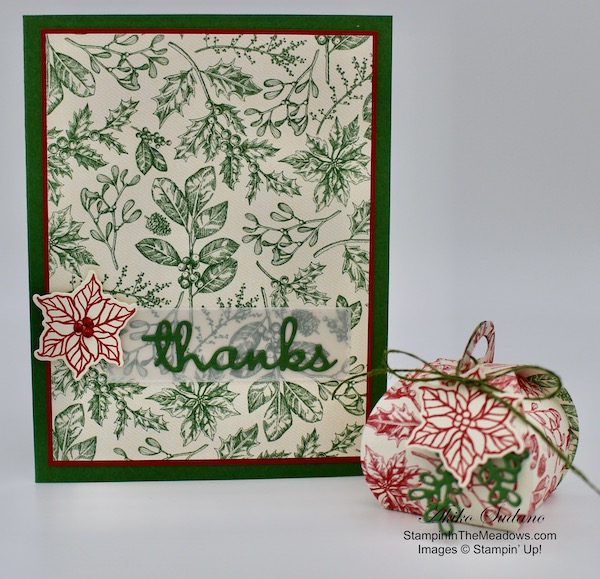
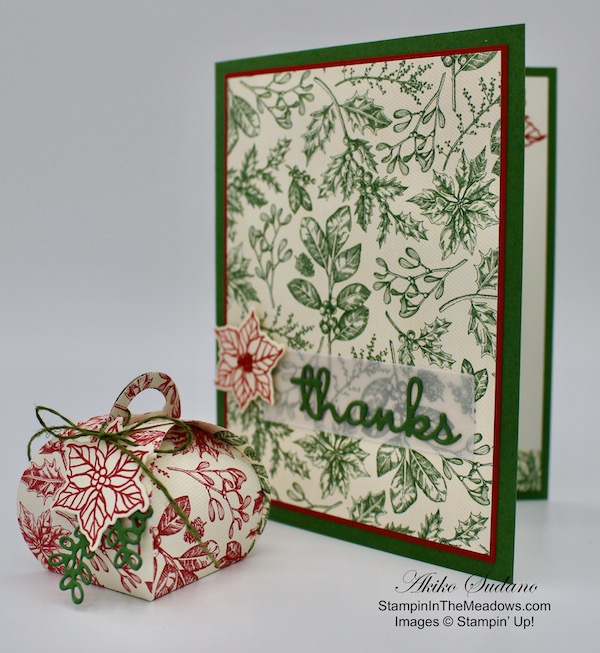
Emboss a Rich Razzleberry panel with the Ornate Floral 3D embossing folder and adhere it to the front of a Rich Razzleberry card base. Cut a Terracotta Tile panel with the Ornate Layers Die and adhere a panel of Plaid Tidings designer series paper to the front. Adhere the layered die cut to the front of the card. Cut and embossed three leaves from the Nature’s Roots dies in Bumblebee and adhere them to the bottom of the panel. Cut some branches from the Forever Gold Laser Cut specialty paper and adhere them to the top of the leaves.

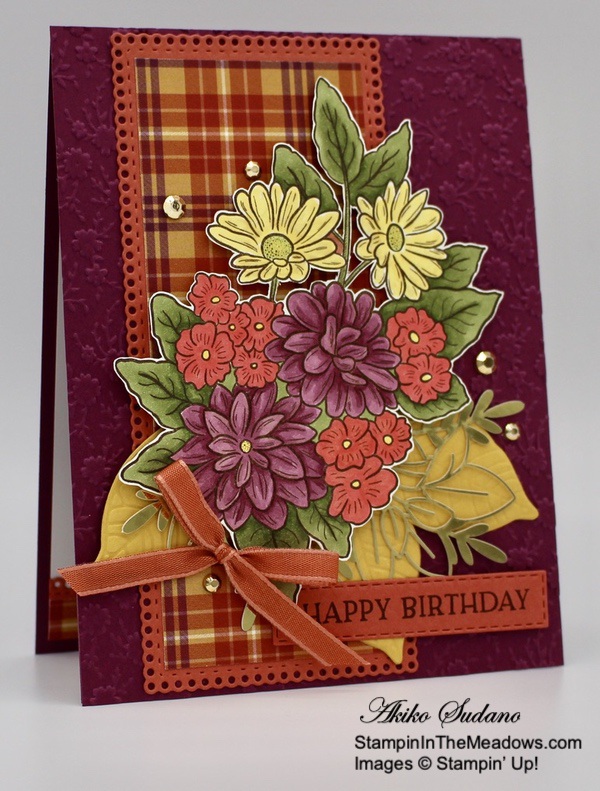
Stamp the bouquet from the Stampin’ Up! Ornate Style cling stamp set in Early Espresso ink on a Whisper White panel. Color it with Rich Razzleberry, Mossy Meadow, Mango Melody, Granny Apple Green, Calypso Coral and Poppy Parade Stampin’ Blends. Fussy cut the image and brush clear Wink of Stella on the flowers.

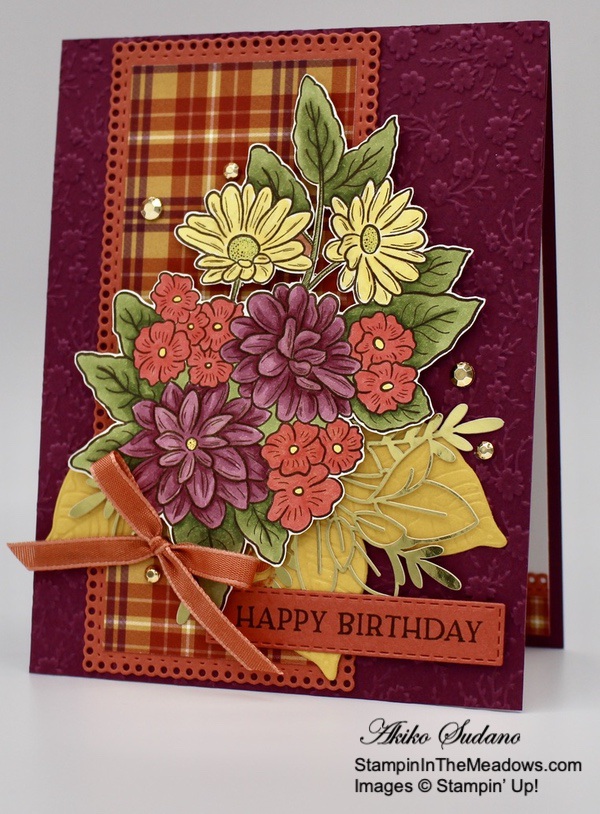
Adhere the flowers to the card front with dimensionals. Stamp the Happy Birthday sentiment from the Blossoms in Bloom stamp set in Early Espresso ink on a strip of Terracotta Tile and cut it out with the long small die from the Stitched Rectangles Dies. Adhere it to the bottom of the card with liquid glue and dimensionals. Accent the card front with Gilded Gems and a Terracotta Tile bow.

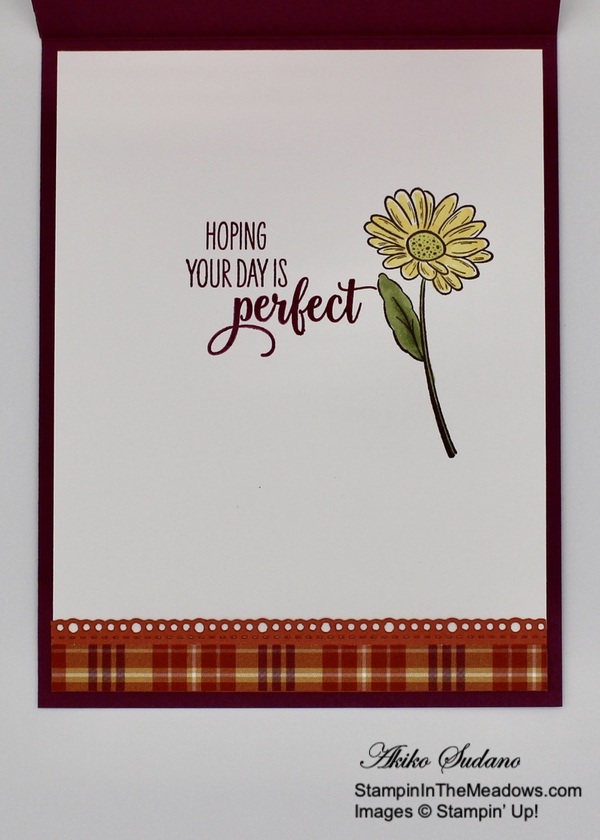
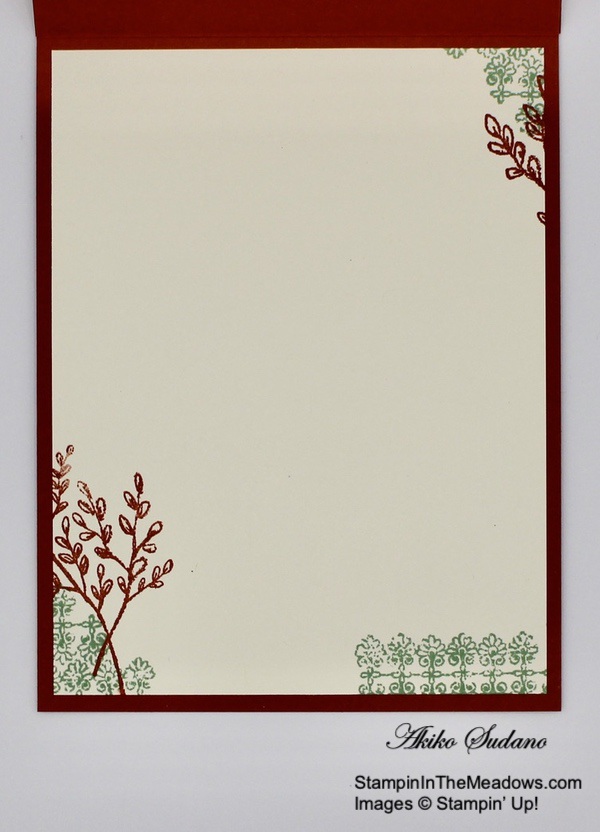
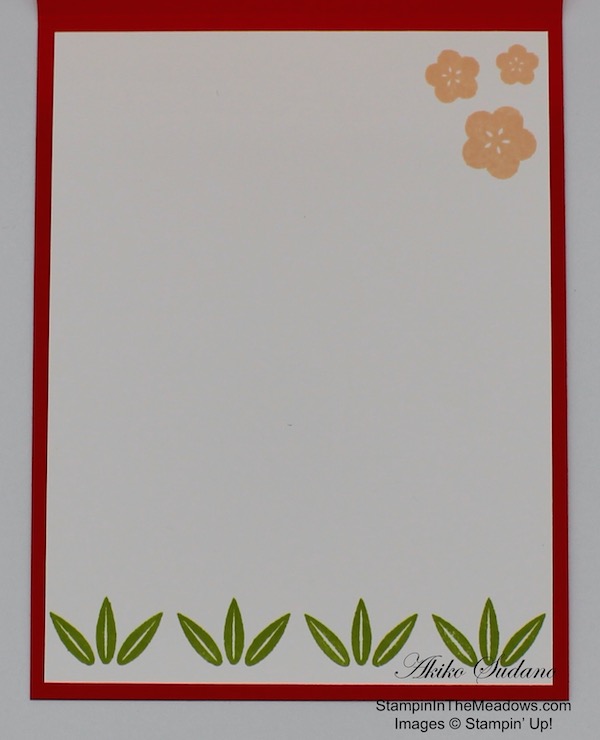
Stamp the sentiment from the Sending Sunshine stamp set in Rich Razzleberry ink on a Whisper White panel. Stamp the flower from the Stampin’ Up! Ornate Style Stamp set in Early Espresso ink next to the sentiment and color it with Mango Melody, Granny Apple Green and Mossy Meadow Stampin’ Blends. Cut a strip of Terracotta Tile with the Ornate Borders die and adhere a strip of Plaid Tidings DSP to the bottom. Adhere it to the bottom of the Whisper White panel and adhere the panel to the inside of the card.

The rich fall colors and the plaid give a different look to the beautiful flowers from the Stampin’ Up! Ornate Style stamp set, that is perfect for this time of year. So if you’ve got this bundle, pull it out and have fun creating a fall card! Oh, and the pretty Plaid Tidings designer series paper is on sale for 15% off!

On with the Hop! Click the Next button below to visit Karen Ksenzakovic’s blog.

And just in case you get lost along the way, here’s a list of the team members participating in the hop today:


Stampin’ Up! Designer Series Paper Sale Going on Now!

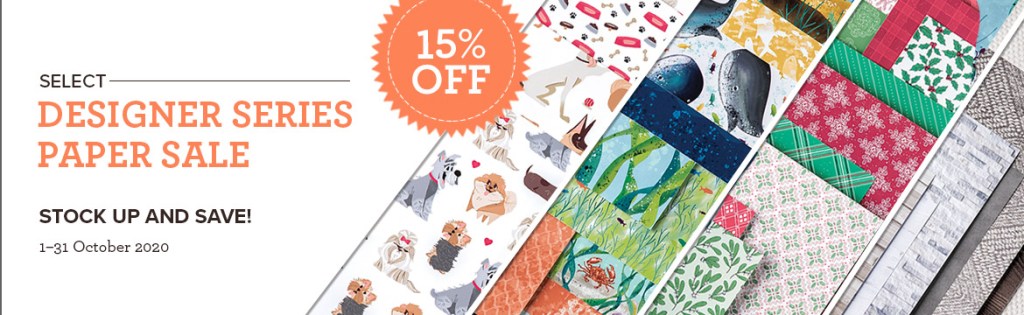
Stampin’ Up! has beautiful Designer Series Paper and during the Month of October they’re putting a select list of those on sale with a 15% discount! This is a fantastic opportunity for you to stock up and save on paper. And the sale includes some of the designs from the August-December 2020 Mini Catalog too! Get the full details on my Promotion Page or click on the image above to download a printable PDF with all the selections.  Click Here to shop the Designer Series Paper Sale in My Online Store now!


October 1-15 Host Code: F4UK7V36

Use this host code when you order $50 or more and receive a free gift from me!  The gift is your choice of any item valued up to $10.00 in the 2019-20 Annual Catalog or in the 2020 January-June Mini Catalog!  That includes some of the Host Exclusive stamp sets!

If your order is over $150, please do not use the host code since you’ll receive your own Host Dollars plus I’ll still send you the free gift!  This host code can be used by anyone, no commitment required.  Let me know if you have any questions.


If you need any stamping supplies, I’d be very happy to be your Demonstrator.  Just click on the Shop Now Button on the right side of the screen to go directly to my online store or contact me if you have any questions.  Happy Stamping!

Thanks for visiting!

Akiko

  • Visit my online store here
  • See the current Stampin’ Up! clearance rack specials here
  • Earn FREE Stampin’ Up! products through my Wildflower Frequent Shopper Program – my way of saying thank you to my frequent shopper online customers.
  • Sign up for my weekly newsletter here
  • Have any questions? I’d be happy to help, click here to contact me.

Cardstock Cuts for this project:

  • Rich Razzleberry – 4-1/4″ x 11″ card base scored at 5-1/2″, 4-1/4″ x 5-1/2″ (embossed panel)
  • Terracotta Tile – 2-3/4″ x 5-3/4″ (DSP mat), 5/8″ x 4″ (inside trim), 1-1/4″ x 3-1/4″ (label)
  • Whisper White – 4″ x 5-1/4″ (inside panel), 3-1/2″ x 4-3/4″ (flower bouquet)
  • Bumblebee – 3″ x 4″ (die cut leaves)
  • Plaid Tidings DSP – 2″ x 5″ (front panel), 3/8″ x 4″ (inside trim)
  • Forever Gold – trim leaves from the hexagon label

Stampin’ Up! products used in this project:


Stampin’ Up! Tasteful Touches for the Happy Inkin’ Thursday Blog Hop

Good Morning! Welcome to another Happy Inkin’ Thursday Blog Hop! For today’s hop, I made a card with the elegant Stampin’ Up! Tasteful Touches bundle and the Gilded Autumn specialty designer series paper to share. You can find the supplies used to create this card at the bottom of my post along with the sizes of cardstock.

We have a sketch challenge this week, and here is the card sketch we are using:

I embossed a Cajun Craze panel with the Bricks & Mortar 3D embossing folder and adhered it to the front of a Cajun Craze card base. I cut a panel of the Mint Macaroon paper from the Subtles 6″ x 6″ designer series paper pack with a die from the Stitched Rectangles Dies and adhered it to an Early Espresso mat. I used the same die to cut a panel of Gilded Autumn specialty designer series paper and adhered it on top.

I cut a panel of the striped Gilded Autumn specialty designer series paper with the long curvy label die from the Tasteful Labels Dies in the Stampin’ Up! Tasteful Touches bundle and adhered two leaf sprigs from the Forever Gold laser cut specialty paper with dots of liquid glue. I stamped the sentiment from the Stampin’ Up! Tasteful Touches cling stamp set in versamark ink and heat embossed it with gold embossing powder. I adhered the embossed label to the striped label and accented it with a Gilded gem and gold trim bow.

I applied Stampin’ Seal to the layered die cut DSP panel and wound a length of Mint Macaron Basketweave ribbon, making a Z and trimming the ends. I adhered the label over the ribbon with dimensionals and popped the layered panel to the embossed card front with dimensionals.

I stamped the leaf and grill images from the Stampin’ Up! Tasteful Touches stamp set in Cajun Craze and Mint Macaron inks on a Very Vanilla panel. I adhered the panel to the inside of the card.

The rich colors of the Gilded Autumn specialty designer series paper make any fall card special. When paired with the beautiful images in the Stampin’ Up! Tasteful Touches stamp set and touches of gold, your card becomes extra special!

On with the Hop! Click the Next button below to visit Karen Ksenzakovic’s blog.

And just in case you get lost along the way, here’s a list of the team members participating in the hop today:


October 1-15 Host Code: F4UK7V36

Use this host code when you order $50 or more and receive a free gift from me!  The gift is your choice of any item valued up to $10.00 in the 2019-20 Annual Catalog or in the Aug-Dec 2020 Mini Catalog!  That includes some of the Host Exclusive stamp sets!

If your order is over $150, please do not use the host code since you’ll receive your own Host Dollars plus I’ll still send you the free gift!  This host code can be used by anyone, no commitment required.  Let me know if you have any questions.


If you need any stamping supplies, I’d be very happy to be your Demonstrator.  Just click on the Shop Now Button on the right side of the screen to go directly to my online store or contact me if you have any questions.  Happy Stamping!

Thanks for visiting!

Akiko

  • Visit my online store here
  • See the current Stampin’ Up! clearance rack specials here
  • Earn FREE Stampin’ Up! products through my Wildflower Frequent Shopper Program – my way of saying thank you to my frequent shopper online customers.
  • Sign up for my weekly newsletter here
  • Have any questions? I’d be happy to help, click here to contact me.

Cardstock Cuts for this project:

  • Cajun Craze – 4-1/4″ x 11″ card base scored at 5-1/2″, 4-1/4″ x 5-1/2″ (embossed panel)
  • Early Espresso – 3-1/8″ x 4-1/2″ (DSP mat)
  • Forever Gold Laser Cut Specialty paper – two leaf sprigs
  • Very Vanilla – 4″ x 5-1/4″ (inside panel), 1-1/2″ x 3-1/4″ (label)
  • Subtles 6″ x 6″ DSP – 3-1/4″ x 4-1/2″ (background panel)
  • Gilded Autumn DSP – 3-1/4″ x 4-1/2″ (background panel), 2″ x 3-1/2″ (label background)

Stampin’ Up! products used in this project:


Stampin’ Up! Floral Essence Miss You Card for the Happy Inkin’ Thursday Blog Hop

Good Morning! Welcome to another Happy Inkin’ Thursday Blog Hop! I have a whimsical miss you card to brighten your day using the sweet Stampin’ Up! Floral Essence stamp bundle along with the Well Written Dies.

We have a color challenge this week, and here is the bright, fun color palette we are using:

My card also fits with the current challenge at TGIF Challenges – #TGIFC261- Use Your Words. Check it out – it’s a fun challenge and the cards are so cute.

I adhered a panel of the Daffodil Delight sprinkles paper from the Birthday Bonanza designer series paper pack to a Grapefruit Grove mat and then to a thick Whisper White card base with multipurpose liquid glue. I cut a panel of Whisper White with a Stitched So Sweetly Dies scalloped rectangle and embossed it with the Scripty embossing folder. I adhered it to the card front with multipurpose liquid glue.

I stamped 9 three petal flower clusters from the Stampin’ Up! Floral Essence photopolymer stamp set in VersaMark Ink on the Grapefruit Grove starburst paper from the Birthday Bonanza DSP pack. I sprinkled them with white embossing powder and shook off the excess. I heat set until shiny and punched them out with the Perennial Flower Punch. I gently curved the petals with my fingers and made three flowers by adhering the centers with multipurpose liquid glue – each flower has three sets of petals. I added a fun, fuzzy Perennial Essence Floral Center to each flower. I stamped 6 leaf clusters from the Stampin’ Up! Floral Essence stamp set using Bermuda Bay ink on the Bermuda Bay confetti paper from the Birthday Bonanza DSP pack and punched them out with the Leaf Punch.

I cut out the sentiment from Bermuda Bay card stock using the Well Written Dies. I also cut two Well Written Dies butterflies from Daffodil Delight card stock. With all the pieces cut out, I arranged them on the card front and started assembly by adhering the Bermuda Bay words with multipurpose liquid glue – Don’t lose the tiny dot for the ‘I’! I adhered the leaves with multipurpose liquid glue and the flowers with glue dots. Lastly, I adhere a little butterfly and finished it off with Calypso Coral enamel dots.

I adhered the second butterfly to the top corner of a Whisper White panel and added the strip of Daffodil Delight DSP. I adhered the decorated panel to a Grapefruit Grove mat and then to the inside of the card.

What do you think of stamping on the designer series paper? It’s a little different, giving a little extra texture to the flowers and leaves. Too bad I didn’t die cut the butterflies from the Daffodil Delight sprinkle paper – next time.

On with the Hop! Click the Next button below to see the project that Karen Ksenzakovic created for today’s blog hop.

And just in case you get lost along the way, here’s a list of the team members participating in the hop today:


April 16 – 30 Host Code: SJ9ZJ46Z

May 1 – 15 Host Code: T323M33B

Use this host code when you order $50 or more and receive a free gift from me!  The gift is your choice of any item valued up to $10.00 in the 2019-20 Annual Catalog or in the 2020 January-June Mini Catalog!  That includes some of the Host Exclusive stamp sets!

If your order is over $150, please do not use the host code since you’ll receive your own Host Dollars plus I’ll send you the free gift!  This host code can be used by anyone, no commitment required.  Let me know if you have any questions.


If you need any stamping supplies, I’d be very happy to be your Demonstrator.  Just click on the Shop Now button on the right side of the screen to go directly to my online store or contact me if you have any questions.  Happy Stamping!

Thanks for visiting!

Akiko

  • Visit my online store here
  • See the current Stampin’ Up! clearance rack specials here
  • Earn FREE Stampin’ Up! products through my Wildflower Frequent Shopper Program – my way of saying thank you to my frequent shopper online customers.
  • Sign up for my weekly newsletter here
  • Have any questions? I’d be happy to help, click here to contact me.

Cardstock Cuts for this project:

  • Thick Whisper White – 4-1/4″ x 11″ card base scored at 5-1/2
  • Grapefruit Grove – (2) 4″ x 5-1/4″ (mats)
  • Bermuda Bay – 1″ x 3″ (miss you die cuts)
  • Daffodil Delight – 1″ x 1″ (2 butterfly die cuts)
  • Whisper White – 3-7/8″ x 5-1/8″ (inside panel), 2-3/4″ x 3-3/4″ (scalloped rectangle)
  • Birthday Bonanza DSP
    • Daffodil Delight Sprinkles – 3-7/8″ x 5-1/8″ (front background), 1/2″ x 3-7/8″ (inside trim)
    • Grapefruit Grove Starbursts – 6″ x 6″ (punched flower petals)
    • Bermuda Bay Confetti – 4″ x 6″ (punched leaves)

Stampin’ Up! products used in this project:


Stampin’ Up! Timeless Tropical Friendship Card for the Happy Inkin’ Thursday Blog Hop

Good Morning! Welcome to another Happy Inkin’ Thursday Blog Hop! For today’s card, I used the sweet sentiment from the Free as a Bird stamp set and the flowers from the Stampin’ Up! Timeless Tropical bundle to make a note card for your BFF. You can find the supplies that I used to create this card at the bottom of my post along with the sizes of cardstock.

We have a sketch challenge this week, and here is the sketch we are using:

I embossed a panel of Mossy Meadow card stock with the Coastal Weave embossing folder and adhered it to a So Saffron card base with multipurpose liquid glue. I cut a panel of the Tropical Oasis designer series paper and adhered it to a real red mat before popping it on the card base with dimensionals. I stamped the sentiment from the Free As A Bird cling stamp set in Mossy Meadow ink on a Whisper White strip and cut it out with the small long Stitched Rectangle die. I adhered it to a Real Red mat and then to the flowers with multipurpose liquid glue.

I stamped the frangipani flower and large leaf from the Stampin’ Up! Timeless Tropical stamp set in Sahara Sand ink on Whisper White. I colored the flower with the Light Real Red, Light Flirty Flamingo, Light Mango Melody and Light Daffodil Delight Stampin’ Blends. I also used the Stampin’ Blend Color Lifter to create highlights on the flower petals. I used the Light and Dark Old Olive Stampin Blends to color the leaves. I cut the flower and leaf out with the coordinating die from the In The Tropics dies.

I die cut three long leaves from Old Olive cardstock, a set of three flowers from So Saffron and Real Red card stock and five of the small leaves from Shaded Spruce card stock. I arranged the die cuts on the card front and adhered them with multipurpose liquid glue and dimensionals where they were half on the floral panel and half off. Note that some were adhered to the embossed panel with multipurpose liquid glue. I finished off the frangipani flower with a large red rhinestone and the little red flowers with yellow rhinestones from the Holiday Rhinestones. I added small Red Rhinestones to the yellow flowers.

For the inside of the card, I adhered a strip of the Tropical Oasis DSP to the bottom of a Whisper White panel. I stamped three partial frangipani flowers from the Stampin’ Up! Timeless Tropical stamp set in Real Red after stamping off twice. I adhered the panel to the inside of the card with multipurpose liquid glue.

I’m happy the Stampin’ Up! Timeless Tropical and Free As A Bird stamp sets will be carried over to the new 2020-2021 Annual Catalog, but they won’t be available as a bundle with the 10% discount.

On with the Hop! Click the Next button below to visit Karen Ksenzakovic’s blog.

And just in case you get lost along the way, here’s a list of the team members participating in the hop today:


April 16 – 30 Host Code: SJ9ZJ46Z

Use this host code when you order $50 or more and receive a free gift from me!  The gift is your choice of any item valued up to $10.00 in the 2019-20 Annual Catalog or in the 2020 January-June Mini Catalog!  That includes some of the Host Exclusive stamp sets!

If your order is over $150, please do not use the host code since you’ll receive your own Host Dollars plus I’ll send you the free gift!  This host code can be used by anyone, no commitment required.  Let me know if you have any questions.


If you need any stamping supplies, I’d be very happy to be your Demonstrator.  Just click on the Shop Now button on the right side of the screen to go directly to my online store or contact me if you have any questions.  Happy Stamping!

Thanks for visiting!

Akiko

  • Visit my online store here
  • See the current Stampin’ Up! clearance rack specials here
  • Earn FREE Stampin’ Up! products through my Wildflower Frequent Shopper Program – my way of saying thank you to my frequent shopper online customers.
  • Sign up for my weekly newsletter here
  • Have any questions? I’d be happy to help, click here to contact me.

Cardstock Cuts for this project:

  • So Saffron – 5-1/2″ x 8-1/2″ card base scored at 4-1/4″, 1″ x 2″ (3 flower die cuts)
  • Mossy Meadow – 4″ x 5-1/4″ (embossed background)
  • Old Olive – 1″ x 3-1/2″ (3 long leaf die cuts)
  • Shaded Spruce – 1″ x 4″ (5 small leaf die cuts)
  • Real Red – 1″ x 2″ (3 flower die cuts), 5/8″ x 2-5/8″ (label mat), 2-5/8″ x 3-7/8″ (floral mat)
  • Whisper White – 4″ x 5-1/4″, (inside panel), 2″ x 3-3/4″ (flower and leaf die cuts)
  • Tropical Oasis DSP – 2-1/2″ x 3-3/4″ (front panel), 1/2″ x 5-1/4″ (inside trim)

Stampin’ Up! products used in this project:


Stampin’ Up! New Year Celebration Happy New Year Card

Good Morning! Today I have a special Happy New Year Card using the Stampin’ Up! New Year Celebration stamp set. This is an exclusive set and this is the first time that it is available outside of Japan. New Years is a very big holiday in Japan, and since it’s part of my heritage and Stampin’ Up! made this set available in the US, I had to make a card with it. You can find the supplies used to create this card at the bottom of my post along with the sizes of cardstock used.

This is a simple, flat card, but I did a lot of stamping! Also, since many of the stamps are thick images, I pulled out my Stamparatus so that I would be able to get good alignment if I had to stamp an image again. Luckily, my stamp pads were pretty juicy too. I started by stamping the Mt. Fuji outline stamp from the Stampin’ Up! New Year Celebration stamp set in Pretty Peacock on a Whisper White panel. Then I stamped the inside of Mt. Fuji in Gray Granite. I love how it leaves a mountain snow cap! I mounted these two stamps on either side of my Stamparatus plate and practiced stamping on copy paper several times to get the alignment right, moving the inside stamp slightly each time until I was happy with the results.

I stamped the leaves from the Stampin’ Up! New Year Celebration stamp set on the bottom in Granny Apple Green. Again, the Stamparatus was great because I moved my paper 1″ after each stamping, resulting in a neat row of 4 stamped leaf clusters. Then I stamped the ribbon and bow using Poppy Parade. I stamped the clouds in Seaside Spray.

I stamped the plum flowers in Petal Pink. I stamped them randomly in the space, and stamped a few single flowers to fill it up. I stamped the gourd in Soft Suede after stamping off. The gourd reminded me of one my Mother had on her knick knack shelf while I was growing up, so I had to use it. The last thing I stamped was the Kanji Happy New year symbol in Memento Tuxedo Black. When I finished stamping, I adhered the panel to a Poppy Parade card base with snail

I stamped another row of leaf clusters using Granny Apple Green ink on a Whisper White panel for the inside of the card. I added a cluster of plum flowers in Petal Pink in the upper corner and then adhered it to the inside of the card with snail.

I hope you like this card – it’s a little different from my usual style with layers, die cuts and bling. Click on the picture below to open a flyer on this exclusive stamp set. I printed it out and inserted it in my stamp case so I would have a reference for all the stamps in this special set.


Stampin’ In The Meadows January – June 2020 Mini Catalog Product Shares

I’m doing my first Stampin’ Up! Product Share to get ready for the new January-June 1010 Mini Catalog and I invite you to join me!  I’m placing an order early on January 3 and I’m going to use the expedited shipping option so I should be able to have the shares cut, bundled and back out to you during the week of January 13. I am doing a paper share and an ribbon & embellishments share. A share is a good way to get a sample of the new products before committing to purchase full packages of each product. See my New Mini Catalog Product Shares page to get a complete details of the options and their costs, a complete listing of all the products you will be getting, and how to sign up. Let me know if you have any questions.


Stampin’ In The Meadows Online Host Club Starting in January 2020

Starting in January, I am going to start the Stampin’ In The Meadows Online Host club. Club members commit to spending $25 on supplies each month for 6 months, Each club member gets to be the host for a month during the period. See my Online Host Club page for complete details. Contact me if you have questions.


December 16 – 31 Host Code: A99JPHA3

Use this host code when you order $50 or more and receive a free gift from me!  The gift is your choice of any item valued up to $10.00 in the 2019-20 Annual Catalog or in the 2019 Holiday Catalog!  That includes some of the Host Exclusive stamp sets!

If your order is over $150, please do not use the host code since you’ll receive your own Host Dollars plus I’ll send you the free gift!  This host code can be used by anyone, no commitment required.  Let me know if you have any questions.


If you need any stamping supplies, I’d be very happy to be your Demonstrator.  Just click on the Shop Now button on the right side of the screen to go directly to my online store or contact me if you have any questions.  Happy Stamping!

Thanks for stopping by and have a great day!

Akiko

  • Visit my online store here
  • See the current Stampin’ Up! clearance rack specials here
  • Earn FREE Stampin’ Up! products through my Wildflower Frequent Shopper Program – my way of saying thank you to my frequent shopper online customers.
  • Sign up for my weekly newsletter here
  • Have any questions? I’d be happy to help, click here to contact me.

Cardstock Cuts for this project:

  • Poppy Parade – 4 1/4″ x 11″
  • Whisper White – (2) 4″ x 5 1/4″

Stampin’ Up! products used in this project:


Stampin’ Up! Toile Tidings Thank You Card

Good Morning! Today I have a Thank You Card made with the pretty Stampin’ Up! Toile Tidings designer series paper, the Well Written dies and the little poinsettia from the Stampin’ Up! Cup of Christmas stamp bundle. As I put Christmas stamping supplies away to make room for the items from the new Stampin’ Up! January-June 2020 Mini Catalog, I find lots of pretty Christmas DSP looking so sad, wanting to be used. So let’s put it to good use with a Holiday Thank You card. Plus, we can use the cute Mini Curvy Keepsakes box die to hold a little something to go with your card! You can find the supplies used to create this card at the bottom of my post along with the sizes of cardstock used.

I started with a panel of the botanical toile from the Stampin’ Up! Toile Tidings DSP pack and adhered it to a Real Red mat and then to a Garden Green card base. I found that the little red poinsettia from the Cup of Christmas bundle went with it, so I stamped it in Real Red on Very Vanilla card stock and cut it out with the matching die.

I cut out the thanks sentiment from the Stampin’ Up! Well Written dies from Garden Green card stock. I cut a label from vellum card stock using the second smallest label from the Stitched Rectangle dies to put behind the thanks. I find the vellum adds some contrast so that the word stands out a little better and it makes the card fancier with the translucent texture! I used multipurpose liquid glue to adhere the word to the vellum and used a stamp block to weigh it down and keep it put while it dried.

Then I applied multipurpose liquid glue to the vellum behind the word so that it would be disguised and adhered it to the card front. I weighed it down with the stamp block to keep it still while drying again. I added 3 red rhinestones to the poinsettia and popped it next to the label with a dimensional.

I decided to use the Real Red side of the botanical print in the Stampin’ Up! Toile Tidings DSP for the outside of my little box, so I cut it out using the Mini Curvy Keepsakes box die. I gently folded along the score lines and shaped it with my bone folder to get curves. I stamped and die cut another poinsettia with Real Red ink on Very Vanilla and punched a little hole in one petal. I die cut the Cup of Christmas little leaf cluster and adhered it to the back of the flower with multipurpose liquid glue and tied it on the box with mossy Meadow twine.

On the inside of the card, I stamped a little poinsettia using Real Red ink on a Very Vanilla panel. I added a strip of the Garden Green side of the botanical Stampin’ Up! Toile Tidings DSP to the bottom and adhered it to the inside of the card.

Do you have a lot of Holiday DSP left over from Christmas cards like me? What are your ideas for using it up? There were so many pretty papers from the Holiday Catalog … and there are so many pretty ones in the new catalog as well!


January Paper Pumpkin: I’ll Bee Yours

Paper Pumpkin’s first kit of 2020 is all about L-O-V-E. Whether you want handmade favors for Valentine’s Day, a bridal shower, or a remarkably romantic wedding, this month’s kit has everything you need to help you celebrate your favorite friendships and love stories. So make it a “LOVE”-ly year with Paper Pumpkin.

  • Kit details: Makes 20 treat bags + 10 mini cards and envelopes
  • Card size: 3″ x 3″ (7.5 x 7.5 cm) 
  • Envelope size: 3-1/8″ x 3-1/8″ (7.8 x 7.8 cm) 
  • Bag size: 3-1/4″ x 4″ (8.2 x 10 cm)
  • Coordinating Stampin’ Up! colors: Crushed Curry, Highland Heather, Mint Macaron, and Rococo Rose

December 1 – 15 Host Code: R497392Q

December 16 – 31 Host Code: A99JPHA3

Use this host code when you order $50 or more and receive a free gift from me!  The gift is your choice of any item valued up to $10.00 in the 2019-20 Annual Catalog or in the 2019 Holiday Catalog!  That includes some of the Host Exclusive stamp sets!

If your order is over $150, please do not use the host code since you’ll receive your own Host Dollars plus I’ll send you the free gift!  This host code can be used by anyone, no commitment required.  Let me know if you have any questions.


If you need any stamping supplies, I’d be very happy to be your Demonstrator.  Just click on the Shop Now button on the right side of the screen to go directly to my online store or contact me if you have any questions.  Happy Stamping!

Thanks for stopping by and have a great weekend!

Akiko

  • Visit my online store here
  • See the current Stampin’ Up! clearance rack specials here
  • Earn FREE Stampin’ Up! products through my Wildflower Frequent Shopper Program – my way of saying thank you to my frequent shopper online customers.
  • Sign up for my weekly newsletter here
  • Have any questions? I’d be happy to help, click here to contact me.

Cardstock Cuts for this project:

  • Garden Green – 5 1/2″ x 8 1/2″ scored at 4 1/4″ (card base), 2″ x 4 1/2″ (die cuts)
  • Real Red – 3 7/8″ x 5 1/8″ (mat)
  • Very Vanilla – 4″ x 5 1/4″ (inside panel), 2″ x 4″ (die cuts)
  • Vellum – 1 1/2″ x 3 1/4″ (label)
  • Toile Tidings DSP – 3 3/4″ x 5″ (front), 1/2″ x 4″ (inside)

Stampin’ Up! products used in this project:


Stampin’ Up! Itty Bitty Christmas Snowflakes for the Happy Inkin’ Thursday Blog Hop

Good Morning! Welcome to another Happy Inkin’ Thursday Blog Hop! For today’s blog hop, I am sharing one of the last Christmas Cards for this season since I will need to send them out soon! I used the Stampin’ Up! Itty Bitty Christmas bundle with the Wrapped in Plaid specialty designer series paper to make a sparkly card. The bundle includes the Christmas Layers dies and it has some snowflake dies – one with a cluster of snowflakes and two individual snowflakes. I used these to create my card today.

We have a sketch challenge this week, and here is the sketch we are using:

I started by die cutting 5 snowflake clusters using the Christmas Layers dies from Sparkle Glimmer paper and arranging them to cover a panel of Wrapped in Plaid DSP. I adhered the snowflakes with multipurpose liquid glue and trimmed the ends, using some of the trimmings to fill in bare spots. I ran a strip of Cherry Cobbler card stock through the Country Floral embossing folder and adhered it to the bottom of a Cherry Cobbler card base with multipurpose liquid glue. I adhered the snowflake covered DSP panel to the card front with dimensionals.

I made a layered die cut sentiment label, starting out by stamping the Stampin’ Up! Itty Bitty Christmas sentiment in Cherry Cobbler ink on a strip of Whisper White. I cut it out with the large label die from the Merry Christmas dies. I cut the long label from the Stitched Labels dies out of Gold Foil using the two step die cutting technique so it would be longer than the Whisper White label and adhered it to the back with multipurpose liquid glue. I cut the large label from the Detailed Bands dies from the Wrapped in Plaid DSP and adhered it to the back of the layered label with multipurpose liquid glue.

I cut the two small leaf clusters from the Christmas Cardinal dies out of Shaded Spruce card stock. I cut the two swirl flourishes from the Christmas Cardinal dies out of Gold foil. I arranged the large flourish and leaf cluster and adhered it behind the top left of the layered label with a glue dot. I arranged the small flourish and leaf cluster and adhered it behind the bottom right of the layered label with a glue dot. I cut out the two small snowflakes using the Christmas Layers dies from Sparkle Glimmer paper and adhered them to the label with multipurpose liquid glue. I finished it off by adhering the label to the card front with dimensionals.

I decorated the inside of the card by stamping the greeting from the Frosted Foliage stamp set in Cherry Cobbler ink on a panel of Whisper White. I trimmed the bottom with a strip of Wrapped in Plaid DSP and adhered to the inside of the card.

I love the Wrapped in Plaid DSP with the touches of Gold Foil and I love it in combination with the elegant Country Floral embossing and Sparkle Glimmer snowflakes. And while the Stampin’ Up! Itty Bitty Christmas stamps and Christmas Layers dies will be carried over (Yay!!), they will no longer be available as a bundle with the 10% discount.

On with the Hop! Click the Next button below to visit Karen Ksenzakovic’s blog.

And just in case you get lost along the way, here’s a list of the team members participating in the hop today:


December 1 – 15 Host Code: R497392Q

Use this host code when you order $50 or more and receive a free gift from me!  The gift is your choice of any item valued up to $10.00 in the 2019-20 Annual Catalog or in the 2019 Holiday Catalog!  That includes some of the Host Exclusive stamp sets!

If your order is over $150, please do not use the host code since you’ll receive your own Host Dollars plus I’ll send you the free gift!  This host code can be used by anyone, no commitment required.  Let me know if you have any questions.


If you need any stamping supplies, I’d be very happy to be your Demonstrator.  Just click on the Shop Now button on the right side of the screen to go directly to my online store or contact me if you have any questions.  Happy Stamping!

Thanks for visiting and enjoy the Blog Hop!

Akiko

  • Visit my online store here
  • See the current Stampin’ Up! clearance rack specials here
  • Earn FREE Stampin’ Up! products through my Wildflower Frequent Shopper Program – my way of saying thank you to my frequent shopper online customers.
  • Sign up for my weekly newsletter here
  • Have any questions? I’d be happy to help, click here to contact me.

Cardstock Cuts for this project:

  • Cherry Cobbler – 5 1/2″ x 8 1/2″ scored at 4 1/4 (card base), 3/4″ x 5 1/2″ (embossed strip)
  • Whisper White – 3 3/4″ x 5″ (inside panel), 1 1/2″ x 3″ (label)
  • Sparkle DSP – 5″ x 8 1/2″ (snowflake die cuts)
  • Gold Foil – 3″ x 4″ (die cuts)
  • Shaded Spruce – 2″ x 3″ (die cuts)
  • Wrapped in Plaid DSP – 3 3/4″ x 5 1/2″ (card front), 1/2″ x 5″ (inside trim), 2″ x 3 1/2″ (label)

Stampin’ Up! products used in this project:


Stampin’ Up! Peaceful Boughs Wreath Seasons Greetings Card

Good Morning! I hope you had a great Thanksgiving. I have a Christmas card this morning made with the Stampin’ Up! Peaceful Boughs bundle and the Stampin’ Up! Christmastime Is Here specialty designer series paper. I love cards with dimensional wreaths and so I made one with the small bough from the Beautiful Boughs dies in the bundle. You can find the supplies used to create this card at the bottom of my post along with the sizes of cardstock used.

I cut out 7 small boughs from the Beautiful Boughs dies using Old Olive card stock. I sponged the outside of each bough with Old Olive ink so that it would have some texture. I cut out a circle with two medium circle dies from the Layering Circles dies using Early Espresso card stock. I adhered the boughs around the circle with liquid glue on the stem and lowest needle section. I tucked the last stem underneath the first branch’s upper needles, so that it looks like a continuous circle of pine branches.

I cut a panel of the pinecone paper from the Christmastime Is Here specialty designer series paper and adhered it to a Poppy Parade card base with liquid glue. I stamped the Seasons Greetings sentiment from the Stampin’ Up! Peaceful Boughs stamp set in Poppy Parade ink on Crumb Cake card stock and cut it out with the small label die from the Beautiful Boughs dies.

I adhered the wreath to the card front with mini dimensionals. I made a bow with Real Red ribbon and adhered it to the bottom of the wreath with glue dots. I finished the wreath off with red glitter enamel dots. I adhered the label to the card with mini dimensionals.

I stamped the greeting from the Stampin’ Up! Peaceful Boughs stamp set in Poppy Parade on a Whisper White panel for the inside of the card. I stamped the medium pine sprig stamp over the sentiment in Old Olive after stamping off twice. I added a strip of the pinecone DSP to the bottom and adhered it to a Crumb Cake mat before adhering it to the inside of the card.

I thought the Christmastime Is Here pinecone paper would coordinate nicely with the Stampin’ Up! Peaceful Boughs bundle. What do you think?

Join me on Sunday at 1 PM on my Facebook Page for my weekly Facebook Live session as I re-do one of the Make and Takes that I received from Stampin’ Up! On Stage a couple of weeks ago. It did not come out very well and I will show you how to make it better (I hope it comes out better). I will post it on my Monday blog so you can catch it there if you have a busy weekend planned. I think all weekends are going to be busy for the next month!


Stampin’ Up!’s Year-End Closeout is almost here!

Beginning December 3 and while supplies last, you can save big on a selection of retiring and surplus items including holiday catalog items, stamp sets, and Paper Pumpkin past kits. Shop early to avoid missing out! Supplies are limited and popular items will sell out quickly. This amazing sale ends on January 2. Additional details will be posted as soon as they are available.


This image has an empty alt attribute; its file name is 10.01.19_OMAIN_Q4_OOP_NAUK.jpg

We hope you’re ready to make this holiday season magical, because the Christmastime Is Here Suite is, well . . . here! This exclusive, limited-time collection of festive, floral coordinating products has everything you need to share love, joy, and creativity this holiday season.

Products from the Christmastime Is Here Suite will be available while supplies last only.

Click on the image below to see the details of the products in the suite and the pricing or click here to shop the products in my online store.

This image has an empty alt attribute; its file name is 10-01-19_th_flyer_q4_oop_na.jpg

November 16 – 30 Host Code: 462PVWKY

December 1 – 15 Host Code: R497392Q

Use this host code when you order $50 or more and receive a free gift from me!  The gift is your choice of any item valued up to $10.00 in the 2019-20 Annual Catalog or in the 2019 Holiday Catalog!  That includes some of the Host Exclusive stamp sets!

If your order is over $150, please do not use the host code since you’ll receive your own Host Dollars plus I’ll send you the free gift!  This host code can be used by anyone, no commitment required.  Let me know if you have any questions.


If you need any stamping supplies, I’d be very happy to be your Demonstrator.  Just click on the Shop Now button on the right side of the screen to go directly to my online store or contact me if you have any questions.  Happy Stamping!

Thanks for stopping by and have a great weekend!

Akiko

  • Visit my online store here
  • See the current Stampin’ Up! clearance rack specials here
  • Earn FREE Stampin’ Up! products through my Wildflower Frequent Shopper Program – my way of saying thank you to my frequent shopper online customers.
  • Sign up for my weekly newsletter here
  • Have any questions? I’d be happy to help, click here to contact me.

Cardstock Cuts for this project:

  • Poppy Parade – 4 1/4″ x 11″ scored at 5 1/2″ (card base)
  • Crumb Cake – 3 3/4″ x 5″ (inside mat), 1 3/4″ x 3 1/4″ (sentiment label)
  • Old Olive – 5″ x 6″ (7 pine sprig die cuts)
  • Early Espresso – 2 3/4″ x 2 3/4″ (wreath ring)
  • Whisper White – 3 5/8″ x 4 7/8″ (inside panel)
  • Christmastime Is Here DSP – 4″ x 5 1/4″(card front background), 1/2″ x 3 5/8″ (inside trim)

Stampin’ Up! products used in this project:


Stampin’ Up! Country Road with Beautiful Boughs for the Happy Inkin’ Thursday Blog Hop

Happy Thanksgiving! Welcome to another Happy Inkin’ Thursday Blog Hop! I used the Stampin’ Up! Country Road stamp set along with the Beautiful Boughs dies to create a country themed Christmas Card for this week’s challenge. Here is my card:

We have a color challenge this week, and here is color palette we are using:

I started by stamping the horse weather vane from the Stampin’ Up! Country Road stamp set in Versamark Ink on a panel of Very Vanilla. I sprinkled it with Copper embossing powder and heat set. I stamped the grain stamp along the left side and bottom in Crumb Cake ink. I blotted the weather vane with a paper towel to remove wet Crumb Cake ink so it wouldn’t smear. I stamped the wagon wheel in Soft Suede ink. I sponged the sky in Night of Navy, Balmy Blue, Calypso Coral and Mango Melody so that it would look like an evening sunset. I sponged Crumb Cake ink along the bottom. I adhered the image to a Night of Navy mat with liquid glue and then to a Crumb Cake card base with dimensionals.

I cut the berry branch using the Beautiful Bouquet dies from Real Red Glimmer paper. I cut the medium branch from the Stampin’ Up! Beautiful Boughs dies from Mossy Meadow. I snipped the berry branch in two and adhered the pieces behind the Mossy Meadow branch between the boughs with glue dots. I adhered the branch and berries to the card front with glue dots. I stamped the Blessed Christmas Wishes sentiment from the Stampin’ Up! Itty Bitty Christmas stamp set in Real Red ink on a strip of Very Vanilla. I trimmed the ends and adhered it to a Night of Navy mat and then to the bottom of the card front using liquid glue.

I made two pinecones with the small pine cone dies from the Beautiful Boughs dies. I used Crumb cake for the background and Soft Suede for the front. I adhered them to the bough with glue dots. I adhered a short length of copper trim with glue dots and made a bow with the Real Red ribbon and adhered it with a glue dot. I finished the label off with a Night of Navy rhinestone.

I decorated the inside of the card with a Very Vanilla panel stamped with the sentiment from the Toile Christmas stamp set in Night of Navy ink. I stamped the grain from the Stampin’ Up! Country Road stamp set in Crumb Cake ink and added a small Mossy Meadow bough from the Beautiful Boughs dies. I adhered the panel to a Night of Navy mat and then to the inside of the card with liquid glue.

I hope you like the card and that you have a wonderful time with family and friends!

On with the Hop! Click the Next button below to visit Karen Ksenzakovic’s blog.

And just in case you get lost along the way, here’s a list of the team members participating in the hop today:


November 16 – 30 Host Code: 462PVWKY

Use this host code when you order $50 or more and receive a free gift from me!  The gift is your choice of any item valued up to $10.00 in the 2019-20 Annual Catalog or in the 2019 Holiday Catalog!  That includes some of the Host Exclusive stamp sets!

If your order is over $150, please do not use the host code since you’ll receive your own Host Dollars plus I’ll send you the free gift!  This host code can be used by anyone, no commitment required.  Let me know if you have any questions.


If you need any stamping supplies, I’d be very happy to be your Demonstrator.  Just click on the Shop Now button on the right side of the screen to go directly to my online store or contact me if you have any questions.  Happy Stamping!

Thanks for taking the time to visit!

Akiko

  • Visit my online store here
  • See the current Stampin’ Up! clearance rack specials here
  • Earn FREE Stampin’ Up! products through my Wildflower Frequent Shopper Program – my way of saying thank you to my frequent shopper online customers.
  • Sign up for my weekly newsletter here
  • Have any questions? I’d be happy to help, click here to contact me.

Cardstock Cuts for this project:

  • Crumb Cake – 5 1/2″ x 8 1/2″, 1 1/2″ x 2″
  • Night of Navy – 3 7/8″ x 5 1/8″, 5/8″ x 3 1/2″
  • Mossy Meadow – 2 1/2″ x 3″
  • Very Vanilla – (2) 3 3/4″ x 5″, 1/2″ x 3″
  • Soft Suede – 1 1/2″ x 2″
  • Real Red Glimmer – 2″ x 2 1/2″

Stampin’ Up! products used in this project:


Stampin’ Up! Christmas Rose Celebrate the Season Card

Good Morning! Today I have another Christmas card made with the Stampin’ Up! Christmas Rose stamp set from the beautiful Christmastime is Here Suite. For today’s card, I used gold embossing for the outline and the photopolymer stamps to color each section in different colors. You can find the supplies used to create this card at the bottom of my post along with the sizes of cardstock used.

I stamped the outline image from the Christmas Rose stamp set in Versamark Ink on Shimmery White Paper. I sprinkled it with gold embossing powder and heat set. I then cut it out with the coordinating die. I was glad I used the shimmery white paper for two reasons. First after I stamped each section, I used my aqua painter to go over the sections and blend them (you can use the aqua painter on shimmery white card stock without pilling problems). This gave me a smoother look. The second reason is that the shimmer shows through the image nicely and makes it look special!

I stamped the flowers with Cherry Cobbler ink and then went over them with the aqua painter. Then I blotted it with a paper towel to clean the ink from the embossing. You need to blot it because the embossing resists the ink from being absorbed on the paper and so it has wet ink that can be smeared and spoil your project if you don’t blot it. I next stamped each leaf section with Mossy Meadow ink and repeated with the aqua painter on the broad leaves and paper towel after each. I then stamped the pinecones in Soft Suede and repeated with the aqua painter and paper towel. I finished it off by stamping the berries in Poppy Parade. I did not use the aqua painter on these, but I did blot the ink off the embossing with a paper towel. The Poppy Parade berries really brought the bouquet to life after they were stamped!

Next I cut a panel of the green paper from the Christmastime is Here specialty designer series paper and adhered it to a gold mat. I cut the lattice from gold foil with the large die and adhered it to the panel with liquid glue. I cut a strip of the shimmery gold ribbon and wrapped it around the panel, securing it in the back. I stamped the Celebrate the Season sentiment from the Itty Bitty Christmas stamp set in Versamark Ink on a strip of shimmery white card stock and sprinkled it with gold embossing powder and heat set. I then trimmed the ends and adhered it over the lattice with dimensionals. I adhered the floral bouquet on the panel with dimensionals and added a large bow made with the gold shimmer ribbon. I then popped the panel on a Mossy Meadow card base with dimensionals. I finished off the card front with three gold glitter enamel dots.

I stamped the sentiment from the Frosted Foliage stamp set in Mossy Meadow ink on a panel of Whisper White. I added a strip of the green paper from the Christmastime is Here DSO to the bottom and added a thin strip of gold foil. Then I adhered the panel to the inside of the card.

When I first got the stamp set I was surprised that it had both cling stamps and photopolymer stamps. But it makes sense that you have photopolymer for the solid images so you can see through the stamp to position it over the lined images. I was pleased at how easy this makes it to create the main focal image and how beautiful it came out with this technique. Stampin’ Up! did a great job of designing the pieces so you can use all the different colors on different sections of the bouquet. I definitely recommend trying it.


We hope you’re ready to make this holiday season magical, because the Christmastime Is Here Suite is, well . . . here! This exclusive, limited-time collection of festive, floral coordinating products has everything you need to share love, joy, and creativity this holiday season.

Products from the Christmastime Is Here Suite will be available while supplies last only.

Click on the image below to see the details of the products in the suite and the pricing or click here to shop the products in my online store.


November 16 – 30 Host Code: 462PVWKY

Use this host code when you order $50 or more and receive a free gift from me!  The gift is your choice of any item valued up to $10.00 in the 2019-20 Annual Catalog or in the 2019 Holiday Catalog!  That includes some of the Host Exclusive stamp sets!

If your order is over $150, please do not use the host code since you’ll receive your own Host Dollars plus I’ll send you the free gift!  This host code can be used by anyone, no commitment required.  Let me know if you have any questions.


If you need any stamping supplies, I’d be very happy to be your Demonstrator.  Just click on the Shop Now button on the right side of the screen to go directly to my online store or contact me if you have any questions.  Happy Stamping!

Thanks for stopping by and have a great week!

Akiko

  • Visit my online store here
  • See the current Stampin’ Up! clearance rack specials here
  • Earn FREE Stampin’ Up! products through my Wildflower Frequent Shopper Program – my way of saying thank you to my frequent shopper online customers.
  • Sign up for my weekly newsletter here
  • Have any questions? I’d be happy to help, click here to contact me.

Cardstock Cuts for this project:

  • Mossy Meadow – 4 1/4″ x 11″
  • Shimmery White – 4″ x 5″ (rose bouquet), 1/2″ x 3″ (label)
  • Gold foil – 3 3/4″ x 5″ (front mat), 1 1/2″ x 3″ (lattice), 1/8″ x 3 3/4″
  • Whisper White – 3 3/4″ x 5″
  • Christmastime Is Here DSP – 3 5/8″ x 4 7/8″, 1/2″ x 3 3/4″

Stampin’ Up! products used in this project: