Stampin’ Up! Brightest Glow Seasons Greetings Card

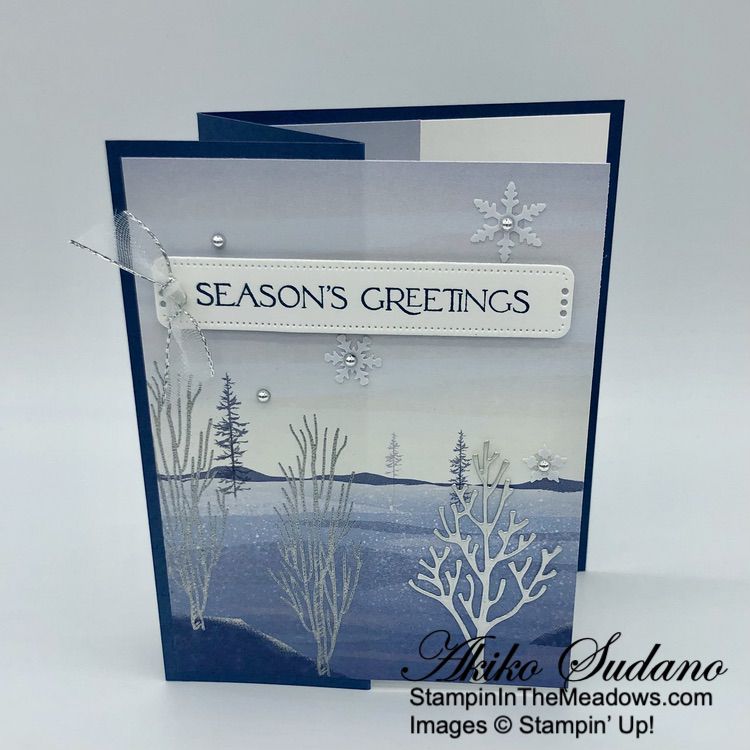
Good Morning! Have you seen the pretty Z-fold cards that use gorgeous scenic designer series paper for the card front? I used the sentiments from the pretty Stampin’ Up! Brightest Glow cling stamp set with the One Horse Open Sleigh designer series paper to make one for today. You can find the currently products I used at the bottom of my post along with the card stock sizes.

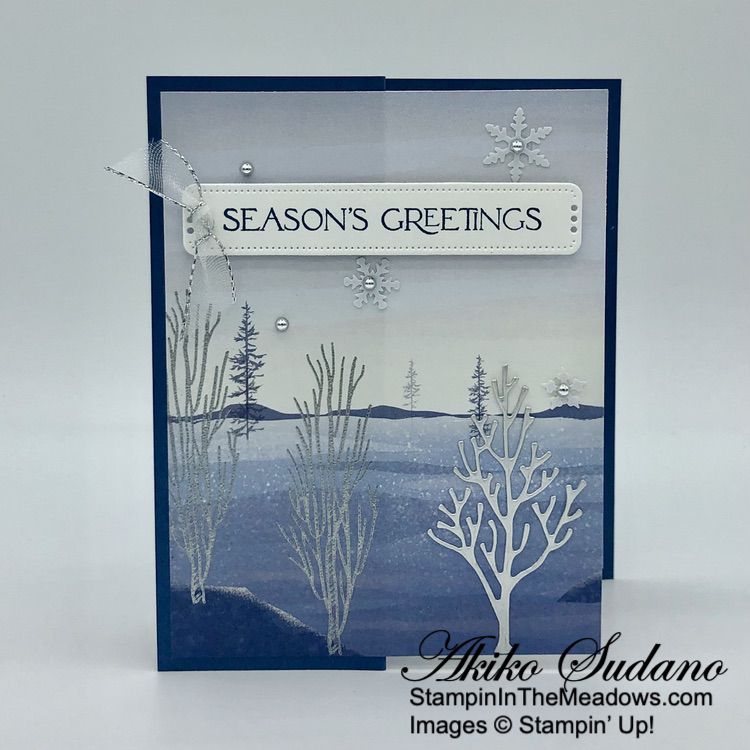
I started by cutting 3/4″ off the top of a 6″ x 6″ One Horse Open Sleigh panel so that it was 5-1/4″ x 6″. Then I cut 2″ off the right side so that I had a right side 4″ x 5-1/4″ panel for the card front and a 2″ x 5-1/4″ panel for the inside of the card. Since I chose a simple, serene icy blue landscape, I decided to dress it up a bit by adding some silver embossed trees.

I stamped the tree from the Horse and Sleigh stamp set in Versamark ink twice on the large panel and once on the small panel. I sprinkled the stamped trees with silver embossing powder, shook off the excess and heated the powder with my heat tool until it was bright and shiny. I adhered the large DSP panel to a Misty Moonlight card base with liquid glue by applying the glue to the left half of the embossed panel.

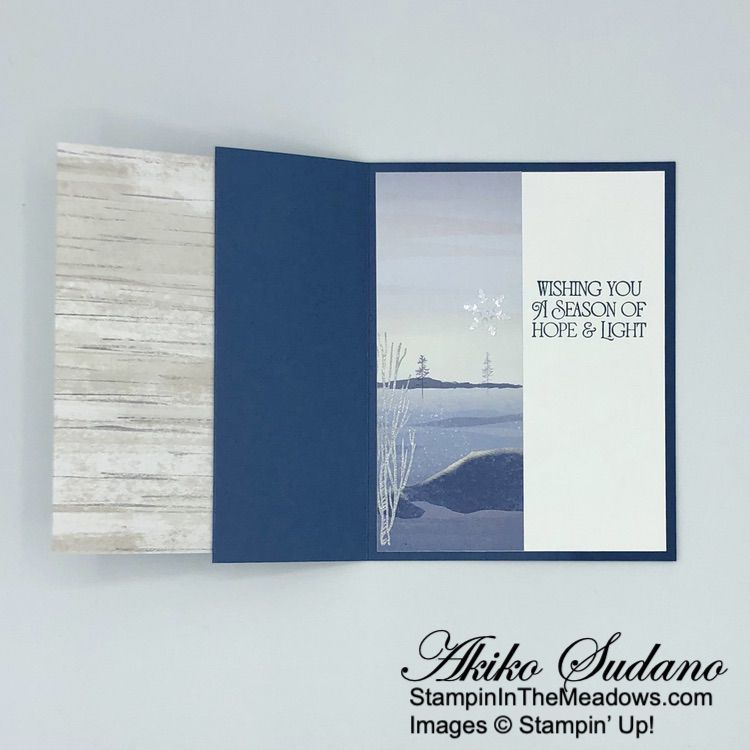
I stamped the sentiment from the Stampin’ Up! Brightest Glow stamp set in Misty Moonlight ink on the right side of a Basic White panel and adhered the small embossed One Horse Open Sleigh DSP panel to the left side. I adhered the panel to the inside of the card with liquid glue and checked to make sure it was covered by the front DSP panel when the card was closed.

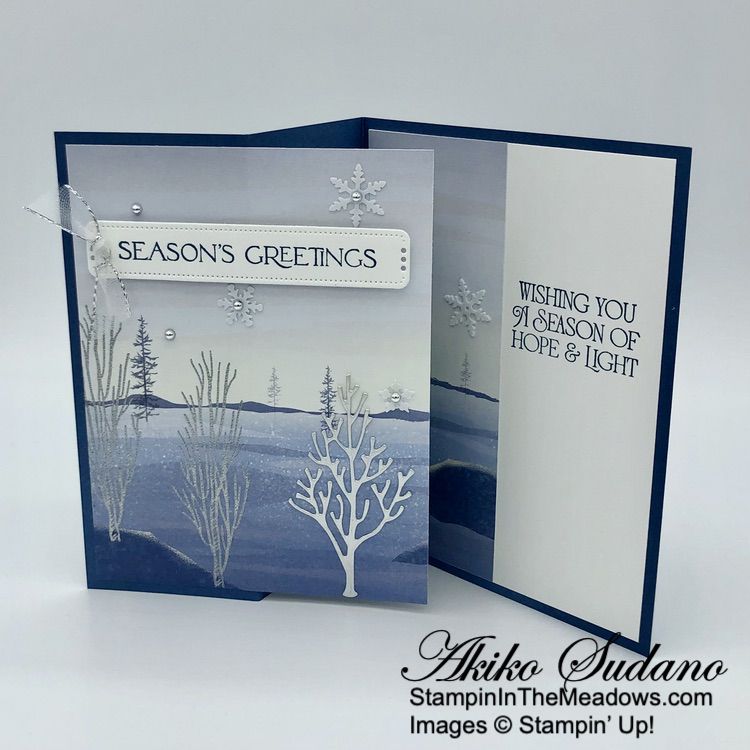
I stamped the Seasons Greetings sentiment from the Stampin’ Up! Brightest Glow stamp set in Misty Moonlight ink on a Basic White strip and adhered it to the card front with dimensionals. I adhered some adhesive strip to the back of a silver foil panel and cut the tree from the Horse and Sleigh dies. I peeled off the adhesive back and adhered it to the card front.

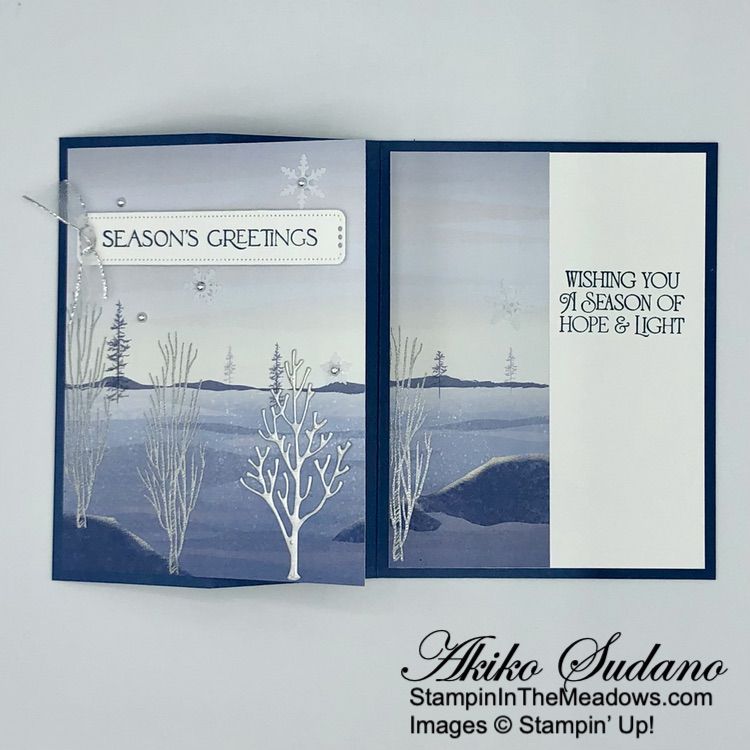
I tied a knot in a length of silver and white sheer ribbon and adhered it to the label with a glue dot. I adhered snowflakes and silver pearls to the card to finish.

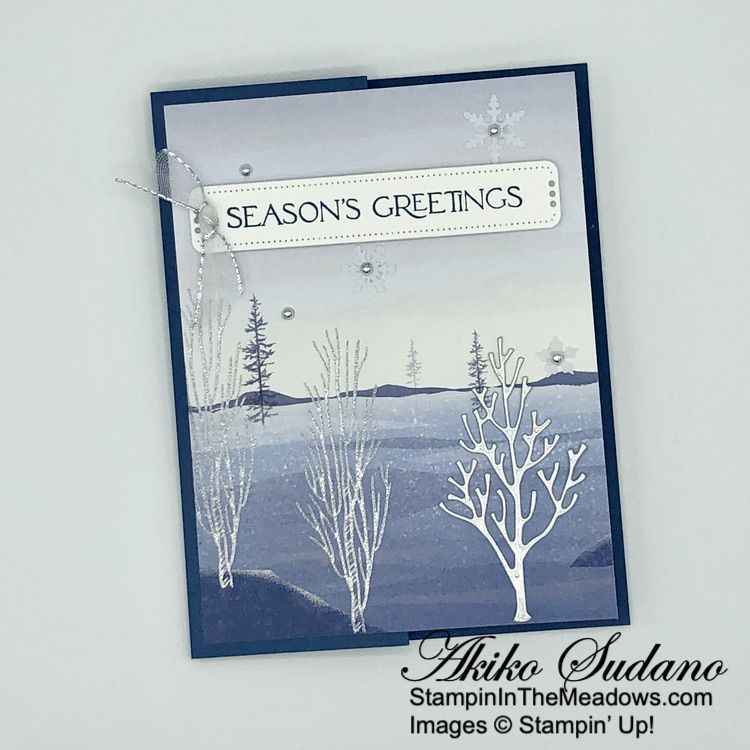
Making a fun fold is a great way to make a handmade card extra special and this is a super simple design, especially when you have beautiful scenic designer series paper. I love how the back of the paper is also part of the card design. And the Stampin’ Up! Brightest Glow stamp set with it’s beautiful sentiments are the perfect compliment!


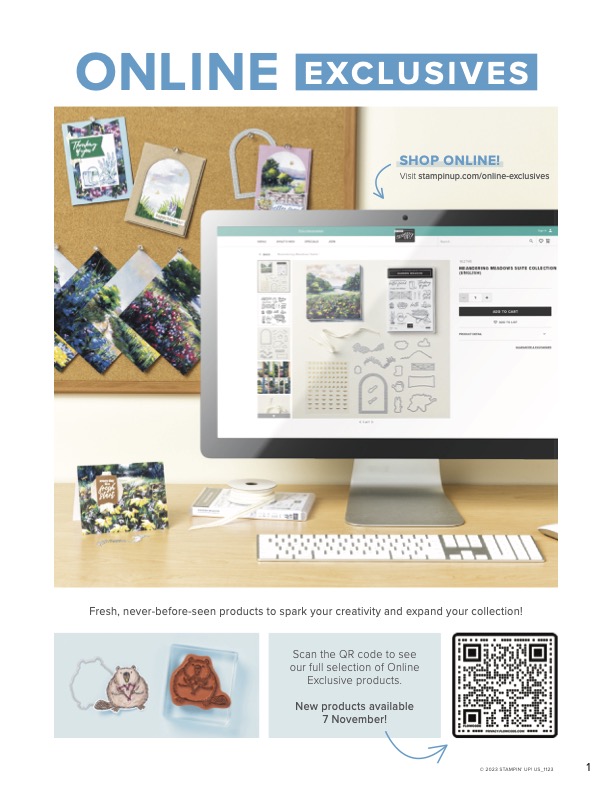
New Online Exclusives are Here!

A new selection of pretty Springtime Online Exclusive products will be available soon. Online Exclusives won’t appear in any catalog and are only available in the Online Store while supplies last. Click on the image below to download a PDF with a sneak peek:


Current Host Code: CD4VVKRG

Use this host code when you order $50 or more and receive a Thank You gift from me!  The free gift is your choice of any item currently available valued up to $10.00.

If your order is over $150, please do not use the host code since you’ll receive your own Host Dollars plus I’ll still send you the Thank You gift!  This host code can be used by anyone, no club or commitment required. Let me know if you have any questions.


If you need any stamping supplies, I’d be very happy to be your Demonstrator.  Just click on the Shop Now Button on the right side of the screen to go directly to my Online store or contact me if you have any questions.  Happy Stamping!

Thanks for stopping by and have a great day!

Akiko

  • Visit my online store here
  • See the current Stampin’ Up! clearance rack specials here
  • Earn FREE Stampin’ Up! products through my Wildflower Frequent Shopper Program – my way of saying thank you to my online frequent shopper customers.
  • Have any questions? I’d be happy to help, click here to contact me.

Cardstock Cuts for this project:

  • Misty Moonlight – 5-1/2″ x 8-1/2″ card base scored at 2-1/8″ and 4-1/4″
  • Silver Foil – 2″ x 3″ (die cut tree)
  • Basic White – 4″ x 5-1/4″ (inside panel), 1″ x 4″ (label)
  • One Horse Open Sleigh 6″ x6″ DSP – 4″ x 5-1/4″ (front background), 2″ x 5-1/4″ (inside trim)

Stampin’ Up! products used in this project:


Stampin’ Up! Textured Floral for World Card Making Day with Video

Good Morning and Happy Monday! I hope you had a great Fall weekend! If you happened to catch the Inkin’ Krew World Card Making Day Event, maybe you got a chance to see the video for my Stampin’ Up! Textured Floral fun fold card. If not, I’ve linked up the video below so you can check it out. You can also find the products I used at the bottom of my post along with the card stock sizes.

Here is the video that I made for the Inkin’ Krew WCMD event. You can also view it on my YouTube Channel:

I adhered the floral panels of Garden Walk 6″ x 6″ designer series paper to the inside and short front flap of the Calypso Coral card base with liquid glue. I adhered the dotted DSP to the short Calypso Coral panel that I cut off the front flap.

After adhering the floral DSP to the card base, I worked on the inside. I stamped the flowers from the Stampin’ Up! Textured Florals stamp set in Calypso Coral ink in the lower corner of a Basic White panel. I stamped the stems in Garden green ink and then adhered the panel to a Calypso Coral mat with Stampin’ Seal. I then adhered the layered inside panel to the floral inside of the card, centering the panel on the designer series paper.

Then I adhered the layered dotted designer series paper panel to the short front flap with liquid glue, being careful to apply glue to only the left half of the panel. I also wanted to make sure that the inside panel was covered and the liquid glue gave me the wiggle room to make sure it was placed properly.

I cut the wide leaf sprig die from the Stampin’ Up! Textured Floral dies from Garden Green and the small leaf sprig die from Lost lagoon. I adhered the leaf sprigs to the dotted panel with bits of glue dots (I think liquid glue would work too). I stamped the flowers from the Stampin’ Up! Textured Floral stamp set in Calypso Coral ink on Basic White and stamped the stems in Garden Green. I cut out the flowers with the coordinating die and adhered it to the panel with dimensionals.

I stamped the sentiment from the Stampin’ Up! Textured Floral stamp set in Lost Lagoon ink on Basic White and cut it out with the long skinny banner die from the Stylish Shapes dies. I adhered the label to the card front with dimensionals and finished the card with Calypso Coral Iridescent gems and a knotted length of Lost Lagoon ribbon.

I love how the greenery dies and stamped flowers in the Stampin’ Up! Textured Florals bundle compliment the Garden Walk 6″ x 6″ designer series paper. And the simple fun fold gives the card just a little something extra.


Free Shipping from Stampin’ Up! Starts Today!

Stampin’ Up! is offering free shipping on all orders of $75+ placed between October 9-11!  So get your lists ready and save on shipping fees Today, Tuesday and Wednesday!

Details:

  • Free shipping offer begins:  October 9 at 12:01 AM MT
  • Ordering Deadline:  October 11 at 11:59 PM MT
  • Free shipping applies after the qualifying amount has been met.
  • The minimum qualifying amount to receive free shipping is $75 or more (before tax).
  • Free shipping only applies during the three-day period the promotion is live; this means that the order must be opened and closed between October 9-11.
  • With the exception of a one-time monthly Paper Pumpkin subscription, all Stampin’ Up! products qualify for the promotion. Subscriptions billed and shipped this month will be charged for the normal amount ($24.50 shipping included) + tax.
  • Prepaid 3, 6, or 12 month Paper Pumpkin subscriptions are eligible for FREE shipping under the same rules as all other Stampin’ Up! items during the promotion.
  • The free shipping promotion does not cover the additional cost for expedited shipping.
  • Please keep in mind, that with any product launch, the distribution center may fall behind our typical shipping timeframes.

Let me know if you have any questions. You can find my online store here.


Celebrate 35 Years Joining Special!

Stampin’ Up!’s is celebrating their 35th anniversary in style! From October 3 – October 31 2023, anyone who joins our fun crafting community as a new demonstrator can choose either 35% OFF the cost of their Starter Kit or get 35% MORE product with their Starter Kit!

Promotion Details:

  • Promotion Period: October 3 – October 31, 2023
  • Deadline to Join: October 31, 2023; 11:59 PM (MT)
  • New demonstrators can choose one of the following options for their Starter Kit:
    • Option 1: Get 35% OFF the normal cost of a Stampin’ Up! Starter Kit. Those who select this option will receive $125 worth of product for only $64.35!
    • Option 2: Get 35% MORE product with their Starter Kit. Those who select this option will receive $168.75 worth of product by spending $99!

No matter which option you choose for your Starter Kit, you will receive free business supplies and free shipping on your Starter Kit—not to mention all the fun that comes with being part of Stampin’ Up!

FREE OnStage@Home Registration

It gets better! Those who sign up for a Starter Kit during this offer will also be automatically registered for FREE to our virtual OnStage event on November 11 – a $77 value!

  • Those who sign up for this offer have the opportunity to watch the event independently, gathered together with other demonstrators, or with their Team Leader.
  • Demonstrators who join during this promotion will be automatically added to the OnStage attendees; they do not need to register separately.
  • Demonstrators who join during this promotion will also receive an email with all the information about this event.

Yay!  Stampin’ Up! events are always SO much fun!!  Bonus that you can join and attend your first even for free!!

Come Join Us!

If you’d like to join our team, we’d love to have you!  Once you join, you’ll get at least a 20% discount on all of your Stampin’ Up! purchases and you can preorder from the upcoming catalogs!

We welcome all types of Demonstrators from those only purchasing to get the discount for themselves to those who want to run a business and those anywhere in between!  We’re a relaxed group that loves to stamp with no pressure to sell!

Contact me at apsudano@stampininthemeadows.com if you have questions.


Designer Series Paper Special Release Going On Now!

A special selection of Designer Series Papers is available in the Online Exclusives section of the Online Store. These papers will be available only while supplies last, so shop early to bet yours before they’re gone. Click on the image below to download a PDF with all the details including item numbers and prices.

These papers are perfect for both holiday crafting and all occasion crafting.


Current Host Code: 4BTBNFDU

Use this host code when you order $50 or more and receive a Thank You gift from me!  The free gift is your choice of any item currently available valued up to $10.00 .

If your order is over $150, please do not use the host code since you’ll receive your own Host Dollars plus I’ll still send you the Thank You gift!  This host code can be used by anyone, no club or commitment required. Let me know if you have any questions.


If you need any stamping supplies, I’d be very happy to be your Demonstrator.  Just click on the Shop Now button on the right side of the screen to go directly to my online store or contact me if you have any questions.  Happy Stamping!

Thanks for stopping by and have a great weekend!

Akiko

  • Visit my online store here
  • See the current Stampin’ Up! clearance rack specials here
  • Earn FREE Stampin’ Up! products through my Wildflower Frequent Shopper Program – my way of saying thank you to my online frequent shopper customers.
  • Have any questions? I’d be happy to help, click here to contact me.

Cardstock Cuts for this project:

  • Calypso Coral – 4-1/4″ x 8-1/4″ card base, scored at 5-1/2″, two 2-3/4″ x 4-1/4″ panels (front flap and inside mat)
  • Garden Green – 1-1/2″ x 3-1/2″ (die cut leaf sprig)
  • Lost Lagoon – 2″ x 3-1/4″ (die cut leaf sprig)
  • Basic White – 2-1/2″ x 4″ (inside panel), 1″ x 3-1/4″ (label), 2″ x 3″ (die cut flower)
  • Garden Walk 6″ x 6″ DSP – 4″ x 5-1/4″ (inside background), two 2-1/2″ x 4″ panels (front panels)

Stampin’ Up! products used in this project:


Stampin’ Up! Carousel Horses Birthday Card

The Stampin’ Up! Carousel Horse bundle is such a cute set with stamps and dies you can use to make a pretty carousel. I used it to make a sweet birthday card with rainbow ponies and lots of pink sparkle! Plus, it’s a simple fun fold! You can find the products I used at the bottom of my post along with the card stock sizes.

I adhered a panel of Bright and Beautiful 6″ x 6″ designer series paper to a Berry Burst panel. I adhered a 2-1/2″ wide mini card base to the layered panel with liquid glue and adhered another panel of DSP to the front. I cut a Basic White panel with the second largest scalloped contours die and adhered another panel of DSP to the center.

I cut the main carousel from Melon Mambo using the pretty Stampin’ Up! Carousel Horses dies. I used the die again to cut the top two cutouts from Bubble Bath shimmer paper and cut the trim from Rose Gold iridescent foil. I adhered the post and base to the scalloped rectangle with glue dots and the shimmer paper with dimensionals.

I stamped the horses from the Stampin’ Up! Carousel Horses stamp set in Smoky Slate ink on Basic White. I stamped the saddle details in Berry Burst and colored the backgroundof the saddle with the light Bubble Bath Stampin’ Blend. I colored the manes and tales with lighht Melon Mambo, light Granny Apple Green, dark Lemon Lolly and light Balmy Blue Stampin’ Blends for a rainbow pony look. I adhered the ponies to the panel with glue dots and adhered the top foil decoration with dimensionals. I adhered the panel to the mini card front with liquid glue and finished it with silver pearls.

For the inside of the card, I stamped the sentiment from the Stampin’ Up! Carousel Horses stamp set in Berry Burst ink on a Basic White panel. I cut some balloons using the Zany Zoo balloon die from Melon Mambo, Fresh Freesia and Bubble bath and adhered them to the corner. I drew some strings with a Basic Gray Stampin’ Write marker and adhered the panel to the inside of the mini card with Stampin’ Seal.

The ponies in the Stampin’ Up! Carousel Horses bundle are just as pretty as Unicorns and are sure to delight a little girl on her birthday. And even better, you can really ride carousel horses!!


Designer Series Paper Special Release Going On Now!

A special selection of Designer Series Papers is available in the Online Exclusives section of the Online Store. These papers will be available only while supplies last, so shop early to bet yours before they’re gone. Click on the image below to download a PDF with all the details including item numbers and prices.

These papers are perfect for both holiday crafting and all occasion crafting.


World Card Making Day – October 7, 2023!

It’s time to celebrate one of our favorite days of the year—World Card Making Day! Invite your friends to craft along with Stampin’ Up! as we express our creativity and make fabulous cards! In just under three hours, we’ll create three unique cards together. Everyone is invited and welcome. And the event and registration are FREE!

Here are the Details:

  • Who: Anyone!
  • When: October 7, 2023 from 2:00 – 5:00 pm (MT)
  • Where: Online
  • Price of Event: FREE
  • Registration Dates: Sept 6 – Oct 7, 2023
    • You can participate in the event without registering. However, registration is encouraged because it’s the best way to stay up to date regarding event details. The email address provided will only be used for event communication.

Go to the World Card Making Day page in my Online Store to register and get more information. You will also find Supply Lists and Card Stock cuts that you can download to prepare.

Inkin’ Krew World Card Making Day Event

In addition to the World Card Making Day event that Stampin’ Up! is planning, The Inkin’ Krew is planning a Facebook event to celebrate World Card Making Day!! The event will be Saturday, Oct 7 and we’ll be scheduling our lives around the Stampin’ Up! event so that you’ll be able to attend both if you’d like!  We’ll be starting a new Facebook page for the event. We are planning to have as many team members as possible go live with card making presentations throughout the day. We will also have a few giveaways to keep it fun! More details will follow.


Current Host Code: 4BTBNFDU

Use this host code when you order $50 or more and receive a Thank You gift from me!  The free gift is your choice of any item currently available valued up to $10.00 .

If your order is over $150, please do not use the host code since you’ll receive your own Host Dollars plus I’ll still send you the Thank You gift!  This host code can be used by anyone, no club or commitment required. Let me know if you have any questions.


If you need any stamping supplies, I’d be very happy to be your Demonstrator.  Just click on the Shop Now button on the right side of the screen to go directly to my online store or contact me if you have any questions.  Happy Stamping!

Thanks for stopping by and have a great weekend!

Akiko

  • Visit my online store here
  • See the current Stampin’ Up! clearance rack specials here
  • Earn FREE Stampin’ Up! products through my Wildflower Frequent Shopper Program – my way of saying thank you to my online frequent shopper customers.
  • Have any questions? I’d be happy to help, click here to contact me.

Cardstock Cuts for this project:

  • Berry Burst – 4-1/4″ x 5″ card base panel, 2-1/2″ x 11″ mini-card base, scored at 5-1/2″, 1/2″ x 1″ (die cut balloonn)
  • Melon Mambo – 3″ x 4″ (die cut carousel)
  • Bubble Bath – 1/2″ x 1″ (die cut balloon)
  • Fresh Freesia – 1/2″ x 1″ (die cut balloon)
  • Bubble Bath Shimmer – 1-1/4″ x 3″ (carousel top)
  • Rose Gold Iridescent foil – 1-1/4″ x 5-1/2″ (carousel base and trim)
  • Basic White – 2-1/4″ x 5-1/4″ (inside panel), 2-3/4″ x 4″ (die cut ponies), 3-1/2″ x 4-3/4″ (die cut scalloped rectangle)
  • Bright & Beautiful 6″ x 6″ DSP – 4″ x 5-1/4″ (back panel background), 2-1/4″ x 5-1/4″ (front background), 2-3/4″ x 4″ (scalloped rectangle panel)

Stampin’ Up! products used in this project:

Stampin’ Up! Autumn Leaves for the Happy Inkin’ Thursday Blog Hop

Good Morning and welcome to the Happy Inkin’ Thursday Blog Hop! Here’s another simple Thank You card made with the beautiful Stampin’ Up! Autumn Leaves bundle and the All About Autumn 6″ x 6″ specialty designer series paper. This is a very simple and elegant Z-Fold card that focuses on a beautiful woodland morning scene in the DSP. You can find the supplies I used along with card stock cuts at the bottom of my post.

We have a theme challenge this week:

This beautiful DSP looks nice when folded, but I cut the panels so that they would flow together forming a nice wide woodland scene with the inside panel in the center. I started by cutting the bottom so that the length was 5-1/4″. Then I cut 2″ from the right side and 1-7/8″ twice. This gives me my three panels for the card and leaves little strips for my pretty scrap bin.

I adhered the right panel to the right side of the Very Vanilla panel and stamped the sentiment from the Stampin’ Up! Autumn Leaves stamp set in Copper Clay ink on the bottom of the Very Vanilla panel. I adhered the panel to the right side of a Wild Wheat Z-Fold card base with Stampin’ Seal.

I adhered the two 1-7/8″ wide All About Autumn DSP panels to the left and middle sections of the card base with liquid glue. I stamped the sentiment from the Stampin’ Up! Autumn Leaves stamp set in Versamark ink on a Very Vanilla panel. I sprinkled it with copper embossing powder and shook off the excess. I heated it with my heat tool until it was bright and shiny and cut it out with the label die from the Stampin’ Up! Autumn Leaves dies.

I folded a length of copper ribbon and adhered it to the back of the label with Stampin’ Seal. I adhered the label to the front flap with dimensionals. I cut Crushed Curry and Pecan Pie panels with the leaf dies from the Stampin’ Up! Autumn Leaves dies and adhered them to the right side, positioning them under the label.

I finished the card with Crumb Cake dots. The All About Autumn 6″ x 6″ specialty DSP is so pretty and it’s sad that it sold so quickly. Hopefully it will be re-stocked next week as scheduled.

On with the Hop! Click on the Next Blog button to move forward to see the beautiful project Karen Ksenzakovic has created.

If you get lost along the way, here are the participants for the hop:


Current Host Code: ATSGGVYD

Use this host code when you order $50 or more and receive a free gift from me!  The free gift is your choice of any item currently available valued up to $10.00!

If your order is over $150, please do not use the host code since you’ll receive your own Host Dollars plus I’ll still send you the free gift!  This host code can be used by anyone, no club or commitment required. Let me know if you have any questions.


If you need any stamping supplies, I’d be very happy to be your Demonstrator.  Just click on the Shop Now button on the right side of the screen to go directly to my online store or contact me if you have any questions. 

Thanks for stopping by and Happy Stamping!

Akiko

  • Visit my online store here
  • See the current Stampin’ Up! clearance rack specials here
  • Earn FREE Stampin’ Up! products through my Wildflower Frequent Shopper Program – my way of saying thank you to my online frequent shopper customers.
  • Have any questions? I’d be happy to help, click here to contact me.

Cardstock Cuts for this project:

  • Wild Wheat – 5-1/2″ x 8-1/2″ card base scored at 2-1/8″ and 4-1/4″
  • Crushed Curry – 2″ x 2″ (die cut leaf)
  • Pecan Pie – 1″ x 2″ (die cut leaf)
  • Very Vanilla – 4″ x 5-1/4″ (inside panel), 1-1/2″ x 3″ (label)
  • All About Autumn Specialty DSP – 2″ x 5-1/4″ (inside panel), two 1-7/8″ x 5-1/4″ panels (front and middle panels)

Stampin’ Up! products used in this project:


Stampin’ Up! Gone Fishing Birthday Card

Good Morning! The Stampin’ Up! Gone Fishing bundle is one of the best ever for making cards for fishing fanatics! The two-step stamping makes it real easy to create cute fishing tackle and the tackle box dies are fabulous. I stamped some tackle and paired it with the wonderful Lets Go Fishing designer series paper for a simple Z-Fold birthday card. You can find the supplies I used at the bottom of my post along with the sizes of cardstock used.

After folding the Very Vanilla card base, I adhered panels of Let’s Go Fishing Designer series paper to Pebbled Path mats and adhered each panel to a section of the card base. I used a different pattern for each section to show off this pretty DSP.

I cut a Misty Moonlight panel with the 4th largest Deckled Rectangles die and cut another DSP pattern with the 5th largest die. I adhered them together and adhered it to the front flap with liquid glue. I stamped the bobber, fly and lure from the Stampin’ Up! Gone Fishing stamp set in Pebbled Path ink on Very Vanilla. I stamped the bottom of the bobber in Real Red and the inside of the lure in Granny Apple Green and colored the fly with light Misty Moonlight and Wild Wheat Stampin’ Blends. I cut them all out with the coordinating dies.

I stamped the birthday sentiment from the Waves of Inspiration stamp set in Misty Moonlight ink and cut it out with the small label die from the Something Fancy dies. I adhered it to the card with glue dots. I poked a hole in the top of the bobber and tied some fishing line to it and wrapped it around the back. I popped the bobber on the card front with dimensionals and finished with Misty Moonlight Tinsel gems.

For the inside of the card, I cut a plain panel of Let’s Go Fishing DSP with the 4th largest Deckled Rectangles die and adhered it to the inside panel I cut the silver lure from foil and adhered the lures and fly to the side with glue dots.

The Stampin’ Up! Gone Fishing bundle has so many different and great pieces of fishing tackle stamps and you can make just a few of them to add to the pretty Let’s Go Fishing DSP for a simple card that is really pretty. Or you can go all out and make a tackle box card like the one I made for Father’s Day here.


Customer Catalogs are In The Mail!

It took much longer than I wanted, but I finally got my customer September – December 2023 Mini Catalogs out in the mail yesterday! So if you are a customer of mine, be on the lookout for your new catalog. Ordering starts on September 6, 2023. Let me know if you have any questions!


Bonus Days Redemption Period Going on Now!

Time to redeem those Bonus Days coupons! Make sure you save all your coupons because you can redeem them (and we mean ALL of them) between August 1 – August 31, 2023. There’s no limit to how many coupons you can earn!

Promotion Details:

Redemption Period: August 1 – August 31, 2023

  • There is no limit to the number of coupon codes participants can redeem on an order during the redemption period. If using multiple codes, they must be separated by a space. 
  • Coupons may be redeemed one time only.
  • Coupon codes may be redeemed for any product (excluding Starter Kits, demonstrator supply items, and Paper Pumpkin month-to-month subscriptions).
  • New prepaid Paper Pumpkin codes may be discounted using Bonus Days coupon codes.

Let me know if you have any questions, and have fun shopping!


Kits Collection on Sale August 1 – August 31, 2023!

Save big on the Kits Collection for a limited time only! Each paper crafting kit comes with everything you need to create artistically designed handmade projects. From birthday cards to festive tags, cute treat packaging to floral wreaths, you can try something new at a great discount. Craft with friends, buy as gifts, or simply stock up on your favorites—just don’t miss out on this great deal!

Details:

  • Sales period: August 1, 2023 – August 31, 2023
  • The sale only applies to the Kits Collection by Stampin’ Up!
    • It does not include Paper Pumpkin kits
  • There is no limit to how many kits may be purchased.
  • The kits will be up to 30% off as indicated on the website.
  • No discount code necessary—the discount will be applied automatically.

Note: Discounted Kits are only available while supplies last!

Shop the Stampin’ Up! Kits Collection in my Online Store.


Current Host Code: MK3GJ47F

Use this host code when you order $50 or more and receive a Thank You gift from me!  The free gift is your choice of any item currently available valued up to $10.00 .

If your order is over $150, please do not use the host code since you’ll receive your own Host Dollars plus I’ll still send you the Thank You gift!  This host code can be used by anyone, no club or commitment required. Let me know if you have any questions.


If you need any stamping supplies, I’d be very happy to be your Demonstrator.  Just click on the Shop Now button on the right side of the screen to go directly to my online store or contact me if you have any questions.  Happy Stamping!

Thanks for stopping by and have a great weekend!

Akiko

  • Visit my online store here
  • See the current Stampin’ Up! clearance rack specials here
  • Earn FREE Stampin’ Up! products through my Wildflower Frequent Shopper Program – my way of saying thank you to my online frequent shopper customers.
  • Have any questions? I’d be happy to help, click here to contact me.

Cardstock Cuts for this project:

  • Very Vanilla – 5-1/2″ x 8-1/2″ card base scored at 2-1/8″ and 4-1/4″, 1″ x 3″ (label), 2″ x 4″ (die cut tackle)
  • Pebbled Path – 4″ x 5-1/4″ (inside mat), two 1-7/8″ x 5-1/4″ panels (DSP mats)
  • Misty Moonlight – 3″ x 4-1/4″ (rectangle die cut)
  • Silver Foil Specialty – 1″ x 2″ (die cut lure)
  • Let’s Go Fishing DSP – 3-7/8″ x 5-1/8″ (inside background), two 1-3/4″ x 5-1/8″ panels (front and side panels), 3″ x 4-1/2″ (inside die cut rectangle), 2-1/2″ x 4″ (front die cut rectangle)

Stampin’ Up! products used in this project:


Stampin’ Up! Inked and Tiled for the Inkin’ Krew Blog Hop

Good Morning! Welcome to the July Inkin’ Krew Team Blog Hop! The theme for this month’s hop is “Fun Fold” and I used the Stampin’ Up! Inked and Tiled cling stamp set to make a simple accordion tri-fold friendship card for our hop!

I adhered a Calypso Coral panel of Inked Botanicals 6″ x 6″ designer series paper to a Calypso Coral card base. I scored a Crushed Curry mini card base in a mountain/valley manner to create the tri-fold accordion and adhered it to the center of card base with liquid glue. I adhered the smaller panels of Inked Botanicals DSP to the left and middle panels of the mini card.

I used the dies from the Timeless Arrangements die set to cut foliage for the mini card front. I applied liquid adhesive to the bars connecting the sprigs to build the layers. I cut two long leaf sprig sets and two leaf clusters from Old Olive. I adhered the leaf clusters to the right side of the sprig sets with liquid glue.

I cut two floral sets from Calypso Coral and adhered them on top of the Old Olive leaf sets with liquid glue. I cut two berry sprig sets from Petal Pink and adhered them to the layered die cuts with liquid glue. I love how easy it is to build up the floral bouquets with the solid bars – the spacing is perfect!

I adhered the two sets of layered die cuts to the mini card, centering them and spacing the bars 1/2″ apart. I cut 4 floral sprigs (with holes) from Daffodil Delight and adhered them to the layered die cuts with liquid glue.

I stamped the sentiment from the Stampin’ Up! Inked and Tiled cling stamp set in Calypso Coral ink on Basic White and cut it out with the large label die from the Timeless Arrangements dies. I cut a leaf sprig from Old Olive and a floral sprig from Daffodil Delight and adhered them to the side of the sentiment with liquid glue and adhered the label to the mini card with dimensionals and glue dots. I finished the card with Lemon Lime Twist tinsel gems.

For the inside of the card, I inked up the flower from the Stampin’ Up! Inked and Tiled stamp set in Daffodil Delight ink. i used a Sponge Dauber to apply Calypso Coral ink to the center and stamped the flower on a Basic White panel. I stamped the sentiment in Old Olive ink next to the flower and used stamped off Petal Pink to stamp a light wood grain design under the sentiment.

The Timeless Arrangements dies make such sweet arrangements and they go so well with the Stampin’ Up! Inked and Tiled stamp set and Inked Botanicals designer series paper.

On With The Hop! Click on the Next Blog button to move forward to Mary Deatherage’s project or click the Previous Blog button to move back to see the project that Karen Ksenzakovic created.

If you get lost along the way, here are the participants for the hop:


Current Host Code: P7SWY6DS

Use this host code when you order $50 or more and receive a Thank You gift from me!  The free gift is your choice of any currently available item valued up to $10.00.

If your order is over $150, please do not use the host code since you’ll receive your own Host Dollars plus I’ll still send you the Thank You gift!  This host code can be used by anyone, no club or commitment required. Let me know if you have any questions.


If you need any stamping supplies, I’d be very happy to be your Demonstrator.  Just click on the Shop Now button on the right side of the screen to go directly to my online store or contact me if you have any questions.  Happy Stamping!

Thanks for stopping by and have a great week!

Akiko

  • Visit my online store here
  • See the current Stampin’ Up! clearance rack specials here
  • Earn FREE Stampin’ Up! products through my Wildflower Frequent Shopper Program – my way of saying thank you to my online frequent shopper customers.
  • Have any questions? I’d be happy to help, click here to contact me.

Cardstock Cuts for this project:

  • Calypso Coral – 4-1/4″ x 5-1/2″ card base, 3″ x 3″ (die cut flowers)
  • Crushed Curry – 4″ x 9″ mini card base scored at 3″ and 6″
  • Old Olive – 3″ x 5″ (die cut leaves)
  • Petal Pink -3″ x 3″ (die cut berry sprigs)
  • Daffodil Delight – 1-1/4″ x 4″ (die cut flowers)
  • Basic White – 2-3/4″ x 3-3/4″ (inside panel), 2″ x 2-3/4″ (label)
  • Inked Botanicals DSP – 4″ x 5-1/4″ (background), two 2-3/4″ x 3-3/4″ panels (mini card panels)

Stampin’ Up! products used in this project:


Stampin’ Up! Countryside Corners Mother’s Day Card with Video Tutorial

Good Morning! Here’s a Mother’s Day card made with the new Stampin’ Up! Countryside Corners bundle and pretty Countryside Inn designer series paper. It’s a book fold card and I used the Alphabest photopolymer stamp set to spell out ‘mom’. You can find the supplies I used at the bottom of my post along with the sizes of cardstock used.

I made a video tutorial for this card and posted it to my YouTube Channel and you can see the video here:

I applied liquid glue to the end of my Boho Blue card base to seal it and create a book fold card base. I adhered panels of Countryside Inn designer series paper to Night of Navy mats and adhered them to the card front. I cut a Boho Blue panel with the 4th largest hexagon die from the Stampin’ Up! Countryside Corners bundle and embossed it with the Countryside Blossoms embossing folder before adhering it to the card front.

I stamped the frame from the Alphabest stamp set in Night of Navy ink three times on a strip of Basic White. I stamped the letters inside the frames in Night of Navy and then used the Best Labels punch to punch them out. I adhered them to the card with liquid glue. I stamped the large hexagons from the Stampin’ Up! Countryside Corners stamp set in Versamark ink on Night of Navy and sprinkled it with white embossing powder. I shook off the excess and heated the powder with my heat tool until it was bright and shiny. I cut the floral frame out with the 4th and 5th largest hexagon dies and adhered it to the card with dimensionals. I saved the rest of the hexagon for another project.

I used the Timeless Arrangements dies to cut a leaf sprig from Boho Blue card stock and the small triple flower die from the Sentimental Park dies to cut flowers from Night of Navy. I adhered these with glue dots and finished the flower centers with iridescent pearls. I wrapped a length of Night of Navy bordered ribbon around the end of the card and made a knot, securing it with a glue dot.

For the inside of the card, I stamped the sentiment from the Timeless Arrangements stamp set in Night of Navy ink on a Basic White panel. I stamped the corners with the small flower from the Petal Park stamp set in Night of navy and adhered the panel to the inside of the card.

Isn’t this a pretty frame from the Stampin’ Up! Countryside Corners bundle? And the gorgeous flowers from the Countryside Inn designer series paper are the perfect background for a pretty Mother’s Day card.


Current Host Code: TUMGKET9

Use this host code when you order $50 or more and receive a Thank You gift from me!  The free gift is your choice of any item valued up to $10.00 from the 2023-2024 Annual Catalog.

If your order is over $150, please do not use the host code since you’ll receive your own Host Dollars plus I’ll still send you the Thank You gift!  This host code can be used by anyone, no club or commitment required. Let me know if you have any questions.


If you need any stamping supplies, I’d be very happy to be your Demonstrator.  Just click on the Shop Now button on the right side of the screen to go directly to my online store or contact me if you have any questions.  Happy Stamping!

Thanks for stopping by and have a great week!

Akiko

  • Visit my online store here
  • See the current Stampin’ Up! clearance rack specials here
  • Earn FREE Stampin’ Up! products through my Wildflower Frequent Shopper Program – my way of saying thank you to my online frequent shopper customers.
  • Have any questions? I’d be happy to help, click here to contact me.

Cardstock Cuts for this project:

  • Boho Blue – 4-1/4″ x 11″ card base scored at 5-1/2″ and 6-3/4″, 2-1/4″ x 3-3/4″ (embossed background), 1″ x 1-1/2″ (die cut leaf sprig)
  • Night of Navy – 4″ x 4″ (main panel mat), 1″ x 4″ (side panel mat), 3-1/2″ x 5-1/4″ (die cut frame), 1″ x 1-1/2″ (die cut flowers)
  • Basic White – 4″ x 4″ (inside panel), 1″ x 4″ (punched letters)
  • Countryside Inn DSP – 3-7/8″ x 3-7/8″ (main panel background), 7/8″ x 3-7/8″ (side panel background)

Stampin’ Up! products used in this project:


Stampin’ Up! Places in the Heart Mother’s Day Card and Video Tutorial

Good Morning! Mother’s Day is a couple of weeks away so I used the sweet Stampin’ Up! Places in the Heart cling stamp set to make a Mother’s day card during my Facebook Live yesterday afternoon. I used it with the new Bright and Beautiful 6″ x 6″ designer series paper and you can find the currently available supplies I used at the bottom of my post along with the sizes of cardstock used.

You can watch my FB Live video on my Facebook page HERE. I also posted the video to my YouTube Channel and you can view it HERE.

I adhered a panel of striped Bright and Beautiful 6″ x 6″ designer series paper to the side of a lighter patterned panel of the DSP and adhered them both to the front of an Azure Afternoon card base with liquid glue. Azure Afternoon is one of the new core colors that is coming with the color refresh tomorrow!

I stamped the scene from the Stampin’ Up! Places in the Heart stamp set in Pebbled Path ink (one of the new 20223-2025 In Colors) and colored it with Stampin’ Blends. I used light Bubble Bath, light Petal Pink, light Pecan Pie, light Wild Wheat on the Mom and light Lemon Lime Twist, light Pecan Pie, light Smoky Slate and light Petal Pink on the child. I used a blending brush and mask to apply Azure Afternoon ink to the sky and used light Pretty Peacock Stampin’ Blend on the ground. I cut it out with the fourth largest Deckled Rectangle die.

I stamped the sentiment from the Welcoming Windows photopolymer stamp set in the sky and adhered it to an Azure Afternoon mat. I adhered a Lemon Lime Twist bow to the back with a glue dot and popped it on the card front with dimensionals. I finished the card front with pink Loose Frosted Gems.

For the inside of the card, I stamped the sentiment from the Stampin’ Up! Places in the Heart stamp set in Pebbled Path ink on a Basic White panel and trimmed the side with a strip of Bright and Beautiful DSP. I adhered the panel to the inside of the card with Stampin’ Seal.

So many of the inks, blends and card stocks I used are new colors that will be available on Tuesday when the new catalog launches. The new colors are also used in the Bright and Beautiful 6″ x 6″ DSP, and along with the sweet Stampin’ Up! Places In The Heart stamp set they make for a colorful, bright and beautiful Mother’s day card.


Last Chance Products Sale Ends Today!

This Last Chance Products promotion includes two lists of products that will no longer be available once the catalogs retire today. There will be one for the 2022-2023 Annual Catalog and one for the January-April 2023 Mini Catalog. For these retiring catalogs, you can find carryover products in the upcoming 2023-2024 Annual Catalog.

Items on the retiring list are only available while supplies last, so order soon to make sure that you are able to get the items that you are wanting! Some of the items will have sale prices listed with discounts up to 60% off.

The last day to order from these catalogs is TODAY!

Click HERE to download a PDF of the Retiring Last Chance Products from the 2022-2023 Annual Catalog.

Click HERE to download a PDF of the Retiring Last Chance Products from the January-April 2023 Mini Catalog.


New 2023-2024 Annual Catalog Opens Tomorrow!

The new Stampin’ Up! 2023-2024 Annual Catalog debuts tomorrow! I have sent out catalogs to my current customers. If you would like a copy, simply place an order and I will be happy to send you one, too!!

Get the complete details on the new 2023-2025 In Colors and the Color Refresh on my Stampin’ Up! Promotions Page.


Current Host Code: 6EDCPU4T

Use this host code when you order $50 or more and receive a Thank You gift from me!  The free gift is your choice of any item valued up to $10.00 currently available!

If your order is over $150, please do not use the host code since you’ll receive your own Host Dollars plus I’ll still send you the Thank You gift!  This host code can be used by anyone, no club or commitment required. Let me know if you have any questions.


If you need any stamping supplies, I’d be very happy to be your Demonstrator.  Just click on the Shop Now button on the right side of the screen to go directly to my online store or contact me if you have any questions.  Happy Stamping!

Thanks for stopping by and have a great week!

Akiko

  • Visit my online store here
  • See the current Stampin’ Up! clearance rack specials here
  • Earn FREE Stampin’ Up! products through my Wildflower Frequent Shopper Program – my way of saying thank you to my online frequent shopper customers.
  • Have any questions? I’d be happy to help, click here to contact me.

Cardstock Cuts for this project:

  • Azure Afternoon – 4-1/4″ x 11″ card base scored at 5-1/2″, 2-3/4″ x 4-1/8″ (art panel mat)
  • Basic White – 4″ x 5-1/4″ (inside panel),3″ x 4-1/4″ (art panel)
  • Bright and Beautiful 6″ x 6″ DSP – 4″ x 5-1/4″ (front background), 1-1/4″ x 5-1/4″ (front side strip), 1/2″ x 5-1/4″ (inside trim)

Stampin’ Up! products used in this project:


Stampin’ Up! Sentimental Park Thank You Card and Video Tutorial

Good Morning! The Stampin’ Up! Sentimental Park bundle is a wonderful photopolymer stamp set with gorgeous floral dies for making fancy labels. It’s full of sentiments for all occasions and some pretty florals that coordinate with the beautiful Regency Park 6″ x 6″ designer series paper. I used the bundle to make a simple gate fold thank you card during my Facebook Live yesterday and you can find the supplies I used at the bottom of my post along with the sizes of cardstock used.

You can watch my FB Live video on my Facebook page HERE. I also posted the video to my YouTube Channel and you can view it HERE.

I adhered plain panels of Regency Park 6″ x 6″ designer series paper to the back of floral panels to use as contrasting mats and adhered the panels to each side of the front of a gate fold card base.

I cut the layered label dies from the Stampin’ Up! Sentimental Park dies from Basic White. I stamped the sentiment in Night of Navy ink on the smaller one and slipped it into the larger floral label die cut. I love how the layered panels give the look of a double stitched edge!

I cut the small solid and outline flowers from the Stampin’ Up! Sentimental Park dies from Night of Navy card stock and Mango Melody Regency Park DSP and adhered them to the label. For the outline flowers, I applied adhesive sheets to the back of the DSP before die cutting and removed the backing from the die cut flowers before adhering them. I decorated the flower centers with rhinestones and adhered the label to the left side of the gate fold card front, being careful to apply adhesive to only one side of the card.

For the inside of the card, I stamped the small flowers from the Stampin’ Up! Sentimental Park stamp set in Night of Navy on the bottom of a Basic White panel. I used a Daffodil Delight Stampin’ Blend to color the centers and adhered the panel to a Regency Park mat before adhering the panel to the inside of the card. Here’s the finished card with the samples I made for my video.

The layered label from the Stampin’ Up! Sentimental Park bundle is gorgeous and pretty much all you need to make a beautiful card. Luckily the stamp set and dies are returning in the upcoming 2023 – 2024 Annual Catalog, but the bundle discount will no longer be offered. And sadly, the Regency Park DSP will be retiring soon, so now is the time to pick it up before it’s gone for good.


New 2023-2024 Annual Catalog Coming Soon!

The new Stampin’ Up! 2023-2024 Annual Catalog will debut on May 2, 2023! The Demonstrator pre-order is happening now, so there will be sneak peeks of wonderful new products and colors! I have sent out catalogs to my current customers. If you would like a copy, simply place an order and I will be happy to send you one, too!!

Get the complete details on the new 2023-2025 In Colors and the Color Refresh on my Stampin’ Up! Promotions Page.


Last Chance Products Sale Going On Now!

This Last Chance Products promotion includes two lists of products that will no longer be available once the catalogs retire on May 1, 2023. There will be one for the 2022-2023 Annual Catalog and one for the January-April 2023 Mini Catalog. For these retiring catalogs, you can find carryover products in the upcoming 2023-2024 Annual Catalog.

Items on the retiring list are only available while supplies last, so order soon to make sure that you are able to get the items that you are wanting! Some of the items will have sale prices listed with discounts up to 60% off.

Several wonderful retiring items have already sold out!

The last day to order from these catalogs will be May 1, 2023.

Click HERE to download a PDF of the Retiring Last Chance Products from the 2022-2023 Annual Catalog.

Click HERE to download a PDF of the Retiring Last Chance Products from the January-April 2023 Mini Catalog.


Current Host Code: 6EDCPU4T

Use this host code when you order $50 or more and receive a Thank You gift from me!  The free gift is your choice of any item valued up to $10.00 currently available!

If your order is over $150, please do not use the host code since you’ll receive your own Host Dollars plus I’ll still send you the Thank You gift!  This host code can be used by anyone, no club or commitment required. Let me know if you have any questions.


If you need any stamping supplies, I’d be very happy to be your Demonstrator.  Just click on the Shop Now button on the right side of the screen to go directly to my online store or contact me if you have any questions.  Happy Stamping!

Thanks for stopping by and have a great week!

Akiko

  • Visit my online store here
  • See the current Stampin’ Up! clearance rack specials here
  • Earn FREE Stampin’ Up! products through my Wildflower Frequent Shopper Program – my way of saying thank you to my online frequent shopper customers.
  • Have any questions? I’d be happy to help, click here to contact me.

Cardstock Cuts for this project:

  • Night of Navy – 5-1/2″ x 8-1/2″ card base scored at 2-1/8″ and 6-3/8″, 1″ x 2″ (die cut flowers)
  • Basic White – 3-7/8″ x 5-1/8″ (inside panel), 4-1/2″ x 5-1/4″ (die cut label layers)
  • Regency Park 6″ x 6″ DSP – 4″ x 5-1/4″ (inside mat), two 1-7/8″ x 5-1/4″ panels (front mats), two 1-3/4″ x 5-1/8″ panels (front background panels), 1″ x 2″ (die cut flowers)

Stampin’ Up! products used in this project:


Stampin’ Up! Friendly Gnomes Spring Card

Good Morning! Whimsical garden gnomes have decorated our flower beds for the past couple of years and with the weather warming up, I knew I had to make a card with the Stampin’ Up! Friendly Gnomes stamp set before they retired. I paired this cute stamp set with the Happy Forest Friends designer series paper for a faux side step fun fold card to share today. You can find the supplies I used at the bottom of my post along with the sizes of cardstock used.

I used panels of Calypso Coral Happy Forest Friends designer series paper as mats and I adhered one to each panel of Happy Forest Friends DSP for my card. I used a strip of greenery for the first step and adhered it to the Pear Pizzazz card base. I used a forest scenery panel for the middle step and adhered it to the card. I used a tall forest scenery panel to adhere to the pear Pizzazz faux side step. I adhered the faux side step to the first step with Tear N Tape adhesive, burnished the score line and used Tear N Tape to adhere the back to the back of the card. It’s so easy to make, compared to the careful scoring and cutting for a regular side step card.

I stamped the two gnomes from the Stampin’ Up! Friendly Gnomes cling stamp set in Memento Tuxedo Black ink and colored them with Stampin’ Blends. I used So Saffron, Calypso Coral, Pecan Pie (a new color available on May 2, 2023), Balmy Blue, Petal Pink, Bubble Bath (another new color available on May 2, 2023) and Old Olive. I cut the gnomes out with the coordinating dies and adhered them to the cad with glue dots.

I stamped the sentiment from the Stampin’ Up! Friendly Gnomes stamp set in Memento Tuxedo Black ink on Basic White and adhered it to a mat and Pear Pizzazz panel. I adhered it to the front of the card with glue dots and finished the card front with Calypso Coral resin glowers and a Linen Thread bow.

For the inside of the card, I stamped the sentiment from the Stampin’ Up! Friendly Gnomes stamp set in Memento Tuxedo Black ink on a Basic White panel. I stamped the floral sprig and grass and colored them with Stampin’ Blends. I adhered the panel to a DSP mat and then to the inside of the card with Stampin’ Seal.

I even decorated the back of the card with another forest scene panel! And I layered another panel of Happy Forest Friends to the top of the faux side step. This area could also be covered with another decorated Basic White panel and used to write a personal message.

Both the Stampin’ Up! Friendly Gnomes stamp set and the Happy Forest Friends designer series paper are retiring (and so is Pear Pizzazz!) so now is a good time to pick up these products for your Springtime gnomes card!


New 2023-2024 Annual Catalog Coming Soon!

The new Stampin’ Up! 2023-2024 Annual Catalog will debut on May 2, 2023! The Demonstrator pre-order is happening now, so there will be sneak peeks of wonderful new products and colors! I have sent out catalogs to my current customers. If you would like a copy, simply place an order and I will be happy to send you one, too!!

Get the complete details on the new 2023-2025 In Colors and the Color Refresh on my Stampin’ Up! Promotions Page.


Last Chance Products Sale Going On Now!

This Last Chance Products promotion includes two lists of products that will no longer be available once the catalogs retire on May 1, 2023. There will be one for the 2022-2023 Annual Catalog and one for the January-April 2023 Mini Catalog. For these retiring catalogs, you can find carryover products in the upcoming 2023-2024 Annual Catalog.

Items on the retiring list are only available while supplies last, so order soon to make sure that you are able to get the items that you are wanting! Some of the items will have sale prices listed with discounts up to 60% off.

Several wonderful retiring items have already sold out!

The last day to order from these catalogs will be May 1, 2023.

Click HERE to download a PDF of the Retiring Last Chance Products from the 2022-2023 Annual Catalog.

Click HERE to download a PDF of the Retiring Last Chance Products from the January-April 2023 Mini Catalog.


Current Host Code: 6EDCPU4T

Use this host code when you order $50 or more and receive a Thank You gift from me!  The free gift is your choice of any currently available item valued up to $10.00.

If your order is over $150, please do not use the host code since you’ll receive your own Host Dollars plus I’ll still send you the Thank You gift!  This host code can be used by anyone, no club or commitment required. Let me know if you have any questions.


If you need any stamping supplies, I’d be very happy to be your Demonstrator.  Just click on the Shop Now button on the right side of the screen to go directly to my online store or contact me if you have any questions.  Happy Stamping!

Thanks for stopping by and have a great week!

Akiko

  • Visit my online store here
  • See the current Stampin’ Up! clearance rack specials here
  • Earn FREE Stampin’ Up! products through my Wildflower Frequent Shopper Program – my way of saying thank you to my online frequent shopper customers.
  • Have any questions? I’d be happy to help, click here to contact me.

Cardstock Cuts for this project:

  • Pear Pizzazz – 5-1/2″ x 8-1/2″ card base scored at 1-1/4″, 2-1/2″ and 5-1/2″, 2-1/2″ x 6″ scored at 4-1/4″ (faux side step), 1″ x 2″ (label)
  • Basic White – 2-5/8″ x 5-1/8″ (inside panel), 3/4″ x 1-3/4″ (label)
  • Happy Forest Friends DSP
    • Calypso Coral mat – 1″ x 5-1/4″ (front step), three 2-3/4″ x 5-1/5″ panels (inside panel, middle step and back panel), 1-1/8″ x 2-1/4″ (back top panel), 7/8″ x 1-7/8″ (label), 2-1/4″ x 4″ (faux side step)
    • leafy panels – 7/8″ x 5-1/8″ (front step), 1″ x 2-1/8″ (back top panel)
    • forest scene panels – two 2-5/8″ x 5-1/8″ panels (middle step and back panel), 2-1/8″ x 3-7/8″ panels (faux side step)

Stampin’ Up! products used in this project: