Stampin’ Up! Ornate Style You’re Amazing Card

Good Morning! Today I have a sneak peek card made with the Stampin’ Up Ornate Style and Ornate Thanks stamp bundles. These bundles are part of the Ornate Garden Suite which are going to be in the 2020-2021 Annual Catalog, but are being be released early. Yay!! You can find the supplies used to create this card at the bottom of my post along with the sizes of cardstock used.

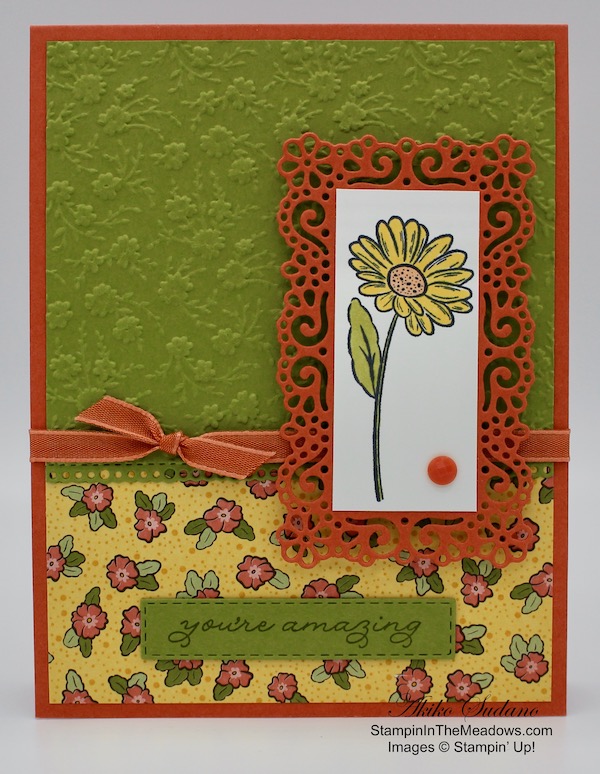
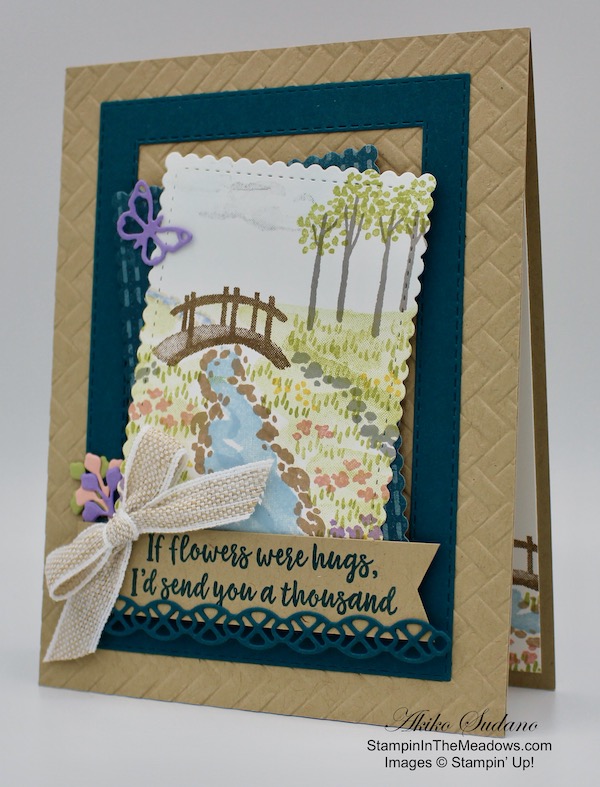
I cut a panel of the pretty yellow background Ornate Garden specialty designer series paper and adhered it to the bottom of a Terracotta Tile card base. I used the little circle border die from the Ornate Borders Dies to cut the bottom of a panel of Old Olive card stock and then ran it through the Ornate Floral embossing folder. I adhered it to the top of the card base, overlapping the floral DSP. I tied a length of Terracotta Tile ribbon around the card front and tied a faux bow just above the die cut border.

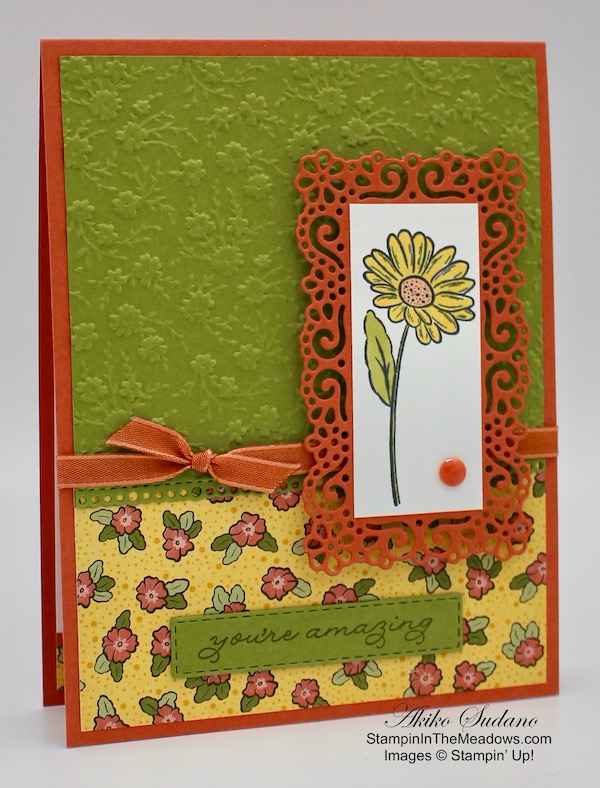
I stamped the you’re amazing sentiment from the Ornate Thanks photopolymer stamp set on a strip of Old Olive card stock using Old Olive ink. I cut it out with small long Stitched Rectangles dies. I cut the small frame from the Ornate Layers Dies from Terracotta Tile card stock.

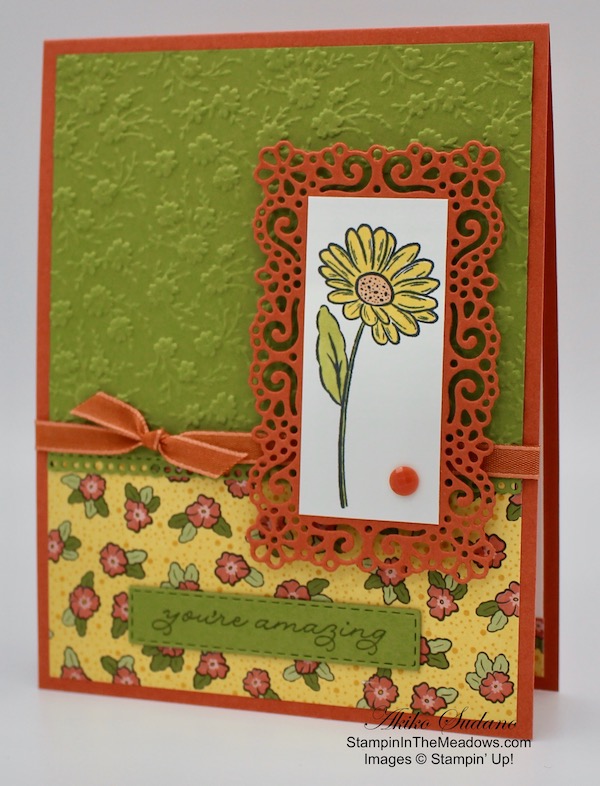
I stamped the flower from the Stampin’ Up! Ornate Style cling stamp set in Memento Tuxedo Black ink on a small Whisper White panel. I colored it with the Dark So Saffron, Light Calypso Coral and Light Old Olive Stampin’ Blends. I adhered the flower to the Terracotta Tile frame and accented it with a Terracotta Tile faceted dot. I adhered it to the card front with dimensionals. I finally centered the Old Olive die cut label on the bottom of the card front.

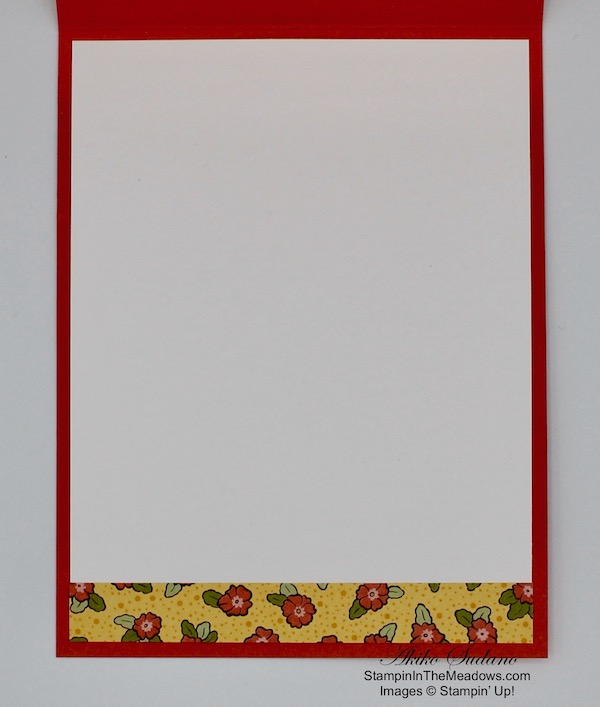
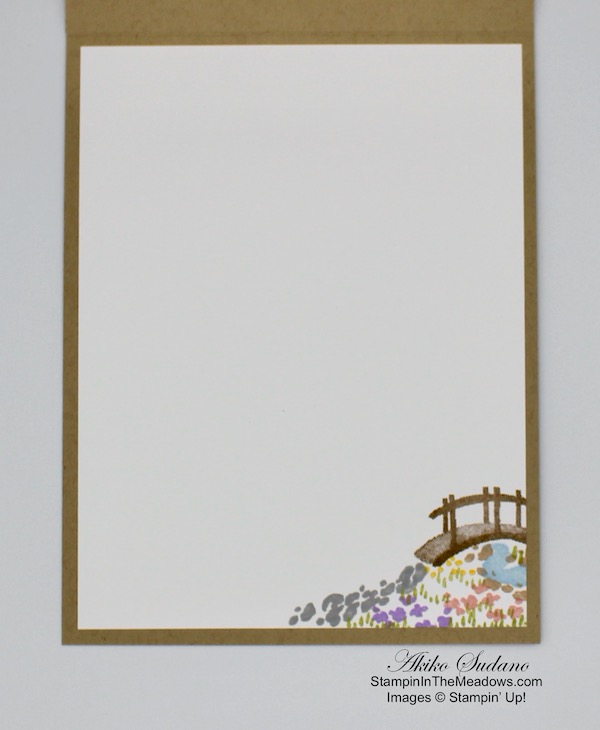
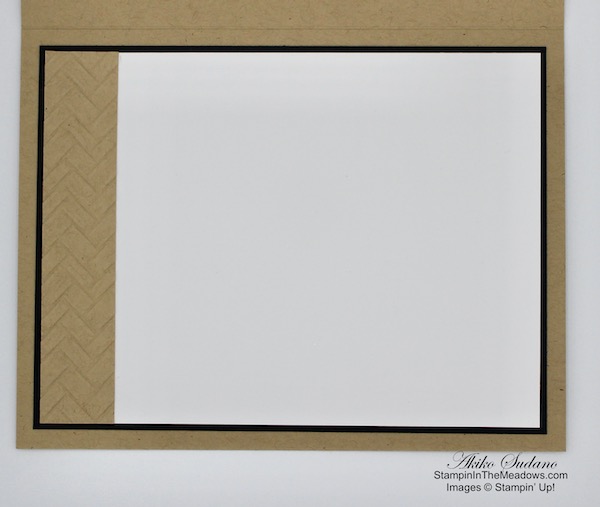
The inside of the card is pretty simple – I trimmed a Whisper White panel with the yellow and Terracotta Tile floral paper from the Ornate Garden specialty designer series paper pack and adhered it to the inside of the card.

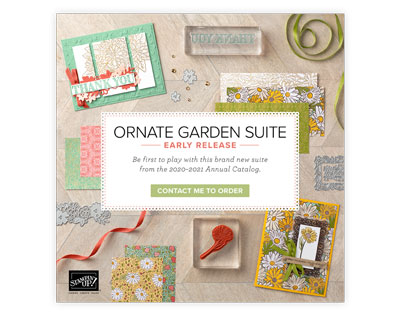
The Stampin’ Up! Ornate Garden Suite is really pretty with gorgeous die cut borders and frames, pretty floral images and sweet thank you sentiments for every occasion. The items in the suite are currently available to Stampin’ Up! Demonstrators during the pre-order period and will be available to everyone beginning April 1! That’s next week. Click on the image below to open a PDF file to see all of the items in the suite.

And note that if you are interested in joining Stampin’ Up! as a demonstrator now, you can add items from the suite to your starter kit. Contact me if you have any questions.


March 16 – 31 Host Code: RSAF3R27

Use this host code when you order $50 or more and receive a free gift from me!  The gift is your choice of any item valued up to $10.00 in the 2019-20 Annual Catalog or in the 2020 January-June Mini Catalog!  That includes some of the Host Exclusive stamp sets!

If your order is over $150, please do not use the host code since you’ll receive your own Host Dollars plus I’ll send you the free gift!  This host code can be used by anyone, no commitment required.  Let me know if you have any questions.


If you need any stamping supplies, I’d be very happy to be your Demonstrator.  Just click on the Shop Now button on the right side of the screen to go directly to my online store or contact me if you have any questions.  Happy Stamping!

Thanks for stopping by and have a great day!

Akiko

  • Visit my online store here
  • See the current Stampin’ Up! clearance rack specials here
  • Earn FREE Stampin’ Up! products through my Wildflower Frequent Shopper Program – my way of saying thank you to my frequent shopper online customers.
  • Sign up for my weekly newsletter here
  • Have any questions? I’d be happy to help, click here to contact me.

Cardstock Cuts for this project:

  • Terracotta Tile – 4-1/4″ x 11″ card base scored at 5-1/2″, 2-1/4″ x 4″ (die cut frame)
  • Old Olive – 3-1/2″ x 4″ (embossed panel)
  • Whisper White – 1-1/8″ x 2-1/2″ (flower panel), 4″ x 5-1/4″ (inside panel)
  • Ornate Gardens DSP – 2″ x 4″ (front panel), 1/2″ x 4″ (inside trim)

Stampin’ Up! products used in this project:


Stampin’ Up! My Meadow Flowers and Hugs Card

Happy Friday Morning! Are you ready for the weekend? Today I have a flowers and hugs card made with the pretty Stampin’ Up! My Meadow stamp set with the lovely sentiment from the Abstract Impressions stamp set – If flowers were hugs, I’d send you a thousand. You can find the supplies used to create this card at the bottom of my post along with the sizes of cardstock used.

I started by embossing a Crumb Cake panel with the Coastal Weave embossing folder and adhering it to a Crumb Cake card base. I cut a frame with the Stitched Rectangles dies from Pretty Peacock card stock and adhered it to the card front with multipurpose liquid glue. I cut a panel of the pretty Peacock paper from the Woven Threads designer series paper with the second largest scalloped rectangle from the Stitched So Sweetly dies.

Then I went to work with the stamps in the Stampin’ Up! My Meadow stamp set, a bunch of ink pads and a small panel of Whisper White card stock. First I stamped the little bridge in Soft Suede. Then the stream in Seaside Spray – I stamped several times to make a little winding brook. I stamped the rocks using both rock stamps in Crumb Cake ink. I used the same rocks stamps to create a little path to and from the bridge, but with Smoky Slate ink. I also used Smoky Slate ink to stamp the clouds after stamping off. I stamped the tree trunks in Gray Granite ink and used the little round dots to create Spring leaves on the tops of the trees with Pear Pizzazz ink. I used the larger background stamps to create a light wash of Pear Pizzazz on the ground after stamping off each time. I stamped flowers in Blushing Bride and Highland Heather, and small dotted flowers in daffodil delight. Finally, I stamped the grass sprigs in pear pizzazz. I used my Seaside Spray Stampin’ Write marker to extend the brook beyond the bridge and Crumb Cake Stampin’ Blend to create something rocks next to the brook. Finally, I used a sponge dauber to sponge in a little Balmy Blue in the sky (it’s a little hard to see). I cut it out with the second largest scalloped rectangle from the Stitched So Sweetly dies.

I adhered the panel to the Pretty Peacock scalloped rectangle on an angle with multipurpose liquid glue and adhered it to the card with dimensionals. I stamped the sentiment from the Abstract Impressions stamp set on a strip of Crumb Cake card stock using Pretty Peacock ink and trimmed the end. I cut a decorative strip from the Nature’s Thoughts dies from Pretty Peacock ink and adhered it to the bottom of the label with multipurpose liquid glue. I adhered the label to the card with dimensionals. I cut the little sprig from the Nature’s Thoughts dies from Pear Pizzazz, Blushing Bride and Highland Heather card stock and adhered them to the side of the card. I cut the little butterfly from the Nature’s Thoughts dies and adhered it to the top. I finished off the card front with a White and Linen ribbon bow.

On the inside of the card, I stamped another little bridge and path scene in the corner of a Whisper White Panel using the same colors as the card front. I adhered the panel to the inside of the card with multipurpose liquid glue.

Today’s little meadow scene has a little brook, bridge and wildflowers. The Stampin’ Up! My Meadow stamp set has several other stamps that can be used to create other peaceful retreats – more trees, a cute wheel barrow and a little gazebo. So close your eyes and imagine your perfect place and then bring it to life with the Stampin’ Up! My Meadow stamp set.


March 1 – 15 Host Code: BQCVV2RG

Use this host code when you order $50 or more and receive a free gift from me!  The gift is your choice of any item valued up to $10.00 in the 2019-20 Annual Catalog or in the 2020 January-June Mini Catalog!  That includes some of the Host Exclusive stamp sets!

If your order is over $150, please do not use the host code since you’ll receive your own Host Dollars plus I’ll send you the free gift!  This host code can be used by anyone, no commitment required.  Let me know if you have any questions.


If you need any stamping supplies, I’d be very happy to be your Demonstrator.  Just click on the Shop Now button on the right side of the screen to go directly to my online store or contact me if you have any questions.  Happy Stamping!

Thanks for stopping by and have a great day!

Akiko

  • Visit my online store here
  • See the current Stampin’ Up! clearance rack specials here
  • Earn FREE Stampin’ Up! products through my Wildflower Frequent Shopper Program – my way of saying thank you to my frequent shopper online customers.
  • Sign up for my weekly newsletter here
  • Have any questions? I’d be happy to help, click here to contact me.

Cardstock Cuts for this project:

  • Crumb Cake – 4-1/4″ x 11″ card base scored at 5-1/2″, 4-1/4″ x 5-1/2″ (embossed panel), 3/4″ x 4″ (label)
  • Pretty Peacock – 4″ x 6″ (die cuts)
  • Whisper White – 4″ x 5-1/4″ (inside panel), 3″ x 4-1/4″ (meadow scene)
  • Woven Threads DSP – 3″ x 4 1/4″
  • Blushing Bride – 1″ x 1″ (die cuts)
  • Highland Heather – 2″ x 1″ (die cuts)
  • Pear Pizzazz – 1″ x 1″ (die cuts)

Stampin’ Up! products used in this project:


Stampin’ Up! Grace’s Garden Friendship Card

Hello and Happy Friday! Today I have a friendship card made with the pretty Stampin’ Up! Grace’s Garden bundle. This stamp set includes beautiful flower and fence images that look like you are in an English country garden. You can find the supplies used to create this card at the bottom of my post along with the sizes of cardstock used.

I cut out an oval in a Sahara Sand panel using the large die in the Layering Ovals dies. I embossed the panel with the Brick and Mortar 3D embossing folder. I colored a whisper White panel with the Light Pool Party Stampin’ Blend on the top and Old Olive on the bottom. I ran the panel through the Subtle embossing folder to give it a little texture.

Using the stamps in the Stampin’ Up! Grace’s Garden stamp set, I stamped the gate, one of each of the flower clusters, the little bird and cat with Memento Tuxedo Black ink on a panel of Whisper White. I cut them out with the matching die from the Garden Gateway dies and used Stampin’ Blends to color the. I colored the flowers with Flirty Flamingo, Mango Melody, Highland Heather, Balmy Blue, Old Olive and Granny Apple Green. I colored the cat with Mango Melody and Crumb Cake and the bird with Balmy Blue and Mango Melody. I added touch of Granny Apple Green to the grass on the gate and colored the area between the slats with Light Pool Party.

Using multipurpose liquid glue, I adhered the gate, tall flowers and bird to the colored and embossed Whisper White panel. I positioned the panel behind the embossed Sahara Sand panel and adhered it with dimensionals. I stamped the sentiment from the Painted Moments stamp set in Mossy Meadow ink on a Whisper White strip. I colored a length of Burlap Ribbon with the dark Old Olive Stampin’ Blend and adhered it to the panel with glue dots. I adhered the label on top with glue dots and added an Old Olive gemstone. I adhered the cat and small flower cluster on the panel with multipurpose liquid glue and dimensionals. I finished the panel off with a looped bow made with regular and Mossy Meadow Linen Thread. I adhered the panel to a Mossy Meadow card base with dimensionals.

For the inside of the card, I stamped the tall and short flowers from the Stampin’ Up! Grace’s Garden stamp set in Memento Tuxedo Black on a panel of Whisper White. I colored them to match the flowers on the front with Flirty Flamingo, Balmy Blue, Granny Apple Green and Old Olive Stampin’ Blends. I adhered the panel to a Sahara Sand mat and then to the inside of the card.

The Stampin’ Up! Grace’s Garden bundle is such a sweet set that is perfect for Springtime cards.


February 16 – 29 Host Code: KFK3RZHV

March 1 – 15 Host Code: BQCVV2RG

Use this host code when you order $50 or more and receive a free gift from me!  The gift is your choice of any item valued up to $10.00 in the 2019-20 Annual Catalog or in the 2020 January-June Mini Catalog!  That includes some of the Host Exclusive stamp sets!

If your order is over $150, please do not use the host code since you’ll receive your own Host Dollars plus I’ll send you the free gift!  This host code can be used by anyone, no commitment required.  Let me know if you have any questions.


If you need any stamping supplies, I’d be very happy to be your Demonstrator.  Just click on the Shop Now button on the right side of the screen to go directly to my online store or contact me if you have any questions.  Happy Stamping!

Thanks for stopping by and have a great day!

Akiko

  • Visit my online store here
  • See the current Stampin’ Up! clearance rack specials here
  • Earn FREE Stampin’ Up! products through my Wildflower Frequent Shopper Program – my way of saying thank you to my frequent shopper online customers.
  • Sign up for my weekly newsletter here
  • Have any questions? I’d be happy to help, click here to contact me.

Cardstock Cuts for this project:

  • Mossy Meadow – 5 1/2″ x 8 1/2″ card base scored at 4 1/4″
  • Sahara Sand – 4″ x 5 1/4″ (brick embossed background), 3 7/8″ x 5 1/8″ (inside mat)
  • Whisper White – 3 3/4″ x 5″ (inside panel), 3 1/2″ x 4 1/4″ (front background panel), 3″ x 7″ (garden die cuts), 5/8″ x 4″ (label)

Stampin’ Up! products used in this project:


Stampin’ Up! Timeless Tropical Friendship Card

Good Morning! Today I have a tropical friendship card made with the beautiful flowers from the Stampin’ Up! Timeless Tropical stamp bundle. You can find the supplies used to create this card at the bottom of my post along with the sizes of cardstock used.

I started by embossing a panel of Soft Suede card stock with the new Coastal Weave 3d Embossing folder. I adhered it to a Shaded Spruce Card base with snail. I took a piece of Timeless Oasis designer series paper and adhered it to a Shaded Spruce mat and then to the card base with snail. I stamped the large hibiscus, two plumeria flowers and two leafs from the Stampin’ Up! Timeless Tropical stamp set using Sahara Sand ink on Thick Whisper White card stock. I colored the hibiscus flower with the Real Red Stampin’ Blends. I colored the smaller plumeria flowers with Daffodil Delight Stampin’ Blends with small touches of Light Real Red in the center. I highlighted the flower petals by using the Stampin’ Blends Color Lifter to remove color from the flower petals, brushing back and forth in a linear fashion on the hibiscus and brushing in circular motions on the plumeria flower tips. I colored the leaves with the Old Olive Stampin’ Blends, using the dark marker to highlight the leaf veins.

I stamped the monstera leaf from the Tropical Chic stamp set using the Stamparatus so that it would resemble the leaves on the Tropical Oasis DSP. I first stamped the leaf in Old Olive ink on Thick Whisper White card stock. I wiped the stamp and then inked the edges with Shaded Spruce ink. I used a sponge dauber to blend the ink on the stamp to remove the harsh edge and closed the Stamparatus. This resulted in a two tone look that goes pretty well with the way the leaves are colored on the DSP. I cut out all the flowers and leaves using their coordinating dies. I stamped the sentiment from the Stampin’ Up! Timeless Tropical stamp set on a strip of Whisper white using Sahara Sand ink. I trimmed the end of the label to make an angle and then sponged the edges to give it a vintage look. I adhered it to a Shaded Spruce mat.

I arranged the flowers, leaves and label on the card front. I adhered the label with glue dots. Then I adhered the leaves with glue dots. I added the small plumeria flowers next with glue dots. I finally added the large hibiscus flower with dimensionals. I brushed clear Wink of Stella over the flowers to give them some shimmer. I added two red rhinestones to the plumeria flower centers. I made a bow with Linen Thread and adhered it with a glue dot and finished off the card front with a little monstera leaf embellishment from the Tropical Oasis trinkets.

On the inside, I stamped the hibiscus flower from the Timeless Tropical stamp set on a Whisper White panel in Sahara Sand ink after stamping off. I trimmed the bottom with a strip of the Tropical Oasis designer series paper. I adhered the panel to the inside of the card with snail.

The Stampin’ Up! Timeless Tropical bundle has the most beautiful tropical images and dies that coordinate with them. Tropical themed cards are perfect escapes during the cold winter, and this set is perfect for creating them. And the set also brings a bit of nostalgia with the vintage feel in the images and sentiments, evoking memories of warmer times, which help us get through the cold winter.


January 16 – 31 Host Code: EFVWTZUQ

Use this host code when you order $50 or more and receive a free gift from me!  The gift is your choice of any item valued up to $10.00 in the 2019-20 Annual Catalog or in the 2019 Holiday Catalog!  That includes some of the Host Exclusive stamp sets!

If your order is over $150, please do not use the host code since you’ll receive your own Host Dollars plus I’ll send you the free gift!  This host code can be used by anyone, no commitment required.  Let me know if you have any questions.


If you need any stamping supplies, I’d be very happy to be your Demonstrator.  Just click on the Shop Now button on the right side of the screen to go directly to my online store or contact me if you have any questions.  Happy Stamping!

Thanks for stopping by and have a great day!

Akiko

  • Visit my online store here
  • See the current Stampin’ Up! clearance rack specials here
  • Earn FREE Stampin’ Up! products through my Wildflower Frequent Shopper Program – my way of saying thank you to my frequent shopper online customers.
  • Sign up for my weekly newsletter here
  • Have any questions? I’d be happy to help, click here to contact me.

Cardstock Cuts for this project:

  • Shaded Spruce – 4 1/4″ x 11″ scored at 5 1/2″ (card base), 2 1/8″ x 4 1/2″ (mat), 3/4″ x 4″ (label)
  • Thick Whisper White – 3 1/2″ x 6″ (flower die cuts), 3″ x 4″ (leaf die cuts)
  • Whisper White – 3 3/4″ x 5″ (inside), 3/8″ x 4″ (label)
  • Tropical Oasis DSP – 2″ x 4 3/8″ (front panel), 1/2″ x 3 3/4″ (inside trim)

Stampin’ Up! products used in this project:


Stampin’ Up! All Dressed Up Note Card Tote

Good Morning! Today I am sharing a video that I did yesterday during my Sunday Facebook Live session. The Stampin’ Up! All Dressed Up dies set has dies to make the cutest little tote bags!

Here’s the Facebook Live video showing how to make this cute little tote bag:

I also posted the video to my YouTube channel and you can view it here.

In the video I show how I made the tote bag. I die cut two of the bag dies using two sheets of the Best Dressed designer series paper. I cut two of the handle dies from the Stampin’ Up! All Dressed Up dies from Blackberry Bliss card stock. I cut a pocket die from Blackberry Bliss card stock and two of the buckle dies from Daffodil Delight card stock.

I used Tear & Tape on the side flaps and adhered the sides together, pressing real good. I added Tear & Tape to the pocket and adhered it to the front and added the die cut heart with multipurpose liquid glue. I used Tear & Tape to secure the bottom. I slipped a buckle on each end of the Blackberry Bliss straps and used glue dots to secure the straps/buckles to the tote bag.

These are the 3×3 note cards that I made to go in the tote. I made card bases with a 3×6 panel of Whisper White card stock scored at 3″ and decorated them with various scraps of card stock, ribbons, designer series paper and embossing folders. I used small dies to use up the last bits of paper and create accents for the cards. I squared off various panels of the remaining Best Dressed scraps and used them along with coordinating scraps of matching card stock. In this case I used Blackberry Bliss and Purple Posey cardstock, the Coastal Weave 3D embossing folder, along with the butterfly from the Well Written dies and the stitched heart from the Stitched Labels dies. And I stamped sentiments in some of the open white spaces. Each note card is different with the common theme of the DSP used in the bag. And the nice thing is that the note cards can be used for any occasion. Plus it is so cute!!

These are the note cards I made for the sample tote. For these I used Blackberry Bliss and Daffodil Delight card stock. The sentiment is from the Dressed to Impress stamp set.

The Stampin’ Up! All Dressed Up dies are part of the Dressed To Impress bundle at a 10% discount. The totes are perfectly sized to hold 3×3 note cards and I made my own, but the Best Dressed suite also has the cutest 3×3 note cards with coordinating envelopes that you could use instead. The totes are also perfect for holding party favors and you can use a card stock color that coordinates with your party theme. I don’t think it matters what they hold, the person who receives them will think they are so cute, they will love them no matter what. I hope you get a chance to have fun making them.


January 1 – 15 Host Code: FB6MBVE3

Use this host code when you order $50+ and receive a free gift from me!  If your order is over $150, please do not use this code, but you’ll still get the free gift.  The free gift is your choice of any item valued up to $10.00 in the 2018-19 Annual Catalog or in the 2019 Occasions Catalog!  That includes some of the Host Exclusive stamp sets!

If your order is over $150, please do not use the host code since you’ll receive your own Host Dollars plus I’ll send you the free gift!  This host code can be used by anyone, no club or commitment required.  Let me know if you have any questions.


If you need any stamping supplies, I’d be very happy to be your Demonstrator.  Just click on the Shop Now button on the right side of the screen to go directly to my online store or contact me if you have any questions.  Happy Stamping!

Thanks for stopping by and have a great week!

Akiko

  • Visit my online store here
  • See the current Stampin’ Up! clearance rack specials here
  • Earn FREE Stampin’ Up! products through my Wildflower Frequent Shopper Program – my way of saying thank you to my frequent shopper online customers.
  • Have any questions? I’d be happy to help, click here to contact me.

Cardstock Cuts for this project:

  • Best Dressed DSP – 2 6″ x 6″ panels of same design for each die cut tote bag (There will be scraps left over that I squared off to decorate the note cards)
  • Whisper White – (4) 6″ x 3″ panels scored at 3″ (note card bases)
  • Blackberry Bliss – 1 1/2″ x 6 1/2″ (tote bag straps), 2″ x 2 1/2″ (tote bag pocket)
  • Daffodil Delight – 1 1/2″ x 2″ (tote bag buckles)
  • Purple Posey – scraps to decorate note cards

Stampin’ Up! products used in this project:


Stampin’ Up! Peaceful Moments Friendship Card for the Happy Inkin’ Thursday Blog Hop

Good Morning and Happy New Year! Welcome to the first Happy Inkin’ Thursday Blog Hop of 2020! Tomorrow is first day for ordering from the 2020 January-June 2020 Mini Catalog and my card is made with the beautiful Stampin’ Up! Peaceful Moments bundle that is just one of the new items that will be available.

We have a sketch challenge this week, and here is the sketch we are using:

I started by embossing a panel of Crumb Cake card stock with the new Coastal Weave embossing folder (also available in the new Mini Catalog tomorrow) and adhering it to a Crumb Cake card base. Then I cut out the solid flowers from Poppy Parade card stock with the Poppy Moments dies and the outline flowers from Calypso Coral cardstock. The Poppy Moments dies are part of the Stampin’ Up! Peaceful Moments bundle. I adhered the flowers with multipurpose liquid glue. I cut out the centers from Basic Black card stock and adhered them to the flowers.

I cut out three sets of large leaves and 1 set of leaf clusters from Pear Pizzazz and Old Olive card stock (solids from Pear Pizzazz) and adhered them together. I love how they automatically create shading and dimension when you put them together!

I arranged the leaves and adhered them to the card with multipurpose liquid glue. I popped the flowers on with dimensionals. I stamped the sentiment from the Stampin’ Up! Peaceful Moments cling stamp set in Memento Tuxedo Black ink on a strip of Whisper White. I adhered it to a Basic Black mat and adhered it to the card base with dimensionals.

I left the inside of the card pretty simple, just adding a strip of embossed Crumb Cake card stock to the side of a Whisper White panel and adhering it to a Basic Black mat. I then adhered it to the inside of the card with multipurpose liquid glue – plenty of room to write a personal message to a dear friend.

Tomorrow is the big day for the the start of the new Mini Catalog and Sale-A-Bration! My shopping list is prepared and I’m just counting down the hours. Enjoy!!

On with the Hop! Click the Next button below to visit Karen Ksenzakovic’s blog.

And just in case you get lost along the way, here’s a list of the team members participating in the hop today:


January 1 – 15 Host Code: FB6MBVE3

Use this host code when you order $50 or more and receive a free gift from me!  The gift is your choice of any item valued up to $10.00 in the 2019-20 Annual Catalog or in the 2019 Holiday Catalog!  That includes some of the Host Exclusive stamp sets!

If your order is over $150, please do not use the host code since you’ll receive your own Host Dollars plus I’ll send you the free gift!  This host code can be used by anyone, no commitment required.  Let me know if you have any questions.


If you need any stamping supplies, I’d be very happy to be your Demonstrator.  Just click on the Shop Now button on the right side of the screen to go directly to my online store or contact me if you have any questions.  Happy Stamping!

Thanks for visiting!

Akiko

  • Visit my online store here
  • See the current Stampin’ Up! clearance rack specials here
  • Earn FREE Stampin’ Up! products through my Wildflower Frequent Shopper Program – my way of saying thank you to my frequent shopper online customers.
  • Sign up for my weekly newsletter here
  • Have any questions? I’d be happy to help, click here to contact me.

Cardstock Cuts for this project:

  • Crumb Cake – 5 1/2″ x 8 1/2″ scored at 4 1/4″ (card base), 3 1/2″ x 4 3/4″ (embossed background), 1/2″ x 3 3/4″ (inside embossed trim)
  • Poppy Parade – 2 1/2″ x 4 1/4″ (solid poppy die cuts)
  • Calypso Coral – 2 1/2″ x 4 1/4″ (outline poppy die cuts)
  • Pear Pizzazz – 1″ x 6″ (3 solid single leaf die cuts), 1 1/2″ x 3 1/4″ (solid leaf cluster)
  • Old Olive – 1″ x 6″ (3 outline single leaf die cuts), 1 1/2″ x 3 1/4″ (outline leaf cluster)
  • Whisper White – 3 3/4″ x 5″ (inside), 5/8″ x 4″ (label)
  • Basic Black – 3 7/8″ x 5 1/8″ (inside mat), 3/4″ x 4 1/8″ (label mat), 1 1/4″ x 2″ (flower centers)

Stampin’ Up! products used in this project:


Stampin’ Up! Forever Blossoms Friendship Card

Good Morning! Today I am sharing another video that I did yesterday during my Sunday Facebook Live session. For this card, I found a pretty card from last year’s catalog that uses the Stampin’ Up! Love What You Do stamp set. Since the DSP from the card is no longer available, I looked for an alternative and found one in the new Parisian Blossoms specialty designer series paper from the new Mini Catalog that will be available on January 3, 2020. So I decided to make my updated version using the Stampin’ Up! Forever Blossoms stamp set with the Parisian Blossoms DSP to compliment the wonderful sentiment from the Love What You Do stamp set.

Here’s the Facebook Live video where I show how to make the card:

I also posted the video to my YouTube channel and you can view it here.

I started by running a panel of Pool Party card stock through the Tufted embossing folder and adhering it to a Pool Party card base with multipurpose liquid glue. I adhered the beautiful Parisian Blossoms specialty designer series paper to the card front. I realized afterward that I didn’t say anything about the beautiful touches of champagne foil running through the paper – it really makes it special! I trimmed the end of the a strip of the reverse Petal Pink paper and adhered it on top.

I stamped the single cherry blossom stamp from the Stampin’ Up! Forever Blossoms stamp set in Pool Party ink in a random pattern on a panel of Whisper White card stock. I stamped off each flower once before stamping it on the panel. I stamped the sentiment from the Love What you Do stamp set in Memento Tuxedo Black ink over the blossoms. Using the second largest circle from the Stitched Shapes dies, I cut out the sentiment. I adhered the sentiment to a pearlized doily with glue dots. I adhered 3 sets of vellum leaves cut with the leaf punch to the back of the doily. I tied a knot in a short length of polka dot tulle and made a bow using Whisper White baker’s twine. I adhered the bow and ribbon to the back of the doily with a glue dot. I adhered the layered label to the card front with dimensionals. I finished off the card front by adding 3 pearls to the label.

On the inside of the card, I stamped more cherry blossoms in Pool Party ink on a panel of Whisper White after stamping off. I added a strip of the Parisian blossoms to the bottom and adhered it to the inside of the card.

The Stampin’ Up! Forever Blossoms and Parisian Blossoms specialty designer series paper will be available when the new January-June 2020 Mini Catalog makes it’s debut on January 3, 2020. The Stampin’ Up! Love What You Do stamp set is currently available with the 2019-2020 Annual Catalog and in my Online Store.


This image has an empty alt attribute; its file name is stampin-up-2020-jan-jun-mini-catalog-stampininthemeadows.com_.jpeg

Stampin’ In The Meadows January – June 2020 Mini Catalog Product Shares

I’m doing my first Stampin’ Up! Product Share to get ready for the new January-June 1010 Mini Catalog and I invite you to join me! A share is a good way to get a sample of the new products before committing to purchase full packages of each product. See my New Mini Catalog Product Shares page to get a complete details of the options and their costs, a complete listing of all the products you will be getting, and how to sign up. Let me know if you have any questions.


Stampin’ In The Meadows Online Host Club Starting in January 2020

Starting in January, I am going to start the Stampin’ In The Meadows Online Host club. Club members commit to spending $25 on supplies each month for 6 months, Each club member gets to be the host for a month during the period. See my Online Host Club page for complete details. Contact me if you have questions.


December 16 – 31 Host Code: A99JPHA3

Use this host code when you order $50+ and receive a free gift from me!  If your order is over $150, please do not use this code, but you’ll still get the free gift.  The free gift is your choice of any item valued up to $10.00 in the 2018-19 Annual Catalog or in the 2019 Occasions Catalog!  That includes some of the Host Exclusive stamp sets!

If your order is over $150, please do not use the host code since you’ll receive your own Host Dollars plus I’ll send you the free gift!  This host code can be used by anyone, no club or commitment required.  Let me know if you have any questions.


If you need any stamping supplies, I’d be very happy to be your Demonstrator.  Just click on the Shop Now button on the right side of the screen to go directly to my online store or contact me if you have any questions.  Happy Stamping!

Thanks for stopping by and have a great week!

Akiko

  • Visit my online store here
  • See the current Stampin’ Up! clearance rack specials here
  • Earn FREE Stampin’ Up! products through my Wildflower Frequent Shopper Program – my way of saying thank you to my online frequent shopper customers.
  • Have any questions? I’d be happy to help, click here to contact me.

Cardstock Cuts for this project:

  • Pool Party – 5 1/2″ x 8 1/2″ scored at 4 1/4″ (card base), 4″ x 5 1/4″ (embossed panel)
  • Whisper White – 3 3/4″ x 5″ (inside panel), 3″ x 3″ (label)
  • Vellum Card Stock – 2″ x 3 1/2″ (punched leaves)
  • Parisian Blossoms DSP – 2″ x 4 1/2″ (front panel), 5/8″ x 5″ (front strip), 1/2″ x 3 3/4″ (inside trim)

Stampin’ Up! products used in this project:


Stampin’ Up! Snow Front Autumn Cabin in the Woods Card

Good Morning! Yesterday was officially the first day of Fall, but with temperatures n the high 80’s here in Pennsylvania, it really doesn’t feel like it yet. So here’s a card to get us in the mood. It’s made with the new Stampin’ Up! Snow Front photopolymer stamp set. You can find the supplies used to create this card at the bottom of my post along with the sizes of cardstock used.

I started by running a Cajun Craze panel through the Pinewood Planks embossing folder and mounting it on a Soft Suede card base with liquid glue. I randomly stamped the large maple leaf from the Gather Together stamp set in Delicata Celestial Copper ink on a panel of Crumb Cake cardstock.

I stamped the images from the Stampin’ Up Snow Front stamp set on a panel of Whisper white as follows:

  • Mountains – Smoky Slate
  • Pine Trees – Shaded Spruce
  • Cabin and Deer – Early Espresso
  • Tree Trunks – Soft Suede
  • Leaves – Old Olive, Crushed Curry, Cajun Crazw
  • Lake – Balmy Blue
  • Grass – Old Olive

I then lightly sponged the grass in Old Olive and the sky in Seaside Spray. I gave the cabin a red tin roof using the Dark Real Red Stampin’ Blend and colored the cabin with the Light Crumb Cake Stampin’ Blend. I added a touch of Wink of Stella to the lake to make the water sparkle and wrapped a piece of copper trim around the bottom.

I stamped the sentiment from the Stampin’ Up! Gathered Together set on a strip of Old Olive cardstock using Early Espresso ink and added a copper Designer element before adhering it to the bottom of the image. I layered the Crumb Cake panel and the image and adhered them to the card with liquid glue.

I decorated the inside of the card by stamping a few maple leaves from the Gather Together stamp set in Celestial Copper ink on a panel of Whisper White. I adhered it to a Cajun Craze mat and then to the inside of the card.

The Stampin’ Up Snow Front stamp set is similar to the Waterfront stamp set for creating artistic landscape scenes. This puts me in the mood to visit the mountains and woods to see some great fall foliage. Thanks for visiting and have a great Fall day!

Akiko


This image has an empty alt attribute; its file name is 09-19_banner_dsp_us.jpg

Buy 3 Get 1 Free Designer Series Paper Sale

By popular demand, Stampin’ Up! is bringing back the Designer Series Paper Sale! During September 4–30, you can buy three packages of select Designer Series Paper, and get one FREE! See the full details on my Stampin’ Up! Promotions Page.


September 16 – 30 Host Code: EDRVYB3Z

Use this host code when you order and receive a free gift from me!  If your order is over $150, please do not use this code, but you’ll still get the free gift.  The free gift is your choice of any item valued up to $10.00 in the 2018-19 Annual Catalog or in the 2019 Occasions Catalog!  That includes some of the Host Exclusive stamp sets!


If you need any stamping supplies, I’d be very happy to be your Demonstrator.  Just click on the Shop Now button on the right side of the screen to go directly to my online store or contact me if you have any questions.  Happy Stamping!

  • Visit my online store here
  • See the current Stampin’ Up! clearance rack specials here
  • Earn FREE Stampin’ Up! products through my Wildflower Frequent Shopper Program – my way of saying thank you to my frequent shopper online customers.
  • Have any questions? I’d be happy to help, click here to contact me.

Cardstock Cuts for this project:

  • Soft Suede – 4 1/4″ x 11″
  • Cajun Craze – (2) 3 3/4″ x 5″
  • Whisper White – 3 5/8″ x 4 7/8″, 3″ x 4″
  • Crumb Cake – 3″ x 4″
  • Old Olive – 3/8″ x 3″

Stampin’ Up! products used in this project:


Stampin’ Up! Gather Together Friendship Card

Good Morning! Today’s card is another fall card using the wonderful Stampin’ Up! Gather Together photopolymer stamp set. This is an autumn friendship card with pumpkins and vellum leaves and the sweet sentiment So glad to have you in my life from the Gather Together stamp set. You can find the supplies used to create this card at the bottom of my post along with the sizes of cardstock used.

My card is entered into the challenge in Hand Stamped Sentiments Sketch Challenge #323. Check out the other entries.

I started by taking a panel of the wood background from the Come To Gather designer series paper and stamping it with the leaf branch from the Stampin’ Up! Very Versailles stamp set in Mint Macaron ink. I adhered it to an Early Espresso mat and adhered it to a Mint Macaron card base with liquid glue. I took another piece of the DSP, this time with the pumpkins, and die cut it using one of the Stitched Nested Labels dies. I die cut a piece of Whisper White and adhered it to the back to stiffen it and attached it to the card with dimensionals.

I stamped the sentiment from the Stampin’ Up! Gather Together stamp set in Mint Macaron on a strip of Whisper White and attached it to an Early Espresso Mat. I then trimmed the ends of both the banner and the mat.

I stamped the pumpkins from the Stampin’ Up! Gather Together stamp set in Pear Pizzazz on a panel of Thick Whisper White cardstock and cut it out using the coordinating dies from the Gathered Leaves die set. I also cut a set of leaves from the Frosted Frames dies from the Old Olive in the Perennial Essence vellum cardstock. I attached the pumpkins, leaves and banner to the card front with glue dots and dimensionals. I finished it off with a braided linen trim bow and three faux pearls.

I decorated the inside of the card by attaching a strip of the wood panel DSP from the Come to Gather paper pack on a panel of Whisper White and adhering it to an Early Espresso mat before attaching it to the inside of the card. I finished a matching envelope by stamping it with the Very Versailles leaf branch in Mint Macaron ink.

Do you decorate for fall? I like to plant a couple of colorful mums by my front door and get a pumpkin. Thanks for visiting!

Akiko


This image has an empty alt attribute; its file name is 09-19_banner_dsp_us.jpg

Buy 3 Get 1 Free Designer Series Paper Sale

By popular demand, Stampin’ Up! is bringing back the Designer Series Paper Sale! During September 4–30, you can buy three packages of select Designer Series Paper, and get one FREE! See the full details on my Stampin’ Up! Promotions Page.


Clearance Rack Refresh

New items have been added to the Clearance Rack in the online store! Supplies are limited, and with discounts up to 60%, products will go quickly. Shop now and stock up.


September 16 – 30 Host Code: EDRVYB3Z

Use this host code when you order and receive a free gift from me!  If your order is over $150, please do not use this code, but you’ll still get the free gift.  The free gift is your choice of any item valued up to $10.00 in the 2018-19 Annual Catalog or in the 2019 Occasions Catalog!  That includes some of the Host Exclusive stamp sets!


If you need any stamping supplies, I’d be very happy to be your Demonstrator.  Just click on the Shop Now button on the right side of the screen to go directly to my online store or contact me if you have any questions.  Happy Stamping!

  • Visit my online store here
  • See the current Stampin’ Up! clearance rack specials here
  • Earn FREE Stampin’ Up! products through my Wildflower Frequent Shopper Program – my way of saying thank you to my frequent shopper online customers.
  • Have any questions? I’d be happy to help, click here to contact me.

Cardstock Cuts for this project:

  • Mint Macaron – 5 1/2″ x 8 1/2″ card base
  • Early Espresso – (2) 3 3/4″ x 5, 3/8″ x 2 1/2″ scrap
  • Whisper White – 3 1/2″ x 4 3/4″, 2 1/2″ x 4 1/4″, 1/4″ x 2 1/2″ scrap
  • Thick Whisper White – 2″ x 3 1/2″ scrap for pumpkins
  • Gather Together DSP – 3 5/8″ x 4 7/8″ (wood grain), 2 1/2″ x 4 1/4″ (pumpkins), 1/2″ x 4 3/4″ (wood grain)

Stampin’ Up! products used in this project:


Stampin’ Up! Free as a Bird Friendship Card

Good Morning! Today I made another card using the beautiful Free as a Bird cling stamp set. This time I stamped the large bird image and colored it using Stampin’ Blends markers. You can find the supplies used to create this card at the bottom of my post along with the sizes of cardstock used.

Today’s card is entered in the Sunday Stamps Sketch Challenge SSC21o Triple the Fun where I used the trio of birds to represent the three objects in the sketch.

I stamped the large bird image from the Stampin’ Up! Free as a Bird Cling Stamp set on a piece of Whisper White cardstock using Memento Tuxedo Black ink. I colored the birds and branch using the So Saffron, Old Olive, Calypso Coral and Crumb Cake Stampin’ Blends. I used both the light and dark markers to give depth to each element. I then colored the background with the Light Pool Party Stampin’ Blends marker. I die cut the image out using the Stitched Rectangle dies first by lining it up and cutting partway through and then moving the die so that the stitches aligned and cutting partway through from the opposite direction. This way the image is shorter than the original die. This allowed me to crop out the fourth bird so that the picture echoed the card sketch.

I matted the image on a piece of Old Olive cardstock with multipurpose glue. I stamped the We’re the best of friends sentiment on a Piece of Calypso Coral cardstock in Memento Tuxedo Black ink and used the scallop edge die from the Budding Blooms die set to trim the bottom. I mounted the bird image on the top. I cut a piece of the multicolored floral paper from the Bird Ballad Designer Series Paper or DSP and mounted it on an Old Olive mat. I used the retired Old Olive linen thread to wrap the DSP and tie a bow. I attached the paper to a So Saffron Card base with dimensionals and then added the bird image with dimensionals and glue dots. I finished it off with three white sequins.

I decorated the inside of the card by adding a strip of the Bird Ballad DSP to a Whisper White panel and attaching that to an Old Olive mat before attaching it to the inside of the card.

My two sisters are visiting this week and they helped me with this card. I think it describes us perfectly – three sisters that are the best of friends! Thanks for visiting!

Akiko


We’re in the redemption period of Bonus Days! Don’t forget to redeem those $5 coupons that you earned for purchases in July. See the full details on the Stampin’ Up! Promotions Page.


August 1 – 15 Host Code: WG237RFK

Use this host code when you order and receive a free gift from me!  If your order is over $150, please do not use this code, but you’ll still get the free gift.  The free gift is your choice of any item valued up to $10.00 in the 2018-19 Annual Catalog or in the 2019 Occasions Catalog!  That includes some of the Host Exclusive stamp sets!


If you need any stamping supplies, I’d be very happy to be your Demonstrator.  Just click on the Shop Now button on the right side of the screen to go directly to my online store or contact me if you have any questions.  Happy Stamping!

  • Visit my online store here
  • See the current Stampin’ Up! clearance rack specials here
  • Earn FREE Stampin’ Up! products through my Wildflower Frequent Shopper Program – my way of saying thank you to my frequent shopper online customers.
  • Have any questions? I’d be happy to help, click here to contact me.

Cardstock Cuts for this project:

  • So Saffron – 5 1/2″ x 8 1/2″
  • Whisper White – 3 5/8″ x 4 7/8″, 2 1/2″ x 3 1/2″
  • Old Olive – 3 3/4″ x 5″, 2 3/8″ x 5 1/2″, 2 3/4″ x 1 7/8″
  • Calypso Coral – 2 3/4″ x 2 3/4″
  • Bird Ballad DSP – 2 1/4″ x 5 1/2″, 1/2″ x 3 5/8″

Stampin’ Up! products used in this project: