Stampin’ Up! Earthen Textures Card with Video Tutorial

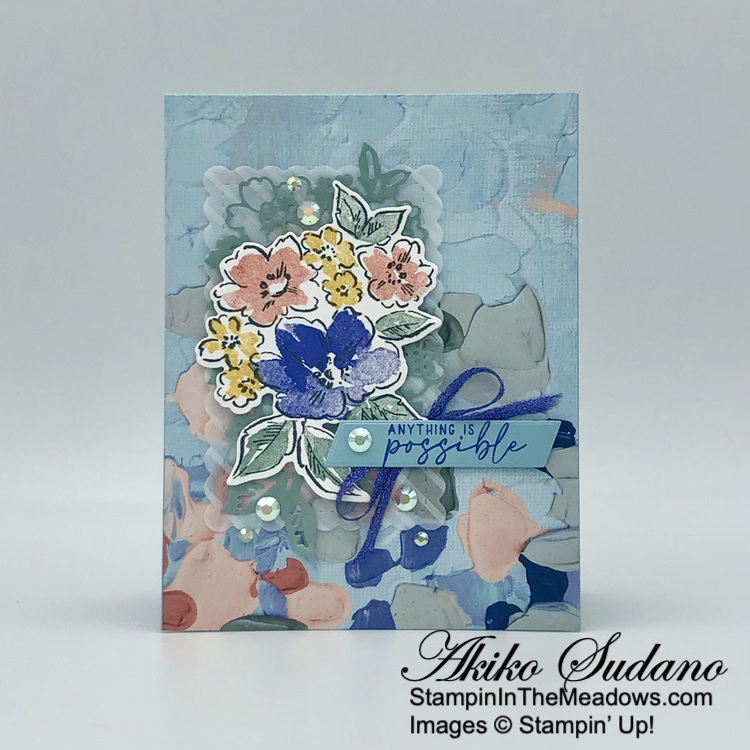
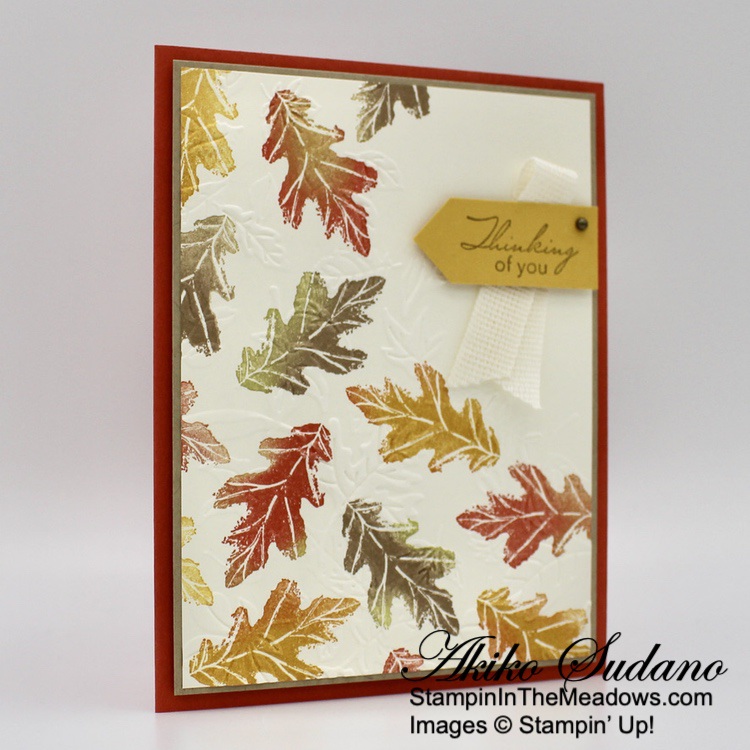
Good Morning! I hope you are having a wonderful Memorial Day Weekend. I used the wonderful new Stampin’ Up! Earthen Textures bundle with the beautiful Earthen Elegance designer series paper for my Facebook Live yesterday afternoon. These are new products with the rustic feel of handmade pottery. You can find the supplies I used at the bottom of my post along with the sizes of cardstock used.

You can watch my FB Live video on my Facebook page HERE. I also posted the video to my YouTube Channel and you can view it HERE.

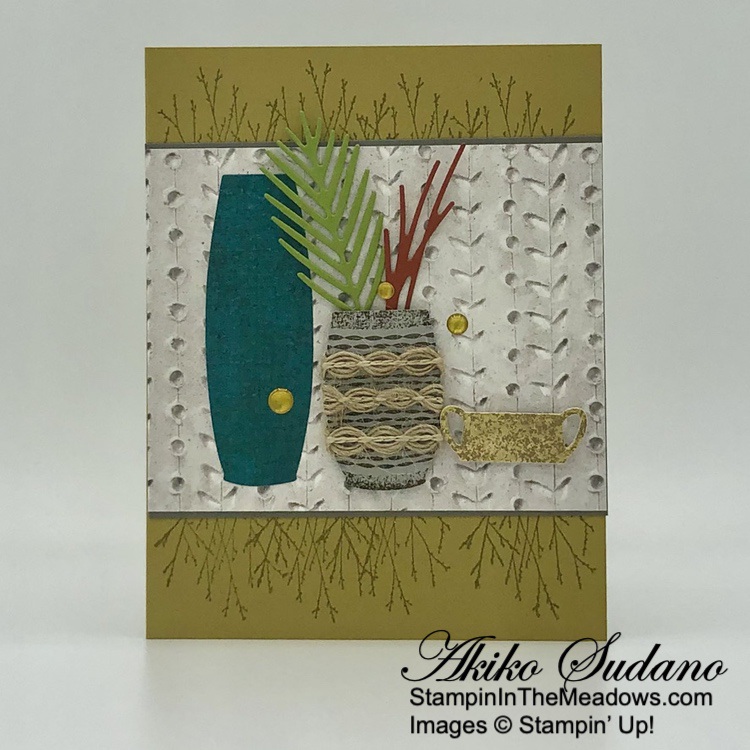
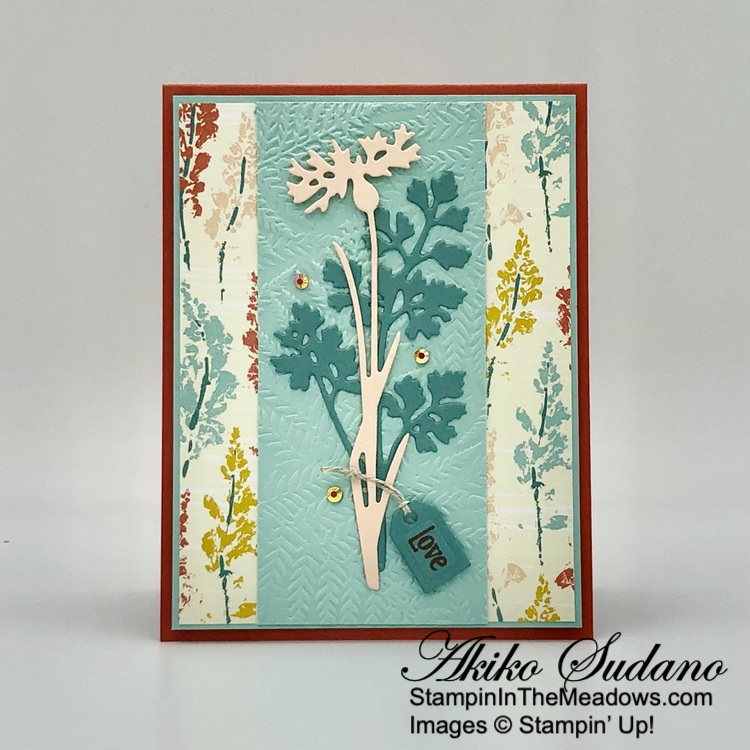
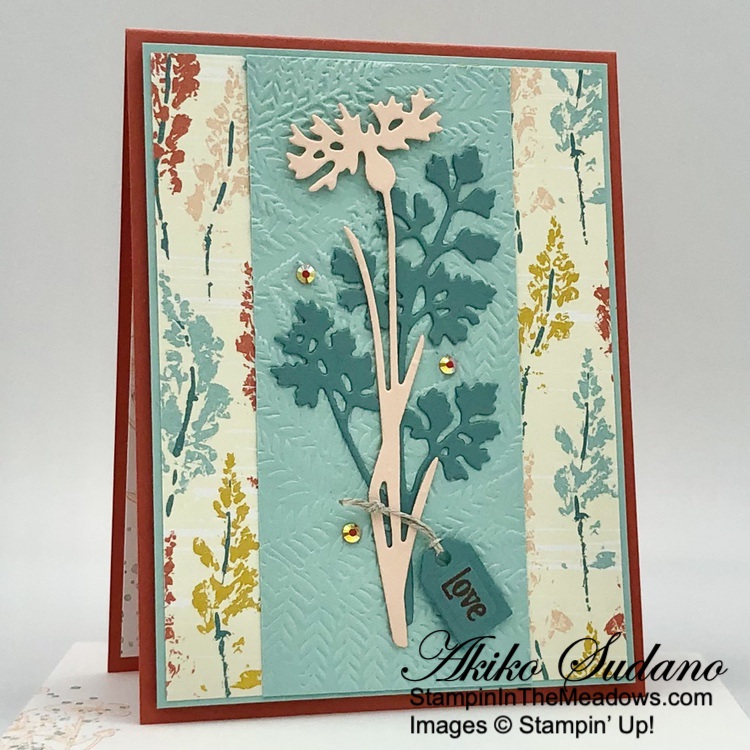
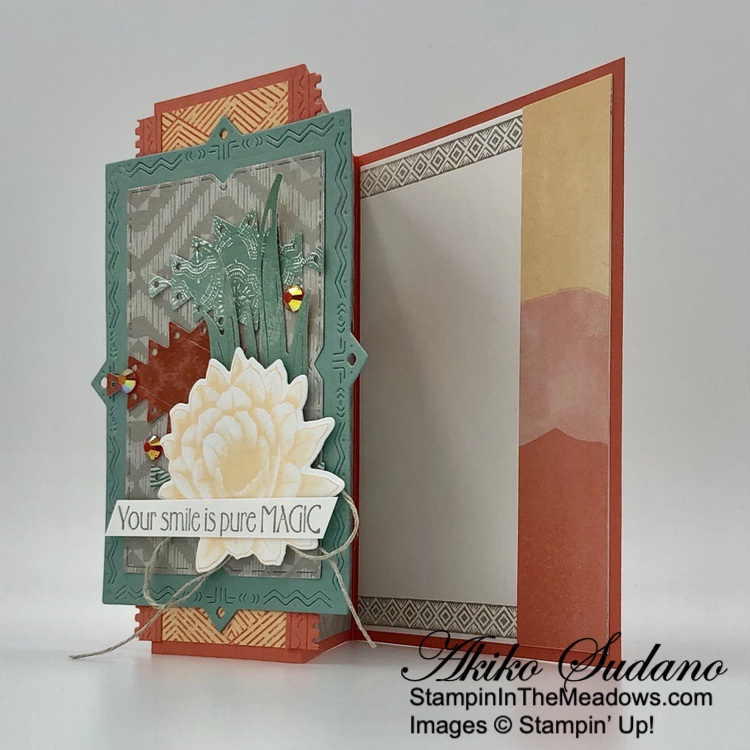
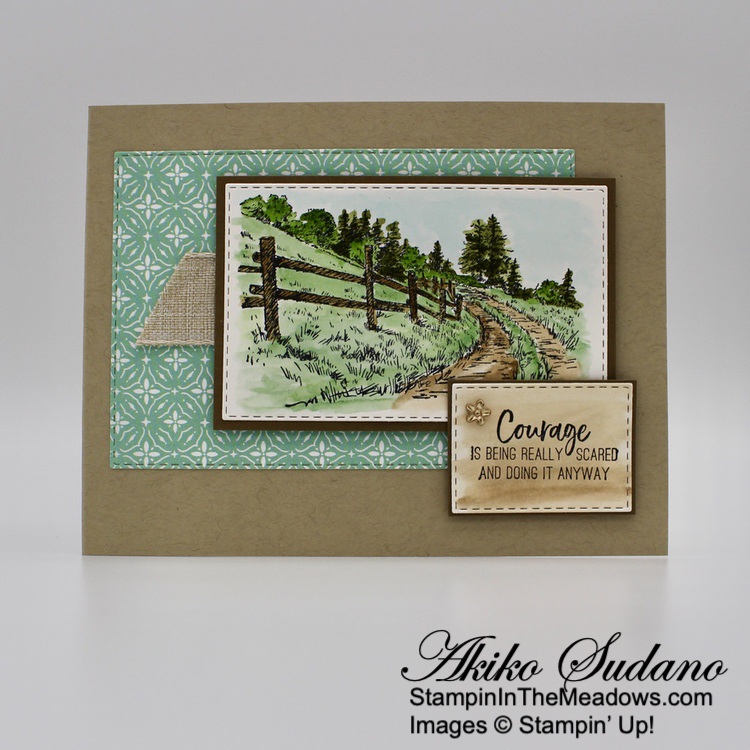
I stamped the thin branch stamp from the Stampin’ Up! Earthen Textures cling stamp set using Wild Wheat ink several times across the top and bottom of the front of a Wild Wheat card base. I adhered a panel of Earthen Elegance designer series paper to a Pebbled Path mat and adhered it to the card front with liquid glue.

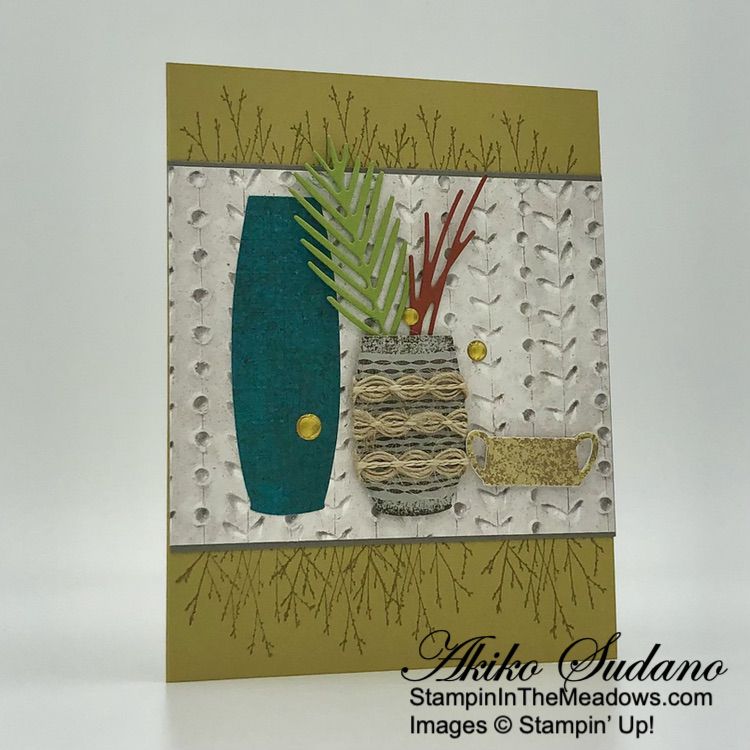
I cut a Pretty Peacock panel of Earthen Elegance DSP with the tall vase die from the Stampin’ Up! Earthen Textures dies and adhered it to the card with liquid glue. I cut the palm branch from Old Olive card stock and the sticks from Cajun Craze and adhered them to the card front with glue dots.

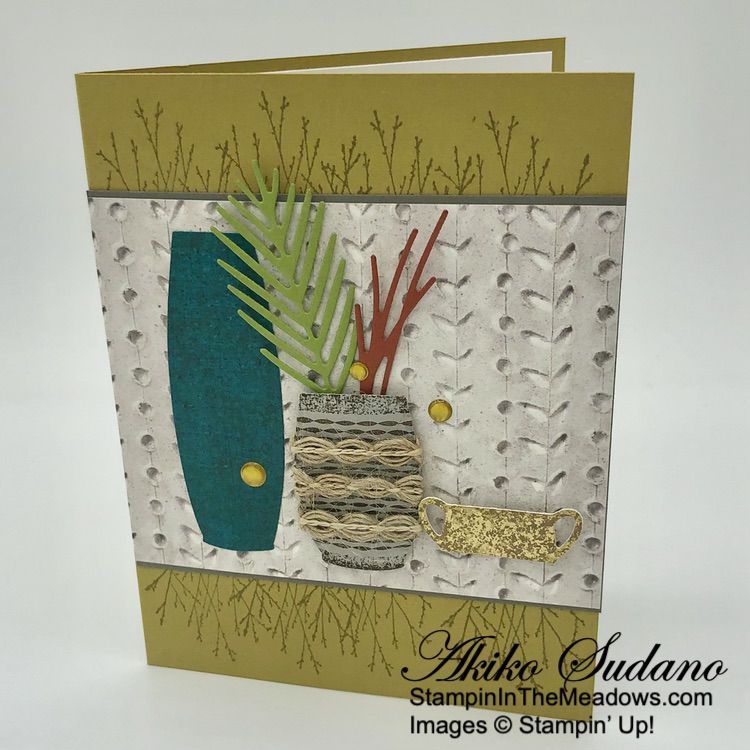
I stamped the medium pot from the Stampin’ Up! Earthen Textures stamp set in Early Espresso ink on Gray Granite card stock. I cut it out with the coordinating die and wrapped three short lengths of Natural wavy trim around it, securing it in the back with Stampin’ Seal. I covered it with scotch tape to keep it in place and popped it on the card with dimensionals. I cut the short pot from distressed gold paper and backed it with a white die cut and adhered it to the card with dimensionals. I finished the card front with three Wild Wheat dots.

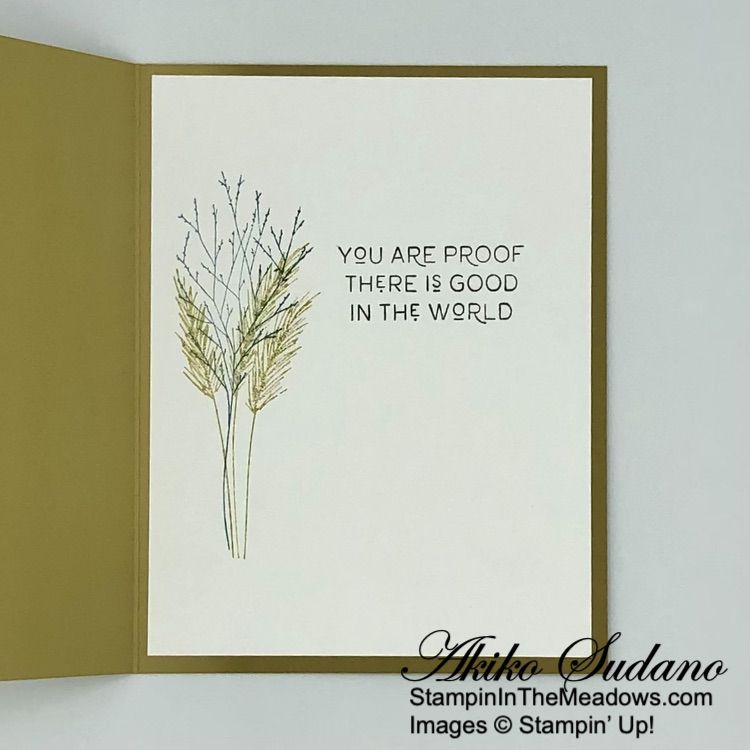
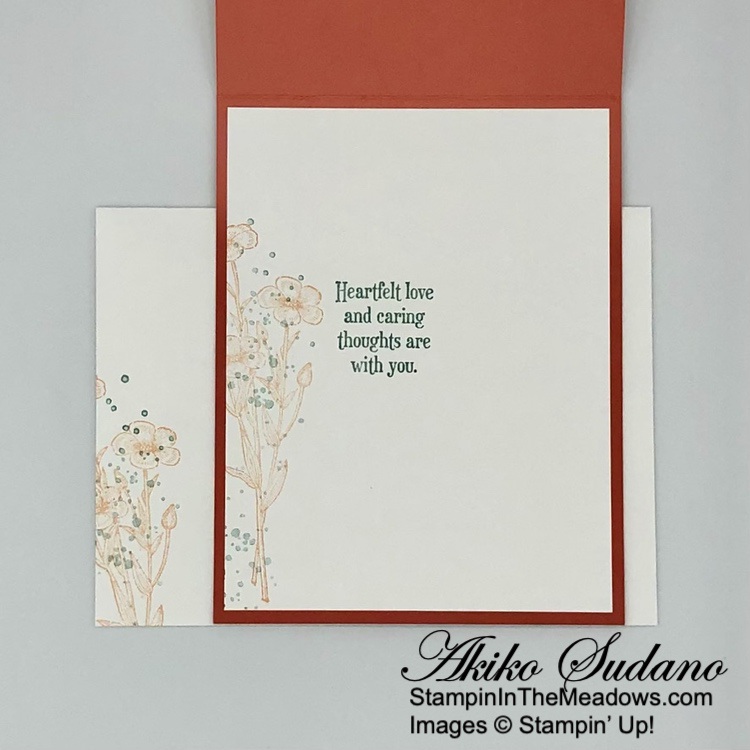
For the inside of the card, I stamped the thin branch from the Stampin’ Up! Earthen Textures stamp set in stamped off Pretty Peacock ink on Basic White. I stamped the wheat in stamped off Wild Wheat ink over it and stamped the sentiment in Early Espresso. I adhered the panel to the inside of the card with Stampin’ Seal.

I love the natural textures and handmade feel of the stamps and dies in the Stampin’ Up! Earthen Textures bundle and the Earthen Elegance DSP. The pots or vases are wonderful stamped or just cut from pretty designer series paper, and the sentiments are sweet and done in a wonderful font.


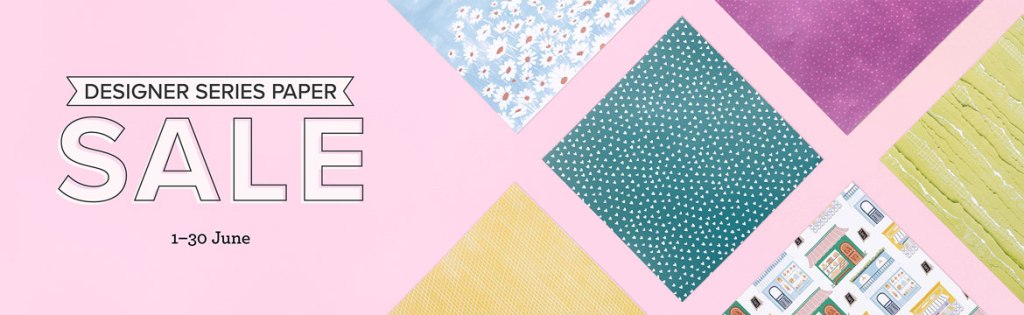
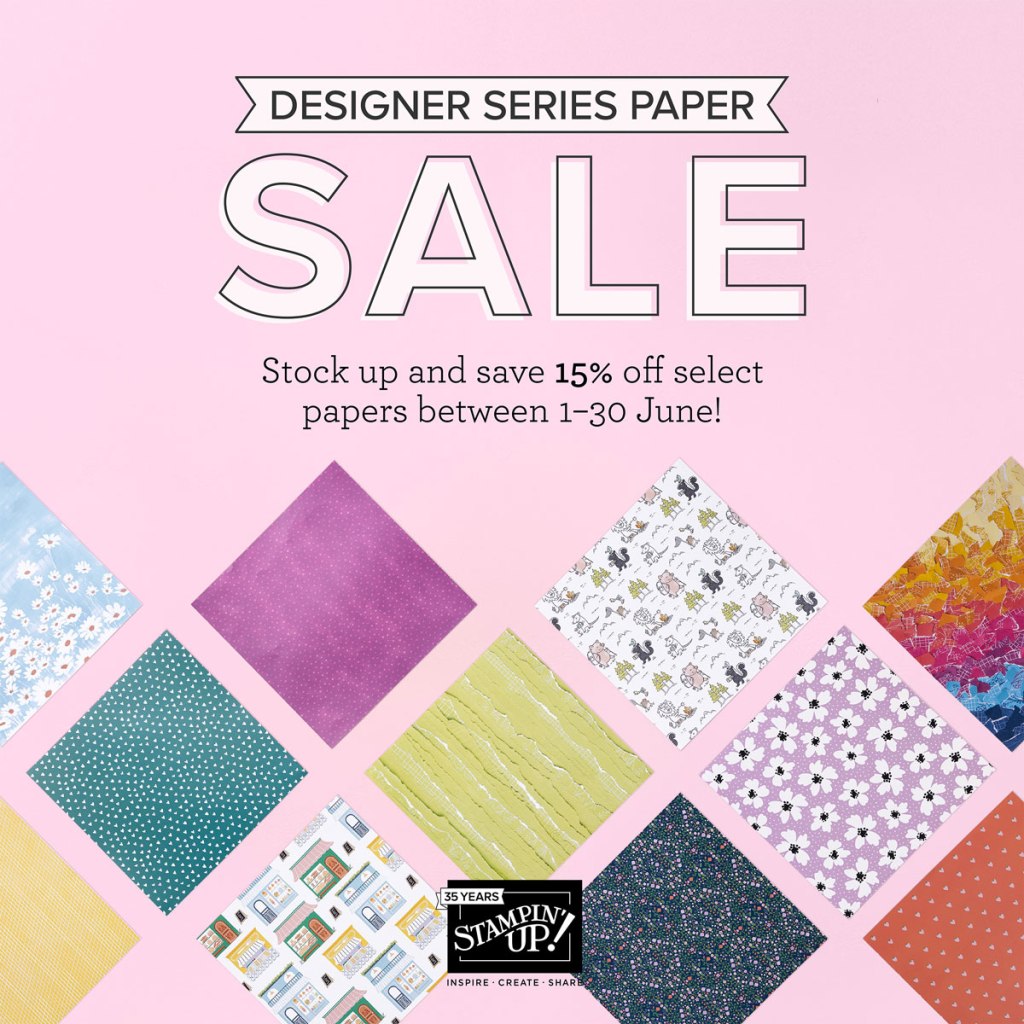
Coming Soon – SAVE 15% ON SELECT DESIGNER SERIES PAPERS!

We all love beautiful Designer Series Paper, and in June, you can enjoy a 15% discount on select Designer Series Papers from our new 2023–2024 Annual Catalog and Online Exclusives. Whether you’re a scrapbooker, a card maker or simply a paper lover, this is a great time to stock up and save on gorgeous paper so you have artistic and versatile paper designs on hand for your next projects!

Here are the Details:

  • Sales Period: June 1, 2021 – June 30, 2023
  • All order types qualify for this promotion. 
  • There is no limit to how many packages of Designer Series Paper may be purchased during this promotion.
  • Only select Designer Series Papers are available at a 15% discount during this promotion.
  • Orders must be placed—and closed—during the promotion period for the 15% discount to apply.
  • Designer Series Paper ordered as part of a Starter Kit or with Stampin’ Rewards qualify for the 15% discount.
  • Designer Series Papers are from the new 2023–2024 Annual Catalog (p. 129–132) and Online Exclusives

Click on the image below to download a PDF with the list of designer series papers that are on sale and their sale prices:


Current Host Code: TUMGKET9

Use this host code when you order $50 or more and receive a Thank You gift from me!  The free gift is your choice of any item VALUED UP TO $10 from the 2023-2024 Annual Catalog!

If your order is over $150, please do not use the host code since you’ll receive your own Host Dollars plus I’ll still send you the Thank You gift!  This host code can be used by anyone, no club or commitment required. Let me know if you have any questions.


If you need any stamping supplies, I’d be very happy to be your Demonstrator.  Just click on the Shop Now button on the right side of the screen to go directly to my online store or contact me if you have any questions.  Happy Stamping!

Thanks for stopping by and have a great week!

Akiko

  • Visit my online store here
  • See the current Stampin’ Up! clearance rack specials here
  • Earn FREE Stampin’ Up! products through my Wildflower Frequent Shopper Program – my way of saying thank you to my online frequent shopper customers.
  • Have any questions? I’d be happy to help, click here to contact me.

Cardstock Cuts for this project:

  • Wild Wheat – 5-1/2″ x 8-1/2″ card base scored at 4-1/4″
  • Pebbled Path – 3-1/2″ x 4-1/4″ (front mat)
  • Gray Granite – 1-3/4″ x 2-1/2″ (medium vase)
  • Cajun Craze – 1″ x 2″ (die cut sticks)
  • Old Olive – 1-1/2″ x 2-1/2″ (die cut palm leaf)
  • Distressed Gold – 3/4″ x 1-1/2″ (die cut small vase)
  • Basic White – 4″ x 5-1/4″ (inside panel), 3/4″ x 1-1/2″ (die cut small vase backing)
  • Earthen Elegance DSP – 3-3/8″ x 4-1/4″ (front background), 1-1/2″ x 2-1/2″ (die cut tall vase)

Stampin’ Up! products used in this project:


Stampin’ Up! Quiet Meadow Love Card

Good Morning! The Stampin’ Up! Quiet Meadow cling stamp set and Meadows dies are favorites with sweet sentiments, pretty flowers and gorgeous floral dies. I paired the stamps and dies with the new Inked Botanicals 6″ x 6″ designer series paper for a fresh take on these favorites. You can find the supplies I used at the bottom of my post along with the sizes of cardstock used.

I embossed a Pool Party panel with the Fern 3D embossing folder and adhered it to the front of a panel of Inked Botanicals 6″ x 6″ designer series paper. I adhered the panel to a Pool Party mat and popped it on the front of a Calypso Coral card base.

I used the fern die from the Meadows dies to cut a Lost Lagoon panel and I used the flower die to cut a Petal Pink panel. I adhered the die cut fern to the card with dots of liquid glue. I stamped the sentiment from the Stampin’ Up! Quiet Meadow stamp set in Copper Clay ink on Lost Lagoon card stock and cut it out with the little tag die.

I looped a length of Linen Thread through the tag and tied it to the die cut flower stem. I adhered the flower to the card with glue dots on the stem and dimensionals on the flower. I secured the little tag with a dimensional and finished the card front with Pastel Iridescent Rhinestones.

For the inside of the card, I stamped the flower from the Stampin’ Up! Quiet Meadow stamp set in Petal Pink ink on the side of a Basic White panel. I inked the spatter stamp with Lost Lagoon ink and stamped off twice before stamping over the flower. I stamped the sentiment in Lost Lagoon and adhered the panel to the inside of the card with Stampin’ Seal.

The wildflowers in the Inked Botanicals 6″ x 6″ designer series paper go great with the die cut flowers from the Meadows dies and I love it when new products go so well with old favorites! I also stamped the side of a Basic White with the Stampin’ Up! Quiet Meadow flowers to match the inside of the card.


SAVE 15% ON SELECT DESIGNER SERIES PAPERS!

We all love beautiful Designer Series Paper, and in June, you can enjoy a 15% discount on select Designer Series Papers from our new 2023–2024 Annual Catalog and Online Exclusives. Whether you’re a scrapbooker, a card maker or simply a paper lover, this is a great time to stock up and save on gorgeous paper so you have artistic and versatile paper designs on hand for your next projects!

Here are the Details:

  • Sales Period: June 1, 2021 – June 30, 2023
  • All order types qualify for this promotion. 
  • There is no limit to how many packages of Designer Series Paper may be purchased during this promotion.
  • Only select Designer Series Papers are available at a 15% discount during this promotion.
  • Orders must be placed—and closed—during the promotion period for the 15% discount to apply.
  • Designer Series Paper ordered as part of a Starter Kit or with Stampin’ Rewards qualify for the 15% discount.
  • Designer Series Papers are from the new 2023–2024 Annual Catalog (p. 129–132) and Online Exclusives

Click on the image below to download a PDF with the list of designer series papers that are on sale and their sale prices:


Current Host Code: TUMGKET9

Use this host code when you order $50 or more and receive a Thank You gift from me!  The free gift is your choice of any currently available item valued up to $10.00.

If your order is over $150, please do not use the host code since you’ll receive your own Host Dollars plus I’ll still send you the Thank You gift!  This host code can be used by anyone, no club or commitment required. Let me know if you have any questions.


If you need any stamping supplies, I’d be very happy to be your Demonstrator.  Just click on the Shop Now button on the right side of the screen to go directly to my online store or contact me if you have any questions.  Happy Stamping!

Thanks for stopping by and have a great week!

Akiko

  • Visit my online store here
  • See the current Stampin’ Up! clearance rack specials here
  • Earn FREE Stampin’ Up! products through my Wildflower Frequent Shopper Program – my way of saying thank you to my online frequent shopper customers.
  • Have any questions? I’d be happy to help, click here to contact me.

Cardstock Cuts for this project:

  • Calypso Coral – 4-1/4″ x 11″ card base scored at 5-1/2″
  • Pool Party – 4″ x 5-1/4″ (front mat), 2-1/4″ x 5-1/8″ (embossed panel)
  • Lost Lagoon – 2-1/4″ x 4-1/4″ (die cut fern), 1″ x 1-1/2″ (die cut tag)
  • Petal Pink – 1-1/2″ x 4-3/4″ (die cut flower)
  • Basic White – 4″ x 5-1/4″ (inside panel),
  • Inked Botanicals 6″ x 6″ DSP – 3-7/8″ x 5-1/8″ (front background)

Stampin’ Up! products used in this project:


Stampin’ Up! Legendary Ride Card and Video Tutorial

Good Morning! The Stampin’ Up! Legendary Ride bundle and the coordinating Ready to Ride specialty designer series paper are the best motorcycle themed stamping products ever! The bundle has cool stamped motorcycles and sentiments and the dies make a cool dimensional motorcycle. The DSP has wonderful backgrounds that are perfect for travel or masculine cards (and designs for the ladies that ride). I made this card during my Facebook Live yesterday and you can find the supplies I used at the bottom of my post along with the sizes of cardstock used.

You can watch my FB Live video on my Facebook page HERE. I also posted the video to my YouTube Channel and you can view it HERE.

I adhered a panel of tire track Ready To Ride designer series paper to a panel of diners DSP and adhered them to the front of a Basic Black card base with liquid glue. I cut the Stampin’ Up! Legendary Ride motorcycle dies from brushed silver foil, Basic Gray and Basic Black, making sure to apply adhesive sheets to the thin top layer die cuts before cutting. I also rolled it back and forth a couple of times to make sure the die cut through the adhesive sheet.

Here are the motorcycle die cuts showing the cardstock colors and dies:

I assembled the motorcycle by adhering the die cuts to the Basic Gray motorcycle base. I adhered the Basic Black engine first, and then the silver wheel spokes. I adhered a Basic Black tire to each wheel. I adhered the large intricate silver die cut, lining up the handle and wheel axels. I finished by adhering the seat and adding a silver dot to each wheel and a diamond to the tank. I adhered the motorcycle to the card with dimensionals.

I stamped the sentiment from the Stampin’ Up! Legendary Ride cling stamp set in Memento Tuxedo Black ink on Very Vanilla. I cut it out with the small label die from the Painted Labels dies and adhered it to the card with glue dots. I finished with adhesive backed studs.

For the inside of the card, I stamped the small motorcycle from the Stampin’ Up! Legendary Ride stamp set in Memento Tuxedo Black ink on the bottom of a Very Vanilla Panel. I stamped the sentiment and the landscaping and trimmed the bottom with a strip of Ready to Ride specialty DSP. I adhered the panel to the inside of the card with Stampin’ Seal. As a bonus, I adhered a diner DSP panel to the opposite side to carry through theme from the card front!

I’m so glad that the Stampin’ Up! Legendary Ride stamp set and dies are carrying over into the new 2023-2024 Annual Catalog! Unfortunately, it will no longer be available as a bundle with the 10% discount and the Ready to Ride specialty designer series paper is retiring. So now is a great time to pick up these items and save too!


New 2023-2024 Annual Catalog Coming Soon!

The new Stampin’ Up! 2023-2024 Annual Catalog will debut on May 2, 2023! The Demonstrator pre-order is happening now, so there will be sneak peeks of wonderful new products and colors! I have sent out catalogs to my current customers. If you would like a copy, simply place an order and I will be happy to send you one, too!!

Get the complete details on the new 2023-2025 In Colors and the Color Refresh on my Stampin’ Up! Promotions Page.


Last Chance Products Sale Going On Now!

This Last Chance Products promotion includes two lists of products that will no longer be available once the catalogs retire on May 1, 2023. There will be one for the 2022-2023 Annual Catalog and one for the January-April 2023 Mini Catalog. For these retiring catalogs, you can find carryover products in the upcoming 2023-2024 Annual Catalog.

Items on the retiring list are only available while supplies last, so order soon to make sure that you are able to get the items that you are wanting! Some of the items will have sale prices listed with discounts up to 60% off.

Several wonderful retiring items have already sold out!

The last day to order from these catalogs will be May 1, 2023.

Click HERE to download a PDF of the Retiring Last Chance Products from the 2022-2023 Annual Catalog.

Click HERE to download a PDF of the Retiring Last Chance Products from the January-April 2023 Mini Catalog.


Current Host Code: 6EDCPU4T

Use this host code when you order $50 or more and receive a Thank You gift from me!  The free gift is your choice of any item valued up to $10.00 currently available!

If your order is over $150, please do not use the host code since you’ll receive your own Host Dollars plus I’ll still send you the Thank You gift!  This host code can be used by anyone, no club or commitment required. Let me know if you have any questions.


If you need any stamping supplies, I’d be very happy to be your Demonstrator.  Just click on the Shop Now button on the right side of the screen to go directly to my online store or contact me if you have any questions.  Happy Stamping!

Thanks for stopping by and have a great week!

Akiko

  • Visit my online store here
  • See the current Stampin’ Up! clearance rack specials here
  • Earn FREE Stampin’ Up! products through my Wildflower Frequent Shopper Program – my way of saying thank you to my online frequent shopper customers.
  • Have any questions? I’d be happy to help, click here to contact me.

Cardstock Cuts for this project:

  • Basic Black – 4-1/4″ x 11″ card base scored at 5-1/2″, 1-3/4″ x 3-3/4″ (motorcycle die cuts)
  • Basic Gray – 2″ x 4-1/4″ (motorcycle die cuts)
  • Silver Foil – 1-1/2″ x 6″ (motorcycle die cuts)
  • Very Vanilla – 4″ x 5-1/4″ (inside panel), 1-3/4″ x 3″ (label)
  • Ready To Ride specialty DSP – 4″ x 5-1/4″ (front background), 1-3/4″ x 4″ (front bottom panel), 1/2″ x 4″ (inside trim)

Stampin’ Up! products used in this project:


Stampin’ Up! Desert Details for the Happy Inkin’ Thursday Blog Hop

Good Morning and welcome to the Happy Inkin’ Thursday Blog Hop! The Stampin’ Up! Desert Details bundle is a pretty South West themed stamp set with pretty Photopolymer stamps and dies and wonderful sentiments. II used it to make a friendship/encouragement Z-Fold card for today’s hop. You can find the supplies I used along with card stock cuts at the bottom of my post.

We have a sketch challenge this week:

I adhered panels of Delicate Desert designer series paper to the left side of the Calypso Coral card base and the front and back sides of the middle section. I used the the long embossed Stampin’ Up! Desert Details die to cut two strips of Calypso Coral and adhered the pretty die cuts to each side of the left section with liquid glue.

I cut a panel of Soft Succulent with the large Stampin’ Up! Desert Details large rectangle die and cut a panel of Delicate Desert DSP with the small one. I adhered the DSP rectangle to the card stock rectangle with liquid glue. I used the diamond die to cut four diamonds and adhered three to the large rectangle and one to the inside of the center section of the card base. I used the Agave die to cut another panel of Soft Succulent Delicate Desert DSP, keeping the centers of the leaves. I adhered the leaves to the rectangle with glue dots.

I stamped the large flower from the Stampin’ Up! Desert Details cling stamp set inPale Papaya ink on Basic White and cut it out with the coordinating die. I used the light Pale Papaya Stampin’ Blend to accent the shadows of the petals and adhered the flower to the large rectangle die cut with dimensionals. I tied a linen thread Bow and tucked it under the flower with a glue dot. I adhered the large die cut rectangle to the left panel of the card base with liquid glue.

I stamped the sentiment from the Stampin’ Up! Desert Details stamp set in Gray Granite ink on Basic White. I trimmed the sentiment with my trimmer, close to the sentiment and sniped diagonal ends. I adhered the label to the card front with dimensionals and glue dots and finished the front with Pastel Iridescent gems.

For the inside of the card, I stamped the bottom and top of a Basic White panel with the long diamond stamp from the Stampin’ Up! Desert Details stamp set in Gray Granite ink. I adhered the last panel of Delicate Desert DSP to the right side and adhered the panel to the right section of the card base with Stampin’ Seal.

The pretty Stampin’ Up! Desert Details bundle is retiring at beginning of next month along with the Delicate Desert DSP. The pretty designs on the DSP I used remind me of beautiful South West sunsets. the embossed designs on the die cuts have a unique Native American feel that is beautiful and magic!

On with the Hop! Click on the Next Blog button to move forward to see the beautiful project Karen Ksenzakovic has created.

If you get lost along the way, here are the participants for the hop:


Current Host Code: 6EDCPU4T

Use this host code when you order $50 or more and receive a free gift from me!  The free gift is your choice of any currently available item valued up to $10.

If your order is over $150, please do not use the host code since you’ll receive your own Host Dollars plus I’ll still send you the free gift!  This host code can be used by anyone, no club or commitment required. Let me know if you have any questions.


If you need any stamping supplies, I’d be very happy to be your Demonstrator.  Just click on the Shop Now button on the right side of the screen to go directly to my online store or contact me if you have any questions. 

Thanks for stopping by and Happy Stamping!

Akiko

  • Visit my online store here
  • See the current Stampin’ Up! clearance rack specials here
  • Earn FREE Stampin’ Up! products through my Wildflower Frequent Shopper Program – my way of saying thank you to my online frequent shopper customers.
  • Have any questions? I’d be happy to help, click here to contact me.

Cardstock Cuts for this project:

  • Calypso Coral – 5-1/2″ x 9-3/8″ card base scored at 2″(mountain) and 5-1/8″ (valley), 1-1/4″ x 5-1/4″ (debossed strip die cuts)
  • Soft Succulent – 4″ x 5-1/4″ (large rectangle die cut)
  • Basic White – 4″ x 5-1/4″ (inside panel), 2-1/2″ x 3″ (die cut flower), 1/2″ x 3-1/2″ (label)
  • Delicate Desert DSP – 1-3/4″ x 5-1/4″ (left section panel), two 2-7/8″ x 5-1/4″ panels (front and back of middle section), 1-1/4″ x 5-1/4″ (right panel inside trim), 3″ x 4-1/4″ (small die cut rectangle), 1-3/4″ x 3″ (leaves), four 1-1/2″ x 4″ panels (die cut diamonds)

Stampin’ Up! products used in this project:


Stampin’ Up! Zany Zoo Sneak Peek and Video Tutorial

Good Morning! The Stampin’ Up! Zany Zoo bundle and the coordinating Zoo Crew designer series paper are new items that are coming in the new 2023-2024 Annual Catalog that goes live on May 2, 2023. The Zoo Crew Suite is such a fun critter themed set that covers all kinds of activities and is perfect for fun, light hearted cards for everyone. I made this card during my Facebook Live yesterday and you can find the currently available supplies I used at the bottom of my post along with the sizes of cardstock used.

You can watch my FB Live video on my Facebook page HERE. I also posted the video to my YouTube Channel and you can view it HERE.

I adhered a panel of Zoo Crew designer series paper to the front of a Lost Lagoon card base with liquid glue. I stamped strips of Crumb Cake, Flirty Flamingo, Lost Lagoon and Lemon Lime Twist with different stitches from the Stitches cling stamp set (retired) in Versamark ink and sprinkled it with white embossing powder. I shook off the excess and heated the powder with my heat tool until it was bright and shiny. I adhered the strips to the card front with liquid glue.

I used the third largest scalloped rectangle die from the Scalloped Contours dies to cut a panel of Petal Pink. I used the alpaca from the Stampin’ Up! Zany Zoo dies to cut an alpaca from the Zoo Crew DSP and cut another one from Basic White. I adhered the two die cuts together with liquid glue and adhered the layered die cut to Petal Pink scalloped rectangle with dimensionals. I used the dies to cut a little table from Crumb Cake, a vase from Pool Party and a set flowers from So Saffron. I adhered the table, vase and flowers to the scalloped rectangle with glue dots and adhered the rectangle to the card front with dimensionals.

I stamped the sentiment from the Stampin’ Up! Zany Zoo cling stamp set in Memento Tuxedo Black ink on Lemon Lime Twist. I cut it out with the circle die from the Radiating Stitches die and adhered it to the card with glue dots and dimensionals. I finished with a black gingham bow and Parakeet Party dots.

For the inside of the card, I stamped the stitches in Flirty Flamingo, Crumb Cake, Lost Lagoon and Lemon Lime Twist on the bottom of a Basic White panel. I adhered the panel to the inside of the card with Stampin’ Seal.

It was refreshing to stamp with the new colors, but I also felt sentimental and had to pull in some retiring favorites. I’ve loved the Stitches stamp set since it first came out, but it was when I saw the knitting alpaca from the Stampin’ Up! Zany Zoo bundle that I found the perfect way to use it. The new bundle, DSP and colors will be available on May 2, 2023. It will be here before you know it!

Here’s my card with the Stampin’ Up! Zany Zoo cling stamp set and Zany Zoo dies:

Here’s a picture of the Zoo Crew designer series paper pack. The coordinating colors are Petal Pink, Pumpkin Pie Lemon Lime Twist, Pool Party Crumb Cake and Basic Black.

The new 2023-2024 Annual Catalog will open for orders on May 2, 2023!


New 2023-2024 Annual Catalog Coming Soon!

The new Stampin’ Up! 2023-2024 Annual Catalog will debut on May 2, 2023! The Demonstrator pre-order will occur during April, so there will be sneak peeks of wonderful new products and colors! I received catalogs for my current customers and will be sending them out early next week.  If you would like a copy of the new Stampin’ Up! 2023-2024 Annual Catalog, simply place an order and I will be happy to send you one, too!

Get the complete details on the new 2023-2025 In Colors and the Color Refresh on my Stampin’ Up! Promotions Page.


Last Chance Products Sale Going On Now!

This Last Chance Products promotion includes two lists of products that will no longer be available once the catalogs retire on May 1, 2023. There will be one for the 2022-2023 Annual Catalog and one for the January-April 2023 Mini Catalog. For these retiring catalogs, you can find carryover products in the upcoming 2023-2024 Annual Catalog.

Several wonderful retiring items have already sold out!

A few things to know about the retiring lists and the Last Chance products:

  • Items on the retiring list are only available while supplies last, so order soon to make sure that you are able to get the items that you are wanting!
  • The 2021-2023 In Color items, ink pads, refills, Stampin’ Blends and cardstock are usually some of the first items to sell out.
  • There will be retiring colors as part of the Color Refresh, and these items will likely sell out early as well!
  • Some of the items have sale prices listed with discounts up to 60% off!
  • The last day to order from these catalogs will be May 1, 2023.

Note that while some of the bundles are on the retiring list, the individual stamps and dies/punched may be carried over. Also, if one of the items in a retiring bundle is deeply discounted, the total price may be less than the bundled price, so pull out your calculators to double check.

Click HERE to download a PDF of the Retiring Last Chance Products from the 2022-2023 Annual Catalog.

Click HERE to download a PDF of the Retiring Last Chance Products from the January-April 2023 Mini Catalog.

Shop early to get the items you want before they’re gone for good!


Last Day to Sign Up for the April Paper Pumpkin Kit!

Good things take time, but you can start creating them now with the All the Little Things Paper Pumpkin kit! This kit includes nine cards, three each of three designs, with elegant designs and bright colors. The iridescent foil is the shining detail to bring your crafts together. You can make a card for anyone and for any occasion! 

And don’t wait, because anyone who subscribes to this month’s kit will get a FREE box organizer! This organizer fits perfectly inside your Paper Pumpkin box and is great for keeping your supplies from past kits organized, so you know right where everything is!

The April Kit Includes:

  • All the supplies you need to create 9 cards: 3 each of 3 designs and coordinating envelopes. 
    • Finished card size: 5-1/2″ x 4-1/4″
  • 1 photopolymer stamp set with celebratory sentiments.
  • 1 Shaded Spruce Stampin’ Spot.
  • Precut cherry blossom paper pieces with iridescent foil. 
  • Unique embellishments and twine.
  • Adhesives to complete the projects. 
  • FREE box organizer

Coordinating Colors: Balmy Blue, Basic Black, Calypso Coral, Granny Apple Green, Petal Pink, Poppy Parade, Shaded Spruce

If you’re interested in subscribing to Paper Pumpkin, you can either sign up for a subscription where you are billed monthly for your kit or you can purchase a prepaid subscription in my Online Store. To see more information and to sign up for the monthly subscription click here. To see the options for prepaid subscriptions in my Online Store, click here.

Sign up deadline for the April 2023 kit is April 10, 2023. Note: Supplies may be limited toward the end of the subscription period.


Current Host Code: 6EDCPU4T

Use this host code when you order $50 or more and receive a Thank You gift from me!  The free gift is your choice of any item valued up to $10.00 currently available!

If your order is over $150, please do not use the host code since you’ll receive your own Host Dollars plus I’ll still send you the Thank You gift!  This host code can be used by anyone, no club or commitment required. Let me know if you have any questions.


If you need any stamping supplies, I’d be very happy to be your Demonstrator.  Just click on the Shop Now button on the right side of the screen to go directly to my online store or contact me if you have any questions.  Happy Stamping!

Thanks for stopping by and have a great week!

Akiko

  • Visit my online store here
  • See the current Stampin’ Up! clearance rack specials here
  • Earn FREE Stampin’ Up! products through my Wildflower Frequent Shopper Program – my way of saying thank you to my online frequent shopper customers.
  • Have any questions? I’d be happy to help, click here to contact me.

Cardstock Cuts for this project:

  • Lost Lagoon – 4-1/4″ x 11″ card base scored at 5-1/2″, 5/8″ x 3-3/4″ (embossed strip)
  • Petal Pink – 3″ x 4-1/4″ (scalloped rectangle)
  • Crumb Cake – 1/2″ x 3-1/2″ (embossed strip), 1″ x 1″ (die cut table)
  • Pool Party – 1″ x 1″ (die cut vase)
  • Flirty Flamingo – 1/2″ x 3-3/4″ (embossed strip)
  • So Saffron – 1″ x 1″ (die cut flowers)
  • Lemon Lime Twist – 2″ x 2″ (label), 5/8″ x 3-1/2″ (embossed strip)
  • Basic White – 4″ x 5-1/4″ (inside panel), 1-3/4″ x 3-1/4″ (die cut alpaca backing)
  • Zoo Crew DSP – 4″ x 5-1/4″ (front background), alpaca die cut

Stampin’ Up! products used in this project:


Stampin’ Up! Hand Penned Petals for the Happy Inkin’ Thursday Blog Hop

Good Morning and welcome to the Happy Inkin’ Thursday Blog Hop! The Stampin’ Up! Hand Penned Petals photopolymer stamp set and the coordinating Penned Flowers dies have some pretty two step stamping images with wonderful sentiments and coordinating dies. This has been a favorite for it’s casual style so I used it for today’s card. You can find the supplies I used along with card stock cuts at the bottom of my post.

We have a color challenge this week:

I adhered a panel of Fancy Flora 6″ x 6″ designer series paper to the front of a Balmy Blue card base with liquid glue. I cut a diagonal striped vellum panel with the 3rd largest Scalloped Contours dies and adhered it to the card with Stampin’ Seal. I cut two of the large bouquet dies from the Penned Flowers dies from Brushed Soft Succulent paper and adhered them on the vellum with glue dots.

I stamped the large bouquet from the Stampin’ Up! Hand Penned Flowers stamp set in Memento Tuxedo Black ink on Basic White. I used the filler stamps to color the flowers in Orchid Oasis, stamped off Calypso Coral and Daffodil Delight and the leaves in Soft Succulent. I cut the flowers out with the coordinating die and adhered it to the card with dimensionals.

I stamped the sentiment from the Stampin’ Up! Hand Penned Petals stamp set in Orchid Oasis Ink on Balmy Blue. I cut the label out with the slant label die from the Something Fancy dies. I used Orchid Oasis metallic ribbon to make a loopy bow and adhered it with a glue dot and adhered the label over the bow and flowers with glue dots and dimensionals. I finished the front with Iridescent gems.

For the inside of the card, I stamped the flowers in the upper corner of a Basic White panel using the same colors as the front. I trimmed the bottom of the panel with Fancy Flora 6″ x 6″ DSP and adhered the panel to the inside of the card with Stampin’ Seal.

The pretty Stampin’ Up! Hand Penned Petals stamp set is on the retirement list along with the Penned Flowers dies and the Fancy Flora 6″ x 6″ DSP. It’s sad to see these retiring – they have inspired so many pretty projects!

On with the Hop! Click on the Next Blog button to move forward to see the beautiful project Karen Ksenzakovic has created.

If you get lost along the way, here are the participants for the hop:


Current Host Code: XPRMTP4D

Use this host code when you order $50 or more and receive a free gift from me!  The free gift is your choice of any item valued up to $10 in the 2022-2023 Annual Catalog or the January-April 2023 Mini Catalog!

If your order is over $150, please do not use the host code since you’ll receive your own Host Dollars plus I’ll still send you the free gift!  This host code can be used by anyone, no club or commitment required. Let me know if you have any questions.


If you need any stamping supplies, I’d be very happy to be your Demonstrator.  Just click on the Shop Now button on the right side of the screen to go directly to my online store or contact me if you have any questions. 

Thanks for stopping by and Happy Stamping!

Akiko

  • Visit my online store here
  • See the current Stampin’ Up! clearance rack specials here
  • Earn FREE Stampin’ Up! products through my Wildflower Frequent Shopper Program – my way of saying thank you to my online frequent shopper customers.
  • Have any questions? I’d be happy to help, click here to contact me.

Cardstock Cuts for this project:

  • Balmy Blue – 4-1/4″ x 11″ card base scored at 5-1/2″, 3/4″ x 3″ (label)
  • Vellum Basics – 2-3/4″ x 4″ (scalloped rectangle)
  • Soft Succulent Brushstroke specialty – 2-1/2″ x 6″ (two die cut florals)
  • Basic White – 4″ x 5-1/4″ (inside panel), 3″ x 3-1/2″ (die cut flowers)
  • Fancy Flora 6″ x 6″ DSP – 4-1/4″ x 5-1/2″ (front background), 1/2″ x 4″ (inside trim)

Stampin’ Up! products used in this project:


Stampin’ Up! Two-Tone Flora You Matter Card

Good Morning! The Stampin’ Up! Two-Tone Flora bundle is a beautiful two step stamping floral bundle with coordinating dies. Today, I used it to make a soft pink rose to pair with the pretty Sale-A-Bration Dainty Flowers designer series paper. You can find the supplies I used at the bottom of my post along with the sizes of cardstock used.

I adhered a Night of Navy geometric panel of Dainty Flowers DSP to a floral Dainty Flowers panel with liquid glue and adhered it to a Blushing Bride mat. I adhered the layered panel to the front of a Night of Navy Card base with dimensionals. I stamped the sentiment from the Something Fancy stamp set in Orchid Oasis ink on a Basic White panel and cut it out with the small rectangle label die for the Something Fancy dies. I adhered the label to the card with liquid glue.

I stamped the large flower from the Stampin’ Up! Two-Tone Flora photopolymer stamp set in Blushing Bride ink on Basic White. I stamped the detailed image in full strength ink and the filler stamp in stamped off ink. I used the same technique to stamp the small flower cluster in Orchid Oasis ink annd stamped the leaf spray in Mossy Meadow ink. I cut them out with the coordinating dies.

I adhered the leaf spray to the card with liquid glue and adhered the two floral die cuts with dimensionals. I made a triple bow with Starry Sky bakers twine and tucked it under the flowers, adhering it with a glue dot. I finished the card with Milky dots, using yellow ones for the flower centers and pink ones around the card.

For the inside of the card, I stamped the leaf spray from the Stampin’ Up! Two-Tone Flora stamp set in Mossy Meadow ink in the corner of a Basic White panel. I stamped the sentiment from the Something Fancy stamp set in Orchid Oasis ink and trimmed the bottom with a strip of the Sale-A-Bration Dainty Flowers DSP. I adhered the panel to the inside of the card with Stamping’ Seal.

The Stampin’ Up! Two-Tone Flora bundle is one of many pretty floral sets in the current mini catalog. And it goes great with the beautiful Dainty Flowers Sale-A-Bration designer series paper. But this paper will only be available while supplies last during Sale-A-Bration, so be sure to get yours while it’s available. Sale-A-Bration ends on February 28 – less than two weeks away!


Sale-A-Bration Ending Soon!

Sale-A-Bration is Stampin’ Up!’s best promotion of the year with specials for shopping, hosting and joining! It will run through February 28, 2023Thats less than two weeks away!

There’s still lots of wonderful free items that you can choose with your $50 or $100 in purchases (before shipping and taxes) and Sale-A-Bration has the best Joining bonuses.

Click HERE to download a Sale-A-Bration brochure to get all the details.

Click HERE to download the additional Sale-A-Bration items flyer.

Click HERE to see the Sale-A-Bration items in my Online Store.

Click HERE to start shopping in my Online Store.


Stampin’ Up! Online Exclusives Begin March 1!

An exciting new Stampin’ Up! shopping experience is beginning on March 1, 2023 – the Stampin’ Up! Online Exclusives. You won’t find these products in any catalog, which means fresh products, more often, to spark your creativity and expand your crafting collection and all from the convenience of the Online Store. And there’s no end date for the sales period! Some products will be reordered when inventory is low, and others will only be available while supplies last. This way Stampin’ Up! can offer even more new products throughout the year and respond more quickly to relevant trends and your needs. New products mean new inspiration and new ways to express your creativity! So be sure to check my Online Store on March 1 to shop these new products.


Current Host Code: Y7X69NCW

Use this host code when you order $50 or more and receive a Thank You gift from me!  The free gift is your choice of any item valued up to $10.00 in the 2022-2023 Annual Catalog or the January-April 2023 Mini Catalog!

If your order is over $150, please do not use the host code since you’ll receive your own Host Dollars plus I’ll still send you the Thank You gift!  This host code can be used by anyone, no club or commitment required. Let me know if you have any questions.


If you need any stamping supplies, I’d be very happy to be your Demonstrator.  Just click on the Shop Now button on the right side of the screen to go directly to my online store or contact me if you have any questions.  Happy Stamping!

Thanks for stopping by and have a great week!

Akiko

  • Visit my online store here
  • See the current Stampin’ Up! clearance rack specials here
  • Earn FREE Stampin’ Up! products through my Wildflower Frequent Shopper Program – my way of saying thank you to my online frequent shopper customers.
  • Have any questions? I’d be happy to help, click here to contact me.

Cardstock Cuts for this project:

  • Night of Navy – 4-1/4″ x 11″ card base scored at 5-1/2″
  • Blushing Bride – 4″ x 5-1/4″ (front mat)
  • Basic White – 4″ x 5-1/4″ (inside panel), 3″ x 5-1/2″ (die cut flowers and label)
  • Dainty Flowers DSP – 3-7/8″ x 5-1/8″ (front background), 3″ x 3-7/8″ (front stripe), 1/2″ x 4″ (inside trim), 2-1/2″ x 6″ (envelope flap cover)

Stampin’ Up! products used in this project:


Stampin’ Up! In The Country Sneak Peek

Good Morning! The upcoming January-April 2023 Mini Catalog will be available on January 5, 2023. On the same date, Sale-A-Bration 2023 will be open. I have sneak peek of two stamp sets from the upcoming Sale-A-Bration brochure that I used on today’s card. They are the Stampin’ Up! In The Country cling stamp set and the Sending Support cling stamp set. You can find the currently available supplies I used at the bottom of my post along with the sizes of cardstock used.

I used a watercolor technique today with water painters and ink pads on Shimmery White card stock to color the pretty country path in the Stampin’ Up! In The Country stamp set. I stamped the image using Black Stazon Ink on Shimmery White card stock. I colored the sky Balmy Blue and the fields in light Garden Green and dark Mint Macaron. The Trees are done in dark Mossy Meadow and dark Garden Green and the path in Crumb Cake. I used dark Soft Suede on the fence. I am not a painter, so don’t be too critical. I kept my water painter just moist enough to spread the color and quickly dry and I like the way it came out!

I cut a panel of Design A Daydream designer series paper with the 3rd largest Stitched Rectangle die and adhered it to the front of a Crumb Cake card base. I adhered a strip of natural ribbon to the card with Stampin’ Seal on top of the DSP. I cut the country path with the 5th largest Stitched Rectangle die and adhered it to a Soft Suede mat with liquid glue. I adhered the layered panel to the card front with dimensionals.

I stamped the sentiment from the upcoming Sale-A-Bration stamp set, Sending Support, in Black Stazon ink on Shimmery White. I used a water painter to apply a Crumb Cake wash over the sentiment and cut it out with the small Stitched Rectangle die. I adhered it to the card front with glue dots and dimensionals and finished it with a champagne flower trinket.

For the inside of the card, I stamped the sentiment from the Sending Support stamp set in Mossy Meadow ink in the lower corner of a Basic White panel. I adhered a strip of Design a Daydream DSP to the side of the panel and adhered the panel to the inside of the card.

This little scene reminds me of a hillside farm close to my house with a post and rail fence along the road. I imagine that 100 years ago, the paved road looked like this. I love the way the country path curves so you can’t see around the bend and the little courage sentiment was fitting for this scene. Here are the two Sale-A-Bration stamp sets with today’s card.

Here is the Stampin’ Up! In The Country stamp set. It has two pretty scenic images that are perfect for experimenting with different coloring techniques.

Here is the Sending Support stamp set. It has lots of uplifting sentiments for expressing encouragement and support for friends and loved ones.

Both of these pretty stamp sets will be available on January 5, 2023 as part of the Sale-A-Bration promotion. They will both be FREE with a $50 order before shipping and taxes. They are just a few new items to look forward to after the holidays!


The July–December 2022 Mini Catalog will be retiring soon! It’s always bittersweet to see a classic Stampin’ Up! catalog take a trip to retirement. But, we’re looking forward to all the new products on their way—and we hope you are, too!

Stock up on your favorite products before they’re gone for good! Save up to 60% on essential craft supplies. What are you waiting for? Start shopping! After all, this selection of Last Chance Products is only available while supplies last and some favorites are already sold out!

The Last Chance Promotion discounts will start on December 1, 2022. Note that while some of the bundles are on the retiring list, the individual stamps and dies/punched may be carried over. These items are marked with three asterisks on the retiring lists. Also, if one of the items in the bundle is deeply discounted, the total price may be less than the bundled price, so pull out your calculators to double check.

Click HERE to download an Excel Spreadsheet of the Retiring Last Chance Items.

Click HERE to download a PDF of the Retiring Last Chance Items.

Click HERE to download a PDF of the Carryover List of items.

Shop early to get the items you want before they’re gone for good! Click HERE to shop in my Online Store 24×7!


The Fitting Florets Collection is Now Available!

Add just the right touch of elegance to any occasion, including Christmas and seasonal celebrations, with the sweet Fitting Florets Collection. From color schemes to sentiments and embellishments to dies, these unique products blend together so that your cards and crafts fit whatever occasion you might need. Send birthday wishes, express your gratitude, or spread Christmas cheer—with so many options to mix and match you’ll be set no matter the celebration all year!

The beautiful Framed Florets bundle is an early release from the upcoming January-June 2023 Mini catalog. The Framed & Festive cling stamp set, Fitting Florets designer series paper and gold adhesive backed swirls are only available during this promotion. Click on the picture below to download a flyer with the details.

Watch this video that showcases the new and exclusive products from the Fitting Florets Collection:

The Fitting Florets collection is available now to Stampin’ Up! Demonstrators. And if you decide to join Stampin’ Up! this month, you can add items from this collection to your Starter Kit! Contact me if you have any questions.


Current Host Code: F7CW3QU3

Use this host code when you order $50 or more and receive a free gift from me!  The free gift is your choice of any item currently available valued up to $10.00 from the July-December 2022 Mini Catalog or the 2022-2023 Annual Catalog!

If your order is over $150, please do not use the host code since you’ll receive your own Host Dollars plus I’ll still send you the free gift!  This host code can be used by anyone, no club or commitment required. Let me know if you have any questions.


If you need any stamping supplies, I’d be very happy to be your Demonstrator.  Just click on the Shop Now button on the right side of the screen to go directly to my online store or contact me if you have any questions.  Happy Stamping!

Thanks for stopping by and have a great week!

Akiko

  • Visit my online store here
  • See the current Stampin’ Up! clearance rack specials here
  • Earn FREE Stampin’ Up! products through my Wildflower Frequent Shopper Program – my way of saying thank you to my online frequent shopper customers.
  • Have any questions? I’d be happy to help, click here to contact me.

Cardstock Cuts for this project:

  • Crumb Cake – 4-1/4″ x 11″ card base scored at 5-1/2″
  • Shimmery White – 2-3/4″ x 4″ (country path scene), 1-1/2″ x 2-1/4″ (label)
  • Soft Suede – 1-1/4″ x 1-3/4″ (label mat), 3-3/8″ x 3-3/4″ (country path mat)
  • Basic White – 4″ x 5-1/4″ (inside panel)
  • Design A Daydream DSP – 3-1/2″ x 5″ (front background), 1″ x 4″ (inside trim)

Stampin’ Up! products used in this project:


Stampin’ Up! Hello Harvest Thinking of You Card

Good Morning! We returned to PA last week, just in time for the Fall Foliage to peak, so I was inspired to use the Stampin’ Up! Hello Harvest stamp set to capture the beauty. I finally finished my card and used the pretty sentiments from the Very Best Occasion cling stamp set with it. You can find the supplies I used at the bottom of my post along with the sizes of cardstock used.

I stamped the oak leaf from the Stampin’ Up! Hello Harvest stamp set several times on a Very Vanilla panel. I used a technique where I inked the stamp in one color and used a sponge dauber to apply a second color to parts of the leaf before stamping the image on the card stock. I used Crumb Cake with Parakeet Party, Calypso Coral with Parakeet Party and Crushed Curry with Calypso Coral. I cleaned the stamp after each leaf and rubbed out the excess color from my sponge daubers to keep my ink pad colors from mixing.

I embossed the stamped panel with the Leaf Fall 3D embossing folder and adhered the panel to a Crumb Cake mat. I adhered the layered panel to the front of a Calypso Coral card base with dimensionals.

I stamped the sentiment from the Very Best Occasions stamp set in Crumb Cake ink on a Crushed Curry strip and trimmed the end with my paper snips. I folded a length of natural ribbon, secured the middle with a glue dot and adhered it to the card front with Stampin’ Seal. I adhered the label over the ribbon with dimensionals and finished it with a rustic metallic dot.

For the inside of the card, I stamped the sentiment from the Very Best Occasions stamp set in Crumb Cake ink on a Very Vanilla panel. I inked up the leaf from the Stampin’ Up! Hello Harvest stamp set in Crushed Curry and Calypso coral and stamped it next to the sentiment. I adhered the panel to the inside of the card with Stampin’ Seal.

We had beautiful Fall Foliage this week, but after Halloween, half of the trees are bare – the peak passed so fast! Falling leaves are so peaceful, and these sentiments are so pretty, making a nice fall friendship card, encouragement card or even a get well card.


The Fitting Florets Collection is Now Available!

Add just the right touch of elegance to any occasion, including Christmas and seasonal celebrations, with the sweet Fitting Florets Collection. From color schemes to sentiments and embellishments to dies, these unique products blend together so that your cards and crafts fit whatever occasion you might need. Send birthday wishes, express your gratitude, or spread Christmas cheer—with so many options to mix and match you’ll be set no matter the celebration all year!

The beautiful Framed Florets bundle is an early release from the upcoming January-June 2023 Mini catalog. The Framed & Festive cling stamp set, Fitting Florets designer series paper and gold adhesive backed swirls are only available during this promotion. Click on the picture below to download a flyer with the details.

Watch this video that showcases the new and exclusive products from the Fitting Florets Collection:

The Fitting Florets collection is available now to Stampin’ Up! Demonstrators. And if you decide to join Stampin’ Up! this month, you can add items from this collection to your Starter Kit! Contact me if you have any questions.


Current Host Code: F7CW3QU3

Use this host code when you order $50 or more and receive a free gift from me!  The free gift is your choice of any item currently available valued up to $10.00 from the July-December 2022 Mini Catalog or the 2022-2023 Annual Catalog!

If your order is over $150, please do not use the host code since you’ll receive your own Host Dollars plus I’ll still send you the free gift!  This host code can be used by anyone, no club or commitment required. Let me know if you have any questions.


If you need any stamping supplies, I’d be very happy to be your Demonstrator.  Just click on the Shop Now button on the right side of the screen to go directly to my online store or contact me if you have any questions.  Happy Stamping!

Thanks for stopping by and have a great week!

Akiko

  • Visit my online store here
  • See the current Stampin’ Up! clearance rack specials here
  • Earn FREE Stampin’ Up! products through my Wildflower Frequent Shopper Program – my way of saying thank you to my online frequent shopper customers.
  • Have any questions? I’d be happy to help, click here to contact me.

Cardstock Cuts for this project:

  • Calypso Coral – 5-1/2″ x 8-1/2″ card base scored at 4-1/4″
  • Crumb Cake – 4″ x 5-1/4″ (front mat)
  • Crushed Curry – 3/4″ x 2-1/4″ (label
  • Very Vanilla – 3-7/8″ x 5-1/8″ (stamped front background), 4″ x 5-1/4″ (inside panel),

Stampin’ Up! products used in this project:


Stampin’ Up! Simply Fabulous Card

Good Morning! The Stampin’ Up! Simply Fabulous photopolymer stamp set is just that – fabulous! It has the most wonderful sentiments that are so cheerful along with a bunch of solid graphic floral images. Remember the Lovely You stamp set (another of my favorites)? Well these solid florals would go nicely with those, especially because these are larger in scale. You can find the supplies I used at the bottom of my post along with the sizes of cardstock used.

I stamped one of the large daisy like flowers from the Stampin’ Up! Simply Fabulous stamp set in Crushed Curry ink in the corners of a Crushed Curry card base. I stamped the flowers and leaves in a line across a Basic White panel. I turned the panel upside down and stamped the flowers and stems again, overlapping in the area under the label.

I stamped the round leaves in Garden Green, the large flowers in Calypso Coral, the flower sprigs in Mossy Meadow and Crushed Curry and the small flowers in Real Red. I stamped the sentiment from the Stampin’ Up! Simply Fabulous stamp set in Real Red on a Basic White strip.

I adhered the label to an Old Olive mat and adhered it to the stamped flowers and leaves panel, covering the overlapping stamped area. I adhered the panel to another Old Olive mat and popped it on the card base with dimensionals. I finished the card front with rhinestones.

For the inside of the card, I stamped the large flowers from the Stampin’ Up! Simply Fabulous stamp set in the corners of the inside panel of the card base, mimicking the front of the card. I stamped the flowers and greenery in the corner of a Basic White panel, using the same color combination as the front of the card and adhered the panel to the inside of the card.

This is a simple simple card with lots of colorful stamping, but the wonderful sentiment from the Stampin’ Up! Simply Fabulous stamp set makes it so happy and cheerful. The stamps can be used in so many ways and the sentiments are already one of my favorites!


Sale-A-Bration is Going on Now and New Items have been added!

Sale-A-Bration is going strong and some of the items have already sold out! But there’s good news – additional items have been added to the list of things you can get for FREE with at least a $50 order!

With Sale-A-Bration going on through August 31, and the new Mini Catalog, now is a great time to stock up on supplies for Holiday card making and gifts. For every $50 or $100 in orders (before shipping and taxes) you get to choose a free item from nine available stamp sets, dies and papers. And there are extra bonuses for Hosting and Joining Too. Click HERE to download the Sale-A-Bration brochure to learn more. Please note that Sale-A-Bration items are only available while supplies last, so shop early to get the bonus item you really want!

Click HERE to download the flyer with the details on the additional items that have been added.


Save The Date!!

World Cardmaking Day is October 1 and we’re planning to spend the day making cards!

Inkin’ Krew World Card Making Day Event – 9 AM ET Until 9 PM ET, Saturday, October 1!

We’re doing it again!!  Our team will be hosting a fun all-day event on Saturday, October 1 for World Card Making Day!  Our event will feature card making presentations live on the event Facebook page as well as some fun giveaways!

Stampin’ Up! is also hosting an event online (see the details below) and we’re scheduling our event so that it runs before and after the Stampin’ Up! event!  Most of us will be using one of the three bundles from the Stampin’ Up! event for our projects so you will come away from the day with tons of ideas for those three bundles!

All are welcome to join us!  We’ll be setting up a Facebook page to host the event and we’ll be sharing the link to the page in late September. No registration required for our group, just request to join the Facebook page when you see it in late September!  Can’t wait to stamp with you all then!!

Stampin’ Up! Free Virtual Craft Along Event

Stampin’ Up! is also hosting a free, virtual card making event on October 1!  In just under three hours, Stampin’ Up will make three unique cards and will share the instructions with you.  Everyone is invited and welcome, and registration is not required.

Stampin’ Up! Event Details:

Who: Anyone!
When: October 1 from 2:00–5:00 p.m. (MT)
Where: Online
Price of Event: Free
Registration Dates*: Now – October 1 (Registration is not required)

*You can still participate in the event without registering. Registration is encouraged because it’s the best way to stay up to date regarding event details.

Click HERE to register for the Stampin’ Up! 3 Hour Event.

Everyone is invited and welcome to attend this FREE event!  There will be three cardmaking presentations and you are welcome craft along.  If you don’t want to craft along, join us anyway!  It’s the perfect opportunity to hang out, watch, and be a part of the Stampin’ Up! experience.

World Card Making Day is all about making beautiful, heartfelt cards. During the event, Stampin’ Up! will walk you through several projects, and you can create the cards along with the presenters.  You’ll end up with new project ideas and some stunning new cards!

To make the most of this experience, you can order the Cottage Rose Bundle from the 2022–2023 Annual Catalog, the Cottage Wreaths Bundle from the July–December 2022 Mini Catalog, or the Warm Welcome Bundle which you can get early from the January–June 2023 Mini Catalog beginning September 1!!  The bundles aren’t required to attend the event, but if you’d like to make the projects presented, you’ll want to get the bundles!

Click HERE to download a brochure with ordering details.

As an added bonus, when you order any of the three bundles used for the event, you’ll get a FREE gift of Iridescent Pearl Basic Jewels! (Note that even if you order all three bundles, you’ll only receive one Iridescent Pearls gift.)

Let me know if you have any questions.


Current Host Code: 3XYTPTZC

Use this host code when you order $50 or more and receive a free gift from me!  The free gift is your choice of any item currently available valued up to $10.00 from the July-December 2022 Mini Catalog or the 2022-2023 Annual Catalog!

If your order is over $150, please do not use the host code since you’ll receive your own Host Dollars plus I’ll still send you the free gift!  This host code can be used by anyone, no club or commitment required. Let me know if you have any questions.


If you need any stamping supplies, I’d be very happy to be your Demonstrator.  Just click on the Shop Now button on the right side of the screen to go directly to my online store or contact me if you have any questions.  Happy Stamping!

Thanks for stopping by and have a great week!

Akiko

  • Visit my online store here
  • See the current Stampin’ Up! clearance rack specials here
  • Earn FREE Stampin’ Up! products through my Wildflower Frequent Shopper Program – my way of saying thank you to my online frequent shopper customers.
  • Have any questions? I’d be happy to help, click here to contact me.

Cardstock Cuts for this project:

  • Crushed Curry – 5-1/2″ x 8-1/2″ card base scored at 4-1/4″
  • Old Olive – 3-1/4″ x 4-1/2″ (front mat), 1″ x 4-3/8″ (label mat)
  • Basic White – 3-3/4” x 5” (inside panel), 3-1/8″ x 4-3/8″ (front panel), 7/8″ x 3-1/8″ (label)

Stampin’ Up! products used in this project: