Stampinโ€™ Up! Your Biggest Fan Birthday Card

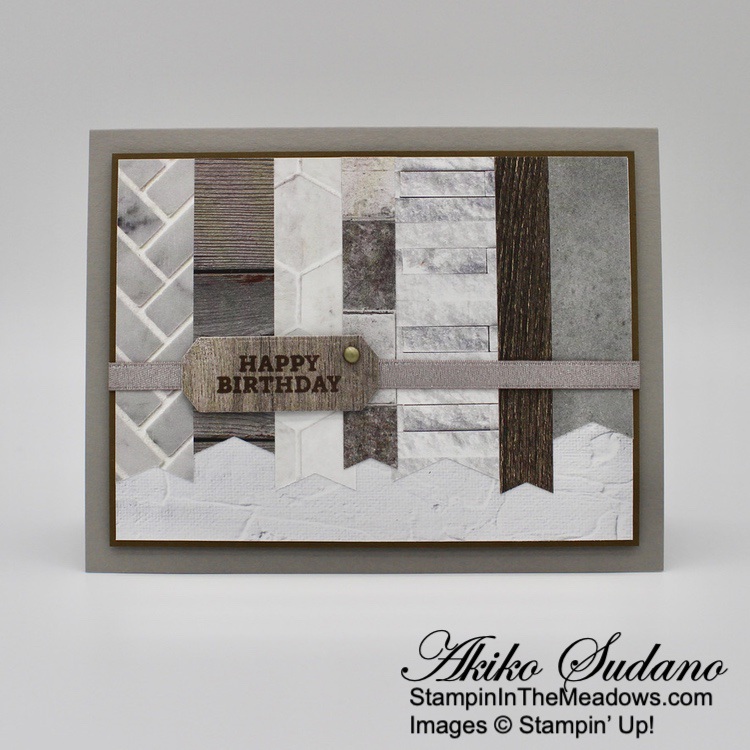
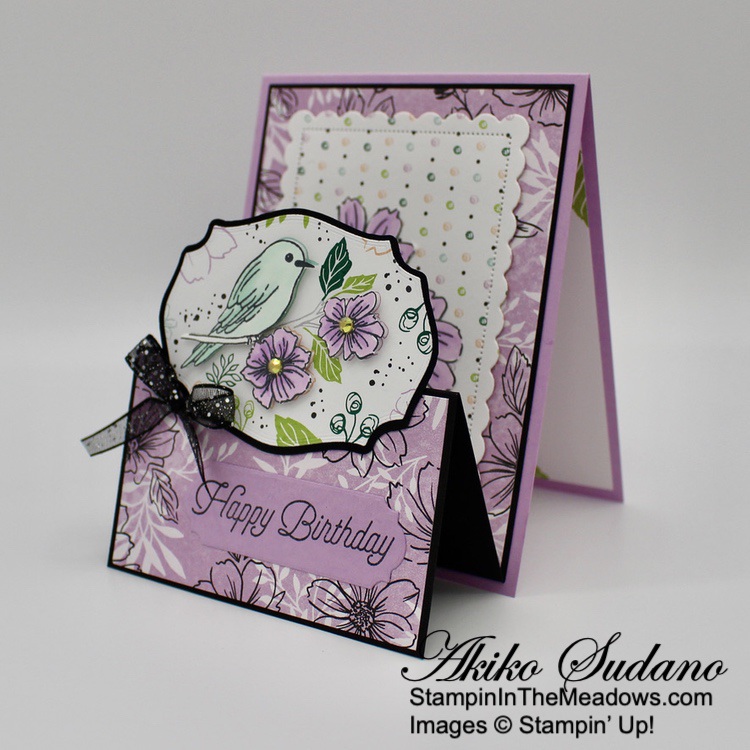
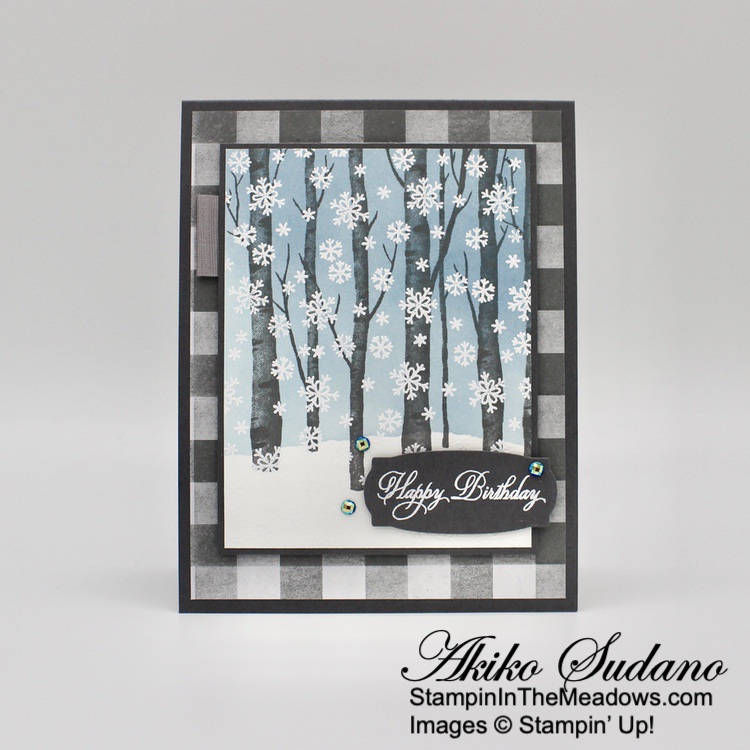
Good Morning! Today I made a masculine birthday card with the new Stampin’ Up! Your Biggest Fan stamp set, but no it’s not a sports theme card. I used the strong, bold sentiments from the stamp set with the retiring In Good Taste designer series paper for a simple masculine card. You can find the supplies I used at the bottom of my post along with the sizes of cardstock used.

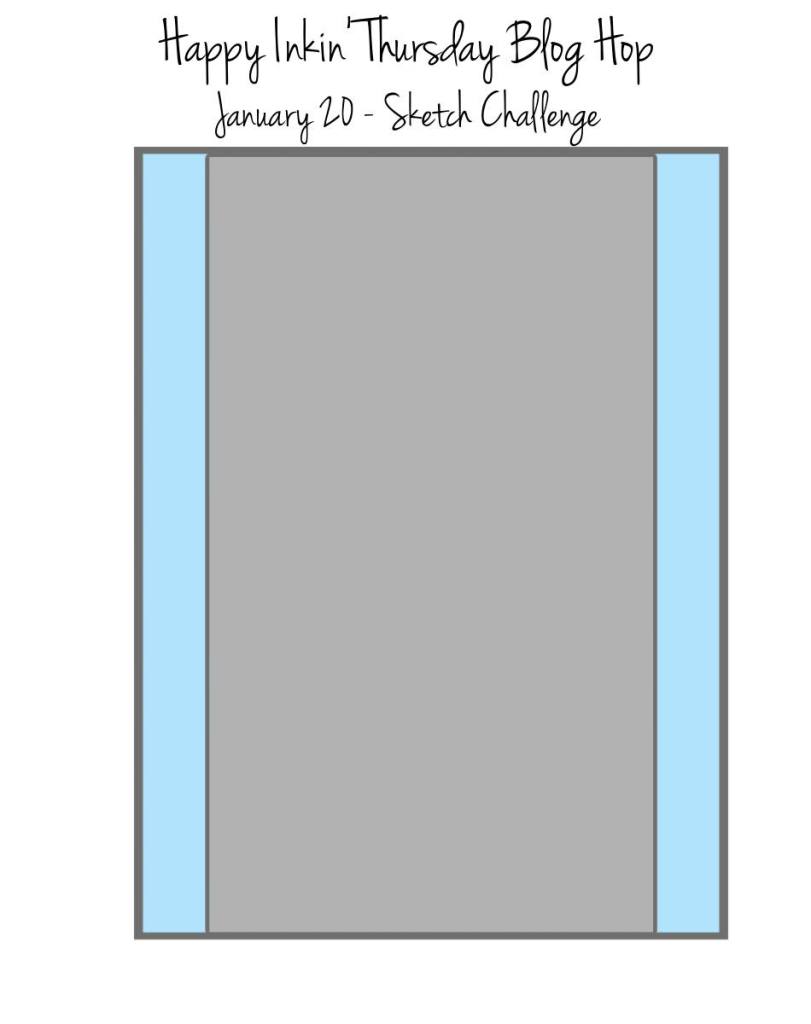
My card was inspired by the fun sketch challenge on Try Stampin’ On Tuesday Challenge #549:

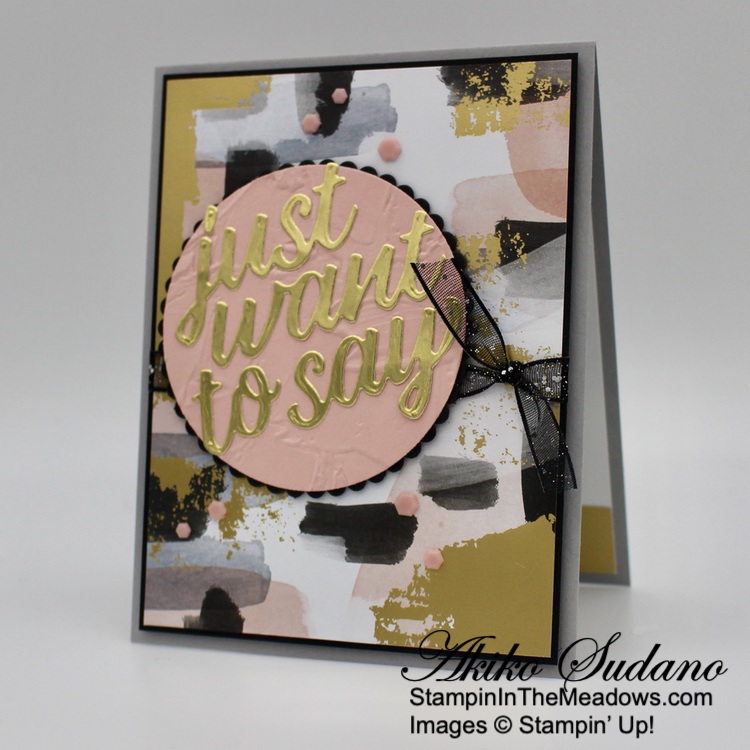
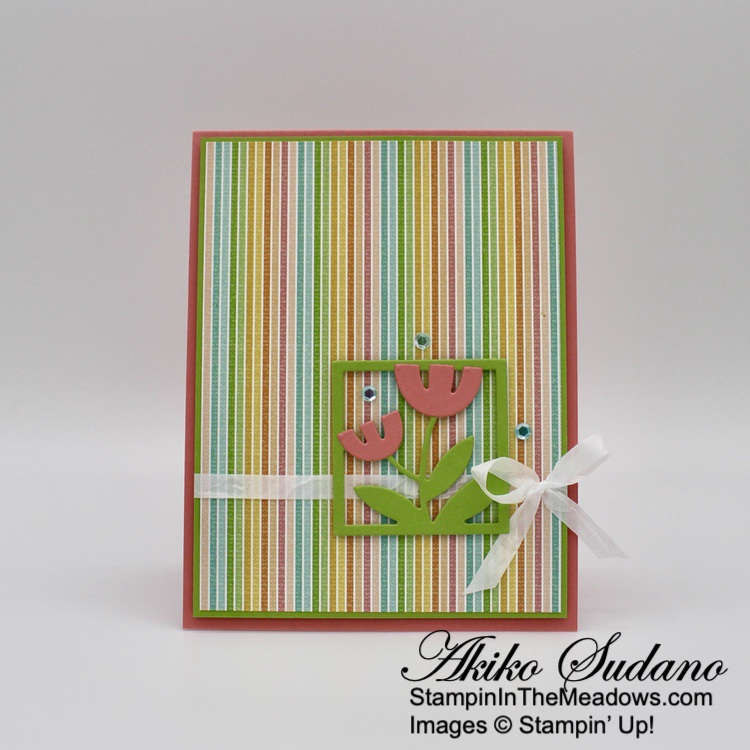
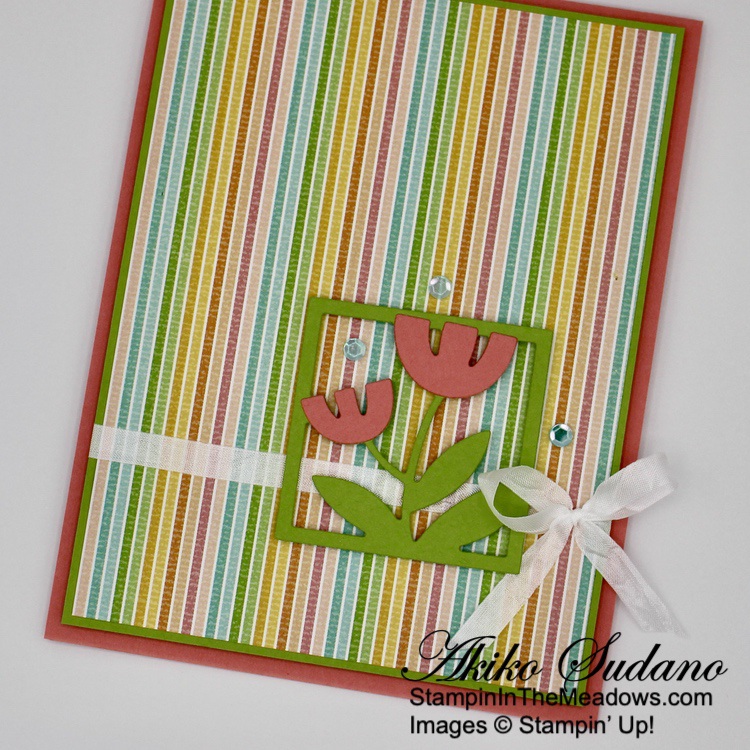
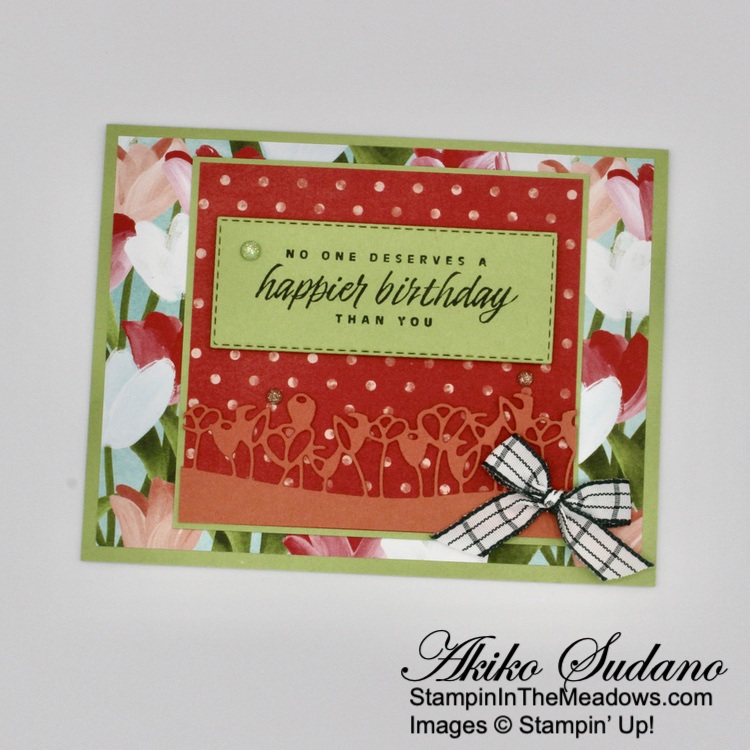
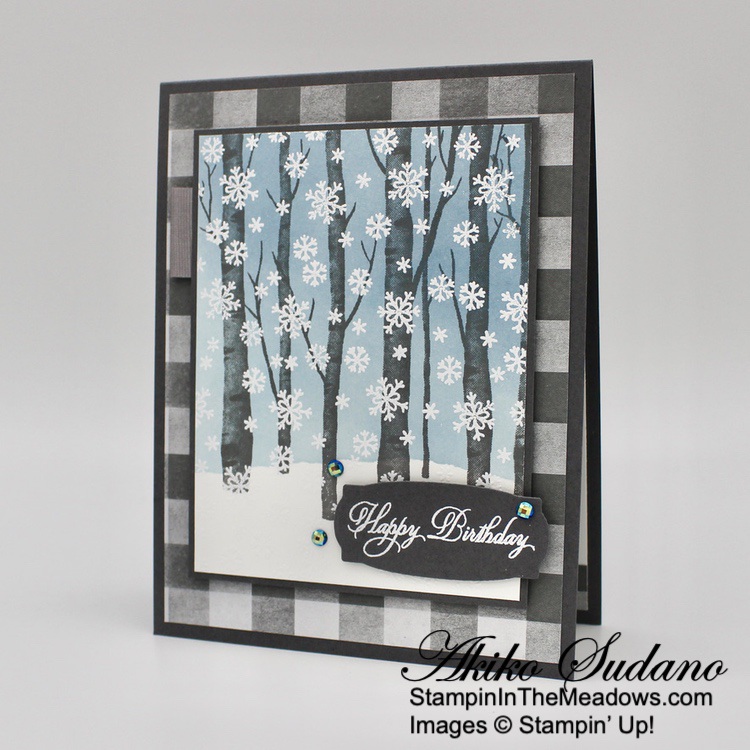
I used the Banner Pick a Punch to cut the ends of several scrap strips of the In Good Taste DSP. It felt good to put them to use and the mixture of wood grains and stones go together well. Select varying widths and lengths. I adhered them to a panel of the DSP that looked like a painting canvas, varying the lengths and I trimmed the tops off after the strips were adhered to get a clean edge on top. I adhered the DSP to a Soft Suede mat.

I wrapped the DSP panel with a length of Gray Granite shimmer ribbon, securing it in the back with tape and adhered the panel to the front of a Gray Granite card base.

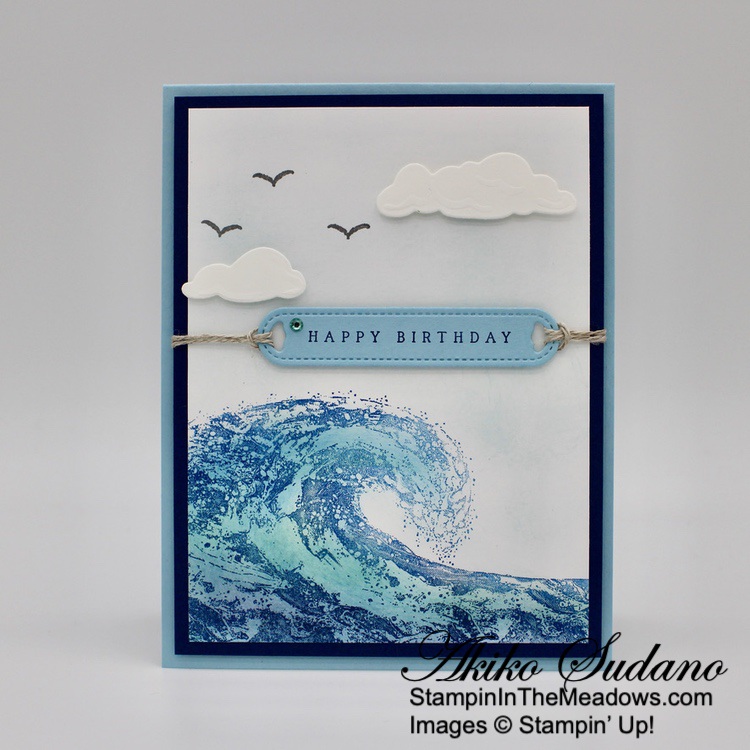
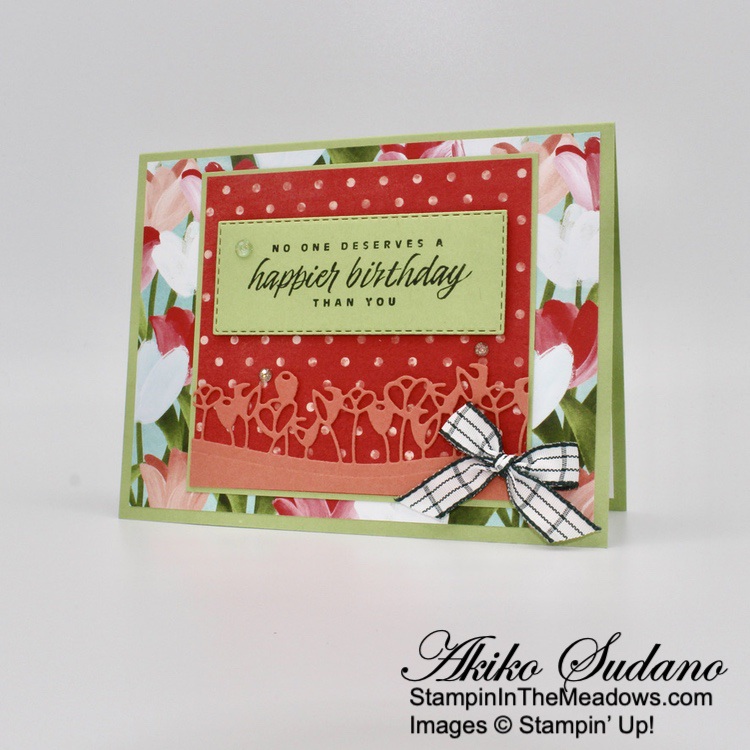
I stamped the sentiment from the Stampin’ Up! Your Biggest Fan photopolymer stamp set in Soft Suede on a wood grain panel of In Good Taste DSP and cut it out with the small label die from the Harvest dies. I cut another panel of Soft Suede with the die and adhered the DSP to the top. I adhered the label to the card front with dimensionals and finished it with a Brushed Metallic Dot.

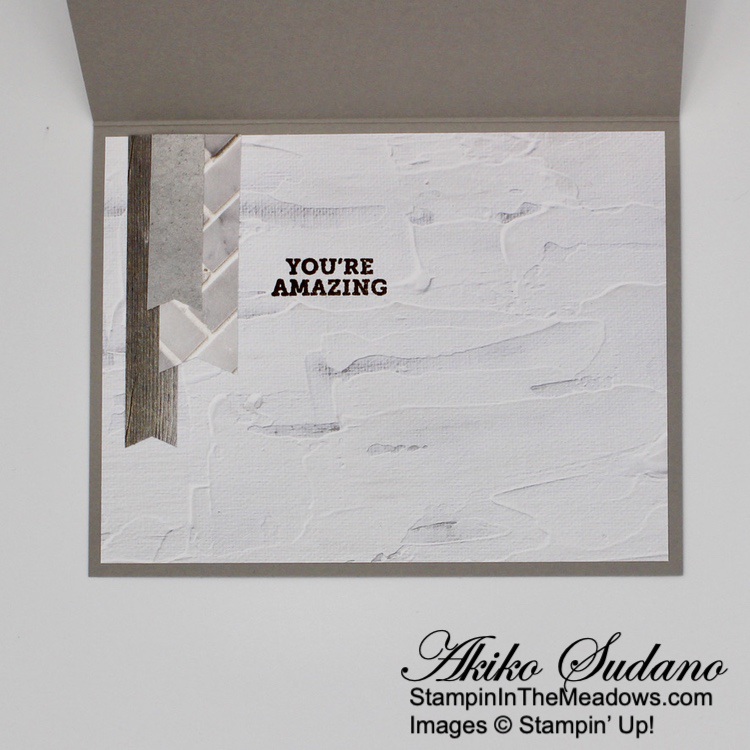
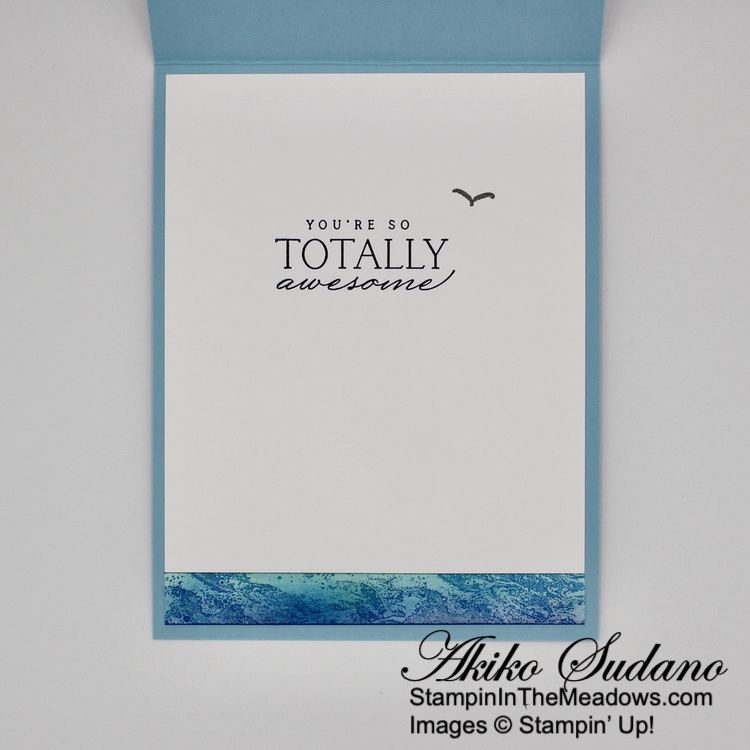
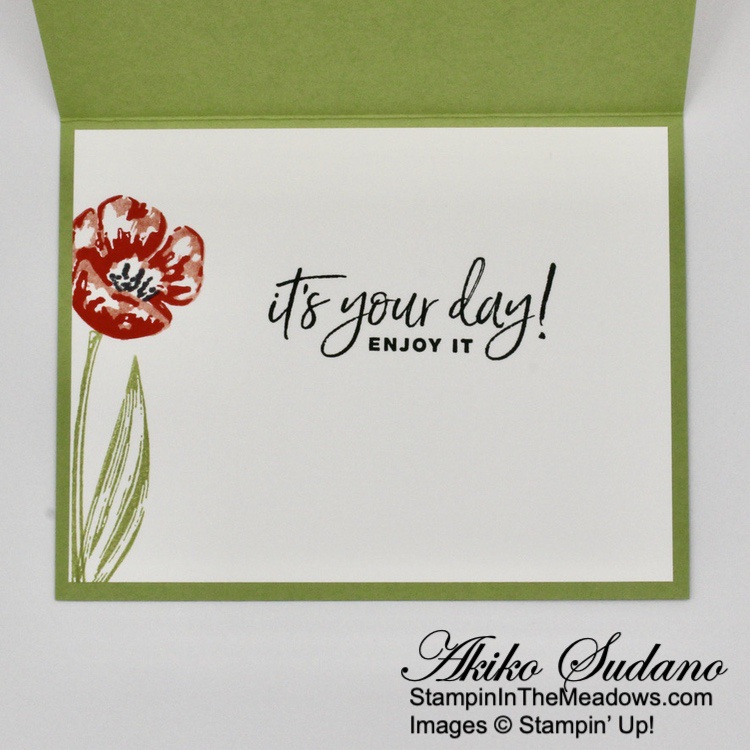
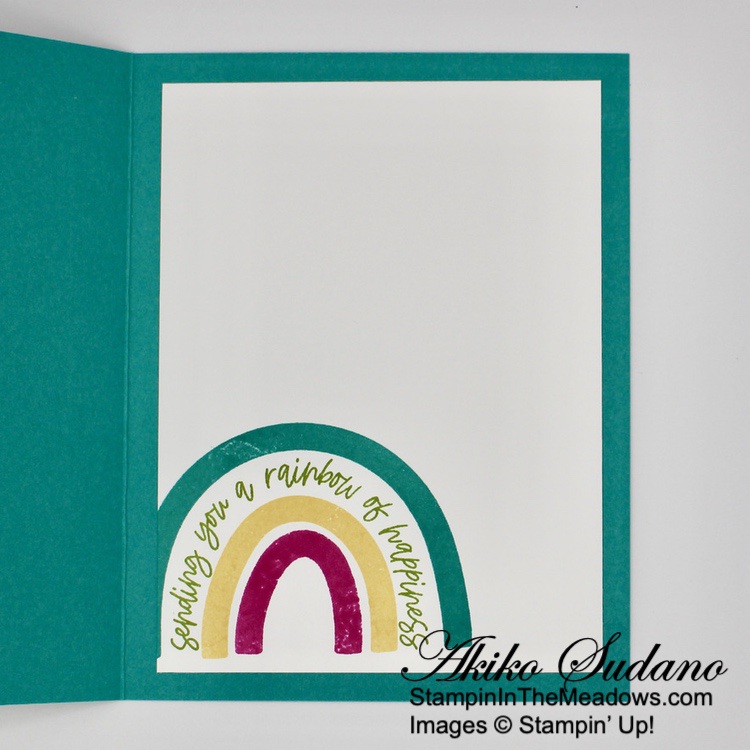
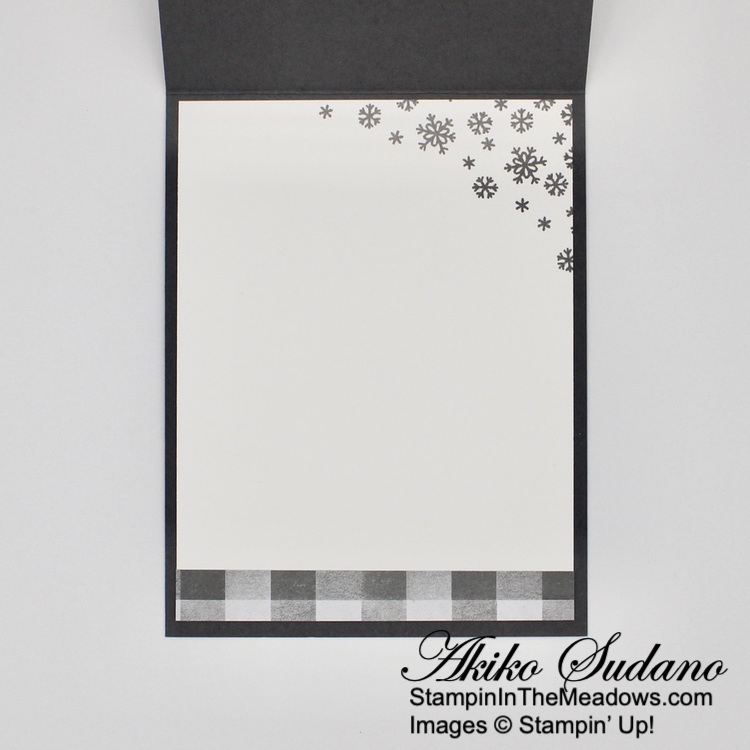
For the inside of the card, I decided to use the In Good Taste DSP for my writing panel. I stamped the sentiment from the Stampin’ Up! Your Biggest Fan stamp set in Soft Suede ink and adhered strips of punched DSP to the side. I adhered the panel to the inside of the card.

The In Good Taste DSP is perfect for masculine cards, just like the bold font in the Stampin’ Up! Your Biggest Fan stamp set. The natural tones also work well to contrast with florals for feminine cards, so overall it’s a great pack! It’s a great value with a 40% discount during the Last Chance Products sale.


2021 – 2022 Annual Catalog Last Chance Sale is Going on Now!

Many items have already sold out, so stock up on your favorite products before theyโ€™re gone for good! Save up to 50% on essential craft supplies. What are you waiting for? Start shopping! After all, this selection of Last Chance Products is only available while supplies last.

Here are the details:

  • Not all retiring items are on sale. Discounted items are noted in the Retiring List PDF or in Last Chance Products pages of my Online Store
  • All products are available while supplies last, and there are no purchase limits.
  • Discounted items can be added to a Starter Kit and redeemed as a 50% off item or with Stampinโ€™ Rewards.
  • The items are available while supplies last through May 2, 2022.

Order soon to make sure that you are able to get the items that you are wanting! Let me know if you have any questions.  Happy shopping!

Click HERE to download a PDF of the Retiring List items.

Head over to my Online Store to shop now.


Current Host Code: 6Y7ZDRM7

Use this host code when you order $50 or more and receive a free gift from me!  The free gift is your choice of any currently available item valued up to $10.00!

If your order is over $150, please do not use the host code since you’ll receive your own Host Dollars plus I’ll still send you the free gift!  This host code can be used by anyone, no club or commitment required. Let me know if you have any questions.


If you need any stamping supplies, Iโ€™d be very happy to be your Demonstrator.  Just click on the Shop Now button on the right side of the screen to go directly to my online store or contact me if you have any questions.  Happy Stamping!

Thanks for stopping by and have a great week!

Akiko

  • Visit my online store here
  • See the current Stampinโ€™ Up! clearance rack specials here
  • Earn FREE Stampinโ€™ Up! products through my Wildflower Frequent Shopper Program – my way of saying thank you to my online frequent shopper customers.
  • Have any questions? I’d be happy to help, click here to contact me.

Cardstock Cuts for this project:

  • Gray Granite – 5-1/2″ x 8-1/2″ card base scored at 4-1/4″
  • Soft Suede – 3-3/4″ x 6″ (front mat), 1″ x 2-1/2″ (label)
  • In Good Taste DSP – 4″ x 5-1/4″ (inside panel), 3-5/8″ x 4-7/8″ (front background), 1″ x 2-1/2″ (label), several strips with varying widths and lengths 1/2″ – 1″ wide and 3″ – 4″ long

Stampinโ€™ Up! products used in this project:


Stampinโ€™ Up! Pansy Patch Birthday Card for the Happy Inkinโ€™ Thursday Blog Hop

Good morning and welcome to the Happy Inkin’ Thursday Blog Hop! Today I used the pretty Stampin’ Up! Pansy Patch bundle to make a sweet birthday card. With the warmer weather, I planted some pansies by my mailbox this weekend, so I had to pull out this set for today’s card. With all the excitement about the new products, I forgot how beautiful this suite is, so it’s time to re-discover it! You can find the supplies I used along with card stock cuts at the bottom of my post.

We have a Theme Challenge this week with the wonderful theme of Flowers – so perfect!

This card is kind of a fun fold card, where the card front is cut in half and turned sideways, so part of the inside of the card is showing – perfect for showing off pretty DSP. So I adhered panels of the pansy filled Pansy Petals designer series paper to the inside and to the front of a my Calypso Coral card base. I adhered a Calypso Coral dotted panel of the Pansy Petals DSP to the cut off front panel, and adhered it to the card front with Tear & Tape, centering the panel on the card.

I cut my flower and bud from Basic White, Pale Papaya, Calypso Coral, Daffodil Delight and Evening Evergreen using the Pansy Dies from the Stampin’ Up! Pansy Patch bundle. I adhered the Pale Papaya large petal edge to the Basic White base and topped it with the Calypso Coral center detail and a Daffodil Delight flower center. I adhered the two Calypso Coral edges to the two Pale Papaya small petals and adhered them both to the back of the Basic White large flower. I adhered the Pale Papaya bud petal to the Basic White bud base and adhered them to the Evening Evergreen stem. I adhered the bud with glue dots and the large flower with dimensionals.

I cut some Evening Evergreen leaves from the Pansy Patch DSP and tucked them under the large pansy. I stamped the sentiment from the Stampin’ Up! Pansy Patch stamp set in Evening Evergreen ink on Pale Papaya and cut it out with the Ornate Frames die. I adhered it to the card front. I finished off the card with a Pale Papaya bow and some iridescent gems, adding a large one to the pansy center!

For the inside, I stamped the sentiment from the Stampin’ Up! Pansy Patch stamp set in Evening Evergreen on a Basic White panel. I cut out a small pansy from the Pansy Patch DSP and adhered it to the corner and adhered the panel to a Calypso Coral mat. I adhered the panel to the inside of the card with liquid glue, lining it up so that it would be covered by the front panel.

The Stampin’ Up! Pansy Patch bundle is really sweet and makes gorgeous dimensional pansies. The sentiments are also great and the Pansy Patch DSP is perfect for all your Spring cards.

On with the Hop! Click on the Next Blog button to move forward to see the beautiful project Karen Ksenzakovic has created.

If you get lost along the way, here are the participants for the hop:


Savings Are In Bloom During March!

During the month of March, you can snag the Mini Stampinโ€™ Cut & Emboss Machine at a 20% discount! This miniature machine is compatible with a large selection of Stampinโ€™ Up! embossing folders and dies. Build your craft collection and combine the Mini Stampinโ€™ Cut & Emboss Machine with any (or all!) of the select stamp-and-die bundles that are also available for 20% off during the month of March!

Click on the image below to download a PDF with all the details, including all the stamp bundles that will be on sale and the discounted prices! Click HERE to shop for these discounted items in my Online Store.


Current Host Code: MPMDW6BG

Use this host code when you order $50 or more and receive a free gift from me!  The free gift is your choice of any item valued up to $10.00 in the 2021 – 2022 Annual Catalog or the January – June 2022 Mini Catalog!

If your order is over $150, please do not use the host code since you’ll receive your own Host Dollars plus I’ll still send you the free gift!  This host code can be used by anyone, no club or commitment required. Let me know if you have any questions.


If you need any stamping supplies, Iโ€™d be very happy to be your Demonstrator.  Just click on the Shop Now button on the right side of the screen to go directly to my online store or contact me if you have any questions. 

Thanks for stopping by and Happy Stamping!

Akiko

  • Visit my online store here
  • See the current Stampinโ€™ Up! clearance rack specials here
  • Earn FREE Stampinโ€™ Up! products through my Wildflower Frequent Shopper Program – my way of saying thank you to my online frequent shopper customers.
  • Have any questions? I’d be happy to help, click here to contact me.

Cardstock Cuts for this project:

  • Calypso Coral โ€“ 4-1/4″ x 8-1/4″ card base scored at 2-3/4″, two 2-3/4″ x 4-1/4″ panels (front panel and inside mat), 1″ x 3″ (pansy die cuts)
  • Pale Papaya – 2″ x 4-1/2″ (pansy die cuts), 1-1/4″ x 2-1/2″ (label)
  • Daffodil Delight – 1″ x 1″ x 4″ (pansy center)
  • Evening Evergreen – 1-1/4″ x 3″ (bud stem)
  • Basic White – 2-1/2″ x 4″ (inside panel), 2″ x 3″ (pansy die cuts)
  • Pansy Petals DSP – 4″ x 5-1/4″ (inside panel), two 2-1/2″ x 4″ panels (front panels), small die cut pansy, two evening evergreen die cut leaves

Stampinโ€™ Up! products used in this project:


Stampinโ€™ Up! Art Gallery Birthday Card

Good Monday Morning! Here’s a modern birthday card made with the Stampin’ Up! Art Gallery bundle and Abstract Beauty Specialty designer series paper. This is a different style for me, but a lot of fun and I hope you like it. You can find the supplies I used at the bottom of my post along with the sizes of cardstock used.

I adhered a panel of Abstract Beauty specialty designer series paper to a Basic Black mat and tied a length of black glitter ribbon around it, tying a knot. I adhered the panel to a Smoky Slate card base with dimensionals.

I cut a panel of Blushing Bride with the largest Layering circle die and embossed it with the Painted Texture 3D embossing folder. I adhered it to a Basic Black die cut scalloped circle.

I cut the word dies from the Floral Beauty Dies in the Stampin’ Up! Art Gallery bundle from Gold Foil and adhered them to the embossed circle – don’t forget the dot for the letter ‘j’. I popped the circle on the card front with dimensionals and finished with Blushing Bride hexagon dots.

For the inside of the card, I inked up the large flower from the Stampin’ Up! Art Gallery stamp set with Blushing Bride. I stamped off the solid flower before stamping on the side of a Basic White panel and stamped the detailed flower full strength. I stamped the leaf and stem in Soft Sea Foam and the sentiment in Memento Tuxedo Black. I trimmed the bottom with a strip of the Abstract Beauty DSP and adhered the panel to the inside of the card.

The Abstract Beauty DSP is different, but the gold foil touches are beautiful! So I thought that it would go great with the word dies from the Stampin’ Up! Art Gallery bundle. What do you think?


Savings Are In Bloom During March!

During the month of March, you can snag the Mini Stampinโ€™ Cut & Emboss Machine at a 20% discount! This miniature machine is compatible with a large selection of Stampinโ€™ Up! embossing folders and dies. Build your craft collection and combine the Mini Stampinโ€™ Cut & Emboss Machine with any (or all!) of the select stamp-and-die bundles that are also available for 20% off during the month of March!

Click on the image below to download a PDF with all the details, including all the stamp bundles that will be on sale and the discounted prices! Click HERE to shop for these discounted items in my Online Store.


Current Host Code: MPMDW6BG

Use this host code when you order $50 or more and receive a free gift from me!  The free gift is your choice of any item valued up to $10.00 in the 2021-2022 Annual Catalog or the January โ€“ June 2022 Mini Catalog!

If your order is over $150, please do not use the host code since you’ll receive your own Host Dollars plus I’ll still send you the free gift!  This host code can be used by anyone, no club or commitment required. Let me know if you have any questions.


If you need any stamping supplies, Iโ€™d be very happy to be your Demonstrator.  Just click on the Shop Now button on the right side of the screen to go directly to my online store or contact me if you have any questions.  Happy Stamping!

Thanks for stopping by and have a great week!

Akiko

  • Visit my online store here
  • See the current Stampinโ€™ Up! clearance rack specials here
  • Earn FREE Stampinโ€™ Up! products through my Wildflower Frequent Shopper Program – my way of saying thank you to my online frequent shopper customers.
  • Have any questions? I’d be happy to help, click here to contact me.

Cardstock Cuts for this project:

  • Smoky Slate – 4-1/4″ x 11″ card base scored at 5-1/2″
  • Blushing Bride – 3-1/4″ x 3-1/4″ (embossed circle)
  • Basic Black – 4″ x 5-1/4″ (front mat), 3-1/2″ x 3-1/2″ (scalloped circle)
  • Gold Foil – 2-3/4″ x 3″ (die cut words)
  • Basic White – 4″ x 5-1/4″ (inside panel)
  • Abstract Beauty 4″ x 6″ specialty DSP – 3-7/8″ x 5-1/8″, 4″ x 3/4″

Stampinโ€™ Up! products used in this project:


Stampinโ€™ Up! Waves Of Inspiration Birthday Card

Good Morning! The Stampin’ Up! Waves Of Inspiration bundle is an early release from the upcoming 2022-2023 Annual Catalog and boy is is gorgeous! I made this simple birthday card to introduce you to the bundle and you can check out all the details of the promotion because this bundle is available today! You can find the supplies I used at the bottom of my post along with the sizes of cardstock used.

I used sponge daubers to apply Pacific Point and Night of Navy inks to the large wave stamp in the Stampin’ Up! Waves Of Inspiration cling stamp set. I applied Pacific Point to the entire stamp and Night of Navy to the bottom and stamped the image on a Basic White panel. I used sponge daubers to apply additional ink to the wave, Bermuda Bay to the top part of the wave, blending into Pacific Point and Night of Navy towards the bottom.

I used another sponge dauber to lightly ink the sky with Balmy Blue ink. I stamped the bird from the Stampin’ Up! Waves of Inspiration stamp set in Basic Gray three times in the sky. I adhered the panel to a Night of Navy mat. I cut the clouds from Basic White using the Waves Dies and adhered them to the panel with dimensionals.

I stamped the sentiment from the Stampin’ Up! Waves Of Inspiration stamp set in Night of Navy on a strip of Balmy Blue and cut it out with the label from the Waves Dies. I looped Linen thread through the ends of the label and adhered the label to the card front with dimensionals. I pulled the linen thread around to the back of the card and secured the ends in the back with tape. I accented the label with a rhinestone and adhered the panel to the front of a Balmy Blue card base with dimensionals.

For the inside of the card, I stamped the wave again in Pacific Point on a Basic White strip. I used sponge daubers to apply Bermuda Bay and Night of Navy inks to the strip so that it would resemble the ocean on the front of the card. I stamped the sentiment from the Stampin’ Up! Waves Of Inspiration stamp set in Night of Navy ink on a Basic White panel. I stamped the bird in Basic Gray and adhered the ocean strip to the bottom. I adhered the panel to the inside of the card.

This is just a simple example of using the pretty Stampin’ Up! Waves Of Inspiration bundle for a birthday card. Be on the lookout for more cards made with this gorgeous bundle and the other exclusive items in the Waves of the Ocean Collection.


Waves of the Ocean Collection Available March 1, 2022

Discover the depths of the oceanโ€”and your artistic abilitiesโ€”with the Waves of the Ocean Collection! This coastal collection includes an inspiring set of stamps and detailed dies, both early-release products from the upcoming 2022โ€“2023 Annual Catalog. Plus, a pack of paper made from images of hand-poured paint, blue-hued foil sheets for a sea of shine, and radiant rhinestones for a splash of sparkleโ€”each an exclusive product you can only purchase during the promotion period!

Here are the Details:

  • Promotion Period: March 1, 2022 – May 2, 2022
  • The Waves of Inspiration Stamp Set and Waves Dies can be ordered separately.
  • The Waves of Inspiration Stamp Set is available in English, French, and German.
  • The following exclusive products are only available while supplies last:
    • Waves of the Ocean 12″ x 12″ Designer Series Paper
    • Blue Foils 12″ x 12″ Specialty Paper
    • Rhinestone Waves Basic Jewels

Click on the image below to download a PDF flyer with all the details including the item numbers and prices. Click HERE to shop the Waves of the Ocean Collection in my Online Store now.


Savings Are In Bloom During March!

If you havenโ€™t already, itโ€™s time to meet your mini crafting companion: the Mini Stampinโ€™ Cut & Emboss Machine! If this is your first encounter, allow us to introduce you.

This miniโ€”but mightyโ€”machine is durable, portable, and easy to use. Itโ€™s the perfect pick for budding beginners who want to branch out, papercrafting pros who want to craft on the go, or those who are short on storage space! With this trusty tool, any crafter can make precise cuts and embossed designs for their projects with one pass.

During the month of March, you can snag the Mini Stampinโ€™ Cut & Emboss Machine at a 20% discount! This miniature machine is compatible with a large selection of Stampinโ€™ Up! embossing folders and dies. Build your craft collection and combine the Mini Stampinโ€™ Cut & Emboss Machine with any (or all!) of the select stamp-and-die bundles that are also available for 20% off during the month of March!

Here are the Details:

  • Promotion Period: March 1, 2022 – March 31, 2022
  • The Mini Stampinโ€™ Cut & Emboss Machine will be available for purchase at a 20% discount.
  • A number of select stamp-and-die bundles that are compatible with the Mini Stampinโ€™ Cut & Emboss Machine will also be available for purchase at a 20% discount.
  • For this promotion only, weโ€™ve brought back the previously popular Art Gallery, Celebrate Sunflowers, and Garden Wishes bundles. They will only be available in their bundle form during this promotion, so make sure to snag โ€˜em while you still can!
  • The Mini Stampinโ€™ Cut & Emboss Machine and select compatible bundles can be bought together or separately.
  • There is no limit on the number of Mini Stampinโ€™ Cut & Emboss Machines you can purchase
  • Products are available while supplies last – No backorders or substitutions will be allowed.
  • The stamp-and-die bundles that can be found in a current catalog will be replenished until they retire. When they do retire, the bundles will be added to the Retiring List.
  • Due to supply chain challenges, this promotion may be altered or ended early. We will post an update with further information if this is anticipated. 

Click on the image below to download a PDF with all the details, including all the stamp bundles that will be on sale and the discounted prices! Click HERE to shop for these discounted items in my Online Store.


Current Host Code: MPMDW6BG

Use this host code when you order $50 or more and receive a free gift from me!  The free gift is your choice of any item valued up to $10.00 in the 2021-2022 Annual Catalog or the January โ€“ June 2022 Mini Catalog!

If your order is over $150, please do not use the host code since you’ll receive your own Host Dollars plus I’ll still send you the free gift!  This host code can be used by anyone, no club or commitment required. Let me know if you have any questions.


If you need any stamping supplies, Iโ€™d be very happy to be your Demonstrator.  Just click on the Shop Now button on the right side of the screen to go directly to my online store or contact me if you have any questions.  Happy Stamping!

Thanks for stopping by and have a great week!

Akiko

  • Visit my online store here
  • See the current Stampinโ€™ Up! clearance rack specials here
  • Earn FREE Stampinโ€™ Up! products through my Wildflower Frequent Shopper Program – my way of saying thank you to my online frequent shopper customers.
  • Have any questions? I’d be happy to help, click here to contact me.

Cardstock Cuts for this project:

  • Balmy Blue – 4-1/4″ x 11″ card base scored at 5-1/2″, 1″ x 3-1/2″ (label)
  • Night of Navy – 4″ x 5-1/2″ (front mat)
  • Basic White – 3-7/8″ x 5-1/8″ (front panel), 4″ x 5-1/4″ panels (inside panel), 1″ x 3-1/2″ (die cut clouds), 1/2″ x 4″ (inside trim)

Stampinโ€™ Up! products used in this project:


Stampinโ€™ Up! Friendly Hello Birthday Card

Good Morning! Today I’m bringing you a Double Easel fun fold card made with the Sale-A-Bration Stampin’ Up! Friendly Hello bundle This is a beautiful set of coordinating stamps and designer series paper that you can get for FREE with a $100 purchase during Sale-A-Bration! You can find the supplies I used at the bottom of my post along with the sizes of cardstock used.

I adhered the Stampin’ Up! Friendly Hello designer series paper panels to each scored section of the Basic Black panel, burnished the score lines, and adhered the folded Basic Black panel to the front of the Fresh Freesia card base. I cut a panel of the DSP with the second largest Scalloped Contours die and adhered it to the card front.

I traced the outline of the die from one of the Tasteful Labels dies on a Basic Black panel and fussy cut it out with my paper snips. I used the die to cut a panel of the Stampin’ Up! Friendly Hello DSP with the bird and flowers, and adhered it to the fussy cut Basic Black mat. I stamped the bird image from the Stampin’ Up! Friendly Hello stamp set in Memento Tuxedo Black and colored it with Pool Party, Fresh Freesia and Pale Papaya Stampin’ Blends. I fussy cut the bird and flowers and adhered them to the die cut with dimensionals. I adhered the die cut to the card front with Tear & Tape and finished the flowers with Pale Papaya rhinestones.

I stamped the double flower from the Stampin’ Up! Friendly Hello stamp set in Memento Tuxedo Black ink on Basic White. I colored the flowers with Fresh Freesia and Pale Papaya Stampin’ Blends. I stamped the leaves in Granny Apple Green and fussy cut the leaves and flowers. I adhered the flowers and leaves to the scalloped rectangle die cut panel with liquid glue.

I stamped the sentiment from the Sale-A-Bration Special Moments photopolymer stamp set in Basic Black on Fresh Freesia and cut it out with the Ornate Labels die. I adhered it to the card front and finished the card with a glittered Black Organdy bow.

I stamped the sentiment from the Special Moments stamp set in Memento Tuxedo Black on a Basic White panel. I stamped the large flowers from the Stampin’ Up! Friendly Hello stamp set in the corners in Basic Black and the leaves in Granny Apple Green. I colored the flowers with Fresh Freesia and Pale Papaya Stampin Blends and adhered the panel to the inside of the card. I also stamped a Basic White envelope with the flowers and leaves and colored it with Stampin’ Blends to match the inside panel.

The Stampin’ Up! Friendly Hello bundle is a wonderful Sale-A-Bration item that you can get for free with a $100 order. The designer series paper is so beautiful and the stamp set has pretty images and sentiments that can be used with it or on their own. But hurry, because Sale-A-Bration ends on February 28, 2022!


Earn Free Products During Sale-A-Bration: Jan 4 โ€“ Feb 28 2022!

Sale-A-Bration is one of Stampinโ€™ Up!โ€™s biggest promotions of the year with fun for everyone!  There are fantastic Sale-A-Bration specials for Shopping, Hosting and Joining! See my Promotions Page for more details or contact me and Iโ€™ll be happy to tell you more! But hurry because these specials are only available through February 28, 2022 or while supplies last!

All Together Collection Available Through May 2, 2022

Loving hands and heartfelt words are the best way to show you care. With hand designs that illustrate coming together in friendship and solidarity, the All Together Collection will help you create cardmaking and paper crafting projects that reflect the people you know and love. Click on the picture below to download a brochure with all the details or click HERE to start shopping the All Together Collection now in My Online Store.


Current Host Code: 3QYMGKQY

Use this host code when you order $50 or more and receive a free gift from me!  The free gift is your choice of any item valued up to $10.00 in the 2021-2022 Annual Catalog or the January โ€“ June 2022 Mini Catalog!

If your order is over $150, please do not use the host code since you’ll receive your own Host Dollars plus I’ll still send you the free gift!  This host code can be used by anyone, no club or commitment required. Let me know if you have any questions.


If you need any stamping supplies, Iโ€™d be very happy to be your Demonstrator.  Just click on the Shop Now button on the right side of the screen to go directly to my online store or contact me if you have any questions.  Happy Stamping!

Thanks for stopping by and have a great week!

Akiko

  • Visit my online store here
  • See the current Stampinโ€™ Up! clearance rack specials here
  • Earn FREE Stampinโ€™ Up! products through my Wildflower Frequent Shopper Program – my way of saying thank you to my online frequent shopper customers.
  • Have any questions? I’d be happy to help, click here to contact me.

Cardstock Cuts for this project:

  • Fresh Freesia – 4-1/4″ x 11″ card base scored at 5-1/2″, 1-1/4″ x 3-1/2 (label)
  • Basic Black – 4″ x 10-1/4″ scored at 2-1/2″ and 5″ (double easel), 3″ x 4″ (die cut mat)
  • Basic White – 4″ x 5-1/4″ (inside panel), 2-3/4″ x 3-3/3″ (bird and flowers), 1-3/4″ x 3″ (double flowers), 1-1/2″ x 1-1/2″ (leaves)
  • Friendly Hello DSP – 3-7/8″ x 5-1/8″ (large background panel), two 2-3/8″ x 3-7/8″ panels (small background panels), 2-3/4″ x 3-3/4″ (die cut bird), 3-1/2″ x 4-3/4″ (die cut scalloped rectangle)

Stampinโ€™ Up! products used in this project:


Stampinโ€™ Up! All Squared Away for the Inkin’ Krew Blog Hop

Good morning! Welcome to the February Inkinโ€™ Krew Team Blog Hop! The theme for this monthโ€™s hop is “Birthday” and I used the Stampin’ Up! All Squared Away bundle to make a colorful floral Birthday card. You can find the supplies I used at the bottom of my post along with the sizes of cardstock used.

I adhered a panel of striped Pattern Party Host special designer series paper to a Granny Apple Green mat with liquid glue and wrapped it with white crinkle ribbon and made a bow on the side. I adhered it to the front of a Flirty Flamingo card base with dimensionals.

I cut a small Flirty Flamingo panel with the two flower dies from the Floral Squares dies that come in the Stampin’ Up! All Squared Away bundle. I cut a small Granny Apple Green Panel with the square die and adhered the two Flirty Flamingo floral die cuts to the square die cut to make the pink flowers on green stems.

I cut small slivers of dimensionals to put around the Granny Apple Green die cut frame and behind the flowers and leaves and adhered the die cut to the card front. I finished the card with three Pool Party iridescent sequins.

For the inside of the card, I stamped the sentiment from the Stampin’ Up! All Squared Away stamp set in Granny Apple Green on a Basic White panel. I cut the small flowers from Bumblebee and adhered them next to the sentiment and trimmed the bottom of the panel with a strip of the striped Pattern Party DSP. I adhered the panel to the inside of the card with Stampin’ Seal.

The Stampin’ Up! All Squared Away bundle is really sweet with the graphic floral die cuts, and so easy to use. I didn’t used the background stamps, but they would be awesome to add additional texture when stamped on the die cuts or as a background for the die cuts. And popping these cute little squares on dimensionals makes any card special!

On With The Hop! Click on the Next Blog button to move forward to Amy Koender’s project or click the Previous Blog button to move back to see the project that Leslie Larkin created.

If you get lost along the way, here are the participants for the hop:

  1. Karen Ksenzakovic 
  2. Jaimie Babarczy 
  3. Jillian Good 
  4. Tara Carpenter
  5. Mary Deatherage 
  6. Karen Finkle 
  7. Sue Prather 
  8. Leslie Larkin 
  9. Akiko Sudano <– You are here
  10. Amy Koenders 

Earn Free Products During Sale-A-Bration: Jan 4 โ€“ Feb 28 2022!

Sale-A-Bration is one of Stampinโ€™ Up!โ€™s biggest promotions of the year with fun for everyone!  There are fantastic Sale-A-Bration specials for Shopping, Hosting and Joining! And itโ€™s happening through February 28, 2022!

SHOP 

During Sale-A-Bration you get to choose a FREE Sale-A-Bration product with every $50 or $100 you spend (before Shipping and tax). There are 7 items that are available for free with every $50 you spend and 2 items that are available for free with every $100 you spend.

HOST

Host a party during Sale-A-Bration and both you and your guests can earn FREE Sale-A-Bration products! Plus, place any party or personal order of $300 or more and receive the exclusive Calming Camellia cling stamp set for FREE! And you can even host a virtual party! Drop me an email at apsudano@stampininthemeadows.com if you are interested in setting up a host code for yourself to see if you can collect $300 in orders from yourself and your stamping friends to get that FREE stamp set!  Iโ€™m happy to set up a code just for you!

JOIN

And there is an awesome joining special during Sale-A-Bration! When you join as a Stampinโ€™ Up! Demonstrator, you pay $99 for your starter kit and you get to choose $125 in product from any current catalog plus your starter kit ships for free! And if you join during Sale-A-Bration you get to pick two additional stamp sets to add to your starter kit for free! Contact me if you have any questions about joining and Iโ€™ll be happy to tell you more!


Current Host Code: 3QYMGKQY

Use this host code when you order $50 or more and receive a free gift from me! ย The free gift isย your choice ofย any itemย valued up to $10.00 in the 2021 – 2022 Annual Catalog or the January-June 2022 Mini Catalog!

If your order is over $150, please do not use the host code since you’ll receive your own Host Dollars plus I’ll still send you the free gift!  This host code can be used by anyone, no club or commitment required. Let me know if you have any questions


If you need any stamping supplies, Iโ€™d be very happy to be your Demonstrator.  Just click on the Shop Now button on the right side of the screen to go directly to my online store or contact me if you have any questions. 

Thanks for stopping by and Happy Stamping!

Akiko

  • Visit my online store here
  • See the current Stampinโ€™ Up! clearance rack specials here
  • Earn FREE Stampinโ€™ Up! products through my Wildflower Frequent Shopper Program – my way of saying thank you to my online frequent shopper customers.
  • Have any questions? I’d be happy to help, click here to contact me.

Cardstock Cuts for this project:

  • Flirty Flamingo- 4-1/4″ x 11″ card base scored at 5-1/2″, 1-1/2″ x 2″ (die cut flowers)
  • Granny Apple Green – 4″ x 5-1/4″ (front mat), 2″ x 2″ (die cut frame)
  • Bumblebee – 1″ x 1″ (inside die cut flowers)
  • Basic White – 3-7/8″ x 5-1/8″ (inside panel)
  • Pattern Party DSP – 3-7/8″ x 5-1/8″ (front background), 1/2″ x 3-7/8″ (inside trim)

Stampinโ€™ Up! products used in this project:


Stampinโ€™ Up! Gumball Greetings for the Happy Inkinโ€™ Thursday Blog Hop

Good morning and welcome to the Happy Inkin’ Thursday Blog Hop! For today card, I used the fun Stampin’ Up! Gumball Greetings bundle to make a shaker birthday card. I used the Gumball Machine shaker dome and filled it with the Frosted beads. I also used the Pattern Party designer series paper for the background. You can find the supplies I used at the bottom of my post along with the sizes of cardstock used.

We have a sketch challenge this week – here is the pretty sketch we are using:

I stamped the gumball dome from the Stampin’ Up! Gumball Greetings photopolymer stamp set in Memento Tuxedo Black on a Basic White panel. I stamped several gumballs in Poppy Parade, Bermuda Bay, Granny Apple Green, Highland Heather, Flirty Flamingo and Daffodil Delight and cut them out with the coordinating die. I adhered them to the stamped gumball dome back with liquid glue and put a pile of frosted beads in the middle. I peeled off the adhesive backing from one of the plastic gumball shaker domes and adhered it to the stamped dome, securing the frosted beads inside.

I cut a panel of Pattern Party designer series paper with the gumball dome die from the Stampin’ Up! Gumball Greetings bundle and pulled the adhesive strip covering off the front of the shaker dome. I adhered the shaker dome to the back of the die cut DSP and then adhered it to a Granny Apple Green mat. I adhered it to the front of a Crushed curry card base with liquid glue. I cut the gumball dome top, base, handle and trim pieces from Poppy Parade. I adhered the trim pieces to the dome top and the base – this gives the gumball machine some nice dimension! I adhered the base to the card front under the dome and the top to the top of the dome. I lifted the gumball opening slightly and adhered a stamped gumball under it with a glue dot.

I cut some silver foil with the coin plate die from the Stampin’ Up! Gumball Greetings bundle and adhered it to the gumball machine base with dimensionals. I cut the spinner from Poppy Parade and popped it on the machine with dimensionals. I finished the spinner with a silver metallic pearl. I stamped the sentiment from the Art Gallery photopolymer stamp set in Poppy Parade on a strip of Crushed Curry and cut it out with the label from the Floral Gallery dies. I adhered it to the card front with dimensionals.

For the inside, I stamped the gumball machine from the Stampin’ Up! Gumball Greetings stamp set in Memento Tuxedo Black ink on a Basic White panel and colored it with Poppy Parade, Daffodil Delight, Bermuda Bay, Highland Heather, Granny Apple Green and Flirty Flamingo Stampin’ Blends. I stamped the sentiment from the stamp set in Bermuda Bay ink next to the gumball machine and trimmed the bottom with a strip of the Pattern Party DSP. I adhered the panel to the inside of the card.

The Gumball Greetings bundle is so much

On with the Hop! Click on the Next Blog button to move forward to see the beautiful project Karen Ksenzakovic has created.

If you get lost along the way, here are the participants for the hop:


Earn Free Products During Sale-A-Bration: Jan 4 โ€“ Feb 28 2022!

Sale-A-Bration is one of Stampinโ€™ Up!โ€™s biggest promotions of the year with fun for everyone!  There are fantastic Sale-A-Bration specials for Shopping, Hosting and Joining! And itโ€™s happening through February 28, 2022!

SHOP 

During Sale-A-Bration you get to choose a FREE Sale-A-Bration product with every $50 or $100 you spend (before Shipping and tax). There are 7 items that are available for free with every $50 you spend and 2 items that are available for free with every $100 you spend.

HOST

Host a party during Sale-A-Bration and both you and your guests can earn FREE Sale-A-Bration products! Plus, place any party or personal order of $300 or more and receive the exclusive Calming Camellia cling stamp set for FREE! And you can even host a virtual party! Drop me an email at apsudano@stampininthemeadows.com if you are interested in setting up a host code for yourself to see if you can collect $300 in orders from yourself and your stamping friends to get that FREE stamp set!  Iโ€™m happy to set up a code just for you!

JOIN

And there is an awesome joining special during Sale-A-Bration! When you join as a Stampinโ€™ Up! Demonstrator, you pay $99 for your starter kit and you get to choose $125 in product from any current catalog plus your starter kit ships for free! And if you join during Sale-A-Bration you get to pick two additional stamp sets to add to your starter kit for free! Contact me if you have any questions about joining and Iโ€™ll be happy to tell you more!


Current Host Code: 2YHH339E

Use this host code when you order $50 or more and receive a free gift from me!  The free gift is your choice of any item valued up to $10.00 in the 2021 – 2022 Annual Catalog or the July – December 2021 Mini Catalog including some of the host stamp sets!

If your order is over $150, please do not use the host code since you’ll receive your own Host Dollars plus I’ll still send you the free gift!  This host code can be used by anyone, no club or commitment required. Let me know if you have any questions.


If you need any stamping supplies, Iโ€™d be very happy to be your Demonstrator.  Just click on the Shop Now button on the right side of the screen to go directly to my online store or contact me if you have any questions. 

Thanks for stopping by and Happy Stamping!

Akiko

  • Visit my online store here
  • See the current Stampinโ€™ Up! clearance rack specials here
  • Earn FREE Stampinโ€™ Up! products through my Wildflower Frequent Shopper Program – my way of saying thank you to my online frequent shopper customers.
  • Have any questions? I’d be happy to help, click here to contact me.

Cardstock Cuts for this project:

  • Crushed Curry โ€“ 4-1/4″ x 11″ card base scored at 5-1/2″, 1″ x 3″ (label)
  • Silver Foil – 1-1/2″ x 1-1/2″ (die cut gumball machine panel), 3/4″ x 1″ (gumball machine flap liner)
  • Granny Apple Green – 3-1/8″ x 5-1/2″ (front mat)
  • Poppy Parade – 3-1/4″ x 4-1/4″ (gumball machine die cuts)
  • Basic White – 4″ x 5-1/4″ (inside panel), 1″ x 6″ (gum-balls), 2-1/2″ x 2-3/4″ (shaker dome backing)
  • Pattern Party DSP – 3″ x 5-1/2″ (front background)

Stampinโ€™ Up! products used in this project:


Stampinโ€™ Up! Flowering Tulips for the Happy Inkinโ€™ Thursday Blog Hop

Good morning and welcome to the Happy Inkin’ Thursday Blog Hop! For today’s card, I used the brand new Stampin’ Up! Flowering Tulips bundle with the Flowering Fields designer series paper to make a cheery Birthday card. You can find the supplies I used at the bottom of my post along with the sizes of cardstock used.

We have a sketch this week – here is the pretty sketch we are using:

I adhered a panel of colorful Flowering Fields designer series paper to the front of a Pear Pizzazz card base. I cut a strip of Calypso Coral card stock with the tulip border die from the Stampin’ Up! Flowering Tulips bundle and adhered it to a polka dot panel of Flowering Fields DSP. I adhered the layered DSP panel to a Pear Pizzazz mat.

I stamped the sentiment from the Stampin’ Up! Flowering Fields photopolymer stamp set in Evening Evergreen ink and cut it out with the Stitched Rectangle die. I adhered it to the card front with dimensionals.

I finished the card front with Genial Gems and a bow made with the pretty Evening Evergreen Windowpane Check ribbon.

For the inside of the card, I stamped the tulip from the Stampin’ Up! Flowering Tulips stamp set in Poppy Parade, Calypso Coral, Memento Tuxedo Black and Pear Pizzazz on the side of a Basic White panel. I stamped the sentiment from the Happiest of Birthdays stamp set in Evening Evergreen in the middle of the panel. I adhered the panel to the inside of the card.

With the versatile Stampin’ Up! Flowering Tulips multi-step photopolymer stamp set, it’s easy to create pretty multicolored flowers! And when paired with the coordinating Tulips dies, you can make dimensional flowers as well!

On with the Hop! Click on the Next Blog button to move forward to see the beautiful project Karen Ksenzakovic has created.

If you get lost along the way, here are the participants for the hop:


Current Host Code: 2YHH339E

Use this host code when you order $50 or more and receive a free gift from me!  The free gift is your choice of any item valued up to $10.00 in the 2021 – 2022 Annual Catalog or the July – December 2021 Mini Catalog including some of the host stamp sets!

If your order is over $150, please do not use the host code since you’ll receive your own Host Dollars plus I’ll still send you the free gift!  This host code can be used by anyone, no club or commitment required. Let me know if you have any questions.


If you need any stamping supplies, Iโ€™d be very happy to be your Demonstrator.  Just click on the Shop Now button on the right side of the screen to go directly to my online store or contact me if you have any questions. 

Thanks for stopping by and Happy Stamping!

Akiko

  • Visit my online store here
  • See the current Stampinโ€™ Up! clearance rack specials here
  • Earn FREE Stampinโ€™ Up! products through my Wildflower Frequent Shopper Program – my way of saying thank you to my online frequent shopper customers.
  • Have any questions? I’d be happy to help, click here to contact me.

Cardstock Cuts for this project:

  • Pear Pizzazz โ€“ 5-1/2″ x 8-1/2″ card base scored at 4-1/4″, 3-5/8″ x 3-7/8″ (front mat), 1-3/4″ x 4″ (label)
  • Calypso Coral – 1-1/2″ x 3-3/4″ (die cut tulips)
  • Basic White – 4″ x 5-1/4″ (inside panel)
  • Flowering Fields DSP – 4″ x 5-1/4″ (front background), 3-1/2″ x 3-3/4″ (front inset

Stampinโ€™ Up! products used in this project:


Stampinโ€™ Up! Rainbow of Happiness Birthday Card Sneak Peek

Good Morning! One of the sweetest bundles in the upcoming January – June 2022 Mini Catalog is the Stampin’ Up! Rainbow of Happiness bundle. And for the Jan-Feb 2022 Sale-A-Bration, there’s a package of coordinating 6″ x 6″ designer series paper called Sunshine and Rainbows that you can get for FREE with a $50 order before shipping and taxes. You can find the supplies I used at the bottom of my post along with the sizes of cardstock used.

And I’m joining some of the ladies on the Inkin’ Krew Team in a Blog Hop to celebrate the upcoming Jan-Jun 2022 Mini Catalog and Jan-Feb 2022 Sale-A-Bration! So be sure to check out everyone’s projects to get inspiration on using these exciting new products!

I used the rainbow border die from the Stampin’ Up! Rainbow of Happiness bundle to cut two strips of Basic White and adhered them to the top and bottom of a strip of Sunshine & Rainbows 6″ x 6″ designer series paper. I adhered the strip to the front of a striped panel of Sunshine & Rainbows 6″ x 6″ designer series paper and then adhered the layered panel to a Magenta Madness mat. I popped the layered DSP panel onto the front of a Bermuda Bay card base with dimensionals.

I cut Pool Party Sunshine & Rainbows DSP panel with the largest Hippo & Friends die and used the rainbow die from the Stampin’ Up! Rainbow Of Happiness bundle to cut rainbows bands from Magenta Madness, So Saffron, Granny Apple Green and Bermuda Bay card stock. I cut clouds from Basic White using the Brilliant Rainbows dies and adhered the rainbow bands to the back of the cards with Stampin’ Seal. I adhered the clouds and rainbows to the Pool Party DSP die cut with dimensionals, cutting skinny strips of dimensionals to place behind the rainbow bands. I adhered the layered die cut to the card front with liquid glue.

I trimmed the ends of a Granny Apple Green strip with the Banners Pick a Punch and stamped the sentiment from the Turtle Friends stamp set in Versamark Ink. I sprinkled it with white embossing powder, shook off the excess and heat set the powder with my heat tool until shiny. I adhered the label to the card front with dimensionals.

For the inside of the card, I stamped the rainbow bands and sentiment from the Stampin’ Up! Rainbow Of Happiness stamp set in Magenta Madness, So Saffron, Granny Apple Green and Bermuda Bay in the lower corner of a Basic White panel. I adhered the panel to the inside of the card.

The Stampinโ€™ Up! Rainbow Of Happiness stamp bundle is so sweet, with uplifting sentiments and fun rainbow stamps and dies. Hereโ€™s a picture of the Rainbow of Happiness photopolymer stamp set and and Brilliant Rainbow dies in the bundle:

And here’s a picture of the pretty Sunshine and Rainbows 6″ x 6″ designer series paper that is Free with a $50 order (before shipping and taxes) during Sale-A-Bration:

This bundle is sure to be a favorite on January 4, 2022 when the new catalog and Sale-A-Bration is open for ordering!

On With The Hop! Click on the Next Button to see Karen Ksenzakovic’s pretty card and the Previous Button to see Amy Koenders’ pretty card.

And here’s the list of hoppers for today in case you get lost along the way:

  1. Jaimie Babarczy
  2. Tara Beth
  3. Amy Koenders
  4. Akiko Sudano <– You Are Here
  5. Karen Ksenzakovic
  6. Jillian Good


Last Chance Products Sale Going on Now!

The Julyโ€“December 2021 Mini Catalog will be retiring soon and several products have already sold out! Itโ€™s always bittersweet to see a classic Stampinโ€™ Up! catalog take a trip to retirement. But, weโ€™re looking forward to all the new products on their wayโ€”and we hope you are, too!

Stock up on your favorite products before theyโ€™re gone for good! After all, this selection of Last Chance Products is only available through January 3, 2022 or while supplies last.

Click Here to download a PDF with the retiring products.

Click Here to download a PDF with the carry over list of products.

Click Here to Shop the Last Chance Products in my Online Store now!


Current Host Code: 2YHH339E

Use this host code when you order $50 or more and receive a free gift from me!  The free gift is your choice of any item valued up to $10.00 in the 2021-2022 Annual Catalog or the July โ€“ December 2021 Mini Catalog!

If your order is over $150, please do not use the host code since you’ll receive your own Host Dollars plus I’ll still send you the free gift!  This host code can be used by anyone, no club or commitment required. Let me know if you have any questions.


If you need any stamping supplies, Iโ€™d be very happy to be your Demonstrator.  Just click on the Shop Now button on the right side of the screen to go directly to my online store or contact me if you have any questions.  Happy Stamping!

Thanks for stopping by and have a great week!

Akiko

  • Visit my online store here
  • See the current Stampinโ€™ Up! clearance rack specials here
  • Earn FREE Stampinโ€™ Up! products through my Wildflower Frequent Shopper Program – my way of saying thank you to my online frequent shopper customers.
  • Have any questions? I’d be happy to help, click here to contact me.

Cardstock Cuts for this project:

  • Bermuda Bay – 5-1/2″ x 8-1/2″ card base scored at 4-1/4″, 2โ€ณ x 3โ€ณ (rainbow)
  • Granny Apple Green – 1/2″ x 4″ (label), 2โ€ณ x 3โ€ณ (rainbow)
  • Magenta Madness โ€“ 3-3/4″ x 5″ (front mat), 2โ€ณ x 3โ€ณ (rainbow)
  • So Saffron โ€“ 2โ€ณ x 3โ€ณ (rainbow)
  • Basic White- 3-3/4″ x 5″ (inside panel), 1″ x 4″ (die cut clouds), two 1/2″ x 3-5/8″ strips (rainbow borders)
  • Sunshine & Rainbows DSP – 3-5/8″ x 4-7/8″ (front background), 1/2″ x 3-3/4″ (inside trim), 1″ x 3-5/8″ (front stripe), 3″ x 3″ (die cut background)

Stampinโ€™ Up! products used in this project:


Stampinโ€™ Up! Welcoming Woods Winter Birthday Card

Happy Saturday! The Stampin’ Up! Welcoming Woods stamp set is one of the prettiest woodland stamp sets and it’s great for all seasons. And it has lots of sentiments that use the prettiest font that are appropriate for lots of occasions. Today’s card is an elegant Birthday Card with an embossed snowy scene that is perfect for winter birthdays. You can find the supplies I used at the bottom of my post along with the sizes of cardstock used.

I adhered a panel of Peaceful Place specialty designer series paper to the front of a Basic Gray card base with liquid glue. I tore a couple of sticky notes to create a mask for a snowy ground and adhered them to the bottom of a Basic White panel, covering the bottom 1″ of the panel. I used blending brushes to apply Balmy Blue and Misty Moonlight ink to the top of the panel over the mask to color the sky – I love how the snowy ground reveals itself when you remove the masks.

I stamped the trees from the Stampin’ Up! Welcoming Woods photopolymer stamp set in Basic Gray so that the tree tops cover the panel top. I stamped it twice, getting a thin tree trunk on the right side, but you could center it more if you want. I let it dry for a couple of hours and then stamped the snowflakes all over the image in Versamark ink. I sprinkled the image with white embossing powder and shook off the excess. I heated the powder with my heat tool until shiny and then adhered the image to a Basic Gray mat with liquid glue.

I folded a short length of Smoky slate ribbon and adhered it to the top right back of the layered stamped panel with glue dots. I adhered the panel to the front of the card with dimensionals. I stamped the sentiment from the Stampin’ Up! Welcoming Woods stamp set in Versamark ink and sprinkled it with white embossing powder. I shook off the excess and heated the powder with my heat tool until shiny. I used the Messages die to cut out the sentiment and adhered it to the front of the card with dimensionals. I finished the card with three blue gems.

For the inside of the card, I stamped the snowflakes from the Stampin’ Up! Welcoming Woods stamp set in Basic Gray in the top corner of a Basic White panel. I adhered a strip of Peaceful Place specialty designer series paper to the bottom of the panel and adhered the panel to the inside of the card.

The Stampin’ Up! Welcoming Woods stamp set is such a pretty stamp set and it’s on the retiring list, so get it before it’s gone! So I just noticed that the Peaceful Place specialty designer series paper just sold out and is no longer available. So instead of having a gray plaid background for the scene which reminds me of a warm flannel shirt (and you may have some other retired gray plaid papers in your stash), you could use a wood themed embossing folder such as the Timber 3D or Bark 3D folders on a Basic Gray panel. Or perhaps use the Birch background stamp in Basic Gray ink on Smoky Slate card stock. The Welcoming Woods stamp set would go well against any of these backgrounds!


January’s Paper Pumpkin Kit is Kisses & Hugs!

We all know that roses are red and violets are blueโ€”itโ€™s time that love-themed cards got an upgrade! The Kisses & Hugs Paper Pumpkin Kit will help you express that forever kind of love with heart-shaped cards that would make Cupid jealous.

The Kisses & Hugs kit is not bound to just Valentineโ€™s Day, it works for all love occasions year-round like anniversaries, weddings, birthdays, or those โ€œjust becauseโ€ days.

Details:

  • Contains enough supplies to create 10 cards and coordinating envelopes.
  • Perfect for all love occasions throughout the year like Valentineโ€™s Day, anniversaries, weddings, honeymoons, birthdays, and more!
  • Includes an exclusive stamp set and a Gray Granite Classic Stampinโ€™ Spot.
  • Create matching treats with the coordinating Kisses & Hugs Mini Treat Boxes (item 160147)

f youโ€™re interested in subscribing toย Paperย Pumpkin, you can either sign up for a subscription where you are billed monthly for your kit or you can purchase a prepaid subscription in my Online Store.ย To see more information and to sign up for the monthly subscription clickย here. To see the options for prepaid subscriptions in my Online Store, clickย here.

Sign up deadline for the January 2022 kit is January 10, 2022. Supplies may be limited toward the end of the subscription period.


Last Chance Products Sale Going on Now!

The Julyโ€“December 2021 Mini Catalog will be retiring soon! Itโ€™s always bittersweet to see a classic Stampinโ€™ Up! catalog take a trip to retirement. But, weโ€™re looking forward to all the new products on their wayโ€”and we hope you are, too!

Stock up on your favorite products before theyโ€™re gone for good! After all, this selection of Last Chance Products is only available through January 3, 2022 or while supplies last.

Click Here to download a PDF with the retiring products.

Click Here to download a PDF with the carry over list of products.

Click Here to Shop the Last Chance Products in my Online Store now!


Current Host Code: H6UDQF6U

Use this host code when you order $50 or more and receive a free gift from me!  The free gift is your choice of any item valued up to $10.00 in the 2021-2022 Annual Catalog or the July โ€“ December 2021 Mini Catalog!

If your order is over $150, please do not use the host code since you’ll receive your own Host Dollars plus I’ll still send you the free gift!  This host code can be used by anyone, no club or commitment required. Let me know if you have any questions.


If you need any stamping supplies, Iโ€™d be very happy to be your Demonstrator.  Just click on the Shop Now button on the right side of the screen to go directly to my online store or contact me if you have any questions.  Happy Stamping!

Thanks for stopping by and have a great week!

Akiko

  • Visit my online store here
  • See the current Stampinโ€™ Up! clearance rack specials here
  • Earn FREE Stampinโ€™ Up! products through my Wildflower Frequent Shopper Program – my way of saying thank you to my online frequent shopper customers.
  • Have any questions? I’d be happy to help, click here to contact me.

Cardstock Cuts for this project:

  • Basic Gray – 4-1/4″ x 11″ card base scored at 5-1/2″, 3-3/8″ x 4-3/8″ (art panel mat), 1-1/4″ x 2-1/2″ (label)
  • Basic White – 4″ x 5-1/4″ (inside panel), 3-1/4″ x 4-1/4″ (art panel)
  • Peaceful Home specialty DSP – 4″ x 5-1/4″ (front background), 1/2″ x 4″ (inside trim)

Stampinโ€™ Up! products used in this project: