Stampin’ Up! Daisy Garden Friendship Card

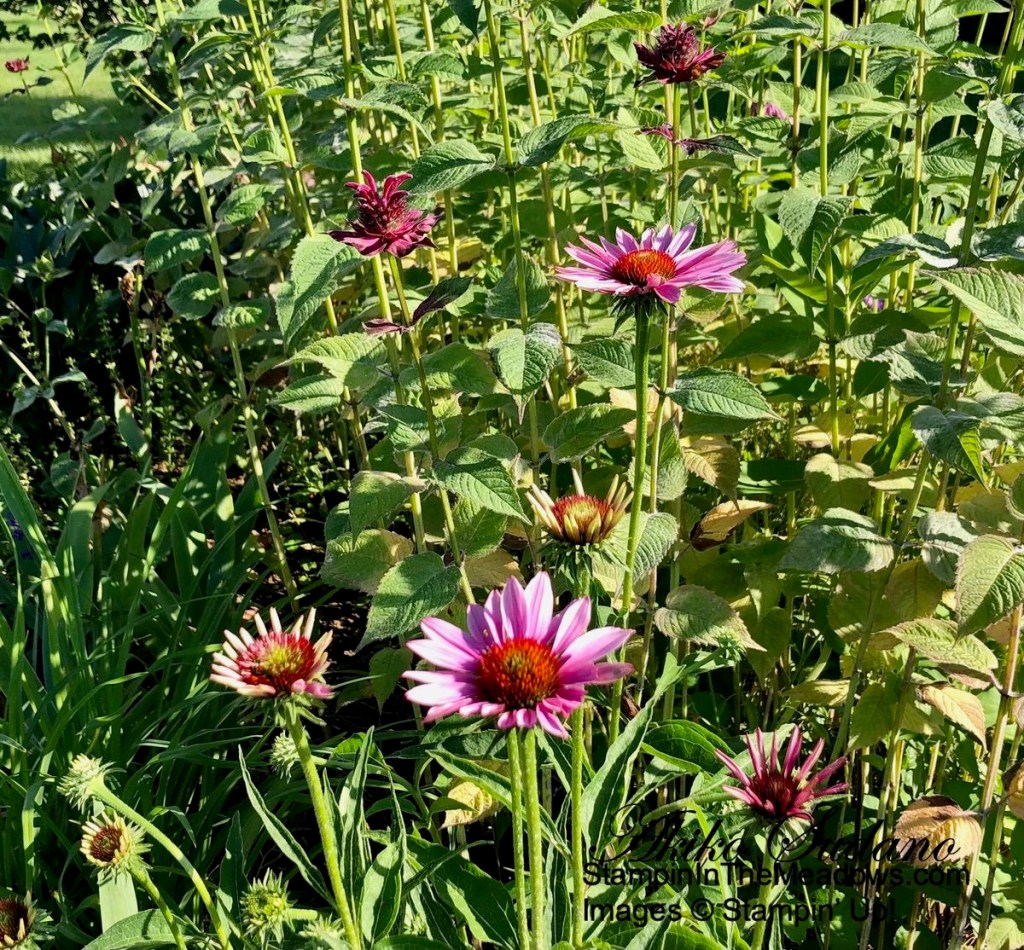
Good Morning! Summer is really here this week and the summer flowers are blooming! I was inspired by the coneflowers in my garden to color the daisies in the Stampin’ Up! Daisy Garden cling stamp set with Rich Razzleberry Stampin’ Blends for this friendship card. You can find the supplies I used at the bottom of my post along with the sizes of cardstock used.

I stamped the Stampin’ Up! Daisy Garden background cling stamp in Memento Tuxedo Black in on a Basic White panel and colored it with Stampin’ Blends. I colored the flower petals with light Rich Razzleberry and the flower centers with dark Soft Suede and light Cinnamon Cider. I colored the leaves with dark Old Olive and the sky using Light Balmy Blue. I made little circles all over the sky with the Balmy Blue, giving the sky a mottled look.

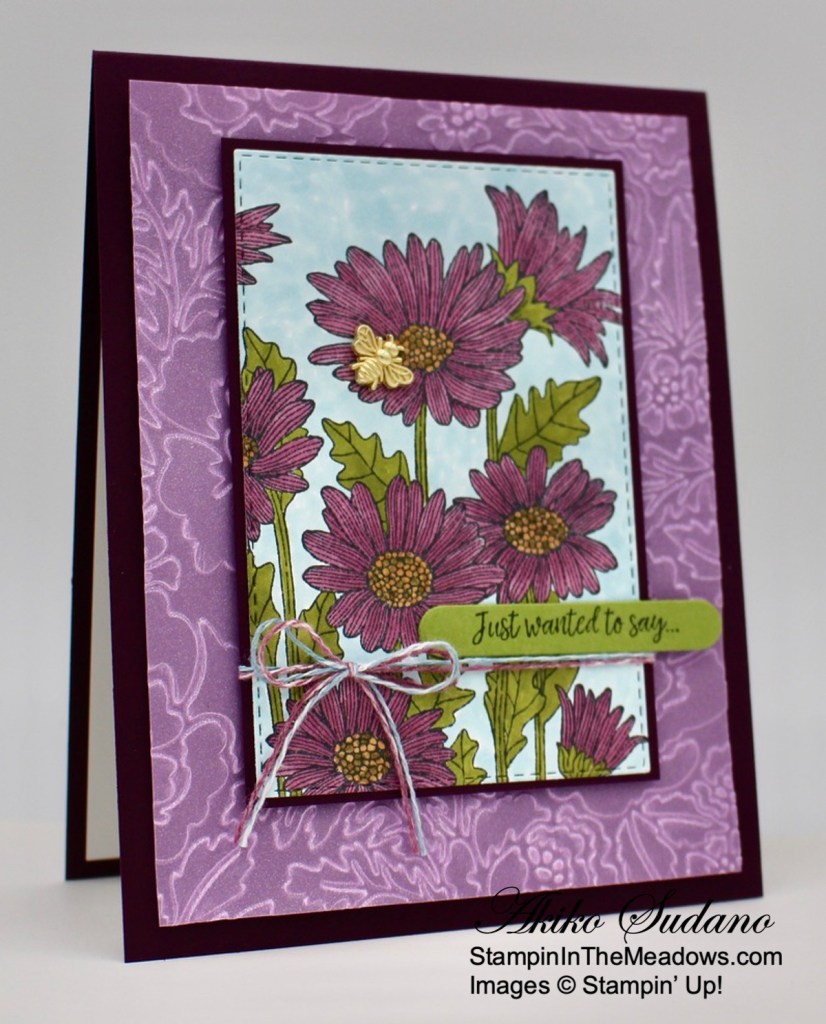
I cut the daisy image with the 4th largest Stitched Rectangle die and adhered it to a Blackberry Bliss mat. I split a length of white twine and colored each half with Stampin’ Blends – light Balmy Blue and dark Rich Razzleberry. I wrapped them around the panel and tied a bow. I stamped the sentiment from the Many Messages stamp set in Memento Tuxedo Black ink on an Old Olive panel and cut it out with the Messages die. I adhered the label to the daisy panel with glue dots just above the twine. I love this little label because it doesn’t hide much of the daisy panel!

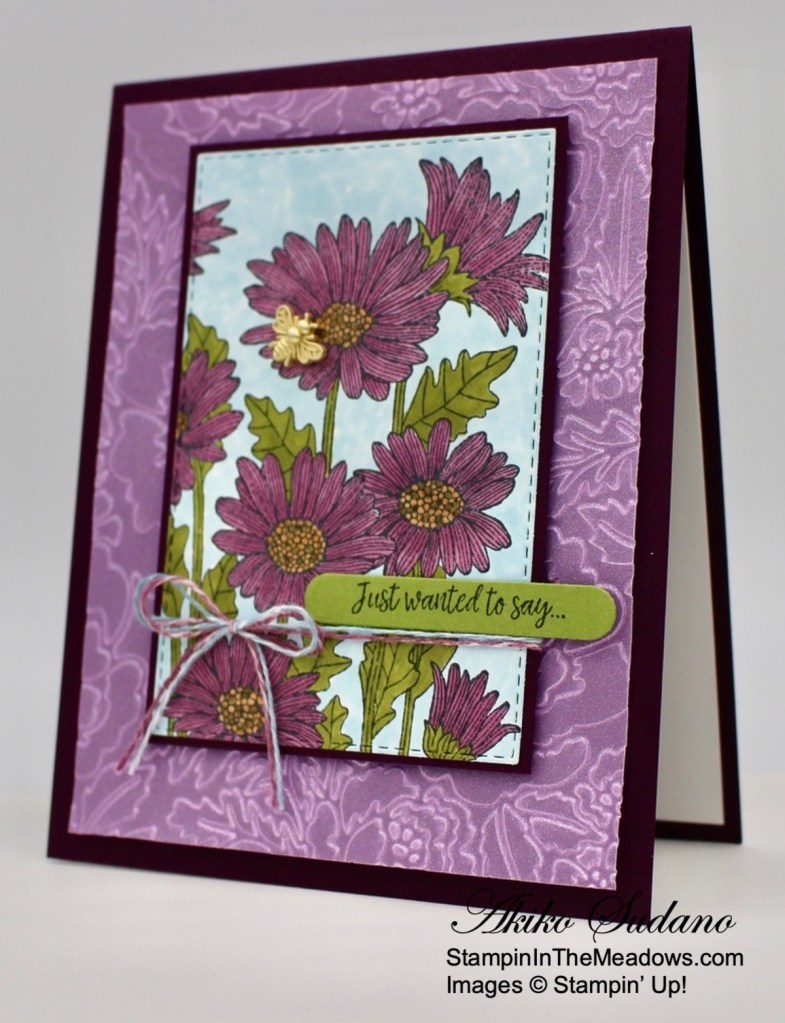
I embossed a panel of Fresh Freesia shimmer vellum with the Pretty Flowers embossing folder and adhered it to the front of a Blackberry Bliss card base. I used Stampin’ Seal Adhesive just under the area where the stamped daisy panel would cover it. I popped the stamped panel on top of the embossed vellum with dimensionals and finished the card front by adhering a gold bumblebee trinket to one of the flowers with a glue dot.


For the inside of the card, I stamped the flower from the Daisy Lane stamp set in Memento Tuxedo Black ink in the lower corner of a Basic White panel. I covered the flower with a mask and stamped the stem in Memento Tuxedo Black. I colored the flower the same as the flowers on the front. I love how the Daisy Lane flowers are in the same style as the Daisy Garden flowers! I stamped the sentiment from the Daisy lane stamp set in Rich Razzleberry ink next to the flower and adhered the panel to the inside of the card.

I love the Stampin’ Up! Daisy Garden stamp set because the flowers are so cheerful and perfect for summer cards! And its great that the flowers coordinate with the Daisy Lane stamp set because it makes them both more versatile and the sentiments in the Daisy Lane stamp set are just fantastic! And here are the coneflowers blooming in my garden – at least the ones the deer didn’t get yet. LOL.


Tomorrow is the Last Day for the January – June 2021 Mini Catalog Last Chance Products Sale!

Many favorites have already sold out on the Last Chance sale, but some pretty items are still available. So don’t delay – head over to my Online Store to start shopping now! 


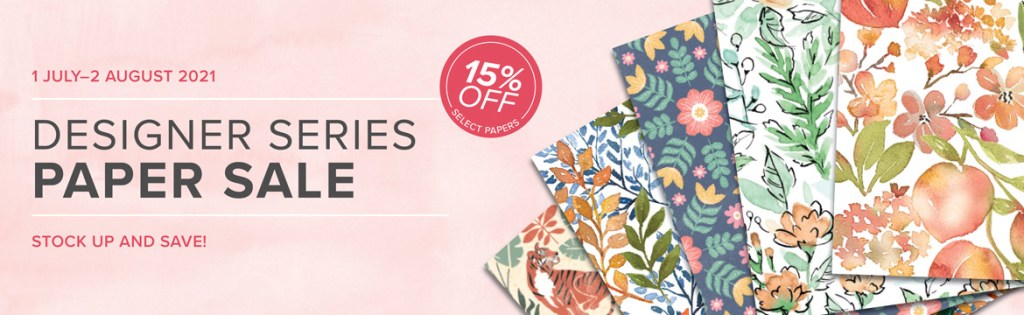
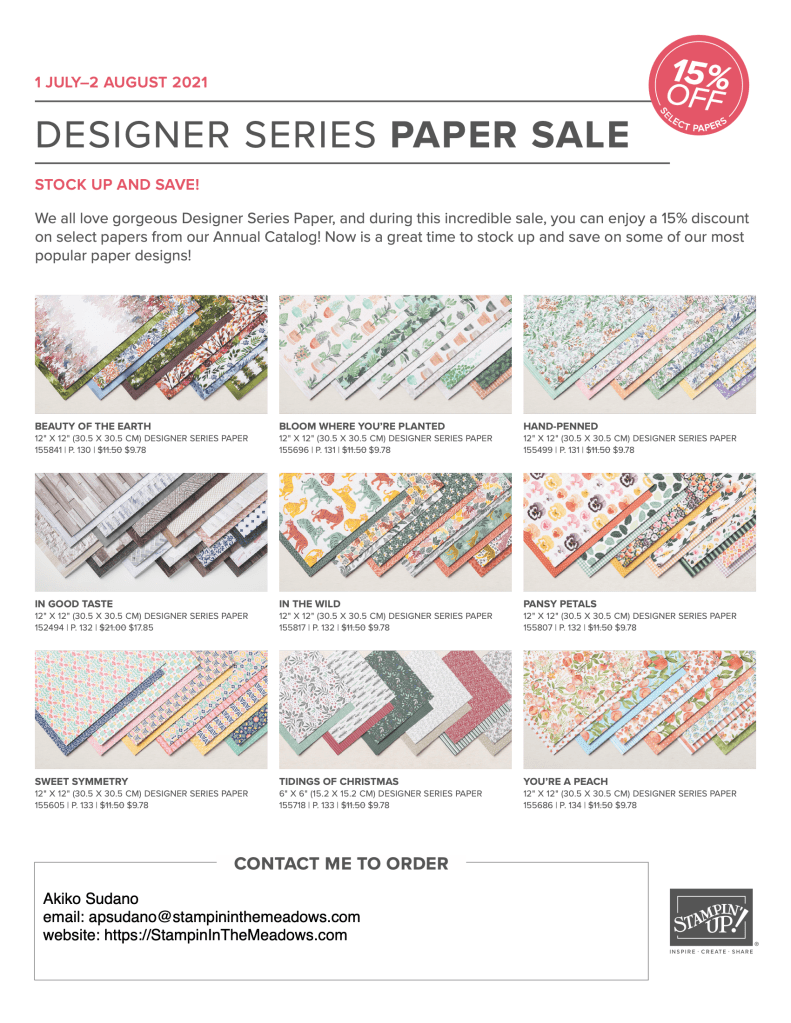
Stampin’ Up! Designer Series Paper Sale Starts Thursday, July 1!

We all love gorgeous Designer Series Paper, and during this incredible sale, you can enjoy a 15% discount on select papers from the 2021–2022 Annual Catalog! Now is a great time to stock up and save on some of Stampin’ Up!’s most beautiful paper designs! Get all the details on my Promotions Page or click on the image below for a printable PDF Flyer:


Current Host Code: ZQAFXXXK

Use this host code when you order $50 or more and receive a free gift from me!  The free gift is your choice of any item valued up to $10.00 in the 2021 – 2022 Annual Catalog!

If your order is over $150, please do not use the host code since you’ll receive your own Host Dollars plus I’ll still send you the free gift!  This host code can be used by anyone, no club or commitment required. Let me know if you have any questions.


If you need any stamping supplies, I’d be very happy to be your Demonstrator.  Just click on the Shop Now button on the right side of the screen to go directly to my online store or contact me if you have any questions. 

Thanks for stopping by and Happy Stamping!

Akiko

  • Visit my online store here
  • See the current Stampin’ Up! clearance rack specials here
  • Earn FREE Stampin’ Up! products through my Wildflower Frequent Shopper Program – my way of saying thank you to my online frequent shopper customers.
  • Have any questions? I’d be happy to help, click here to contact me.

Cardstock Cuts for this project:

  • Blackberry Bliss – 4-1/4″ x 11″ card base scored at 5-1/2″, 2-3/4″ x 4-1/8″ panel (daisy mat)
  • 2021-2023 In Color Shimmer Vellum – 3-7/8″ x 5-1/8″ (embossed background)
  • Old Olive – 1/2″ x 3″ (label)
  • Basic White – 4″ x 5-1/4″ panel (inside panel), 3-4/4″ x 5″ (daisy panel)

Stampin’ Up! products used in this project:


Stampin’ Up! Sweet As A Peach Video Tutorial

Good Morning, I hope you had a great weekend. Today I’m sharing a fun card made with the Stampin’ Up! Sweet As A Peach bundle. It’s a simple fun fold card that is really easy to make and is so pretty with the You’re A Peach designer series paper! You can find the supplies I used at the bottom of my post along with the sizes of cardstock used.

Here is the Facebook Live video showing how I made the card:

I posted a copy of the video in my YouTube channel here so you can view it there if you prefer.

This is a pretty simple fun fold in that it just splits a top fold card front in half, rotates the bottom and turns it on it’s side. Not only that, I did it backwards, making the inside of the card first. I am so confused!! So let’s start at the beginning…

Cut off the bottom 2-3/4″ of a 4-1/2″ x 11″ (scored at 5-1/2″) Calypso Coral card base so you have a 4-1/4″ x 8-1/4″ card base scored at 5-1/2″ and a 2-3/4″ x 4-1/4″ panel. Adhere a panel of floral You’re A Peach designer series paper to the inside of the card with liquid glue. Stamp the little flower and leaf pair from the Stampin’ Up! Sweet As A Peach photopolymer stamp set in Balmy Blue and Pear Pizzazz ink in the top corner of a Basic White panel. Do this a couple of times. Adhere the panel to a Balmy Blue mat and then adhere the layered panel to the inside of the card.

Adhere the floral You’re A Peach DSP to the front flap. Emboss the Basic White panel with the Bark 3D embossing folder and adhere it to the Calypso Coral panel that was cut off the bottom of the card base. Stamp the leaf spray from the Stampin’ Up! Sweet As A Peach stamp set in Pear Pizzazz ink on the Basic White panel and cut it out with the coordinating die from the Peach dies.

Ink up the triple small peaches stamp with Pale Papaya ink and apply some Calypso Coral ink around the edges with a sponge dauber. Stamp the peaches on Basic White and cut them out with the coordinating die. Stamp the sentiment in Pear Pizzazz on Basic White and cut it out with the Messages die. Adhere the label and leaf spray to the embossed panel with glue dots and pop the peaches on the leaf spray with dimensionals.

Adhere the decorated panel to the top flap with Tear & Tape, being careful not to get tape on the section of the panel that touches the inside of the card. Finish off the decorated panel with three sequins and a white bow.

The Stampin’ Up! Sweet As A Peach bundle is really very versatile, with flower and peach stamps, wonderful sentiments and dies that cut everything out and dies that cut out additional mini greenery! I thought I found a good method for lining up the leaf spray stamp so it would be die cut nicely – well that didn’t work out during the video. I think I’ll try doing something similar to the method for lining up stamps with builder punches next! The leaf spray stamp has thin section that can be misaligned if you’re not careful when mounting it on your block. This is good because you don’t have extra stamp material that can pick up ink and make for messy stamping. It’s also good if you want to curve the spray in a different way and not die cut – and this is a beautiful look too! So all in all, I am in love with this beautiful new bundle and I hope you like it too!


Final Days for the January – June 2021 Mini Catalog Last Chance Products Sale!

Many favorites have already sold out on the Last Chance sale, but some pretty items are still available. So don’t delay – head over to my Online Store to start shopping now! 

Last Week for Hey Chick and Hey Birthday Chick Bundles!

June 30, 2021 is also the last day for the fantastic Hey Chick and Hey Birthday Chick bundles! The Hey Chick Bundle is the cutest ever, and it will be so sad when they’re gone. The Hey Birthday Chick stamp set and Birthday Chick dies will still be around afterwards, but not at the special bundle pricing. So don’t delay any longer!


Stampin’ Up! Designer Series Paper Starts July 1!

We all love gorgeous Designer Series Paper, and during this incredible sale, you can enjoy a 15% discount on select papers from the 2021–2022 Annual Catalog! Now is a great time to stock up and save on some of Stampin’ Up!’s most beautiful paper designs! Get all the details on my Promotions Page or click on the image below for a printable PDF Flyer:


Current Host Code: VZMG92YZ

Use this host code when you order $50 or more and receive a free gift from me!  The free gift is your choice of any item valued up to $10.00 in the 2021-2022 Annual Catalog!

If your order is over $150, please do not use the host code since you’ll receive your own Host Dollars plus I’ll still send you the free gift!  This host code can be used by anyone, no club or commitment required. Let me know if you have any questions.


If you need any stamping supplies, I’d be very happy to be your Demonstrator.  Just click on the Shop Now button on the right side of the screen to go directly to my online store or contact me if you have any questions.  Happy Stamping!

Thanks for stopping by and have a great week!

Akiko

  • Visit my online store here
  • See the current Stampin’ Up! clearance rack specials here
  • Earn FREE Stampin’ Up! products through my Wildflower Frequent Shopper Program – my way of saying thank you to my online frequent shopper customers.
  • Have any questions? I’d be happy to help, click here to contact me.

Cardstock Cuts for this project:

  • Calypso Coral – 4-1/4″ x 8-1/4″ card base scored at 5-1/2″, 2-3/4″ x 4-1/4″ (front panel)
  • Balmy Blue – 2-3/4″ x 4-1/4″ (inside mat)
  • Basic White – 2-5/8″ x 4-1/8″ (inside panel), 2-1/2″ x 4″ (embossed panel), 2-3/4″ x 3-1/4″ (die cut leaf spray), 1-3/4″ x 2-1/4″ (die cut peaches), 1-1/4″ x 2-1/4″ (label)
  • You’re a Peach DSP – 4″ x 5-1/4″ (inside background), 2-1/2″ x 4″ (front side background)

Stampin’ Up! products used in this project:


Stampin’ Up! Designer Series Paper Sale

Good Morning! June is winding down and this means the end of the Jan-Jun Mini Catalog. The Jul-Dec Mini Catalog is not coming out until August, so Stampin’ Up! has announced a special Designer Series Paper sale for July! Yay!!

Stampin’ Up! Designer Series Paper Starts July 1!

We all love gorgeous Designer Series Paper, and during this incredible sale, you can enjoy a 15% discount on select papers from the 2021–2022 Annual Catalog! Now is a great time to stock up and save on some of Stampin’ Up!’s most beautiful paper designs!

Here are the Details:

  • Sales Period: July 1, 2021 – August 2, 2021.
  • All order types qualify for this promotion.
  • There is no limit to how many packages of Designer Series Paper may be purchased during this promotion.
  • Only select Designer Series Papers are available at a 15% discount during this promotion.
  • Orders must be placed—and closed—during the promotion period for the 15% discount to apply.
  • Designer Series Paper ordered as part of a Starter Kit or with Stampin’ Rewards qualify for the 15% discount.

Here are the DSP packs and the discounted prices that are included:

ITEMPageDescriptionPrice
155841130BEAUTY OF THE EARTH 12″ X 12″$11.50 USD
$9.78 USD
155696131BLOOM WHERE YOU’RE PLANTED 12″ X 12″$11.50 USD
$9.78 USD
155499131HAND-PENNED 12″ X 12″$11.50 USD
$9.78 USD
152494132IN GOOD TASTE 12″ X 12″$21.00 USD
$
17.85 USD
155817132IN THE WILD 12″ X 12″$11.50 USD
$9.78 USD
155807132PANSY PETALS 12″ X 12″$11.50 USD
$9.78 USD
155605133SWEET SYMMETRY 12″ X 12″$11.50 USD
$9.78 USD
155718133TIDINGS OF CHRISTMAS 6″ X 6″$11.50 USD
$9.78 USD
155686134YOU’RE A PEACH 12″ X 12″$11.50 USD
$9.78 USD

Click on the image below for a printable PDF Flyer with pictures of the papers:


Join me for a Facebook Live this afternoon!

I’m planning to go live on my Facebook Page at 1:00 ET today. I will be making a fun card with the Sweet as a Peach bundle! Look forward to seeing you then!


Final Days for the January – June 2021 Mini Catalog Last Chance Products Sale!

Many favorites have already sold out on the Last Chance sale, but some pretty items are still available. So don’t delay – head over to my Online Store to start shopping now! 


Current Host Code: VZMG92YZ

Use this host code when you order $50 or more and receive a free gift from me!  The free gift is your choice of any item valued up to $10.00 in the 2021 – 2022 Annual Catalog!

If your order is over $150, please do not use the host code since you’ll receive your own Host Dollars plus I’ll still send you the free gift!  This host code can be used by anyone, no club or commitment required. Let me know if you have any questions.


If you need any stamping supplies, I’d be very happy to be your Demonstrator.  Just click on the Shop Now button on the right side of the screen to go directly to my online store or contact me if you have any questions. 

Thanks for stopping by and Happy Stamping!

Akiko

  • Visit my online store here
  • See the current Stampin’ Up! clearance rack specials here
  • Earn FREE Stampin’ Up! products through my Wildflower Frequent Shopper Program – my way of saying thank you to my online frequent shopper customers.
  • Have any questions? I’d be happy to help, click here to contact me.

Stampin’ Up! Poinsettia Petals Christmas Card

Good Morning! Do you realize that Christmas is 6 months away? It always arrives before I’m ready, so I need to start early with Christmas cards! Here is my first Christmas card for the year made with the beautiful Stampin’ Up! Poinsettia Petals photopolymer stamp set and fabulous Poinsettia dies. You can find the supplies I used at the bottom of my post along with the sizes of cardstock used.

I used a Blending Brush to apply Soft Succulent ink to a Basic White panel. I randomly stamped the berry sprig from the Stampin’ Up! Poinsettia Petals stamp set in Soft Suede ink on the panel. I stamped the berries in Real Red ink and then embossed the panel with the Tasteful Textile 3D embossing folder. I adhered the panel to the right side of the front of a Soft Succulent card base. I cut the strip of striped Pansy Petals designer series paper with the Scalloped Contours die and adhered it to the right side of the card.

I one each of the three largest Poinsettia dies from Real Red card stock with the embossing insert and gently curved the petals with my fingers. I adhered the petal clusters together with liquid glue, alternating the petals so they fell between the petals in the layer below. I cut one each of the leaf dies from Soft Succulent card stock with the embossing insert. I adhered the flower and leaves to the card front with glue dots. I added three gold glitter enamel dots to the center of the flower.

I stamped the sentiment from the Stampin’ Up! Poinsettia Petals stamp set in Versamark ink on Evening Evergreen. I sprinkled it with white embossing powder and heat set the powder until it was shiny. I cut the sentiment with the Tailor Made Tags die. I adhered a Real Red bow to the end of the tag and slipped it under the flower.


For the inside of the card, I stamped the pine sprig from the Stampin’ Up! Poinsettia Petals stamp set in Evening Evergreen on the bottom and top corners of a Basic White panel. I stamped the berry sprig in Soft Suede ink in the lower corner and stamped the berries in Real Red. I stamped the sentiment in Real Red and adhered the panel to the inside of the card.

I’m so glad that the gorgeous Stampin’ Up! Poinsettia Petals stamp set and dies were carries over from last year’s Holiday Catalog because these are the most beautiful poinsettias ever! And don’t the Real Red flowers look great with the new In Color greens – Evening Evergreen and Soft Succulent? One last tip – they also go beautiful with the Plush Poinsettia Specialty paper (item 153486) in the Clearance Rack!

I’m so glad to start my Christmas cards for this year. The 2021-2022 Annual Catalog has favorite holiday stamp sets as well as some new bundles so you can get started right now! The July – December 2021 Mini Catalog is ramping up with the Demonstrator Pre-Order starting July 1. It will be open for customers on August 3, 2021 along with Sale A Bration Part 2!! So there are lots of pretty Holiday items coming soon – stay tuned!!


Final Days for the January – June 2021 Mini Catalog Last Chance Products Sale!

Favorite items are selling out on the Last Chance sale, so don’t wait too long. Last chance products from the January–June 2021 Mini Catalog are available while supplies last so shop early for the best selection! Many items will sell out fast, so don’t delay – head over to my Online Store to start shopping now! 

Click Here to download a PDF of the LAST CHANCE retiring items from the Jan-Jun 2021 Mini Catalog.

Click Here to down load an Excel file with the LAST CHANCE retiring items from the Jan-Jun 2021 Mini Catalog


Current Host Code: VZMG92YZ

Use this host code when you order $50 or more and receive a free gift from me!  The free gift is your choice of any item valued up to $10.00 in the 2021 – 2022 Annual Catalog or in the Jan-Jun 2021 Mini Catalog!

If your order is over $150, please do not use the host code since you’ll receive your own Host Dollars plus I’ll still send you the free gift!  This host code can be used by anyone, no club or commitment required.  Let me know if you have any questions.


If you need any stamping supplies, I’d be very happy to be your Demonstrator.  Just click on the Shop Now button on the right side of the screen to go directly to my online store or contact me if you have any questions. 

Thanks for stopping by and Happy Stamping!

Akiko

  • Visit my online store here
  • See the current Stampin’ Up! clearance rack specials here
  • Earn FREE Stampin’ Up! products through my Wildflower Frequent Shopper Program – my way of saying thank you to my online frequent shopper customers.
  • Have any questions? I’d be happy to help, click here to contact me.

Cardstock Cuts for this project:

  • Soft Succulent – 4-1/4″ x 11″ card base scored at 5-1/2″, 2″ x 3″ panel (poinsettia leaves)
  • Real Red – 4-1/2″ x 5-1/2″ (flower petal clusters)
  • Evening Evergreen – 1-1/2″ x 3″ (label)
  • Basic White – 4″ x 5-1/4″ panel (inside panel), 3-1/4″ x 5-1/2″ (front background)
  • Pansy Petals DSP – 1-1/4″ x 5-1/2″ (scalloped front side trim)

Stampin’ Up! products used in this project:

<

Stampin’ Up! Beauty of Friendship for the Happy Inkin’ Thursday Blog Hop

Good morning and welcome to the Happy Inkin’ Thursday Blog Hop! I made a simple friendship card with the pretty Stampin’ Up! Beauty of Friendship photopolymer stamp set and the pretty Beauty of the Earth designer series paper. I also used the fun Stitched with Whimsy dies to add a special touch to my card. You can find the supplies I used at the bottom of my post along with the sizes of cardstock used.

We have a sketch challenge this week and here is the pretty sketch we are using today.

I embossed a panel of Beauty of the Earth designer series paper with the second largest Stitched With Whimsy dies – note that I used the pretty paper with the tree lines to make my stripes! I adhered the DSP to a Bumblebee mat with liquid glue and wrapped it twice with gold trim making a loopy bow on the right side, securing it with a glue dot.

I stamped the sentiment from the Stampin’ Up! Beauty of the Earth stamp set in Mossy Meadow ink on a Bumblebee panel and embossed it with the small rectangle Stitched With Whimsy die. I adhered the panel to a Mossy Meadow mat and popped it on the tree panel with dimensionals.

I adhered the tree panel to the front of a Mossy Meadow card base with dimensionals and finished it with three Gilded Gems.

I stamped the sentiment from the Free as a Bird cling stamp set in Bumblebee ink in the lower corner of a Basic White panel. I trimmed the bottom of the panel with the tree line paper from Beauty of the Earth designer series paper pack and adhered the panel to the inside of the card.

The Stampin’ Up! Beauty of Friendship stamp set has pretty sentiments celebrating friendship and the woodland background makes it appropriate for anyone.

On With The Hop! Click on the Next Blog button to move forward to Karen Ksenzakovic’s project.

If you get lost along the way, here are the participants for the hop:


Current Host Code: VZMG92YZ

Use this host code when you order $50 or more and receive a free gift from me!  The free gift is your choice of any item valued up to $10.00 in the 2021 – 2022 Annual Catalog!

If your order is over $150, please do not use the host code since you’ll receive your own Host Dollars plus I’ll still send you the free gift!  This host code can be used by anyone, no club or commitment required. Let me know if you have any questions.


If you need any stamping supplies, I’d be very happy to be your Demonstrator.  Just click on the Shop Now button on the right side of the screen to go directly to my online store or contact me if you have any questions. 

Thanks for stopping by and Happy Stamping!

Akiko

  • Visit my online store here
  • See the current Stampin’ Up! clearance rack specials here
  • Earn FREE Stampin’ Up! products through my Wildflower Frequent Shopper Program – my way of saying thank you to my online frequent shopper customers.
  • Have any questions? I’d be happy to help, click here to contact me.

Cardstock Cuts for this project:

  • Mossy Meadow – 4-1/4″ x 11″ card base scored at 5-1/2″, 1-5/8″ x 3″ (label)
  • Bumblebee -3-7/8″ x 5-1/8″ (front mat), 1-1/2″ x 2-7/8″ (label)
  • Basic White – 4″ x 5-1/4″ (inside panel)
  • Beauty of the Earth DSP – 3-1/4″ x 5″ (front background), 1/2″ x 4″ (inside trim)

Stampin’ Up! products used in this project:


Stampin’ Up! June Pumpkin Kit – Expressions of Color!

Good Morning! I got my Stampin’ Up! June Paper Pumpkin kit and made one of each of the cards. This kit is so pretty with the alcohol ink backgrounds and vellum card elements! The stamp set has great sentiments and I especially love the Evening Evergreen baker’s twine and iridescent sequins! And instead of the usual 1 Stampin’ Spot that each Paper Pumpkin kit contains, this kit comes with two – Evening Evergreen and Bumblebee!! 😊

The Stampin’ Up! June Paper Pumpkin kit makes 9 cards with 3 different designs – 6 standard A2 cards and 3 note cards. This kit is the first with the new and improved instructional format that has more pictures and is easier to follow. I generally followed the instructions, but I did change things up to make cards that fit my needs better.

For my first card, I kept with the cool color scheme and used my Fresh Freesia ink to stamp a Thank You card. I also used the ink spot stamp that came with the Stampin’ Up! June Paper Pumpkin kit to add additional color to the label with my Blackberry Bliss stamp pad. Aren’t the printed vellum flowers beautiful!

I love the leafy vellum overlay in my second card, and I changed it up by wrapping my trim around the label and making a bow. So many folks I know need hugs these days, so this sentiment was perfect!

The last card is the note card and I love the monotone Evening Evergreen. The flower stamps from the Stampin’ Up! June 2021 Paper Pumpkin kit are really pretty

And I made a card with an alternative design too. I used the ink spot stamp from the kit to ink a panel of white tissue that came in the kit with Bumblebee and Polished Pink. I crumpled the tissue and adhered it to a Basic White panel with a Polished Pink mat. The vellum flower in the Stampin’ Up! June 2021 Paper Pumpkin is the same as the floral die cut from the Artistic Dies that are in the Artistically Inked bundle. So I cut one out of Polished Pink card stock and adhered it to the front of the panel and wrapped the panel with white twine and a bow before popping it on a Bumblebee card base with dimensionals. I stamped the sentiment in Polished Pink and popped it over the twine.

Here is the pretty photopolymer stamp set that is included in the kit.

Here’s the contents of the kit. I’m sure there will be refills available in the Online Store soon:

Here’s the Paper Pumpkin unboxing video from the Paper Pumpkin YouTube channel showing how to assemble the cards.

Paper Pumpkin publishes a different kit each month. They are usually card kits, but sometimes the kits will be little containers or other projects. On the first day of the ordering period, they publish a description so you will know the theme and whether it will be a card kit or other type of project. They will give clues about the design, but the kit will be a surprise when it arrives. You need to place your order or subscribe by the 10th of each month and the kit will be delivered to your mailbox before the end of the month. And then, the crafting fun begins!! Here’s the Preview of the July kit.

The July Paper Pumpkin Kit is The Adventure Begins!

Life is full of big adventures that are best experienced together! This month’s The Adventure Begins Paper Pumpkin Kit helps you celebrate those exciting new chapters in the most creative of ways with enough supplies to create twelve motivating cards—plus coordinating envelopes—all featuring the exciting colors of nature. Like the still moments before a great adventure, the kit’s designs contain a quiet energy that hint at all the grand possibilities of what is yet to come.

Here are the Details:

  • Kit includes enough supplies to make 12 cards and coordinating envelopes. 
  • This all-inclusive kit includes printed card bases, die-cut paper pieces, embellishments, adhesive, and more!
    • Card Size: 4-1/4″ x 5-1/2″
    • Envelope size: 4-1/2″ x 5-3/4″

Coordinating Colors: Basic Black, Basic White, Bermuda Bay, Crushed Curry, Early Espresso, Flirty Flamingo, Garden Green, Granny Apple Green, Mango Melody, Night of Navy

If you’re interested in subscribing to Paper Pumpkin, you can either sign up for a subscription where you are billed monthly for your kit or you can purchase a prepaid subscription in my online store. To see more information and to sign up for the monthly subscription click here. To see the options for prepaid subscriptions in my online store, click here.

Sign up deadline for the July 2021 kit is July 10, 2021. Supplies may be limited toward the end of the subscription period. 


And if you like kits, be sure to check out the current selection of affordably priced and all inclusive kits in the new Kits Collection by Stampin’ Up! here in my Online Store! Choose the kit that’s right for you! There is an assortment of options designed in a range of styles and occasions. New kits are added regularly and they are only available while supplies last.


January – June 2021 Mini Catalog Last Chance Products Sale Going on Now!

Favorite items are selling out on the Last Chance sale, so don’t wait too long. Last chance products from the January–June 2021 Mini Catalog are available while supplies last so shop early for the best selection! Many items will sell out fast, so don’t delay – head over to my Online Store to start shopping now! 

Click Here to download a PDF of the LAST CHANCE retiring items from the Jan-Jun 2021 Mini Catalog.

Click Here to down load an Excel file with the LAST CHANCE retiring items from the Jan-Jun 2021 Mini Catalog.


Current Host Code: VZMG92YZ

Use this host code when you order $50 or more and receive a free gift from me!  The gift is your choice of any item valued up to $10.00 in the 2021 – 2022 Annual Catalog!

If your order is over $150, please do not use the host code since you’ll receive your own Host Dollars plus I’ll still send you the free gift!  This host code can be used by anyone, no commitment required.  Let me know if you have any questions.


If you need any stamping supplies, I’d be very happy to be your Demonstrator.  Just click on the Shop Now Button on the right side of the screen to go directly to my Online store or contact me if you have any questions.  Happy Stamping!

Thanks for stopping by and have a great day!

Akiko

  • Visit my Online store here
  • See the current Stampin’ Up! clearance rack specials here
  • Earn FREE Stampin’ Up! products through my Wildflower Frequent Shopper Program – my way of saying thank you to my frequent shopper online customers.
  • Have any questions? I’d be happy to help, click here to contact me.

Stampin’ Up! Prepaid Paper Pumpkin Subscription Options:


Stampin’ Up! Hey Chick Happy Day Card

Good Morning! The Stampin’ Up! Hey Chick is a cute cling stamp set that came out for a short time a couple of years ago. And it was brought back this spring as a bundle with the cutest set of coordinating dies! But it will only be available until the end of this month, so I wanted to make a card with it before it’s gone. You can find the supplies I used at the bottom of my post along with the sizes of cardstock used.

I embossed a Crumb Cake panel with the new Bark 3D embossing folder and adhered it to the front of a Crumb cake card base with liquid glue. I wrapped the card front with a length of Bumblebee gingham ribbon and tied a knot on the side. I cut the henhouse from the Chick dies from Crumb Cake and adhered it to the card front with glue dots.

I cut the largest circle from the Layering Circles dies and colored a background with Crumb Cake, Garden Green. Balmy Blue and Pacific Point inks using my Blending Brushes. I cut the cornstalk and cornhusks from Garden Green and the corn from So Saffron. I adhered the corn to the cornhusks and adhered three of them to the cornstalk before adhering the cornstalk to the circle. I die cut the fence from Smoky Slate and adhered it to the circle over the cornstalk with dots of liquid glue.

I die cut the sign from Soft Suede and stamped the sentiment from the Stampin’ Up! Hey Chick stamp set on it in Memento Tuxedo Black. I adhered the sign to the circle with glue dots. I applied some adhesive strip behind a Cinnamon Cider panel and cut the little seeds. I removed the backing from the seeds and adhered them to the circle. I finally stamped the hen from the Stampin’ Up! Hey Chick stamp set in Memento Tuxedo Black ink and colored her with Poppy Parade and Daffodil Delight Stampin’ Blends. I popped the hen into the scene with dimensionals and popped it all onto the card front with more dimensionals.


For the inside of the card, I stamped the little egg from the Stampin’ Up! Hey Chick stamp set in Memento Tuxedo Black ink on a Basic White panel and colored the little feet with Daffodil Delight Stampin Blends. I stamped the sentiment next to the egg and adhered the panel to the inside of the card.

Isn’t the Stampin’ Up! Hey Chick bundle so cute? The Chick dies are so detailed and make wonderful little farm scenes! The hens are cute too and the sentiments are simple and perfect. So hurry so you can get yours while it’s still available! On another note, the Hey Birthday Chick cling stamp set and coordinating Birthday Chick dies will still be available next month, the bundle pricing with the 10% discount will also end on June 30.


January – June 2021 Mini Catalog Last Chance Products Sale Going on Now!

Last chance products from the January–June 2021 Mini Catalog are available while supplies last so shop early for the best selection! Many items will sell out fast, so don’t delay – head over to my Online Store to start shopping now! 

Click Here to download a PDF of the LAST CHANCE retiring items from the Jan-Jun 2021 Mini Catalog.

Click Here to down load an Excel file with the LAST CHANCE retiring items from the Jan-Jun 2021 Mini Catalog


Current Host Code: VZMG92YZ

Use this host code when you order $50 or more and receive a free gift from me!  The free gift is your choice of any item valued up to $10.00 in the 2021 – 2022 Annual Catalog or in the Jan-Jun 2021 Mini Catalog!

If your order is over $150, please do not use the host code since you’ll receive your own Host Dollars plus I’ll still send you the free gift!  This host code can be used by anyone, no club or commitment required.  Let me know if you have any questions.


If you need any stamping supplies, I’d be very happy to be your Demonstrator.  Just click on the Shop Now button on the right side of the screen to go directly to my online store or contact me if you have any questions. 

Thanks for stopping by and Happy Stamping!

Akiko

  • Visit my online store here
  • See the current Stampin’ Up! clearance rack specials here
  • Earn FREE Stampin’ Up! products through my Wildflower Frequent Shopper Program – my way of saying thank you to my online frequent shopper customers.
  • Have any questions? I’d be happy to help, click here to contact me.

Cardstock Cuts for this project:

  • Crumb Cake – 4-1/4″ x 11″ card base scored at 5-1/2″, 4″ x 5-1/4″ panel (embossed background), 2″ x 2-3/4″ (hen house die cut)
  • Soft Suede – 1-1/2″ x 1-3/4″ (sign die cut)
  • Garden Green – 1-1/2″ x 4″ (cornstalk and cornhusks die cuts)
  • So Saffron – 3/4″ x 2-1/2″ (corn die cuts)
  • Smoky Slate – 1-1/2″ x 3″ (fence die cut)
  • Cinnamon Cider – 1/2″ x 1-1/2″ (seed die cuts)
  • Basic White – 4″ x 5-1/4″ panel (inside panel), 3-3/4″ x 3-3/4″ (circle die cut), 2-1/4″ x 2-1/4″ (hen die cut)

Stampin’ Up! products used in this project:


Stampin’ Up! Wild Cats Birthday Card

Good Monday Morning! I hope you had a wonderful weekend and a fun Father’s Day! For today’s card I pulled out the Stampin’ Up! Wild Cats bundle and In the wild designer series paper for a jungle themed birthday card. You can find the supplies I used at the bottom of my post along with the sizes of cardstock used.

My card fits perfectly with the cool TGIF Technique Challenge #TGIFC321 going on this week:

I used the Picture This rectangle die to cut windows in a Soft Succulent panel and embossed it with the cool Animal Print embossing folder. Then I cut panels of the images I wanted from the In The wild designer series paper and adhered them to the back of the embossed panel with pieces of dimensionals. You can see how I adhered them in this picture. I did this so that I could position the tiger and leopard in the cutouts the way I wanted. I then added more dimensionals to the back of the embossed panel and glue dots to the back of the DSP and adhered the panel to the front of a Cajun Craze card base.

I stamped the sentiment from the Stampin’ Up! Wild Cats photopolymer stamp set in Cajun Craze ink on a strip of Crushed Curry and cut it out with the Messages die – I love how you can cut sentiments from so many different stamp sets with this die! I adhered the label in the center window with dimensionals.

I cut two of the small leafy plants and the two vines from the Big Cats dies from Evening Evergreen card stock and adhered them to the card front with glue dots and dimensionals.

I made a triple bow with Linen Thread and adhered it to the card front with a glue dot and finished it with three Cinnamon Cider square jewels.


For the inside of the card, I stamped the sentiment from the Happiest of Birthdays stamp set in Cajun Craze ink in the center of a Basic White panel. I stamped the leaf cluster from the Stampin’ Up! Wild Cats stamp set around the top and the sentiment in Evening Evergreen ink. I trimmed the bottom with a strip of the In The Wild DSP and adhered the panel to the inside of the card.

I wanted to make a card featuring the fierce cats from the In The Wild designer series paper and the Picture This dies are the perfect way to highlight the cats in this beautiful DSP. The sentiments from the Stampin’ Up! Wild Cats stamp sets are so fun and I think this card would be great birthday card for anyone! Thanks for stopping by and have a great week!


January – June 2021 Mini Catalog Last Chance Products Sale Going on Now!

Many items are selling out in the Last Chance sale, so don’t wait too long. Last chance products from the January–June 2021 Mini Catalog are available while supplies last! Many items will sell out fast, so don’t delay – head over to my Online Store to start shopping now! 

Click Here to download a PDF of the LAST CHANCE retiring items from the Jan-Jun 2021 Mini Catalog.

Click Here to down load an Excel file with the LAST CHANCE retiring items from the Jan-Jun 2021 Mini Catalog


Current Host Code: VZMG92YZ

Use this host code when you order $50 or more and receive a free gift from me!  The free gift is your choice of any item valued up to $10.00 in the 2021 – 2022 Annual Catalog!

If your order is over $150, please do not use the host code since you’ll receive your own Host Dollars plus I’ll still send you the free gift!  This host code can be used by anyone, no club or commitment required.  Let me know if you have any questions.


If you need any stamping supplies, I’d be very happy to be your Demonstrator.  Just click on the Shop Now button on the right side of the screen to go directly to my online store or contact me if you have any questions. 

Thanks for stopping by and Happy Stamping!

Akiko

  • Visit my online store here
  • See the current Stampin’ Up! clearance rack specials here
  • Earn FREE Stampin’ Up! products through my Wildflower Frequent Shopper Program – my way of saying thank you to my online frequent shopper customers.
  • Have any questions? I’d be happy to help, click here to contact me.

Cardstock Cuts for this project:

  • Cajun Craze – 4-1/4″ x 11″ card base scored at 5-1/2″
  • Soft Succulent – 4″ x 5-1/4″ (embossed window panel)
  • Evening Evergreen – 1″ x 4″ (plant die cuts)
  • Crushed Curry – 3/8″ x 3″ (label)
  • Basic White – 4″ x 5-1/4″ panel (inside panel)
  • In The Wild DSP – two 1-1/4″ x 3-1/4″ panels (tiger and leopard for windows), 1-1/8″ x 3-3/8″ (floral strip behind label), 1/2″ x 4″ (inside trim)

Stampin’ Up! products used in this project:


Stampin’ Up! Art Gallery Thank You Card

Happy Saturday! Today I am sharing a layered Thank You card made with the pretty Stampin’ Up! Art Gallery stamp bundle and the gorgeous Fine Art Floral designer series paper. You can find the supplies I used at the bottom of my post along with the sizes of cardstock used.

I used the sketch for the Try Stampin’ On Tuesday Challenge 510. I used the pretty designer series paper instead of making a white on white card and here’s the challenge graphic:

I cut the Golden Garden acetate so that it matches the pattern in the Fine Art Floral designer series paper and I peeled off the protective backing on the acetate and adhered it to the floral DSP with Stampin’ Seal under the Basic White rectangle. I adhered the Pool Party texture paper to a Pool Party mat and then adhered the layered floral paper next to it. I adhered the panel to the front of a Poppy Parade card base.

I cut a Basic White panel with the 4th smallest Stitched Rectangles die and embossed it with the Painted Texture 3D embossing folder. I stamped the sentiment from the Stampin’ Up! Art Gallery stamp set in Poppy Parade on Basic White and cut it out with the small label die from the Floral Gallery dies. I adhered the label to the back of the embossed rectangle and adhered them both to the card front.

I stamped the flower from the Stampin’ Up! Art Gallery stamp set in Poppy Parade – the solid stamp after stamping off and the detailed stamp full strength on top. I stamped the stem and leaves in Old Olive ink and cut the flower and stem out with the coordinating die. I popped the flower on the card front with dimensionals and adhered the stem with glue dots. I adhered three Gilded Gems around the flower and added a gold trim bow with a glue dot.


For the inside of the card, I adhered the floral DSP to the Pool Party card stock and adhered them both to the side of a Basic White panel. I adhered the panel to the inside of the card.

The Stampin’ Up! Art Gallery bundle is one of my favorites and I’m glad that it is being carried over into the new 2021-2022 Annual Catalog. But since it will no longer be available as a bundle, now is the time to get it if you want the 10% bundle savings. Both the Fine Art Floral and the Golden Garden acetate are being retired, and they’re both beautiful, so get them while they’re still available!


January – June 2021 Mini Catalog Last Chance Products Sale Going on Now!

Items are starting to sell out on the Last Chance sale, so don’t wait too long. Last chance products from the January–June 2021 Mini Catalog are available while supplies last so shop early for the best selection! Many items will sell out fast, so don’t delay – head over to my Online Store to start shopping now! 

Click Here to download a PDF of the LAST CHANCE retiring items from the Jan-Jun 2021 Mini Catalog.

Click Here to down load an Excel file with the LAST CHANCE retiring items from the Jan-Jun 2021 Mini Catalog


Current Host Code: VZMG92YZ

Use this host code when you order $50 or more and receive a free gift from me!  The free gift is your choice of any item valued up to $10.00 in the 2021 – 2022 Annual Catalog or in the Jan-Jun 2021 Mini Catalog!

If your order is over $150, please do not use the host code since you’ll receive your own Host Dollars plus I’ll still send you the free gift!  This host code can be used by anyone, no club or commitment required.  Let me know if you have any questions.


If you need any stamping supplies, I’d be very happy to be your Demonstrator.  Just click on the Shop Now button on the right side of the screen to go directly to my online store or contact me if you have any questions. 

Thanks for stopping by and Happy Stamping!

Akiko

  • Visit my online store here
  • See the current Stampin’ Up! clearance rack specials here
  • Earn FREE Stampin’ Up! products through my Wildflower Frequent Shopper Program – my way of saying thank you to my online frequent shopper customers.
  • Have any questions? I’d be happy to help, click here to contact me.

Cardstock Cuts for this project:

  • Poppy Parade – 4-1/4″ x 11″ card base scored at 5-1/2″
  • Pool Party – 4″ x 5-1/4″ (front mat), 13/16″ x 5-1/4″ (inside trim)
  • Golden Garden Acetate – 2″ x 5-1/8″ (floral DSP overlay)
  • Basic White – 4″ x 5-1/4″ panel (inside panel), 2-1/2″ x 4″ panel (die cut and embossed center panel), 1″ x 2-1/4″ (label), 3″ x 5″ (flower and stem die cuts)
  • Fine Art Floral DSP – 2-1/8″ x 5-1/8″ (Pool Party texture), 2″ x 5-1/8″ (floral), 3/4″ x 5-1/4″ (inside trim)

Stampin’ Up! products used in this project:


Stampin’ Up! Pansy Patch for the Happy Inkin’ Thursday Blog Hop

Good morning! Welcome to the Happy Inkin’ Thursday Blog Hop! Today I made a fun fold Thank You card with featuring the Stampin’ Up! Pansy Patch bundle and the pretty Pansy Petals designer series paper. The style of the card is called a Book Fold or Book Binder Fold and it’s an easy fun fold that is great for showcasing pretty coordinating designer series paper. You can find the supplies I used at the bottom of my post along with the sizes of cardstock used.

We have a theme challenge this week and our challenge is to use punches! How fun!!

I applied Tear & Tape to the side hinge part of a Pale Papaya card base, pulled the cover and adhered the hinge closed. I adhered the Soft Succulent gingham Pansy Petals DSP to an Evening Evergreen mat and adhered it to the hinge with liquid glue. I wrapped the hinge with a length of Fresh Freesia Ribbon and tied a bow. I secured the bow to the hinge with a glue dot. I adhered the floral Pansy Petals DSP to an Evening Evergreen Mat and popped it onto the open part of the card front with dimensionals.

I stamped the sentiment from the Stampin’ Up! Pansy Petals photopolymer stamp set in Evening Evergreen ink on a Fresh Freesia panel and punched it out with the Double Oval punch. I punched a Soft Succulent panel with the scalloped oval section and adhered the two punched ovals together with liquid glue and adhered it to the card front with dimensionals. I stamped small pansies from the Stampin’ Up! Pansy Patch stamp set in Pale Papaya, Pumpkin Pie, Fresh Freesia, Gorgeous Grape and Daffodil Delight. I stamped two in Pale Papaya with stamped off Pumpkin Pie accents and Daffodil Delight centers and two with Gorgeous Grape outsides and accents, Fresh Freesia tops (I masked off the bottom three petals) and Daffodil Delight centers. I cut all of them out with the die.

I stamped the leaves from the Stampin’ Up! Pansy Patch stamp set in Soft Succulent backgrounds and Evening Evergreen details and cut them out with the corresponding dies. I adhered three leaves to the card front with liquid glue and popped the pansies on top with dimensionals. I finished the card front off with 2021-2023 In Color jewels.

I stamped the sentiment from the Stampin’ Up! Pansy Patch stamp set in Fresh Freesia ink on a Basic White panel and adhered the remaining die cut pansies and leaves in the top corner. I adhered the panel to the inside of the card with Stampin’ Seal.

The Book Fold card is a real easy fun fold and it’s great with the Pansy Petals DSP. The Stampin’ Up! Pansy Patch bundle is so pretty and versatile. It’s so much fun to play with because pansies come in so many different colors and styles and you can combine the stamps in so many different ways to recreate your favorites!

On With The Hop! Click on the Next Blog button to move forward to Karen Ksenzakovic’s project.

If you get lost along the way, here are the participants for the hop:


Current Host Code: VZMG92YZ

Use this host code when you order $50 or more and receive a free gift from me!  The free gift is your choice of any item valued up to $10.00 in the 2021 – 2022 Annual Catalog!

If your order is over $150, please do not use the host code since you’ll receive your own Host Dollars plus I’ll still send you the free gift!  This host code can be used by anyone, no club or commitment required. Let me know if you have any questions.


If you need any stamping supplies, I’d be very happy to be your Demonstrator.  Just click on the Shop Now button on the right side of the screen to go directly to my online store or contact me if you have any questions. 

Thanks for stopping by and Happy Stamping!

Akiko

  • Visit my online store here
  • See the current Stampin’ Up! clearance rack specials here
  • Earn FREE Stampin’ Up! products through my Wildflower Frequent Shopper Program – my way of saying thank you to my online frequent shopper customers.
  • Have any questions? I’d be happy to help, click here to contact me.

Cardstock Cuts for this project:

  • Pale Papaya – 4-1/4″ x 11″ card base scored at 5-1/2″ (mountain) and 6-3/4″ (valley), 1-1/4″ x 2-1/4″ (label)
  • Evening Evergreen -1″ x 4″ (front hinge mat), 4″ x 4″ (front background mat)
  • Fresh Freesia – 1-1/4″ x 3-1/2″ (label punch)
  • Soft Succulent – 1-3/4″ x 3-1/2″ (label mat punch)
  • Basic White – 4″ x 4″ (inside panel), 4″ x 5″ (die cut small pansies and leaves)
  • Pansy Petals 6″ x 6″ DSP – 3-7/8″ x 3-7/8″ (floral front background), 7/8″ x 3-7/8″ (gingham front hinge)

Stampin’ Up! products used in this project: