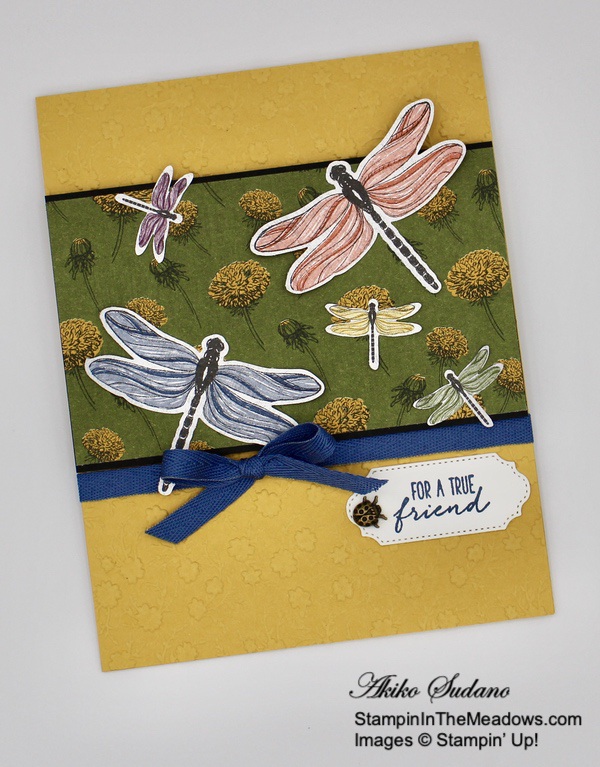
Good Friday Morning! Today am sharing a sneak peek of a card that uses the new Stampin’ Up! Enjoy The Moment cling stamp set from the upcoming January – June 2021 Mini Catalog. My card is CASE’d from one that Melody Hyde presented at the Stampin’ Up! OnStage@Home event a few weeks back. While Melody used new designer series paper, I paired the stamp set with the In Good Taste DSP. You can find the currently available supplies used to create this card at the bottom of my post along with the sizes of cardstock used.
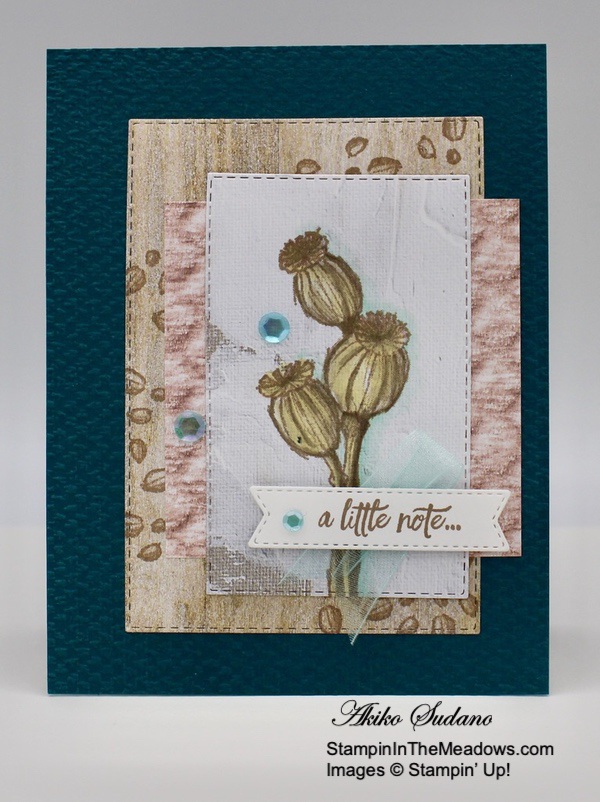
I embossed a panel of Pretty Peacock with the Tasteful Textile 3D embossing folder and adhered it to the front of a Pretty Peacock card base. I used two sizes of the Stitched Rectangles Dies to cut the wood grained and the gesso canvas papers from the In Good Taste designer series paper. I stamped the small seed pods from the upcoming Stampin’ Up! Enjoy The Moment cling stamp set in Crumb Cake ink randomly across the die cut wood grained paper.

I stamped the large seed pod from the Stampin’ Up! Enjoy The Moment stamp set in Crumb Cake ink on the die cut gesso canvas DSP panel. I colored it with Crumb Cake and So Saffron Stampin’ Blends. I brushed some Pool Party Stampin’ Blends on the right side of the pod like a shadow and used the Color Lifter to blend the line. I adhered the In Good Taste paper panels to the card front with liquid glue.

I stamped the sentiment from the Stampin’ Up! Enjoy The Moment stamp set in Crumb Cake ink on a Whisper White strip and cut it out with the Tasteful Labels die. I folded a length of sheer Pool Party ribbon and adhered it behind the label. I popped it on the card front with dimensionals. I finished off the card front with blue sequins.

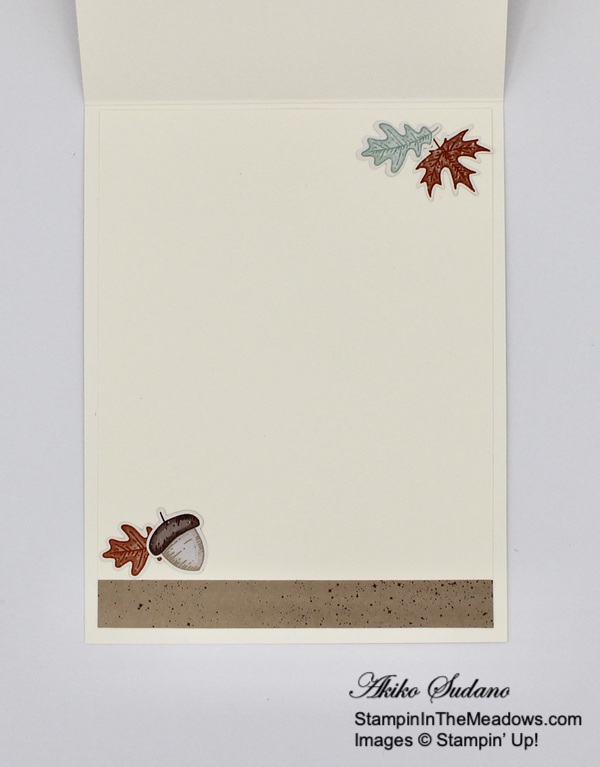
I stamped the seed pod from the Stampin’ Up! Enjoy The Moment stamp set in Crumb Cake ink on a small panel of the gesso canvas DSP and colored it to match the front. I stamped the little seed pods on a small panel of the wood grained DSP. I adhered the little panels of the In Good Taste DSP to the lower corner of a Whisper white panel and adhered the panel to the inside of the card.
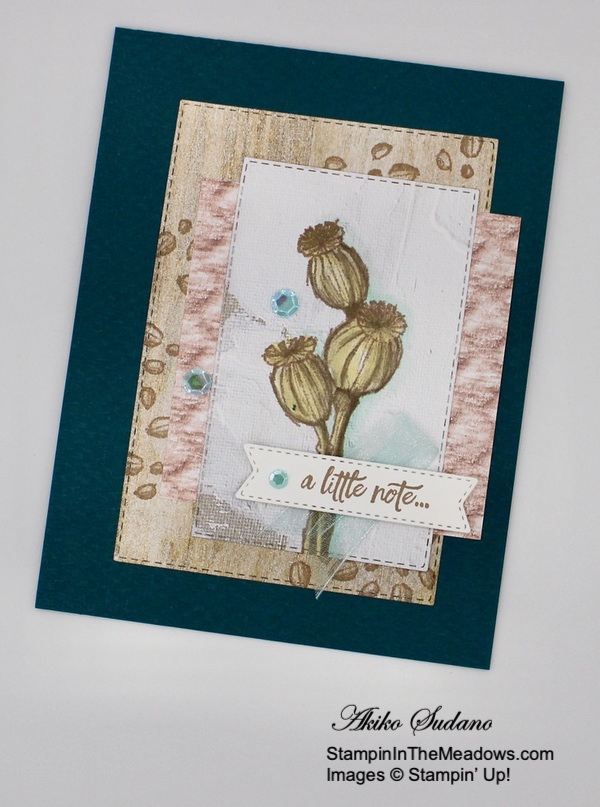
A cute little nature themed note card! The In Good Taste designer series papers have so many different textures that coordinate beautifully with nature themed stamp sets like the new Stampin’ Up! Enjoy The Moment stamp set. With all the different images and sweet sentiments, this stamp set belongs on every wish list for the upcoming January – June 2021 Mini Catalog!

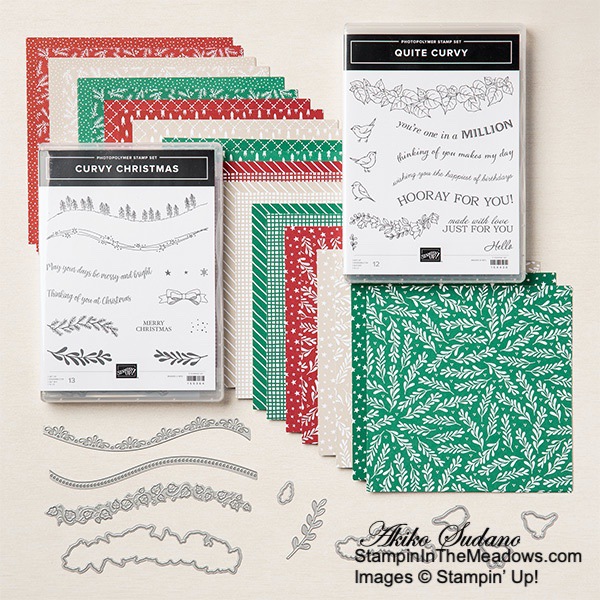
Stampin’ Up! Curvy Celebrations Going On now!
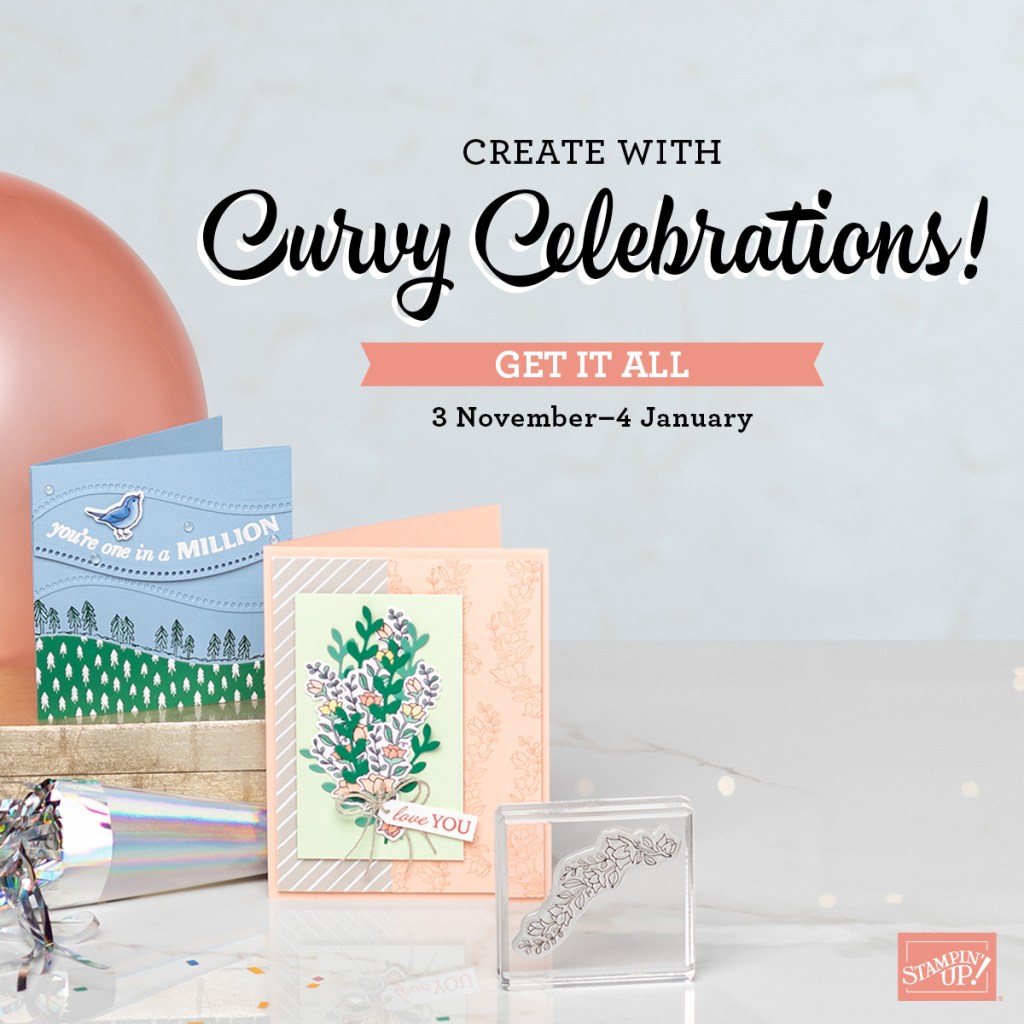
The Stampin’ Up! Curvy Celebrations runs through January 4, 2021. This will include the Quite Curvy bundle, which is an early release of the upcoming January – June 2021 Mini Catalog along with the Curvy Christmas stamp set and Classic Christmas 6″ x 6″ designer series paper. Click on the picture above to view PDF Flyer with all the details. And if you purchase either the Quite Curvy Variety Bundle (item 158396) or the Quite Curvy Bundle (item 156228) from me between now and January 4, you will receive our special Online Tutorial Class with videos. This is an exclusive set of written and video tutorials created by Inkin’ Krew team members who purchase these products during the Curvy Celebrations!

January – June 2021 Mini Catalog is Coming Soon!

I received my copies of the new January – June 2021 Mini Catalog and Sale A Bration Brochure and there are so many new and exciting products coming on January 5, 2021 – Yay!! Demonstrators are able to place orders early – starting December 1, 2020. On that morning I will be placing an order that includes new catalogs for my customers! When I get my order, I’ll be sending my customer catalogs out ASAP. If you’ve placed orders with me of at least $50 during the past year, you are automatically on my list to get a catalog when my shipment arrives! If you have not placed an order with me but want to be on my mailing list for the new catalogs too, simply place an order through my Online Store and I’ll add you to my list so you can get your catalogs next month too!
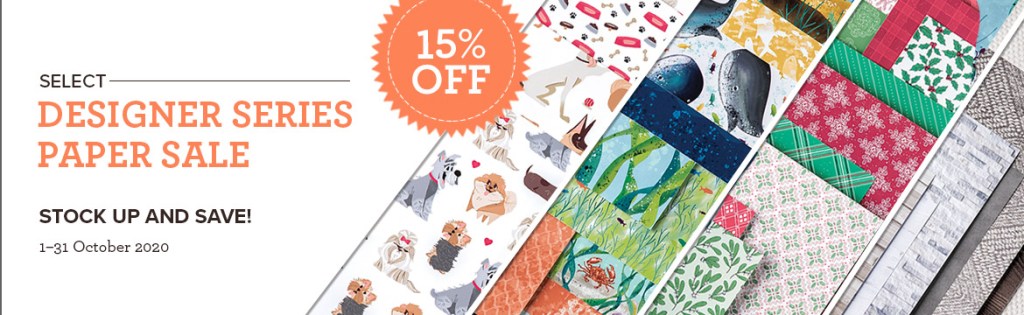
Stampin’ Up! Merry & Bright Online Extravaganza Coming November 24th!

The Stampin’ Up! Merry & Bright Online Extravaganza will be here soon, with 10% off select annual catalog items. Nearly all of the items in the annual catalog are eligible for the discount, but some exclusions do apply. You can see the exclusion list here. So get your wish list ready so you can shop early. The sale only lasts for 24 hours on Tuesday November 24th!
November 15-30 Host Code: N7E9DGB9
Use this host code when you order $50 or more and receive a free gift from me! The gift is your choice of any item valued up to $10.00 in the 2020-21 Annual Catalog or the Aug – Dec 2020 Mini Catalog. This includes some of the host exclusive sets!
If your order is over $150, please do not use the host code since you’ll receive your own Host Dollars plus I’ll still send you the free gift! This host code can be used by anyone, no commitment required. Let me know if you have any questions.
If you need any stamping supplies, I’d be very happy to be your Demonstrator. Just click on the Shop Now Button on the right side of the screen to go directly to my Online store or contact me if you have any questions. Happy Stamping!
Thanks for stopping by and have a great day!
Akiko
- Visit my Online store here
- See the current Stampin’ Up! clearance rack specials here
- Earn FREE Stampin’ Up! products through my Wildflower Frequent Shopper Program – my way of saying thank you to my frequent shopper online customers.
- Sign up for my monthly newsletter here
- Have any questions? I’d be happy to help, click here to contact me.
Cardstock Cuts for this project:
- Pretty Peacock – 4-1/4″ x 11″ card base scored at 5-1/2″, 4-1/4″ x 5-1/2″ (embossed panel)
- Whisper White – 4″ x 5-1/4″ (inside panel), 1″ x 3″ (label)
- In Good Taste DSP
- Wood Grain – 3-1/4″ x 4-1/2″ (front background), 1-1/4″ x 1-1/4″ (inside)
- Rococo Rose Fabric – 3″ x 3″ (front layer), 1/2″ x 1-1/2″ (inside)
- Gesso Canvas – 2-1/2″ x 3-3/4″ (front layer)., 1″ x 1″ (inside)
Stampin’ Up! products used in this project:


 Sheer Ribbon")


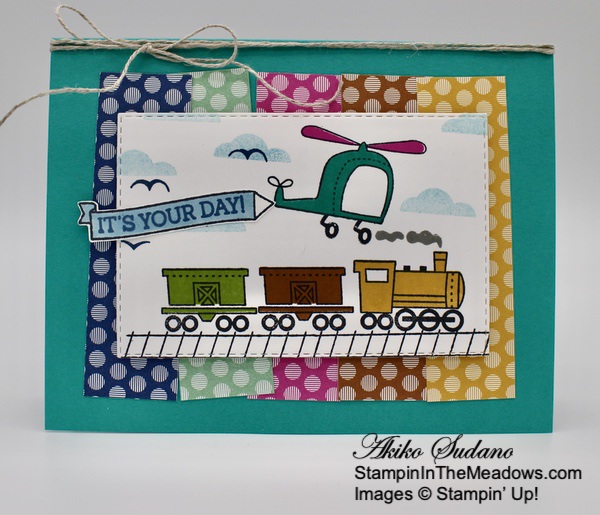
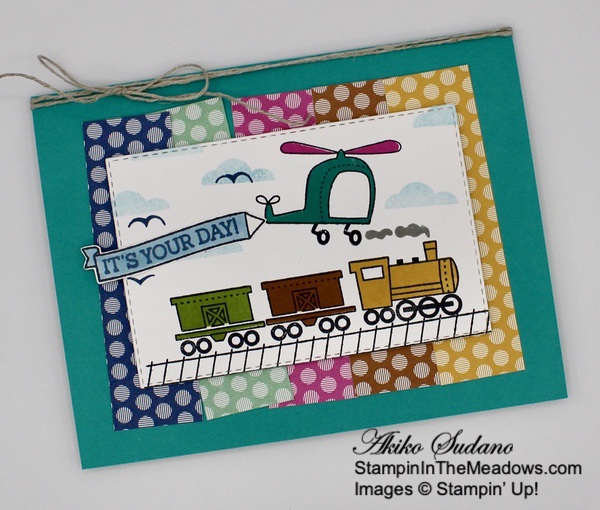
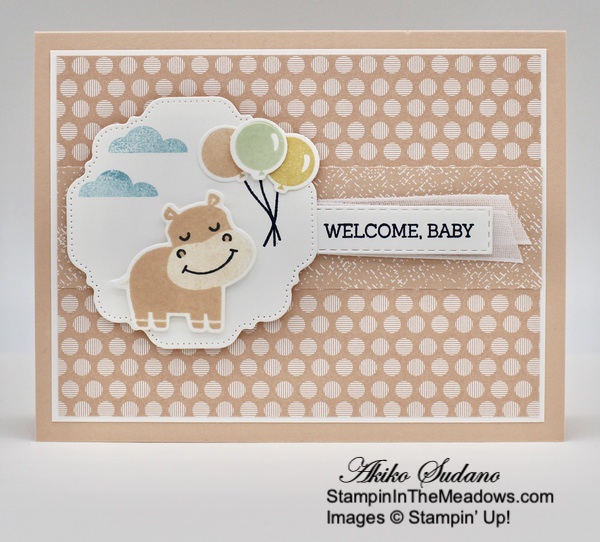 Adhere a strip of the textured Petal Pink paper from the Subtles 6″ x 6″ designer series paper pack to the Petal Pink dotted panel. Adhere the layered DSP panel to a Whisper White mat and then to the front of a Petal Pink card base with liquid glue.
 Cut the fancy stitched panel from the Hippo and Friends Dies in the Stampin’ Up! Hippo Happiness bundle from Whisper White. Stamp the balloons in Soft Sea Foam, Petal Pink and So Saffron on Whisper White and cut them out with the coordinating die. Stamp the hippo from the Stampin’ Up! Hippo Happiness photopolymer stamp set in Memento Tuxedo Black and Petal Pink on Whisper White. Hint: Stamp the darkest ink first and the lightest last for easier alignment. Stamp the face in Memento Tuxedo Black, then the partial body in Petal Pink and the full body in stamped off Petal Pink. Cut out the Hippo with the coordinating die.
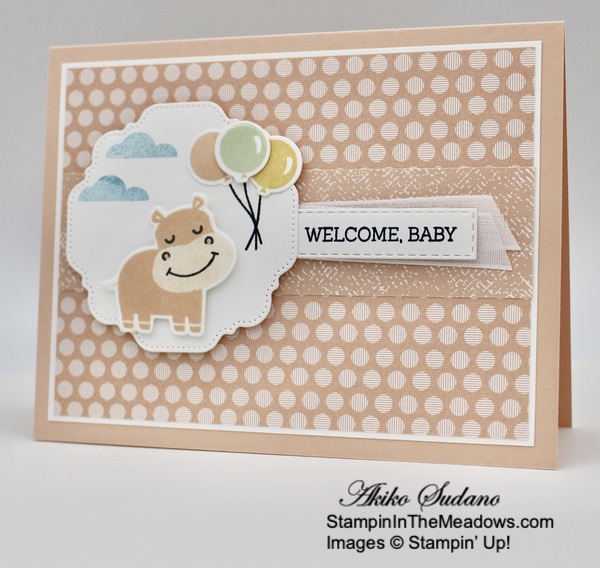 Stamp the balloon strings from the Stampin’ Up! Hippo Happiness stamp set in Memento Tuxedo Black and the clouds from the Moving Along stamp set in stamped off Balmy Blue on the fancy Whisper White die cut. Adhere the balloons with glue dots and dimensionals and adhere the hippo with dimensionals. Stamp the sentiment from the Moving Along stamp set in Memento Tuxedo Black ink on Whisper White and cut it out with the small skinny Stitched Rectangles die. Adhere it to a folded Whisper White ribbon and then to the card front with glue dots. Pop the hippo fancy panel on the card front with dimensionals.
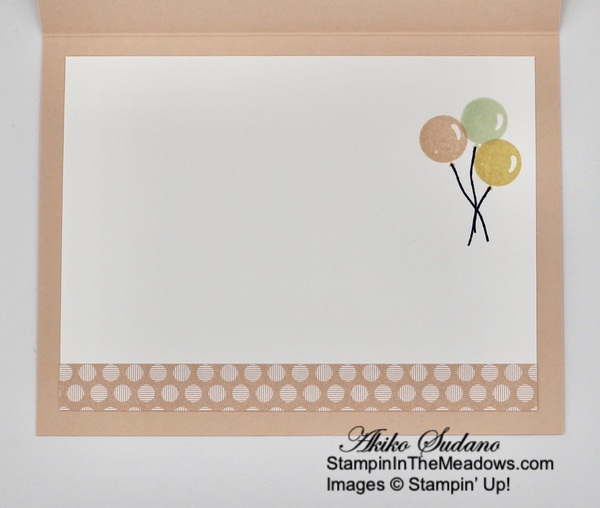 For the inside, stamp the balloons in Petal Pink, So Saffron and Soft Sea Foam on a Whisper White panel. Adhere a strip of Petal Pink Subtles 6″ x 6″ DSP to the bottom of the panel and adhere the panel to the inside of the card.
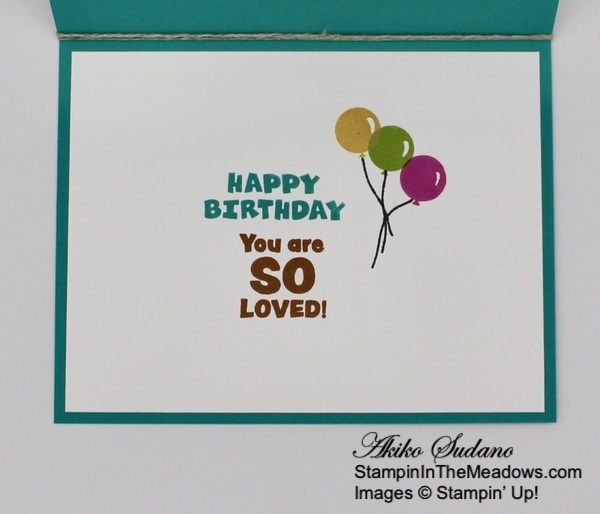
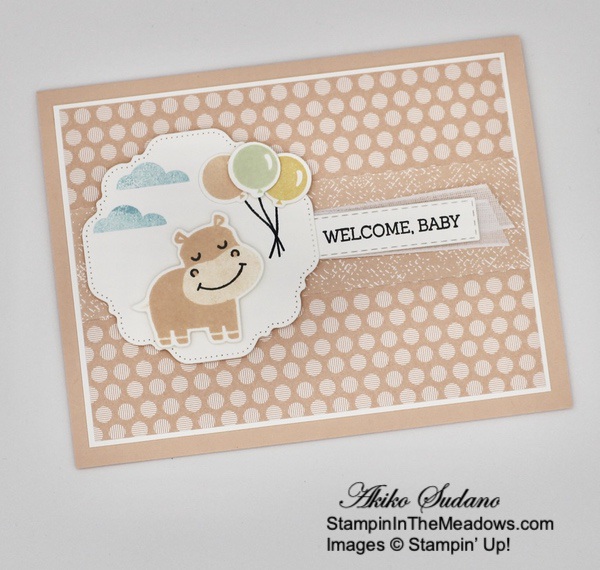

")
")
 Designer Series Paper")


")


")
")
 Designer Series Paper")


 Double-Stitched Satin Ribbon")


")


 Braided Linen Trim")


 2020–2022 In Color Ribbon")


")


