Stampin’ Up! My Meadow Flowers and Hugs Card

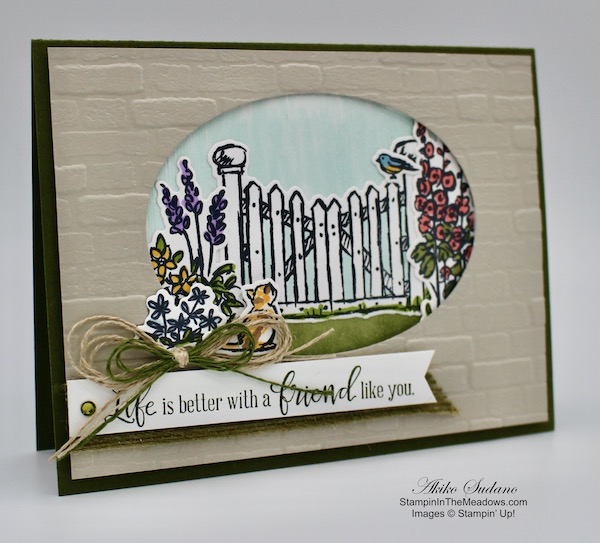
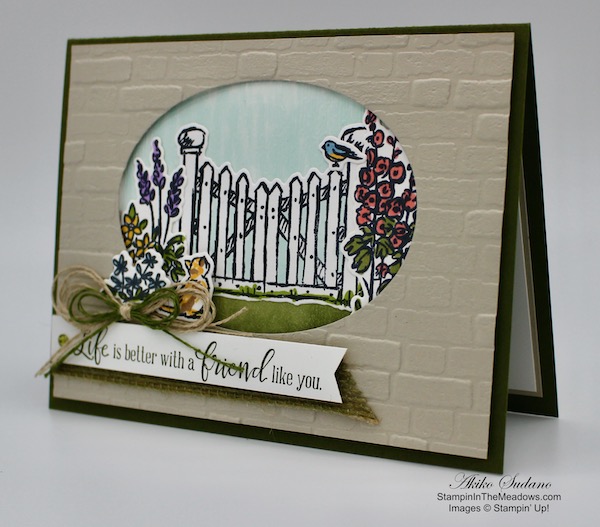
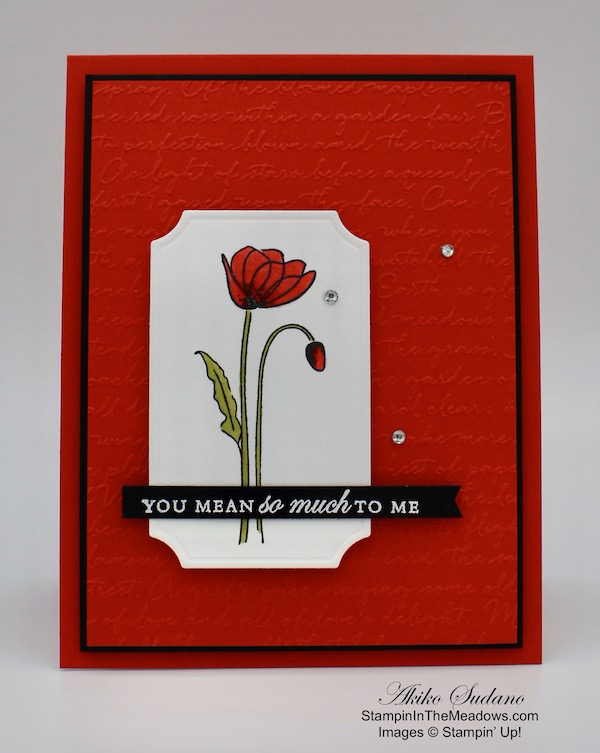
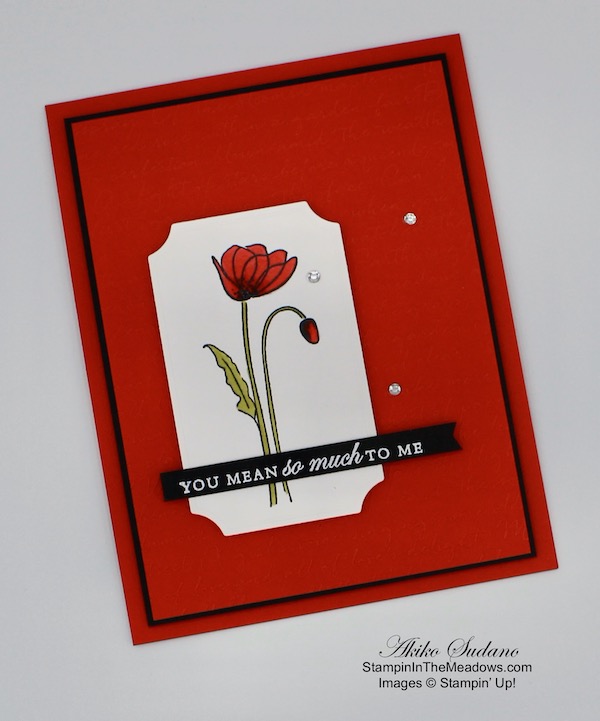
Happy Friday Morning! Are you ready for the weekend? Today I have a flowers and hugs card made with the pretty Stampin’ Up! My Meadow stamp set with the lovely sentiment from the Abstract Impressions stamp set – If flowers were hugs, I’d send you a thousand. You can find the supplies used to create this card at the bottom of my post along with the sizes of cardstock used.

I started by embossing a Crumb Cake panel with the Coastal Weave embossing folder and adhering it to a Crumb Cake card base. I cut a frame with the Stitched Rectangles dies from Pretty Peacock card stock and adhered it to the card front with multipurpose liquid glue. I cut a panel of the pretty Peacock paper from the Woven Threads designer series paper with the second largest scalloped rectangle from the Stitched So Sweetly dies.

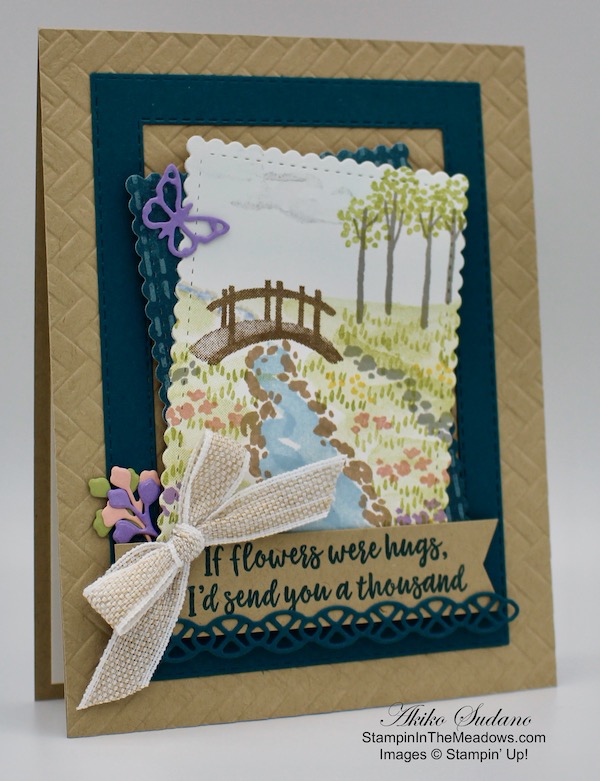
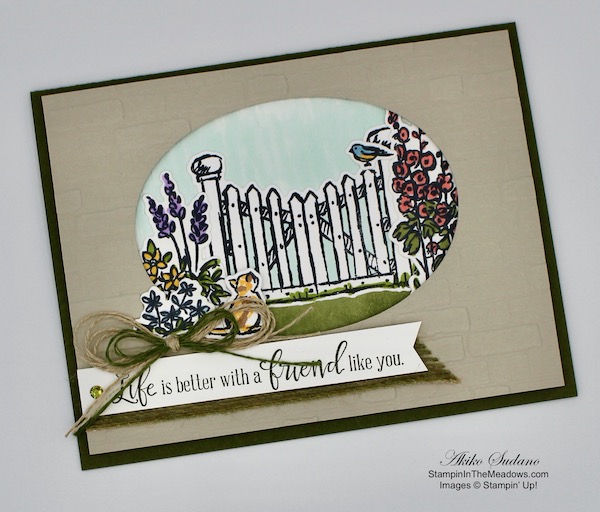
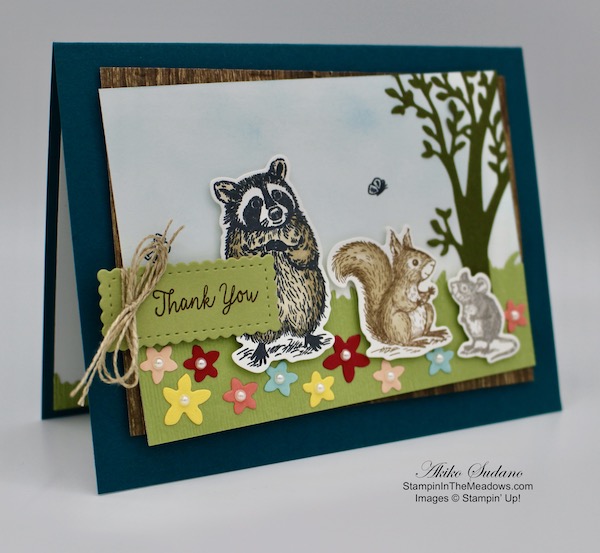
Then I went to work with the stamps in the Stampin’ Up! My Meadow stamp set, a bunch of ink pads and a small panel of Whisper White card stock. First I stamped the little bridge in Soft Suede. Then the stream in Seaside Spray – I stamped several times to make a little winding brook. I stamped the rocks using both rock stamps in Crumb Cake ink. I used the same rocks stamps to create a little path to and from the bridge, but with Smoky Slate ink. I also used Smoky Slate ink to stamp the clouds after stamping off. I stamped the tree trunks in Gray Granite ink and used the little round dots to create Spring leaves on the tops of the trees with Pear Pizzazz ink. I used the larger background stamps to create a light wash of Pear Pizzazz on the ground after stamping off each time. I stamped flowers in Blushing Bride and Highland Heather, and small dotted flowers in daffodil delight. Finally, I stamped the grass sprigs in pear pizzazz. I used my Seaside Spray Stampin’ Write marker to extend the brook beyond the bridge and Crumb Cake Stampin’ Blend to create something rocks next to the brook. Finally, I used a sponge dauber to sponge in a little Balmy Blue in the sky (it’s a little hard to see). I cut it out with the second largest scalloped rectangle from the Stitched So Sweetly dies.

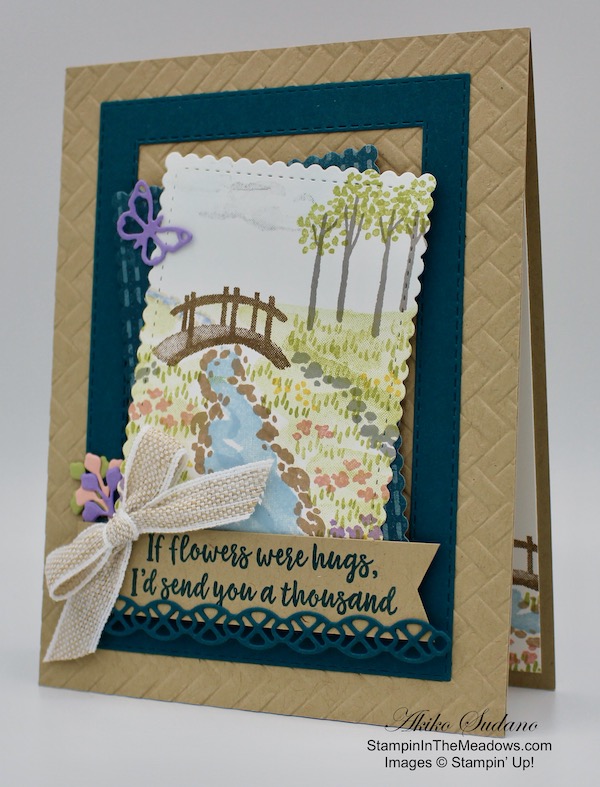
I adhered the panel to the Pretty Peacock scalloped rectangle on an angle with multipurpose liquid glue and adhered it to the card with dimensionals. I stamped the sentiment from the Abstract Impressions stamp set on a strip of Crumb Cake card stock using Pretty Peacock ink and trimmed the end. I cut a decorative strip from the Nature’s Thoughts dies from Pretty Peacock ink and adhered it to the bottom of the label with multipurpose liquid glue. I adhered the label to the card with dimensionals. I cut the little sprig from the Nature’s Thoughts dies from Pear Pizzazz, Blushing Bride and Highland Heather card stock and adhered them to the side of the card. I cut the little butterfly from the Nature’s Thoughts dies and adhered it to the top. I finished off the card front with a White and Linen ribbon bow.

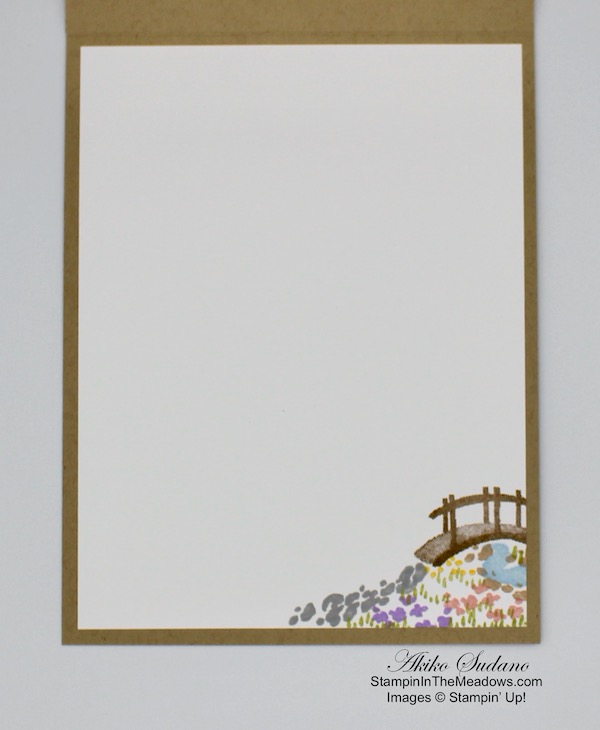
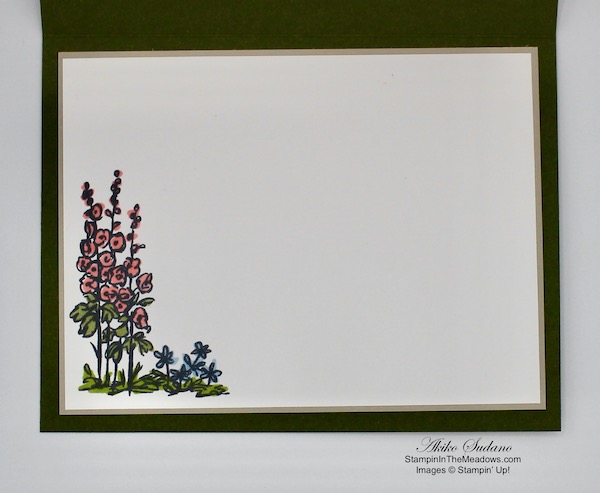
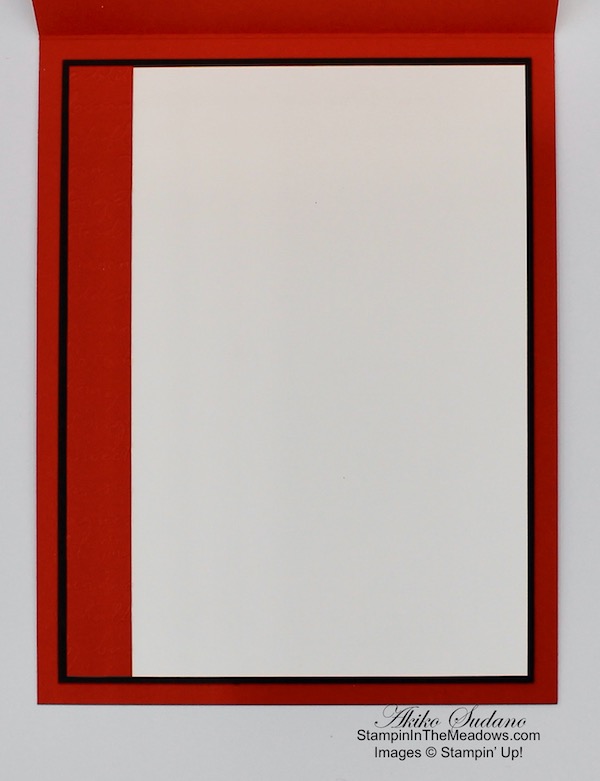
On the inside of the card, I stamped another little bridge and path scene in the corner of a Whisper White Panel using the same colors as the card front. I adhered the panel to the inside of the card with multipurpose liquid glue.

Today’s little meadow scene has a little brook, bridge and wildflowers. The Stampin’ Up! My Meadow stamp set has several other stamps that can be used to create other peaceful retreats – more trees, a cute wheel barrow and a little gazebo. So close your eyes and imagine your perfect place and then bring it to life with the Stampin’ Up! My Meadow stamp set.


March 1 – 15 Host Code: BQCVV2RG

Use this host code when you order $50 or more and receive a free gift from me!  The gift is your choice of any item valued up to $10.00 in the 2019-20 Annual Catalog or in the 2020 January-June Mini Catalog!  That includes some of the Host Exclusive stamp sets!

If your order is over $150, please do not use the host code since you’ll receive your own Host Dollars plus I’ll send you the free gift!  This host code can be used by anyone, no commitment required.  Let me know if you have any questions.


If you need any stamping supplies, I’d be very happy to be your Demonstrator.  Just click on the Shop Now button on the right side of the screen to go directly to my online store or contact me if you have any questions.  Happy Stamping!

Thanks for stopping by and have a great day!

Akiko

  • Visit my online store here
  • See the current Stampin’ Up! clearance rack specials here
  • Earn FREE Stampin’ Up! products through my Wildflower Frequent Shopper Program – my way of saying thank you to my frequent shopper online customers.
  • Sign up for my weekly newsletter here
  • Have any questions? I’d be happy to help, click here to contact me.

Cardstock Cuts for this project:

  • Crumb Cake – 4-1/4″ x 11″ card base scored at 5-1/2″, 4-1/4″ x 5-1/2″ (embossed panel), 3/4″ x 4″ (label)
  • Pretty Peacock – 4″ x 6″ (die cuts)
  • Whisper White – 4″ x 5-1/4″ (inside panel), 3″ x 4-1/4″ (meadow scene)
  • Woven Threads DSP – 3″ x 4 1/4″
  • Blushing Bride – 1″ x 1″ (die cuts)
  • Highland Heather – 2″ x 1″ (die cuts)
  • Pear Pizzazz – 1″ x 1″ (die cuts)

Stampin’ Up! products used in this project:


Stampin’ Up! Lovely Lily Pad Happy For You Card for the Happy Inkin’ Thursday Blog Hop

Good Morning! Welcome to another Happy Inkin’ Thursday Blog Hop! For my card today, I’ve used a lot of Sale-A-Bration Products, including the Stampin’ Up! Lovely Lily Pad stamp set, Lily Pad Dies and the Lily Impressions designer series paper.

We have a color challenge this week, and here is the bold and beautiful color palette I am using for my card:

I started by adhering a panel of the Sale-A-Bration Lily Impressions designer series paper on a Bermuda Bay Card base with snail. I cut the large label from the Stitched Label Dies in Bermuda Bay card stock. I cut two large outline lilies and one small outline lily from the Sale-A-Bration Lily Pad Dies in Lovely Lipstick card stock. I cut two medium solid flowers and one small flower from the Lily Pad Dies in Petal Pink Vellum. I cut two large leaf clusters and one small leaf cluster from the Lily Pad Dies in Granny Apple Green card stock. I trimmed the stems from the large leaf clusters.

I stamped the large lily pad from the Stampin’ Up! Lovely Lily Pad Sale-A-Bration stamp set in Granny Apple Green ink on Granny Apple Green card stock and cut it out with the coordinating die from the Lily Pad Dies. I adhered the lily pad to the large stitched label with multipurpose liquid glue. I made three flower clusters by layering the Lovely Lipstick outline flower on the Petal Pink vellum flower and topping it off with a leaf cluster. I adhered them together with multipurpose liquid glue, being careful to keep the glue behind the cardstock. I accented each flower with a Lovely Lipstick enamel dot and adhered them to the label with dimensionals. Again, I was careful to place the dimensionals behind the cardstock, and ended up cutting small, skinny pieces. I adhered the label to the card base with dimensionals.

I cut the decorative die cut strip from the Lily Pad Dies in Bermuda Bay card stock. I trimmed it to 4″ and adhered it to the card front with multipurpose liquid glue. I stamped the sentiment from the A Little Lace stamp set in Versamark Ink on Lovely Lipstick and sprinkled it with white embossing powder. I heat set the sentiment and cut it out with the die from the Stitched Label Dies. I adhered it to the card base over the decorative strip with dimensionals. I finished it off with a Lovely Lipstick enamel dot.

On the inside of the card, I stamped the small lily bud from the Stampin’ Up! Lovely Lily Pad stamp set in Lovely Lipstick ink, after stamping off twice, on the bottom of a Whisper White panel. I stamped the small leaf cluster under it in Granny Apple Green ink after stamping off once. I added a strip of the Lily Impressions designer series paper and adhered it to the inside of the card.

The Stampin’ Up! Lovely Lily Pad photopolymer stamp set and Lily Impressions designer series paper are FREE with a $50 purchase during Sale-A-Bration. The Lily Pad Dies are FREE with a $100 purchase.

And did you see that there is a new Sale-A-Bration Second Release out with 3 new Sale-A-Bration stamp sets and two new designer series paper packs? Check out my Promotions Page for full Sale-A-Bration Details.

On with the Hop! Click the Next button below to visit Karen Ksenzakovic’s blog.

And just in case you get lost along the way, here’s a list of the team members participating in the hop today:


March 1 – 15 Host Code: BQCVV2RG

Use this host code when you order $50 or more and receive a free gift from me!  The gift is your choice of any item valued up to $10.00 in the 2019-20 Annual Catalog or in the 2020 January-June Mini Catalog!  That includes some of the Host Exclusive stamp sets!

If your order is over $150, please do not use the host code since you’ll receive your own Host Dollars plus I’ll send you the free gift!  This host code can be used by anyone, no commitment required.  Let me know if you have any questions.


If you need any stamping supplies, I’d be very happy to be your Demonstrator.  Just click on the Shop Now button on the right side of the screen to go directly to my online store or contact me if you have any questions.  Happy Stamping!

Thanks for visiting!

Akiko

  • Visit my online store here
  • See the current Stampin’ Up! clearance rack specials here
  • Earn FREE Stampin’ Up! products through my Wildflower Frequent Shopper Program – my way of saying thank you to my frequent shopper online customers.
  • Sign up for my weekly newsletter here
  • Have any questions? I’d be happy to help, click here to contact me.

Cardstock Cuts for this project:

  • Bermuda Bay – 4-1/4″ x 11″ card base scored at 5-1/2″, 4 1/4″ x 5″ (die cuts)
  • Lovely Lipstick – 3-1/2″ x 4-1/2″ (die cuts)
  • Granny Apple Green – 2″ x 3-1/2″ (die cuts)
  • Whisper White – 4″ x 5-1/4″ (inside panel)
  • Lily Impressions DSP – 4″ x 5-1/4″ (background), 1/2″ x 4″ (inside trim)
  • Petal Pink Vellum – 3″ x 3″

Stampin’ Up! products used in this project:


Stampin’ Up! Well Dressed Birthday Card

Good Morning! Today I have a masculine birthday card made with the new Stampin’ Up! Well Dressed cling stamp set. This stamp set is one of the new Sale-A-Bration second release products that is FREE with a $50 order and it is available starting today! You can find the supplies used to create this card at the bottom of my post along with the sizes of cardstock used.

I embossed a Sahara Sand panel with the Pinewood Planks embossing folder. I adhered it to a Basic Gray card base with Snail. I adhered a panel of the gray argyle paper from the Country Club designer series paper to a Basic Black mat and then adhered them both to the embossed panel.

I stamped the fedora from the Stampin’ Up! Well Dressed stamp set with Memento Tuxedo Black ink on a Whisper White panel. I colored it with the Gray Granite Stampin’ Blends and fussy cut the hat with my paper snips. I stamped the umbrella from the Stampin’ Up! Well Dressed stamp set with Memento Tuxedo Black ink on a Whisper White panel and fussy cut it with my paper snips.

I stamped the sentiment from the Perennial Birthday stamp set in Memento Tuxedo Black ink on a Whisper White Panel. I cut it out with the Stitched Rectangle die and adhered it to the argyle paper with snail. I adhered the fedora and umbrella with dimensionals. I finished the card front with a silver metallic pearl.

I stamped the Happy Birthday sentiment from the Perennial Birthday stamp set in Memento Tuxedo Black ink on a Whisper White panel. I stamped the keys from the Stampin’ Up! Well Dressed stamp set next to the sentiment and trimmed the bottom with the Country Club argyle designer series paper before adhering the panel to the inside of the card.

Masculine cards are so hard, yet so essential!! I hope you have a gentleman in your life who would fit the dapper images in this new Sale-A-Bration stamp set. And be sure to head to my online store to check out the new Sale-A-Bration products that are available until the end of the month or while supplies last.


Sale-A-Bration Second Release Going on Now!

It’s the first day for Customers to get the Sale-A-Bration Second Release products. Yay!!! The second release consists of three additional stamp sets and two beautiful designer series paper packs that you can get for FREE with a $50 minimum purchase. Click on the picture below to see these new items and read on to get a refresher on the Sale-A-Bration details:

There are three ways to enjoy Sale-A-Bration benefits: Shop – Host – Join.

Sale-A-Bration Shopping Benefits

You earn FREE products for every $50 you spend (before shipping and taxes) during Sale-A-Bration. The Sale-A-Bration brochure has the products that you can choose to add to your order. And the more you spend, the more FREE products you can earn. There are two qualifying levels with spending thresholds, giving you flexibility to choose what you want.

For example, if you spend $150, then you can then choose three level 1 items or one level 1 and one level 2.

Head over to my online store to shop now.

Sale-A-Bration Host Benefits

Hosts with orders of $300 or more can receive the exclusive Little Ladybug Stamp Set (Item 152384).

  • Customer, workshop, and online orders qualify.
  • There is no limit as to how many qualifying orders you can place throughout the promotion.
  • Only one Little Ladybug Stamp Set can be redeemed per order. 
  • Only the host of the order will receive the free stamp set.
  • To qualify, orders must be opened from January 3, and closed by March 31.

Sale-A-Bration Joining Benefits

Recruits who join Stampin’ Up! as an independent Stampin’ Up! demonstrator between January 3–March 31, 2020, will receive the Mini Paper Cutter, a 6″ x 6″ Designer Series Paper sampler, and your choice of stamp set (Host stamp sets and Sale-A-Bration stamp sets not included.). 

  • The 6″ x 6″ Designer Series Paper Sampler in the Join offering has samples from the Lily Impressions Designer Series Paper (Sale-A-Bration brochure), Peaceful Poppies Designer Series Paper (January–June 2020 Mini Catalog), Country Club Designer Series Paper (January–June 2020 Mini Catalog), Birthday Bonanza Designer Series Paper (January–June 2020 Mini Catalog), Tropical Oasis Designer Series Paper (January–June 2020 Mini Catalog), Best Dress 6″ x 6″ Designer Series Paper (January–June 2020 Mini Catalog). 
  • 12 double-sided designs (two double-sided sheets from six different Designer Series Paper packs) QTY: 48 sheets total (four each of 12 designs)
  • Mini Paper Cutter Dimensions: 7-5/8″ x 5-3/8″ x 1-1/4″

And to sweeten the Joining offer, you can add items from the Sale-A-Bration second release to your Starter Kit if you join before March 3, 2020. 

For more details on the benefits of joining Stampin’ Up! as a Demonstrator, see my Join My Team page. There is a Join My Team button at the bottom where you can start the process. Please contact me if you have any questions. I’ll be happy to tell you more.


March 1 – 15 Host Code: BQCVV2RG

Use this host code when you order $50 or more and receive a free gift from me!  The gift is your choice of any item valued up to $10.00 in the 2019-20 Annual Catalog or in the 2020 January-June Mini Catalog!  That includes some of the Host Exclusive stamp sets!

If your order is over $150, please do not use the host code since you’ll receive your own Host Dollars plus I’ll send you the free gift!  This host code can be used by anyone, no commitment required.  Let me know if you have any questions.


If you need any stamping supplies, I’d be very happy to be your Demonstrator.  Just click on the Shop Now button on the right side of the screen to go directly to my online store or contact me if you have any questions.  Happy Stamping!

Thanks for stopping by and have a great day!

Akiko

  • Visit my online store here
  • See the current Stampin’ Up! clearance rack specials here
  • Earn FREE Stampin’ Up! products through my Wildflower Frequent Shopper Program – my way of saying thank you to my frequent shopper online customers.
  • Sign up for my weekly newsletter here
  • Have any questions? I’d be happy to help, click here to contact me.

Cardstock Cuts for this project:

  • Basic Gray – 4-1/4″ x 11″ card base scored at 5-1/2″
  • Sahara Sand – 4″ x 5-1/4″ (embossed background)
  • Whisper White – 4″ x 5 1/4″ (inside panel), 4″ x 3″ (label, hat & umbrella)
  • Basic Black – 2-1/8″ x 4″ (front trim mat)
  • Country Club DSP – 2″ x 4″ (front trim), 1/2″ x 4″ (inside trim)

Stampin’ Up! products used in this project:


Stampin’ Up! Timeless Tulips Mother’s Day Card Video Tutorial

Good Morning! Today I am sharing a video tutorial that I made yesterday during my Sunday Facebook Live session. I made a Mother’s Day Card with the pretty Stampin’ Up! Timeless Tulips bundle. You can find the supplies used to create this card at the bottom of my post along with the sizes of cardstock used. Here is my card:

And here’s the Facebook Live video:

I also posted the video to YouTube and you can view it here if you prefer.

I started by embossing a panel of Soft Sea Foam card stock with the Parisian Flourish embossing folder. I adhered it to a So Saffron card base with snail. I trimmed the bottom of a strip of Perennial Essence designer series paper with the Banner Triple Punch and adhered it to the card with snail.

I stamped one of each tulip flower from the Stampin’ Up! Timeless Tulips stamp set in Daffodil Delight ink on Whisper White. I cut out the largest flower with the Tulip Builder punch and fussy cut the other two. I stamped three stems and two leaves using Pear Pizzazz ink on Whisper White and fussy cut them out. I cut a Whisper White Circle using the largest circle in the Stitched Shapes dies and a Soft Sea Foam scalloped circle using the Layering Circles dies. I adhered these together with snail.

I arranged the flowers and stems on the circle and adhered the stems with glue dots. I adhered the small tulips to the circle with multipurpose liquid glue and the large flower with dimensionals. I adhered the stems with multipurpose liquid glue and trimmed the ends. I attached the leaves. I stamped the sentiment in Pear Pizzazz ink on a Stitched So Sweetly die cut Whisper White label. I adhered the circle and label on the card front with dimensionals, including skinny ones under the stems. I finished the card with a Daffodil Delight ruched ribbon bow and a pearl colored with the dark Daffodil Delight Stampin Blend.

I stamped another tulip, stem and leaf on a Whisper White panel for the inside of the card. I added a strip of the Perennial Essence DSP to the bottom and adhered it to the inside of the card with snail.

I love bright yellow tulips in the Spring and I think they’re perfect for Mother’s Day! What will you make for Mother’s Day?


Sale-A-Bration Second Release Begins Tomorrow!

Tomorrow is the first day for Customers to get the Sale-A-Bration Second Release products. Yay!!! The second release consists of three additional stamp sets and two beautiful designer series paper packs that you can get for FREE with a $50 minimum purchase. Click on the picture below to see these new items and read on to get a refresher on the Sale-A-Bration details:

There are three ways to enjoy Sale-A-Bration benefits: Shop – Host – Join.

Sale-A-Bration Shopping Benefits

You earn FREE products for every $50 you spend (before shipping and taxes) during Sale-A-Bration. The Sale-A-Bration brochure has the products that you can choose to add to your order. And the more you spend, the more FREE products you can earn. There are two qualifying levels with spending thresholds, giving you flexibility to choose what you want.

For example, if you spend $150, then you can then choose three level 1 items or one level 1 and one level 2.

Head over to my online store to shop now.

Sale-A-Bration Host Benefits

Hosts with orders of $300 or more can receive the exclusive Little Ladybug Stamp Set (Item 152384).

  • Customer, workshop, and online orders qualify.
  • There is no limit as to how many qualifying orders you can place throughout the promotion.
  • Only one Little Ladybug Stamp Set can be redeemed per order. 
  • Only the host of the order will receive the free stamp set.
  • To qualify, orders must be opened from January 3, and closed by March 31.

Sale-A-Bration Joining Benefits

Recruits who join Stampin’ Up! as an independent Stampin’ Up! demonstrator between January 3–March 31, 2020, will receive the Mini Paper Cutter, a 6″ x 6″ Designer Series Paper sampler, and your choice of stamp set (Host stamp sets and Sale-A-Bration stamp sets not included.). 

  • The 6″ x 6″ Designer Series Paper Sampler in the Join offering has samples from the Lily Impressions Designer Series Paper (Sale-A-Bration brochure), Peaceful Poppies Designer Series Paper (January–June 2020 Mini Catalog), Country Club Designer Series Paper (January–June 2020 Mini Catalog), Birthday Bonanza Designer Series Paper (January–June 2020 Mini Catalog), Tropical Oasis Designer Series Paper (January–June 2020 Mini Catalog), Best Dress 6″ x 6″ Designer Series Paper (January–June 2020 Mini Catalog). 
  • 12 double-sided designs (two double-sided sheets from six different Designer Series Paper packs) QTY: 48 sheets total (four each of 12 designs)
  • Mini Paper Cutter Dimensions: 7-5/8″ x 5-3/8″ x 1-1/4″

And to sweeten the Joining offer, you can add items from the Sale-A-Bration second release to your Starter Kit if you join before March 3, 2020. 

For more details on the benefits of joining Stampin’ Up! as a Demonstrator, see my Join My Team page. There is a Join My Team button at the bottom where you can start the process. Please contact me if you have any questions. I’ll be happy to tell you more.


March 1 – 15 Host Code: BQCVV2RG

Use this host code when you order $50+ and receive a free gift from me!  If your order is over $150, please do not use this code, but you’ll still get the free gift.  The free gift is your choice of any item valued up to $10.00 in the 2019 – 2020 Annual Catalog or in the 2020 Mini Catalog!  That includes some of the Host Exclusive stamp sets!

If your order is over $150, please do not use the host code since you’ll receive your own Host Dollars plus I’ll send you the free gift!  This host code can be used by anyone, no club or commitment required.  Let me know if you have any questions.


If you need any stamping supplies, I’d be very happy to be your Demonstrator.  Just click on the Shop Now button on the right side of the screen to go directly to my online store or contact me if you have any questions.  Happy Stamping!

Thanks for stopping by and have a great week!

Akiko

  • Visit my online store here
  • See the current Stampin’ Up! clearance rack specials here
  • Earn FREE Stampin’ Up! products through my Wildflower Frequent Shopper Program – my way of saying thank you to my online frequent shopper customers.
  • Sign up for my weekly newsletter here
  • Have any questions? I’d be happy to help, click here to contact me.

Cardstock Cuts for this project:

  • So Saffron – 4-1/4″ x 11″ card base scored at 5-1/2″
  • Soft Sea Foam – 4″ x 5-1/4″ (embossed background), 3-1/2″ x 3-1/2″ (scalloped circle mat)
  • Whisper White – 4″ x 5-1/4″ (inside panel), 4″ x 4-1/2″ (flowers & stems), 3-1/4″ x 3-1/4″ (circle), 1-1/2″ x 2 1/2″ (label)
  • Perennial Essence DSP – 2″ x 5″ (banner), 1/2″ x 4″ (inside trim)

Stampin’ Up! products used in this project:


Stampin’ Up! Grace’s Garden Friendship Card

Hello and Happy Friday! Today I have a friendship card made with the pretty Stampin’ Up! Grace’s Garden bundle. This stamp set includes beautiful flower and fence images that look like you are in an English country garden. You can find the supplies used to create this card at the bottom of my post along with the sizes of cardstock used.

I cut out an oval in a Sahara Sand panel using the large die in the Layering Ovals dies. I embossed the panel with the Brick and Mortar 3D embossing folder. I colored a whisper White panel with the Light Pool Party Stampin’ Blend on the top and Old Olive on the bottom. I ran the panel through the Subtle embossing folder to give it a little texture.

Using the stamps in the Stampin’ Up! Grace’s Garden stamp set, I stamped the gate, one of each of the flower clusters, the little bird and cat with Memento Tuxedo Black ink on a panel of Whisper White. I cut them out with the matching die from the Garden Gateway dies and used Stampin’ Blends to color the. I colored the flowers with Flirty Flamingo, Mango Melody, Highland Heather, Balmy Blue, Old Olive and Granny Apple Green. I colored the cat with Mango Melody and Crumb Cake and the bird with Balmy Blue and Mango Melody. I added touch of Granny Apple Green to the grass on the gate and colored the area between the slats with Light Pool Party.

Using multipurpose liquid glue, I adhered the gate, tall flowers and bird to the colored and embossed Whisper White panel. I positioned the panel behind the embossed Sahara Sand panel and adhered it with dimensionals. I stamped the sentiment from the Painted Moments stamp set in Mossy Meadow ink on a Whisper White strip. I colored a length of Burlap Ribbon with the dark Old Olive Stampin’ Blend and adhered it to the panel with glue dots. I adhered the label on top with glue dots and added an Old Olive gemstone. I adhered the cat and small flower cluster on the panel with multipurpose liquid glue and dimensionals. I finished the panel off with a looped bow made with regular and Mossy Meadow Linen Thread. I adhered the panel to a Mossy Meadow card base with dimensionals.

For the inside of the card, I stamped the tall and short flowers from the Stampin’ Up! Grace’s Garden stamp set in Memento Tuxedo Black on a panel of Whisper White. I colored them to match the flowers on the front with Flirty Flamingo, Balmy Blue, Granny Apple Green and Old Olive Stampin’ Blends. I adhered the panel to a Sahara Sand mat and then to the inside of the card.

The Stampin’ Up! Grace’s Garden bundle is such a sweet set that is perfect for Springtime cards.


February 16 – 29 Host Code: KFK3RZHV

March 1 – 15 Host Code: BQCVV2RG

Use this host code when you order $50 or more and receive a free gift from me!  The gift is your choice of any item valued up to $10.00 in the 2019-20 Annual Catalog or in the 2020 January-June Mini Catalog!  That includes some of the Host Exclusive stamp sets!

If your order is over $150, please do not use the host code since you’ll receive your own Host Dollars plus I’ll send you the free gift!  This host code can be used by anyone, no commitment required.  Let me know if you have any questions.


If you need any stamping supplies, I’d be very happy to be your Demonstrator.  Just click on the Shop Now button on the right side of the screen to go directly to my online store or contact me if you have any questions.  Happy Stamping!

Thanks for stopping by and have a great day!

Akiko

  • Visit my online store here
  • See the current Stampin’ Up! clearance rack specials here
  • Earn FREE Stampin’ Up! products through my Wildflower Frequent Shopper Program – my way of saying thank you to my frequent shopper online customers.
  • Sign up for my weekly newsletter here
  • Have any questions? I’d be happy to help, click here to contact me.

Cardstock Cuts for this project:

  • Mossy Meadow – 5 1/2″ x 8 1/2″ card base scored at 4 1/4″
  • Sahara Sand – 4″ x 5 1/4″ (brick embossed background), 3 7/8″ x 5 1/8″ (inside mat)
  • Whisper White – 3 3/4″ x 5″ (inside panel), 3 1/2″ x 4 1/4″ (front background panel), 3″ x 7″ (garden die cuts), 5/8″ x 4″ (label)

Stampin’ Up! products used in this project:


Stampin’ Up! Special Someone Thank You Card for the Happy Inkin’ Thursday Blog Hop

Good Morning! Welcome to another Happy Inkin’ Thursday Blog Hop! I have made a whimsical thank you card using the Stampin’ Up! Special Someone stamp set along with the matching Special Day dies from the Coordination Release. Here’s my card:

We have a sketch challenge this week, and here is the sketch we are using:

I embossed a panel of the wood grain paper from the Pressed Petals specialty designer series paper with the Woodland embossing folder. I cut a strip of Pear Pizzazz card stock with the grass die from the Special Day dies. I embossed the grass strip with the Subtle embossing folder. I cut the tree from Mossy Meadow card stock using the tree die from the Sweet Silhouettes dies. I sponged the top of a Whisper White panel with Balmy Blue ink so that it would look like a sky. I adhered the grass to the bottom of the panel with multipurpose liquid glue. I adhered the tree to the right side of the panel with multipurpose liquid glue and trimmed the ends. I adhered the panel to the embossed wood grain paper with multipurpose liquid glue.

On a panel of Whisper White, I stamped the raccoon from the Stampin’ Up! Special Someone stamp set in Memento Tuxedo Black ink. I stamped the squirrel in Early Espresso ink and the mouse in Gray Granite ink. I cut out all three critters using the coordinating dies from the Special Day dies. I colored the raccoon and squirrel with the Crumb Cake Stampin’ Blends and the mouse with the Gray Granite Stampin’ Blends. I adhered them to the front with dimensionals. I stamped the butterflies from the Stampin’ Up! Special Someone stamp set with Memento Tuxedo Black ink. I die cut the flowers with the 4-flower dies using Lovely Lipstick, Pineapple Punch, Petal Pink and Pool Party card stock scraps. I adhered them to the bottom with multipurpose liquid glue and added a pearl to the center of each.

I stamped the Thank You sentiment from the Stampin’ Up! Special Someone stamp set in Early Espresso ink on a strip of Pear Pizzazz card stock. I cut it out with the smallest scalloped rectangle die from the Stitched So Sweetly dies. I wrapped it with linen thread and tied a bow to the left side. I adhered it to the panel with dimensionals and I adhered the decorated panel to a Pretty Peacock card base with dimensionals.

For the inside of the card, I cut a strip of Pear Pizzazz card stock with the grass die from the Special Day dies. I embossed it with the Subtle embossing folder and adhered it to the bottom of a Whisper White panel. I adhered the panel to the inside of the card with multipurpose liquid glue.

On with the Hop! Click the Next button below to visit Karen Ksenzakovic’s blog.

And just in case you get lost along the way, here’s a list of the team members participating in the hop today:


February 16 – 29 Host Code: KFK3RZHV

Use this host code when you order $50 or more and receive a free gift from me!  The gift is your choice of any item valued up to $10.00 in the 2019-20 Annual Catalog or in the 2020 January-June Mini Catalog!  That includes some of the Host Exclusive stamp sets!

If your order is over $150, please do not use the host code since you’ll receive your own Host Dollars plus I’ll send you the free gift!  This host code can be used by anyone, no commitment required.  Let me know if you have any questions.


If you need any stamping supplies, I’d be very happy to be your Demonstrator.  Just click on the Shop Now button on the right side of the screen to go directly to my online store or contact me if you have any questions.  Happy Stamping!

Thanks for visiting!

Akiko

  • Visit my online store here
  • See the current Stampin’ Up! clearance rack specials here
  • Earn FREE Stampin’ Up! products through my Wildflower Frequent Shopper Program – my way of saying thank you to my frequent shopper online customers.
  • Sign up for my weekly newsletter here
  • Have any questions? I’d be happy to help, click here to contact me.

Cardstock Cuts for this project:

  • Pretty Peacock – 5 1/2″ x 8 1/2″ card base scored at 4 1/4″
  • Pear Pizzazz – 1 3/4″ x 4 5/8″ (card front grass), 1″ x 5 1/4″ (inside grass), 1″ x 2 1/2″ (label)
  • Mossy Meadow – 2 3/4″ x 4 1/2″ (tree)
  • Whisper White – 3 3/8″ x 4 5/8″ (card front), 3″ x 4″ (critter die cuts), 4″ x 5 1/4″ (inside panel)
  • Pressed Petals DSP – 3 1/2″ x 4 3/4″
  • Flirty Flamingo, Pineapple Punch, Lovely Lipstick, Petal Pink, Pool Party – 1 1/2″ x 1 1/2″ (flowers)

Stampin’ Up! products used in this project:


Stampin’ Up! Peaceful Moments Congratulations Card

Good Morning! Today I have a Congratulations card made with the Stampin’ Up! Peaceful Moments bundle. This stamp set has wonderful sentiments and is bundled with the Poppy Moments dies that create beautiful die cut poppies. You can find the supplies used to create this card at the bottom of my post along with the sizes of cardstock used.

I cut the large poppy with the dies in the Poppy Moments die set in Real Red and Poppy Parade card stocks. I cut the solid piece from Poppy Parade and the outline piece from Real Red. I adhered them with liquid glue and added a center cut from Basic Black card stock. I cut two sets of the large single leaf dies, using Mossy Meadow for the outline and Old Olive for the solid. I adhered them together with liquid glue.

I cut a panel of Old Olive card stock and embossed it with the Layered Leaves 3D Embossing Folder. I adhered it to the bottom of a Blackberry Bliss mat with snail and added a panel of Peaceful Poppies designer series paper to the top. I covered the seam with a strip of Real Red Stitched Ribbon and secured it in the back. I stamped the Congratulations greeting from the Stampin’ Up! Peaceful Moments stamp set with Memento Tuxedo Black ink on a strip of Rick Razzleberry and trimmed the ends before adhering it to the embossed Old Olive panel with liquid glue.

I adhered the leaves using liquid glue and popped the flower on with dimensionals. I finished off the panel with a Real Red bow and clear gemstones. I popped the panel on the front of the card with dimensionals.

For the inside of the card, I adhered a strip of the same Peaceful Poppies DSP to the bottom of a Whisper White panel before adhering it to a Blackberry Bliss mat. I then adhered it to the inside of the card. I finished off the inside by adhering a small die cut poppy that was made with Poppy Parade, Real Red and Basic Black card stock.

The die cut poppies in the Poppy Moments are so dramatic and make every card special. And they go so well with the wonderful greetings in the Stampin’ Up! Peaceful Moments stamp set.


February 16 – 29 Host Code: KFK3RZHV

Use this host code when you order $50 or more and receive a free gift from me!  The gift is your choice of any item valued up to $10.00 in the 2019-20 Annual Catalog or in the 2020 January-June Mini Catalog!  That includes some of the Host Exclusive stamp sets!

If your order is over $150, please do not use the host code since you’ll receive your own Host Dollars plus I’ll send you the free gift!  This host code can be used by anyone, no commitment required.  Let me know if you have any questions.


If you need any stamping supplies, I’d be very happy to be your Demonstrator.  Just click on the Shop Now button on the right side of the screen to go directly to my online store or contact me if you have any questions.  Happy Stamping!

Thanks for stopping by and have a great day!

Akiko

  • Visit my online store here
  • See the current Stampin’ Up! clearance rack specials here
  • Earn FREE Stampin’ Up! products through my Wildflower Frequent Shopper Program – my way of saying thank you to my frequent shopper online customers.
  • Sign up for my weekly newsletter here
  • Have any questions? I’d be happy to help, click here to contact me.

Cardstock Cuts for this project:

  • Thick Whisper White – 5 1/2″ x 8 1/2″ card base scored at 4 1/4″
  • Blackberry Bliss – (2) 3 7/8″ x 5 1/8″ (mats)
  • Whisper White – 3 3/4″ x 5″ (inside panel)
  • Old Olive – 1 1/2″ x 5″ (embossed panel), 1″ x 5″ (die cut leaves)
  • Mossy Meadow – 1″ x 5″ (die cut leaves)
  • Rich Razzleberry – 3/4″ x 4″ (label)
  • Poppy Parade – 3″ x 6″ (die cut flowers)
  • Real Red – 3″ x 6″ (die cut flowers)
  • Basic Black = 1 1/2″ x 2″ (die cut flower centers)
  • Peaceful Poppies DSP – 2 1/4″ x 5″ (card front), 1/2″ x 5″ (inside trim)

Stampin’ Up! products used in this project:


Stampin’ Up! February Paper Pumpkin Kit – A Lovely Day

Good Morning! Today I am sharing another Paper Pumpkin Kit video that I did yesterday during my Sunday Facebook Live session. The Stampin’ Up! February Paper Pumpkin kit goes well with the Sale-A-Bration Happy Birthday stamp set and I used it to make pretty alternative design cards.

These are the cards I have made so far with the kit:

Here’s the Facebook Live video where I put together some of the cards from the kit and explained how I made the alternative cards. I also showed the contents of the kit and some of the projects that I made during the week. I also talked about my 5 favorite things about the kit.

Unfortunately, I had technical problems downloading my video, so I couldn’t post it to YouTube this week. I’ll look into it more during the week so I can be sure to upload next week’s video and upload yesterday’s too.

These are the cards that I made according to the instructions provided. I did make some changes though. On the Rich Razzleberry base card, I stamped the HAVE A on the wrong edge, so I couldn’t align the the lovely as in the picture – but I think it worked out ok anyway. On the Pretty Peacock card, I colored the cake icing with my Pool Party Stampin’ Blend and stamped the BIRTHDAY in with my Pretty Peacock ink pad. I also used the iridescent sequins from my stash because I wanted more of a monochromatic look. On the Rococo Rose and Petal Pink card, I just used the celebrate greeting and skipped the label. I also stamped on the inside of the cards and you can see them in the video. The elements in the kit are pretty flexible and you can make pretty cards quite easily!

Here is one of the alternative design cards I made with the Stampin’ Up! February Paper Pumpkin kit. I used the papers from the Rococo Rose card and used the pretty floral cake from the Sale-A-
Bration Happy Birthday To You
stamp set. I stamped the cake in Rococo Rose and colored it with my Petal Pink, Old Olive and Smoky Slate Stampin’ Blends. I also used the matching Birthday dies from the Coordination Release and accented the background with those pretty Petal Pink iridescent sequins from the Paper Pumpkin kit. In the video, you can see how I stamped the large flower on the inside of the card.

Here is the second alternative design card I made with the Stampin’ Up! February Paper Pumpkin kit. I stamped the large flower in Smoky Slate ink on a panel of Whisper White and cut it out with the Stitched so Sweetly dies. I colored it with Rich Razzleberry, Petal Pink, So Saffron and Old Olive Stampin’ Blends. I stamped the congratulations in Versamark Ink on a panel of Old Olive. I sprinkled it with Silver embossing powder and heat set. I fussy cut around the letters and popped it on the panel with dimensionals. I used the Stitched Rectangle die to cut a panel of the Rick Razzleberry card base from the kit and adhered it to an Old Olive mat. I adhered the floral panel to the top with snail and popped it on a Rich Razzleberry card base.

The elements in the Stampin’ Up! February Paper Pumpkin kit coordinate with many items you may already have in your stash and are flexible and versatile enough make pretty cards that you customize to your exclusive designs.

Here are my five favorite things about the kit:

  1. I love the stamp set included in the kit – it has pretty images and is versatile.
  2. The envelopes in the kit are a nice unique design.
  3. The papers in the kit are pretty.
  4. The die cuts are fantastic
  5. It has pretty clear pink iridescent sequins.

I hope you enjoy your Stampin’ Up! February Paper Pumpkin kit as much as I did!


March 2020 Paper Pumpkin: No Matter the Weather

Cheers to seven years! This March, Paper Pumpkin has reached another exciting milestone: our seventh year of delivering fun, easy, creative projects to you and your customers. To thank everyone who has helped us along the way, we’re including an additional FREE stamp set with every March kit. This means that every subscriber will receive two stamp sets! 

The March 2020 kit will arrive in an exclusive, specially-designed box that you and your subscribers will love! Think daffodils, raindrops, and a fresh spring vibe.

Here are the Details:

  • Kit contains supplies for 12 cards and envelopes (4 cards of 3 designs)
  • Notecard size: 5″ x 3-1/2″ (12.7 x 8.9 cm)
  • Envelope size: 5-1/8″ x 3-5/8″ (13 x 9.2 cm)
  • The additional stamp set coordinates with the March kit design; however, you do not need it to complete the March cards.
  • The additional stamp set is a 4×6 footprint, which is larger than most Paper Pumpkin sets and is designed for use on a variety of crafting projects.

Coordinating Colors: Balmy Blue, Basic Gray, Calypso Coral, Grapefruit Grove, Gray Granite, Pear Pizzazz, Petal Pink, Shaded Spruce, and So Saffron

If you’re interested in subscribing to Paper Pumpkin, you can either sign up for a subscription where you are billed monthly for your kit or you can purchase a prepaid subscription in my online store. To see more information and to sign up for the monthly subscription click here. To see the options for prepaid subscriptions in my online store, click here.

As a bonus during Sale-A-Bration, purchasing a 3-month or longer prepaid subscription qualifies for FREE Sale-A-Bration products!

Sign up deadline for the March 2020 kit is March 10, 2020.


February 16 – 29 Host Code: KFK3RZHV

Use this host code when you order $50+ and receive a free gift from me!  If your order is over $150, please do not use this code, but you’ll still get the free gift.  The free gift is your choice of any item valued up to $10.00 in the 2019 – 2020 Annual Catalog or in the 2020 Mini Catalog!  That includes some of the Host Exclusive stamp sets!

If your order is over $150, please do not use the host code since you’ll receive your own Host Dollars plus I’ll send you the free gift!  This host code can be used by anyone, no club or commitment required.  Let me know if you have any questions.


If you need any stamping supplies, I’d be very happy to be your Demonstrator.  Just click on the Shop Now button on the right side of the screen to go directly to my online store or contact me if you have any questions.  Happy Stamping!

Thanks for stopping by and have a great week!

Akiko

  • Visit my online store here
  • See the current Stampin’ Up! clearance rack specials here
  • Earn FREE Stampin’ Up! products through my Wildflower Frequent Shopper Program – my way of saying thank you to my online frequent shopper customers.
  • Sign up for my weekly newsletter here
  • Have any questions? I’d be happy to help, click here to contact me.

Stampin’ Up! products used in this project:


Stampin’ Up! Painted Poppies You Mean So Much Card

Good Morning and Happy Friday! I have another card today made with the beautiful Stampin’ Up! Painted Poppies stamp set. You can find the supplies used to create this card at the bottom of my post along with the sizes of cardstock used.

I embossed a panel of Poppy Parade card stock with the Scripty embossing folder. I adhered it to a Basic Black mat with snail and then to a Poppy Parade card base with dimensionals.

I stamped the Poppy and bud from the Stampin’ Up! Painted Poppies stamp set in Memento Tuxedo Black ink on a panel of Thick Whisper White. I colored it with the Poppy Parade and Old Olive Stampin Blends. I cut it out with the large label from the Painted Labels dies. The Painted Labels dies come bundled with the Stampin’ Up! Painted Poppies stamp set for a 10% discount. I adhered it to the card front with dimensionals.

I stamped the sentiment from the Forever Blossoms stamp set using Versamark Ink on a strip of Basic Black. I sprinkled it with White Embossing powder and heat set. I trimmed the end and adhered it to the panel with glue dots. I finished off the card front with three rhinestones.

I embossed a strip of Poppy Parade with the Scripty embossing folder and adhered it to the side of a Whisper White panel. I adhered the panel to a Basic Black mat and then to the inside of the card.

It’s funny because when I first envisioned this card, I wanted to do a White on White theme with the red poppy making a big contrast. As I pulled it together, first the card base turned red, then the mats turned black and finally the embossed background turned red. Oh Well – but I do like how it turned out. We’ll have to do White on White another day. Have a great weekend!!


February 16 – 29 Host Code: KFK3RZHV

Use this host code when you order $50 or more and receive a free gift from me!  The gift is your choice of any item valued up to $10.00 in the 2019-20 Annual Catalog or in the 2019 Holiday Catalog!  That includes some of the Host Exclusive stamp sets!

If your order is over $150, please do not use the host code since you’ll receive your own Host Dollars plus I’ll send you the free gift!  This host code can be used by anyone, no commitment required.  Let me know if you have any questions.


If you need any stamping supplies, I’d be very happy to be your Demonstrator.  Just click on the Shop Now button on the right side of the screen to go directly to my online store or contact me if you have any questions.  Happy Stamping!

Thanks for stopping by and have a great day!

Akiko

  • Visit my online store here
  • See the current Stampin’ Up! clearance rack specials here
  • Earn FREE Stampin’ Up! products through my Wildflower Frequent Shopper Program – my way of saying thank you to my frequent shopper online customers.
  • Sign up for my weekly newsletter here
  • Have any questions? I’d be happy to help, click here to contact me.

Cardstock Cuts for this project:

  • Poppy Parade – 4 1/4″ x 11″ scored at 5 1/2″ (card base), 3 3/4″ x 5″ (embossed background), 1/2″ x 5″ (embossed inside trim)
  • Basic Black – (2) 3 7/8″ x 5 1/8″ (mats), 1/4″ x 4″ (label)
  • Whisper White – 3 3/4″ x 5″ (inside panel)
  • Thick Whisper White – 3″ x 4″ (flower label)

Stampin’ Up! products used in this project:


Stampin’ Up! Sending You Thoughts for the Happy Inkin’ Thursday Blog Hop

Good Morning! Welcome to the Happy Inkin’ Thursday Blog Hop! My share for today’s hop is a tag card made with the Stampin’ Up! Sending You Thoughts stamp set and the Sending Flowers Dies.

We have a color challenge this week, and here is the color palette we are using:

Today’s card was also inspired by the Sunday Stamps Sketch Challenge SSC224 Tag You’re it.

I cut a panel of Best Dressed floral designer series paper and a strip of a matching striped Best Dressed designer series paper and adhered them together. I adhered them to a Lovely Lipstick mat and attached them to a Mint Macaron card base with dimensionals. I used the tag die from the Bonanza dies to cut a tag from the striped Best Dressed designer series paper. I used the Bonanza dies tag die to cut tags from Pool Party and Lovely Lipstick card stock. I cut a rectangle out of the Lovely Lipstick tag using one of the rectangles from the Stitched Rectangles dies.

I used the large Sending Flowers die to cut some flowers from a panel of Mint Macaron. I colored the stems with the Dark Mint Macaron Stampin’ Blend. I adhered the stems to the Pool Party tag with multipurpose liquid glue and trimmed off the excess. I cut three sets of the Sending Flowers flower dies from a strip of Petal Pink card stock and adhered them to the stems with multipurpose liquid glue (Note: I saved one of the large petal flower centers for the inside of the card). I adhered the Lovely Lipstick tag on top with multipurpose liquid glue. I stamped the thanks greeting from the Stampin’ Up! Sending You Thoughts stamp set on a little scrap of Mint Macaron, trimmed it up and adhered it to the bottom of the tag with glue dots.

I die cut the little butterfly from the Well Written dies on a scrap of Lovely Lipstick and adhered it to the tag with multipurpose liquid glue. I adhered the floral tag to the Best Dressed striped designer series paper tag with snail and adhered it to the card front with dimensionals. I finished it off by adding yellow rhinestones to the flower centers and topping the tags with a Mint Macaron bow.

On the inside of the card, I adhered the strip of Best Dressed floral DSP to the bottom of a Whisper White Panel. I die cut two more stems with he Sending Flowers dies in Mint Macaron and adhered them to the panel with multipurpose liquid glue. I adhered the Petal Pink flowers on top, including the large flower center. I cut another large petal flower in Whisper White and colored the center with Dark Daffodil Delight Stampin’ Blend before adhering it to the center of the large flower. I adhered the panel to a Lovely Lipstick mat before adhering to the inside of the card with snail.

The Stampin’ Up! Sending You Thoughts stamp set is a Sale-A-Bration stamp set that is FREE with a $50 order and it has a great selection of sentiments in a great font. The Sending Flowers dies are part of the new Coordination Product Release. Both of these products are available now while supplies last.

On with the Hop! Click the Next button below to visit Karen Ksenzakovic’s blog.

And just in case you get lost along the way, here’s a list of the team members participating in the hop today:


February 16 – 29 Host Code: KFK3RZHV

Use this host code when you order $50 or more and receive a free gift from me!  The gift is your choice of any item valued up to $10.00 in the 2019-20 Annual Catalog or in the 2020 January-June Mini Catalog!  That includes some of the Host Exclusive stamp sets!

If your order is over $150, please do not use the host code since you’ll receive your own Host Dollars plus I’ll send you the free gift!  This host code can be used by anyone, no commitment required.  Let me know if you have any questions.


If you need any stamping supplies, I’d be very happy to be your Demonstrator.  Just click on the Shop Now button on the right side of the screen to go directly to my online store or contact me if you have any questions.  Happy Stamping!

Thanks for visiting!

Akiko

  • Visit my online store here
  • See the current Stampin’ Up! clearance rack specials here
  • Earn FREE Stampin’ Up! products through my Wildflower Frequent Shopper Program – my way of saying thank you to my frequent shopper online customers.
  • Sign up for my weekly newsletter here
  • Have any questions? I’d be happy to help, click here to contact me.

Cardstock Cuts for this project:

  • Mint Macaron – 5 1/2″ x 8 1/2″ scored at 4 1/4″ (card base), 2 1/4″ x 3″ (tag stems), 1″ x 1″ (label), 1 1/2″ x 3 (inside stems)
  • Lively Lipstick – (2) 3 7/8″ x 5 1/8″ (mats), 2 1/2″ x 4″ (tag), 1″ x 1″ (butterfly die cut)
  • Pool Party – 2 1/2″ x 4″ (tag)
  • Whisper White – 3 3/4″ x 5″ (inside), 1″ x 1″ (flower center)
  • Petal Pink – 1″ x 7″ (flower die cuts)
  • Best Dressed DSP – 3 3/4″ x 5″ (front floral background), 1″ x 3 3/4″ (front stripe), 2 1/2″ x 4″ (tag), 1/2″ x 3 3/4″ (inside trim)

Stampin’ Up! products used in this project: