Stampin’ Up! Quite Curvy Video Tutorial

Good Morning! Today’s card uses the Stampin’ Up! Quite Curvy bundle along with a sneak peek of the Field & Flower designer series paper. The Field & Flower DSP pack is a Sale A Bration item that you can get for FREE with a $50 order beginning January 5. This is the card I made during my Facebook Live video tutorial yesterday afternoon and you can find the currently available supplies I used to create this card at the bottom of my post along with the sizes of cardstock used.

Here is the Facebook Live video showing how I made the card:

I posted a copy of the video in my YouTube channel here so you can view it there if you prefer.


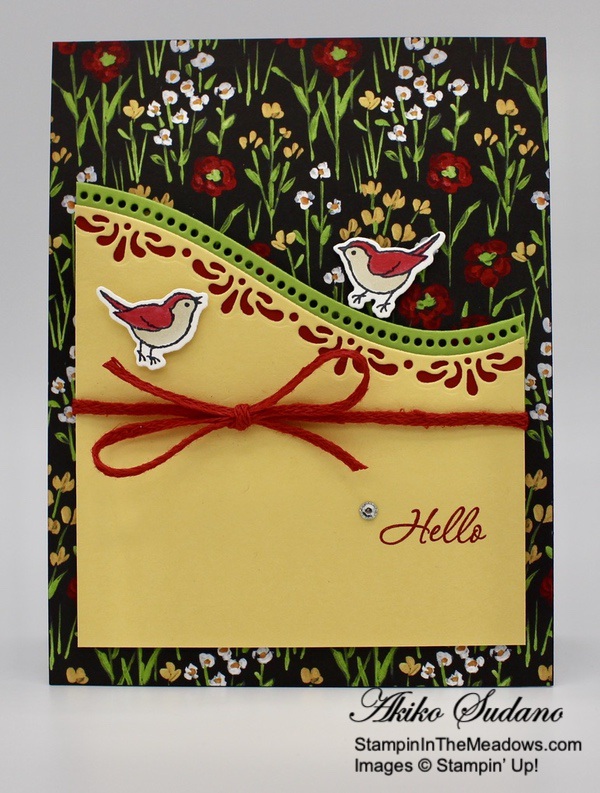
I adhered the pretty Flower & Field designer series paper panel to the front of a Basic Black card base with liquid glue. I cut the top of the So Saffron panel with the fancy floral edge die from the Curvy Dies in the Stampin’ Up! Quite Curvy Bundle. Then I stamped the sentiment in Real Red ink on the bottom of the panel. I aligned the discarded top edge of the So Saffron panel to the top of the Real Red panel and drew a line and fussy cut the top off and adhered it to the back of the So Saffron panel so you would see the red though the die cut edge.

I used the discarded edge again to line up the dotted edge die on the Granny Apple Green panel and cut it out and adhered the panel to the back of the So Saffron panel. I wrapped a length of Real Red braided linen trim around the panel and tied a bow. I adhered the layered die cut panel to the card front with dimensionals.

I stamped two birds from the Stampin’ Up! Quite Curvy stamp set in Memento Tuxedo Black ink on Whisper White and cut them out with the corresponding dies. I colored them with the Crumb Cake and Real Red Stampin Blends and popped them on the card front with dimensionals. I finished the card front with a rhinestone gem.

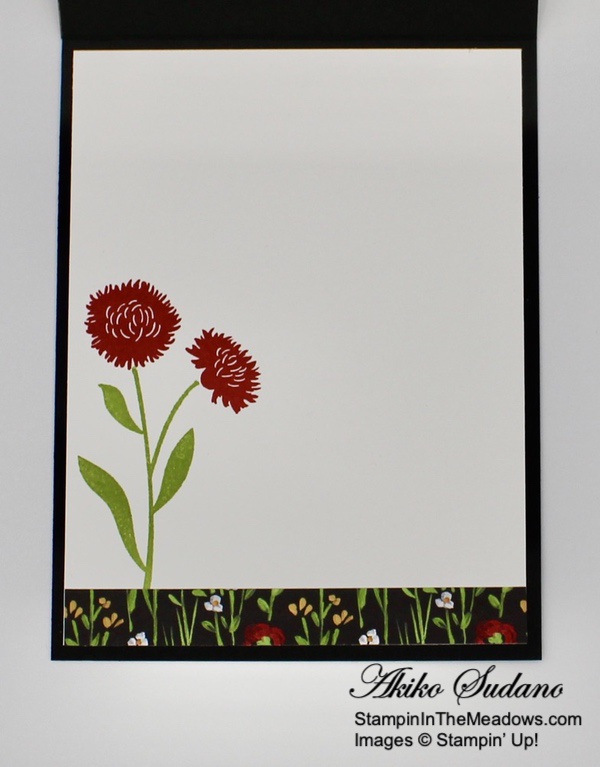
I stamped the flower and stem from the Field of Flowers photopolymer stamp set in Real Red and Granny Apple Green on a Whisper White panel. I trimmed the bottom with a strip of Flower & Field DSP and adhered the panel to the inside of the card.

The Stampin’ Up! Quite Curvy bundle is an early release of the January – June 2021 Mini Catalog that is available now! And if you purchase this bundle from me this month, you’ll get a bonus tutorial with 5 Curvy Celebrations projects (details below). And the pretty Field & Flower DSP is a Sale A Bration item that will be available on January 5, 2021. Sale A Bration is Stampin’ Up!’s biggest promotion of the year, where you choose a FREE $50 item with every $50 or $100 you spend (before shipping and taxes). Sale A Bration begins on January 5, 2021 and runs through February 28, 2021. So there is so much excitement to look forward to in the new year!!


Stampin’ In The Meadows January – June 2021 Mini Catalog New Product Shares Now Open

Do you want all of the great new products in the new January – June 2021 Mini Catalog but can’t afford everything?  Let’s do a share!  I’m placing an order early on January 5 for all the papers, ribbons and embellishments and I’m going to use the expedited shipping option so I get them fast. When I receive the order, I will cut and bundle the products and have the shares on their way to you by January 15. Go to my New Catalog Product Shares page to get the full details and to join. Please note, I can only ship to addresses within the US. Deadline to sign up for a share is January 3, 2021.


Stampin’ In The Meadows Online Host Club Openings Starting January 1

The Stampin’ In The Meadows Online Host Club is a good way to build up your Stampin’ Up supplies a little at a time without breaking the bank. You make a commitment to join the club for 6 months and place a minimum $25 order each month. A random host is chosen for each month and when you are the host, you get the Stampin’ Rewards Host Dollars for additional products. You can also give your Host Code to your Stampin’ Friends to increase your host rewards! For complete details, see my Online Host Club Page. You can also contact me at (484) 356-5031 or drop me an email at apsudano@stampininthemeadows.com.  

Sign up Deadline is Monday December 28, 2020.


FREE Bonus Quite Curvy and Curvy Christmas Project Tutorials With Videos When You Purchase The Bundle From Me!!

The Quite Curvy bundle is an early release of the upcoming January – June 2021 Mini Catalog and is a featured product during the Curvy Celebrations. And if you purchase either the Quite Curvy Variety Bundle (item 158396) or the Quite Curvy Bundle (item 156228) from me between now and January 4, you will receive the special Online Tutorial Class with videos. This is an exclusive set of five written and video tutorials created by a group of us for our customers who purchase these products during the Curvy Celebrations! And this is on top of my regular thank you gifts!


Stampin’ Up!’s Giant Year-End Closeout Is Going On Now!

If you love Great Deals like I do, then the Giant Year-End Closeout event is the perfect time to shop. You’ll get deep discounts on your favorite products (up to 50% off some items) from the August–December 2020 Mini Catalog. Head over to my Online Store to check out the sale.  The retiring items are only available while supplies last! And some popular items have already been sold out!


December 1 – 15 Host Code: E7SDCMYW

Use this host code when you order $50 or more and receive a free gift from me!  The free gift is your choice of any item valued up to $10.00 in the 2019 – 2020 Annual Catalog or in the Aug-Dec 2020 Mini Catalog!  That includes some of the Host Exclusive stamp sets!

If your order is over $150, please do not use the host code since you’ll receive your own Host Dollars plus I’ll still send you the free gift!  This host code can be used by anyone, no club or commitment required.  Let me know if you have any questions.


If you need any stamping supplies, I’d be very happy to be your Demonstrator.  Just click on the Shop Now button on the right side of the screen to go directly to my online store or contact me if you have any questions.  Happy Stamping!

Thanks for stopping by and have a great week!

Akiko

  • Visit my online store here
  • See the current Stampin’ Up! clearance rack specials here
  • Earn FREE Stampin’ Up! products through my Wildflower Frequent Shopper Program – my way of saying thank you to my online frequent shopper customers.
  • Sign up for my weekly newsletter here
  • Have any questions? I’d be happy to help, click here to contact me.

Cardstock Cuts for this project:

  • Basic Black – 4-1/4″ x 11″ card base scored at 5-1/2″
  • So Saffron – 3-3/4″ x 3-3/4″ (die cut panel front)
  • Granny Apple Green – 2″ x 3-3/4″ (die cut panel back)
  • Real Red – 1-3/4″ x 3-3/4″ panel (peek a boo die cut backing)
  • Whisper White – 3-3/4″ x 5″ (inside panel), 1″ x 2-1/2″ (die cut birds)
  • Flower & Field DSP – 4-1/4″ x 5-1/2″ (front background panel), 1/2″ x 4″ (inside trim)

Stampin’ Up! products used in this project:


Stampin’ Up! Poinsettia Petals Thank You Card Video Tutorial

Good Morning! Today’s card is a holiday themed Thank You card using the beautiful Stampin’ Up! Poinsettia Petals bundle and the Poinsettia Place designer series paper. This is the card I made during my Facebook Live video tutorial yesterday afternoon and you can find the supplies I used to create this card at the bottom of my post along with the sizes of cardstock used.

My card was inspired by the cute Sketch Challenge in Freshly Made Sketches #464.

Here is the Facebook Live video showing how I made the card:

I posted a copy of the video in my YouTube channel here so you can view it there if you prefer.


I cut a poinsettia flower from the floral Poinsettia Place designer series paper with the outline poinsettia die from the Poinsettia Dies in the Stampin’ Up! Poinsettia Petals designer series paper. I used the same die to cut a Whisper White panel and adhered it to the back of the DSP flower so that the flower would be a little stiffer. I also fussy cut the center of another poinsettia and adhered it to the center with dimensionals.

I cut a panel of fancy green paper from the Poinsettia Place DSP with the stitched square from the Stitched Shapes Dies and adhered it to a Woodgrain panel of the Poinsettia Place DSP. I adhered it all to a Soft Suede mat. I popped the poinsettia on with dimensionals and tucked a Linen Thread bow under the flower.

I used the Banners Pick A Punch to cut the end of a Whisper White strip and stamped the sentiment from the Stampin’ Up! Poinsettia Place photopolymer stamp set in Soft Suede ink near the end. I trimmed the other end of the label and adhered it to the panel with a length of Real Red ribbon underneath. I popped the panel on a Real Red card base with dimensionals and accented the front with three red Wonderful Gems.

I adhered a strip of wood grain paper to a Whisper White panel and fussy cut another poinsettia from the Poinsettia Place DSP and adhered it to the corner. I trimmed the petals to be even with the Whisper White panel and adhered the panel to the inside of the card.

The sentiments from the Stampin’ Up! Poinsettia Petals stamp set are really nice! The Thank You sentiment is perfect for expressing appreciation for that extra special gift or for sending a quick note after a fun holiday visit or outing. Have a great week!!


Stampin’ In The Meadows January – June 2021 Mini Catalog New Product Shares Now Open

Do you want all of the great new products in the new January – June 2021 Mini Catalog but can’t afford everything?  Let’s do a share!  I’m placing an order early on January 5 for all the papers, ribbons and embellishments and I’m going to use the expedited shipping option so I get them fast. When I receive the order, I will cut and bundle the products and have the shares on their way to you by January 15. Go to my New Catalog Product Shares page to get the full details and to join. Please note, I can only ship to addresses within the US. Deadline to sign up for a share is January 3, 2021.


Holiday Shipping Deadlines Reminder

Stampin’ Up! has shared the following information regarding Holiday Shipping deadlines:

The Christmas season is a busy time of year for sending and receiving packages, so naturally shipping may take longer than normal. If you are placing any orders for Christmas gifts, please submit them by 9 December. We cannot guarantee that orders placed by 9 December will arrive in time for Christmas, but orders submitted after this date are unlikely to arrive before Christmas. 


FREE Bonus Quite Curvy and Curvy Christmas Project Tutorials With Videos When You Purchase The Bundle From Me!!

The Quite Curvy bundle is an early release of the upcoming January – June 2021 Mini Catalog and is a featured product during the Curvy Celebrations. And if you purchase either the Quite Curvy Variety Bundle (item 158396) or the Quite Curvy Bundle (item 156228) from me between now and January 4, you will receive the special Online Tutorial Class with videos. This is an exclusive set of five written and video tutorials created by a group of us for our customers who purchase these products during the Curvy Celebrations! And this is on top of my regular thank you gifts!


Stampin’ Up!’s Giant Year-End Closeout Begins Tomorrow!

If you love Great Deals like I do, then the Giant Year-End Closeout event is the perfect time to shop. You’ll get deep discounts on your favorite products (up to 50% off some items) from the August–December 2020 Mini Catalog. The Year-End Closeout happens only once a year, so get your shopping lists ready for December 8. Click here to download the full list of items (excel spreadsheet) that are retiring and on sale starting on December 8, 2020 or here for a PDF if you prefer that format. Get your lists ready and shop early!!  The retiring items are only available while supplies last! And everything on this list is retiring!


December 1 – 15 Host Code: E7SDCMYW

Use this host code when you order $50 or more and receive a free gift from me!  The free gift is your choice of any item valued up to $10.00 in the 2019 – 2020 Annual Catalog or in the Aug-Dec 2020 Mini Catalog!  That includes some of the Host Exclusive stamp sets!

If your order is over $150, please do not use the host code since you’ll receive your own Host Dollars plus I’ll still send you the free gift!  This host code can be used by anyone, no club or commitment required.  Let me know if you have any questions.


If you need any stamping supplies, I’d be very happy to be your Demonstrator.  Just click on the Shop Now button on the right side of the screen to go directly to my online store or contact me if you have any questions.  Happy Stamping!

Thanks for stopping by and have a great week!

Akiko

  • Visit my online store here
  • See the current Stampin’ Up! clearance rack specials here
  • Earn FREE Stampin’ Up! products through my Wildflower Frequent Shopper Program – my way of saying thank you to my online frequent shopper customers.
  • Sign up for my weekly newsletter here
  • Have any questions? I’d be happy to help, click here to contact me.

Cardstock Cuts for this project:

  • Real Red – 4-1/4″ x 11″ card base scored at 5-1/2″
  • Whisper White – 3-3/4″ x 5″ (inside panel), 3″ x 3″ (die cut poinsettia backing), 3/4″ x 3-1/2″ (label)
  • Poinsettia Place DSP – 3-3/4″ x 5″ (front background panel), 2-1/2″ x 2-1/2″ (Garden Green square), 1/2″ x 3-3/4″ (inside trim), fussy and die cut poinsettias.

Stampin’ Up! products used in this project:


Stampin’ Up! Have A Hoot Christmas Card Video Tutorial

Good Morning! Shhh… Today I am sharing the Christmas card that I made for my husband! I used the cute Stampin’ Up! Have A Hoot bundle along with the ‘Tis The Season designer series paper and I colored the images with the Stampin’ Up! watercolor pencils! This is the card I made during my Facebook Live video tutorial yesterday afternoon and you can find the supplies I used to create this card at the bottom of my post along with the sizes of cardstock used.

Here is the Facebook Live video showing how I made the card:

I posted a copy of the video in my YouTube channel here so you can view it there if you prefer.


I adhered the plaid ‘Tis The Season designer series paper to the front of a Real Red card base. I used the Banner Triple punch on the bottom of the Garden Green strip to create the fishtail and adhered the strip to the card with liquid glue. I cut a panel of Crumb Cake card stock with the Stitched Rectangle die and stamped the owls from the Stampin’ Up! Have a Hoot cling stamp set in Crumb Cake ink. I stamped another set of owls on a smaller Crumb Cake panel and cut them out with the coordinating die.

I colored the branch, leaves and mistletoe on the large panel with the Early Espresso and Garden Green watercolor pencils. I colored the wings and sides of the die cut owls with Early Espresso and used the blender pen to smooth out the coloring. I colored the bellies with Whisper White and the beaks and feet with the daffodil delight. I popped the die cut owls on the main panel with dimensionals. I love how the images are drawn so you can die cut the owls and get a clean edge – no branch lines on the feet!

I cut two mistletoe branches from the Peek A Hoot dies from the Stampin’ Up! Have A Hoot bundle from Garden Green and adhered them on the top of the panel. I cut a Cherry Cobbler border using the pretty scalloped border die from the Peony dies and adhered them to the back of the panel. I stamped the sentiment from the Stampin’ Up! Have A Hoot stamp set in Versamark ink on Real Red. I sprinkled it with white embossing powder and heat set until shiny. I cut it out with the small Stitched Rectangle die using the two step die cutting method so that it is shorter and fits the sentiment. I adhered the sentiment to the panel with liquid glue and popped the panel on the card front with dimensionals. I finished the card front with a braided linen knot and three white resin dots.

I stamped the sentiment from the Stampin’ Up! Have A Hoot stamp set in Real Red ink on a Whisper White panel. I die cut another set of Garden Green mistletoe and adhered them to the top corner. I cut some Whisper White dots using the North Pole Wonder dies and adhered them with liquid glue. I trimmed the bottom with the plaid ‘Tis The Season DSP and adhered the panel to the inside of the card.

I CASE’d this sweet card from the Aug 2020 Mini Catalog, because when I saw it, I knew that I needed to make it for my dear hubby. The owls from the Stampin’ Up! Have A Hoot bundle are just too cute! Have a great week!!


Stampin’ Up! Curvy Celebrations Going On now!

The Stampin’ Up! Curvy Celebrations runs through January 4, 2021. This will include the Quite Curvy bundle, which is an early release of the upcoming January – June 2021 Mini Catalog along with the Curvy Christmas stamp set and Classic Christmas 6″ x 6″ designer series paper. Click on the picture above to view PDF Flyer with all the details. And if you purchase either the Quite Curvy Variety Bundle (item 158396) or the Quite Curvy Bundle (item 156228) from me between now and January 4, you will receive our special Online Tutorial Class with videos. This is an exclusive set of written and video tutorials created by Inkin’ Krew team members who purchase these products during the Curvy Celebrations!


January – June 2021 Mini Catalog is Coming Soon!

Yay!! Tomorrow is the day that the Stampin’ Up! Demonstrator Pre-Order opens! My list is ready and I will be placing my order as I have my morning coffee and that includes new catalogs for my customers! When I get my order, I’ll be sending my customer catalogs out ASAP. If you’ve placed orders with me of at least $50 during the past year, you are automatically on my list to get a catalog when my shipment arrives! If you have not placed an order with me but want to be on my mailing list for the new catalogs too, simply place an order through my Online Store and I’ll add you to my list so you can get your catalogs next month too! Ordering from the new catalog begins January 5, 2021, but if you decide to join as a Stampin’ Up! Demonstrator during the month of December, you can choose January – June Mini Catalog pre-order products as part of your Starter Kit! Let me know if you have any questions – I’ll be happy to talk to you about the benefits of being a Stampin’ Up! demonstrator!


The December Paper Pumpkin Kit is Beary Comforting!

December’s cute and cuddly Paper Pumpkin kit—called “Beary Comforting”—is designed to uplift your loved ones as this beary tough year finally comes to a close. After a year like 2020, we all could use a big bear hug! With the help of this bear-themed kit, you can create 12 unbearably cute cards featuring warm and fuzzy friends, sweet stamps, and meaningful messages. Near or far, send your friends and family the extra comfort, love, and encouragement they need with this month’s Paper Pumpkin kit! 

Here are the Details:

  • Kit contains enough supplies to create 12 cards and coordinating envelopes.
  • Card size: 4-1/4″ x 5-1/2″ 
  • Envelope size: 4-1/2″ x 5-3/4″ 

Coordinating Colors: Basic Gray, Calypso Coral, Cinnamon Cider, Daffodil Delight, Rich Razzleberry, Soft Sea Foam, Whisper White

If you’re interested in subscribing to Paper Pumpkin, you can either sign up for a subscription where you are billed monthly for your kit or you can purchase a prepaid subscription in my online store. To see more information and to sign up for the monthly subscription click here. To see the options for prepaid subscriptions in my online store, click here.

Sign up deadline for the December 2020 kit is December 10, 2020. Supplies may be limited toward the end of the subscription period. 


November 15 – 30 Host Code: N7E9DGB9

December 1 – 15 Host Code: E7SDCMYW

Use this host code when you order $50 or more and receive a free gift from me!  The free gift is your choice of any item valued up to $10.00 in the 2019 – 2020 Annual Catalog or in the Aug-Dec 2020 Mini Catalog!  That includes some of the Host Exclusive stamp sets!

If your order is over $150, please do not use the host code since you’ll receive your own Host Dollars plus I’ll still send you the free gift!  This host code can be used by anyone, no club or commitment required.  Let me know if you have any questions.


If you need any stamping supplies, I’d be very happy to be your Demonstrator.  Just click on the Shop Now button on the right side of the screen to go directly to my online store or contact me if you have any questions.  Happy Stamping!

Thanks for stopping by and have a great week!

Akiko

  • Visit my online store here
  • See the current Stampin’ Up! clearance rack specials here
  • Earn FREE Stampin’ Up! products through my Wildflower Frequent Shopper Program – my way of saying thank you to my online frequent shopper customers.
  • Sign up for my weekly newsletter here
  • Have any questions? I’d be happy to help, click here to contact me.

Cardstock Cuts for this project:

  • Real Red – 4-1/4″ x 11″ card base scored at 5-1/2″, 1-1/2″ x 2-1/2″ (label)
  • Crumb Cake – 2-1/2″ x 3-3/4″ (art panel), 1-3/4″ x 2-1/2″ (owls die cut)
  • Garden Green – 1″ x 3″ (mistletoe die cuts)
  • Cherry Cobbler – 1/2″ x 4″ (scalloped border)
  • Whisper White – 3-3/4″ x 5″ (inside panel), 1/2″ x 1-1/4″ (mistletoe berries die cut)
  • ‘Tis The Season 6″ x 6″ DSP – 4-1/4″ x 5-1/2″ (front panel), 1/2″ x 3-3/4″ (inside trim), 2″ x 5-1/4″ (Garden Green banner)

Stampin’ Up! products used in this project:


Stampin’ Up! Snowflake Wishes Thank You Card Video Tutorial

Good Morning! Today I’m sharing a Winter Thank You card made with the Stampin’ Up! Snowflake Wishes bundle. This is the card I made during my Facebook Live video tutorial yesterday afternoon and I also used the Winter Snow 3D embossing folder and the Snowflake Splendor designer series paper to make sure I had enough snowflakes. Today’s card was inspired by a set of cards I saw on Pinterest made by Australian Demonstrator Gail Ellis. You can find the supplies I used to create this card at the bottom of my post along with the sizes of cardstock used.

Here is the Facebook Live video showing how I made the card:

I posted a copy of the video in my YouTube channel here so you can view it there if you prefer. Later this week I hope to get a quickie version posted to my channel too.

I embossed a Whisper White panel with the Winter Snow embossing folder and adhered it to the front of a Whisper White note card. I adhered the Snowflake Splendor DSP panels to the Balmy Blue mats and adhered it to the card front with liquid glue. I could not believe that when I was Live, I put my liquid glue on the wrong side of the designer series paper!! So I had to change things up a bit and stamped in Pacific Point instead of Balmy Blue. The color is a little more intense, but everything still goes together beautifully!

I stamped the sentiment from the Stampin’ Up! Snowflake Wishes photopolymer stamp set to a Whisper White panel in Pacific Point ink and cut it out with the Tasteful Labels die. I adhered some Snowflake Splendor ribbon to the back and adhered it to the card front with dimensionals.

I cut two small snowflakes and a medium snowflake from Balmy Blue glimmer paper with the So Many Snowflakes dies from the Stampin’ Up! Snowflake Wishes bundle and adhered them to the card front. I finished the card with a blue gem.

I stamped the snowflakes from the Stampin’ Up! Snowflake Wishes photopolymer stamp set in Pacific Point ink after stamping off in the corners of the inside of the card. I also stamped the outside of the envelope with Pacific Point snowflakes to match.

The Whisper White note cards and envelopes are perfect for a quick little thank you note – they are nice and thick, and don’t need an inside panel. Layered panel card designs like this one are a good use for those little scraps of pretty DSP that you can’t bear to throw out. And sending a quick thank you after Christmas is a nice way to reach out and let the joy of the season linger a little longer.


Stampin’ Up! Curvy Celebrations Going On now!

The Stampin’ Up! Curvy Celebrations runs through January 4, 2021. This will include the Quite Curvy bundle, which is an early release of the upcoming January – June 2021 Mini Catalog along with the Curvy Christmas stamp set and Classic Christmas 6″ x 6″ designer series paper. Click on the picture above to view PDF Flyer with all the details. And if you purchase either the Quite Curvy Variety Bundle (item 158396) or the Quite Curvy Bundle (item 156228) from me between now and January 4, you will receive our special Online Tutorial Class with videos. This is an exclusive set of written and video tutorials created by Inkin’ Krew team members who purchase these products during the Curvy Celebrations!


Stampin’ Up! Merry & Bright Online Extravaganza Is Tomorrow!!

The Stampin’ Up! Merry & Bright Online Extravaganza is tomorrow, with 10% off select annual catalog items. Nearly all of the items in the annual catalog are eligible for the discount, but some exclusions do apply. You can see the exclusion list here. So get your wish list ready so you can shop early in my Online Store. The sale only lasts for 24 hours on Tuesday November 24th!


November 15-30 Host Code: N7E9DGB9

Use this host code when you order $50 or more and receive a free gift from me!  The free gift is your choice of any item valued up to $10.00 in the 2019 – 2020 Annual Catalog or in the Aug-Dec 2020 Mini Catalog!  That includes some of the Host Exclusive stamp sets!

If your order is over $150, please do not use the host code since you’ll receive your own Host Dollars plus I’ll still send you the free gift!  This host code can be used by anyone, no club or commitment required.  Let me know if you have any questions.


If you need any stamping supplies, I’d be very happy to be your Demonstrator.  Just click on the Shop Now button on the right side of the screen to go directly to my online store or contact me if you have any questions.  Happy Stamping!

Thanks for stopping by and have a great week!

Akiko

  • Visit my online store here
  • See the current Stampin’ Up! clearance rack specials here
  • Earn FREE Stampin’ Up! products through my Wildflower Frequent Shopper Program – my way of saying thank you to my online frequent shopper customers.
  • Sign up for my weekly newsletter here
  • Have any questions? I’d be happy to help, click here to contact me.

Cardstock Cuts for this project:

  • Balmy Blue – 2-1/8″ x 2-1/8″, 1-1/8″ x 1-1/8″ (DSP mats)
  • Whisper White – 3-1/4″ x 4-3/4″ (embossed background), 2-1/4″ x 2-1/4″ (label)
  • Balmy Blue Glimmer – 2″ x 3-3/4″ (die cut snowflakes)
  • Snowflake Splendor DSP – 2″ x 2″, 1″ x 4″ (front panels)

Stampin’ Up! products used in this project:


Stampin’ Up! Gather Together Thanksgiving Card Video Tutorial

Good Morning! Today I’m sharing my final Thanksgiving card for this year – I’ll be sending them out to my family this week and moving on to finishing up Christmas cards. Kind of sad because I really love the fall season. This is the card I made during my Facebook Live video tutorial yesterday afternoon and it is full of pumpkins from the Stampin’ Up! Gather Together stamp set and Gathered Leaves dies. And I filled it out with an Autumn version of the new Quite Curvy leaves! You can find the supplies used to create this card at the bottom of my post along with the sizes of cardstock used.

Here is the Facebook Live video showing how I made the card:

I posted a copy of the video in my YouTube channel here so you can view it there if you prefer. Later this week I hope to get a quickie version posted to my channel too.

I started by stamping the pumpkins from the Stampin’ Up! Gather Together photopolymer stamp set in Cajun Craze ink on Whisper White. I stamped three large pumpkins and two of the smaller sets of pumpkins and colored them with Pumpkin Pie and Mossy Meadow Stampin’ Blends. I fussy cut them out. I cut two large leaves from the Gathered Leaves Dies from Old Olive card stock.

I stamped the large leafy vine from the Quite Curvy photopolymer stamp set in Soft Suede ink on Whisper White and cut it out with the coordinating die. I colored the leaves with Cajun Craze, Mango Melody, Cinnamon Cider and Old Olive Stampin’ Blends. I adhered a panel of Cinnamon Cider 2020-2022 In Color 6″ x 6″ designer series paper to a Cajun Craze mat and adhered it to the front of a Bumblebee card base. I adhered the die cut leaves to the panel with liquid glue and adhered the pumpkins across the bottom. I used liquid glue on all except the center pumpkin, which I popped on with a dimensional.

I adhered the Quite Curvy leafy vine with dimensionals on the bottom of the arrangement. I stamped the sentiment from the Stampin’ Up! Gathered Together stamp set in Soft Suede ink on a Bumblebee panel. I cut it out with the small label die from the Beautiful Boughs dies and stamped the wheat sheafs in Bumblebee ink. I adhered the label to the front of the card with dimensionals and finished of the card front with three Bumblebee enamel gems.

I stamped the sentiment from the Banner Year photopolymer stamp set in Cajun Craze ink on a Whisper White panel. I stamped the wheat sheaf from the Stampin’ Up! Gather Together stamp set in Bumblebee ink next to the sentiment and stamped the leafy vine in Soft Suede ink on the bottom. I colored the leaves with dimensionals like the card front and adhered the panel to a Cajun Craze mat before adhering it to the inside of the card.

I love the Stampin’ Up! Gather Together Bundle and was so happy to see it return in the Aug-Dec 2020 Mini Catalog. And I love the fall version of the Quite Curvy leafy vine!! Thanks for stopping by and Have a great week!


Stampin’ Up! Curvy Celebrations Going On now!

The Stampin’ Up! Curvy Celebrations runs through January 4, 2021. This will include the Quite Curvy bundle, which is an early release of the upcoming January – June 2021 Mini Catalog along with the Curvy Christmas stamp set and Classic Christmas 6″ x 6″ designer series paper. Click on the picture above to view PDF Flyer with all the details. And if you purchase either the Quite Curvy Variety Bundle (item 158396) or the Quite Curvy Bundle (item 156228) from me between now and January 4, you will receive our special Online Tutorial Class with videos. This is an exclusive set of written and video tutorials created by Inkin’ Krew team members who purchase these products during the Curvy Celebrations!


January – June 2021 Mini Catalog and Sale A Bration is Coming Soon!

Last weekend at Stampin’ Up! OnStage, we got to see many of the new products that will be coming in the new January-June 2021 Mini Catalog – and they are so amazing! Another benefit of attending OnStage is that we got the opportunity to order a few of the new products and received copies of the new Mini Catalog and Sale A Bration Brochure! So I’m busy looking through the catalogs, planning my pre-order next month – including new catalogs for my customers! If you’ve placed orders with me of at least $50 during the past year, you are automatically on my list to get a catalog when my shipment arrives! If you have not placed an order with me but want to be on my mailing list for the new catalogs too, simply place an order through my Online Store and I’ll add you to my list so you can get your catalogs too!


November 15-30 Host Code: N7E9DGB9

Use this host code when you order $50 or more and receive a free gift from me!  The free gift is your choice of any item valued up to $10.00 in the 2019 – 2020 Annual Catalog or in the Aug-Dec 2020 Mini Catalog!  That includes some of the Host Exclusive stamp sets!

If your order is over $150, please do not use the host code since you’ll receive your own Host Dollars plus I’ll still send you the free gift!  This host code can be used by anyone, no club or commitment required.  Let me know if you have any questions.


If you need any stamping supplies, I’d be very happy to be your Demonstrator.  Just click on the Shop Now button on the right side of the screen to go directly to my online store or contact me if you have any questions.  Happy Stamping!

Thanks for stopping by and have a great week!

Akiko

  • Visit my online store here
  • See the current Stampin’ Up! clearance rack specials here
  • Earn FREE Stampin’ Up! products through my Wildflower Frequent Shopper Program – my way of saying thank you to my online frequent shopper customers.
  • Sign up for my weekly newsletter here
  • Have any questions? I’d be happy to help, click here to contact me.

Cardstock Cuts for this project:

  • Bumblebee – 5-1/2″ x 8-1/2″ card base scored at 4-1/4″, 1-3/4″ x 3″ (label)
  • Cajun Craze – 3-1/8″ x 4-5/8″ (DSP mat), 3-7/8″ x 5-1/8″ (inside mat)
  • Old Olive – 2-1/2″ x 5″ (die cut leaves)
  • Whisper White – 3-3/4″ x 5″ panel (inside panel), 1-3/4″ x 5-1/2″ (leafy vine die cut), 2-1/2″ x 4-1/2″ (die cut pumpkins)
  • 2020-2022 In Color 6″ x 6″ DSP – 3″ x 4-1/2″ (front background)

Stampin’ Up! products used in this project:


Stampin’ Up! Dove of Hope Floral Christmas Card Video Tutorial

Good Morning! Today I’m sharing another Christmas card – a floral card made with the Stampin’ Up! Dove of Hope bundle that I made during my Facebook Live video tutorial yesterday afternoon. So you might think that the Dove of Hope cling stamp set isn’t a floral stamp set, but look closely and you will spot the doves. You can find the supplies used to create this card at the bottom of my post along with the sizes of cardstock used.

Here is the Facebook Live video showing how I made the card:

I will post an edited version of how I made the card in my YouTube channel later this week so you can view a quickie version.

I started by randomly stamping the doves from the Stampin’ Up! Dove of Hope stamp set in Crumb Cake ink on a crumb cake panel and adhered it to a Real Red mat. This gives me a textured background for my flowers like you would get if you embossed it or used designer series paper. I die cut the petals from the Magnolia Memory Dies using Whisper White card stock, I cut two of each petal cluster giving me six total. I gently curled the petals up with my fingers and adhered them together with liquid glue.

I cut two small centers from the Magnolia Memory Dies and adhered them together. I bent the stamens up and adhered it to the center of the Whisper White flower. I cut two large flowers from the Wreath Builder Dies from Real Red card stock and three large leaves from the Magnolia Memory Dies from Mossy Meadow card stock. I cut a label using the Stitched Nested Labels Dies from Crumb Cake card stock and stamped the sentiment from the Stampin’ Up! Dove of Hope stamp set in Real Red ink in the lower left corner. I adhered a Mossy Meadow die cut leaf sprig from the Detailed Dove Dies to the label.

I popped the label to the stamped panel with dimensionals. I adhered the leaves and Real Red flowers with liquid glue and popped the large Magnolia Memory Dies Whisper White flower on with dimensionals. I made a bow with Real Red braided twine and adhered it with a glue dot and finished the flowers with resin dots. I popped the finished panel on the front of a Crumb Cake card base with dimensionals.

I stamped the sentiment from the Stampin’ Up! Dove of Hope stamp set in Real Red ink on a Whisper White panel. I stamped a dove in the upper corner and adhered a die cut sprig under the sentiment. I adhered the panel to the inside of the card.

I love rustic Christmas cards with Crumb Cake card card stock! They have such a natural homespun feel. And I love floral Christmas cards because they’re different, but express the joy of the holiday. And I’m so glad to be able to use the pretty flower from the Magnolia Memory Dies! Have a great week!!


Stampin’ Up! Curvy Celebrations Coming Tomorrow!

The Stampin’ Up! Curvy Celebrations starts on November 3, 2020 and runs through January 4, 2021. This will include the Quite Curvy bundle, which is an early release of the upcoming January – June 2021 Mini Catalog along with the Curvy Christmas stamp set and Classic Christmas 6″ x 6″ designer series paper. Click on the picture above to view PDF Flyer with all the details.


November 1-15 Host Code: N7E9DGB9

Use this host code when you order $50 or more and receive a free gift from me!  The free gift is your choice of any item valued up to $10.00 in the 2019 – 2020 Annual Catalog or in the Aug-Dec 2020 Mini Catalog!  That includes some of the Host Exclusive stamp sets!

If your order is over $150, please do not use the host code since you’ll receive your own Host Dollars plus I’ll still send you the free gift!  This host code can be used by anyone, no club or commitment required.  Let me know if you have any questions.


If you need any stamping supplies, I’d be very happy to be your Demonstrator.  Just click on the Shop Now button on the right side of the screen to go directly to my online store or contact me if you have any questions.  Happy Stamping!

Thanks for stopping by and have a great week!

Akiko

  • Visit my online store here
  • See the current Stampin’ Up! clearance rack specials here
  • Earn FREE Stampin’ Up! products through my Wildflower Frequent Shopper Program – my way of saying thank you to my online frequent shopper customers.
  • Sign up for my weekly newsletter here
  • Have any questions? I’d be happy to help, click here to contact me.

Cardstock Cuts for this project:

  • Crumb Cake – 4-1/4″ x 11″ card base scored at 5-1/2″, 3-3/4″ x 5″ (stamped background), 2″ x 3-1/2″ (label)
  • Mossy Meadow – 1″ x 6-1/2″ (die cut leaves)
  • Bumblebee – 1″ x 2″ (flower centers)
  • Whisper White – 4″ x 5-1/4″ panel (inside panel), 4-1/2″ x 6″ (die cut flower petals)

Stampin’ Up! products used in this project:


Stampin’ Up! Beautiful Autumn Card Video Tutorial

Good Morning! Today I’m sharing a clean and simple card made with the Stampin’ Up! Beautiful Autumn bundle accented with leaves and acorns punched from the beautiful Gilded Autumn specialty designer series paper. You can find the supplies used to create this card at the bottom of my post along with the sizes of cardstock used.

Here is the Facebook Live video showing how I made the card:

I will post an edited version of how I made the card in my YouTube channel later this week so you can view a quickie version.

Emboss a Very Vanilla panel with the Pinewoods Plank embossing folder and adhere it to a Very Vanilla mat with liquid glue. Pop it on the front of a Thick Very Vanilla card base with dimensionals. Punch out Cajun Craze and Mint Macaron leaves and Crumb Cake acorns from the Gilded Autumn specialty designer series paper with the Autumn Punch pack from the Stampin’ Up! Beautiful Autumn bundle.

With the Stitched So Sweetly Dies, cut out the fancy layered labels, the large one from the speckled Crumb Cake paper in the Gilded Autumn paper pack and the smaller one from Very Vanilla card stock, Stamp the sentiment from the Stampin’ Up! Beautiful Autumn photopolymer stamp set in Early Espresso ink on the Very Vanilla label and adhere it to the DSP label. Pop the labels on the card front with dimensionals.

Adhere the punched leaves on the label with liquid glue and adhere the acorn with a dimensional. Make a bow with the Very Vanilla ribbon and adhere it with a glue dot. Finish the card front with three champaign rhinestones on the label.

Adhere leaves and an acorn to a Very Vanilla panel with liquid glue. Adhere a strip of the Crumb Cake paper from the Gilded Autumn specialty designer series paper to the bottom of the panel and adhere the panel to the inside of the card.

The Stampin’ Up! Beautiful Autumn bundle is so versatile and it has great sentiments. The leaves and acorn could have easily been stamped in any color palette and then punched – but it’s nice to have beautiful DSP that can be die cut or punched like I did here. And the images in this stamp set are so beautiful in a clean and simple card with a textured Whisper White or Very Vanilla background. And the bonus is that they can be made fairly quickly with stunning results.


Last Week for the Stampin’ Up! Designer Series Paper Sale!

Stampin’ Up! has beautiful Designer Series Paper and during the Month of October they’re putting a select list of those on sale with a 15% discount! This is a fantastic opportunity for you to stock up and save on paper. And the sale includes some of the designs from the August-December 2020 Mini Catalog too! Get the details on my Promotions Page or click on the image above to download a printable PDF with all the selections.  Click Here to shop the Designer Series Paper Sale in My Online Store now! But hurry, the sale ends on October 31!


October 16-31 Host Code: 3VJWYCTP

Use this host code when you order $50 or more and receive a free gift from me!  The free gift is your choice of any item valued up to $10.00 in the 2019 – 2020 Annual Catalog or in the Aug-Dec 2020 Mini Catalog!  That includes some of the Host Exclusive stamp sets!

If your order is over $150, please do not use the host code since you’ll receive your own Host Dollars plus I’ll still send you the free gift!  This host code can be used by anyone, no club or commitment required.  Let me know if you have any questions.


If you need any stamping supplies, I’d be very happy to be your Demonstrator.  Just click on the Shop Now button on the right side of the screen to go directly to my online store or contact me if you have any questions.  Happy Stamping!

Thanks for stopping by and have a great week!

Akiko

  • Visit my online store here
  • See the current Stampin’ Up! clearance rack specials here
  • Earn FREE Stampin’ Up! products through my Wildflower Frequent Shopper Program – my way of saying thank you to my online frequent shopper customers.
  • Sign up for my weekly newsletter here
  • Have any questions? I’d be happy to help, click here to contact me.

Cardstock Cuts for this project:

  • Thick Very Vanilla – 4-1/4″ x 11″ card base scored at 5-1/2″
  • Very Vanilla – two 4″ x 5-1/4″ panels (inside panel and front mat), 3-7/8″ x 5-1/8″ (embossed panel), 2-1/4″ x 2-3/4″ (label)
  • Gilded Autumn specialty DSP – 2-1/2″ x 3-3/4″ (label mat), 1/2″ x 4″ (inside trim), punched leaves and acorns

Stampin’ Up! products used in this project:


Stampin’ Up! Daisy Lane Fall Card Video Tutorial

Good Morning! Today I’m sharing a fall card made with the Stampin’ Up! Daisy Lane stamp set accented with leaves from the Gathered Leaves Dies. You can find the supplies used to create this card at the bottom of my post along with the sizes of cardstock used.

Here is the Facebook Live video showing how I made the card:

I will post an edited version of how I made the card in my YouTube channel later this week so you can view a quickie version.

My card layout uses Freshly Made Sketches 457 – this is a good one, check it out.

Adhere a panel of Plaid Tidings 6″ x 6″ designer series paper to the front of an Early Espresso Card base (don’t forget that the Plaid Tidings DSP is on sale this month! 😊). Stamp the Birch cling background stamp in Early Espresso ink on a Bumblebee panel and emboss it with the Tasteful Textile 3D embossing folder. Adhere it to an Early Espresso mat and pop it on the card front with dimensionals.

Adhere a berry branch from the Forever Gold Laser cut specialty paper to the embossed panel. Cut the Gathered Leaves dies from Cajun Craze, Pumpkin Pie and Pear Pizzazz card stock. Adhere the leaves to the card front. Stamp three small daisies from the Stampin’ Up! Daisy Lane stamp set in Bumblebee ink on Bumblebee card stock. Sponge the centers with Cajun Craze ink and sponge Pumpkin Pie ink around the petals, leaving just the tips. Punch out the three petal clusters with the medium daisy punch. Gently bend the petals back on one cluster, back and forward on the second and all forward on the last cluster. Adhere the clusters together with liquid glue.

Cut the center from gold foil using the flower center die from the Poinsettias Dies and adhere it to the middle of the flower. Pop the flower on the card front with a dimensional. Adhere a gold trim bow under the flower. Stamp the sentiment from the Stampin’ Up! Daisy Lane stamp set in Early Espresso ink on a strip of Pumpkin Pie and trim the ends. Adhere it to a strip of early Espresso and pop it on the card front with dimensionals. Finish the card front with three Gilded Gems.

Stamp and emboss a strip of Bumblebee card stock to match the front panel and adhere it to the bottom of a Whisper White panel. Cut a small Gathered Leaves Die leaf from Pumpkin Pie and adhere it to the top corner of the card.

The Stampin’ Up! Daisy Lane stamp set and the coordinating punches are perfect for creating fall floral cards – just change up the colors to coordinate with your favorite fall designer series paper. This is perfect for birthdays and other occasions when a pumpkin just won’t do.


Stampin’ Up! Designer Series Paper Sale Going on Now!

Stampin’ Up! has beautiful Designer Series Paper and during the Month of October they’re putting a select list of those on sale with a 15% discount! This is a fantastic opportunity for you to stock up and save on paper. And the sale includes some of the designs from the August-December 2020 Mini Catalog too! Get the details on my Promotions Page or click on the image above to download a printable PDF with all the selections.  Click Here to shop the Designer Series Paper Sale in My Online Store now!


October 16-31 Host Code: 3VJWYCTP

Use this host code when you order $50 or more and receive a free gift from me!  The free gift is your choice of any item valued up to $10.00 in the 2019 – 2020 Annual Catalog or in the Aug-Dec 2020 Mini Catalog!  That includes some of the Host Exclusive stamp sets!

If your order is over $150, please do not use the host code since you’ll receive your own Host Dollars plus I’ll still send you the free gift!  This host code can be used by anyone, no club or commitment required.  Let me know if you have any questions.


If you need any stamping supplies, I’d be very happy to be your Demonstrator.  Just click on the Shop Now button on the right side of the screen to go directly to my online store or contact me if you have any questions.  Happy Stamping!

Thanks for stopping by and have a great week!

Akiko

  • Visit my online store here
  • See the current Stampin’ Up! clearance rack specials here
  • Earn FREE Stampin’ Up! products through my Wildflower Frequent Shopper Program – my way of saying thank you to my online frequent shopper customers.
  • Sign up for my weekly newsletter here
  • Have any questions? I’d be happy to help, click here to contact me.

Cardstock Cuts for this project:

  • Early Espresso – 4-1/4″ x 11″ card base scored at 5-1/2″, 3/8″ x 2-1/2″ (label mat), 2-5/8″ x 5-1/8″ (embossed panel mat)
  • Bumblebee – 2-1/2″ x 5″ (embossed front panel), 1/4″ x 4″ (embossed inside trim), 2″ x 6″ (stamped and punched daisy clusters)
  • Cajun Craze – 2″ x 2″ (large die cut leaf)
  • Pumpkin Pie – 2″ x 3-1/2″ (medium and small die cut leaves), 1/4″ x 3-1/2″ (label)
  • Pear Pizzazz – 1-1/2″ x 1-1/2″ (small die cut leaf)
  • Gold Foil – 1″ x 1″ (flower center)
  • Whisper White – 4″ x 5-1/4″ (inside panel), 3-7/8″ x 5-1/8″ (front mat), 3/4″ x 6″ (die cut sprigs), 1-1/2″ x 2-1/2″ (punched label)
  • Plaid Tidings DSP – 3-1/4″ x 4-1/4″ (front background)

Stampin’ Up! products used in this project:


Stampin’ Up! Curvy Christmas Sneak Peek Video Tutorial

Good Morning! Today I’m sharing a sneak peek of the Stampin’ Up Curvy Christmas stamp set that will be available as part of the Curvy Celebrations promotion starting on November 3. This will include the Quite Curvy bundle, which is an early release of the upcoming January – June 2021 Mini Catalog along with the Stampin’ Up! Curvy Christmas stamp set and Classic Christmas 6″ x 6″ designer series paper. So here is my card:

Here is the Facebook Live video giving more details on these products and showing how I made the card:

I will post an edited version of how I made the card in my YouTube channel later this week so you can view a quickie version.

Cut a panel of Shaded Spruce Card stock with the fancy curved die from the Curvy Dies that will be available November 3 and emboss it with the Subtle 3D embossing folder. Adhere it to a panel of Classic Christmas 6″ x 6″ designer series paper (available November 3). Adhere the panel to a Whisper White mat and pop it on the front of a Shaded Spruce Card base with dimensionals.

Cut a Whisper White label with the Timeless Label Punch and stamp the Merry Christmas sentiment from the Stampin’ Up! Curvy Christmas photopolymer stamp set (available November 3) in the lower corner in Cherry Cobbler ink. Adhere the label to the card front. Cut out two Cherry Cobbler flowers from the Wreath Builder Dies and adhere them together. Cut out three sprigs from the Curvy Dies (available November 3) from Whisper White card stock and adhere them to the back of the flower. Adhere the flower to the card front.

Make a bow with Whisper White crinkle ribbon and adhere it to the corner with a glue dot. Trim the flower center with yellow Holiday Rhinestones and the border with Shaded Spruce Holiday Rhinestones.

Stamp the curvy sentiment from the Stampin’ Up! Curvy Christmas stamp set (available November 3) in Cherry Cobbler ink on a Whisper White panel. Stamp the pine branch under the sentiment in Shaded Spruce ink and adhere a strip of Classic Christmas designer series paper (available November 3) to the bottom. Adhere the panel to the inside of the card.

All the products from the Stampin’ Up! Curvy Celebrations promotion will be available to customers on November 3, 2020. Demonstrators can pre-order limited quantities of these products now. Click on the picture below for a PDF flyer with all the details on these products and be on the look out for more sneak peeks!!


October 1-15 Host Code: F4UK7V36

Use this host code when you order $50 or more and receive a free gift from me!  The free gift is your choice of any item valued up to $10.00 in the 2019 – 2020 Annual Catalog or in the Aug-Dec 2020 Mini Catalog!  That includes some of the Host Exclusive stamp sets!

If your order is over $150, please do not use the host code since you’ll receive your own Host Dollars plus I’ll still send you the free gift!  This host code can be used by anyone, no club or commitment required.  Let me know if you have any questions.


If you need any stamping supplies, I’d be very happy to be your Demonstrator.  Just click on the Shop Now button on the right side of the screen to go directly to my online store or contact me if you have any questions.  Happy Stamping!

Thanks for stopping by and have a great week!

Akiko

  • Visit my online store here
  • See the current Stampin’ Up! clearance rack specials here
  • Earn FREE Stampin’ Up! products through my Wildflower Frequent Shopper Program – my way of saying thank you to my online frequent shopper customers.
  • Sign up for my weekly newsletter here
  • Have any questions? I’d be happy to help, click here to contact me.

Cardstock Cuts for this project:

  • Shaded Spruce – 4-1/4″ x 11″ card base scored at 5-1/2″, 3-3/4″ x 3-3/4″ (die cut and embossed front panel)
  • Cherry Cobbler – 1-1/2″ x 3″ (die cut flowers),
  • Whisper White – 4″ x 5-1/4″ (inside panel), 3-7/8″ x 5-1/8″ (front mat), 3/4″ x 6″ (die cut sprigs), 1-1/2″ x 2-1/2″ (punched label)
  • Celebrate Christmas DSP – 3-3/4″ x 5″ ” (front background), 1/2″ x 4″ (inside trim)

Stampin’ Up! products used in this project:


Stampin’ Up! Celebrate Sunflowers Ombre Thank You Card Video Tutorial

Good Morning! Today I’m sharing another beautiful card made with the Stampin’ Up! Celebrate Sunflowers cling stamp set that I made during my Facebook Live video tutorial yesterday afternoon. Instead of using the wonderful dies, I just used the gorgeous large sunflower stamp and paired it with an ombre technique with some touches of gold. You can find the supplies used to create this card at the bottom of my post along with the sizes of cardstock used.

Here is the Facebook Live video showing how I made the card:

I will also edit the video and post a concise tutorial on my YouTube Channel, so look for that soon. The edited video has been posted on my YouTube Channel and you can find it here.

I stamped three of the large sunflowers from the Stampin’ Up! Celebrate Sunflowers cling stamp set in Early Espresso ink on a Whisper White panel. Using the sponge brayer, I colored the panel starting with Cajun Craze on the bottom and adding in Pumpkin Pie, Bumblebee and So Saffron inks. I colored the darkest colors on the bottom and the lightest color on top, overlapping the colors as I went. I also used the sponge brayer to add So Saffron ink to the Whisper White label. I stamped the sentiment from the Stampin’ Up! Celebrate Sunflowers stamp set in Early Espresso ink on the label. I adhered the label to the flower panel and adhered the panel to a gold foil mat.

I wrapped gold trim around the panel just above the label, making a bow, and finished the panel with three gold metallic pearls. I adhered the dark woodgrain In Good Taste designer series paper to the front of an early Espresso card base and popped the flower panel on top with dimensionals.

I stamped another sunflower from the Stampin’ Up! Celebrate Sunflowers stamp set in Early Espresso ink in the corner of a Whisper White panel. I added some Cajun Craze, Pumpkin Pie and Bumblebee ink with the sponge brayer and adhered the panel to the inside of the card.

The soft touches of gold with the dark wood grain give the card an elegant look, especially when paired with the beautiful sentiment!


Inkin’ Krew World Card Making Day Facebook Event – This Saturday, October 3!

World Card Making Day is October 3 and we’re going to celebrate again with a fun all-day event on Facebook! All are welcome to join us!  We’ll be setting up a Facebook page to host the event and we’ll be sharing the link to the page later this week. Let me know if you are interested and I’ll be sure to send you an invite by the end of the week. Can’t wait to stamp with you all then!!


Stampin’ In The Meadows Double Wildflower Points through September 30!

To celebrate the end of a great Stampin’ Up! year, I’m offering Double Wildflower Points!! If you don’t know about my Wildflower Points program, here’s how it works:

  • For each $50 that you order from my online store (before shipping) you will earn one Wildflower point.
  • You will earn one Wildflower point for each friend that you refer when they place their first order of $50+ from my online store.
  • When you have earned 8 Wildflower points you will get a FREE product order valued up to $40.00, your choice and mailed directly to you!

With DOUBLE Wildflower points you get 2 points for each $50 order, 4 points for each $100 order, and so on, reaching your FREE order faster!!

For complete details on my Wildflower Rewards, scroll to the bottom of my Customer Rewards page or contact me. To start shopping now, head over to my Online Store!


Get & Go Starter Kit Promotion Ends September 30!

These are only a few days left in the The Get & Go Starter Kit limited time promotion. This fantastic offer is designed to give new Stampin’ Up! demonstrators additional products to help you get started right away. In addition to the already great valued Starter Kit – $125 worth of products for $99 – you will receive card stock to make 16 cards, two stamp sets, and rhinestone basic jewels to use in your first event.

Full Details are on my Promotion Page, or you can contact me – I’d love to talk to you about joining my team!


September 16 – 30 Host Code: V9FPKC9R

Use this host code when you order $50 or more and receive a free gift from me!  The free gift is your choice of any item valued up to $10.00 in the 2019 – 2020 Annual Catalog or in the 2020 Mini Catalog!  That includes some of the Host Exclusive stamp sets!

If your order is over $150, please do not use the host code since you’ll receive your own Host Dollars plus I’ll still send you the free gift!  This host code can be used by anyone, no club or commitment required.  Let me know if you have any questions.


If you need any stamping supplies, I’d be very happy to be your Demonstrator.  Just click on the Shop Now button on the right side of the screen to go directly to my online store or contact me if you have any questions.  Happy Stamping!

Thanks for stopping by and have a great week!

Akiko

  • Visit my online store here
  • See the current Stampin’ Up! clearance rack specials here
  • Earn FREE Stampin’ Up! products through my Wildflower Frequent Shopper Program – my way of saying thank you to my online frequent shopper customers.
  • Sign up for my weekly newsletter here
  • Have any questions? I’d be happy to help, click here to contact me.

Cardstock Cuts for this project:

  • Early Espresso – 4-1/4″ x 11″ card base scored at 5-1/2″
  • Gold Foil – 3-3/8″ x 5-1/2″ (front mat)
  • Whisper White – 3-1/4″ x 5-1/2″ (front panel), 3-3/4″ x 5″ (inside panel), 3/4″ x 4″ (label)
  • In Good Taste DSP – 4-1/4″ x 5-1/2″ (front background)

Stampin’ Up! products used in this project: