Stampin’ Up! Timeless Tulips Hello Sneak Peek

Good Morning! Today I am sharing a video that I did yesterday during my Sunday Facebook Live session. At Stampin’ Up! On Stage a couple of weeks ago, we made a pretty card with the Stampin’ Up! Timeless Tulips bundle that will be available in the new January – June Mini Catalog next month. But my card did not come out very well because I stamped the stems of the tulips before the flowers, so I ended up with a mess. So this project’s purpose is to fix my card. And my card came out much better than the initial one I made at Stampin’ Up! On Stage.

Here’s the Facebook Live video:

I also posted the video to my YouTube channel and you can view it here.

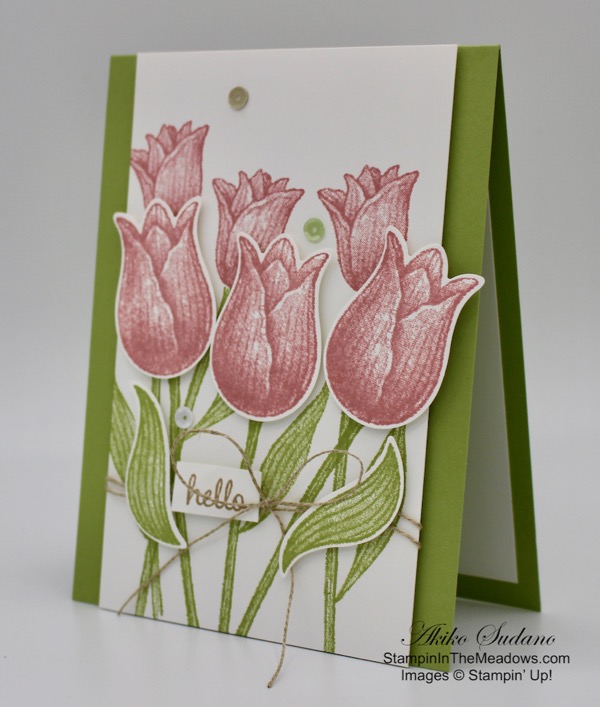
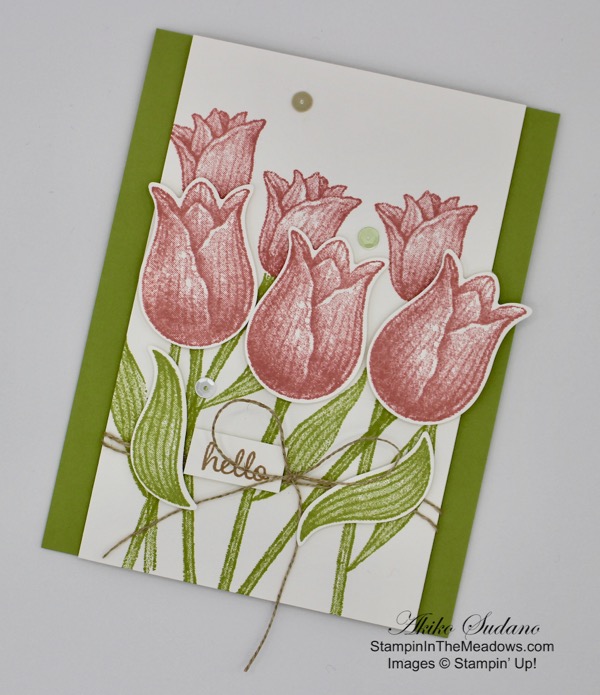
I started by stamping the large tulip 3 times in Rococo Rose on a scrap piece of Whisper White card stock. Then I stamped the medium tulip 3 times across a Whisper White panel with the bottoms of the flowers about 1/3 the way down from the top. I then stamped the stems for the flowers in Pear Pizzazz. I stamped the last 3 stems for the large tulips, positioning them so that they large tulips would have room on top of the stems. I stamped some leaves to fill in the bottom of the card. Finally, I stamped two leaves in Pear Pizzazz on a scrap piece of Whisper White to be punched out later. I tied linen thread in a bow around the panel and adhered the large tulips and extra leaves with dimensionals. I stamped the hello sentiment on a panel of whisper white and cut it out with paper snips. I adhered the sentiment to the panel with dimensionals and the panel to a Pear Pizzazz card base with dimensionals as well. I finished off the card front with 3 adhesive sequins.

For the inside, I stamped a tulip, stem and leaf on a Whisper White panel and adhered it to the inside of the card with liquid glue.

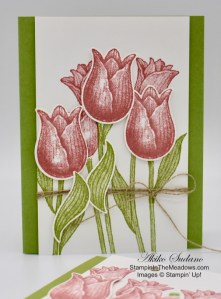
Here’s the card I originally made at Stampin’ Up! On Stage. At least the flowers are attached to stems, but they cover each other up and they’re all clumped in the middle, leaving too much white space on the sides. And What’s up with those leaves? Oh Well!! I’m going to make this bad picture small so it’s harder to see.

This one’s much better.

The Stampin’ Up! Timeless Tulips Bundle will be available on January 3 when the new January – June Mini Catalog comes out. It comes with the Timeless Tulips photopolymer stamp set and the Tulip Builder punch. And it has lots of pretty sentiments to celebrate a variety of occasions.


Stampin’ Up! January – June 2020 Mini Catalog and Sale-A-Bration coming in January!

I will order catalogs for my customers tomorrow morning with expedited shipping.  If you placed an order with me, I will send you one via priority mail as soon as my order arrives!

If you have not placed an order with me but want to be on my mailing list for the new catalogs too, simply place an order through my online store by the end of the week and you’ll automatically be added to my mailing list to get your catalogs ASAP!

The new January – June 2020 Mini Catalog will be open for ordering on January 3, 2020.


Stampin’ Up! Year-End Closeout begins tomorrow!

Stampin’ Up!’s Year-End Closeout begins tomorrow! While supplies last, you can save big on a selection of retiring and surplus items including holiday catalog items, stamp sets, and Paper Pumpkin past kits. Shop early to avoid missing out! Supplies are limited and popular items will sell out quickly. This amazing sale ends on January 2.


December 1 – 15 Host Code: R497392Q

Use this host code when you order $50+ and receive a free gift from me!  If your order is over $150, please do not use this code, but you’ll still get the free gift.  The free gift is your choice of any item valued up to $10.00 in the 2018-19 Annual Catalog or in the 2019 Occasions Catalog!  That includes some of the Host Exclusive stamp sets!

If your order is over $150, please do not use the host code since you’ll receive your own Host Dollars plus I’ll send you the free gift!  This host code can be used by anyone, no club or commitment required.  Let me know if you have any questions.


If you need any stamping supplies, I’d be very happy to be your Demonstrator.  Just click on the Shop Now button on the right side of the screen to go directly to my online store or contact me if you have any questions.  Happy Stamping!

Thanks for stopping by and have a great week!

Akiko

  • Visit my online store here
  • See the current Stampin’ Up! clearance rack specials here
  • Earn FREE Stampin’ Up! products through my Wildflower Frequent Shopper Program – my way of saying thank you to my frequent shopper online customers.
  • Have any questions? I’d be happy to help, click here to contact me.

Cardstock Cuts for this project:

  • Pear Pizzazz- 4 1/4″ x 11″, scored at 5 1/2″
  • Whisper White – 3 1/2″ x 5 1/2″ (front panel), 3 3/4″ x 5″ (inside), (2) 2 1/2″ x 5″ (scraps for punched tulips, leaves and sentiment)

Stampin’ Up! products used in this project:


Stampin’ Up! Pop of Petals Thank You Card

Good Morning! I need some thank you cards and I have been working on a post for later this week using the Stampin’ Up! Pop of Petals stamp set. I found a pretty card on Pinterest that was made by Tammy Beard of StampinSavvy.com here and was inspired to make one similar but with fall colors. I’m not sure I succeeded, but it was a lot of fun playing with different colors and stamping a card rather than relying on die cuts.

Here’s the Facebook Live video where I demonstrated how to make the card.

In the video, I used the Stampin’ Up! Pop of Petals stamp set to make the Rich Razzleberry and Mango Melody card with the Mossy Meadow leaves. I started by stamping the Mango Melody flowers, and then the Rich Razzleberry flowers, and then filling in with leaves. I finish off the card front by stamping the sentiment from the Stampin’ Up! Love what you Do in Memento Tuxedo Black and I use the Stamparatus so that I can stamp twice to get good coverage. I also show how to curve the petals on the punched flower so that you can get a dimensional look. And I used a black sharpie so that I wouldn’t harm the tip of my Stampin’ Blend on the faceted gems to color it black before applying it to the center flower.

I also posted the video to my YouTube channel and you can view it here.

It was fun to make a card that had a lot of stamping and was not for Christmas. And you’ll note that I did make two boo boos by rocking the leaf stamp instead of bringing it straight up and down – now I have an example for why you shouldn’t do this. Finally, thank you Tammy for the wonderful inspiration!


November 1 – 15 Host Code: WR4KJJM4

Use this host code when you order and receive a free gift from me!  If your order is over $150, please do not use this code, but you’ll still get the free gift.  The free gift is your choice of any item valued up to $10.00 in the 2018-19 Annual Catalog or in the 2019 Occasions Catalog!  That includes some of the Host Exclusive stamp sets!


If you need any stamping supplies, I’d be very happy to be your Demonstrator.  Just click on the Shop Now button on the right side of the screen to go directly to my online store or contact me if you have any questions.  Happy Stamping!

Thanks for stopping by and have a great week!

Akiko

  • Visit my online store here
  • See the current Stampin’ Up! clearance rack specials here
  • Earn FREE Stampin’ Up! products through my Wildflower Frequent Shopper Program – my way of saying thank you to my frequent shopper online customers.
  • Have any questions? I’d be happy to help, click here to contact me.

Cardstock Cuts for this project:

  • Rich Razzleberry – 4 1/4″ x 11″
  • Mango Melody – 4 1/4″ x 11″
  • Whisper White – (4) 3 3/4″ x 5″, (2) 2″ x 2″ scraps
  • Garden Green – 3 7/8″ x 5 1/8″
  • Mossy Meadow – 3 7/8″ x 5 1/8″

Stampin’ Up! products used in this project:


Stampin’ Up! Feels Like Frost Merry Christmas to All Card

Good Morning! Today I am sharing some cards that I made for my Facebook Live video yesterday afternoon. These are simple, easy to make cards that use Stampin’ Up! Feels Like Frost specialty designer series paper and the Stampin’ Up! Merry Christmas to All stamp set and coordinating dies.

The Stampin’ Up! Feels Like Frost specialty designer series paper has beautiful winter images of nature with snow and ice. The back of the paper has designs in silver foil and white. The Stampin’ Up! Merry Christmas to All photopolymer stamp set has a beautiful and elegant font and many Christmas words that can be used in combination to convey many sentiments and the coordinating dies use the same beautiful font. When used with silver foil, they look beautiful with the Feels Like Frost paper. Here’s the video. Please excuse the first few minutes when I’m trying to ‘unstick’ my computer.

I also posted the video to my YouTube channel and you can view it here.

The holidays are coming quick and high impact easy-to-make cards are real important! It gives us the opportunity to give something special to our loved ones while maintaining balance in our busy lives.


October 15 – 31 Host Code: 3KQUKV9U

Use this host code when you order and receive a free gift from me!  If your order is over $150, please do not use this code, but you’ll still get the free gift.  The free gift is your choice of any item valued up to $10.00 in the 2018-19 Annual Catalog or in the 2019 Occasions Catalog!  That includes some of the Host Exclusive stamp sets!


If you need any stamping supplies, I’d be very happy to be your Demonstrator.  Just click on the Shop Now button on the right side of the screen to go directly to my online store or contact me if you have any questions.  Happy Stamping!

Thanks for stopping by and have a great week!

Akiko

  • Visit my online store here
  • See the current Stampin’ Up! clearance rack specials here
  • Earn FREE Stampin’ Up! products through my Wildflower Frequent Shopper Program – my way of saying thank you to my frequent shopper online customers.
  • Have any questions? I’d be happy to help, click here to contact me.

Cardstock Cuts for this project:

  • Seaside Spray – 4 1/4″ x 11″, 1″ x 3 1/4″
  • Purple Posey – 4 1/4″ x 11″
  • Whisper White – (2) 3 3/4″ x 5″
  • Sparkle Glimmer Paper – (2) 3 3/4″ x 5″
  • Silver Foil – 1 3/4″ x 12″
  • Feels Like Frost Specialty DSP – (2) 3 1/2″ x 4 3/4″

Stampin’ Up! products used in this project:


Stampin’ Up! October Paper Pumpkin – Winter Woods Christmas Cards

Happy Monday morning! When I did my Facebook Live yesterday, I played with the October Paper Pumpkin Kit. It’s called Winter Woods and it has all the supplies you need to make 10 beautiful Christmas Cards, including paper, stamps, ink, mini dimensionals, and mini glue dots.

This kit is a real winner. The cards are so beautiful and the laser cut birches are made with shimmer paper so they sparkle! It’s stunning! The snow laden pine trees are are really pretty and the combination of silver foil and wood grain is real elegant. And the little cardinals add the perfect pop of red.

In the video, I followed the instructions to make the card, but I was just a bit bothered by Night of Navy snow flakes. So I also show some alternative approaches to deal with my issues. Here’s the video.

I also posted it to my YouTube channel and you can view it here.

On the card on the left, I substituted VersaMark Ink and white embossing powder for the Night of Navy ink. In the card on the right, I didn’t stamp any falling snow and used the tiny snowflake sequins as falling snow. Which do you prefer? I like them both and can’t decide.

One thing that didn’t work out was using Delicata Silver ink for snow. So I had an extra set of beautiful birch trees that I had to put to use. So I stamped and punched a snowman and added some Let it Snow Specialty Designer Series paper and came up with this little cutie.

I had to trim the snowbank and move the trees so that it would fit on the smaller panel, but it worked out well. The sparkly birch trees in this kit make every card beautiful.

I hope that if you received the October Paper Pumpkin kit, you have as much fun as I’m having. If you are not a current Paper Pumpkin Subscriber, see the information below to learn more. This is a really pretty kit! Thanks for visiting!

Akiko


October 15 – 31 Host Code: 3KQUKV9U

Use this host code when you order and receive a free gift from me!  If your order is over $150, please do not use this code, but you’ll still get the free gift.  The free gift is your choice of any item valued up to $10.00 in the 2018-19 Annual Catalog or in the 2019 Occasions Catalog!  That includes some of the Host Exclusive stamp sets!


November Paper Pumpkin Kit Details

The holiday season will be here before we know it. And along with putting up the Christmas tree and spending snowy nights by the fire, Paper Pumpkin subscribers will be looking forward to opening their holiday kit. Christmastime papercrafting with Paper Pumpkin has become an annual tradition!

So to deliver more of what our subscribers love this holiday season, in November we are offering a kit with Christmas tags that coordinates with our October card kit. This makes it easy for you to add a handmade, personal touch to your holiday giving—without a lot of fuss. It’s Christmas made easy with Paper Pumpkin!

Kit Details:

  • Makes 24 holiday-themed gift tags of 4 various sizes and designs. 
  • Coordinating colors: Early Espresso, Pool Party, Poppy Parade, and Shaded Spruce
  • You can subscribe for the November Paper Pumpkin Kit between October 11 and November 10 at paperpumpkin.com.
  • Supplies may be limited toward the end of the subscription period.

If you’re interested in subscribing to Paper Pumpkin, you can either sign up for a subscription where you are billed monthly for your kit or you can purchase a prepaid subscription in my online store. To learn more or to subscribe visit paperpumpkin.com. To see the pre-paid subscription options, see the Paper Pumpkin section of my online store.


If you need any stamping supplies, I’d be very happy to be your Demonstrator.  Just click on the Shop Now button on the right side of the screen to go directly to my online store or contact me if you have any questions.  Happy Stamping!

  • Visit my online store here
  • See the current Stampin’ Up! clearance rack specials here
  • Earn FREE Stampin’ Up! products through my Wildflower Frequent Shopper Program – my way of saying thank you to my frequent shopper online customers.
  • Have any questions? I’d be happy to help, click here to contact me.

Cardstock Cuts for this project:

The cardstock cuts are used for the snowman card.

  • Thick Whisper White – 4 1/4″ x 11″
  • Real Red – (2) 5″ x 3 3/4″
  • Whisper White – 3 3/8″ x 4 7/8″
  • Let it Snow Specialty DSP – 3 3/8″ x 4 7/8″

Stampin’ Up! products used in this project:


Stampin’ Up! Perfectly Plaid Christmas Tree Card

Good Morning! Today I have a Christmas Card made with the Stampin’ Up! Perfectly Plaid photopolymer stamp set and Pine Tree Punch.

This is the first Christmas Card that I designed for my Card Making 101 video series on Facebook. I used some more die cuts and introduced dry embossing with the Pinewood Planks embossing folder. You can find the supplies used to create this card at the bottom of my post along with the sizes of cardstock used.

Here’s the video with instructions on how to make the card. I think I’m making improvements each time, but I’m still not ready for Prime Time (and definitely no Emmy!).

Here’s a picture of the inside of the card. I am planning to share card making videos on Facebook Live on Sundays at 1:00 Eastern time. I invite you to join me and like my Facebook page.

And don’t forget about the current Buy 3 Get 1 Free Designer Series Paper promotion that lasts for just one more week.

Thanks for stopping by!

Akiko


This image has an empty alt attribute; its file name is 09-19_banner_dsp_us.jpg

Buy 3 Get 1 Free Designer Series Paper Sale

By popular demand, Stampin’ Up! is bringing back the Designer Series Paper Sale! During September 4–30, you can buy three packages of select Designer Series Paper, and get one FREE! See the full details on my Stampin’ Up! Promotions Page.


September 16 – 30 Host Code: EDRVYB3Z

Use this host code when you order and receive a free gift from me!  If your order is over $150, please do not use this code, but you’ll still get the free gift.  The free gift is your choice of any item valued up to $10.00 in the 2018-19 Annual Catalog or in the 2019 Occasions Catalog!  That includes some of the Host Exclusive stamp sets!


If you need any stamping supplies, I’d be very happy to be your Demonstrator.  Just click on the Shop Now button on the right side of the screen to go directly to my online store or contact me if you have any questions.  Happy Stamping!

  • Visit my online store here
  • See the current Stampin’ Up! clearance rack specials here
  • Earn FREE Stampin’ Up! products through my Wildflower Frequent Shopper Program – my way of saying thank you to my frequent shopper online customers.
  • Have any questions? I’d be happy to help, click here to contact me.

Cardstock Cuts for this project:

  • Shaded Spruce – 4 1/4″ x 11″
  • Whisper White – (2) 3 3/4″ x 5″, 2 1/2″ x 5 3/4″
  • Cherry Cobbler – 2 1/4″ x 3 1/4″
  • Gold Foil – 1” x 2”
  • Wrapped in Plaid DSP – 2 3/4″ x 3 5/8″, 1/2″ x 3 3/4”

Stampin’ Up! products used in this project: