Stampin’ Up! Love What You Do with Pressed Petals Thank You Cards

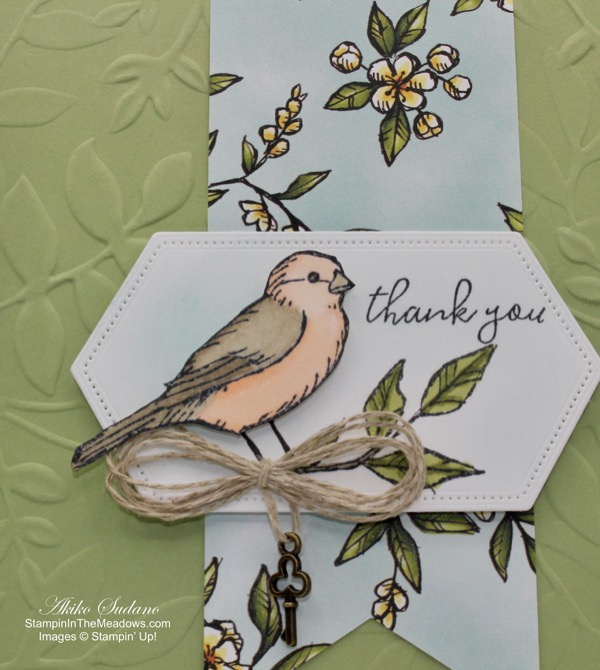
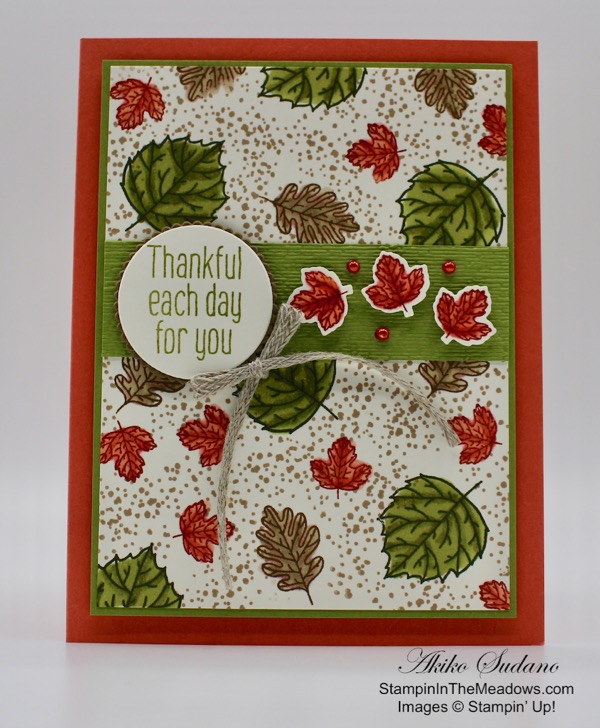
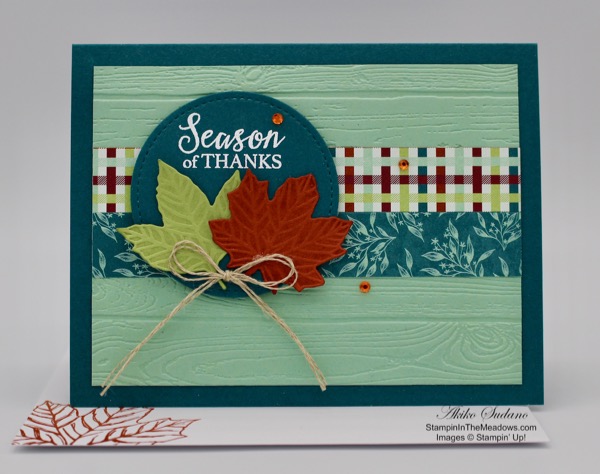
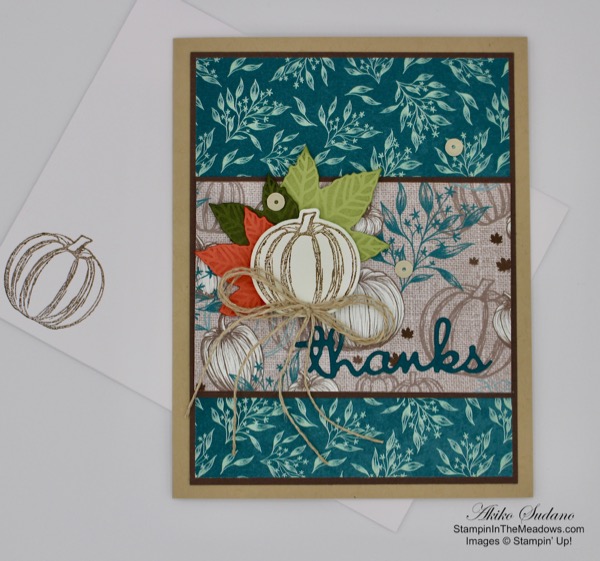
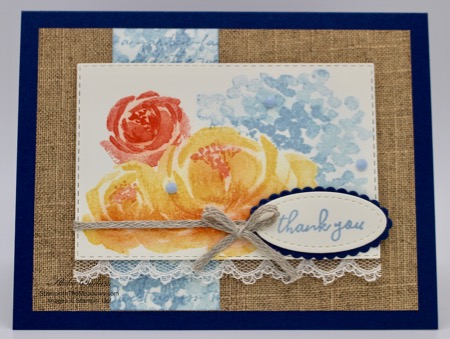
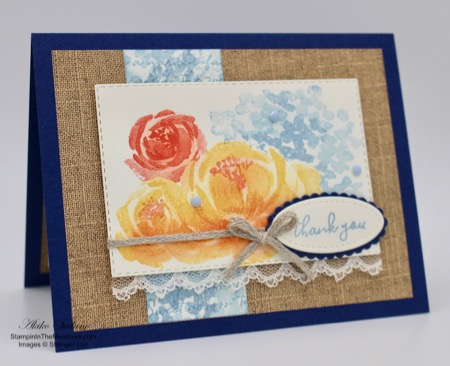
Good Morning! Today I have a set four Thank You cards made with the Pressed Petals Specialty Designer Series Paper and stamped with the pretty Thank You sentiment from the Stampin’ Up! Love What You Do photopolymer stamp set. I feel that I can never have enough thank you cards. You can find the supplies used to create this card at the bottom of my post along with the sizes of cardstock used.

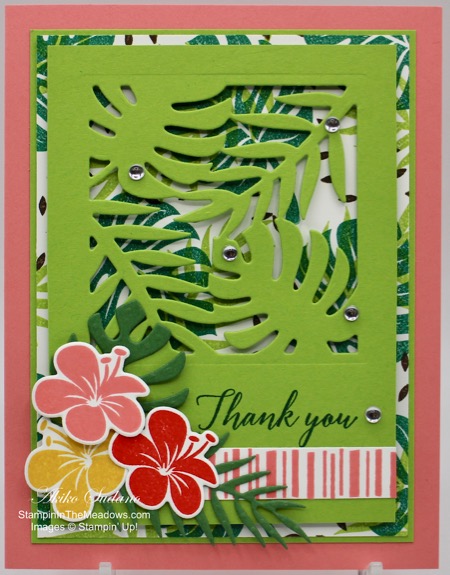
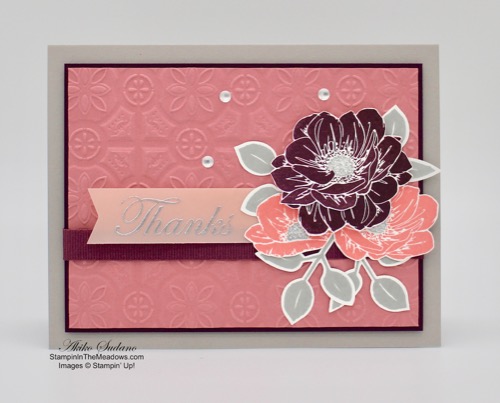
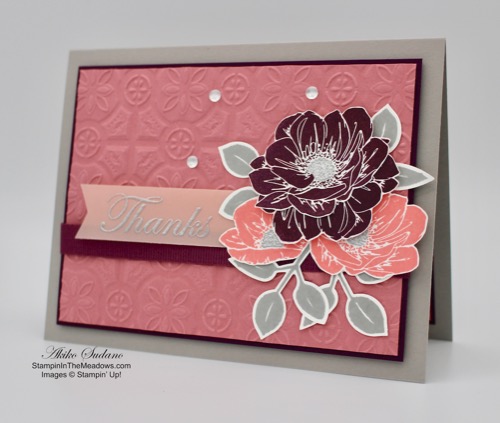
In the Pressed Petals Specialty DSP set, there is a sheet that has a bunch of different floral panels. I took the four largest and cut them down to 3 3/4″ x 5″ and adhered them to a mat in coordinating colors – Mossy Meadow, Night of Navy, Merry Merlot and Flirty Flamingo.

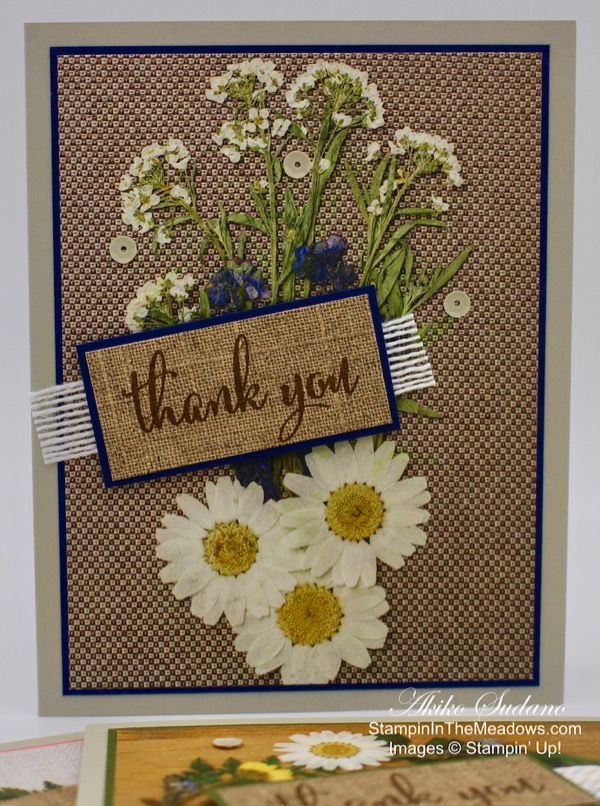
I attached each to a Sahara Sand card base with liquid glue.

I took a strip of the burlap paper and stamped the Thank You sentiment from the Stampin’ Up! Love What You Do stamp set in Soft Suede. I matted the sentiment in the same color as the main mat and adhered a strip of White Flax ribbon behind it with snail. I adhered the label to the card front with dimensionals.

For a little bling, I finished off each card with three crumb cake sequins.

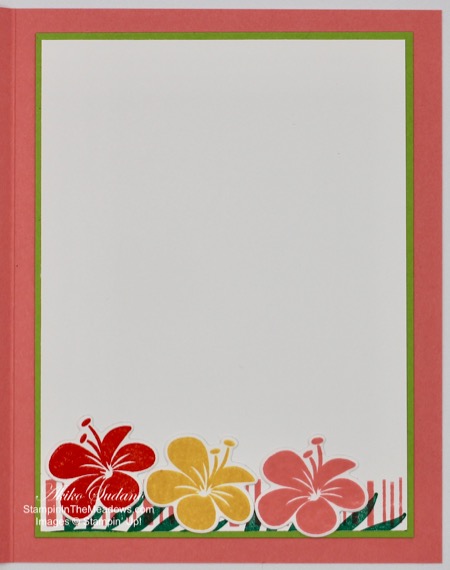
I left the inside pretty simple, just added a coordinating mat to a Whisper White panel and adhering it to the inside of the card

Pretty Paper – check; Ribbon – check; Bling – check; Dimensionals – check. Basic elements for a fancy handmade card all accounted for in a simple easy to do project. I even included stamping! Taking advantage of the beautiful Pressed Petals specialty designer series paper gave me a quick way to replenish my stock of Thank You cards!

I’ll be doing my Facebook Live again this Sunday at 1:00. I missed it last weekend as I was returning from Stampin’ Up! On Stage. I received my November Paper Pumpkin this week – the Winter Wonders tags kit, and I will show you the tags and make some alternative design cards. Here’s my page.


This image has an empty alt attribute; its file name is 10-01-19_dheader_onlinex_na.jpg
๏ปฟ

Last Day for Stampin’ Up! Online Extravaganza Sale !

Today is the last day for the Stampinโ€™ Up! Online Extravaganza!

DETAILS:

Ordering Deadline: November 22, 2019; 11:50 PM (MT)

  • Promotion includes items from the 2019โ€“2020 annual catalog only.
  • Discounts apply to promotion items only. 
  • Ordering information can be found in the flyer below.
  • No limits apply. 
  • Discounted pricing for items featured in this promotion will be available ONLY during the sales period. No exceptions.
  • If you purchased a product offered in the promotion prior to the sale, we will not be offering exchanges or credits. 
  • In the event that we run out of any item offered, promotional pricing will be honored on items backordered, up to the point it reaches the backorder limit. If you try to order an item that is not available, you will receive a notification informing you it is currently unavailable. Once an item reaches the backorder limit and is not orderable, it will no longer be available during the promotion and will not be available to order until additional inventory arrives in your market.

Click on the image below to get the full details of the items on sale:

This image has an empty alt attribute; its file name is 10-01-19_th_sharable_flyer_onlinex_na.jpg

Go to my online store and stock up today!


Double Wildflower Points Ordering Bonus through November 25!

And in celebration of the sale and all the excitement this week, I’m offering an ordering bonus of DOUBLE the Wildflower Points in my Wildflower Frequent Shopper Program!

Youโ€™ll get DOUBLE Wildflower Reward Points for every order of $50 or greater before shipping and taxes (no matter what you order!) placed through my online store from now through, Monday, November 25!!

Donโ€™t forget to add the Host Code below if your order is under $150 to get your free thank you gift (donโ€™t apply the code to orders over $150 – they will automatically get the free thank you gift AND you get host rewards of your own!).  For more information about my WildflowerFrequent Shopper Program (my way of saying thanks to my returning buyers) and Wildflower Points, click here.  Let me know if you have any questions.  Happy Shopping!!


November 16 – 30 Host Code: 462PVWKY

Use this host code when you order $50 or more and receive a free gift from me!  The gift is your choice of any item valued up to $10.00 in the 2019-20 Annual Catalog or in the 2019 Holiday Catalog!  That includes some of the Host Exclusive stamp sets!

If your order is over $150, please do not use the host code since you’ll receive your own Host Dollars plus I’ll send you the free gift!  This host code can be used by anyone, no commitment required.  Let me know if you have any questions.


If you need any stamping supplies, Iโ€™d be very happy to be your Demonstrator.  Just click on the Shop Now button on the right side of the screen to go directly to my online store or contact me if you have any questions.  Happy Stamping!

Thanks for stopping by and have a great weekend!

Akiko

  • Visit my online store here
  • See the current Stampin’ Up! clearance rack specials here
  • Earn FREE Stampin’ Up! products through my Wildflower Frequent Shopper Program – my way of saying thank you to my frequent shopper online customers.
  • Sign up for my weekly newsletter here
  • Have any questions? I’d be happy to help, click here to contact me.

Cardstock Cuts for this project:

  • Sahara Sand – (4) 5 1/2″ x 8 1/2″ (card base)
  • Night of Navy – 3 7/8″ x 5 1/8″ (card front mat), 3 3/4″ x 5″ (inside mat), 1 1/8″ x 2 3/8″ (label mat)
  • Merry Merlot – 3 7/8″ x 5 1/8″ (card front mat), 3 3/4″ x 5″ (inside mat), 1 1/8″ x 2 3/8″ (label mat)
  • Mossy Meadow – 3 7/8″ x 5 1/8″ (card front mat), 3 3/4″ x 5″ (inside mat), 1 1/8″ x 2 3/8″ (label mat)
  • Flirty Flamingo – 3 7/8″ x 5 1/8″ (card front mat), 3 3/4″ x 5″ (inside mat), 1 1/8″ x 2 3/8″ (label mat)
  • Pressed Petals DSP – (4) 3 3/4″ x 5″ (floral arrangements), (4) 1″ x 2 1/4″ (burlap design for labels)
  • Whisper White – (4) 3 1/2″ x 4 3/4″

Stampin’ Up! products used in this project:


Stampin’ Up! Pop of Petals Thank You Card

Good Morning! I need some thank you cards and I have been working on a post for later this week using the Stampin’ Up! Pop of Petals stamp set. I found a pretty card on Pinterest that was made by Tammy Beard of StampinSavvy.com here and was inspired to make one similar but with fall colors. I’m not sure I succeeded, but it was a lot of fun playing with different colors and stamping a card rather than relying on die cuts.

Here’s the Facebook Live video where I demonstrated how to make the card.

In the video, I used the Stampin’ Up! Pop of Petals stamp set to make the Rich Razzleberry and Mango Melody card with the Mossy Meadow leaves. I started by stamping the Mango Melody flowers, and then the Rich Razzleberry flowers, and then filling in with leaves. I finish off the card front by stamping the sentiment from the Stampin’ Up! Love what you Do in Memento Tuxedo Black and I use the Stamparatus so that I can stamp twice to get good coverage. I also show how to curve the petals on the punched flower so that you can get a dimensional look. And I used a black sharpie so that I wouldn’t harm the tip of my Stampin’ Blend on the faceted gems to color it black before applying it to the center flower.

I also posted the video to my YouTube channel and you can view it here.

It was fun to make a card that had a lot of stamping and was not for Christmas. And you’ll note that I did make two boo boos by rocking the leaf stamp instead of bringing it straight up and down – now I have an example for why you shouldn’t do this. Finally, thank you Tammy for the wonderful inspiration!


November 1 – 15 Host Code: WR4KJJM4

Use this host code when you order and receive a free gift from me!  If your order is over $150, please do not use this code, but youโ€™ll still get the free gift.  The free gift is your choice of any item valued up to $10.00 in the 2018-19 Annual Catalog or in the 2019 Occasions Catalog!  That includes some of the Host Exclusive stamp sets!


If you need any stamping supplies, Iโ€™d be very happy to be your Demonstrator.  Just click on the Shop Now button on the right side of the screen to go directly to my online store or contact me if you have any questions.  Happy Stamping!

Thanks for stopping by and have a great week!

Akiko

  • Visit my online store here
  • See the current Stampin’ Up! clearance rack specials here
  • Earn FREE Stampin’ Up! products through my Wildflower Frequent Shopper Program – my way of saying thank you to my frequent shopper online customers.
  • Have any questions? I’d be happy to help, click here to contact me.

Cardstock Cuts for this project:

  • Rich Razzleberry – 4 1/4″ x 11″
  • Mango Melody – 4 1/4″ x 11″
  • Whisper White – (4) 3 3/4″ x 5″, (2) 2″ x 2″ scraps
  • Garden Green – 3 7/8″ x 5 1/8″
  • Mossy Meadow – 3 7/8″ x 5 1/8″

Stampin’ Up! products used in this project:


Stampin’ Up! Daisy Lane Simply Thankful Card for the Inkin’ Krew Blog Hop

Good Morning! Welcome to The October Inkin’ Krew Monthly Blog Hop!

Our theme for this month is Giving Thanks and I’ve made a card using the Stampin’ Up! Daisy Lane stamp set and the wonderful sentiment from the Stampin’ Up! Country Home stamp set. These daisies remind me of the purple mums that are all over the place at this time of year and make me feel like Fall. You can find the supplies used to create this card at the bottom of my post along with the sizes of cardstock used.

I started by die cutting two pieces of Sahara Sand card stock using the second largest of the Stitched Rectangles dies. On one of them, I took the third largest of the Stitched Rectangle dies and cut out the middle to make a frame. Then I cut a panel of green leafy paper from the Magnolia Lane designer series paper using the same die. Then I adhered the frame to the second Sahara Sand die cut and adhered the green leaf DST to the inside.

Then I used the middle of the Sahara Sand frame to cut the label die from the Wild Rose dies. I stamped the sentiment from the Country Home stamp set in Versamark ink and sprinkled it with gold embossing powder. I heat set it and then adhered it to the background panel with liquid glue.

I stamped the large maple leaf from the Gather Together stamp set in Early Espresso ink on a panel of Very Vanilla. I then colored it with the Old Olive and Calypso Coral Stampin’ Blends and cut it out with the coordinating die. I also cut two maple leaves from Old Olive cardstock and one maple leaf from Cajun Craze cardstock using the smaller maple leaf die from the Gathered Leaves dies. Then I cut three berry branches in Gold Glimmer paper using the berry die from the Frosted Bouquet dies.

I stamped six small daisies from the Stampin’ Up! Daisy Lane stamp set in Rich Razzleberry ink on Rich Razzleberry card stock. Using a bone folder, I gently rounded the ends of the petals and glued three petal clusters together for each flower. I accented the centers with the gold Designer Elements. I arranged the leaves and berries on the panel and adhered them with liquid glue. I adhered the flowers with glue dots. I then used dimensionals to attach the decorated panel to a Cajun Craze card base.

I decided that I had to give the inside of the card the same frame treatment as the card front. So I cut another frame in Sahara Sand just like the front and attached it to the inside of the card with liquid glue. I then adhered a strip of the Magnolia Lane DSP to the bottom of a Very Vanilla panel and cut it out with the third largest die from the Stitched Rectangles dies. I adhered this to the inside of the card with liquid glue.

There you have it – a pretty fall card with flowers from the Stampin’ Up! Daisy Lane stamp set, turning maple leaves and touches of gold to express the thankful sentiments that abound at this time of year. Thanks for visiting! Click on the Next Blog button to move forward to Sue Prather’s project or click the Previous Blog button to move back to see the project that Shirley Gentry created.

If you get lost along the way, here are the participants for the hop:

I hope you enjoy all the projects that the team has created today. Have a great week!

Akiko


October 1 โ€“ 15 Host Code: 44YKETNJ

Use this host code when you order and receive a free gift from me!  If your order is over $150, please do not use this code, but youโ€™ll still get the free gift.  The free gift is your choice of any item valued up to $10.00 in the 2018-19 Annual Catalog or in the 2019 Occasions Catalog!  That includes some of the Host Exclusive stamp sets!


If you need any stamping supplies, Iโ€™d be very happy to be your Demonstrator.  Just click on the Shop Now button on the right side of the screen to go directly to my online store or contact me if you have any questions.  Happy Stamping!

  • Visit my online store here
  • See the current Stampin’ Up! clearance rack specials here
  • Earn FREE Stampin’ Up! products through my Wildflower Frequent Shopper Program – my way of saying thank you to my frequent shopper online customers.
  • Have any questions? I’d be happy to help, click here to contact me.

Cardstock Cuts for this project:

  • Cajun Craze – 5 1/2″ x 8 1/2″, 2″ x 2″
  • Sahara Sand – (3) 3 3/4″ x 5″
  • Very Vanilla – 3 3/4″ x 5″, 3 1/2″ x 3 1/2″
  • Old Olive – 2″ x 4″
  • Rich Razzleberry – 4″ x 6″
  • Magnolia Lane DSP – 3 3/4″ x 5″, 1/2″ x 5″
  • Gold Glimmer – 2″ x 6 1/2″

Stampin’ Up! products used in this project:


Stampin’ Up! To Every Season Holiday Cards

Good Morning! Saturday was World Card Making Day and the Inkin Krew had a celebration on Facebook. Our leader, Amy, created a group for customers and friends and we had several Facebook Live presentations on card making throughout the day. It was an inspirational and fun day and thank you to everyone who participated!

For this celebration, I made a Thankful for You card using the Stampin’ Up! To Every Season bundle on Facebook Live. I was so nervous since I have only done a few videos and the audience was so much bigger than the handful of supporters I usually have watching! Here is the Facebook Live video:

You can also view this video on YouTube here.

And then on Sunday afternoon, I did my normally scheduled Live session on my Stampin’ In The Meadows Facebook page and I made a Halloween card using the same stamp set.

Here is that video:

And I also uploaded it to YouTube for watching here.

The Stampin’ Up! To Every Season stamp bundle is very versatile and will take you a long way. It has bat stamps for Halloween, leaf stamps for Fall or Thanksgiving, snowflake stamps for Christmas or Winter and heart stamps for Valentines day. And in the bundle, you also get the Every Season punch pack, consisting of 4 mini punches – a bat, a leaf, a snowflake and a heart. And it has lots of sentiments in a nice simple font.

My video adventure continues to evolve. I’m taking baby steps and learning A LOT. I still have a ways to go, but I did get my Stampin’ In The Meadows YouTube channel started and a couple of videos posted. YAY!! I still need to learn about customizing it so it’s pretty, but I’ll get there eventually. You can take a look at it here, and all suggestions are welcome. Thanks for stopping by and have a great week!

Akiko


October 1 โ€“ 15 Host Code: 44YKETNJ

Use this host code when you order and receive a free gift from me!  If your order is over $150, please do not use this code, but youโ€™ll still get the free gift.  The free gift is your choice of any item valued up to $10.00 in the 2018-19 Annual Catalog or in the 2019 Occasions Catalog!  That includes some of the Host Exclusive stamp sets!


If you need any stamping supplies, Iโ€™d be very happy to be your Demonstrator.  Just click on the Shop Now button on the right side of the screen to go directly to my online store or contact me if you have any questions.  Happy Stamping!

  • Visit my online store here
  • See the current Stampin’ Up! clearance rack specials here
  • Earn FREE Stampin’ Up! products through my Wildflower Frequent Shopper Program – my way of saying thank you to my frequent shopper online customers.
  • Have any questions? I’d be happy to help, click here to contact me.

Cardstock Cuts for these projects:

  • Thankful for You card
    • Calypso Coral โ€“ 5 ยฝโ€ x 8 ยฝโ€
    • Very Vanilla – 3 3/4โ€ x 5โ€, 3 5/8โ€ x 4 7/8โ€, 2โ€ x 2โ€, 1โ€ x 5โ€
    • Old Olive โ€“ 3 3/4โ€ x 5โ€, 1โ€ x 3 5/8โ€
    • Soft Suede โ€“ 2โ€ x 2โ€
  • Halloween card
    • Pumpkin Pie – 4 1/4″ x 11″
    • Very Vanilla – 3 5/8โ€ x 4 7/8โ€, 1″ x 4 7/8″, 1″ x 3″
    • Basic Black – (2) 3 3/4″ x 5″, 1 1/2″ x 3 1/2″,
    • Monster Bash DSP – 2 3/4″ x 4 7/8″, 1/2″ x 3 5/8″

Stampin’ Up! products used in this project:


Stampin’ Up! Gather Together Fall Leaves Card

Good Morning! Today I’m sharing another Facebook Live video that I made with a card that I CASEd ( copy and share everything) from a fellow Inkinโ€™ Krew team member Leslie Larkin. I loved this card that Leslie made and shared on our Facebook Team page. You can see her original on her blog here. You can find the supplies used to create my card at the bottom of my post along with the sizes of cardstock used.

When I first made the sample I made a boo boo because I embossed the panel before stamping the sentiment. So I had to modify it, and then when I made the video I changed it up a little more. Hereโ€™s the video. I hope you enjoy it.

This is the first time I’ve used my phone camera for recording for FB Live and I figured out how to fix some technical difficulties, but some still exist, so thank you for bearing with me. I’m planning to start a You Tube Channel by the week’s end, and I’ll update this post with the link when its ready.

Thanks for stopping by and have a great week!

Akiko

Evening Update: I posted the video to YouTube and you can view it here. I also managed to clean up phone orientation issues in the first two minutes (Yay!) before posting. Thanks for being patient with me. ๐Ÿ™‚


This image has an empty alt attribute; its file name is 09-19_banner_dsp_us.jpg

LAST DAY!!! Buy 3 Get 1 Free Designer Series Paper Sale Ends Today

Today is the last day for the Stampin’ Up! Designer Series Paper Sale! where you can buy three packages of select Designer Series Paper, and get one FREE! See the full details on my Stampinโ€™ Up! Promotions Page. Don’t miss out!


September 16 – 30 Host Code: EDRVYB3Z

October 1 – 15 Host Code: 44YKETNJ

Use this host code when you order and receive a free gift from me!  If your order is over $150, please do not use this code, but youโ€™ll still get the free gift.  The free gift is your choice of any item valued up to $10.00 in the 2018-19 Annual Catalog or in the 2019 Occasions Catalog!  That includes some of the Host Exclusive stamp sets!


If you need any stamping supplies, Iโ€™d be very happy to be your Demonstrator.  Just click on the Shop Now button on the right side of the screen to go directly to my online store or contact me if you have any questions.  Happy Stamping!

  • Visit my online store here
  • See the current Stampin’ Up! clearance rack specials here
  • Earn FREE Stampin’ Up! products through my Wildflower Frequent Shopper Program – my way of saying thank you to my frequent shopper online customers.
  • Have any questions? I’d be happy to help, click here to contact me.

Cardstock Cuts for this project:

  • Pretty Peacock โ€“ 5 1/2″ x 8 1/2, 3โ€ x 3โ€
  • Mint Macaron โ€“ (2) 3 3/4โ€ x 5โ€
  • Come to Gather DSP โ€“ (2) 3/4″ x 5″, 1/2″ x 4 7/8โ€
  • Whisper White โ€“ 3 5/8″ x 4 7/8โ€
  • Cajun Craze โ€“ 2 1/4″ x 2 1/4″ scrap
  • Pear Pizzazz – 2 1/4″ x 2 1/4″ scrap 

Stampin’ Up! products used in this project:


Stampin’ Up! Gather Together Fall Thank You Card

Good Morning! Boy, I’m really on a roll with the new Stampin’ Up! Gather Together bundle. I’ve made about 1/2 dozen different designs for classes and tutorials as well as this blog. I think it’s because we’re in the season and the bundle and papers are so pretty and versatile. This card is a Thank You card that combines the Gather Together bundle with the Well Written dies.

This is a card that I designed for my Cardmaking 101 video series on Facebook. It’s the first time I’ve introduced die cuts in the series and these are the perfect sets to introduce this wonderful technique. Here is the card. You can find the supplies used to create this card at the bottom of my post along with the sizes of cardstock used.

And here is a link to the how-to video that I shared earlier on Facebook Live. Instructions for creating the card are in the video. I apologize ahead of time for it being so long – my goal is to improve each video in both production and instructional quality.

I intend to set up a YouTube channel in the near future so you can view my videos there as well, but I’m still learning how to set this up, so for now I am only on Facebook and here.

Here’s a closeup of the card front details:

Thanks for visiting and watching. Have a great weekend!

Akiko


This image has an empty alt attribute; its file name is 09-19_banner_dsp_us.jpg

Buy 3 Get 1 Free Designer Series Paper Sale

By popular demand, Stampinโ€™ Up! is bringing back the Designer Series Paper Sale! During September 4โ€“30, you can buy three packages of select Designer Series Paper, and get one FREE! See the full details on my Stampinโ€™ Up! Promotions Page.


September 1 – 15 Host Code: DHYEBG62

September 16 – 30 Host Code: EDRVYB3Z

Use this host code when you order and receive a free gift from me!  If your order is over $150, please do not use this code, but youโ€™ll still get the free gift.  The free gift is your choice of any item valued up to $10.00 in the 2018-19 Annual Catalog or in the 2019 Occasions Catalog!  That includes some of the Host Exclusive stamp sets!


If you need any stamping supplies, Iโ€™d be very happy to be your Demonstrator.  Just click on the Shop Now button on the right side of the screen to go directly to my online store or contact me if you have any questions.  Happy Stamping!

  • Visit my online store here
  • See the current Stampin’ Up! clearance rack specials here
  • Earn FREE Stampin’ Up! products through my Wildflower Frequent Shopper Program – my way of saying thank you to my frequent shopper online customers.
  • Have any questions? I’d be happy to help, click here to contact me.

Cardstock Cuts for this project:

  • Crumb Cake – 5 1/2″ x 8 1/2″
  • Come to Gather DSP – (pretty peacock leaves) 3 3/4″ x 5″, 1/2″ x 3 3/4″, (pumpkins) 2 1/4″ x 3 3/4″
  • Early Espresso – 3 7/8″ x 5 1/8″, 3 3/4″ x 5″, 2 5/8″ x 3 3/4″
  • Whisper White – 3 5/8″ x 4 7/8″, (2) 1 1/2″ x 1 1/2″ scraps
  • Pretty Peacock – 1″ x 2 1/2″ scrap
  • Calypso Coral -1 1/2″ x 2″ scrap
  • Pear Pizzazz – 1 1/2″ x 2″ scrap
  • Mossy Meadow – 1 1/2″ x 2″ scrap

Stampin’ Up! products used in this project:


Stampin’ Up! Floral Essence Thank You Card

Good Morning! I hope you had a great weekend! Today I have a Floral Thank You card made with the Stampin’ Up! Floral Essence Photopolymer stamp set. I was inspired by the colors and theme in the Hand Stamped Sentiments Inspiration Challenge #322.

I just love these colors – they are so elegant and kind of old fashioned! You can find the supplies used to create this card at the bottom of my post along with the sizes of cardstock used.

So here’s my card. I started by running a panel of Rococo Rose cardstock through the Tin Tile embossing folder and adhering it to a Blackberry Bliss mat. I took a piece of Raspberry Ripple grosgrain ripple ribbon from my stash and wrapped it around the bottom, securing it in the back. I embossed the Thanks sentiment from the Good Morning Magnolia stamp set using silver embossing powder on a strip of the Petal Pink vellum from the Perennial Essence vellum cardstock and adhered it over the ribbon.

I then worked on the flower bouquet. I stamped two of the solid flowers from the Stampin’ Up! Floral Essence stamp set in Blackberry Bliss and one in Flirty Flamingo on Whisper White cardstock. I stamped one of the small solid flowers in Flirty Flamingo and one in Blackberry Bliss (for the inside of the card) on Whisper White cardstock. I then fussy cut all the flowers. I stamped four sets of the the leaves in Smoky Slate ink on Whisper White cardstock and punched them out with the leaf punch (much easier than fussy cutting!).

I stamped centers for the flowers in Versamark ink on Whisper White and embossed them in Silver. I fussy cut them and adhered them to the flowers using liquid glue. I then arranged the leaves and Flirty Flamingo flowers on the card front panel and adhered them with liquid glue. I adhered the two large Blackberry Bliss flowers together to make a larger flower and popped it on the card front with dimensionals. I finished the card front with three frosted epoxy drops and popped the panel on a Gray Granite card base with dimensionals.

I decorated the inside of the card by stamping another leaf branch in Smoky Slate ink on a panel of Whisper White and adhered the last Blackberry Bliss flower over it. I then added Rococo Rose and Blackberry Bliss mats and adhered it to the inside of the card with liquid glue.

I hope you liked my card for today. Thanks for visiting and have a great week!

Akiko


This image has an empty alt attribute; its file name is 09-19_banner_dsp_us.jpg

Buy 3 Get 1 Free Designer Series Paper Sale

By popular demand, Stampinโ€™ Up! is bringing back the Designer Series Paper Sale! During September 4โ€“30, you can buy three packages of select Designer Series Paper, and get one FREE! See the full details on my Stampinโ€™ Up! Promotions Page.


September 1 – 15 Host Code: DHYEBG62

Use this host code when you order and receive a free gift from me!  If your order is over $150, please do not use this code, but youโ€™ll still get the free gift.  The free gift is your choice of any item valued up to $10.00 in the 2018-19 Annual Catalog or in the 2019 Occasions Catalog!  That includes some of the Host Exclusive stamp sets!


If you need any stamping supplies, Iโ€™d be very happy to be your Demonstrator.  Just click on the Shop Now button on the right side of the screen to go directly to my online store or contact me if you have any questions.  Happy Stamping!

  • Visit my online store here
  • See the current Stampin’ Up! clearance rack specials here
  • Earn FREE Stampin’ Up! products through my Wildflower Frequent Shopper Program – my way of saying thank you to my frequent shopper online customers.
  • Have any questions? I’d be happy to help, click here to contact me.

Cardstock Cuts for this project:

  • Gray Granite – 5 1/2″ x 8 1/2″
  • Blackberry Bliss – (2) 3 3/4″ x 5″
  • Rococo Rose – (2) 3 5/8″ x 4 7/8″
  • Whisper White – 3 3/8″ x 4 5/8″, scraps for flowers and leaves
  • Petal Pink Vellum – 3/4″ x 4 1/2″

Stampin’ Up! products used in this project:


Stampin’ Up! Beautiful Friendship Thank You Card

Good Morning! For today, I made a feminine thank you card using the beautiful flowers in the Stampin’ Up! Beautiful Friendship Photopolymer Stamp set. I paired it with the linen paper from the Pressed Petals Specialty Designer Series Paper for a natural and rustic look. You can find the supplies used to create this card at the bottom of my post along with the sizes of cardstock used.

I wanted to use both So Saffron and Calypso Coral on the large double roses, so I mounted the stamp on my Stamparatus. I first inked it with So Saffron ink and stamped it on Very Vanilla. Then I used sponge daubers to add Calypso Coral ink to the stamp and stamped again in the same place. I did this a couple of times until I got the depth of color I wanted in the places I wanted. The Stamparatus made this quite easy.

I then stamped the large hydrangea in Seaside Spray and the small rose in Calypso Coral. I stamped the rose centers in Calypso Coral after stamping off once. I lightly sponged all the flowers in the same inks. I then cut it out with the Stitched Rectangle die and adhered a piece of Very Vanilla Scalloped Lace to the bottom.

I stamped the thank you sentiment from the Free as a Bird stamp set in Seaside Spray on a scrap of Very Vanilla and cut it out with the small stitched oval from the Stitched Shapes dies. I cut a backing from a scrap of Night of Navy cardstock with the small scalloped oval from the Layering Ovals dies. I adhered a piece of Braided Linen Trim across the bottom and attached the labels and a bow. I finished it off with three small Seaside Spray Faceted Dots.

I stamped the hydrangea stamp from the Stampin’ Up! Beautiful Friendship stamp set on a strip of Very Vanilla to cover it. I then ran it through the Scripty Embossing Folder and sponged it with Seaside Spray to highlight the embossing. I adhered it to a panel of Pressed Petals DSP and then to a Night of Navy card base with liquid glue. I attached the floral panel with Dimensionals.

I decorated the inside of the card by stamping the large double rose image from the Stampin’ Up! Beautiful Friendship stamp set in So Saffron ink on Very Vanilla cardstock after stamping off. I stamped the flower centers in Calypso Coral after stamping off twice. I lightly sponged the flower in So Saffron to fill it in and adhered it to a panel of Pressed Petals DSP and then to the inside of the card.

I hope you like today’s card. The flowers in the Stampin’ Up! Beautiful Friendship stamp set remind me of Victorian cabbage roses in vintage fabrics and porcelain. Maybe it’s a little fussy for today’s tastes – what do you think? Thanks for visiting!

Akiko


Buy 3 Get 1 Free Designer Series Paper Sale Is Back โ€“ Starting Sept 4!

By popular demand, Stampinโ€™ Up! is bringing back the Designer Series Paper Sale! During September 4โ€“30, you can buy three packages of select Designer Series Paper, and get one FREE!

Here are the Details:

  • Sale Dates:  September 4โ€“30
    • Order Deadline:  September 30, 2019; 11:50 pm (MT)
  • Only Designer Series Papers listed in the table below qualify for this promotion. You may mix and match papers from any of the listed papers.
  • There is no limit to how many times participants can buy three packages of Designer Series Paper, and get one free during this sale.
  • In the online ordering system, when three qualifying Designer Series Paper packs are entered, a prompt to add a free Designer Series Paper will appear.
  • In the online store, if a you order four packages of the same qualifying Designer Series Paper, you will need to enter three together and then order the fourth free item separately.
  • Designer Series Paper ordered as part of a Starter Kit does not qualify for this sale.
  • Designer Series Paper ordered with Stampinโ€™ Rewards does not qualify for this sale.

Here are the Designer Series Paper Packs that are included in the Sale:

ITEMPAGEDESCRIPTIONPRICE
149100166PERENNIAL ESSENCE DESIGNER SERIES PAPER$11.50
149443166SEE A SILHOUETTE DESIGNER SERIES PAPER$11.50
149481167COME SAIL AWAY DESIGNER SERIES PAPER$11.50
149484165MAGNOLIA LANE DESIGNER SERIES PAPER$11.50
149488165GARDEN LANE DESIGNER SERIES PAPER$11.50
149489165FOLLOW YOUR ART DESIGNER SERIES PAPER$11.50
149497165WOVEN THREADS DESIGNER SERIES PAPER$11.50
149589166DINOROAR DESIGNER SERIES PAPER$11.50
149592166BIRD BALLAD DESIGNER SERIES PAPER$11.50
149500167PRESSED PETALS SPECIALTY DESIGNER SERIES PAPER$14.50

Get ready for this great sale starting September 4!


We only have a few more days left in Bonus Days! Don’t forget to redeem those $5 coupons that you earned for purchases in July. See the full details on my Stampinโ€™ Up! Promotions Page.


August 16 – 31 Host Code: KHSFPFPZ

September 1 – 15 Host Code: DHYEBG62

Use this host code when you order and receive a free gift from me!  If your order is over $150, please do not use this code, but youโ€™ll still get the free gift.  The free gift is your choice of any item valued up to $10.00 in the 2018-19 Annual Catalog or in the 2019 Occasions Catalog!  That includes some of the Host Exclusive stamp sets!


If you need any stamping supplies, Iโ€™d be very happy to be your Demonstrator.  Just click on the Shop Now button on the right side of the screen to go directly to my online store or contact me if you have any questions.  Happy Stamping!

  • Visit my online store here
  • See the current Stampin’ Up! clearance rack specials here
  • Earn FREE Stampin’ Up! products through my Wildflower Frequent Shopper Program – my way of saying thank you to my frequent shopper online customers.
  • Have any questions? I’d be happy to help, click here to contact me.

Cardstock Cuts for this project:

  • Night of Navy – 5 1/2″ x 8 1/2″ card base, 1 1/4″ x 2 1/4″ scrap for label
  • Very Vanilla – (2) 4 3/4″ x 3 1/2″ panels, 1 1/4″ x 2 1/4″ scrap for label, 1 1/2″ x 3 3/4″ strip
  • Pressed Petals DSP – (2) 3 3/4″ x 5″ panels

Stampin’ Up! products used in this project:


Stampin’ Up! Tropical Chic Thank You

Good Morning! The Stampin’ Up Tropical Chic Cling stamp set has wonderful tropical images that can be used for any occasion. Pair it with the Tropical Dies and you expand the potential creative fun. When the set came out last year, Stampin’ Up! also offered a set of coordinating designer series paper or DSP. Well, that’s no longer available, so when I pulled out the set for the first time this week, I decided that I first needed to create my own DSP.

I was amazed at how easy it was to do! The different leaves are perfectly sized and coordinated to give you interesting texture and movement. The hibiscus flowers are great for providing that little pop of color and the little leaves are perfect for filling in those little blank spaces that you know need something, but don’t know what. Finally, that little striped thing that looks like a price code is perfect for giving you a striped texture where you need it. Imagine the reeds on the roof of a tropical hut, or poles lashed together to make a raft.

Plus – you can do it in any set of colors that you have! Let me show you what I came up with. As always, you can find the supplies I used to create this card at the bottom of my post along with the sizes of cardstock used.

I started out by randomly stamping the palm frond and philodendron leaf all over a panel of Whisper White in Shaded Spruce and Granny Apple Green. I added some touches of the small leaves stamp in Early Espresso. I adhered it to a Granny Apple Green mat and then to a Flirty Flamingo card base.

I stamped the stripe stamp across a piece of Whisper White in Flirty Flamingo ink. I then die cut a panel of Granny Apple Green using the square leaf window die. I stamped the Thank You greeting from the Stampin’ Up! Tropical Chic stamp set in Shaded Spruce below the cut out and attached the striped piece to the bottom. I popped it on the leaf panel with dimensionals.

I stamped and die cut the two each of the hibiscus flowers in Daffodil Delight, Flirty Flamingo and Poppy Parade. I also die cut the philodendron leaf and palm frond in Garden Green. I arranged the die cuts on the panel and attached them with glue dots, and used a dimensional for the top Flirty Flamingo flower. I finished off the card front with clear epoxy dots.

The inside was decorated by stamping the stripes in Flirty Flamingo across the bottom of a Whisper White panel. I then stamped the tips of the palm frond stamp over the stripes in Shaded Spruce. I finished it by attaching the remaining hibiscus flowers.

Don’t those hibiscus flowers call for a cool fruity tropical drink – perhaps in a coconut? Definitely with a paper umbrella! The Stampin’ Up! Tropical Chic stamp set and Tropical dies are perfect for sending someone on an imaginary tropical escape. Where is your favorite tropical paradise?

Thanks for visiting!

Akiko


These are the last two days of the Bonus Days earning period where you get a coupon for $5 to redeem in August for every $50 you spend (before shipping and taxes) in July.

On Thursday, August 1, the redemption period begins and we can start to cash in those coupons. Yay!! See the full details on the Stampinโ€™ Up! Promotions Page.


July 15 โ€“ 31 Host Code: CA7YRFE3

August 1 – 15 Host Code: WG237RFK

Use this host code when you order and receive a free gift from me!  If your order is over $150, please do not use this code, but youโ€™ll still get the free gift.  The free gift is your choice of any item valued up to $10.00 in the 2018-19 Annual Catalog or in the 2019 Occasions Catalog!  That includes some of the Host Exclusive stamp sets!


If you need any stamping supplies, Iโ€™d be very happy to be your Demonstrator.  Just click on the Shop Now button on the right side of the screen to go directly to my online store or contact me if you have any questions.  Happy Stamping!

  • Visit my online store here
  • See the current Stampin’ Up! clearance rack specials here
  • Earn FREE Stampin’ Up! products through my Wildflower Frequent Shopper Program – my way of saying thank you to my frequent shopper online customers.
  • Have any questions? I’d be happy to help, click here to contact me.

Cardstock Cuts for this project:

  • Flirty Flamingo – 5 1/2″ x 8 1/2″
  • Granny Apple Green – (2) 3 3/4″ x 5″, 3 3/8″ x 4 5/8″
  • Whisper White – (2) 3 5/8″ x 4 7/8″, 1/2″ x 3 3/8″, (2) 1 1/4″ x 4 1/2″ scraps for flowers
  • Garden Green – 2 1/2″ x 1 3/4″, 1 1/2″ x 3″ scraps for leaves

Stampin’ Up! products used in this project:


Stampin’ Up! Free as a Bird Thank You Card

Good Morning! Today’s card showcases the beautiful new Bird Ballad suite of products from the new 2019 – 2020 Annual Catalog. The art image is created with the beautiful Stampin’ Up! Free as a Bird cling stamp set.

The layout for today’s card was inspired by the #TGIFC216 Sketch Challenge at TGIF Challenges. Check out all the entries for this challenge by clicking on the picture below.

I started out by embossing a piece of Pear Pizzazz cardstock in the Layered Leaves 3-D embossing folder and attaching it to a Thick Whisper White card base. I cut a strip of blue floral paper from the Bird Ballad designer series paper and used the Banner Triple punch to trim the bottom.

I stamped the sentiment and leaf cluster from the Stampin’ Up! Free as a Bird cling stamp set using Memento Tuxedo Black ink on Thick Whisper White cardstock and die cut it using one of the Nested Label dies. I then colored the leaves with the Old Olive Stampin’ Blends and the branch with the dark Crumb Cake Stampin’ Blends. I lightly sponged the background with Pool Party ink.

I then stamped the single bird from the Stampin’ Up! Free as a Bird cling stamp set in Memento Tuxedo Black ink on Thick Whisper White cardstock. I colored it with Crumb Cake and Petal Pink Stampin’ Blends and fussy cut it using my paper snips. Since I cut it on the line, I used a black marker to color to color the edges of the bird. This gives the bird a more finished look by hiding the white paper edge.

I then made a bow with the Linen Thread and attached a key from the Bird Ballad Trinkets to the bottom so that it dangles – such a fun touch for a card! Since I cut off the legs when I cut out the bird, I drew legs on the label using a black journaling pen. I then popped the bird on the label with dimensionals and glued the bow on with a glue dot. I used more dimensionals to attack the label to the banner.

I attached a strip of the same DSP as the front banner to the bottom of a whisper white panel using multipurpose glue and attached it to a Pear Pizzazz mat using snail. I then attached this to the inside of the card, also with snail adhesive.

Everything in the Bird Ballad suit is so beautiful and every Bird Ballad card I see is stunning. Thank you for stopping by!

Akiko


June 16 – 30 Host Code: 3ZXWQ49Y

Use this host code when you order and receive a free gift from me!  If your order is over $150, please do not use this code, but youโ€™ll still get the free gift.  The free gift is your choice of any item valued up to $10.00 in the 2018-19 Annual Catalog or in the 2019 Occasions Catalog!  That includes some of the Host Exclusive stamp sets!


If you need any stamping supplies, Iโ€™d be very happy to be your Demonstrator.  Just click on the Shop Now button on the right side of the screen to go directly to my online store or contact me if you have any questions.  Happy Stamping!

  • Visit my online store here
  • See the current Stampin’ Up! clearance rack specials here
  • Earn FREE Stampin’ Up! products through my Wildflower Frequent Shopper Program – my way of saying thank you to my frequent shopper online customers.
  • Have any questions? I’d be happy to help, click here to contact me.

Cardstock Cuts for this project:

  • Thick Whisper White – 4 1/4″ x 11″, 2 1/4″ x 3 1/2″, 2″ x 2″
  • Whisper White – 4 3/4″ x 3 1/2″
  • Pear Pizzazz – 5″ x 3 3/4″, 5 1/4″ x 4″
  • Bird Ballad DSP – 2″ x 5″, 1/2″ x 3 1/2″

Stampin’ Up! products used in this project: