Stampin’ Up! Botanical Prints Product Medley Cards

Good Morning! Today I’m sharing a pair of sweet cards designed for our Inkin’ Krew Team Meeting last month using the Stampin’ Up! Botanical Prints Product Medley. You can find the supplies used to create this card at the bottom of my post along with the sizes of cardstock used.

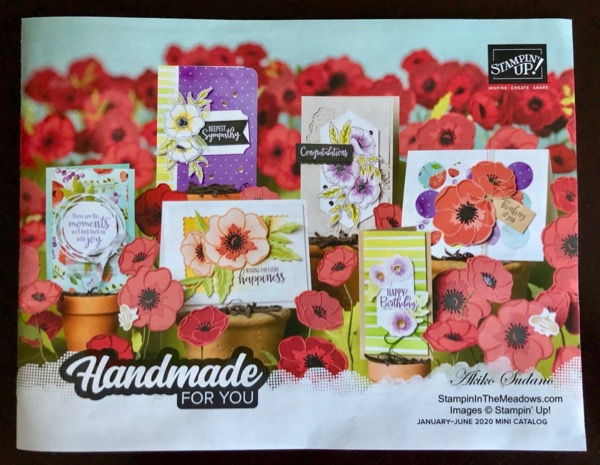
The Stampin’ Up! Botanical Prints Product Medley is the latest in the series and it includes stamps, dies, designer series paper, embellishments and die cut and laser cut accent sheets. Stampin’ Up! provides the list of coordinating colors so you can use the cardstock and ink that is already in your stash to express your creativity with all the coordinating items.

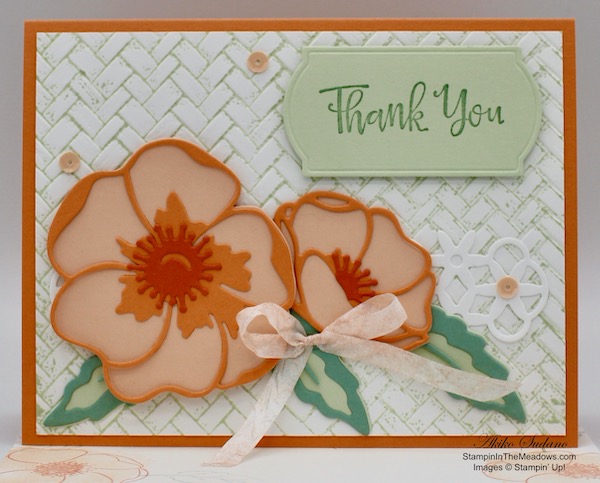
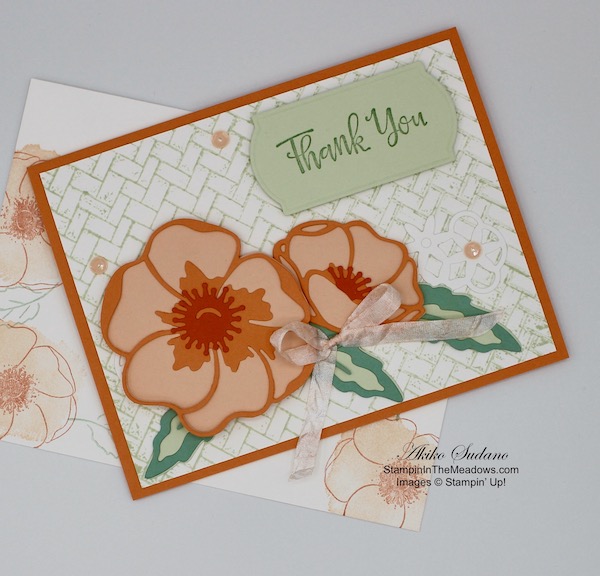
Adhere the Whisper White panel to the Old Olive panel and pop it on a Terracotta Tile card base with dimensionals. Color the leaves in the Terracotta Tile DSP with Light Old Olive Stampin’ Blend and the flower centers with Dark Daffodil Delight. Adhere it to the Old Olive mat and then to the card front with liquid glue. Stamp the flower cluster from the Stampin’ Up! Botanical Prints Product Medley stamp set twice with Memento Tuxedo Black ink on Whisper White and cut them out with the coordinating die. Color the leaves with Light Old Olive and the flower centers with Dark Daffodil Delight Stampin Blends.

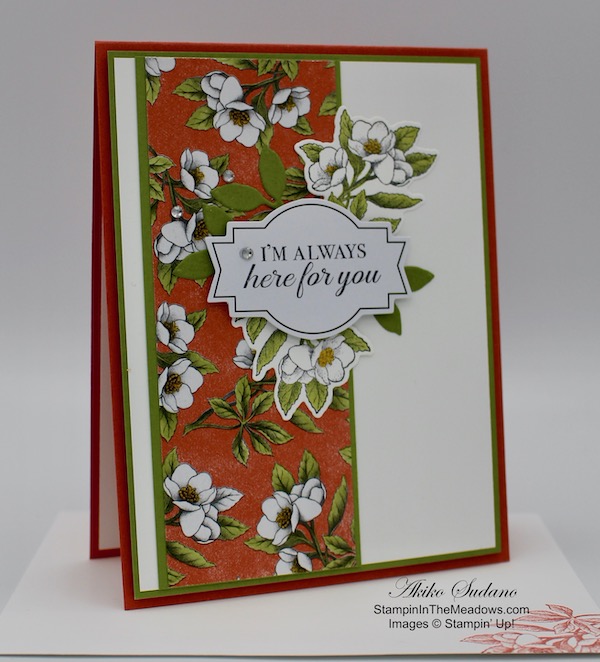
Stamp the sentiment on one of the fancy laser cut labels in Memento Tuxedo Black ink. Cut out 3 sets of leaf clusters from Old Olive card stock. Arrange the die cut flowers and leaves and adhere them with liquid glue. Adhere the label with dimensionals and finish the front with clear rhinestone gems.

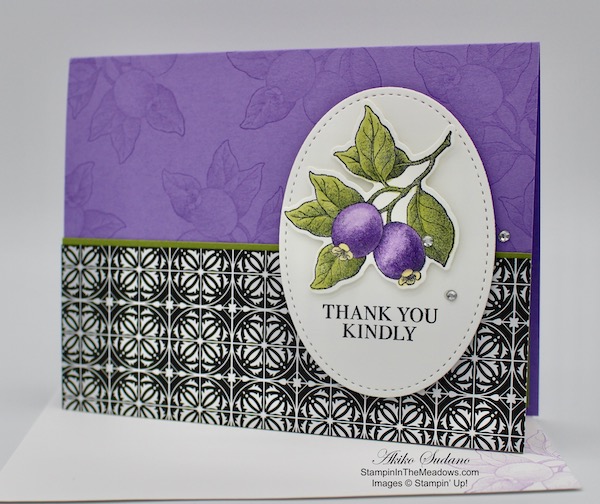
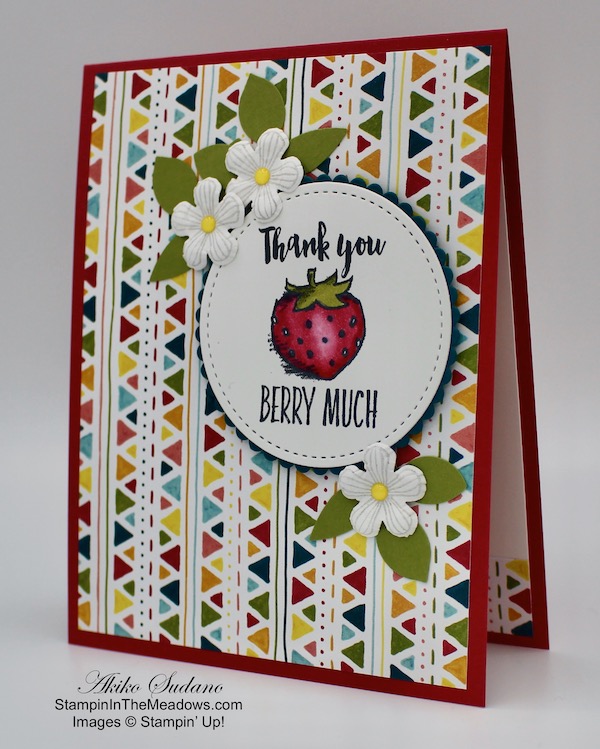
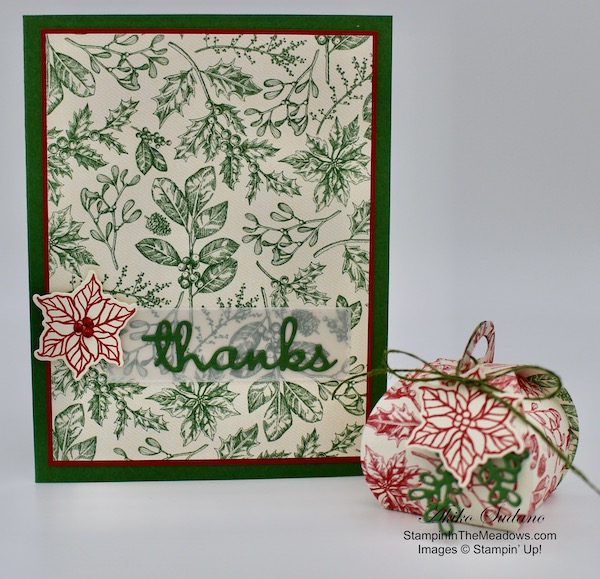
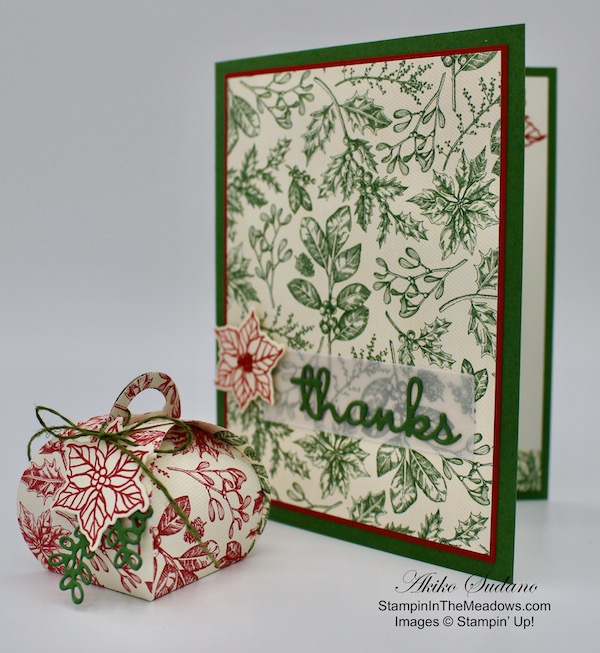
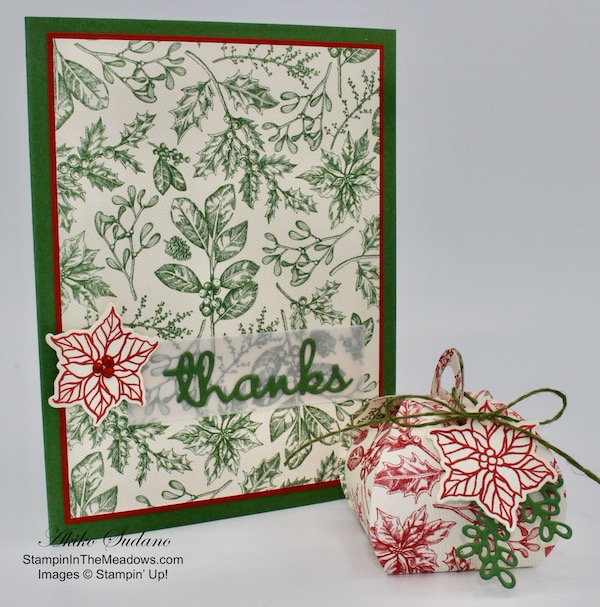
Stamp the berry cluster from the Stampin’ Up! Botanical Prints Product Medley in Highland Heather ink on the top of a Highland Heather card base. Adhere the tile patterned DSP from Botanical Prints DSP to the Old Olive mat and then to the Highland Heather card base with liquid glue. Stamp the sentiment on a Whisper White panel and cut it out with the largest oval from the Stitched Shapes Dies.

Stamp the berries on a Whisper White panel and color them with Highland Heather, Light So Saffron and Light Old Olive Stampin’ Blends. Cut them out with the coordinating die and pop them on the oval with dimensionals. Pop the oval on the card base with dimensionals and accent with three rhinestone gems.

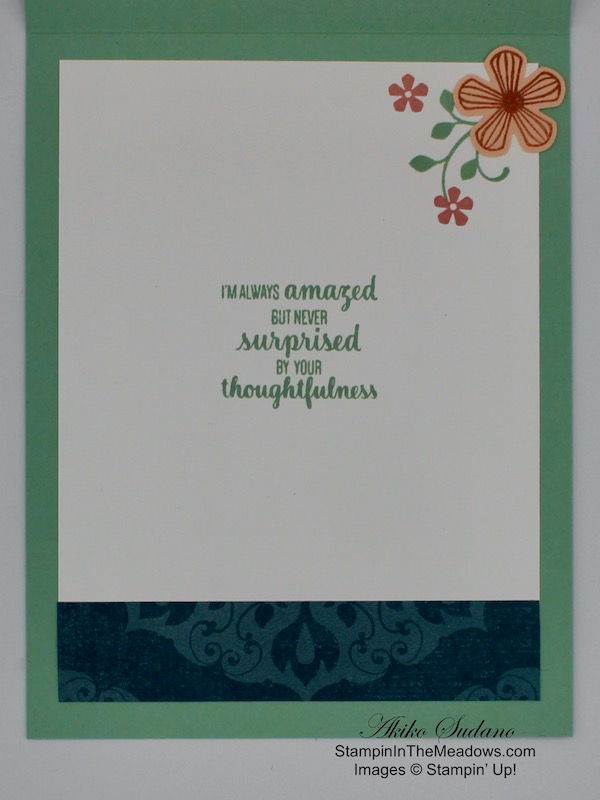
For the inside of the Terracotta Tile card, stamp the floral image from the Stampin’ Up! Botanical Prints Product Medley in two corners of a Whisper White panel in Terracotta Tile ink and adhere it to the inside of the card. Stamp the floral image on the corner of a Whisper White Medium envelope to match.

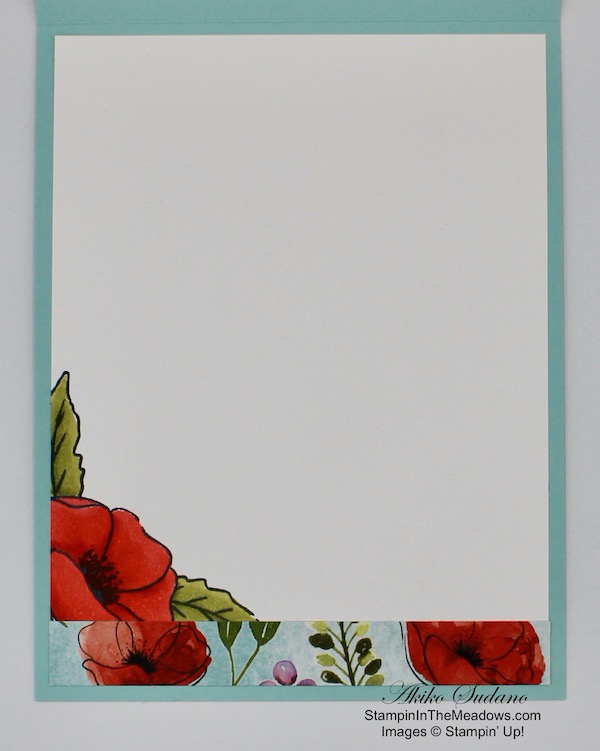
For the inside of the Highland Heather card, stamp the berries from the Stampin’ Up! Botanical Prints Product Medley on the lower corner of a Whisper White panel. Adhere it to an Old Olive mat and then to the inside of the card with liquid glue.

The lifelike images of the flowers and fruits in the Stampin’ Up! Botanical Prints Product Medley are reminiscent of antique botanical prints and make elegant and pretty cards with an updated and modern feel.


April 1 – 15 Host Code: N39D7TBK

Use this host code when you order $50 or more and receive a free gift from me!  The gift is your choice of any item valued up to $10.00 in the 2019-20 Annual Catalog or in the 2020 January-June Mini Catalog!  That includes some of the Host Exclusive stamp sets!

If your order is over $150, please do not use the host code since you’ll receive your own Host Dollars plus I’ll send you the free gift!  This host code can be used by anyone, no commitment required.  Let me know if you have any questions.


If you need any stamping supplies, I’d be very happy to be your Demonstrator.  Just click on the Shop Now button on the right side of the screen to go directly to my online store or contact me if you have any questions.  Happy Stamping!

Thanks for stopping by and have a great day!

Akiko

  • Visit my online store here
  • See the current Stampin’ Up! clearance rack specials here
  • Earn FREE Stampin’ Up! products through my Wildflower Frequent Shopper Program – my way of saying thank you to my frequent shopper online customers.
  • Sign up for my weekly newsletter here
  • Have any questions? I’d be happy to help, click here to contact me.

Cardstock Cuts for this project:

Terracotta Tile Card:

  • Terracotta Tile – 4-1/4″ x 11″ card base scored at 5-1/2″
  • Old Olive – 2″ x 5-1/8″ (DSP mat), 4″ x 5-1/4″ (front mat), 1″ x 3″ (die cut leaves)
  • Whisper White – 3-7/8″ x 5-1/8″ (card front), 4″ x 5-1/4″ (inside panel), 2-1/2″ x 3-1/2″ (flower die cuts)
  • Botanical Prints DSP – 2″ x 5-1/8″ (front)

Highland Heather Card:

  • Highland Heather – 5-1/2″ x 8-1/2″ card base scored at 4-1/4″
  • Old Olive – 2-1/16″ x 5-1/2″ (front mat), 4″ x 5-1/4″ (inside mat)
  • Whisper White – 3-7/8″ x 5-1/8″ (inside panel), 2-3/4″ x 3-3/4″ (die cut oval), 2-1/2″ x 3″ (berries die cut)
  • Botanical Prints DSP – 2″ x 5-1/2″ (front panel)

Stampin’ Up! products used in this project:


Stampin’ Up! Painted Poppies Thank You Card for the Happy Inkin’ Thursday Blog Hop

Good Morning! Welcome to another Happy Inkin’ Thursday Blog Hop! I made a pretty thank you card for today’s hop using the beautiful Stampin’ Up! Painted Poppies bundle along with the Peaceful Poppies designer series paper.

We have a color challenge this week, and here is the pretty color palette we are using:

My card layout was inspired by the pretty sketch in the TGIF Challenges blog, #TGIFC255 Sketch Challenge. Here is their sketch:

I cut a strip of the striped Peaceful Poppies designer series paper and adhered it to the side of a Blackberry Bliss panel with snail. I cut three of the bubble border dies from the Painted Labels dies in Blackberry Bliss card stock and adhered them together. I adhered them to the back of the floral panel of Peaceful Poppies DSP and then trimmed the ends. I adhered the panel to the Blackberry bliss panel so that it overlapped the striped paper.

I stamped the Thank You sentiment from the Peaceful Moments stamp set on a strip of Old Olive in Memento Tuxedo Black ink. I used the large label die from the Merry Christmas Dies to cut out the sentiment. I stamped the small poppy and three leaves from the Stampin’ Up! Painted Poppies stamp set on a Whisper White panel in Memento Tuxedo Black ink. I colored them with the Poppy Parade and Old Olive Stampin’ Blends and cut them out with the coordinating dies from the Painted Labels dies.

I adhered the label and leaves to the floral background with multipurpose liquid glue and adhered the poppy with dimensionals. I adhered the decorated panel to a Pool Party card base and finished of the front with rhinestones colored with the dark Blackberry Bliss Stampin’ Blend.

I stamped the small poppy and two leaves from the Stampin’ Up! Painted Poppies cling stamp set in Memento Tuxedo Black ink on a Whisper White panel. I used a mask to stamp the leaves after I stamped the flower. I colored the leaves with the Old Olive Stampin’ Blends and the flower with the Poppy Parade Stampin Blends. I trimmed the bottom with a strip of the floral Peaceful Poppies DSP and adhered it to the inside of the card.

On with the Hop! Click the Next button below to visit Karen Ksenzakovic’s blog.

And just in case you get lost along the way, here’s a list of the team members participating in the hop today:


March 16 – 31 Host Code: RSAF3R27

Use this host code when you order $50 or more and receive a free gift from me!  The gift is your choice of any item valued up to $10.00 in the 2019-20 Annual Catalog or in the 2020 January-June Mini Catalog!  That includes some of the Host Exclusive stamp sets!

If your order is over $150, please do not use the host code since you’ll receive your own Host Dollars plus I’ll send you the free gift!  This host code can be used by anyone, no commitment required.  Let me know if you have any questions.


If you need any stamping supplies, I’d be very happy to be your Demonstrator.  Just click on the Shop Now button on the right side of the screen to go directly to my online store or contact me if you have any questions.  Happy Stamping!

Thanks for visiting!

Akiko

  • Visit my online store here
  • See the current Stampin’ Up! clearance rack specials here
  • Earn FREE Stampin’ Up! products through my Wildflower Frequent Shopper Program – my way of saying thank you to my frequent shopper online customers.
  • Sign up for my weekly newsletter here
  • Have any questions? I’d be happy to help, click here to contact me.

Cardstock Cuts for this project:

  • Pool Party – 4-1/4″ x 11″ card base scored at 5-1/2″
  • Blackberry Bliss – 4″ x 5-1/4″ (front mat), (3) 1″ x 3-1/2″ (die cuts)
  • Old Olive – 1-1/2″ x 3-1/2″ (label)
  • Whisper White – 4″ x 5-1/4″ (inside panel) 2″ x 4-1/2″ (die cut flowers and leaves)
  • Peaceful Poppies DSP – 1″ x 5-1/8″ (stripe), 3-1/4″ x 5-1/8″ (floral panel), 1/2″ x 4″ (inside floral strip)

Stampin’ Up! products used in this project:


Stampin’ Up! Witty-cisms for the Happy Inkin’ Thursday Blog Hop

Good Morning! Welcome to another Happy Inkin’ Thursday Blog Hop! Today I made a cheerful thank you card using the fun Stampin’ Up! Witty-cisms cling stamp set along with the bright Dinoroar designer series paper.

We have a sketch challenge this week, and here is the sketch we are using:

Who would have thought you could mix dinosaurs with strawberries? But this pretty paper in the Dinoroar designer series paper pack was so bright and cheerful and it reminded me of my old kitchen wallpaper, so I thought it would be perfect with strawberries! So I cut a panel and adhered it to a Lovely Lipstick card base with multipurpose liquid glue.

I stamped the strawberry thank you image from the Stampin’ Up! Witty-cisms cling stamp set in Memento Tuxedo Black ink on a panel of Whisper White and colored it with the Lovely Lipstick and Old Olive Stampin’ Blends. I made a highlight in the center of the berry with the Stampin’ Blends Color Lifter. Then I cut it out with the second largest circle from the Stitched Shapes Dies. I cut a scalloped circle with the Layering Circles Dies from Pretty Peacock and adhered it to the back with snail. I punched four leaf clusters from Old Olive card stock with the Leaf Punch.

I stamped four little flowers from the Sale-A-Bration Thoughtful Blooms stamp set in stamped-off Smoky Slate ink on Whisper White. I punched them out with the Sale-A-Bration Small Bloom Punch. I curled the petals of three flowers with the large ball in the Take Your Pick tool and my mouse pad. I turned the flower upside down and rolled little circles in each petal until it puffed out. Then I turned it right side up and pressed in the center. I finished off the centers with a Pineapple Punch enamel dot. I arranged the leaf clusters and adhered them to the card front with multipurpose liquid glue. I adhered the layered circle with dimensionals and finally stuck on each flower with a glue dot.

For the inside of the card, I adhered the last leaf cluster to a Whisper White panel with multipurpose liquid glue. I added a strip of the colorful Dinoroar DSP to the bottom and added the last flower. I cut a small circle of Pineapple Punch card stock with the large flower die from the Sending Flowers Dies and adhered it to the center of the flower. I think if I had a 1/8″ or 1/4″ hole punch, I would have used it instead, but I made the best of what I had available. Finally I stamped and colored another strawberry from the Stampin’ Up! Witty-cisms stamp set and my Old Olive and Lovely Lipstick Stampin’ Blends. I fussy cut the strawberry and adhered it next to the flower. I adhered the panel to the inside of the card with snail.

The Stampin’ Up! Witty-cisms cling stamp set has fun images mixed with punny sentiments to create light hearted cards for different occasions.

On with the Hop! Click the Next button below to visit Karen Ksenzakovic’s blog.

And just in case you get lost along the way, here’s a list of the team members participating in the hop today:


March 1 – 15 Host Code: BQCVV2RG

Use this host code when you order $50 or more and receive a free gift from me!  The gift is your choice of any item valued up to $10.00 in the 2019-20 Annual Catalog or in the 2020 January-June Mini Catalog!  That includes some of the Host Exclusive stamp sets!

If your order is over $150, please do not use the host code since you’ll receive your own Host Dollars plus I’ll send you the free gift!  This host code can be used by anyone, no commitment required.  Let me know if you have any questions.


If you need any stamping supplies, I’d be very happy to be your Demonstrator.  Just click on the Shop Now button on the right side of the screen to go directly to my online store or contact me if you have any questions.  Happy Stamping!

Thanks for visiting!

Akiko

  • Visit my online store here
  • See the current Stampin’ Up! clearance rack specials here
  • Earn FREE Stampin’ Up! products through my Wildflower Frequent Shopper Program – my way of saying thank you to my frequent shopper online customers.
  • Sign up for my weekly newsletter here
  • Have any questions? I’d be happy to help, click here to contact me.

Cardstock Cuts for this project:

  • Lovely Lipstick – 4-1/4″ x 11″ card base scored at 5-1/2″
  • Pretty Peacock – 3″ x 3″ (scalloped circle mat)
  • Old Olive – 3″ x 3″ (punched leaves)
  • Pineapple Punch – 1″ x 1″ (inside flower center)
  • Whisper White – 4″ x 5-1/4″ (inside panel), 3″ x 3″ (stamped strawberry circle), 3″ x 3-1/4 (flowers and fussy cut strawberry)
  • Dinoroar DSP – 4″ x 5-1/4″ (background), 3/4″ x 4″ (inside trim)

Stampin’ Up! products used in this project:


Stampin’ Up! Thoughtful Blooms Thank You Card

Good Morning! Today I have thank you card made with the pretty Stampin’ Up! Thoughtful Blooms photopolymer stamp set and the coordinating Small Bloom punch. Both of these items are Sale-A-Bration items that are FREE with a qualifying purchase. You can find the supplies used to create this card at the bottom of my post along with the sizes of cardstock used.

This card was inspired by the color palette in the Fab Friday #184 Challenge. Check out the inspiration cards and other challenge entries:

I started with a panel of Pretty Peacock Woven Heirlooms designer series paper and adhering it to a Pretty Peacock mat. I adhered the panel to a Mint Macaron card base with dimensionals. I stamped four flowers from the Stampin’ Up! Thoughtful Blooms stamp set using Rococo Rose ink on a panel of Petal Pink card stock. I punched them out with the Small Bloom punch.

I stamped the large leafy swirl from the Stampin’ Up! Thoughtful Blooms stamp set in Mint Macaron on a panel of Thick Whisper White card stock. I cut it out with the second largest Stitched So Sweetly die. I stamped the small flowers in Rococo Rose ink and the thank you sentiment in Mint Macaron ink. I wrapped it in Mint Macaron twine and made a bow. I adhered Rococo Rose faceted gems to the Petal Pink flowers and adhered them to the panel with dimensionals. I finished it off with a Pretty Peacock faceted gem and adhered it to the card front with dimensionals.

I decorated the inside by stamping the sentiment from the Stampin’ Up! Thoughtful Blooms stamp set in Mint Macaron ink on a Whisper White panel. I stamped part of the large swirl in the upper right corner, also using Mint Macaron ink and added two Rococo Rose small flowers. I stamped the center of the last punched flower with Rococo Rose and adhered it to the panel with multipurpose liquid glue. I trimmed the bottom with a strip of the Woven Threads DSP and adhered it to the inside of the card.

The Stampin’ Up Thoughtful Blooms stamp set is a Sale-A-Bration stamp set that is FREE with a $50 purchase. The Small Blooms punch coordinates with the stamps and is also a Sale-A-Bration item that is FREE with a $100 purchase. Sale-A-Bration is going strong, but will end on March 31 and these items are still available!


Three Weeks Left for Sale-A-Bration!

Sale-A-Bration has been very exciting this year with lots of beautiful products and special releases. But there are only three weeks left to participate in the best Stampin’ Up! deals of the year! While a few of the products have sold out, there’s still lots of great items left, including the stamp set and punch used in today’s post. You can check out all the items still available in my Online Store and read on to learn more. There are three ways to enjoy Sale-A-Bration benefits: Shop – Host – Join.

Sale-A-Bration Shopping Benefits

You earn FREE products for every $50 you spend (before shipping and taxes) during Sale-A-Bration. The Sale-A-Bration brochure has the products that you can choose to add to your order. And the more you spend, the more FREE products you can earn. There are two qualifying levels with spending thresholds, giving you flexibility to choose what you want.

For example, if you spend $150, then you can then choose three level 1 items or one level 1 and one level 2.

Head over to my online store to shop now.

Sale-A-Bration Host Benefits

Hosts with orders of $300 or more (before shipping and taxes) can receive the exclusive Little Ladybug Stamp Set (Item 152384).

  • Customer, workshop, and online orders qualify.
  • There is no limit as to how many qualifying orders you can place throughout the promotion.
  • Only one Little Ladybug Stamp Set can be redeemed per order. 
  • Only the host of the order will receive the free stamp set.
  • To qualify, orders must be opened from January 3, and closed by March 31.

Sale-A-Bration Joining Benefits

Recruits who join Stampin’ Up! as an independent Stampin’ Up! demonstrator between January 3–March 31, 2020, will receive the Mini Paper Cutter, a 6″ x 6″ Designer Series Paper sampler, and your choice of stamp set (Host stamp sets and Sale-A-Bration stamp sets not included.). 

  • The 6″ x 6″ Designer Series Paper Sampler in the Join offering has samples from the Lily Impressions Designer Series Paper (Sale-A-Bration brochure), Peaceful Poppies Designer Series Paper (January–June 2020 Mini Catalog), Country Club Designer Series Paper (January–June 2020 Mini Catalog), Birthday Bonanza Designer Series Paper (January–June 2020 Mini Catalog), Tropical Oasis Designer Series Paper (January–June 2020 Mini Catalog), Best Dress 6″ x 6″ Designer Series Paper (January–June 2020 Mini Catalog). 
  • 12 double-sided designs (two double-sided sheets from six different Designer Series Paper packs) QTY: 48 sheets total (four each of 12 designs)
  • Mini Paper Cutter Dimensions: 7-5/8″ x 5-3/8″ x 1-1/4″

For more details on the benefits of joining Stampin’ Up! as a Demonstrator, see my Join My Team page. There is a Join My Team button at the bottom where you can start the process. Please contact me if you have any questions. I’ll be happy to tell you more.


March 1 – 15 Host Code: BQCVV2RG

Use this host code when you order $50 or more and receive a free gift from me!  The gift is your choice of any item valued up to $10.00 in the 2019-20 Annual Catalog or in the 2020 January-June Mini Catalog!  That includes some of the Host Exclusive stamp sets!

If your order is over $150, please do not use the host code since you’ll receive your own Host Dollars plus I’ll send you the free gift!  This host code can be used by anyone, no commitment required.  Let me know if you have any questions.


If you need any stamping supplies, I’d be very happy to be your Demonstrator.  Just click on the Shop Now button on the right side of the screen to go directly to my online store or contact me if you have any questions.  Happy Stamping!

Thanks for stopping by and have a great day!

Akiko

  • Visit my online store here
  • See the current Stampin’ Up! clearance rack specials here
  • Earn FREE Stampin’ Up! products through my Wildflower Frequent Shopper Program – my way of saying thank you to my frequent shopper online customers.
  • Sign up for my weekly newsletter here
  • Have any questions? I’d be happy to help, click here to contact me.

Cardstock Cuts for this project:

  • Mint Macaron – 4-1/4″ x 11″ card base scored at 5-1/2
  • Pretty Peacock – 4″ x 5-1/4″ (front mat)
  • Thick Whisper White – 3″ x 4-1/4″ (front scalloped die cut panel)
  • Petal Pink – 1″ x 4-1/4″ (punched flowers)
  • Whisper White – 4″ x 5-1/4″ (inside panel)
  • Woven Threads DSP – 3-7/8″ x 5-1/8″ (front background), 3/4″ x 4″ (inside trim)

Stampin’ Up! products used in this project:


Stampin’ Up! Peaceful Moments Thank You Card Video Tutorial

Good Morning! Today I am sharing a video tutorial that I made yesterday during my Sunday Facebook Live session. I made a Thank You Card with the pretty Stampin’ Up! Peaceful Moments and Painted Poppies bundles. You can find the supplies used to create this card at the bottom of my post along with the sizes of cardstock used. Here is my card:

And here’s the Facebook Live video:

I also posted the video to YouTube and you can view it here if you prefer.

I started by inking up my Coastal Weave Embossing Folder with Soft Sea Foam ink using the ink pad directly to the embossing folder. I carefully positioned a Whisper White panel in the embossing folder, closed it and ran it through the die cutting machine. This gave me the embossed panel with touches of Soft Sea Foam ink in the creases. I adhered the embossed panel to a Grapefruit Grove card base. I cut a Whisper White panel with the flower trellis die from the Wild Roses dies and adhered it to the lower part of the embossed panel with multipurpose liquid glue.

I die cut the flowers and leaves from the Peaceful Poppies dies and assembled them with multipurpose liquid glue. I cut the solid flowers from Petal Pink, the outline flowers from Grapefruit Grove and the centers from Calypso Coral. I cut the solid Leaves from Soft Sea Foam and the accent parts from Mint Macaron. I arranged the flowers and leaves on the card on top of the trellis and adhered all but the large flower with multipurpose liquid glue. I adhered the large flower with dimensionals.

I stamped the sentiment from the Stampin’ Up! Peaceful Moments stamp set in Mint Macaron ink on a panel of Soft Sea Foam. I cut it out with the small label die from the Painted Labels dies and adhered it to the card with dimensionals. I used the small spatter stamp from the Painted Poppies stamp set to stamp Calypso Coral ink on a length of Whisper White Crinkle Seam Binding ribbon to give it some color. I made a bow and attached it under the flowers with glue dots. I finished the card with three Petal Pink sequins.

On the inside of the card I stamped three flowers from the Painted Poppies stamp set in Calypso Coral ink after stamping off on a panel of Whisper White. I used the splotch stamp from the set to color the poppies in Petal Pink ink. I stamped three leaves in Mint Macaron after stamping off and then adhered it to the inside of the card with snail. I stamped a Whisper White envelope the same way as the inside panel.


Tomorrow is the last day to sign up for the March 2020 Paper Pumpkin kit!

The theme is No Matter the weather and it celebrates a Paper Pumpkin milestone: our seventh year of delivering fun, easy, creative projects. To thank everyone who has helped us along the way, we’re including an additional FREE stamp set with every March kit. This means that every subscriber will receive two stamp sets! 

The March 2020 kit will arrive in an exclusive, specially-designed box that subscribers will love! Think daffodils, raindrops, and a fresh spring vibe.

Here are the Details:

  • Kit contains supplies for 12 cards and envelopes (4 cards of 3 designs)
  • Notecard size: 5″ x 3-1/2″ (12.7 x 8.9 cm)
  • Envelope size: 5-1/8″ x 3-5/8″ (13 x 9.2 cm)
  • The additional stamp set coordinates with the March kit design; however, you do not need it to complete the March cards.
  • The additional stamp set is a 4×6 footprint, which is larger than most Paper Pumpkin sets and is designed for use on a variety of crafting projects.

Coordinating Colors: Balmy Blue, Basic Gray, Calypso Coral, Grapefruit Grove, Gray Granite, Pear Pizzazz, Petal Pink, Shaded Spruce, and So Saffron

If you’re interested in subscribing to Paper Pumpkin, you can either sign up for a subscription where you are billed monthly for your kit or you can purchase a prepaid subscription in my online store. To see more information and to sign up for the monthly subscription click here. To see the options for prepaid subscriptions in my online store, click here.

As a bonus during Sale-A-Bration, purchasing a 3-month or longer prepaid subscription qualifies for FREE Sale-A-Bration products!

Sign up deadline for the March 2020 kit is tomorrow.


March 1 – 15 Host Code: BQCVV2RG

Use this host code when you order $50+ and receive a free gift from me!  If your order is over $150, please do not use this code, but you’ll still get the free gift.  The free gift is your choice of any item valued up to $10.00 in the 2019 – 2020 Annual Catalog or in the 2020 Mini Catalog!  That includes some of the Host Exclusive stamp sets!

If your order is over $150, please do not use the host code since you’ll receive your own Host Dollars plus I’ll send you the free gift!  This host code can be used by anyone, no club or commitment required.  Let me know if you have any questions.


If you need any stamping supplies, I’d be very happy to be your Demonstrator.  Just click on the Shop Now button on the right side of the screen to go directly to my online store or contact me if you have any questions.  Happy Stamping!

Thanks for stopping by and have a great week!

Akiko

  • Visit my online store here
  • See the current Stampin’ Up! clearance rack specials here
  • Earn FREE Stampin’ Up! products through my Wildflower Frequent Shopper Program – my way of saying thank you to my online frequent shopper customers.
  • Sign up for my weekly newsletter here
  • Have any questions? I’d be happy to help, click here to contact me.

Cardstock Cuts for this project:

  • Grapefruit Grove – 5-1/2″ x 8-1/2″ card base scored at 4-1/4″, 3″ x 4-1/2″ (flower die cuts)
  • Petal Pink – 3″ x 4-1/2″ (flower die cuts)
  • Calypso Coral – 1-1/2″ x 3″ (flower center die cuts)
  • Soft Sea Foam – 2-1/2″ x 3″ (leaf die cuts), 2-1/2″ x 3-1/2″ (label)
  • Mint Macaron – 2-1/2″ x 3″ (leaf die cuts)
  • Whisper White – (2) 4″ x 5-1/4″ (inside panel and embossed background), 1-1/2″ x 5 1/4″ (trellis die cut)

Stampin’ Up! products used in this project:


Stampin’ Up! Special Someone Thank You Card for the Happy Inkin’ Thursday Blog Hop

Good Morning! Welcome to another Happy Inkin’ Thursday Blog Hop! I have made a whimsical thank you card using the Stampin’ Up! Special Someone stamp set along with the matching Special Day dies from the Coordination Release. Here’s my card:

We have a sketch challenge this week, and here is the sketch we are using:

I embossed a panel of the wood grain paper from the Pressed Petals specialty designer series paper with the Woodland embossing folder. I cut a strip of Pear Pizzazz card stock with the grass die from the Special Day dies. I embossed the grass strip with the Subtle embossing folder. I cut the tree from Mossy Meadow card stock using the tree die from the Sweet Silhouettes dies. I sponged the top of a Whisper White panel with Balmy Blue ink so that it would look like a sky. I adhered the grass to the bottom of the panel with multipurpose liquid glue. I adhered the tree to the right side of the panel with multipurpose liquid glue and trimmed the ends. I adhered the panel to the embossed wood grain paper with multipurpose liquid glue.

On a panel of Whisper White, I stamped the raccoon from the Stampin’ Up! Special Someone stamp set in Memento Tuxedo Black ink. I stamped the squirrel in Early Espresso ink and the mouse in Gray Granite ink. I cut out all three critters using the coordinating dies from the Special Day dies. I colored the raccoon and squirrel with the Crumb Cake Stampin’ Blends and the mouse with the Gray Granite Stampin’ Blends. I adhered them to the front with dimensionals. I stamped the butterflies from the Stampin’ Up! Special Someone stamp set with Memento Tuxedo Black ink. I die cut the flowers with the 4-flower dies using Lovely Lipstick, Pineapple Punch, Petal Pink and Pool Party card stock scraps. I adhered them to the bottom with multipurpose liquid glue and added a pearl to the center of each.

I stamped the Thank You sentiment from the Stampin’ Up! Special Someone stamp set in Early Espresso ink on a strip of Pear Pizzazz card stock. I cut it out with the smallest scalloped rectangle die from the Stitched So Sweetly dies. I wrapped it with linen thread and tied a bow to the left side. I adhered it to the panel with dimensionals and I adhered the decorated panel to a Pretty Peacock card base with dimensionals.

For the inside of the card, I cut a strip of Pear Pizzazz card stock with the grass die from the Special Day dies. I embossed it with the Subtle embossing folder and adhered it to the bottom of a Whisper White panel. I adhered the panel to the inside of the card with multipurpose liquid glue.

On with the Hop! Click the Next button below to visit Karen Ksenzakovic’s blog.

And just in case you get lost along the way, here’s a list of the team members participating in the hop today:


February 16 – 29 Host Code: KFK3RZHV

Use this host code when you order $50 or more and receive a free gift from me!  The gift is your choice of any item valued up to $10.00 in the 2019-20 Annual Catalog or in the 2020 January-June Mini Catalog!  That includes some of the Host Exclusive stamp sets!

If your order is over $150, please do not use the host code since you’ll receive your own Host Dollars plus I’ll send you the free gift!  This host code can be used by anyone, no commitment required.  Let me know if you have any questions.


If you need any stamping supplies, I’d be very happy to be your Demonstrator.  Just click on the Shop Now button on the right side of the screen to go directly to my online store or contact me if you have any questions.  Happy Stamping!

Thanks for visiting!

Akiko

  • Visit my online store here
  • See the current Stampin’ Up! clearance rack specials here
  • Earn FREE Stampin’ Up! products through my Wildflower Frequent Shopper Program – my way of saying thank you to my frequent shopper online customers.
  • Sign up for my weekly newsletter here
  • Have any questions? I’d be happy to help, click here to contact me.

Cardstock Cuts for this project:

  • Pretty Peacock – 5 1/2″ x 8 1/2″ card base scored at 4 1/4″
  • Pear Pizzazz – 1 3/4″ x 4 5/8″ (card front grass), 1″ x 5 1/4″ (inside grass), 1″ x 2 1/2″ (label)
  • Mossy Meadow – 2 3/4″ x 4 1/2″ (tree)
  • Whisper White – 3 3/8″ x 4 5/8″ (card front), 3″ x 4″ (critter die cuts), 4″ x 5 1/4″ (inside panel)
  • Pressed Petals DSP – 3 1/2″ x 4 3/4″
  • Flirty Flamingo, Pineapple Punch, Lovely Lipstick, Petal Pink, Pool Party – 1 1/2″ x 1 1/2″ (flowers)

Stampin’ Up! products used in this project:


Stampin’ Up! Sending You Thoughts for the Happy Inkin’ Thursday Blog Hop

Good Morning! Welcome to the Happy Inkin’ Thursday Blog Hop! My share for today’s hop is a tag card made with the Stampin’ Up! Sending You Thoughts stamp set and the Sending Flowers Dies.

We have a color challenge this week, and here is the color palette we are using:

Today’s card was also inspired by the Sunday Stamps Sketch Challenge SSC224 Tag You’re it.

I cut a panel of Best Dressed floral designer series paper and a strip of a matching striped Best Dressed designer series paper and adhered them together. I adhered them to a Lovely Lipstick mat and attached them to a Mint Macaron card base with dimensionals. I used the tag die from the Bonanza dies to cut a tag from the striped Best Dressed designer series paper. I used the Bonanza dies tag die to cut tags from Pool Party and Lovely Lipstick card stock. I cut a rectangle out of the Lovely Lipstick tag using one of the rectangles from the Stitched Rectangles dies.

I used the large Sending Flowers die to cut some flowers from a panel of Mint Macaron. I colored the stems with the Dark Mint Macaron Stampin’ Blend. I adhered the stems to the Pool Party tag with multipurpose liquid glue and trimmed off the excess. I cut three sets of the Sending Flowers flower dies from a strip of Petal Pink card stock and adhered them to the stems with multipurpose liquid glue (Note: I saved one of the large petal flower centers for the inside of the card). I adhered the Lovely Lipstick tag on top with multipurpose liquid glue. I stamped the thanks greeting from the Stampin’ Up! Sending You Thoughts stamp set on a little scrap of Mint Macaron, trimmed it up and adhered it to the bottom of the tag with glue dots.

I die cut the little butterfly from the Well Written dies on a scrap of Lovely Lipstick and adhered it to the tag with multipurpose liquid glue. I adhered the floral tag to the Best Dressed striped designer series paper tag with snail and adhered it to the card front with dimensionals. I finished it off by adding yellow rhinestones to the flower centers and topping the tags with a Mint Macaron bow.

On the inside of the card, I adhered the strip of Best Dressed floral DSP to the bottom of a Whisper White Panel. I die cut two more stems with he Sending Flowers dies in Mint Macaron and adhered them to the panel with multipurpose liquid glue. I adhered the Petal Pink flowers on top, including the large flower center. I cut another large petal flower in Whisper White and colored the center with Dark Daffodil Delight Stampin’ Blend before adhering it to the center of the large flower. I adhered the panel to a Lovely Lipstick mat before adhering to the inside of the card with snail.

The Stampin’ Up! Sending You Thoughts stamp set is a Sale-A-Bration stamp set that is FREE with a $50 order and it has a great selection of sentiments in a great font. The Sending Flowers dies are part of the new Coordination Product Release. Both of these products are available now while supplies last.

On with the Hop! Click the Next button below to visit Karen Ksenzakovic’s blog.

And just in case you get lost along the way, here’s a list of the team members participating in the hop today:


February 16 – 29 Host Code: KFK3RZHV

Use this host code when you order $50 or more and receive a free gift from me!  The gift is your choice of any item valued up to $10.00 in the 2019-20 Annual Catalog or in the 2020 January-June Mini Catalog!  That includes some of the Host Exclusive stamp sets!

If your order is over $150, please do not use the host code since you’ll receive your own Host Dollars plus I’ll send you the free gift!  This host code can be used by anyone, no commitment required.  Let me know if you have any questions.


If you need any stamping supplies, I’d be very happy to be your Demonstrator.  Just click on the Shop Now button on the right side of the screen to go directly to my online store or contact me if you have any questions.  Happy Stamping!

Thanks for visiting!

Akiko

  • Visit my online store here
  • See the current Stampin’ Up! clearance rack specials here
  • Earn FREE Stampin’ Up! products through my Wildflower Frequent Shopper Program – my way of saying thank you to my frequent shopper online customers.
  • Sign up for my weekly newsletter here
  • Have any questions? I’d be happy to help, click here to contact me.

Cardstock Cuts for this project:

  • Mint Macaron – 5 1/2″ x 8 1/2″ scored at 4 1/4″ (card base), 2 1/4″ x 3″ (tag stems), 1″ x 1″ (label), 1 1/2″ x 3 (inside stems)
  • Lively Lipstick – (2) 3 7/8″ x 5 1/8″ (mats), 2 1/2″ x 4″ (tag), 1″ x 1″ (butterfly die cut)
  • Pool Party – 2 1/2″ x 4″ (tag)
  • Whisper White – 3 3/4″ x 5″ (inside), 1″ x 1″ (flower center)
  • Petal Pink – 1″ x 7″ (flower die cuts)
  • Best Dressed DSP – 3 3/4″ x 5″ (front floral background), 1″ x 3 3/4″ (front stripe), 2 1/2″ x 4″ (tag), 1/2″ x 3 3/4″ (inside trim)

Stampin’ Up! products used in this project:


Stampin’ Up! Kerchief Card Kit

Good Morning! Today I have a set of cards that I made with the FREE Sale-A-Bration Stampin’ Up! Kerchief Card Kit and they are so adorable! I made most of the cards using the examples in the kit, but did made some modifications to two of them to give you a small taste of the possibilities. You can find the supplies used to create this card at the bottom of my post along with the sizes of cardstock used.

The Stampin’ Up! Kerchief Card Kit is a Sale-A-Bration item that is FREE with a $50 purchase. It has all the supplies needed to make 8 4 1/4″ x 5″ cards in two designs. It is inspired by pretty bandana prints and reminds me of my free-spirited youth – tying a bandana around my head to keep my hair out of my face.

The Stampin’ Up! Kerchief Card Kit comes with:

  • 8 printed card bases and envelopes, 4 in blue and 4 in red
  • Printed die-cut accents including printed labels
  • Gold foil accents
  • Vellum accents
  • Twine
  • Adhesive (glue dots and dimensionals)
  • Instruction sheet

The labels have the sentiments printed on them, so there is no need for stamp and ink, and there are sentiments in English, French and German included (I only used the English sentiments).

The colors are Balmy Blue, Coastal Cabana, Early Espresso, gold, Mossy Meadow, Night of Navy, Petal Pink, Pear Pizzazz, Poppy Parade, and white.

I started each card by adhering the vellum to the centers. On the blue cards, I adhered a few glue dots behind the gold dots. On the red cards, I just ran snail down the middle since it will be covered by the label. I punched out all the die cuts and trimmed the excess, including the gold foil accents. On the blue cards, I adhered the labels and then adhered the die cuts and foil accents on the Night of Navy disks. I adhered the flowers with dimensionals and the rest with glue dots. I adhered the disks on the card front with dimensionals and then made the bows and adhered them with glue dots.

On the red cards, I adhered the gold foil accents with glue dots and then adhered the labels with dimensionals. I finally made the bows and adhered them with glue dots.

On these cards, I just changed up the labels so that I had thank you cards. On the blue card, I die cut the thanks sentiment from the Well Written dies in Night of Navy card stock and adhered it to the card in place of the label. On the red card I needed to use a label to cover the center, so I stamped thank you sentiment from the Peaceful Moments stamp set in Poppy Parade ink on a small Whisper White panel and cut it out with the Small Label die from the Painted Labels dies. I applied it in place of the provided label with dimensionals.

The Stampin’ Up! Kerchief Card kit is a pretty and sweet Sale-A-Bration (free with $50 purchase) set that makes pretty and quick any occasion cards. And since it’s Stampin’ Up!, you can also mix the up with other items in your stash to make perfectly matched alternative designs if you want.


Stampin’ Up! Sale-A-Bration is going on now!

Stampin’ Up!’s spectacular Sale-A-Bration is going on now and it’s about to get better with the Sale-A-Bration Second Release. The Sale-A-Bration Second Release offers three additional stamp sets and two new designer series paper packs on top of the current list of items. The items from the Second Release are available now to Stampin’ Up! Demonstrators during the pre-order period and will be available to everyone beginning March 3. Click on the image below to see these new items.

There are three ways to enjoy Sale-A-Bration benefits: Shop – Host – Join.

Sale-A-Bration Shopping Benefits

You earn FREE products for every $50 you spend (before shipping and taxes) during Sale-A-Bration. The Sale-A-Bration brochure has the products that you can choose to add to your order. And the more you spend, the more FREE products you can earn. There are two qualifying levels with spending thresholds, giving you flexibility to choose what you want.

For example, if you spend $150, then you can then choose three level 1 items or one level 1 and one level 2.

Head over to my online store to shop now.

Sale-A-Bration Host Benefits

Hosts with orders of $300 or more can receive the exclusive Little Ladybug Stamp Set (Item 152384).

  • Customer, workshop, and online orders qualify.
  • There is no limit as to how many qualifying orders you can place throughout the promotion.
  • Only one Little Ladybug Stamp Set can be redeemed per order. 
  • Only the host of the order will receive the free stamp set.
  • To qualify, orders must be opened from January 3, and closed by March 31.

Sale-A-Bration Joining Benefits

Recruits who join Stampin’ Up! as an independent Stampin’ Up! demonstrator between January 3–March 31, 2020, will receive the Mini Paper Cutter, a 6″ x 6″ Designer Series Paper sampler, and your choice of stamp set (Host stamp sets and Sale-A-Bration stamp sets not included.). 

  • The 6″ x 6″ Designer Series Paper Sampler in the Join offering has samples from the Lily Impressions Designer Series Paper (Sale-A-Bration brochure), Peaceful Poppies Designer Series Paper (January–June 2020 Mini Catalog), Country Club Designer Series Paper (January–June 2020 Mini Catalog), Birthday Bonanza Designer Series Paper (January–June 2020 Mini Catalog), Tropical Oasis Designer Series Paper (January–June 2020 Mini Catalog), Best Dress 6″ x 6″ Designer Series Paper (January–June 2020 Mini Catalog). 
  • 12 double-sided designs (two double-sided sheets from six different Designer Series Paper packs) QTY: 48 sheets total (four each of 12 designs)
  • Mini Paper Cutter Dimensions: 7-5/8″ x 5-3/8″ x 1-1/4″

And to sweeten the Joining offer, you can add items from the Sale-A-Bration second release to your Starter Kit if you join before March 3, 2020. 

For more details on the benefits of joining Stampin’ Up! as a Demonstrator, see my Join My Team page. There is a Join My Team button at the bottom where you can start the process. Please contact me if you have any questions. I’ll be happy to tell you more.


February 16 – 29 Host Code: KFK3RZHV

Use this host code when you order $50 or more and receive a free gift from me!  The gift is your choice of any item valued up to $10.00 in the 2019-20 Annual Catalog or in the 2020 January-June Mini Catalog!  That includes some of the Host Exclusive stamp sets!

If your order is over $150, please do not use the host code since you’ll receive your own Host Dollars plus I’ll send you the free gift!  This host code can be used by anyone, no commitment required.  Let me know if you have any questions.


If you need any stamping supplies, I’d be very happy to be your Demonstrator.  Just click on the Shop Now button on the right side of the screen to go directly to my online store or contact me if you have any questions.  Happy Stamping!

Thanks for stopping by and have a great day!

Akiko

  • Visit my online store here
  • See the current Stampin’ Up! clearance rack specials here
  • Earn FREE Stampin’ Up! products through my Wildflower Frequent Shopper Program – my way of saying thank you to my frequent shopper online customers.
  • Sign up for my weekly newsletter here
  • Have any questions? I’d be happy to help, click here to contact me.

Cardstock Cuts for this project:

  • Night of Navy – 1 1/4″ x 3″ (die cut ‘thanks’)
  • Whisper White – 2″ x 3 1/2″ (thank you label)

Stampin’ Up! products used in this project:


Stampin’ Up! Toile Tidings Thank You Card

Good Morning! Today I have a Thank You Card made with the pretty Stampin’ Up! Toile Tidings designer series paper, the Well Written dies and the little poinsettia from the Stampin’ Up! Cup of Christmas stamp bundle. As I put Christmas stamping supplies away to make room for the items from the new Stampin’ Up! January-June 2020 Mini Catalog, I find lots of pretty Christmas DSP looking so sad, wanting to be used. So let’s put it to good use with a Holiday Thank You card. Plus, we can use the cute Mini Curvy Keepsakes box die to hold a little something to go with your card! You can find the supplies used to create this card at the bottom of my post along with the sizes of cardstock used.

I started with a panel of the botanical toile from the Stampin’ Up! Toile Tidings DSP pack and adhered it to a Real Red mat and then to a Garden Green card base. I found that the little red poinsettia from the Cup of Christmas bundle went with it, so I stamped it in Real Red on Very Vanilla card stock and cut it out with the matching die.

I cut out the thanks sentiment from the Stampin’ Up! Well Written dies from Garden Green card stock. I cut a label from vellum card stock using the second smallest label from the Stitched Rectangle dies to put behind the thanks. I find the vellum adds some contrast so that the word stands out a little better and it makes the card fancier with the translucent texture! I used multipurpose liquid glue to adhere the word to the vellum and used a stamp block to weigh it down and keep it put while it dried.

Then I applied multipurpose liquid glue to the vellum behind the word so that it would be disguised and adhered it to the card front. I weighed it down with the stamp block to keep it still while drying again. I added 3 red rhinestones to the poinsettia and popped it next to the label with a dimensional.

I decided to use the Real Red side of the botanical print in the Stampin’ Up! Toile Tidings DSP for the outside of my little box, so I cut it out using the Mini Curvy Keepsakes box die. I gently folded along the score lines and shaped it with my bone folder to get curves. I stamped and die cut another poinsettia with Real Red ink on Very Vanilla and punched a little hole in one petal. I die cut the Cup of Christmas little leaf cluster and adhered it to the back of the flower with multipurpose liquid glue and tied it on the box with mossy Meadow twine.

On the inside of the card, I stamped a little poinsettia using Real Red ink on a Very Vanilla panel. I added a strip of the Garden Green side of the botanical Stampin’ Up! Toile Tidings DSP to the bottom and adhered it to the inside of the card.

Do you have a lot of Holiday DSP left over from Christmas cards like me? What are your ideas for using it up? There were so many pretty papers from the Holiday Catalog … and there are so many pretty ones in the new catalog as well!


January Paper Pumpkin: I’ll Bee Yours

Paper Pumpkin’s first kit of 2020 is all about L-O-V-E. Whether you want handmade favors for Valentine’s Day, a bridal shower, or a remarkably romantic wedding, this month’s kit has everything you need to help you celebrate your favorite friendships and love stories. So make it a “LOVE”-ly year with Paper Pumpkin.

  • Kit details: Makes 20 treat bags + 10 mini cards and envelopes
  • Card size: 3″ x 3″ (7.5 x 7.5 cm) 
  • Envelope size: 3-1/8″ x 3-1/8″ (7.8 x 7.8 cm) 
  • Bag size: 3-1/4″ x 4″ (8.2 x 10 cm)
  • Coordinating Stampin’ Up! colors: Crushed Curry, Highland Heather, Mint Macaron, and Rococo Rose

December 1 – 15 Host Code: R497392Q

December 16 – 31 Host Code: A99JPHA3

Use this host code when you order $50 or more and receive a free gift from me!  The gift is your choice of any item valued up to $10.00 in the 2019-20 Annual Catalog or in the 2019 Holiday Catalog!  That includes some of the Host Exclusive stamp sets!

If your order is over $150, please do not use the host code since you’ll receive your own Host Dollars plus I’ll send you the free gift!  This host code can be used by anyone, no commitment required.  Let me know if you have any questions.


If you need any stamping supplies, I’d be very happy to be your Demonstrator.  Just click on the Shop Now button on the right side of the screen to go directly to my online store or contact me if you have any questions.  Happy Stamping!

Thanks for stopping by and have a great weekend!

Akiko

  • Visit my online store here
  • See the current Stampin’ Up! clearance rack specials here
  • Earn FREE Stampin’ Up! products through my Wildflower Frequent Shopper Program – my way of saying thank you to my frequent shopper online customers.
  • Sign up for my weekly newsletter here
  • Have any questions? I’d be happy to help, click here to contact me.

Cardstock Cuts for this project:

  • Garden Green – 5 1/2″ x 8 1/2″ scored at 4 1/4″ (card base), 2″ x 4 1/2″ (die cuts)
  • Real Red – 3 7/8″ x 5 1/8″ (mat)
  • Very Vanilla – 4″ x 5 1/4″ (inside panel), 2″ x 4″ (die cuts)
  • Vellum – 1 1/2″ x 3 1/4″ (label)
  • Toile Tidings DSP – 3 3/4″ x 5″ (front), 1/2″ x 4″ (inside)

Stampin’ Up! products used in this project:


Stampin’ Up! Winter Woods Thank You Card

Good Morning! Today I have a simple monochromatic winter Thank You Card Made with the Stampin’ Up! Winter Woods stamp set. You can find the supplies used to create this card at the bottom of my post along with the sizes of cardstock used.

I brushed the embossing buddy on a Whisper White panel and stamped the trees from the Stampin’ Up! Winter Woods stamp set on it with VersaMark ink. I sprinkled it with White embossing powder and heat set. I sponged the entire panel with Seaside Spray ink, making sure to get a good contrast in the tree branches. I adhered it to a Whisper White mat with liquid glue and then to a Seaside Spray card base with dimensionals.

I tied a length of the Shimmery Seaside Spray ribbon around the card and made a faux bow.

I stamped the Thank You sentiment from the Tropical Chic stamp set in Seaside Spray on a strip of Whisper White. I used the large label die from the Merry Christmas dies to cut out the label. It is larger than the sentiment, so I realigned the die to the opposite side and cut it again to shorten it to fit the sentiment better. I adhered it to the card front over the ribbon with dimensionals.

I decorated the inside by stamping part of the first tree on the right side of a Whisper White panel in Seaside Spray. I adhered it to the inside of the card. I also stamped the tree in Seaside on the right side of a Whisper White medium envelope.

The Winter Woods stamp set was carried over from last year’s Holiday Catalog and I wanted to make a Christmas Card with it for this season because it’s so pretty. I didn’t get to it, so I decided to use it for a seasonal thank you. Since we haven’t had any real snow yet, I feel good about seeing winter trees (just give me a few more months though!).


Stampin’ Up! January – June 2020 Mini Catalog and Sale-A-Bration Coming in January!

This image has an empty alt attribute; its file name is stampin-up-2020-jan-jun-mini-catalog-stampininthemeadows.com_.jpg
This image has an empty alt attribute; its file name is stampin-up-on-stage-stampininthemeadows.com-07.jpg

I ordered catalogs for my customers earlier this week, but I messed up and did not get expedited shipping, so I will not get them until next week (boo hoo).  But if you placed an order with me, I will send you one via priority mail as soon as my order arrives!

If you have not placed an order with me but want to be on my mailing list for the new catalogs too, simply place an order through my online store by next Tuesday and you’ll automatically be added to my mailing list to get your catalogs ASAP!

The new January – June 2020 Mini Catalog and Sale-A-Bration will be open for ordering on January 3, 2020.


Stampin’ Up! Year-End Closeout is going on now!

Stampin’ Up!’s Year-End Closeout started earlier this week and things are starting to run out! While supplies last, you can save big on a selection of retiring and surplus items including holiday catalog items, stamp sets, and Paper Pumpkin past kits. Shop early to avoid missing out! Supplies are limited and popular items will sell out quickly. This amazing sale ends on January 2. Head over to my online store to shop now.


Stampin’ Up! 2019 Holiday Catalog Carryover List Announced with New Features

Stampin’ Up! frequently carries over select products from our holiday catalog to our annual catalog the next year. This year, they’re trying something different. They will continue to carry over select products from the holiday catalog to the annual catalog, AND they will also carry over select products from the 2019 holiday catalog to the 2020 holiday catalog! These special holiday-to-holiday catalog carryover items are listed below. 

Holiday-to-holiday catalog carryover products will not be available between January 3 and the start of the 2020 holiday catalog preorder period, unlike holiday catalog products that will be carrying over to the annual catalog, which will be available the whole time.

  • Most Wonderful Time Product Medley (item 150705)
  • Christmas Countdown Project Kit (item 150703) Please note: The coordinating Christmas Countdown Stamp Set (item 151833) will not carry over.
  • Jingle Bells Embellishments (item 149598)
  • Snowflake Sequins Embellishments (item 150443)
  • Feels Like Frost Specialty Designer Series Paper (item 150444)
  • Toile Tidings Designer Series Paper (item 150432)
  • Brightly Gleaming Specialty Designer Series Paper (item 150429)
  • Christmas Gleaming Stamp Set (item 150464)
  • Gleaming Ornament Punch Pack (item 150647)
  • Merry Moose Stamp Set (item 150494)
  • Moose Punch (item 150652)
  • Gather Together Stamp Set (item 150589)
  • Gathered Leaves Dies (item 150662)

The entire carry over list including the items that will continue to be available between holiday catalogs can be viewed here.


December 1 – 15 Host Code: R497392Q

Use this host code when you order $50 or more and receive a free gift from me!  The gift is your choice of any item valued up to $10.00 in the 2019-20 Annual Catalog or in the 2019 Holiday Catalog!  That includes some of the Host Exclusive stamp sets!

If your order is over $150, please do not use the host code since you’ll receive your own Host Dollars plus I’ll send you the free gift!  This host code can be used by anyone, no commitment required.  Let me know if you have any questions.


If you need any stamping supplies, I’d be very happy to be your Demonstrator.  Just click on the Shop Now button on the right side of the screen to go directly to my online store or contact me if you have any questions.  Happy Stamping!

Thanks for stopping by and have a great weekend!

Akiko

  • Visit my online store here
  • See the current Stampin’ Up! clearance rack specials here
  • Earn FREE Stampin’ Up! products through my Wildflower Frequent Shopper Program – my way of saying thank you to my frequent shopper online customers.
  • Sign up for my weekly newsletter here
  • Have any questions? I’d be happy to help, click here to contact me.

Cardstock Cuts for this project:

  • Seaside Spray – 4 1/4″ x 11″ (card base)
  • Whisper White – 3 3/4″ x 5″ (inside panel), 3″ x 3 3/4″ (tree panel), 3 1/4″ x 4″ (tree mat), 1 1/4″ x 3″ (label)

Stampin’ Up! products used in this project: