Stampin’ Up! Dragonfly Garden Friendship Card

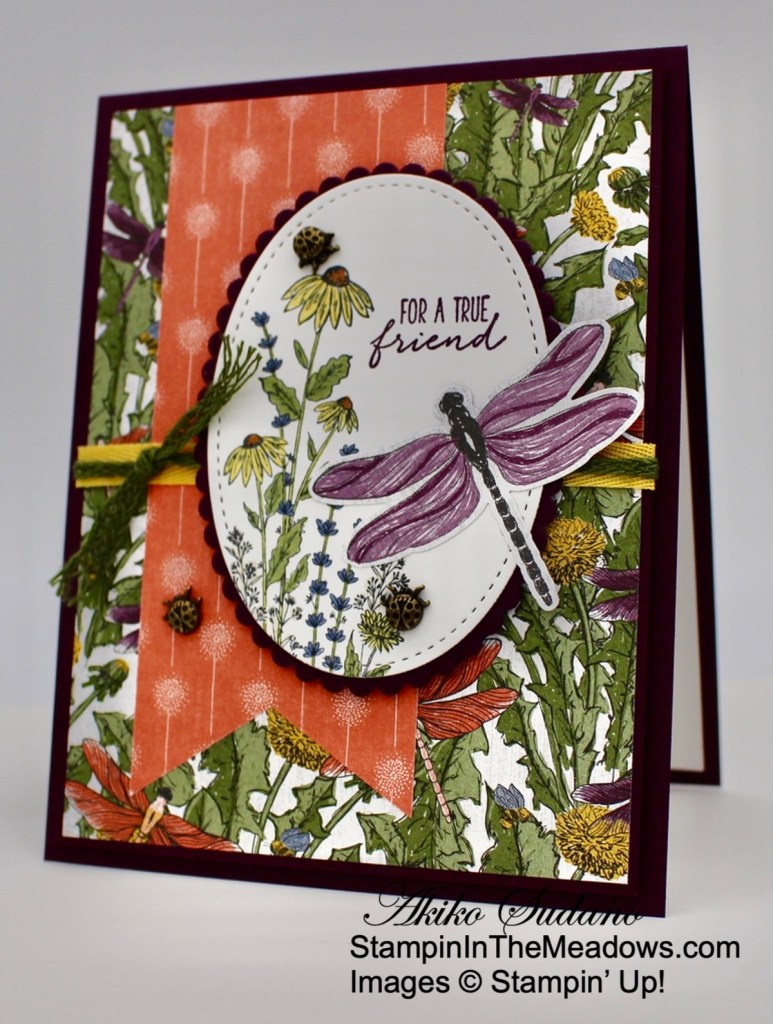
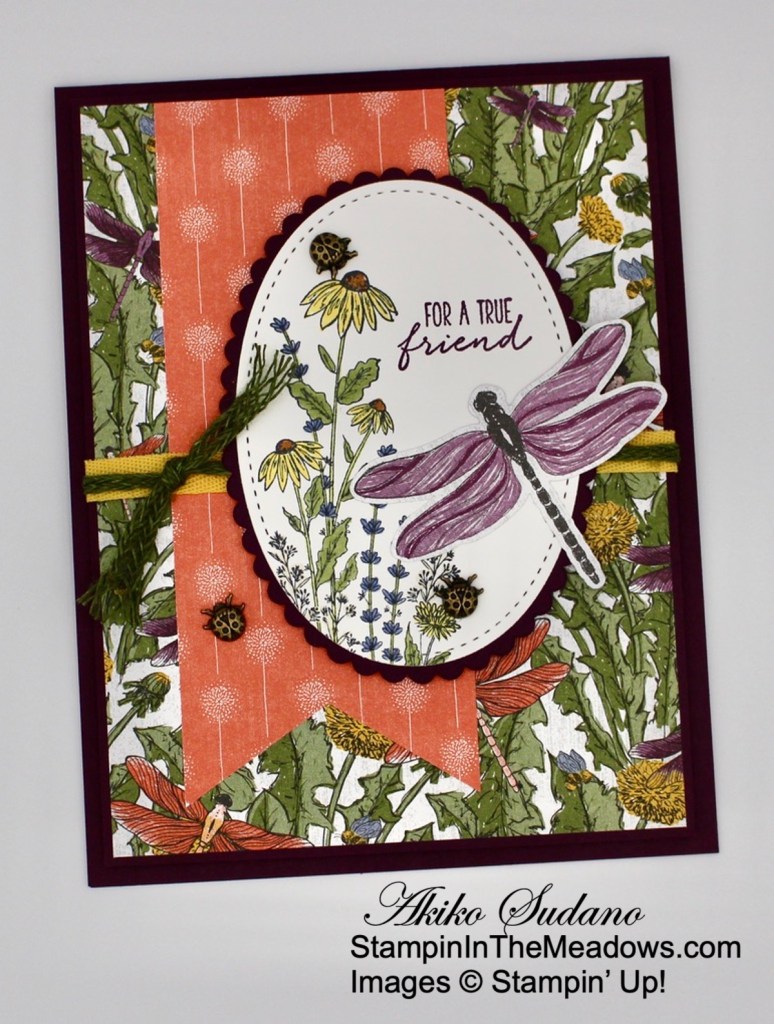
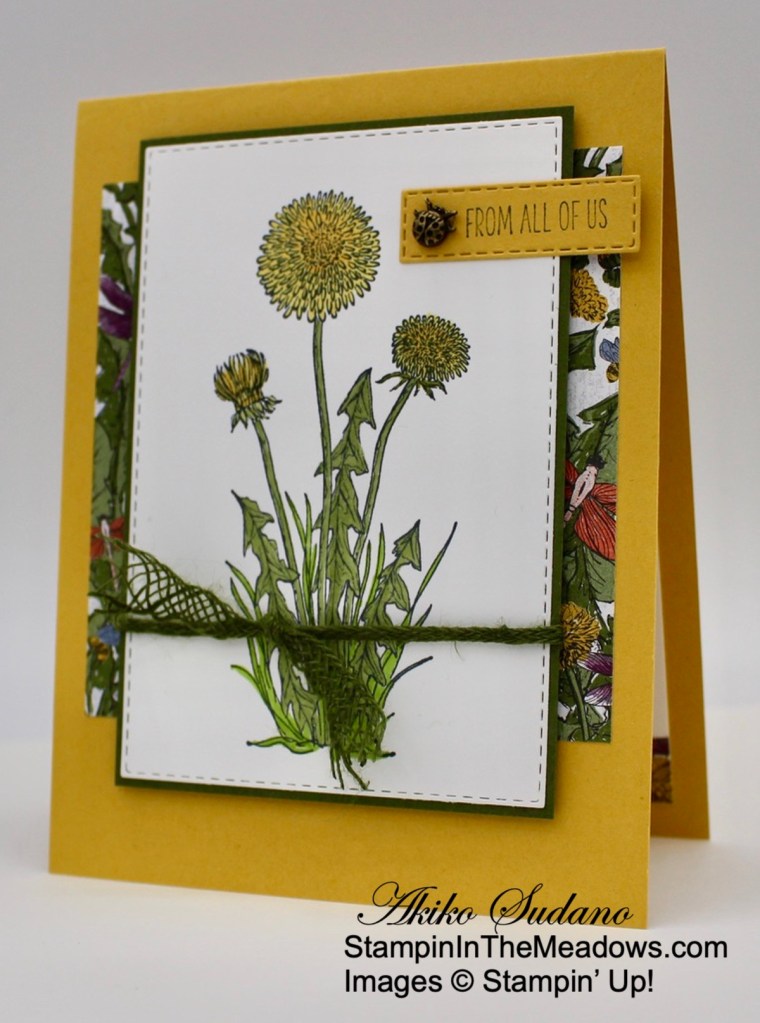
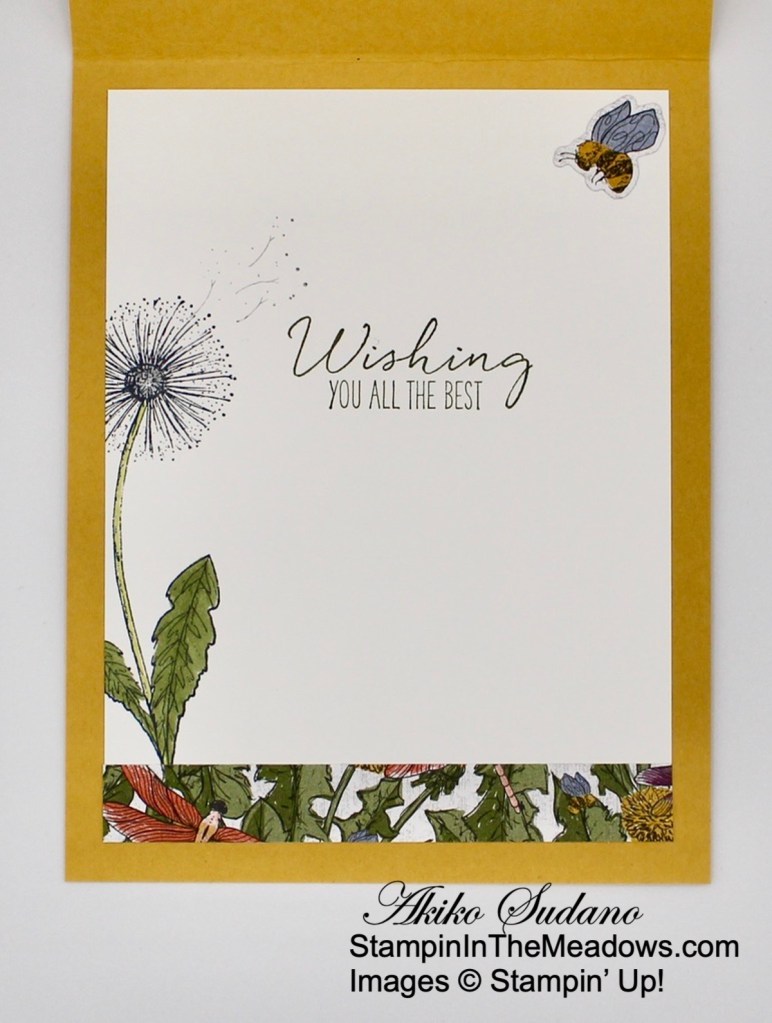
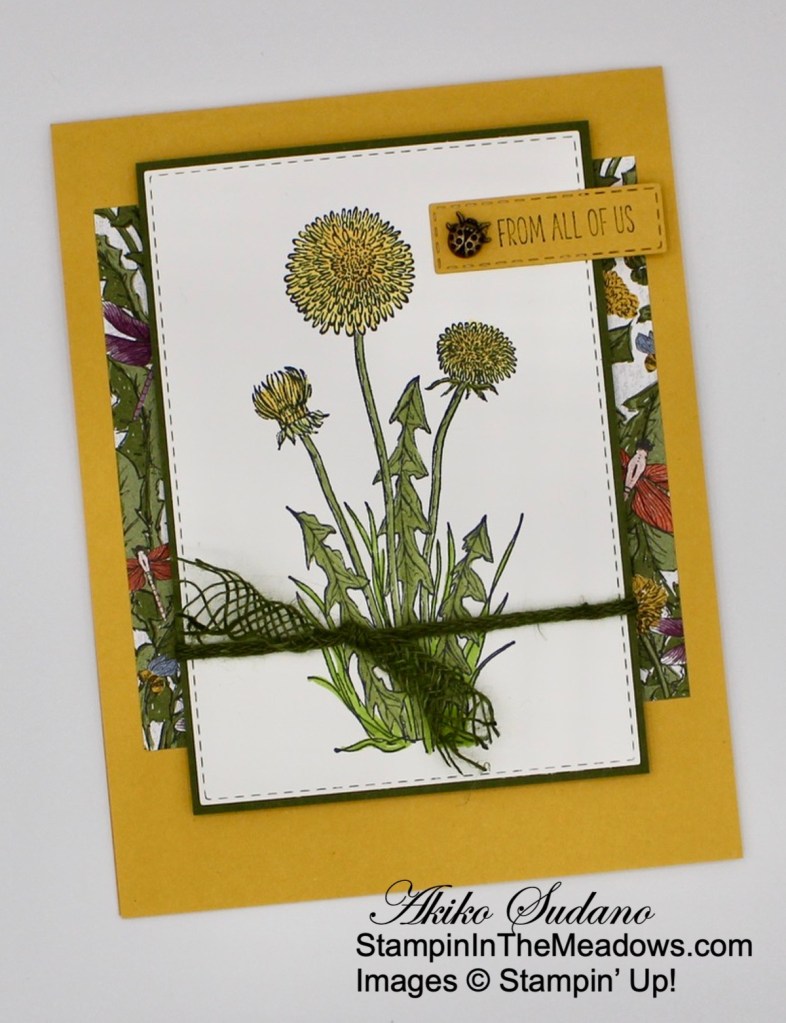
Good morning! Today I have a friendship card made with the Stampin’ Up! Dragonfly Garden bundle along with the Dandy Garden 6″ x 6″ designer series paper. And it’s a fun fold card – a Z-fold that is so simple to make! You can find the supplies I used at the bottom of my post along with the sizes of cardstock used.

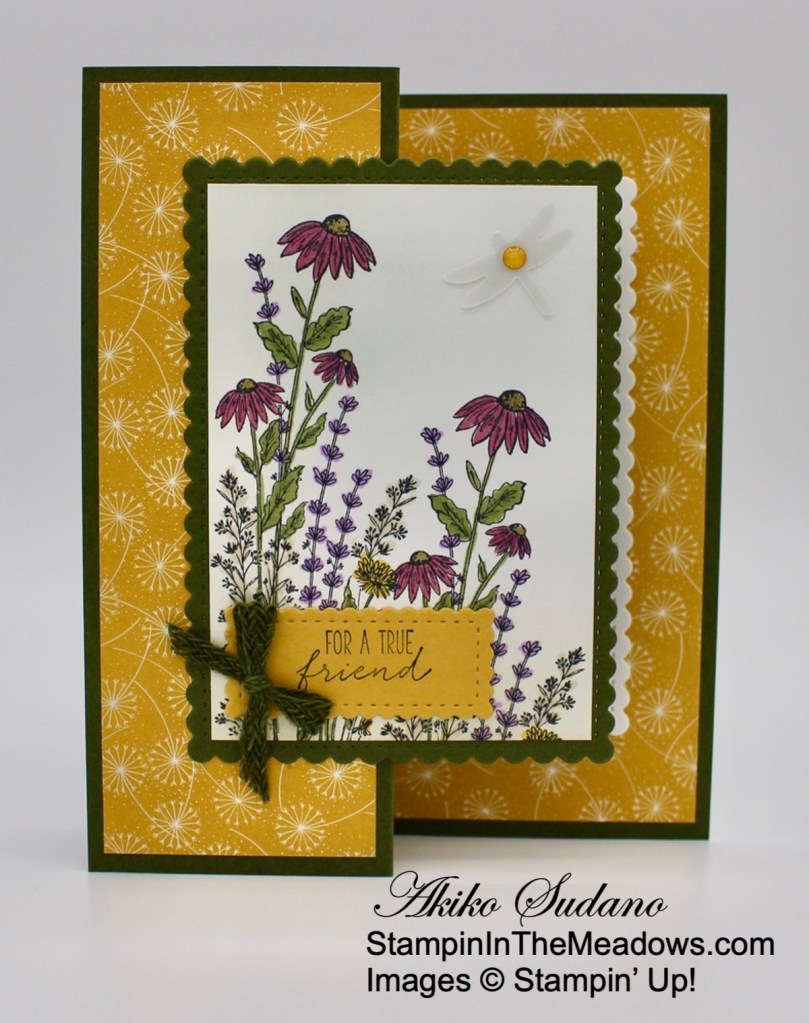
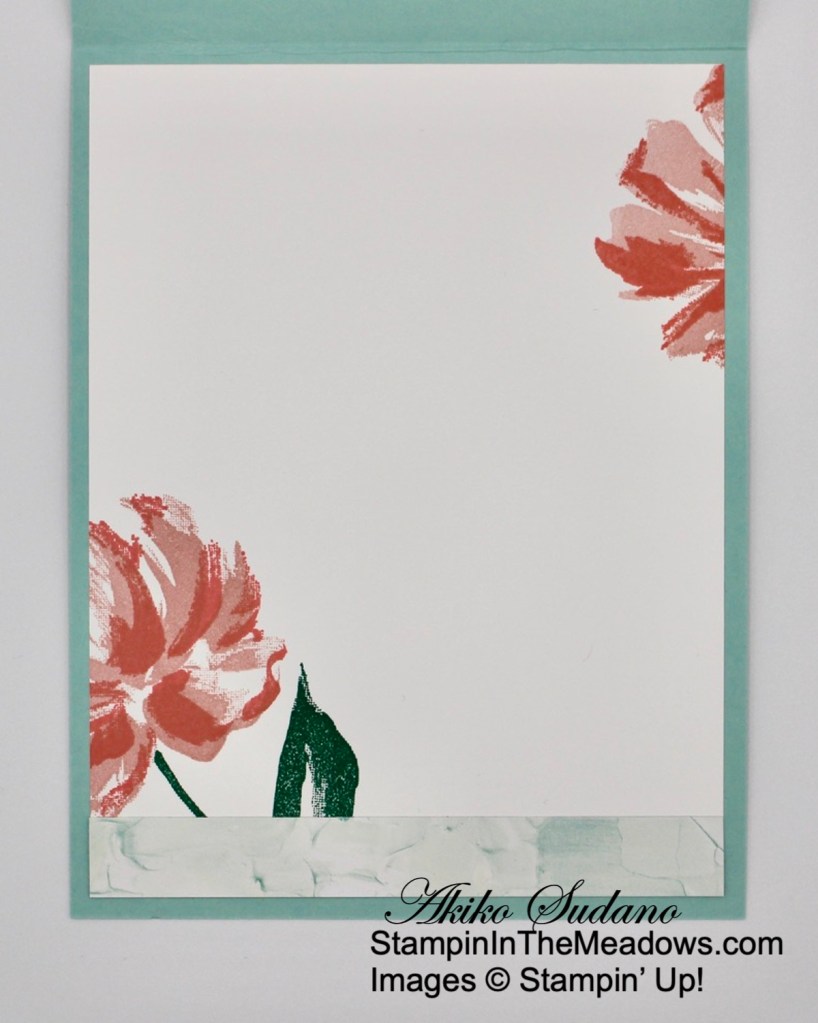
I stamped the wildflowers from the Stampin’ Up! Dragonfly Garden cling stamp set in Memento Tuxedo Black ink on a Basic White panel twice. I colored the flowers with Stampin’ Blends – Rich Razzleberry, Mossy Meadow, Mango Melody, Highland Heather, Soft Suede and Crumb Cake. I used my blending brushes to lightly sponge some Balmy Blue ink on the open sky area and some Old Olive ink on the wildflower stems.

I cut a Mossy Meadow panel with the Stitched So Softly scalloped rectangle die and adhered the stamped panel to the front. I stamped the sentiment from the Stampin’ Up! Dragonfly Garden stamp set on a Bumblebee panel in Mossy Meadow and cut it out with the smallest scalloped rectangle from the Stitched Rectangles dies. I adhered it to the stamped panel. I adhered the Bumblebee panels of the Dandy Garden designer series paper to the Mossy Meadow card base on both ends. I adhered the white panel in the middle.

I stamped the open tailed dragonfly from the Stampin’ Up! Dragonfly Garden stamp set in stamped off Bumblebee ink on a Basic White panel and cut it out with the Stitched So Sweetly die. I adhered it to the large section of the card base that will be the inside of the card. I applied Tear & Tape to the left side of the layered stamped panel, being careful so that it didn’t go past the fold. I removed the tape strip covers and adhered it to the panel to the closed card, aligning the pane with the scalloped panel on the inside.

I punched a small dragonfly from Vellum with the Dragonflies punch and adhered it to the card front with a glue dot. I adhered a Bumblebee enamel dot on the dragonfly. I adhered a Mossy Meadow braided trim bow to the label, and my card was done.

The Stampin’ Up! Dragonfly Garden bundle is such a pretty set – I love the wildflowers stamp image – and it goes so beautifully with the Dandy Garden designer series paper. This style of Z-fold card is really easy to make, yet really makes the card extra special – try it!


Current Host Code: 9WJYHP76

Use this host code when you order $50 or more and receive a free gift from me!  The free gift is your choice of any item valued up to $10.00 in the 2019 – 2020 Annual Catalog or in the Jan-Jun 2021 Mini Catalog!

If your order is over $150, please do not use the host code since you’ll receive your own Host Dollars plus I’ll still send you the free gift!  This host code can be used by anyone, no club or commitment required.  Let me know if you have any questions.


If you need any stamping supplies, I’d be very happy to be your Demonstrator.  Just click on the Shop Now button on the right side of the screen to go directly to my online store or contact me if you have any questions.  Happy Stamping!

Thanks for stopping by and have a great weekend!

Akiko

  • Visit my online store here
  • See the current Stampin’ Up! clearance rack specials here
  • Earn FREE Stampin’ Up! products through my Wildflower Frequent Shopper Program – my way of saying thank you to my online frequent shopper customers.
  • Sign up for my weekly newsletter here
  • Have any questions? I’d be happy to help, click here to contact me.

Cardstock Cuts for this project:

  • Mossy Meadow – 5-1/2″ x 8-1/2″ card base scored at 2-1/8″ (mountain) and 4-1/4″ (valley), 3-1/4″ x 4-1/4″ (scalloped rectangle die cut)
  • Bumblebee – 1″ x 2-1/4″ (label)
  • Basic White – 3-1/4″ x 4-1/4″ (scalloped rectangle die cut for inside panel), 2-9/16″ x 3-3/4″ (art panel)
  • Vellum – 1″ x 1″ (small dragonfly)
  • Dandy Garden 6″ x 6″ DSP – 4″ x 5-1/4″ panel (inside Bumblebee), two 1-7/8″ x 5-1/4″ (Bumblebee for the front and white for the center panel)

Stampin’ Up! products used in this project:


Stampin’ Up! Butterfly Brilliance Cards

Good Morning! Today I want to share some pretty cards made with the Stampin’ Up! Butterfly Brilliance bundle. This is an early release from the upcoming 2021-2022 Annual Catalog that is available now. And it’s full of six gorgeous butterfly stamps in different sizes with detailed and outline dies for each one! Here are some cards made by the Stampin’ Up! Design team to give you some ideas:

One of the nice things I like about these cards is that they do do a nice job of showing how you can use the large butterfly stamp as background stamp and just ink it up and stamp it once!

The butterflies can be colored using many different techniques and in many different colors. There are outline dies for each butterfly, so you can use it as an embellishment. I love the variety in shapes and sizes!

The background dies are really cool – like this basketweave! And the bricks are neat too!

And finally there are all the detailed dies. This card leaves the little pieces in the watercolored die cuts for an artistic look, but they can be nicely used in conjunction with the stamped images for a variety of looks. And again, I love all the different sizes!

There are simple recipes for making these cards with the Stampin’ Up! Butterfly Brilliance bundle, and you can get them HERE. And check out the trio of Butterfly Brilliance cards I posted earlier this week here.

Here are close ups of the stamps and dies. Click on the pictures to get the full descriptions and to shop in my Online Store.

Thanks for looking and I hope you consider the Stampin’ Up! Butterfly Brilliance bundle for your next stamp purchase.


The April Paper Pumpkin Kit is So Cool!

The So Cool Paper Pumpkin Kit is a little taste of summer fun, with enough supplies to make 12 colorful, shaped cards with coordinating envelopes. Six card bases are popsicle shaped, the other six are semicircles: three watermelons and three rainbows. All of the cards are splashed with cheerful, vivid watercolor images. The kit also includes two full-size, matching sticker sheets, die-cut accents, fun embellishments, and more. But, even more cool: it’s the first Paper Pumpkin kit designed with kids in mind!

Coordinating Colors: Blackberry Bliss, Bermuda Bay, Bumblebee, Cinnamon Cider, Old Olive, Terracotta Tile

If you’re interested in subscribing to Paper Pumpkin, you can either sign up for a subscription where you are billed monthly for your kit or you can purchase a prepaid subscription in my online store. To see more information and to sign up for the monthly subscription click here. To see the options for prepaid subscriptions in my online store, click here.

Sign up deadline for the April 2021 kit is April 10, 2021. Supplies may be limited toward the end of the subscription period. 


Current Host Code: 9WJYHP76

Use this host code when you order $50 or more and receive a free gift from me!  The gift is your choice of any item valued up to $10.00 in the 2020-21 Annual Catalog or the Jan-Jun 2021 Mini Catalog.

If your order is over $150, please do not use the host code since you’ll receive your own Host Dollars plus I’ll still send you the free gift!  This host code can be used by anyone, no commitment required.  Let me know if you have any questions.


If you need any stamping supplies, I’d be very happy to be your Demonstrator.  Just click on the Shop Now Button on the right side of the screen to go directly to my Online store or contact me if you have any questions.  Happy Stamping!

Thanks for stopping by and have a great day!

Akiko

  • Visit my Online store here
  • See the current Stampin’ Up! clearance rack specials here
  • Earn FREE Stampin’ Up! products through my Wildflower Frequent Shopper Program – my way of saying thank you to my frequent shopper online customers.
  • Sign up for my monthly newsletter here
  • Have any questions? I’d be happy to help, click here to contact me.

Stampin’ Up! Friends are Like Seashells Birthday Card

Happy Friday! Today I made a simple Birthday card with the pretty Stampin’ Up! Friends are Like Seashells bundle and the Sand and Sea designer series paper. I love seashell stamps and the shells in this stamp set are gorgeous – plus the dies and coordinating embossing steps it up big time!! You can find the supplies I used at the bottom of my post along with the sizes of cardstock used.

I stamped a seashell from the Stampin’ Up! Friends are Like Seashells photopolymer stamp set in So Saffron ink on Pearlescent paper and cut it out with the large Seaside Seashells die. I trimmed the scraps and carefully placed the shell in the corresponding location in the Seashells 3D embossing folder. I did some final trimming as needed with my paper snips and I have a beautiful, dimensional, shiny shell! I used the large die again to cut the seaweed from Pear Pizzazz and then embossed it.

I stamped the sentiment from the Stampin’ Up! Friends are Like Seashells stamp set on a panel of Seaside Spray in Versamark ink and sprinkled it with white embossing powder. I heat set the sentiment until it was shiny and cut it out with the Ornate Frames die. I cut out a panel of Sand and Sea designer series paper with the third largest Stitched Rectangles die and adhered it to a Gray Granite mat. I adhered the seaweed to the panel with glue dots and wrapped it twice with linen thread and tied a bow on the side. Then I adhered the label over the linen thread with dimensionals.

I adhered the shell on top of the label with glue dots and adhered a little pink shell sequin to the label. I popped the panel on the front of a Rococo Rose card base with dimensionals.

For the inside of the card, I stamped the sentiment from the Stampin’ Up! Friends are Like Seashells stamp set in Gray Granite ink on a Basic White panel. I stamped the shell in stamped off Gray Granite ink and stamped the shading stamp on top of it with So Saffron ink. I trimmed the bottom with a strip of Sand and Sea DSP and adhered the panel to the inside of the card.

The Stampin’ Up! Friends are Like Seashells bundle along with the Seashells 3D embossing folder are my favorite items for making seashell theme cards. And as a bonus, it has wonderful sentiments that go with the seashell theme.


2019 – 2021 In Colors Are Retiring Soon!!

The new Stampin’ Up! 2021-2022 Annual Catalog will be open for orders beginning on May 4 and that’s just around the corner. And Stampin’ Up! has already announced that the Rococo Rose card stock supplies are running low:

We anticipate running out of Rococo Rose Cardstock (item 150882) in the next couple days. When this item runs out, it will show as not orderable until we are able to get more inventory. Because the 2019–2021 In Color Cardstock Assortment (item 149701) includes Rococo Rose Cardstock, this item will also be not orderable for a time. We have more inventory of Rococo Rose Cardstock coming in a few weeks; however, as this is a retiring color and the inventory we receive in a few weeks will be our final shipment, both the cardstock and cardstock assortment will only be available while supplies last.

Shortly Stampin’ Up! will be announcing their retiring list and the inks and card stocks are usually the first to be sell out. So now is a good time to stock up on the retiring In Color products before the rush! Head over to my Online Store to shop NOW!


Butterfly Brilliance is Available Now!

Bring in the beauty of nature with the artistic designs of the Butterfly Brilliance Bundle and textured specialty paper that will put a pop of brilliance on every project. The Butterfly Brilliance Collection is available now!! Click on the image below to download a PDF with all the details.

Note that the Butterfly Brilliance bundle is an early release from the 2021-2022 Annual Catalog that will be available in May! Unfortunately the beautiful Butterfly Bijou designer series paper is no longer available.

Stampin’ Up! Hey Chick and Hey Birthday Chick Bundles are Available Now!

What’s better than one fantastic bundle? Two fantastic (coordinating) bundles! The Hey Chick Stamp Set (a 2017 Sale-A-Bration set) has returned and brought along three new friends: The Chick Dies and a brand-new bundle that includes the Hey Birthday Chick Stamp Set and the Birthday Chick Dies. These playful images are so fun to stamp. You’ll love sending the punny cards you make to all your friends. Click on the image below to download a PDF with all the details on these fun bundles!


Current Host Code: 9WJYHP76

Use this host code when you order $50 or more and receive a free gift from me!  The free gift is your choice of any item valued up to $10.00 in the 2019 – 2020 Annual Catalog or in the Jan-Jun 2021 Mini Catalog!

If your order is over $150, please do not use the host code since you’ll receive your own Host Dollars plus I’ll still send you the free gift!  This host code can be used by anyone, no club or commitment required.  Let me know if you have any questions.


If you need any stamping supplies, I’d be very happy to be your Demonstrator.  Just click on the Shop Now button on the right side of the screen to go directly to my online store or contact me if you have any questions.  Happy Stamping!

Thanks for stopping by and have a great weekend!

Akiko

  • Visit my online store here
  • See the current Stampin’ Up! clearance rack specials here
  • Earn FREE Stampin’ Up! products through my Wildflower Frequent Shopper Program – my way of saying thank you to my online frequent shopper customers.
  • Sign up for my weekly newsletter here
  • Have any questions? I’d be happy to help, click here to contact me.

Cardstock Cuts for this project:

  • Rococo Rose – 4-1/4″ x 11″ card base scored at 5-1/2″
  • Pear Pizzazz – 2-1/4″ x 3-1/2″ (sea weed)
  • Gray Granite – 3-1/8″ x 4-1/2″ (front mat)
  • Seaside Spray – 1-1/4″ x 3″ (label)
  • Pearlescent Paper – 1-1/4″ x 2″ (seashell)
  • Basic White – 4″ x 5-1/4″ panel (inside panel)
  • Sand and Sea DSP – 3-1/4″ x 4-3/4″” panel (background panel), 1/2″ x 4″ (inside trim),

Stampin’ Up! products used in this project:


Stampin’ Up! All Things Fabulous for the Happy Inkin’ Thursday Blog Hop

Good Morning and welcome to the Happy Inkin’ Thursday Blog Hop! For today’s card I used the beautiful Stampin’ Up! All Things Fabulous bundle to make a pretty floral birthday card. This photopolymer stamp set has two and three step stamps that make gorgeous multi-toned flowers! You can find the supplies used to create this card at the bottom of my post along with the sizes of cardstock used.

We have a sketch challenge this week and here is the pretty sketch we are using:

I embossed a panel of Soft Sea Foam Subtles 6″ x 6″ designer series paper with the Tasteful Textile embossing folder and adhering it to the front of a Soft Sea Foam card base. I cut the lattice from the Fabulous Florals Dies from Basic White card stock and cut the second largest oval from the Stitched Shapes dies from the Fine Art Floral designer series paper. I adhered the oval to the lattice with glue dots.

I stamped the large flower from the Stampin’ Up! All Things Fabulous photopolymer stamp set in Flirty Flamingo. I mounted the three stamps for this 3 step flower on blocks and stamped the center with full strength and then stamped the larger detailed stamp on top full strength. Then I stamped the larger background in stamped off Flirty Flamingo. Doing the stamping in this order made it fairly easy to line up. Then I stamped the small yellow flowers with the center in Mango Melody and the outer two in So Saffron. I cut out the flowers with the coordinating dies. I stamped two of each set of leaves in Pear Pizzazz and cut them out with the coordinating dies.

I arranged the leaves and flowers on the oval and used glue dots to adhere the So Saffron Flowers and leaves. I popped the Flirty Flamingo flower on the top with dimensionals. I stamped the sentiment from the Stampin’ Up! All Things Fabulous stamp set in Pear Pizzazz ink on a Basic White strip. I cut the end of the strip with the Banners Pick-A-Punch and adhered it to the oval. I adhered the oval to the card front with dimensionals and finished the card front with a White bow and three pearls.

For the inside of the card, I stamped the sentiment from the Peaceful Moments stamp set in Flirty Flamingo on a Basic White panel and trimmed the side in the Soft Seafoam Subtles 6″ x 6″ DSP. Stamped another flower from the Stampin’ Up! All Things Fabulous stamp set in Flirty Flamingo and cut it out with the coordinating die. I adhered the flower and remaining leaves to the panel and adhered the panel to the inside of the card.

The Stampin’ Up! All Things Fabulous bundle has beautiful floral images using the two and three step stamping techniques. These flowers definitely look better when carefully stamped to preserve the white highlights. So practice with different color combinations and use different techniques to help line up your stamps – it’s relaxing and fun!!

On with the Hop! Click the Next button below to visit Karen Ksenzakovic’s blog.

And just in case you get lost along the way, here’s a list of the team members participating in the hop today:


Current Host Code: 9WJYHP76

Use this host code when you order $50 or more and receive a free gift from me!  The gift is your choice of any item valued up to $10.00 in the 2019-20 Annual Catalog or in the 2021 January-June Mini Catalog!

If your order is over $150, please do not use the host code since you’ll receive your own Host Dollars plus I’ll still send you the free gift!  This host code can be used by anyone, no commitment required.  Let me know if you have any questions.


If you need any stamping supplies, I’d be very happy to be your Demonstrator.  Just click on the Shop Now Button on the right side of the screen to go directly to my online store or contact me if you have any questions.  Happy Stamping!

Thanks for visiting!

Akiko

  • Visit my online store here
  • See the current Stampin’ Up! clearance rack specials here
  • Earn FREE Stampin’ Up! products through my Wildflower Frequent Shopper Program – my way of saying thank you to my frequent shopper online customers.
  • Sign up for my weekly newsletter here
  • Have any questions? I’d be happy to help, click here to contact me.

Cardstock Cuts for this project:

  • Soft Sea Foam – 5-1/2″ x 8-1/2″ card base scored at 4-1/4″
  • Basic White – 4-1/2″ x 6″ (die cut flowers, leaves and lattice), 1/2″ x 3″ (label), 4″ x 5-1/4″ (inside panel)
  • Subtles 6″ x 6″ DSP – 1″ x 5-1/4″ (front background), 3/4″ x 4″ (inside trim)
  • Fine Art Floral DSP – 2-1/4″ x 3-1/2″ (die cut oval)

Stampin’ Up! products used in this project:


Stampin’ Up! Art Gallery Congratulations Card

Happy Friday! I pulled out the beautiful Stampin’ Up! Art Gallery bundle for a soft, feminine congratulations card to share today. I also added some touches of gold, including the Golden Garden acetate for some fun bling! You can find the supplies used to create this card at the bottom of this post along with the sizes of card stock used.

I embossed a Basic White panel with the Painted Texture 3D embossing folder and brushed Pool Party ink on it with my blending brush, making a delicate soft blue background. I adhered the panel to the front of a Pool Party card base and adhered a panel of Golden Garden Acetate across the embossed panel. I used Stampin’ Seal in the middle where it Ould be hidden by the main art panel – don’t forget to peel off the acetate protective backing! I adhered a square vellum doily to the top with glue dots.

I stamped the large flower from the Stampin’ Up! Art Gallery photopolymer stamp set with Blushing Bride ink on Basic White. I stamped the coordinating detailed stamp in Flirty Flamingo on top. I inked up the center of the detailed stamp with Versamark ink and stamped a third time. I tamped the Versamark with a sponge dauber to soften any sharp edges and sprinkled the flower with heat and stick powder and heated it. I sprinkled it with a few gilding flakes and rubbed it in till smooth, giving me a light touch of gold in the flower center. I cut out the flower with the coordinating die and stamped the large stem in Shaded Spruce ink on basic White. I cut the stem out as well.

I stamped the sentiment from the Stampin’ Up! Art Gallery stamp set in Versamark ink on a strip of Pool Party and sprinkled it with Gold embossing powder. I heat set the powder until it was shiny and cut it out with the long label die. I cut a panel of the Fine Art Floral designer series paper with the Stitched Rectangles die and adhered it to a Pool Party mat. I adhered the label to the bottom of the panel with glue dots and adhered the leaves and stem on top. I popped the flower on with dimensionals and finished with a gold trim double bow on the stem. I adhered the panel to the card front with dimensional and finished it off with three gilded gems for a final touch of gold bling!

For the inside of the card, I the stamped the large flower and stem from the Stampin’ Up! Art Gallery stamp set in Blushing Bride, Flirty Flamingo and Shaded Spruce in the corners of a Basic White panel. I adhered a strip of Fine Art Floral DSP to the bottom of the panel and adhered it to the inside of the card.

The Stampin’ Up! Art Gallery bundle is just beautiful! The two step stamps are fairly easy to use for stamping pretty modern flowers that turn out beautiful even when they aren’t perfectly lined up! The simple font in the sentiments are a perfect contrast with the ornate flowers. This was the first time I used the gilding flakes, but it definitely won’t be the last – they add a beautiful touch!


Bring in the beauty of nature with the artistic designs of the Butterfly Brilliance Bundle and coordinating designer series paper, along with textured specialty paper that will put a pop of brilliance on every project. The Butterfly Brilliance Collection is available now!! Click on the image below to download a PDF with all the details.

Note that the Butterfly Brilliance bundle is an early release from the 2021-2022 Annual Catalog that will be available in May! Unfortunately the beautiful Butterfly Bijou and Natural Touch specialty paper are only available while supplies last during the Butterfly Bouquet promotion period March 2, 2021 – May 3, 2021. So get them while supplies last!

Stampin’ Up! Hey Chick and Hey Birthday Chick Bundles are Available Now!

What’s better than one fantastic bundle? Two fantastic (coordinating) bundles! The Hey Chick Stamp Set (a 2017 Sale-A-Bration set) has returned and brought along three new friends: The Chick Dies and a brand-new bundle that includes the Hey Birthday Chick Stamp Set and the Birthday Chick Dies. These playful images are so fun to stamp. You’ll love sending the punny cards you make to all your friends. Click on the image below to download a PDF with all the details on these fun bundles!


The April Paper Pumpkin Kit is So Cool!

The So Cool Paper Pumpkin Kit is a little taste of summer fun, with enough supplies to make 12 colorful, shaped cards with coordinating envelopes. Six card bases are popsicle shaped, the other six are semicircles: three watermelons and three rainbows. All of the cards are splashed with cheerful, vivid watercolor images. The kit also includes two full-size, matching sticker sheets, die-cut accents, fun embellishments, and more. But, even more cool: it’s the first Paper Pumpkin kit designed with kids in mind!

Here are the Details:

  • Kit includes enough supplies to make 12 fresh, fun-shaped cards—6 popsicles and 6 blank semicircles to color—and coordinating envelopes. 
  • Kit includes card bases, 2 full sticker sheets, decorative die-cut pieces, embellishments, and more.
  • Envelope size: 4-1/2″ x 5-3/4″
  • Coordinates with the Ice Cream Corner Designer Series Paper (154567)

Coordinating Colors: Blackberry Bliss, Bermuda Bay, Bumblebee, Cinnamon Cider, Old Olive, Terracotta Tile

If you’re interested in subscribing to Paper Pumpkin, you can either sign up for a subscription where you are billed monthly for your kit or you can purchase a prepaid subscription in my online store. To see more information and to sign up for the monthly subscription click here. To see the options for prepaid subscriptions in my online store, click here.

Sign up deadline for the April 2021 kit is April 10, 2021. Supplies may be limited toward the end of the subscription period. 


March Host Code: 9WJYHP76

Use this host code when you order $50 or more and receive a free gift from me!  The gift is your choice of any item valued up to $10.00 in the 2020-21 Annual Catalog or the Jan-Jun 2021 Mini Catalog.

If your order is over $150, please do not use the host code since you’ll receive your own Host Dollars plus I’ll still send you the free gift!  This host code can be used by anyone, no commitment required.  Let me know if you have any questions.


If you need any stamping supplies, I’d be very happy to be your Demonstrator.  Just click on the Shop Now Button on the right side of the screen to go directly to my Online store or contact me if you have any questions.  Happy Stamping!

Thanks for stopping by and have a great day!

Akiko

  • Visit my Online store here
  • See the current Stampin’ Up! clearance rack specials here
  • Earn FREE Stampin’ Up! products through my Wildflower Frequent Shopper Program – my way of saying thank you to my frequent shopper online customers.
  • Sign up for my monthly newsletter here
  • Have any questions? I’d be happy to help, click here to contact me.

Cardstock Cuts for this project:

  • Pool Party – 4-1/4″ x 11″ card base scored at 5-1/2″, 2-3/8″ x 3-11/16″ (front mat), 1″ x 3-1/2″ (label)
  • Basic White – two 4″ x 5-1/4″ panels (front embossed panel and inside panel), 2-1/2″ x 5″ (die cut flower and stem)
  • Golden Garden Specialty Acetate – 2″ x 4″ (front accent panel)
  • Fine Art Floral DSP – 2-1/2″ x 3-3/4″ (front inset panel), 1/2″ x 4″ (inside trim)

Stampin’ Up! products used in this project:


Stampin’ Up! Dragonfly Garden for the Happy Inkin’ Thursday Blog Hop

Good Morning and welcome to the Happy Inkin’ Thursday Blog Hop! For today’s card I used the pretty Stampin’ Up! Dragonfly Garden bundle to make a pretty wildflower friendship card. I love the images in this stamp set and the pretty Dandy Garden designer series paper. You can find the supplies used to create this card at the bottom of my post along with the sizes of cardstock used.

We have a color challenge this week and here is the pretty color palette we are using – it just called out for the Dandy Garden designer series paper!!

I started by trimming the bottom of a Calypso Coral strip of the Dandy Garden 6″ x 6″ DSP with the Banner Triple Punch and adhering the banner to a colorful panel of the DSP. I adhered the layered panel to a Blackberry Bliss panel and wrapped it with a length of Bumblebee ribbon, securing it in the back. Then I wrapped a length of Mossy Meadow braided trim on top of the Bumblebee ribbon, tied a knot on the side and fluffed and trimmed the ends.

I stamped the wildflowers from the Stampin’ Up! Dragonfly Garden cling stamp set on a Basic White panel with Memento Tuxedo Black ink and colored it with Mango Melody, Mossy Meadow, Cinnamon Cider, Misty Moonlight, Old Olive and Crumb Cake Stampin’ Blends. I stamped the sentiment in Blackberry Bliss ink next to the flowers and cut it out with the largest stitched oval from the Stitched Shapes Dies. I cut the largest scalloped oval from the Layering Ovals dies from Blackberry Bliss and adhered the stitched oval on top.

I adhered the oval panel to the banner panel with dimensionals. I used the Dragonflies Punch to punch a large Blackberry Bliss dragonfly from the Dandy Garden DSP pack and adhered it to the panel with glue dots. I adhered 4 ladybug trinkets to the front with more glue dots and popped the panel to the front of a Blackberry Bliss card base.

For the inside of the card, I stamped the the wildflowers from the Stampin’ Up! Dragonfly Garden stamp set in Memento Tuxedo Black ink on thee side of a Basic White panel. I colored the flowers with Stampin’ blends just like the front oval panel. I stamped the sentiment in Blackberry Bliss next to the flowers and punched a little dragonfly from the Dandy Garden DSP. After adhering the little dragonfly to the top corner, I adhered the panel to the inside of the card.

The Stampin’ Up! Dragonfly Garden bundle has beautiful dragonfly and wildflower images and wonderful sentiments – it’s one of my many favorites in the current Mini Catalog. And the ladybug trinkets are just too cute!

On with the Hop! Click the Next button below to visit Karen Ksenzakovic’s blog.

And just in case you get lost along the way, here’s a list of the team members participating in the hop today:


March Host Code: 9WJYHP76

Use this host code when you order $50 or more and receive a free gift from me!  The gift is your choice of any item valued up to $10.00 in the 2019-20 Annual Catalog or in the 2020 January-June Mini Catalog!  That includes some of the Host Exclusive stamp sets!

If your order is over $150, please do not use the host code since you’ll receive your own Host Dollars plus I’ll still send you the free gift!  This host code can be used by anyone, no commitment required.  Let me know if you have any questions.


If you need any stamping supplies, I’d be very happy to be your Demonstrator.  Just click on the Shop Now Button on the right side of the screen to go directly to my online store or contact me if you have any questions.  Happy Stamping!

Thanks for visiting!

Akiko

  • Visit my online store here
  • See the current Stampin’ Up! clearance rack specials here
  • Earn FREE Stampin’ Up! products through my Wildflower Frequent Shopper Program – my way of saying thank you to my frequent shopper online customers.
  • Sign up for my weekly newsletter here
  • Have any questions? I’d be happy to help, click here to contact me.

Cardstock Cuts for this project:

  • Blackberry Bliss – 4-1/4″ x 11″ card base scored at 5-1/2″, 4″ x 5-1/4″ (front mat), 2-3/4″ x 4″ (scalloped oval mat)
  • Basic White – 3″ x 4″ (stitched oval art panel), 4″ x 5-1/4″ (inside panel)
  • Dandy Garden DSP – 3-7/8″ x 5-1/8″ (front background), 2″ x 5″ (Calypso Coral banner), large dragonfly, small dragonfly

Stampin’ Up! products used in this project:


Stampin’ Up! Springtime Joy for the Inkin’ Krew Blog Hop

Good Morning! Welcome to another Inkin’ Krew Monthly Blog Hop! The theme for this month’s hop is Celebrate Spring and I made an Easter Card with the sweet little bunny from the Stampin’ Up! Springtime Joy stamp set. Little furry animals with floral wreaths on their head are very popular these days because they’re so cute, so this stamp set is perfect!! You can find the supplies used to create this card at the bottom of my post along with the sizes of cardstock used.

I stamped the little bunny from the Stampin’ Up! Springtime Joy cling stamp set in Memento Tuxedo Black ink on a Basic White panel and colored the wreath with Purple Posy and Light Granny Apple Green Stampin’ Blends. I used the Light Petal Pink on her cheeks and Light Smoky Slate on her outline and used the Color Lifter to blend it into the white. Then I fussy cut the little bunny. I made a tag with Basic White card stock and the Fancy Tag Topper and Detailed Trio punches and adhered a Purple Posy panel that was embossed with the Meadow Moments embossing folder to the front. I topped the tag with some Purple Posy ribbon and made a bow with a double strand of linen thread.

I cut a panel of Purple Posy striped Playing With Patterns 6″ x 6″ designer series paper with the largest Stitched with Whimsey die and adhered the panel to the front of a Purple Posy card base. I used a blending brush to color a Square Vellum Doily with Highland Heather ink and adhered it to the card front. I used the second and third smallest Stitched Rectangles dies to cut a frame from a panel of light wood grained In Good Taste designer series paper an adhered it to the card front with glue dots. I cut two stitched branches from Soft Sea Foam DSP from the Subtles 6″ x 6″ DSP pack using the Pierced Blooms dies and adhered one to the card front and one to the tag with glue dots.

I stamped the eggs from the Arrange A Wreath photopolymer stamp set in Highland Heather (after stamping off), Soft Sea Foam and Crumb Cake (after stamping off) inks on Basic White and cut them out with the coordinating dies. I adhered one of the Soft Sea Foam eggs to the tag and popped the bunny on top with dimensionals. I adhered the tag to the card front with dimensionals and trimmed the ribbons. I stamped the sentiment from the Timeless Tulips stamp set in Crumb Cake ink on a Purple Posy strip and trimmed the ends with the Banners Pick a Punch. I popped it on the tag with dimensionals and used double dimensionals on the side that extended off the tag. I tucked three more eggs behind the label and tag with glue dots.

For the inside of the card, I adhered a strip of Purple Posy Playing with Patterns DSP to the bottom of a Basic White panel and adhered the last two eggs with glue dots. I stamped the flower and butterfly from the Stampin’ Up! Springtime Joy stamp set in Memento Tuxedo Black ink and colored them with the Purple Posy, Granny Apple Green Smoky Slate and Petal Pink Stampin’ Blends. I adhered the panel to the inside of the card.

I really like tag cards and the Stampin’ Up Springtime Joy bunny is perfect for tags.

On With The Hop! Click on the Next Blog button to move forward to Karen Finkle’s project or click the Previous Blog button to move back to see the project that Terry Lynn Bright created.

If you get lost along the way, here are the participants for the hop:


March Host Code: 9WJYHP76

Use this host code when you order $50 or more and receive a free gift from me!  The gift is your choice of any item valued up to $10.00 in the 2020-21 Annual Catalog or the Jan-Jun 2021 Mini Catalog.

If your order is over $150, please do not use the host code since you’ll receive your own Host Dollars plus I’ll still send you the free gift!  This host code can be used by anyone, no commitment required.  Let me know if you have any questions.


If you need any stamping supplies, I’d be very happy to be your Demonstrator.  Just click on the Order Stampin’ Up! Online Now button on the right side of the screen to go directly to my online store or contact me if you have any questions.  Happy Stamping!

Thanks for visiting!

Akiko

  • Visit my online store here
  • See the current Stampin’ Up! clearance rack specials here
  • Earn FREE Stampin’ Up! products through my Wildflower Frequent Shopper Program – my way of saying thank you to my frequent shopper online customers.
  • Sign up for my weekly newsletter here
  • Have any questions? I’d be happy to help, click here to contact me.

Cardstock Cuts for this project:

  • Purple Posy – 4-1/4″ x 11″ card base scored at 5-1/2″, 2″ x 2-1/2″ (embossed tag), 1/2″ x 3-1/4″ (label)
  • Basic White – 4″ x 5-1/4″ (inside panel), 1-1/2″ x 2″ (fussy cut bunny), 1″ x 5″ (die cut eggs), 2″ x 4″ (tag)
  • Subtles 6″ x 6″ DSP – 2″ x 3-1/2″ (Soft Sea Foam leaves)
  • In Good Taste DSP – 2″ x 3-1/2″ (die cut stitched frame)
  • Playing With Patterns 6″ x 6″ DSP – 4-1/4″ x 5-1/2″ (front background), 1/2″ x 4″ (inside trim)

Stampin’ Up! products used in this project:


Stampin’ Up! Snailed It Hello Card

Happy Friday! For today’s card I pulled out the fun Stampin’ Up! Snailed It bundle and the pretty Snail Mail designer series paper to make a cheerful Hello card. You can find the supplies used to create this card at the bottom of this post along with the sizes of card stock used.

I adhered a panel of the Snail Mail designer series paper to a Real Red mat and. I used largest stitched circle from the Stitched Shapes dies to cut a Bermuda Bay Circle and the stitched postage stamp from the Snail Dies to cut a Daffodil Delight square, both from the Snail Mail DSP and adhered them to the panel with liquid glue. I cut a Basic White letter using the die from the Snail Dies and stamped the hello sentiment from the Stampin’ Up! Snailed It cling stamp set in Bermuda Bay. I cut an envelope from Real Red and adhered the letter to the inside, folded it up and used glue dots to hold the envelope together – so cute!!

I cut another snail from the Snail Mail DSP – the Snail Dies fit some of the images in the DSP pack – and I also cut a backing from Basic White and adhered it to the back to make the snail a bit sturdier. I used my Basic Black Stampin’ Write marker and my Stamparatus to color just the happy mail portion of the postage stamp from the Stampin’ Up! Snailed It stamp set. I had to color the stamp, huff on it, stamp it and repeat a couple of times to get a good image on the Blushing Bride panel. The Stamparatus really helped to get a clean repeated image. I cut it out with the word bubble die from the Snail Dies.

I wrapped the panel a couple of times with Blushing Bride twine and tied a bow. I adhered the letter with glue dots and popped the word bubble and snail on with dimensionals. I finished with some resin hearts, red for the letter and white for the word bubble. I adhered the panel to the front of a Coastal Cabana card base with dimensionals.

For the inside of the card, I the stamped hearts from the Stampin’ Up! Snailed It stamp set in Blushing Bride and Bermuda Bay in the top corner of a Basic White panel. I adhered a strip of Snail Mail designer series paper to the bottom and adhered the panel to a Real Red mat. I adhered the panel to the inside of the card.

The Stampin’ Up! Snailed It stamp bundle is so cute with the snail and mushroom stamps and dies. And aren’t the dies for the letter and envelope the best!! The Snail Mail designer series paper is so happy and colorful and perfect for making pretty cards for any occasion!


Bring in the beauty of nature with the artistic designs of the Butterfly Brilliance Bundle and coordinating designer series paper, along with textured specialty paper that will put a pop of brilliance on every project. The Butterfly Brilliance Collection is available now!! Click on the image below to download a PDF with all the details.

Note that the Butterfly Brilliance bundle is an early release from the 2021-2022 Annual Catalog that will be available in May! Unfortunately the beautiful Butterfly Bijou and Natural Touch specialty paper are only available while supplies last during the Butterfly Bouquet promotion period March 2, 2021 – May 3, 2021. So get them while supplies last!


The March Paper Pumpkin Kit is Here’s To You!

Three cheers for mountain air, a sky filled with sunshine, and finding joy in life’s journey! Adventure awaits inside this month’s majestic, mountain-themed kit. With enough elements and embellishments to create eight cards and coordinating envelopes, the Here’s to You Paper Pumpkin Kit is the perfect pick for celebrating life’s little moments and mountain-high milestones! Love those Wildflowers!!

What makes March’s kit one-of-a-kind? The spectacular set of four free stencils—and a stamping sponge—that you’ll find inside! Pair this pack of stunning stencils with the kit’s contents to stamp a springtime scene, then store the set to stamp for any season in the future. Clean up your binoculars and dust off your hiking boots—the Here’s to You Paper Pumpkin Kit is ready to lead you on an excursion to explore your creativity!

If you’re interested in subscribing to Paper Pumpkin, you can either sign up for a subscription where you are billed monthly for your kit or you can purchase a prepaid subscription in my online store. To see more information and to sign up for the monthly subscription click here. To see the options for prepaid subscriptions in my online store, click here.

Sign up deadline for the March 2021 kit is March 10, 2021. Supplies may be limited toward the end of the subscription period. 


March Host Code: 9WJYHP76

Use this host code when you order $50 or more and receive a free gift from me!  The gift is your choice of any item valued up to $10.00 in the 2020-21 Annual Catalog or the Jan-Jun 2021 Mini Catalog.

If your order is over $150, please do not use the host code since you’ll receive your own Host Dollars plus I’ll still send you the free gift!  This host code can be used by anyone, no commitment required.  Let me know if you have any questions.


If you need any stamping supplies, I’d be very happy to be your Demonstrator.  Just click on the Shop Now Button on the right side of the screen to go directly to my Online store or contact me if you have any questions.  Happy Stamping!

Thanks for stopping by and have a great day!

Akiko

  • Visit my Online store here
  • See the current Stampin’ Up! clearance rack specials here
  • Earn FREE Stampin’ Up! products through my Wildflower Frequent Shopper Program – my way of saying thank you to my frequent shopper online customers.
  • Sign up for my monthly newsletter here
  • Have any questions? I’d be happy to help, click here to contact me.

Cardstock Cuts for this project:

  • Coastal Cabana – 5-1/2″ x 8-1/2″ card base scored at 4-1/4″
  • Real Red – two 3-7/8″ x 5-1/8″ panels (front and inside mats), 2-1/2″ x 4″ (envelope die cut)
  • Blushing Bride – 2″ x 2″ (word bubble die cut)
  • Basic White – 3-3/4″ x 5″ (inside panel), 1-3/4″ x 3-1/2″ (letter and snail backing die cuts)
  • Snail Mail DSP – 3-3/4″ x 4″ (front background panel), 1/2″ x 3-3/4″ (inside trim), 2-3/4″ x 2-3/4″ (postage stamp die cut), 3-1/4″ x 3-1/4″ (stitched circle die cut), die cut snail

Stampin’ Up! products used in this project:


Stampin’ Up! Garden Wishes for the Happy Inkin’ Thursday Blog Hop

Good Morning and welcome to the Happy Inkin’ Thursday Blog Hop! For today’s card I used the pretty Stampin’ Up! Garden Wishes bundle and while I don’t like dandelions in my yard, I am so ready for spring that if I saw one of these yellow flowers in my yard, I would jump for joy! Plus the artwork in these stamps is exquisite! You can find the supplies used to create this card at the bottom of my post along with the sizes of cardstock used.

We have a Sketch challenge this week and here is the pretty sketch we are using:

I started by adhering a pretty panel of the Dandy Garden 6″ x 6″ designer series paper to the front of a Bumblebee card base. Then I stamped the blooming dandelion image from the Stampin’ Up! Garden Wishes cling stamp set on a Basic White panel with Memento Tuxedo Black ink. I colored the image with Mango Melody, Mossy Meadow, Old Olive and Granny Apple Green Stampin’ Blends.

I cut out the flower with the third largest Stitched Rectangles die and adhered it to a Mossy Meadow mat with liquid glue. I wrapped a length of Mossy Meadow braided trim around it and tied a knot. Then I frayed the ends to make it wider and give it a bit of a messy look.

I stamped the sentiment from the Stampin’ Up! Garden Wishes stamp set in Mossy Meadow ink on a small Bumblebee panel. I cut it out with the smallest long Stitched Rectangle die by using the two step method (I partially cut one end of the label with the die, moved the die and partially cut the other end) and adhered it to the panel with glue dots. I adhered a ladybug trinket to the label with a glue dot and popped the panel on the card front with dimensionals.

For the inside of the card, I stamped the dandelion from the Stampin’ Up! Garden Wishes stamp set in Memento Tuxedo Black ink on the side of a Basic White panel and colored it with Mossy Meadow, Old Olive and Smoky Slate Stampin’ Blends. I stamped the dandelion seeds in Memento Tuxedo Black after stamping off twice and stamped the sentiment in Mossy Meadow. I cut out a little bumblebee from another panel of Dandy Garden DSP with the coordinating die from the Dandy Wishes dies and adhered it to the top corner. I trimmed the bottom with a strip of the Dandy Garden 6″ x 6″ designer series paper and adhered the panel to the inside of the card.

The Stampin’ Up! Garden Wishes stamp set has beautiful dandelion images and sweet sentiments. The Dandy Wishes dies has dies that coordinate with the images and other dies that you can make dandelions from colored card stock – I need to play with these next. So pick a dandelion, make a wish and blow!

On with the Hop! Click the Next button below to visit Karen Ksenzakovic’s blog.

And just in case you get lost along the way, here’s a list of the team members participating in the hop today:


March Host Code: 9WJYHP76

Use this host code when you order $50 or more and receive a free gift from me!  The gift is your choice of any item valued up to $10.00 in the 2019-20 Annual Catalog or in the 2020 January-June Mini Catalog!  That includes some of the Host Exclusive stamp sets!

If your order is over $150, please do not use the host code since you’ll receive your own Host Dollars plus I’ll still send you the free gift!  This host code can be used by anyone, no commitment required.  Let me know if you have any questions.


If you need any stamping supplies, I’d be very happy to be your Demonstrator.  Just click on the Shop Now Button on the right side of the screen to go directly to my online store or contact me if you have any questions.  Happy Stamping!

Thanks for visiting!

Akiko

  • Visit my online store here
  • See the current Stampin’ Up! clearance rack specials here
  • Earn FREE Stampin’ Up! products through my Wildflower Frequent Shopper Program – my way of saying thank you to my frequent shopper online customers.
  • Sign up for my weekly newsletter here
  • Have any questions? I’d be happy to help, click here to contact me.

Cardstock Cuts for this project:

  • Bumblebee – 4-1/4″ x 11″ card base scored at 5-1/2″, 3/4″ x 2-1/2″ (label)
  • Mossy Meadow – 3-1/8″ x 4-1/2 (front mat)
  • Basic White – 3-3/4″ x 5″ (inside panel), 3-3/4″ x 5″ (front panel)
  • Dandy Garden DSP – 3-3/4″ x 3-3/4″ (front back panel)1/2″ x 3-3/4″ (inside trim), small bumblebee

Stampin’ Up! products used in this project:


Stampin’ Up! Butterfly Brilliance Thank You Card

Happy Wednesday! I hope you’re having a good week and that you are enjoying the pretty Stampin’ Up! Butterfly Brilliance bundle that came out yesterday! I am using it today with the Butterfly Bijou designer series paper and several other items from my stash to make a butterfly Thank You card. You can find the supplies used to create this card at the bottom of this post along with the sizes of card stock used.

I cut a panel of the Butterfly Bijou 6″ x 6″ designer series paper with the third largest Stitched Rectangles die. I used the second largest of the long Stitched Rectangles dies to cut another panel of the flip side of this paper to get a contrasting stripe. Then I finally cut it again with the first die to trim the ends so it would fit. I adhered it to the larger die cut DSP and adhered them both to a Magenta Madness mat. I cut a Magenta Madness panel with the middle sized die from the Hippo and Friends dies and embossed it with the Ornate Floral 3D embossing folder.

I stamped the sentiment from the Free as a Bird cling stamp set on a small strip of Basic White in Magenta Madness ink and cut it out with the small label die from the Hydrangea dies. I had a Butterfly Bijou DSP butterfly that was cut out with the Brilliant Wings Dies from the Stampin’ Up! Butterfly Brilliance bundle and I used the coordinating detailed die to cut a butterfly from Basic White. I adhered the detailed die cut to the DSP butterfly with glue dots in the center.

With all the card elements prepared, I began to assemble the card. I adhered the DSP panel to the center of a So Saffron card base with dimensionals. I adhered the embossed Magenta Madness panel with liquid glue letting it overlap the edge of the panel. I adhered the label and finished with the butterfly. I added Magenta Madness enamel dots to the butterfly and label and the card front was done!

For the inside of the card, I stamped the butterfly from the Stampin’ Up! Butterfly Brilliance cling stamp set in Magenta Madness on the center of a Basic White panel after stamping off 3 times. This gave me a really soft pink butterfly that you can easily write over. I trimmed the bottom with a strip of Butterfly Bijou DSP and adhered the panel to the inside of the card.

And YES!! I did it – I cut the big butterfly stamp!! I saw another demonstrator do this and it gave me the courage to do the same. This made it so much easier to just ink up the one butterfly on a regular stamp block and stamp in the center of the panel, especially since I stamped off 3 times!! I’ll eventually cut the other butterflies off too, but I need to take baby steps.

I hope you like today’s card. The Stampin’ Up! Butterfly Brilliance bundle is so versatile in that there are so many different ways you can combine the stamps and dies to create beautiful butterfly cards and have fun being creative!


Bring in the beauty of nature with the artistic designs of the Butterfly Brilliance Bundle and coordinating designer series paper, along with textured specialty paper that will put a pop of brilliance on every project. The Butterfly Brilliance Collection is available now!! Click on the image below to download a PDF with all the details.

Note that the Butterfly Brilliance bundle is an early release from the 2021-2022 Annual Catalog that will be available in May! Unfortunately the beautiful Butterfly Bijou and Natural Touch specialty paper are only available while supplies last during the Butterfly Bouquet promotion period March 2, 2021 – May 3, 2021. So get them while supplies last!


The March Paper Pumpkin Kit is Here’s To You!

Three cheers for mountain air, a sky filled with sunshine, and finding joy in life’s journey! Adventure awaits inside this month’s majestic, mountain-themed kit. With enough elements and embellishments to create eight cards and coordinating envelopes, the Here’s to You Paper Pumpkin Kit is the perfect pick for celebrating life’s little moments and mountain-high milestones! Love those Wildflowers!!

What makes March’s kit one-of-a-kind? The spectacular set of four free stencils—and a stamping sponge—that you’ll find inside! Pair this pack of stunning stencils with the kit’s contents to stamp a springtime scene, then store the set to stamp for any season in the future. Clean up your binoculars and dust off your hiking boots—the Here’s to You Paper Pumpkin Kit is ready to lead you on an excursion to explore your creativity!

If you’re interested in subscribing to Paper Pumpkin, you can either sign up for a subscription where you are billed monthly for your kit or you can purchase a prepaid subscription in my online store. To see more information and to sign up for the monthly subscription click here. To see the options for prepaid subscriptions in my online store, click here.

Sign up deadline for the March 2021 kit is March 10, 2021. Supplies may be limited toward the end of the subscription period. 


March Host Code: 9WJYHP76

Use this host code when you order $50 or more and receive a free gift from me!  The gift is your choice of any item valued up to $10.00 in the 2020-21 Annual Catalog or the Jan-Jun 2021 Mini Catalog.

If your order is over $150, please do not use the host code since you’ll receive your own Host Dollars plus I’ll still send you the free gift!  This host code can be used by anyone, no commitment required.  Let me know if you have any questions.


If you need any stamping supplies, I’d be very happy to be your Demonstrator.  Just click on the Shop Now Button on the right side of the screen to go directly to my Online store or contact me if you have any questions.  Happy Stamping!

Thanks for stopping by and have a great day!

Akiko

  • Visit my Online store here
  • See the current Stampin’ Up! clearance rack specials here
  • Earn FREE Stampin’ Up! products through my Wildflower Frequent Shopper Program – my way of saying thank you to my frequent shopper online customers.
  • Sign up for my monthly newsletter here
  • Have any questions? I’d be happy to help, click here to contact me.

Cardstock Cuts for this project:

  • So Saffron – 4-1/4″ x 11″ card base scored at 5-1/2″
  • Magenta Madness – 3-1/8″ x 4-1/2″ (front mat), 3-1/8″ x 3-1/8″ (embossed die cut)
  • Basic White – 3-3/4″ x 5″ (inside panel), 2″ x 2-1/2″ (butterfly die cut), 1″ x 2-1/4″ (label)
  • Butterfly Bijou 6″ x 6″ DSP – 3-1/4″ x 4-3/4″ (front panel), 1-1/2″ x 4″ (die cut stripe), 1/2″ x 3-3/4″ (inside trim), die cut butterfly

Stampin’ Up! products used in this project: