Stampin’ Up! Coffee With Friends Thinking Of You Card

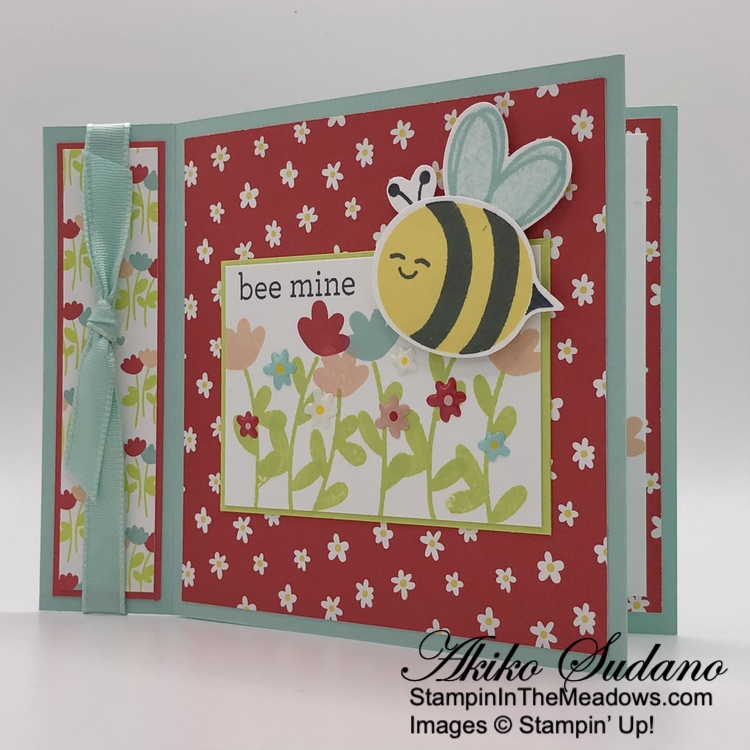
Good Morning! The Stampin’ Up! Coffee With Friends stamp set is a fun set expressing friendship and I used it with the pretty A Little Latte designer series paper to make a simple fun fold thinking of you card. You can find the products I used at the bottom of my post along with the card stock sizes.

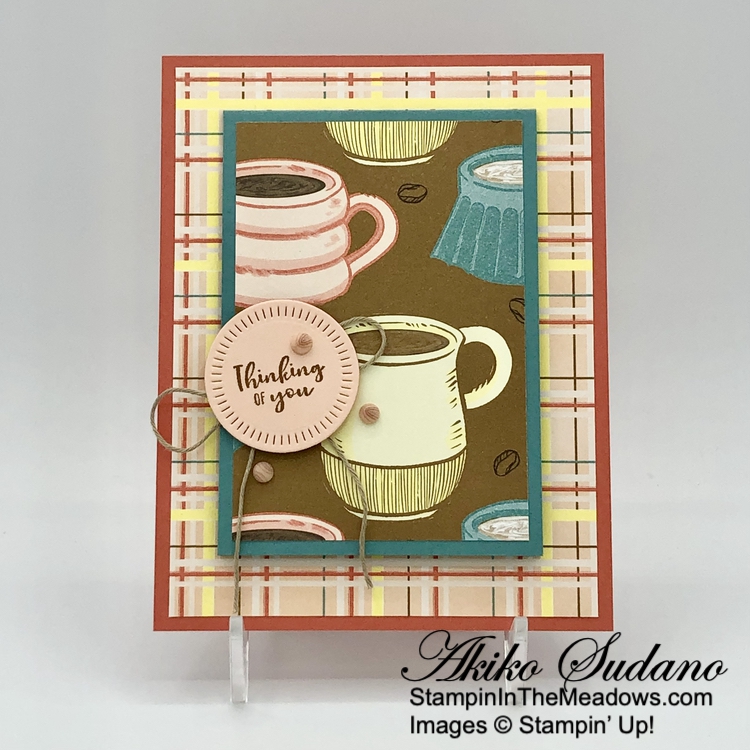
I adhered plaid panel of A Little Latte designer series paper to a Calypso Coral card base with liquid glue. I adhered another panel with pretty coffee cups to the front of a Lost Lagoon mini card and adhered it to the main card base with liquid glue.

I stamped the sentiment from the Stampin’ Up! Coffee With Friends stamp set in Pecan Pie Ink on a Petal Pink panel. I cut it out with the circle die from the Radiating Stitches dies. Sadly, I learned that these dies have retired since I made the card, so I would recommend using the awesome Spotlight on Nature dies or the Everyday Details dies instead.

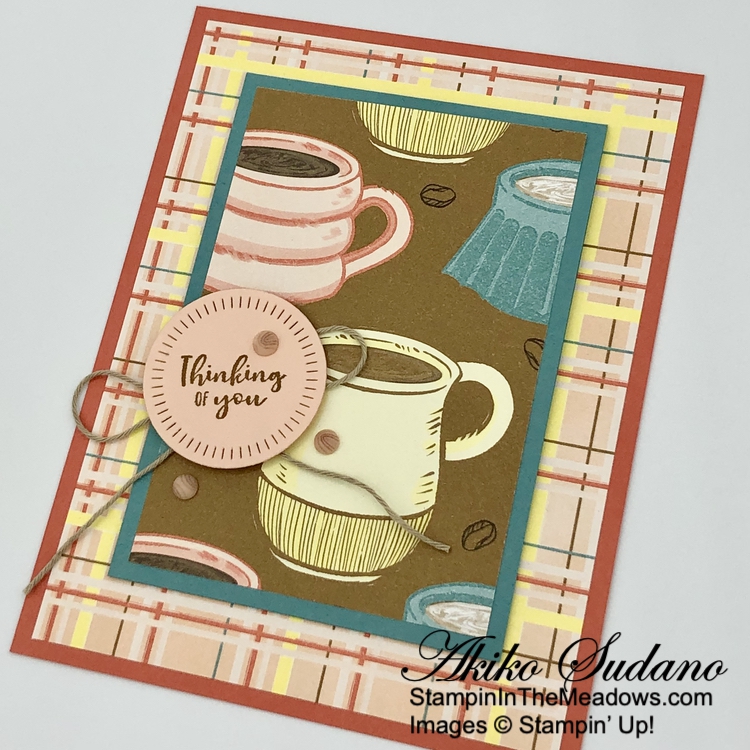
I made a bow with Crumb Cake baker’s twine and adhered it to the back of the label and adhered the label to the card with dimensionals. I finished the card with Petal Pink swirl dots.

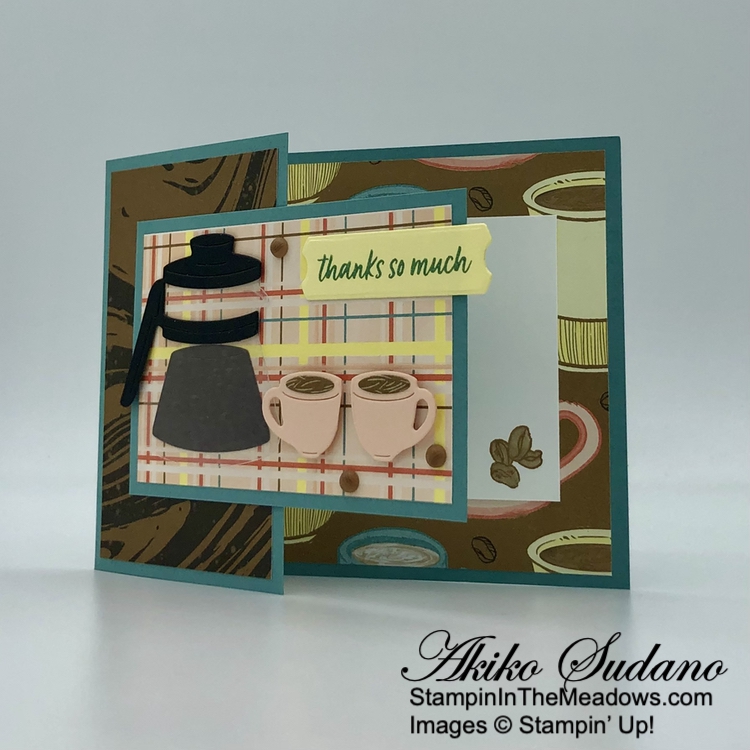
For the inside of the card I stamped the ladies on the bench from the Stampin’ Up! Coffee with Friends stamp set in Pecan Pie ink on a Basic White panel. I stamped the sentiment in Lost Lagoon ink and adhered the panel to the inside of the Mini Card with Stampin’ Seal.

The A Little Latte designer series paper is so pretty and I thought it would coordinate with the Stampin’ Up! Coffee With Friends stamp set. There are so many little coffee shops near me that are great to catch up with friends and relax. I hope you have some places near you too!


The June Paper Pumpkin Kit – Life Is Sweet!

Celebrate the sweet things in life with textured, artistic cards.

  • Makes 9 cards: 3 each of 3 designs with 9 coordinating envelopes
  • Iridescent glimmer sentiments and precut paper pieces
  • Vellum accents, iridescent pearls, and linen thread
  • Shy Shamrock Classic Stampin’ Spot

Coordinating Colors: Poppy Parade, Peach Pie, Lemon Lolly, Shy Shamrock, Pool Party, Pretty In Pink

And the coordinating add-on is the Thanks and Beyond dies. These dies coordinate with the Best There Is kit and will also coordinate with the June kit.

If you’re interested in subscribing to Paper Pumpkin, you can either sign up for a subscription where you are billed monthly for your kit or you can purchase a prepaid subscription in my Online Store. To see more information and to sign up for the monthly subscription click here. To see the options for prepaid subscriptions in my Online Store, click here.

Sign up deadline for the June 2024 kit is June 10, 2024. Note: Supplies may be limited toward the end of the subscription period.


Stampin’ Up! Bundle Sale Starting June 5, 2024!

Everyone loves a good deal, which is why Stampin’ Up! is offering an additional 10% off all stamp and die bundles! Between June 5, 2024 and June 30, 2024, take advantage of the sale and add some new bundles to your collection. Plus, save 10% on the Stampin’ Cut & Emboss Machine and the Mini Stampin’ Cut & Emboss Machine. These machines make the perfect crafting partner for stamp and die bundles.

Promotion Details:

  • Sales Period: June 5, 2024 – June 30, 2024
  • Get an additional 10% discount on stamp and die bundles only (that’s a total of 20% discount on stamp and die bundles!).
  • This excludes suite collections, stamp and punch bundles and any other bundles*.
  • Save 10% on Stampin’ Cut & Emboss Machine and Mini Stampin’ Cut & Emboss Machine (white and Boho Blue). 
  • The 10% discount applies automatically to stamp and die bundles in all orders including Starter Kit orders.

*Please note Close to My Heart products are not included in this promotion.


Current Host Code: SSMUTY4A

Use this host code when you order $50 or more and receive a Thank You gift from me!  The free gift is your choice of any item currently available valued up to $10.00.

If your order is over $150, please do not use the host code since you’ll receive your own Host Dollars plus I’ll still send you the Thank You gift!  This host code can be used by anyone, no club or commitment required. Let me know if you have any questions.


If you need any stamping supplies, I’d be very happy to be your Demonstrator.  Just click on the Shop Now Button on the right side of the screen to go directly to my Online store or contact me if you have any questions.  Happy Stamping!

Thanks for stopping by and have a great day!

Akiko

  • Visit my online store here
  • See the current Stampin’ Up! clearance rack specials here
  • Earn FREE Stampin’ Up! products through my Wildflower Frequent Shopper Program – my way of saying thank you to my online frequent shopper customers.
  • Have any questions? I’d be happy to help, click here to contact me.

Cardstock Cuts for this project:

  • Calypso Coral – 4-1/4″ x 5-1/2″ card base
  • Lost Lagoon – 3″ x 8-1/2″ mini card Base, scored at 4-1/4
  • Petal Pink – 1-3/4″ x 1-3/4″ (label)
  • Basic White – 2-3/4″ x 4″ (inside panel)
  • A Little Latte DSP – 4″ x 5-1/4″ (large front background), 2-3/4″ x 4″ (mini card background)

Stampin’ Up! products used in this project:


Stampin’ Up! Latte Love Thank You Card

Good Morning! The Stampin’ Up! Latte Love bundle is such a fun set for coffee lovers with great dies to make coffee pots and wonderful coffee sentiments. I paired it with the pretty A Little Latte designer series paper to make a simple fun fold thank you card. You can find the products I used at the bottom of my post along with the card stock sizes.

For my card base, I started out with a standard 4-1/4″ x 11 inch Lost Lagoon top fold card base and cut the front flap in half, resulting in a 4-1/4″ x 8-1/4″ card base and a 2-3/4″ x 4-1/4″ panel. I adhered panels of A Little Latte DSP to the large back panel and both sides of the front flap. I adhered another panel to the little Lost Lagoon card stock.

I love this coffee pot – it takes me back to all the mornings of making coffee in my Mr. Coffee coffee makers! I used the dies from the Stampin’ Up! Latte Love dies to cut the pot from a Window Sheet, the lid and handle from Basic Black and the coffee from Early Espresso. I adhered the handle and lid to the die cut carafe with glue dots and adhered the coffee to the small panel with liquid glue. I placed more glue dots on the window sheet, lid and handle and adhered the carafe to the panel, positioning it over the die cut coffee – this way the adhesives don’t show.

I stamped the coffee stamp from the Stampin’ Up! Latte Love stamp set twice using Pecan Pie ink on Crumb Cake. I used the little coffee disk die cuts to cut out coffee. I cut two small cups from Petal Pink and adhered the coffee disks to the top. I popped the coffee cups onto the panel with dimensionals. I stamped the sentiment from the Stampin’ Up! Latte Love stamp set using Lost Lagoon ink on a Lemon Lolly panel and cut it out with the label die from the Unbounded Love dies. I adhered the label to the panel with glue dots and adhered the panel to the front flap of the card base with liquid glue. I finished the front with three Pecan Pie dots.

For the inside of the card, I stamped the coffee beans from the Stampin’ Up! Latte Love stamp set in the corners of a Basic White panel using Pecan Pie ink. I colored the beans with the dark Crumb Cake Stampin’ Blend and adhered it to the back panel with Stampin’ Seal.

It’s too bad that pictures don’t capture the Window sheet very well, because the die cut coffee pot is so cute!! The Stampin’ Up! Latte Love bundle is the perfect way to start the day!


Free Shipping on Orders of $75 or More on May 21, 2024!

Surprise! It’s time for FREE SHIPPING! On 21 May 2024, you can shop and save on all qualifying orders of $75 or more. What a great way to stock up on all your favorite products from the catalog, Online Exclusives, kits, and more! This incredible deal only lasts for 24 hours, so don’t miss out!

Promotion Details:

  • Dates: May 21, 2024
  • Free shipping is for 24 hours only. Orders must be opened and closed on 21 May 2024.
  • Free shipping automatically applies to your cart after the qualifying amount has been met, which is $75 USD (before tax).
  • Coupon codes and product credits are non-commissionable and will lower your order’s retail amount. Orders must meet the qualifying amount to be eligible for free shipping.
  • The additional cost for expedited shipping is not covered by this promotion.
  • Prepaid 3-, 6-, or 12-month Paper Pumpkin subscriptions can contribute to the qualifying amount for free shipping (Month-to-month subscriptions do not qualify). Subscriptions billed and shipped this month will be charged for the normal amount ($24.50 USD) + tax.

Current Host Code: SSMUTY4A

Use this host code when you order $50 or more and receive a Thank You gift from me!  The free gift is your choice of any item currently available valued up to $10.00.

If your order is over $150, please do not use the host code since you’ll receive your own Host Dollars plus I’ll still send you the Thank You gift!  This host code can be used by anyone, no club or commitment required. Let me know if you have any questions.


If you need any stamping supplies, I’d be very happy to be your Demonstrator.  Just click on the Shop Now Button on the right side of the screen to go directly to my Online store or contact me if you have any questions.  Happy Stamping!

Thanks for stopping by and have a great day!

Akiko

  • Visit my online store here
  • See the current Stampin’ Up! clearance rack specials here
  • Earn FREE Stampin’ Up! products through my Wildflower Frequent Shopper Program – my way of saying thank you to my online frequent shopper customers.
  • Have any questions? I’d be happy to help, click here to contact me.

Cardstock Cuts for this project:

  • Lost Lagoon – 4-1/4″ x 8-1/4″ card base, scored at 5-1/2″, 2-3/4″ x 4-1/4″ (front panel)
  • Window Sheet – 2-1/2″ x 2-1/2″ (coffee pot)
  • Basic Black – 1-1/4″ x 3″ (coffee pot handle & lid)
  • Early Espresso – 1-1/4″ x 2″ (die cut coffee in pot)
  • Petal Pink – 1″ x 2-1/2″ (die cut coffee cups)
  • Crumb Cake – 3/4″ x 2-1/2″ (coffee in cups)
  • Lemon Lolly – 1″ x 2-1/2″ (label)
  • Basic White – 2-3/4″ x 4-1/4″ (inside panel)
  • A Little Latte DSP – 4″ x 5-1/4″ (inside background), three 2-1/2″ x 4″ panels (front flaps and inside panel)

Stampin’ Up! products used in this project:


Stampin’ Up! Cheerful Daisies Mother’s Day Card

Happy St. Patrick’s Day! Last weekend we had our quarterly Inkin’ Krew Team meeting and Carol Buckalew demonstrated a beautiful Center Pop Out card made with the pretty Simply Zinnia bundle (you can see her pretty card here). I CASE’d her card and used the Stampin’ Up! Cheerful Daisies bundle with the Fresh As A Daisy designer series paper to make a Mother’s Day card. You can find the products I used at the bottom of my post along with the card stock sizes.

I carefully scored a Thick Basic White card base and burnished the score lines and adhered the panels of Fresh As A Daisy designer series paper to Garden Green mats with liquid glue. I adhered each layered DSP panel to the front center and side panels of my card base.

I adhered panels of Delightfully Eclectic DSP to the middle panels to add some interest because the white was too stark. Then I cut out all the flower dies from the Stampin’ Up! Cheerful Daisies dies from Basic White. I made each flower three layers, so I cut one of each of the dies and I cut one large center and two small ones. I used the light Lemon Lolly and Dark Daffodil Delight Stampin’ Blends to color the centers so that they looked like the DSP flowers. Then I used the Early Espresso Stampin’ Write Marker make highlights on the top, detailed die cuts for each flower. I cut off the leaves from the center section with my paper snips and adhered the detailed die cuts to the top and the larger die cuts to the back of each flower. I trimmed one of the small flower centers with my paper snips and popped them on the flowers with dimensionals.

I used the medium rectangle label die from the Something Fancy dies to cut a Garden Green panel for the label mat. I stamped the sentiment from the Flower Cart stamp set in Early Espresso ink on Daffodil Delight and cut it out with the smallest rectangle label die from the Something Fancy dies. I adhered the labels together and adhered it to the center section of the card base.

I cut three twig clusters using the Stampin’ Up! Cheerful Daisies dies and adhered them to the top of the center section of the card with tiny dots of liquid glue. I adhered the flowers with dimensionals. I used the leaf cluster section of the large die to cut out four sets of leaves from Garden Green. I adhered the leaves to the card, tucking them under the flowers. I finished with a Parakeet Party metallic bow and three Daffodil Delight glossy dots.

For the inside of the card, I used the back of the center section. I stamped the sentiment from the Flower Cart stamp set in Early Espresso ink on a Basic White panel. I stamped the flower cluster from the Stampin’ Up! Cheerful Daisies stamp set in Daffodil Delight ink. I accented the centers with my Early Espresso Stampin’ Write marker and cut out a mask using the coordinating die. I covered the flowers with the mask and stamped two leaves using Garden Green ink. I adhered the panel to a Garden Green mat and then adhered it to the center space in the back. I finished by adhering panels of Delightfully Eclectic DSP to the remaining back panels.

I loved making this fun fold card and it was really pretty simple. I was happy to pull out the beautiful Stampin’ Up! Cheerful Daisy bundle and Fresh As A Daisy DSP to make it. Daisies are simple flowers, so they’re perfect to give on Mother’s Day. And there’s so much green on this card that it’s perfect for St. Patrick’s Day! Enjoy!!


Your Day To Shine and Frog & Friends Added to Kits Collection!

The Kits Collection by Stampin’ Up! provides different options and a range of project types that allow you to choose the crafting experiences that best fits your style and needs. There’s a variety of kits to choose from and these all-inclusive project kits have everything you need in one box! You can Find these kits in the Online Store.

The new kits for March are the Your Day To Shine Kit and the Frog & Friends Kit. Click on the images below to see the details in the Online Store.

Your Day To Shine Kit
Frog & Friends Kit

Current Host Code: XR9HAEK4

Use this host code when you order $50 or more and receive a Thank You gift from me!  The free gift is your choice of any item currently available valued up to $10.00.

If your order is over $150, please do not use the host code since you’ll receive your own Host Dollars plus I’ll still send you the Thank You gift!  This host code can be used by anyone, no club or commitment required. Let me know if you have any questions.


If you need any stamping supplies, I’d be very happy to be your Demonstrator.  Just click on the Shop Now Button on the right side of the screen to go directly to my Online store or contact me if you have any questions.  Happy Stamping!

Thanks for stopping by and have a great day!

Akiko

  • Visit my online store here
  • See the current Stampin’ Up! clearance rack specials here
  • Earn FREE Stampin’ Up! products through my Wildflower Frequent Shopper Program – my way of saying thank you to my online frequent shopper customers.
  • Have any questions? I’d be happy to help, click here to contact me.

Cardstock Cuts for this project:

  • Thick Basic White – 4-1/4″ x 11″ card base scored at 2-1/4″, 3-5/8″, 7-3/8″ and 8-3/4″
  • Garden Green – two 3-5/8″ x 4-1/8″ panels (front and back center panel mats), two 2-1/8″ x 4-1/8″ panels (side DSP mats), 2″ x 3″ (label mat), 1-1/2″ x 6″ (die cut leaves)
  • Daffodil Delight – 1-3/4″ x 3″ (label)
  • Early Espresso – 2-1/2″ x 4-1/2″ (die cut twigs)
  • Basic White – 3-1/2″ x 4″ (back center panel), 4″ x 8″ panel (floral die cuts)
  • Fresh As A Daisy DSP – 3-1/2″ x 4″ (center panel background), two 2″ x 4″ (side panels)
  • Delightfully Eclectic DSP – four 1-1/4″ x 4-1/8″ panels (front and back middle panels), two 2-1/8″ x 4-1/8″ panels (back side panels)

Stampin’ Up! products used in this project:


Stampin’ Up! Wanted to Say Card

Good Morning! Here’s a cheerful Get Well card using the wonderful word dies from the Stampin’ Up! Wanted To Say dies and the pretty Sunny Days Sale-A-Bration designer series paper. You can find the products I used at the bottom of my post along with the card stock sizes.

I adhered a panel of the pretty Sunny Days Sale-A-Bration designer series paper to the front of a Pool Party Card base and another strip to the back panel of this simple fun fold.

I used adhesive sheets on the back of a Poppy Parade panel and cut the detailed word die from the Stampin’ Up! Wanted To Say dies. With the adhesive sheet, I went back and forth in my Stampin’ Cut & Emboss machine a couple of times to make sure it cut all the way through since the die has fine details. I cut the background die from Basic White and peeled the adhesive backing off and adhered the die cut words together. I popped the words on the card front with a little part hanging over the front flap.

I make a knot in a length of black and white gingham ribbon and adhered it with a glue dot. I finished the card front with black matte dots.

For the inside of the card, I cut the flower and stem from the Stampin’ Up! Wanted to Say dies and adhered them to a Basic White panel with liquid glue. I adhered the panel to the inside of the card with Stampin’ Seal leaving a little Pool Party border with the DSP.

Unfortunately, no stamping on this card, but I love word dies and the Stampin’ Up! Wanted to Say die set is one of the best. And the pretty Sale-A-Bration Sunny Days DSP is sure to bring cheer to someone under the weather.


Sale-A-Bration Is Going On Now!

Sale-A-Bration is Stampin’ Up!’s best promotion of the year with specials for Shopping, Hosting and Joining!

Shopping

Choose a FREE Sale-A-Bration item from the Sale-A-Bration Brochure with every $50 or $100 you spend (before tax and shipping). The Sale-A-Bration brochure has eleven items available for free with orders of $50 or greater and three items you can pick from with orders of $100 or greater! The free Sale-A-Bration items are stackable, so if you place an order of $150, you can choose to add three $50 items or one $100 item and one $50 item to your order! The Sale-A-Bration items are only available while supplies last, so order early if there are items that you are really wanting! 

Hosting

Host a party of $300 or more and get an additional $30 in Stampin’ Rewards! Normally a $300 party will result in $36 in Stampin’ Rewards for the host, but during Sale-A-Bration a $300 party will result in $66 in Stampin’ Rewards! Stampin’ Rewards are redeemed to get free items from any current catalog. And if you have a large enough shopping list, you will get the Sale-A-Bration Host rewards in a single order (and that’s in addition to the Sale-A-Bration shopping items)! 

If you’d like to set up a host code to see if you can collect $300 in orders, I’d be happy to help you with that!  Reach out to me at apsudano@stampininthemeadows.com.

Joining

Sale-A-Bration is one of the best times to join Stampin’ Up! as a new demonstrator and there are two fantastic options for purchasing your Starter Kit during Sale-A-Bration

Option 1: 

Customers who join our fun crafting community as a new demonstrator can get $125 worth of product PLUS our Stampin’ Glass Mat Studio* (a $60 USD) for just $99! The Glass Mat Studio includes a 17″ x 14″ safety-tempered glass mat, a gray 8-1/4″ x 8-1/4″ lint-free, reusable cleaning cloth and a 8-3/4″ x 6″ white 4-palette silicone mat.

Option 2:

Customers who want to join Stampin’ Up! during Sale-A-Bration but are interested in a different join option can instead get $125 worth of product PLUS an additional $30 worth of product of their choice when they join for $99. That’s $155 in products for $99! 

Once you join, you’ll get at least a 20% discount on all of your Stampin’ Up! merchandise purchases AND you get to order early from upcoming catalogs!  There is NO COMMITMENT and NO REQUIREMENT TO SELL to anyone.  You can join and just get the discount for yourself!  Contact me at apsudano@stampininthhemeadows.com if you’d like more information about joining or purchasing the Starter Kit! 

Click on the image below to open a PDF of the Sale-A-Bration Brochure to see all the Sale-A-Bration items and get additional details:

SURPRISE! Stampin’ Up! Is giving us even more to Sale-A-Brate! They just released even more products you can earn for FREE! Take a look at the products just added to this promotion by clicking on the image below to download a PDF. Get Shopping! Sale-A-Bration ends 29 February!


Current Host Code: M3WQ2HCB

Use this host code when you order $50 or more and receive a Thank You gift from me!  The free gift is your choice of any item currently available valued up to $10.00.

If your order is over $150, please do not use the host code since you’ll receive your own Host Dollars plus I’ll still send you the Thank You gift!  This host code can be used by anyone, no club or commitment required. Let me know if you have any questions.


If you need any stamping supplies, I’d be very happy to be your Demonstrator.  Just click on the Shop Now Button on the right side of the screen to go directly to my Online store or contact me if you have any questions.  Happy Stamping!

Thanks for stopping by and have a great day!

Akiko

  • Visit my online store here
  • See the current Stampin’ Up! clearance rack specials here
  • Earn FREE Stampin’ Up! products through my Wildflower Frequent Shopper Program – my way of saying thank you to my online frequent shopper customers.
  • Have any questions? I’d be happy to help, click here to contact me.

Cardstock Cuts for this project:

  • Pool Party – 5-1/2″ x 7-1/2″ card base, scored at 4-1/4″
  • Poppy Parade – 1-3/4″ x 3-1/4″ (die cut detailed word), 1″ x 1″ (die cut flower)
  • Basic Black – 1-1/4″ x 2″ (die cut stem)
  • Basic White – 2-7/8 x 5-1/4″ (inside panel), 2″ x 3-1/2″ (die cut word mat)
  • Sunny Days DSP – 3″ x 5-1/4″ (front background), 1″ x 5-1/4″ (inside side panel)

Stampin’ Up! products used in this project:


Stampin’ Up! Trusty Tools for the Inkin’ Krew Blog Hop

Good Morning! Welcome to the February Inkin’ Krew Team Blog Hop! The theme for this month’s hop is “Birthday” and I used the Stampin’ Up! Trusty Tools bundle with the Trusty Toolbox Sale-A-Bration designer series paper to make a fun fold masculine birthday card. You can find the supplies I used along with card stock cuts at the bottom of my post.

I cut and scored the Gray Granite and Lost Lagoon card bases for my Joy Fold card and adhered panels of Trusty Toolbox designer series paper to the back section and front and back of the front flap of the Gray Granite card base and to the front and back of the front flap of the Lost Lagoon mini card. I used different patterns for each panel and adhered them with liquid glue. I adhered the Lost Lagoon mini card to the inside of the main Gray Granite card base with liquid glue, placing the hinge on the right side.

I used the drill dies from the Stampin’ Up! Trusty Tools dies to cut Crushed Curry, Gray Granite, Copper Clay, Lost Lagoon and Basic Black card stock. For the Basic Black and Lost Lagoon sections, I used the large drill die to partially cut the pieces and finished cutting with paper snips. I adhered the die cuts together with liquid glue and adhered the drill to the front flap of the large card base. 

I used the Stampin’ Up! Trusty Tools dies to cut the pencil, tape measure and paintbrush from Trusty Toolbox DSP and fussy cut the screwdriver and pliers. I used dies to cut nuts and bolts from Gray Granite card stock and adhered the all the tools to the inside flaps with liquid glue.

I stamped the Happy Birthday sentiment from the Carousel Horses stamp set in Memento Tuxedo Black in on a strip of Trusty Toolbox DSP and cut it out with the Gorgeously Made label die. I cut the toolbox from Copper Clay card stock using the Stampin’ Up! Trusty Tools dies. I adhered the handle to the mini card front with liquid glue and adhered the label on top. I adhered more die cut and fussy cut Trusty Toolbox DSP tools to the card and popped the toolbox on top with dimensionals. I adhered a die cut DSP hammer on top with glue dots and dimensionals.

For the inside of the card, I stamped the sentiment from the Stampin’ Up! Trusty Tools stamp set in Lost Lagoon ink on Basic White. I stamped the nuts and bolts in Gray Granite and adhered the panel to the inside of the card with Stampin’ Seal.

The Stampin’ Up! Trusty Tools bundle is a great tool themed bundle that is perfect for making cards for your handy man or handy lady who is great at fixing things.

On With The Hop! Click on the Next Blog button to move forward to Amy Koender’s project or click the Previous Blog button to move back to see the project that Nel Thames created.

If you get lost along the way, here are the participants for the hop:

UPDATE: I decided to enter this card in the Creative Creases Challenge #75 – Anything Goes with a Fun Fold. Check out the other fun folds:


Current Host Code: M3WQ2HCB

Use this host code when you order $50 or more and receive a Thank You gift from me!  The free gift is your choice of any currently available item valued up to $10.00.

If your order is over $150, please do not use the host code since you’ll receive your own Host Dollars plus I’ll still send you the Thank You gift!  This host code can be used by anyone, no club or commitment required. Let me know if you have any questions.


If you need any stamping supplies, I’d be very happy to be your Demonstrator.  Just click on the Shop Now button on the right side of the screen to go directly to my online store or contact me if you have any questions.  Happy Stamping!

Thanks for stopping by and have a great week!

Akiko

  • Visit my online store here
  • See the current Stampin’ Up! clearance rack specials here
  • Earn FREE Stampin’ Up! products through my Wildflower Frequent Shopper Program – my way of saying thank you to my online frequent shopper customers.
  • Have any questions? I’d be happy to help, click here to contact me.

Cardstock Cuts for this project:

  • Gray Granite – 4-1/4″ x 8-1/2″ card base scored at 5-1/2″, 1″ x 3-1/2″ (die cut tools)
  • Lost Lagoon – 3″ x 8″ mini card base scored at 4″, 1″ x 2″ (die cut tools)
  • Copper Clay – 3″ x 4″ (die cut tool box)
  • Crushed Curry – 2″ x 2-3/4″ (die cut tools)
  • Basic Black – 1″ x 1-1/2″ (die cut tools)
  • Basic White – 2-3/4″ x 3-3/4″ (inside panel)
  • Trusty Toolbox DSP – 3-3/4″ x 5″ (inside background), two 2-3/4″ x 4″ panels (large card front flap), two 2-3/4″ x 3-3/4″ panels (mini card front flap), 1″ x 3″ (label), die cut and fussy cut tools

Stampin’ Up! products used in this project:

Stampin’ Up! Painted Lavender for the Happy Inkin’ Thursday Blog Hop

Good Morning and welcome to the Happy Inkin’ Thursday Blog Hop! The beautiful Stampin’ Up! Painted Lavender bundle and Perennial Lavender designer series paper are some of the prettiest new products in the new Mini Catalog, especially if you are a purple lover! I used these products to make a fun fold card for today – a simple Z-fold with die cut extender panel. You can find the supplies I used along with card stock cuts at the bottom of my post.

We have a color challenge this week, and I used most of the colors, but not all!

I adhered panels of Perennial Lavender designer series paper to Gorgeous Grape mats and adhered them to panels of the card base. I used the same pattern for the front and inside and a contrasting pattern for the middle section. I used the second largest rectangle to cut a Gorgeous Grape panel. It only cut three sides, so I aligned the die with the scallops to cut the fourth side and ran it through the Stampin’ Cut & Emboss machine a second time and it made a nice square! I adhered a checked panel of Perennial Lavender DSP to the front and adhered it to front of the card by applying liquid glue to the left side.

I cut the double lavender sprig from the Stampin’ Up! Painted Lavender dies from Gorgeous Grape card stock and adhered it to the card front with glue dots. I cut three lavender leaf sprig dies from Lost Lagoon and adhered them to the card with glue dots. I stamped the lavender sprig bunch from the Stampin’ Up! Painted Lavender stamp set in Highland Heather ink on Basic White. I used the little flower stamp to stamp Gorgeous Grape ink over the Highland Heather sprigs and then cut it out with the lavender sprig bunch die.

I stamped the stems from the Stampin’ Up! Painted Lavender stamp set in Shaded Spruce ink on Basic White and cut them out with the coordinating die. I adhered the stems to the sprigs and popped them on the card front with dimensionals. I made a knot in a short length of burlap ribbon and adhered it with glue dots. I finished the card front with there purple shimmer gems.

For the inside of the card, I stamped the little butterfly from the Stampin’ Up! Painted Lavender stamp set in Highland Heather ink on Basic White. I adhered the panel to the inside of the card with Stampin’ Seal, lining it up so that it would be covered by the die cut when the card is closed.

I love the Stampin’ Up! Painted Lavender bundle more and more as I play with it. The flowers are pretty when stamped in a single color, but there are so many ways to get multiple colors and it’s so fun to experiment.

On with the Hop! Click on the Next Blog button to move forward to see the beautiful project Karen Ksenzakovic has created.

If you get lost along the way, here are the participants for the hop:


Current Host Code: M3WQ2HCB

Use this host code when you order $50 or more and receive a free gift from me!  The free gift is your choice of any item currently available valued up to $10.00!

If your order is over $150, please do not use the host code since you’ll receive your own Host Dollars plus I’ll still send you the free gift!  This host code can be used by anyone, no club or commitment required. Let me know if you have any questions.


If you need any stamping supplies, I’d be very happy to be your Demonstrator.  Just click on the Shop Now button on the right side of the screen to go directly to my online store or contact me if you have any questions. 

Thanks for stopping by and Happy Stamping!

Akiko

  • Visit my online store here
  • See the current Stampin’ Up! clearance rack specials here
  • Earn FREE Stampin’ Up! products through my Wildflower Frequent Shopper Program – my way of saying thank you to my online frequent shopper customers.
  • Have any questions? I’d be happy to help, click here to contact me.

Cardstock Cuts for this project:

  • Highland Heather – 4-1/4″ x 11″ card base, scored at 2-3/4″ and 5-1/2″
  • Gorgeous Grape 4″ x 5-1/4″ (inside DSP mat), two 2-1/2″ x 4″ panels (front and side panel DSP mats), 3-1/2″ x 3-1/2″ (postage stamp die cut), 1″ x 4-1/4″ (lavender die cuts)
  • Lost Lagoon – 3-3/4″ x 4″ (lavender leaves die cuts)
  • Basic White – 3″ x 3″ (inside panel), 2-1/2″ x 3-1/2″ (die cut lavender and stems)
  • Perennial Lavender DSP – 3″ x3″ (front background), two 2-3/8″ x 3-7/8″ panels (front and side panel DSP), 3-7/8″ x 5-1/8″ (inside DSP background)

Stampin’ Up! products used in this project:


Stampin’ Up! Bee My Valentine for the Happy Inkin’ Thursday Blog Hop

Good Morning and welcome to the Happy Inkin’ Thursday Blog Hop! The Stampin’ Up! Bee My Valentine bundle is my favorite Valentine set in the new January – April Mini Catalog. The whimsical bee, flower and heart stamps and wonderful sentiments are so much fun to play with and make Valentine projects. I made a book fold Valentine’s day card and used the stamps with the pretty Bee Mine designer series paper. You can find the supplies I used along with card stock cuts at the bottom of my post.

We have a pretty color challenge this week:

I adhered the left hinge of my Pool Party card base closed with liquid glue. I adhered a strip of Bee Mine designer series paper to a Sweet Sorbet mat and adhered it to the hinge. I adhered another panel of Bee Mine DSP to the main section with liquid glue.

I stamped the sentiment from the Stampin’ Up! Bee My Valentine stamp set in Memento Tuxedo Black ink on a Basic White panel. I stamped several stems across the bottom in Lemon Lime Twist ink and stamped flowers on top in Pool Party, Sweet Sorbet and Petal Pink. I adhered the panel to a Lemon Lime Twist mat and adhered the panel to the card front. 

I stamped the bee from the Stampin’ Up! Bee My Valentine stamp set in Daffodil Delight and Memento Tuxedo Black ink on Basic White and punched it out with the Bee Builder Punch. I stamped the wings in Pool Party and used Stamped off Pool Party to stamp the large heart over the wings to give them light color. I punched it out and adhered it to the back of the bee. I stamped the antenna and punched it out and adhered it to the back of the bee and adhered the bee to the card with dimensionals. I tied Pool Party ribbon around the hinge and made a knot and added flowers embellishments to the stamped floral panel

For the inside of the card, I stamped the sentiment from the Stampin’ Up! Bee My Valentine stamp set in Sweet Sorbet ink on Basic White. I stamped the hearts in Petal Pink, the stems in Lemon Lime Twist and the flowers in Petal Pink and Pool Party. I stamped a bee trail in stamped off Pool Party and adhered the panel to a Bee Mine DSP mat. I adhered the layered panel to the inside of the card.

The Stampin’ Up! Bee My Valentine bundle is so cute and very versatile. And when paired with the Bee Mine designer series paper, it always results in cheerful and cute Valentine projects!

On with the Hop! Click on the Next Blog button to move forward to see the beautiful project Karen Ksenzakovic has created.

If you get lost along the way, here are the participants for the hop:


Current Host Code: 4X6DDWUC

Use this host code when you order $50 or more and receive a free gift from me!  The free gift is your choice of any item currently available valued up to $10.00!

If your order is over $150, please do not use the host code since you’ll receive your own Host Dollars plus I’ll still send you the free gift!  This host code can be used by anyone, no club or commitment required. Let me know if you have any questions.


If you need any stamping supplies, I’d be very happy to be your Demonstrator.  Just click on the Shop Now button on the right side of the screen to go directly to my online store or contact me if you have any questions. 

Thanks for stopping by and Happy Stamping!

Akiko

  • Visit my online store here
  • See the current Stampin’ Up! clearance rack specials here
  • Earn FREE Stampin’ Up! products through my Wildflower Frequent Shopper Program – my way of saying thank you to my online frequent shopper customers.
  • Have any questions? I’d be happy to help, click here to contact me.

Cardstock Cuts for this project:

  • Pool Party – 4-1/4″ x 11″ card base scored at 4-1/4″ and 5-1/2″
  • Sweet Sorbet – 1″ x 4″ (hinge mat)
  • Lemon Lime Twist – 2-1/8″ x 3-1/8″ (stamped image mat)
  • Basic White – 4″ x 4″ (inside panel), 2″ x3″ (stamped panel), 2″ x 4″ (punched bee)
  • Bee Mine DSP – two 4″ x 4″panels (front background and inside mat), 7/8″ x 3-7/8″ (hinge)

Stampin’ Up! products used in this project:


Stampin’ Up! Bee My Valentine Fun Fold Card

Good Morning and Happy New Year! I’m starting the year with a Fun Fold Valentine made with the sweet Stampin’ Up! Bee My Valentine bundle. This is a stamp and punch bundle that is coming out in the new January – April Mini Catalog on Thursday (YAY!!) and my fun fold is a mini accordion tent card that was inspired by Robin Ambrecht . You can find the products I used at the bottom of my post along with the card stock sizes.

I adhered a panel of plaid Bee Mine designer series paper to the front of a Sweet Sorbet card base with liquid glue. I adhered a Sweet Sorbet panel to the center with liquid glue to serve as a mat for my accordion and mini tent.

I scored and folded a floral panel of Bee Mine DSP and adhered the large panel to the Sweet Sorbet Mat. I adhered the last two panels of DSP to the Balmy Blue mini tent card and applied liquid glue to the edges of the mini tent card. I carefully lined up the tent to the accordion and pressed to adhere the glue. I opened and closed the accordion to make sure the mini card tent and accordion lined up both when the card was open and closed.

I stamped the bee from the Stampin’ Up! Bee My Valentine stamp set in Daffodil Delight and the stripes and face in Memento Tuxedo Black on Basic White and punched it out. I stamped the wings in Petal Pink and punched it out with the large heart punch and colored the wings with light Petal Pink Stampin’ Blend. I stamped the antenna in Memento Tuxedo Black and punched them out with the small heart and adhered the bee with liquid glue. i popped the bee onto the mini card with dimensionals. I stamped the love you sentiment in Sweet Sorbet on Petal Pink and punched it out with the large heart. I adhered it to the card with glue dots.

For the inside of the card, I stamped the sentiment from the Stampin’ Up! Bee My Valentine stamp set in Sweet Sorbet on Basic White. I stamped the flower in Petal Pink and the stem in Lemon Lime Twist and adhered the panel to the inside of the card with liquid glue. I closed the card to make sure the inside panel is covered when the card is closed – good thing liquid glue gives you wiggle room to move things a bit if needed!

The Stampin’ Up! Bee My Valentine bundle and Bee Mine designer series paper are so cute and cheerful and I’m thrilled that they’ll finally be available to everyone later this week! Here’s the stamp set and punch:

Cute bees, hearts, flowers and honey are a perfect way to start getting ready for Valentine’s Day.


Last Chance Products Discounts Going on Now!

The September–December 2023 Mini Catalog is retiring soon! It’s bittersweet to say goodbye to a Stampin’ Up! catalog, but we’re looking forward to all the new products on their way—and we hope you are, too!

The lists of retiring and carryover products has been announcedFrom November 21, 2023 –January 3, 2024, you can stock up on your favorite seasonal products from the September – December 2023 Mini Catalog and save up to 60%! So, what are you waiting for? After all, Last Chance Products will only be available while supplies last.

Click HERE to download a PDF with the list of retiring items from the Sept-Dec 2023 Mini Catalog and the discounts that start Nov 21.

Click HERE to download a PDF with the list of items from the Sept-Dec 2023 Mini Catalog that will be carrying over.

Note that for some Last Chance bundles, the individual items may be carried over, but the items will no longer be bundled with the 10% savings. These items are marked with three asterisks in the Last Chance PDF.


New January-April 2024 Mini and Sale-A-Bration

The Stampin’ Up! January – April 2024 Mini Catalog and Sale-A-Bration 2024 will begin on January 4, 2024!


Current Host Code: 4X6DDWUC

Use this host code when you order $50 or more and receive a Thank You gift from me!  The free gift is your choice of any item currently available valued up to $10.00.

If your order is over $150, please do not use the host code since you’ll receive your own Host Dollars plus I’ll still send you the Thank You gift!  This host code can be used by anyone, no club or commitment required. Let me know if you have any questions.


If you need any stamping supplies, I’d be very happy to be your Demonstrator.  Just click on the Shop Now Button on the right side of the screen to go directly to my Online store or contact me if you have any questions.  Happy Stamping!

Thanks for stopping by and have a great day!

Akiko

  • Visit my online store here
  • See the current Stampin’ Up! clearance rack specials here
  • Earn FREE Stampin’ Up! products through my Wildflower Frequent Shopper Program – my way of saying thank you to my online frequent shopper customers.
  • Have any questions? I’d be happy to help, click here to contact me.

Cardstock Cuts for this project:

  • Sweet Sorbet – 4-1/4″ x 5-1/2″ card base, 3″ x 4-1/2″ (accordion mat)
  • Balmy Blue – 2-3/4″ x 4-1/2″ mini card tent scored at 2-1/4″
  • Petal Pink – 1-1/2″ x 1-1/2″ (punched label)
  • Basic White – 2-1/4″ x 2-3/4″ (inside panel), 2″ x 3-1/2″ (punched bee)
  • Bee Mine DSP – 4″ x 5-1/4″ (plaid background), 4-1/4″ x 7-3/4″ accordion scored at 1-1/4″, 2-1/2″, 3-3/4″ and 5″ (folded in mountain/valley fashion), two 2″ x 2-1/2″ panels (mini card tent)

Stampin’ Up! products used in this project:


Stampin’ Up! Sentimental Park for the Inkin’ Krew Blog Hop

Good Morning! Welcome to the December Inkin’ Krew Team Blog Hop! The theme for this month’s hop is “Celebrate” and I used the Stampin’ Up! Sentimental Park stamp set with the beautiful new Flight and Airy Sale-A-Bration designer series paper that will be available on January 4, 2024. You can find the supplies I used along with card stock cuts at the bottom of my post.

Today’s card is celebrating a special birthday and it’s a dainty gate fold card.

I adhered panels of the new Flight and Airy designer series paper to the front panels of a Misty Moonlight card base with liquid glue. I cut a Misty Moonlight panel with the large floral label die from the Stampin’ Up! Sentimental Park dies and I cut a panel of Flight and Airy DSP with a sweet bird with the plain die. I inserted the bird die cut into the slots of the floral die cut – I love how this works!

I cut several small flowers from Flirty Flamingo and Petal Pink and adhered them to the larger die cut and adhered some pink pearls to some flower centers. I adhered the panel to the left side of the card with liquid glue applied to half of the die cut.

I stamped the sentiment from the Stampin’ Up! Sentimental Park stamp set in Misty Moonlight ink on Petal Pink and cut it out with the small banner die from the Stylish Shapes dies using the two-step die cutting technique. I adhered it to the card with glue dots and finished the card front with a Night of Navy bow.

For the inside of the card, I stamped the sentiments from the Stampin’ Up! Sentimental Park stamp set in Misty Moonlight ink on a Basic White panel. I stamped the flowers in Petal Pink ink in the corner and colored them with Daffodil Delight, Petal Pink and Flirty Flamingo Stampin’ Blends. I used the dark Granny Apple Green Stampin’ Blend to color the berries and made some stems. I adhered the panel to the inside of the card and adhered two floral panels of Flight and Airy DSP to the inside of the front flaps.

The Flight and Airy DSP is a Sale-A-Bration item that you will be able to get for free with a $50 purchase when Sale-A-Bration starts on January 4, 2024 and it’s so pretty! And it goes so well with the Stampin’ Up! Sentimental Park stamp set and dies and so many other current and retired Stampin’ Up sets. Be sure to check it out!

On With The Hop! Click on the Next Blog button to move forward to Nel Thames’ project or click the Previous Blog button to move back to see the project that Terry Lynn Bright created.

If you get lost along the way, here are the participants for the hop:


Current Host Code: 27CYQXTT

Use this host code when you order $50 or more and receive a Thank You gift from me!  The free gift is your choice of any currently available item valued up to $10.00.

If your order is over $150, please do not use the host code since you’ll receive your own Host Dollars plus I’ll still send you the Thank You gift!  This host code can be used by anyone, no club or commitment required. Let me know if you have any questions.


If you need any stamping supplies, I’d be very happy to be your Demonstrator.  Just click on the Shop Now button on the right side of the screen to go directly to my online store or contact me if you have any questions.  Happy Stamping!

Thanks for stopping by and have a great week!

Akiko

  • Visit my online store here
  • See the current Stampin’ Up! clearance rack specials here
  • Earn FREE Stampin’ Up! products through my Wildflower Frequent Shopper Program – my way of saying thank you to my online frequent shopper customers.
  • Have any questions? I’d be happy to help, click here to contact me.

Cardstock Cuts for this project:

  • Misty Moonlight – 4-1/4″ x 11″ card base scored at 2-3/4″ and 8-1/4″
  • Petal Pink – 2″ x 3″ (die cut flowers), 1″ x 3″ (label)
  • Flirty Flamingo – 1″ x 3″ (die cut flowers)
  • Basic White – 4″ x 5-1/4″ (inside panel)
  • Light and Airy DSP – 2″ x 4″ (die cut bird), two 2-5/8″ x 4-1/8″ panels (front background panels), two 2-1/2″ x 4″ (inside panels)

Stampin’ Up! products used in this project:

Stampin’ Up! Joy Of Noel for the Happy Inkin’ Thursday Blog Hop

Good Morning and welcome to the Happy Inkin’ Thursday Blog Hop! I used the pretty Stampin’ Up! Joy Of Noel bundle with the beautiful Joy of Christmas designer series paper for a gate fold Christmas card. And I also used the pretty holiday greenery frame from the Christmas Classics dies to really make it fancy. You can find the supplies I used along with card stock cuts at the bottom of my post.

We have a color challenge this week and thanks to the pretty designer series paper, I managed to get all the colors in my card!

I adhered the floral panels of Joy of Christmas designer series paper to Shaded Spruce mats and adhered them to the two front flaps of a Real Red gatefold card base. I cut a mottled Shaded Spruce panel of the DSP with the pretty square greenery frame from the Christmas Classics dies. I cut a red plaid panel of the DSP with the small square die and adhered them together with liquid glue.

I stamped the NOEL letters from the Stampin’ Up! Joy of Noel stamp set in Cherry Cobbler ink on Basic White. I cut the letters out with the coordinating die and adhered them to the DSP frame with liquid glue. I applied liquid glue to the back left side of the frame and adhered it to the card front, so that it sticks only to the left flap of the card front.

I stamped the Joyous sentiment from the Stampin’ Up! Joy of Noel stamp set in Versamark ink and sprinkled it with white embossing powder. I shook off the excess powder and heated it with my heat tool until it was bright and shiny. I fussy cut around the letters with my paper snips and popped it on the card front with dimensionals. I finished the card front with rhinestone gems.

For the inside of the card, I stamped the sentiment from the Very Best Occasions stamp set in Real Red ink on a Basic White panel. I stamped part of the small spray from the Stampin’ Up! Joy Of Noel stamp set in the corner using Pebbled Path ink and colored it with Cherry Cobbler, Old Olive and Shaded Spruce Stampin’ Blends. I adhered the panel to the inside of the card. I also adhered red plaid panels of Joy of Christmas DSP to the inside of the front flaps.

The Stampin’ Up! Joy of Noel bundle has beautiful greenery stamps and dies and the NOEL stamp is just gorgeous! It goes so well with the Christmas Classics bundle and is perfect with the Joy of Christmas designer series paper for a beautiful traditional Christmas card.

On with the Hop! Click on the Next Blog button to move forward to see the beautiful project Karen Ksenzakovic has created.

If you get lost along the way, here are the participants for the hop:


Current Host Code: J39F9RSA

Use this host code when you order $50 or more and receive a free gift from me!  The free gift is your choice of any item currently available valued up to $10.00!

If your order is over $150, please do not use the host code since you’ll receive your own Host Dollars plus I’ll still send you the free gift!  This host code can be used by anyone, no club or commitment required. Let me know if you have any questions.


If you need any stamping supplies, I’d be very happy to be your Demonstrator.  Just click on the Shop Now button on the right side of the screen to go directly to my online store or contact me if you have any questions. 

Thanks for stopping by and Happy Stamping!

Akiko

  • Visit my online store here
  • See the current Stampin’ Up! clearance rack specials here
  • Earn FREE Stampin’ Up! products through my Wildflower Frequent Shopper Program – my way of saying thank you to my online frequent shopper customers.
  • Have any questions? I’d be happy to help, click here to contact me.

Cardstock Cuts for this project:

  • Real Red – 5-1/2″ x 8-1/2″ card base scored at 2-1/8″ and 6-3/8″
  • Shaded Spruce – two 2″ x 5-3/8″ panels (front mats)
  • Basic Black – 1-1/4″ x 2″ (fussy cut Joyous)
  • Basic White – 4″ x 5-1/4″ (inside panel), 2-1/2″ x 2-1/2″ (NOEL die cuts)
  • Joy Of Christmas DSP – four 1-7/8″ x 5-1/4″ panels (two floral for the front and two plaid for the inside), 4″ x 4″ (greenery frame), 2-1/2″ x 2-1/2″ (plaid label)

Stampin’ Up! products used in this project: