Stampin’ Up! Something Fancy Wedding Card

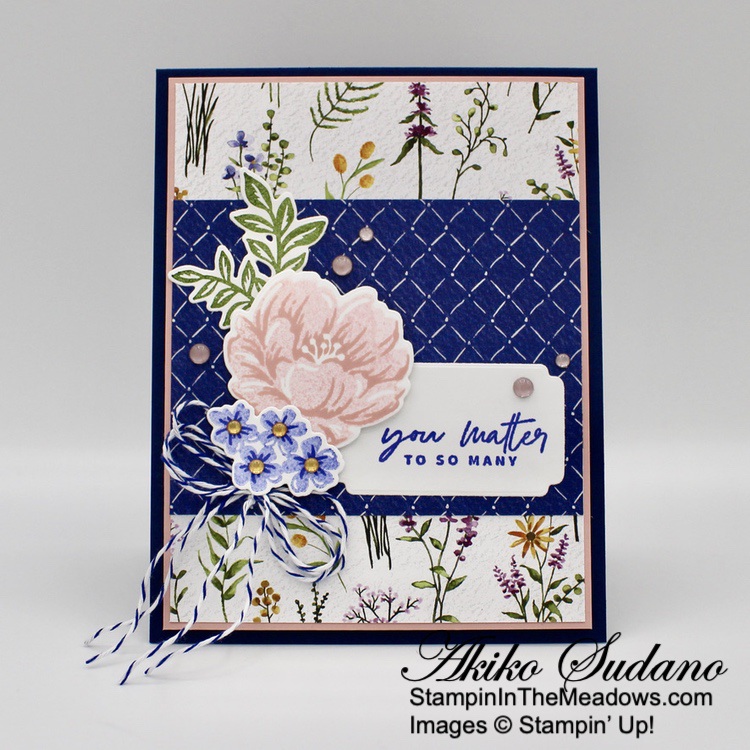
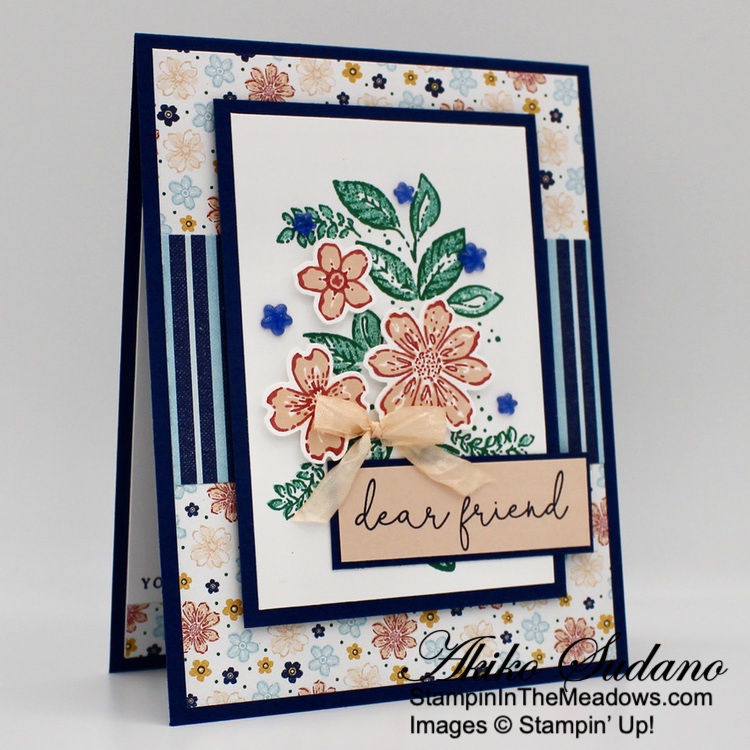
Good Morning! The Stampin’ Up! Something Fancy bundle is full of wonderful sentiments and gorgeous label die cuts. I used the sentiments with the beautiful large background die from the Two-Tone Flora bundle along with the Fancy Flora 6″ x 6″ designer series paper to make a simple Wedding Card You can find the supplies I used at the bottom of my post along with the sizes of cardstock used.

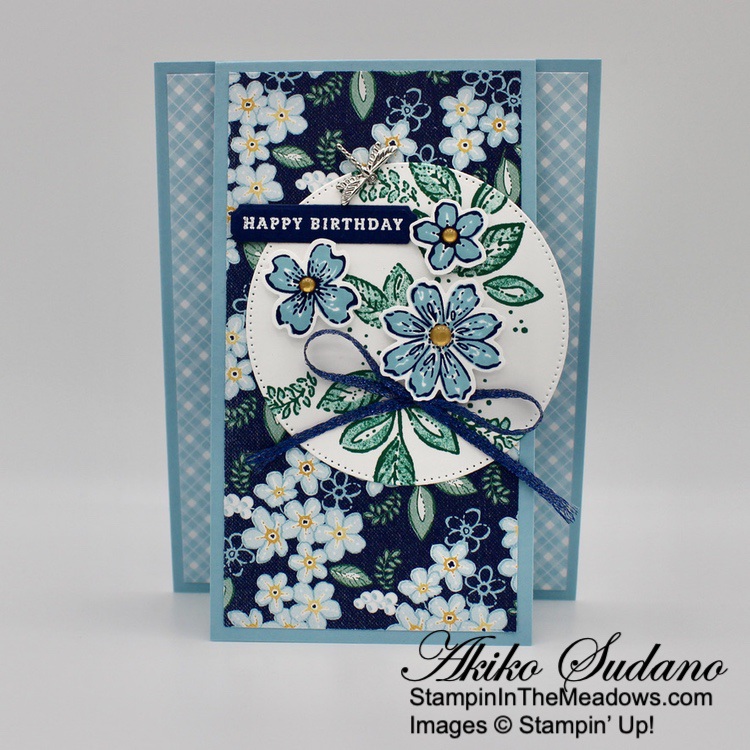
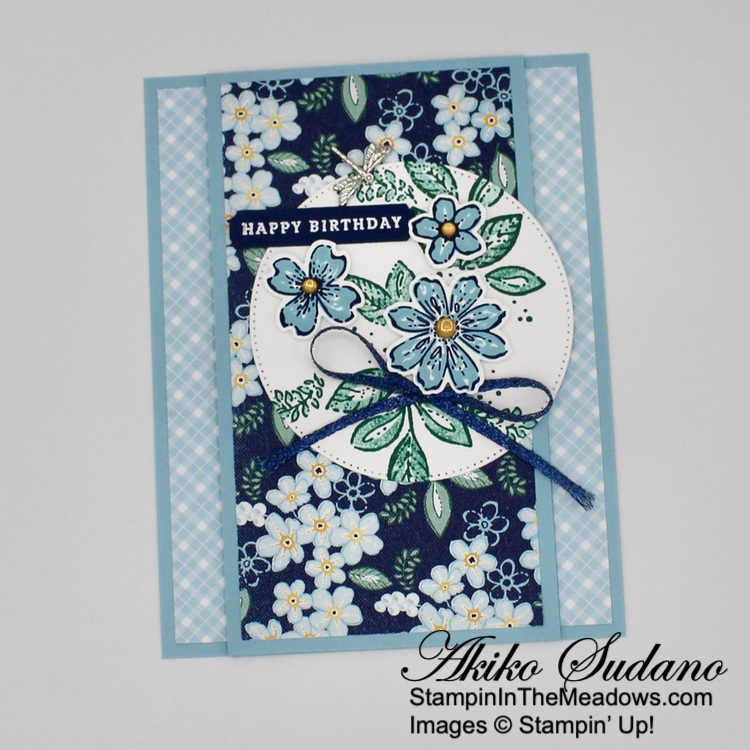
I cut a Basic White panel with the large floral background die from the Two-Tone Flora dies and adhered it to a Fancy Flora panel with dots of liquid glue. I adhered the layered panel to the front of a Soft Succulent card base.

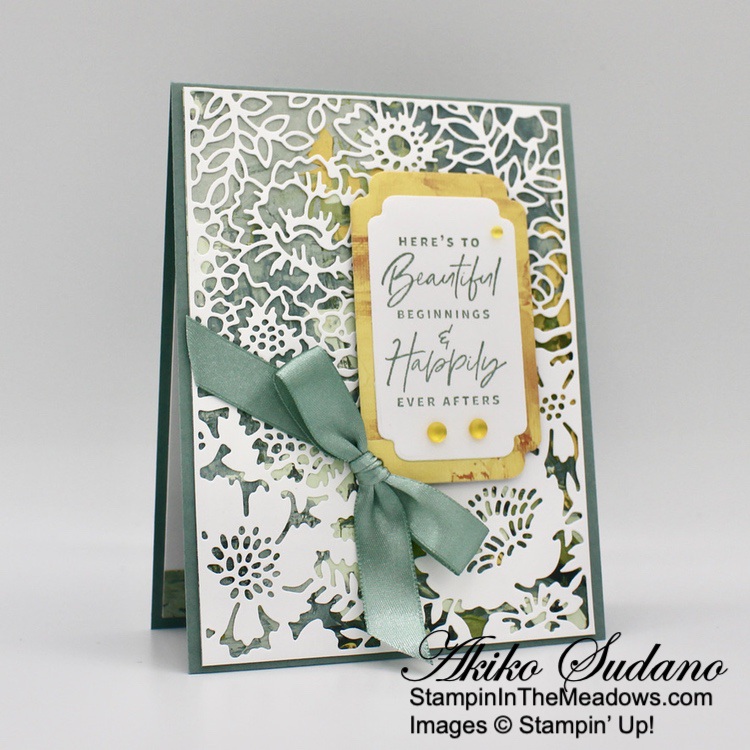
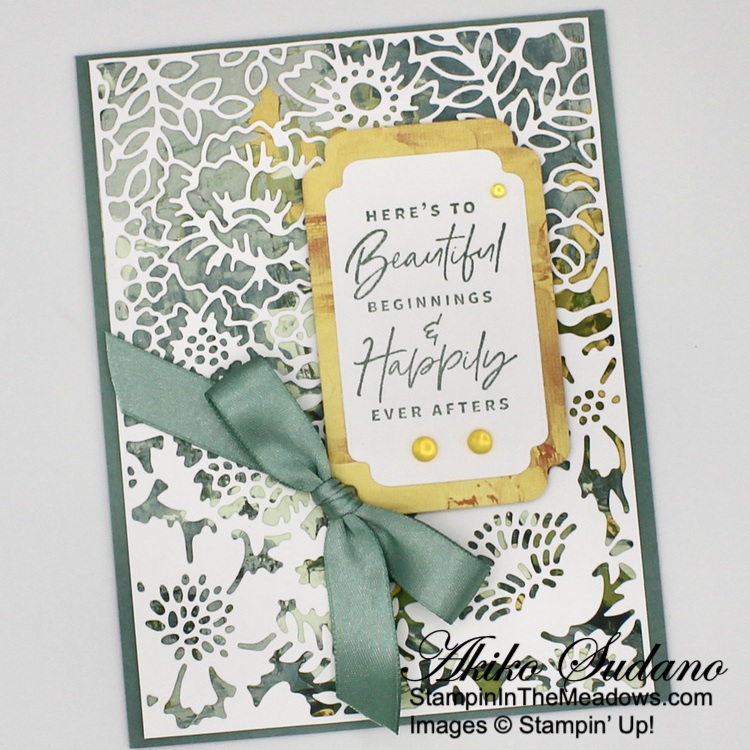
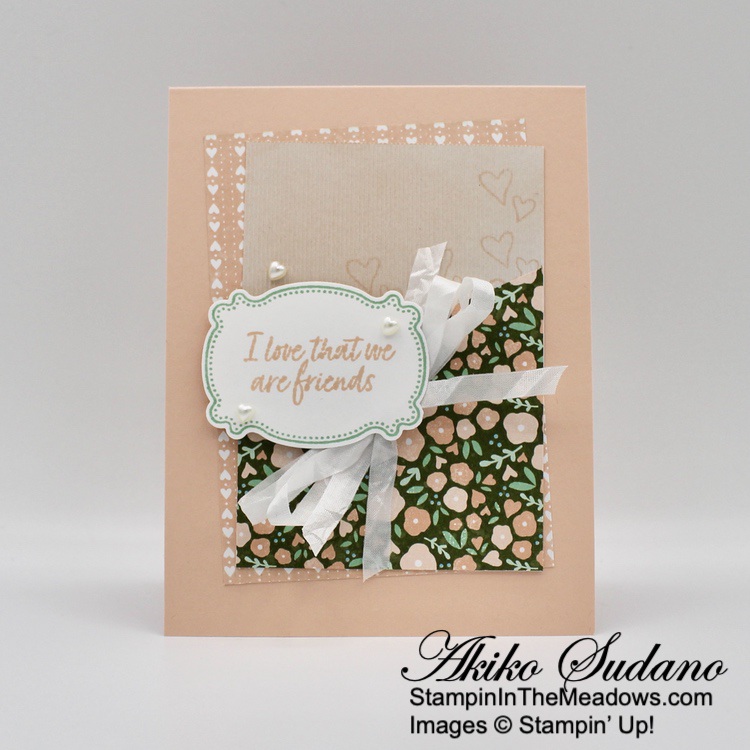
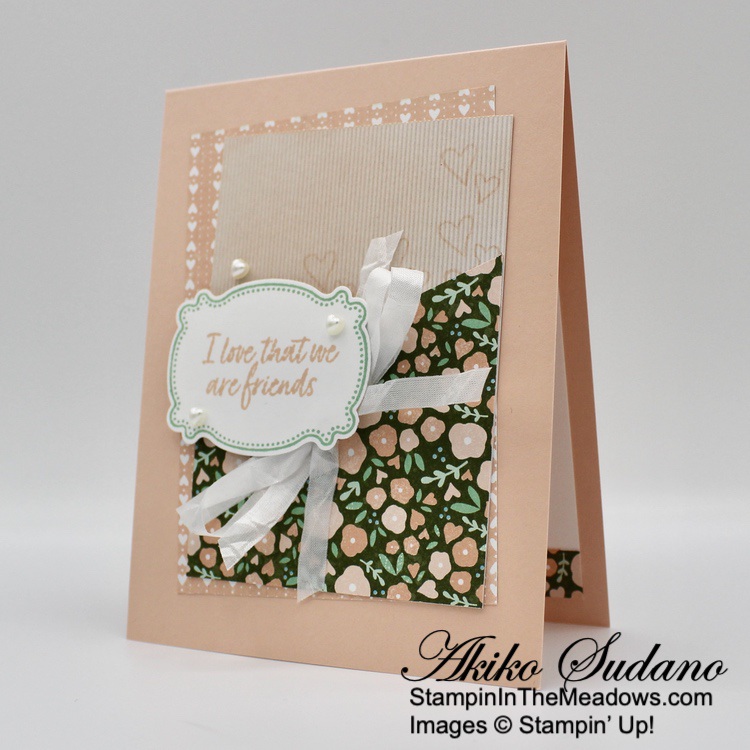
I cut a Fancy Flora 6″ x 6″ DSP panel with the largest fancy rectangle die from the Stampin’ Up! Something Fancy dies. I stamped the sentiment from the Stampin’ Up! Something Fancy cling stamp set in Soft Succulent ink on a Basic White panel and cut it out with the medium fancy rectangle die. I adhered the labels together with liquid glue and adhered them to the card front with dimensionals.

I made a large bow with Soft Succulent satin ribbon and adhered it to the card with glue dots. I adhered three Daffodil Delight Loose Frosted dots to the label with glue dots to finish the card.

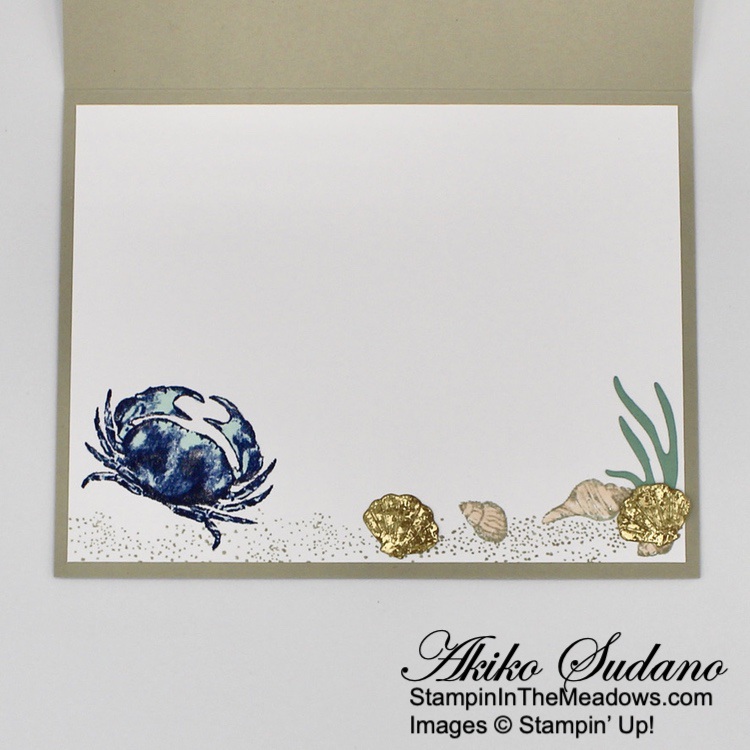
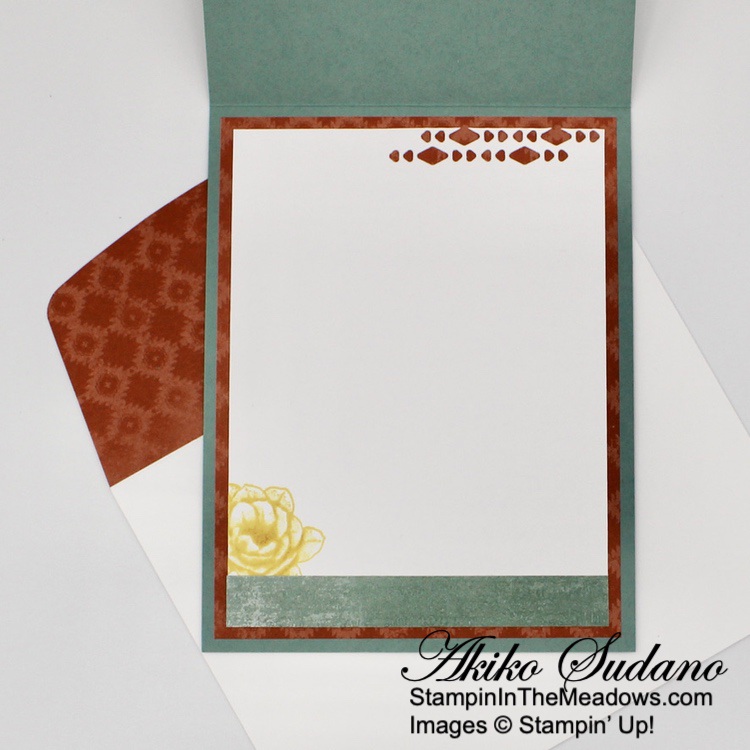
For the inside of the card, I stamped the sentiment from the Stampin’ Up! Something Fancy stamp set in Soft Succulent on a Basic White panel. I stamped the leaf cluster from the Two-Tone Flora stamp set in the top corner and trimmed the bottom with a strip of Fancy Flora 6″ x 6″ DSP. I adhered the panel to the inside of the card with Stamping’ Seal.

The pretty background die cut from the Two-Tone Flora dies is perfect for Wedding Cards! With a gorgeous satin bow, you don’t need much more than a beautiful sentiment to make a beautiful card for that extra special day!


Stampin’ Up! Online Exclusives Available Now!

An exciting new Stampin’ Up! shopping experience has just started – the Stampin’ Up! Online Exclusives. You won’t find these products in any catalog, which means fresh products, more often, to spark your creativity and expand your crafting collection and all from the convenience of the Online Store. And there’s no end date for the sales period! Some products will be reordered when inventory is low, and others will only be available while supplies last. This way Stampin’ Up! can offer even more new products throughout the year and respond more quickly to relevant trends and your needs. New products mean new inspiration and new ways to express your creativity!

Go to my Online Store to shop these new products.


Current Host Code: FWMXBD76

Use this host code when you order $50 or more and receive a Thank You gift from me!  The free gift is your choice of any item valued up to $10.00 in the 2022-2023 Annual Catalog or the January-April 2023 Mini Catalog!

If your order is over $150, please do not use the host code since you’ll receive your own Host Dollars plus I’ll still send you the Thank You gift!  This host code can be used by anyone, no club or commitment required. Let me know if you have any questions.


If you need any stamping supplies, I’d be very happy to be your Demonstrator.  Just click on the Shop Now button on the right side of the screen to go directly to my online store or contact me if you have any questions.  Happy Stamping!

Thanks for stopping by and have a great week!

Akiko

  • Visit my online store here
  • See the current Stampin’ Up! clearance rack specials here
  • Earn FREE Stampin’ Up! products through my Wildflower Frequent Shopper Program – my way of saying thank you to my online frequent shopper customers.
  • Have any questions? I’d be happy to help, click here to contact me.

Cardstock Cuts for this project:

  • Soft Succulent – 4-1/4″ x 11″ card base scored at 5-1/2″
  • Basic White – 4″ x 5-1/4″ (inside panel), 4″ x 5-3/8″ (front die cut floral background), 2-1/4″ x 3″ (label)
  • Fancy Flora 6″ x 6″ DSP – 4″ x 5-3/8″ (front background), 2-1/4″ x 3-1/4″ (label), 1/2″ x 4″ (inside trim)

Stampin’ Up! products used in this project:


Stampin’ Up! Seaside Bay Thank You Card for the Happy Inkin’ Thursday Blog Hop

Good Morning and welcome to the Happy Inkin’ Thursday Blog Hop! The Stampin’ Up! Seaside Bay bundle is a beautiful nautical set with both undersea and shore images and dies. I used the crab and shells to make an undersea thank you card. You can find the supplies I used along with card stock cuts at the bottom of my post.

We have a sketch challenge this week:

I adhered a panel of wood grained By The Sea 6″ x 6″ specialty designer series paper to the front of a Sahara Sand card base. I cut a panel of By The Sea 6″ x 6″ specialty designer series paper with the fourth largest Stitched Rectangles dies. I stamped the fishes from the Sea Turtle photopolymer stamp set in Versamark ink o the die cut DSP and sprinkled it with gold embossing powder. I shook off the excess and heated the powder with my heat tool until it was bright and shiny.

I stamped the sand and sand and shell stamps from the Stampin’ Up! Seaside Bay cling stamp set in Sahara Sand ink across a Sahara Sand strip. I cut the top using the sand die from the Stampin’ Up! Seaside Bay dies and cut the bottom with the fourth largest Stitched Rectangle die. I adhered the die cut sand to the bottom of the DSP die cut rectangle with liquid glue and adhered the layered panel to a Soft Suede mat.

I cut three sea grasses (two short and one long) from the Stampin’ Up! Seaside Bay dies from Mint Macaron and adhered them to the undersea panel with glue dots. I stamped the three small sea shells in Sahara Sand ink on Petal Pink and cut them out with the coordinating die. I adhered them to the panel with glue dots. I stamped the crab in Night of Navy ink on Basic White and cut it out with the coordinating die. I colored it with a light Pool Party Stampin’ Blend and adhered it to the panel with glue dots. I cut a pair of small shells from Distressed Gold paper and adhered them to the panel with glue dots.

I stamped the sentiment (inking up only the thank you part of the stamp) from the Stampin’ Up! Seaside Bay stamp set in Versamark ink on Balmy Blue and sprinkled it with gold embossing powder. I shook off the excess powder and heated the sentiment with my heat tool until it was bright and shiny. I cut it out with the small skinny stitched rectangle die. I looped Linen Thread twice around the end and tied a knot and adhered the label to the panel with dimensionals. I adhered the panel to the card front with dimensionals and finished it with flat pearls.

For the inside of the card, I stamped the crab from the Stampin’ Up! Seaside Bay stamp set in Night of Navy ink on a Basic White panel. I colored it with the light Pool Party Stampin’ Blend and stamped the bottom with the seashell and sand and sand stamps using Sahara Sand ink. I colored the shells with the dark Petal Pink Stampin’ Blend and adhered the die cut Mint Macaron sea grass and Distress Gold seashells to the bottom. I adhered the panel to the inside of the card with Stampin’ Seal.

The Stampin’ Up! Seaside Bay bundle goes great with the By the Bay specialty DSP and other ocean themed stamp supplies. And the sentiments are wonderful!

On with the Hop! Click on the Next Blog button to move forward to see the beautiful project Karen Ksenzakovic has created.

If you get lost along the way, here are the participants for the hop:


Current Host Code: FWMXBD76

Use this host code when you order $50 or more and receive a free gift from me!  The free gift is your choice of any item valued up to $10 in the 2022-2023 Annual Catalog or the January-April 2023 Mini Catalog!

If your order is over $150, please do not use the host code since you’ll receive your own Host Dollars plus I’ll still send you the free gift!  This host code can be used by anyone, no club or commitment required. Let me know if you have any questions.


If you need any stamping supplies, I’d be very happy to be your Demonstrator.  Just click on the Shop Now button on the right side of the screen to go directly to my online store or contact me if you have any questions. 

Thanks for stopping by and Happy Stamping!

Akiko

  • Visit my online store here
  • See the current Stampin’ Up! clearance rack specials here
  • Earn FREE Stampin’ Up! products through my Wildflower Frequent Shopper Program – my way of saying thank you to my online frequent shopper customers.
  • Have any questions? I’d be happy to help, click here to contact me.

Cardstock Cuts for this project:

  • Sahara Sand – 5-1/2″ x 8-1/2″ card base scored at 4-1/4″, 3/4″ x 4-1/2″ (sea bottom)
  • Softy Suede – 2-3/4″ x 4-1/8″ (front mat)
  • Petal Pink – 1″ x 2-1/2″ (sea shells)
  • Balmy Blue – 3/4″ x 3″ (label)
  • Mint Macaron – 2-1/4″ x 2-1/2″ (die cut sea grass)
  • Distress Gold – 1″ x 4″ (die cut shells)
  • Basic White – 4″ x 5-1/4″ (inside panel), 1-1/4″ x 2″ (crab)
  • By the Bay DSP – 4-1/4″ x 5-1/2″ (front background), 3″ x 4-1/2″ (die cut rectangle)

Stampin’ Up! products used in this project:


Stampin’ Up! Lucky Clover St. Patrick’s Day Card

Good Morning! The Stampin’ Up! Lucky Clover cling stamp set is a sweet stamp set with lots of fun lucky clover images and wonderful sentiments that is perfect for St Patrick’s Day. Today, I used it with the Sale-A-Bration Dandy Designs designer series paper for a friendly St. Patrick’s Day card. You can find the supplies I used at the bottom of my post along with the sizes of cardstock used.

I adhered a panel of Dandy Designs designer series paper to a Soft Sea Foam mat and then to the front of a Granny Apple Green card base. I stamped the large clover from the Stampin’ Up! Lucky Clover stamp set in Granny Apple Green on a Soft Sea Foam panel and cut it out with the second largest circle from the Stylish Shapes dies. I cut a scalloped circle using the second largest die from the Layering Circles dies and adhered the clover to it with liquid glue.

I cut a strip of the chevron Dandy Designs DSP with the largest banner die from the Stylish Shapes dies and adhered it to the card with liquid glue. I stamped the small clovers from the Stampin’ Up! Lucky Clover stamp set in Granny Apple Green on a Soft Sea Foam strip and cut it out with the smallest banner die from the Stylish Shapes dies. I adhered it to the card over the larger banner with liquid glue and adhered the layered stamped clover circle on top with dimensionals.

I stamped the sentiment from the Stampin’ Up! Lucky Clover stamp set in Old Olive on Granny Apple Green and cut it out with the long, skinny Stylish Shapes banner die. I trimmed a length of Old Olive ribbon and adhered it to the back of the label with glue dots and adhered the label to the card with dimensionals. I finished the card with Parakeet Party dots.

For the inside of the card, I stamped the sentiment from the Stampin’ Up! Lucky Clover stamp set in Old Olive on a Basic White panel. I stamped the small single clover next to the sentiment in Granny Apple Green and stamped the smallest clovers multiple times in the corners of the panel using both full strength and stamped off ink. I trimmed the bottom with a strip of Dandy Designs DSP and adhered the panel to the inside of the card with Stamping’ Seal.

The Sale-A-Bration Dandy Designs DSP goes perfect with the Stampin’ Up! Lucky Clover stamp set, but it will only be available for a few more days because Sale-A-Bration ends on February 28!


Sale-A-Bration Ends February 28!

Sale-A-Bration is Stampin’ Up!’s best promotion of the year with specials for shopping, hosting and joining! It will run through February 28, 2023Thats less than two weeks away!

There’s still lots of wonderful free items that you can choose with your $50 or $100 in purchases (before shipping and taxes) and Sale-A-Bration has the best Joining bonuses.

Click HERE to download a Sale-A-Bration brochure to get all the details.

Click HERE to download the additional Sale-A-Bration items flyer.

Click HERE to see the Sale-A-Bration items in my Online Store.

Click HERE to start shopping in my Online Store.


Stampin’ Up! Online Exclusives Begin March 1!

An exciting new Stampin’ Up! shopping experience is beginning on March 1, 2023 – the Stampin’ Up! Online Exclusives. You won’t find these products in any catalog, which means fresh products, more often, to spark your creativity and expand your crafting collection and all from the convenience of the Online Store. And there’s no end date for the sales period! Some products will be reordered when inventory is low, and others will only be available while supplies last. This way Stampin’ Up! can offer even more new products throughout the year and respond more quickly to relevant trends and your needs. New products mean new inspiration and new ways to express your creativity! So be sure to check my Online Store on March 1 to shop these new products.

Click HERE to download a flyer with the item numbers and pictures of these items. Note that the links to the online exclusives section of the store will not be live until March 1, 2023.


Current Host Code: FWMXBD76

Use this host code when you order $50 or more and receive a Thank You gift from me!  The free gift is your choice of any item valued up to $10.00 in the 2022-2023 Annual Catalog or the January-April 2023 Mini Catalog!

If your order is over $150, please do not use the host code since you’ll receive your own Host Dollars plus I’ll still send you the Thank You gift!  This host code can be used by anyone, no club or commitment required. Let me know if you have any questions.


If you need any stamping supplies, I’d be very happy to be your Demonstrator.  Just click on the Shop Now button on the right side of the screen to go directly to my online store or contact me if you have any questions.  Happy Stamping!

Thanks for stopping by and have a great week!

Akiko

  • Visit my online store here
  • See the current Stampin’ Up! clearance rack specials here
  • Earn FREE Stampin’ Up! products through my Wildflower Frequent Shopper Program – my way of saying thank you to my online frequent shopper customers.
  • Have any questions? I’d be happy to help, click here to contact me.

Cardstock Cuts for this project:

  • Granny Apple Green – 5-1/2″ x 8-1/2″ card base scored at 4-1/4″, 3-1/4″ x 3-1/4″ (die cut scalloped circle), 1″ x 4″ (label)
  • Soft Sea Foam – 4″ x 5-1/4″ (front mat), 3″ x 3″ (die cut circle), 3/4″ x 3″ (small banner)
  • Basic White – 4″ x 5-1/4″ (inside panel)
  • Dandy Designs Sale-A-Bration DSP – 3-7/8″ x 5-1/8″ (front background), 1-1/4″ x 4″ (die cut banner), 1/2″ x 4″ (inside trim)

Stampin’ Up! products used in this project:


Stampin’ Up! Sea Turtle for the Happy Inkin’ Thursday Blog Hop

Good Morning and welcome to the Happy Inkin’ Thursday Blog Hop! The Stampin’ Up! Sea Turtle photopolymer stamp set has wonderful seaside images and the stamps are reversible! They are made so that you have a detailed image on one side and a solid image on the other, so they can be used for two step stamping. See how I did this on the inside image below. You can find the supplies I used along with card stock cuts at the bottom of my post.

We have a theme challenge this week:

I stamped the detailed seaweed image from the Stampin’ Up! Sea Turtle stamp in Old Olive ink set several times in the lower corner of a panel of By The Bay designer series paper. I turned the stamp upside down sometimes, and also used stamped off ink to give it dimension. I stamped the detailed bubble image several times on the DSP using Pool Party ink and then embossed the panel with the Seashells 3D embossing folder. I adhered it to a Mint Macaron panel with liquid glue and popped it on the front of a Balmy Blue card base with dimensionals.

I stamped the detailed large turtle from the Stampin’ Up Sea Turtle stamp set in Shaded Spruce ink on a Mint Macaron panel and fussy cut the turtle with paper snips. I adhered the turtle to the card front with dimensionals.

I stamped the sentiment from the Happy Labels cling stamp set in Old Olive ink on a strip of Mint Macaron (note that the Happy Labels stamp set comes in photopolymer or cling). I punched the end with the ticket side of the Happy Labels Pick A Punch and adhered it to the card with glue dots. I finished the card with white Elegant Faceted gems.

For the inside of the card, I stamped the detailed side of the small turtle from the Stampin’ Up! Sea Turtle stamp set in Shaded Spruce ink in the corner of a Basic White panel. I cleaned the stamp and flipped it over and stamped the solid side in Mint Macaron ink over the detailed image. I stamped the seaweed on the side of the panel in Old Olive regular and stamped off ink. I stamped and embossed a strip of By The Bay DSP like the front background and adhered it to the bottom of the panel. I adhered the panel to the inside of the card with Stampin’ Seal.

The Stampin’ Up! Sea Turtle stamp set is full of wonderful images. It’s fun to create with and is perfect for many occasions!

On with the Hop! Click on the Next Blog button to move forward to see the beautiful project Karen Ksenzakovic has created.

If you get lost along the way, here are the participants for the hop:


Current Host Code: FWMXBD76

Use this host code when you order $50 or more and receive a free gift from me!  The free gift is your choice of any item valued up to $10 in the 2022-2023 Annual Catalog or the January-April 2023 Mini Catalog!

If your order is over $150, please do not use the host code since you’ll receive your own Host Dollars plus I’ll still send you the free gift!  This host code can be used by anyone, no club or commitment required. Let me know if you have any questions.


If you need any stamping supplies, I’d be very happy to be your Demonstrator.  Just click on the Shop Now button on the right side of the screen to go directly to my online store or contact me if you have any questions. 

Thanks for stopping by and Happy Stamping!

Akiko

  • Visit my online store here
  • See the current Stampin’ Up! clearance rack specials here
  • Earn FREE Stampin’ Up! products through my Wildflower Frequent Shopper Program – my way of saying thank you to my online frequent shopper customers.
  • Have any questions? I’d be happy to help, click here to contact me.

Cardstock Cuts for this project:

  • Balmy Blue – 4-1/4″ x 11″ card base scored at 5-1/2″
  • Mint Macaron – 4″ x 5-1/4″ (front mat), 4″ x 4-1/2″ (fussy cut turtle), 1/2″ x 2-1/2″ (label)
  • Basic White – 4″ x 5-1/4″ (inside panel)
  • By the Bay DSP – 3-7/8″ x 5-1/8″ panel (front background), 1/2″ x 4″ (inside trim)

Stampin’ Up! products used in this project:


Stampin’ Up! Two-Tone Flora You Matter Card

Good Morning! The Stampin’ Up! Two-Tone Flora bundle is a beautiful two step stamping floral bundle with coordinating dies. Today, I used it to make a soft pink rose to pair with the pretty Sale-A-Bration Dainty Flowers designer series paper. You can find the supplies I used at the bottom of my post along with the sizes of cardstock used.

I adhered a Night of Navy geometric panel of Dainty Flowers DSP to a floral Dainty Flowers panel with liquid glue and adhered it to a Blushing Bride mat. I adhered the layered panel to the front of a Night of Navy Card base with dimensionals. I stamped the sentiment from the Something Fancy stamp set in Orchid Oasis ink on a Basic White panel and cut it out with the small rectangle label die for the Something Fancy dies. I adhered the label to the card with liquid glue.

I stamped the large flower from the Stampin’ Up! Two-Tone Flora photopolymer stamp set in Blushing Bride ink on Basic White. I stamped the detailed image in full strength ink and the filler stamp in stamped off ink. I used the same technique to stamp the small flower cluster in Orchid Oasis ink annd stamped the leaf spray in Mossy Meadow ink. I cut them out with the coordinating dies.

I adhered the leaf spray to the card with liquid glue and adhered the two floral die cuts with dimensionals. I made a triple bow with Starry Sky bakers twine and tucked it under the flowers, adhering it with a glue dot. I finished the card with Milky dots, using yellow ones for the flower centers and pink ones around the card.

For the inside of the card, I stamped the leaf spray from the Stampin’ Up! Two-Tone Flora stamp set in Mossy Meadow ink in the corner of a Basic White panel. I stamped the sentiment from the Something Fancy stamp set in Orchid Oasis ink and trimmed the bottom with a strip of the Sale-A-Bration Dainty Flowers DSP. I adhered the panel to the inside of the card with Stamping’ Seal.

The Stampin’ Up! Two-Tone Flora bundle is one of many pretty floral sets in the current mini catalog. And it goes great with the beautiful Dainty Flowers Sale-A-Bration designer series paper. But this paper will only be available while supplies last during Sale-A-Bration, so be sure to get yours while it’s available. Sale-A-Bration ends on February 28 – less than two weeks away!


Sale-A-Bration Ending Soon!

Sale-A-Bration is Stampin’ Up!’s best promotion of the year with specials for shopping, hosting and joining! It will run through February 28, 2023Thats less than two weeks away!

There’s still lots of wonderful free items that you can choose with your $50 or $100 in purchases (before shipping and taxes) and Sale-A-Bration has the best Joining bonuses.

Click HERE to download a Sale-A-Bration brochure to get all the details.

Click HERE to download the additional Sale-A-Bration items flyer.

Click HERE to see the Sale-A-Bration items in my Online Store.

Click HERE to start shopping in my Online Store.


Stampin’ Up! Online Exclusives Begin March 1!

An exciting new Stampin’ Up! shopping experience is beginning on March 1, 2023 – the Stampin’ Up! Online Exclusives. You won’t find these products in any catalog, which means fresh products, more often, to spark your creativity and expand your crafting collection and all from the convenience of the Online Store. And there’s no end date for the sales period! Some products will be reordered when inventory is low, and others will only be available while supplies last. This way Stampin’ Up! can offer even more new products throughout the year and respond more quickly to relevant trends and your needs. New products mean new inspiration and new ways to express your creativity! So be sure to check my Online Store on March 1 to shop these new products.


Current Host Code: Y7X69NCW

Use this host code when you order $50 or more and receive a Thank You gift from me!  The free gift is your choice of any item valued up to $10.00 in the 2022-2023 Annual Catalog or the January-April 2023 Mini Catalog!

If your order is over $150, please do not use the host code since you’ll receive your own Host Dollars plus I’ll still send you the Thank You gift!  This host code can be used by anyone, no club or commitment required. Let me know if you have any questions.


If you need any stamping supplies, I’d be very happy to be your Demonstrator.  Just click on the Shop Now button on the right side of the screen to go directly to my online store or contact me if you have any questions.  Happy Stamping!

Thanks for stopping by and have a great week!

Akiko

  • Visit my online store here
  • See the current Stampin’ Up! clearance rack specials here
  • Earn FREE Stampin’ Up! products through my Wildflower Frequent Shopper Program – my way of saying thank you to my online frequent shopper customers.
  • Have any questions? I’d be happy to help, click here to contact me.

Cardstock Cuts for this project:

  • Night of Navy – 4-1/4″ x 11″ card base scored at 5-1/2″
  • Blushing Bride – 4″ x 5-1/4″ (front mat)
  • Basic White – 4″ x 5-1/4″ (inside panel), 3″ x 5-1/2″ (die cut flowers and label)
  • Dainty Flowers DSP – 3-7/8″ x 5-1/8″ (front background), 3″ x 3-7/8″ (front stripe), 1/2″ x 4″ (inside trim), 2-1/2″ x 6″ (envelope flap cover)

Stampin’ Up! products used in this project:


Stampin’ Up! Desert Details for the Happy Inkin’ Thursday Blog Hop

Good Morning and welcome to the Happy Inkin’ Thursday Blog Hop! The Stampin’ Up! Desert Details is a wonderful southwest theme cling stamp and die set with unique images and sentiments. I’ve had a lot of fun playing with it and experimenting with different techniques, so I decided to use three cactus flowers as my centerpiece for today’s card. You can find the supplies I used along with card stock cuts at the bottom of my post.

We have a sketc challenge this week featurinng three flowers – here is the pretty sketch we are using:

I stamped three of the large cactus flowers from the Stampin’ Up! Desert Details stamp set in Daffodil Delight ink on Basic White. After the ink dried, I used a Crushed Curry watercolor pencil to add shading around each petal and the center. This really makes the flower pop. I cut them out with the coordinating die and put them aside. I used the long agave (or are they aloe?) die to cut two leaf frond clusters from the Soft Succulent Dry Brush Metallic specialty paper.

I used the diamond and triangle die from the Stampin’ Up! Desert Detail dies to cut three sections of a Soft Succulent Panel of Delicate Desert DSP. I used a sponge dauber to apply Gray Granite ink to the long diamond stamp and stamped it all over the panel. This gave it a light, splotchy look. I finally ran the panel through the Timeworn Type 3D embossing folder to give it texture. I adhered it to a Cajun Craze panel of Delicate Desert DSP and then adhered it to the front of a Soft Succulent card base with liquid glue.

I adhered the leaves to the card front with glue dots and looped some gold trim around the card, adhering it with glue dots. I adhered the three cactus flowers with dimensionals. I stamped the sentiment from the Stampin’ Up! Desert Detail stamp set in Cajun Craze ink on Delicate Desert DSP. I cut the sentiment out with the largest banner die from the Stylish Shapes dies using the two step die cutting method (to shorten the label) and cut a Basic White white label the same size. I adhered the DSP label to the Basic White backing with liquid glue and popped it onto the card with dimensionals. I finished the card with gold adhesive sequins.

For the inside of the card, I stamped the small cactus flower from the Stampin’ Up! Desert Details stamp set in Daffodil Delight ink on a Basic White panel. I accented the center and petals with the Crushed Curry water color pencil to get some contrast. I cut the top with the diamond and triangle die. I stamped and embossed a strip of Soft Succulent Delicate Desert DSP to match the front background and adhered it to the bottom of the panel and adhered it to a Cajun Craze Delicate Desert DSP mat. I adhered the layered panel to the inside of the card with Stampin’ Seal. Finally, I adhered a panel of the Cajun Craze DSP to the envelope flap and trimmed it with my paper snips.

It’s fun to see the Cajun Craze peeking through the die cuts on the card and gold sequins are the perfect trimming for anything with the Dry Brushed Metallic DSP.

On with the Hop! Click on the Next Blog button to move forward to see the beautiful project Karen Ksenzakovic has created.

If you get lost along the way, here are the participants for the hop:


Current Host Code: Y7X69NCW

Use this host code when you order $50 or more and receive a free gift from me!  The free gift is your choice of any item valued up to $10 in the 2022-2023 Annual Catalog or the January-April 2023 Mini Catalog!

If your order is over $150, please do not use the host code since you’ll receive your own Host Dollars plus I’ll still send you the free gift!  This host code can be used by anyone, no club or commitment required. Let me know if you have any questions.


If you need any stamping supplies, I’d be very happy to be your Demonstrator.  Just click on the Shop Now button on the right side of the screen to go directly to my online store or contact me if you have any questions. 

Thanks for stopping by and Happy Stamping!

Akiko

  • Visit my online store here
  • See the current Stampin’ Up! clearance rack specials here
  • Earn FREE Stampin’ Up! products through my Wildflower Frequent Shopper Program – my way of saying thank you to my online frequent shopper customers.
  • Have any questions? I’d be happy to help, click here to contact me.

Cardstock Cuts for this project:

  • Soft Succulent – 4-1/4″ x 11″ card base scored at 5-1/2″
  • Dry Brushed Metallic paper – 1-3/4″ x 4-1/2″ (die cut agaves)
  • Basic White – 3-3/4″ x 5″ (inside panel), 2-1/2″ x 8-1/2″ (die cut cactus blooms), 1-1/2″ x 3″ (label backing)
  • Delicate Desert DSP – two 4″ x 5-1/5″ panels (front and inside mats), 3-7/8″ x 5-1/8″ (front background), 1-1/2″ x 3″ (label), 1/2″ x 3-3/4″ (inside trim), 6″ x 2-1/2″ (envelope flap)

Stampin’ Up! products used in this project:


Stampin’ Up! Petal Park for the Inkin’ Krew Blog Hop

Good morning! Welcome to the February Inkin’ Krew Team Blog Hop! The theme for this month’s hop is “Birthday” and I used the sweet Stampin’ Up! Petal Park bundle to make a simple fun fold Birthday card! You can find the supplies I used at the bottom of my post along with the sizes of cardstock used.

I adhered a panel of Balmy Blue Country Gingham 6″ x 6″ designer series paper to a panel of Balmy Blue card stock with liquid glue. I adhered a panel of Regency Park 6″ x 6″ designer series paper to the front of a 3″ mini card and adhered the mini card to the DSP panel with liquid glue.

I stamped the large leaf spray line image from the Stampin’ Up! Petal Park photopolymer stamp set in Shaded Spruce ink on Basic White and used stamped off Shaded Spruce ink to stamp the filler image. I cut it with the largest circle die from the Stylish Shapes dies.

I stamped the three large outline flowers from the Stampin’ Up! Petal Park stamp set in Night of Navy ink on Basic White. I stamped the filler flower image in Balmy Blue and cut the flowers out with the coordinating punch. I adhered the flowers to the die cut circle with dimensionals and adhered Milky Dots to the centers. I adhered the decorated circle to the card with liquid glue.

I stamped the birthday sentiment from the Sentimental Park stamp set in Versamark ink on a strip of Night of Navy. I sprinkled it with white embossing powder and shook off the excess. I heated the powder with my heat tool until it was bright and shiny. I cut the sentiment out with the small label die from the Sending dies, using the two step die cutting method. I adhered the label to the card with glue dots. I made a bow with Starry Sky metallic ribbon and tucked it under one of the flowers, adhering it with a glue dot. I finished the card with a dragonfly trinket, adhered with a glue dot.

For the inside of the card, I stamped the the flowers from the Stampin’ Up! Petal Park stamp set in Night of Navy in the corner of a Basic White panel. I stamped the flower filler image in Balmy Blue and the leaves in Shaded Spruce – full strength for the outline and stamped off for the filler. I stamped the sentiments from the Sentimental Park stamp set in Night of Navy and trimmed the bottom with a strip of Regency Park 6″ x 6″ DSP before adhering it to the inside of the card.

A pretty floral birthday wish with the beautiful Stampin’ Up! Petal Park bundle and Regency Park 6″ x 6″ DSP!

On With The Hop! Click on the Next Blog button to move forward to Amy Koenders’ project or click the Previous Blog button to move back to see the project that Mary Deatherage created.

If you get lost along the way, here are the participants for the hop:


Current Host Code: ZYNDU2N9

Use this host code when you order $50 or more and receive a free gift from me!  The free gift is your choice of any item currently available valued up to $10.00 in the 2022-2023 Annual Catalog or the January-April 2023 Mini Catalog!

If your order is over $150, please do not use the host code since you’ll receive your own Host Dollars plus I’ll still send you the free gift!  This host code can be used by anyone, no club or commitment required. Let me know if you have any questions


If you need any stamping supplies, I’d be very happy to be your Demonstrator.  Just click on the Shop Now button on the right side of the screen to go directly to my online store or contact me if you have any questions. 

Thanks for stopping by and Happy Stamping!

Akiko

  • Visit my online store here
  • See the current Stampin’ Up! clearance rack specials here
  • Earn FREE Stampin’ Up! products through my Wildflower Frequent Shopper Program – my way of saying thank you to my online frequent shopper customers.
  • Have any questions? I’d be happy to help, click here to contact me.

Cardstock Cuts for this project:

  • Balmy Blue – 4-1/4″ x 5″ main card base, 3″ x 11″ mini card base scored at 5-1/2″
  • Night of Navy – 3/4″ x 3″ (label)
  • Basic White – 2-3/4″ x 5-1/4″ (inside panel), 3-1/4″ x 3-1/4″ (die cut circle), 2-1/2″ x 3″ (punched flowers)
  • Country Gingham 6″ x 6″ DSP – 4″ x 5-1/4″ (main card base background)
  • Regency Park 6″ x 6″ DSP – 2-3/4″ x 5-1/4″ (mini card base background), 3/4″ x 2-3/4″ (inside trim)

Stampin’ Up! products used in this project:


Stampin’ Up! Country Bouquet Friendship Card with Video Tutorial

Good Morning! The Stampin’ Up! Country Bouquet photopolymer stamp set is a pretty Valentine’s Day stamp set, but it’s also wonderful for friendship cards. I paired it with the sweet Country Floral Lane designer series paper and the Lasting Label punch from the Lovely and Lasting bundle for a pre-Superbowl Facebook Live yesterday afternoon where I made this card. You can find the supplies I used at the bottom of my post along with the sizes of cardstock used.

You can watch my FB Live video on my Facebook page HERE. I also posted the video to my YouTube Channel and you can view it HERE.

I cut a floral panel of Country Floral Lane designer series paper on an angle about 1-1/4″ shorter on the left side. I applied Petal Pink ink with a blending brush to the top of a panel of white Textured Shimmer paper. I stamped the small open hearts from the Stampin’ Up! Country Bouquet photopolymer stamp set along the blended edge so that they would show above the slant after the DSP was adhered. I adhered the slant cut DSP to the panel with liquid glue.

I adhered another panel of Country Floral Lane to the front of a Petal Pink card base with liquid glue on an angle. I adhered the layered Texture shimmer paper panel to the card front, offset from the first layer of DSP. I made a big double loop bow with white crinkle ribbon and adhered it to the card front with a glue dot.

I stamped the frame from the Lovely and Lasting photopolymer stamp set in Mint Macaron on Basic White. I stamped the sweet sentiment from the Stampin’ Up! Country Bouquet stamp set in Petal Pink ink on the label and punched it out with the Lasting Label punch. I adhered the label to the card front with dimensionals over the bow and finished the card with three pearl hearts.

For the inside of the card, I stamped the sprig from the Stampin’ Up! Country Bouquet stamp set using Mint Macaron ink on the top of a Basic White panel and trimmed the bottom with a strip of Country Floral Lane DSP. I adhered the panel to the inside of the card with Stamping’ Seal.

The Stampin’ Up! Country Bouquet stamp set is perfect for Valentine’s Day, but also for other occasions where you want to express love and caring thoughts. The hearts and flowers theme is real sweet and the sentiments pretty and simple. These pictures don’t capture the shine from the Textured Shimmer paper, too bad. It’s really pretty with the subtle striped texture and it takes the color pretty well.


Sale-A-Bration is Stampin’ Up!’s best promotion of the year with specials for shopping, hosting and joining! It will run through February 28, 2023 and will be the only Sale-A-Bration this year!

SHOP

Orders placed during Sale-A-Bration will receive FREE products for orders of $50 or more(before shipping and taxes). There are 7 items that are available for free with orders of $50 or greater and 2 items that are available for free with orders of $100 or greater. The free Sale-A-Bration items are stackable, so if you place an order of $150, you can choose to add 3 $50 items or a $100 item and a $50 item to your order! And that’s in addition to the regular host rewards! The Sale-A-Bration items are only available while supplies last, so order early if there are items that you are really wanting! 

There’s even more to Sale-A-Brate with more FREE products that you can earn while you shop! Click on the image below to download a Flyer with all the details:

HOST

There’s also a host exclusive stamp set on page 16 of the Sale-A-Bration Brochure that is ONLY AVAILABLE to those ordering $300 or greater in a single order or who host a party with sales of $300 or greater during Sale-a-bration.  If you’d like to set up a host code to see if you can collect $300 in orders to earn that stamp set, I’d be happy to help you with that!  Reach out to me at apsudano@stampininthemeadows.com.

JOIN

Stampin’ Up! has three great joining promotion options during Sale-a-bration!

OPTION 1: Pay $129 and receive the exclusive Boho Blue Mini Machine (a $63 value) + choose $175 in Stampin’ Up! Products for your Starter Kit*.

OPTION 2: Pay $129 and receive the original white Mini Machine (a $63 value) + choose $175 in Stampin’ Up! Products for your Starter Kit*.

OPTION 3: Pay $99 and choose $175 in Stampin’ Up! Products for your Starter Kit*.

Once you join, you’ll get at least a 20% discount on all of your Stampin’ Up! merchandise purchases AND you get to order early from upcoming catalogs!  There is NO COMMITMENT and NO REQUIREMENT TO SELL to anyone.  You can join and just get the discount for yourself!  Contact me at apsudano@stampininthhemeadows.com if you’d like more information about joining or purchasing the Starter Kit! 

*That’s $50 more product than the standard Starter Kit offer!


Current Host Code: Y7X69NCW

Use this host code when you order $50 or more and receive a Thank You gift from me!  The free gift is your choice of any item valued up to $10.00 in the 2022-2023 Annual Catalog or the January-April 2023 Mini Catalog!

If your order is over $150, please do not use the host code since you’ll receive your own Host Dollars plus I’ll still send you the Thank You gift!  This host code can be used by anyone, no club or commitment required. Let me know if you have any questions.


If you need any stamping supplies, I’d be very happy to be your Demonstrator.  Just click on the Shop Now button on the right side of the screen to go directly to my online store or contact me if you have any questions.  Happy Stamping!

Thanks for stopping by and have a great week!

Akiko

  • Visit my online store here
  • See the current Stampin’ Up! clearance rack specials here
  • Earn FREE Stampin’ Up! products through my Wildflower Frequent Shopper Program – my way of saying thank you to my online frequent shopper customers.
  • Have any questions? I’d be happy to help, click here to contact me.

Cardstock Cuts for this project:

  • Petal Pink – 4-1/4″ x 11″ card base scored at 5-1/2″
  • Textured Shimmer paper – 3″ x 4-1/2″ (top layer)
  • Basic White – 3-3/4″ x 5″ (inside panel), 2″ x 3″ (label)
  • Country Floral Lane DSP – 3-1/4″ x 4-1/2″ (lower layer), 3″ x 3″ (lower top layer), 1/2″ x 3-3/4″ (inside trim)

Stampin’ Up! products used in this project:


Stampin’ Up! Petal Park Friendship Card

Good Morning! The Stampin’ Up! Petal Park bundle is a pretty two step stamping floral bundle with a wonderful coordinating punch. It’s part of the new Regency Park suite and coordinates well with the Sentimental Park bundle and Regency Park 6″ x 6″ designer series paper and I used all three for my card today. You can find the supplies I used at the bottom of my post along with the sizes of cardstock used.

I adhered the striped panel of Regency Park 6″ x 6″ designer series paper to the floral panel with liquid glue and adhered the layered panel to the front of a Night of Navy card base. I stamped the leaf spray from the Stampin’ Up! Petal Park photopolymer stamp set using Shaded Spruce ink. I stamped the line image full strength and stamped the filler image over it in stamped off ink. I adhered the panel to a Night of Navy mat.

I stamped the two step triple flower image from the Stampin’ Up! Petal Park stamp set on a panel of Basic White. I stamped the line image in Sweet Sorbet ink and stamped the filler image over it in Petal Pink ink. I punched the flowers out with the coordinating punch and adhered them to the leaf spray with dimensionals. I stamped the sentiment from the Sentimental Park stamp set in Night of Navy ink on Petal Pink and adhered it to a Night of Navy mat. I adhered it to the floral panel with liquid glue.

I popped the layered panel on the card front with dimensionals. I colored a length of white crinkle ribbon with a dark Petal Pink Stampin’ Blend and adhered it to the card with a glue dot. I finished the card with blue flower gems.

For the inside of the card, I stamped the floral image from the Sentimental Park stamp set using Petal Pink ink in the corner of a Basic White panel. I stamped the sentiment in Night of Navy ink and trimmed the bottom with a strip of Regency Park 6″ x 6″ DSP. I adhered the panel to the inside of the card with Stamping’ Seal.

The Stampin’ Up! Petal Park bundle has pretty two step stamping flowers and leaves with a coordinating punch. The punch cuts three different sizes of flowers and a leaf. The two step stamping can be done with different colors or in full strength and stamped off ink, or can be colored with other coloring methods. It’s a pretty versatile set, so check it out!


Sale-A-Bration is Stampin’ Up!’s best promotion of the year with specials for shopping, hosting and joining! It will run through February 28, 2023 and will be the only Sale-A-Bration this year!

SHOP

Orders placed during Sale-A-Bration will receive FREE products for orders of $50 or more(before shipping and taxes). There are 7 items that are available for free with orders of $50 or greater and 2 items that are available for free with orders of $100 or greater. The free Sale-A-Bration items are stackable, so if you place an order of $150, you can choose to add 3 $50 items or a $100 item and a $50 item to your order! And that’s in addition to the regular host rewards! The Sale-A-Bration items are only available while supplies last, so order early if there are items that you are really wanting! 

There’s even more to Sale-A-Brate with more FREE products that you can earn while you shop! Click on the image below to download a Flyer with all the details:

HOST

There’s also a host exclusive stamp set on page 16 of the Sale-A-Bration Brochure that is ONLY AVAILABLE to those ordering $300 or greater in a single order or who host a party with sales of $300 or greater during Sale-a-bration.  If you’d like to set up a host code to see if you can collect $300 in orders to earn that stamp set, I’d be happy to help you with that!  Reach out to me at apsudano@stampininthemeadows.com.

JOIN

Stampin’ Up! has three great joining promotion options during Sale-a-bration!

OPTION 1: Pay $129 and receive the exclusive Boho Blue Mini Machine (a $63 value) + choose $175 in Stampin’ Up! Products for your Starter Kit*.

OPTION 2: Pay $129 and receive the original white Mini Machine (a $63 value) + choose $175 in Stampin’ Up! Products for your Starter Kit*.

OPTION 3: Pay $99 and choose $175 in Stampin’ Up! Products for your Starter Kit*.

Once you join, you’ll get at least a 20% discount on all of your Stampin’ Up! merchandise purchases AND you get to order early from upcoming catalogs!  There is NO COMMITMENT and NO REQUIREMENT TO SELL to anyone.  You can join and just get the discount for yourself!  Contact me at apsudano@stampininthhemeadows.com if you’d like more information about joining or purchasing the Starter Kit! 

*That’s $50 more product than the standard Starter Kit offer!


Current Host Code: Y7X69NCW

Use this host code when you order $50 or more and receive a Thank You gift from me!  The free gift is your choice of any item valued up to $10.00 in the 2022-2023 Annual Catalog or the January-April 2023 Mini Catalog!

If your order is over $150, please do not use the host code since you’ll receive your own Host Dollars plus I’ll still send you the Thank You gift!  This host code can be used by anyone, no club or commitment required. Let me know if you have any questions.


If you need any stamping supplies, I’d be very happy to be your Demonstrator.  Just click on the Shop Now button on the right side of the screen to go directly to my online store or contact me if you have any questions.  Happy Stamping!

Thanks for stopping by and have a great week!

Akiko

  • Visit my online store here
  • See the current Stampin’ Up! clearance rack specials here
  • Earn FREE Stampin’ Up! products through my Wildflower Frequent Shopper Program – my way of saying thank you to my online frequent shopper customers.
  • Have any questions? I’d be happy to help, click here to contact me.

Cardstock Cuts for this project:

  • Night of Navy – 4-1/4″ x 11″ card base scored at 5-1/2″, 3″ x 4-1/4″ (floral mat), 7/8″ x 2-1/2″ (label mat)
  • Petal Pink – 3/4″ x 2-3/8″ (label)
  • Basic White – 4″ x 5-1/4″ (inside panel), 2-3/4″ x 4″ (floral panel), 2-1/2″ x 3″ (punched flowers)
  • Regency Park DSP – 4″ x 5-1/4″ (front background), 2″ x 4″ (front stripe), 31/2″ x 4″ (inside trim)

Stampin’ Up! products used in this project:


Stampin’ Up! Playing in the Rain for the Happy Inkin’ Thursday Blog Hop

Good Morning and welcome to the Happy Inkin’ Thursday Blog Hop! The Stampin’ Up! Playing in the Rain bundle is a cute weather theme bundle with cute critters and is perfect for fun spring cards. I used it with the Rain or Shine specialty designer series paper for today’s card. You can find the supplies I used along with card stock cuts at the bottom of my post.

We have a color challenge this week and here is the pretty color palette we are using:

I adhered a panel of Rain or Shine specialty designer series paper to a Mango Melody mat and popped it on an Old Olive card base with dimensionals. I cut bunny and turtle from the DSP with the Stampin’ Up! Playing in the Rain dies and used the same dies to cut a Basic White panel. I adhered the DSP die cuts to the Basic White die cuts to make them thicker for popping on the cards with dimensionals.

I used the Stampin’ Up! Playing in the Rain dies to cut a stump from Soft Suede and two grass clumps from Old Olive and adhered these die cuts to the card with liquid glue. Once these were on the card, I could place the bunny jumping over the stump and the turtle looking at the bunny, so I adhered them with dimensionals.

I stamped the sentiment from the Stampin’ Up! Playing in the Rain cling stamp set in Memento Tuxedo Black ink on a Basic White panel. I cut it out with the largest banner die from the Stylish Shapes dies and trimmed off the left end with my paper snips. I adhered the label to the card with liquid glue and decorated it with loose daisy embellishments adhered with glue dots. I adhered more daisies around the tree stump to finish the card front.

For the inside of the card, I stamped the flowers from the Stampin’ Up! Playing in the Rain stamp set in Memento Tuxedo Black ink across the bottom of a Basic White panel. Since the Mango Melody Stampin’ Blends are no longer available, I used a Blender Pen to color the flowers. I colored the flowers with Mango Melody, Cajun Craze and Old Olive ink that I squeezed to the top of my ink pad covers. The flowers are so small that it’s easy to color them with a Blender Pen or a Stampin’ Write marker and get the same look as using Stampin’ Blends. It’s great to have so many coloring options and have your colors coordinate with the DSP! I adhered the panel to the inside of the card with Stampin’ Seal.

The some of the cute critters in the Rain or Shine DSP can also be cut out with the Stampin’ Up! Playing in the Rain dies that cut out the stamped images. Since the DSP critters have the shiny clear embossed look, I decided to use these for the card rather than stamping and coloring new ones. They’re so sweet and cute!

On with the Hop! Click on the Next Blog button to move forward to see the beautiful project Karen Ksenzakovic has created.

If you get lost along the way, here are the participants for the hop:


Current Host Code: Y7X69NCW

Use this host code when you order $50 or more and receive a free gift from me!  The free gift is your choice of any item valued up to $10 in the 2022-2023 Annual Catalog or the January-April 2023 Mini Catalog!

If your order is over $150, please do not use the host code since you’ll receive your own Host Dollars plus I’ll still send you the free gift!  This host code can be used by anyone, no club or commitment required. Let me know if you have any questions.


If you need any stamping supplies, I’d be very happy to be your Demonstrator.  Just click on the Shop Now button on the right side of the screen to go directly to my online store or contact me if you have any questions. 

Thanks for stopping by and Happy Stamping!

Akiko

  • Visit my online store here
  • See the current Stampin’ Up! clearance rack specials here
  • Earn FREE Stampin’ Up! products through my Wildflower Frequent Shopper Program – my way of saying thank you to my online frequent shopper customers.
  • Have any questions? I’d be happy to help, click here to contact me.

Cardstock Cuts for this project:

  • Old Olive – 4-1/4″ x 11″ card base scored at 5-1/2″, 1-1/2″ x 2″ (die cut grasses)
  • Soft Suede – 1-1/4″ x 1-3/4″ (die cut stump)
  • Mango Melody – 4″ x 5-1/4″ (front mat)
  • Basic White – 4″ x 5-1/4″ (inside panel), 2-1/2″ x 4″ (die cut critter backing), 1-1/2″ x 2-1/” (label)
  • Rain or Shine specialty DSP – 3-7/8″ x 5-1/8″ (front background), die cut rabbit, die cut turtle

Stampin’ Up! products used in this project: