Stampin’ Up! Painted Poppies You are the Best Card

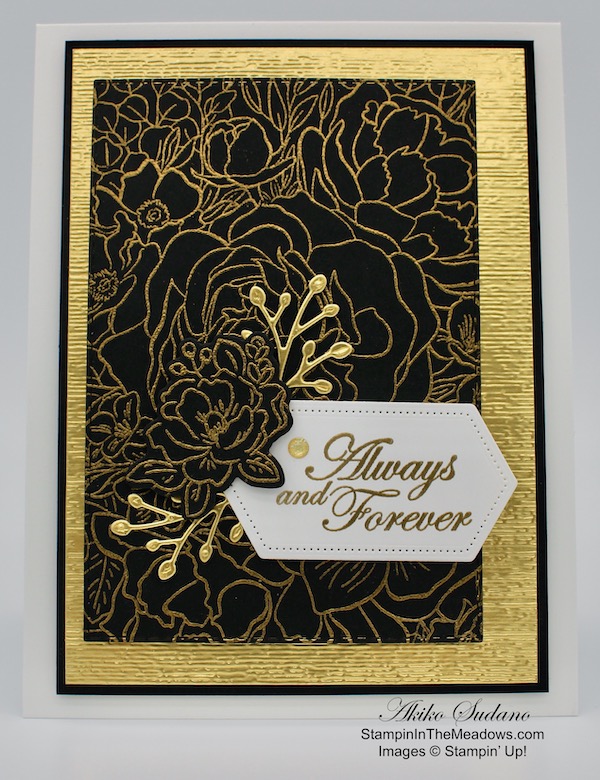
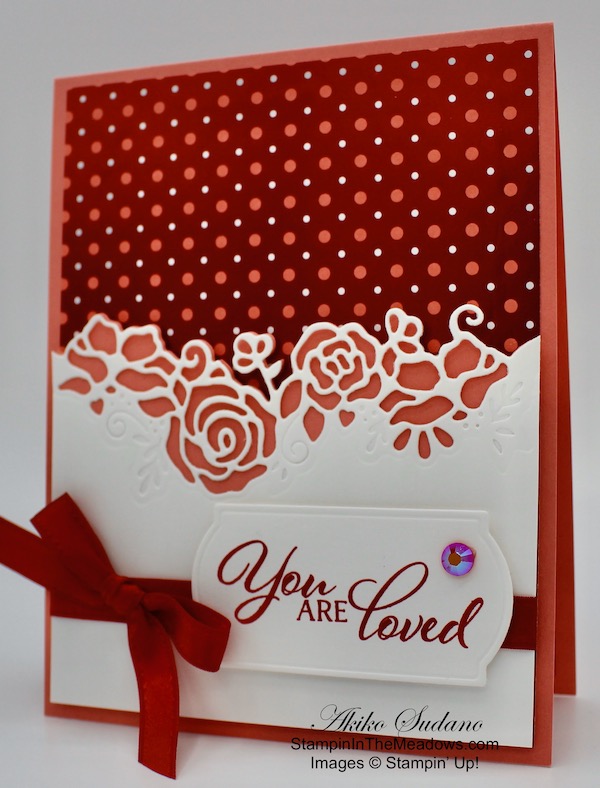
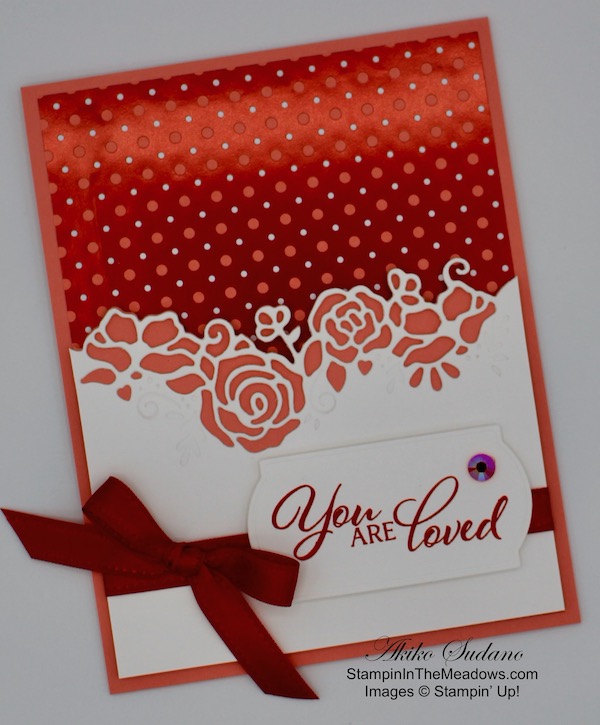
Good Morning and Happy Valentine’s Day! Today’s card is made with the beautiful and versatile Stampin’ Up! Painted Poppies stamp set. You can find the supplies used to create this card at the bottom of my post along with the sizes of cardstock used.

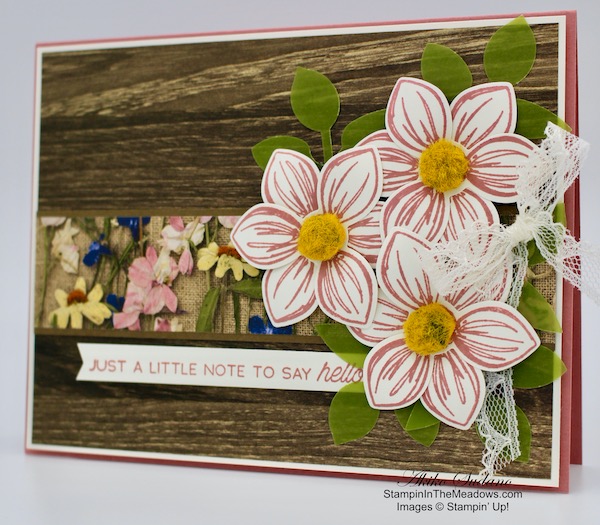
I stamped the small poppy field stamp from the Stampin’ Up! Painted Poppies stamp set in Memento Tuxedo Black ink on thick Whisper White card stock. I stamped twice so that the flowers would go across the panel. I cut out the panel with the largest scalloped rectangle from the Stitched So Sweetly dies. I colored the flowers with the light Poppy Parade Stampin’ Blend.

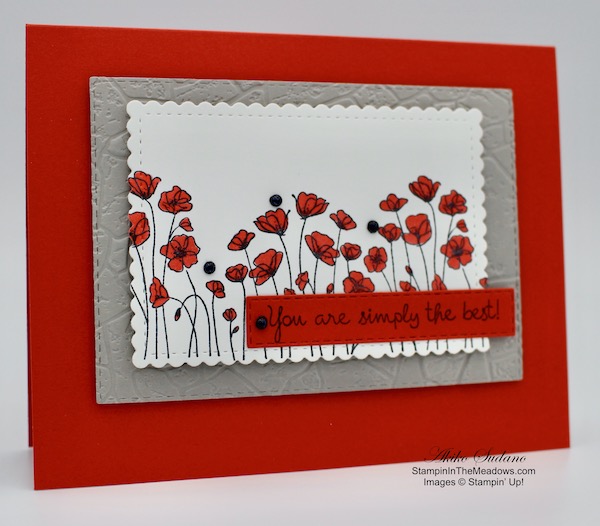
I cut a panel of Gray Granite card stock with the third largest Stitched Rectangle die and ran it through the Stone embossing folder. The Stone embossing folder is a Sale-A-Bration item that comes in the Power of Hope bundle that is FREE with a $100 purchase. I adhered the stamped thick Whisper White panel over the embossed panel with dimensionals. I adhered the embossed panel over a Poppy Parade card base with dimensionals.

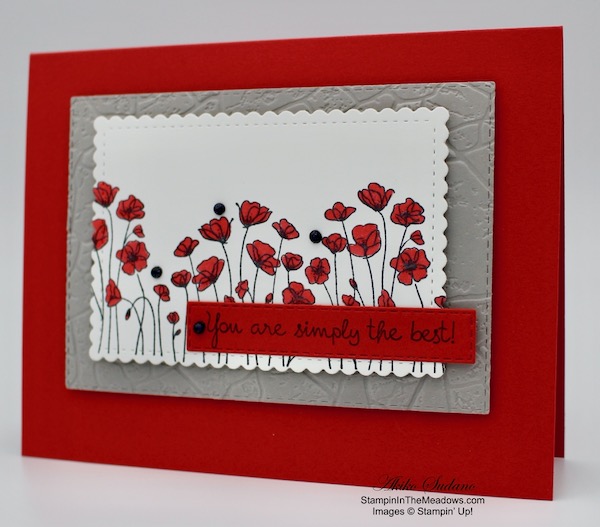
I stamped the sentiment from the Varied Vases stamp set in Memento Tuxedo Black ink on a strip of Poppy Parade card stock. I cut out the label using the long thin Stitched Rectangle die using the two-step partial die cutting method so that it would be long enough for the entire sentiment. I adhered it to the poppy panel with glue dots. I colored some basic pearls with my dark Basic Black Stampin’ Blend and added them to the panel to finish it off.

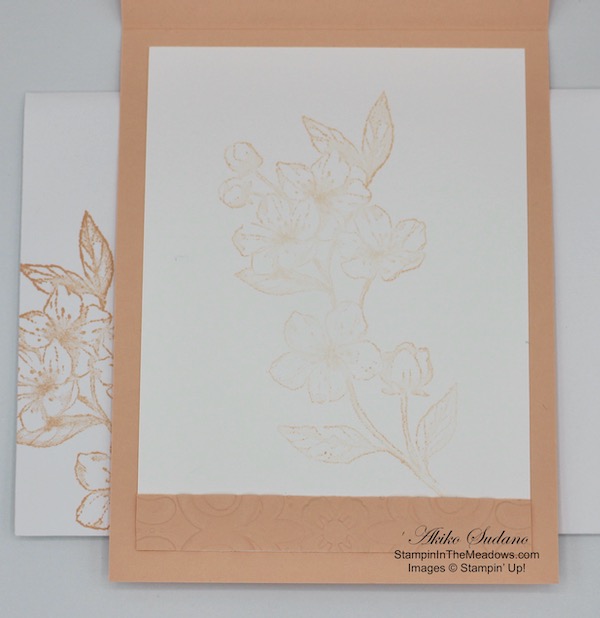
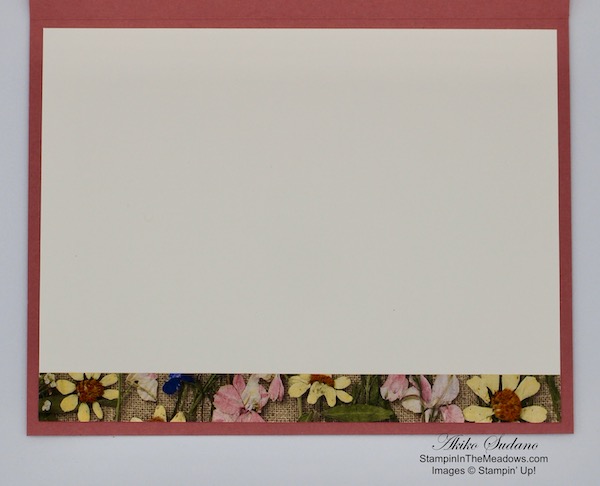
I stamped the middle section of the small poppy field stamp from the Stampin’ Up! Painted Poppies stamp set across a strip of Whisper White. I colored the flowers with the Light Poppy Parade Stampin’ Blend and adhered it to the bottom of a Whisper White panel. I adhered the panel to a Gray Granite mat and then to the inside of the card.

The Stampin’ Up! Painted Poppies stamp set is so versatile because it has so many different poppy images that can be used to make pretty cards. I hope you try this simple design.


Stampin’ In The Meadows Online Host Club Opening in March

A quick reminder that there are openings in the Stampin’ In The Meadows Online Host club beginning March 1. See my Stampin’ In The Meadows Online Host Club page or email me at apsudano@stampininthemeadows.com for more details.


Double Wildflower Points Ordering Bonus

Tomorrow is the last day for my DOUBLE Wildflower Points Bonus. If you don’t know about my Wildflower Frequent Shopper program, are the highlights on how it works:

  • For each $50 that you order from my online store (before S & H) you will earn one Wildflower point.
  • You will earn one Wildflower point for each friend that you refer when they place their first order of $50+ from my online store.
  • When you have earned 8 Wildflower points you will get a FREE product order valued up to $40.00, your choice and mailed directly to you!

With DOUBLE points you get 2 points for each $50 order, 4 points for each $100 order, and so on, reaching your FREE order faster!!

This offer ends TOMORROW.

For complete details on my Wildflower Frequent Shopper Program, scroll to the bottom of my Customer Rewards page or contact me at apsudano@stampininthemeadows.com.


This image has an empty alt attribute; its file name is 01.01.20_sab_cmain_us.jpg

Stampin’ Up! Sale-A-Bration is going on now!

Stampin’ Up!’s spectacular Sale-A-Bration is entering its second month. There are three ways to enjoy Sale-A-Bration benefits: Shop – Host – Join.

Sale-A-Bration Shopping Benefits

This image has an empty alt attribute; its file name is 12-01-19_sab_demoshare_shop_us_th.jpg

You earn FREE products for every $50 you spend (before shipping and taxes) during Sale-A-Bration. The Sale-A-Bration brochure has the products that you can choose to add to your order. And the more you spend, the more FREE products you can earn. There are two qualifying levels with spending thresholds, giving you flexibility to choose what you want.

This image has an empty alt attribute; its file name is sale-a-bration-levels.jpeg

For example, if you spend $150, then you can then choose three level 1 items or one level 1 and one level 2.

Head over to my online store to shop now.

See the current Sale-A-Bration Joining and Hosting specials on my Promotions page. These are available through March 31, 2020.


February 1 – 15 Host Code: ZSQEMEKE

Use this host code when you order $50 or more and receive a free gift from me!  The gift is your choice of any item valued up to $10.00 in the 2019-20 Annual Catalog or in the 2020 January-June Mini Catalog!  That includes some of the Host Exclusive stamp sets!

If your order is over $150, please do not use the host code since you’ll receive your own Host Dollars plus I’ll send you the free gift!  This host code can be used by anyone, no commitment required.  Let me know if you have any questions.


If you need any stamping supplies, I’d be very happy to be your Demonstrator.  Just click on the Shop Now button on the right side of the screen to go directly to my online store or contact me if you have any questions.  Happy Stamping!

Thanks for stopping by and have a great day!

Akiko

  • Visit my online store here
  • See the current Stampin’ Up! clearance rack specials here
  • Earn FREE Stampin’ Up! products through my Wildflower Frequent Shopper Program – my way of saying thank you to my frequent shopper online customers.
  • Sign up for my weekly newsletter here
  • Have any questions? I’d be happy to help, click here to contact me.

Cardstock Cuts for this project:

  • Poppy Parade – 5 1/2″ x 8 1/2″ scored at 4 1/4 (card base), 1 1/2″ x 3″ (label)
  • Grey Granite – 3 1/4″ x 4 1/2″ (embossed front panel), 3 7/8″ x 5 1/8″ (inside mat)
  • Whisper White – 3 3/4″ x 5″ (inside panel), 1/2″ x 5″
  • Thick Whisper White – 3″ x 4″ (poppy panel)

Stampin’ Up! products used in this project:


Stampin’ Up! Cherry Blossoms Birthday Card for the Inkin’ Krew Blog Hop

Good Morning! Welcome to another Inkin’ Krew Monthly Blog Hop! The theme for this month’s hop is Birthday and I made a pretty pink birthday card with the Stampin’ Up! Cherry Blossoms dies to share.

I started by embossing a panel of Petal Pink card stock with the Parisian Flourish embossing folder and adhering it to a Petal Pink card base with snail.

To make the flowers, I cut out three sets of the two largest petals and three sets of the two smallest petals from Whisper White card stock using the Stampin’ Up Cherry Blossom dies. Note that the small petals have two flower clusters on each die, so I ended up with six of each of the smaller petal clusters and three of each of the larger petal clusters. I sponged the edges of each petal cluster with Petal Pink ink and curled the edges up with my bone folder. I assembled three large flowers with multipurpose liquid glue, layering four flowers from largest on the bottom to smallest on top, turning each so that the petals fall between the petals on the layer below. I assembled three small flowers starting with a 1/4″ x 1/4″ scrap of Whisper White and layering the two smallest petal clusters on top of it with multipurpose liquid glue, turning each layer so the petals fall between the petals below.

I cut five sets of the large embossed leaves and three sets of the smallest embossed leaves. I adhered three leaves on the back of each of the large flowers and two leaves on the back of the small flowers with multipurpose liquid glue. I adhered champagne rhinestones in the center of each flower. I cut a Sahara Sand branch using the die from the Stampin’ Up! Cherry Blossoms dies.

I stamped the Happy Birthday sentiment from the Magnolia Blooms stamp set in Petal Pink ink on a Whisper White panel. I cut it out with the small label die from the Painted Labels dies. I arranged the flowers and branch on the card with the label and adhered everything down with glue dots. I tied a length of Petal Pink ribbon and adhered it with a glue dot.

I stamped the large floral branch from the Forever Blossoms cling stamp set in Petal Pink ink on a Whisper White panel. I embossed a strip of Petal Pink with the Parisian Flourish embossing folder and adhered it to the bottom. I adhered the panel to the inside of the card with snail. I stamped the floral branch on a medium Whisper White envelope to coordinate with the card.


Let’s visit the other beautiful projects in the Blog Hop. Click on the Next Blog button to move forward to Mary Deatherage’s project or click the Previous Blog button to move back to see the project that Connie Troyer created.

If you get lost along the way, here are the participants for the hop:


February 1 – 15 Host Code: ZSQEMEKE

Use this host code when you order $50 or more and receive a free gift from me!  The gift is your choice of any item valued up to $10.00 in the 2019-20 Annual Catalog or in the 2020 January-June Mini Catalog!  That includes some of the Host Exclusive stamp sets!

If your order is over $150, please do not use the host code since you’ll receive your own Host Dollars plus I’ll send you the free gift!  This host code can be used by anyone, no commitment required.  Let me know if you have any questions.


If you need any stamping supplies, I’d be very happy to be your Demonstrator.  Just click on the Order Stampin’ Up! Online Now button on the right side of the screen to go directly to my online store or contact me if you have any questions.  Happy Stamping!

Thanks for visiting!

Akiko

  • Visit my online store here
  • See the current Stampin’ Up! clearance rack specials here
  • Earn FREE Stampin’ Up! products through my Wildflower Frequent Shopper Program – my way of saying thank you to my frequent shopper online customers.
  • Sign up for my weekly newsletter here
  • Have any questions? I’d be happy to help, click here to contact me.

Cardstock Cuts for this project:

  • Petal Pink – 4 1/4″ x 11″ scored at 5 1/2″ (card base), 3 7/8″ x 5 1/8″ (embossed background), 1/2″ x 3 3/4″ (inside embossed trim)
  • Old Olive – 1″ x 6″ (leaf die cuts)
  • Sahara Sand – 2 1/2″ x 5″ (branch die cut)
  • Whisper White – 3 3/4″ x 5″ (inside panel), (2) 1″ x 5″ & (2) 1 1/4″ x 5″ (flower die cuts), 2″ x 3″ (label)

Stampin’ Up! products used in this project:


Stampin’ Up! Breathtaking Bouquet Wedding Card for the Happy Inkin’ Thursday Blog Hop

Good Morning! Welcome to another Happy Inkin’ Thursday Blog Hop! I made an elegant wedding card with the new Stampin’ Up! Breathtaking Bouquet stamp set to share today.

We have a color challenge this week, and here is the color palette we are using:

I started by stamping the Stampin’ Up! Breathtaking Bouquet background stamp set on a panel of Basic Black card stock using VersaMark Ink. I sprinkled it with Gold embossing powder and heat set. I cut it out with the third largest of the Stitched Rectangles dies. I cut a panel of Gold Foil and ran it through the Subtle embossing folder and adhered it to a Basic Black mat. I popped the embossed gold foil on a Thick Whisper White card base with dimensionals. I popped the floral embossed basic black die cut panel on the card front with dimensionals.

I stamped the sentiment from the Forever Blossoms stamp set in VersaMark Ink on a panel of Whisper White. I sprinkled Gold embossing powder on it and heat set. I cut it out with a Stitched Nested Label die. I stamped the top of the birthday cake from the Happy Birthday to You Sale-A-Bration stamp set twice on a panel of Basic Black card stock in VersaMark Ink. I sprinkled them with Gold embossing powder and heat set. I cut each cluster with the coordinating die from the Birthday Dies and I fussy cut the top flower in each cluster. I put one aside for the inside of the card.

I cut the leaf spray from the Birthday dies on a panel of Gold foil giving me two dies. I adhered the dies and label to the card front with glue dots. I adhered the Happy Birthday to You flower to the card front with dimensionals. I finished the card front with a gold glitter enamel dot.

For the inside, I stamped the sentiment from Forever Blossoms on a Whisper White panel using VersaMark Ink. I sprinkled it with Gold embossing powder and heat set. I added a strip of Gold foil that was embossed with the Subtle embossing folder to the bottom and adhered the panel to a Basic Black mat. I adhered the panel to the inside of the card with snail. I finished the inside with the second Happy Birthday to You embossed flower.

It’s fun to use Foil in making cards, and it is so elegant and beautiful when embossed. Good thing there are Weddings to have an excuse to be so extravagant!

On with the Hop! Click the Next button below to visit Karen Ksenzakovic’s blog.

And just in case you get lost along the way, here’s a list of the team members participating in the hop today:


February 1 – 15 Host Code: ZSQEMEKE

Use this host code when you order $50 or more and receive a free gift from me!  The gift is your choice of any item valued up to $10.00 in the 2019-20 Annual Catalog or in the 2019 Holiday Catalog!  That includes some of the Host Exclusive stamp sets!

If your order is over $150, please do not use the host code since you’ll receive your own Host Dollars plus I’ll send you the free gift!  This host code can be used by anyone, no commitment required.  Let me know if you have any questions.


If you need any stamping supplies, I’d be very happy to be your Demonstrator.  Just click on the Shop Now button on the right side of the screen to go directly to my online store or contact me if you have any questions.  Happy Stamping!

Thanks for visiting!

Akiko

  • Visit my online store here
  • See the current Stampin’ Up! clearance rack specials here
  • Earn FREE Stampin’ Up! products through my Wildflower Frequent Shopper Program – my way of saying thank you to my frequent shopper online customers.
  • Sign up for my weekly newsletter here
  • Have any questions? I’d be happy to help, click here to contact me.

Cardstock Cuts for this project:

  • Thick Whisper White – 4 1/4″ x 11″ scored at 5 1/2″ (card base)
  • Whisper White – 3 3/4″ x 5″ (inside panel), 1 3/4″ x 3 1/2″ (label)
  • Basic Black – 3 3/4″ x 5″ (embossed panel), 3 7/8″ x 5 1/8″ (inside mat), 2 1/2″ x 6″ (die cuts), 3 3/4″ x 5 1/8″ (front mat)
  • Gold Foil – 3 5/8″ x 5″ (front embossed background), 1/2″ x 3 3/4″ (inside trim), 2″ x 2″ (die cuts)

Stampin’ Up! products used in this project:


Stampin’ Up! Cherry Blossoms Thinking of You Card

Good Morning! Today I am thinking Spring and bringing you a Thinking of You card made with the Stampin’ Up! Cherry Blossoms dies that are part of the Parisian Blossoms suite and Forever Blossoms bundle in the new Mini Catalog. You can find the supplies used to create this card at the bottom of my post along with the sizes of cardstock used.

I embossed a panel of Pool Party card stock with the beautiful Parisian Flourish embossing folder and adhered it to a Pool Party card base with snail. I cut a panel of the Parisian Blossoms specialty designer series paper and adhered it to a Petal Pink mat. I cut one of each of the flowers in the Stampin’ Up! Cherry Blossoms dies from Whisper White card stock. Note that the smaller dies cut two flowers in each die and that there are two dies of each for the larger flowers. I cut a total of 8 flowers and for the smaller flowers, I was careful to save the centers. I sponged the edges of each flower with Petal Pink ink along with the centers of the larger flowers. I cut two sets of the stamen center dies from Smoky Slate card stock (note that the die cuts two stamen centers at a time).

I adhered a stamen to the center of each of the larger flowers with multipurpose liquid glue. I colored the tiny centers of the smaller flowers with the Light Smoky Slate Stampin’ Blend. I stuck a glue dot behind each of the small flowers and adhered the centers to the flowers. I cut a branch from the Stampin’ Up! Cherry Blossoms die set from Soft Suede card stock. I stamped the Thinking of You sentiment from the Good Morning Magnolia stamp set in Smoky Slate ink on a scrap of Petal Pink card stock. The font is the same as the font in the Parisian Blossoms suite, so it goes well with the set and gives you alternative sentiments to use while keeping the same elegant feel. I cut the sentiment out with one of the Stitched Nested Labels dies.

I arranged the branch and label on the Parisian Blossoms DSP panel and adhered them with multipurpose liquid glue. I arranged the flowers and adhered the large ones with dimensionals and the small ones with glue dots. I finished off each flower center with a Champagne rhinestone and added a bow to the label made with the metallic edge Petal Pink ribbon. I adhered the Parisian Blossoms panel on the card front with dimensionals.

I kept the inside of the card simple with plenty of space to write a personal message. I adhered a strip of the Parisian Blossoms specialty designer series paper to the bottom of a Whisper White panel and attached it to the inside of the card.

The Parisian Blossoms suite is so beautiful and the Stampin’ Up! Cherry Blossoms dies allow you to create elegant and beautiful dimensional floral cards. With the unique shapes of each flower, you have a lot of movement and flexibility in arranging them on the branch.


January 16 – 31 Host Code: EFVWTZUQ

February 1 – 15 Host Code: ZSQEMEKE

Use this host code when you order $50 or more and receive a free gift from me!  The gift is your choice of any item valued up to $10.00 in the 2019-20 Annual Catalog or in the 2019 Holiday Catalog!  That includes some of the Host Exclusive stamp sets!

If your order is over $150, please do not use the host code since you’ll receive your own Host Dollars plus I’ll send you the free gift!  This host code can be used by anyone, no commitment required.  Let me know if you have any questions.


If you need any stamping supplies, I’d be very happy to be your Demonstrator.  Just click on the Shop Now button on the right side of the screen to go directly to my online store or contact me if you have any questions.  Happy Stamping!

Thanks for stopping by and have a great day!

Akiko

  • Visit my online store here
  • See the current Stampin’ Up! clearance rack specials here
  • Earn FREE Stampin’ Up! products through my Wildflower Frequent Shopper Program – my way of saying thank you to my frequent shopper online customers.
  • Sign up for my weekly newsletter here
  • Have any questions? I’d be happy to help, click here to contact me.

Cardstock Cuts for this project:

  • Pool Party – 4 1/4″ x 11″ scored at 5 1/2″ (card base), 4″ x 5 1/4″ (embossed panel)
  • Whisper White – 4″ x 5 1/4″ (inside panel), 2″ x 5″ (flower die cuts)
  • Petal Pink – 3 1/2″ x 4 1/4″ (front mat), 1 1/2″ x 3 1/2″ (label)
  • Smoky Slate – 1″ x 2″ (stamen die cuts)
  • Soft Suede – 3″ x 5″ (branch die cut)
  • Parisian Blossoms DSP – 3 3/8″ x 4 1/8″ (front panel), 1/2″ x 4″ (inside trim)

Stampin’ Up! products used in this project:


Stampin’ Up! Abstract Impressions for the Inkin’ Krew Blog Hop

Good Morning! Today it is time for the January Inkin’ Krew Monthly Blog Hop and the theme is “Love”. I made a note card with the awesome Stampin’ Up! Abstract Impressions stamp set with a little treat holder made with the Mini Curvy Keepsakes Box dies. You can find the supplies used to create this card at the bottom of my post along with the sizes of cardstock used.

I am featuring the new Best Dressed designer series paper for today’s project because hearts and flowers with presents say LOVE:

I cut a panel of the Best Dressed designer series paper and adhered it to the front of a Whisper White Note Card. I took a panel of Whisper White and stamped the sentiment from the Stampin’ Up! Abstract Impressions stamp set in Pretty Peacock ink. I stamped the two thickest images of the rose in Highland Heather ink. I stamped off the thick one and then stamped the thinner one on top full strength.

I stamped several of the round flowers in Daffodil Delight. I inked up the single flower that was off to the side and again stamped the thicker image after stamping off once and the highlight stamp full strength. I stamped the single leaf the same way using Mint Macaron – stamping off once for the background and full strength for the highlight. These two-step stamping sets make a nice design when used this way and the photopolymer makes it easy to see and control your design. For the red flowers, I used my Lovely Lipstick Stampin’ Write marker to hand draw small wispy flowers to echo the flowers in the background paper.

After I finished stamping the panel, I adhered it to a Purple Posy mat with multipurpose liquid glue and then popped it on the front of the note card with dimensionals. I finished off the front with a Purple Posy faceted dot and a Blackberry Bliss twine bow. I decorated the envelope by stamping the flower and some leaves in Highland Heather and Mint Macaron, just like the card front.

I used the same sheet of Best Dressed designer series paper to make a Mini Curvy Keepsake box. I used the heart tag die cut to cut a heart from the DSP and from Blackberry Bliss card stock. I decorated the hearts with the small stitched heart from the Stitched Labels dies – I was pleased that these hearts go together perfectly. I tied the hearts to the box handle with Mossy Meadow Linen Thread.

I kept the inside simple, just adding some hearts made with the small heart die.

This set is designed for a quick little love note and chocolate treat – perfect for that someone special!

Thanks for visiting and on with the Hop! Click on the Next Blog button to move forward to Jaimie’s project or click the Previous Blog button to move back to see the project that Connie created.

If you get lost along the way, here are the participants for the hop:

I hope you enjoy all the beautiful projects that the team has created for our hop today and that they inspire you for celebrating Valentine’s Day and fill your heart with love.


January 1 – 15 Host Code: FB6MBVE3

January 16 – 31 Host Code: EFVWTZUQ

Use this host code when you order $50 or more and receive a free gift from me!  The gift is your choice of any item valued up to $10.00 in the 2019-20 Annual Catalog or in the 2019 Holiday Catalog!  That includes some of the Host Exclusive stamp sets!

If your order is over $150, please do not use the host code since you’ll receive your own Host Dollars plus I’ll send you the free gift!  This host code can be used by anyone, no commitment required.  Let me know if you have any questions.


If you need any stamping supplies, I’d be very happy to be your Demonstrator.  Just click on the Shop Now button on the right side of the screen to go directly to my online store or contact me if you have any questions.  Happy Stamping!

Thanks for stopping by and have a great week!

Akiko

  • Visit my online store here
  • See the current Stampin’ Up! clearance rack specials here
  • Earn FREE Stampin’ Up! products through my Wildflower Frequent Shopper Program – my way of saying thank you to my frequent shopper online customers.
  • Sign up for my weekly newsletter here
  • Have any questions? I’d be happy to help, click here to contact me.

Cardstock Cuts for this project:

  • Best Dressed DSP – 6″ x 6″ (mini curvy keepsake box and die cuts), 3 1/4″ x 4 3/4″ (background)
  • Blackberry Bliss – 2″ x 2″ (die cut)
  • Whisper White – 2″ x 4″ (floral panel)
  • Purple Posey – 2 1/8″ x 4 1/8″ (front mat), 1″ x 1″ (die cut)

Stampin’ Up! products used in this project:


Stampin’ Up! Forever Lovely for the Happy Inkin’ Thursday Blog Hop

Good Morning! Welcome to another Happy Inkin’ Thursday Blog Hop! Can you feel all the love in the air? I am using the Stampin’ Up! Forever Lovely photopolymer stamp set with the new From My Heart specialty designer series paper to bring some more.

We have a color challenge this week, and here is the color palette we are using:

Doesn’t it inspire Love? I started with the shiny Real Red with Flirty Flamingo and Whisper White dotted paper from the From My Heart specialty DSP and cut a panel and adhered it to a Flirty Flamingo card base with multipurpose liquid glue. I cut a Thick Whisper White panel with the long flowers die cut from the Lovely Flowers dies which coordinates with the Stampin’ Up! Forever Lovely stamp set. I used the edge die from the Lovely Flowers die to cut a backing in Flirty Flamingo. I adhered the Flirty Flamingo die cut behind the Whisper White die cut with multipurpose liquid glue.

I wrapped the Real Red satin ribbon around the panels and secured it in the back. I stamped the sentiment from the Stampin’ Up! Forever Lovely stamp set in Real Red ink on a scrap of Thick Whisper White. I cut it out with the curved edge die from the Painted Labels dies and popped it over the ribbon with dimensionals. I made a bow and adhered it to the ribbon with glue dots. I popped the layered panel on the card front with dimensionals and finished it off with a Real Red faceted gem on the label.


I stamped the long floral spray from the Stampin’ Up! Forever Lovely stamp set on the bottom of a Whisper White panel in Flirty Flamingo ink. I stamped the coordinating leaf stamp over it using Pear Pizzazz ink. I added the strip of shiny Real Red paper and adhered the panel to a Real Red mat before attaching it to the inside of the card with multipurpose liquid glue.

With all the flowers and pink and red, Valentine’s Day must be right around the corner – I think we’re getting ready for it!

On with the Hop! Click the Next button below to see Karen Ksenzakovic’s project.

And just in case you get lost along the way, here’s a list of the team members participating in the hop today:


January 1 – 15 Host Code: FB6MBVE3

Use this host code when you order $50 or more and receive a free gift from me!  The gift is your choice of any item valued up to $10.00 in the 2019-20 Annual Catalog or in the 2019 Holiday Catalog!  That includes some of the Host Exclusive stamp sets!

If your order is over $150, please do not use the host code since you’ll receive your own Host Dollars plus I’ll send you the free gift!  This host code can be used by anyone, no commitment required.  Let me know if you have any questions.


If you need any stamping supplies, I’d be very happy to be your Demonstrator.  Just click on the Shop Now button on the right side of the screen to go directly to my online store or contact me if you have any questions.  Happy Stamping!

Thanks for visiting!

Akiko

  • Visit my online store here
  • See the current Stampin’ Up! clearance rack specials here
  • Earn FREE Stampin’ Up! products through my Wildflower Frequent Shopper Program – my way of saying thank you to my frequent shopper online customers.
  • Sign up for my weekly newsletter here
  • Have any questions? I’d be happy to help, click here to contact me.

Cardstock Cuts for this project:

  • Flirty Flamingo – 4 1/4″ x 11″ scored at 5 1/2″ (card base), 2″ x 4″ (die cut backing panel)
  • Whisper White – 3 3/4″ x 5″ (inside panel)
  • Thick Whisper White – 3 1/4″ x 4″ (front die cut panel), 2″ x 3″ (label)
  • Real Red – 3 7/8″ x 5 1/8″ (inside mat)
  • From My Heart specialty DSP – 4″ x 5 1/4″ (front background), 1/2″ x 3 3/4″ (inside trim)

Stampin’ Up! products used in this project:


Stampin’ Up! Beautiful Friendship Congratulations Card

Good Morning! I am sharing a card I made for a special lady who just got engaged. I made it with the Stampin’ Up! Beautiful Friendship photopolymer stamp set and used the Sale-A-Bration Sending You Thoughts cling stamp set for the sentiments. You can find the supplies used to create this card at the bottom of my post along with the sizes of cardstock used.

The design for this card was inspired by the sketch in the Global Design Project 222 Sketch Challenge. Check it out along with the other entries in the challenge.

I started by cutting two panels of Woven Threads designer series paper and adhering them together with multipurpose liquid glue. I ran the DSP through the Scripty embossing folder and adhered it to the front of a Seaside Spray card base with multipurpose liquid glue.

I stamped the flowers on the main panel with the Stampin’ Up! Beautiful Friendship photopolymer stamp set. I used Rococo Rose, Seaside Spray, So Saffron, Pear Pizzazz and Soft Sea Foam inks on a Whisper White Panel. I brushed some clear Wink of Stella on the flowers to give them a touch of sparkle.

I stamped the sentiment from the Sale-A-Bration stamp set Sending You Thoughts in Smoky Slate ink in the upper corner. I adhered the panel to a Rococo Rose mat and wrapped a length of Seaside Spray metallic ribbon around it, securing it in the back. I made a bow with the ribbon and adhered it to the front with glue dots and popped the panel on the card front with dimensionals. I finished off the floral panel with a Seaside Spray faceted gem.

On the inside of the card, I stamped the hydrangea flower from the Stampin’ Up! Beautiful Friendship stamp set in the lower corner of a Whisper White panel in Seaside Spray ink. I added some Pear Pizzazz leaves and stamped the sentiment from the Sending You Thoughts stamp set in Smoky Slate ink. I added a strip of Woven Threads DSP that I embossed with the Scripty embossing folder to the bottom and adhered it to a Rococo Rose mat before adhering it to the inside of the card with multipurpose liquid glue. I also stamped the hydrangeas and leaves on a Whisper White envelope to match.

These sentiments from the Sending You Thoughts stamp set are perfect for an engagement card. And the sentiments from this stamp set are great for a lot of celebrations. You can get the Sending You Thoughts stamp set for FREE with a $50 purchase during Sale-A-Bration.


January 1 – 15 Host Code: FB6MBVE3

Use this host code when you order $50 or more and receive a free gift from me!  The gift is your choice of any item valued up to $10.00 in the 2019-20 Annual Catalog or in the 2019 Holiday Catalog!  That includes some of the Host Exclusive stamp sets!

If your order is over $150, please do not use the host code since you’ll receive your own Host Dollars plus I’ll send you the free gift!  This host code can be used by anyone, no commitment required.  Let me know if you have any questions.


If you need any stamping supplies, I’d be very happy to be your Demonstrator.  Just click on the Shop Now button on the right side of the screen to go directly to my online store or contact me if you have any questions.  Happy Stamping!

Thanks for stopping by and have a great day!

Akiko

  • Visit my online store here
  • See the current Stampin’ Up! clearance rack specials here
  • Earn FREE Stampin’ Up! products through my Wildflower Frequent Shopper Program – my way of saying thank you to my frequent shopper online customers.
  • Sign up for my weekly newsletter here
  • Have any questions? I’d be happy to help, click here to contact me.

Cardstock Cuts for this project:

  • Seaside Spray – 4 1/4″ x 11″ scored at 5 1/2″ (card base)
  • Rococo Rose – 3 3/8″ x 4 1/8″ (front mat), 3 7/8″ x 5 1/8″ (inside mat)
  • Whisper White – 3 1/4″ x 4″ (floral panel), 3 3/4″ x 5″ (inside panel)
  • Woven Threads DSP – 4″ x 5 1/4″ (front background), 1 1/2″ x 4″ (front contrasting strip), 1/2″ x 3 3/4″ (inside trim)

Stampin’ Up! products used in this project:


Stampin’ Up! Dino Days Love You Card

Happy New Year! Today I am starting out 2020 with a cute little card made with the Stampin’ Up! Dino Days bundle. You can find the supplies used to create this card at the bottom of my post along with the sizes of cardstock used.

My card was inspired by the sketch in Freshly Made Sketches #416. This is a versatile sketch and there are so many creative ideas on how to use it, so check them out!

I started by adhering two panels of the DinoRoar designer series paper on a Pretty Peacock card base with snail adhesive so that they are crooked and you can see both of the papers. I stamped the coconut tree trunk from the Stampin’ Up! Dino Days stamp set using Soft Suede ink on a panel of Soft Suede card stock and cut it out with the coordinating die from the Dino die set. I stamped 5 coconut leaf fronds using Granny Apple Green ink on a strip of Granny Apple Green card stock and cut them out with the coordinating die. I attached the coconut tree pieces to the card with liquid glue and trimmed two of the fronds to align with the edge of the paper before attaching.

I cut two Tyrannosaurus Rex, a Brontosaurus and a Pterodactyl from from the DinoRoar designer series paper using the dies from the Dino die set. The paper with the large dinosaurs fits the dies perfectly so that you can die cut the images directly from the DSP in addition from a stamped image. I also cut the dinosaurs that go on the front of the card from Thick Whisper White card stock using the dies. I adhered these to the back of the DSP dinosaurs to stiffen them before popping them on the card front with dimensionals.

I stamped the sentiment from the Stampin’ Up! Dino Days stamp set in Versamark Ink on a panel of Pretty Peacock after swiping it with the embossing buddy. I sprinkled White embossing powder on it and heat set. I trimmed the end and popped it on the card front with dimensionals. I placed the dimensionals carefully on the banner so that it would straddle the Brontosaurus.

I added a strip of the DinoRoar designer series paper to the bottom of a Whisper White panel. I added the last Tyrannosaurus Rex with multipurpose liquid glue and trimmed his tail and added the panel to the inside of the card.

Starting out the New Year with something old is a little counterintuitive, but the new January-June 2020 Mini Catalog and Sale-A-Bration start in just 2 more days. So I have to pace myself, because the excitement is really building – 2 more days!


This image has an empty alt attribute; its file name is stampin-up-2020-jan-jun-mini-catalog-stampininthemeadows.com_.jpeg

Stampin’ In The Meadows January – June 2020 Mini Catalog Product Shares

There are still a couple more days to sign up for the Stampin’ In The Meadows first Product Share. See my New Mini Catalog Product Shares page to get a complete details of the options and their costs, a complete listing of all the products you will be getting, and how to sign up. Let me know if you have any questions.
Deadline to sign up for my share is Thursday, January 2 at 1:00 PM ET


January 1 – 15 Host Code: FB6MBVE3

Use this host code when you order $50 or more and receive a free gift from me!  The gift is your choice of any item valued up to $10.00 in the 2019-20 Annual Catalog or in the 2019 Holiday Catalog!  That includes some of the Host Exclusive stamp sets!

If your order is over $150, please do not use the host code since you’ll receive your own Host Dollars plus I’ll send you the free gift!  This host code can be used by anyone, no commitment required.  Let me know if you have any questions.


If you need any stamping supplies, I’d be very happy to be your Demonstrator.  Just click on the Shop Now button on the right side of the screen to go directly to my online store or contact me if you have any questions.  Happy Stamping!

Thanks for stopping by and have a great day!

Akiko

  • Visit my online store here
  • See the current Stampin’ Up! clearance rack specials here
  • Earn FREE Stampin’ Up! products through my Wildflower Frequent Shopper Program – my way of saying thank you to my frequent shopper online customers.
  • Sign up for my weekly newsletter here
  • Have any questions? I’d be happy to help, click here to contact me.

Cardstock Cuts for this project:

  • Pretty Peacock – 5 1/2″ x 8 1/2″ scored at 4 1/4″ (card base), 5/5″ x 3″ (label)
  • Thick Whisper White – 2 3/4″ x 6 1/2″ (Dino die cuts)
  • Soft Suede – 1 1/2″ x 3″ (coconut tree trunk)
  • Granny Apple green – 1″ x 8 1/2″ (coconut tree leaves)
  • Whisper White – 3 3/4″ x 5″ (inside)
  • DinoRoar designer series paper – (2) 3 3/4″ x 5″ (front wonky panels), 1/2″ x 5″ (inside trim), (2) T-Rex, 1 Brontosaurus and 1 Pterodactyl die cuts from the large Dino paper

Stampin’ Up! products used in this project:


Stampin’ Up! Timeless Tulips Happy Birthday Card

Good Morning on the last day of 2019! Today I have another sneak peek of the pretty Stampin’ Up! Timeless Tulips bundle that will be available on Friday when the January-June 2020 Mini Catalog becomes available. You can find the supplies used to create this card at the bottom of my post along with the sizes of cardstock used.

I adhered a panel of the Perennial Essence designer series paper to a Blackberry Bliss card base. I cut a panel of Balmy Blue card stock with the Stitched Rectangle die. I stamped three stems and some leaves in Mossy Meadow ink on the die cut panel. I ran it through the Scripty embossing folder.

I stamped 3 of the large tulips from the Stampin’ Up! Timeless Tulips stamp set in Blackberry Bliss ink on a panel of Whisper White. I cut out the flowers using the Tulip Builder punch and then colored them with the Clear Wink of Stella glitter brush. I attached them to the embossed panel with dimensionals. It’s too bad the shine from the Wink of Stella doesn’t show very well because the effect is dramatic!

I stamped the happy birthday sentiment on a strip of Whisper White and cut it out with another Stitched Rectangle Die. I adhered it to the embossed panel with Multipurpose Liquid Glue and trimmed it with a pink Noble Peacock rhinestone gem. I adhered the panel to the card base with dimensionals.

On the inside of the card, I stamped the tulip flower from the Stampin’ Up! Timeless Tulips stamp set in Blackberry Bliss ink on a panel of Whisper White. I brushed the Wink of Stella over it like the flowers on the card front. I added a stem and leaf in Mossy Meadow. I stamped the sentiment in Blackberry Bliss ink and trimmed the bottom with a strip of Perennial Essence DSP. I adhered the decorated panel to the inside of the card with Multipurpose Liquid Glue. I also stamped the tulip, stem and leaves on the left side of a Whisper White Medium Envelope to coordinate with the card.

I love the dark purple tulips in the Springtime, but sadly, there are deer nearby, so I can’t grow them very well. So instead, when the snows melt, I will be greeted by the happy yellow daffodils instead. Can we just skip the snow part?

Have fun and be safe if you are celebrating the New Year’s Eve tonight!


December 16 – 31 Host Code: A99JPHA3

January 1 – 15 Host Code: FB6MBVE3

Use this host code when you order $50 or more and receive a free gift from me!  The gift is your choice of any item valued up to $10.00 in the 2019-20 Annual Catalog or in the 2019 Holiday Catalog!  That includes some of the Host Exclusive stamp sets!

If your order is over $150, please do not use the host code since you’ll receive your own Host Dollars plus I’ll send you the free gift!  This host code can be used by anyone, no commitment required.  Let me know if you have any questions.


If you need any stamping supplies, I’d be very happy to be your Demonstrator.  Just click on the Shop Now button on the right side of the screen to go directly to my online store or contact me if you have any questions.  Happy Stamping!

Thanks for stopping by and have a great day!

Akiko

  • Visit my online store here
  • See the current Stampin’ Up! clearance rack specials here
  • Earn FREE Stampin’ Up! products through my Wildflower Frequent Shopper Program – my way of saying thank you to my frequent shopper online customers.
  • Sign up for my weekly newsletter here
  • Have any questions? I’d be happy to help, click here to contact me.

Cardstock Cuts for this project:

  • Blackberry Bliss – 4 1/4″ x 11″ scored at 5 1/2″ (card base)
  • Balmy Blue – 2 1/2″ x 4″ (embossed panel)
  • Whisper White – 3 3/4″ x 5″ (inside panel), 3/4″ x 3″ (label), 2 1/4″ x 5″ (tulip flowers)
  • Perennial Essence DSP – 3 3/4″ x 5″ (front background), 1/2″ x 3 3/4″ (inside trim)

Stampin’ Up! products used in this project:


Stampin’ Up! Floral Essence Hello Card for the Happy Inkin’ Thursday Blog Hop

Good Morning and Welcome to another Happy Inkin’ Thursday Blog Hop! I hope you’re enjoying everyone’s projects and I’m sure everyone loved your handmade Christmas Cards! While we’re awaiting the launch of the new Mini Catalog on January 3, I thought I would return to some old favorites for a Hello Card for today’s Hop. Here is my card:

We have a color challenge this week, and here is the color pallette we are using:

I started by stamping six flowers from the Stampin’ Up! Floral Essence stamp set in Rococo Rose on Very Vanilla Card Stock. I punched them out with the Perennial Flower Punch and curled the petals with my bone folder. I adhered the centers of two petal clusters to make three flowers and added a Perennial Essence floral center to each. I punched 5 leaf clusters from Old Olive vellum using the Leaf punch.

I adhered a panel of the wood grain paper from the Pressed Petals specialty designer series paper to a very vanilla mat. I adhered a strip of the floral Pressed Petals paper to a soft suede mat and adhered it to the wood grained panel background. I stamped the hello sentiment from the A Little Lace stamp set using Rococo Rose ink on a strip of Very Vanilla and trimmed the end before adhering it to the panel.

I arranged the vellum leaves and flowers on the panel and adhered it with glue dots. I made a bow from the Very Vanilla scalloped lace trim and adhered it next to the flowers. I adhered the decorated panel to a Rococo Rose card base using dimensionals.

I kept the inside of the card simple and only decorated it by adhering a strip of the floral Pressed Petals DSP to the bottom of a Very Vanilla panel and adhering to the inside of the card. This leaves plenty of room to write a personal hello message!

I can’t wait to mix up these flowers with some of the new items in the upcoming Mini Catalog!

On with the Hop! Click the Next button below to visit Karen K’s blog.

And just in case you get lost along the way, here’s a list of the team members participating in the hop today:


December 16 – 31 Host Code: A99JPHA3

Use this host code when you order $50 or more and receive a free gift from me!  The gift is your choice of any item valued up to $10.00 in the 2019-20 Annual Catalog or in the 2019 Holiday Catalog!  That includes some of the Host Exclusive stamp sets!

If your order is over $150, please do not use the host code since you’ll receive your own Host Dollars plus I’ll send you the free gift!  This host code can be used by anyone, no commitment required.  Let me know if you have any questions.


If you need any stamping supplies, I’d be very happy to be your Demonstrator.  Just click on the Shop Now button on the right side of the screen to go directly to my online store or contact me if you have any questions.  Happy Stamping!

Thanks for visiting!

Akiko

  • Visit my online store here
  • See the current Stampin’ Up! clearance rack specials here
  • Earn FREE Stampin’ Up! products through my Wildflower Frequent Shopper Program – my way of saying thank you to my frequent shopper online customers.
  • Sign up for my weekly newsletter here
  • Have any questions? I’d be happy to help, click here to contact me.

Cardstock Cuts for this project:

  • Rococo Rose 5 1/2″ x 8 1/2″ scored at 4 1/4″ (card base)
  • Very Vanilla – 2″ x 8 1/2″ (flower petal clusters), 4 1/8″ x 5 3/8″ (front mat), 4″ x 5 1/4″ (inside)
  • Soft Suede – 1 1/4″ x 5 1/4″
  • Pressed Petals DSP – 4″ x 5 1/4″ (wood, front background), 1 1/8″ x 5 1/4″ (flower, front band), 1/2″ x 5 1/4″ (flower, inside trim)
  • Old Olive Vellum – 2 1/2″ x 5″ (punched leaf clusters)

Stampin’ Up! products used in this project:

<