Stampin’ Up! Ornate Style Hello Card

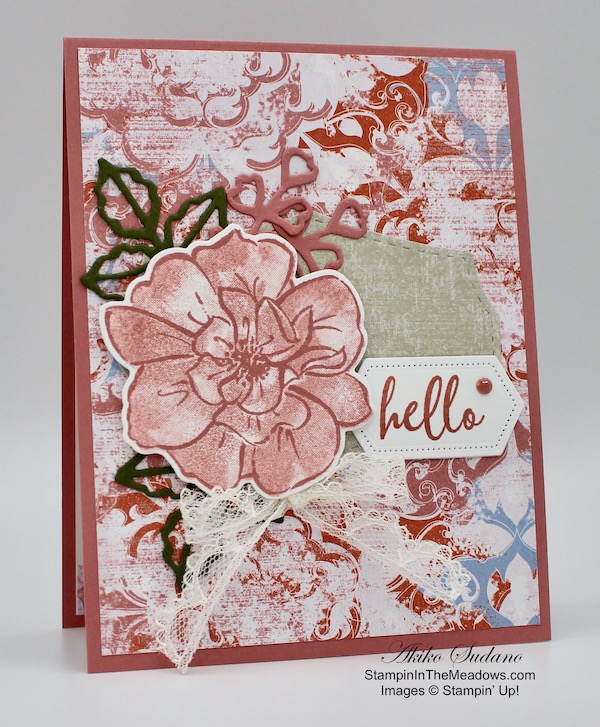
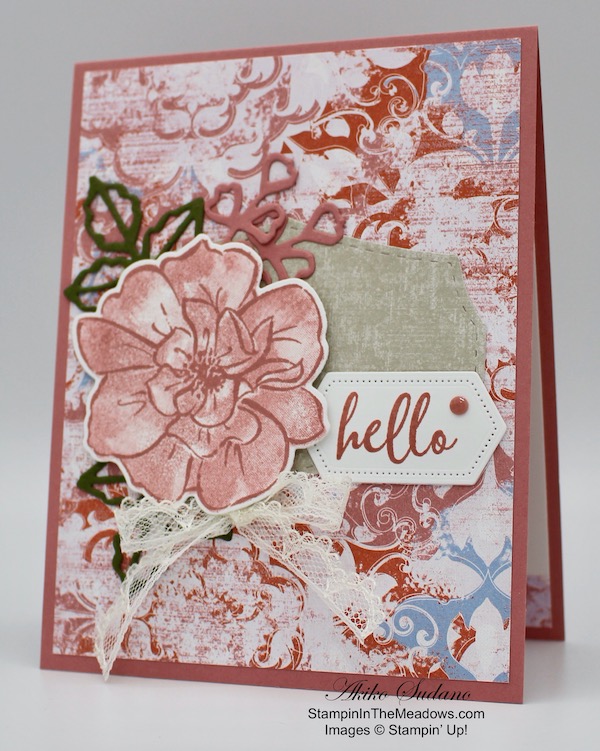
Good Morning! Today I am sharing a sweet hello card that I made yesterday during my Sunday Facebook Live session using the new Early Release Stampin’ Up! Ornate Style stamp set and other items from the Ornate Garden Suite. You can find the supplies used to create this card at the bottom of my post along with the sizes of cardstock used.

Here’s the Facebook Live video showing how to make the card:

I also posted the video to my YouTube Channel and you can view it here if you prefer.

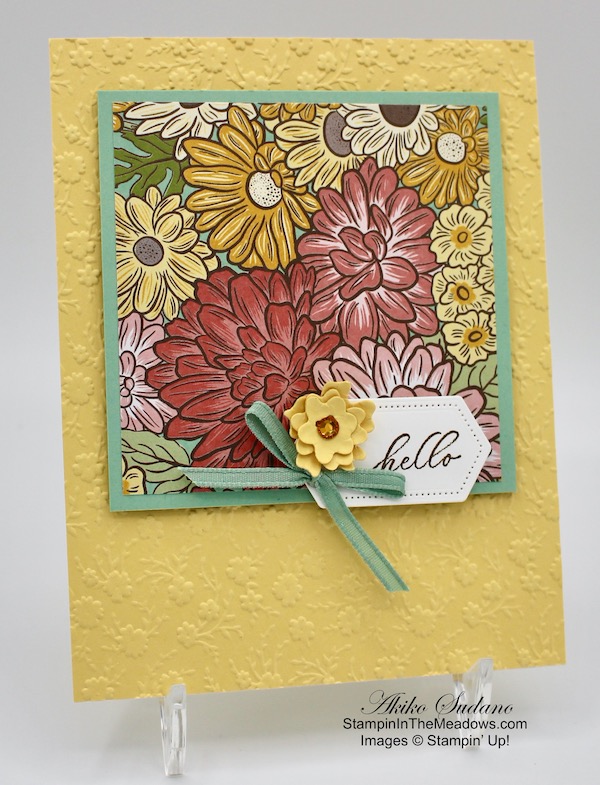
Emboss a panel of So Saffron card stock with the Ornate Floral embossing folder and adhere it to the front of a So Saffron card base. Adhere a panel of Ornate Garden specialty designer series paper to a Mint Macaron mat and adhere it to the card front with dimensionals.

Cut out the three flowers from So Saffron card stock using the flowers from the Ornate Border Dies. Using the large ball stylus from the Take Your Pick tool, Curl the petals upward on each cluster with a circular motion on a soft mat or mousepad. Adhere the petal clusters together with glue dots, offsetting the petals as much as you can. Add a yellow rhinestone to the center. Stamp the hello greeting from the Timeless Tropical stamp set with Early Espresso ink on a scrap of Whisper White and cut it out with a Stitched Nested Label Die. Adhere the label to the card with dimensionals and adhere the flower and a Mint Macaron bow to the label with glue dots.

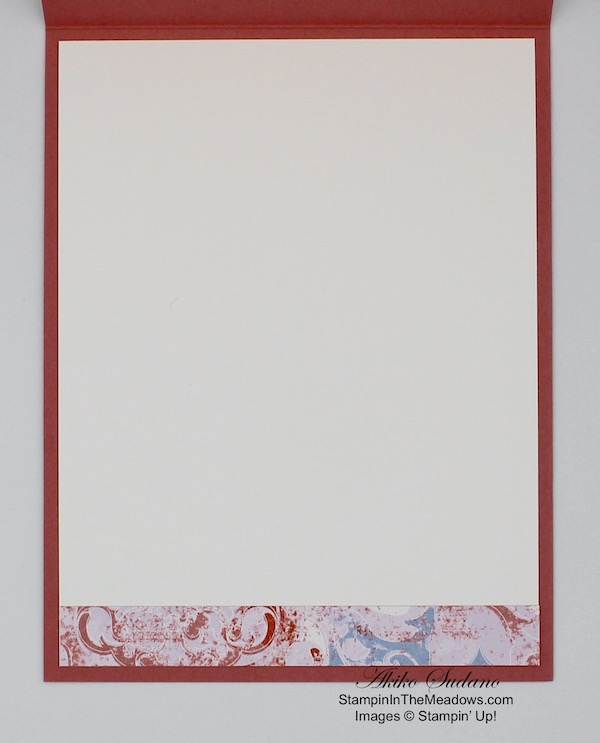
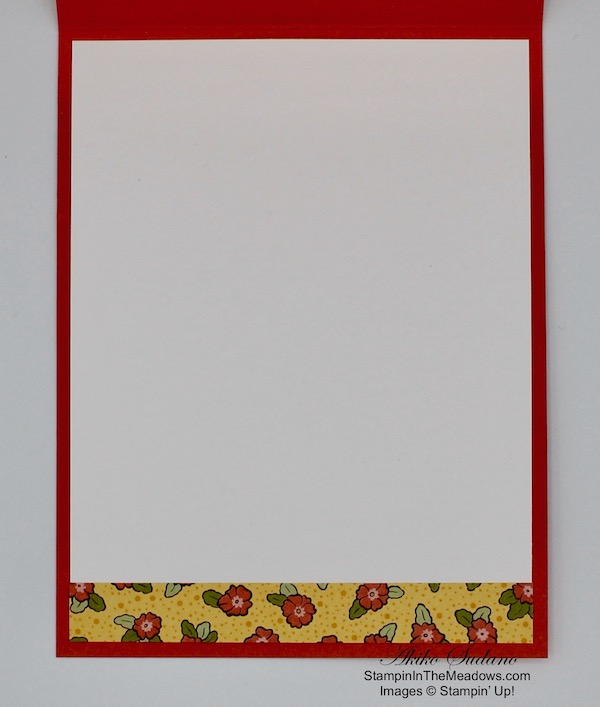
For the inside of the card, I stamped the large flower bouquet from the Stampin’ Up! Ornate Style stamp set in the center of a Whisper White panel using So Saffron ink after stamping off twice. Add a strip of the Ornate Floral DSP to the bottom and adhere it to the inside of the card.

The Ornate Garden Suite is so pretty and versatile. The Inkin’ Krew Team is having an Ornate Garden Facebook event on April 18 to celebrate! Contact me if you are interested.


April 1 – 15 Host Code: N39D7TBK

Use this host code when you order $50+ and receive a free gift from me!  If your order is over $150, please do not use this code, but you’ll still get the free gift.  The free gift is your choice of any item valued up to $10.00 in the 2019 – 2020 Annual Catalog or in the 2020 Mini Catalog!  That includes some of the Host Exclusive stamp sets!

If your order is over $150, please do not use the host code since you’ll receive your own Host Dollars plus I’ll send you the free gift!  This host code can be used by anyone, no club or commitment required.  Let me know if you have any questions.


If you need any stamping supplies, I’d be very happy to be your Demonstrator.  Just click on the Shop Now button on the right side of the screen to go directly to my online store or contact me if you have any questions.  Happy Stamping!

Thanks for stopping by and have a great week!

Akiko

  • Visit my online store here
  • See the current Stampin’ Up! clearance rack specials here
  • Earn FREE Stampin’ Up! products through my Wildflower Frequent Shopper Program – my way of saying thank you to my online frequent shopper customers.
  • Sign up for my weekly newsletter here
  • Have any questions? I’d be happy to help, click here to contact me.

Cardstock Cuts for this project:

  • So Saffron – 5-1/2″ x 8-1/2″ card base scored at 4-1/4″, 4″ x 5-1/4″ (embossed front), 1″ x 3″ (flower die cuts)
  • Mint Macaron – 3-1/2″ x 3-1/2″ (DSP mat)
  • Whisper White – 4″ x 5-1/4″ (inside panel), 1-1/4″ x 2-1/2″ (label)
  • Ornate Garden Designer Series Paper – 3-1/4″ x 3-1/4″ (main panel), 1/2″ x 4″ (inside trim)

Stampin’ Up! products used in this project:


Stampin’ Up! Ornate Garden with Love What You Do

Good Morning! Today I have a thank you card made with several products from the new Stampin’ Up! Ornate Garden Suite paired with the thank you sentiment from the Love What You Do photopolymer stamp set. You can find the supplies used to create this card at the bottom of my post along with the sizes of cardstock used.

Emboss a panel of Whisper White with the Ornate Floral 3D Embossing Folder and adhere the panel of the Stampin’ Up! Ornate Garden specialty designer series paper to the right side. Cut a strip of Old Olive card stock with the skinny eyelet border from the Ornate Borders Dies and adhere it to the seam with liquid glue. Adhere the layered embossed panel to an Old Olive mat with liquid glue and pop it on a Rococo Rose card base with dimensionals.

Cut a panel of Old Olive card stock with the large fancy label from the Stitched So Sweetly Dies. Stamp the thank you sentiment from the Love What You Do photopolymer stamp set in Rococo Rose ink on a Whisper White panel. Stamp the floral cluster from the Ornate Style cling stamp set in Old Olive ink a couple of times after stamping off twice. Cut out the sentiment with the die from the Stitched So Sweetly dies and adhere it to the larger Old Olive die cut label with liquid glue. Adhere the label to the card with dimensionals.

Cut out the two smallest flower dies from the Ornate Borders Dies using Blushing Bride card stock. Adhere the smaller flower on top of the larger flower with liquid glue, offsetting the petals to fill in the gaps. Add a Rococo Rose faceted gem to the center. Cut a leaf cluster out of Old Olive with the Leaf Punch. Adhere the leaf cluster to the label with a glue dot. Adhere the flower on top with a dimensional. Make a bow with the Whisper White crinkle ribbon and tuck it under the flower with a glue dot.

On a Whisper White panel, stamp the little flower from the Ornate Style stamp set in Early Espresso ink. Color it with the light Rococo Rose and Light Old Olive Stampin’ Blends. Trim the bottom of the panel with a strip of the Stampin’ Up! Ornate Garden specialty designer series paper and adhere the panel to the inside of the card with liquid glue.

All the florals in the Stampin’ Up! Ornate Garden suite of products are fresh and perfect for Springtime cards for all occasions. Click on the image below to see the products in this wonderful suite, or head over to the Ornate Garden section of my Online Store to order.


April 1 – 15 Host Code: N39D7TBK

Use this host code when you order $50 or more and receive a free gift from me!  The gift is your choice of any item valued up to $10.00 in the 2019-20 Annual Catalog or in the 2020 January-June Mini Catalog!  That includes some of the Host Exclusive stamp sets!

If your order is over $150, please do not use the host code since you’ll receive your own Host Dollars plus I’ll send you the free gift!  This host code can be used by anyone, no commitment required.  Let me know if you have any questions.


If you need any stamping supplies, I’d be very happy to be your Demonstrator.  Just click on the Shop Now button on the right side of the screen to go directly to my online store or contact me if you have any questions.  Happy Stamping!

Thanks for stopping by and have a great day!

Akiko

  • Visit my online store here
  • See the current Stampin’ Up! clearance rack specials here
  • Earn FREE Stampin’ Up! products through my Wildflower Frequent Shopper Program – my way of saying thank you to my frequent shopper online customers.
  • Sign up for my weekly newsletter here
  • Have any questions? I’d be happy to help, click here to contact me.

Cardstock Cuts for this project:

  • Rococo Rose – 4-1/4″ x 11″ card base scored at 5-1/2″
  • Old Olive – 4″ x 5-1/4″ (front mat), 1-1/2″ x 1-1/2″ (leaf cluster), 2-3/4″ x 4″ (label), 1/2″ x 5-1/8″ (die cut border)
  • Whisper White – 4″ x 5-1/2″ (inside panel), 3-7/8″ x 5-1/8″ (embossed front), 2-1/4″ x 2-13/4″ (label)
  • Blushing Bride – 1″ x 2″ (floral die cuts)
  • Ornate Garden Specialty DSP – 2″ x 5-1/8″ (front panel), 1/2″ x 4″ (inside trim)

Stampin’ Up! products used in this project:


Stampin’ Up! Bloom and Grow for the Happy Inkin’ Thursday Blog Hop

Good Morning! Welcome to another Happy Inkin’ Thursday Blog Hop! Sale-a-Bration is over, but it’s April and so we have an early release of the Ornate Garden Suite from the 2020-2021 Annual Catalog! I have uses some of the dies from the Ornate Layers Dies along with the Stampin’ Up! Bloom and Grow photopolymer stamp bundle to create today’s card.

We have a color challenge this week, and here is the sketch we are using:

Stamp the flowers from the Stampin’ Up! Bloom and Grow stamp set in Memento Tuxedo Black ink on a Whisper White panel. Color the flowers with the Real Red, Light Old Olive, Light Soft Suede and Light Blackberry Bliss Stampin’ Blends. Cut the flowers out with the coordinating die from the Budding Blooms Dies and brush the flower petals with clear Wink of Stella to add some sparkle.

Stamp the sentiment from the Stampin’ Up! Bloom and Grow stamp set in Memento Tuxedo Black ink on Old Olive and cut it out with the die from the Ornate Layers Dies. This sentiment fits perfectly in the new die! Cut the lacy background die from Whisper White and adhered it to the label with liquid glue. Stamp two berry sprigs in Memento Tuxedo Black and color them with Light Old Olive and Light Blackberry Bliss Stampin’ Blends. Cut them out with the coordinating die.

Emboss the Soft Suede panel with the Corrugated embossing folder. This embossing folder will shrink the paper, so the cut is about 1/4″ longer than needed. After embossing, measure and trim to 4″ x 5-1/4″ and adhere it to a Soft Suede card base with liquid glue. Adhere the berry sprigs with liquid glue and the label and flowers with dimensionals. Finish the card front with a Whisper White Polka Dot Tulle Ribbon bow and three red rhinestone jewels.

Stamp the flowers along the side of a Whisper White panel with Memento Tuxedo Black ink and color it to match the front. Adhere the panel to an Old Olive mat and then to the inside of the card with liquid glue. Here is another picture of the front where you can see a bit of the Wink of Stella sparkle.

The flowers and dies in the Stampin’ Up! Bloom and Grow bundle are some of my favorites in this year’s annual catalog, so I’m really glad to be able to pair it with the new Ornate Layers Dies.

On with the Hop! Click the Next button below to visit Karen Ksenzakovic’s blog.

And just in case you get lost along the way, here’s a list of the team members participating in the hop today:


April 1 – 15 Host Code: N39D7TBK

Use this host code when you order $50 or more and receive a free gift from me!  The gift is your choice of any item valued up to $10.00 in the 2019-20 Annual Catalog or in the 2020 January-June Mini Catalog!  That includes some of the Host Exclusive stamp sets!

If your order is over $150, please do not use the host code since you’ll receive your own Host Dollars plus I’ll send you the free gift!  This host code can be used by anyone, no commitment required.  Let me know if you have any questions.


If you need any stamping supplies, I’d be very happy to be your Demonstrator.  Just click on the Shop Now button on the right side of the screen to go directly to my online store or contact me if you have any questions.  Happy Stamping!

Thanks for visiting!

Akiko

  • Visit my online store here
  • See the current Stampin’ Up! clearance rack specials here
  • Earn FREE Stampin’ Up! products through my Wildflower Frequent Shopper Program – my way of saying thank you to my frequent shopper online customers.
  • Sign up for my weekly newsletter here
  • Have any questions? I’d be happy to help, click here to contact me.

Cardstock Cuts for this project:

  • Soft Suede – 5-1/2″ x 8-1/2″ card base scored at 4-1/4″, 4″ x 5-1/2″ (embossed background)
  • Old Olive – 1-1/4″ x 5″ (label), 4″ x 5-1/5″ (inside mat)
  • Whisper White – 2″ x 5-1/4″ (label frame), 2″ x 5″ (flower die cuts), 1″ x 3″ (berry accent die cuts), 3-7/8″ x 5-1/8″ (inside panel)

Stampin’ Up! products used in this project:

<

Stampin’ Up! Botanical Prints Product Medley Cards

Good Morning! Today I’m sharing a pair of sweet cards designed for our Inkin’ Krew Team Meeting last month using the Stampin’ Up! Botanical Prints Product Medley. You can find the supplies used to create this card at the bottom of my post along with the sizes of cardstock used.

The Stampin’ Up! Botanical Prints Product Medley is the latest in the series and it includes stamps, dies, designer series paper, embellishments and die cut and laser cut accent sheets. Stampin’ Up! provides the list of coordinating colors so you can use the cardstock and ink that is already in your stash to express your creativity with all the coordinating items.

Adhere the Whisper White panel to the Old Olive panel and pop it on a Terracotta Tile card base with dimensionals. Color the leaves in the Terracotta Tile DSP with Light Old Olive Stampin’ Blend and the flower centers with Dark Daffodil Delight. Adhere it to the Old Olive mat and then to the card front with liquid glue. Stamp the flower cluster from the Stampin’ Up! Botanical Prints Product Medley stamp set twice with Memento Tuxedo Black ink on Whisper White and cut them out with the coordinating die. Color the leaves with Light Old Olive and the flower centers with Dark Daffodil Delight Stampin Blends.

Stamp the sentiment on one of the fancy laser cut labels in Memento Tuxedo Black ink. Cut out 3 sets of leaf clusters from Old Olive card stock. Arrange the die cut flowers and leaves and adhere them with liquid glue. Adhere the label with dimensionals and finish the front with clear rhinestone gems.

Stamp the berry cluster from the Stampin’ Up! Botanical Prints Product Medley in Highland Heather ink on the top of a Highland Heather card base. Adhere the tile patterned DSP from Botanical Prints DSP to the Old Olive mat and then to the Highland Heather card base with liquid glue. Stamp the sentiment on a Whisper White panel and cut it out with the largest oval from the Stitched Shapes Dies.

Stamp the berries on a Whisper White panel and color them with Highland Heather, Light So Saffron and Light Old Olive Stampin’ Blends. Cut them out with the coordinating die and pop them on the oval with dimensionals. Pop the oval on the card base with dimensionals and accent with three rhinestone gems.

For the inside of the Terracotta Tile card, stamp the floral image from the Stampin’ Up! Botanical Prints Product Medley in two corners of a Whisper White panel in Terracotta Tile ink and adhere it to the inside of the card. Stamp the floral image on the corner of a Whisper White Medium envelope to match.

For the inside of the Highland Heather card, stamp the berries from the Stampin’ Up! Botanical Prints Product Medley on the lower corner of a Whisper White panel. Adhere it to an Old Olive mat and then to the inside of the card with liquid glue.

The lifelike images of the flowers and fruits in the Stampin’ Up! Botanical Prints Product Medley are reminiscent of antique botanical prints and make elegant and pretty cards with an updated and modern feel.


April 1 – 15 Host Code: N39D7TBK

Use this host code when you order $50 or more and receive a free gift from me!  The gift is your choice of any item valued up to $10.00 in the 2019-20 Annual Catalog or in the 2020 January-June Mini Catalog!  That includes some of the Host Exclusive stamp sets!

If your order is over $150, please do not use the host code since you’ll receive your own Host Dollars plus I’ll send you the free gift!  This host code can be used by anyone, no commitment required.  Let me know if you have any questions.


If you need any stamping supplies, I’d be very happy to be your Demonstrator.  Just click on the Shop Now button on the right side of the screen to go directly to my online store or contact me if you have any questions.  Happy Stamping!

Thanks for stopping by and have a great day!

Akiko

  • Visit my online store here
  • See the current Stampin’ Up! clearance rack specials here
  • Earn FREE Stampin’ Up! products through my Wildflower Frequent Shopper Program – my way of saying thank you to my frequent shopper online customers.
  • Sign up for my weekly newsletter here
  • Have any questions? I’d be happy to help, click here to contact me.

Cardstock Cuts for this project:

Terracotta Tile Card:

  • Terracotta Tile – 4-1/4″ x 11″ card base scored at 5-1/2″
  • Old Olive – 2″ x 5-1/8″ (DSP mat), 4″ x 5-1/4″ (front mat), 1″ x 3″ (die cut leaves)
  • Whisper White – 3-7/8″ x 5-1/8″ (card front), 4″ x 5-1/4″ (inside panel), 2-1/2″ x 3-1/2″ (flower die cuts)
  • Botanical Prints DSP – 2″ x 5-1/8″ (front)

Highland Heather Card:

  • Highland Heather – 5-1/2″ x 8-1/2″ card base scored at 4-1/4″
  • Old Olive – 2-1/16″ x 5-1/2″ (front mat), 4″ x 5-1/4″ (inside mat)
  • Whisper White – 3-7/8″ x 5-1/8″ (inside panel), 2-3/4″ x 3-3/4″ (die cut oval), 2-1/2″ x 3″ (berries die cut)
  • Botanical Prints DSP – 2″ x 5-1/2″ (front panel)

Stampin’ Up! products used in this project:


Stampin’ Up! Little Ladybug Hello Card

Good Morning! Today is the last day of Sale-A-Bration, so I have a card made with the cute Stampin’ Up! Little Ladybug cling stamp set. It is also the last day for the Coordination Products Release which includes the Ladybug Dies that I also used. You can find the supplies used to create this card at the bottom of my post along with the sizes of cardstock used.

I embossed a panel of So Saffron card stock with the Subtle embossing folder and adhered it to a So Saffron card base with liquid glue. I cut a Balmy Blue panel with the large scalloped rectangle from the Stitched So Sweetly Dies. I cut one end of a strip of Old Olive with the grass die from the Special Day Dies and cut the other sides with the same Stitched So Sweetly scalloped rectangle die. I adhered the grass to the bottom of the Balmy Blue die cut with liquid glue. I adhered the panel to the card base with dimensionals.

I stamped the large flower from the Stampin’ Up! Little Ladybug cling stamp set in Memento Tuxedo Black ink on a Whisper White panel. I colored it with Mango Melody, Old Olive and Smoky Slate Stampin’ Blends and cut it out with the coordinating die from the Ladybug Dies. I stamped the Hey, Lady sentiment in Memento Tuxedo Black ink on a strip of Whisper White and cut it out with the smallest Stitched So Sweetly scalloped rectangle die. I adhered the flower with dimensionals and adhered the label with a dimensional and liquid glue where the label overlapped the larger die cut.

I stamped all four ladybugs from the Stampin’ Up! Little Ladybug stamp set in Memento Tuxedo Black ink on Whisper White. I colored them with Light Real Red, Light Petal Pink and both Smoky Slate Stampin’ Blends and cut them out with the coordinating dies. I colored the little flower with the light Mango Melody Blend. I adhered the ladybug holding the flower with liquid glue and the other two ladybugs with dimensionals.

I saved the last ladybug for the inside of the card. I also cut a flower using the dies from the Ladybug Dies using Mango Melody, Old Olive and Basic Black card stock and adhered it to the bottom of a Whisper White panel with liquid glue. I added the last ladybug next to the flower and adhered the panel to the inside of the card.

The Stampin’ Up! Little Ladybug stamp set is a Sale-A-Bration special that is FREE for Hosts with workshops totaling $300 or more (or an order of $300 or more), but today is the last day for the offer.


March 16 – 31 Host Code: RSAF3R27

April 1 – 15 Host Code: N39D7TBK

Use this host code when you order $50 or more and receive a free gift from me!  The gift is your choice of any item valued up to $10.00 in the 2019-20 Annual Catalog or in the 2020 January-June Mini Catalog!  That includes some of the Host Exclusive stamp sets!

If your order is over $150, please do not use the host code since you’ll receive your own Host Dollars plus I’ll send you the free gift!  This host code can be used by anyone, no commitment required.  Let me know if you have any questions.


If you need any stamping supplies, I’d be very happy to be your Demonstrator.  Just click on the Shop Now button on the right side of the screen to go directly to my online store or contact me if you have any questions.  Happy Stamping!

Thanks for stopping by and have a great day!

Akiko

  • Visit my online store here
  • See the current Stampin’ Up! clearance rack specials here
  • Earn FREE Stampin’ Up! products through my Wildflower Frequent Shopper Program – my way of saying thank you to my frequent shopper online customers.
  • Sign up for my weekly newsletter here
  • Have any questions? I’d be happy to help, click here to contact me.

Cardstock Cuts for this project:

  • So Saffron – 4-1/4″ x 11″ card base scored at 5-1/2, 4″ x 5-1/2″ (embossed card front)
  • Balmy Blue – 3-1/4″ x 4-1/2″ (die cut panel)
  • Old Olive – 1″ x 3-1/4″ (grass die cut), 1″ x 1-1/2″ (inside flower stem)
  • Mango Melody – 1″ x 1″ (inside flower)
  • Basic Black – 1″ x 1″ (inside flower center)
  • Whisper White – 4″ x 5-1/4″ (inside panel), 4″ x 4″ (die cut flower), 4-1/2″ x 4-1/2″ (ladybug lie cuts), 1″ x 2-1/2″ (label)

Stampin’ Up! products used in this project:


Stampin’ Up! Welcome Easter Card

Good Morning! Today I am sharing a sweet Easter Card that I made yesterday during my Sunday Facebook Live session. The Stampin’ Up! Welcome Easter cling stamp set has three cute baby animals that can be used for either baby cards or Easter cards. I made an Easter card with the cute little chick.

Here’s the Facebook Live video showing how to make the card:

I also posted the video to my YouTube Channel and you can view it here if you prefer.

I stamped the little chick from the Stampin’ Up! Welcome Easter in Basic Gray ink on a small Whisper White panel and colored it with Daffodil Delight and Light Pumpkin Pie Stampin’ Blends. I cut it out with the largest stitched circle from the Stitched Shapes Dies and adhered it to a Pear Pizzazz scalloped circle cut with the Layering Circles Dies. I stamped the Happy Easter Greeting in Pear Pizzazz ink on a strip of Whisper White and cut it out with the long stitched rectangle die from the Stitched Rectangles Dies.

I embossed a Whisper White panel with the Ornate Flowers 3D embossing folder. This pretty embossing folder will be available on April 1 as part of the Ornate Garden Suite Early Release. I adhered the embossed panel to a Pear Pizzazz card base with liquid glue. I added a strip of Pear Pizzazz gingham from the Subtles 6×6 Designer Series Paper and adhered the label on top with liquid glue. I adhered the chick from the Stampin’ Up! Welcome Easter stamp set with dimensionals and finished the front with a Daffodil Delight bow.

For the inside of the card, I stamped the flower cluster and little bee in Basic Gray ink on a Whisper White panel. I colored them with Daffodil Delight, Flirty Flamingo, Highland Heather and Balmy Blue Stampin’ Blends. I trimmed the bottom with a strip of Pear Pizzazz gingham and adhered it to the inside of the card with liquid glue.

Next up for Stampin’ Up! Welcome Easter stamp set is a set of baby cards, also with gingham – I just need to figure out the sketch. On the sample (bottom card), I stamped the chick with Smoky Slate ink and I used Basic Gray (top card) in the video. I didn’t want to use black ink because I wanted to keep the softness of the baby chick. I think I prefer the Basic Gray, what do you think? Have a great week and stay healthy!


March 16 – 31 Host Code: RSAF3R27

Use this host code when you order $50+ and receive a free gift from me!  If your order is over $150, please do not use this code, but you’ll still get the free gift.  The free gift is your choice of any item valued up to $10.00 in the 2019 – 2020 Annual Catalog or in the 2020 Mini Catalog!  That includes some of the Host Exclusive stamp sets!

If your order is over $150, please do not use the host code since you’ll receive your own Host Dollars plus I’ll send you the free gift!  This host code can be used by anyone, no club or commitment required.  Let me know if you have any questions.


If you need any stamping supplies, I’d be very happy to be your Demonstrator.  Just click on the Shop Now button on the right side of the screen to go directly to my online store or contact me if you have any questions.  Happy Stamping!

Thanks for stopping by and have a great week!

Akiko

  • Visit my online store here
  • See the current Stampin’ Up! clearance rack specials here
  • Earn FREE Stampin’ Up! products through my Wildflower Frequent Shopper Program – my way of saying thank you to my online frequent shopper customers.
  • Sign up for my weekly newsletter here
  • Have any questions? I’d be happy to help, click here to contact me.

Cardstock Cuts for this project:

  • Pear Pizzazz – 5-1/2″ x 8-1/2″ card base scored at 4-1/4″
  • Whisper White – (2) 4″ x 5-1/4″ (inside panel and embossed front), 3″ x 3″ (chick panel)
  • Subtles 6″ x 6″ Designer Series Paper – 1-1/2″ x 5-1/4″ (gingham front strip), 1/2″ x 5-1/4″ (inside gingham trim)

Stampin’ Up! products used in this project:


Stampin’ Up! Dino Days Birthday Card

Good Morning! Today I’m sharing a birthday card made with the Stampin’ Up! Dino Days photopolymer stamp set and the Dinoroar designer series paper. You can find the supplies used to create this card at the bottom of my post along with the sizes of cardstock used.

The card design was inspired by the Paper Players Sketch Challenge #483. Here is the sketch:

I cut two strips of the geometric Dinoroar designer series paper and adhered them to the background DSP and to a Garden Green card base.

I stamped the sentiment from the Stampin’ Up! Dino Days stamp set in Garden Green ink on a Whisper White panel. I used the dinosaur footprint stamp to stamp a trail in Crumb Cake ink and cut it out with the largest stitched oval from the Stitched Shapes Dies. I cut grass in Garden Green using the Special Day Dies and then cut the bottom with the same stitched oval die. I adhered the grass to the bottom of the oval with multipurpose liquid glue. I cut a mat from Lovely Lipstick card stock using the largest scalloped label in the Layering Ovals dies and adhered it to the back of the oval panel.

I stamped two dinosaurs from the Stampin’ Up! Dino Days stamp set in Balmy Blue ink on Whisper White. I stamped two sets of the back fins in Lovely Lipstick ink on Whisper White. I cut these pieces out with the coordinating dies and adhered them together. I colored the eyes with a black journaling pen. I adhered one of the dinosaurs on the oval panel with dimensionals. Then I adhered the oval panel on the card front with dimensionals.

I adhered a strip of the geometric Dino Roar DSP to a Whisper White panel and adhered the second dinosaur on top. I adhered the panel to the inside of the card.

The Stampin’ Up! Dino Days bundle includes the Dino Days photopolymer stamp set and the coordinating Dino Dies. The Dinoroar designer series paper was just added to the Sale-A-Bration FREE with $50 purchase list – Yay!! And did you know that some of the dinosaur images in the Dinoroar DSP can also be cut with the Dino Dies?


March 16 – 31 Host Code: RSAF3R27

Use this host code when you order $50 or more and receive a free gift from me!  The gift is your choice of any item valued up to $10.00 in the 2019-20 Annual Catalog or in the 2020 January-June Mini Catalog!  That includes some of the Host Exclusive stamp sets!

If your order is over $150, please do not use the host code since you’ll receive your own Host Dollars plus I’ll send you the free gift!  This host code can be used by anyone, no commitment required.  Let me know if you have any questions.


If you need any stamping supplies, I’d be very happy to be your Demonstrator.  Just click on the Shop Now button on the right side of the screen to go directly to my online store or contact me if you have any questions.  Happy Stamping!

Thanks for stopping by and have a great day!

Akiko

  • Visit my online store here
  • See the current Stampin’ Up! clearance rack specials here
  • Earn FREE Stampin’ Up! products through my Wildflower Frequent Shopper Program – my way of saying thank you to my frequent shopper online customers.
  • Sign up for my weekly newsletter here
  • Have any questions? I’d be happy to help, click here to contact me.

Cardstock Cuts for this project:

  • Garden Green – 5-1/2″ x 8-1/2″ card base scored at 4-1/4, 1-1/2″ x 4″ (die cut grass)
  • Lovely Lipstick – 3″ x 4-1/4″ (scalloped oval mat)
  • Whisper White – 4″ x 5-1/4″ (inside panel), 4-1/4″ x 6″ (die cus – dinosaurs and oval)
  • Dinoroar DSP – 4″ x 5-1/4″ (front panel), (3) 1/2″ x 4″ (geometric strips)

Stampin’ Up! products used in this project:


Stampin’ Up! Positive Thoughts for the Happy Inkin’ Thursday Blog Hop

Good Morning! Welcome to another Happy Inkin’ Thursday Blog Hop! I made a card with the Stampin’ Up! Positive Thoughts cling stamp set and the coordinating Nature’s Thoughts Dies from the Coordination Products Release. You can find the supplies used to create this card at the bottom of my post along with the sizes of cardstock used.

We have a sketch challenge this week, and here is the sketch we are using:

I started by embossing a panel of Mint Macaron card stock with the Coastal Weave 3D embossing folder and the 3D embossing folder plate and adhering it to the bottom of a panel of Garden Lane designer series paper with multipurpose liquid glue. I adhered the layered DSP to a Soft Suede card base. I stamped the Hugs Prayers Love sentiment from the Stampin’ Up! Positive Thoughts stamp set with Versamark Ink on a Sahara Sand panel and sprinkled it with gold embossing powder. I heat set the embossing powder. I stamped the fern three times on the panel with Mint Macaron ink, once full strength and twice after stamping off. I cut the panel out with the fancy stitched rectangle die from the Nature’s Thoughts Dies and sponged the edges with Soft Suede ink to give it a distressed look.

I stamped the fern from the Stampin’ Up! Positive Thoughts stamp set in Pear Pizzazz ink on a Whisper White panel. I cut it out with the coordinating die. I stamped the flower in Blushing Bride ink on a Whisper White panel and cut it out with the coordinating die. I cut the flower center out of Blushing Bride card stock with the die from the Nature’s Thoughts dies and pushed up the little die cuts. I also cut out two of the sprigs from Rococo Rose card stock. I lightly sponged all the die cuts with Soft Suede ink.

I adhered the flower center to the stamped flower with multipurpose liquid glue and added a Rococo Rose faceted dot. I arranged the leaves and buds on the embossed panel and adhered them with multipurpose liquid glue. I folded and trimmed a length of white linen ribbon and adhered it with glue dots. I popped the layered flower on with dimensionals and added a linen thread bow. I finished it off with a gold foil butterfly cut with the small butterfly die from the Nature’s Thoughts dies. I adhered the panel to the card front with dimensionals.

I stamped the corners of a Whisper White panel with the fern stamp in Mint Macaron ink after stamping off. I trimmed the bottom with a strip of the Garden Lane DSP and adhered it to the inside of the card with snail.

The Stampin’ Up! Positive Thoughts cling stamp set has so many beautiful natural images and I love all the cards I have seen using it. And it’s so appropriate to our times. Take care!

On with the Hop! Click the Next button below to visit Karen Ksenzakovic’s blog.

And just in case you get lost along the way, here’s a list of the team members participating in the hop today:


March 16 – 31 Host Code: RSAF3R27

Use this host code when you order $50 or more and receive a free gift from me!  The gift is your choice of any item valued up to $10.00 in the 2019-20 Annual Catalog or in the 2020 January-June Mini Catalog!  That includes some of the Host Exclusive stamp sets!

If your order is over $150, please do not use the host code since you’ll receive your own Host Dollars plus I’ll send you the free gift!  This host code can be used by anyone, no commitment required.  Let me know if you have any questions.


If you need any stamping supplies, I’d be very happy to be your Demonstrator.  Just click on the Shop Now button on the right side of the screen to go directly to my online store or contact me if you have any questions.  Happy Stamping!

Thanks for visiting!

Akiko

  • Visit my online store here
  • See the current Stampin’ Up! clearance rack specials here
  • Earn FREE Stampin’ Up! products through my Wildflower Frequent Shopper Program – my way of saying thank you to my frequent shopper online customers.
  • Sign up for my weekly newsletter here
  • Have any questions? I’d be happy to help, click here to contact me.

Cardstock Cuts for this project:

  • Soft Suede – 5-1/2″ x 8-1/2″ card base scored at 4-1/4
  • Mint Macaron – 1-1/2″ x 5-1/4″ (embossed background)
  • Sahara Sand – 3″ x 4-1/2″ (die cut background)
  • Rococo Rose – 1-1/4″ x 2-1/2″ (floral die cuts)
  • Blushing Bride – 1-1/2″ x 1-1/2″ (die cut flower center)
  • Gold Foil – 1″ x 1″ (die cut butterfly)
  • Whisper White – 4″ x 5-1/4″ (inside panel), 2-3/4″ x 4-1/2″ (die cut stamped fern and flower)
  • Garden Lane DSP – 4″ x 5-1/4″ (front panel), 1/2″ x 5-1/4″ (inside trim)

Stampin’ Up! products used in this project:


Stampin’ Up! To A Wild Rose Hello Card

Good Morning! Did you hear that they added new items to Saale-A-Bration? We are in the final week and ten items from the Annual Catalog have been tagged as FREE Sale-A-Bration items with a minimum $50 purchase. And today’s card uses two of these items. You can find the supplies used to create this card at the bottom of my post along with the sizes of cardstock used. Important: Note that the Sale-A-Bration item numbers are different!!

I cut a panel of the Woven Threads designer series paper and adhered it to a Rococo Rose card base. I cut another panel of Woven Threads DSP using the large label from the Wild Rose Dies and adhered it to the front with snail. I stamped the outline rose from the Stampin’ Up! To A Wild Rose photopolymer stamp set in Rococo Rose ink on a Whisper White panel. Then I stamped the fuller image in Rococo Rose after stamping off once. Finally I stamped the smallest image in Rococo Rose after stamping off once. I used the matching die cut to cut it out. With the Wild Rose Dies, I cut out two leaf clusters from Mossy Meadow and two bud clusters from Rococo Rose.

I stamped the hello sentiment from the Stampin’ Up! To A Wild Rose stamp set on a Whisper White panel with Rococo Rose ink and cut it out with the smallest Stitched Nested Labels die. I arranged the die cuts on the large label and adhered the leaf and bud clusters and label with multipurpose liquid glue and the rose with dimensionals. I finished off the front with a lace ribbon bow and a Rococo Rose faceted gem

I decorated the inside by adding a strip of the Woven Threads DSP to the bottom of a Whisper White Panel and adhering it to the inside of the card.

The Wild Rose Dies and Woven Threads designer series paper are two of the new items that were added to Sale-A-Bration. Important: Note that the Sale-A-Bration item numbers are different!! Click on the image to see a PDF with all the new items or visit my Online Store to see all the Sale-A-Bration items:

Sale-A-Bration Runs through March 31, so hurry to take advantage of these great deals!!


March 16 – 31 Host Code: RSAF3R27

Use this host code when you order $50 or more and receive a free gift from me!  The gift is your choice of any item valued up to $10.00 in the 2019-20 Annual Catalog or in the 2020 January-June Mini Catalog!  That includes some of the Host Exclusive stamp sets!

If your order is over $150, please do not use the host code since you’ll receive your own Host Dollars plus I’ll send you the free gift!  This host code can be used by anyone, no commitment required.  Let me know if you have any questions.


If you need any stamping supplies, I’d be very happy to be your Demonstrator.  Just click on the Shop Now button on the right side of the screen to go directly to my online store or contact me if you have any questions.  Happy Stamping!

Thanks for stopping by and have a great day!

Akiko

  • Visit my online store here
  • See the current Stampin’ Up! clearance rack specials here
  • Earn FREE Stampin’ Up! products through my Wildflower Frequent Shopper Program – my way of saying thank you to my frequent shopper online customers.
  • Sign up for my weekly newsletter here
  • Have any questions? I’d be happy to help, click here to contact me.

Cardstock Cuts for this project:

  • Rococo Rose – 4-1/4″ x 11″ card base scored at 5-1/2, 1″ x 4″ (bud die cuts)
  • Mossy Meadow – 2″ x 4″ (leaves die cuts)
  • Whisper White – 4″ x 5-1/4″ (inside panel), 3″ x 3″ (rose), 1-1/2″ x 2-1/2″ (label)
  • Woven Threads DSP – 4″ x 5-1/4″ (background), 1/2″ x 4″ (inside trim), 2-3/4″ x 4″ (large label)

Stampin’ Up! products used in this project:


Stampin’ Up! Ornate Style You’re Amazing Card

Good Morning! Today I have a sneak peek card made with the Stampin’ Up Ornate Style and Ornate Thanks stamp bundles. These bundles are part of the Ornate Garden Suite which are going to be in the 2020-2021 Annual Catalog, but are being be released early. Yay!! You can find the supplies used to create this card at the bottom of my post along with the sizes of cardstock used.

I cut a panel of the pretty yellow background Ornate Garden specialty designer series paper and adhered it to the bottom of a Terracotta Tile card base. I used the little circle border die from the Ornate Borders Dies to cut the bottom of a panel of Old Olive card stock and then ran it through the Ornate Floral embossing folder. I adhered it to the top of the card base, overlapping the floral DSP. I tied a length of Terracotta Tile ribbon around the card front and tied a faux bow just above the die cut border.

I stamped the you’re amazing sentiment from the Ornate Thanks photopolymer stamp set on a strip of Old Olive card stock using Old Olive ink. I cut it out with small long Stitched Rectangles dies. I cut the small frame from the Ornate Layers Dies from Terracotta Tile card stock.

I stamped the flower from the Stampin’ Up! Ornate Style cling stamp set in Memento Tuxedo Black ink on a small Whisper White panel. I colored it with the Dark So Saffron, Light Calypso Coral and Light Old Olive Stampin’ Blends. I adhered the flower to the Terracotta Tile frame and accented it with a Terracotta Tile faceted dot. I adhered it to the card front with dimensionals. I finally centered the Old Olive die cut label on the bottom of the card front.

The inside of the card is pretty simple – I trimmed a Whisper White panel with the yellow and Terracotta Tile floral paper from the Ornate Garden specialty designer series paper pack and adhered it to the inside of the card.

The Stampin’ Up! Ornate Garden Suite is really pretty with gorgeous die cut borders and frames, pretty floral images and sweet thank you sentiments for every occasion. The items in the suite are currently available to Stampin’ Up! Demonstrators during the pre-order period and will be available to everyone beginning April 1! That’s next week. Click on the image below to open a PDF file to see all of the items in the suite.

And note that if you are interested in joining Stampin’ Up! as a demonstrator now, you can add items from the suite to your starter kit. Contact me if you have any questions.


March 16 – 31 Host Code: RSAF3R27

Use this host code when you order $50 or more and receive a free gift from me!  The gift is your choice of any item valued up to $10.00 in the 2019-20 Annual Catalog or in the 2020 January-June Mini Catalog!  That includes some of the Host Exclusive stamp sets!

If your order is over $150, please do not use the host code since you’ll receive your own Host Dollars plus I’ll send you the free gift!  This host code can be used by anyone, no commitment required.  Let me know if you have any questions.


If you need any stamping supplies, I’d be very happy to be your Demonstrator.  Just click on the Shop Now button on the right side of the screen to go directly to my online store or contact me if you have any questions.  Happy Stamping!

Thanks for stopping by and have a great day!

Akiko

  • Visit my online store here
  • See the current Stampin’ Up! clearance rack specials here
  • Earn FREE Stampin’ Up! products through my Wildflower Frequent Shopper Program – my way of saying thank you to my frequent shopper online customers.
  • Sign up for my weekly newsletter here
  • Have any questions? I’d be happy to help, click here to contact me.

Cardstock Cuts for this project:

  • Terracotta Tile – 4-1/4″ x 11″ card base scored at 5-1/2″, 2-1/4″ x 4″ (die cut frame)
  • Old Olive – 3-1/2″ x 4″ (embossed panel)
  • Whisper White – 1-1/8″ x 2-1/2″ (flower panel), 4″ x 5-1/4″ (inside panel)
  • Ornate Gardens DSP – 2″ x 4″ (front panel), 1/2″ x 4″ (inside trim)

Stampin’ Up! products used in this project: