Stampin’ Up! Whale Done Love You Card

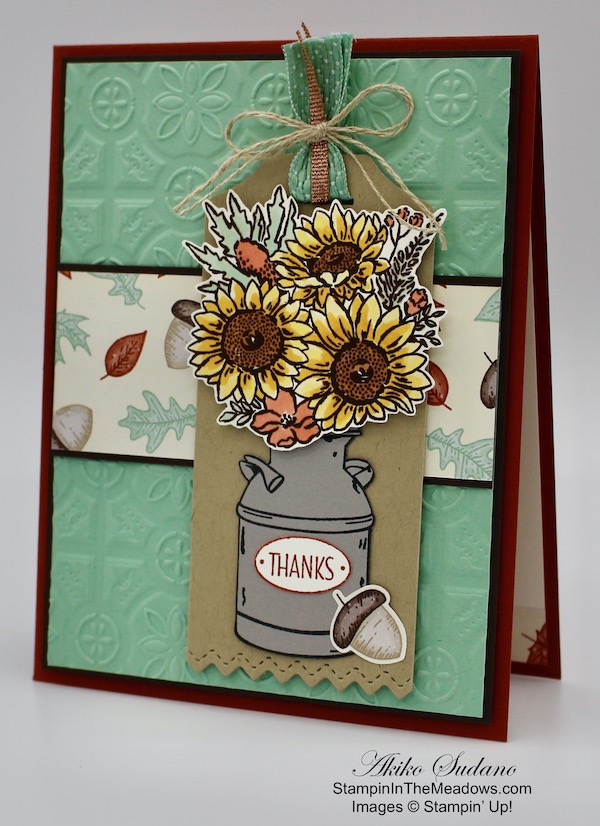
Good Morning! Today I have a cute little ocean themed card made with the Stampin’ Up! Whale Done photopolymer stamp set and Whale of a Time 6″ x 6″ designer series paper. You can find the supplies used to create this card at the bottom of my post along with the sizes of cardstock used.

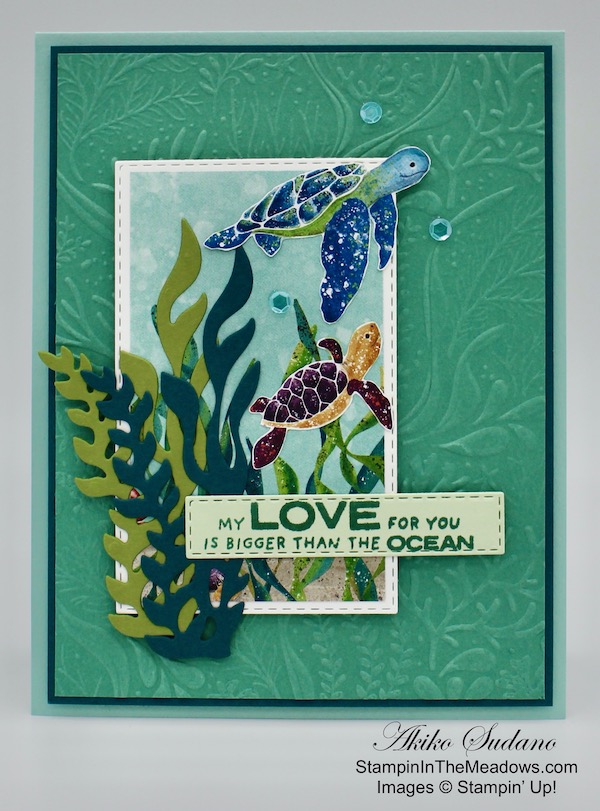
I embossed a panel of Just Jade card stock with the Seabed 3D embossing folder and adhered it to a Pretty Peacock mat. I popped it on the front of a Pool Party card base with dimensionals. I cut a Whisper White panel with the Stitched Rectangles Dies and adhered a panel of the Whale of a Time designer series paper to the front.

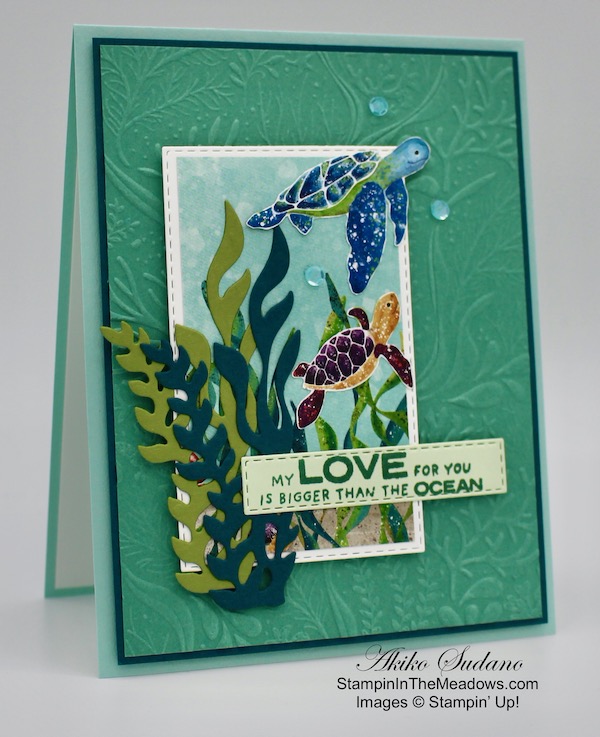
I cut two pieces of seaweed using the die from the Smooth Sailing Dies, one from Pretty Peacock and one from Old Olive. I adhered the seaweed to the DSP panel with liquid glue. I stamped the sentiment from the Stampin’ Up! Whale Done stamp set in Just Jade ink on a strip of Soft Sea Foam card stock and cut it out with the die from the Stitched Rectangles Dies. I adhered the label to the DSP panel with liquid glue. I fussy cut two sea turtles from another sheet of the Whale of a Time DSP and adhered them to the DSP panel with liquid glue.

I popped the DSP panel on the card front with dimensionals, also carefully placing parts of dimensionals underneath the elements that overlapped the panel. I finished the card front with three small Coastal Cabana sequins.

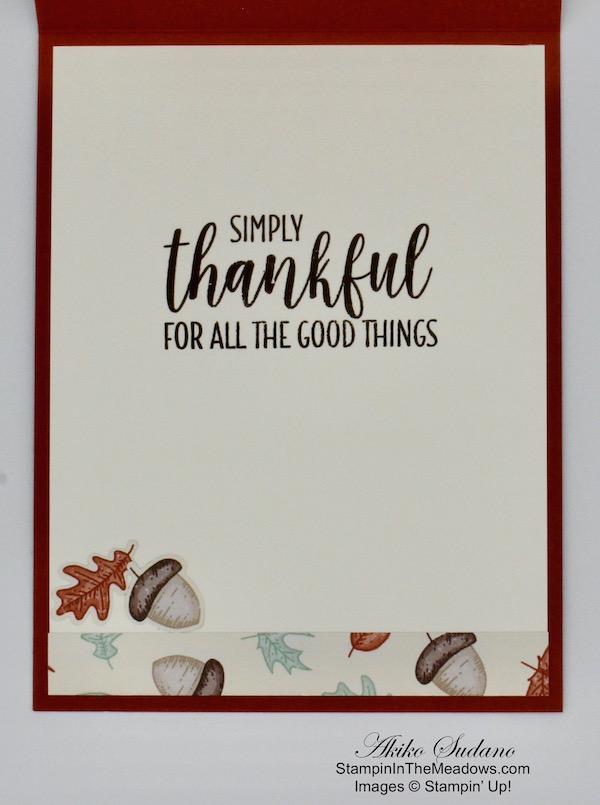
I stamped the seaweed from the Stampin’ Up! Whale Done stamp set in Pretty Peacock and Old Olive inks in the corner of a Whisper White panel. I stamped the coral in Calypso Coral and stamped the bubbles in Pool Party. I adhered the panel to the inside of the card with Stampin’ Seal.

The Stampin’ Up! Whale Done stamp set and Whale of a Time designer series papers are pretty and colorful and perfect for creating fun ocean themed cards as we wind down the summer.


August 16 – 31 Host Code: TV9N9BHQ

Use this host code when you order $50 or more and receive a free gift from me!  The gift is your choice of any item valued up to $10.00 in the 2020-21 Annual Catalog or the Aug – Dec 2020 Mini Catalog. This includes some of the host exclusive sets!

If your order is over $150, please do not use the host code since you’ll receive your own Host Dollars plus I’ll still send you the free gift!  This host code can be used by anyone, no commitment required.  Let me know if you have any questions.


If you need any stamping supplies, I’d be very happy to be your Demonstrator.  Just click on the Shop Now Button on the right side of the screen to go directly to my Online store or contact me if you have any questions.  Happy Stamping!

Thanks for stopping by and have a great day!

Akiko

  • Visit my Online store here
  • See the current Stampin’ Up! clearance rack specials here
  • Earn FREE Stampin’ Up! products through my Wildflower Frequent Shopper Program – my way of saying thank you to my frequent shopper online customers.
  • Sign up for my monthly newsletter here
  • Have any questions? I’d be happy to help, click here to contact me.

Cardstock Cuts for this project:

  • Pool Party – 4-1/4″ x 11″ card base scored at 5-1/2″
  • Pretty Peacock – 4″ x 5-1/4″ (front mat), 1-1/2″ x 3-3/4″ (die cut seaweed)
  • Just Jade – 3-7/8″ x 5-1/8″ (embossed front background)
  • Old Olive – 1-1/2″ x 3-3/4″ (die cut seaweed)
  • Soft Sea Foam – 1″ x 3″ (label)
  • Whale of a Time DSP – 3″ x 3-3/8″ (small panel background)
  • Whisper White – 4″ x 5-1/4″ (inside panel), 3-2/2″ x 3-3/4″ (die cut mat)

Stampin’ Up! products used in this project:


Stampin’ Up! Four Season Floral Note Cards

Good Morning! Today I have a little project that is perfect for beginner stampers and card makers. The sweet Stampin’ Up! Four Season Floral photopolymer stamp set in the Stampin’ Up! Beginner Brochure and has simple floral images and sentiments that are great for coloring or just stamping. You can pair the stamps with the Flowers for Every Season Cards and More and the Flowers for Every Season Memories and More card pack. You can find the supplies used to create this card at the bottom of my post.

For the first card, I used the Tasteful Touches Dies to cut a label from Bumblebee card stock and stamped the sentiment from the Stampin’ Up! Four Seasons Floral Stamp set in Poppy Parade ink in the lower corner. I applied a floral sticker from the Flowers for Every Season Memories and More card pack and a Magenta Madness enamel dot to the label and adhered the it to the pretty striped card from the Flowers for Every Season Cards and More set with dimensionals. I adhered the layered card to the front of one of the white Flowers for Every Season Cards and More card bases with more dimensionals.

For the second card, I used the pretty Misty Moonlight 3″ x 4″ cards from the Flowers for Every Season Memories and More card pack. I another floral sticker to the center and stamped the sentiment from the Stampin’ Up! Four Seasons Floral Stamp set in Just Jade ink on a strip of Whisper White. I adhered the label to the card with liquid glue and added a twine bow and Bumblebee enamel dot. I adhered the card to the front of the white Flowers for Every Season Cards and More card bases with dimensionals

For the third card, I stamped the sentiment from the Stampin’ Up! Four Seasons Floral Stamp set in Just Jade ink on the card from the pretty Flowers for Every Season Cards and More card and added a Magenta Madness enamel dot. I wrapped a length of Magenta Madness ribbon around the card and secured it in the back with Stampin’ Seal. I added a Magenta Madness faux bow to the bottom and popped it on another white Flowers for Every Season Cards and More card base with dimensionals.

The last card was the simplest! I trimmed a Flowers for Every Season Memories and More card pack card by 1/16″ on all sides and adhered it to a Cinnamon Cider mat (cut to 3″ x 4″). I used this card because it has the same design as the envelope liner, as well as a sweet sentiment. I decorated it with 3 Bumblebee enamel dots and popped it on another white Flowers for Every Season Cards and More card base with dimensionals.

The Flowers for Every Season Cards and More pack has:

  • Ten 3-1/4″ x 4-1/4″ white card bases
  • Ten envelopes with printed linings
  • Ten 3″ x 4″ double sided printed card fronts (two designs, five of each)

The small Memories and more cards are 3″ x 4″, so the Flowers for Every Season Memories and More card packs fit perfectly as well – and they have the cute stickers. And the designs coordinate with the stamps in the Stampin’ Up! Four Season Floral stamp set and other products in the Flowers for Every Season suite. So these are the perfect products for the beginning stamper or for when you are crunched for time and need a pretty card quick.


The September Paper Pumpkin Kit Celebrates Fall!

As the autumn season approaches, prepare to celebrate with the September Paper Pumpkin Kit! There’s so much to love about fall—some love the haunts of Halloween, many love the time to give thanks, and others love the changing colors and cooler temperatures. Whatever you love most about fall, September’s kit has everything you need to celebrate the season your way! Between a multi-occasion stamp set and enough supplies to design 20 cracker box treat packages, you can create custom fall crafts to celebrate Halloween, Thanksgiving, pumpkins, and leaves. Whether you make them all the same or mix ‘n’ match your crafts, there’s something for everyone in this kit!

Here are the Details:

  • Kit contains enough supplies to create 20 cracker box treat packages.
  • Each cracker box treat package can be customized to celebrate Halloween, Thanksgiving, the autumn season, or all three!
  • While this kit was designed to offer a unique treat packaging experience, the supplies can easily be used to create cards for any autumn occasion.

Coordinating Colors: Bumblebee, Basic Black, Cajun Craze, Cinnamon Cider, Mossy Meadow, Old Olive, Pumpkin Pie, white

If you’re interested in subscribing to Paper Pumpkin, you can either sign up for a subscription where you are billed monthly for your kit or you can purchase a prepaid subscription in my online store. To see more information and to sign up for the monthly subscription click here. To see the options for prepaid subscriptions in my online store, click here.

Sign up deadline for the September 2020 kit is September 10, 2020. Supplies may be limited toward the end of the subscription period. 


Don’t forget to redeem your Bonus Days Coupon Codes before the end of the month!!


August 16 – 31 Host Code: TV9N9BHQ

Use this host code when you order $50 or more and receive a free gift from me!  The gift is your choice of any item valued up to $10.00 in the 2020-21 Annual Catalog or the Aug – Dec 2020 Mini Catalog. This includes some of the host exclusive sets!

If your order is over $150, please do not use the host code since you’ll receive your own Host Dollars plus I’ll still send you the free gift!  This host code can be used by anyone, no commitment required.  Let me know if you have any questions.


If you need any stamping supplies, I’d be very happy to be your Demonstrator.  Just click on the Shop Now Button on the right side of the screen to go directly to my Online store or contact me if you have any questions.  Happy Stamping!

Thanks for stopping by and have a great day!

Akiko

  • Visit my Online store here
  • See the current Stampin’ Up! clearance rack specials here
  • Earn FREE Stampin’ Up! products through my Wildflower Frequent Shopper Program – my way of saying thank you to my frequent shopper online customers.
  • Sign up for my monthly newsletter here
  • Have any questions? I’d be happy to help, click here to contact me.

Stampin’ Up! products used in this project:


Stampin’ Up! Perfect Parcel Christmas Gift Box Video Tutorial

Good Morning! Today I’m sharing a cute little Christmas gift box made with the Stampin’ Up! Perfect Parcel dies that I made during my Facebook Live video tutorial yesterday afternoon. This die set has been available since last year and now you can update it using products from the August -December 2020 Mini Catalog. You can find the supplies used to create this project at the bottom of my post along with the sizes of cardstock used.

Here is the Facebook Live video showing how I made the blue box and snowflake tag:

I also posted the video to my YouTube Channel and you can view it here if you prefer.

I cut two of the box using the box die from the Stampin’ Up! Perfect Parcel Die set from Misty Moonlight card stock. I creased the box along the top and bottom score lines and adhered the box together with tear & tape. See the video for how to apply the tear & tape.

I applied the Snowflake Splendor designer series paper to the side and top box panels and folded the top down, tucking the flaps into the sides. I tied a length of metallic Seaside Spray ribbon around the box. I used the tag topper die from the Stampin’ Up! Perfect Parcel dies to cut the top of the Seaside Spray tag panel and adhered a strip of Snowflake Splendor DSP to the bottom of the tag.

I stamped the sentiment from the Itty Bitty Christmas stamp set in Misty Moonlight ink on a Whisper White panel and cut it out with the label die. I popped the label on the tag with dimensionals. I cut the small snowflake from the So Many Snowflakes dies using Balmy Blue Glimmer paper and the medium snowflake from Misty Moonlight cardstock. I adhered the snowflakes together and adhered them to the tag. I finished the tag with rhinestone gems and used the metallic twine to loop the tag onto the ribbon before tying the bow.

The Stampin’ Up! Perfect Parcel dies makes a really nice little gift box! It’s perfectly sized to hold a gift card or sweets or maybe even handmade jewelry. And it’s perfect for coordinating your card with a fancy box for that extra special gift.


Today is the last day to earn Double Wildflower Points!!

To celebrate the new catalog, I announced Double Wildflower Points. But since I couldn’t blog for days, I decided to extend this for another week – But today is the last day! My Wildflower Points program is my way of saying thank you to my frequent shoppers.  For every $50 you order from my online store, you earn 1 point, and when you earn 8 points, I owe you a FREE $40 order of your choice!  With Double Wildflower Points, you get 2 points for each $50 order, 4 points for each $100 order, and so on, reaching the goal of 8 points faster!  Yay!!  For complete details on the program, see my Customer Rewards page.  Let me know if you have any questions!


And don’t forget to redeem your Bonus Days Coupon Codes before the end of the month!!


August 16 – 31 Host Code: TV9N9BHQ

Use this host code when you order $50 or more and receive a free gift from me!  The free gift is your choice of any item valued up to $10.00 in the 2020 – 2021 Annual Catalog or the new Aug-Dec 2020 Mini Catalog.  This includes some of the host exclusive sets!

If your order is over $150, please do not use the host code since you’ll receive your own Host Dollars plus I’ll still send you the free gift!  This host code can be used by anyone, no club or commitment required.  Let me know if you have any questions.


If you need any stamping supplies, I’d be very happy to be your Demonstrator.  Just click on the Shop Now button on the right side of the screen to go directly to my online store or contact me if you have any questions.  Happy Stamping!

Thanks for stopping by and have a great week!

Akiko

  • Visit my online store here
  • See the current Stampin’ Up! clearance rack specials here
  • Earn FREE Stampin’ Up! products through my Wildflower Frequent Shopper Program – my way of saying thank you to my online frequent shopper customers.
  • Sign up for my weekly newsletter here
  • Have any questions? I’d be happy to help, click here to contact me.

Cardstock Cuts for this project:

  • Basic Box and Tag
    • Box card stock – two 4-1/4″ x 6-1/4″ panels
    • Box DSP – two 1-1/4″ x 3-3/8″ (box sides), 7/8″ x 3-3/8″ (box top flaps), 1/4″ x 2″ (tag trim)
    • Tag – 2″ x 3-1/2″
    • Label – 1-1/2″ x 2-1/2″
    • plus anything else needed to embellish the box
  • Cherry Cobbler Box and Tag
    • Thick Whisper White – two 4-1/4″ x 6-1/4″ panels (box die cuts)
    • Cherry Cobbler – 2″ x 3-1/2″ (tag)
    • Shaded Spruce – 1″ x 2″ (pine sprigs)
    • Silver Foil – 1-1/2″ x 2-1/2″ (jingle bells)
    • ‘Tis The Season DSP – two 1-1/4″ x 3-3/8″ (box sides), 7/8″ x 3-3/8″ (box top flaps), 1/4″ x 2″ (tag trim)
    • Whisper White – 1-1/2″ x 2-1/2″ (label)
  • Snowflake Splendor Box and Tag
    • Misty Moonlight – two 4-1/4″ x 6-1/4″ panels (box die cuts), 2″ x 2″ (large snowflake)
    • Seaside Spray – 2″ x 3-1/2″ (tag)
    • Balmy Blue Glimmer – 1-1/4″ x 1-1/4″ (small snowflake)
    • Snowflake Splendor DSP – two 1-1/4″ x 3-3/8″ (box sides), 7/8″ x 3-3/8″ (box top flaps), 1/4″ x 2″ (tag trim)
    • Whisper White – 1-1/2″ x 2-1/2″ (label)

Stampin’ Up! products used in this project:


Stampin’ Up! Wonder of the Season Christmas Card

Good Morning! Today I have a Christmas Card made with the Stampin’ Up! Wonder of the Season Memories and More card pack and the cards and envelopes. But the star of the card is the beautiful red foil poinsettia made from the Poinsettia Dies. You can find the supplies used to create this card at the bottom of my post along with the sizes of cardstock used.

I cut the Garden Green and gold foil pine branch Stampin’ Up! Wonder of the Season Memories and More large card in half and adhered it to the front of a Stampin’ Up! Wonder of the Season Memories and More card bases. These cards are larger than your normal A2 card and are so pretty with the red foil trim. The large Memories and More cards fit perfectly on the front and the small cards fit perfectly on the on the inside of the red foil frame. So I cut the large card in half to incorporate the pretty frame in the card design.

I cut three of the petal clusters from the Poinsettia Dies from red foil with the embossing dies. I gently curled the petals down with my fingers and adhered them together with glue dots. I adhered the flower to the card front with glue dots and added three Gilded Gems to the center. I stamped the Merry Christmas sentiment from the Perfectly Plaid photopolymer stamp set in Versamark ink on a Whisper White panel. I sprinkled it with gold embossing powder and heat set until shiny. I cut it out with a die from the Painted Labels Dies and adhered it to the card front.

I stamped two leaves from the Poinsettia Petals photopolymer stamp set in Versamark ink on Garden Green card stock. I sprinkled them with gold embossing powder and heat set until shiny. I cut them out with the coordinating dies and adhered them under the poinsettia with glue dots. I finished off the card front with a double bow made with gold twine.

I adhered a strip of the Stampin’ Up! Wonder of the Season specialty designer series paper to the bottom of a Whisper White panel so I could bring the pretty red foil scroll work to the inside of the card. I adhered the panel to the inside of the card.

The Stampin’ Up! Wonder of the Season card pack and cards and envelopes are a great way to make beautiful quick Christmas cards. The nostalgic themes are cheerful and fun. The touches of foil add an elegant sparkle and shine that coordinate well with many Christmas stamps and dies like the pretty poinsettia.


Double Wildflower Points Extended to August 17!!

To celebrate the new catalog, I announced Double Wildflower Points. But since I couldn’t blog for days, I decided to extend this for another week! My Wildflower Points program is my way of saying thank you to my frequent shoppers.  For every $50 you order from my online store, you earn 1 point, and when you earn 8 points, I owe you a FREE $40 order of your choice!  With Double Wildflower Points, you get 2 points for each $50 order, 4 points for each $100 order, and so on, reaching the goal of 8 points faster!  Yay!!  For complete details on the program, see my Customer Rewards page.  Let me know if you have any questions!


And don’t forget to redeem your Bonus Days Coupon Codes before the end of the month!!


August 1 – 15 Host Code: B76NYDVU

August 16 – 31 Host Code: TV9N9BHQ

Use this host code when you order $50 or more and receive a free gift from me!  The gift is your choice of any item valued up to $10.00 in the 2020-21 Annual Catalog or the Aug – Dec 2020 Mini Catalog. This includes some of the host exclusive sets!

If your order is over $150, please do not use the host code since you’ll receive your own Host Dollars plus I’ll still send you the free gift!  This host code can be used by anyone, no commitment required.  Let me know if you have any questions.


If you need any stamping supplies, I’d be very happy to be your Demonstrator.  Just click on the Shop Now Button on the right side of the screen to go directly to my Online store or contact me if you have any questions.  Happy Stamping!

Thanks for stopping by and have a great day!

Akiko

  • Visit my Online store here
  • See the current Stampin’ Up! clearance rack specials here
  • Earn FREE Stampin’ Up! products through my Wildflower Frequent Shopper Program – my way of saying thank you to my frequent shopper online customers.
  • Sign up for my monthly newsletter here
  • Have any questions? I’d be happy to help, click here to contact me.

Cardstock Cuts for this project:

  • Red Foil – 3-1/4″ x 7-1/2″ (die cut poinsettia petals)
  • Garden Green – 2″ x 4″ (die cut leaves)
  • Whisper White – 4″ x 6″” (inside panel)
  • Wonder of the Season DSP – 3/4″ x 4″ (inside trim)

Stampin’ Up! products used in this project:


Stampin’ Up! Field Journal Birthday Card

Good Morning! Today I have a simple masculine birthday card made with the Stampin’ Up! Field Journal Cling stamp set. You can find the supplies used to create this card at the bottom of my post along with the sizes of cardstock used.

I stamped the duck from the Stampin’ Up! Field Journal stamp set in Early Espresso ink on a Whisper White panel. I cut it out with the largest stitched oval from the Stitched Shapes Dies. I colored it with Bermuda Bay, Cinnamon Cider, Soft Suede, Crumb Cake and Mango Melody Stampin’ Blends. I colored the ground with Old Olive Stampin’ Blends and the background with Pool Party Stampin’ Blends.

I embossed a panel of Mossy Meadow card stock with the Old World Paper 3D embossing folder. I adhered an antique corner to each corner with a glue dot. I adhered a panel of World of Good specialty designer series paper to an Early Espresso mat. I adhered a strip of In Good Taste designer series paper on top.

I adhered the embossed Mossy Meadow panel on the layered DSP panel and popped the art panel on top with dimensionals. I popped the panel on the front of a Crumb Cake card base.

I stamped the Happy Birthday sentiment from the Pallet Thoughts cling stamp set in Early Espresso ink on a Whisper White panel. I stamped the plant from the Stampin’ Up! Field Journal stamp set in Crumb Cake ink after stamping off twice. I trimmed the bottom with a strip of World of Good DSP to the bottom and adhered it to the inside of the card.

The Stampin’ Up! Field Journal stamp set is like a walk in the woods. The pretty line drawn images are great for coloring and would make a great card for any nature lover.


Double Wildflower Points Extended to August 17!!

To celebrate the new catalog, I announced Double Wildflower Points. But since I couldn’t blog for days, I decided to extend this for another week! My Wildflower Points program is my way of saying thank you to my frequent shoppers.  For every $50 you order from my online store, you earn 1 point, and when you earn 8 points, I owe you a FREE $40 order of your choice!  With Double Wildflower Points, you get 2 points for each $50 order, 4 points for each $100 order, and so on, reaching the goal of 8 points faster!  Yay!!  For complete details on the program, see my Customer Rewards page.  Let me know if you have any questions!


August 1 – 15 Host Code: B76NYDVU

Use this host code when you order $50 or more and receive a free gift from me!  The gift is your choice of any item valued up to $10.00 in the 2020-21 Annual Catalog or the Aug – Dec 2020 Mini Catalog. This includes some of the host exclusive sets!

If your order is over $150, please do not use the host code since you’ll receive your own Host Dollars plus I’ll still send you the free gift!  This host code can be used by anyone, no commitment required.  Let me know if you have any questions.


If you need any stamping supplies, I’d be very happy to be your Demonstrator.  Just click on the Shop Now Button on the right side of the screen to go directly to my Online store or contact me if you have any questions.  Happy Stamping!

Thanks for stopping by and have a great day!

Akiko

  • Visit my Online store here
  • See the current Stampin’ Up! clearance rack specials here
  • Earn FREE Stampin’ Up! products through my Wildflower Frequent Shopper Program – my way of saying thank you to my frequent shopper online customers.
  • Sign up for my monthly newsletter here
  • Have any questions? I’d be happy to help, click here to contact me.

Cardstock Cuts for this project:

  • Crumb Cake – 4-1/4″ x 11″ card base scored at 5-1/2″
  • Early Espresso – 4″ x 5-1/4″ (front mat)
  • Mossy Meadow – 2-3/4″ x 3-3/4″ (embossed panel)
  • Whisper White – 4″ x 5-1/4″ (inside panel), 2-3/4″ x 3-3/4″ (art panel)
  • World of Good DSP – 3-7/8″ x 5-1/8″ (front background), 1/2″ x 4″ (inside trim)
  • In Good Taste DSP 2″ x 5-1/8″ (front wood grained strip)

Stampin’ Up! products used in this project:


Stampin’ Up! Forever Fern for the Happy Inkin’ Thursday Blog Hop

Good Morning! Welcome to the Happy Inkin’ Thursday Blog Hop! We have a new kind of challenge this week – a theme challenge! So we are all creating projects around a theme, and this week’s theme gave me an excuse to pull out the Stampin’ Up! Forever Fern bundle for today’s card:

This week’s theme is:

I adhered a panel of the pretty Forever Greenery designer series paper to the front of a Soft Sea Foam card base. I cut a panel of Soft Sea Foam card stock with a scalloped rectangle from the Stitched So Sweetly Dies and embossed it with the Greenery embossing folder. I stamped the leaf clusters from the Stampin’ Up! Forever Fern cling stamp set in Pear Pizzazz and Pretty Peacock inks on a Whisper White panel and cut them out with the coordinating dies from the Forever Flourishing Dies.

I stamped the sentiment in Pretty Peacock ink and cut it out with the fancy circle die from the Tasteful Labels Dies. I stamped the small leaf cluster from the Rooted in Nature cling stamp set twice in Versamark ink on Soft Sea Foam card stock and sprinkled it with gold embossing powder and heat set. I cut it out with the coordinating die from the Nature’s Root Dies. I cut the boughs with the Forever Flourishing Dies from Pretty Peacock and Soft Sea Foam card stock.

I adhered the stamped leaves on the die Soft Sea Foam scalloped panel with liquid glue. I adhered a gold hoop with glue dots and adhered the gold embossed leaf clusters on top with glue dots. I popped the sentiment on with dimensionals and made a double bow with gold floss and white ribbon and adhered it to the panel with glue dots. I adhered the panel to the card front with dimensionals and finished the card front off with three gilded gems.

For the inside of the card, I stamped the leaf clusters from the Stampin’ Up! Forever Fern stamp set in Pear Pizzazz and Pretty Peacock inks on a Whisper White panel. I trimmed the bottom with a strip of Forever Greenery DSP and adhered the panel to the inside of the card.

This theme was a great excuse to pull out the Stampin’ Up! Forever Fern bundle and use it for a project! It’s been a while since I’ve played with this set and I was reminded of how beautiful and versatile it is.

On with the Hop! Click the Next button below to visit Karen Ksenzakovic’s blog.

And just in case you get lost along the way, here’s a list of the team members participating in the hop today:


August 1 – 15 Host Code: B76NYDVU

Use this host code when you order $50 or more and receive a free gift from me!  The gift is your choice of any item valued up to $10.00 in the 2020-21 Annual Catalog or the Aug – Dec 2020 Mini Catalog. This includes some of the host exclusive sets!

If your order is over $150, please do not use the host code since you’ll receive your own Host Dollars plus I’ll still send you the free gift!  This host code can be used by anyone, no commitment required.  Let me know if you have any questions.


If you need any stamping supplies, I’d be very happy to be your Demonstrator.  Just click on the Shop Now Button on the right side of the screen to go directly to my online store or contact me if you have any questions.  Happy Stamping!

Thanks for visiting!

Akiko

  • Visit my online store here
  • See the current Stampin’ Up! clearance rack specials here
  • Earn FREE Stampin’ Up! products through my Wildflower Frequent Shopper Program – my way of saying thank you to my frequent shopper online customers.
  • Sign up for my weekly newsletter here
  • Have any questions? I’d be happy to help, click here to contact me.

Cardstock Cuts for this project:

  • Soft Sea Foam – 4-1/4″ x 11″ card base scored at 5-1/2″, 3″ x 4″ (scalloped die cut panel), 3/4″ x 2-1/2″ (die cut small bough), 1-3/4″ x 3″ (gold embossed clusters)
  • Pretty Peacock – 1/2″ x 2-3/4″ (large die cut bough)
  • Whisper White – 4″ x 5-1/4″ (inside panel), 1-3/4″ x 10″ (stamped leaves and label)
  • Forever Greenery DSP – 4″ x 5-1/4″ (front background), 1/2″ x 4″ (inside trim)

Stampin’ Up! products used in this project:


Stampin’ Up! Under My Umbrella Hello Sunshine Card

Good Morning! Last week when the tropical storm came through, I decided I needed to pull out the Stampin’ Up! Under My Umbrella photopolymer stamp set to cheer up a rainy day. And then we lost power for a couple of days and I couldn’t blog, so I get to finally share it today! You can find the supplies used to create this card at the bottom of my post along with the sizes of cardstock used.

My layout was inspired by the pretty Fab Friday 195 Sketch Challenge. Check it out:

I embossed a panel of Calypso Coral card stock with the Ornate Floral 3D embossing folder and adhered it to the front of a Calypso Coral card base. I adhered a panel of the Calypso Coral with Whisper White dots Playing with Patterns designer series paper to a Whisper White mat so that only two sides of the Whisper White shows (the right and bottom sides). I adhered the DSP panel to the upper left corner of the card front with dimensionals.

I stamped the umbrella from the Stampin’ Up! Under My Umbrella photopolymer stamp set in Night of Navy ink on the Playing with Patterns multicolor circle paper. I punched it out with the Umbrella Builder Punch. I punched another umbrella top from Whisper White card stock and adhered it to the back. I punched out an umbrella handle from Silver Foil. When using the punch, if you don’t have enough paper to position the paper properly, adhere it to a post-it-note so you have a handle to move the paper around until you get the alignment you want.

I stamped the boots from the Stampin’ Up! Under My Umbrella stamp set in Night of Navy ink on a small panel of Playing with Patterns DSP and fussy cut it out with my paper snips. I stamped the flowers three times in Night of Navy on Whisper White and colored the flowers with the Purple Posy, Daffodil Delight, Bermuda Bay and Calypso Coral Stampin’ Blends. I fussy cut the flowers. I stamped the sentiment in Night of Navy on a strip of Whisper White and trimmed the end with the new Banners Pick A Punch. I adhered the sentiment, two flowers and boots on the card with multipurpose liquid glue. I adhered the umbrella handle with liquid glue and popped the umbrella on top with dimensionals. I adhered flowers to the top of the umbrella and finished the card front with a resin dot and Night of Navy bow.

I stamped the flowers again on the lower left corner of a Whisper White panel in Night of Navy Ink and colored it with Stampin’ Blends just like the flowers on the front. I added a strip of Playing with Patterns DSP and adhered the panel to the inside of the card.

The Stampin’ Up Under My Umbrella stamp set and Umbrella Builder punch are perfect for making cheerful cards for any occasion! And the perfect accompaniment is the Playing with Patterns 6″ x 5″ designer series paper.


Double Wildflower Points Extended to August 17!!

To celebrate the new catalog, I announced Double Wildflower Points. But since I couldn’t blog for days, I decided to extend this for another week! My Wildflower Points program is my way of saying thank you to my frequent shoppers.  For every $50 you order from my online store, you earn 1 point, and when you earn 8 points, I owe you a FREE $40 order of your choice!  With Double Wildflower Points, you get 2 points for each $50 order, 4 points for each $100 order, and so on, reaching the goal of 8 points faster!  Yay!!  For complete details on the program, see my Customer Rewards page.  Let me know if you have any questions!


And don’t forget to redeem your Bonus Days Coupon Codes before the end of the month!!


August 1 – 15 Host Code: B76NYDVU

Use this host code when you order $50 or more and receive a free gift from me!  The gift is your choice of any item valued up to $10.00 in the 2020-21 Annual Catalog or the Aug – Dec 2020 Mini Catalog. This includes some of the host exclusive sets!

If your order is over $150, please do not use the host code since you’ll receive your own Host Dollars plus I’ll still send you the free gift!  This host code can be used by anyone, no commitment required.  Let me know if you have any questions.


If you need any stamping supplies, I’d be very happy to be your Demonstrator.  Just click on the Shop Now Button on the right side of the screen to go directly to my Online store or contact me if you have any questions.  Happy Stamping!

Thanks for stopping by and have a great day!

Akiko

  • Visit my Online store here
  • See the current Stampin’ Up! clearance rack specials here
  • Earn FREE Stampin’ Up! products through my Wildflower Frequent Shopper Program – my way of saying thank you to my frequent shopper online customers.
  • Sign up for my monthly newsletter here
  • Have any questions? I’d be happy to help, click here to contact me.

Cardstock Cuts for this project:

  • Calypso Coral – 4-1/4″ x 11″ card base scored at 5-1/2″, 4-1/4″ x 5″ (embossed background)
  • Silver Foil – 1/2″ x 2″ (umbrella handle)
  • Whisper White – 4″ x 5-1/4″ (inside panel), 3-9/16″ x 4-13/16″ (DSP mat), 1-1/4″ x 2-3/4″ (umbrella backing), 1″ x 4-1/2″ (fussy cut flowers), 3/4″ x 3″ (label)
  • Playing with Patterns DSP – 3-1/2″ x 4-3/4″ (calypso coral dotted front background), 1/2″ x 4″ (inside trim), 1-1/4″ x 4″ (multicolor circles for umbrella and boots)

Stampin’ Up! products used in this project:


Stampin’ Up! Jar of Flowers and Country Home Card for the Inkin’ Krew Blog Hop

Good Morning! Welcome to the August Inkin’ Krew Team Monthly Blog Hop! The theme for this month’s hop is Fall Frenzy. My card combines the old with the new – the Stampin’ Up! Jar of Flowers and Country Home stamp sets, the Tin Tile 3D embossing folder and the beautiful Gilded Autumn specialty designer series paper. You can find the supplies used to create this card at the bottom of my post along with the sizes of cardstock used.

I embossed a panel of Mint Macaron card stock with the Tin Tile 3D embossing folder and adhered it to an Early Espresso mat with multipurpose liquid glue. I adhered a strip of the Gilded Autumn designer series paper to another Early Espresso mat and adhered them to the embossed panel. I cut the bottom of a Crumb Cake panel with the zigzag bottom of the tag die from the North Pole Wonder Dies. I used the Fancy Tag Topper die to cut the top so I would have a longer tag. I wrapped some Mint Macaron and copper ribbons through the top of the tag and tied them with Linen Thread.

I stamped the milk can from the Stampin’ Up! Country Home stamp set in Memento Tuxedo Black ink on Gray Granite card stock and fussy cut it out. I adhered it to the bottom of the tag with liquid glue. I stamped the sunflower bouquet from the Stampin’ Up! Jar of Flowers stamp set in Early Espresso ink on Very Vanilla. I colored it with Calypso Coral, Mint Macaron, Cinnamon Cider, Daffodil Delight and Mango Melody Stampin’ Blends. I fussy cut the flowers and adhered them to the tag with dimensionals.

I stamped the label and Thanks sentiment from the Country Home stamp set in Cajun Craze ink on a small panel of Very Vanilla. I fussy cut it out and adhered it to the milk can with liquid glue. I punched out an acorn from the Gilded Autumn designer series paper with the acorn punch from the Autumn Punch Pack and adhered it to the bottom of the tag. I adhered the decorated tag to the embossed panel with dimensionals and popped the panel on the front of a Cajun Craze card base.

I stamped the sentiment from the Country Home stamp set in Early Espresso ink on a Very Vanilla panel. I trimmed the bottom with a strip of Gilded Autumn DSP and added a punched oak leaf and acorn to finish the inside panel.

Decorating with old milk cans is still pretty popular, so I was happy to see that it went so well with the new bouquets from the Stampin’ Up! Jar of Flowers stamp set. What do you think of this mixing the old with the new?

Let’s get on with the hop! Be sure to visit each of this wonderfully creative team’s blogs to see all the great Fall Frenzy projects. Click on the Next Blog button to move forward to Julie Johnston’s project or click the Previous Blog button to move back to see the project that Leslie Larkin created.

If you get lost along the way, here are the participants for the hop:


August 1 – 15 Host Code: B76NYDVU

Use this host code when you order $50 or more and receive a free gift from me!  The gift is your choice of any item valued up to $10.00 in the 2020-21 Annual Catalog or the Aug–Dec 2020 Mini Catalog. This includes some of the host exclusive sets!

If your order is over $150, please do not use the host code since you’ll receive your own Host Dollars plus I’ll still send you the free gift!  This host code can be used by anyone, no commitment required.  Let me know if you have any questions.


If you need any stamping supplies, I’d be very happy to be your Demonstrator.  Just click on the Order Stampin’ Up! Online Now button on the right side of the screen to go directly to my online store or contact me if you have any questions.  Happy Stamping!

Thanks for visiting!

Akiko

  • Visit my online store here
  • See the current Stampin’ Up! clearance rack specials here
  • Earn FREE Stampin’ Up! products through my Wildflower Frequent Shopper Program – my way of saying thank you to my frequent shopper online customers.
  • Sign up for my weekly newsletter here
  • Have any questions? I’d be happy to help, click here to contact me.

Cardstock Cuts for this project:

  • Cajun Craze – 4-1/4″ x 11″ card base scored at 5-1/2″
  • Early Espresso – 4″ x 5-1/4″ (front mat), 1-5/8″ x 3-7/8″ (DSP strip mat)
  • Mint Macaron – 3-7/8″ x 5-1/8″ (embossed front background)
  • Gray Granite – 1-3/4″ x 2-1/4″ (milk can)
  • Crumb Cake – 2″ x 4-1/2″ (tag)
  • Very Vanilla – 4″ x 5-1/4″ (inside panel), 2″ x 2-1/2″ (sunflower bouquet), 1″ x 1-1/2″ (milk can label)
  • Gilded Autumn DSP – 1-1/2″ x 3-7/8″ (front strip), 1/2″ x 4″ (inside trim), 2 punched pine cones and 1 punched oak leaf

Stampin’ Up! products used in this project:


Stampin’ Up! Snow Front Birthday Card Video Tutorial

Good Morning! Today I’m sharing a Masculine Birthday Card made with the Stampin’ Up! Snow Front photopolymer stamp set that I made during my Facebook Live video tutorial yesterday afternoon. Nature cards are always good themes for masculine birthdays and the Stampin’ Up! Snow Front stamp set is one that helps you create beautiful natural landscapes that look like watercolor paintings. You can find the supplies used to create this card at the bottom of my post along with the sizes of cardstock used.

Here is the Facebook Live video showing how I made the card:

I also posted the video to my YouTube Channel and you can view it here if you prefer.

I started by stamping the mountains from the Stampin’ Up! Snow Front stamp set in Gray Granite ink twice along the middle of a Whisper White panel. I stamped the large pine tree in Garden Green ink, the deer in Cinnamon Cider ink and the lake in Balmy Blue ink. I used the swirl stamp to stamp some Pear Pizzazz ink on the ground after stamping off.

I lightly sponged the sky above the mountains in Balmy Blue ink with my sponge dauber and lightly sponged some Pear Pizzazz ink on the ground and mountains. I adhered the stamped panel to a Garden Green mat with Stampin’ Seal. I wrapped Linen Thread around the layered panel and tied a knot and popped it on the front of a Cinnamon Cider card base.

I stamped the Happy Birthday sentiment from the Pallet Thoughts cling stamp set in Cinnamon Cider ink on a small Garden Green panel and cut it out with the banner die from the Tasteful Labels Dies. I added a small silver metallic pearl and adhered it to the card with dimensionals.

I stamped the tree, deer and ground in the corner of a Whisper White panel using the same colors as the card front. I adhered the panel to a Garden Green mat and then to the inside of the card.

The Stampin’ Up! Snow Front stamp set has lots of elements to create beautiful watercolor – like landscapes just by stamping and it’s easy and fun. You can use it with other stamp sets such as the similar Waterfront and My Meadow stamp sets. I kept this card simple and used the entire card front for my stamped image so it has a lot of white space, but you can also stamp a smaller image and layer it with embossed card stock or natural texture designer series paper. It’s very versatile and the results are amazing!


It’s time to start redeeming those Bonus Days Coupon Codes!

  • Redemption Deadline:  August 31 2020, by 11:50 PM (MT)
  • There is no limit to the number of coupon codes participants can use on an order during redemption.
  • Bonus Days coupon codes may be redeemed for any product (excluding Starter Kits and Paper Pumpkin monthly subscriptions).
    • New prepaid Paper Pumpkin codes may be discounted using Bonus Days coupon codes.
  • Bonus Days coupon codes will reduce the amount of an order.
    • Note that rewards and gifts are based on the final value of your order after your coupon codes have been applied. 
  • Bonus Days coupon codes may be redeemed one time only.

Today is the last day to sign up for the August Paper Pumpkin Kit!

Celebrate and appreciate the everyday heroes in your life with the August Paper Pumpkin Kit. The cards included in this kit are specifically designed for celebrating life’s champions! The kit includes Distinktive stamps, which are photo-realistic stamps that create an impressive detailed image with a single stamp. While the elements of the August kit can be used to show appreciation for anyone, the card designs also have a masculine feel – perfect for the men in your life!

Here are the Details:

  • Kit contains enough supplies to create nine cards and coordinating envelopes.
  • Card size: 4-1/4” x 5-1/2”
  • Envelope size: 4-1/2” x 5-3/4”
  • The kit’s stamp set includes Distinktive stamps

Coordinating Colors: Bumblebee, gold, Mint Macaron, Pacific Point, Soft Suede, white

Watch this video to catch a glimpse of the World’s Greatest by Paper Pumpkin:

If you’re interested in subscribing to Paper Pumpkin, you can either sign up for a subscription where you are billed monthly for your kit or you can purchase a prepaid subscription in my online store. To see more information and to sign up for the monthly subscription click here. To see the options for prepaid subscriptions in my online store, click here.


August 1 – 15 Host Code: B76NYDVU

Use this host code when you order $50 or more and receive a free gift from me!  The free gift is your choice of any item valued up to $10.00 in the 2019 – 2020 Annual Catalog or in the August – December 2020 Mini Catalog!  That includes some of the Host Exclusive stamp sets!

If your order is over $150, please do not use the host code since you’ll receive your own Host Dollars plus I’ll still send you the free gift!  This host code can be used by anyone, no club or commitment required.  Let me know if you have any questions.


If you need any stamping supplies, I’d be very happy to be your Demonstrator.  Just click on the Shop Now button on the right side of the screen to go directly to my online store or contact me if you have any questions.  Happy Stamping!

Thanks for stopping by and have a great week!

Akiko

  • Visit my online store here
  • See the current Stampin’ Up! clearance rack specials here
  • Earn FREE Stampin’ Up! products through my Wildflower Frequent Shopper Program – my way of saying thank you to my online frequent shopper customers.
  • Sign up for my weekly newsletter here
  • Have any questions? I’d be happy to help, click here to contact me.

Cardstock Cuts for this project:

  • Cinnamon Cider – 4-1/4″ x 11″ card base scored at 5-1/2″
  • Garden Green – (2) 4″ x 5-1/4″ panels (front and inside mats), 1″ x 3″ (label)
  • Whisper White – (2) 3-7/8″” x 5-1/8″ panels (stamped front and inside)

Stampin’ Up! products used in this project:


Stampin’ Up! August – December Mini Catalog is Open!!

Yay!! Today is the day that the new Stampin’ Up! August – December Mini Catalog is open for orders!!

And the new store is open too! It’s a little different, but I really love the larger pictures and I’m starting to get used to the new menus and filters on the left. And I still need to check all my blog links, so if you click on an item, it will take you to my Online Store Front but not to the right item yet.

I’ve added links to a PDF version of the catalog to my promotions page and sidebar, so you can view it online if you want. If you want a copy of the catalog and are considering becoming a customer of mine, let me know and I’ll be happy to send you one!!

And to celebrate the new catalog, I’m offering a Double Wildflower Points promotion beginning today through Monday August 10!

If you don’t know about my Wildflower Points frequent shopper program, here’s how it works:

  • For each $50 that you order from my online store (before shipping) you will earn one Wildflower point.
  • You will earn one Wildflower point for each friend that you refer when they place their first order of $50+ from my online store.
  • When you have earned 8 Wildflower points you will get a FREE product order valued up to $40.00, your choice and mailed directly to you!

With DOUBLE Wildflower points you get 2 points for each $50 order, 4 points for each $100 order, and so on, reaching your FREE order faster!!

This offer ends on Monday Aug 10, 2020.

For complete details on my Wildflower Rewards, scroll to the bottom of my Customer Rewards page or contact me. To start shopping now, head over to my Online Store!

Time to start redeeming those Bonus Days Coupon Codes!

  • Redemption Deadline:  August 31 2020, by 11:50 PM (MT)
  • There is no limit to the number of coupon codes participants can use on an order during redemption.
  • Bonus Days coupon codes may be redeemed for any product (excluding Starter Kits and Paper Pumpkin monthly subscriptions).
    • New prepaid Paper Pumpkin codes may be discounted using Bonus Days coupon codes.
  • Bonus Days coupon codes will reduce the amount of an order.
    • Note that rewards and gifts are based on the final value of your order after your coupon codes have been applied. 
  • Bonus Days coupon codes may be redeemed one time only.

August 1 – 15 Host Code: B76NYDVU

Use this host code when you order $50 or more and receive a free gift from me!  The gift is your choice of any item valued up to $10.00 in the 2020-21 Annual Catalog or the Aug–Dec 2020 Mini Catalog. This includes some of the host exclusive sets!

If your order is over $150, please do not use the host code since you’ll receive your own Host Dollars plus I’ll still send you the free gift!  This host code can be used by anyone, no commitment required.  Let me know if you have any questions.


If you need any stamping supplies, I’d be very happy to be your Demonstrator.  Just click on the Shop Now Button on the right side of the screen to go directly to my Online store or contact me if you have any questions.  Happy Stamping!

Thanks for stopping by and have a great day!

Akiko

  • Visit my Online store here
  • See the current Stampin’ Up! clearance rack specials here
  • Earn FREE Stampin’ Up! products through my Wildflower Frequent Shopper Program – my way of saying thank you to my frequent shopper online customers.
  • Sign up for my monthly newsletter here
  • Have any questions? I’d be happy to help, click here to contact me.