Stampinโ€™ Up! Blessings Of Home Sneak Peek

Good Morning! The Stampin’ Up! Annual Convention was held virtually last weekend, and it was so much fun! I learned so much and we made three beautiful projects with a new bundle from the upcoming January-June 2021 Mini Catalog – the Stampin’ Up! Blessings Of Home bundle. I did make some minor changes to the original designs, but it was so much fun to make the cards, each with different techniques! You can find the supplies I used at the bottom of my post along with the sizes of cardstock used.

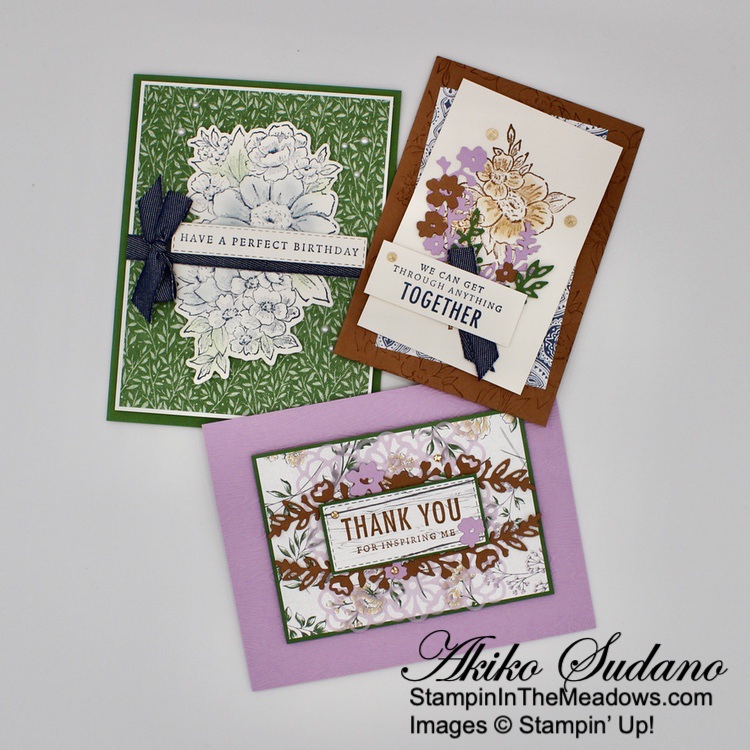
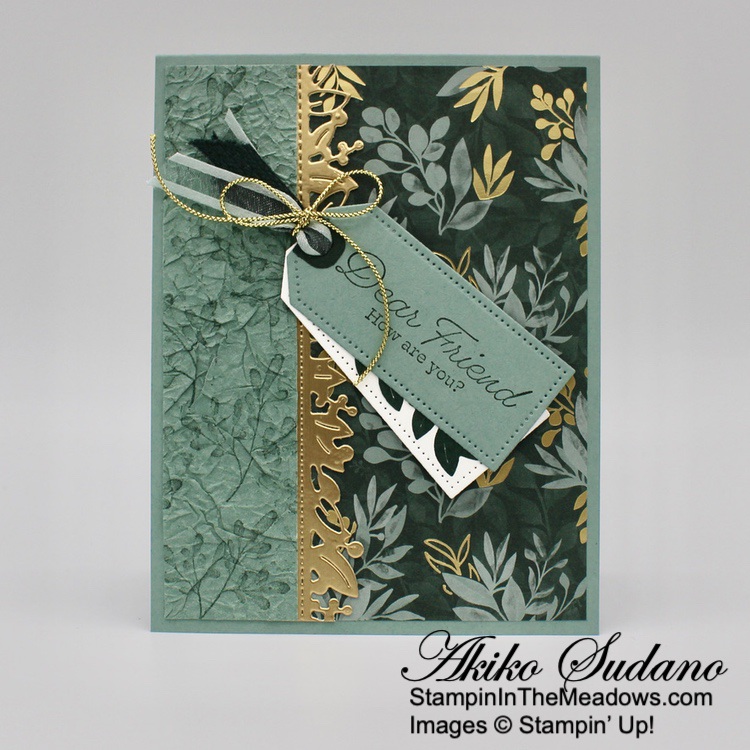
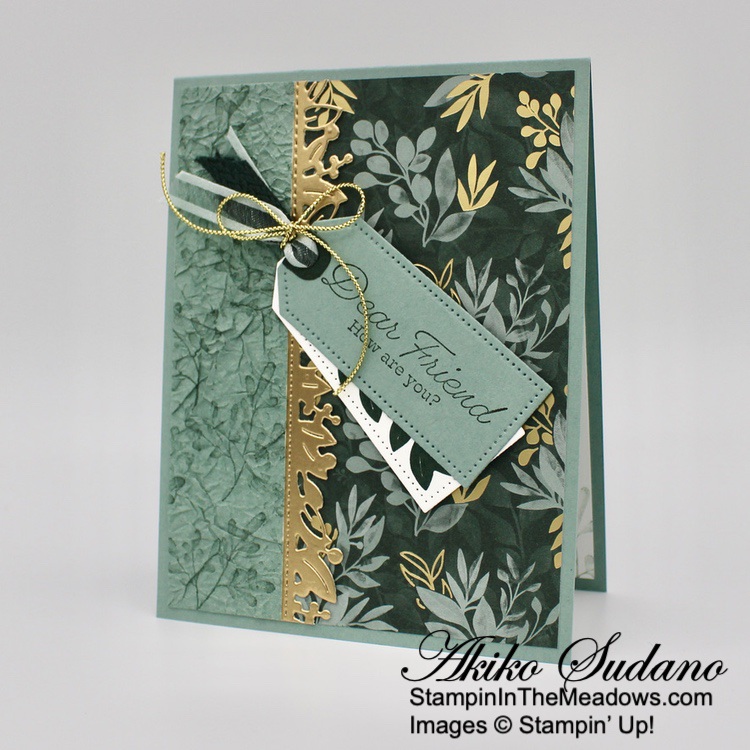
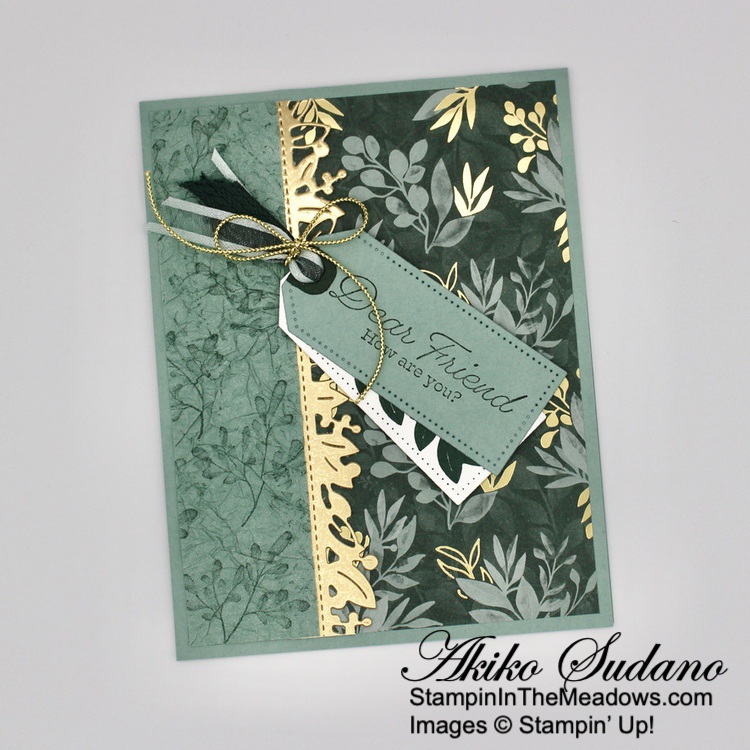
For the first card, I used the pretty Heart & Home designer series paper as the background – I matted it with Basic White and stamped the pretty floral Bouquet from the Stampin’ Up! Blessings of Home in Misty Moonlight on Shimmery White paper. I used sponge daubers to add Misty Moonlight and Garden Green to some of the flowers and leaves and cut it out with the coordinating die. I adhered the image to the DSP and wrapped it with denim ribbon and adhered it to the front of a Garden Green card base. Then I stamped the label in Misty Moonlight and cut it out with a stitched rectangle die and adhered it to the card with dimensionals. I finished it off with a denim ribbon bow and pearls.

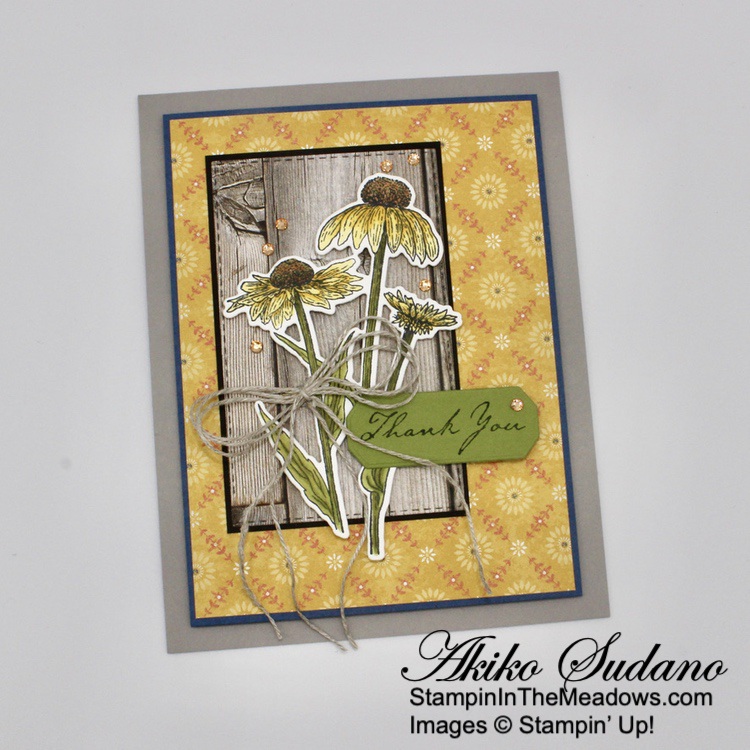
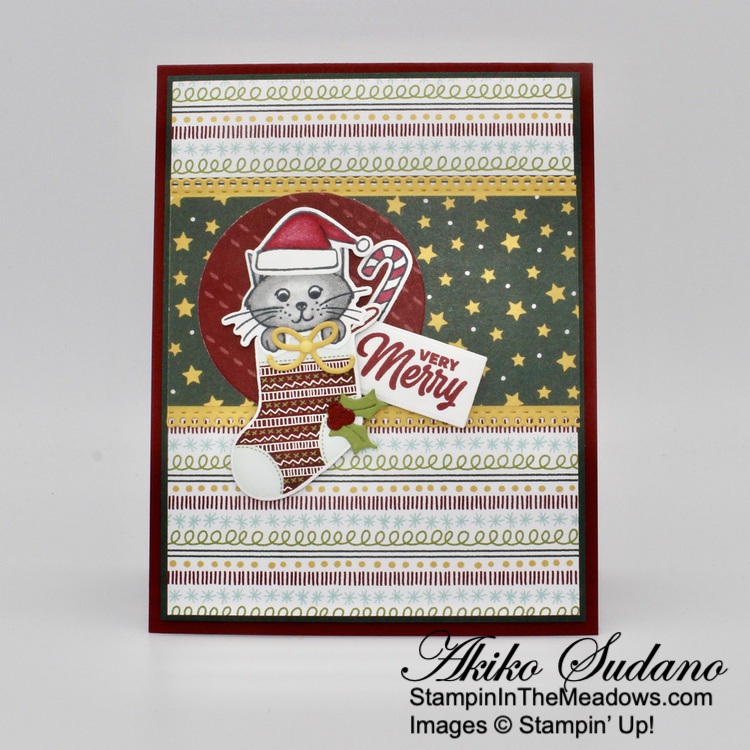
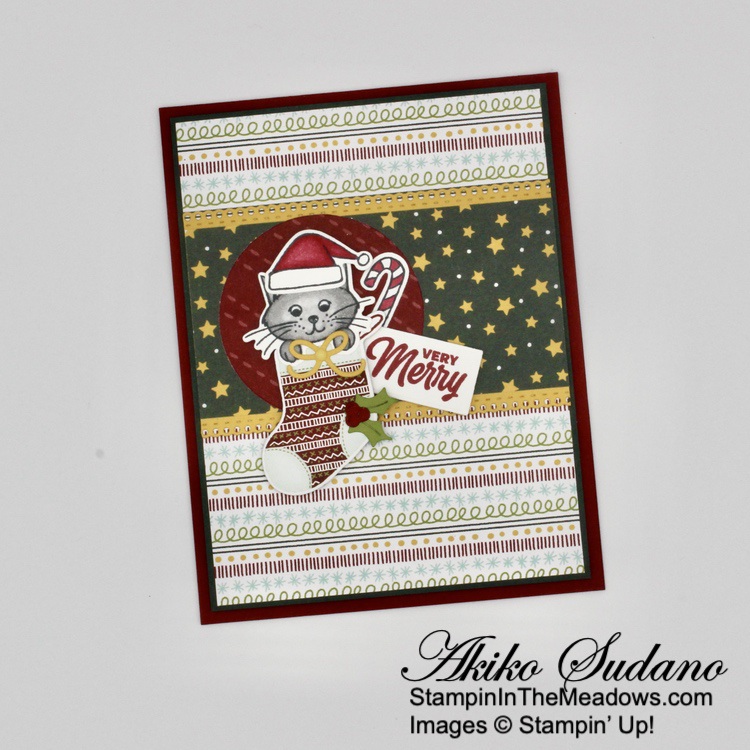
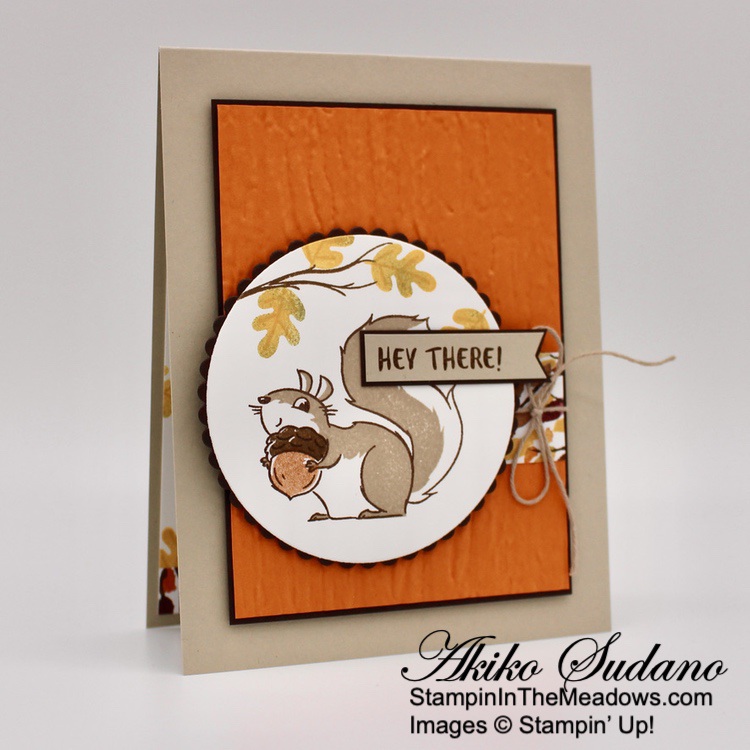
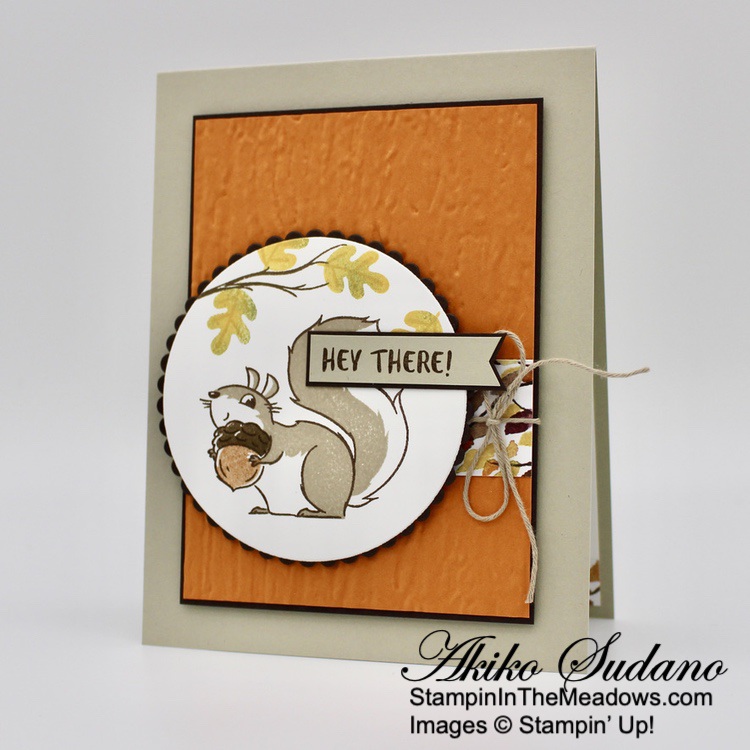
For the second card, I stamped the posy image from the Stampin’ Up! Blessings of Home stamp set in Cinnamon Cider on the front of a Cinnamon Cider note card base. I adhered a panel of Heart & Home DSP to the front and stamped the image in Cinnamon Cider on Shimmery White. I used a water painter to color the flower petals lightly with Cinnamon Cider ink and adhered it to the card front with dimensionals. I cut some of the flowers and stems from the Flowers of Home dies in Fresh Freesia, cinnamon Cider and Garden green and adhered them to the card front. I stamped the sentiment in Misty Moonlight on Shimmery White and adhered a folded denim ribbon to the back before popping it on the card front with dimensionals. I finished the card with Genial Gems.

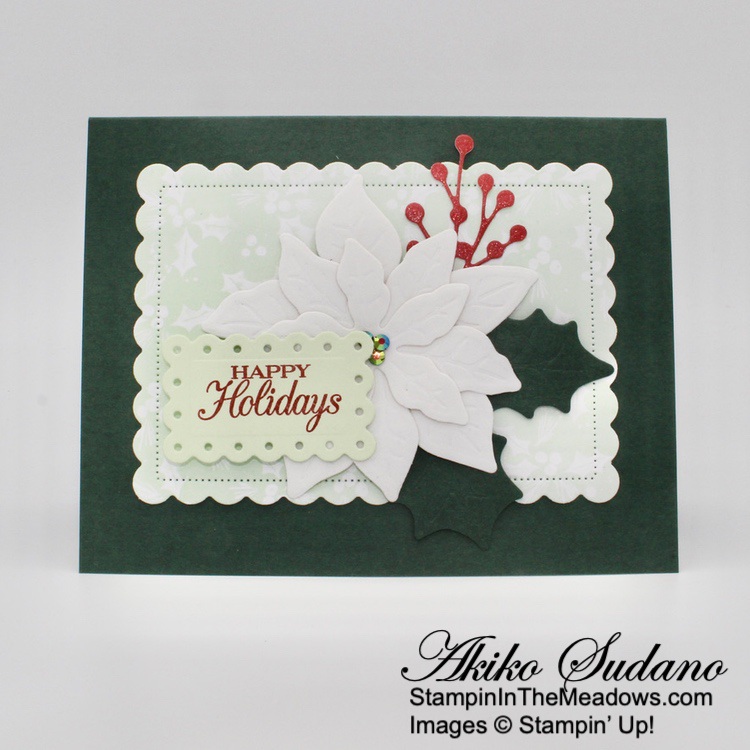
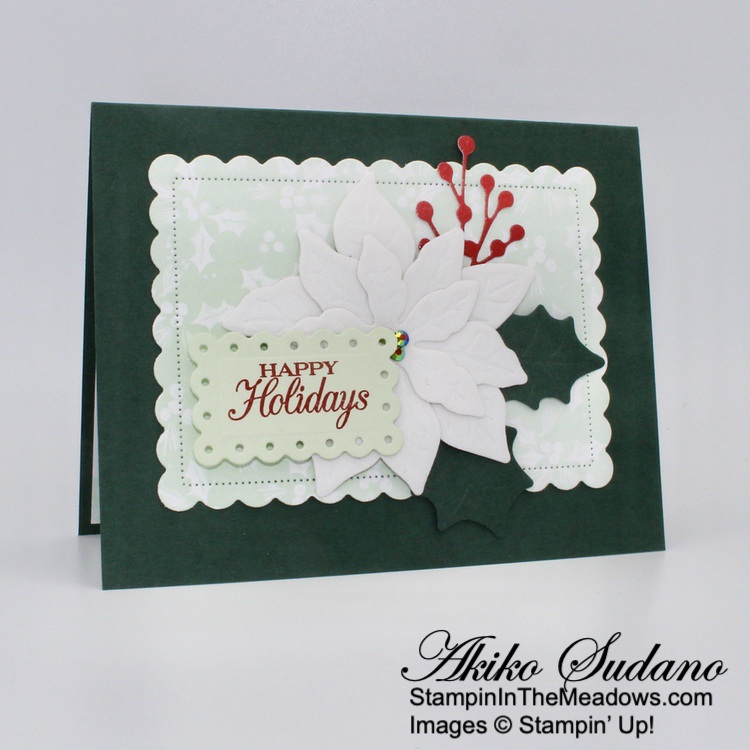
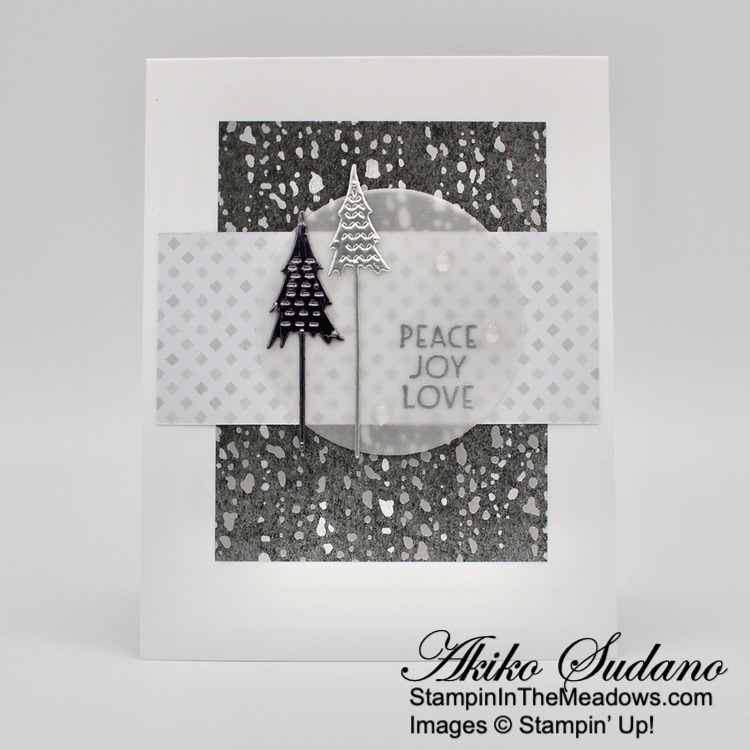
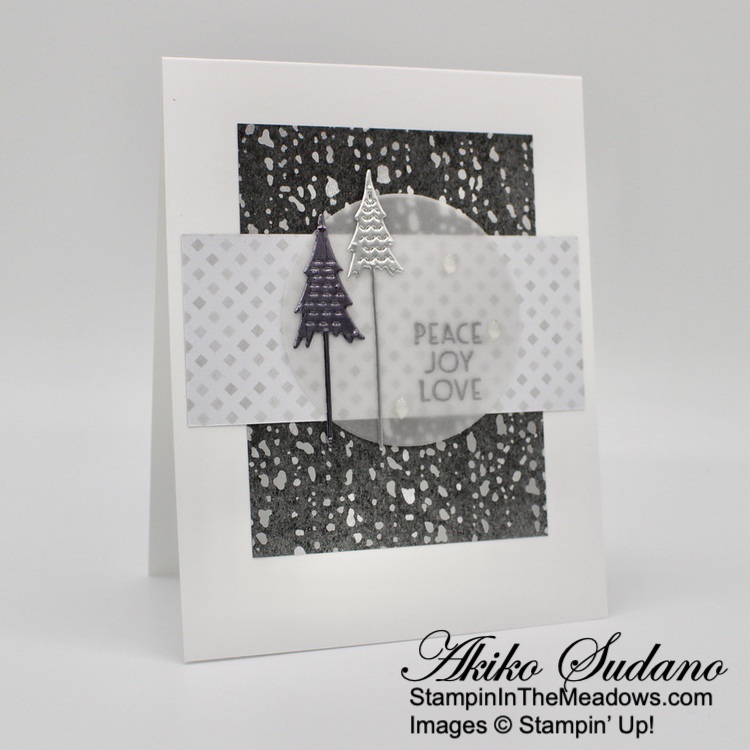
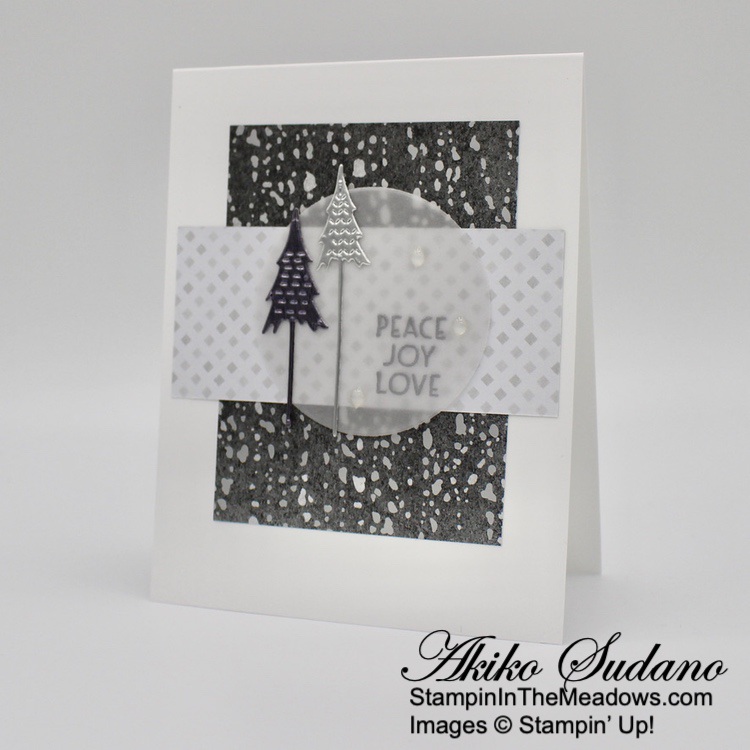
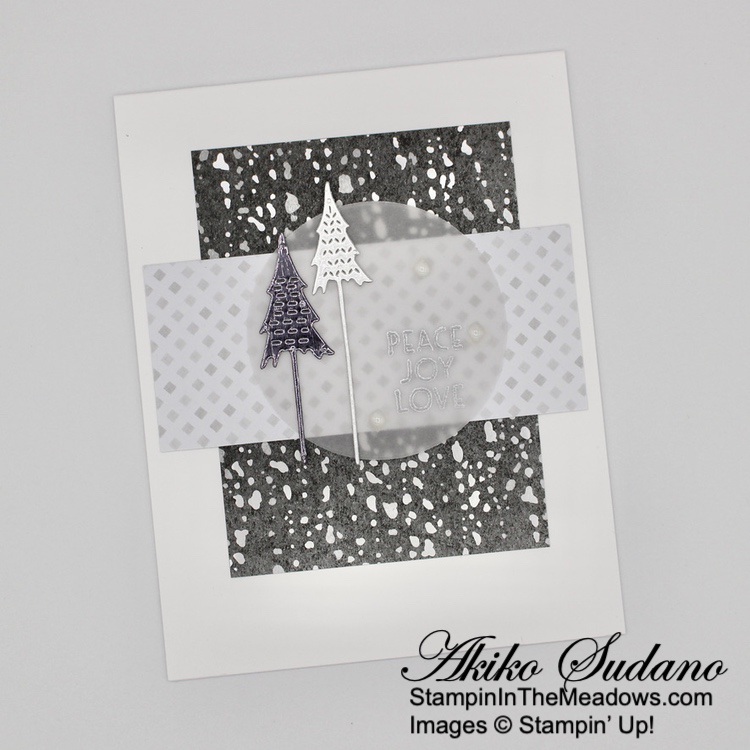
For the third card, I embossed a panel of Fresh Freesia with the Timber 3D embossing folder and adhered it to the front of a Fresh Freesia Card base. I adhered a panel of Hearth & Home DSP to a Garden Green mat and popped it on the card front with dimensionals. I colored a vellum doily with Fresh Freesia ink using a blending brush and adhered it with liquid glue. I cut some Cinnamon Cider with the Flowers of Home dies and adhered them to the card with liquid glue. I stamped the sentiment from the Stampin’ Up! Blessings of Home stamp set in Cinnamon Cider ink on Hearth & Home DSP, cut it out with a stitched rectangle die and adhered it to a Garden Green mat and then to the card front with dimensionals. I finished the card with more Fresh Freesia die cut flowers and Champagne rhinestones.

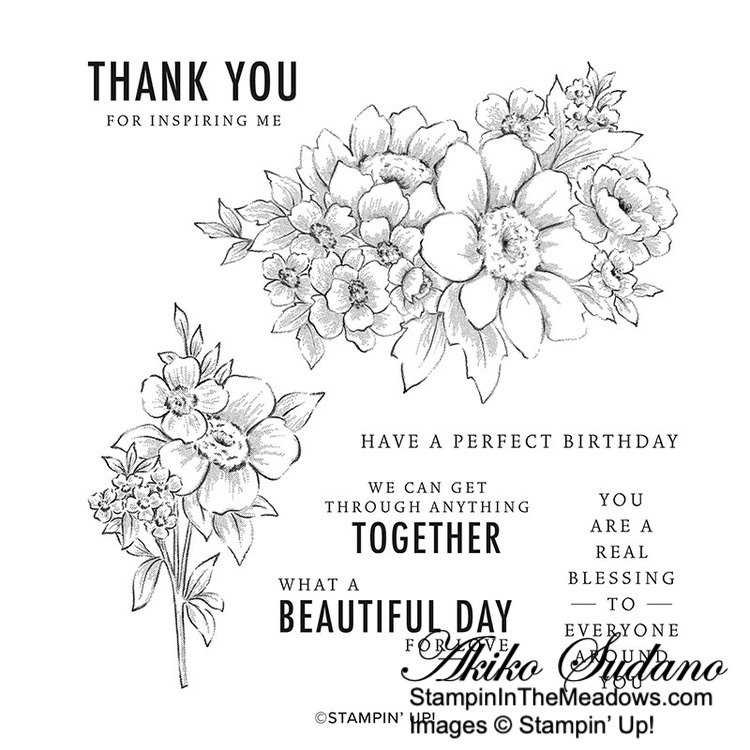
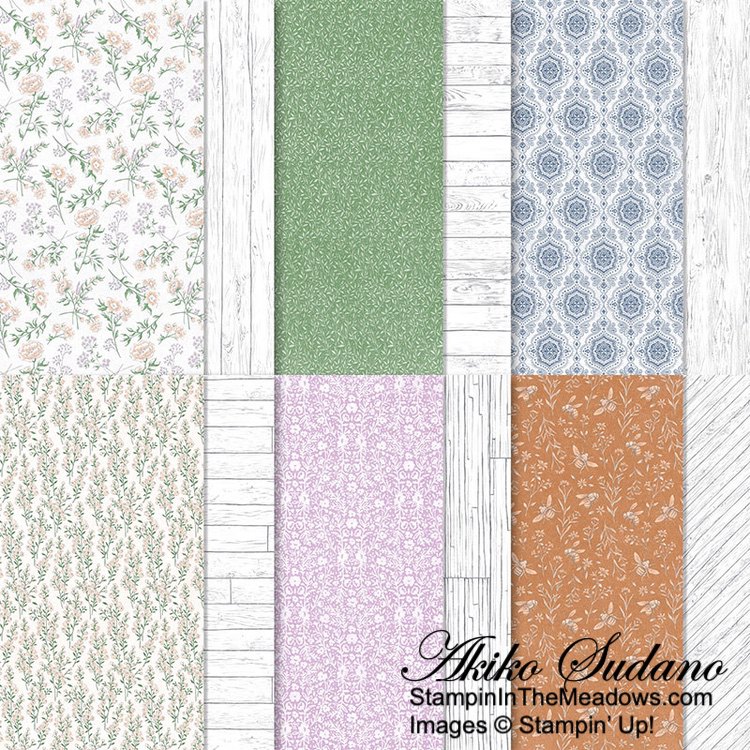
The Stampin’ Up! Blessings of Home bundle is really beautiful and has wonderful sentiments. The Hearth & Home designer series paper has a beautiful Shabby Chic look with beautiful gray wood grain on the flip side of the soft florals. Here are pictures of the stamp set, dies and designer series paper. Remember, these items will be available on January 4, 2022 when the new January – June 2022 Mini Catalog goes live!


Stampin’ Up! Seasonal Sale Starts Tomorrow!

Fold, snip, layer, and stamp! During the Seasonal Sale, you can stock up and save 10% on cardstock, 15% on ink pads, and 20% on dies. Build up your collection of crafting basicsโ€”and prepare for another year of top-tier projectsโ€”with a steal of a deal on papercrafting products!

Here are the details:

  • The sale will run for three days only: November 16, 2021 โ€“ November 18, 2021.
  • The discount includes 10% off cardstock, 15% off ink pads (excluding ink pad bundles and third-party pads), and 20% off dies.
  • The discount applies to products featured in the 2021โ€“2022 Annual Catalog only. Products from the Julyโ€“December 2021 Mini Catalog are not included.

Click on the image below to download a flyer with details:


Edenโ€™s Garden Collection is Available Now!

You can begin enjoying the new January – June 2021 Mini Catalog now wit the new Eden’s Garden Collection! This delightful and desirable collection includes early-release products from the Januaryโ€“June 2022 Mini Catalogโ€”a bundle of stamps and dies thatโ€™s blooming with beauty and bounty. Plus, exclusive products you canโ€™t uncover anywhere elseโ€”a pack of paper patterned with green and gold, a set of specialty sheets for gift-giving and textured touches, and a sparkling set of gleaming gems!

Click on the image below to download a flyer with all the details or click HERE to shop the Edenโ€™s Garden Collection now in my Online Store.

The Edenโ€™s Garden bundle is a beautiful Early Release from the upcoming January-June 2022 Mini Catalog. Other items in the collection are available through January 3, 2022, or while supplies last.


Current Host Code: PYA3MMQ6

Use this host code when you order $50 or more and receive a free gift from me!  The free gift is your choice of any item valued up to $10.00 in the 2021-2022 Annual Catalog or the July โ€“ December 2021 Mini Catalog!

If your order is over $150, please do not use the host code since you’ll receive your own Host Dollars plus I’ll still send you the free gift!  This host code can be used by anyone, no club or commitment required. Let me know if you have any questions.


If you need any stamping supplies, Iโ€™d be very happy to be your Demonstrator.  Just click on the Shop Now button on the right side of the screen to go directly to my online store or contact me if you have any questions.  Happy Stamping!

Thanks for stopping by and have a great week!

Akiko

  • Visit my online store here
  • See the current Stampinโ€™ Up! clearance rack specials here
  • Earn FREE Stampinโ€™ Up! products through my Wildflower Frequent Shopper Program – my way of saying thank you to my online frequent shopper customers.
  • Have any questions? I’d be happy to help, click here to contact me.

Cardstock Cuts for this project:

  • Birthday Card
    • Garden Green โ€“ 5-1/2″ x 8-1/2″ card base scored at 4-1/4″
    • Shimmery White – 3″ x 4-1/2″ (die cut flowers), 1″ x 3-1/4″ (label)
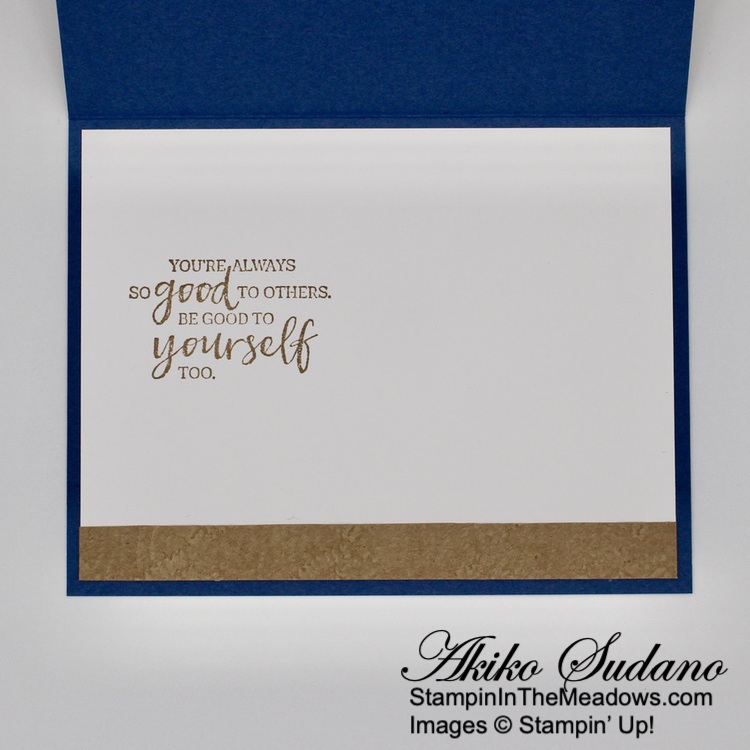
    • Basic White – two 4″ x 5-1/4″ panels (front mat and inside panel), 1/2″ x 4″ (inside trim)
    • Hearth & Home DSP – 3-7/8″ x 5-1/8″ (front background)
  • Together Card
    • Cinnamon Cider – 5″ x 7″ card base scored at 3-1/2″, 1-1/2″ x 1-1/2″ (die cut flowers)
    • Fresh Freesia – 1-3/4″ x 3-1/2″ (die cut sprigs)
    • Garden Green – 1-1/2″ x 2-1/2″ (die cut leaves)
    • Shimmery White – 2-3/4″ x 4-1/4″ (art panel), 7/8″ x 2-1/2″ (label)
    • Basic White – 4″ x 5-1/4″ (inside panel), 3-1/2″ x 3-1/2″ (squirrel circle)
    • Hearth & Home DSP – 2-3/4″ x 4-1/4″ (front background), 1/2″ x 3-1/2″ (inside trim)
  • Thank You Card
    • Fresh Freesia – 5-1/2″ x 8-1/2″ card base scored at 4-1/4″, 4-1/4″ x 5-1/2″ (embossed panel), 1-1/2″ x 1-1/2″ (die cut flowers)
    • Cinnamon Cider – 3″ x 5″ (die cut boughs)
    • Garden Green – 3″ x 4-1/4″ (DSP mat), 1-1/8″ x 2-1/2″ (label mat)
    • Basic White – 4″ x 5-1/4″ (inside panel)
    • Hearth & Home DSP – 2-7/8″ x 4-1/8″ (front panel), 1″ x 4″ (inside trim)

Stampinโ€™ Up! products used in this project:


Stampinโ€™ Up! In The Moment Sneak Peek

Good Morning! This weekend is the Stampin’ Up! Annual Convention – On Stage! This year’s convention is being held virtually but it’s still been lots of fun. One of our convention goodies is a pretty stamp set – Stampin’ Up! In The Moment, and I used it to make today’s simple card. You can find the currently available supplies I used at the bottom of my post along with the sizes of cardstock used.

I embossed a Kraft panel with the Macrame 3D embossing folder and adhered it to the front of a Misty Moonlight card base.

I cut a Basic White panel with the Scalloped Contours die and stamped the pretty scene from the new Stampin’ Up! In The Moment cling stamp set in Memento Tuxedo Black ink on the left side. I colored the image with Stampin’ Blends, Misty Moonlight, Fresh Freesia, Smoky Slate, Pale Papaya, Pool Party, Petal Pink and Poppy Parade.

I stamped the sentiment from the Stampin’ Up! In The Moment stamp set in Crumb Cake next to the scene and wrapped the panel with Crumb Cake baker’s twine and made a bow. I adhered the panel to the card front with Dimensionals.

For the inside of the card, I stamped the sentiment from the Stampin’ Up! In The Moment stamp set in Crumb Cake ink on the side of a Basic White panel. I trimmed the bottom with a strip of embossed Kraft paper and adhered the panel to the inside of the card with Stampin’ Seal.

This card really speaks to me in these hectic days and I love all the images in the Stampin’ Up! In The Moment stamp set. This pretty set will be available with the new January – June 2022 Mini Catalog when it goes live on January 4, 2022.

Here’s a picture of the pretty stamp set! Remember – it will be available January 4, 2022. If you are a current customer of mine, I will be sending out the new January – June Mini Catalogs next month. If you are not a current customer, but would like a copy of the new catalog, just place an order with me and I’ll add you to my list. In the meantime, let’s get those Christmas cards finished up!


Seasonal Sale Coming November 16 – November 18!

Fold, snip, layer, and stamp! During the Seasonal Sale, you can stock up and save 10% on cardstock, 15% on ink pads, and 20% on dies. Build up your collection of crafting basicsโ€”and prepare for another year of top-tier projectsโ€”with a steal of a deal on papercrafting products!

Promotion Details:

  • The sale will run for three days only โ€“ November 16, 2021 โ€“ November 18, 2021.
  • The discount includes 10% off cardstock, 15% off ink pads (excluding ink pad bundles and third-party pads), and 20% off dies.
  • The discount applies to products featured in the 2021โ€“2022 Annual Catalog only. Products from the Julyโ€“December 2021 Mini Catalog are not included.

Click on the image below to download a flyer with details:


The December Paper Pumpkin Kit is Lots Of Pun!

Whatโ€™s not to โ€œloafโ€ about a punny joke? It never hurts to have a little laughter, light-heartedness, and humor sprinkled into your schedule. If youโ€™re a fan of fun, get a kick out of clever crafts, and canโ€™t keep it together when you hear a classic knee-slapper, youโ€™ll go bananas over this monthโ€™s cute โ€˜nโ€™ quirky kit!

The Lots of Pun Paper Pumpkin Kit includes enough egg-citing elements to create nine cards and coordinating envelopes. From giddy gingham to splatters and stripes, this playful Paper Pumpkin kit features a fun and fresh look with one-of-a-kind patterns and designs! Egg-cellent for any occasion, reason, or season throughout the year, the kitโ€™s pun-packed stamp set provides completely customizable characters for a very versatile crafting experience. Pair each stamp with its matching die-cut snack, then mix up the faces and accessories for an absolutely adorable accent!

Pick up your friends and family with pun-filled projects. Decemberโ€™s delightful kit is sure to make โ€˜em smile!

Here are the Details:

  • The kit contains enough elements to create 9 cardsโ€”3 each of 3 designsโ€”and 9 coordinating envelopes. 
    • Card size: 4-1/4โ€ณ x 5-1/2โ€ณ
    • Envelope size: 4-1/2โ€ณ x 5-3/4โ€ณ
  • This all-inclusive kit includes printed card bases, die-cut paper pieces, embellishments, adhesive, and more!
  • The Lots of Pun Stamp Set is a builder stamp set! This means the included images can be mixed and matched to build a variety of unique characters with different looks and features.
  • Includes an exclusive stamp set and a Classic Stampinโ€™ Spot

Coordinating Colors: Crumb Cake, Daffodil Delight, Early Espresso, Granny Apple Green, Pool Party, Poppy Parade

If youโ€™re interested in subscribing to Paper Pumpkin, you can either sign up for a subscription where you are billed monthly for your kit or you can purchase a prepaid subscription in my Online Store. To see more information and to sign up for the monthly subscription click here. To see the options for prepaid subscriptions in my Online Store, click here.

Sign up deadline for the December 2021 kit is December 10, 2021.  Note: Supplies may be limited toward the end of the subscription period.


Current Host Code: PYA3MMQ6

Use this host code when you order $50 or more and receive a free gift from me!  The free gift is your choice of any item valued up to $10.00 in the 2021-2022 Annual Catalog or the July โ€“ December 2021 Mini Catalog!

If your order is over $150, please do not use the host code since you’ll receive your own Host Dollars plus I’ll still send you the free gift!  This host code can be used by anyone, no club or commitment required. Let me know if you have any questions.


If you need any stamping supplies, Iโ€™d be very happy to be your Demonstrator.  Just click on the Shop Now button on the right side of the screen to go directly to my online store or contact me if you have any questions.  Happy Stamping!

Thanks for stopping by and have a great week!

Akiko

  • Visit my online store here
  • See the current Stampinโ€™ Up! clearance rack specials here
  • Earn FREE Stampinโ€™ Up! products through my Wildflower Frequent Shopper Program – my way of saying thank you to my online frequent shopper customers.
  • Have any questions? I’d be happy to help, click here to contact me.

Cardstock Cuts for this project:

  • Misty Moonlight – 5-1/2″ x 8-1/2″ card base scored at 4-1/4″
  • Kraft 6″ x 6″ paper – 4″ x 5-1/4″ (embossed background), 1/2″ x 5-1/4″ (inside trim
  • Basic White – 4″ x 5-1/4″ (inside panel), 3-1/4″ x 4-3/4″ (scalloped rectangle)

Stampinโ€™ Up! products used in this project:


Stampinโ€™ Up! Nature’s Harvest Thank You Card

Good Morning! The Stampin’ Up! Nature’s Harvest is one of my favorites from the current July – December Mini Catalog, so I was happy to use it for another fall Thank You card. And I decided to combine it with the quaint Harvest Meadow and rustic In Good Taste designer series papers for a sweet country look. You can find the supplies I used at the bottom of my post along with the sizes of cardstock used.

My card was inspired by the Nature’s Beauty Color Challenge at Sunday Stamps SSC269:

I adhered a panel of Harvest Meadows designer series paper to a Misty Moonlight mat and popped it on the front of a Gray Granite Card base with dimensionals. I cut a stitched rectangle using the rustic wood grain In Good Taste designer series paper, adhered it to a Basic Black mat and then adhered it to the card front with liquid glue.

I stamped the pretty coneflowers from the beautiful Stampin’ Up! Nature’s Harvest cling stamp set in Memento Tuxedo Black on Basic White and colored it with Stampin’ Blends. I used Old Olive, Daffodil Delight, Cinnamon Cider and Soft Suede. Then I cut it out with the coordinating die and popped it on the card front with dimensionals.

I stamped the sentiment from the Stampin’ Up! Nature’s Harvest stamp set in Memento Tuxedo Black on Old Olive and cut it out with the small label die. I adhered it to the card with dimensionals and glue dots. I made a triple loopy bow with Linen thread and adhered it with a glue dot and finished the card front with champagne rhinestone gems.

For the inside of the card, I inked up the coneflower stamp with Gray Granite ink and stamped off twice before stamping the image on a Basic White panel. I trimmed the bottom with the Harvest Meadow DSP and adhered the panel to the inside of the card with Stampin’ Seal.

The beautiful coneflowers from the Stampin’ Up! Nature’s Harvest stamp set are really fun to color and they always come out beautiful! Thanks for stopping by!


Seasonal Sale Coming November 16 – November 18!

Fold, snip, layer, and stamp! During the Seasonal Sale, you can stock up and save 10% on cardstock, 15% on ink pads, and 20% on dies. Build up your collection of crafting basicsโ€”and prepare for another year of top-tier projectsโ€”with a steal of a deal on papercrafting products!

Promotion Details:

  • The sale will run for three days only โ€“ November 16, 2021 โ€“ November 18, 2021.
  • The discount includes 10% off cardstock, 15% off ink pads (excluding ink pad bundles and third-party pads), and 20% off dies.
  • The discount applies to products featured in the 2021โ€“2022 Annual Catalog only. Products from the Julyโ€“December 2021 Mini Catalog are not included.

Click on the image below to download a flyer with details:


Join Stampin’ Up! With Savings During November!

Jump for join! Thereโ€™s no better time than November to begin your Stampinโ€™ Up! business. Why? If you sign up to be an Independent Stampinโ€™ Up! demonstrator before the end of the month, youโ€™ll get the $99 Starter Kitโ€”filled with your pick of productsโ€”for only $75! Start your Stampinโ€™ Up! business strong with big savings!

Enjoy early access to our amazing products, exclusive perks, an opportunity to earn additional income, and an incredible community of crafters. Whether you want to make the most of your papercrafting passion or build a business, thereโ€™s so much in store for you with Stampinโ€™ Up! Check out my Join My Team Page to see more benefits and join now or contact me if you have any questions and Iโ€™ll be happy to tell you more!


Current Host Code: PYA3MMQ6

Use this host code when you order $50 or more and receive a free gift from me!  The free gift is your choice of any item valued up to $10.00 in the 2021-2022 Annual Catalog or the July โ€“ December 2021 Mini Catalog!

If your order is over $150, please do not use the host code since you’ll receive your own Host Dollars plus I’ll still send you the free gift!  This host code can be used by anyone, no club or commitment required. Let me know if you have any questions.


If you need any stamping supplies, Iโ€™d be very happy to be your Demonstrator.  Just click on the Shop Now button on the right side of the screen to go directly to my online store or contact me if you have any questions.  Happy Stamping!

Thanks for stopping by and have a great week!

Akiko

  • Visit my online store here
  • See the current Stampinโ€™ Up! clearance rack specials here
  • Earn FREE Stampinโ€™ Up! products through my Wildflower Frequent Shopper Program – my way of saying thank you to my online frequent shopper customers.
  • Have any questions? I’d be happy to help, click here to contact me.

Cardstock Cuts for this project:

  • Gray Granite โ€“ 4-1/4″ x 11″ card base scored at 5-1/2″
  • Misty Moonlight – 3-3/4″ x 5″ (front mat)
  • Old Olive – 1″ x 2-1/2″ (label)
  • Basic Black – 2-3/8″ x 3-3/4″ (stitched rectangle mat)
  • Basic White – 4″ x 5-1/4″ (inside panel), 2-3/4″ x 4-1/2″ (die cut flowers)
  • In Good Taste DSP – 2-1/2″ x 3-3/4″ (die cut stitched rectangle)
  • Harvest Meadow DSP – 3-5/8″ x 4-7/8″ (front background), 3/4″ x 4″ (inside trim)

Stampinโ€™ Up! products used in this project:


Stampinโ€™ Up! Poinsettia Petals for the Happy Inkinโ€™ Thursday Blog Hop

Good morning and welcome to the Happy Inkin’ Thursday Blog Hop! I used the Stampin’ Up! Poinsettia Petals bundle to make another poinsettia Christmas card. For today’s poinsettias, I used the Snowy White Velvet paper to make a poinsettia with a velvety texture – the dies cut the velvet paper beautifully! You can find the supplies I used at the bottom of my post along with the sizes of cardstock used.

We have a sketch challenge this week and here’s the pretty sketch we are using:

I cut a panel of Painted Christmas designer series paper with the Scalloped Contours die and adhered it to the front of an Evening Evergreen card base with liquid glue. I cut the three largest poinsettia clusters from the Snowy White Velvet paper using the embossing insets. I gently curled the petals backwards and adhered the centers with liquid glue.

I adhered the poinsettia to the card front with glue dots. I cut the berry sprig using from the dark side of the Poppy Parade Ombre specialty paper and adhered it to the card front with glue dots, tucking it under the flower. I cut two of the leaves from the Poinsettia dies with the embossing insets from Evening Evergreen and gently curved them before adhering them with glue dots under the flower.

I stamped the sentiment from the Stampin’ Up! Poinsettia Petals photopolymer stamp set in Real Red on Soft Sea Foam. I cut out the sentiment with the smallest Scalloped Contour die using the two step method and adhered it on the card with dimensionals and glue dots. I finished the card front with three Garden Gems.

For the inside of the card, I stamped the sentiment from the Stampin’ Up! Poinsettia Petals stamp set in Real Red on Basic White. I stamped the little holly flourish from the Whimsical Trees stamp set next to the sentiment in Soft Sea Foam and trimmed the bottom of the panel with a strip of the Painted Christmas DSP. I adhered the panel to the inside of the card.

The die cut poinsettia from the Stampin’ Up! Poinsettia Petals stamp set and Poinsettia dies are my all time favorite die cut poinsettia for Christmas cards. A single die cut poinsettia that is so dramatic – especially when cut from a specialty paper like the velvet!

On with the Hop! Click on the Next Blog button to move forward to see the beautiful project Karen Ksenzakovic has created.

If you get lost along the way, here are the participants for the hop:


Current Host Code: PYA3MMQ6

Use this host code when you order $50 or more and receive a free gift from me!  The free gift is your choice of any item valued up to $10.00 in the 2021 – 2022 Annual Catalog or the July – December 2021 Mini Catalog including some of the host stamp sets!

If your order is over $150, please do not use the host code since you’ll receive your own Host Dollars plus I’ll still send you the free gift!  This host code can be used by anyone, no club or commitment required. Let me know if you have any questions.


If you need any stamping supplies, Iโ€™d be very happy to be your Demonstrator.  Just click on the Shop Now button on the right side of the screen to go directly to my online store or contact me if you have any questions. 

Thanks for stopping by and Happy Stamping!

Akiko

  • Visit my online store here
  • See the current Stampinโ€™ Up! clearance rack specials here
  • Earn FREE Stampinโ€™ Up! products through my Wildflower Frequent Shopper Program – my way of saying thank you to my online frequent shopper customers.
  • Have any questions? I’d be happy to help, click here to contact me.

Cardstock Cuts for this project:

  • Evening Evergreen โ€“ 5-1/2″ x 8-1/2″ card base scored at 4-1/4″, 2-1/4″ x 3″ (die cut leaves)
  • Snowy White Velvet – 3-1/2″ x 8-1/2″ (poinsettia petal clusters)
  • Soft Sea Foam – 1-1/2″ x 3″ (label)
  • Red Ombre specialty glitter – 1-1/2″ x 3″ (berry sprig)
  • Basic White – 4″ x 5-1/4″ (inside panel)
  • Painted Christmas DSP – 3-1/4″ x 4-3/4″ (die cut scalloped rectangle, 1/2″ x 5-1/4″ (inside trim)

Stampinโ€™ Up! products used in this project:


Stampin’ Up! November Promotions

Hello! Stampin’ Up! has a couple of exciting going on now and starting soon. Here’s a little summary.

Today is the last day to sign up for the November Paper Pumpkin Kit – Gifts Galore!

We all love to see piles of presents on Christmas morning. Make that your reality with the Gifts Galore Paper Pumpkin Kit! With classic Christmas sentiments, bright and festive colors, a sweet snowman, a tree with all the trimmings, or a playful pile of presents, youโ€™ll have everything you need to make eye-catching treat packages that are sure to spread Christmas cheer. Each Gifts Galore box contains enough supplies to create nine treat packagesโ€”three each of three designsโ€”and nine food-safe bags that are adorably styled for easy Christmas gifting. Thereโ€™s plenty of joy to share with Gifts Galore!

Here are the Details:

  • Kit contains enough supplies to create nine treat packagesโ€”three each of three designsโ€”and nine food-safe bags. 
  • This all-inclusive kit includes printed die cuts, die-cut boxes, cellophane treat bags, adhesive, and more!
  • Includes an exclusive stamp set and a Classic Stampinโ€™ Spot

Coordinating Colors: Evening Evergreen, Flirty Flamingo, Old Olive, Pool Party, Poppy Parade

If youโ€™re interested in subscribing to Paper Pumpkin, you can either sign up for a subscription where you are billed monthly for your kit or you can purchase a prepaid subscription in my Online Store. To see more information and to sign up for the monthly subscription click here. To see the options for prepaid subscriptions in my Online Store, click here.


Seasonal Sale Coming Next Week!

Fold, snip, layer, and stamp! During the Seasonal Sale, you can stock up and save 10% on cardstock, 15% on ink pads, and 20% on dies. Build up your collection of crafting basicsโ€”and prepare for another year of top-tier projectsโ€”with a steal of a deal on papercrafting products!

Here are the details:

  • The sale will run for three days only: November 16, 2021 โ€“ November 18, 2021.
  • The discount includes 10% off cardstock, 15% off ink pads (excluding ink pad bundles and third-party pads), and 20% off dies.
  • The discount applies to products featured in the 2021โ€“2022 Annual Catalog only. Products from the Julyโ€“December 2021 Mini Catalog are not included.

Click on the image below to download a flyer with details:


November Joining Special – Starts with Savings!

Jump for join! Thereโ€™s no better time than November to begin your Stampinโ€™ Up! business. Why? If you sign up to be an Independent Stampinโ€™ Up! demonstrator before the end of the month, youโ€™ll get the $99 Starter Kitโ€”filled with your pick of productsโ€”for only $75! Start your Stampinโ€™ Up! business strong with big savings!

Enjoy early access to our amazing products, exclusive perks, an opportunity to earn additional income, and an incredible community of crafters. Whether you want to make the most of your papercrafting passion or build a business, thereโ€™s so much in store for you with Stampinโ€™ Up! Check out my Join My Team Page to see more benefits and to join now or contact me if you have any questions and Iโ€™ll be happy to tell you more!


Eden’s Garden Collection is Available Now!

Enter and explore Eden with the Edenโ€™s Garden Collection! This delightful and desirable collection includes early-release products from the Januaryโ€“June 2022 Mini Catalogโ€”a bundle of stamps and dies thatโ€™s blooming with beauty and bounty. Plus, exclusive products you canโ€™t uncover anywhere elseโ€”a pack of paper patterned with green and gold, a set of specialty sheets for gift-giving and textured touches, and a sparkling set of gleaming gems!

Click on the image below to download a flyer with all the details or click HERE to shop the Edenโ€™s Garden Collection now in my Online Store.

The Eden’s Garden bundle is a beautiful Early Release from the upcoming January-June 2022 Mini Catalog. Other items in the collection are available through January 3, 2022, or while supplies last.


And since I don’t have a card to share today, here are a few projects made by the Stampin’ Up! Design Team using the Sweet Little Stockings bundle that I used for yesterday’s card. Quick instructions are right below.

CASUAL – To make the Very Merry card, stamp the stars in Pool Party ink, making sure to stamp off to create lighter stars. Use Early Espresso to stamp the stocking and hamster on Basic White Cardstock, then color them in with the Polished Pink and Light Gray Granite Stampinโ€™ Blends. Adhere your sentiment with Stampinโ€™ Dimensionals, and add a beautiful Jolly Felt die-cut ribbon with Multi-Purpose Liquid Glue. 

AVID – For the Santa Paws card, use the Mini Stampinโ€™ Cut and Emboss Machine to die cut tags using Sweet Stockings Designer Series Paper and Basic White Cardstock. Then, die cut your furry friend and a stocking, and use Jolly Felt to make a holly bush. Color in the kitty and the stocking and adhere it to your card, along with a sweet sentiment, with Stampinโ€™ Dimensionals. Finish the card off with a Pool Party 3/8″ (1 cm) Striped Grosgrain Ribbon.

ARTFULLY AVID – To make the Christmas Greetings card, die cut leaves from Shaded Spruce Cardstock, presents from Vellum, and stars from Jolly Felt. For the sentiment, try putting masking tape over one word at a time to create two separate stamps, then use the heat embossing tool to make it shine.


Current Host Code: PYA3MMQ6

Use this host code when you order $50 or more and receive a free gift from me!  The free gift is your choice of any item valued up to $10.00 in the 2021-2022 Annual Catalog or the July โ€“ December 2021 Mini Catalog!

If your order is over $150, please do not use the host code since youโ€™ll receive your own Host Dollars plus Iโ€™ll still send you the free gift!  This host code can be used by anyone, no club or commitment required. Let me know if you have any questions.


If you need any stamping supplies, Iโ€™d be very happy to be your Demonstrator.  Just click on the Shop Now button on the right side of the screen to go directly to my online store or contact me if you have any questions.  Happy Stamping!

Thanks for stopping by and have a great week!

Akiko

  • Visit my online store here
  • See the current Stampinโ€™ Up! clearance rack specials here
  • Earn FREE Stampinโ€™ Up! products through my Wildflower Frequent Shopper Program โ€“ my way of saying thank you to my online frequent shopper customers.
  • Have any questions? Iโ€™d be happy to help, click here to contact me.

Stampinโ€™ Up! Sweet Little Stockings for the Inkin’ Krew Blog Hop

Good morning! Welcome to the November Inkinโ€™ Krew Team Blog Hop! The theme for this monthโ€™s hop is “Christmas” and I’m using the Stampin’ Up! Sweet Little Stockings bundle to make my Christmas Card. You can find the supplies I used at the bottom of my post along with the sizes of cardstock used.

My card was also inspired by the sketch challenge in Try Stampin’ On Tuesday Challenge #531:

I cut a Bumblebee panel with the long simple lacy border from the Ornate Layers dies and adhered a panel of Sweet Stockings designer series paper across the center. I adhered it to a panel of Sweet Stockings designer series paper and then adhered it to an Evening Evergreen mat. I popped the layered DSP panel to the front of a Cherry Cobbler card base. I die cut another circle of Sweet Stockings DSP and adhered it to the card front.

I stamped the kitty from the Stampin’ Up! Sweet Little Stockings photopolymer stamp set in Memento Tuxedo Black on Basic White. I colored it with Smoky Slate Stampin’ Blends and cut it out with the coordinating die. I stamped the Santa’s hat and candy cane in Memento Tuxedo Black, colored them with Cherry Cobbler Stampin’ Blends and cut them out with the coordinating dies. I stamped the sentiment in Cherry Cobbler and cut it out with the little label die. And finally, I cut one of the cute stockings from the Sweet Stockings DSP with the Stockings die. I adhered the cat, hat and stocking together with liquid glue and popped them on the card front with dimensionals. I tucked the candy cane and label under the stocking and adhered them with glue dots.

I cut the bow from Bumblebee, the holly leaves from Old Olive and the holly berries from Cherry Cobbler using the Stockings dies and adhered these to the stocking with liquid glue. I finished the stocking with a bumblebee Decorative Matte Dot on the bow.

For the inside of the card, I stamped the sentiment from the Stampin’ Up! Sweet Little Stockings stamp set in Cherry Cobbler on a Basic White panel. I fussy cut some of the other cute critter images from the Sweet Stockings DSP and adhered them to the panel with liquid glue and trimmed the bottom with a strip of the DSP. I adhered the panel to the inside of the card.

The Stampin’ Up! Sweet Little Stockings bundle and the Sweet Stockings designer series paper are perfect for making Christmas cards for pet loving friends and relatives! The images are so cute, colorful and full of mischievous fun and joy.

On With The Hop! Click on theย Next Blogย button to move forward to Jaimie Babarczy’sย project or click theย Previous Blogย button to move back to see the project that Jillian Goodย created.

If you get lost along the way, here are the participants for the hop:

  1. Karen Ksenzakovic
  2. Tara Carpenter
  3. Jillian Good
  4. Akiko Sudano <– you are here
  5. Jaimie Babarczy
  6. Mary Deatherage
  7. Sue Prather
  8. Terry Lynn Bright
  9. Amy Koenders

Current Host Code: PYA3MMQ6

Use this host code when you order $50 or more and receive a free gift from me!  The free gift is your choice of any item valued up to $10.00 in the 2021 – 2022 Annual Catalog or the July – December 2021 Mini Catalog!

If your order is over $150, please do not use the host code since you’ll receive your own Host Dollars plus I’ll still send you the free gift!  This host code can be used by anyone, no club or commitment required. Let me know if you have any questions


If you need any stamping supplies, Iโ€™d be very happy to be your Demonstrator.  Just click on the Shop Now button on the right side of the screen to go directly to my online store or contact me if you have any questions. 

Thanks for stopping by and Happy Stamping!

Akiko

  • Visit my online store here
  • See the current Stampinโ€™ Up! clearance rack specials here
  • Earn FREE Stampinโ€™ Up! products through my Wildflower Frequent Shopper Program – my way of saying thank you to my online frequent shopper customers.
  • Have any questions? I’d be happy to help, click here to contact me.

Cardstock Cuts for this project:

  • Cherry Cobbler โ€“ 4-1/4″ x 11″ card base scored at 5-1/2″, 1″ x 1″ (die cut holly berries)
  • Evening Evergreen – 4″ x 5-1/4″ (front mat)
  • Bumblebee – 2-3/4″ x 3-7/8″ (die cut lacy stripe), 1″ x 1″ (die cut bow)
  • Old Olive – 1″ x 1″ (die cut holly leaves)
  • Basic White – 4″ x 5-1/2″ (inside panel), 3″ x 4″ (die cut shapes)
  • Sweet Stockings DSP – 3-7/8″ x 5-1/8″ (front background), 2″ x 3-7/8″ (front stripe), 2-1/2″ x 2-1/2″ (die cut circle), 1/2″ x 4″ (inside trim), die cut stockings, fussy cut images

Stampinโ€™ Up! products used in this project:


Stampinโ€™ Up! Inspired Thoughts Christmas Card Video Tutorial

Good Morning! I used the Stampin’ Up! Inspired Thoughts stamp set with the Christmas Trees dies and elegant Peaceful Place specialty designer series paper to make a CAS (clean and simple) Christmas card in grays and white with silver foil. I did this during my Facebook Live yesterday afternoon. You can find the supplies I used at the bottom of my post along with the sizes of cardstock used.

My card was also inspired by the layout in Freshly Made Sketches #510:

Here is the video of my Facebook Live from yesterday afternoon. I also posted a copy of the video in my YouTube channel and you can view it here if you prefer.

I adhered a panel of the pretty Peaceful Place specialty designer series paper on a Thick Basic White card base. I adhered another panel of the DSP, with Smoky Slate diamonds on top.

I stamped the sentiment from the Stampin’ Up! Inspired Thoughts cling stamp set in Versamark ink on a vellum cardstock panel. I sprinkled it with silver embossing powder and shook off the excess. I heat set the powder with my heat tool until it was shiny and cut it out with the third largest Layering Circle die.

I put some adhesive sheets on the back of silver foil panels and cut out two trees using the Christmas Trees dies. I peeled off the adhesive sheets and adhered the trees to the vellum die cut circle. I adhered the die cut circle to the card front with glue dots placed behind the trees and in places where I would add some enamel shapes. I adhered three clear enamel diamond shapes over the glue dots.

For the inside of the card, I stamped the sentiment from the Stampin’ Up! Inspired Thoughts stamp set in Smoky Slate ink on the inside of the card base. I cut out another tree from the Peaceful Place specialty DSP and adhered it next to the sentiment.

The Peaceful Place specialty DSP is so elegant and perfect for Christmas cards. I love the contrast of the shiny silver foil with the matte vellum and the simple font in the Stampin’ Up! Inspired Thoughts stamp set is perfect with the modern, clean elegance of this design.


The November Paper Pumpkin Kit is Gifts Galore!

We all love to see piles of presents on Christmas morning. Make that your reality with the Gifts Galore Paper Pumpkin Kit! With classic Christmas sentiments, bright and festive colors, a sweet snowman, a tree with all the trimmings, or a playful pile of presents, youโ€™ll have everything you need to make eye-catching treat packages that are sure to spread Christmas cheer. Each Gifts Galore box contains enough supplies to create nine treat packagesโ€”three each of three designsโ€”and nine food-safe bags that are adorably styled for easy Christmas gifting. Thereโ€™s plenty of joy to share with Gifts Galore!

Here are the Details:

  • Kit contains enough supplies to create nine treat packagesโ€”three each of three designsโ€”and nine food-safe bags. 
  • This all-inclusive kit includes printed die cuts, die-cut boxes, cellophane treat bags, adhesive, and more!
  • Includes an exclusive stamp set and a Classic Stampinโ€™ Spot

Coordinating Colors: Evening Evergreen, Flirty Flamingo, Old Olive, Pool Party, Poppy Parade

If youโ€™re interested in subscribing to Paper Pumpkin, you can either sign up for a subscription where you are billed monthly for your kit or you can purchase a prepaid subscription in my online store. To see more information and to sign up for the monthly subscription click here. To see the options for prepaid subscriptions in my online store, click here.

Sign up deadline for the November 2021 kit is November 10, 2021. Supplies may be limited toward the end of the subscription period. 


Enter and explore Eden with the Edenโ€™s Garden Collection! This delightful and desirable collection includes early-release products from the Januaryโ€“June 2022 Mini Catalogโ€”a bundle of stamps and dies thatโ€™s blooming with beauty and bounty. Plus, exclusive products you canโ€™t uncover anywhere elseโ€”a pack of paper patterned with green and gold, a set of specialty sheets for gift-giving and textured touches, and a sparkling set of gleaming gems!

Click on the image below to download a flyer with all the details or click HERE to shop the Edenโ€™s Garden Collection now in my Online Store.


Current Host Code: PYA3MMQ6

Use this host code when you order $50 or more and receive a free gift from me!  The free gift is your choice of any item valued up to $10.00 in the 2021-2022 Annual Catalog or the July โ€“ December 2021 Mini Catalog!

If your order is over $150, please do not use the host code since you’ll receive your own Host Dollars plus I’ll still send you the free gift!  This host code can be used by anyone, no club or commitment required. Let me know if you have any questions.


If you need any stamping supplies, Iโ€™d be very happy to be your Demonstrator.  Just click on the Shop Now button on the right side of the screen to go directly to my online store or contact me if you have any questions.  Happy Stamping!

Thanks for stopping by and have a great week!

Akiko

  • Visit my online store here
  • See the current Stampinโ€™ Up! clearance rack specials here
  • Earn FREE Stampinโ€™ Up! products through my Wildflower Frequent Shopper Program – my way of saying thank you to my online frequent shopper customers.
  • Have any questions? I’d be happy to help, click here to contact me.

Cardstock Cuts for this project:

  • Thick Basic White – 4-1/4″ x 11″ card base scored at 5-1/2″
  • Silver Metallic – 3/4″ x 3″ (light tree die cut), 1-1/4″ x 2-1/2″ (dark tree die cut)
  • Vellum – 3″ x 3″ (die cut circle)
  • Peaceful Place specialty DSP – 3″ x 4″ (front background), 1-3/4″ x 4″ (front stripe), 1-1/4″ x 2-1/2″ (inside tree die cut)

Stampinโ€™ Up! products used in this project:


Stampinโ€™ Up! Nuts About Squirrels Hello Card

Good Morning! Oh My Gosh – the Stampin’ Up! Nuts About Squirrels photopolymer stamp set is the cutest squirrel stamp set ever! For today’s card, I made a Fall hello card with one of the little guys and used and embossed Pumpkin Pie panel as the background and I just love how it came out. You can find the currently available supplies I used at the bottom of my post along with the sizes of cardstock used.

I embossed a panel of Pumpkin Pie with the Bark 3D embossing folder (this embossing folder shrinks a little, so I embossed a panel 1/8″ wider and cut it to size after embossing). I adhered a strip of Beauty of the Earth designer series paper to the front and adhered the panel to an Early Espresso mat. I wrapped it with Crumb Cake baker’s Twine and made a bow, then adhered it to the front of a Sahara Sand card base.

I stamped the outline squirrel from the Stampin’ Up! Nuts About Squirrels stamp set in Early Espresso on a Basic White panel and stamped the filler in Sahara Sand. I am amazed at how wonderful this two step process turns out! I stamped the bottom of the acorn in stamped off Cinnamon Cider and the acorn top in Soft Suede. I stamped the tree branch in Soft Suede and inked the leaves in bumblebee and used a sponge dauber to add touches of Old Olive (I cleaned off the stamp each time to keep my Bumblebee ink pad green-free). After all the leaves were stamped, I stamped the leaf veins in Bumblebee. I cut the little guy out with the largest Layering Circle die and cut out a scalloped circle from Early Espresso to adhere to the back.

I stamped the sentiment from the Stampin’ Up! Nuts About Squirrels stamp set in Early Espresso on Sahara Sand and hand trimmed a banner flag end with my paper snips. I adhered it to an Early Espresso mat and trimmed the banner end before adhering it to the squirrel with glue dots. I adhered the little squirrel to the card front with dimensionals.

For the inside of the card, I stamped a couple of tree branches in Soft Suede and a bunch of falling leaves in Bumblebee and Old Olive on a Basic White panel, just like the front. And of course I had to stamp the cute little sentiment from the Banner Year photopolymer stamp set in Early Espresso! I trimmed the bottom with Beauty of the Earth DSP before adhering the panel to the inside of the card.

The little squirrel from the Stampin’ Up! Nuts About Squirrels stamp set is so cute and mischievous! It’s perfect for sending some cheerful Fall greetings to, well everyone! The two step stamping process works wonderfully for the images, but you can also color these little guys with markers or watercolors

Join me for a Facebook Live this Afternoon!

Iโ€™m planning to go live on my Facebook Page at 1:00 ET this afternoon to make a Christmas card with the Inspired Thoughts stamp set and the beautiful Peaceful Place specialty designer series paper. Look forward to seeing you then!


Enter and explore Eden with the Edenโ€™s Garden Collection! This delightful and desirable collection includes early-release products from the Januaryโ€“June 2022 Mini Catalogโ€”a bundle of stamps and dies thatโ€™s blooming with beauty and bounty. Plus, exclusive products you canโ€™t uncover anywhere elseโ€”a pack of paper patterned with green and gold, a set of specialty sheets for gift-giving and textured touches, and a sparkling set of gleaming gems!

Click on the image below to download a flyer with all the details or click HERE to shop the Edenโ€™s Garden Collection now in my Online Store.


Jump for join! Thereโ€™s no better time than November to begin your Stampinโ€™ Up! business. Why? If you sign up to be an Independent Stampinโ€™ Up! demonstrator before the end of the month, youโ€™ll get the $99 Starter Kitโ€”filled with your pick of productsโ€”for only $75! Start your Stampinโ€™ Up! business strong with big savings!

Enjoy early access to our amazing products, exclusive perks, an opportunity to earn additional income, and an incredible community of crafters. Whether you want to make the most of your papercrafting passion or build a business, thereโ€™s so much in store for you with Stampinโ€™ Up! Check out my Join My Team Page to see more benefits and join now or contact me if you have any questions and Iโ€™ll be happy to tell you more!


Current Host Code: PYA3MMQ6

Use this host code when you order $50 or more and receive a free gift from me!  The free gift is your choice of any item valued up to $10.00 in the 2021-2022 Annual Catalog or the July โ€“ December 2021 Mini Catalog!

If your order is over $150, please do not use the host code since you’ll receive your own Host Dollars plus I’ll still send you the free gift!  This host code can be used by anyone, no club or commitment required. Let me know if you have any questions.


If you need any stamping supplies, Iโ€™d be very happy to be your Demonstrator.  Just click on the Shop Now button on the right side of the screen to go directly to my online store or contact me if you have any questions.  Happy Stamping!

Thanks for stopping by and have a great week!

Akiko

  • Visit my online store here
  • See the current Stampinโ€™ Up! clearance rack specials here
  • Earn FREE Stampinโ€™ Up! products through my Wildflower Frequent Shopper Program – my way of saying thank you to my online frequent shopper customers.
  • Have any questions? I’d be happy to help, click here to contact me.

Cardstock Cuts for this project:

  • Sahara Sand โ€“ 4-1/4″ x 11″ card base scored at 5-1/2″, 3/8″ x 2″ (label)
  • Pumpkin Pie – 3-1/4″ x 4-1/2″ (embossed background)
  • Early Espresso – 3-3/8″ x 4-5/8″ (front mat), 1/2″ x 2-1/8″ (label mat), 3-1/2″ x 3-1/2″ (scalloped circle)
  • Basic White – 4″ x 5-1/4″ (inside panel), 3-1/2″ x 3-1/2″ (squirrel circle)
  • Beauty of the Earth DSP – 1″ x 3-1/4″, 1/2″ x 4″ (inside trim)

Stampinโ€™ Up! products used in this project:


Stampinโ€™ Up! Eden’s Garden Friendship Card

Good Friday Morning! I hope you’re ready for a nice relaxing weekend. I made another card with the new Stampin’ Up! Eden’s Garden bundle! In today’s card, I used the pretty cling stamp set and new Soft Succulent cotton paper to create a panel of richly textured paper to go with the lush Ever Eden specialty designer series paper. You can find the currently available supplies I used at the bottom of my post along with the sizes of cardstock used.

I randomly stamped the matte side of the Soft Succulent cotton paper with the large leaf sprig from the Stampin’ Up! Eden’s Garden stamp set in Evening Evergreen ink. I crinkled it in a ball a couple of times to get lots of wrinkles and gently opened it up. I covered a Basic White panel with an adhesive sheet, pulled off the cover and adhered the crinkled cotton paper to the front, leaving in crinkles and pressing it firmly. I trimmed the excess cotton paper and cut 1/2″ off the panel to have a strip for the inside.

I used the border die from the Eden dies to cut a strip of brushed metallic gold foil and adhered it to the back of the cotton paper panel and adhered them both to an Ever Eden specialty designer series paper panel with liquid glue. I adhered the layered panel to the front of a Soft Succulent card base with liquid glue.

I stamped the sentiment from the Stampin’ Up! Eden’s Garden stamp set in Evening Evergreen ink on Soft Succulent and cut it out with the second smallest angled Tailor Made Tags die. I cut out a reinforcer form Evening Evergreen and adhered it to the front. I cut another tag from Basic White and decorated it by adhering two leaf sprigs die cut from Evening Evergreen cotton paper. I adhered the Basic White tag to the back of the Soft Succulent tag and wrapped Soft Succulent and Evening Evergreen ribbon through the hole. I tied the ribbon with gold trim, making a bow, and adhered the tags to the card front with dimensionals.

For the inside of the card, I stamped the leaf sprig in Evening Evergreen across the bottom of a Basic White panel after stamping off twice each time. I adhered the Soft Succulent cotton panel to the left side and adhered the panel to the inside of the card.

The the stamped and crinkled cotton paper technique is one I’ve used in the past with tissue paper. The cotton paper is a little stronger, but still very lightweight so it’s very fun to play with – a nice addition to the Stampin’ Up! Eden’s Garden collection that is available while supplies last.


Current Host Code: PYA3MMQ6

Use this host code when you order $50 or more and receive a free gift from me!  The free gift is your choice of any item valued up to $10.00 in the 2021-2022 Annual Catalog or the July โ€“ December 2021 Mini Catalog!

If your order is over $150, please do not use the host code since you’ll receive your own Host Dollars plus I’ll still send you the free gift!  This host code can be used by anyone, no club or commitment required. Let me know if you have any questions.


If you need any stamping supplies, Iโ€™d be very happy to be your Demonstrator.  Just click on the Shop Now button on the right side of the screen to go directly to my online store or contact me if you have any questions.  Happy Stamping!

Thanks for stopping by and have a great week!

Akiko

  • Visit my online store here
  • See the current Stampinโ€™ Up! clearance rack specials here
  • Earn FREE Stampinโ€™ Up! products through my Wildflower Frequent Shopper Program – my way of saying thank you to my online frequent shopper customers.
  • Have any questions? I’d be happy to help, click here to contact me.

Cardstock Cuts for this project:

  • Soft Succulent โ€“ 4-1/4″ x 11″ card base scored at 5-1/2″, 1-3/4″ x 3-1/2″ (die cut tag)
  • Evening Evergreen – 1″ x 1″ (die cut tag reinforcement)
  • Brushed Gold – 1″ x 5-1/4″ (die cut border)
  • Soft Succulent cotton paper – 8″ x 4″
  • Evening Evergreen cotton paper – 2″ x 2″ (die cut leaves)
  • Basic White – 4″ x 5-1/4″ (inside panel), 1-3/4″ x 3-1/2″ (die cut tag)
  • Ever Eden Specialty DSP – 4″ x 5-1/4″ (front background)

Stampinโ€™ Up! products used in this project:


Stampinโ€™ Up! Merry Snowflakes for the Happy Inkinโ€™ Thursday Blog Hop

Good morning and welcome to the Happy Inkin’ Thursday Blog Hop! I used the Stampin’ Up! Merry Snowflakes stamp set to make a snowflake themed Christmas card. I paired it with the beautiful Peaceful Place specialty designer series paper to create a white, silver and gray winter wonderland. You can find the supplies I used at the bottom of my post along with the sizes of cardstock used.

We have a theme challenge this week of Christmas!

I adhered a panel of Peaceful Place specialty designer series paper to a Smoky Slate mat and adhered a Wonderful Snowflake to it with liquid glue. I wrapped it with Metallic Mesh ribbon tying a knot on the side. I adhered the panel to the front of a Thick Basic White card base.

I stamped the sentiment from the Stampin’ Up! Merry Snowflakes cling stamp set in Versamark ink on a Smoky Slate panel. I sprinkled it with white embossing powder and shook off the excess. I heat set it with my heat tool until shiny and cut it out with the medium label die from the Seasonal Labels dies.

I adhered the label to the card front with dimensionals over the ribbon and snowflake. I finished the card front with silver epoxy dots.

For the inside of the card, I stamped the small snowflake from the Stampin’ Up! Merry Snowflakes stamp set in Versamark ink in the corner of a Basic White panel. I sprinkled it with silver embossing powder and and shook off the excess. I heat set it with my heat tool until shiny. I stamped the sentiment in Basic Gray and trimmed the bottom with Peaceful Place specialty DSP. I adhered the panel to the inside of the card.

The sentiments from the Stampin’ Up! Merry Snowflakes stamp set are so festive and wonderful for sending Christmas Wishes. How are your Christmas cards coming along? We have about a month left before we start mailing them!

On with the Hop! Click on the Next Blog button to move forward to see the beautiful project Karen Ksenzakovic has created.

If you get lost along the way, here are the participants for the hop:


Current Host Code: PYA3MMQ6

Use this host code when you order $50 or more and receive a free gift from me!  The free gift is your choice of any item valued up to $10.00 in the 2021 – 2022 Annual Catalog or the July – December 2021 Mini Catalog including some of the host stamp sets!

If your order is over $150, please do not use the host code since you’ll receive your own Host Dollars plus I’ll still send you the free gift!  This host code can be used by anyone, no club or commitment required. Let me know if you have any questions.


If you need any stamping supplies, Iโ€™d be very happy to be your Demonstrator.  Just click on the Shop Now button on the right side of the screen to go directly to my online store or contact me if you have any questions. 

Thanks for stopping by and Happy Stamping!

Akiko

  • Visit my online store here
  • See the current Stampinโ€™ Up! clearance rack specials here
  • Earn FREE Stampinโ€™ Up! products through my Wildflower Frequent Shopper Program – my way of saying thank you to my online frequent shopper customers.
  • Have any questions? I’d be happy to help, click here to contact me.

Cardstock Cuts for this project:

  • Thick Basic white โ€“ 4-1/4″ x 11″ card base scored at 5-1/2″
  • Smoky Slate – 4″ x 5-1/4″ (front mat), 2-1/2″ x 3-3/4″ (label)
  • Basic White – 4″ x 5-1/4″ (inside panel)
  • Peaceful Place specialty DSP – 3-7/8″ x 5-1/8″, 1/2″ x 4″ (inside trim)

Stampinโ€™ Up! products used in this project: