Stampin’ Up! Tea Together Mother’s Day Card Video Tutorial

Good Morning! Today I’m sharing a card that I made yesterday afternoon during my Facebook Live Tutorial. The lovely Stampin’ Up! Tea Together cling stamp set and coordinating Tea Time Dies only came out last year, but they are on the retiring list – and the dies come with a 60% discount!! It’s a sweet set and with two weeks to Mother’s Day, it seemed the right stamp set to play with. You can find the supplies used to create this card at the bottom of my post along with the sizes of cardstock used.

Here is the Facebook Live video showing how I made the card:

I also posted the video to my YouTube Channel and you can view it here.

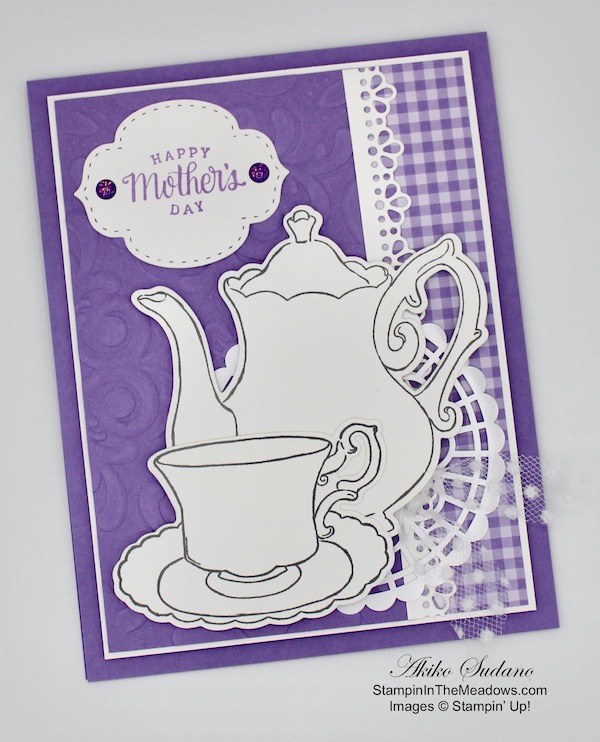
I started by running a panel of Highland Heather card stock through the Parisian Flourish embossing folder and adhering it to the left side of a Whisper White panel. I adhered a strip of Highland Heather gingham next to it. I cut a Whisper White lacy border using the die from the Ornate Borders Dies and adhered it between the layers. I popped the layered panel on a Highland Heather card base with dimensionals.

I stamped the sentiment from the Stampin’ Up! Tea Together cling stamp set in Highland Heather ink on a Whisper White panel. I cut it out with the Stitched So Sweetly die and adhered it to the card with liquid glue. I accented it with two Highland Heather glitter enamel dots.

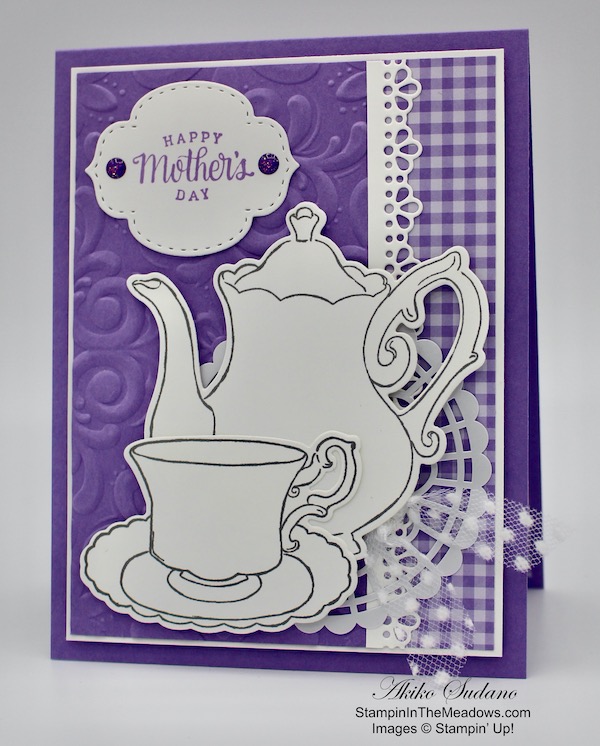
I stamped the teapot and teacup from the Stampin’ Up! Tea Together stamp set in Basic Gray ink on Whisper White card stock and cut them out with the coordinating dies. I adhered a pearlized doily to the card front with multipurpose liquid glue and adhered the teapot and teacup with dimensionals and some liquid glue behind the teacup where it overlapped the teapot. I finished off the front with some tied off polka dot tulle ribbon.

I stamped the sweet sentiment from the Stampin’ Up! Tea Together stamp set on the side of a Whisper White panel in Highland Heather ink. Next to it, I stamped the large rose in Basic Gray ink. I colored the rose with Highland Heather Stampin’ Blends and the leaves with Light Granny Apple Green Stampin’ Blend. I added a strip of Highland heather to the bottom and adhered the panel to the inside of the card.

So many products used in today’s card are on the current retiring list and I was worried that not all of them would still be available at publication time. Sadly, I just learned that the gingham paper that is part of the Subtles 6″ x 6″ DSP is sold out. Many products are going quickly, so hurry over to my Online Store to check out what you’ve been waiting to buy before it’s gone!


Stampin’ Up! 2019-20 Annual Catalog and January-June 2020 Mini Catalog Retiring Lists Have Posted!

Stampin’ Up has posted the retirement lists for the 2019-2020 Annual Catalog and January-June 2020 Mini Catalog today in preparation for the release of the new 2020-2021 Annual Catalog. The items on the lists are only available while supplies last from now through June 2!  And some of the items are available at a discount!!

Click on the picture below to head over to my Online Store to shop the retiring products:

Have fun shopping and let me know if you have any questions!


Stampin’ Up! Ornate Garden Suite Early Release available for ordering NOW!

Stampin’ Up! has a beautiful new early release product suite from the upcoming Annual Catalog and it’s available to order now!! Click the image below to see a PDF brochure of all the products that are available with this beautiful suite or go to the Ornate Garden page in my Online Store to place your order now.


April 16 – 30 Host Code: SJ9ZJ46Z

Use this host code when you order $50+ and receive a free gift from me!  If your order is over $150, please do not use this code, but you’ll still get the free gift.  The free gift is your choice of any item valued up to $10.00 in the 2019 – 2020 Annual Catalog or in the 2020 Mini Catalog!  That includes some of the Host Exclusive stamp sets!

If your order is over $150, please do not use the host code since you’ll receive your own Host Dollars plus I’ll send you the free gift!  This host code can be used by anyone, no club or commitment required.  Let me know if you have any questions.


If you need any stamping supplies, I’d be very happy to be your Demonstrator.  Just click on the Shop Now button on the right side of the screen to go directly to my online store or contact me if you have any questions.  Happy Stamping!

Thanks for stopping by and have a great week!

Akiko

  • Visit my online store here
  • See the current Stampin’ Up! clearance rack specials here
  • Earn FREE Stampin’ Up! products through my Wildflower Frequent Shopper Program – my way of saying thank you to my online frequent shopper customers.
  • Sign up for my weekly newsletter here
  • Have any questions? I’d be happy to help, click here to contact me.

Cardstock Cuts for this project:

  • Highland Heather – 4-1/4″ x 11″ card base scored at 5-1/2″, 2-3/4″ x 5-1/8″ (embossed panel)
  • Whisper White – 4″ x 5-1/4″ (inside panel), 3-7/8″ x 5-1/8″ (front mat), 4″ x 7″ (teapot, teacup and label die cuts), 1/2″ x 5″ (lace border die cut)
  • Subtles 6″ x 6″ Designer Series Paper – 1″ x 5″ (gingham front trim), 1/2″ x 4″ (gingham inside trim)

Stampin’ Up! products used in this project:


Stampin’ Up! Ornate Style Friendship Card Video Tutorial

Good Morning! On Saturday we had our Inkin’ Krew Ornate Garden Facebook Event where we shared lots of projects made with the new Stampin’ Up! Ornate Garden Suite. Did you get a chance to tune in? We had several Facebook Live video tutorials and I shared the tutorial for this card. I used the Stampin’ Up! Ornate Style bundle along with the Ornate Garden specialty designer series paper and the Grace’s Garden and Daisy Lane stamp sets. You can find the supplies used to create this card at the bottom of my post along with the sizes of cardstock used.

Unfortunately I can’t link to the Facebook video ☹️, but it is on my YouTube Channel and you can view it here.

I stamped the sentiment from the Grace’s Garden photopolymer stamp set in Early Espresso ink on a small panel of So Saffron vellum. Be careful because the ink will take longer to dry on the vellum and will be easy to smear if you handle it too early, so I put it aside to let it dry. Using the Leaf Punch, I punched a leaf cluster from Old Olive card stock. I stamped three of the small petal clusters from the Daisy Lane cling stamp set with So Saffron ink after stamping off. I cut them out with the Medium Daisy Punch. I gently curved the petals on the daisies with my fingers, curving the bottom layer up, the top layer down and the middle layer alternating up and down. I adhered the layers with a dot of multipurpose liquid in the center and topped it off with a large gold faceted gem.

I cut the fancy frame from the Ornate Layers Dies from Terracotta Tile card stock. After cleaning the gazillion little pieces that were cut out – this is such an ornate frame and I love it! – I aligned the 3rd smallest of the Stitched Rectangles Dies in the center and cut out the center. I love how these dies leave a stitched edge on both the inside and outside! With the frame ready, I began to assemble my card base.

I adhered a panel of the Ornate Garden specialty designer series paper to a Terracotta Tile card base with multipurpose liquid glue. I adhered the frame to the vellum with pieces of dimensionals. The dimensionals on the side will extend beyond the vellum to adhere it to the card base, but the top and bottom won’t, so I added a strip of multipurpose liquid glue to the back of the vellum that is hidden by the frame. I adhered it to the card base. I adhered the leaf with multipurpose liquid glue and the flower with glue dots. I finished it off with a Terracotta Tile bow.

For the inside of the card, I stamped the little flourish from the Stampin’ Up! Ornate Style cling stamp set in Early Espresso ink at the top of a Whisper White panel. I added a strip of the Ornate Garden specialty DSP to the bottom and adhered the panel to the inside of the card.

Now, I have to admit that I did some surgery to my card after the video ended. In realtime, I stamped the sentiment too hight and crooked as you can see in the picture here. So I snipped the dimensionals behind the frame and trimmed the vellum (luckily it was just stuck down behind the frame. I then re-stamped the sentiment properly and re-attached the frame to the vellum and then adhered it to the card base. It looks much better and from the pictures above, I don’t think you can tell that it needed to be fixed!

I hope that you enjoyed the Inkin’ Krew Ornate Garden event if you got a chance to join it Saturday afternoon. And I hope you got a lot of inspiration and ideas on how you will use the products in the Ornate Garden Suite. If you didn’t, the group will still be there and you can check out the postings and watch the videos on replay. Here is the link to the group where you can join and we will get you approved as soon as we can: https://www.facebook.com/groups/1833741716756137/. Now to end my post with a better picture…


Stampin’ Up! Ornate Garden Suite Early Release available for ordering NOW!

Stampin’ Up! has a beautiful new early release product suite from the upcoming Annual Catalog and it’s available to order now!! Click the image below to see a PDF brochure of all the products that are available with this beautiful suite or go to the Ornate Garden page in my Online Store to place your order now.


April 16 – 30 Host Code: SJ9ZJ46Z

Use this host code when you order $50+ and receive a free gift from me!  If your order is over $150, please do not use this code, but you’ll still get the free gift.  The free gift is your choice of any item valued up to $10.00 in the 2019 – 2020 Annual Catalog or in the 2020 Mini Catalog!  That includes some of the Host Exclusive stamp sets!

If your order is over $150, please do not use the host code since you’ll receive your own Host Dollars plus I’ll send you the free gift!  This host code can be used by anyone, no club or commitment required.  Let me know if you have any questions.


If you need any stamping supplies, I’d be very happy to be your Demonstrator.  Just click on the Shop Now button on the right side of the screen to go directly to my online store or contact me if you have any questions.  Happy Stamping!

Thanks for stopping by and have a great week!

Akiko

  • Visit my online store here
  • See the current Stampin’ Up! clearance rack specials here
  • Earn FREE Stampin’ Up! products through my Wildflower Frequent Shopper Program – my way of saying thank you to my online frequent shopper customers.
  • Sign up for my weekly newsletter here
  • Have any questions? I’d be happy to help, click here to contact me.

Cardstock Cuts for this project:

  • Terracotta Tile – 4-1/4″ x 11″ card base scored at 5-1/2″
  • Old Olive – 1-1/2″ x 3″ (leaf cluster punch)
  • Perennial Essence vellum card stock – 2-1/8″ x 3-5/8″ (So Saffron vellum panel)
  • Whisper White – 4″ x 5-1/4″ (inside panel), 2″ x 6″ (punched daisy petals)
  • Ornate Garden Designer Series Paper – 4-1/4″ x 5-1/2″ (card front background), 1/2″ x 4″ (inside trim)

Stampin’ Up! products used in this project:


Stampin’ Up! Ornate Style Hello Card

Good Morning! Today I am sharing a sweet hello card that I made yesterday during my Sunday Facebook Live session using the new Early Release Stampin’ Up! Ornate Style stamp set and other items from the Ornate Garden Suite. You can find the supplies used to create this card at the bottom of my post along with the sizes of cardstock used.

Here’s the Facebook Live video showing how to make the card:

I also posted the video to my YouTube Channel and you can view it here if you prefer.

Emboss a panel of So Saffron card stock with the Ornate Floral embossing folder and adhere it to the front of a So Saffron card base. Adhere a panel of Ornate Garden specialty designer series paper to a Mint Macaron mat and adhere it to the card front with dimensionals.

Cut out the three flowers from So Saffron card stock using the flowers from the Ornate Border Dies. Using the large ball stylus from the Take Your Pick tool, Curl the petals upward on each cluster with a circular motion on a soft mat or mousepad. Adhere the petal clusters together with glue dots, offsetting the petals as much as you can. Add a yellow rhinestone to the center. Stamp the hello greeting from the Timeless Tropical stamp set with Early Espresso ink on a scrap of Whisper White and cut it out with a Stitched Nested Label Die. Adhere the label to the card with dimensionals and adhere the flower and a Mint Macaron bow to the label with glue dots.

For the inside of the card, I stamped the large flower bouquet from the Stampin’ Up! Ornate Style stamp set in the center of a Whisper White panel using So Saffron ink after stamping off twice. Add a strip of the Ornate Floral DSP to the bottom and adhere it to the inside of the card.

The Ornate Garden Suite is so pretty and versatile. The Inkin’ Krew Team is having an Ornate Garden Facebook event on April 18 to celebrate! Contact me if you are interested.


April 1 – 15 Host Code: N39D7TBK

Use this host code when you order $50+ and receive a free gift from me!  If your order is over $150, please do not use this code, but you’ll still get the free gift.  The free gift is your choice of any item valued up to $10.00 in the 2019 – 2020 Annual Catalog or in the 2020 Mini Catalog!  That includes some of the Host Exclusive stamp sets!

If your order is over $150, please do not use the host code since you’ll receive your own Host Dollars plus I’ll send you the free gift!  This host code can be used by anyone, no club or commitment required.  Let me know if you have any questions.


If you need any stamping supplies, I’d be very happy to be your Demonstrator.  Just click on the Shop Now button on the right side of the screen to go directly to my online store or contact me if you have any questions.  Happy Stamping!

Thanks for stopping by and have a great week!

Akiko

  • Visit my online store here
  • See the current Stampin’ Up! clearance rack specials here
  • Earn FREE Stampin’ Up! products through my Wildflower Frequent Shopper Program – my way of saying thank you to my online frequent shopper customers.
  • Sign up for my weekly newsletter here
  • Have any questions? I’d be happy to help, click here to contact me.

Cardstock Cuts for this project:

  • So Saffron – 5-1/2″ x 8-1/2″ card base scored at 4-1/4″, 4″ x 5-1/4″ (embossed front), 1″ x 3″ (flower die cuts)
  • Mint Macaron – 3-1/2″ x 3-1/2″ (DSP mat)
  • Whisper White – 4″ x 5-1/4″ (inside panel), 1-1/4″ x 2-1/2″ (label)
  • Ornate Garden Designer Series Paper – 3-1/4″ x 3-1/4″ (main panel), 1/2″ x 4″ (inside trim)

Stampin’ Up! products used in this project:


Stampin’ Up! Welcome Easter Card

Good Morning! Today I am sharing a sweet Easter Card that I made yesterday during my Sunday Facebook Live session. The Stampin’ Up! Welcome Easter cling stamp set has three cute baby animals that can be used for either baby cards or Easter cards. I made an Easter card with the cute little chick.

Here’s the Facebook Live video showing how to make the card:

I also posted the video to my YouTube Channel and you can view it here if you prefer.

I stamped the little chick from the Stampin’ Up! Welcome Easter in Basic Gray ink on a small Whisper White panel and colored it with Daffodil Delight and Light Pumpkin Pie Stampin’ Blends. I cut it out with the largest stitched circle from the Stitched Shapes Dies and adhered it to a Pear Pizzazz scalloped circle cut with the Layering Circles Dies. I stamped the Happy Easter Greeting in Pear Pizzazz ink on a strip of Whisper White and cut it out with the long stitched rectangle die from the Stitched Rectangles Dies.

I embossed a Whisper White panel with the Ornate Flowers 3D embossing folder. This pretty embossing folder will be available on April 1 as part of the Ornate Garden Suite Early Release. I adhered the embossed panel to a Pear Pizzazz card base with liquid glue. I added a strip of Pear Pizzazz gingham from the Subtles 6×6 Designer Series Paper and adhered the label on top with liquid glue. I adhered the chick from the Stampin’ Up! Welcome Easter stamp set with dimensionals and finished the front with a Daffodil Delight bow.

For the inside of the card, I stamped the flower cluster and little bee in Basic Gray ink on a Whisper White panel. I colored them with Daffodil Delight, Flirty Flamingo, Highland Heather and Balmy Blue Stampin’ Blends. I trimmed the bottom with a strip of Pear Pizzazz gingham and adhered it to the inside of the card with liquid glue.

Next up for Stampin’ Up! Welcome Easter stamp set is a set of baby cards, also with gingham – I just need to figure out the sketch. On the sample (bottom card), I stamped the chick with Smoky Slate ink and I used Basic Gray (top card) in the video. I didn’t want to use black ink because I wanted to keep the softness of the baby chick. I think I prefer the Basic Gray, what do you think? Have a great week and stay healthy!


March 16 – 31 Host Code: RSAF3R27

Use this host code when you order $50+ and receive a free gift from me!  If your order is over $150, please do not use this code, but you’ll still get the free gift.  The free gift is your choice of any item valued up to $10.00 in the 2019 – 2020 Annual Catalog or in the 2020 Mini Catalog!  That includes some of the Host Exclusive stamp sets!

If your order is over $150, please do not use the host code since you’ll receive your own Host Dollars plus I’ll send you the free gift!  This host code can be used by anyone, no club or commitment required.  Let me know if you have any questions.


If you need any stamping supplies, I’d be very happy to be your Demonstrator.  Just click on the Shop Now button on the right side of the screen to go directly to my online store or contact me if you have any questions.  Happy Stamping!

Thanks for stopping by and have a great week!

Akiko

  • Visit my online store here
  • See the current Stampin’ Up! clearance rack specials here
  • Earn FREE Stampin’ Up! products through my Wildflower Frequent Shopper Program – my way of saying thank you to my online frequent shopper customers.
  • Sign up for my weekly newsletter here
  • Have any questions? I’d be happy to help, click here to contact me.

Cardstock Cuts for this project:

  • Pear Pizzazz – 5-1/2″ x 8-1/2″ card base scored at 4-1/4″
  • Whisper White – (2) 4″ x 5-1/4″ (inside panel and embossed front), 3″ x 3″ (chick panel)
  • Subtles 6″ x 6″ Designer Series Paper – 1-1/2″ x 5-1/4″ (gingham front strip), 1/2″ x 5-1/4″ (inside gingham trim)

Stampin’ Up! products used in this project:


Stampin’ Up! March Paper Pumpkin Kit – No Matter The Weather

Good Morning! Today I am sharing another Paper Pumpkin Kit video that I did yesterday during my Sunday Facebook Live session. The Stampin’ Up! March Paper Pumpkin Kit is a really great kit, and I liked all the cards per the instructions, so I made them according to the video pretty much as designed, and used some of the extra stamps to make my card share for the video tutorial.

These are the cards I have made so far with the kit:

Here’s the Facebook Live video where I put together an alternative design card using the stamps from the Stampin’ Up! March Paper Pumpkin Kit along with the Under My Umbrella Bundle.

I also posted the video to my YouTube Channel and you can view it here if you prefer. And here is the alternative design card that I made.

I started by stamping the umbrella handle from the Under My Umbrella photopolymer stamp set in Basic Gray ink on a Balmy Blue Panel. Then I ran the panel through the Subtle embossing folder and adhered it to the front of a Balmy Blue card base. I stamped the boots outline from the Stampin’ Up! March Paper Pumpkin Kit on a Whisper White panel in Basic Gray ink. I stamped the flower boots on top in Poppy Parade ink. I cut masks for the boots out of a post-it note and then stamped the grass stamp in Granny Apple Green ink. I stamped flower bouquets on top of the boots in Basic Gray ink and colored them in with Dark Daffodil Delight and Light Granny Apple Green Stampin’ Blends. I cut it out with the large stitched oval from the Stitched Shapes Dies and adhered it to a Basic Gray mat that was cut with the large scalloped oval die from the Layering Ovals Dies.

I stamped the umbrella from the Under My Umbrella stamp set four times on a Whisper White panel. I punched the first one out with the Umbrella Builder Punch. I carefully stamped the flowered boots on the one section of the other three in Poppy Parade ink so that I had the three sections with the flowered boot designs. You want to be careful to avoid the empty buckle section of the boots and carefully align the middle section so that it is completely covered. Then I fussy cut each umbrella section and adhered it to the punched umbrella with multipurpose liquid glue. I stamped the sentiment from the Stampin’ Up! March Paper Pumpkin kit in Basic Gray ink and cut it out with the smallest scalloped rectangle in the Stitched So Sweetly Dies. I adhered the boots, umbrella and label to the card front with dimensionals.

For the inside of the card, I stamped the grass along the bottom of a Whisper White panel in Granny Apple Green ink and the flowers from the Under My Umbrella Stamp set in the corner in Basic Gray ink. I colored the flowers with Stampin’ Blends and adhered the panel to the inside of the card.

Here are close-ups of the original cards I made using the Kit instructions. For the kit cards, I pretty much followed the instructions in the kit and added some stamping on the insides to decorate them. You can see that in the video.

On this card, I added a Calypso Coral sequin from the Iridescent Sequins pack.

Here, I substituted the sentiment from the Timeless Tulips stamp set to make it a fun Easter card.

Aren’t those cloud stamps great!! And the sentiment perfectly expresses the optimism we need today. I will be sending these to far away friends I haven’t seen for a while with my love.

Let me finish with my five favorite things about the kit. This month’s kit was hard, because there were so many things that I loved, but here are the top five:

  1. The card designs are gorgeous with wonderful backgrounds and die cuts.
  2. The stamp images are great and fun.
  3. The extra stamp set is a great freebie.
  4. The raindrop embellishments are great
  5. The colors are so beautiful.

I hope you enjoy your Stampin’ Up! March Paper Pumpkin kit as much as I did!


April 2020 Paper Pumpkin: My Wonderful Family

For April, Paper Pumpkin has created a fun, family appreciation themed card kit that makes it easy for you to share your hearts with those you love most: mom, dad, daughter, son, sister, and brother. April’s kit even includes Mother’s Day and Father’s Day sentiments, giving you the perfect way to show your appreciation for beloved parents on their special days with a beautiful, handmade card.

One more thing to about this “fam-tastic” kit: The Paper Pumpkin team knows that everyone’s clan is unique. With that in mind, we provided sentiments that would include anyone in your life who feels like family; for instance, “brothers” and “sisters” who have helped you along the journey of life.

Here are the Details:

  • Kit contains supplies for 8 cards and envelopes
  • Card size: 4-1/4″ x 5-1/2″
  • Envelope size: 4-1/2″ x 5-3/4″

Coordinating Colors: Crushed Curry, Early Espresso, Melon Mambo, Mint Macaron, Pear Pizzazz, Shaded Spruce, Soft Sea Foam

If you’re interested in subscribing to Paper Pumpkin, you can either sign up for a subscription where you are billed monthly for your kit or you can purchase a prepaid subscription in my online store. To see more information and to sign up for the monthly subscription click here. To see the options for prepaid subscriptions in my online store, click here. NOTE: Prepaid Subscriptions of 3 months or longer qualify for FREE Sale-A-Bration items!

Sign up deadline for the April 2020 kit is April 10, 2020. Supplies may be limited toward the end of each subscription period.


March 16 – 31 Host Code: RSAF3R27

Use this host code when you order $50+ and receive a free gift from me!  If your order is over $150, please do not use this code, but you’ll still get the free gift.  The free gift is your choice of any item valued up to $10.00 in the 2019 – 2020 Annual Catalog or in the 2020 Mini Catalog!  That includes some of the Host Exclusive stamp sets!

If your order is over $150, please do not use the host code since you’ll receive your own Host Dollars plus I’ll send you the free gift!  This host code can be used by anyone, no club or commitment required.  Let me know if you have any questions.


If you need any stamping supplies, I’d be very happy to be your Demonstrator.  Just click on the Shop Now button on the right side of the screen to go directly to my online store or contact me if you have any questions.  Happy Stamping!

Thanks for stopping by and have a great week!

Akiko

  • Visit my online store here
  • See the current Stampin’ Up! clearance rack specials here
  • Earn FREE Stampin’ Up! products through my Wildflower Frequent Shopper Program – my way of saying thank you to my online frequent shopper customers.
  • Sign up for my weekly newsletter here
  • Have any questions? I’d be happy to help, click here to contact me.

Cardstock Cuts for this project:

  • Balmy Blue – 4-1/4″ x 11″card base scored at 5-1/2″, 4-1/4″ x 5-1/2″ (embossed front)
  • Whisper White – 3-3/4″ x 5″ (inside panel), 3″ x 4″ (boots panel), 3″ x 5″ (umbrella pieces)1″ x 2-1/2″ (label)
  • Basic Gray – 3″ x 4″ (mat)

Stampin’ Up! products used in this project:


Stampin’ Up! Peaceful Moments Thank You Card Video Tutorial

Good Morning! Today I am sharing a video tutorial that I made yesterday during my Sunday Facebook Live session. I made a Thank You Card with the pretty Stampin’ Up! Peaceful Moments and Painted Poppies bundles. You can find the supplies used to create this card at the bottom of my post along with the sizes of cardstock used. Here is my card:

And here’s the Facebook Live video:

I also posted the video to YouTube and you can view it here if you prefer.

I started by inking up my Coastal Weave Embossing Folder with Soft Sea Foam ink using the ink pad directly to the embossing folder. I carefully positioned a Whisper White panel in the embossing folder, closed it and ran it through the die cutting machine. This gave me the embossed panel with touches of Soft Sea Foam ink in the creases. I adhered the embossed panel to a Grapefruit Grove card base. I cut a Whisper White panel with the flower trellis die from the Wild Roses dies and adhered it to the lower part of the embossed panel with multipurpose liquid glue.

I die cut the flowers and leaves from the Peaceful Poppies dies and assembled them with multipurpose liquid glue. I cut the solid flowers from Petal Pink, the outline flowers from Grapefruit Grove and the centers from Calypso Coral. I cut the solid Leaves from Soft Sea Foam and the accent parts from Mint Macaron. I arranged the flowers and leaves on the card on top of the trellis and adhered all but the large flower with multipurpose liquid glue. I adhered the large flower with dimensionals.

I stamped the sentiment from the Stampin’ Up! Peaceful Moments stamp set in Mint Macaron ink on a panel of Soft Sea Foam. I cut it out with the small label die from the Painted Labels dies and adhered it to the card with dimensionals. I used the small spatter stamp from the Painted Poppies stamp set to stamp Calypso Coral ink on a length of Whisper White Crinkle Seam Binding ribbon to give it some color. I made a bow and attached it under the flowers with glue dots. I finished the card with three Petal Pink sequins.

On the inside of the card I stamped three flowers from the Painted Poppies stamp set in Calypso Coral ink after stamping off on a panel of Whisper White. I used the splotch stamp from the set to color the poppies in Petal Pink ink. I stamped three leaves in Mint Macaron after stamping off and then adhered it to the inside of the card with snail. I stamped a Whisper White envelope the same way as the inside panel.


Tomorrow is the last day to sign up for the March 2020 Paper Pumpkin kit!

The theme is No Matter the weather and it celebrates a Paper Pumpkin milestone: our seventh year of delivering fun, easy, creative projects. To thank everyone who has helped us along the way, we’re including an additional FREE stamp set with every March kit. This means that every subscriber will receive two stamp sets! 

The March 2020 kit will arrive in an exclusive, specially-designed box that subscribers will love! Think daffodils, raindrops, and a fresh spring vibe.

Here are the Details:

  • Kit contains supplies for 12 cards and envelopes (4 cards of 3 designs)
  • Notecard size: 5″ x 3-1/2″ (12.7 x 8.9 cm)
  • Envelope size: 5-1/8″ x 3-5/8″ (13 x 9.2 cm)
  • The additional stamp set coordinates with the March kit design; however, you do not need it to complete the March cards.
  • The additional stamp set is a 4×6 footprint, which is larger than most Paper Pumpkin sets and is designed for use on a variety of crafting projects.

Coordinating Colors: Balmy Blue, Basic Gray, Calypso Coral, Grapefruit Grove, Gray Granite, Pear Pizzazz, Petal Pink, Shaded Spruce, and So Saffron

If you’re interested in subscribing to Paper Pumpkin, you can either sign up for a subscription where you are billed monthly for your kit or you can purchase a prepaid subscription in my online store. To see more information and to sign up for the monthly subscription click here. To see the options for prepaid subscriptions in my online store, click here.

As a bonus during Sale-A-Bration, purchasing a 3-month or longer prepaid subscription qualifies for FREE Sale-A-Bration products!

Sign up deadline for the March 2020 kit is tomorrow.


March 1 – 15 Host Code: BQCVV2RG

Use this host code when you order $50+ and receive a free gift from me!  If your order is over $150, please do not use this code, but you’ll still get the free gift.  The free gift is your choice of any item valued up to $10.00 in the 2019 – 2020 Annual Catalog or in the 2020 Mini Catalog!  That includes some of the Host Exclusive stamp sets!

If your order is over $150, please do not use the host code since you’ll receive your own Host Dollars plus I’ll send you the free gift!  This host code can be used by anyone, no club or commitment required.  Let me know if you have any questions.


If you need any stamping supplies, I’d be very happy to be your Demonstrator.  Just click on the Shop Now button on the right side of the screen to go directly to my online store or contact me if you have any questions.  Happy Stamping!

Thanks for stopping by and have a great week!

Akiko

  • Visit my online store here
  • See the current Stampin’ Up! clearance rack specials here
  • Earn FREE Stampin’ Up! products through my Wildflower Frequent Shopper Program – my way of saying thank you to my online frequent shopper customers.
  • Sign up for my weekly newsletter here
  • Have any questions? I’d be happy to help, click here to contact me.

Cardstock Cuts for this project:

  • Grapefruit Grove – 5-1/2″ x 8-1/2″ card base scored at 4-1/4″, 3″ x 4-1/2″ (flower die cuts)
  • Petal Pink – 3″ x 4-1/2″ (flower die cuts)
  • Calypso Coral – 1-1/2″ x 3″ (flower center die cuts)
  • Soft Sea Foam – 2-1/2″ x 3″ (leaf die cuts), 2-1/2″ x 3-1/2″ (label)
  • Mint Macaron – 2-1/2″ x 3″ (leaf die cuts)
  • Whisper White – (2) 4″ x 5-1/4″ (inside panel and embossed background), 1-1/2″ x 5 1/4″ (trellis die cut)

Stampin’ Up! products used in this project:


Stampin’ Up! Timeless Tulips Mother’s Day Card Video Tutorial

Good Morning! Today I am sharing a video tutorial that I made yesterday during my Sunday Facebook Live session. I made a Mother’s Day Card with the pretty Stampin’ Up! Timeless Tulips bundle. You can find the supplies used to create this card at the bottom of my post along with the sizes of cardstock used. Here is my card:

And here’s the Facebook Live video:

I also posted the video to YouTube and you can view it here if you prefer.

I started by embossing a panel of Soft Sea Foam card stock with the Parisian Flourish embossing folder. I adhered it to a So Saffron card base with snail. I trimmed the bottom of a strip of Perennial Essence designer series paper with the Banner Triple Punch and adhered it to the card with snail.

I stamped one of each tulip flower from the Stampin’ Up! Timeless Tulips stamp set in Daffodil Delight ink on Whisper White. I cut out the largest flower with the Tulip Builder punch and fussy cut the other two. I stamped three stems and two leaves using Pear Pizzazz ink on Whisper White and fussy cut them out. I cut a Whisper White Circle using the largest circle in the Stitched Shapes dies and a Soft Sea Foam scalloped circle using the Layering Circles dies. I adhered these together with snail.

I arranged the flowers and stems on the circle and adhered the stems with glue dots. I adhered the small tulips to the circle with multipurpose liquid glue and the large flower with dimensionals. I adhered the stems with multipurpose liquid glue and trimmed the ends. I attached the leaves. I stamped the sentiment in Pear Pizzazz ink on a Stitched So Sweetly die cut Whisper White label. I adhered the circle and label on the card front with dimensionals, including skinny ones under the stems. I finished the card with a Daffodil Delight ruched ribbon bow and a pearl colored with the dark Daffodil Delight Stampin Blend.

I stamped another tulip, stem and leaf on a Whisper White panel for the inside of the card. I added a strip of the Perennial Essence DSP to the bottom and adhered it to the inside of the card with snail.

I love bright yellow tulips in the Spring and I think they’re perfect for Mother’s Day! What will you make for Mother’s Day?


Sale-A-Bration Second Release Begins Tomorrow!

Tomorrow is the first day for Customers to get the Sale-A-Bration Second Release products. Yay!!! The second release consists of three additional stamp sets and two beautiful designer series paper packs that you can get for FREE with a $50 minimum purchase. Click on the picture below to see these new items and read on to get a refresher on the Sale-A-Bration details:

There are three ways to enjoy Sale-A-Bration benefits: Shop – Host – Join.

Sale-A-Bration Shopping Benefits

You earn FREE products for every $50 you spend (before shipping and taxes) during Sale-A-Bration. The Sale-A-Bration brochure has the products that you can choose to add to your order. And the more you spend, the more FREE products you can earn. There are two qualifying levels with spending thresholds, giving you flexibility to choose what you want.

For example, if you spend $150, then you can then choose three level 1 items or one level 1 and one level 2.

Head over to my online store to shop now.

Sale-A-Bration Host Benefits

Hosts with orders of $300 or more can receive the exclusive Little Ladybug Stamp Set (Item 152384).

  • Customer, workshop, and online orders qualify.
  • There is no limit as to how many qualifying orders you can place throughout the promotion.
  • Only one Little Ladybug Stamp Set can be redeemed per order. 
  • Only the host of the order will receive the free stamp set.
  • To qualify, orders must be opened from January 3, and closed by March 31.

Sale-A-Bration Joining Benefits

Recruits who join Stampin’ Up! as an independent Stampin’ Up! demonstrator between January 3–March 31, 2020, will receive the Mini Paper Cutter, a 6″ x 6″ Designer Series Paper sampler, and your choice of stamp set (Host stamp sets and Sale-A-Bration stamp sets not included.). 

  • The 6″ x 6″ Designer Series Paper Sampler in the Join offering has samples from the Lily Impressions Designer Series Paper (Sale-A-Bration brochure), Peaceful Poppies Designer Series Paper (January–June 2020 Mini Catalog), Country Club Designer Series Paper (January–June 2020 Mini Catalog), Birthday Bonanza Designer Series Paper (January–June 2020 Mini Catalog), Tropical Oasis Designer Series Paper (January–June 2020 Mini Catalog), Best Dress 6″ x 6″ Designer Series Paper (January–June 2020 Mini Catalog). 
  • 12 double-sided designs (two double-sided sheets from six different Designer Series Paper packs) QTY: 48 sheets total (four each of 12 designs)
  • Mini Paper Cutter Dimensions: 7-5/8″ x 5-3/8″ x 1-1/4″

And to sweeten the Joining offer, you can add items from the Sale-A-Bration second release to your Starter Kit if you join before March 3, 2020. 

For more details on the benefits of joining Stampin’ Up! as a Demonstrator, see my Join My Team page. There is a Join My Team button at the bottom where you can start the process. Please contact me if you have any questions. I’ll be happy to tell you more.


March 1 – 15 Host Code: BQCVV2RG

Use this host code when you order $50+ and receive a free gift from me!  If your order is over $150, please do not use this code, but you’ll still get the free gift.  The free gift is your choice of any item valued up to $10.00 in the 2019 – 2020 Annual Catalog or in the 2020 Mini Catalog!  That includes some of the Host Exclusive stamp sets!

If your order is over $150, please do not use the host code since you’ll receive your own Host Dollars plus I’ll send you the free gift!  This host code can be used by anyone, no club or commitment required.  Let me know if you have any questions.


If you need any stamping supplies, I’d be very happy to be your Demonstrator.  Just click on the Shop Now button on the right side of the screen to go directly to my online store or contact me if you have any questions.  Happy Stamping!

Thanks for stopping by and have a great week!

Akiko

  • Visit my online store here
  • See the current Stampin’ Up! clearance rack specials here
  • Earn FREE Stampin’ Up! products through my Wildflower Frequent Shopper Program – my way of saying thank you to my online frequent shopper customers.
  • Sign up for my weekly newsletter here
  • Have any questions? I’d be happy to help, click here to contact me.

Cardstock Cuts for this project:

  • So Saffron – 4-1/4″ x 11″ card base scored at 5-1/2″
  • Soft Sea Foam – 4″ x 5-1/4″ (embossed background), 3-1/2″ x 3-1/2″ (scalloped circle mat)
  • Whisper White – 4″ x 5-1/4″ (inside panel), 4″ x 4-1/2″ (flowers & stems), 3-1/4″ x 3-1/4″ (circle), 1-1/2″ x 2 1/2″ (label)
  • Perennial Essence DSP – 2″ x 5″ (banner), 1/2″ x 4″ (inside trim)

Stampin’ Up! products used in this project:


Stampin’ Up! February Paper Pumpkin Kit – A Lovely Day

Good Morning! Today I am sharing another Paper Pumpkin Kit video that I did yesterday during my Sunday Facebook Live session. The Stampin’ Up! February Paper Pumpkin kit goes well with the Sale-A-Bration Happy Birthday stamp set and I used it to make pretty alternative design cards.

These are the cards I have made so far with the kit:

Here’s the Facebook Live video where I put together some of the cards from the kit and explained how I made the alternative cards. I also showed the contents of the kit and some of the projects that I made during the week. I also talked about my 5 favorite things about the kit.

Unfortunately, I had technical problems downloading my video, so I couldn’t post it to YouTube this week. I’ll look into it more during the week so I can be sure to upload next week’s video and upload yesterday’s too.

These are the cards that I made according to the instructions provided. I did make some changes though. On the Rich Razzleberry base card, I stamped the HAVE A on the wrong edge, so I couldn’t align the the lovely as in the picture – but I think it worked out ok anyway. On the Pretty Peacock card, I colored the cake icing with my Pool Party Stampin’ Blend and stamped the BIRTHDAY in with my Pretty Peacock ink pad. I also used the iridescent sequins from my stash because I wanted more of a monochromatic look. On the Rococo Rose and Petal Pink card, I just used the celebrate greeting and skipped the label. I also stamped on the inside of the cards and you can see them in the video. The elements in the kit are pretty flexible and you can make pretty cards quite easily!

Here is one of the alternative design cards I made with the Stampin’ Up! February Paper Pumpkin kit. I used the papers from the Rococo Rose card and used the pretty floral cake from the Sale-A-
Bration Happy Birthday To You
stamp set. I stamped the cake in Rococo Rose and colored it with my Petal Pink, Old Olive and Smoky Slate Stampin’ Blends. I also used the matching Birthday dies from the Coordination Release and accented the background with those pretty Petal Pink iridescent sequins from the Paper Pumpkin kit. In the video, you can see how I stamped the large flower on the inside of the card.

Here is the second alternative design card I made with the Stampin’ Up! February Paper Pumpkin kit. I stamped the large flower in Smoky Slate ink on a panel of Whisper White and cut it out with the Stitched so Sweetly dies. I colored it with Rich Razzleberry, Petal Pink, So Saffron and Old Olive Stampin’ Blends. I stamped the congratulations in Versamark Ink on a panel of Old Olive. I sprinkled it with Silver embossing powder and heat set. I fussy cut around the letters and popped it on the panel with dimensionals. I used the Stitched Rectangle die to cut a panel of the Rick Razzleberry card base from the kit and adhered it to an Old Olive mat. I adhered the floral panel to the top with snail and popped it on a Rich Razzleberry card base.

The elements in the Stampin’ Up! February Paper Pumpkin kit coordinate with many items you may already have in your stash and are flexible and versatile enough make pretty cards that you customize to your exclusive designs.

Here are my five favorite things about the kit:

  1. I love the stamp set included in the kit – it has pretty images and is versatile.
  2. The envelopes in the kit are a nice unique design.
  3. The papers in the kit are pretty.
  4. The die cuts are fantastic
  5. It has pretty clear pink iridescent sequins.

I hope you enjoy your Stampin’ Up! February Paper Pumpkin kit as much as I did!


March 2020 Paper Pumpkin: No Matter the Weather

Cheers to seven years! This March, Paper Pumpkin has reached another exciting milestone: our seventh year of delivering fun, easy, creative projects to you and your customers. To thank everyone who has helped us along the way, we’re including an additional FREE stamp set with every March kit. This means that every subscriber will receive two stamp sets! 

The March 2020 kit will arrive in an exclusive, specially-designed box that you and your subscribers will love! Think daffodils, raindrops, and a fresh spring vibe.

Here are the Details:

  • Kit contains supplies for 12 cards and envelopes (4 cards of 3 designs)
  • Notecard size: 5″ x 3-1/2″ (12.7 x 8.9 cm)
  • Envelope size: 5-1/8″ x 3-5/8″ (13 x 9.2 cm)
  • The additional stamp set coordinates with the March kit design; however, you do not need it to complete the March cards.
  • The additional stamp set is a 4×6 footprint, which is larger than most Paper Pumpkin sets and is designed for use on a variety of crafting projects.

Coordinating Colors: Balmy Blue, Basic Gray, Calypso Coral, Grapefruit Grove, Gray Granite, Pear Pizzazz, Petal Pink, Shaded Spruce, and So Saffron

If you’re interested in subscribing to Paper Pumpkin, you can either sign up for a subscription where you are billed monthly for your kit or you can purchase a prepaid subscription in my online store. To see more information and to sign up for the monthly subscription click here. To see the options for prepaid subscriptions in my online store, click here.

As a bonus during Sale-A-Bration, purchasing a 3-month or longer prepaid subscription qualifies for FREE Sale-A-Bration products!

Sign up deadline for the March 2020 kit is March 10, 2020.


February 16 – 29 Host Code: KFK3RZHV

Use this host code when you order $50+ and receive a free gift from me!  If your order is over $150, please do not use this code, but you’ll still get the free gift.  The free gift is your choice of any item valued up to $10.00 in the 2019 – 2020 Annual Catalog or in the 2020 Mini Catalog!  That includes some of the Host Exclusive stamp sets!

If your order is over $150, please do not use the host code since you’ll receive your own Host Dollars plus I’ll send you the free gift!  This host code can be used by anyone, no club or commitment required.  Let me know if you have any questions.


If you need any stamping supplies, I’d be very happy to be your Demonstrator.  Just click on the Shop Now button on the right side of the screen to go directly to my online store or contact me if you have any questions.  Happy Stamping!

Thanks for stopping by and have a great week!

Akiko

  • Visit my online store here
  • See the current Stampin’ Up! clearance rack specials here
  • Earn FREE Stampin’ Up! products through my Wildflower Frequent Shopper Program – my way of saying thank you to my online frequent shopper customers.
  • Sign up for my weekly newsletter here
  • Have any questions? I’d be happy to help, click here to contact me.

Stampin’ Up! products used in this project:


Stampin’ Up! January Paper Pumpkin Kit – Bee Mine

Good Morning! Today I am sharing another Paper Pumpkin Kit video that I did yesterday during my Sunday Facebook Live session. The Stampin’ Up! January Paper Pumpkin kit is fun for Valentine’s Day and goes with many other Stampin’ Up! products.

These are the items I have made with the kit:

Here’s the Facebook Live video where I put together a note card and a gift bag. I also showed the contents of the kit and some of the projects that I made during the week. I also talked about my 5 favorite things about the kit.

I also posted the video to my YouTube channel and you can view it here.

These are the note cards I made from the kit so far and the middle one is the one I made in the video. In addition to the fun embellishments, the stamps are wonderful. The small floral background stamp is the star here, used to stamp the background on the middle card and the Mint Macaron floral heart on the left.

These are the gift bags I made to show off the features of the kit. The bottom one is the one I did in the video. I wanted to show how versatile the kit elements are for combining with other items you have in your own stash and how the Mint Macaron ink spot and background colors can be combined with your favorite non-kit items. In the bottom gift bag, I used the stamps from the kit to stamp on the back of one of the heart cut outs in Real Red ink. I backed it with one of the Real Red Heart doilies, and three red sequins from the Peaceful Poppies sequins. I finished it off with one of the cute bees and a bow with the Whisper White baker’s twine included in the kit. This shows how the Mint Macaron can be used with any other colors you have in your stash.

This is a card I made using the elements in the kit and there’s a surprise inside. The sketch is from Freshly Made Sketches #419 – A Sketch by Lee Ann, which is wonderful!

Can you tell I’m in love with the little floral background stamp in the kit? I stamped it on Mint Macaron card stock and Whisper White card stock in Mint Macaron Ink before cutting it out with the Heart punches. I stamped it in Rococo Rose in a continuous fashion to make the angled background paper before cutting it out with the large Stitched Rectangle die. It does make a pretty background handmade DSP paper and is easier to do than I originally thought (but you do have to take your time). Of course I had fun decorating the heart with elements from the Stampin’ Up! January Paper Pumpkin kit. The sentiment is from the Stampin’ Up! Forever Lovely stamp set.

And on the inside I added one of the little gift bags and a decorated heart. These little bags are perfect for holding gift cards – and that’s what’s inside!

And here are my 5 favorite things about this kit:

  1. The kit coordinates with so many other products that are currently available from Stampin’ Up!
  2. The kit would be great to do with children – so many elements to decorate the hearts and simple stamp designs
  3. You easily combine it with many different ink and card stock colors – not just the ones used in the kit (although they are beautiful too if you are fortunate enough to have them all).
  4. I love that the gift bags are perfect for gift cards – and they are shiny too!
  5. It is fun, relaxing stamp therapy to decorate the hearts with stamps and embellishments in the kit

I hope you enjoy your Stampin’ Up! January Paper Pumpkin kit as much as I did!


February 2020 Paper Pumpkin: The Lovely Day

February’s Paper Pumpkin kit is coming, and love is in the air! The Lovely Day kit is versatile, elegant, and the perfect way to help your customers celebrate birthdays and other grand occasions.

  • Kit details: Makes nine cards and envelopes
  • Card size: 4-1/4” x 5-1/2” (10.8 x 14 cm)
  • Envelope size: 4-1/2” x 5-3/4” (11.4 x 14.6 cm)
  • Coordinating Stampin’ Up! colors: Petal Pink, Pool Party, Pretty Peacock, Rich Razzleberry, Rococo Rose, and Old Olive

AND … the February Paper Pumpkin kit coordinates perfectly with the Happy Birthday to You Stamp Set (item 152308), which is available as part of Stampin’ Up!’s Sale-A-Bration promotion. You can get it for FREE by reaching the qualifying purchase amount of $50.

If you’re interested in subscribing to Paper Pumpkin, you can either sign up for a subscription where you are billed monthly for your kit or you can purchase a prepaid subscription in my online store. To see more information and to sign up for the monthly subscription click here. To see the options for prepaid subscriptions in my online store, click here.

As a bonus during Sale-A-Bration, purchasing a 3-month or longer prepaid subscription qualifies for FREE Sale-A-Bration products!

Sign up deadline for the February 2020 kit is February 10, 2020.


January 16 – 31 Host Code: EFVWTZUQ

Use this host code when you order $50+ and receive a free gift from me!  If your order is over $150, please do not use this code, but you’ll still get the free gift.  The free gift is your choice of any item valued up to $10.00 in the 2018-19 Annual Catalog or in the 2019 Occasions Catalog!  That includes some of the Host Exclusive stamp sets!

If your order is over $150, please do not use the host code since you’ll receive your own Host Dollars plus I’ll send you the free gift!  This host code can be used by anyone, no club or commitment required.  Let me know if you have any questions.


If you need any stamping supplies, I’d be very happy to be your Demonstrator.  Just click on the Shop Now button on the right side of the screen to go directly to my online store or contact me if you have any questions.  Happy Stamping!

Thanks for stopping by and have a great week!

Akiko

  • Visit my online store here
  • See the current Stampin’ Up! clearance rack specials here
  • Earn FREE Stampin’ Up! products through my Wildflower Frequent Shopper Program – my way of saying thank you to my online frequent shopper customers.
  • Have any questions? I’d be happy to help, click here to contact me.

Stampin’ Up! products used in this project:


Stampin’ Up! December Paper Pumpkin Kit – Something for Everything

Good Morning! Today I am sharing another Paper Pumpkin Kit video that I did yesterday during my Sunday Facebook Live session. This is a wonderful Paper Pumpkin kit that has lots of short sentiments for different occasions in a large typewriter style font – so it’s great to use for masculine cards as well.

These are the cards that I have made with the kit so far. I have only used a few of the sentiments so far.

Here’s the Facebook Live video where I put together some of my cards:

I also posted the video to my YouTube channel and you can view it here.

I basically made one of each card pretty much following the main instructions. I did not go wild with creating something completely different because the cards in the kit are pretty nice as designed.

Plus the elements in the kit can be mixed up with each other nicely – and there are lots of extra pieces for making additional coordinating cards. I did choose to stamp some of the sentiments in Shaded Spruce ink which I had in my stash and I used some Grapefruit Grove twine from the Nature’s twine pack on one of my samples.

If you’d like to see the video that Paper Pumpkin put together to show how to make the Something For Everything kit, you can view it here. And here are some alternatives that Paper Pumpkin put together:

And did you know that you can download stamp case inserts for your Paper Pumpkin kits? Check them out at the bottom of the page here. I think these sentiments are going to be used over and over, so I will download the case insert and store them in their own case with the rest of my Stampin’ Up! stamps.

If you’re interested in subscribing to Paper Pumpkin, you can either sign up for a subscription where you are billed monthly for your kit or you can purchase a prepaid subscription in my online store. To see more information and to sign up for the monthly subscription click here. To see the options for prepaid subscriptions in my online store, click here.


This image has an empty alt attribute; its file name is 12-01-19_header_paperpumpkin_dec_na.jpg

January 2020 Paper Pumpkin: I’ll Bee Yours

Paper Pumpkin’s first kit of 2020 is all about L-O-V-E. Whether you want handmade favors for Valentine’s Day, a bridal shower, or a remarkably romantic wedding, this month’s kit has everything you need to help you celebrate your favorite friendships and love stories. So make it a “LOVE”-ly year with Paper Pumpkin!

  • Kit details: Makes 20 treat bags + 10 mini cards and envelopes
  • Card size: 3″ x 3″
  • Envelope size: 3 1/8″ x 3 1/8″
  • Coordinating colors: Crushed Curry, Highland Heather, Mint Macaron, and Rococo Rose

Sign up deadline for the January 2020 kit is January 10, 2020.


December 16 – 31 Host Code: A99JPHA3

January 1 – 15 Host Code: FB6MBVE3

Use this host code when you order $50+ and receive a free gift from me!  If your order is over $150, please do not use this code, but you’ll still get the free gift.  The free gift is your choice of any item valued up to $10.00 in the 2018-19 Annual Catalog or in the 2019 Occasions Catalog!  That includes some of the Host Exclusive stamp sets!

If your order is over $150, please do not use the host code since you’ll receive your own Host Dollars plus I’ll send you the free gift!  This host code can be used by anyone, no club or commitment required.  Let me know if you have any questions.


If you need any stamping supplies, I’d be very happy to be your Demonstrator.  Just click on the Shop Now button on the right side of the screen to go directly to my online store or contact me if you have any questions.  Happy Stamping!

Thanks for stopping by and have a great week!

Akiko

  • Visit my online store here
  • See the current Stampin’ Up! clearance rack specials here
  • Earn FREE Stampin’ Up! products through my Wildflower Frequent Shopper Program – my way of saying thank you to my online frequent shopper customers.
  • Have any questions? I’d be happy to help, click here to contact me.

Stampin’ Up! products used in this project: