Stampin’ Up! So Sincere for the Happy Inkin’ Thursday Blog Hop

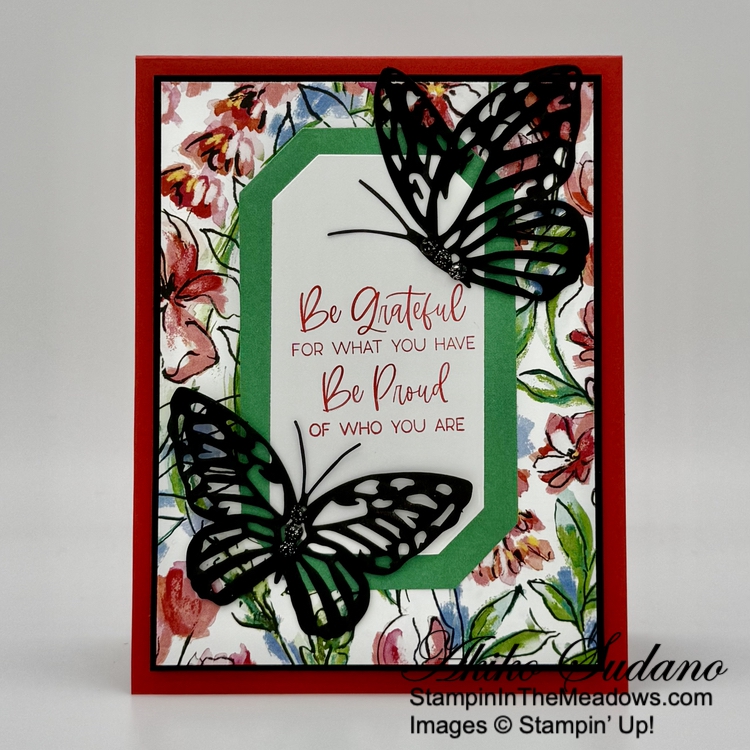
Good Morning and welcome to the Happy Inkin’ Thursday Blog Hop! The Stampin’ Up! So Sincere stamp set from the current Annual Catalog is filled with wonderful sentiments. I picked an inspirational one and paired it with the beautiful new Mixed Media Florals designer series paper and the paper butterfly cutouts for today’s card. You can find the supplies I used along with card stock cuts at the bottom of my post.

We have a fun theme challenge this week:

I adhered a panel of Mixed Media Florals designer series paper to a Basic Black mat and popped it on the front of a Poppy Parade card base with dimensionals.

I stamped the sentiment from the Stampin’ Up! So Sincere stamp set using Poppy Parade ink on Basic White and cut it out with the Countryside Corners die. I cut a Garden Green panel of the DSP with the next largest size Countryside Corners die and adhered the stamped die cut on top. I adhered the layered die cuts to the card with liquid glue.

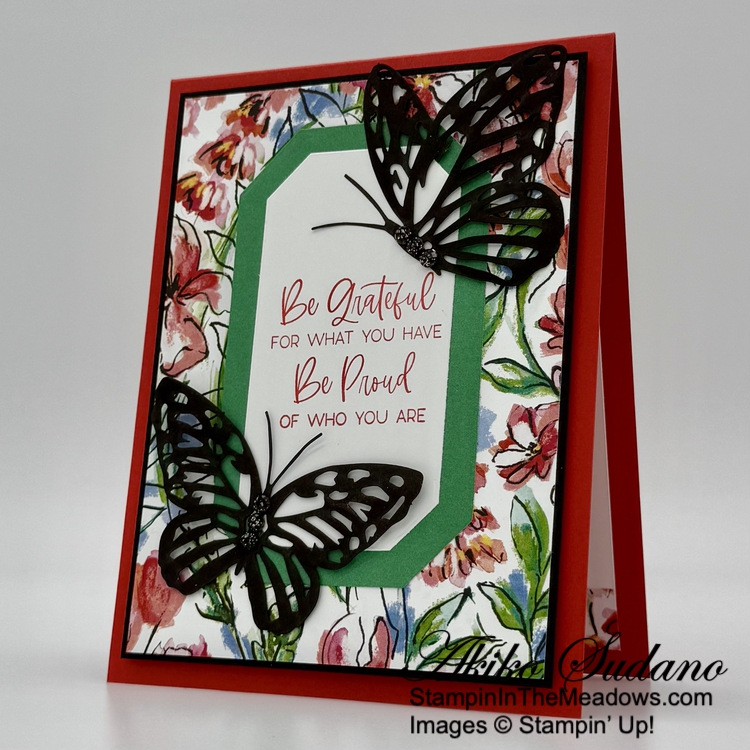
I colored two of the paper butterfly cutouts Basic Black. In order to get an intense color, I used the dark Stampin’ Blend and then use the Stampin’ Write marker over it. I found that it wasn’t intense enough with just one. Also I colored the back sides of the butterflies. I adhered them to the card with glue dots applied to the butterfly bodies and finished the butterflies with black sparkle gems.

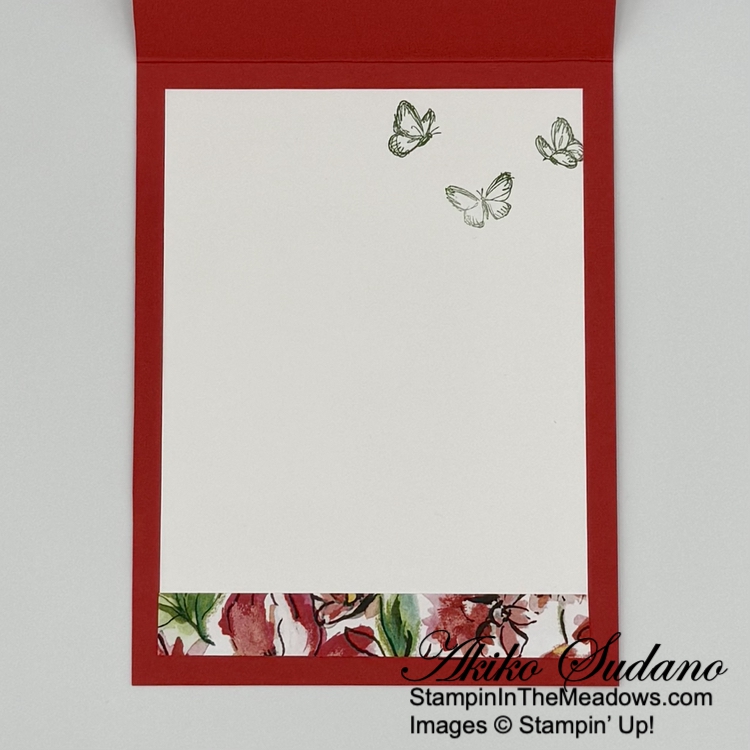
For the inside, I stamped the small butterflies from the Sketched butterflies stamp set using Garden Green ink on Basic White I trimmed the bottom with DSP and adhered the panel to the inside of the card with Stampin’ Seal.

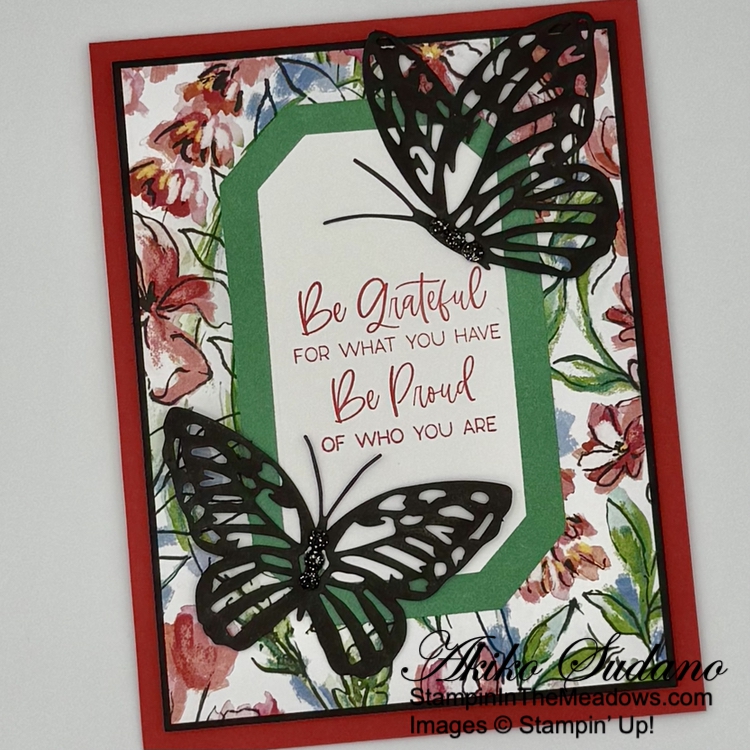
The Mixed Media Florals designer series paper is full of bold, pretty colors that make wonderful cards. The sentiments from the Stampin’ Up! So Sincere stamp set are perfect for many occasions and go well with this pretty DSP. And I just love these versatile paper butterflies!

On with the Hop! Click on the Next Blog button to move forward to see the beautiful project Karen Ksenzakovic has created.

If you get lost along the way, here are the participants for the hop:


Current Host Code: FYMGA4AN

Use this host code when you order $50 or more and receive a free gift from me!  The free gift is your choice of any item currently available valued up to $10.00!

If your order is over $150, please do not use the host code since you’ll receive your own Host Dollars plus I’ll still send you the free gift!  This host code can be used by anyone, no club or commitment required. Let me know if you have any questions.


If you need any stamping supplies, I’d be very happy to be your Demonstrator.  Just click on the Shop Now button on the right side of the screen to go directly to my online store or contact me if you have any questions. 

Thanks for stopping by and Happy Stamping!

Akiko

  • Visit my online store here
  • See the current Stampin’ Up! Last Chance items here
  • Earn FREE Stampin’ Up! products through my Wildflower Frequent Shopper Program – my way of saying thank you to my online frequent shopper customers.
  • Have any questions? I’d be happy to help, click here to contact me.

Cardstock Cuts for this project:

  • Poppy Parade – 4-1/4″ x 11″ card base, scored at 5-1/2″
  • Basic Black – 3-7/8″ x 5-1/8″ (DSP mat)
  • Basic White – 3-3/4″ x 5″ (inside panel), 2-1/4″ x 3-3/4″ (small die cut hexagon)
  • Mixed Media Florals DSP – 3-3/4″ x 5″ (front background), 2-3/4″ x 4-1/4″ (large die cut hexagon), 1/2″ x 3-3/4″ (inside trim)
  • Two paper butterfly accents

Stampin’ Up! products used in this project:

Stampin’ Up! Simply Said Hello Card

Good Morning! Here’s a simple hello card made with the Stampin’ Up! Simply Said stamp set, featuring the pretty Perennial Lavender designer series paper and the pretty Painted Lavender dies from the current annual catalog. You can find the products I used at the bottom of my post along with the card stock sizes.

My design was inspired by the current challenge in Freshly Made Sketches #673:

I stamped the sentiment from the Stampin’ Up! Simply Said stamp set using Gorgeous Grape ink on the front of a Fresh Freesia card base. This stamp set has several simple sentiments that go well with many different designs for any occasion.

I cut a panel of Perennial Lavender designer series paper with the largest circle die from the Stylish Shapes dies. I traced the outline of the die on Gorgeous Grape card stock and fussy cut the circle for a perfect mat. I adhered the DSP to the mat with liquid glue and adhered them both to the card front.

I cut the leaf sprig from the Painted Lavender dies from Lost Lagoon and the double flower stems from Gorgeous Grape. I adhered the leaves and one of the flowers to the card with glue dots. I finished with Purple shimmer gems and a length of white ribbon tied in a knot.

For the inside panel, I left it simple, just trimming the side of a Basic White panel with DSP and adhering the panel to the inside of the card with Stampin’ Seal. This leaves plenty of room for a personal message.

The Stampin’ Up! Simply Said stamp set is my go to stamp set for a simple front of card sentiment. And the Challenge inspired me to pull out and use some old favorites – the pretty Perennial Lavender designer series paper and Painted Lavender stamp and dies.


Sale-A-Bration Is Going On Now!!

Sale-A-Bration is the biggest Stampin’ Up! promotion of the year. The best part of Sale-A-Bration is that you earn FREE items for every $60 worth of products you purchase. There are items that you get for $60 and there are items you can get for $120. All the details are in the Sale-A-Bration Brochure. Click on the picture of the brochure below to download a copy to view the items and details.

Another benefit of Sale-A-Bration is when you host a workshop with sales over $300 or have an individual order over $300, you get to choose an additional $30 worth of products from the Stampin’ Up! catalog or Online Store for FREE!

And Sale-A-Bration is the best time to join Stampin’ Up! as a new Demonstrator. During Sale-A-Bration, new Demonstrators who purchase a starter kit by choosing $125 worth of products for only $99 (includes shipping) have two FREE bonus options to add to your starter kit.

  • Option 1: Your choice of TWO marker sets from our Stampin’ Write Marker Assortments (Brights, Neutrals, Regals, Subtles), PLUS the Handmade Designs stamp set, a beautiful stamp set exclusively designed to work with them.
  • Option 2: Your Choice of an additional $30 in FREE products

Sale-A-Bration runs through February 28, 2025. Visit my Online Store to start shopping now.


Current Host Code: FYMGA4AN

Use this host code when you order $50 or more and receive a Thank You gift from me!  The free gift is your choice of any item currently available valued up to $10.00.

If your order is over $150, please do not use the host code since you’ll receive your own Host Dollars plus I’ll still send you the Thank You gift!  This host code can be used by anyone, no club or commitment required. Let me know if you have any questions.


If you need any stamping supplies, I’d be very happy to be your Demonstrator.  Just click on the Shop Now Button on the right side of the screen to go directly to my Online store or contact me if you have any questions.  Happy Stamping!

Thanks for stopping by and have a great day!

Akiko

  • Visit my online store here
  • See the current Stampin’ Up! Last Chance items here
  • Earn FREE Stampin’ Up! products through my Wildflower Frequent Shopper Program – my way of saying thank you to my online frequent shopper customers.
  • Have any questions? I’d be happy to help, click here to contact me.

Cardstock Cuts for this project:

  • Fresh Freesia – 5-1/2″ x 8-1/2″ card base, scored at 4-1/4″
  • Gorgeous Grape – 1″ x 4-1/2″ (die cut flower), 3-1/2″ x 3-1/2″ (fussy cut circle mat)
  • Lost Lagoon – 1-1/2″ x 4″ (die cut leaves
  • Basic White – 3-3/4″ x 5″ (inside panel)
  • Perennial Lavender DSP – 3-1/4″ x 3-1/4″ (die cut circle), 3/4″ x 3-3/4″ (inside trim)

Stampin’ Up! products used in this project:


Stampin’ Up! Meant To Bee Valentine’s Day Card

Happy Valentine’s Day! The Stampin’ Up! Meant To Bee bundle is from the new Scrapbooking Brochure and it coordinates with the fun Bee My Valentine stamp set and punch from last year. I used both of them for today’s card along with the new Cute As Can Be designer series paper. You can find the products I used at the bottom of my post along with the card stock sizes.

I adhered a strip of Cute As Can Be DSP to another panel of the DSP and then adhered the layered panel to the front of a Petunia Pop card base. I used the small octagon die from the Stampin’ Up! Meant To Bee bundle to cut a Petunia Pop panel and a plaid DSP panel and adhered them to the card with liquid glue – the DSP in the middle with the card stock around it.

I stamped the large bee from the Stampin’ Up! Meant To Bee stamp set using Daffodil Delight and Memento Tuxedo Black inks and cut it out with the coordinating die. I stamped the bee from the Stampin’ Up! Bee My Valentine stamp set in the same colors and punched it out with the coordinating punch. Between the two stamp sets, you can create three different sized bees!

I stamped the bee faces and antenna for both bees using the stamps from the Stampin’ Up! Meant To Bee stamp set in Memento Tuxedo black ink. I stamped the wings (I used the small wings) using Pool Party. I cut the antenna and wings out with the coordinating dies and adhered them to the back of the bees with liquid glue. I adhered the bees to the front of the card with dimensionals and finished it with Petunia Pop dots.

For the inside panel, I stamped the sentiment from the Bee My Valentine stamp set using Old Olive ink and the little hearts in Bubble Bath. I trimmed the side with DSP and adhered the panel to the inside of the card with Stampin’ Seal.

The Stampin’ Up! Meant To Bee bundle has a great set of nested octagon dies and sentiments that are wonderful for memory keeping and scrapbooking. Everything can be used for card making too and I love how it coordinates with last year’s Bee My Valentine bundle. The Cute As Can Bee DSP designs are the same as last years with the fresh new colors. And I love how it all coordinates for Valentines Day and Spring!


Sale-A-Bration Is Going On Now!!

Sale-A-Bration is the biggest Stampin’ Up! promotion of the year. The best part of Sale-A-Bration is that you earn FREE items for every $60 worth of products you purchase. There are items that you get for $60 and there are items you can get for $120. All the details are in the Sale-A-Bration Brochure. Click on the picture of the brochure below to download a copy to view the items and details.

Another benefit of Sale-A-Bration is when you host a workshop with sales over $300 or have an individual order over $300, you get to choose an additional $30 worth of products from the Stampin’ Up! catalog or Online Store for FREE!

And Sale-A-Bration is the best time to join Stampin’ Up! as a new Demonstrator. During Sale-A-Bration, new Demonstrators who purchase a starter kit by choosing $125 worth of products for only $99 (includes shipping) have two FREE bonus options to add to your starter kit.

  • Option 1: Your choice of TWO marker sets from our Stampin’ Write Marker Assortments (Brights, Neutrals, Regals, Subtles), PLUS the Handmade Designs stamp set, a beautiful stamp set exclusively designed to work with them.
  • Option 2: Your Choice of an additional $30 in FREE products

Sale-A-Bration runs through February 28, 2025. Visit my Online Store to start shopping now.


Current Host Code: FYMGA4AN

Use this host code when you order $50 or more and receive a Thank You gift from me!  The free gift is your choice of any item currently available valued up to $10.00.

If your order is over $150, please do not use the host code since you’ll receive your own Host Dollars plus I’ll still send you the Thank You gift!  This host code can be used by anyone, no club or commitment required. Let me know if you have any questions.


If you need any stamping supplies, I’d be very happy to be your Demonstrator.  Just click on the Shop Now Button on the right side of the screen to go directly to my Online store or contact me if you have any questions.  Happy Stamping!

Thanks for stopping by and have a great day!

Akiko

  • Visit my online store here
  • See the current Stampin’ Up! Last Chance items here
  • Earn FREE Stampin’ Up! products through my Wildflower Frequent Shopper Program – my way of saying thank you to my online frequent shopper customers.
  • Have any questions? I’d be happy to help, click here to contact me.

Cardstock Cuts for this project:

  • Petunia Pop – 5-1/2″ x 8-1/2″ card base, scored at 4-1/4″, 3-1/4″ x 3-1/4″ (octagon frame)
  • Basic White – 3-3/4″ x 5″ (inside panel), 3″ x 3″ (bees), 1-1/2″ x 4″ (bee wings), 1″ x 2″ (bee antennae)
  • Cute As Can Bee DSP – 3-3/4″ x 5″ (front background), two 1″ x 3-3/4″ strips (inside trim and front strip), 3″ x 3″ (plaid octagon)

Stampin’ Up! products used in this project:


Stampin’ Up! Penciled Pear CAS Note Card

Good Morning! I’m heading back to Pennsylvania today so I’ve been busy cleaning and packing and only had time for a simple card using the Stampin’ Up! Penciled Pear stamp set. This is a clean and simple (CAS) card with only stamped images! You can find the products I used at the bottom of my post along with the card stock sizes.

I stamped the large pear from the Stampin’ Up! Penciled Pear stamp set using Pecan Pie ink on the front of a Basic Beige card base. I stamped the sentiment next to the pear, also using Pecan Pie ink. And that’s it! No embellishments, die cuts or designer series paper.

I left the inside of the card blank and didn’t even add a white panel. The Basic Beige card stock is light enough to write a personal message on and sturdy enough to make a nice card. This was quick and easy, but I did take care to position the pear and sentiment.

Card making doesn’t always have to be complex, and a simple stamped design using a beautiful stamp can be all you need – like this large pear from the Stampin’ Up! Penciled Pear stamp set. The cling stamp does a nice job with the pen and ink design of the pear Next time, I’ll make it a little fussier.


Sale-A-Bration Is Going On Now!!

Sale-A-Bration is the biggest Stampin’ Up! promotion of the year. The best part of Sale-A-Bration is that you earn FREE items for every $60 worth of products you purchase. There are items that you get for $60 and there are items you can get for $120. All the details are in the Sale-A-Bration Brochure. Click on the picture of the brochure below to download a copy to view the items and details.

Another benefit of Sale-A-Bration is when you host a workshop with sales over $300 or have an individual order over $300, you get to choose an additional $30 worth of products from the Stampin’ Up! catalog or Online Store for FREE!

And Sale-A-Bration is the best time to join Stampin’ Up! as a new Demonstrator. During Sale-A-Bration, new Demonstrators who purchase a starter kit by choosing $125 worth of products for only $99 (includes shipping) have two FREE bonus options to add to your starter kit.

  • Option 1: Your choice of TWO marker sets from our Stampin’ Write Marker Assortments (Brights, Neutrals, Regals, Subtles), PLUS the Handmade Designs stamp set, a beautiful stamp set exclusively designed to work with them.
  • Option 2: Your Choice of an additional $30 in FREE products

Sale-A-Bration runs through February 28, 2025. Visit my Online Store to start shopping now.


The February 2025 Paper Pumpkin Kit is Hello Spring!

Say goodbye to chilly days and let a little sunshine in with the Hello Spring Paper Pumpkin Kit! This kit comes with all the components to create cheerful, garden-inspired cards, including printed card bases, precut paper pieces featuring lush green herbs, bronze foil for an eye-catching sheen, and earthy linen thread. Seed packet envelopes bring a special touch of botanical whimsy. These handmade cards are sure to delight gardening enthusiasts and anyone with a green thumb!

Details:

  • Makes 9 cards: 3 each of 3 designs
  • Precut pieces with bronze foil
  • Unique spring-themed envelopes
  • Petunia Pop Classic Stampin’ Spot

Coordinating Colors:  Basic Beige, Bubble Bath, Lemon Lime Twist, Lost Lagoon, Old Olive, Petunia Pop

And the coordinating add-on is the Spring is in the Air dies – item #166237 for $12 (available while supplies last).

If you’re interested in subscribing to Paper Pumpkin, you can either sign up for a subscription where you are billed monthly for your kit or you can purchase a prepaid subscription in my Online Store. To see more information and to sign up for the monthly subscription click here. To see the options for prepaid subscriptions in my Online Store, click here.

Sign up deadline for the February 2025 kit is February 10, 2025. Note: Supplies may be limited toward the end of the subscription period.


Current Host Code: FYMGA4AN

Use this host code when you order $50 or more and receive a Thank You gift from me!  The free gift is your choice of any item currently available valued up to $10.00.

If your order is over $150, please do not use the host code since you’ll receive your own Host Dollars plus I’ll still send you the Thank You gift!  This host code can be used by anyone, no club or commitment required. Let me know if you have any questions.


If you need any stamping supplies, I’d be very happy to be your Demonstrator.  Just click on the Shop Now Button on the right side of the screen to go directly to my Online store or contact me if you have any questions.  Happy Stamping!

Thanks for stopping by and have a great day!

Akiko

  • Visit my online store here
  • See the current Stampin’ Up! Last Chance items here
  • Earn FREE Stampin’ Up! products through my Wildflower Frequent Shopper Program – my way of saying thank you to my online frequent shopper customers.
  • Have any questions? I’d be happy to help, click here to contact me.

Cardstock Cuts for this project:

  • Basic Beige –5-1/2″ x 8-1/2 card base, scored at 4-1/4″

Stampin’ Up! products used in this project:


Stampin’ Up! Memorable Blooms You Are Awesome Card

Good Morning! I just received the beautiful Stampin’ Up! Memorable Blooms bundle and I just had to use it. I combined the bundle with the Unbounded Beauty designer series paper from the current Annual Catalog to kind of combine the old with the new and I hope you like the results. You can find the products I used at the bottom of my post along with the card stock sizes.

I embossed panel of Peach Pie Unbounded Beauty designer series paper with the Eyelet 3D embossing folder and adhered it to the front of a Peach Pie card base with liquid glue. I cut Peach Pie card stock with the nested floral frames dies from the Stampin’ Up! Memorable Blooms dies. This is a very detailed die, so I had to use a card stock shim and run it through my cut & emboss machine several times to get a good cut (this die cutting machine has lighter pressure than my other one). I adhered the die cut frame to my card with liquid glue applied to the frame and larger sections of the die cut flowers.

I cut the leaf sprig from the Stampin’ Up! Memorable Blooms dies from Shy Shamrock Unbounded Beauty DSP. I trimmed the bottom to make it shorter and trimmed it again to look like the top of another sprig. I adhered the die cuts to the card with glue dots. I stamped the small flowers from the Stampin’ Up! Memorable Blooms stamp set using Memento Tuxedo Black ink on Basic White. I colored it with light Peach Pie and Shy Shamrock Stampin’ Blends. I used the dark Peach Pie Stampin’ Blend to highlight the center dots.

I stamped the sentiment from the Stampin’ Up! Memorable Blooms stamp set using Memento Tuxedo Black ink on Basic white and cut it out with the short fat banner die from the Stylish Shapes die. I adhered it to the card with glue dots and popped the flowers on top with dimensionals. I finished with Shy Shamrock shimmer gems and ribbon.

For the inside panel, I stamped the small flower from the Stampin’ Up! Memorable Blooms stamp set using stamped off Peach Pie ink on a Basic White panel. I trimmed the bottom with embossed DSP and adhered the panel to the inside of the card with Stampin’ Seal.

Isn’t the frame from the Stampin’ Up! Memorable Blooms bundle just gorgeous!! There are two dies that make up the frame and the outer die cuts a pattern along the outside so you can make a fancy octagonal opening for a peek-a-boo effect. The flowers are pretty and the sentiments are pretty great too!


Sale-A-Bration Is Going On Now!!

Sale-A-Bration is the biggest Stampin’ Up! promotion of the year. The best part of Sale-A-Bration is that you earn FREE items for every $60 worth of products you purchase. There are items that you get for $60 and there are items you can get for $120. All the details are in the Sale-A-Bration Brochure. Click on the picture of the brochure below to download a copy to view the items and details.

Another benefit of Sale-A-Bration is when you host a workshop with sales over $300 or have an individual order over $300, you get to choose an additional $30 worth of products from the Stampin’ Up! catalog or Online Store for FREE!

And Sale-A-Bration is the best time to join Stampin’ Up! as a new Demonstrator. During Sale-A-Bration, new Demonstrators who purchase a starter kit by choosing $125 worth of products for only $99 (includes shipping) have two FREE bonus options to add to your starter kit.

  • Option 1: Your choice of TWO marker sets from our Stampin’ Write Marker Assortments (Brights, Neutrals, Regals, Subtles), PLUS the Handmade Designs stamp set, a beautiful stamp set exclusively designed to work with them.
  • Option 2: Your Choice of an additional $30 in FREE products

Sale-A-Bration runs through February 28, 2025. Visit my Online Store to start shopping now.


The February 2025 Paper Pumpkin Kit is Hello Spring!

Say goodbye to chilly days and let a little sunshine in with the Hello Spring Paper Pumpkin Kit! This kit comes with all the components to create cheerful, garden-inspired cards, including printed card bases, precut paper pieces featuring lush green herbs, bronze foil for an eye-catching sheen, and earthy linen thread. Seed packet envelopes bring a special touch of botanical whimsy. These handmade cards are sure to delight gardening enthusiasts and anyone with a green thumb!

Details:

  • Makes 9 cards: 3 each of 3 designs
  • Precut pieces with bronze foil
  • Unique spring-themed envelopes
  • Petunia Pop Classic Stampin’ Spot

Coordinating Colors:  Basic Beige, Bubble Bath, Lemon Lime Twist, Lost Lagoon, Old Olive, Petunia Pop

And the coordinating add-on is the Spring is in the Air dies – item #166237 for $12 (available while supplies last).

If you’re interested in subscribing to Paper Pumpkin, you can either sign up for a subscription where you are billed monthly for your kit or you can purchase a prepaid subscription in my Online Store. To see more information and to sign up for the monthly subscription click here. To see the options for prepaid subscriptions in my Online Store, click here.

Sign up deadline for the February 2025 kit is February 10, 2025. Note: Supplies may be limited toward the end of the subscription period.


Current Host Code: FYMGA4AN

Use this host code when you order $50 or more and receive a Thank You gift from me!  The free gift is your choice of any item currently available valued up to $10.00.

If your order is over $150, please do not use the host code since you’ll receive your own Host Dollars plus I’ll still send you the Thank You gift!  This host code can be used by anyone, no club or commitment required. Let me know if you have any questions.


If you need any stamping supplies, I’d be very happy to be your Demonstrator.  Just click on the Shop Now Button on the right side of the screen to go directly to my Online store or contact me if you have any questions.  Happy Stamping!

Thanks for stopping by and have a great day!

Akiko

  • Visit my online store here
  • See the current Stampin’ Up! Last Chance items here
  • Earn FREE Stampin’ Up! products through my Wildflower Frequent Shopper Program – my way of saying thank you to my online frequent shopper customers.
  • Have any questions? I’d be happy to help, click here to contact me.

Cardstock Cuts for this project:

  • Peach Pie –4-1/4″ x 11″ card base, scored at 5-1/2″, 3-3/4″ x 3-3/4″ (die cut frame)
  • Basic White – 3-3/4″ x 5″ (inside panel), 1-1/4″ x 3″ (label), 2″ x 2″ (flowers)
  • Unbounded Beauty DSP – 4″ x 5-1/4″ (embossed background), 1/2″ x 3-3/4″ (inside trim)

Stampin’ Up! products used in this project:


Stampin’ Up! Sparkling Snowflakes Card for the Happy Inkin’ Thursday Blog Hop

Good Morning and welcome to the Happy Inkin’ Thursday Blog Hop! The Stampin’ Up! Sparkling Snowflakes stamp set has the prettiest, most detailed snowflake images and I used it with the Snowflake Sly 3D embossing folder to make a snowy background for today’s card. You can find the supplies I used along with card stock cuts at the bottom of my post.

We have a theme challenge this week:

I stamped the snowflakes from the Stampin’ Up! Sparkling Snowflakes stamp set using Night of Navy, Balmy Blue and Pool Party inks all over a Basic White panel. I embossed the panel with the Snowflake Sky 3D embossing folder and adhered it to a Night of Navy mat.

I wrapped the layered panel with the retired Starry Sky metallic ribbon and made a bow. This pretty ribbon is on the Last Chance Products list at a wonderful discount and the metallic shine goes perfect with the sparkle theme for my card. I adhered the wrapped panel to the front of a Balmy Blue card base with liquid glue. I stamped the sentiment from the Stampin’ Up! Sparkling Snowflakes stamp set using Night of Navy Ink on Pool Party card stock. I cut it out with the Autumn Leaves label die and adhered it to the card with dimensionals.

I cut the large snowflake from the One of A Kind dies and three of the small snowflakes from the Snowy Wonder dies using white glimmer paper. I adhered a small die cut snowflake to the label and two more to the front background with liquid glue. I finished the die cut snowflakes with rhinestone gems.

For the inside panel, I stamped the snowflakes from the Stampin’ Up! Sparkling Snowflakes stamp set using Night of Navy, Balmy Blue and Pool Party inks. I embossed the panel with the Snowflake Sky 3D embossing folder and adhered it to the bottom of a Basic White panel. I adhered the last little die cut snowflake to the corner and adhered the panel to the inside of the card with Stampin’ Seal.

In addition to the pretty snowflakes, the Stampin’ Up! Sparkling Snowflakes stamp set has pretty sentiments that go well with any snowflake set to bring heartwarming cheer to cold snowy days. Stay warm!

On with the Hop! Click on the Next Blog button to move forward to see the beautiful project Karen Ksenzakovic has created.

If you get lost along the way, here are the participants for the hop:


Current Host Code: VT29C2UC

Use this host code when you order $50 or more and receive a free gift from me!  The free gift is your choice of any item currently available valued up to $10.00!

If your order is over $150, please do not use the host code since you’ll receive your own Host Dollars plus I’ll still send you the free gift!  This host code can be used by anyone, no club or commitment required. Let me know if you have any questions.


If you need any stamping supplies, I’d be very happy to be your Demonstrator.  Just click on the Shop Now button on the right side of the screen to go directly to my online store or contact me if you have any questions. 

Thanks for stopping by and Happy Stamping!

Akiko

  • Visit my online store here
  • See the current Stampin’ Up! Last Chance items here
  • Earn FREE Stampin’ Up! products through my Wildflower Frequent Shopper Program – my way of saying thank you to my online frequent shopper customers.
  • Have any questions? I’d be happy to help, click here to contact me.

Cardstock Cuts for this project:

  • Balmy Blue – 4-1/4″ x 11″ card base, scored at 5-1/2″
  • Night of Navy – 3-7/8″ x 5-1/8″ (front mat)
  • Pool Party – 1-1/4″ x 2-3/4″ (label)
  • White Glimmer – 3/4″ x 2-1/2″ (small die cut snowflakes), 1-1/2″ x 1-3/4″ (large die cut snowflake)
  • Basic White – two 3-3/4″ x 5″ panels (front background and inside panel), 1/2″ x 3-3/4″ (inside trim)

Stampin’ Up! products used in this project:


Stampin’ Up! Terrific Toadstools Sneak Peek

Good Morning! The new January – April 2025 Mini Catalog is coming out on January 7, 2025 and I’ve got a sneak peek of a bun new bundle – the Stampin’ Up! Terrific Toadstools bundle. Sale-A-Bration will also start on January 7, and there’s a 6″ x 6″ designer series paper pack called Toadstool Gardens that coordinates with the new bundle. I’ve used both of them for today’s sneak peek card. You can find the currently avaliable supplies I used along with card stock cuts at the bottom of my post.

I adhered a strip of Toadstool Gardens 6″ x 6″ DSP to the side of a sweet garden background panel of the DSP with liquid glue and adhered them both to the front of a Pumpkin Pie card base. On a Basic White panel, I stamped the ground from the Stampin’ Up! Terrific Toadstools stamp set using Granny Apple Green ink. I used a Blending Brush to apply Pool Party ink to the sky.

I stamped the little mushrooms to the panel using Smoky Slate, Basic Beige, Peach Pie and Fresh Freesia inks and cut it out using a circle die from the Stylish Shapes dies. I stamped the large mushroom cap using Real Red ink on Basic Beige and punched it out using the Stampin’ Up! Terrific Toadstools punch. I punched the stem from Basic Beige and adhered them together with liquid glue.

I stamped the sentiment from the Stampin’ Up! Terrific Toadstools stamp set using Melon Mambo ink on Basic White and cut it out with a die from the Unbounded Love dies. I popped the die cut circle on the card with dimensionals and adhered the label with dimensionals and a glue dot. I adhered the large mushroom with dimensionals and finished the card with shiny sequins.

For the inside of the card, I stamped the leaf from the Stampin’ Up! Terrific Toadstools stamp set using Garden Green ink. I trimmed the bottom of the panel with DSP and adhered the panel to the inside of the card with Stampin’ Seal.

Here is the Stampin’ Up! Terrific Toadstools bundle with all the fun mushroom stamps and cute sentiments. Note that the punch cuts inside the stamped images, so that you won’t have white borders.

Isn’t it such a whimsical, fun set? The Stampin’ Up! Terrific Toadstools bundle will be available next month when the January-April 2025 catalog goes live. It will be perfect for crafting fun on cold January Winter days!


Last Chance Products Now Available!

Retiring products for the current September-December 2024 Mini Catalog are now available in the Last Chance Products category in the Online Store.

Stampin’ Up! is making some changes to their product retirement process. They are introducing a new Last Chance Products category in the Online Store today that will include retiring products from the current 2024 September-December Mini Catalog and Online Exclusives items that are being discontinued. The Last Chance Products category is replacing the current Clearance Rack and will be updated every two months.

Here are the details:

  • Last Chance Products include retiring products from both catalogs and online releases, excluding Paper Pumpkin.
  • Last Chance Products are available while supplies last and will be discontinued when they sell out. Items will be automatically removed from the category and the online store when they are discontinued.
  • Discounts vary and are subject to change. Also, depending on inventory, these products may or may not have discounts.
  • The Last Chance Products category will be updated every other month. Updates happen at the beginning of the month and may include additional products in the category and any adjustments to product discounts.

This change aligns with Stampin’ Up!’s product release strategy of new Online Exclusives every two months and unifies the retirement process for Online Exclusive and Catalog products. The goal is to keep product offerings fresh, trendy and exciting for Stampin’ Up! customers.

If you have any questions, let me know.


FREE Shipping on orders of $75+ December 9-11!

Yay!!  Stampin’ Up! is offering FREE shipping on orders of $75+ from December 9-11!!  Here are the details:

  • All order types qualify for this promotion.
  • Free shipping is for three days only. Orders must be opened and closed during December 9–11.
  • Free shipping automatically applies to your cart after the qualifying amount has been met, which is $75 .
  • Orders must meet the qualifying amount to be eligible for free shipping.
  • The additional cost for expedited shipping is not covered by this promotion.
  • Prepaid 3-, 6-, or 12-month Paper Pumpkin subscriptions can contribute to the qualifying amount for free shipping (Month-to-month subscriptions do not qualify). Subscriptions billed and shipped this month will be charged for the normal amount ($24.50 shipping included) + tax .
  • Please keep in mind that due to the high volume of orders and the Christmas season, the distribution center may fall behind our typical shipping timeframes. Stampin’ Up! will do all they can to return to our regular service levels as quickly as possible.  Any orders placed during this promotion are not guaranteed to arrive before or by December 25.  If you need an order by Christmas, order as early as possible or consider expedited shipping.

Get your wish lists ready and get your orders placed between December 9-11!! 


New January-April 2025 Mini Catalog and Sale-A-Bration Coming January 7, 2025!

I’ve shipped copies of the new January-April 2025 Mini Catalog and Sale-A-Bration Brochure to my customers, so if you’ve ordered from me within the last year, your new catalogs should be arriving soon! I’ve also placed my Demonstrator pre-order and started using the new items, so be on the look out for sneak peeks from me and other Stampin’ Up! Demonstrators.

January 7, 2025 is the big day!! In addition to Sale-A-Bration and the new Mini Catalog, a new selection of Online Exclusives will be available for even more exciting new products. And scrapbooking crafters will be treated to a new Scrapbooking Brochure.


Current Host Code: VT29C2UC

Use this host code when you order $50 or more and receive a Thank You gift from me!  The free gift is your choice of any item currently available valued up to $10.00.

If your order is over $150, please do not use the host code since you’ll receive your own Host Dollars plus I’ll still send you the Thank You gift!  This host code can be used by anyone, no club or commitment required. Let me know if you have any questions.


If you need any stamping supplies, I’d be very happy to be your Demonstrator.  Just click on the Shop Now Button on the right side of the screen to go directly to my Online store or contact me if you have any questions.  Happy Stamping!

Thanks for stopping by and have a great day!

Akiko

  • Visit my online store here
  • See the current Stampin’ Up! Last Chance items here
  • Earn FREE Stampin’ Up! products through my Wildflower Frequent Shopper Program – my way of saying thank you to my online frequent shopper customers.
  • Have any questions? I’d be happy to help, click here to contact me.

Cardstock Cuts for this project:

  • Pumpkin Pie – 4-1/4″ x 11″ card base, scored at 5-1/2″
  • Basic Beige – 1/2″ x 2″ (mushroom stem), 1-1/4″ x 2-1/2″ (mushroom cap)
  • Basic White – 3-3/4″ x 5″ (inside panel), 2-3/4″ x 2-3/4″ (stamped, die cut circle), 1″ x 3″ (label)
  • Toadstool Gardens 6″ x 6″ DSP – 4″ x 5-1/4″ (front background), 3/4″ x 5-1/4″ (striped accent), 3/4″ x 3-3/4″ (inside trim)

Stampin’ Up! products used in this project:


Stampin’ Up! Winterly Tree Tops for the Happy Inkin’ Thursday Blog Hop

Good Morning and welcome to the Happy Inkin’ Thursday Blog Hop! I used the pretty Stampin’ Up! Winterly Tree Tops stamp set with the sweet Nests of Winter designer series paper to make a simplenThinking of You card today. You can find the supplies I used along with card stock cuts at the bottom of my post.

We have a pretty sketch challenge this week:

I adhered a panel of Nests of Winter designer series paper to the front of a Thick Basic White card base with liquid glue.

I adhered a birdy panel of the DSP to a Shaded Spruce mat and popped it on the card front with dimensionals. I stamped part of the sentiment from the Stampin’ Up! Winterly Tree Tops stamp set using Memento Tuxedo Black ink on a Gray Granite strip and cut it out with the skinny banner die from the Stylish Shapes dies. I popped it on the card with dimensionals.

I made a bow with Gray Granite baker’s twine and adhered it to the label with a glue dot. I finished the card with Cherry Cobbler berries.

For the inside of the card, I stamped the bird from the Stampin’ Up! Winterly Tree Tops stamp set using twice stamped off Gray Granite ink on a Basic White panel. I adhered DSP to the side before adhering the panel to the inside of the card with Stampin’ Seal..

The sentiments in the Stampin’ Up! Winterly Tree Tops stamp set are simple and perfect for use year round. The pretty Nests of Winter DSP are nice for Christmas cards, making the suite perfect for any occasion during the Winter holidays!

On with the Hop! Click on the Next Blog button to move forward to see the beautiful project Karen Ksenzakovic has created.

If you get lost along the way, here are the participants for the hop:


Current Host Code: V3YZAAN7

Use this host code when you order $50 or more and receive a free gift from me!  The free gift is your choice of any item currently available valued up to $10.00!

If your order is over $150, please do not use the host code since you’ll receive your own Host Dollars plus I’ll still send you the free gift!  This host code can be used by anyone, no club or commitment required. Let me know if you have any questions.


If you need any stamping supplies, I’d be very happy to be your Demonstrator.  Just click on the Shop Now button on the right side of the screen to go directly to my online store or contact me if you have any questions. 

Thanks for stopping by and Happy Stamping!

Akiko

  • Visit my online store here
  • See the current Stampin’ Up! clearance rack specials here
  • Earn FREE Stampin’ Up! products through my Wildflower Frequent Shopper Program – my way of saying thank you to my online frequent shopper customers.
  • Have any questions? I’d be happy to help, click here to contact me.

Cardstock Cuts for this project:

  • Thick Basic White – 5-1/2″ x 8-1/2″ card base, scored at 4-1/4″
  • Shaded Spruce – 2-3/4″ x 4″ (DSP mat)
  • Gray Granite – 1″ x 3″ (label)
  • Basic White – 3-3/4″ x 5″ (inside panel)
  • Nests of Winter DSP – 4″ x 5-1/4″ (front background), 2-5/8″ x 4-7/8″ (DSP panel), 3/4″ x 3-3/4″ (inside trim)

Stampin’ Up! products used in this project:


Stampin’ Up! Layering Leaves for the Happy Inkin’ Thursday Blog Hop

Good Morning and welcome to the Happy Inkin’ Thursday Blog Hop! The Stampin’ Up! Layering Leaves stamp set is a pretty returning stamp set with gorgeous sentiments and great leaf and flower images that coordinate with the pretty bough punch. I used them with the wonderful Splendid Autumn 6″ x 6″ designer series paper for a hugs card. You can find the supplies I used along with card stock cuts at the bottom of my post.

We have a pretty color challenge this week:

I embossed a panel of Wild Wheat and adhered it to the front of a Wild Wheat card base with liquid glue. I adhered a panel of Splendid Autumn 6″ x 6″ designer series paper to a Mossy Meadow mat and popped it on the card front with dimensionals.

I stamped two leaf clusters from the Stampin’ Up! Layering Leaves stamp set using Pecan Pie ink on Cajun Craze and punched them out with the Bough Punch. I stamped three flower clusters using Pecan Pie ink on Cherry Cobbler and punched them out. I adhered the leaf and flower clusters to the card with glue dots. I separated strands of 2023-2025 In Color Jute and tied them together before adhering them to the card with a glue dot.

I stamped the sentiment from the Stampin’ Up! Layering Leaves stamp set using Mossy Meadow ink on Basic White and cut it out with the medium die from the Something Fancy Dies. I felt it was too stark, so I lightly applied Wild Wheat ink over the top with a Blending Brush, and it was perfect! I popped it on the card with dimensionals and finished the card with Cajun Craze dots.

For the inside of the card, I stamped the flower and leaf clusters from the Stampin’ Up! Layering Leaves stamp set using Cherry Cobbler and Cajun Craze inks in the corners of a Basic White panel. I ahdered the panel to the inside of the card with Stampin’ Seal..

The Stampin’ Up! Layering Leaves stamp set is a simple and wonderful set that is so versatile! The sentiments are just gorgeous and I love that it coordinates with the Bough Punch!

On with the Hop! Click on the Next Blog button to move forward to see the beautiful project Karen Ksenzakovic has created.

If you get lost along the way, here are the participants for the hop:


Current Host Code: V3YZAAN7

Use this host code when you order $50 or more and receive a free gift from me!  The free gift is your choice of any item currently available valued up to $10.00!

If your order is over $150, please do not use the host code since you’ll receive your own Host Dollars plus I’ll still send you the free gift!  This host code can be used by anyone, no club or commitment required. Let me know if you have any questions.


If you need any stamping supplies, I’d be very happy to be your Demonstrator.  Just click on the Shop Now button on the right side of the screen to go directly to my online store or contact me if you have any questions. 

Thanks for stopping by and Happy Stamping!

Akiko

  • Visit my online store here
  • See the current Stampin’ Up! clearance rack specials here
  • Earn FREE Stampin’ Up! products through my Wildflower Frequent Shopper Program – my way of saying thank you to my online frequent shopper customers.
  • Have any questions? I’d be happy to help, click here to contact me.

Cardstock Cuts for this project:

  • Wild Wheat – 4-1/4″ x 11″ card base, scored at 5-1/2″, 4-1/4″ x 5-1/2″ (embossed background)
  • Mossy Meadow – 3-5/8″ x 4-7/8″ (DSP mat)
  • Cajun Craze – 1-1/2″ x 5-1/2″ (punched leaves)
  • Cherry Cobbler – 3/4″ x 4-1/2″ (punched flowers)
  • Basic White – 4″ x 5-1/4″ (inside panel), 2″ x 3″ (label
  • Splendid Autumn 6″ x 6″ DSP – 3-1/2″ x 4-7/8″ (front panel)

Stampin’ Up! products used in this project:


Stampin’ Up! Artful Amaryllis for the Happy Inkin’ Thursday Blog Hop

Good Morning and welcome to the Happy Inkin’ Thursday Blog Hop! One of the pretty floral bundles in the new Mini Catalog is the Stampin’ Up! Artful Amaryllis bundle. I just used the stamp set to make today’s card – it was so simple! But the die set makes it so versatile because you can make die cut flowers as well as use dies to cut out the stamped flowers. You can find the supplies I used along with card stock cuts at the bottom of my post.

We have a pretty sketch challenge this week”

I adhered a panel of Thoughtful Designs specialty designer series paper to the front of a Flirty Flamingo card base using Stampin’ Seal. I have had experiences where liquid glue left visible lines on the paper and I didn’t want to take a chance, but I had to be extra careful to line it up.

I stamped the line flower from the Stampin’ Up! Artful Amaryllis stamp set using Smoky Slate ink on Basic White. I stamped the filler flowers and buds stamps using Flirty Flamingo ink and the stems and leaves using Granny Apple Green ink. I popped the panel on the card with dimensionals.

I stamped the sentiment from the Stampin’ Up! Artful Amaryllis stamp set using Versamark ink on Granny Apple Green. I I sprinkled it with white embossing powder and shook off the excess. I heated the powder with my heat tool until it was bright and shiny. I made a bow with Flirty Flamingo baker’s twine and adhered it to the back of the label before adhering it to the card with dimensionals. I finished the card with pink pearls.

For the inside of the card, I stamped the line flower from the Stampin’ Up! Artful Amaryllis stamp set using stamped off Flirty Flamingo ink on Basic White. I trimmed the bottom with DSP and adhered the panel to the inside of the card with Stampin’ Seal.

I love having an amaryllis plant for the Winter months, they bring cheerful color during during the cold, dreary days after Christmas. So when I saw the pretty Stampin’ Up! Artful Amaryllis bundle in the new catalog, I knew I had to have it! And I’m so happy that this simple stamped flower is so pretty!

On with the Hop! Click on the Next Blog button to move forward to see the beautiful project Karen Ksenzakovic has created.

If you get lost along the way, here are the participants for the hop:


Current Host Code: 37AE7ZXV

Use this host code when you order $50 or more and receive a free gift from me!  The free gift is your choice of any item currently available valued up to $10.00!

If your order is over $150, please do not use the host code since you’ll receive your own Host Dollars plus I’ll still send you the free gift!  This host code can be used by anyone, no club or commitment required. Let me know if you have any questions.


If you need any stamping supplies, I’d be very happy to be your Demonstrator.  Just click on the Shop Now button on the right side of the screen to go directly to my online store or contact me if you have any questions. 

Thanks for stopping by and Happy Stamping!

Akiko

  • Visit my online store here
  • See the current Stampin’ Up! clearance rack specials here
  • Earn FREE Stampin’ Up! products through my Wildflower Frequent Shopper Program – my way of saying thank you to my online frequent shopper customers.
  • Have any questions? I’d be happy to help, click here to contact me.

Cardstock Cuts for this project:

  • Flirty Flamingo – 5-1/2″ x 8-1/2″ card base, scored at 4-1/4″
  • Granny Apple Green – 1/2″ x 3″ (label)
  • Basic White – 3-3/4″ x 5″ (inside panel), 3″ x 4″ (flower panel)
  • Thoughtful Designs specialty DSP – 4″ x 5-1/4″ (front background), 1/2″ x 3-3/4″ (inside trim)

Stampin’ Up! products used in this project: