Stampin’ Up! Sweet Ice Cream Birthday Card with Gift Card Pocket

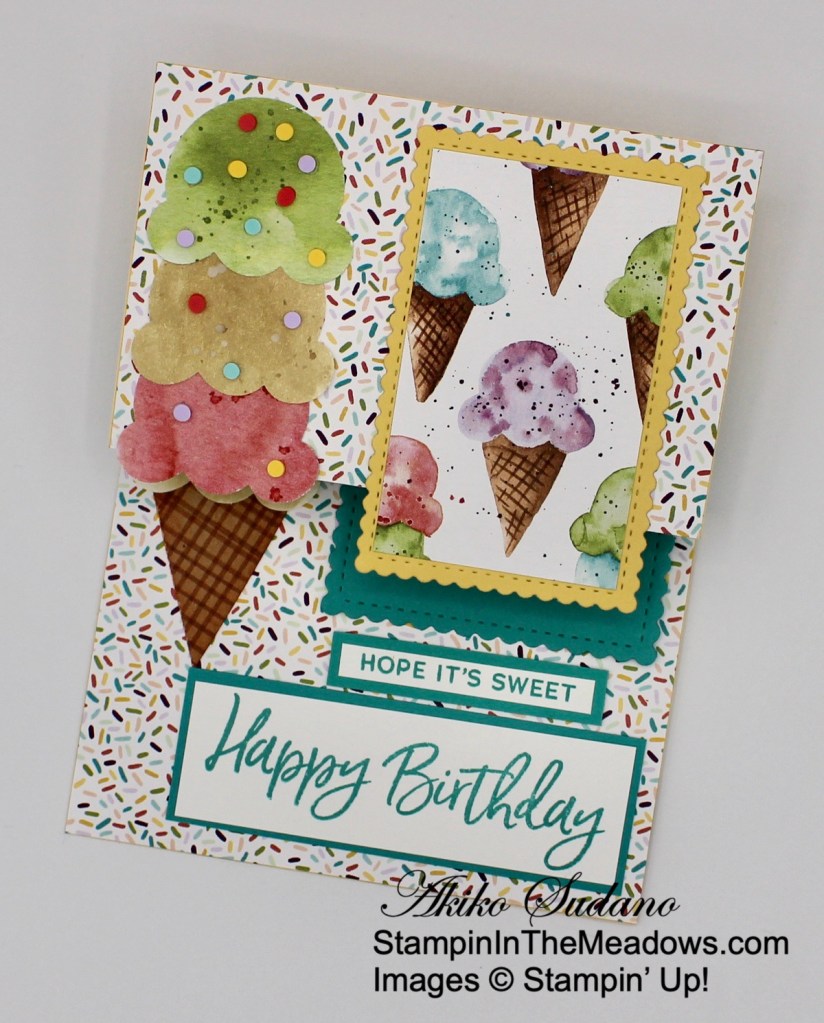
Good morning! Today I have a fun fold Birthday Card / Gift card holder made with the yummy Stampin’ Up! Sweet Ice Cream bundle. My card was inspired by a similar cupcake card on the Tatiana Creative Stamping Adventure blog – I fell in love with this idea the minute I saw it on Pinterest. You can find the supplies I used at the bottom of my post along with the sizes of cardstock used.

The idea is that when you open up the card, instead of a triple scoop ice cream cone, you see a cone with 10 scoops! And there is a little section on the right side for a gift card. I started with a top folding Z-fold So Saffron card base and covered the top with the sprinkles Ice Cream Corner designer series paper. I used the smaller striped paper for the middle section and covered the top of the large section with the 2-3/4″ sprinkles paper and aligned it just below the fold. I used Tear & Tape adhesive to adhere the bottom to the large section, putting a strip behind the right edge, another strip 2-3/4″ from the right edge and a final strip along the bottom. Leave the top of this section open so you have a pocket to slide the gift card in. I used Stampin’ Seal for the rest behind the left side. I removed the Tear & Tape covers and adhered it to the bottom of the large panel.

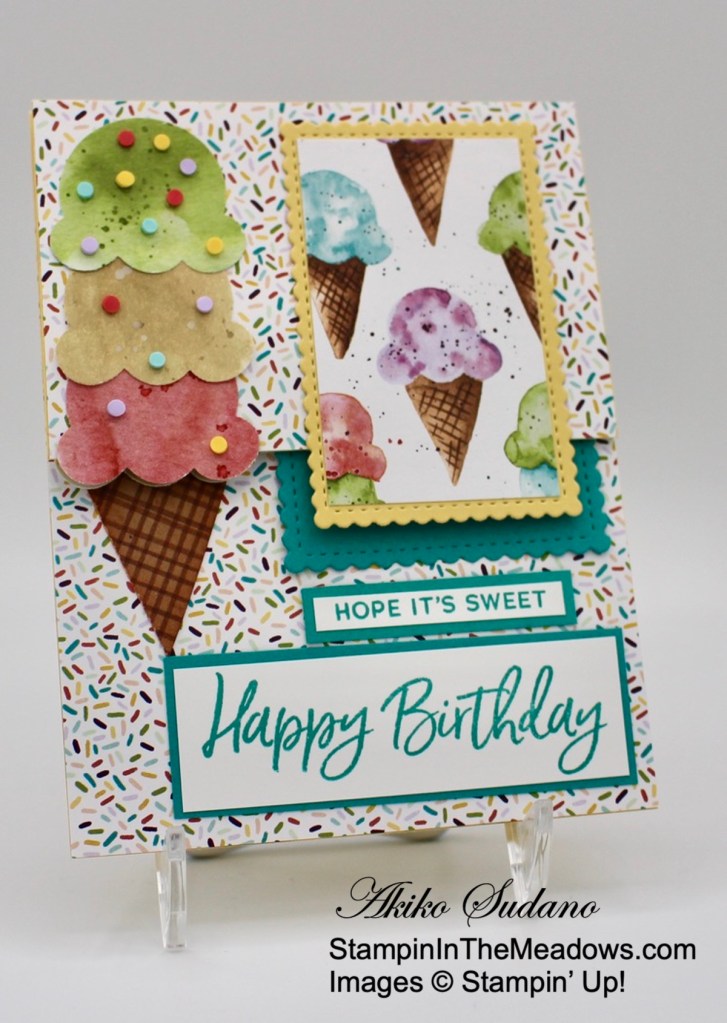
I punched 7 ice cream scoops from the Ice Cream Corner DSP with the Ice Cream Cone Builder punch. I used my Water Painter to make 2″ splotches of Soft Suede ink to Basic White card stock. I wanted to use a thinner paper than watercolor paper, and since it was a small area, it worked ok. I added some spatter marks with my water brush and punched it out when dry. All for chocolate ice cream! And then I did the same thing with So Saffron to get some vanilla ice cream for my last scoop. I used the Ice Cream Corner DSP to cut out the cone.

I stamped the Happy Birthday sentiment from the Stampin’ Up! Ice Cream Corner photopolymer stamp set in Bermuda Bay ink and adhered it to a Bermuda Bay mat. I stamped the other sentiment in Bermuda Bay ink and adhered it to a Bermuda Bay mat. I cut the Bermuda Bay scalloped accent with the Stitched So Sweetly die and adhered both labels and the scalloped accent to the left side of the large panel, aligning the top of the scalloped accent to the top of the gift card pocket.

With the label in place, I could start building my ice cream cone. I adhere the cone and first scoop and lined up the rest of the scoops so I can figure out which scoops will land on the folds. I adhered the first scoop on the top section so that it covers the scoop on the cone when the card is closed. The scoop will hang over the fold, so be careful to only apply the adhesive to the top part. I adhered the rest of the scoops on the top section. I folded the scoop that will be on the center fold and checked the alignment. I adhered the rest of the scoops on the large bottom section, finishing with the scoop on the fold. I adhered the bottom of the fold scoop. I adhered the last scoops to the middle section, trimming the top of the last scoop even with the fold. It will be covered by the bottom scoop in the top section when the card is opened.

I adhered the message panel to the Bermuda Bay mat and adhered it to the middle section. I cut the So Saffron panel with the Stitched So Sweetly die and adhered the Ice Cream Cone panel to the middle. I adhered the panel to the top section with Tear & Tape, centering it with the Bermuda Bay scalloped panel below. I finished the ice cream cone by adhering sprinkles with glue dots.

The Stampin’ Up! Sweet Ice Cream bundle is great for children’s cards or for anyone who is young at heart. And with the weather warming up, it’s perfect for any occasion these days.


Stampin’ Up! Last Chance Sale is going on NOW!

Stampin’ Up! has posted the list of items from the 2020-2021 Annual catalog that are retiring and some of the items are on sale! Retiring items will be available only white supplies last! If you love great deals, now is the perfect time to shop.

To download a PDF with the Retiring Items List, click here.

To download an excel file with the Retiring Items List, click here.

Head to my Online Store to get the retiring items you need before they sell out!

The new 2021-2022 Annual Catalog will open for orders on May 4, 2021 and by then it will be too late!


The April Paper Pumpkin Kit is So Cool!

The So Cool Paper Pumpkin Kit is a little taste of summer fun, with enough supplies to make 12 colorful, shaped cards with coordinating envelopes. Six card bases are popsicle shaped, the other six are semicircles: three watermelons and three rainbows. All of the cards are splashed with cheerful, vivid watercolor images. The kit also includes two full-size, matching sticker sheets, die-cut accents, fun embellishments, and more. But, even more cool: it’s the first Paper Pumpkin kit designed with kids in mind!

Coordinating Colors: Blackberry Bliss, Bermuda Bay, Bumblebee, Cinnamon Cider, Old Olive, Terracotta Tile

If you’re interested in subscribing to Paper Pumpkin, you can either sign up for a subscription where you are billed monthly for your kit or you can purchase a prepaid subscription in my online store. To see more information and to sign up for the monthly subscription click here. To see the options for prepaid subscriptions in my online store, click here.

Sign up deadline for the April 2021 kit is April 10, 2021. Supplies may be limited toward the end of the subscription period. 


Current Host Code: ARFDXWP4

Use this host code when you order $50 or more and receive a free gift from me!  The free gift is your choice of any item valued up to $10.00 in the 2020 – 2021 Annual Catalog or in the Jan-Jun 2021 Mini Catalog!

If your order is over $150, please do not use the host code since you’ll receive your own Host Dollars plus I’ll still send you the free gift!  This host code can be used by anyone, no club or commitment required.  Let me know if you have any questions.


If you need any stamping supplies, I’d be very happy to be your Demonstrator.  Just click on the Shop Now button on the right side of the screen to go directly to my online store or contact me if you have any questions. 

Thanks for stopping by and Happy Stamping!

Akiko

  • Visit my online store here
  • See the current Stampin’ Up! clearance rack specials here
  • Earn FREE Stampin’ Up! products through my Wildflower Frequent Shopper Program – my way of saying thank you to my online frequent shopper customers.
  • Sign up for my weekly newsletter here
  • Have any questions? I’d be happy to help, click here to contact me.

Cardstock Cuts for this project:

  • So Saffron – 4-1/4″ x 11″ card base scored at 2-3/4″ and 5-1/2″, 2-1/4″ x 3-1/2″ (die cut)
  • Bermuda Bay – 2-1/8″ x 2-3/8″ (message area mat), 1-1/8″ x 3-3/4″ (label mat), 3/8″ x 2″ (message mat), 1-3/4″ x 2-3/4″(scalloped panel)
  • Basic White – 2″ x 2-1/4″ (message area), 1″ x 3-1/4″ (label), 1/4″ x 1-7/8″
  • Ice Cream Corner DSP – 2-3/4″ x 4-1/4″ (top panel), 2-3/4″ x 4-1/4″ (inside back panel), 3″ x 4-1/4″ (inside pocket panel), 2-1/2″ x 4″ (striped panel), 1-3/4″ x 2-7/8″ (ice cream cone panel), cone punch, 10 ice cream punches

Stampin’ Up! products used in this project:


Stampin’ Up! Sailing Home Birthday Card

Good morning! Today I’m sharing a nautical theme masculine Birthday Card made with the wonderful Stampin’ Up! Sailing Home cling stamp set, the coordinating Smooth Sailing dies and the World of Good specialty designer series paper. You can find the supplies I used at the bottom of my post along with the sizes of cardstock used.

My card design is based on the Paper Players Sketch Challenge PP534. Here’s the pretty sketch:

Since the card sketch calls for any shape, I decided to use the lighthouse for a fun twist!

I used my blending brush to add Crumb Cake ink around the edges of a panel of Crumb Cake World Of Good designer series paper and then embossed the panel with the Old World Paper 3D embossing folder. I cut three Early Espresso ropes with the rope die from the Smooth Sailing dies and adhered them to the embossed panel and adhered the panel to an Early Espresso mat. I adhered the panel to the front of a Crumb Cake card base.

I stamped the lighthouse from the Stampin’ Up! Sailing Home cling stamp set in Misty Moonlight ink on a Crumb cake panel and cut it out with the coordinating die from the Smooth Sailing dies. I stamped the sentiment from the Pallet Thoughts stamp set and trimmed it to a thin border. I used blending brushes with Crumb Cake ink to ink the Misty Moonlight compass panels from the World of Good DSP and adhered the panels to a Misty Moonlight mat. I popped the panel on the card front with dimensionals.

I adhered the sentiment to the card front with glue dots and popped the lighthouse on with dimensionals. I cut out the rope knot from the Smooth Sailing dies from Early Espresso ink and adhered it to the ropes with glue dots.

For the inside of the card, I stamped another lighthouse from the Stampin’ Up! Sailing Home stamp set in stamped off Misty Moonlight ink on a Basic White panel. I stamped the compass in Crumb Cake ink in the upper corner and stamped the beautiful sentiment from the Happy Thoughts cling stamp set in Early Espresso ink. I trimmed the bottom of the panel with a strip of World of Good DSP and adhered the panel to a Misty Moonlight mat before adhering the panel to the inside of the card.

The map themes from the World of Good specialty DSP compliment the nautical themes from the Stampin’ Up! Sailing Home stamp set pretty nicely. The World of Good specialty DSP is on the retiring list and is currently available for a 40% discount and though I didn’t use them for today’s card, the brass foil accents on some of these papers are a nice way to add some bling to masculine cards. So be sure to check it out.


Stampin’ Up! Last Chance Sale is going on NOW!

Stampin’ Up! has posted the list of items from the 2020-2021 Annual catalog that are retiring and some of the items are on sale! Retiring items will be available only white supplies last! If you love great deals, now is the perfect time to shop.

To download a PDF with the Retiring Items List, click here.

To download an excel file with the Retiring Items List, click here.

Head to my Online Store to get the retiring items you need before they sell out!


Butterfly Brilliance is Available Now!

Bring in the beauty of nature with the artistic designs of the Butterfly Brilliance Bundle and textured specialty paper that will put a pop of brilliance on every project. The Butterfly Brilliance Collection is available now!! Click on the image below to download a PDF with all the details.

Note that the Butterfly Brilliance bundle is an early release from the 2021-2022 Annual Catalog that will be available in May! Unfortunately the beautiful Butterfly Bijou designer series paper is no longer available.

Stampin’ Up! Hey Chick and Hey Birthday Chick Bundles are Available Now!

What’s better than one fantastic bundle? Two fantastic (coordinating) bundles! The Hey Chick Stamp Set (a 2017 Sale-A-Bration set) has returned and brought along three new friends: The Chick Dies and a brand-new bundle that includes the Hey Birthday Chick Stamp Set and the Birthday Chick Dies. These playful images are so fun to stamp. You’ll love sending the punny cards you make to all your friends. Click on the image below to download a PDF with all the details on these fun bundles!


Current Host Code: ARFDXWP4

Use this host code when you order $50 or more and receive a free gift from me!  The free gift is your choice of any item valued up to $10.00 in the 2020 – 2021 Annual Catalog or in the Jan-Jun 2021 Mini Catalog!

If your order is over $150, please do not use the host code since you’ll receive your own Host Dollars plus I’ll still send you the free gift!  This host code can be used by anyone, no club or commitment required.  Let me know if you have any questions.


If you need any stamping supplies, I’d be very happy to be your Demonstrator.  Just click on the Shop Now button on the right side of the screen to go directly to my online store or contact me if you have any questions.  Happy Stamping!

Thanks for stopping by and have a great weekend!

Akiko

  • Visit my online store here
  • See the current Stampin’ Up! clearance rack specials here
  • Earn FREE Stampin’ Up! products through my Wildflower Frequent Shopper Program – my way of saying thank you to my online frequent shopper customers.
  • Sign up for my weekly newsletter here
  • Have any questions? I’d be happy to help, click here to contact me.

Cardstock Cuts for this project:

  • Crumb Cake – 4-1/4″ x 11″ card base scored at 5-1/2″, 2-1/4″ x 3-1/2″ (lighthouse), 1/2″ x 2″ (label)
  • Misty Moonlight – 4″ x 5-1/4″ (inside mat), 2-1/4″ x 3-7/8″ (DSP mat)
  • Early Espresso – 3-7/8″ x 5-1/8″ (front mat), 1″ x 3-3/4″ (die cut ropes), 1-1/4″ x 1-1/2″ (die cut rope knot)
  • Basic White – 3-7/8″ x 5-1/8″ (inside panel)
  • World of Good specialty DSP – 3-3/4″ x 5″ (embossed background), two 1-1/32″ x 3-3/4″ (Misty Moonlight compass strips), 1/2″ x 3-7/8″ (inside trim)

Stampin’ Up! products used in this project:


Stampin’ Up! Friends are Like Seashells Birthday Card

Happy Friday! Today I made a simple Birthday card with the pretty Stampin’ Up! Friends are Like Seashells bundle and the Sand and Sea designer series paper. I love seashell stamps and the shells in this stamp set are gorgeous – plus the dies and coordinating embossing steps it up big time!! You can find the supplies I used at the bottom of my post along with the sizes of cardstock used.

I stamped a seashell from the Stampin’ Up! Friends are Like Seashells photopolymer stamp set in So Saffron ink on Pearlescent paper and cut it out with the large Seaside Seashells die. I trimmed the scraps and carefully placed the shell in the corresponding location in the Seashells 3D embossing folder. I did some final trimming as needed with my paper snips and I have a beautiful, dimensional, shiny shell! I used the large die again to cut the seaweed from Pear Pizzazz and then embossed it.

I stamped the sentiment from the Stampin’ Up! Friends are Like Seashells stamp set on a panel of Seaside Spray in Versamark ink and sprinkled it with white embossing powder. I heat set the sentiment until it was shiny and cut it out with the Ornate Frames die. I cut out a panel of Sand and Sea designer series paper with the third largest Stitched Rectangles die and adhered it to a Gray Granite mat. I adhered the seaweed to the panel with glue dots and wrapped it twice with linen thread and tied a bow on the side. Then I adhered the label over the linen thread with dimensionals.

I adhered the shell on top of the label with glue dots and adhered a little pink shell sequin to the label. I popped the panel on the front of a Rococo Rose card base with dimensionals.

For the inside of the card, I stamped the sentiment from the Stampin’ Up! Friends are Like Seashells stamp set in Gray Granite ink on a Basic White panel. I stamped the shell in stamped off Gray Granite ink and stamped the shading stamp on top of it with So Saffron ink. I trimmed the bottom with a strip of Sand and Sea DSP and adhered the panel to the inside of the card.

The Stampin’ Up! Friends are Like Seashells bundle along with the Seashells 3D embossing folder are my favorite items for making seashell theme cards. And as a bonus, it has wonderful sentiments that go with the seashell theme.


2019 – 2021 In Colors Are Retiring Soon!!

The new Stampin’ Up! 2021-2022 Annual Catalog will be open for orders beginning on May 4 and that’s just around the corner. And Stampin’ Up! has already announced that the Rococo Rose card stock supplies are running low:

We anticipate running out of Rococo Rose Cardstock (item 150882) in the next couple days. When this item runs out, it will show as not orderable until we are able to get more inventory. Because the 2019–2021 In Color Cardstock Assortment (item 149701) includes Rococo Rose Cardstock, this item will also be not orderable for a time. We have more inventory of Rococo Rose Cardstock coming in a few weeks; however, as this is a retiring color and the inventory we receive in a few weeks will be our final shipment, both the cardstock and cardstock assortment will only be available while supplies last.

Shortly Stampin’ Up! will be announcing their retiring list and the inks and card stocks are usually the first to be sell out. So now is a good time to stock up on the retiring In Color products before the rush! Head over to my Online Store to shop NOW!


Butterfly Brilliance is Available Now!

Bring in the beauty of nature with the artistic designs of the Butterfly Brilliance Bundle and textured specialty paper that will put a pop of brilliance on every project. The Butterfly Brilliance Collection is available now!! Click on the image below to download a PDF with all the details.

Note that the Butterfly Brilliance bundle is an early release from the 2021-2022 Annual Catalog that will be available in May! Unfortunately the beautiful Butterfly Bijou designer series paper is no longer available.

Stampin’ Up! Hey Chick and Hey Birthday Chick Bundles are Available Now!

What’s better than one fantastic bundle? Two fantastic (coordinating) bundles! The Hey Chick Stamp Set (a 2017 Sale-A-Bration set) has returned and brought along three new friends: The Chick Dies and a brand-new bundle that includes the Hey Birthday Chick Stamp Set and the Birthday Chick Dies. These playful images are so fun to stamp. You’ll love sending the punny cards you make to all your friends. Click on the image below to download a PDF with all the details on these fun bundles!


Current Host Code: 9WJYHP76

Use this host code when you order $50 or more and receive a free gift from me!  The free gift is your choice of any item valued up to $10.00 in the 2019 – 2020 Annual Catalog or in the Jan-Jun 2021 Mini Catalog!

If your order is over $150, please do not use the host code since you’ll receive your own Host Dollars plus I’ll still send you the free gift!  This host code can be used by anyone, no club or commitment required.  Let me know if you have any questions.


If you need any stamping supplies, I’d be very happy to be your Demonstrator.  Just click on the Shop Now button on the right side of the screen to go directly to my online store or contact me if you have any questions.  Happy Stamping!

Thanks for stopping by and have a great weekend!

Akiko

  • Visit my online store here
  • See the current Stampin’ Up! clearance rack specials here
  • Earn FREE Stampin’ Up! products through my Wildflower Frequent Shopper Program – my way of saying thank you to my online frequent shopper customers.
  • Sign up for my weekly newsletter here
  • Have any questions? I’d be happy to help, click here to contact me.

Cardstock Cuts for this project:

  • Rococo Rose – 4-1/4″ x 11″ card base scored at 5-1/2″
  • Pear Pizzazz – 2-1/4″ x 3-1/2″ (sea weed)
  • Gray Granite – 3-1/8″ x 4-1/2″ (front mat)
  • Seaside Spray – 1-1/4″ x 3″ (label)
  • Pearlescent Paper – 1-1/4″ x 2″ (seashell)
  • Basic White – 4″ x 5-1/4″ panel (inside panel)
  • Sand and Sea DSP – 3-1/4″ x 4-3/4″” panel (background panel), 1/2″ x 4″ (inside trim),

Stampin’ Up! products used in this project:


Stampin’ Up! All Things Fabulous for the Happy Inkin’ Thursday Blog Hop

Good Morning and welcome to the Happy Inkin’ Thursday Blog Hop! For today’s card I used the beautiful Stampin’ Up! All Things Fabulous bundle to make a pretty floral birthday card. This photopolymer stamp set has two and three step stamps that make gorgeous multi-toned flowers! You can find the supplies used to create this card at the bottom of my post along with the sizes of cardstock used.

We have a sketch challenge this week and here is the pretty sketch we are using:

I embossed a panel of Soft Sea Foam Subtles 6″ x 6″ designer series paper with the Tasteful Textile embossing folder and adhering it to the front of a Soft Sea Foam card base. I cut the lattice from the Fabulous Florals Dies from Basic White card stock and cut the second largest oval from the Stitched Shapes dies from the Fine Art Floral designer series paper. I adhered the oval to the lattice with glue dots.

I stamped the large flower from the Stampin’ Up! All Things Fabulous photopolymer stamp set in Flirty Flamingo. I mounted the three stamps for this 3 step flower on blocks and stamped the center with full strength and then stamped the larger detailed stamp on top full strength. Then I stamped the larger background in stamped off Flirty Flamingo. Doing the stamping in this order made it fairly easy to line up. Then I stamped the small yellow flowers with the center in Mango Melody and the outer two in So Saffron. I cut out the flowers with the coordinating dies. I stamped two of each set of leaves in Pear Pizzazz and cut them out with the coordinating dies.

I arranged the leaves and flowers on the oval and used glue dots to adhere the So Saffron Flowers and leaves. I popped the Flirty Flamingo flower on the top with dimensionals. I stamped the sentiment from the Stampin’ Up! All Things Fabulous stamp set in Pear Pizzazz ink on a Basic White strip. I cut the end of the strip with the Banners Pick-A-Punch and adhered it to the oval. I adhered the oval to the card front with dimensionals and finished the card front with a White bow and three pearls.

For the inside of the card, I stamped the sentiment from the Peaceful Moments stamp set in Flirty Flamingo on a Basic White panel and trimmed the side in the Soft Seafoam Subtles 6″ x 6″ DSP. Stamped another flower from the Stampin’ Up! All Things Fabulous stamp set in Flirty Flamingo and cut it out with the coordinating die. I adhered the flower and remaining leaves to the panel and adhered the panel to the inside of the card.

The Stampin’ Up! All Things Fabulous bundle has beautiful floral images using the two and three step stamping techniques. These flowers definitely look better when carefully stamped to preserve the white highlights. So practice with different color combinations and use different techniques to help line up your stamps – it’s relaxing and fun!!

On with the Hop! Click the Next button below to visit Karen Ksenzakovic’s blog.

And just in case you get lost along the way, here’s a list of the team members participating in the hop today:


Current Host Code: 9WJYHP76

Use this host code when you order $50 or more and receive a free gift from me!  The gift is your choice of any item valued up to $10.00 in the 2019-20 Annual Catalog or in the 2021 January-June Mini Catalog!

If your order is over $150, please do not use the host code since you’ll receive your own Host Dollars plus I’ll still send you the free gift!  This host code can be used by anyone, no commitment required.  Let me know if you have any questions.


If you need any stamping supplies, I’d be very happy to be your Demonstrator.  Just click on the Shop Now Button on the right side of the screen to go directly to my online store or contact me if you have any questions.  Happy Stamping!

Thanks for visiting!

Akiko

  • Visit my online store here
  • See the current Stampin’ Up! clearance rack specials here
  • Earn FREE Stampin’ Up! products through my Wildflower Frequent Shopper Program – my way of saying thank you to my frequent shopper online customers.
  • Sign up for my weekly newsletter here
  • Have any questions? I’d be happy to help, click here to contact me.

Cardstock Cuts for this project:

  • Soft Sea Foam – 5-1/2″ x 8-1/2″ card base scored at 4-1/4″
  • Basic White – 4-1/2″ x 6″ (die cut flowers, leaves and lattice), 1/2″ x 3″ (label), 4″ x 5-1/4″ (inside panel)
  • Subtles 6″ x 6″ DSP – 1″ x 5-1/4″ (front background), 3/4″ x 4″ (inside trim)
  • Fine Art Floral DSP – 2-1/4″ x 3-1/2″ (die cut oval)

Stampin’ Up! products used in this project:


Stampin’ Up! Darling Donkeys for the Happy Inkin’ Thursday Blog Hop

Good Morning and welcome to the Happy Inkin’ Thursday Blog Hop! Today I have a fun Card made with the fun Stampin’ Up! Darling Donkeys Sale A Bration cling stamp set along with the Hey Chick bundle and Birthday Chick dies. You can find the supplies used to create this card at the bottom of my post along with the sizes of cardstock used.

We have a Theme challenge this week, sharing Fun Fold cards. So it’s sure to be awesome!

So I used these stamps and dies to make a fun Double Z fold card! I started by covering my Crumb Cake card base and the little Z part with designer series papers. I adhered strips of the leafy paper from the Berry Delightful Sale A Bration DSP to cover the little Z part and the light part of the Bermuda Bay Oh So Ombre 6″ x 6″ Sale A Bration to cover the top. I adhered the wider panel on the far right, and overlapped a full length Basic White panel. I adhered the last strip of Berry Delightful leafy paper to the bottom middle panel since this part is visible.

I cut 4 cornstalks from Hey Chick dies from Garden Green and adhered them to the card and I cut 4 sets of corn husks from Garden Green and 4 sets of corn from So Saffron. I adhered the corn husks to the corn and adhered them to the cornstalks with glue dots. I cut out the henhouse from the Hey Chick dies from Crumb Cake and colored it with Crumb Cake and Mango Melody Stampin’ Blends. I adhered it to the panel. I stamped the cracked egg from the Hey Chick cling stamp set in Memento Tuxedo Black ink on Basic White and cut it out with the coordinating die along with a pair of eggs. I colored the legs with my Mango Melody Stampin’ Blend.

I cut out the sign from the Birthday Chick dies from Crumb Cake and three fences from Basic White. I stamped the Hee Haw! from the Stampin’ Up! Darling Donkeys cling stamp set in Memento Tuxedo Black ink on the sign and adhered the sign to the card. I adhered the fence to the long panel in the little Z.

I stamped the little donkey from the Stampin’ Up! Darling Donkeys stamp set in Memento Tuxedo Black ink on a Basic White panel and colored it with Crumb Cake and Petal Pink Stampin’ Blends. I fussy cut the donkey and adhered it to the first panel, letting part of it hang over the edge. To finish the main body of the card, I stamped the little birds from the My Meadow photopolymer stamp set in Memento Tuxedo Black ink and the sentiment from the Stampin’ Up! Darling Donkeys in the corner of the Basic White writing panel.

With all this done, I adhered the little Z to the main part of the card. I applied Tear & Tape on the first panel and under the henhouse part of the last panel. I pulled off the covers and carefully adhered the little Z on the Tear & Tape, aligning the corners and bottom edges, and pressing firmly. I finished by adhering the little eggs to the last panel on the little Z.

The Stampin’ Up! Darling Donkeys stamp set is probably the most popular Sale A Bration stamp set this year, and it’s free with a $50 purchase (before shipping and taxes) during Sale A Bration! Why not consider either the Hey Chick or Hey Birthday Chick bundle to get started? Add some embellishments or card stock and you’re there. But do hurry, because Sale A Bration ends this Sunday!

On with the Hop! Click the Next button below to visit Karen Ksenzakovic’s blog.

And just in case you get lost along the way, here’s a list of the team members participating in the hop today:


February Host Code: JNWPB7A4

Use this host code when you order $50 or more and receive a free gift from me!  The gift is your choice of any item valued up to $10.00 in the 2019-20 Annual Catalog or in the 2020 January-June Mini Catalog!  That includes some of the Host Exclusive stamp sets!

If your order is over $150, please do not use the host code since you’ll receive your own Host Dollars plus I’ll still send you the free gift!  This host code can be used by anyone, no commitment required.  Let me know if you have any questions.


If you need any stamping supplies, I’d be very happy to be your Demonstrator.  Just click on the Shop Now Button on the right side of the screen to go directly to my online store or contact me if you have any questions.  Happy Stamping!

Thanks for visiting!

Akiko

  • Visit my online store here
  • See the current Stampin’ Up! clearance rack specials here
  • Earn FREE Stampin’ Up! products through my Wildflower Frequent Shopper Program – my way of saying thank you to my frequent shopper online customers.
  • Sign up for my weekly newsletter here
  • Have any questions? I’d be happy to help, click here to contact me.

Cardstock Cuts for this project:

  • Crumb Cake – 4-1/4″ x 11″ card base scored at 5-1/2″ and 2-3/4″, 1-1/8″ x 11″ scored at 2-3/4″ and 5-1/2″ (little Z), 1-3/4″ x 2-1/2″ (die cut henhouse), 2″ x 2″ (die cut sign)
  • Garden Green – 4″ x 5-1/4″ (die cut cornstalks and corn husks)
  • So Saffron – 3/4″ x 4″ (die cut corn)
  • Basic White – 2-5/8″ x 4-1/8″ (writing panel), 3/4″ x 7″ (die cut fences), 2″ x 2-1/2″ (donkey), 1-1/2″ x 2″ (dies cut eggs)
  • Berry Delightful DSP – 1″ x 5-3/8″ strip (little Z leafy paper), three 1″ x 2-5/8″ (little Z leafy paper and inside trim)
  • Oh So Ombre 6″ x 6″ DSP – two 2-5/8″ x 3-1/4″ panels (first and second panel sky), 2-3/4″ x 3-1/4″ (last panel sky)

Stampin’ Up! products used in this project:


Stampin’ Up! In Bloom Birthday Card for the Happy Inkin’ Thursday Blog Hop

Good Morning and welcome to the Happy Inkin’ Thursday Blog Hop! Today I have a sweet floral Birthday Card made with the Stampin’ Up! In Bloom bundle and the pretty Paper Blooms Sale A Bration designer series paper. You can find the supplies used to create this card at the bottom of my post along with the sizes of cardstock used.

We have a sketch challenge this week, and here’s the pretty sketch we’re using. When I saw it, I knew that I needed to use the Paper Blooms designer series paper so I could use the pretty Rococo Rose stripes on the bottom.

I adhered the striped Rococo Rose Paper Blooms paper to the bottom of a Basic White panel and adhered the Rococo Rose floral paper to the top. I stamped the sentiment from the Stampin’ Up! In Bloom stamp set in Rococo Rose on a strip of Basic White and trimmed the end with the Banner Pick A Punch. I punched the end of a Rococo Rose strip and embossed it with the Ornate Floral 3D embossing folder. I adhered the label to the embossed banner and adhered them both to the DSP panel on the seam.

I cut the two large stitched flowers from Balmy Blue using the Pierced Blooms dies from the Stampin’ Up! In Bloom bundle. I cut the medium flowers from So Saffron and the leaves and flower centers from Smoky Slate. Finally I cut two sets of the small flowers from Rococo Rose. I used the Stampin’ Up Color Coach for Rococo Rose to choose my color palette, pairing it with Balmy Blue and Smoky Slate. You can find it on the second page HERE. I really like how this color palette came out, the Balmy Blue flowers really pop! I also love these die cut flowers and leaves!! It was so much fun playing with them to figure out what looked best layered together.

I layered the flowers, adhering them with liquid glue and arranged them on the DSP panel, adhering them with liquid glue and popping the one on front with dimensionals. I added rhinestone gems to the flower centers and adhered the DSP panel to the front of a Rococo Rose card base with dimensionals.

For the inside of the card, trimmed the bottom of a Basic White panel with the Rococo Rose floral paper from the Paper Blooms DSP and adhered more dic cut flowers. I adhered the panel to the inside of the card.

The Stampin’ Up! In Bloom bundle is a great bundle with pretty images for stamped flowers, fun sentiments (I love this font) and awesome coordinating dies. There are 25 dies in the Pierced Blooms die set, and the stitching is just gorgeous!! And don’t forget that the Paper Blooms designer series paper is free with a $50 purchase (before shipping and taxes) during Sale A Bration!

On with the Hop! Click the Next button below to visit Karen Ksenzakovic’s blog.

And just in case you get lost along the way, here’s a list of the team members participating in the hop today:


February Host Code: JNWPB7A4

Use this host code when you order $50 or more and receive a free gift from me!  The gift is your choice of any item valued up to $10.00 in the 2019-20 Annual Catalog or in the 2020 January-June Mini Catalog!  That includes some of the Host Exclusive stamp sets!

If your order is over $150, please do not use the host code since you’ll receive your own Host Dollars plus I’ll still send you the free gift!  This host code can be used by anyone, no commitment required.  Let me know if you have any questions.


If you need any stamping supplies, I’d be very happy to be your Demonstrator.  Just click on the Shop Now Button on the right side of the screen to go directly to my online store or contact me if you have any questions.  Happy Stamping!

Thanks for visiting!

Akiko

  • Visit my online store here
  • See the current Stampin’ Up! clearance rack specials here
  • Earn FREE Stampin’ Up! products through my Wildflower Frequent Shopper Program – my way of saying thank you to my frequent shopper online customers.
  • Sign up for my weekly newsletter here
  • Have any questions? I’d be happy to help, click here to contact me.

Cardstock Cuts for this project:

  • Rococo Rose – 5-1/2″ x 8-1/2″ card base scored at 4-1/4″, 3/4″ x 4-1/2″ (embossed banner), 1″ x 2″ (die cut flowers)
  • Balmy Blue – 2″ x 5-1/4″ (die cut flowers)
  • So Saffron – 1″ x 3″ – (die cut flowers)
  • Smoky Slate – 2″ x 3-1/2″ (die cut leaves and flower centers)
  • Basic White – 4″ x 5-1/4″ (inside panel), 3-7/8″ x 5-1/8″ (front mat), 5/8″ x3-3/4″ (label)
  • Paper Blooms DSP – two 2″ x 5″ strips (front top and bottom), 1/2″ x 5-1/4″ (inside trim)

Stampin’ Up! products used in this project:


Stampin’ Up! Zoo Globe Birthday Card for the Inkin’ Krew Blog Hop

Good Morning! Welcome to another Inkin’ Krew Monthly Blog Hop! The theme for this month’s hop is Birthday and I made a sweet birthday card with the little giraffe from the Stampin’ Up! Zoo Globe stamp set. This is a great stamp set for making children’s cards, new baby cards or any animal theme card – and the globe stamps coordinate with the Snow Globe scene dies and shaker dome to make shaker cards! You can find the supplies used to create this card at the bottom of my post along with the sizes of cardstock used.

I stamped the little giraffe from the Stampin’ Up! Zoo Globe photopolymer stamp set in Memento Tuxedo Black ink on a small Basic White panel. I positioned the small rectangle die from the Stitched with Whimsey dies on the panel around the giraffe and ran it through my Stampin’ Cut & Emboss machine to die cut a pretty stitched frame around the giraffe.

I colored the giraffe with the So Saffron and Cinnamon Cider Stampin’ Blends and adhered it to a Basic Black mat. I positioned the giraffe panel on the So Saffron panel and stamped the sentiment from the Stampin’ Up! Zoo Globe stamp set in Memento Tuxedo Black underneath. I embossed the panel with the Tasteful Textile 3D embossing folder and adhered it to the front of a So Saffron card base.

I adhered the giraffe panel to the card front on top of the sentiment using dimensionals. I finished the card by wrapping a length of black and white twine around the fold and tying a bow.

For the inside of the card, I stamped the sentiment from the Stampin’ Up! Zoo Globe stamp set in Memento Tuxedo Black ink on a Basic White panel. I stamped the little bird next to the sentiment and the balloons on the bottom. I colored the images with Stampin Blends – Poppy Parade, So Saffron and Night of Navy – and adhered the panel to the inside of the card.

On With The Hop! Click on the Next Blog button to move forward to Connie Troyer’s project or click the Previous Blog button to move back to see the project that Leslie Larkin created.

If you get lost along the way, here are the participants for the hop:


February Host Code: JNWPB7A4

Use this host code when you order $50 or more and receive a free gift from me!  The gift is your choice of any item valued up to $10.00 in the 2020-21 Annual Catalog or the Jan-Jun 2021 Mini Catalog.

If your order is over $150, please do not use the host code since you’ll receive your own Host Dollars plus I’ll still send you the free gift!  This host code can be used by anyone, no commitment required.  Let me know if you have any questions.


If you need any stamping supplies, I’d be very happy to be your Demonstrator.  Just click on the Order Stampin’ Up! Online Now button on the right side of the screen to go directly to my online store or contact me if you have any questions.  Happy Stamping!

Thanks for visiting!

Akiko

  • Visit my online store here
  • See the current Stampin’ Up! clearance rack specials here
  • Earn FREE Stampin’ Up! products through my Wildflower Frequent Shopper Program – my way of saying thank you to my frequent shopper online customers.
  • Sign up for my weekly newsletter here
  • Have any questions? I’d be happy to help, click here to contact me.

Cardstock Cuts for this project:

  • So Saffron – 5 1/2″ x 8 1/2″ card base scored at 4-1/4″, 4-1/4″ x 5-1/2″ (embossed card front)
  • Basic Black – 1-7/8″ x 3-1/8″ (giraffe panel mat)
  • Basic White – 3 3/4″ x 5″ (inside panel), 1-3/4″ x 3″ (giraffe panel)

Stampin’ Up! products used in this project:


Stampin’ Up! Handsomely Suited for the Happy Inkin’ Thursday Blog Hop

Good Morning and welcome to the Happy Inkin’ Thursday Blog Hop! Today I have a masculine birthday card made with the Stampin’ Up! Handsomely Suited bundle and Well Suited designer series paper. You can find the supplies used to create this card at the bottom of my post along with the sizes of cardstock used.

We have a sketch challenge this week, and here’s the sketch we’re using.

My card also works for the #TGIFC301 challenge at TGIF Challenges with a fun plaid theme:

I started by adhering a panel of the Pacific Point and tweed plaid panels of Well Suited designer series paper to Basic Black mats. I adhered the small panel flush with the top of it’s mat and then I adhered the small panel to the large one, aligning the top of the DSP panels.

I slipped a buckle on the Gray Granite ribbon and wrapped it around the layered panel, adhering it in the back. I adhered the panel to the front of a Basic Gray card base. I stamped the large bow tie from the Stampin’ Up! Handsomely Suited cling stamp set in Memento Tuxedo Black ink on a small panel of Poppy Point paper from the Well Suited DSP pack and cut it out with the coordinating die. I cut out another bow tie from Basic White and adhered it to the back of the tie to make it stiffer.

I stamped the birthday sentiment from the Stampin’ Up! Handsomely Suited stamp set in Memento Tuxedo Black ink on the bottom of a small Basic White panel and adhered the panel to a Basic Black mat. I popped the bow tie on top of the sentiment with dimensionals and popped the label on the card front with dimensionals.

For the inside of the card, I stamped the sentiment from the Stampin’ Up! Handsomely Suited stamp set in Memento Tuxedo Black ink on a Basic White panel. I trimmed the bottom with tweed paper from the Well Suited designer series paper pack and adhered it to the inside of the card.

The Stampin’ Up! Handsomely Suited bundle is a great new bundle for making masculine cards, especially with the coordinating Well Suited designer series paper.

On with the Hop! Click the Next button below to visit Karen Ksenzakovic’s blog.

And just in case you get lost along the way, here’s a list of the team members participating in the hop today:


February Host Code: JNWPB7A4

Use this host code when you order $50 or more and receive a free gift from me!  The gift is your choice of any item valued up to $10.00 in the 2019-20 Annual Catalog or in the 2020 January-June Mini Catalog!  That includes some of the Host Exclusive stamp sets!

If your order is over $150, please do not use the host code since you’ll receive your own Host Dollars plus I’ll still send you the free gift!  This host code can be used by anyone, no commitment required.  Let me know if you have any questions.


If you need any stamping supplies, I’d be very happy to be your Demonstrator.  Just click on the Shop Now Button on the right side of the screen to go directly to my online store or contact me if you have any questions.  Happy Stamping!

Thanks for visiting!

Akiko

  • Visit my online store here
  • See the current Stampin’ Up! clearance rack specials here
  • Earn FREE Stampin’ Up! products through my Wildflower Frequent Shopper Program – my way of saying thank you to my frequent shopper online customers.
  • Sign up for my weekly newsletter here
  • Have any questions? I’d be happy to help, click here to contact me.

Cardstock Cuts for this project:

  • Basic Gray – 4-1/4″ x 11″ card base scored at 5-1/2″
  • Basic Black – 4″ x 5-1/4″ (front tweed background mat), 2-1/8″ x 4-1/16″ (Pacific Point plaid inset mat), 1-5/8″ x 2-1/8″ (label mat)
  • Basic White – 4″ x 5-1/4″ (inside panel), 1-1/2″ x 2″ (label), 1-1/4″ x 2-1/4″ (bow tie backing)
  • Well Suited DSP – 3-7/8″ x 5-1/8″ (front tweed background), 2″ x 4″ (Pacific Point Plaid inset), 1-1/4″ x 2-1/4″ (Poppy Parade bow tie), 1/2″ x 4″ (tweed inside trim)

Stampin’ Up! products used in this project:


Stampin’ Up! Hey Birthday Chick Card

Good morning! Here’s a simple birthday card made with the cute Stampin’ Up! Hey Birthday Chick bundle. And today is the day when the matching dies are available as well as the return of the Hey Chick stamp set and it’s coordinating dies! Let me show you how cute these sets are with today’s card. You can find the supplies used to create this card at the bottom of my post along with the sizes of cardstock used.

My card is also entered in the Paper Players Challenge PP526 – it’s a Tic Tac Toe challenge and I chose the middle column – animal, embossing and markers. Be sure to check out the inspiration and other challenge entries in this fun challenge.

On with my card! I stamped the cute little chicken from the Stampin’ Up! Hey Birthday Chick cling stamp set with Memento Tuxedo Black ink on Thick Basic White card stock and colored her with the Ivory, Real Red and Mango Melody Stampin Blends. I colored the balloon Real Red, because red balloons are the best, and added a highlight with the Color Lifter! I cut her out with the coordinating die from the Birthday Chick dies that are available today (YAY!!)!

I cut out the cornstalk and corn husks with the new Hey Chick dies from Garden Green and the corn cobs from So Saffron. These dies are so tiny and so cute so be careful not to lose them. I cut out two grain sacks from the Hey Birthday Chick dies from Crumb Cake. I stamped the sentiment from the Stampin’ Up! Hey Birthday Chick stamp set in Memento Tuxedo Black ink on the bottom of a Basic White panel.

I used the new blending brushes to brush some So Saffron and Balmy blue ink on the panel as a background for the little chicken and embossed the panel with the Tasteful Textile 3D embossing folder. I adhered the panel to the front of a Real Red card base and adhered the cornstalk, ears of corn and grain sacks to the panel with liquid glue. I finished the front by popping the chicken and balloon on with dimensionals.

For the inside of the card, I stamped the sentiment and little chick from the Stampin’ Up! Hey Birthday Chick stamp set in Memento Tuxedo Black ink on a Basic White panel. I colored the little chick with So Saffron, Real Red and Mango Melody Stampin’ Blend markers and adhered the panel to the inside of the card.

This is a simple fun birthday card with the new Stampin’ Up! Hey Birthday Chick and Hey Chick bundles. Check them out because they’re so cute and the bundles will be available through June 30!


Stampin’ Up! Sale A Bration is going on Now!

Sale A Bration is Stampin’ Up!’s biggest event of the year with three ways to earn FREE products – SHOP – HOST – JOIN!

SHOP

During Sale-A-Bration, for every $50 or $100 you spend, you can choose between two purchasing levels of free products! Depending on the amount you spend, you’ll be able to mix ‘n’ match the Sale-A-Bration items you earn and you can choose from stunning stamp sets and designer series papers. There are 8 free products available to pick from at the $50 level and 2 free products to pick from at the $100 level. Click on the Sale A Bration brochure to the right to see these products.

HOST

Stampin’ Up! is offering an exclusive host stamp set called Punch Party and you can get it for FREE with an order of $300 or greater placed during Sale-a-bration or by hosting a workshop with orders totaling $300 or greater during Sale-a-bration!  And this is on top of the normal Stampin’ Rewards you get when you host a workshop!

JOIN

There’s no better time to Join Stampin’ Up! than during Sale A Bration! And joining is easy! You purchase your Starter kit for $99 by choosing $125 in Stampin’ Up! products (and shipping is FREE). If you join during Sale A Bration, you get an additional five FREE full size packs of 6″ x 6″ Designer Series Paper from the upcoming 2021-2022 Annual Catalog with your Starter Kit (the current 6″ x 6″ designer series paper goes for $11.50 per pack!). 

See my Join My Team page for all the benefits starting with a minimum 20% discount!  Contact me if you have any questions.  Click here to purchase your Starter Kit.

Contact me if you need a copy of the new Jan-Jun Mini Catalog and Sale A Bration brochure, and I’ll be happy to send you one!


FREE SHIPPING

This week is my 2 year anniversary with Stampin’ Up! and to celebrate I am offering FREE standard shipping on all orders over $50 through February 9th.

To get free shipping, you will need to:

  • Place an order at my Online Store between now and Monday February 9th using my current Host Code JNWPB7A4.
  • Send me an email at apsudano@stampininthemeadows.com of how you would like your shipping charges refunded to you, PayPal or check.
  • Once your order is processed and shipped, I will refund your standard shipping charges.

Your order will also qualify you for my thank you gift and for Wildflower Points! Orders over $150 will also qualify you for Stampin’ Rewards, so if your order is $150 or more, don’t use my host code so that you don’t miss out on your own Stampin’ Rewards from Stampin’ Up! Have fun shopping!


February Host Code: JNWPB7A4

Use this host code when you order $50 or more and receive a free gift from me!  The gift is your choice of any item valued up to $10.00 in the 2020-21 Annual Catalog or the Jan-Jun 2021 Mini Catalog.

If your order is over $150, please do not use the host code since you’ll receive your own Host Dollars plus I’ll still send you the free gift!  This host code can be used by anyone, no commitment required.  Let me know if you have any questions.


If you need any stamping supplies, I’d be very happy to be your Demonstrator.  Just click on the Shop Now Button on the right side of the screen to go directly to my Online store or contact me if you have any questions.  Happy Stamping!

Thanks for stopping by and have a great day!

Akiko

  • Visit my Online store here
  • See the current Stampin’ Up! clearance rack specials here
  • Earn FREE Stampin’ Up! products through my Wildflower Frequent Shopper Program – my way of saying thank you to my frequent shopper online customers.
  • Sign up for my monthly newsletter here
  • Have any questions? I’d be happy to help, click here to contact me.

Cardstock Cuts for this project:

  • Real Red – 4-1/4″ x 11″ card base scored at 5-1/2″
  • Basic White – two 3″ x 4-3/4″ panels (front and inside panels)
  • Basic White Thick – 2-1/2″ x 4-1/2″ (chick)
  • Crumb Cake – 1-1/2″ x 2-3/4″ (grain sacks)
  • So Saffron – 1/2″ x 3-1/2″ (corn)
  • Garden Green – 2″ x 3″ (cornstalk and husks)

Stampin’ Up! products used in this project:


Stampin’ Up! Hey Birthday Chick Video Tutorial

Good Morning! The Stampin’ Up! Hey Birthday Chick cling stamp set is a fun set that is a follow on to the Hey Chick stamp set that came out during Sale A Bration a few years ago. And Guess What? Next month coordinating dies will be available! So today’s card is a sort of sneak peek of the new bundles that will be available on February 2! And you’re going to want to get them, because they’re fabulous! You can find the currently available supplies I used at the bottom of my post along with the sizes of cardstock used.

I also entered today’s card in the Sunday Stamps SSC248 sketch challenge – In The Center.

Here is the Facebook Live video showing how I made the card:

I posted a copy of the video in my YouTube channel here so you can view it there if you prefer.

I die cut a Basic White panel with the Stitched rectangles dies and sponged dirt and sky with the new blending brushes and Crumb Cake, Soft Suede, Balmy Blue and Pacific Point inks. I used the lighter inks on the main body and the darker inks around the edges. I adhered the panel to a Granny Apple Green patterned Sale A Bration Oh So Ombre 6″ x 6″ DSP panel that I die cut with a larger Stitched Rectangle die and adhered them both to a Poppy Parade mat.

I cut out the fence using the cute die from the upcoming Chick Dies (available Feb 2) from Gray Granite card stock. Before cutting it out, I remembered to adhere some of the new adhesive sheets to the back, and it worked great for adhering to the panel. The hen house die is also from the upcoming Chick dies and I cut it out of Crumb Cake card stock and outlined it (and colored the doorway) with Smoky Slate Stampin Blend before adhering it on the fence with glue dots. I also colored the hay with the Daffodil Delight Stampin’ Blend. I wrapped a length of braided linen trim around the panel made a knot on the side.

I stamped the Chick and cupcake from the Stampin’ Up! Hey Birthday Chick stamp set using Memento Tuxedo Black ink on Basic White and cut it out with the upcoming coordinating die from the Birthday Chick Dies (available Feb 2). I colored the chick with Pool Party and Mango Melody Stampin’ Blends and the cupcake with Flirty Flamingo, Rococo Rose and Daffodil Delight blends and popped her on the panel with dimensionals.

I used the Birthday Chick dies to cut out the Happy Birthday sentiment from Poppy Parade and the buntings from Granny Apple Green and Bermuda Bay. I adhered the buntings to the panel with liquid glue and then adhered the sentiment. I embossed a panel of Bermuda Bay with the Pinewood Planks embossing folder and adhered it to the front of a Bermuda Bay card base. Then I adhered the decorated panel to the card front with dimensionals.

For the inside of the card, I stamped the fun sentiment from the Stampin’ Up! Hey Birthday Chick stamp set in Memento Tuxedo Black ink on a Basic White panel. I stamped the dancing chick in the egg next to the sentiment in Memento Tuxedo Black ink and colored her with Daffodil Delight, Mango Melody, Poppy Parade and Flirty Flamingo Stampin’ Blends. I adhered a strip of Granny Apple Green patterned Oh So Ombre 6″ x 6″ DSP to the bottom and adhered the panel to a Poppy Parade mat. I adhered the panel to the inside of the card.

The Stampin’ Up! Hey Birthday Chick stamp set is so cute and the cuteness factor increases tenfold with the companion stamp set and dies that will be available on Feb 2. And don’t forget the Oh So Ombre 6″ x 6″ Sale A Bration designer series paper that you can get right now. Don’t those circles remind you of eggs?


Stampin’ Up! Hey Chick and Hey Birthday Chick Bundles available February 2!

The Stampin’ Up! Hey Chick and Hey Birthday Chick bundles will be available February 2 – June 30. Already have the Hey Chick stamp set? You can now purchase the coordinating dies! And they are so cute!! Click on the image above to download a PDF with all the details.


Stampin’ Up! Sale A Bration is going on Now!

Sale A Bration is Stampin’ Up!’s biggest event of the year with three ways to earn FREE products – SHOP – HOST – JOIN!

SHOP

During Sale-A-Bration, for every $50 or $100 you spend, you can choose between two purchasing levels of free products! Depending on the amount you spend, you’ll be able to mix ‘n’ match the Sale-A-Bration items you earn and you can choose from stunning stamp sets and designer series papers. There are 8 free products available to pick from at the $50 level and 2 free products to pick from at the $100 level. Click on the Sale A Bration brochure to the right to see these products.

HOST

Stampin’ Up! is offering an exclusive host stamp set called Punch Party and you can get it for FREE with an order of $300 or greater placed during Sale-a-bration or by hosting a workshop with orders totaling $300 or greater during Sale-a-bration!  And this is on top of the normal Stampin’ Rewards you get when you host a workshop!

JOIN

There’s no better time to Join Stampin’ Up! than during Sale A Bration! And joining is easy! You purchase your Starter kit for $99 by choosing $125 in Stampin’ Up! products (and shipping is FREE). If you join during Sale A Bration, you get an additional five FREE full size packs of 6″ x 6″ Designer Series Paper from the upcoming 2021-2022 Annual Catalog with your Starter Kit (the current 6″ x 6″ designer series paper goes for $11.50 per pack!). 

See my Join My Team page for all the benefits starting with a minimum 20% discount!  Contact me if you have any questions.  Click here to purchase your Starter Kit.

Contact me if you need a copy of the new Jan-Jun Mini Catalog and Sale A Bration brochure, and I’ll be happy to send you one!


January Host Code: 4YZ2J366

Use this host code when you order $50 or more and receive a free gift from me!  The free gift is your choice of any item valued up to $10.00 in the 2019 – 2020 Annual Catalog or in the Aug-Dec 2020 Mini Catalog!  That includes some of the Host Exclusive stamp sets!

If your order is over $150, please do not use the host code since you’ll receive your own Host Dollars plus I’ll still send you the free gift!  This host code can be used by anyone, no club or commitment required.  Let me know if you have any questions.


If you need any stamping supplies, I’d be very happy to be your Demonstrator.  Just click on the Shop Now button on the right side of the screen to go directly to my online store or contact me if you have any questions.  Happy Stamping!

Thanks for stopping by and have a great week!

Akiko

  • Visit my online store here
  • See the current Stampin’ Up! clearance rack specials here
  • Earn FREE Stampin’ Up! products through my Wildflower Frequent Shopper Program – my way of saying thank you to my online frequent shopper customers.
  • Sign up for my weekly newsletter here
  • Have any questions? I’d be happy to help, click here to contact me.

Cardstock Cuts for this project:

  • Bermuda Bay – 4-1/4″ x 11″ card base scored at 5-1/2″, 4-1/4″ x 5-1/2″ (embossed panel), 3/4″ x 3″ (bunting die cut)
  • Granny Apple Green – 3/4″ x 3″ (bunting die cut)
  • Poppy Parade – 1-1/4″ x 2-1/4″ (die cut sentiment), 3-1/8″ x 4-1/2″ (front mat), 3-7/8″ x 5-1/8″ (inside mat)
  • Gray Granite – 1-1/2″ x 3-1/2″ (fence die cut)
  • Crumb Cake – 2″ x 2-3/4″ (hen house die cut)
  • Basic White – 3-3/4″ x 5″ (inside panel), 2-3/4″ x 4″ (die cut small stitched rectangle), 2″ x 2-3/4″ (die cut chick)
  • Oh So Ombre 6″ x 6″ DSP – 3-1/2″ x 4-3/4″ (die cut stitched rectangle), 1/2″ x 3-3/4″ (inside trim)

Stampin’ Up! products used in this project: