Stampin’ Up! Decorative Trees for the Inkin’ Krew Blog Hop

Good Morning! Welcome to the November Inkin’ Krew Team Blog Hop! The theme for this month’s hop is “Merry Christmas or Happy Holidays” and I used the pretty Stampin’ Up! Decorative Trees bundle with the Snowy Scenes designer series paper to make a Z Fold Christmas card. You can find the supplies I used along with card stock cuts at the bottom of my post.

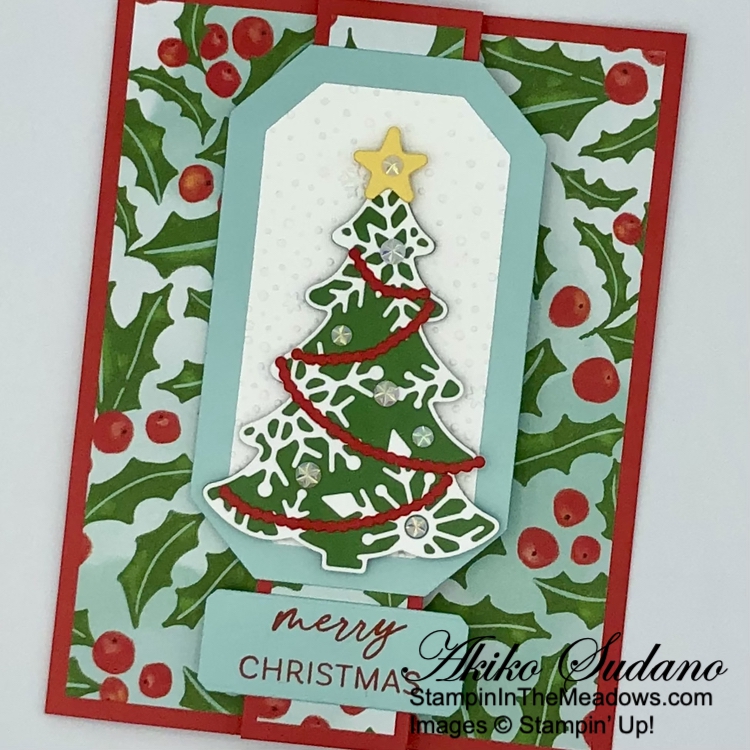
I scored and burnished a 5-1/2″ x 8-1/4″ Poppy Parade card base at 4-1/4″ and 7″ to make a Z fold card with a skinny front section. This 1-1/4″ front section is in the middle of the card, so I had to trim 1/4″ off the normal card length, but it’s nice and symmetric! I adhered the panels of Snowy Scenes designer series paper to the different sections of the card base.

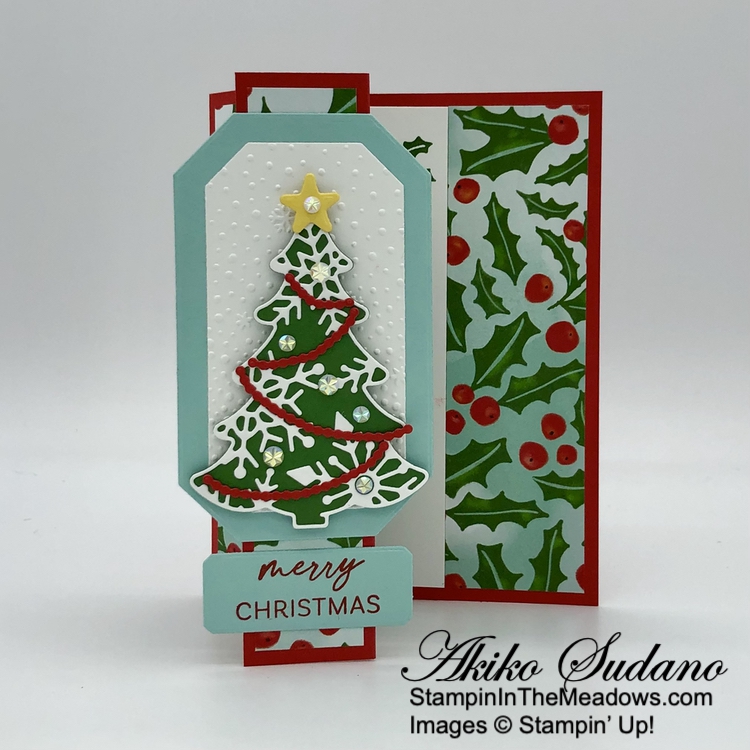
I used the third largest octagon die from the Countryside Corners die to cut a Pool Party panel and the next smallest size to cut a Basic White panel. I embossed the Basic White panel with the Snowflake Sky 3D embossing folder and adhered it to the mat. I adhered the layered octagons to the skinny front panel with liquid glue.

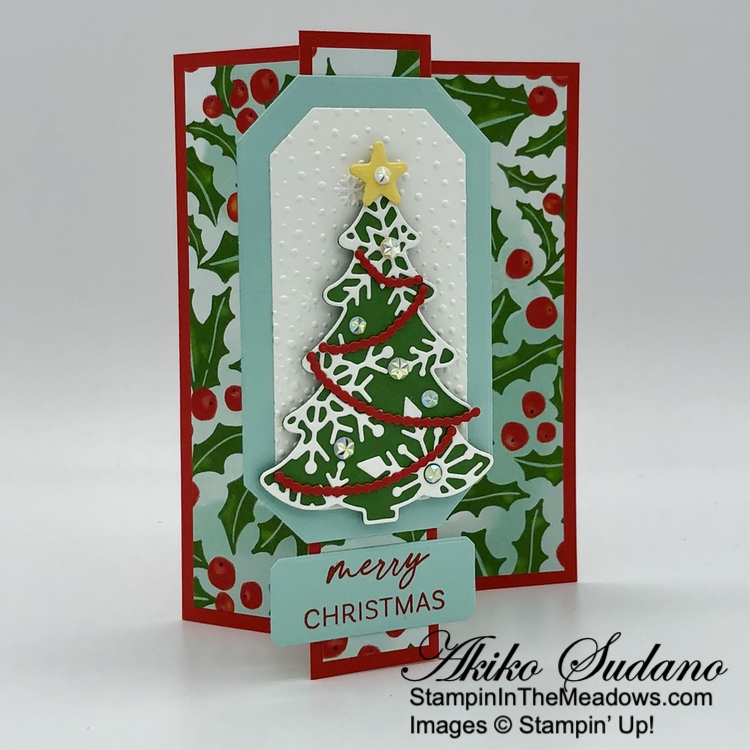
I used the solid tree die from the Stampin’ Up! Decorative Trees dies to cut a Garden Green panel. I applied an adhesive sheet to the back of a Basic White panel and cut it with the snowflake overlay tree die. I pulled off the adhesive backing and adhered the snowflake overlay to the Garden Green tree. I applied adhesive sheets to the back of a Poppy Parade panel and cut the garland dies. I removed the adhesive sheet backing and adhered the garlands to the tree. I cut a Daffodil Delight star and adhered it to the top of the tree and popped the tree onto the octagons with dimensionals. I finished the tree with iridescent faceted gems.

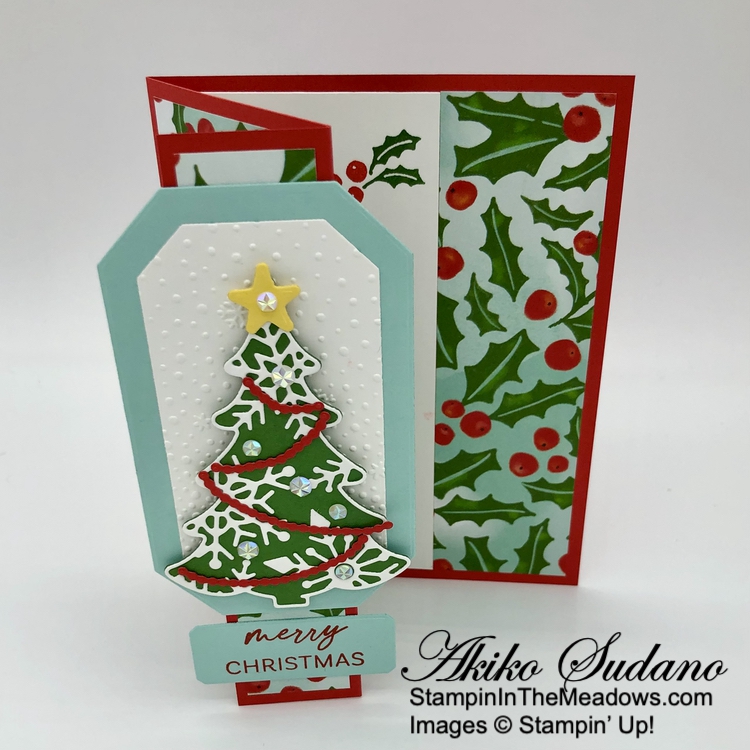
I stamped part of the sentiment from the Stampin’ Up! Decorative Trees stamp set using Poppy Parade ink on a Pool Party panel. I cut it out with the small octagon from the Countryside Corners dies and adhered it to the skinny front panel.

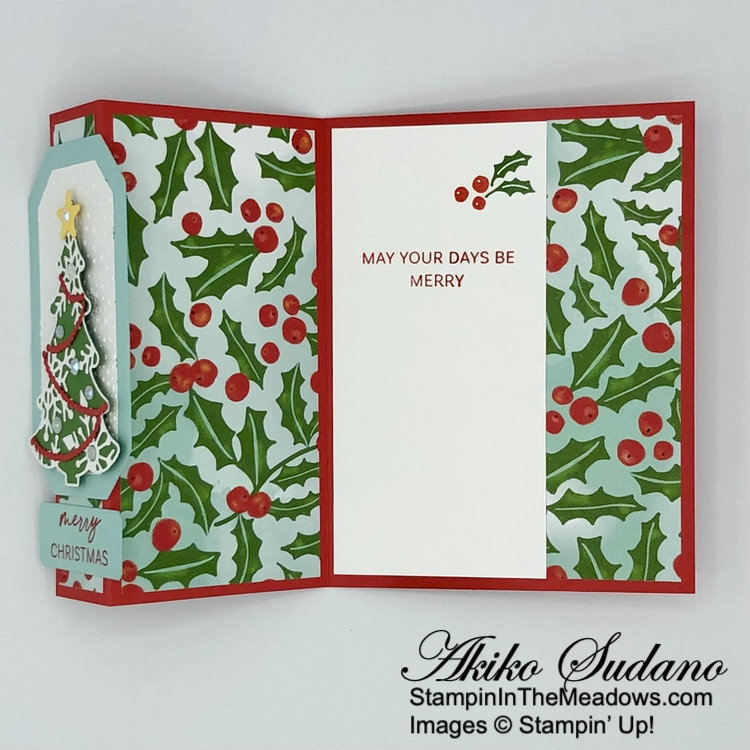
For the inside of the card, I stamped the sentiment from the Stampin’ Up! Decorative Trees stamp set in Poppy Parade ink on a Basic White panel. I stamped the holly leaves and berries from the Snowy Wonder stamp set in Garden Green and Poppy Parade ink in the corner and adhered the panel to the inside of the card with Stampin’ Seal, butting it up next to the DSP trim

The Stampin’ Up! Decorative Trees bundle is one of my favorite Christmas tree bundles of all time! There are so many different looks with the overlays, and even with plain cardstock, the trees are beautiful! They’re also fun to make!!

On With The Hop! Click on the Next Blog button to move forward to Ann Louise’s project or click the Previous Blog button to move back to see the project that Christie created.

If you get lost along the way, here are the participants for the hop:

  1. Tara Carpenter 
  2. Mary Deatherage 
  3. Christie King 
  4. Akiko Sudano  <– you are here
  5. Ann Louise Fodgaard 
  6. Shirley Gentry 
  7. Karen Ksenzakovic 
  8. Sue Prather 
  9. Karen Finkle 
  10. Carol Buckalew 
  11. Amy Koenders

Current Host Code: GBVHGQ4W

Use this host code when you order $50 or more and receive a Thank You gift from me!  The free gift is your choice of any currently available item valued up to $10.00.

If your order is over $150, please do not use the host code since you’ll receive your own Host Dollars plus I’ll still send you the Thank You gift!  This host code can be used by anyone, no club or commitment required. Let me know if you have any questions.


If you need any stamping supplies, I’d be very happy to be your Demonstrator.  Just click on the Shop Now button on the right side of the screen to go directly to my online store or contact me if you have any questions.  Happy Stamping!

Thanks for stopping by and have a great week!

Akiko

  • Visit my online store here
  • See the current Stampin’ Up! clearance rack specials here
  • Earn FREE Stampin’ Up! products through my Wildflower Frequent Shopper Program – my way of saying thank you to my online frequent shopper customers.
  • Have any questions? I’d be happy to help, click here to contact me.

Cardstock Cuts for this project:

  • Poppy Parade – 5-1/2-1/4″ x 8-1/4″ card base, scored at 4-1/4″ and 7″, 1″ x 2-1/2″ (garland die cuts)
  • Pool Party – 2-3/4″ x 4-1/4″ (octagon mat), 1″ x 3″ (label)
  • Garden Green – 2-1/2″ x 3-1/2″ (die cut tree)
  • Daffodil Delight – 1″ x 1″ (die cut star)
  • Basic White – 2-1/2″ x 5-1/4″ (inside panel), 2-1/4″ x 3-3/4″ (embossed octagon), 2-1/2″ x 3-1/2″ (die cut tree overlay)
  • Snowy Scenes DSP – two 2-1/2″ x 5-1/4″ panels (front and back of middle section), 1-1/2″ x 5-1/4″ (inside trim), 1″ x 5-1/4″ (front section background)

Stampin’ Up! products used in this project:

Stampin’ Up! Autumn Leaves for the Inkin’ Krew Blog Hop

Good Morning! Welcome to the October Inkin’ Krew Team Blog Hop! The theme for this month’s hop is “Giving Thanks” and I used the pretty Stampin’ Up! Autumn Leaves stamp set and dies with the Splendid Autumn 6″ x 6″ designer series paper for my card today. You can find the supplies I used along with card stock cuts at the bottom of my post.

I embossed a Crushed Curry panel with the pretty Leaf Fall 3D embossing folder and adhered it to the front of a Crushed Curry card base with liquid glue. I adhered a strip of Oxidized Copper specialty paper to the front.

I adhered a Fall treetop panel of Splendid Autumn 6″ x 6″ designer series paper to a Copper Clay mat and popped it onto the front of the card with dimensionals.

I used the dies from the Stampin’ Up! Autumn Leaves dies to cut a small Lemon Lolly maple leaf and two small copper clay leaves. I adhered the leaves to the card with glue dots.

I stamped the sentiment from the Stampin’ Up! Autumn Leaves stamp set using Copper Clay ink on Old Olive card stock and cut it out with the label die. I made a loopy bow with Copper Clay linen thread and adhered it to the back of the label and popped the label onto the card with dimensionals. I finished with a Copper Clay dot.

For the inside of the card, I stamped the maple leaf veins from the Stampin’ Up! Autumn Leaves stamp set in Lemon Lolly ink on a Basic White panel. I used stamped off Lemon Lolly ink to stamp the leaf over it to reflect a single leaf from the trees on the card front. I adhered a strip of Oxidized Copper specialty paper to the left side and adhered the panel to the inside of the card with Stampin’ Seal.

The wonderful Stampin’ Up! Autumn Leaves stamp set and dies are perfect for making Thanksgiving and other Fall themed cards with the different leaf images, dies and sentiments. And it goes great with the pretty Splendid Autumn 6″ x 6″ designer series paper.

On With The Hop! Click on the Next Blog button to move forward to Christy King’s project or click the Previous Blog button to move back to see the project that Sue Prather created.

If you get lost along the way, here are the participants for the hop:


Current Host Code: BTWRDNAU

Use this host code when you order $50 or more and receive a Thank You gift from me!  The free gift is your choice of any currently available item valued up to $10.00.

If your order is over $150, please do not use the host code since you’ll receive your own Host Dollars plus I’ll still send you the Thank You gift!  This host code can be used by anyone, no club or commitment required. Let me know if you have any questions.


If you need any stamping supplies, I’d be very happy to be your Demonstrator.  Just click on the Shop Now button on the right side of the screen to go directly to my online store or contact me if you have any questions.  Happy Stamping!

Thanks for stopping by and have a great week!

Akiko

  • Visit my online store here
  • See the current Stampin’ Up! clearance rack specials here
  • Earn FREE Stampin’ Up! products through my Wildflower Frequent Shopper Program – my way of saying thank you to my online frequent shopper customers.
  • Have any questions? I’d be happy to help, click here to contact me.

Cardstock Cuts for this project:

  • Crushed Curry – 4-1/4″ x 11″ card base, scored at 5-1/2″, 4-1/4″ x 5-1/2″ (embossed background)
  • Copper Clay – 3-1/8″ x 4-1/8″ (DSP mat), 1-1/4″ x 2″ (die cut leaves)
  • Lemon Lolly – 2″ x 2″ (die cut leaf)
  • Old Olive – 1-1/4″ x 3″ (label)
  • Oxidized Copper specialty paper – 1-1/2″ x 5-1/2″ (front stripe), 1/2″ x 5″ (inside trim)
  • Basic White – 3-3/4″ x 5″ (inside panel)
  • Splendid Autumn 6″ x 6″ DSP – 3″ x 4″ (front panel)

Stampin’ Up! products used in this project:

Stampin’ Up! Choose Happy for the Inkin’ Krew Blog Hop

Good Morning! Welcome to the September Inkin’ Krew Team Blog Hop! The theme for this month’s hop is “Halloween Fun” and I used the sweet Stampin’ Up! Choose Happy stamp set along with the Frosted Forest dies to create a spooky Halloween scene. You can find the supplies I used along with card stock cuts at the bottom of my post.

I adhered a panel of Flowering Zinnias designer series paper to the front of a Pumpkin Pie card base with liquid glue. I cut a mask of the moon using the third smallest circle die from the Stylish shapes dies and adhered the background to a Basic White panel. I used a sponge dauber to apply Lemon Lolly ink to the open circle to make the moon. I removed the mask and covered the moon with the die cut circle. I tore a piece of printer paper and covered the top of the panel and applied Mossy Meadow ink to the bottom edge with a sponge dauber to color the ground. I removed the printer paper and used the other panel cover the ground so I could color the sky.

For the sky, I carefully applied a thin layer of Pumpkin Pie ink next to the ground and colored the rest of the sky lightly with Balmy Blue ink. I used another sponge dauber to apply Blueberry Bushel ink to darken the sky and finally applied Night of Navy ink to intensify the color until I got the look I wanted. I spritzed some water over the sky and blotted it with a paper towel. I removed the mask covering the moon and adhered the panel to a Basic Black mat.

I stamped four pumpkins from the Stampin’ Up! Choose Happy stamp set in Memento Tuxedo Black ink on Basic White. I colored them with Mossy Meadow and Pumpkin Pie Stampin’ Blends. I stamped Jack-O-Lantern faces on two pumpkins and fussy cut them with my paper snips. I used a Basic Black Stampin’ Write marker to color the edges of the card stock, so the white would not show. I used the bare tree die from the Frosted Forest dies to cut a Basic Black panel and adhered the trees to the background with tiny dots of liquid glue.

I arranged the pumpkins on the panel and stamped the ‘Boo‘ sentiment from the Stampin’ Up! Choose Happy stamp set using Memento tuxedo Black ink. I adhered the pumpkins to the panel with dimensionals and adhered the panel to the card front with more dimensionals. I wrapped the top of the card with black baker’s twine, making a bow and added black sparkle dots to the trees.

For the inside of the card, I stamped the ‘happy‘ sentiment from the Stampin’ Up! Choose Happy stamp set in Memento Tuxedo Black ink on a Basic White panel. I used the Mini Alphabet dies to cut letters to spell ‘Halloween‘ from Pumpkin Pie card stock and adhered them with liquid glue. I adhered the Jack-O-Lantern, trimmed the bottom with DSP and adhered the panel to the inside of the card with Stampin’ Seal.

I haven’t done a sponged night scene in a long time, and it was fun to go back to an old technique. This was the first time that I’ve spritzed it with water, and I love how it came out. There are so many Stampin’ Up! dies (and stamp sets) that could be used with this old school technique, and the beauty is that because it’s made by hand, the sky will be different and unique every time!

On With The Hop! Click on the Next Blog button to move forward to Karen Finkle’s project or click the Previous Blog button to move back to see the project that Tara Carpenter created.

If you get lost along the way, here are the participants for the hop:


Current Host Code: 37AE7ZXV

Use this host code when you order $50 or more and receive a Thank You gift from me!  The free gift is your choice of any currently available item valued up to $10.00.

If your order is over $150, please do not use the host code since you’ll receive your own Host Dollars plus I’ll still send you the Thank You gift!  This host code can be used by anyone, no club or commitment required. Let me know if you have any questions.


If you need any stamping supplies, I’d be very happy to be your Demonstrator.  Just click on the Shop Now button on the right side of the screen to go directly to my online store or contact me if you have any questions.  Happy Stamping!

Thanks for stopping by and have a great week!

Akiko

  • Visit my online store here
  • See the current Stampin’ Up! clearance rack specials here
  • Earn FREE Stampin’ Up! products through my Wildflower Frequent Shopper Program – my way of saying thank you to my online frequent shopper customers.
  • Have any questions? I’d be happy to help, click here to contact me.

Cardstock Cuts for this project:

  • Pumpkin Pie – 4-1/4″ x 11″ card base, 5-1/2″ , 1″ x 6″ (die cut letters)
  • Basic Black – 3-5/8″ x 4-1/4″ (front mat), 3″ x 4-1/4″ (die cut trees)
  • Basic White – 3-3/4″ x 5″ (inside panel), 3-1/2″ x 4-1/4″ (art panel), 1-1/2″ x 4″ (fussy cut pumpkins)
  • Flowering Zinnias DSP DSP – 4-1/4″ x 5-1/2″ (front background), 1/2″ x 3-3/4″ (inside trim)

Stampin’ Up! products used in this project:

Stampin’ Up! Simply Zinnia for the Inkin’ Krew Blog Hop

Good Morning! Welcome to the May Inkin’ Krew Team Blog Hop! The theme for this month’s hop is “Fun Fold” and I used the pretty Stampin’ Up! Simply Zinnia bundle and the Flowering Zinnias designer series paper to make an accordion Birthday Card with a belly band. You can find the supplies I used along with card stock cuts at the bottom of my post.

I adhered panels of Flowering Zinnias designer series paper to the front folds of the Melon Mambo accordion card base with liquid glue. This card base is 4″ wide (rather than 4-1/4″) and fits better in the standard envelope with the belly band.

For my belly band panel, I cut a circle from Old Olive using the Spotlight On Nature dies. I cut three sets of zinnia petals (two small and one large) from Real Red and centers from Pumpkin Pie and Daffodil Delight using the Stampin’ Up! Simply Zinnia dies. I assembled the zinnia, adhering it with liquid glue and adhered three leaves to the back – two Mossy Meadow and one Lemon Lime Twist.

I stamped the sentiment from the Unbounded Love stamp set in Old Olive on Basic White and cut it out with the small rectangle die. I used the large rectangle die to cut a mat from Melon Mambo and adhered it to the back of the sentiment. I adhered the label to the die cut circle and adhered the zinnia on top with glue dots. I adhered a panel of Flowering Zinnias DSP to a Melon Mambo strip to make the belly band. I loosely wrapped it around the card so it would slide and secured the ends with Tear-N-Tape. I used glue dots to adhere the decorated circle to the belly band.

I cut the two zinnia bud dies from the Stampin’ Up! Simply Zinnia dies from Real Red and the small stem and leaves from Old Olive. I adhered them with glue dots and adhered them to a die cut circle using the Spotlight on Nature dies. I adhered the decorated die cut circle to the first middle panel with liquid glue.

I stamped the sentiment from the Unbounded Love stamp set in Melon Mambo ink on Basic White and cut it out with the Spotlight on Nature die. I cut small flowers from scraps using the die from the Stampin’ Up! Simply Zinnia dies and adhered them with liquid glue. I adhered the panel to the second middle panel with liquid glue.

For the inside of the card, I stamped the sentiment from the Unbounded Love stamp set in Melon Mambo ink on the left side of a Basic White panel and adhered the last strip of Flowering Zinnias DSP to the right side. I adhered the layered panel to the back panel of the card.

Belly band cards are so fun and special, especially for a birthday. The beautiful die cut flowers from the Stampin’ Up! Simply Zinnia bundle are awesome for decorating a belly band. And it’s wonderful to see all the beautiful papers from the Flowering Zinnias designer series paper on a card!

On With The Hop! Click on the Next Blog button to move forward to Karen Ksenzakovic’s project or click the Previous Blog button to move back to see the project that Karen Finkle created.

If you get lost along the way, here are the participants for the hop:


Current Host Code: SSMUTY4A

Use this host code when you order $50 or more and receive a Thank You gift from me!  The free gift is your choice of any currently available item valued up to $10.00.

If your order is over $150, please do not use the host code since you’ll receive your own Host Dollars plus I’ll still send you the Thank You gift!  This host code can be used by anyone, no club or commitment required. Let me know if you have any questions.


If you need any stamping supplies, I’d be very happy to be your Demonstrator.  Just click on the Shop Now button on the right side of the screen to go directly to my online store or contact me if you have any questions.  Happy Stamping!

Thanks for stopping by and have a great week!

Akiko

  • Visit my online store here
  • See the current Stampin’ Up! clearance rack specials here
  • Earn FREE Stampin’ Up! products through my Wildflower Frequent Shopper Program – my way of saying thank you to my online frequent shopper customers.
  • Have any questions? I’d be happy to help, click here to contact me.

Cardstock Cuts for this project:

  • Melon Mambo – 5-1/2″ x 11″ card base, scored at 1-1/2″ (valley), 4-1/4″ (mountain), and 7″ (valley), 1-1/4″ x 10″ (belly band), 1-3/4″ x 2-1/2″ (label)
  • Mossy Meadow – 2″ x 4″ (die cut leaves)
  • Real Red – 2-1/4″ x ” (die cut zinnia), 1″ x 1-1/2″ (die cut small bud)
  • Daffodil Delight – 1″ x 1″ (flower center)
  • Pumpkin Pie – 1″ x 1″ (flower center)
  • Lemon Lime Twist – 1″ x 2″ (die cut leaf)
  • Old Olive – 3″ x 3″ (belly band circle)
  • Basic White – 3-3/4″ x 5-1/4″ (inside panel), 1-1/2″ x 2-1/4″ (label), 2-1/2″ x 5″ (die cut circles)
  • Flowering Zinnias DSP DSP – 1″ x 10″ (belly Band), three 1-1/4″ x 5-1/4″ panels two 2-3/4″ x 5-1/4″ panels

Stampin’ Up! products used in this project:

Stampin’ Up! Feathered Flight for the Inkin’ Krew Blog Hop

Good Morning! Welcome to the May Inkin’ Krew Team Blog Hop! The theme for this month’s hop is “For the Boys/Men” so I pulled out my Feathered Flight stamp set to make a simple, masculine thinking of you card. The beautiful Thoughtful Journey 6″ x 6″ designer series paper makes a wonderful background for the ducks in the stamp set. You can find the supplies I used along with card stock cuts at the bottom of my post.

I stamped the small flying ducks from the Stampin’ Up! Feathered Flight cling stamp set using Wild Wheat ink on a panel of Thoughtful Journey designer series paper. I adhered the stamped DSP to a Misty Moonlight mat using liquid glue.

I separated a length of Wild Wheat jute and wrapped a single strand around the DSP panel and tied a knot. I adhered the panel to the front of a Boho Blue card base with dimensionals.

I cut two pine sprigs from the Encircled In Nature dies and adhered them to the card with glue dots, tucking them under the jute.

I stamped the sentiment from the Stampin’ Up! Feathered Flight stamp set using Wild Wheat ink on a Boho Blue panel. I cut out the sentiment with the Deckled Rectangles dies using a two step method, lining up one corner and cutting two sides and then cutting the opposite corner and the remaining sides. I adhered the label to the card using dimensionals over the jute and die cut sprigs.

For the inside of the card, I stamped the sentiment from the Stampin’ Up! Feathered Flight stamp set in Wild Wheat ink on a Basic White panel. I used twice stamped off Misty Moonlight ink to stamp the large duck and trimmed the side with DSP. I adhered the panel to a Misty Moonlight mat and then to the inside of the card with Stampin’ Seal.

The Thoughtful Journey 6″ x 6″ designer series paper is so beautiful and I love how it looks with the flying ducks from the Stampin’ Up! Feathered Flight stamp set. A quiet, beautiful morning in the woods with a loved one!

On With The Hop! Click on the Next Blog button to move forward to Carol Buckalew’s project or click the Previous Blog button to move back to see the project that Ann Louise Fodgaard created.

If you get lost along the way, here are the participants for the hop:


Current Host Code: SSMUTY4A

Use this host code when you order $50 or more and receive a Thank You gift from me!  The free gift is your choice of any currently available item valued up to $10.00.

If your order is over $150, please do not use the host code since you’ll receive your own Host Dollars plus I’ll still send you the Thank You gift!  This host code can be used by anyone, no club or commitment required. Let me know if you have any questions.


If you need any stamping supplies, I’d be very happy to be your Demonstrator.  Just click on the Shop Now button on the right side of the screen to go directly to my online store or contact me if you have any questions.  Happy Stamping!

Thanks for stopping by and have a great week!

Akiko

  • Visit my online store here
  • See the current Stampin’ Up! clearance rack specials here
  • Earn FREE Stampin’ Up! products through my Wildflower Frequent Shopper Program – my way of saying thank you to my online frequent shopper customers.
  • Have any questions? I’d be happy to help, click here to contact me.

Cardstock Cuts for this project:

  • Boho Blue – 5-1/2″ x 8-1/2″ card base scored at 4-1/4″, 1″ x 3″ (label)
  • Misty Moonlight – two 4″ x 5-1/4″ panels (front mat and inside mat)
  • Wild Wheat – 1-3/4″ x 2-3/4″ (die cut pine sprigs)
  • Basic White – 3-7/8″ x 5-1/8″ (inside panel)
  • Thoughtful Journey 6″ x 6″ DSP – 3-7/8″ x 5-1/8″ (front background), 1/2″ x 5-1/8″ (inside trim)

Stampin’ Up! products used in this project:

Stampin’ Up! Simply Zinnia for the Inkin’ Krew Blog Hop

Good Morning! Welcome to the March Inkin’ Krew Team Blog Hop! The theme for this month’s hop is “For the Ladies/Girls” and I finally got my Stampin’ Up! Simply Zinnia bundle and used it to make a Mother’s Day card. You can find the supplies I used along with card stock cuts at the bottom of my post.

I adhered a panel of Flowering Zinnias designer series paper to the front of an Old Olive card base. I cut a Basic White panel with the third largest deckled rectangles dies and embossed it with the Zinnia 3D embossing folder before adhering it to the card front wiht liquid glue.

I made a die cut zinnia flower with the Stampin’ Up! Simply Zinnia dies using Blackberry Bliss and Berry Burst petals and Mossy Meadow stems and leaves. I cut a Blackberry Bliss flower back and three Berry Burst petal clusters (1 large and 2 small) and adhered them together with liquid glue. I arranged them so that the petals on each layer fell between the petals on the lower level as much as possible. I cut the flower center from Crushed Curry and Lemon Lolly and adhered them.

I used the Stampin’ Up! Simply Zinnia dies to cut a stem from Mossy Meadow and adhered it to the back of the flower and adhered the flower & stem to the card. I adhered a die cut leaf to each side of the stem with glue dots. I stamped the sentiment from the Perennial Postage stamp set using Mossy Meadow ink on Basic White and cut it out with the fancy label die from the All That dies. I podded it on the card with dimensionals.

I used my dark Berry Burst Stampin’ Blend marker to color a length of Silver & White sheer ribbon and made a bow. I adhered the bow to the card with a glue dot and finished with Berry Burst Tinsel gems.

For the inside of the card, I stamped the sentiment from the Perennial Postage stamp set in Mossy Meadow ink on Basic White. I stamped the large zinnia from the Stampin’ Up! Simply Zinnia stamp set in Stamped off Berry Burst ink next to the sentiment. I covered it with a mask and stamped the leaves using Lemon Lime Twist ink. I trimmed the bottom with DSP and adhered the panel to the inside of the card with Stampin’ Seal.

The Stampin’ Up! Simply Zinnia bundle is so pretty and I was so happy to finally get my set. I’ve had zinnias in my summer gardens for years, and I remember my Mom having them in her garden, too. So I think they’re perfect for Mother’s Day.

On With The Hop! Click on the Next Blog button to move forward to Mary Deatherage’s project or click the Previous Blog button to move back to see the project that Ann Louise Fodgaard created.

If you get lost along the way, here are the participants for the hop:

  1. Carol Buckalew 
  2. Nel Thames 
  3. Karen Ksenzakovic 
  4. Shirley Gentry 
  5. Ann Louise Fodgaard 
  6. Akiko Sudano  <– You Are Here
  7. Mary Deatherage 
  8. Karen Finkle
  9. Tara Carpenter
  10. Amy Koenders

Current Host Code: 9WAA9JP9

Use this host code when you order $50 or more and receive a Thank You gift from me!  The free gift is your choice of any currently available item valued up to $10.00.

If your order is over $150, please do not use the host code since you’ll receive your own Host Dollars plus I’ll still send you the Thank You gift!  This host code can be used by anyone, no club or commitment required. Let me know if you have any questions.


If you need any stamping supplies, I’d be very happy to be your Demonstrator.  Just click on the Shop Now button on the right side of the screen to go directly to my online store or contact me if you have any questions.  Happy Stamping!

Thanks for stopping by and have a great week!

Akiko

  • Visit my online store here
  • See the current Stampin’ Up! clearance rack specials here
  • Earn FREE Stampin’ Up! products through my Wildflower Frequent Shopper Program – my way of saying thank you to my online frequent shopper customers.
  • Have any questions? I’d be happy to help, click here to contact me.

Cardstock Cuts for this project:

  • Old Olive – 5-1/2″ x 8-1/2″ card base scored at 4-1/4″
  • Blackberry Bliss – 2-1/4″ x 2-1/2″ (flower backing die cut)
  • Berry Burst – three 2″ x 2-1/2″ panels (flower petal die cuts)
  • Mossy Meadow – 1/2″ x 4″ (flower stem), 1-1/4″ x 2-1/2″ (leaves)
  • Crushed Curry – 1″ x 1″ (flower center)
  • Lemon Lolly – 1″ x 1″ (flower center)
  • Basic White – 4″ x 5-1/4″ (inside panel), 3-1/2″ x 4-3/4″ (embossed panel), 2-1/4″ x 3″ (label)
  • Flowering Zinnias DSP – 4″ x 5-1/4″ (front background), 1/2″ x 4″ (inside trim)

Stampin’ Up! products used in this project:

Stampin’ Up! Trucking Along for the Inkin’ Krew Blog Hop

Good Morning! Welcome to the March Inkin’ Krew Team Blog Hop! The theme for this month’s hop is “Celebrate Spring” and I used the fun Stampin’ Up! Trucking Along bundle with the Meandering Meadows 6″ x 6″ designer series paper to celebrate celebrate spring with a drive in the countryside to pick up garden flowers. You can find the supplies I used along with card stock cuts at the bottom of my post.

I embossed a panel of Meandering Meadows 6″ x 6″ designer series paper with the Painted Textures 3D embossing folder and adhered it to a Starry Sky mat.

I cut another panel of the DSP with the largest Stylish Shapes circle die. I used an old school technique to make the mat – I flipped the die over on Starry Sky card stock and traced a circle. I used my paper snips to fussy cut the circle and adhered the DSP to the back. I would have preferred a die cut or punched circle, but I didn’t have one and this technique worked out well. I adhered the layered circle to my embossed panel with liquid glue.

I wrapped the panel with a length of Pecan Pie ribbon and secured it in the back with Stampin’ Seal to make a “road” and adhered the panel to a Balmy Blue card base with dimensionals. I stamped the flower stamp from the Stampin’ Up! Trucking Along stamp set in Memento Tuxedo Black ink and colored them with Fresh Freesia, Petal Pink, Pecan Pie, Granny Apple Green and Shaded Spruce Stampin’ Blends.

I stamped the outline of the truck using the stamp from the Stampin’ Up! Trucking Around stamp set in Memento Tuxedo Black ink on Basic White. I stamped the filler in Balmy Blue and colored the windows with the light Pool Party Stampin’ Blend. I used the Smoky Slate Stampin’ Blends to color the wheels and fenders. I punched the truck out with the Stampin’ Up! Trucking Along builder punch and adhered it to the card with dimensionals. I fussy cut the stamped flowers with my paper snips and tucked it into the back of the truck, adhering it with a glue dot. I finished the card with brass swallows.

For the inside of the card, I stamped the sentiment from the Stampin’ Up! Trucking Along stamp set in Starry Sky ink on Basic White. I stamped the flower stamp several times along the bottom in Memento Tuxedo Black ink and colored them with Fresh Freesia, Petal Pink, Pecan Pie, Granny Apple Green and Shaded Spruce Stampin’ Blends. I adhered the panel to the inside of the card with Stampin’ Seal.

The Stampin’ Up! Trucking Along bundle is so cute and has so many cute stamps that you can use to full the truck bed for all different seasons. Hopefully I’ll be heading out soon to find flowers for my garden too!

On With The Hop! Click on the Next Blog button to move forward to Shirley Gentry’s project or click the Previous Blog button to move back to see the project that Terry Lynn Bright created.

If you get lost along the way, here are the participants for the hop:

  1. Nel Thames 
  2. Carol Buckalew 
  3. Karen Finkle 
  4. Tara Carpenter 
  5. Karen Ksenzakovic 
  6. Terry Lynn Bright 
  7. Akiko Sudano  <– You Are Here
  8. Shirley Gentry 
  9. Mary Deatherage 
  10. Ann Louise Fodgaard 
  11. Amy Koenders

Current Host Code: XR9HAEK4

Use this host code when you order $50 or more and receive a Thank You gift from me!  The free gift is your choice of any currently available item valued up to $10.00.

If your order is over $150, please do not use the host code since you’ll receive your own Host Dollars plus I’ll still send you the Thank You gift!  This host code can be used by anyone, no club or commitment required. Let me know if you have any questions.


If you need any stamping supplies, I’d be very happy to be your Demonstrator.  Just click on the Shop Now button on the right side of the screen to go directly to my online store or contact me if you have any questions.  Happy Stamping!

Thanks for stopping by and have a great week!

Akiko

  • Visit my online store here
  • See the current Stampin’ Up! clearance rack specials here
  • Earn FREE Stampin’ Up! products through my Wildflower Frequent Shopper Program – my way of saying thank you to my online frequent shopper customers.
  • Have any questions? I’d be happy to help, click here to contact me.

Cardstock Cuts for this project:

  • Balmy Blue – 4-1/4″ x 11″ card base scored at 5-1/2″
  • Starry Sky – 3-3/4″ x 5″ (front mat), 3-1/4″ x 3-1/4″ (fussy cut circle)
  • Basic White – 3-3/4″ x 5″ (inside panel), 1-3/4″ x 3″ (truck), 1″ x 2″ (fussy cut flowers)
  • Meandering Meadows 6″ x 6″ DSP – 3-5/8″ x 4-7/8″ (front background), 3-1/4″ x 3-1/4″ (die cut circle)

Stampin’ Up! products used in this project:

Stampin’ Up! Trusty Tools for the Inkin’ Krew Blog Hop

Good Morning! Welcome to the February Inkin’ Krew Team Blog Hop! The theme for this month’s hop is “Birthday” and I used the Stampin’ Up! Trusty Tools bundle with the Trusty Toolbox Sale-A-Bration designer series paper to make a fun fold masculine birthday card. You can find the supplies I used along with card stock cuts at the bottom of my post.

I cut and scored the Gray Granite and Lost Lagoon card bases for my Joy Fold card and adhered panels of Trusty Toolbox designer series paper to the back section and front and back of the front flap of the Gray Granite card base and to the front and back of the front flap of the Lost Lagoon mini card. I used different patterns for each panel and adhered them with liquid glue. I adhered the Lost Lagoon mini card to the inside of the main Gray Granite card base with liquid glue, placing the hinge on the right side.

I used the drill dies from the Stampin’ Up! Trusty Tools dies to cut Crushed Curry, Gray Granite, Copper Clay, Lost Lagoon and Basic Black card stock. For the Basic Black and Lost Lagoon sections, I used the large drill die to partially cut the pieces and finished cutting with paper snips. I adhered the die cuts together with liquid glue and adhered the drill to the front flap of the large card base. 

I used the Stampin’ Up! Trusty Tools dies to cut the pencil, tape measure and paintbrush from Trusty Toolbox DSP and fussy cut the screwdriver and pliers. I used dies to cut nuts and bolts from Gray Granite card stock and adhered the all the tools to the inside flaps with liquid glue.

I stamped the Happy Birthday sentiment from the Carousel Horses stamp set in Memento Tuxedo Black in on a strip of Trusty Toolbox DSP and cut it out with the Gorgeously Made label die. I cut the toolbox from Copper Clay card stock using the Stampin’ Up! Trusty Tools dies. I adhered the handle to the mini card front with liquid glue and adhered the label on top. I adhered more die cut and fussy cut Trusty Toolbox DSP tools to the card and popped the toolbox on top with dimensionals. I adhered a die cut DSP hammer on top with glue dots and dimensionals.

For the inside of the card, I stamped the sentiment from the Stampin’ Up! Trusty Tools stamp set in Lost Lagoon ink on Basic White. I stamped the nuts and bolts in Gray Granite and adhered the panel to the inside of the card with Stampin’ Seal.

The Stampin’ Up! Trusty Tools bundle is a great tool themed bundle that is perfect for making cards for your handy man or handy lady who is great at fixing things.

On With The Hop! Click on the Next Blog button to move forward to Amy Koender’s project or click the Previous Blog button to move back to see the project that Nel Thames created.

If you get lost along the way, here are the participants for the hop:

UPDATE: I decided to enter this card in the Creative Creases Challenge #75 – Anything Goes with a Fun Fold. Check out the other fun folds:


Current Host Code: M3WQ2HCB

Use this host code when you order $50 or more and receive a Thank You gift from me!  The free gift is your choice of any currently available item valued up to $10.00.

If your order is over $150, please do not use the host code since you’ll receive your own Host Dollars plus I’ll still send you the Thank You gift!  This host code can be used by anyone, no club or commitment required. Let me know if you have any questions.


If you need any stamping supplies, I’d be very happy to be your Demonstrator.  Just click on the Shop Now button on the right side of the screen to go directly to my online store or contact me if you have any questions.  Happy Stamping!

Thanks for stopping by and have a great week!

Akiko

  • Visit my online store here
  • See the current Stampin’ Up! clearance rack specials here
  • Earn FREE Stampin’ Up! products through my Wildflower Frequent Shopper Program – my way of saying thank you to my online frequent shopper customers.
  • Have any questions? I’d be happy to help, click here to contact me.

Cardstock Cuts for this project:

  • Gray Granite – 4-1/4″ x 8-1/2″ card base scored at 5-1/2″, 1″ x 3-1/2″ (die cut tools)
  • Lost Lagoon – 3″ x 8″ mini card base scored at 4″, 1″ x 2″ (die cut tools)
  • Copper Clay – 3″ x 4″ (die cut tool box)
  • Crushed Curry – 2″ x 2-3/4″ (die cut tools)
  • Basic Black – 1″ x 1-1/2″ (die cut tools)
  • Basic White – 2-3/4″ x 3-3/4″ (inside panel)
  • Trusty Toolbox DSP – 3-3/4″ x 5″ (inside background), two 2-3/4″ x 4″ panels (large card front flap), two 2-3/4″ x 3-3/4″ panels (mini card front flap), 1″ x 3″ (label), die cut and fussy cut tools

Stampin’ Up! products used in this project:

Stampin’ Up! Lovely and Sweet for the Inkin’ Krew Blog Hop

Good Morning! Welcome to the December Inkin’ Krew Team Blog Hop! The theme for this month’s hop is “Love” and I used the Stampin’ Up! Lovely and Sweet bundle with the pretty Most Adored Sale-A-Bration specialty designer series paper to make a Petal Pink love card. You can find the supplies I used along with card stock cuts at the bottom of my post.

I used a blending brush to apply Petal Pink ink all over a panel of gold floral Most Adored Sale-A-Bration specialty designer series paper and adhered it to a Pebbled Path mat with Stampin’ Seal. I adhered the layered panel to the front of a Petal Pink card base.

I used the large floral die from the Stampin’ Up! Lovely and Sweet dies to cut a gold foil design from the Nature’s Sweetness specialty DSP – I love when dies cut out DSP images!. I adhered the die cut to the card front with dimensionals. I folded a length of gold ribbon and adhered it to the card with glue dots.

I cut several three sets of flowers from Petal Pink using the dies from the Stampin’ Up! Lovely and Sweet die set. I cut three small stems and three small leaf clusters from Lost Lagoon. I adhered the flowers to the stems and ahdered them to the leaves with liquid glue.

I adhered two of the layered flower die cuts to the card front with liquid glue. I stamped the sentiment from the Stampin’ Up! Lovely and Sweet stamp set in Pebbled Path ink on Petal Pink card stock and cut it out with the label die. I adhered it to the card with dimensionals, using a double layer of dimensionals on the bottom. I finished the flowers with iridescent foil gems.

For the inside of the card, I stamped the little grid from the Stampin’ Up! Lovely and Sweet stamp set in stamped-off Pebbled Path ink in the corner of a Basic White panel. I trimmed the bottom with a strip of Most Adored specialty DSP that I colored Petal Pink. I adhered the third flower and stem die cuts to the panel with liquid glue and adhered the panel to the inside of the card with Stampin’ Seal.

The Stampin’ Up! Lovely and Sweet bundle has pretty images and wonderful little die cuts that are so versatile. And I love the gold foil designer series papers – they can be colored in to go with any color palette!

On With The Hop! Click on the Next Blog button to move forward to Amy Koender’s project or click the Previous Blog button to move back to see the project that Mary Deatherage created.

If you get lost along the way, here are the participants for the hop:


Current Host Code: 4X6DDWUC

Use this host code when you order $50 or more and receive a Thank You gift from me!  The free gift is your choice of any currently available item valued up to $10.00.

If your order is over $150, please do not use the host code since you’ll receive your own Host Dollars plus I’ll still send you the Thank You gift!  This host code can be used by anyone, no club or commitment required. Let me know if you have any questions.


If you need any stamping supplies, I’d be very happy to be your Demonstrator.  Just click on the Shop Now button on the right side of the screen to go directly to my online store or contact me if you have any questions.  Happy Stamping!

Thanks for stopping by and have a great week!

Akiko

  • Visit my online store here
  • See the current Stampin’ Up! clearance rack specials here
  • Earn FREE Stampin’ Up! products through my Wildflower Frequent Shopper Program – my way of saying thank you to my online frequent shopper customers.
  • Have any questions? I’d be happy to help, click here to contact me.

Cardstock Cuts for this project:

  • Petal Pink – 5-1/2″ x 8-1/2″ card base scored at 4-1/4″,1-1/4″ x 2-1/2″ (label), 1″ x 2″ (die cut flowers)
  • Pebbled Path – 3-5/8″ x 5-1/8″ (front mat)
  • Lost Lagoon – 1-1/4″ x 4-1/2″ (die cut leaves and stems)
  • Basic White – 3-3/4″ x 5″ (inside panel)
  • Most Adored specialty DSP – 3-3/4″ x 5″ (front background), 1/2″ x 3-3/4″ (inside trim)
  • Nature’s Sweetness specialty DSP – large floral die cut

Stampin’ Up! products used in this project:

Stampin’ Up! Sentimental Park for the Inkin’ Krew Blog Hop

Good Morning! Welcome to the December Inkin’ Krew Team Blog Hop! The theme for this month’s hop is “Celebrate” and I used the Stampin’ Up! Sentimental Park stamp set with the beautiful new Flight and Airy Sale-A-Bration designer series paper that will be available on January 4, 2024. You can find the supplies I used along with card stock cuts at the bottom of my post.

Today’s card is celebrating a special birthday and it’s a dainty gate fold card.

I adhered panels of the new Flight and Airy designer series paper to the front panels of a Misty Moonlight card base with liquid glue. I cut a Misty Moonlight panel with the large floral label die from the Stampin’ Up! Sentimental Park dies and I cut a panel of Flight and Airy DSP with a sweet bird with the plain die. I inserted the bird die cut into the slots of the floral die cut – I love how this works!

I cut several small flowers from Flirty Flamingo and Petal Pink and adhered them to the larger die cut and adhered some pink pearls to some flower centers. I adhered the panel to the left side of the card with liquid glue applied to half of the die cut.

I stamped the sentiment from the Stampin’ Up! Sentimental Park stamp set in Misty Moonlight ink on Petal Pink and cut it out with the small banner die from the Stylish Shapes dies using the two-step die cutting technique. I adhered it to the card with glue dots and finished the card front with a Night of Navy bow.

For the inside of the card, I stamped the sentiments from the Stampin’ Up! Sentimental Park stamp set in Misty Moonlight ink on a Basic White panel. I stamped the flowers in Petal Pink ink in the corner and colored them with Daffodil Delight, Petal Pink and Flirty Flamingo Stampin’ Blends. I used the dark Granny Apple Green Stampin’ Blend to color the berries and made some stems. I adhered the panel to the inside of the card and adhered two floral panels of Flight and Airy DSP to the inside of the front flaps.

The Flight and Airy DSP is a Sale-A-Bration item that you will be able to get for free with a $50 purchase when Sale-A-Bration starts on January 4, 2024 and it’s so pretty! And it goes so well with the Stampin’ Up! Sentimental Park stamp set and dies and so many other current and retired Stampin’ Up sets. Be sure to check it out!

On With The Hop! Click on the Next Blog button to move forward to Nel Thames’ project or click the Previous Blog button to move back to see the project that Terry Lynn Bright created.

If you get lost along the way, here are the participants for the hop:


Current Host Code: 27CYQXTT

Use this host code when you order $50 or more and receive a Thank You gift from me!  The free gift is your choice of any currently available item valued up to $10.00.

If your order is over $150, please do not use the host code since you’ll receive your own Host Dollars plus I’ll still send you the Thank You gift!  This host code can be used by anyone, no club or commitment required. Let me know if you have any questions.


If you need any stamping supplies, I’d be very happy to be your Demonstrator.  Just click on the Shop Now button on the right side of the screen to go directly to my online store or contact me if you have any questions.  Happy Stamping!

Thanks for stopping by and have a great week!

Akiko

  • Visit my online store here
  • See the current Stampin’ Up! clearance rack specials here
  • Earn FREE Stampin’ Up! products through my Wildflower Frequent Shopper Program – my way of saying thank you to my online frequent shopper customers.
  • Have any questions? I’d be happy to help, click here to contact me.

Cardstock Cuts for this project:

  • Misty Moonlight – 4-1/4″ x 11″ card base scored at 2-3/4″ and 8-1/4″
  • Petal Pink – 2″ x 3″ (die cut flowers), 1″ x 3″ (label)
  • Flirty Flamingo – 1″ x 3″ (die cut flowers)
  • Basic White – 4″ x 5-1/4″ (inside panel)
  • Light and Airy DSP – 2″ x 4″ (die cut bird), two 2-5/8″ x 4-1/8″ panels (front background panels), two 2-1/2″ x 4″ (inside panels)

Stampin’ Up! products used in this project: