Good Morning! The Stampin’ Up! Easter Lilies bundle has beautiful lilies, both stamped and die cut. I used the gorgeous stamped flowers with the inspirational sentiments to make an Easter card. You can find the products I used at the bottom of my post along with the card stock sizes.
I embossed a Lemon Lolly panel with the beautiful Layered Florals 3D embossing folder and adhered it to the front of a Lemon Lolly card base. I cut a Basic White panel with the large rectangular die from the Thoughtful Expressions dies and adhered it to the card with liquid glue.
I stamped the flowers, buds and stems from the Stampin’ Up! Easter Lilies stamp set in Memento Tuxedo Black ink on Basic White and cut them out with the coordinating dies. I colored the flower centers with Daffodil Delight and Lemon Lolly Stampin’ Blends and the stems and leaves with the Granny Apple Green Stampin’ Blends. I adhered the stem, buds and small flower to the card with glue dots and popped the large flower on the card with dimensionals.
I stamped the sentiment from the Stampin’ Up! Easter Lilies stamp set in Versamark ink on Basic White. I sprinkled it with silver embossing powder and shook off the excess. I heated the powder with my heat tool until it was bright and shiny and cut it out with the small rectangular die from the Thoughtful Expressions dies. I adhered the label to the card front with glue dots and finished the card with a Lemon Lolly bow and sparkling gems.
For the inside of the card, I stamped the palm fronds from the Stampin’ Up! Easter Lilies stamp set in stamped-off Granny Apple Green ink in the corners of a Basic White panel. I stamped the sentiment inn Memento Tuxedo Black ink and adhered the panel to the inside of the card with Stampin’ Seal.
The flowers in the Stampin’ Up! Easter Lilies bundle are great for Easter cards, especially with the beautiful, inspirational sentiments. And they are also perfect for other lilies like the fragrant pink Stargazers, or even summer Day Lilies. So these are a must have if you are a lily lover!
Current Host Code: XR9HAEK4
Use this host code when you order $50 or more and receive a Thank You gift from me! The free gift is your choice of any item currently available valued up to $10.00.
If your order is over $150, please do not use the host code since you’ll receive your own Host Dollars plus I’ll still send you the Thank You gift! This host code can be used by anyone, no club or commitment required. Let me know if you have any questions.
If you need any stamping supplies, I’d be very happy to be your Demonstrator. Just click on the Shop Now Button on the right side of the screen to go directly to my Online store or contact me if you have any questions. Happy Stamping!
Good Morning! I’ve been busy with cleaning out my craft room and organizing my supplies. This seems to be never ending, but I did manage to make a quick card with the Stampin’ Up! Perennial Postage bundle. I am CASE’ing a card from the Mini Catalog, but with so much of a mess, I was inspired to combine the old with the new and pair the new bundle with the Countryside Inn designer series paper. You can find the products I used at the bottom of my post along with the card stock sizes.
The Countryside Inn Suite in the Annual Catalog is such a pretty set of products, and there are so many different floral and graphic patterns in the DSP, so I thought it would be great with a layered postage stamp card. I started by embossing a Boho Blue panel with the Countryside Blossoms embossing folder and adhered it to a Boho Blue mat. I popped it on a Boho Blue card base with dimensionals.
I cut several different squares and rectangles of the Countryside Inn designer series paper using the large square and a couple of the rectangle dies from the Stampin’ Up! Perennial Postage dies. I tried to replicate the pattern in the catalog, but I had to change it up, so that it looked right to me. And then I wanted to make sure I got the bunny in there above where I wanted to put the label. I laid them all out and then took a picture and adhered them with liquid glue. And then I changed the arrangement from my picture, but the bunny is in the right place.
I stamped the sentiment from the Stampin’ Up! Perennial Postage stamp set in Versamark ink on Misty Moonlight. I sprinkled it with white embossing powder and shook off the excess. I heated it with my heat tool until it was bright and shiny and cut it out with one of the rectangle postage stamp dies. I used the two step method, so it’s just a little longer, but it’s so easy to do with these dies. I adhered some Boho Blue ribbon with some Stampin’ Seal and popped the label on top with dimensionals. I finished with three Misty Moonlight tinsel gems.
For the inside of the card, I stamped the flowers and stems from the Lasting Joy stamp set in Night of Navy and Boho Blue on a Basic White panel. They go so nicely with the Countryside Inn designer series paper. I cut the edge of a strip of DSP with the second largest postage square rectangle from the Stampin’ Up! Perennial Postage dies and adhered it to the the panel. I adhered the panel to the inside of the card with Stampin’ Seal.
I love how easy it is to combine two pretty Stampin’ Up! suites and make a card. The Stampin’ Up! Perennial Postage dies are so versatile!
Sale-A-Bration Is Ending Tomorrow!
Sale-A-Bration is Stampin’ Up!’s best promotion of the year with specials for Shopping, Hosting and Joining!
Shopping
Choose a FREE Sale-A-Bration item from the Sale-A-Bration Brochure with every $50 or $100 you spend (before tax and shipping). The Sale-A-Bration brochure has eleven items available for free with orders of $50 or greater and three items you can pick from with orders of $100 or greater! The free Sale-A-Bration items are stackable, so if you place an order of $150, you can choose to add three $50 items or one $100 item and one $50 item to your order! The Sale-A-Bration items are only available while supplies last, so order early if there are items that you are really wanting!
Hosting
Host a party of $300 or more and get an additional $30 in Stampin’ Rewards! Normally a $300 party will result in $36 in Stampin’ Rewards for the host, but during Sale-A-Bration a $300 party will result in $66 in Stampin’ Rewards! Stampin’ Rewards are redeemed to get free items from any current catalog. And if you have a large enough shopping list, you will get the Sale-A-Bration Host rewards in a single order (and that’s in addition to the Sale-A-Bration shopping items)!
If you’d like to set up a host code to see if you can collect $300 in orders, I’d be happy to help you with that! Reach out to me at apsudano@stampininthemeadows.com.
Joining
Sale-A-Bration is one of the best times to join Stampin’ Up! as a new demonstrator and there are two fantastic options for purchasing your Starter Kit during Sale-A-Bration
Option 1:
Customers who join our fun crafting community as a new demonstrator can get $125 worth of product PLUS our Stampin’ Glass Mat Studio* (a $60 USD) for just $99! The Glass Mat Studio includes a 17″ x 14″ safety-tempered glass mat, a gray 8-1/4″ x 8-1/4″ lint-free, reusable cleaning cloth and a 8-3/4″ x 6″ white 4-palette silicone mat.
Option 2:
Customers who want to join Stampin’ Up! during Sale-A-Bration but are interested in a different join option can instead get $125 worth of product PLUS an additional $30 worth of product of their choice when they join for $99. That’s $155 in products for $99!
Once you join, you’ll get at least a 20% discount on all of your Stampin’ Up! merchandise purchases AND you get to order early from upcoming catalogs! There is NO COMMITMENT and NO REQUIREMENT TO SELL to anyone. You can join and just get the discount for yourself! Contact me at apsudano@stampininthhemeadows.com if you’d like more information about joining or purchasing the Starter Kit!
Click on the image below to open a PDF of the Sale-A-Bration Brochure to see all the Sale-A-Bration items and get additional details:
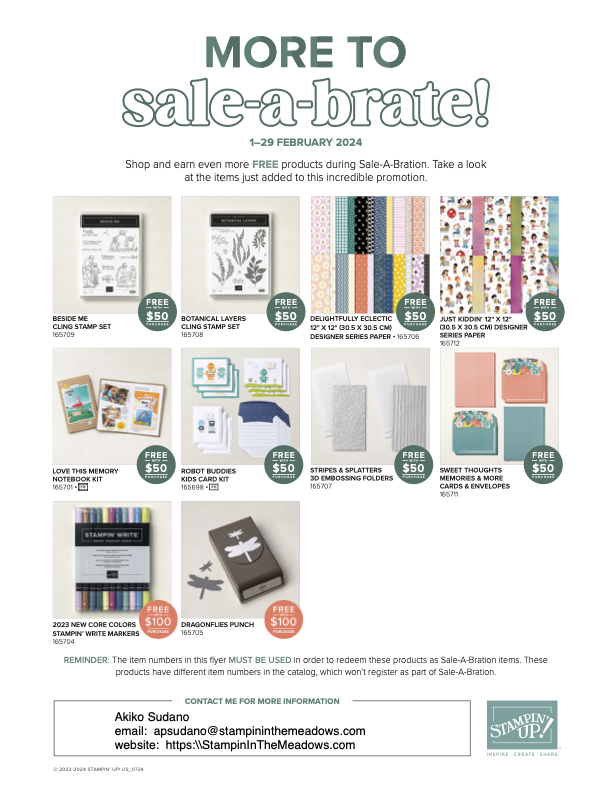
SURPRISE! Stampin’ Up! Is giving us even more to Sale-A-Brate! They just released even more products you can earn for FREE! Take a look at the products just added to this promotion by clicking on the image below to download a PDF. Get Shopping! Sale-A-Bration ends 29 February!
Current Host Code: XR9HAEK4
Use this host code when you order $50 or more and receive a Thank You gift from me! The free gift is your choice of any item currently available valued up to $10.00.
If your order is over $150, please do not use the host code since you’ll receive your own Host Dollars plus I’ll still send you the Thank You gift! This host code can be used by anyone, no club or commitment required. Let me know if you have any questions.
If you need any stamping supplies, I’d be very happy to be your Demonstrator. Just click on the Shop Now Button on the right side of the screen to go directly to my Online store or contact me if you have any questions. Happy Stamping!
See the current Stampin’ Up! clearance rack specials here
Earn FREE Stampin’ Up! products through my Wildflower Frequent Shopper Program – my way of saying thank you to my online frequent shopper customers.
Have any questions? I’d be happy to help, click here to contact me.
Cardstock Cuts for this project:
Boho Blue – 4-1/4″ x 11″ card base, scored at 5-1/2″, 4″ x 5-1/4″ (front mat), 3-7/8″ x 5-1/8″ (embossed background)
Misty Moonlight – 1-2″ x 2-1/2″ (label)
Basic White – 4″ x 5-1/4″ (inside panel_
Countryside Inn DSP – 4″ x 5″ (postage stamp die cuts), 3″ x 4″ (postage stamp die cuts), 2-1/4″ x 3″ (postage stamp die cuts), 3/4″ x 4″ (die cut inside trim)
Good Morning! If you’re like me, you can’t wait for the cold weather to be over and Spring to arrive. Well I used the Stampin’ Up! Bright Skies bundle with the pretty Sunny Days Sale-A-Bration designer series paper to help me focus on Spring. You can find the products I used at the bottom of my post along with the card stock sizes.
I adhered a panel of the pretty Sunny Days Sale-A-Bration designer series paper to the front of a Pool Party Card base. I used the cloud dies from the Stampin’ Up! Bright Skies dies to cut some clouds from the cloud pattern DSP and arranged them on the card. I trimmed the sides of two of the clouds and adhered the large cloud to the card with liquid glue.
I stamped the sun from the Stampin’ Up! Bright Skies stamp set tin Daffodil Delight on Basic White. I cut it out with the coordinating die – it’s a little tricky to line up, so be patient. I cut the circle from Daffodil Delight card stock and adhered it to the center before adhering the sun to the card. I adhered the smaller clouds to the card with dimensionals. I used the Stampin’ Up! Bright Skies dies to cut the tulips and stems from Poppy Parade and Granny Apple Green card stock and adhered them to the card with liquid glue and dimensionals.
I tore the top of a Shaded Spruce strip and adhered it to the bottom of the card to simulate grass (shout out to old school techniques!). I stamped the sentiment from the Stampin’ Up! Bright Skies stamp set in Memento Tuxedo Black ink on Basic White and punched the end with the Banners Pick-A-Punch. I adhered the label with dimensionals and finished with fun Pool Party lightning bolts.
For the inside of the card, I stamped the flower from the Stampin’ Up! Bright Skies stamp set in Poppy Parade and the stem in Granny Apple Green in the bottom corner of a Basic White card base. I trimmed the top of the panel with a strip of DSP and adhered the panel to the inside of the card with Stampin’ Seal.
I love the Stampin’ Up! Bright Skies bundle – it has so many Spring stamps and dies and happy sentiments. And it really goes well with the pretty Sunny Days Sale-A-Bration designer series paper. Are you ready for the brighter skies of Spring?
Sale-A-Bration Is Ending Soon!
Sale-A-Bration is ends this Thursday, February 29. It is Stampin’ Up!’s best promotion of the year with specials for Shopping, Hosting and Joining!
Shopping
Choose a FREE Sale-A-Bration item from the Sale-A-Bration Brochure with every $50 or $100 you spend (before tax and shipping). The Sale-A-Bration brochure has eleven items available for free with orders of $50 or greater and three items you can pick from with orders of $100 or greater! The free Sale-A-Bration items are stackable, so if you place an order of $150, you can choose to add three $50 items or one $100 item and one $50 item to your order! The Sale-A-Bration items are only available while supplies last, so order early if there are items that you are really wanting!
Hosting
Host a party of $300 or more and get an additional $30 in Stampin’ Rewards! Normally a $300 party will result in $36 in Stampin’ Rewards for the host, but during Sale-A-Bration a $300 party will result in $66 in Stampin’ Rewards! Stampin’ Rewards are redeemed to get free items from any current catalog. And if you have a large enough shopping list, you will get the Sale-A-Bration Host rewards in a single order (and that’s in addition to the Sale-A-Bration shopping items)!
Joining
Sale-A-Bration is one of the best times to join Stampin’ Up! as a new demonstrator and there are two fantastic options for purchasing your Starter Kit during Sale-A-Bration
Option 1:
Customers who join our fun crafting community as a new demonstrator can get $125 worth of product PLUS our Stampin’ Glass Mat Studio* (a $60 USD) for just $99! The Glass Mat Studio includes a 17″ x 14″ safety-tempered glass mat, a gray 8-1/4″ x 8-1/4″ lint-free, reusable cleaning cloth and a 8-3/4″ x 6″ white 4-palette silicone mat.
Option 2:
Customers who want to join Stampin’ Up! during Sale-A-Bration but are interested in a different join option can instead get $125 worth of product PLUS an additional $30 worth of product of their choice when they join for $99. That’s $155 in products for $99!
Once you join, you’ll get at least a 20% discount on all of your Stampin’ Up! merchandise purchases AND you get to order early from upcoming catalogs! There is NO COMMITMENT and NO REQUIREMENT TO SELL to anyone. You can join and just get the discount for yourself! Contact me at apsudano@stampininthhemeadows.com if you’d like more information about joining or purchasing the Starter Kit!
Click on the image below to open a PDF of the Sale-A-Bration Brochure to see all the Sale-A-Bration items and get additional details:
SURPRISE! Stampin’ Up! Is giving us even more to Sale-A-Brate! They just released even more products you can earn for FREE! Take a look at the products just added to this promotion by clicking on the image below to download a PDF. Get Shopping! Sale-A-Bration ends 29 February!
Current Host Code: XR9HAEK4
Use this host code when you order $50 or more and receive a Thank You gift from me! The free gift is your choice of any item currently available valued up to $10.00.
If your order is over $150, please do not use the host code since you’ll receive your own Host Dollars plus I’ll still send you the Thank You gift! This host code can be used by anyone, no club or commitment required. Let me know if you have any questions.
If you need any stamping supplies, I’d be very happy to be your Demonstrator. Just click on the Shop Now Button on the right side of the screen to go directly to my Online store or contact me if you have any questions. Happy Stamping!
Good Morning and welcome to the Happy Inkin’ Thursday Blog Hop! The Stampin’ Up! Stippled Roses bundle is one of my favorites in the new Mini Catalog and I used it with the pretty Softly Stippled Sale-A-Bration designer series paper to make a simple thank you card. You can find the supplies I used along with card stock cuts at the bottom of my post.
We have a theme challenge this week:
I embossed a panel of Pebbled Path card stock with the pretty Distressed Tile 3D embossing folder and adhered it to the front of a Pebbled Path card base with liquid glue. I adhered a panel of Softly Stippled DSP to the card with liquid glue.
I adhered another panel of Softly Stippled DSP to a Pebbled Path mat and adhered it to the card with glue dots. I wrapped a length of Pebbled Path ribbon around the card front and tied a knot.I stamped the sentiment from the Stampin’ Up! Stippled Roses stamp set in Pebbled Path ink on Basic White and cut it out with the small rectangle from the Everyday Details dies. I adhered it to the card with glue dots.
I stamped the small rose from the Stampin’ Up! Stippled Roses stamp set in Pebbled Path ink on Basic White and cut it out with the coordinating die. I stamped the top leaf cluster from the large leaf stamp in Pebbled Path ink on Basic White and cut it out with the coordinating die. I trimmed the bottom and adhered it to the back of the die cut rose with glue dots. I adhered the flower to the card with dimensionals and finished with three clear sparkle gems.
I kept the inside of the card simple, just trimming the bottom of a Basic White panel with a strip of DSP. I adhered the panel to the inside of the card with Stampin’ Seal.
I love how the roses in the Softly Stippled designer series paper coordinate with the Stampin’ Up! Stippled Roses bundle. The flowers are so realistic and go well in a monotone design.
On with the Hop! Click on the Next Blog button to move forward to see the beautiful project Karen Ksenzakovichas created.
If you get lost along the way, here are the participants for the hop:
Use this host code when you order $50 or more and receive a free gift from me! The free gift is your choice of any item currently available valued up to $10.00!
If your order is over $150, please do not use the host code since you’ll receive your own Host Dollars plus I’ll still send you the free gift! This host code can be used by anyone, no club or commitment required. Let me know if you have any questions.
If you need any stamping supplies, I’d be very happy to be your Demonstrator. Just click on the Shop Now button on the right side of the screen to go directly to my online store or contact me if you have any questions.
Good Morning! The Stampin’ Up! Cradled In Love stamp set is a sweet Sale-A-Bration stamp set that you can get for free with a $50 order (before shipping and taxes) during Sale-A-Bration. It has a sweet crib image and beautiful sentiments and is perfect for baby cards. You can find the products I used at the bottom of my post along with the card stock sizes.
I adhered a panel of Lighter Than Air 6″ x 6″ designer series paper to the front of a Bubble Bath card base with liquid glue.
I stamped the crib, mobile and rug from the Stampin’ Up! Cradled In Love stamp set in Smoky Slate ink on Basic White and colored it in Stampin’ Blends. I used the light Crumb Cake, light and dark Bubble Bath, light Lemon Lolly, light Fresh Freesia, and light Balmy Blue blends to color the crib and light Lost Lagoon to color the rug. I used the Color lifter to lighten the rug and add texture. I cut the image out with a Deckled Circle die and used the next larger die to cut a Lost Lagoon panel for a mat. I adhered the circles together with liquid glue and trimmed the side with my paper trimmer.
I adhered the trimmed circle to the card front with dimensionals. I stamped the sentiment from the Stampin’ Up! Cradled In Love stamp set in Lost Lagoon on Petal Pink. I used a Deckled Rectangle die to cut it down to size (cutting it twice) and wrapped white Baker’s Twine around the end, making a bow. I adhered it to the card with dimensionals and finished with rainbow dots.
For the inside of the card, I stamped the sentiment from the Stampin’ Up! Cradled in Love stamp set in Smoky Slate ink on Basic White. I stamped the elephant and bottle in Smoky Slate and colored them with Light Bubble Bath, light Balmy Bleu and light Crumb cake Stampin’ Blends. I trimmed the bottom of the panel with a strip of DSP and adhered the panel to the inside of the card with Stampin’ Seal.
Isn’t this a sweet cradle? The Stampin’ Up! Cradled In Love stamp set has cute sentiments that are appropriate for baby girls and boys. And it’s perfect for mixing and matching with other baby stamp sets.
Sale-A-Bration Is Going On Now!
Sale-A-Bration is Stampin’ Up!’s best promotion of the year with specials for Shopping, Hosting and Joining!
Shopping
Choose a FREE Sale-A-Bration item from the Sale-A-Bration Brochure with every $50 or $100 you spend (before tax and shipping). The Sale-A-Bration brochure has eleven items available for free with orders of $50 or greater and three items you can pick from with orders of $100 or greater! The free Sale-A-Bration items are stackable, so if you place an order of $150, you can choose to add three $50 items or one $100 item and one $50 item to your order! The Sale-A-Bration items are only available while supplies last, so order early if there are items that you are really wanting!
Hosting
Host a party of $300 or more and get an additional $30 in Stampin’ Rewards! Normally a $300 party will result in $36 in Stampin’ Rewards for the host, but during Sale-A-Bration a $300 party will result in $66 in Stampin’ Rewards! Stampin’ Rewards are redeemed to get free items from any current catalog. And if you have a large enough shopping list, you will get the Sale-A-Bration Host rewards in a single order (and that’s in addition to the Sale-A-Bration shopping items)!
If you’d like to set up a host code to see if you can collect $300 in orders, I’d be happy to help you with that! Reach out to me at apsudano@stampininthemeadows.com.
Joining
Sale-A-Bration is one of the best times to join Stampin’ Up! as a new demonstrator and there are two fantastic options for purchasing your Starter Kit during Sale-A-Bration
Option 1:
Customers who join our fun crafting community as a new demonstrator can get $125 worth of product PLUS our Stampin’ Glass Mat Studio* (a $60 USD) for just $99! The Glass Mat Studio includes a 17″ x 14″ safety-tempered glass mat, a gray 8-1/4″ x 8-1/4″ lint-free, reusable cleaning cloth and a 8-3/4″ x 6″ white 4-palette silicone mat.
Option 2:
Customers who want to join Stampin’ Up! during Sale-A-Bration but are interested in a different join option can instead get $125 worth of product PLUS an additional $30 worth of product of their choice when they join for $99. That’s $155 in products for $99!
Once you join, you’ll get at least a 20% discount on all of your Stampin’ Up! merchandise purchases AND you get to order early from upcoming catalogs! There is NO COMMITMENT and NO REQUIREMENT TO SELL to anyone. You can join and just get the discount for yourself! Contact me at apsudano@stampininthhemeadows.com if you’d like more information about joining or purchasing the Starter Kit!
Click on the image below to open a PDF of the Sale-A-Bration Brochure to see all the Sale-A-Bration items and get additional details:
SURPRISE! Stampin’ Up! Is giving us even more to Sale-A-Brate! They just released even more products you can earn for FREE! Take a look at the products just added to this promotion by clicking on the image below to download a PDF. Get Shopping! Sale-A-Bration ends 29 February!
Current Host Code: M3WQ2HCB
Use this host code when you order $50 or more and receive a Thank You gift from me! The free gift is your choice of any item currently available valued up to $10.00.
If your order is over $150, please do not use the host code since you’ll receive your own Host Dollars plus I’ll still send you the Thank You gift! This host code can be used by anyone, no club or commitment required. Let me know if you have any questions.
If you need any stamping supplies, I’d be very happy to be your Demonstrator. Just click on the Shop Now Button on the right side of the screen to go directly to my Online store or contact me if you have any questions. Happy Stamping!
Good Friday Morning! With the long weekend coming up I wanted to share a quick card using the Stampin’ Up! Perennial Postage bundle and the beautiful Perennial Lavender designer series paper. You can find the products I used at the bottom of my post along with the card stock sizes.
I adhered a panel of the pretty Perennial Lavender designer series paper to the front of a Starry Sky card base with liquid glue.
I stamped the sentiment from the Stampin’ Up! Perennial Postage stamp set in Starry Sky ink on a Fresh Freesia panel and cut it out with the third smallest rectangle postage stamp die.
I made a loopy bow with the pretty Orchid Oasis Metallic ribbon and adhered it to the back of the label and popped the label on the card front with dimensionals. I adhered a couple of purple shimmer gems to finish the card front.
For the inside of the card, I stamped the sprig from the Painted Lavender stamp set in Shaded Spruce on a Basic White panel. I stamped the butterfly in Starry Sky and colored it with a light Fresh Freesia Stampin’ Blend. I adhered a strip of DSP to the bottom and adhered the panel to the inside of the card with Stampin’ Seal.
The lovely patterns in the Perennial Lavender DSP makes it easy and quick to make a pretty card. And the great sentiments and dies in the Stampin’ Up! Perennial Postage bundle are the perfect pairing. Enjoy the weekend!
Sale-A-Bration Is Going On Now!
Sale-A-Bration is Stampin’ Up!’s best promotion of the year with specials for Shopping, Hosting and Joining!
Shopping
Choose a FREE Sale-A-Bration item from the Sale-A-Bration Brochure with every $50 or $100 you spend (before tax and shipping). The Sale-A-Bration brochure has eleven items available for free with orders of $50 or greater and three items you can pick from with orders of $100 or greater! The free Sale-A-Bration items are stackable, so if you place an order of $150, you can choose to add three $50 items or one $100 item and one $50 item to your order! The Sale-A-Bration items are only available while supplies last, so order early if there are items that you are really wanting!
Hosting
Host a party of $300 or more and get an additional $30 in Stampin’ Rewards! Normally a $300 party will result in $36 in Stampin’ Rewards for the host, but during Sale-A-Bration a $300 party will result in $66 in Stampin’ Rewards! Stampin’ Rewards are redeemed to get free items from any current catalog. And if you have a large enough shopping list, you will get the Sale-A-Bration Host rewards in a single order (and that’s in addition to the Sale-A-Bration shopping items)!
If you’d like to set up a host code to see if you can collect $300 in orders, I’d be happy to help you with that! Reach out to me at apsudano@stampininthemeadows.com.
Joining
Sale-A-Bration is one of the best times to join Stampin’ Up! as a new demonstrator and there are two fantastic options for purchasing your Starter Kit during Sale-A-Bration
Option 1:
Customers who join our fun crafting community as a new demonstrator can get $125 worth of product PLUS our Stampin’ Glass Mat Studio* (a $60 USD) for just $99! The Glass Mat Studio includes a 17″ x 14″ safety-tempered glass mat, a gray 8-1/4″ x 8-1/4″ lint-free, reusable cleaning cloth and a 8-3/4″ x 6″ white 4-palette silicone mat.
Option 2:
Customers who want to join Stampin’ Up! during Sale-A-Bration but are interested in a different join option can instead get $125 worth of product PLUS an additional $30 worth of product of their choice when they join for $99. That’s $155 in products for $99!
Once you join, you’ll get at least a 20% discount on all of your Stampin’ Up! merchandise purchases AND you get to order early from upcoming catalogs! There is NO COMMITMENT and NO REQUIREMENT TO SELL to anyone. You can join and just get the discount for yourself! Contact me at apsudano@stampininthhemeadows.com if you’d like more information about joining or purchasing the Starter Kit!
Click on the image below to open a PDF of the Sale-A-Bration Brochure to see all the Sale-A-Bration items and get additional details:
SURPRISE! Stampin’ Up! Is giving us even more to Sale-A-Brate! They just released even more products you can earn for FREE! Take a look at the products just added to this promotion by clicking on the image below to download a PDF. Get Shopping! Sale-A-Bration ends 29 February!
Current Host Code: M3WQ2HCB
Use this host code when you order $50 or more and receive a Thank You gift from me! The free gift is your choice of any item currently available valued up to $10.00.
If your order is over $150, please do not use the host code since you’ll receive your own Host Dollars plus I’ll still send you the Thank You gift! This host code can be used by anyone, no club or commitment required. Let me know if you have any questions.
If you need any stamping supplies, I’d be very happy to be your Demonstrator. Just click on the Shop Now Button on the right side of the screen to go directly to my Online store or contact me if you have any questions. Happy Stamping!
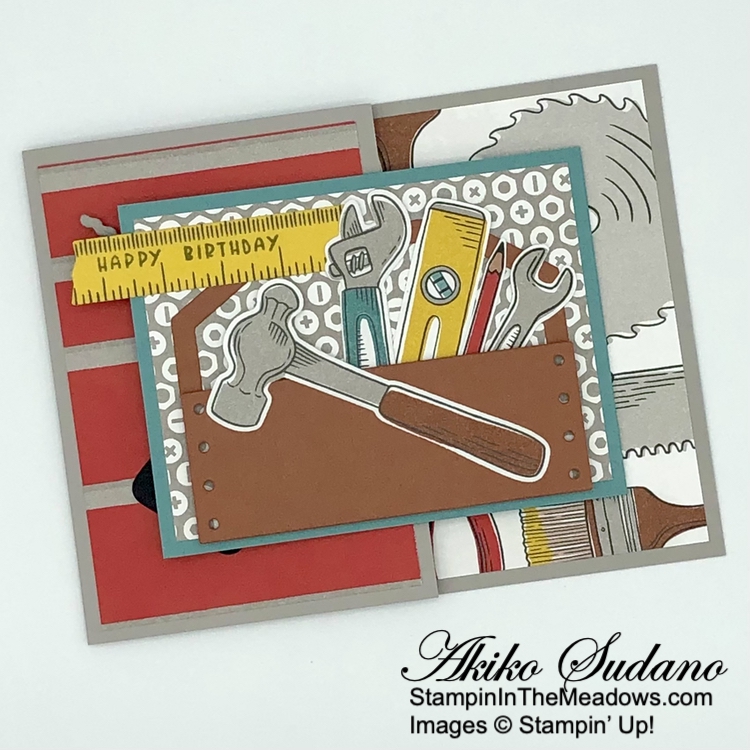
Good Morning! Welcome to the February Inkin’ Krew Team Blog Hop! The theme for this month’s hop is “Birthday” and I used the Stampin’ Up! Trusty Tools bundle with the Trusty Toolbox Sale-A-Bration designer series paper to make a fun fold masculine birthday card. You can find the supplies I used along with card stock cuts at the bottom of my post.
I cut and scored the Gray Granite and Lost Lagoon card bases for my Joy Fold card and adhered panels of Trusty Toolbox designer series paper to the back section and front and back of the front flap of the Gray Granite card base and to the front and back of the front flap of the Lost Lagoon mini card. I used different patterns for each panel and adhered them with liquid glue. I adhered the Lost Lagoon mini card to the inside of the main Gray Granite card base with liquid glue, placing the hinge on the right side.
I used the drill dies from the Stampin’ Up! Trusty Tools dies to cut Crushed Curry, Gray Granite, Copper Clay, Lost Lagoon and Basic Black card stock. For the Basic Black and Lost Lagoon sections, I used the large drill die to partially cut the pieces and finished cutting with paper snips. I adhered the die cuts together with liquid glue and adhered the drill to the front flap of the large card base.
I used the Stampin’ Up! Trusty Tools dies to cut the pencil, tape measure and paintbrush from Trusty Toolbox DSP and fussy cut the screwdriver and pliers. I used dies to cut nuts and bolts from Gray Granite card stock and adhered the all the tools to the inside flaps with liquid glue.
I stamped the Happy Birthday sentiment from the Carousel Horses stamp set in Memento Tuxedo Black in on a strip of Trusty Toolbox DSP and cut it out with the Gorgeously Made label die. I cut the toolbox from Copper Clay card stock using the Stampin’ Up! Trusty Tools dies. I adhered the handle to the mini card front with liquid glue and adhered the label on top. I adhered more die cut and fussy cut Trusty Toolbox DSP tools to the card and popped the toolbox on top with dimensionals. I adhered a die cut DSP hammer on top with glue dots and dimensionals.
For the inside of the card, I stamped the sentiment from the Stampin’ Up! Trusty Tools stamp set in Lost Lagoon ink on Basic White. I stamped the nuts and bolts in Gray Granite and adhered the panel to the inside of the card with Stampin’ Seal.
The Stampin’ Up! Trusty Tools bundle is a great tool themed bundle that is perfect for making cards for your handy man or handy lady who is great at fixing things.
On With The Hop! Click on the Next Blog button to move forward to Amy Koender’sproject or click the Previous Blog button to move back to see the project thatNel Thamescreated.
If you get lost along the way, here are the participants for the hop:
UPDATE: I decided to enter this card in the Creative Creases Challenge #75 – Anything Goes with a Fun Fold. Check out the other fun folds:
Current Host Code: M3WQ2HCB
Use this host code when you order $50 or more and receive a Thank You gift from me! The free gift is your choice of any currently available item valued up to $10.00.
If your order is over $150, please do not use the host code since you’ll receive your own Host Dollars plus I’ll still send you the Thank You gift! This host code can be used by anyone, no club or commitment required. Let me know if you have any questions.
If you need any stamping supplies, I’d be very happy to be your Demonstrator. Just click on the Shop Now button on the right side of the screen to go directly to my online store or contact me if you have any questions. Happy Stamping!
See the current Stampin’ Up! clearance rack specials here
Earn FREE Stampin’ Up! products through my Wildflower Frequent Shopper Program – my way of saying thank you to my online frequent shopper customers.
Have any questions? I’d be happy to help, click here to contact me.
Cardstock Cuts for this project:
Gray Granite – 4-1/4″ x 8-1/2″ card base scored at 5-1/2″, 1″ x 3-1/2″ (die cut tools)
Lost Lagoon – 3″ x 8″ mini card base scored at 4″, 1″ x 2″ (die cut tools)
Copper Clay – 3″ x 4″ (die cut tool box)
Crushed Curry – 2″ x 2-3/4″ (die cut tools)
Basic Black – 1″ x 1-1/2″ (die cut tools)
Basic White – 2-3/4″ x 3-3/4″ (inside panel)
Trusty Toolbox DSP – 3-3/4″ x 5″ (inside background), two 2-3/4″ x 4″ panels (large card front flap), two 2-3/4″ x 3-3/4″ panels (mini card front flap), 1″ x 3″ (label), die cut and fussy cut tools
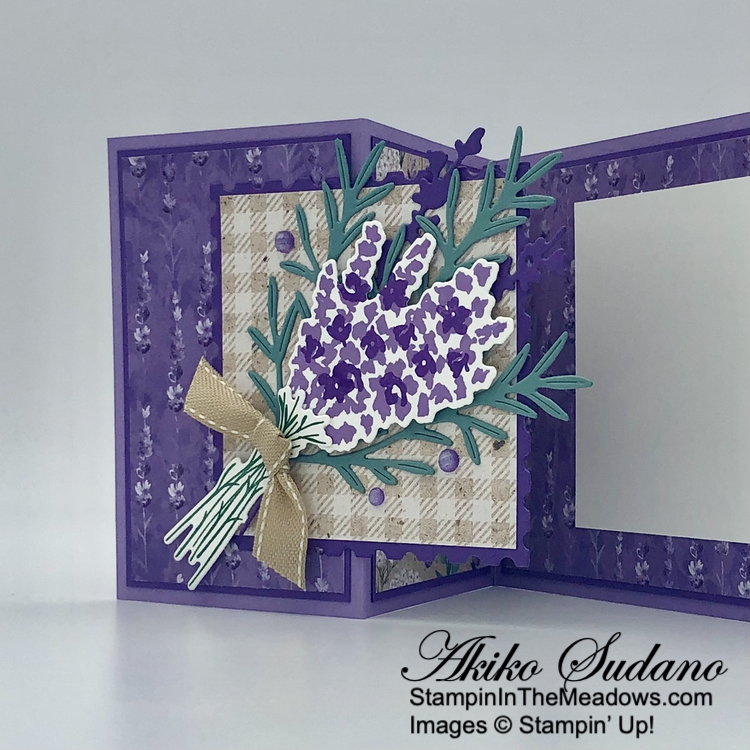
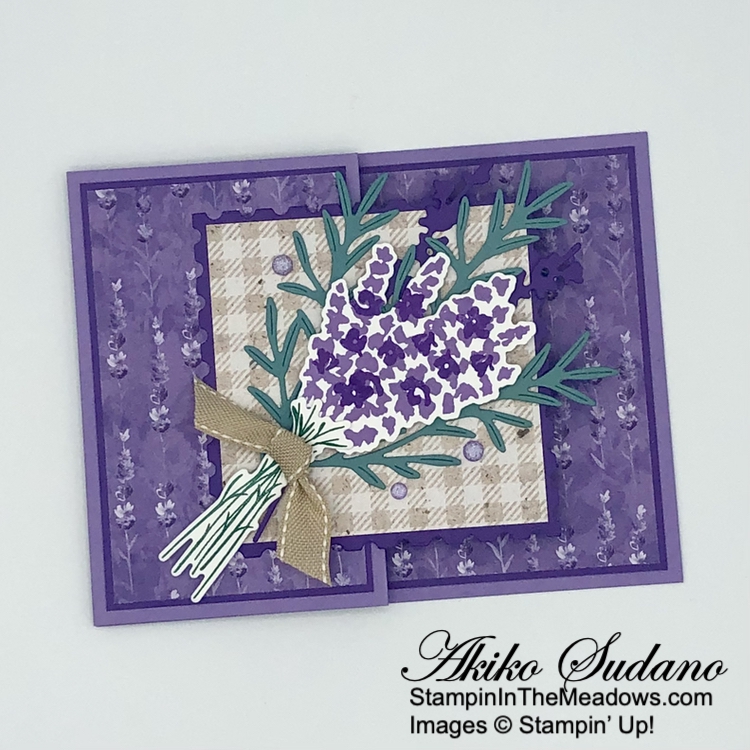
Good Morning and welcome to the Happy Inkin’ Thursday Blog Hop! The beautiful Stampin’ Up! Painted Lavender bundle and Perennial Lavender designer series paper are some of the prettiest new products in the new Mini Catalog, especially if you are a purple lover! I used these products to make a fun fold card for today – a simple Z-fold with die cut extender panel. You can find the supplies I used along with card stock cuts at the bottom of my post.
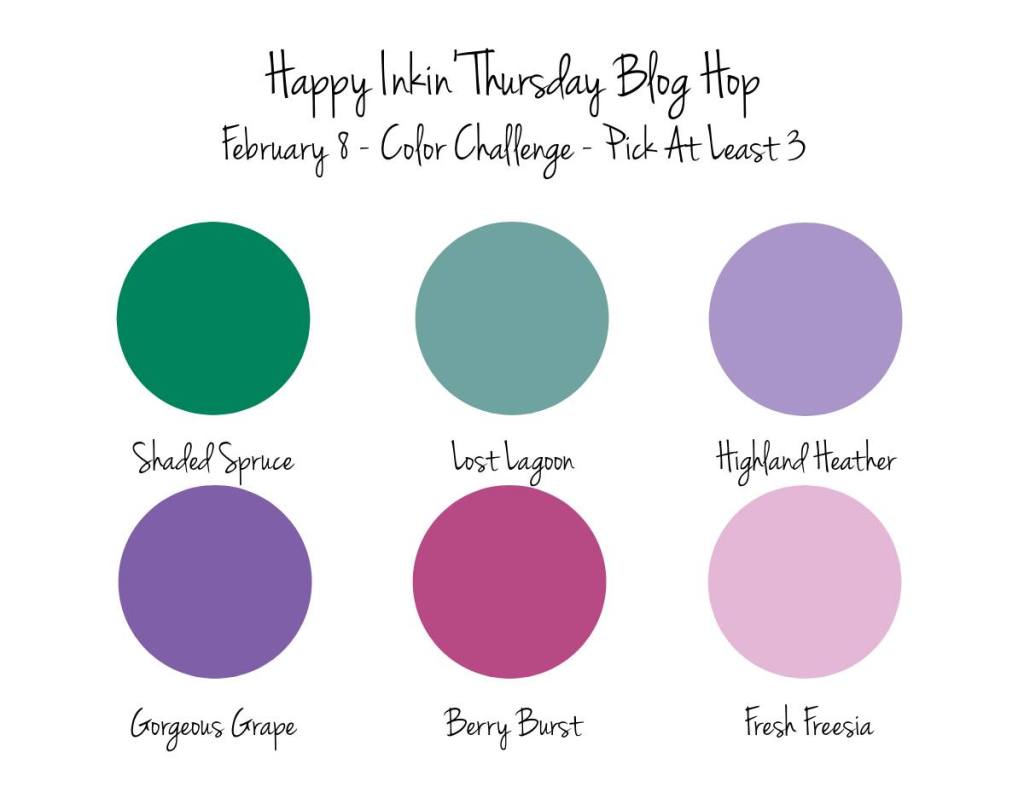
We have a color challenge this week, and I used most of the colors, but not all!
I adhered panels of Perennial Lavender designer series paper to Gorgeous Grape mats and adhered them to panels of the card base. I used the same pattern for the front and inside and a contrasting pattern for the middle section. I used the second largest rectangle to cut a Gorgeous Grape panel. It only cut three sides, so I aligned the die with the scallops to cut the fourth side and ran it through the Stampin’ Cut & Emboss machine a second time and it made a nice square! I adhered a checked panel of Perennial Lavender DSP to the front and adhered it to front of the card by applying liquid glue to the left side.
I cut the double lavender sprig from the Stampin’ Up! Painted Lavender dies from Gorgeous Grape card stock and adhered it to the card front with glue dots. I cut three lavender leaf sprig dies from Lost Lagoon and adhered them to the card with glue dots. I stamped the lavender sprig bunch from the Stampin’ Up! Painted Lavender stamp set in Highland Heather ink on Basic White. I used the little flower stamp to stamp Gorgeous Grape ink over the Highland Heather sprigs and then cut it out with the lavender sprig bunch die.
I stamped the stems from the Stampin’ Up! Painted Lavender stamp set in Shaded Spruce ink on Basic White and cut them out with the coordinating die. I adhered the stems to the sprigs and popped them on the card front with dimensionals. I made a knot in a short length of burlap ribbon and adhered it with glue dots. I finished the card front with there purple shimmer gems.
For the inside of the card, I stamped the little butterfly from the Stampin’ Up! Painted Lavender stamp set in Highland Heather ink on Basic White. I adhered the panel to the inside of the card with Stampin’ Seal, lining it up so that it would be covered by the die cut when the card is closed.
I love the Stampin’ Up! Painted Lavender bundle more and more as I play with it. The flowers are pretty when stamped in a single color, but there are so many ways to get multiple colors and it’s so fun to experiment.
On with the Hop! Click on the Next Blog button to move forward to see the beautiful project Karen Ksenzakovichas created.
If you get lost along the way, here are the participants for the hop:
Use this host code when you order $50 or more and receive a free gift from me! The free gift is your choice of any item currently available valued up to $10.00!
If your order is over $150, please do not use the host code since you’ll receive your own Host Dollars plus I’ll still send you the free gift! This host code can be used by anyone, no club or commitment required. Let me know if you have any questions.
If you need any stamping supplies, I’d be very happy to be your Demonstrator. Just click on the Shop Now button on the right side of the screen to go directly to my online store or contact me if you have any questions.
See the current Stampin’ Up! clearance rack specials here
Earn FREE Stampin’ Up! products through my Wildflower Frequent Shopper Program – my way of saying thank you to my online frequent shopper customers.
Have any questions? I’d be happy to help, click here to contact me.
Cardstock Cuts for this project:
Highland Heather – 4-1/4″ x 11″ card base, scored at 2-3/4″ and 5-1/2″
Gorgeous Grape 4″ x 5-1/4″ (inside DSP mat), two 2-1/2″ x 4″ panels (front and side panel DSP mats), 3-1/2″ x 3-1/2″ (postage stamp die cut), 1″ x 4-1/4″ (lavender die cuts)
Lost Lagoon – 3-3/4″ x 4″ (lavender leaves die cuts)
Basic White – 3″ x 3″ (inside panel), 2-1/2″ x 3-1/2″ (die cut lavender and stems)
Perennial Lavender DSP – 3″ x3″ (front background), two 2-3/8″ x 3-7/8″ panels (front and side panel DSP), 3-7/8″ x 5-1/8″ (inside DSP background)
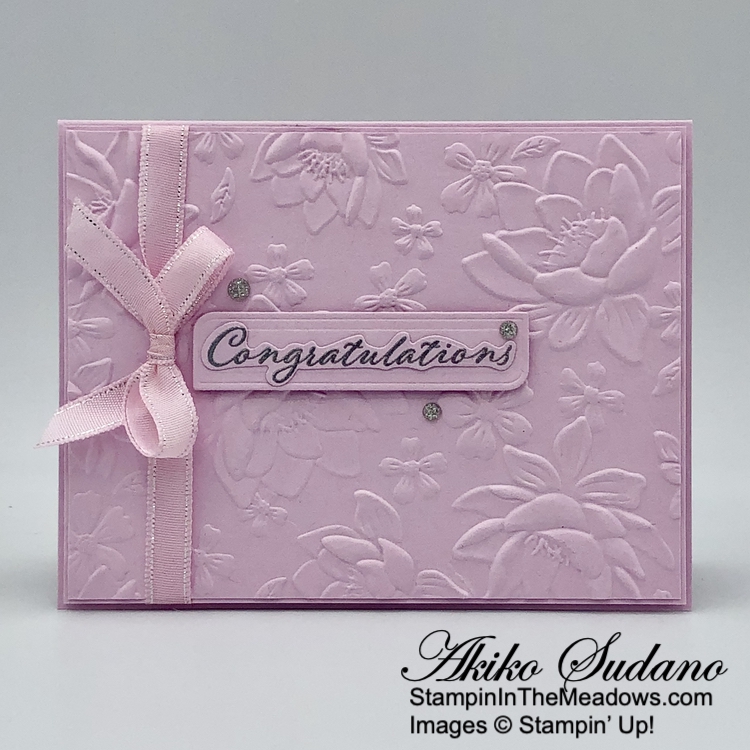
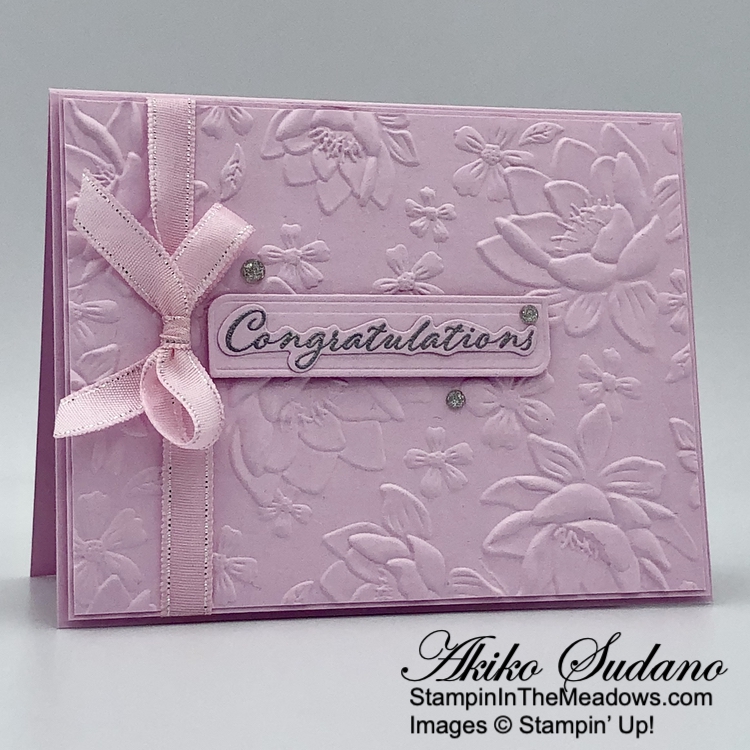
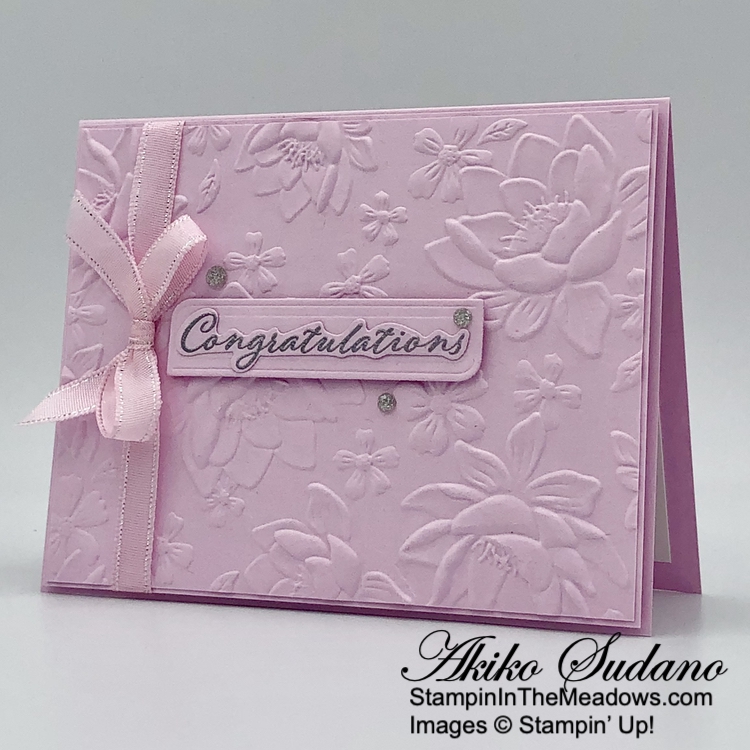
Good Morning! I used the pretty Stampin’ Up! Wonderful Thoughts bundle with the beautiful new Layered Florals 3D embossing folder to make a simple wedding card. You can find the products I used at the bottom of my post along with the card stock sizes.
I embossed a panel of Bubble Bath with the new Layered Florals 3D embossing folder and adhered it to a Bubble Bath mat. I wrapped it with Bubble Bath ribbon and made a bow and adhered it to the front of a Bubble Bath card base with dimensionals.
I stamped the congratulations sentiment from the Stampin’ Up! Wonderful Thoughts stamp set in Versamark ink. I sprinkled it with silver embossing powder and shook off the excess. I heated the powder with my heat tool until it was bright and shiny and cut it out with the coordinating word die.
I cut out a label from Bubble Bath card stock with the long label die from the Stampin’ Up! Wonderful Thoughts dies and adhered the die cut congratulations to the top with glue dots. I adhered the layered label to the card front with dimensionals and finished it with three clear sparkle gems.
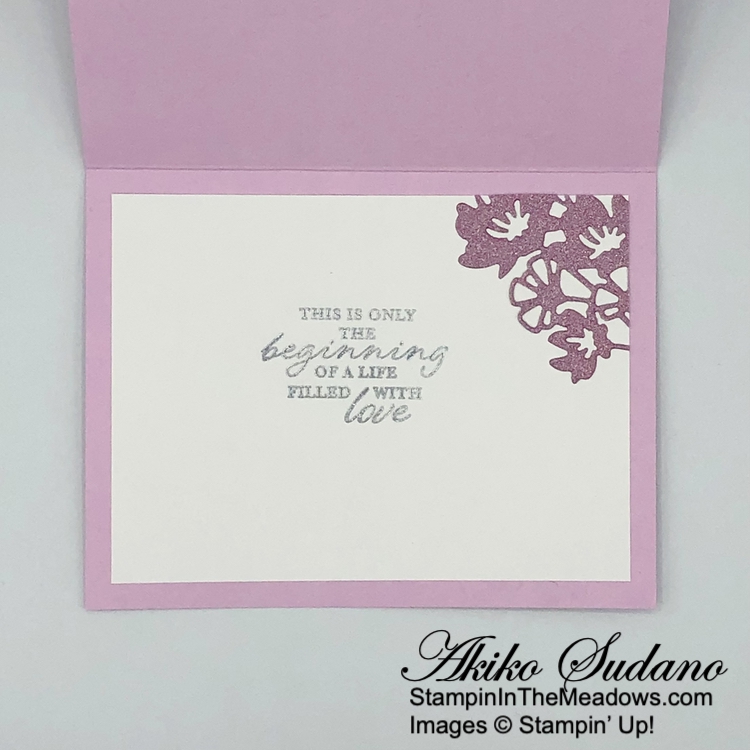
For the inside of the card, I stamped the sentiment from the Stampin’ Up! Wonderful Thoughts stamp set in Versamark ink on Basic White. I sprinkled it with silver embossing powder and shook off the excess. I heated the powder with my heat tool until it was bright and shiny. I cut out the floral die from Bubble Bath Shimmer paper and adhered it to the corner with liquid glue. I trimmed the excess and adhered the panel to the inside of the card with Stampin’ Seal.
The gorgeous new Layered Floral embossing folder is practically all you need to make a beautiful card! I love embossed backgrounds for Wedding Cards and the Stampin’ Up! Wonderful Thoughts bundle has the perfect sentiments for for them, especially when embossed. I chose Bubble Bath, but I think this card would be perfect in any color.
Sale-A-Bration Is Going On Now!
Sale-A-Bration is Stampin’ Up!’s best promotion of the year with specials for Shopping, Hosting and Joining!
Shopping
Choose a FREE Sale-A-Bration item from the Sale-A-Bration Brochure with every $50 or $100 you spend (before tax and shipping). The Sale-A-Bration brochure has eleven items available for free with orders of $50 or greater and three items you can pick from with orders of $100 or greater! The free Sale-A-Bration items are stackable, so if you place an order of $150, you can choose to add three $50 items or one $100 item and one $50 item to your order! The Sale-A-Bration items are only available while supplies last, so order early if there are items that you are really wanting!
Hosting
Host a party of $300 or more and get an additional $30 in Stampin’ Rewards! Normally a $300 party will result in $36 in Stampin’ Rewards for the host, but during Sale-A-Bration a $300 party will result in $66 in Stampin’ Rewards! Stampin’ Rewards are redeemed to get free items from any current catalog. And if you have a large enough shopping list, you will get the Sale-A-Bration Host rewards in a single order (and that’s in addition to the Sale-A-Bration shopping items)!
If you’d like to set up a host code to see if you can collect $300 in orders, I’d be happy to help you with that! Reach out to me at apsudano@stampininthemeadows.com.
Joining
Sale-A-Bration is one of the best times to join Stampin’ Up! as a new demonstrator and there are two fantastic options for purchasing your Starter Kit during Sale-A-Bration
Option 1:
Customers who join our fun crafting community as a new demonstrator can get $125 worth of product PLUS our Stampin’ Glass Mat Studio* (a $60 USD) for just $99! The Glass Mat Studio includes a 17″ x 14″ safety-tempered glass mat, a gray 8-1/4″ x 8-1/4″ lint-free, reusable cleaning cloth and a 8-3/4″ x 6″ white 4-palette silicone mat.
Option 2:
Customers who want to join Stampin’ Up! during Sale-A-Bration but are interested in a different join option can instead get $125 worth of product PLUS an additional $30 worth of product of their choice when they join for $99. That’s $155 in products for $99!
Once you join, you’ll get at least a 20% discount on all of your Stampin’ Up! merchandise purchases AND you get to order early from upcoming catalogs! There is NO COMMITMENT and NO REQUIREMENT TO SELL to anyone. You can join and just get the discount for yourself! Contact me at apsudano@stampininthhemeadows.com if you’d like more information about joining or purchasing the Starter Kit!
Click on the image below to open a PDF of the Sale-A-Bration Brochure to see all the Sale-A-Bration items and get additional details:
SURPRISE! Stampin’ Up! Is giving us even more to Sale-A-Brate! They just released even more products you can earn for FREE! Take a look at the products just added to this promotion by clicking on the image below to download a PDF. Get Shopping! Sale-A-Bration ends 29 February!
Current Host Code: M3WQ2HCB
Use this host code when you order $50 or more and receive a Thank You gift from me! The free gift is your choice of any item currently available valued up to $10.00.
If your order is over $150, please do not use the host code since you’ll receive your own Host Dollars plus I’ll still send you the Thank You gift! This host code can be used by anyone, no club or commitment required. Let me know if you have any questions.
If you need any stamping supplies, I’d be very happy to be your Demonstrator. Just click on the Shop Now Button on the right side of the screen to go directly to my Online store or contact me if you have any questions. Happy Stamping!
See the current Stampin’ Up! clearance rack specials here
Earn FREE Stampin’ Up! products through my Wildflower Frequent Shopper Program – my way of saying thank you to my online frequent shopper customers.
Have any questions? I’d be happy to help, click here to contact me.
Cardstock Cuts for this project:
Bubble Bath – 5-1/2″ x 8-1/2″ card base, scored at 4-1/4″, 4-1/8″ x 5-3/8″ (front mat), 4″ x 5-1/4″ (front embossed background), two 1″ x 3″ panels (label)
Bubble Bath shimmer paper – 2″ x 3″ (die cut flower)
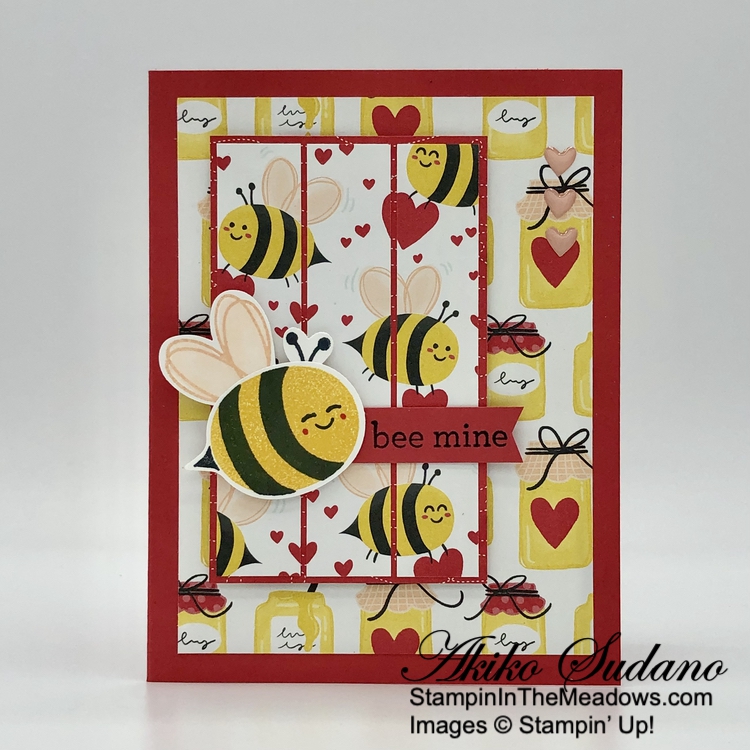
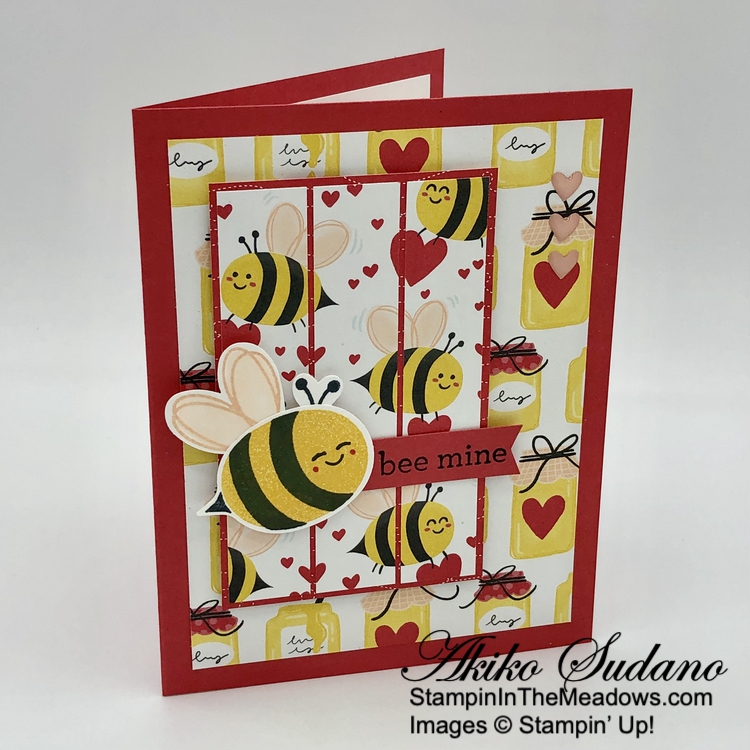
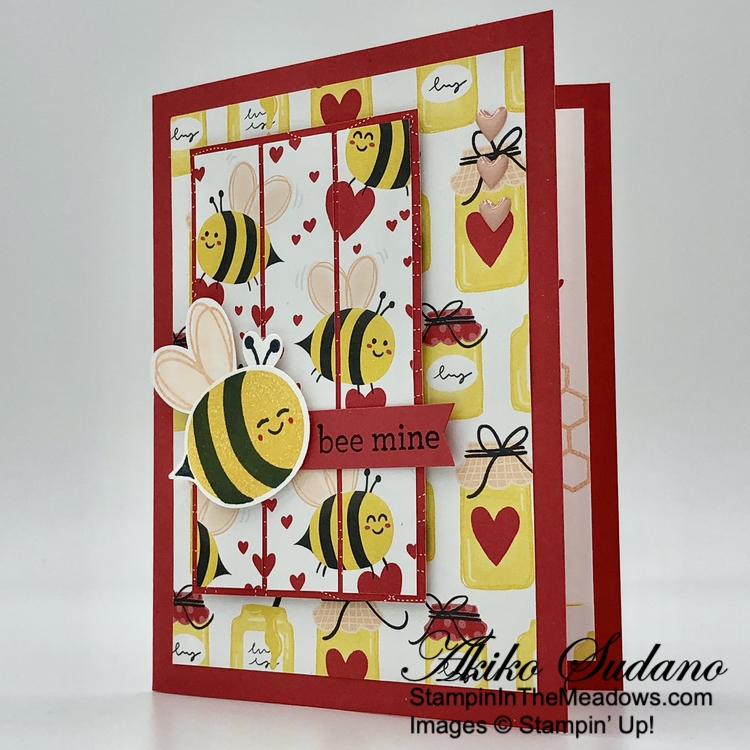
Good Morning! Here’s another Valentine’s Day card made with the sweet Stampin’ Up! Bee My Valentine bundle and the pretty Bee Mine designer series paper. You can find the products I used at the bottom of my post along with the card stock sizes.
I adhered a panel of Bee My Valentine designer series paper to the front of a Sweet Sorbet card base. I cut another panel into thirds and adhered it to a Sweet Sorbet panel with Bee Tracks. I popped the layered panel onto the front of the card with dimensionals.
I stamped the bee from the Stampin’ Up! Bee My Valentine stamp set in Daffodil Delight and Memento Tuxedo Black ink on Basic White and punched it out with the Bee Builder Punch. I gave the bee red cheeks with my dark Sweet Sorbet Stampin’ Blend. I stamped the wings in Petal Pink and used the light Petal Pink Stampin’ Blend to color the wings. I punched it out and adhered it to the back of the bee. I stamped the antenna and punched it out and adhered it to the back of the bee and adhered the bee to the card with dimensionals.
I stamped the hello there sentiment from the Stampin’ Up! Bee My Valentine stamp set in Memento Tuxedo Black ink on Sweet Sorbet and used my paper snips to make a banner at one end. I adhered it to the card with glue dots. I finished the card by adding three Petal Pink hearts.
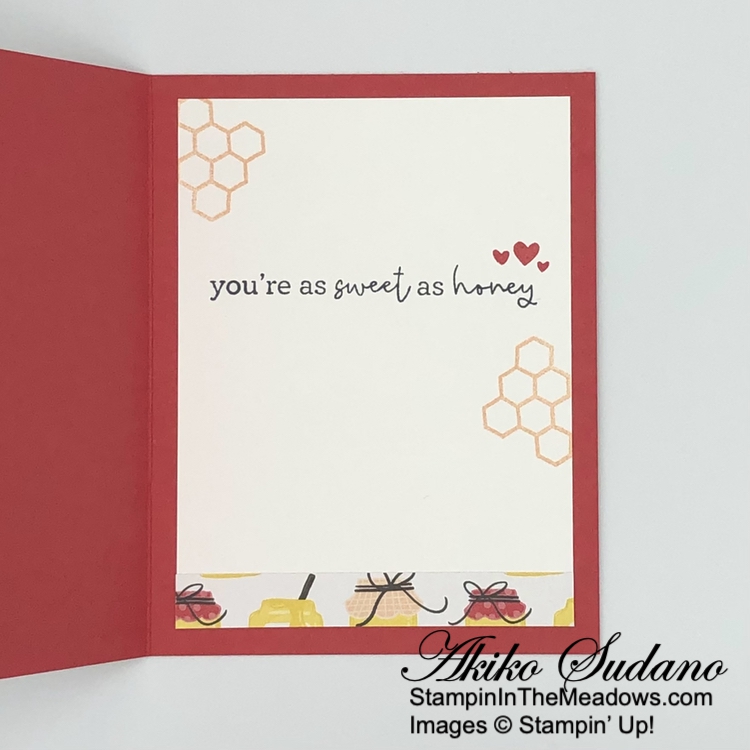
For the inside of the card, I stamped the sentiment from the Stampin’ Up! Bee My Valentine stamp set in Memento Tuxedo Black ink on Basic White. I stamped the hearts in Sweet Sorbet and the honeycomb in Petal Pink. I trimmed the bottom with a strip of DSP and adhered the panel to the inside of the card with Stampin’ Seal.
I’ve used the Stampin’ Up! Bee My Valentine bundle to make most of my Valentines this year. It is so cute and so versatile.
Sale-A-Bration Is Going On Now!
Sale-A-Bration is Stampin’ Up!’s best promotion of the year with specials for Shopping, Hosting and Joining!
Shopping
Choose a FREE Sale-A-Bration item from the Sale-A-Bration Brochure with every $50 or $100 you spend (before tax and shipping). The Sale-A-Bration brochure has eleven items available for free with orders of $50 or greater and three items you can pick from with orders of $100 or greater! The free Sale-A-Bration items are stackable, so if you place an order of $150, you can choose to add three $50 items or one $100 item and one $50 item to your order! The Sale-A-Bration items are only available while supplies last, so order early if there are items that you are really wanting!
Hosting
Host a party of $300 or more and get an additional $30 in Stampin’ Rewards! Normally a $300 party will result in $36 in Stampin’ Rewards for the host, but during Sale-A-Bration a $300 party will result in $66 in Stampin’ Rewards! Stampin’ Rewards are redeemed to get free items from any current catalog. And if you have a large enough shopping list, you will get the Sale-A-Bration Host rewards in a single order (and that’s in addition to the Sale-A-Bration shopping items)!
If you’d like to set up a host code to see if you can collect $300 in orders, I’d be happy to help you with that! Reach out to me at apsudano@stampininthemeadows.com.
Joining
Sale-A-Bration is one of the best times to join Stampin’ Up! as a new demonstrator and there are two fantastic options for purchasing your Starter Kit during Sale-A-Bration
Option 1:
Customers who join our fun crafting community as a new demonstrator can get $125 worth of product PLUS our Stampin’ Glass Mat Studio* (a $60 USD) for just $99! The Glass Mat Studio includes a 17″ x 14″ safety-tempered glass mat, a gray 8-1/4″ x 8-1/4″ lint-free, reusable cleaning cloth and a 8-3/4″ x 6″ white 4-palette silicone mat.
Option 2:
Customers who want to join Stampin’ Up! during Sale-A-Bration but are interested in a different join option can instead get $125 worth of product PLUS an additional $30 worth of product of their choice when they join for $99. That’s $155 in products for $99!
Once you join, you’ll get at least a 20% discount on all of your Stampin’ Up! merchandise purchases AND you get to order early from upcoming catalogs! There is NO COMMITMENT and NO REQUIREMENT TO SELL to anyone. You can join and just get the discount for yourself! Contact me at apsudano@stampininthhemeadows.com if you’d like more information about joining or purchasing the Starter Kit!
Click on the image below to open a PDF of the Sale-A-Bration Brochure to see all the Sale-A-Bration items and get additional details:
SURPRISE! Stampin’ Up! Is giving us even more to Sale-A-Brate! They just released even more products you can earn for FREE! Take a look at the products just added to this promotion by clicking on the image below to download a PDF. Get Shopping! Sale-A-Bration ends 29 February!
Current Host Code: M3WQ2HCB
Use this host code when you order $50 or more and receive a Thank You gift from me! The free gift is your choice of any item currently available valued up to $10.00.
If your order is over $150, please do not use the host code since you’ll receive your own Host Dollars plus I’ll still send you the Thank You gift! This host code can be used by anyone, no club or commitment required. Let me know if you have any questions.
If you need any stamping supplies, I’d be very happy to be your Demonstrator. Just click on the Shop Now Button on the right side of the screen to go directly to my Online store or contact me if you have any questions. Happy Stamping!


")


 Sheer Ribbon Combo Pack")
")


")
")

 Designer Series Paper")


 Textured Ribbon")


")

 Designer Series Paper")


")


 Designer Series Paper")


 Textured Ribbon")


")


 Designer Series Paper")


 Designer Series Paper")


 Woven Metallic Ribbon")


")
")

 Designer Series Paper")


")
 Specialty Paper")


")
 Designer Series Paper")


