Stampin’ Up! Itty Bitty Christmas Plaid Trees Card

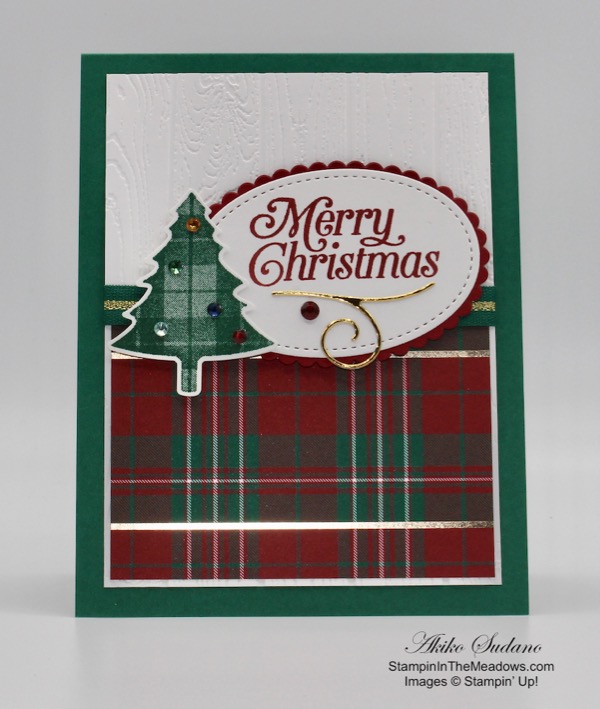
Good Morning! Today I’m sharing a Christmas card with a greeting from the Stampin’ Up! Itty Bitty Christmas cling stamp set and a forest of plaid Christmas trees. The trees are all punched from the Wrapped in Plaid Designer Series Paper using the Pine Tree punch! You can find the supplies used to create this card at the bottom of my post along with the sizes of cardstock used.

I started with a panel of Shaded Spruce cardstock that I ran through the Winter Knit embossing folder. I then adhered it to the front of a Shaded Spruce card base. I selected 7 plaids from the Wrapped in Plaid DSP. I punched out a tree from each using the Pine Tree punch.

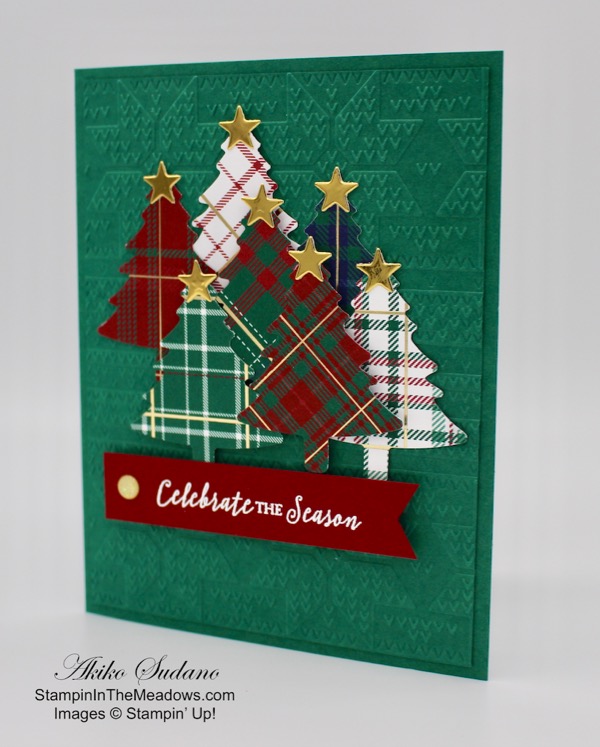
Then I die cut 7 stars from gold foil using one of the stars in the star spray die cut in the Stitched Stars dies. The large star in the Twinkle Builder punch would also work well or gold star shaped faceted gems. These would probably take less time, but I didn’t have them, so I improvised and found that this star die cut was a good size. I adhered a star to the top of each tree with liquid glue.

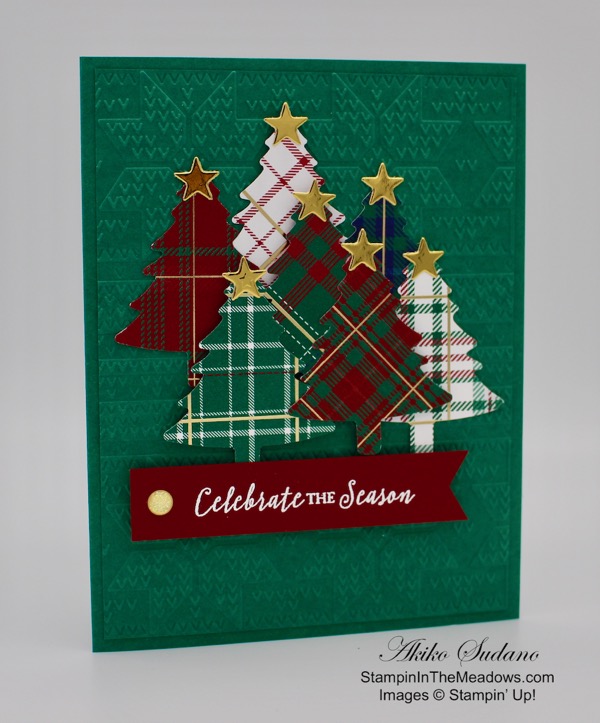
I then arranged the trees and adhered them to the card front. I used liquid glue to attach the back trees and dimensionals to attach the ones in front. I stamped the Celebrate the Season sentiment from the Stampin’ Up! Itty Bitty Christmas stamp set in Versamark ink on a strip of Cherry Cobbler. I sprinkled it with white embossing powder and heat set. I trimmed the end and adhered it to the card front with dimensionals. I finished it off with a gold glitter dot from the upcoming Christmastime is Here limited release suite next month.

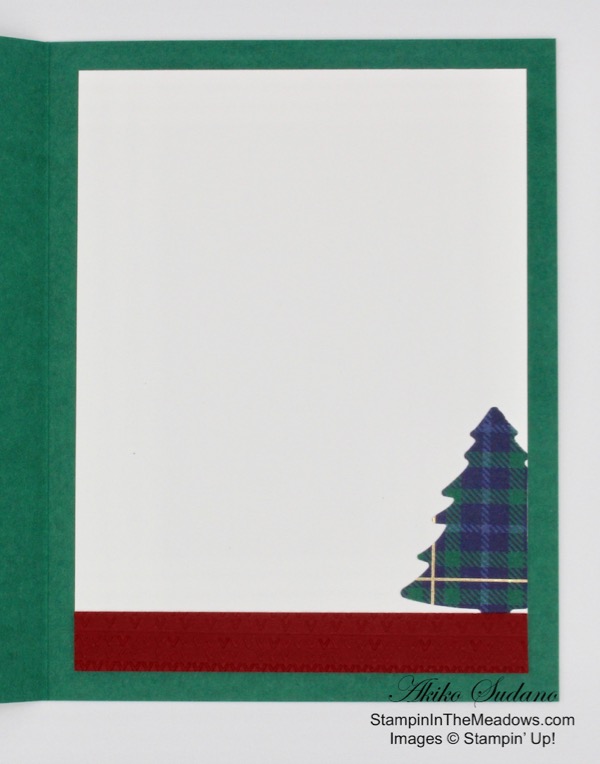
I punched part of another plaid tree and attached it to a Whisper White panel with liquid glue. It’s hard to see, but I embossed a strip of Cherry Cobbler with the Winter Knit embossing folder and adhered it to the bottom. I then adhered the panel to the inside of the card with liquid glue.

This is an elegant Christmas Card that sparkles with the gold foil touches in the Wrapped in Plaid Designer Series Paper and stars. But it also has a flannel and knit sweater kind of look with the embossed background coupled with the DSP. Best of all, it comes together pretty quickly. I hope you like it. Thanks for visiting!

Akiko


October 1 โ€“ 15 Host Code: 44YKETNJ

Use this host code when you order and receive a free gift from me!  If your order is over $150, please do not use this code, but youโ€™ll still get the free gift.  The free gift is your choice of any item valued up to $10.00 in the 2018-19 Annual Catalog or in the 2019 Occasions Catalog!  That includes some of the Host Exclusive stamp sets!


If you need any stamping supplies, Iโ€™d be very happy to be your Demonstrator.  Just click on the Shop Now button on the right side of the screen to go directly to my online store or contact me if you have any questions.  Happy Stamping!

  • Visit my online store here
  • See the current Stampin’ Up! clearance rack specials here
  • Earn FREE Stampin’ Up! products through my Wildflower Frequent Shopper Program – my way of saying thank you to my frequent shopper online customers.
  • Have any questions? I’d be happy to help, click here to contact me.

Cardstock Cuts for this project:

  • Shaded Spruce – 5 1/2″ x 8 1/2″, 4″ x 5 1/4″
  • Cherry Cobbler – 5/8″ x 3 1/2″, 1/2″ x 3 3/4″
  • Whisper White – 3 3/4″ x 5″
  • Gold Foil – (7) 1″ x 1″ scraps
  • Wrapped in Plaid DSP – (7) 2 1/4 x 3″, 1 3/4″ x 3″

Stampin’ Up! products used in this project:


Stampin’ Up! To Every Season Holiday Cards

Good Morning! Saturday was World Card Making Day and the Inkin Krew had a celebration on Facebook. Our leader, Amy, created a group for customers and friends and we had several Facebook Live presentations on card making throughout the day. It was an inspirational and fun day and thank you to everyone who participated!

For this celebration, I made a Thankful for You card using the Stampin’ Up! To Every Season bundle on Facebook Live. I was so nervous since I have only done a few videos and the audience was so much bigger than the handful of supporters I usually have watching! Here is the Facebook Live video:

You can also view this video on YouTube here.

And then on Sunday afternoon, I did my normally scheduled Live session on my Stampin’ In The Meadows Facebook page and I made a Halloween card using the same stamp set.

Here is that video:

And I also uploaded it to YouTube for watching here.

The Stampin’ Up! To Every Season stamp bundle is very versatile and will take you a long way. It has bat stamps for Halloween, leaf stamps for Fall or Thanksgiving, snowflake stamps for Christmas or Winter and heart stamps for Valentines day. And in the bundle, you also get the Every Season punch pack, consisting of 4 mini punches – a bat, a leaf, a snowflake and a heart. And it has lots of sentiments in a nice simple font.

My video adventure continues to evolve. I’m taking baby steps and learning A LOT. I still have a ways to go, but I did get my Stampin’ In The Meadows YouTube channel started and a couple of videos posted. YAY!! I still need to learn about customizing it so it’s pretty, but I’ll get there eventually. You can take a look at it here, and all suggestions are welcome. Thanks for stopping by and have a great week!

Akiko


October 1 โ€“ 15 Host Code: 44YKETNJ

Use this host code when you order and receive a free gift from me!  If your order is over $150, please do not use this code, but youโ€™ll still get the free gift.  The free gift is your choice of any item valued up to $10.00 in the 2018-19 Annual Catalog or in the 2019 Occasions Catalog!  That includes some of the Host Exclusive stamp sets!


If you need any stamping supplies, Iโ€™d be very happy to be your Demonstrator.  Just click on the Shop Now button on the right side of the screen to go directly to my online store or contact me if you have any questions.  Happy Stamping!

  • Visit my online store here
  • See the current Stampin’ Up! clearance rack specials here
  • Earn FREE Stampin’ Up! products through my Wildflower Frequent Shopper Program – my way of saying thank you to my frequent shopper online customers.
  • Have any questions? I’d be happy to help, click here to contact me.

Cardstock Cuts for these projects:

  • Thankful for You card
    • Calypso Coral โ€“ 5 ยฝโ€ x 8 ยฝโ€
    • Very Vanilla – 3 3/4โ€ x 5โ€, 3 5/8โ€ x 4 7/8โ€, 2โ€ x 2โ€, 1โ€ x 5โ€
    • Old Olive โ€“ 3 3/4โ€ x 5โ€, 1โ€ x 3 5/8โ€
    • Soft Suede โ€“ 2โ€ x 2โ€
  • Halloween card
    • Pumpkin Pie – 4 1/4″ x 11″
    • Very Vanilla – 3 5/8โ€ x 4 7/8โ€, 1″ x 4 7/8″, 1″ x 3″
    • Basic Black – (2) 3 3/4″ x 5″, 1 1/2″ x 3 1/2″,
    • Monster Bash DSP – 2 3/4″ x 4 7/8″, 1/2″ x 3 5/8″

Stampin’ Up! products used in this project:


Stampin’ Up! Christmas Countdown Advent Calendar

Good Morning! Today I have a Christmas project that isn’t a card – it’s an Advent Calendar! The Stampin’ Up! Christmas Countdown project kit is in the Holiday catalog and when I saw it, I just had to get it and make it for some special little ones. Advent Calendars are something you have to plan and make time for, because it has to be ready to enjoy by December 1! And that gets here a lot faster than December 25!

The kit comes with most of the supplies you need – all the little box fronts, foil and regular laser cut stickers, numbers and instructions. You need to supply the ink and any other embellishments you want to use. There is an outer box that measures about 11 3/16″ x 11 3/16″. There are dividers and 25 little open top boxes that measure 2 1/8″ x 2 1/8″.

There is a coordinating cling stamp set also called Christmas Countdown which I also purchased and the instructions call for using some of the stamps in the set. In addition to stamping the images, I went beyond the instructions and colored some of the stamped images with my Stampin’ Blends. And I came up with some of my own designs using the stickers. I had to add some rhinestones for bling.

There are extra pieces of card fronts and stickers, so it’s pretty easy to customize as you want. There are also gold foil trimmed stars instead of numbers if you want less than 25 days in your advent calendar.

I have seen some examples of the kit where creative demonstrators have decorated the front for Christmas and decorated the back with other Designer Series Paper to give it a dual purpose. And other creative demonstrators have chosen an entirely different set of Christmas Designer Series Paper to decorate it for Advent. The kit is pretty versatile and well made.

I started filling the little boxes, but still have a ways to go. Good thing I’m starting in October!

I hope you like the project and that the festive little boxes put you in a happy mood. Thanks for visiting and have a great weekend!

Akiko


Join us for the Inkin Krew World Card Making Day Facebook Event Tomorrow!

The Inkinโ€™ Krew is celebrating World Card Making Day on Oct 5 with a Facebook Live Event. Members of our team will be presenting live card making demonstrations throughout the day. In addition we will have fun games and give aways. You can join us NOW atย Inkinโ€™ Krew WCMDย Facebook Page and enjoy the fun as we warm up for the big day.


October 1 โ€“ 15 Host Code: 44YKETNJ

Use this host code when you order and receive a free gift from me!  If your order is over $150, please do not use this code, but youโ€™ll still get the free gift.  The free gift is your choice of any item valued up to $10.00 in the 2018-19 Annual Catalog or in the 2019 Occasions Catalog!  That includes some of the Host Exclusive stamp sets!


If you need any stamping supplies, Iโ€™d be very happy to be your Demonstrator.  Just click on the Shop Now button on the right side of the screen to go directly to my online store or contact me if you have any questions.  Happy Stamping!

  • Visit my online store here
  • See the current Stampin’ Up! clearance rack specials here
  • Earn FREE Stampin’ Up! products through my Wildflower Frequent Shopper Program – my way of saying thank you to my frequent shopper online customers.
  • Have any questions? I’d be happy to help, click here to contact me.

Stampin’ Up! products used in this project:


Stampin’ Up! Toile Christmas Card

Good Morning! Today I have a Christmas card made with the Stampin’ Up! Toile Christmas bundle. This is a simple card that uses the vintage images in the Toile Tidings Designer Series Paper as the focal point. You can find the supplies used to create this card at the bottom of my post along with the sizes of cardstock used.

I cut a panel of the Stampin’ Up! Toile Tidings designer series paper using the largest of the Stitched Rectangles dies and adhered it to a Real Red mat. I attached them to a Garden Green card base with dimensionals.

Using the Stamparatus, I stamped the Christmas Wishes banner greeting from the Stampin’ Up! Toile Christmas stamp set using the Real Red and Garden Green Stampin’ Write markers. The Stamparatus allowed me to use stamp the image in the same place twice. The first time was with the Real Red marker coloring the letters and the second time was with the Garden Green marker coloring the banner. I cut the banner out using the coordinating die from the Christmas Cardinal dies. I cut two of the medium leaf branches and one of the small leaf branches from the Christmas Cardinal dies and arranged and adhered them behind the label with liquid glue. I attached the label to the card front using dimensionals and added some red glittered enamel dots.

I stamped the sentiment from the Stampin’ Up! Toile Christmas stamp set in Real Red ink on a panel of Very Vanilla. I adhered a strip of the Toile Tidings DSP to the bottom of the panel and adhered it to a Real Red mat before attaching it to the inside of the card.

This is a simple and pretty nostalgic Christmas card. I hope you like it. Thanks for visiting!

Akiko


October 1 โ€“ 15 Host Code: 44YKETNJ

Use this host code when you order and receive a free gift from me!  If your order is over $150, please do not use this code, but youโ€™ll still get the free gift.  The free gift is your choice of any item valued up to $10.00 in the 2018-19 Annual Catalog or in the 2019 Occasions Catalog!  That includes some of the Host Exclusive stamp sets!


Join us for the Inkin Krew World Card Making Day Facebook Event!

The Inkin’ Krew is celebrating World Card Making Day on Oct 5 with a Facebook Live Event. Members of our team will be presenting live card making demonstrations throughout the day. In addition we will have fun games and give aways. You can join us NOW at Inkin’ Krew WCMD and join the fun. as we warm up for the big day.


If you need any stamping supplies, Iโ€™d be very happy to be your Demonstrator.  Just click on the Shop Now button on the right side of the screen to go directly to my online store or contact me if you have any questions.  Happy Stamping!

  • Visit my online store here
  • See the current Stampin’ Up! clearance rack specials here
  • Earn FREE Stampin’ Up! products through my Wildflower Frequent Shopper Program – my way of saying thank you to my frequent shopper online customers.
  • Have any questions? I’d be happy to help, click here to contact me.

Cardstock Cuts for this project:

  • Garden Green – 5 1/2″ x 8 1/2″, 2″ x 3″
  • Real Red – 3 7/8″ x 5 1/4″, 3 3/4″ x 5″
  • Very Vanilla – 3 5/8″ x 4 7/8″, 2″ x 4″
  • Toile Tidings DSP – 4″ x 5 1/4″, 1/2″ x 4 7/8″

Stampin’ Up! products used in this project:

Product List

Stampin’ Up! Gather Together Fall Leaves Card

Good Morning! Today I’m sharing another Facebook Live video that I made with a card that I CASEd ( copy and share everything) from a fellow Inkinโ€™ Krew team member Leslie Larkin. I loved this card that Leslie made and shared on our Facebook Team page. You can see her original on her blog here. You can find the supplies used to create my card at the bottom of my post along with the sizes of cardstock used.

When I first made the sample I made a boo boo because I embossed the panel before stamping the sentiment. So I had to modify it, and then when I made the video I changed it up a little more. Hereโ€™s the video. I hope you enjoy it.

This is the first time I’ve used my phone camera for recording for FB Live and I figured out how to fix some technical difficulties, but some still exist, so thank you for bearing with me. I’m planning to start a You Tube Channel by the week’s end, and I’ll update this post with the link when its ready.

Thanks for stopping by and have a great week!

Akiko

Evening Update: I posted the video to YouTube and you can view it here. I also managed to clean up phone orientation issues in the first two minutes (Yay!) before posting. Thanks for being patient with me. ๐Ÿ™‚


This image has an empty alt attribute; its file name is 09-19_banner_dsp_us.jpg

LAST DAY!!! Buy 3 Get 1 Free Designer Series Paper Sale Ends Today

Today is the last day for the Stampin’ Up! Designer Series Paper Sale! where you can buy three packages of select Designer Series Paper, and get one FREE! See the full details on my Stampinโ€™ Up! Promotions Page. Don’t miss out!


September 16 – 30 Host Code: EDRVYB3Z

October 1 – 15 Host Code: 44YKETNJ

Use this host code when you order and receive a free gift from me!  If your order is over $150, please do not use this code, but youโ€™ll still get the free gift.  The free gift is your choice of any item valued up to $10.00 in the 2018-19 Annual Catalog or in the 2019 Occasions Catalog!  That includes some of the Host Exclusive stamp sets!


If you need any stamping supplies, Iโ€™d be very happy to be your Demonstrator.  Just click on the Shop Now button on the right side of the screen to go directly to my online store or contact me if you have any questions.  Happy Stamping!

  • Visit my online store here
  • See the current Stampin’ Up! clearance rack specials here
  • Earn FREE Stampin’ Up! products through my Wildflower Frequent Shopper Program – my way of saying thank you to my frequent shopper online customers.
  • Have any questions? I’d be happy to help, click here to contact me.

Cardstock Cuts for this project:

  • Pretty Peacock โ€“ 5 1/2″ x 8 1/2, 3โ€ x 3โ€
  • Mint Macaron โ€“ (2) 3 3/4โ€ x 5โ€
  • Come to Gather DSP โ€“ (2) 3/4″ x 5″, 1/2″ x 4 7/8โ€
  • Whisper White โ€“ 3 5/8″ x 4 7/8โ€
  • Cajun Craze โ€“ 2 1/4″ x 2 1/4″ scrap
  • Pear Pizzazz – 2 1/4″ x 2 1/4″ scrap 

Stampin’ Up! products used in this project:


Stampin’ Up! Snow Front Autumn Cabin in the Woods Card

Good Morning! Yesterday was officially the first day of Fall, but with temperatures n the high 80’s here in Pennsylvania, it really doesn’t feel like it yet. So here’s a card to get us in the mood. It’s made with the new Stampin’ Up! Snow Front photopolymer stamp set. You can find the supplies used to create this card at the bottom of my post along with the sizes of cardstock used.

I started by running a Cajun Craze panel through the Pinewood Planks embossing folder and mounting it on a Soft Suede card base with liquid glue. I randomly stamped the large maple leaf from the Gather Together stamp set in Delicata Celestial Copper ink on a panel of Crumb Cake cardstock.

I stamped the images from the Stampin’ Up Snow Front stamp set on a panel of Whisper white as follows:

  • Mountains – Smoky Slate
  • Pine Trees – Shaded Spruce
  • Cabin and Deer – Early Espresso
  • Tree Trunks – Soft Suede
  • Leaves – Old Olive, Crushed Curry, Cajun Crazw
  • Lake – Balmy Blue
  • Grass – Old Olive

I then lightly sponged the grass in Old Olive and the sky in Seaside Spray. I gave the cabin a red tin roof using the Dark Real Red Stampin’ Blend and colored the cabin with the Light Crumb Cake Stampin’ Blend. I added a touch of Wink of Stella to the lake to make the water sparkle and wrapped a piece of copper trim around the bottom.

I stamped the sentiment from the Stampin’ Up! Gathered Together set on a strip of Old Olive cardstock using Early Espresso ink and added a copper Designer element before adhering it to the bottom of the image. I layered the Crumb Cake panel and the image and adhered them to the card with liquid glue.

I decorated the inside of the card by stamping a few maple leaves from the Gather Together stamp set in Celestial Copper ink on a panel of Whisper White. I adhered it to a Cajun Craze mat and then to the inside of the card.

The Stampin’ Up Snow Front stamp set is similar to the Waterfront stamp set for creating artistic landscape scenes. This puts me in the mood to visit the mountains and woods to see some great fall foliage. Thanks for visiting and have a great Fall day!

Akiko


This image has an empty alt attribute; its file name is 09-19_banner_dsp_us.jpg

Buy 3 Get 1 Free Designer Series Paper Sale

By popular demand, Stampinโ€™ Up! is bringing back the Designer Series Paper Sale! During September 4โ€“30, you can buy three packages of select Designer Series Paper, and get one FREE! See the full details on my Stampinโ€™ Up! Promotions Page.


September 16 – 30 Host Code: EDRVYB3Z

Use this host code when you order and receive a free gift from me!  If your order is over $150, please do not use this code, but youโ€™ll still get the free gift.  The free gift is your choice of any item valued up to $10.00 in the 2018-19 Annual Catalog or in the 2019 Occasions Catalog!  That includes some of the Host Exclusive stamp sets!


If you need any stamping supplies, Iโ€™d be very happy to be your Demonstrator.  Just click on the Shop Now button on the right side of the screen to go directly to my online store or contact me if you have any questions.  Happy Stamping!

  • Visit my online store here
  • See the current Stampin’ Up! clearance rack specials here
  • Earn FREE Stampin’ Up! products through my Wildflower Frequent Shopper Program – my way of saying thank you to my frequent shopper online customers.
  • Have any questions? I’d be happy to help, click here to contact me.

Cardstock Cuts for this project:

  • Soft Suede – 4 1/4″ x 11″
  • Cajun Craze – (2) 3 3/4″ x 5″
  • Whisper White – 3 5/8″ x 4 7/8″, 3″ x 4″
  • Crumb Cake – 3″ x 4″
  • Old Olive – 3/8″ x 3″

Stampin’ Up! products used in this project:


Stampin’ Up! Perfectly Plaid Christmas Tree Card

Good Morning! Today I have a Christmas Card made with the Stampin’ Up! Perfectly Plaid photopolymer stamp set and Pine Tree Punch.

This is the first Christmas Card that I designed for my Card Making 101 video series on Facebook. I used some more die cuts and introduced dry embossing with the Pinewood Planks embossing folder. You can find the supplies used to create this card at the bottom of my post along with the sizes of cardstock used.

Here’s the video with instructions on how to make the card. I think I’m making improvements each time, but I’m still not ready for Prime Time (and definitely no Emmy!).

Here’s a picture of the inside of the card. I am planning to share card making videos on Facebook Live on Sundays at 1:00 Eastern time. I invite you to join me and like my Facebook page.

And don’t forget about the current Buy 3 Get 1 Free Designer Series Paper promotion that lasts for just one more week.

Thanks for stopping by!

Akiko


This image has an empty alt attribute; its file name is 09-19_banner_dsp_us.jpg

Buy 3 Get 1 Free Designer Series Paper Sale

By popular demand, Stampinโ€™ Up! is bringing back the Designer Series Paper Sale! During September 4โ€“30, you can buy three packages of select Designer Series Paper, and get one FREE! See the full details on my Stampinโ€™ Up! Promotions Page.


September 16 – 30 Host Code: EDRVYB3Z

Use this host code when you order and receive a free gift from me!  If your order is over $150, please do not use this code, but youโ€™ll still get the free gift.  The free gift is your choice of any item valued up to $10.00 in the 2018-19 Annual Catalog or in the 2019 Occasions Catalog!  That includes some of the Host Exclusive stamp sets!


If you need any stamping supplies, Iโ€™d be very happy to be your Demonstrator.  Just click on the Shop Now button on the right side of the screen to go directly to my online store or contact me if you have any questions.  Happy Stamping!

  • Visit my online store here
  • See the current Stampin’ Up! clearance rack specials here
  • Earn FREE Stampin’ Up! products through my Wildflower Frequent Shopper Program – my way of saying thank you to my frequent shopper online customers.
  • Have any questions? I’d be happy to help, click here to contact me.

Cardstock Cuts for this project:

  • Shaded Spruce โ€“ 4 1/4″ x 11″
  • Whisper White โ€“ (2) 3 3/4″ x 5″, 2 1/2″ x 5 3/4″
  • Cherry Cobbler โ€“ 2 1/4″ x 3 1/4″
  • Gold Foil โ€“ 1โ€ x 2โ€
  • Wrapped in Plaid DSP – 2 3/4″ x 3 5/8″, 1/2″ x 3 3/4โ€

Stampin’ Up! products used in this project:


Stampin’ Up! Perfectly Plaid Believe Christmas Card

Good Morning! Today’s card is a Christmas Card made with the Stampin’ Up! Perfectly Plaid Photopolymer stamp set and the Stampin’ Up! Itty Bitty Christmas Cling stamp set. I teamed these up with the Let It Snow Designer Series Paper to make a light and cheerful Christmas Card. You can find the supplies used to create this card at the bottom of my post along with the sizes of cardstock used.

I was inspired by the sketch in the Try Stampin’ On Tuesday Challenge 426 – TSOT426.

I started with a strip of Sparkle Glimmer paper that I used the die cut from the Budding Blooms dies to cut a scalloped edge. I cut a strip of the striped Let It Snow DSP and adhered a strip of Coastal Cabana to the back and edged it with the Sparkle Glimmer paper scalloped edge. I tied a piece of Real Red curly ribbon around the bottom and attached it to a Real Red card base with dimensionals.

I stamped the open leaf tree image from the Stampin’ Up! Perfectly Plaid stamp set on a piece of Coastal Cabana using VersaMark ink. I sprinkled white embossing powder on it and heat set it. Then I punched it out it out with the Pine Tree punch. I punched another pine tree from Sparkle Glimmer paper and attached the trees to the card with liquid glue and dimensionals.

I stamped the believe sentiment from the Stampin’ Up! Itty Bitty Christmas on a strip of Coastal Cabana in VersaMark ink and sprinkled it with white embossing powder and heat set. I trimmed the ends and attached it to a strip of Real Red and attached it to the card. I finished off the card front with three read glittered enamel dots.

I stamped the sentiment from the Stampin’ Up! Perfectly Plaid stamp set in Real Red ink on a panel of Whisper White. I stamped the tree image again in Coastal Cabana in the lower left of the inside panel. I added a strip of the same designer paper that I used on the front of the card to the bottom of the inside panel an adhered it to a Coastal Cabana mat before attaching it to the inside of the card. I also stamped the tree image on the lower left of a white envelope.

Coastal Cabana and Real Red make a cheerful and happy Christmas card. And I guess that this shows how to make a non-plaid Christmas card with the Stampin’ Up! Perfectly Plaid bundle. On Sunday I will be on Facebook Live making a Plaid Christmas card using this bundle on my business page at 1:00 PM Eastern time. I welcome you to tune in. Thanks for visiting and have a great weekend!

Akiko


This image has an empty alt attribute; its file name is 09-19_banner_dsp_us.jpg

Buy 3 Get 1 Free Designer Series Paper Sale

By popular demand, Stampinโ€™ Up! is bringing back the Designer Series Paper Sale! During September 4โ€“30, you can buy three packages of select Designer Series Paper, and get one FREE! See the full details on my Stampinโ€™ Up! Promotions Page.


September 16 – 30 Host Code: EDRVYB3Z

Use this host code when you order and receive a free gift from me!  If your order is over $150, please do not use this code, but youโ€™ll still get the free gift.  The free gift is your choice of any item valued up to $10.00 in the 2018-19 Annual Catalog or in the 2019 Occasions Catalog!  That includes some of the Host Exclusive stamp sets!


If you need any stamping supplies, Iโ€™d be very happy to be your Demonstrator.  Just click on the Shop Now button on the right side of the screen to go directly to my online store or contact me if you have any questions.  Happy Stamping!

  • Visit my online store here
  • See the current Stampin’ Up! clearance rack specials here
  • Earn FREE Stampin’ Up! products through my Wildflower Frequent Shopper Program – my way of saying thank you to my frequent shopper online customers.
  • Have any questions? I’d be happy to help, click here to contact me.

Cardstock Cuts for this project:

  • Real Red – 4 1/4″ x 11″, 1/2″ x 2″
  • Coastal Cabana – 3 3/4″ x 5″, 2″ x 5 1/2″, 2 1/2″ x 3″, 1/2″ x 2″
  • Let it Snow DSP – 5 1/2″ x 2 1/4″, 1/2″ x 3 5/8″,
  • Whisper White – 3 5/8″ x 4 7/8″
  • Sparkle Glimmer Paper – 3/4″ x 5 1/2″, 2 1/2″ x 3″

Stampin’ Up! products used in this project:


Stampin’ Up! Gather Together Friendship Card

Good Morning! Today’s card is another fall card using the wonderful Stampin’ Up! Gather Together photopolymer stamp set. This is an autumn friendship card with pumpkins and vellum leaves and the sweet sentiment So glad to have you in my life from the Gather Together stamp set. You can find the supplies used to create this card at the bottom of my post along with the sizes of cardstock used.

My card is entered into the challenge in Hand Stamped Sentiments Sketch Challenge #323. Check out the other entries.

I started by taking a panel of the wood background from the Come To Gather designer series paper and stamping it with the leaf branch from the Stampin’ Up! Very Versailles stamp set in Mint Macaron ink. I adhered it to an Early Espresso mat and adhered it to a Mint Macaron card base with liquid glue. I took another piece of the DSP, this time with the pumpkins, and die cut it using one of the Stitched Nested Labels dies. I die cut a piece of Whisper White and adhered it to the back to stiffen it and attached it to the card with dimensionals.

I stamped the sentiment from the Stampin’ Up! Gather Together stamp set in Mint Macaron on a strip of Whisper White and attached it to an Early Espresso Mat. I then trimmed the ends of both the banner and the mat.

I stamped the pumpkins from the Stampin’ Up! Gather Together stamp set in Pear Pizzazz on a panel of Thick Whisper White cardstock and cut it out using the coordinating dies from the Gathered Leaves die set. I also cut a set of leaves from the Frosted Frames dies from the Old Olive in the Perennial Essence vellum cardstock. I attached the pumpkins, leaves and banner to the card front with glue dots and dimensionals. I finished it off with a braided linen trim bow and three faux pearls.

I decorated the inside of the card by attaching a strip of the wood panel DSP from the Come to Gather paper pack on a panel of Whisper White and adhering it to an Early Espresso mat before attaching it to the inside of the card. I finished a matching envelope by stamping it with the Very Versailles leaf branch in Mint Macaron ink.

Do you decorate for fall? I like to plant a couple of colorful mums by my front door and get a pumpkin. Thanks for visiting!

Akiko


This image has an empty alt attribute; its file name is 09-19_banner_dsp_us.jpg

Buy 3 Get 1 Free Designer Series Paper Sale

By popular demand, Stampinโ€™ Up! is bringing back the Designer Series Paper Sale! During September 4โ€“30, you can buy three packages of select Designer Series Paper, and get one FREE! See the full details on my Stampinโ€™ Up! Promotions Page.


Clearance Rack Refresh

New items have been added to the Clearance Rack in the online store! Supplies are limited, and with discounts up to 60%, products will go quickly. Shop now and stock up.


September 16 – 30 Host Code: EDRVYB3Z

Use this host code when you order and receive a free gift from me!  If your order is over $150, please do not use this code, but youโ€™ll still get the free gift.  The free gift is your choice of any item valued up to $10.00 in the 2018-19 Annual Catalog or in the 2019 Occasions Catalog!  That includes some of the Host Exclusive stamp sets!


If you need any stamping supplies, Iโ€™d be very happy to be your Demonstrator.  Just click on the Shop Now button on the right side of the screen to go directly to my online store or contact me if you have any questions.  Happy Stamping!

  • Visit my online store here
  • See the current Stampin’ Up! clearance rack specials here
  • Earn FREE Stampin’ Up! products through my Wildflower Frequent Shopper Program – my way of saying thank you to my frequent shopper online customers.
  • Have any questions? I’d be happy to help, click here to contact me.

Cardstock Cuts for this project:

  • Mint Macaron – 5 1/2″ x 8 1/2″ card base
  • Early Espresso – (2) 3 3/4″ x 5, 3/8″ x 2 1/2″ scrap
  • Whisper White – 3 1/2″ x 4 3/4″, 2 1/2″ x 4 1/4″, 1/4″ x 2 1/2″ scrap
  • Thick Whisper White – 2″ x 3 1/2″ scrap for pumpkins
  • Gather Together DSP – 3 5/8″ x 4 7/8″ (wood grain), 2 1/2″ x 4 1/4″ (pumpkins), 1/2″ x 4 3/4″ (wood grain)

Stampin’ Up! products used in this project:


Stampin’ Up! Gather Together Fall Thank You Card

Good Morning! Boy, I’m really on a roll with the new Stampin’ Up! Gather Together bundle. I’ve made about 1/2 dozen different designs for classes and tutorials as well as this blog. I think it’s because we’re in the season and the bundle and papers are so pretty and versatile. This card is a Thank You card that combines the Gather Together bundle with the Well Written dies.

This is a card that I designed for my Cardmaking 101 video series on Facebook. It’s the first time I’ve introduced die cuts in the series and these are the perfect sets to introduce this wonderful technique. Here is the card. You can find the supplies used to create this card at the bottom of my post along with the sizes of cardstock used.

And here is a link to the how-to video that I shared earlier on Facebook Live. Instructions for creating the card are in the video. I apologize ahead of time for it being so long – my goal is to improve each video in both production and instructional quality.

I intend to set up a YouTube channel in the near future so you can view my videos there as well, but I’m still learning how to set this up, so for now I am only on Facebook and here.

Here’s a closeup of the card front details:

Thanks for visiting and watching. Have a great weekend!

Akiko


This image has an empty alt attribute; its file name is 09-19_banner_dsp_us.jpg

Buy 3 Get 1 Free Designer Series Paper Sale

By popular demand, Stampinโ€™ Up! is bringing back the Designer Series Paper Sale! During September 4โ€“30, you can buy three packages of select Designer Series Paper, and get one FREE! See the full details on my Stampinโ€™ Up! Promotions Page.


September 1 – 15 Host Code: DHYEBG62

September 16 – 30 Host Code: EDRVYB3Z

Use this host code when you order and receive a free gift from me!  If your order is over $150, please do not use this code, but youโ€™ll still get the free gift.  The free gift is your choice of any item valued up to $10.00 in the 2018-19 Annual Catalog or in the 2019 Occasions Catalog!  That includes some of the Host Exclusive stamp sets!


If you need any stamping supplies, Iโ€™d be very happy to be your Demonstrator.  Just click on the Shop Now button on the right side of the screen to go directly to my online store or contact me if you have any questions.  Happy Stamping!

  • Visit my online store here
  • See the current Stampin’ Up! clearance rack specials here
  • Earn FREE Stampin’ Up! products through my Wildflower Frequent Shopper Program – my way of saying thank you to my frequent shopper online customers.
  • Have any questions? I’d be happy to help, click here to contact me.

Cardstock Cuts for this project:

  • Crumb Cake – 5 1/2″ x 8 1/2″
  • Come to Gather DSP – (pretty peacock leaves) 3 3/4″ x 5″, 1/2″ x 3 3/4″, (pumpkins) 2 1/4″ x 3 3/4″
  • Early Espresso – 3 7/8″ x 5 1/8″, 3 3/4″ x 5″, 2 5/8″ x 3 3/4″
  • Whisper White – 3 5/8″ x 4 7/8″, (2) 1 1/2″ x 1 1/2″ scraps
  • Pretty Peacock – 1″ x 2 1/2″ scrap
  • Calypso Coral -1 1/2″ x 2″ scrap
  • Pear Pizzazz – 1 1/2″ x 2″ scrap
  • Mossy Meadow – 1 1/2″ x 2″ scrap

Stampin’ Up! products used in this project: