Stampinโ€™ Up! November Paper Pumpkin Kit – From The North Pole!

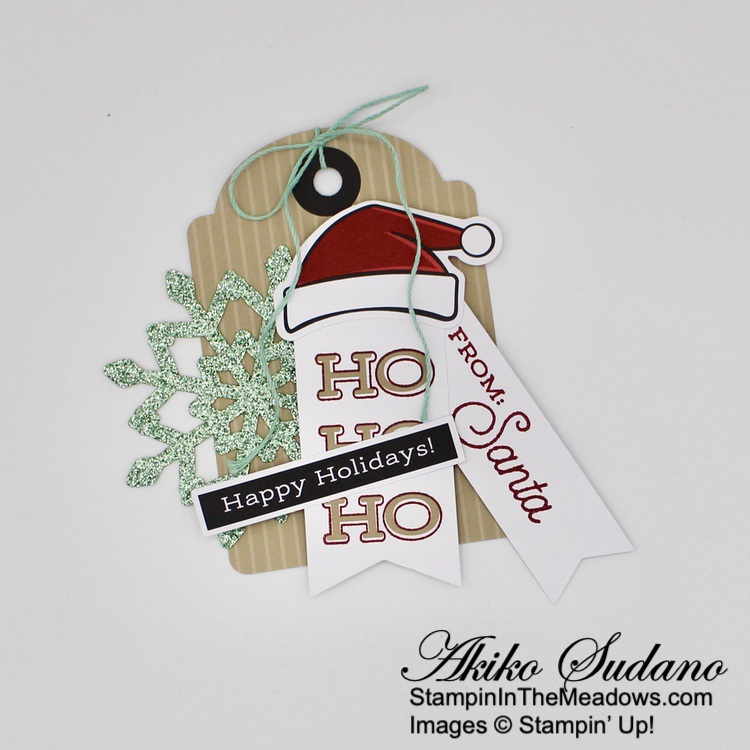
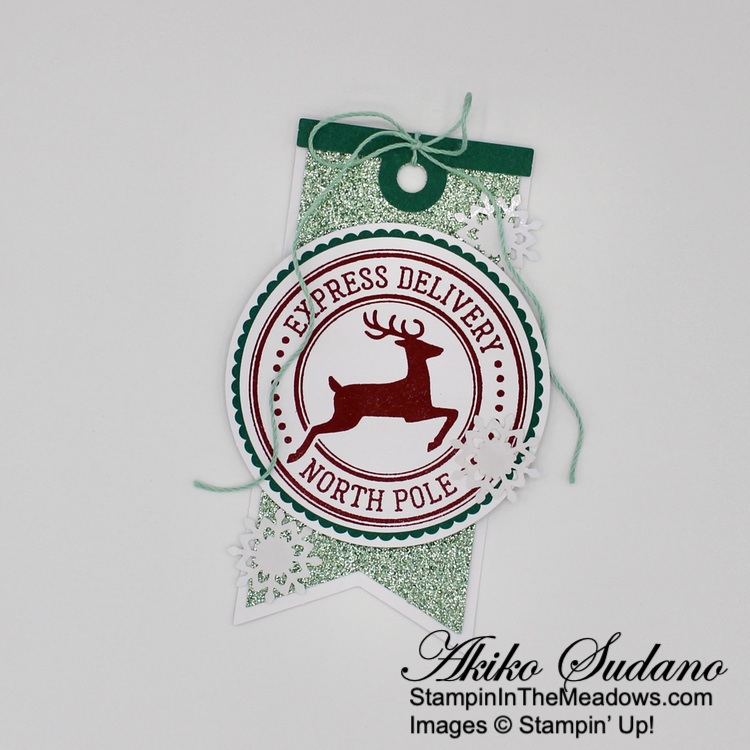
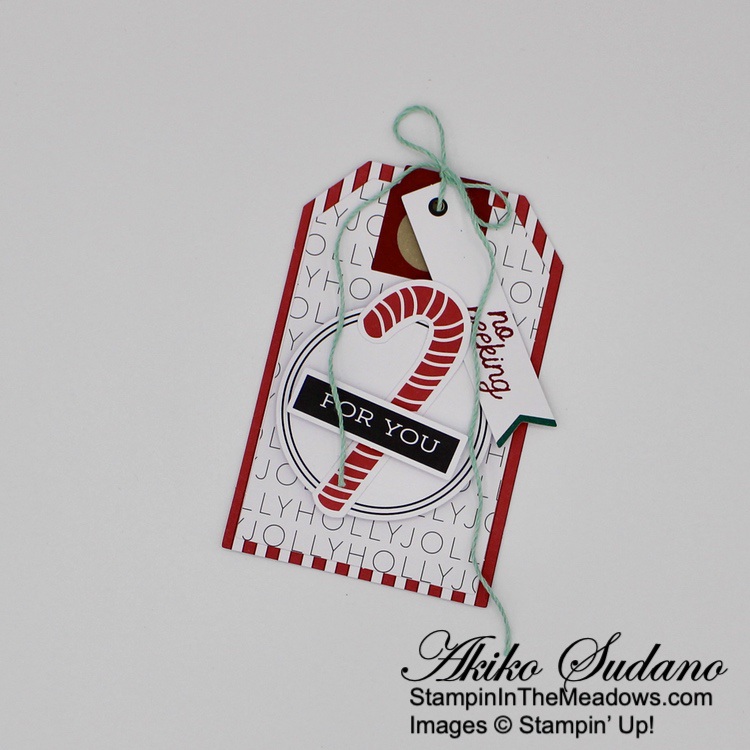
Good Morning! I received my November 2022 Paper Pumpkin Kit – From The North Pole! this week and I put together a couple of cute tags. This kit makes 12 sparkly gift tags – four each of three designs. And it coordinates with last month’s Paper Pumpkin kit that made cards. Here are the tags that I made, pretty much according to the directions:

Here’s the October 2022 Paper Pumpkin kit unboxing video from the Paper Pumpkin YouTube channel showing the kit contents and directions for making each card.

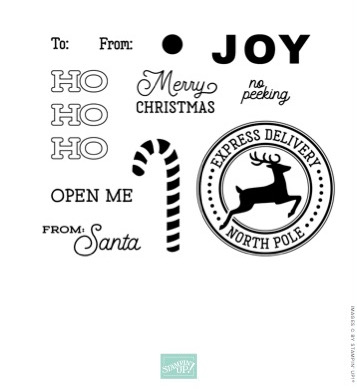
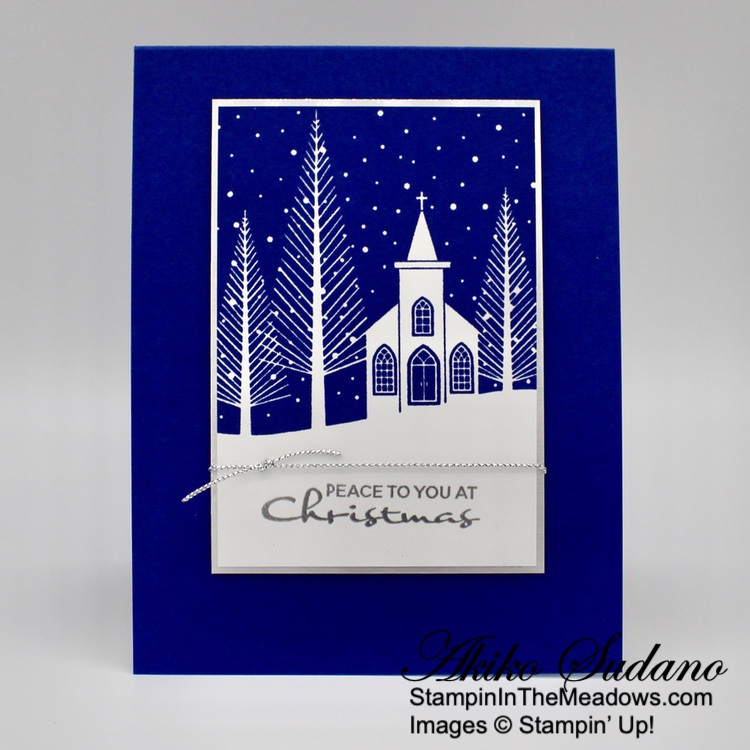
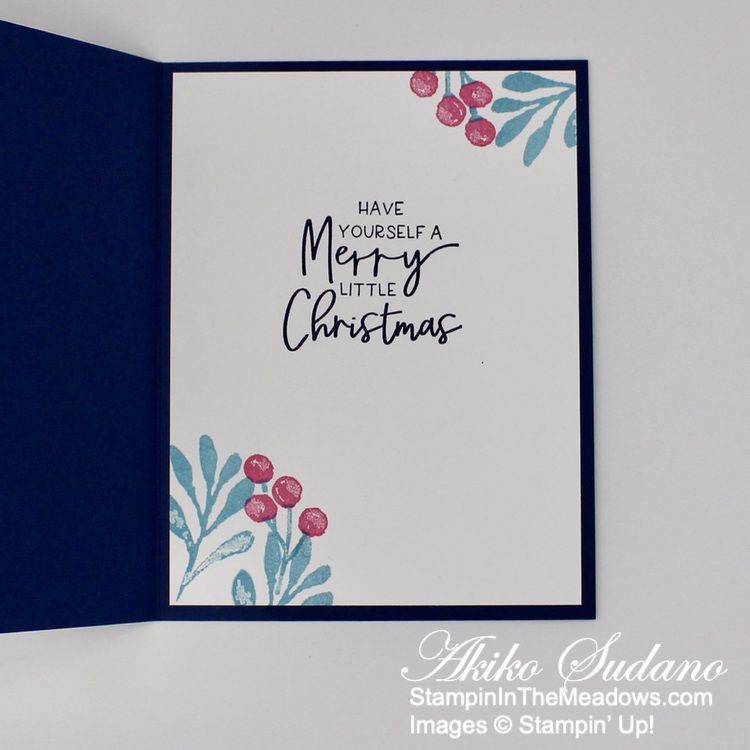
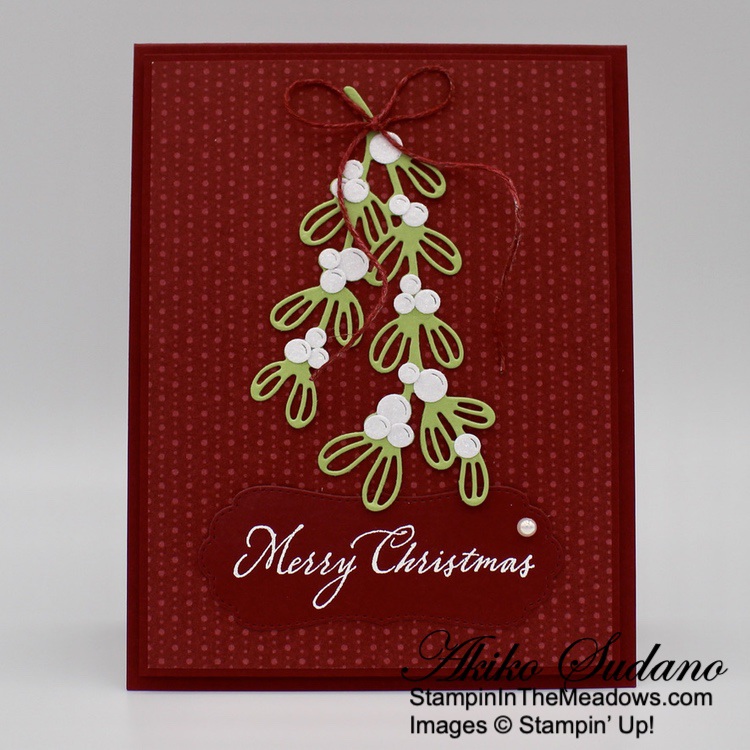
Here’s a closeup of each tag. Note that there are ‘To” and ‘From” stamps that I used to stamp on the back

Here is everything you get in the kit. There are so many die cuts that you can mix and match. The Mint Macaron Glimmer tag and snowflakes are really pretty and along with the iridescent small snowflakes, give your tags a bit of sparkle. You also get some Mint Macaron baker’s twine and a Cherry Cobbler Stampin’ Spot.

Here’s the stamp set that comes in the kit.

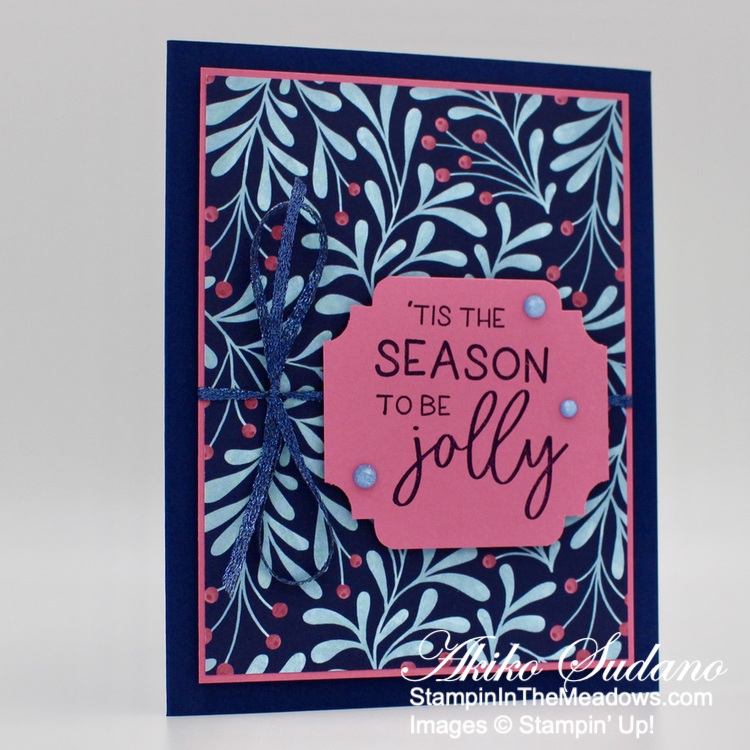
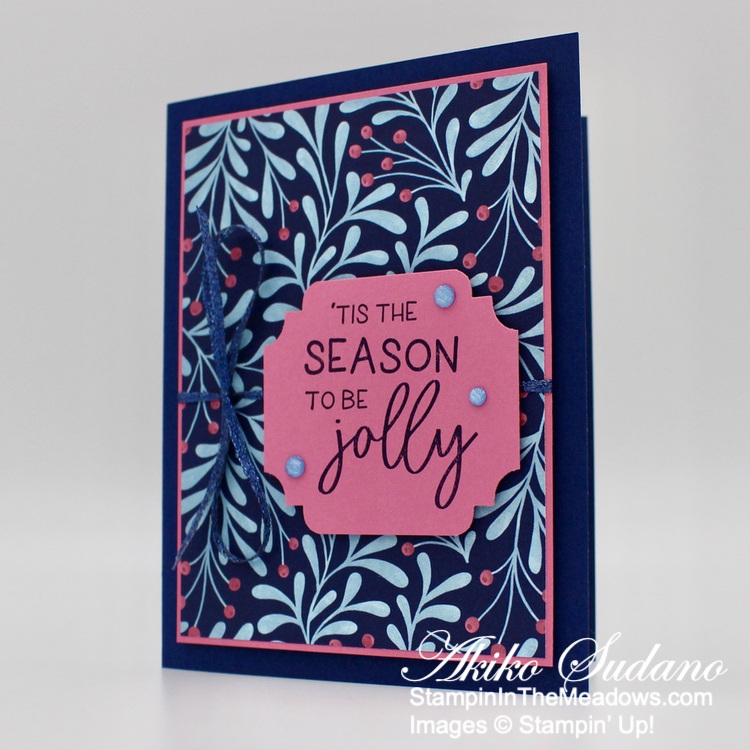
The colors and designs go well with the little North Pole Sacks that are an add on item (item 162416, $4). Here I made a tag and adhered it to one of the treat bags. I also used one of the Santas from last month’s kit and some ribbons and embellishments from my stash.

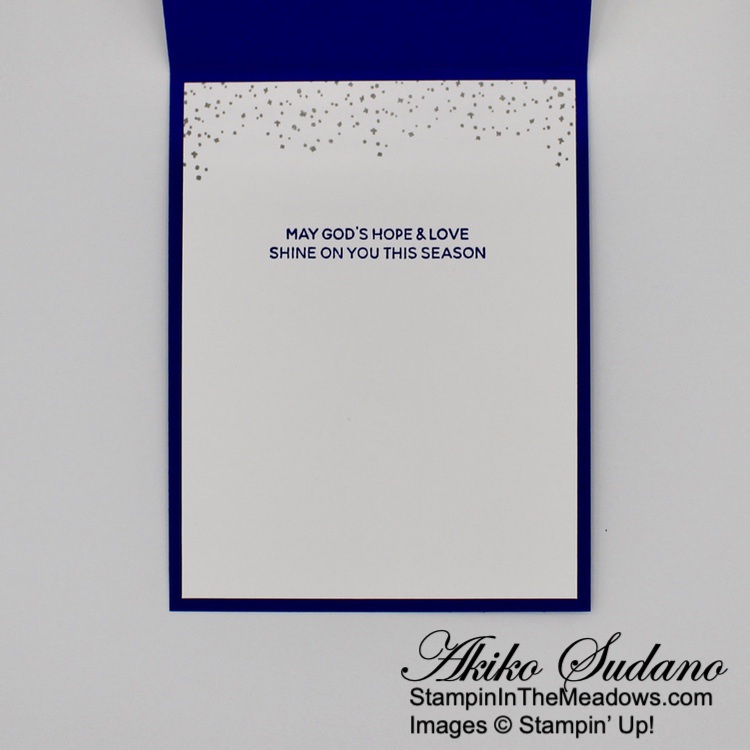
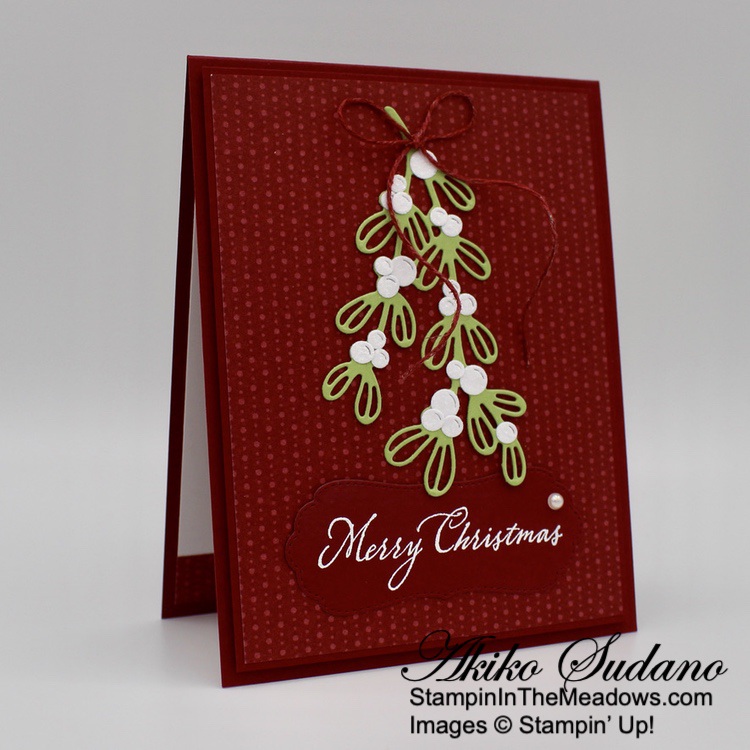
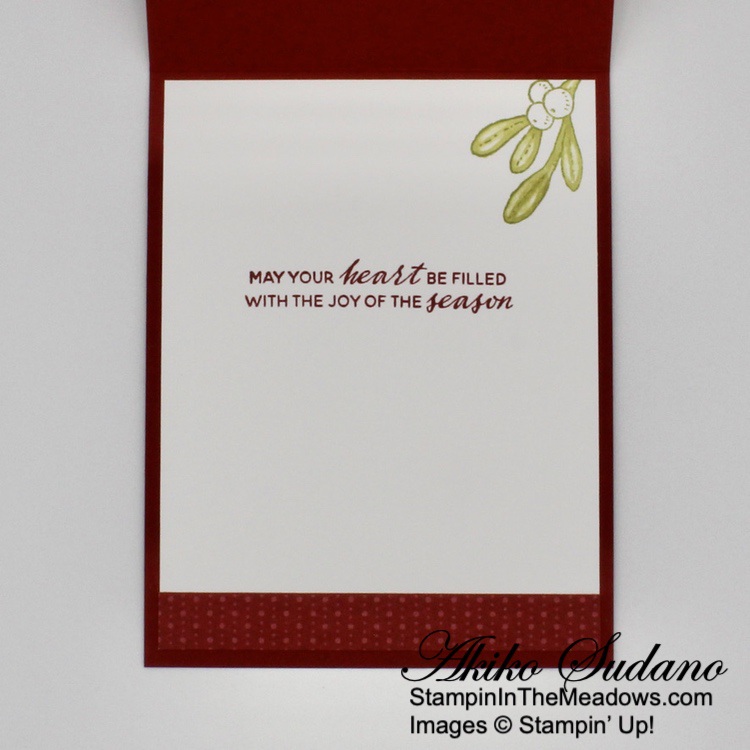
And finally I combined one of the card bases from last month’s kit with a tag from this month’s kit and embellishments from my stash to make a tag card.

It was a lot of fun playing with this kit! There are so many die cuts and fun elements and they can all be mixed and matched so you can create any design you want. And when you add other die cuts, stamps or embellishments from your own personal stash, it’s perfect for a fun afternoon of holiday crafting.


The December Paper Pumpkin Kit is Good Things Come In Small Packages!

Create fun gift card holders to help you celebrate your special occasions all year long! Personalize each gift with these reversible boxes and paper bands for a unique design every time. This kit comes with enough supplies for you to make 16 different gift card holdersโ€”2 each of 8 designs. It also has an all-occasion stamp set and enough paper pieces to make your craft really pop! No matter what the occasion or who the recipient is, this is a coordinated paper craft that everyone will love and appreciate!

And there’s an Add-On available that will coordinate with the gift card boxes – The Good Things Cards and Envelopes Add-On (item number: 163134, price: $10). It includes 16 coordinating cards and envelopes – 4 each of 4 designs (card size: 4-1/4″ x 5-1/2″)

The December Kit Includes:

  • All the supplies you need to create 16 standard gift card holdersโ€”2 each of 8 designs
    • Finished Box size: 3-5/8″ x 2-1/2″ x 1/2″
  • An all-occasion gift-giving sentiment photopolymer stamp set
  • A Garden Green Stampinโ€™ Spot
  • Double-sided paper pieces and boxes, twine, and belly bands you can mix and match for personalized designs
  • Enough adhesive for each project

Coordinating Colors: Balmy Blue, Basic Gray, Blushing Bride, Calypso Coral, Crushed Curry, Garden Green, Tahitian Tide

If youโ€™re interested in subscribing to Paper Pumpkin, you can either sign up for a subscription where you are billed monthly for your kit or you can purchase a prepaid subscription in my Online Store. To see more information and to sign up for the monthly subscription click here. To see the options for prepaid subscriptions in my Online Store, click here.

Sign up deadline for the December 2022 kit is December 10, 2022. Note: Supplies may be limited toward the end of the subscription period.


Current Host Code: F7CW3QU3

Use this host code when you order $50 or more and receive a free gift from me!  The gift is your choice of any currently available item valued up to $10.00!

If your order is over $150, please do not use the host code since you’ll receive your own Host Dollars plus I’ll still send you the free gift!  This host code can be used by anyone, no commitment required.  Let me know if you have any questions.


If you need any stamping supplies, Iโ€™d be very happy to be your Demonstrator.  Just click on the Shop Now Button on the right side of the screen to go directly to my Online store or contact me if you have any questions.  Happy Stamping!

Thanks for stopping by and have a great day!

Akiko

  • Visit my online store here
  • See the current Stampinโ€™ Up! clearance rack specials here
  • Earn FREE Stampinโ€™ Up! products through my Wildflower Frequent Shopper Program – my way of saying thank you to my online frequent shopper customers.
  • Have any questions? I’d be happy to help, click here to contact me.

Stampinโ€™ Up! Prepaid Paper Pumpkin Subscription Options:


Stampinโ€™ Up! Snowman Magic for the Happy Inkinโ€™ Thursday Blog Hop

Good morning and welcome to the Happy Inkin’ Thursday Blog Hop! I finally pulled out my Stampin’ Up! Snowman Magic bundle to make a Christmas card and I love it! I used the White Velvet sheets for the snowman and snow and it looks and feels so nice. You can find the supplies I used along with card stock cuts at the bottom of my post.

We have a color challenge this week and here is the pretty color palette we are using:

I embossed a Basic White panel with the Whimsical Woodland 3D embossing folder and adhered it to the front of a Basic White note card base from the Basic White Note cards and envelopes. These note cards make a 3-1/2″ x 5″ card and are the perfect size for the little scene, while still being mailable. I cut a Pool Party panel with the second largest Stylish Shapes circle die and a Real Red panel with the second largest scalloped circle from the Layering Circles dies. I partially cut a strip of White Velvet paper with the same Stylish Shape circle die and used my paper snips to cut a hillside on the top. I adhered the velvet sheet to the Pool Party circle and then adhered them both to the Real Red scalloped circle. I adhered the layered circles to the card front with liquid glue.

I used the snowman die from the Stampin’ Up! Snowman Magic bundle to cut another White Velvet sheet panel and stamped the face and buttons using Memento Tuxedo Black ink. I put an adhesive sheet on the back of a Pumpkin Pie panel and cut out the nose with the nose die. I peeled off the adhesive backing and adhered the nose to the snowman. I stamped the top hat in Memento Tuxedo Black on Basic White and colored the band with the dark Sweet Sorbet Stampin’ Blend. I stamped the scarf in Sweet Sorbet and stamped it next to the hat and cut them both out with the coordinating dies. I adhered them both to the snowman with glue dots. I cut two arms from Soft Suede and adhered them to the back of the snowman with liquid glue. I cut two pine trees from Garden Green and adhered them to the scene with dots of liquid glue and adhered the snowman to the scene with dimensionals.

I stamped the sentiment from the Stampin’ Up! Snowman Magic stamp set in Versamark ink on Real Red and sprinkled it with white embossing powder. I shook off the excess and heated the powder with my heat tool until it turned bright and shiny. I cut the sentiment out with the long Stylish Shapes banner die and adhered it to the card front with dimensionals. I finished the little scene with small white iridescent adhesive sequins.

For the inside of the card, I stamped the trees from the Stampin’ Up! Snowman Magic stamp set in Garden Green on a Basic White panel. I stamped the sentiment in Real Red ink and the little bird in Pool Party. I adhered the panel to a Real Red mat and adhered the layered panel to the inside of the card with Stampin’ Seal. I also decorated the envelope by stamping the trees and little bird in the front lower right corner.

The textures on this card are so pretty with the white velvet, embossed background and shiny sequins and embossed sentiment. I’m inspired to use the Stampin’ Up! Snowman Magic stamp set on another Christmas card, since this one came out so cute.

On with the Hop! Click on the Next Blog button to move forward to see the beautiful project Karen Ksenzakovic has created.

If you get lost along the way, here are the participants for the hop:


Current Host Code: F7CW3QU3

Use this host code when you order $50 or more and receive a free gift from me!  The free gift is your choice of any available item valued up to $10.00 in the 2022-2023 Annual Catalog or the July-December 2022 Mini Catalog!

If your order is over $150, please do not use the host code since you’ll receive your own Host Dollars plus I’ll still send you the free gift!  This host code can be used by anyone, no club or commitment required. Let me know if you have any questions.


If you need any stamping supplies, Iโ€™d be very happy to be your Demonstrator.  Just click on the Shop Now button on the right side of the screen to go directly to my online store or contact me if you have any questions. 

Thanks for stopping by and Happy Stamping!

Akiko

  • Visit my online store here
  • See the current Stampinโ€™ Up! clearance rack specials here
  • Earn FREE Stampinโ€™ Up! products through my Wildflower Frequent Shopper Program – my way of saying thank you to my online frequent shopper customers.
  • Have any questions? I’d be happy to help, click here to contact me.

Cardstock Cuts for this project:

  • Basic White Note Cards and Envelopes โ€“ 5″ x 7″ card base scored at 3-1/2″
  • Garden Green – 2″ x 2-3/4″ (die cut pine trees)
  • Pumpkin Pie – 1/2″ x 1″ (nose)
  • Pool Party – 2-3/4″ x 2-3/4″ (scene background die cut circle)
  • Real Red – 3-1/4″ x 3-1/4″ (scalloped circle), 1″ x 3-1/4″ (label), 3-1/4″ x 4-3/4″ (inside mat)
  • Soft Suede – 1″ x 1″ (snowman arms)
  • White Velvet sheets – 1-1/2″ x 2″ (die cut snowman), 1-1/4″ x 3″ (ground snow)
  • Basic White โ€“ 3-1/8″ x 4-5/8″ (inside panel), 1-1/4″ x 2-1/2″ (scarf and hat)

Stampinโ€™ Up! products used in this project:


Stampinโ€™ Up! Peace To You Christmas Card

Good Morning! The Stampin’ Up! Peace To You cling stamp set is a gorgeous stamp set that allows you to make elegant and beautiful Christmas cards very easily. It has two main images and lots of wonderful sentiments, and I used the peaceful church stamp for today’s card. You can find the supplies I used at the bottom of my post along with the sizes of cardstock used.

I used my Stamparatus to stamp the image from the Stampin’ Up! Peace To You stamp set in Starry Sky ink on Basic White. Since the stamp has large areas that are inked, I wanted to stamp twice in the same spot, and the Stamparatus is perfect for doing this. I love how my image is still so crisp!

I stamped the sentiment from the Stampin’ Up! Peace To You stamp set in Versamark Ink in the lower part of the stamped church panel and sprinkled it with silver embossing powder. I shook off the excess and heated the powder with my heat tool until the sentiment was bright and shiny.

I adhered the stamped panel to a silver foil panel with liquid glue and wrapped it with silver twine, making a knot. I adhered the panel to the front of a Starry Sky card base with dimensionals.

For the inside of the card, I stamped the sentiment from the Stampin’ Up! Peace To You stamp set in Starry Sky ink on a Basic White panel. I used the snow stamp from the Merriest Moments photopolymer stamp set to apply Smoky Slate ink to the top of the panel, resembling a snowy sky. I adhered the panel to the inside of the card.

So simple and elegant plus it’s easy an easy design to mass produce and mail. So check out the Stampin’ Up! Peace To You stamp set as you make your Christmas cards.


The Stampin’ Up! Seasonal Sale Going on Now!

Create more by spending less during the Seasonal Sale! Between November 15 – November 18 2022, select products from the 2022โ€“2023 Annual Catalog will be on sale with the following discounts:

  • 10% off all punches
  • 15% of all stamps (Host stamp sets are not included in this sale)
  • 20% off all dies
  • 20% off all embossing folders
  • 20% off all non-specialty Designer Series Paper

With the season of giving upon us, this is a great opportunity to buy gifts for your fellow crafting enthusiasts, or to stock up on supplies for all your upcoming handmade projects. Remember, this sale is for four days only! Donโ€™t miss out! Click on the picture below to download a list of items on sale with their sale prices:

Click HERE to shop now in my Online Store!


The Fitting Florets Collection is Now Available!

Add just the right touch of elegance to any occasion, including Christmas and seasonal celebrations, with the sweet Fitting Florets Collection. From color schemes to sentiments and embellishments to dies, these unique products blend together so that your cards and crafts fit whatever occasion you might need. Send birthday wishes, express your gratitude, or spread Christmas cheerโ€”with so many options to mix and match youโ€™ll be set no matter the celebration all year!

The beautiful Framed Florets bundle is an early release from the upcoming January-June 2023 Mini catalog. The Framed & Festive cling stamp set, Fitting Florets designer series paper and gold adhesive backed swirls are only available during this promotion. Click on the picture below to download a flyer with the details.

Watch this video that showcases the new and exclusive products from the Fitting Florets Collection:

The Fitting Florets collection is available now to Stampin’ Up! Demonstrators. And if you decide to join Stampin’ Up! this month, you can add items from this collection to your Starter Kit! Contact me if you have any questions.


Current Host Code: F7CW3QU3

Use this host code when you order $50 or more and receive a free gift from me!  The free gift is your choice of any item currently available valued up to $10.00 from the July-December 2022 Mini Catalog or the 2022-2023 Annual Catalog!

If your order is over $150, please do not use the host code since you’ll receive your own Host Dollars plus I’ll still send you the free gift!  This host code can be used by anyone, no club or commitment required. Let me know if you have any questions.


If you need any stamping supplies, Iโ€™d be very happy to be your Demonstrator.  Just click on the Shop Now button on the right side of the screen to go directly to my online store or contact me if you have any questions.  Happy Stamping!

Thanks for stopping by and have a great week!

Akiko

  • Visit my online store here
  • See the current Stampinโ€™ Up! clearance rack specials here
  • Earn FREE Stampinโ€™ Up! products through my Wildflower Frequent Shopper Program – my way of saying thank you to my online frequent shopper customers.
  • Have any questions? I’d be happy to help, click here to contact me.

Cardstock Cuts for this project:

  • Starry Sky โ€“ 4-1/4″ x 11″ card base scored at 5-1/2″
  • Silver Foil – 2-7/8″ x 4-1/8″ (front mat)
  • Basic White โ€“ 2-3/4″ x 4″ (stamped panel), 4″ x 5-1/4″ (inside panel)

Stampinโ€™ Up! products used in this project:


Stampinโ€™ Up! July-December 2022 Mini Catalog Retiring List Announced

Good Morning! I didn’t get a chance to make a card for today, but more exciting news was announced yesterday! The retiring list for the current July-December 2022 Mini Catalog was announced and some items will be discounted beginning on December 1, 2022.

The Last Chance Promotion discounts will start on December 1, 2022 and items will be available while supplies last. Note that while some of the bundles are on the retiring list, the individual stamps and dies/punched may be carried over. These items are marked with three asterisks on the retiring lists. Also, if one of the items in the bundle is deeply discounted, the total price may be less than the bundled price, so pull out your calculators to double check.

Click HERE to download an Excel Spreadsheet of the Retiring Last Chance Items.

Click HERE to download a PDF of the Retiring Last Chance Items.

Click HERE to download a PDF of the Carryover List of items.

Shop early to get the items you want before they’re gone for good!


The Stampin’ Up! Seasonal Sale Starts Today

Create more by spending less during the Seasonal Sale! Between November 15 – November 18 2022, select products from the 2022โ€“2023 Annual Catalog will be on sale with the following discounts:

  • 10% off all punches
  • 15% of all stamps (Host stamp sets are not included in this sale)
  • 20% off all dies
  • 20% off all embossing folders
  • 20% off all non-specialty Designer Series Paper

With the season of giving upon us, this is a great opportunity to buy gifts for your fellow crafting enthusiasts, or to stock up on supplies for all your upcoming handmade projects. Remember, this sale is for four days only! Donโ€™t miss out! Click on the picture below to download a list of items on sale with their sale prices:


The Fitting Florets Collection is Now Available!

Add just the right touch of elegance to any occasion, including Christmas and seasonal celebrations, with the sweet Fitting Florets Collection. From color schemes to sentiments and embellishments to dies, these unique products blend together so that your cards and crafts fit whatever occasion you might need. Send birthday wishes, express your gratitude, or spread Christmas cheerโ€”with so many options to mix and match youโ€™ll be set no matter the celebration all year!

The beautiful Framed Florets bundle is an early release from the upcoming January-June 2023 Mini catalog. The Framed & Festive cling stamp set, Fitting Florets designer series paper and gold adhesive backed swirls are only available during this promotion. Click on the picture below to download a flyer with the details.

Watch this video that showcases the new and exclusive products from the Fitting Florets Collection:


The December Paper Pumpkin Kit is Good Things Come In Small Packages!

Create fun gift card holders to help you celebrate your special occasions all year long! Personalize each gift with these reversible boxes and paper bands for a unique design every time. This kit comes with enough supplies for you to make 16 different gift card holdersโ€”2 each of 8 designs. It also has an all-occasion stamp set and enough paper pieces to make your craft really pop! No matter what the occasion or who the recipient is, this is a coordinated paper craft that everyone will love and appreciate!

And there’s an Add-On available that will coordinate with the gift card boxes – The Good Things Cards and Envelopes Add-On (item number: 163134, price: $10). It includes 16 coordinating cards and envelopes – 4 each of 4 designs (card size: 4-1/4″ x 5-1/2″)

The December Kit Includes:

  • All the supplies you need to create 16 standard gift card holdersโ€”2 each of 8 designs
    • Finished Box size: 3-5/8″ x 2-1/2″ x 1/2″
  • An all-occasion gift-giving sentiment photopolymer stamp set
  • A Garden Green Stampinโ€™ Spot
  • Double-sided paper pieces and boxes, twine, and belly bands you can mix and match for personalized designs
  • Enough adhesive for each project

Coordinating Colors: Balmy Blue, Basic Gray, Blushing Bride, Calypso Coral, Crushed Curry, Garden Green, Tahitian Tide

If youโ€™re interested in subscribing to Paper Pumpkin, you can either sign up for a subscription where you are billed monthly for your kit or you can purchase a prepaid subscription in my Online Store. To see more information and to sign up for the monthly subscription click here. To see the options for prepaid subscriptions in my Online Store, click here.

Sign up deadline for the December 2022 kit is December 10, 2022. Note: Supplies may be limited toward the end of the subscription period.


Current Host Code: F7CW3QU3

Use this host code when you order $50 or more and receive a free gift from me!  The free gift is your choice of any item currently available valued up to $10.00 from the July-December 2022 Mini Catalog or the 2022-2023 Annual Catalog!

If your order is over $150, please do not use the host code since you’ll receive your own Host Dollars plus I’ll still send you the free gift!  This host code can be used by anyone, no club or commitment required. Let me know if you have any questions.


If you need any stamping supplies, Iโ€™d be very happy to be your Demonstrator.  Just click on the Shop Now button on the right side of the screen to go directly to my online store or contact me if you have any questions.  Happy Stamping!

Thanks for stopping by and have a great week!

Akiko

  • Visit my online store here
  • See the current Stampinโ€™ Up! clearance rack specials here
  • Earn FREE Stampinโ€™ Up! products through my Wildflower Frequent Shopper Program – my way of saying thank you to my online frequent shopper customers.
  • Have any questions? I’d be happy to help, click here to contact me.

Stampinโ€™ Up! On Stage 2022

Good Morning! I went to Stampin’ Up! On Stage over the weekend and had a great time! I met up with other Inkin’ Krew teammates, we made some cards, watched awesome demonstrations of new products from the upcoming January – April 2023 Mini Catalog and Sale-A-Bration and we got a chance to get our new catalogs and some more new products.

First of all, here they are, the new Mini Catalog and Sale-A-Bration brochure. Ordering begins January 5, 2023 and the Mini Catalog will run through the end of April instead of June. But it is chock full of wonderful new products and it’s a great catalog! Also, there will only be one Sale-A-Bration in 2023, and it will be in January and February.

Meet Connie Troyer, Gloria Goller and Debbie Hilands! These ladies enjoyed all the crafting and presentations with me and are some of my Inkin’ Krew Teammates.

And of course we received some nice swag and Prize Patrol gifts to give us a taste of the pretty new things to come.

A pretty green (really) bag, pen and cute notebook. I was wearing my trading pins, so forgot to take a pic
Three gorgeous stamp sets, two from the new catalog and one from Sale-A-Bration. And the cutest little floral embellishments!

We got to make some cards too! We made these wonderful cards using the new Timeless Greetings Kit! This is a new kit that will be available tomorrow and is perfect for masculine cards. The all inclusive kit makes eight 4-1/4″ x 5-1/2″ cards, four in each of these designs. A n exclusive stamp set and Early Espresso Stampin’ Spot, instructions and all needed adhesives are included.

The projects made during the Stampin’ Up! presentations were posted on inspiration boards so we could get a close up look. Here are some of them. My phone photography skills are not the best, but there are so many pretty things to look forward to after the holidays!

And of course many of the Stampin’ Up! Demonstrators in attendance made a bunch of cards to trade. These are called ‘swaps’ and some of the ladies posted them to the boards as well. There was tons of awesome card making inspiration!

All in all it was a fun day! It was great to meet up with my teammates and to see the new things coming our way. I plan to try to intersperse some sneak peeks of some of my new goodies as I finish up my holiday cards. But I need to keep focus on getting my Christmas cards done too!


The Stampin’ Up! Seasonal Sale is November 15 – November 18, 2022!

Create more by spending less during the Seasonal Sale! Between 15 and 18 November 2022, select products from the 2022โ€“2023 Annual Catalog will be on sale with the following discounts:

  • 10% off all punches
  • 15% of all stamps (Host stamp sets are not included in this sale)
  • 20% off all dies
  • 20% off all embossing folders
  • 20% off all non-specialty Designer Series Paper

With the season of giving upon us, this is a great opportunity to buy gifts for your fellow crafting enthusiasts, or to stock up on supplies for all your upcoming handmade projects. Remember, this sale is for four days only! Donโ€™t miss out! Click on the picture below to download a list of items on sale with their sale prices:


Current Host Code: F7CW3QU3

Use this host code when you order $50 or more and receive a free gift from me!  The free gift is your choice of any item currently available valued up to $10.00 from the July-December 2022 Mini Catalog or the 2022-2023 Annual Catalog!

If your order is over $150, please do not use the host code since you’ll receive your own Host Dollars plus I’ll still send you the free gift!  This host code can be used by anyone, no club or commitment required. Let me know if you have any questions.


If you need any stamping supplies, Iโ€™d be very happy to be your Demonstrator.  Just click on the Shop Now button on the right side of the screen to go directly to my online store or contact me if you have any questions.  Happy Stamping!

Thanks for stopping by and have a great week!

Akiko

  • Visit my online store here
  • See the current Stampinโ€™ Up! clearance rack specials here
  • Earn FREE Stampinโ€™ Up! products through my Wildflower Frequent Shopper Program – my way of saying thank you to my online frequent shopper customers.
  • Have any questions? I’d be happy to help, click here to contact me.

Stampinโ€™ Up! Framed and Festive Christmas Card

Good Morning! Today is Stampin’ Up! On Stage and I am in Pittsburgh celebrating and having fun at a local event! but I pulled together a quick Christmas card using fun non-traditional colors and the Stampin’ Up! Framed And Festive cling stamp set. You can find the supplies I used at the bottom of my post along with the sizes of cardstock used.

I adhered a panel of the pretty paper from the Fitted Florets designer series paper to a Polished Pink mat and wrapped it with a length of Starry Sky metallic ribbon, making a bow on the side. I adhered the panel to the front of a Night of Navy card base with dimensionals.

I stamped the sentiment from the Stampin’ Up! Framed And Festive stamp set in Night of Navy ink on a Polished Pink panel. I punched each corner with the curvy end of the Very Best Trio punch – remember to turn the panel upside down to keep the label symmetrical.

I adhered the label to the card front over the ribbon with dimensionals. I finished the card with three Balmy Blue sparkly gems.

For the inside of the card, I stamped the leaf sprig from the Christmas Season photopolymer stamp set in Balmy Blue ink in the corners of a Basic White panel. I stamped the berry stem in Balmy Blue and the berries in Polished Pink. I love how the greenery resembles the DSP on the front of the card! I stamped the sentiment from the Stampin’ Up! Framed And Festive stamp set in Night of Navy ink and adhered the panel to the inside of the card with Stampin’ Seal.

The Stampin’ Up! Framed And Festive stamp set and the Fitting Florets DSP are part of the Fitting Florets promotion that is going on now. These are fun items designed to be used for both holiday crafting and items to coordinate with the early release of the Framed Florets bundle. I love the Polished Pink with the Night of Navy – these are pretty together and make for a fun non-traditional holiday cards.


The Fitting Florets Collection is Now Available!

Add just the right touch of elegance to any occasion, including Christmas and seasonal celebrations, with the sweet Fitting Florets Collection. From color schemes to sentiments and embellishments to dies, these unique products blend together so that your cards and crafts fit whatever occasion you might need. Send birthday wishes, express your gratitude, or spread Christmas cheerโ€”with so many options to mix and match youโ€™ll be set no matter the celebration all year!

The beautiful Framed Florets bundle is an early release from the upcoming January-June 2023 Mini catalog. The Framed & Festive cling stamp set, Fitting Florets designer series paper and gold adhesive backed swirls are only available during this promotion. Click on the picture below to download a flyer with the details.

Watch this video that showcases the new and exclusive products from the Fitting Florets Collection:

The Fitting Florets collection is available now to Stampin’ Up! Demonstrators. And if you decide to join Stampin’ Up! this month, you can add items from this collection to your Starter Kit! Contact me if you have any questions.


Current Host Code: F7CW3QU3

Use this host code when you order $50 or more and receive a free gift from me!  The free gift is your choice of any item currently available valued up to $10.00 from the July-December 2022 Mini Catalog or the 2022-2023 Annual Catalog!

If your order is over $150, please do not use the host code since you’ll receive your own Host Dollars plus I’ll still send you the free gift!  This host code can be used by anyone, no club or commitment required. Let me know if you have any questions.


If you need any stamping supplies, Iโ€™d be very happy to be your Demonstrator.  Just click on the Shop Now button on the right side of the screen to go directly to my online store or contact me if you have any questions.  Happy Stamping!

Thanks for stopping by and have a great week!

Akiko

  • Visit my online store here
  • See the current Stampinโ€™ Up! clearance rack specials here
  • Earn FREE Stampinโ€™ Up! products through my Wildflower Frequent Shopper Program – my way of saying thank you to my online frequent shopper customers.
  • Have any questions? I’d be happy to help, click here to contact me.

Cardstock Cuts for this project:

  • Night of Navy โ€“ 5-1/2″ x 8-1/2″ card base scored at 4-1/4″
  • Polished Pink – 3-3/4″ x 5″ (front mat), 2-1/4″ x 2-1/2″ (punched label)
  • Basic White โ€“ 4″ x 5-1/4″ (inside panel)
  • Fitted Florets DSP – 3-5/8″ x 4-7/8″ (front background)

Stampinโ€™ Up! products used in this project:


Stampinโ€™ Up! Fond of Autumn for the Happy Inkinโ€™ Thursday Blog Hop

Good morning and welcome to the Happy Inkin’ Thursday Blog Hop! I used the beautiful Stampin’ Up! Fond Of Autumn bundle for an autumn wishes card, coloring the pretty floral fie cuts with Stampin’ Blends. You can find the supplies I used along with card stock cuts at the bottom of my post.

We have a pretty sketch challenge this week and sketch we are using:

I adhered a panel of the new Fitted Florets designer series paper to the front of a Soft Succulent card base. I used the largest stitched circle die from the Stylish Shapes dies to cut a panel of Rustic Harvest designer series paper and adhered it to the card front with liquid glue.

I partially stamped the two ends of the large bouquet stamp from the Stampin’ Up! Fond Of Autumn photopolymer stamp set on two panels of Basic White card stock using Memento Tuxedo Black ink and cut them out with the coordinating die that makes 4 separate die cuts. I colored pieces with Stampin’ Blends, using Dark So Saffron for the flower centers, light Soft Suede for the flower leaves, light Soft Succulent for the rounded leaves, Rich Razzleberry for the flowers, light Real Red for the berries and light Daffodil Delight for the berry leaves.

I stamped the sentiment from the Stampin’ Up! Fond Of Autumn stamp set in Memento Tuxedo Black ink on Rich Razzleberry and cut it out with the long skinny banner die from the Stylish Shapes dies. I adhered the label to the card with glue dots. I adhered the die cut berries to the card with glue dots and the flowers with dimensionals. I finished the card front with a Soft Succulent bow and opal gems.

For the inside of the card, I stamped the single flower from the Stampin’ Up! Fond Of Autumn stamp set in Memento Tuxedo Black ink on Basic White. I cut it out with the coordinating die and colored it with Rich Razzleberry, So Saffron and Soft Suede Stampin’ Blends like the flowers on the card front. I trimmed the bottom of a Basic White panel with a strip of Fitted Florets DSP and adhered the flower on top with glue dots. I adhered the panel to the inside of the card with Stampin’ Seal.

The Stampin’ Up! Fond Of Autumn bundle is really pretty and with wonderful floral images that are fun to color. It also comes with great fall sentiments and fun dies.

On with the Hop! Click on the Next Blog button to move forward to see the beautiful project Karen Ksenzakovic has created.

If you get lost along the way, here are the participants for the hop:


Current Host Code: F7CW3QU3

Use this host code when you order $50 or more and receive a free gift from me!  The free gift is your choice of any available item valued up to $10.00 in the 2022-2023 Annual Catalog or the July-December 2022 Mini Catalog!

If your order is over $150, please do not use the host code since you’ll receive your own Host Dollars plus I’ll still send you the free gift!  This host code can be used by anyone, no club or commitment required. Let me know if you have any questions.


If you need any stamping supplies, Iโ€™d be very happy to be your Demonstrator.  Just click on the Shop Now button on the right side of the screen to go directly to my online store or contact me if you have any questions. 

Thanks for stopping by and Happy Stamping!

Akiko

  • Visit my online store here
  • See the current Stampinโ€™ Up! clearance rack specials here
  • Earn FREE Stampinโ€™ Up! products through my Wildflower Frequent Shopper Program – my way of saying thank you to my online frequent shopper customers.
  • Have any questions? I’d be happy to help, click here to contact me.

Cardstock Cuts for this project:

  • Soft Succulent โ€“ 5-1/2″ x 8-1/2″ card base scored at 4-1/4″
  • Rich Razzleberry – 1″ x 3-1/2″ (label)
  • Basic White โ€“ 4″ x 5-1/4″ (inside panel), 2-1/2″ x 3″ (floral part of large stamp), 2″ x 3-3/4″ (berries part of large stamp), 2″ x 2″ (single flower)
  • Fitting Florets DSP – 4-1/8″ x 5-3/8″ (front background), 1/2″ x 5-1/4″ (inside trim)
  • Rustic Harvest DSP – 3-1/2″ x 3-1/2″ (die cut circle)

Stampinโ€™ Up! products used in this project:


Stampinโ€™ Up! Mistletoe Magic for the Inkin’ Krew Blog Hop

Good morning! Welcome to the November Inkinโ€™ Krew Team Blog Hop! The theme for this monthโ€™s hop is “Merry Christmas or Happy Holidays” and I am sharing a Christmas card made with the pretty Stampin’ Up! Mistletoe Magic bundle. You can find the supplies I used at the bottom of my post along with the sizes of cardstock used.

I adhered a panel of Lights Aglow specialty designer series paper to a Cherry Cobbler mat with liquid glue and adhered the panel to the front of a Cherry Cobbler card base with Dimensionals.

I stamped the sentiment from the Stampin’ Up! Mistletoe Magic cling stamp set in Versamark ink on Cherry Cobbler card stock. I sprinkled it with white embossing powder and shook off the excess. I heated the powder with my heat tool until it was bright and shiny and cut it out with the label die from the Potted Succulents dies.

I cut a Pear Pizzazz panel with the mistletoe sprig die from the Stampin’ Up! Mistletoe Magic bundle. I cut several of the berry dies from white glimmer paper using the larger berry dies twice and smallest berry die once. I adhered the berries to the mistletoe sprig with liquid glue (I had several berries left over). There are spots on the sprig die cut where the berries go, and it’s pretty easy to tell.

I adhered the label to the card front with glue dots and adhered the layered mistletoe sprig on top with glue dots. I colored a length of linen thread with the dark Real Red Stampin’ Blend and made a bow. I adhered the bow to the sprig with a rolled up glue dot and finished the label with an iridescent pearl.

For the inside of the card, I stamped little mistletoe sprig from the Stampin’ Up! Mistletoe Magic stamp set in Pear Pizzazz ink in the corner of a Basic White panel. I colored the leaves and stem with the light Old Olive Stampin’ blend and the color lifter. I stamped the sentiment in Cherry Cobbler and trimmed the bottom with a strip of Lights Aglow specialty DSP. I adhered the panel to the inside of the card with Stampin’ Seal.

The Stampin’ Up! Mistletoe Magic bundle is a sweet and simple bundle with pretty images and dies and wonderful Christmas sentiments. The die cut mistletoe sprig came together easily and is really impressive with the white glimmer paper berries.

On With The Hop! Click on the Next Blog button to move forward to Karen Ksenzakovic’s project or click the Previous Blog button to move back to see the project that Amy Koenders created.

If you get lost along the way, here are the participants for the hop:


Current Host Code: F7CW3QU3

Use this host code when you order $50 or more and receive a free gift from me!  The free gift is your choice of any item currently available valued up to $10.00 in the 2022-2023 Annual Catalog or the July-December 2022 Mini Catalog!

If your order is over $150, please do not use the host code since you’ll receive your own Host Dollars plus I’ll still send you the free gift!  This host code can be used by anyone, no club or commitment required. Let me know if you have any questions


If you need any stamping supplies, Iโ€™d be very happy to be your Demonstrator.  Just click on the Shop Now button on the right side of the screen to go directly to my online store or contact me if you have any questions. 

Thanks for stopping by and Happy Stamping!

Akiko

  • Visit my online store here
  • See the current Stampinโ€™ Up! clearance rack specials here
  • Earn FREE Stampinโ€™ Up! products through my Wildflower Frequent Shopper Program – my way of saying thank you to my online frequent shopper customers.
  • Have any questions? I’d be happy to help, click here to contact me.

Cardstock Cuts for this project:

  • Cherry Cobbler – 4-1/4″ x 11″ card base scored at 5-1/2″, 4″ x 5-1/4″ (front mat), 1-1/2″ x 4″ (front label)
  • Pear Pizzazz – 2-1/4″ x 4-1/4″(die cut mistletoe)
  • White 6″ x 6″ Glimmer – 1″ x 3″ (die cut berries)
  • Basic White – 4″ x 5-1/4″ (inside panel)
  • Lights Aglow specialty 6″ x 6″ DSP – 3-7/8″ x 5-1/8″ (front background), 1/2″ x 4″ (inside trim)

Stampinโ€™ Up! products used in this project:


Stampinโ€™ Up! Nature’s Prints with Video Tutorial

Good Morning! One of the prettiest packs of designer series paper currently available is the Splendid Day specialty DSP with it’s colored foils and floral prints. I wanted to use it for a special card and so I paired it with the beautiful sentiments and label dies from the Stampin’ Up! Nature’s Prints bundle. And then I realized that the flower from the new Framed Florets bundle went perfect with the DSP, so I pulled it in as well. You can find the supplies I used at the bottom of my post along with the sizes of cardstock used.

You can watch my Facebook live from yesterday afternoon HERE. I have also posted it to my YouTube Channel and you can view it HERE.

I embossed a panel of Petal Pink card stock with the Timeworn Type 3D embossing folder and adhered it to the front of a Petal Pink card base. I adhered panels of the beautiful Splendid Day specialty designer series paper to a Petal Pink panel with Stampin’ Seal. I cut a Basic White and Rose Gold foil panel with the leaf sprigs from the Splendid Stems dies (I cut two from the Rose Gold foil, saving one for the inside panel) and adhered them to the layered DSP panel with glue dots.

I folded a short length of Rose Gold and White striped ribbon and adhered it together with glue dots. I adhered it next to the sprigs on the layered DSP panel. I stamped the sentiment from the Stampin’ Up! Nature’s Prints cling stamp set in Versamark ink on a Basic White panel. I sprinkled it with copper embossing powder and shook off the excess. I heated the powder with my heat tool until it was bright and shiny and cut the sentiment out with the pretty label die. I adhered it to the panel with dimensionals over the ribbon and sprigs. I adhered the panel to the card front with dimensionals.

I stamped two flowers from the Framed Florets photopolymer stamp set in Versamark ink and sprinkled them with copper embossing powder. I shook off the excess powder and heated the flowers with my heat tool until they were bright and shiny. I cut them out with the coordinating die and saved one for the inside of the card. I adhered the second one to the card front with dimensionals and glue dots and finished the card with three champagne rhinestone jewels.

For the inside of the card, I inked up the large fern from the Stampin’ Up! Nature’s Prints stamp set in Petal Pink ink and stamped it off. Then I stamped it in the corner of a Basic White panel. I adhered the Rose Gold foil die cut sprig over the fern with dots of liquid glue. I adhered a strip of Splendid Day specialty DSP to the bottom of the panel and adhered the second flower on top with liquid glue. I adhered the panel to the inside of the card with Stampin’ Seal.

The gorgeous floral foil from the Splendid Day specialty designer series paper works well with the Rose Gold foil, copper embossing powder and rose gold striped ribbon. And the beautiful sentiments and label die from the Stampin’ Up! Nature’s Prints bundle are the perfect finish. Foils and embossing are easy ways to make an extra special card for any extra special occasion or loved one.


The Fitting Florets Collection is Now Available!

Add just the right touch of elegance to any occasion, including Christmas and seasonal celebrations, with the sweet Fitting Florets Collection. From color schemes to sentiments and embellishments to dies, these unique products blend together so that your cards and crafts fit whatever occasion you might need. Send birthday wishes, express your gratitude, or spread Christmas cheerโ€”with so many options to mix and match youโ€™ll be set no matter the celebration all year!

The beautiful Framed Florets bundle is an early release from the upcoming January-June 2023 Mini catalog. The Framed & Festive cling stamp set, Fitting Florets designer series paper and gold adhesive backed swirls are only available during this promotion. Click on the picture below to download a flyer with the details.

Watch this video that showcases the new and exclusive products from the Fitting Florets Collection:

The Fitting Florets collection is available now to Stampin’ Up! Demonstrators. And if you decide to join Stampin’ Up! this month, you can add items from this collection to your Starter Kit! Contact me if you have any questions.


Current Host Code: F7CW3QU3

Use this host code when you order $50 or more and receive a free gift from me!  The free gift is your choice of any item currently available valued up to $10.00 from the July-December 2022 Mini Catalog or the 2022-2023 Annual Catalog!

If your order is over $150, please do not use the host code since you’ll receive your own Host Dollars plus I’ll still send you the free gift!  This host code can be used by anyone, no club or commitment required. Let me know if you have any questions.


If you need any stamping supplies, Iโ€™d be very happy to be your Demonstrator.  Just click on the Shop Now button on the right side of the screen to go directly to my online store or contact me if you have any questions.  Happy Stamping!

Thanks for stopping by and have a great week!

Akiko

  • Visit my online store here
  • See the current Stampinโ€™ Up! clearance rack specials here
  • Earn FREE Stampinโ€™ Up! products through my Wildflower Frequent Shopper Program – my way of saying thank you to my online frequent shopper customers.
  • Have any questions? I’d be happy to help, click here to contact me.

Cardstock Cuts for this project:

  • Petal Pink โ€“ 4-1/4″ x 11″ card base scored at 5-1/2″, 4-1/4″ x 5-1/2″ (embossed background), 3-1/4″ x 4-1/8″ (DSP mat), 1-1/4โ€ x 2-1/2โ€ (die cut flowers)
  • Basic White – 4″ x 5-1/4โ€ (inside panel), 1-3/4โ€ x 3-3/4โ€ (label), 1-1/4โ€ x 2-1/2โ€ (die cut sprig)
  • Rose Gold Foil – 1-1/4″ x 5″ (two die cut sprigs)
  • Splendid Day specialty DSP – 3″ x 4″ panel cut into 1″ x 4″ strips (floral background strips), 1/2โ€ x 4โ€ (inside trim)

Stampinโ€™ Up! products used in this project:


Stampinโ€™ Up! Nuts About Squirrels Card

Good Morning! Have you seen all the squirrels out lately? They have been very busy in my neighborhood and I hope it doesn’t mean a harsh winter. But they inspired me to pull out the sweet Stampin’ Up! Nuts About Squirrels photopolymer stamp set to make a simple Fall Hello card. This is a fun two-step stamp set with the cutest squirrels that you can find in the current Annual Catalog. You can find the supplies I used at the bottom of my post along with the sizes of cardstock used.

I adhered a panel of the falling leaves Celebrate Everything designer series paper to a Shaded Spruce mat with liquid glue and wrapped a length of Gray Granite baker’s twine around it three times and made a bow. I adhered the wrapped panel to the front of a Crushed Curry card base with dimennsionals.

I stamped the outline of the sweet squirrel from the Stampin’ Up! Nuts About Squirrels stamp set inn Soft Suede ink on Basic White. I stamped the filler stamp with the body and tail in Gray Granite, lining up the paws and tail. It’s nice to be able to line things up with the photopolymer stamps. I stamped the acorn top in Soft Suede and bottom in Crumb Cake. I cut the squirrel out with the second largest square from the Stylish Shapes dies and adhered it to a Shaded Spruce mat with liquid glue. I adhered the squirrel to the card front with dimensionals.

I stamped the sentiment from the Stampin’ Up! Nuts About Squirrels stamp set in Memento Tuxedo Black ink on Granny Apple Green card stock. I cut it out with the smallest banner die from the Stylish Shapes dies and adhered it to the card with glue dots.

For the inside of the card, I stamped the sentiment from the Stampin’ Up! Nuts About Squirrels stamp set in Memento Tuxedo Black ink on a Basic White panel. I stamped the leaf in Crushed Curry and the lines in the leaf in Memento Tuxedo Black – I love how well this leaf matches the leaves in the DSP! I trimmed the bottom with a strip of Celebrate Everything DSP and adhered the panel to the inside of the card with Stampin’ Seal.

The squirrels in the Stampin’ Up! Nuts About Squirrels stamp set are so cute and sweet and they’re perfect for fall cards. The two-step stamping technique is pretty easy to do with this stamp set and there are so many coordinating stamps that compliment the squirrels. Have fun with this set!


The Fitting Florets Collection is Now Available!

Add just the right touch of elegance to any occasion, including Christmas and seasonal celebrations, with the sweet Fitting Florets Collection. From color schemes to sentiments and embellishments to dies, these unique products blend together so that your cards and crafts fit whatever occasion you might need. Send birthday wishes, express your gratitude, or spread Christmas cheerโ€”with so many options to mix and match youโ€™ll be set no matter the celebration all year!

The beautiful Framed Florets bundle is an early release from the upcoming January-June 2023 Mini catalog. The Framed & Festive cling stamp set, Fitting Florets designer series paper and gold adhesive backed swirls are only available during this promotion. Click on the picture below to download a flyer with the details.

Watch this video that showcases the new and exclusive products from the Fitting Florets Collection:

The Fitting Florets collection is available now to Stampin’ Up! Demonstrators. And if you decide to join Stampin’ Up! this month, you can add items from this collection to your Starter Kit! Contact me if you have any questions.


Current Host Code: F7CW3QU3

Use this host code when you order $50 or more and receive a free gift from me!  The free gift is your choice of any item currently available valued up to $10.00 from the July-December 2022 Mini Catalog or the 2022-2023 Annual Catalog!

If your order is over $150, please do not use the host code since you’ll receive your own Host Dollars plus I’ll still send you the free gift!  This host code can be used by anyone, no club or commitment required. Let me know if you have any questions.


If you need any stamping supplies, Iโ€™d be very happy to be your Demonstrator.  Just click on the Shop Now button on the right side of the screen to go directly to my online store or contact me if you have any questions.  Happy Stamping!

Thanks for stopping by and have a great week!

Akiko

  • Visit my online store here
  • See the current Stampinโ€™ Up! clearance rack specials here
  • Earn FREE Stampinโ€™ Up! products through my Wildflower Frequent Shopper Program – my way of saying thank you to my online frequent shopper customers.
  • Have any questions? I’d be happy to help, click here to contact me.

Cardstock Cuts for this project:

  • Crushed Curry โ€“ 4-1/4″ x 11″ card base scored at 5-1/2″
  • Shaded Spruce – 3-3/4″ x 5″ (front mat), 2-1/2″ x 2-1/2″ (squirrel mat)
  • Granny Apple Green – 1″ x 2-1/2″ (label)
  • Basic White โ€“ 3″ x 3″ (squirrel), 4″ x 5-1/4″ (inside panel)
  • Celebrate Everything DSP – 3-5/8″ x 4-7/8″ (front background), 1/2″ x 3-3/4″ (inside trim)

Stampinโ€™ Up! products used in this project: