Stampin’ Up! Snow Front Autumn Cabin in the Woods Card

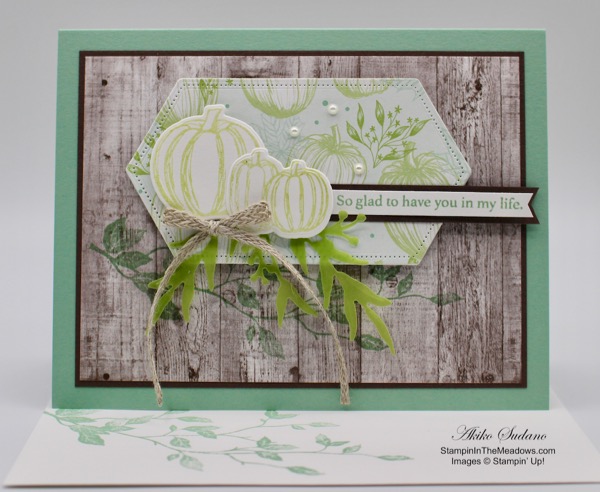
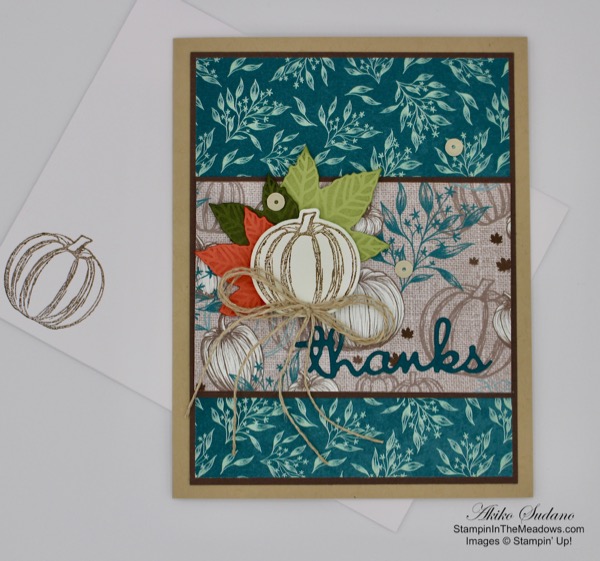
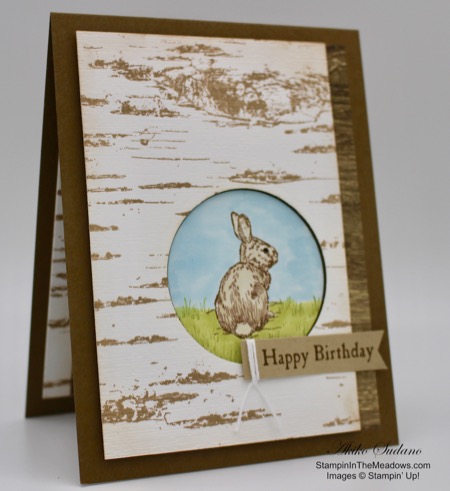
Good Morning! Yesterday was officially the first day of Fall, but with temperatures n the high 80’s here in Pennsylvania, it really doesn’t feel like it yet. So here’s a card to get us in the mood. It’s made with the new Stampin’ Up! Snow Front photopolymer stamp set. You can find the supplies used to create this card at the bottom of my post along with the sizes of cardstock used.

I started by running a Cajun Craze panel through the Pinewood Planks embossing folder and mounting it on a Soft Suede card base with liquid glue. I randomly stamped the large maple leaf from the Gather Together stamp set in Delicata Celestial Copper ink on a panel of Crumb Cake cardstock.

I stamped the images from the Stampin’ Up Snow Front stamp set on a panel of Whisper white as follows:

  • Mountains – Smoky Slate
  • Pine Trees – Shaded Spruce
  • Cabin and Deer – Early Espresso
  • Tree Trunks – Soft Suede
  • Leaves – Old Olive, Crushed Curry, Cajun Crazw
  • Lake – Balmy Blue
  • Grass – Old Olive

I then lightly sponged the grass in Old Olive and the sky in Seaside Spray. I gave the cabin a red tin roof using the Dark Real Red Stampin’ Blend and colored the cabin with the Light Crumb Cake Stampin’ Blend. I added a touch of Wink of Stella to the lake to make the water sparkle and wrapped a piece of copper trim around the bottom.

I stamped the sentiment from the Stampin’ Up! Gathered Together set on a strip of Old Olive cardstock using Early Espresso ink and added a copper Designer element before adhering it to the bottom of the image. I layered the Crumb Cake panel and the image and adhered them to the card with liquid glue.

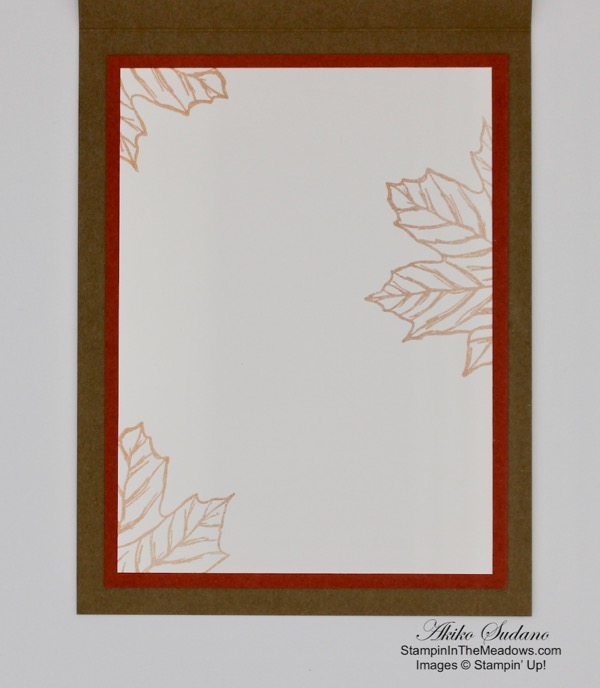
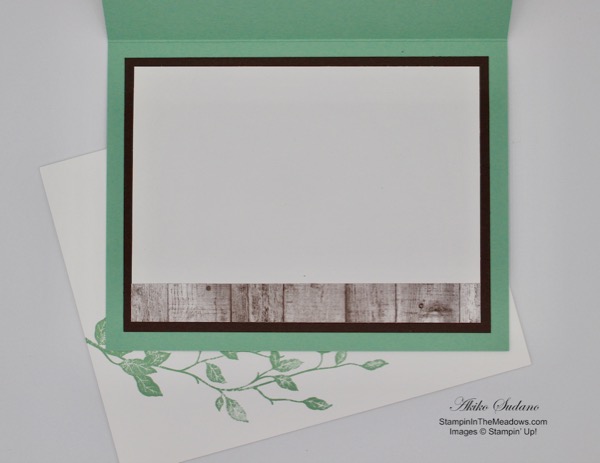
I decorated the inside of the card by stamping a few maple leaves from the Gather Together stamp set in Celestial Copper ink on a panel of Whisper White. I adhered it to a Cajun Craze mat and then to the inside of the card.

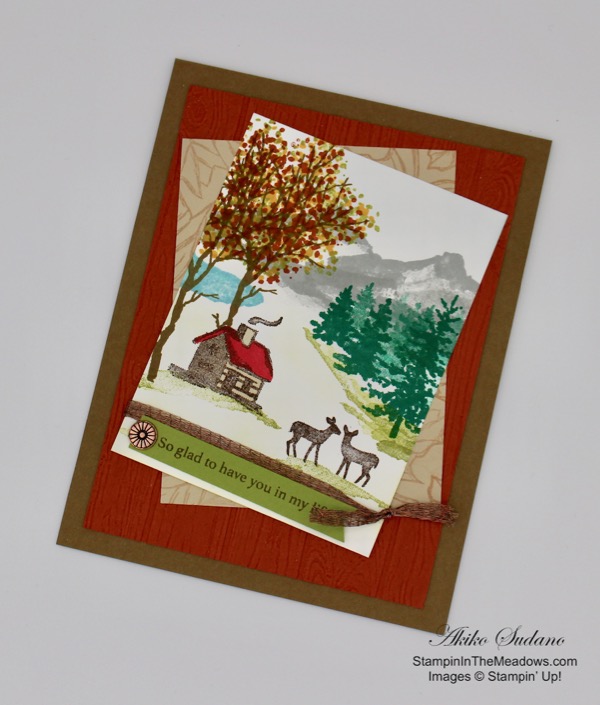
The Stampin’ Up Snow Front stamp set is similar to the Waterfront stamp set for creating artistic landscape scenes. This puts me in the mood to visit the mountains and woods to see some great fall foliage. Thanks for visiting and have a great Fall day!

Akiko


This image has an empty alt attribute; its file name is 09-19_banner_dsp_us.jpg

Buy 3 Get 1 Free Designer Series Paper Sale

By popular demand, Stampinโ€™ Up! is bringing back the Designer Series Paper Sale! During September 4โ€“30, you can buy three packages of select Designer Series Paper, and get one FREE! See the full details on my Stampinโ€™ Up! Promotions Page.


September 16 – 30 Host Code: EDRVYB3Z

Use this host code when you order and receive a free gift from me!  If your order is over $150, please do not use this code, but youโ€™ll still get the free gift.  The free gift is your choice of any item valued up to $10.00 in the 2018-19 Annual Catalog or in the 2019 Occasions Catalog!  That includes some of the Host Exclusive stamp sets!


If you need any stamping supplies, Iโ€™d be very happy to be your Demonstrator.  Just click on the Shop Now button on the right side of the screen to go directly to my online store or contact me if you have any questions.  Happy Stamping!

  • Visit my online store here
  • See the current Stampin’ Up! clearance rack specials here
  • Earn FREE Stampin’ Up! products through my Wildflower Frequent Shopper Program – my way of saying thank you to my frequent shopper online customers.
  • Have any questions? I’d be happy to help, click here to contact me.

Cardstock Cuts for this project:

  • Soft Suede – 4 1/4″ x 11″
  • Cajun Craze – (2) 3 3/4″ x 5″
  • Whisper White – 3 5/8″ x 4 7/8″, 3″ x 4″
  • Crumb Cake – 3″ x 4″
  • Old Olive – 3/8″ x 3″

Stampin’ Up! products used in this project:


Stampin’ Up! Perfectly Plaid Christmas Tree Card

Good Morning! Today I have a Christmas Card made with the Stampin’ Up! Perfectly Plaid photopolymer stamp set and Pine Tree Punch.

This is the first Christmas Card that I designed for my Card Making 101 video series on Facebook. I used some more die cuts and introduced dry embossing with the Pinewood Planks embossing folder. You can find the supplies used to create this card at the bottom of my post along with the sizes of cardstock used.

Here’s the video with instructions on how to make the card. I think I’m making improvements each time, but I’m still not ready for Prime Time (and definitely no Emmy!).

Here’s a picture of the inside of the card. I am planning to share card making videos on Facebook Live on Sundays at 1:00 Eastern time. I invite you to join me and like my Facebook page.

And don’t forget about the current Buy 3 Get 1 Free Designer Series Paper promotion that lasts for just one more week.

Thanks for stopping by!

Akiko


This image has an empty alt attribute; its file name is 09-19_banner_dsp_us.jpg

Buy 3 Get 1 Free Designer Series Paper Sale

By popular demand, Stampinโ€™ Up! is bringing back the Designer Series Paper Sale! During September 4โ€“30, you can buy three packages of select Designer Series Paper, and get one FREE! See the full details on my Stampinโ€™ Up! Promotions Page.


September 16 – 30 Host Code: EDRVYB3Z

Use this host code when you order and receive a free gift from me!  If your order is over $150, please do not use this code, but youโ€™ll still get the free gift.  The free gift is your choice of any item valued up to $10.00 in the 2018-19 Annual Catalog or in the 2019 Occasions Catalog!  That includes some of the Host Exclusive stamp sets!


If you need any stamping supplies, Iโ€™d be very happy to be your Demonstrator.  Just click on the Shop Now button on the right side of the screen to go directly to my online store or contact me if you have any questions.  Happy Stamping!

  • Visit my online store here
  • See the current Stampin’ Up! clearance rack specials here
  • Earn FREE Stampin’ Up! products through my Wildflower Frequent Shopper Program – my way of saying thank you to my frequent shopper online customers.
  • Have any questions? I’d be happy to help, click here to contact me.

Cardstock Cuts for this project:

  • Shaded Spruce โ€“ 4 1/4″ x 11″
  • Whisper White โ€“ (2) 3 3/4″ x 5″, 2 1/2″ x 5 3/4″
  • Cherry Cobbler โ€“ 2 1/4″ x 3 1/4″
  • Gold Foil โ€“ 1โ€ x 2โ€
  • Wrapped in Plaid DSP – 2 3/4″ x 3 5/8″, 1/2″ x 3 3/4โ€

Stampin’ Up! products used in this project:


Stampin’ Up! Perfectly Plaid Believe Christmas Card

Good Morning! Today’s card is a Christmas Card made with the Stampin’ Up! Perfectly Plaid Photopolymer stamp set and the Stampin’ Up! Itty Bitty Christmas Cling stamp set. I teamed these up with the Let It Snow Designer Series Paper to make a light and cheerful Christmas Card. You can find the supplies used to create this card at the bottom of my post along with the sizes of cardstock used.

I was inspired by the sketch in the Try Stampin’ On Tuesday Challenge 426 – TSOT426.

I started with a strip of Sparkle Glimmer paper that I used the die cut from the Budding Blooms dies to cut a scalloped edge. I cut a strip of the striped Let It Snow DSP and adhered a strip of Coastal Cabana to the back and edged it with the Sparkle Glimmer paper scalloped edge. I tied a piece of Real Red curly ribbon around the bottom and attached it to a Real Red card base with dimensionals.

I stamped the open leaf tree image from the Stampin’ Up! Perfectly Plaid stamp set on a piece of Coastal Cabana using VersaMark ink. I sprinkled white embossing powder on it and heat set it. Then I punched it out it out with the Pine Tree punch. I punched another pine tree from Sparkle Glimmer paper and attached the trees to the card with liquid glue and dimensionals.

I stamped the believe sentiment from the Stampin’ Up! Itty Bitty Christmas on a strip of Coastal Cabana in VersaMark ink and sprinkled it with white embossing powder and heat set. I trimmed the ends and attached it to a strip of Real Red and attached it to the card. I finished off the card front with three read glittered enamel dots.

I stamped the sentiment from the Stampin’ Up! Perfectly Plaid stamp set in Real Red ink on a panel of Whisper White. I stamped the tree image again in Coastal Cabana in the lower left of the inside panel. I added a strip of the same designer paper that I used on the front of the card to the bottom of the inside panel an adhered it to a Coastal Cabana mat before attaching it to the inside of the card. I also stamped the tree image on the lower left of a white envelope.

Coastal Cabana and Real Red make a cheerful and happy Christmas card. And I guess that this shows how to make a non-plaid Christmas card with the Stampin’ Up! Perfectly Plaid bundle. On Sunday I will be on Facebook Live making a Plaid Christmas card using this bundle on my business page at 1:00 PM Eastern time. I welcome you to tune in. Thanks for visiting and have a great weekend!

Akiko


This image has an empty alt attribute; its file name is 09-19_banner_dsp_us.jpg

Buy 3 Get 1 Free Designer Series Paper Sale

By popular demand, Stampinโ€™ Up! is bringing back the Designer Series Paper Sale! During September 4โ€“30, you can buy three packages of select Designer Series Paper, and get one FREE! See the full details on my Stampinโ€™ Up! Promotions Page.


September 16 – 30 Host Code: EDRVYB3Z

Use this host code when you order and receive a free gift from me!  If your order is over $150, please do not use this code, but youโ€™ll still get the free gift.  The free gift is your choice of any item valued up to $10.00 in the 2018-19 Annual Catalog or in the 2019 Occasions Catalog!  That includes some of the Host Exclusive stamp sets!


If you need any stamping supplies, Iโ€™d be very happy to be your Demonstrator.  Just click on the Shop Now button on the right side of the screen to go directly to my online store or contact me if you have any questions.  Happy Stamping!

  • Visit my online store here
  • See the current Stampin’ Up! clearance rack specials here
  • Earn FREE Stampin’ Up! products through my Wildflower Frequent Shopper Program – my way of saying thank you to my frequent shopper online customers.
  • Have any questions? I’d be happy to help, click here to contact me.

Cardstock Cuts for this project:

  • Real Red – 4 1/4″ x 11″, 1/2″ x 2″
  • Coastal Cabana – 3 3/4″ x 5″, 2″ x 5 1/2″, 2 1/2″ x 3″, 1/2″ x 2″
  • Let it Snow DSP – 5 1/2″ x 2 1/4″, 1/2″ x 3 5/8″,
  • Whisper White – 3 5/8″ x 4 7/8″
  • Sparkle Glimmer Paper – 3/4″ x 5 1/2″, 2 1/2″ x 3″

Stampin’ Up! products used in this project:


Stampin’ Up! Gather Together Friendship Card

Good Morning! Today’s card is another fall card using the wonderful Stampin’ Up! Gather Together photopolymer stamp set. This is an autumn friendship card with pumpkins and vellum leaves and the sweet sentiment So glad to have you in my life from the Gather Together stamp set. You can find the supplies used to create this card at the bottom of my post along with the sizes of cardstock used.

My card is entered into the challenge in Hand Stamped Sentiments Sketch Challenge #323. Check out the other entries.

I started by taking a panel of the wood background from the Come To Gather designer series paper and stamping it with the leaf branch from the Stampin’ Up! Very Versailles stamp set in Mint Macaron ink. I adhered it to an Early Espresso mat and adhered it to a Mint Macaron card base with liquid glue. I took another piece of the DSP, this time with the pumpkins, and die cut it using one of the Stitched Nested Labels dies. I die cut a piece of Whisper White and adhered it to the back to stiffen it and attached it to the card with dimensionals.

I stamped the sentiment from the Stampin’ Up! Gather Together stamp set in Mint Macaron on a strip of Whisper White and attached it to an Early Espresso Mat. I then trimmed the ends of both the banner and the mat.

I stamped the pumpkins from the Stampin’ Up! Gather Together stamp set in Pear Pizzazz on a panel of Thick Whisper White cardstock and cut it out using the coordinating dies from the Gathered Leaves die set. I also cut a set of leaves from the Frosted Frames dies from the Old Olive in the Perennial Essence vellum cardstock. I attached the pumpkins, leaves and banner to the card front with glue dots and dimensionals. I finished it off with a braided linen trim bow and three faux pearls.

I decorated the inside of the card by attaching a strip of the wood panel DSP from the Come to Gather paper pack on a panel of Whisper White and adhering it to an Early Espresso mat before attaching it to the inside of the card. I finished a matching envelope by stamping it with the Very Versailles leaf branch in Mint Macaron ink.

Do you decorate for fall? I like to plant a couple of colorful mums by my front door and get a pumpkin. Thanks for visiting!

Akiko


This image has an empty alt attribute; its file name is 09-19_banner_dsp_us.jpg

Buy 3 Get 1 Free Designer Series Paper Sale

By popular demand, Stampinโ€™ Up! is bringing back the Designer Series Paper Sale! During September 4โ€“30, you can buy three packages of select Designer Series Paper, and get one FREE! See the full details on my Stampinโ€™ Up! Promotions Page.


Clearance Rack Refresh

New items have been added to the Clearance Rack in the online store! Supplies are limited, and with discounts up to 60%, products will go quickly. Shop now and stock up.


September 16 – 30 Host Code: EDRVYB3Z

Use this host code when you order and receive a free gift from me!  If your order is over $150, please do not use this code, but youโ€™ll still get the free gift.  The free gift is your choice of any item valued up to $10.00 in the 2018-19 Annual Catalog or in the 2019 Occasions Catalog!  That includes some of the Host Exclusive stamp sets!


If you need any stamping supplies, Iโ€™d be very happy to be your Demonstrator.  Just click on the Shop Now button on the right side of the screen to go directly to my online store or contact me if you have any questions.  Happy Stamping!

  • Visit my online store here
  • See the current Stampin’ Up! clearance rack specials here
  • Earn FREE Stampin’ Up! products through my Wildflower Frequent Shopper Program – my way of saying thank you to my frequent shopper online customers.
  • Have any questions? I’d be happy to help, click here to contact me.

Cardstock Cuts for this project:

  • Mint Macaron – 5 1/2″ x 8 1/2″ card base
  • Early Espresso – (2) 3 3/4″ x 5, 3/8″ x 2 1/2″ scrap
  • Whisper White – 3 1/2″ x 4 3/4″, 2 1/2″ x 4 1/4″, 1/4″ x 2 1/2″ scrap
  • Thick Whisper White – 2″ x 3 1/2″ scrap for pumpkins
  • Gather Together DSP – 3 5/8″ x 4 7/8″ (wood grain), 2 1/2″ x 4 1/4″ (pumpkins), 1/2″ x 4 3/4″ (wood grain)

Stampin’ Up! products used in this project:


Stampin’ Up! Magnolia Blooms Enjoy Today Card

Happy Monday! Today I have a feminine card in pink and black with flowers and ribbons made from the Stampin’ Up! Magnolia Blooms Photopolymer stamp set. This is a set from the Experience Creativity Projects Beginner’s Brochure and coordinates with the Magnolia Lane suite. You can find the supplies used to create this card at the bottom of my post along with the sizes of cardstock used.

I started by mounting a panel of the Magnolia Lane Designer Series Paper with the black background on a Petal Pink mat. I took a strip of Whisper White and ran it through the Pinewood Planks Embossing folder and attaching it to a strip of the Petal Pink and Whisper White striped paper that was cut with the scalloped dies from the Budding Blooms dies. I adhered this to the larger panel and wrapped it with Whisper White baker’s twine and attached it to a Basic Black card base with dimensionals.

I took the full bloom magnolia flower stamp from the Stampin’ Up! Magnolia Blooms photopolymer stamp set and stamped it on whisper white on a panel of Whisper white using Memento Tuxedo Black ink. I cut it out using one of the circles from the Stitched Shapes dies and colored it using the Petal Pink, Old Olive and So Saffron Stampin’ Blends.

I attached a piece of Basic Black that was cut with a Scalloped circle from the Layering Circles dies to the back of the panel with liquid glue. I attached some Petal Pink Striped Organza Ribbon and some black lace ribbon from my stash (I recommend the Basic Black Scalloped Ribbon from the Holiday catalog as a substitute) to the back of the layered circles and attached it to the card with dimensionals.

Finally I stamped the Enjoy Today sentiment from the Good Morning Magnolia stamp set using VersaMark ink on a strip of Petal Pink and sprinkled it with black embossing powder and heat set the powder. I added a pearl before attaching it to the card with liquid glue

I decorated the inside of the card with a strip of the same DSP as on the card front and a Petal Pink mat. I stamped the magnolia bud from the Stampin’ Up! Magnolia Blooms stamp set in the corner with Memento Tuxedo Black ink and colored it with Petal Pink and Old Olive Stampin’ Blends.

There you have it – pink and black with flowers and ribbons and a pearl! A mixture of modern and traditional femininity. I hope you enjoy today and the rest of the week as well. Thanks for stopping by!

Akiko


This image has an empty alt attribute; its file name is 09-19_banner_dsp_us.jpg

Buy 3 Get 1 Free Designer Series Paper Sale

By popular demand, Stampinโ€™ Up! is bringing back the Designer Series Paper Sale! During September 4โ€“30, you can buy three packages of select Designer Series Paper, and get one FREE! See the full details on my Stampinโ€™ Up! Promotions Page.


September 16 – 30 Host Code: EDRVYB3Z

Use this host code when you order and receive a free gift from me!  If your order is over $150, please do not use this code, but youโ€™ll still get the free gift.  The free gift is your choice of any item valued up to $10.00 in the 2018-19 Annual Catalog or in the 2019 Occasions Catalog!  That includes some of the Host Exclusive stamp sets!


If you need any stamping supplies, Iโ€™d be very happy to be your Demonstrator.  Just click on the Shop Now button on the right side of the screen to go directly to my online store or contact me if you have any questions.  Happy Stamping!

  • Visit my online store here
  • See the current Stampin’ Up! clearance rack specials here
  • Earn FREE Stampin’ Up! products through my Wildflower Frequent Shopper Program – my way of saying thank you to my frequent shopper online customers.
  • Have any questions? I’d be happy to help, click here to contact me.

Cardstock Cuts for this project:

  • Basic Black – 5 1/2″ x 8 1/2″, 2 3/4″ square
  • Whisper White – 3 5/8″ x 4 7/8″, 1 5/8″ x 3 3/4″, 2 3/4″ square
  • Petal Pink – 3 3/4″ x 5″, 3 7/8″ x 5 1/8″, 1/2″ x 2″
  • Magnolia Lane DSP – 3 3/4″ x 5″, 3 3/3″ x 2 3/4″, 1/2″ x 3 5/8″

Stampin’ Up! products used in this project:


Stampin’ Up! Gather Together Fall Thank You Card

Good Morning! Boy, I’m really on a roll with the new Stampin’ Up! Gather Together bundle. I’ve made about 1/2 dozen different designs for classes and tutorials as well as this blog. I think it’s because we’re in the season and the bundle and papers are so pretty and versatile. This card is a Thank You card that combines the Gather Together bundle with the Well Written dies.

This is a card that I designed for my Cardmaking 101 video series on Facebook. It’s the first time I’ve introduced die cuts in the series and these are the perfect sets to introduce this wonderful technique. Here is the card. You can find the supplies used to create this card at the bottom of my post along with the sizes of cardstock used.

And here is a link to the how-to video that I shared earlier on Facebook Live. Instructions for creating the card are in the video. I apologize ahead of time for it being so long – my goal is to improve each video in both production and instructional quality.

I intend to set up a YouTube channel in the near future so you can view my videos there as well, but I’m still learning how to set this up, so for now I am only on Facebook and here.

Here’s a closeup of the card front details:

Thanks for visiting and watching. Have a great weekend!

Akiko


This image has an empty alt attribute; its file name is 09-19_banner_dsp_us.jpg

Buy 3 Get 1 Free Designer Series Paper Sale

By popular demand, Stampinโ€™ Up! is bringing back the Designer Series Paper Sale! During September 4โ€“30, you can buy three packages of select Designer Series Paper, and get one FREE! See the full details on my Stampinโ€™ Up! Promotions Page.


September 1 – 15 Host Code: DHYEBG62

September 16 – 30 Host Code: EDRVYB3Z

Use this host code when you order and receive a free gift from me!  If your order is over $150, please do not use this code, but youโ€™ll still get the free gift.  The free gift is your choice of any item valued up to $10.00 in the 2018-19 Annual Catalog or in the 2019 Occasions Catalog!  That includes some of the Host Exclusive stamp sets!


If you need any stamping supplies, Iโ€™d be very happy to be your Demonstrator.  Just click on the Shop Now button on the right side of the screen to go directly to my online store or contact me if you have any questions.  Happy Stamping!

  • Visit my online store here
  • See the current Stampin’ Up! clearance rack specials here
  • Earn FREE Stampin’ Up! products through my Wildflower Frequent Shopper Program – my way of saying thank you to my frequent shopper online customers.
  • Have any questions? I’d be happy to help, click here to contact me.

Cardstock Cuts for this project:

  • Crumb Cake – 5 1/2″ x 8 1/2″
  • Come to Gather DSP – (pretty peacock leaves) 3 3/4″ x 5″, 1/2″ x 3 3/4″, (pumpkins) 2 1/4″ x 3 3/4″
  • Early Espresso – 3 7/8″ x 5 1/8″, 3 3/4″ x 5″, 2 5/8″ x 3 3/4″
  • Whisper White – 3 5/8″ x 4 7/8″, (2) 1 1/2″ x 1 1/2″ scraps
  • Pretty Peacock – 1″ x 2 1/2″ scrap
  • Calypso Coral -1 1/2″ x 2″ scrap
  • Pear Pizzazz – 1 1/2″ x 2″ scrap
  • Mossy Meadow – 1 1/2″ x 2″ scrap

Stampin’ Up! products used in this project:


Stampin’ Up! Boo to You Little Monsters Card for the Inkin’ Krew Blog Hop

Good Morning and welcome back to another Inkin’ Krew Blog Hop! Our awesome team is doing a blog hop featuring Stampin’ Up! products with the theme “Halloween Fun”. I am using the Stampin’ Up! Boo to You stamp set to make a spooky card with little Halloween monsters! You can find the supplies used to create this card at the bottom of my post along with the sizes of cardstock used.

I started the card by using one of the layering circles dies to cut a mask for the moon on a piece of copy paper. I positioned the open circle on a Whisper White panel and sponged in Daffodil Delight for the moon. I then covered the moon with the die cut circle and lightly sponged some Calypso Coral ink around the moon. I then took some non-SU purple ink (How come I don’t have any Gorgeous Grape ink? Need to get some!) and added some touches of purple outside the Calypso Coral. I then made a mask for the ground and sponged the rest of the sky in Night of Navy, making it darker at the edges of the paper and lighter closer to the moon. I then removed the cover off the moon.

Next came the large tree from the Snow Front Stamp set, which I stamped using Memento Tuxedo Black ink. I trimmed a piece of Mossy Meadow cardstock to match the ground and adhered it to the panel. I stamped the pair of pumpkins from the Gather Together stamp set in Calypso Coral ink on Whisper White cardstock. I colored them with Old Olive and Calypso Coral Stampin’ Blends and fussy cut them and adhered them to the card front at the base of the tree. Finally I mounted the front panel on a Calypso Coral mat and a Gorgeous Grape card base using liquid glue.

Next I stamped the Frankenstein-like and the hairy horned monsters from the Stampin’ Up! Boo to You stamp set using Memento Tuxedo black ink on Thick Whisper White cardstock. I colored the monsters with Granny Apple Green, Calypso Coral, So Saffron, Soft Suede and Crumb Cake Stampin’ Blends. I fussy cut the monsters and used a black marker to color the white paper edges. And I adhered the green and yellow google eyes to them! I popped them on the card front with dimensionals.

I stamped the Boo to You sentiment from the Stampin’ Up! Boo to You stamp set in Memento Tuxedo Black ink on a Whisper White panel and added another stamped and die cut set of pumpkins fro the Gather Together stamp set to the bottom left corner. I adhered the panel to a Calypso Coral mat and adhered it to the inside of the card.

Do your little ones dress as monsters or superheroes for Halloween? Either way, I bet they love to be scared by monsters on Halloween. Enjoy them!! Thanks for visiting!

Akiko


I hope you enjoyed today’s card and thanks for visiting! Be sure to check out each blog in this month’s Inkin’ Krew Team Blog Hop to see the wonderful projects created by the other team members. Click on the Next Blog button to move forward to Amy Koenders’ project or click the Previous Blog button to move back to see the project that Paula Vincent created.

If you get lost along the way here is a list of the blog hop participants:


This image has an empty alt attribute; its file name is 09-19_banner_dsp_us.jpg

Buy 3 Get 1 Free Designer Series Paper Sale

By popular demand, Stampinโ€™ Up! is bringing back the Designer Series Paper Sale! During September 4โ€“30, you can buy three packages of select Designer Series Paper, and get one FREE! See the full details on my Stampinโ€™ Up! Promotions Page.


September 1 – 15 Host Code: DHYEBG62

Use this host code when you order and receive a free gift from me!  If your order is over $150, please do not use this code, but youโ€™ll still get the free gift.  The free gift is your choice of any item valued up to $10.00 in the 2018-19 Annual Catalog or in the 2019 Occasions Catalog!  That includes some of the Host Exclusive stamp sets!


If you need any stamping supplies, Iโ€™d be very happy to be your Demonstrator.  Just click on the Shop Now button on the right side of the screen to go directly to my online store or contact me if you have any questions.  Happy Stamping!

  • Visit my online store here
  • See the current Stampin’ Up! clearance rack specials here
  • Earn FREE Stampin’ Up! products through my Wildflower Frequent Shopper Program – my way of saying thank you to my frequent shopper online customers.
  • Have any questions? I’d be happy to help, click here to contact me.

Cardstock Cuts for this project:

  • Gorgeous Grape – 4 1/4″ x 11″
  • Thick Whisper White – (2) 2″ x 3″ scraps for monsters
  • Calypso Coral – (2) 3 3/4″ x 5″
  • Whisper White – (2) 3 5/8″ x 4 7/8″, 1 1/2″ x 3″
  • Mossy Meadow – 2″ x 3 5/8″

Stampin’ Up! products used in this project:


Stampin’ Up! Floral Essence Thank You Card

Good Morning! I hope you had a great weekend! Today I have a Floral Thank You card made with the Stampin’ Up! Floral Essence Photopolymer stamp set. I was inspired by the colors and theme in the Hand Stamped Sentiments Inspiration Challenge #322.

I just love these colors – they are so elegant and kind of old fashioned! You can find the supplies used to create this card at the bottom of my post along with the sizes of cardstock used.

So here’s my card. I started by running a panel of Rococo Rose cardstock through the Tin Tile embossing folder and adhering it to a Blackberry Bliss mat. I took a piece of Raspberry Ripple grosgrain ripple ribbon from my stash and wrapped it around the bottom, securing it in the back. I embossed the Thanks sentiment from the Good Morning Magnolia stamp set using silver embossing powder on a strip of the Petal Pink vellum from the Perennial Essence vellum cardstock and adhered it over the ribbon.

I then worked on the flower bouquet. I stamped two of the solid flowers from the Stampin’ Up! Floral Essence stamp set in Blackberry Bliss and one in Flirty Flamingo on Whisper White cardstock. I stamped one of the small solid flowers in Flirty Flamingo and one in Blackberry Bliss (for the inside of the card) on Whisper White cardstock. I then fussy cut all the flowers. I stamped four sets of the the leaves in Smoky Slate ink on Whisper White cardstock and punched them out with the leaf punch (much easier than fussy cutting!).

I stamped centers for the flowers in Versamark ink on Whisper White and embossed them in Silver. I fussy cut them and adhered them to the flowers using liquid glue. I then arranged the leaves and Flirty Flamingo flowers on the card front panel and adhered them with liquid glue. I adhered the two large Blackberry Bliss flowers together to make a larger flower and popped it on the card front with dimensionals. I finished the card front with three frosted epoxy drops and popped the panel on a Gray Granite card base with dimensionals.

I decorated the inside of the card by stamping another leaf branch in Smoky Slate ink on a panel of Whisper White and adhered the last Blackberry Bliss flower over it. I then added Rococo Rose and Blackberry Bliss mats and adhered it to the inside of the card with liquid glue.

I hope you liked my card for today. Thanks for visiting and have a great week!

Akiko


This image has an empty alt attribute; its file name is 09-19_banner_dsp_us.jpg

Buy 3 Get 1 Free Designer Series Paper Sale

By popular demand, Stampinโ€™ Up! is bringing back the Designer Series Paper Sale! During September 4โ€“30, you can buy three packages of select Designer Series Paper, and get one FREE! See the full details on my Stampinโ€™ Up! Promotions Page.


September 1 – 15 Host Code: DHYEBG62

Use this host code when you order and receive a free gift from me!  If your order is over $150, please do not use this code, but youโ€™ll still get the free gift.  The free gift is your choice of any item valued up to $10.00 in the 2018-19 Annual Catalog or in the 2019 Occasions Catalog!  That includes some of the Host Exclusive stamp sets!


If you need any stamping supplies, Iโ€™d be very happy to be your Demonstrator.  Just click on the Shop Now button on the right side of the screen to go directly to my online store or contact me if you have any questions.  Happy Stamping!

  • Visit my online store here
  • See the current Stampin’ Up! clearance rack specials here
  • Earn FREE Stampin’ Up! products through my Wildflower Frequent Shopper Program – my way of saying thank you to my frequent shopper online customers.
  • Have any questions? I’d be happy to help, click here to contact me.

Cardstock Cuts for this project:

  • Gray Granite – 5 1/2″ x 8 1/2″
  • Blackberry Bliss – (2) 3 3/4″ x 5″
  • Rococo Rose – (2) 3 5/8″ x 4 7/8″
  • Whisper White – 3 3/8″ x 4 5/8″, scraps for flowers and leaves
  • Petal Pink Vellum – 3/4″ x 4 1/2″

Stampin’ Up! products used in this project:


Stampin’ Up! Nature’s Beauty Birthday Card

Good Morning! Today I have a rustic birthday card made with the Stampin’ Up! Nature’s Beauty cling stamp set. This is one of the new sets from the Stampin’ Up! 2019 Holiday Catalog. This set has 3 realistic, adorable woodland creatures – a deer, fox and this sweet bunny. You can find the supplies used to create this card at the bottom of my post along with the sizes of cardstock used.

This card uses the layout from the Sunday Stamps SSC212 Circle Around Challenge. It’s a clean and simple layout that results in lovely cards.

Here’s my card for today

I started by stamping the little bunny from the Stampin’ Up! Nature’s Beauty stamp set in Soft Suede ink on a panel of Whisper White. Next I stamped the little grass around the bottom of the bunny in Old Olive ink. Then I colored the image using light Crumb Cake, light Balmy Blue and light Old Olive Stampin’ Blends. I finished it by coloring the bunny’s eye with a journaling pen and cut it out with a circle die from the Layering Circles dies.

Then I stamped the Birch cling stamp on a Thick Whisper White panel using Crumb Cake ink. Since the stamp is so large, I used my Stamparatus so I would get a good clean image, and it came out perfect! I cut the circle using the same die I used for the bunny and then sponged the edges lightly in Crumb Cake. I then ran it through the Subtle embossing folder.

I stamped the Happy Birthday sentiment from the Country Road stamp set in Soft Suede ink on a scrap of Crumb Cake cardstock, wrapped it with white baker’s twine and clipped the ends. On a Soft Suede card base, I laid out the strip of wood grained DSP from the Pressed Petals Specialty Designer Series Paper and then adhered it with liquid glue. I positioned the birch panel and then adhered the bunny in the circle with liquid glue. I then popped on the birch panel with dimensionals and added the sentiment banner.

The inside of the card has a strip of the birch paper over a strip of the Pressed Petals DSP on a Whisper White panel.

A simple rustic birthday card for a nature lover. Thanks for visiting and have a great weekend!

Akiko


September 1 – 15 Host Code: DHYEBG62

Use this host code when you order and receive a free gift from me!  If your order is over $150, please do not use this code, but youโ€™ll still get the free gift.  The free gift is your choice of any item valued up to $10.00 in the 2018-19 Annual Catalog or in the 2019 Occasions Catalog!  That includes some of the Host Exclusive stamp sets!


If you need any stamping supplies, Iโ€™d be very happy to be your Demonstrator.  Just click on the Shop Now button on the right side of the screen to go directly to my online store or contact me if you have any questions.  Happy Stamping!

  • Visit my online store here
  • See the current Stampin’ Up! clearance rack specials here
  • Earn FREE Stampin’ Up! products through my Wildflower Frequent Shopper Program – my way of saying thank you to my frequent shopper online customers.
  • Have any questions? I’d be happy to help, click here to contact me.

Cardstock Cuts for this project:

  • Soft Suede – 4 1/4″ x 11″
  • Thick Whisper White – 3 3/8″ x 5″
  • Whisper White – 3 3/4″ x 5″, 3″ x 3″, 3/8″ x 5″
  • Crumb Cake – 1″ x 3″ scrap
  • Pressed Petals DSP – (2) 1/2″ x 5″

Stampin’ Up! products used in this project:


Stampin’ Up! Snowman Season Christmas Card

Good Morning! Today is the big day – the 2019 Stampin’ Up! Holiday Catalog is finally open for orders! Yay! To celebrate, I made a snowman Christmas card made with the Stampin’ Up! Snowman Season bundle. This includes the Snowman Season Photopolymer stamp set and the Snowman Builder punch. The Snowman Season stamp set is used for cards and tags on the cover of the new catalog.

In addition to it being the first day to order from the new catalog, today is the first day of the popular Buy 3 get 1 Free Designer Series Paper or DSP promotion. The details are on the Stampin’ Up! Promotions page.

Now, on to today’s Snowman Season Christmas card. You can find the supplies used to create this card at the bottom of my post along with the sizes of cardstock used.

I started by adhering the Let it Snow Specialty Designer Series Paper with the trees to a Real mat and then to a Coastal Cabana card base. The DSP has glitter on the pine trees, so pretty! I cut the large circle from the Stitched Shapes dies from Sparkle Glimmer paper and adhered it to the card front.

I made the snowman by stamping it in Memento Tuxedo Black ink on Thick Whisper White cardstock. I then punched it out with the Snowman Builder punch. I colored his nose with a Pumpkin Pie Stamp’ Write marker and added two large and two small coal pieces from the Let it Snow Embellishment kit to his belly. I stamped the top hat in Memento Tuxedo Black ink on Thick Whisper White, punched it out and colored it. I punched the arms in Crumb Cake and attached the red felt gloves from the Let it Snow Embellishment kit.

I stamped the Merry Christmas sentiment from the Stampin’ Up! Snowman Season stamp set in Real Red on a strip of Whisper White cardstock. I die cut the scalloped mat using the scallop die from the Budding Blooms dies on Real Red cardstock and attached the label to it. I attached it to the card with liquid glue and then attached the snowman with dimensionals.

On the inside of the card, I stamped the sentiment from the Stampin’ Up! Snowman Season stamp set in Real Red on a Whisper White panel. I added a strip of DSP to the bottom and added a Real Red mat before adhering it to the inside of the card.

The colors in the Let it Snow DSP are so cheerful and the glitter really makes it special. Coupled with the different snowmen from the Stampin’ Up! Snowman Seasons stamp set, it really makes for happy, whimsical Christmas cards.

My last few cards have been sneak peeks from the new 2019 Stampin’ Up! Holiday Catalog which is open for orders today! If you haven’t received a catalog yet but would like one, visit the Stampin’ Up! Catalogs page to request one and I’ll get it out to you. Thanks for visiting and happy holiday stamping!

Akiko


Buy 3 Get 1 Free Designer Series Paper Sale Is Back โ€“ Starting Today!

By popular demand, Stampinโ€™ Up! is bringing back the Designer Series Paper Sale! During September 4โ€“30, you can buy three packages of select Designer Series Paper, and get one FREE! See the full details on my Stampinโ€™ Up! Promotions Page.


September 1 – 15 Host Code: DHYEBG62

Use this host code when you order and receive a free gift from me!  If your order is over $150, please do not use this code, but youโ€™ll still get the free gift.  The free gift is your choice of any item valued up to $10.00 in the 2018-19 Annual Catalog or in the 2019 Occasions Catalog!  That includes some of the Host Exclusive stamp sets!


If you need any stamping supplies, Iโ€™d be very happy to be your Demonstrator.  Just click on the Shop Now button on the right side of the screen to go directly to my online store or contact me if you have any questions.  Happy Stamping!

  • Visit my online store here
  • See the current Stampin’ Up! clearance rack specials here
  • Earn FREE Stampin’ Up! products through my Wildflower Frequent Shopper Program – my way of saying thank you to my frequent shopper online customers.
  • Have any questions? I’d be happy to help, click here to contact me.

Cardstock Cuts for this project:

  • Coastal Cabana – 5 1/2″ x 8 1/2″
  • Real Red – (2) 3 3/4″ x 5″, 1″ x 3 1/4″
  • Thick Whisper White – 4″ x 2″
  • Whisper White – 3 5/8″ x 4 7/8″, 5/8″ x 3 1/4″
  • Sparkle Glimmer Paper – 3 1/4″ x 3 1/4″
  • Let it Snow Specialty DSP – 3 5/8″ x 4 7/8″, 1/2″ x 3 5/8″
  • Crumb Cake – 1″ x 2″

Stampin’ Up! products used in this project: