Stampin’ Up! Dressed To Impress Birthday Card

Good Morning! Today I have another sneak peek from the new Stampin’ Up! January – June 2020 Mini Catalog. The Stampin’ Up! Dressed To Impress bundle has some cute girly images – flowers, lipstick, heels and a purse – along with some witty sentiments. And the coordinating All Dressed Up dies make a cute little purse that holds 3 x 3 cards. It is so cute!! You can find the supplies used to create this card at the bottom of my post along with the sizes of cardstock used.

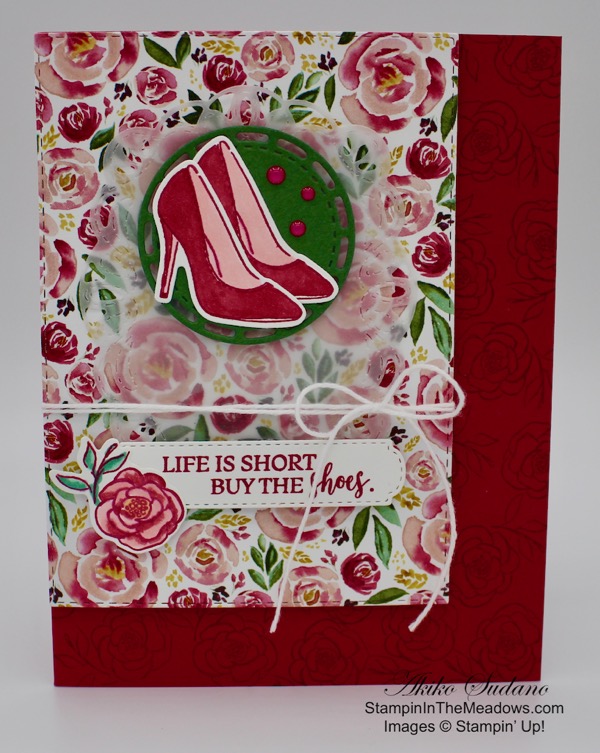
I stamped one of the floral images in Lovely Lipstick ink randomly along the bottom and sides of a Lovely Lipstick card base. Using the Stitched Rectangle die, I cut a panel of one of the floral papers in the Best Dressed DSP pack. I cut the large label from the Stitched Labels dies from vellum card stock and adhered it to the floral panel, applying the liquid glue under the circle and label. I cut a circle from Garden Green card stock using the large circle die from the Stitched Labels dies.

I stamped two shoes from the Stampin’ Up! Dressed To Impress photopolymer stamp set in Lovely lipstick on a panel of Whisper White and colored it with Light Cherry Cobbler and Light Flirty Flamingo Stampin’ Blends. I cut them out with the coordinating shoe die from the All Dressed Up dies and adhered them to the Garden Green circle along with 3 Lovely Lipstick enamel dots. I adhered the decorated circle to the vellum with dimensionals. I wrapped a length of Whisper White Baker’s twine around the panel and made a bow.

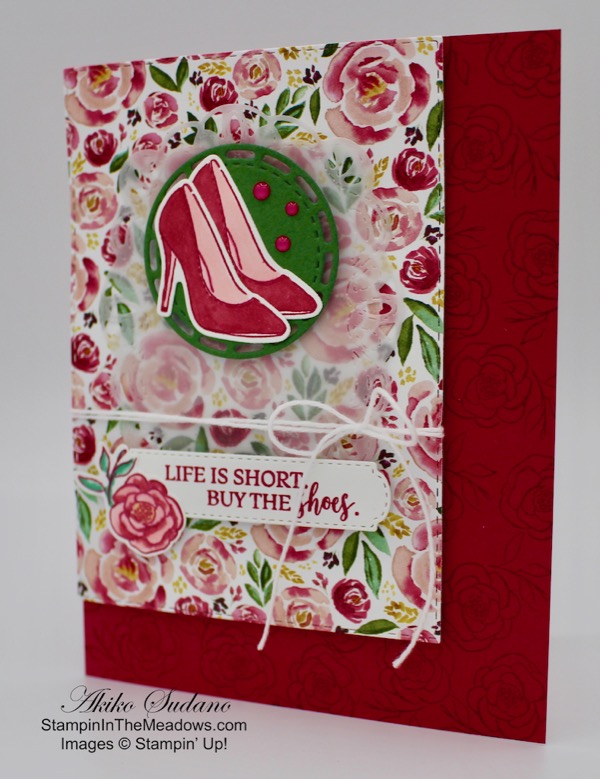
I stamped the sentiment from the Stampin’ Up! Dressed To Impress stamp set in Lovely Lipstick on a strip of Whisper White and cut it out with the label die from the All Dressed Up dies. I stamped a flower on Whisper White and colored it with Light Cherry Cobbler, Light Flirty Flamingo, Light Shaded Spruce and Dark Pool Party Stampin’ Blends. I cut it out with the coordinating die and adhered it to the label with liquid glue. I adhered the label to the floral panel with dimensionals and the floral panel to the stamped Lovely Lipstick card base with dimensionals as well.

I decorated the inside by stamping the Happy Birthday sentiment from the Perennial Birthday stamp set in Lovely Lipstick on a Whisper White panel. I cut a strip of the Best Dressed DSP that was previously cut with the stitched rectangle dies and stuck it on the bottom of the panel before adhering it to the inside of the card. The Stitched Rectangle dies have stitching on both the inside and outside, so why not take advantage of this decorative element?

I love the way the vellum label adds a little something to the card front without obscuring the pretty paper. And I love all the cute elements in this bundle and can’t wait to make a purse! Because … actually I’m more of a purse girl than a shoe girl – but I know a lot of ladies who can’t resist another pretty pair of shoes! How about you?


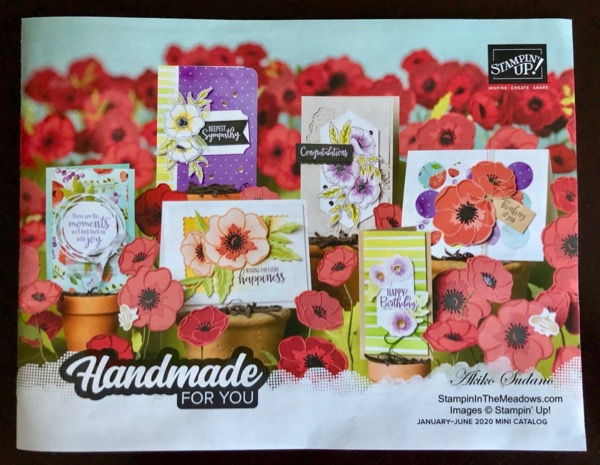
Stampin’ Up! January – June 2020 Mini Catalog and Sale-A-Bration Coming in January!

This image has an empty alt attribute; its file name is stampin-up-2020-jan-jun-mini-catalog-stampininthemeadows.com_.jpg
This image has an empty alt attribute; its file name is stampin-up-on-stage-stampininthemeadows.com-07.jpg

I am ordering catalogs for my customers this morning with expedited shipping.  If you placed an order with me, I will send you one via priority mail as soon as my order arrives!

If you have not placed an order with me but want to be on my mailing list for the new catalogs too, simply place an order through my online store by the end of the week and you’ll automatically be added to my mailing list to get your catalogs ASAP!

The new January – June 2020 Mini Catalog and Sale-A-Bration will be open for ordering on January 3, 2020.


Stampin’ Up! Year-End Closeout begins today!

Stampin’ Up!’s Year-End Closeout begins today! While supplies last, you can save big on a selection of retiring and surplus items including holiday catalog items, stamp sets, and Paper Pumpkin past kits. Shop early to avoid missing out! Supplies are limited and popular items will sell out quickly. This amazing sale ends on January 2. Head over to my online store to shop now.


December 1 – 15 Host Code: R497392Q

Use this host code when you order $50 or more and receive a free gift from me!  The gift is your choice of any item valued up to $10.00 in the 2019-20 Annual Catalog or in the 2019 Holiday Catalog!  That includes some of the Host Exclusive stamp sets!

If your order is over $150, please do not use the host code since you’ll receive your own Host Dollars plus I’ll send you the free gift!  This host code can be used by anyone, no commitment required.  Let me know if you have any questions.


If you need any stamping supplies, I’d be very happy to be your Demonstrator.  Just click on the Shop Now button on the right side of the screen to go directly to my online store or contact me if you have any questions.  Happy Stamping!

Thanks for stopping by!

Akiko

  • Visit my online store here
  • See the current Stampin’ Up! clearance rack specials here
  • Earn FREE Stampin’ Up! products through my Wildflower Frequent Shopper Program – my way of saying thank you to my frequent shopper online customers.
  • Sign up for my weekly newsletter here
  • Have any questions? I’d be happy to help, click here to contact me.

Cardstock Cuts for this project:

  • Lovely Lipstick – 5 1/2″ x 8 1/2″ scored at 4 1/4″ (card base)
  • Whisper White – 3 3/4″ x 5″ (inside panel), 1 1/2″ x 2 1/2″ (shoes), 1 1/4″ x 5″ (label & flower)
  • Garden Green – 2 1/3″ x 2 1/4″
  • Vellum card stock – 1 3/2″ x 4″
  • Best Dressed DSP – 4″ x 5″ (reserve 1/2″ on outside long stitched side for card inside 1/2″ x 3 3/4″ trim)

Stampin’ Up! products used in this project:


Stampin’ Up! Timeless Tulips Hello Sneak Peek

Good Morning! Today I am sharing a video that I did yesterday during my Sunday Facebook Live session. At Stampin’ Up! On Stage a couple of weeks ago, we made a pretty card with the Stampin’ Up! Timeless Tulips bundle that will be available in the new January – June Mini Catalog next month. But my card did not come out very well because I stamped the stems of the tulips before the flowers, so I ended up with a mess. So this project’s purpose is to fix my card. And my card came out much better than the initial one I made at Stampin’ Up! On Stage.

Here’s the Facebook Live video:

I also posted the video to my YouTube channel and you can view it here.

I started by stamping the large tulip 3 times in Rococo Rose on a scrap piece of Whisper White card stock. Then I stamped the medium tulip 3 times across a Whisper White panel with the bottoms of the flowers about 1/3 the way down from the top. I then stamped the stems for the flowers in Pear Pizzazz. I stamped the last 3 stems for the large tulips, positioning them so that they large tulips would have room on top of the stems. I stamped some leaves to fill in the bottom of the card. Finally, I stamped two leaves in Pear Pizzazz on a scrap piece of Whisper White to be punched out later. I tied linen thread in a bow around the panel and adhered the large tulips and extra leaves with dimensionals. I stamped the hello sentiment on a panel of whisper white and cut it out with paper snips. I adhered the sentiment to the panel with dimensionals and the panel to a Pear Pizzazz card base with dimensionals as well. I finished off the card front with 3 adhesive sequins.

For the inside, I stamped a tulip, stem and leaf on a Whisper White panel and adhered it to the inside of the card with liquid glue.

Here’s the card I originally made at Stampin’ Up! On Stage. At least the flowers are attached to stems, but they cover each other up and they’re all clumped in the middle, leaving too much white space on the sides. And What’s up with those leaves? Oh Well!! I’m going to make this bad picture small so it’s harder to see.

This one’s much better.

The Stampin’ Up! Timeless Tulips Bundle will be available on January 3 when the new January – June Mini Catalog comes out. It comes with the Timeless Tulips photopolymer stamp set and the Tulip Builder punch. And it has lots of pretty sentiments to celebrate a variety of occasions.


Stampin’ Up! January – June 2020 Mini Catalog and Sale-A-Bration coming in January!

I will order catalogs for my customers tomorrow morning with expedited shipping.  If you placed an order with me, I will send you one via priority mail as soon as my order arrives!

If you have not placed an order with me but want to be on my mailing list for the new catalogs too, simply place an order through my online store by the end of the week and you’ll automatically be added to my mailing list to get your catalogs ASAP!

The new January – June 2020 Mini Catalog will be open for ordering on January 3, 2020.


Stampin’ Up! Year-End Closeout begins tomorrow!

Stampin’ Up!’s Year-End Closeout begins tomorrow! While supplies last, you can save big on a selection of retiring and surplus items including holiday catalog items, stamp sets, and Paper Pumpkin past kits. Shop early to avoid missing out! Supplies are limited and popular items will sell out quickly. This amazing sale ends on January 2.


December 1 – 15 Host Code: R497392Q

Use this host code when you order $50+ and receive a free gift from me!  If your order is over $150, please do not use this code, but you’ll still get the free gift.  The free gift is your choice of any item valued up to $10.00 in the 2018-19 Annual Catalog or in the 2019 Occasions Catalog!  That includes some of the Host Exclusive stamp sets!

If your order is over $150, please do not use the host code since you’ll receive your own Host Dollars plus I’ll send you the free gift!  This host code can be used by anyone, no club or commitment required.  Let me know if you have any questions.


If you need any stamping supplies, I’d be very happy to be your Demonstrator.  Just click on the Shop Now button on the right side of the screen to go directly to my online store or contact me if you have any questions.  Happy Stamping!

Thanks for stopping by and have a great week!

Akiko

  • Visit my online store here
  • See the current Stampin’ Up! clearance rack specials here
  • Earn FREE Stampin’ Up! products through my Wildflower Frequent Shopper Program – my way of saying thank you to my frequent shopper online customers.
  • Have any questions? I’d be happy to help, click here to contact me.

Cardstock Cuts for this project:

  • Pear Pizzazz- 4 1/4″ x 11″, scored at 5 1/2″
  • Whisper White – 3 1/2″ x 5 1/2″ (front panel), 3 3/4″ x 5″ (inside), (2) 2 1/2″ x 5″ (scraps for punched tulips, leaves and sentiment)

Stampin’ Up! products used in this project:


Stampin’ Up! Peaceful Boughs Wreath Seasons Greetings Card

Good Morning! I hope you had a great Thanksgiving. I have a Christmas card this morning made with the Stampin’ Up! Peaceful Boughs bundle and the Stampin’ Up! Christmastime Is Here specialty designer series paper. I love cards with dimensional wreaths and so I made one with the small bough from the Beautiful Boughs dies in the bundle. You can find the supplies used to create this card at the bottom of my post along with the sizes of cardstock used.

I cut out 7 small boughs from the Beautiful Boughs dies using Old Olive card stock. I sponged the outside of each bough with Old Olive ink so that it would have some texture. I cut out a circle with two medium circle dies from the Layering Circles dies using Early Espresso card stock. I adhered the boughs around the circle with liquid glue on the stem and lowest needle section. I tucked the last stem underneath the first branch’s upper needles, so that it looks like a continuous circle of pine branches.

I cut a panel of the pinecone paper from the Christmastime Is Here specialty designer series paper and adhered it to a Poppy Parade card base with liquid glue. I stamped the Seasons Greetings sentiment from the Stampin’ Up! Peaceful Boughs stamp set in Poppy Parade ink on Crumb Cake card stock and cut it out with the small label die from the Beautiful Boughs dies.

I adhered the wreath to the card front with mini dimensionals. I made a bow with Real Red ribbon and adhered it to the bottom of the wreath with glue dots. I finished the wreath off with red glitter enamel dots. I adhered the label to the card with mini dimensionals.

I stamped the greeting from the Stampin’ Up! Peaceful Boughs stamp set in Poppy Parade on a Whisper White panel for the inside of the card. I stamped the medium pine sprig stamp over the sentiment in Old Olive after stamping off twice. I added a strip of the pinecone DSP to the bottom and adhered it to a Crumb Cake mat before adhering it to the inside of the card.

I thought the Christmastime Is Here pinecone paper would coordinate nicely with the Stampin’ Up! Peaceful Boughs bundle. What do you think?

Join me on Sunday at 1 PM on my Facebook Page for my weekly Facebook Live session as I re-do one of the Make and Takes that I received from Stampin’ Up! On Stage a couple of weeks ago. It did not come out very well and I will show you how to make it better (I hope it comes out better). I will post it on my Monday blog so you can catch it there if you have a busy weekend planned. I think all weekends are going to be busy for the next month!


Stampin’ Up!’s Year-End Closeout is almost here!

Beginning December 3 and while supplies last, you can save big on a selection of retiring and surplus items including holiday catalog items, stamp sets, and Paper Pumpkin past kits. Shop early to avoid missing out! Supplies are limited and popular items will sell out quickly. This amazing sale ends on January 2. Additional details will be posted as soon as they are available.


This image has an empty alt attribute; its file name is 10.01.19_OMAIN_Q4_OOP_NAUK.jpg

We hope you’re ready to make this holiday season magical, because the Christmastime Is Here Suite is, well . . . here! This exclusive, limited-time collection of festive, floral coordinating products has everything you need to share love, joy, and creativity this holiday season.

Products from the Christmastime Is Here Suite will be available while supplies last only.

Click on the image below to see the details of the products in the suite and the pricing or click here to shop the products in my online store.

This image has an empty alt attribute; its file name is 10-01-19_th_flyer_q4_oop_na.jpg

November 16 – 30 Host Code: 462PVWKY

December 1 – 15 Host Code: R497392Q

Use this host code when you order $50 or more and receive a free gift from me!  The gift is your choice of any item valued up to $10.00 in the 2019-20 Annual Catalog or in the 2019 Holiday Catalog!  That includes some of the Host Exclusive stamp sets!

If your order is over $150, please do not use the host code since you’ll receive your own Host Dollars plus I’ll send you the free gift!  This host code can be used by anyone, no commitment required.  Let me know if you have any questions.


If you need any stamping supplies, I’d be very happy to be your Demonstrator.  Just click on the Shop Now button on the right side of the screen to go directly to my online store or contact me if you have any questions.  Happy Stamping!

Thanks for stopping by and have a great weekend!

Akiko

  • Visit my online store here
  • See the current Stampin’ Up! clearance rack specials here
  • Earn FREE Stampin’ Up! products through my Wildflower Frequent Shopper Program – my way of saying thank you to my frequent shopper online customers.
  • Sign up for my weekly newsletter here
  • Have any questions? I’d be happy to help, click here to contact me.

Cardstock Cuts for this project:

  • Poppy Parade – 4 1/4″ x 11″ scored at 5 1/2″ (card base)
  • Crumb Cake – 3 3/4″ x 5″ (inside mat), 1 3/4″ x 3 1/4″ (sentiment label)
  • Old Olive – 5″ x 6″ (7 pine sprig die cuts)
  • Early Espresso – 2 3/4″ x 2 3/4″ (wreath ring)
  • Whisper White – 3 5/8″ x 4 7/8″ (inside panel)
  • Christmastime Is Here DSP – 4″ x 5 1/4″(card front background), 1/2″ x 3 5/8″ (inside trim)

Stampin’ Up! products used in this project:


Stampin’ Up! Country Road with Beautiful Boughs for the Happy Inkin’ Thursday Blog Hop

Happy Thanksgiving! Welcome to another Happy Inkin’ Thursday Blog Hop! I used the Stampin’ Up! Country Road stamp set along with the Beautiful Boughs dies to create a country themed Christmas Card for this week’s challenge. Here is my card:

We have a color challenge this week, and here is color palette we are using:

I started by stamping the horse weather vane from the Stampin’ Up! Country Road stamp set in Versamark Ink on a panel of Very Vanilla. I sprinkled it with Copper embossing powder and heat set. I stamped the grain stamp along the left side and bottom in Crumb Cake ink. I blotted the weather vane with a paper towel to remove wet Crumb Cake ink so it wouldn’t smear. I stamped the wagon wheel in Soft Suede ink. I sponged the sky in Night of Navy, Balmy Blue, Calypso Coral and Mango Melody so that it would look like an evening sunset. I sponged Crumb Cake ink along the bottom. I adhered the image to a Night of Navy mat with liquid glue and then to a Crumb Cake card base with dimensionals.

I cut the berry branch using the Beautiful Bouquet dies from Real Red Glimmer paper. I cut the medium branch from the Stampin’ Up! Beautiful Boughs dies from Mossy Meadow. I snipped the berry branch in two and adhered the pieces behind the Mossy Meadow branch between the boughs with glue dots. I adhered the branch and berries to the card front with glue dots. I stamped the Blessed Christmas Wishes sentiment from the Stampin’ Up! Itty Bitty Christmas stamp set in Real Red ink on a strip of Very Vanilla. I trimmed the ends and adhered it to a Night of Navy mat and then to the bottom of the card front using liquid glue.

I made two pinecones with the small pine cone dies from the Beautiful Boughs dies. I used Crumb cake for the background and Soft Suede for the front. I adhered them to the bough with glue dots. I adhered a short length of copper trim with glue dots and made a bow with the Real Red ribbon and adhered it with a glue dot. I finished the label off with a Night of Navy rhinestone.

I decorated the inside of the card with a Very Vanilla panel stamped with the sentiment from the Toile Christmas stamp set in Night of Navy ink. I stamped the grain from the Stampin’ Up! Country Road stamp set in Crumb Cake ink and added a small Mossy Meadow bough from the Beautiful Boughs dies. I adhered the panel to a Night of Navy mat and then to the inside of the card with liquid glue.

I hope you like the card and that you have a wonderful time with family and friends!

On with the Hop! Click the Next button below to visit Karen Ksenzakovic’s blog.

And just in case you get lost along the way, here’s a list of the team members participating in the hop today:


November 16 – 30 Host Code: 462PVWKY

Use this host code when you order $50 or more and receive a free gift from me!  The gift is your choice of any item valued up to $10.00 in the 2019-20 Annual Catalog or in the 2019 Holiday Catalog!  That includes some of the Host Exclusive stamp sets!

If your order is over $150, please do not use the host code since you’ll receive your own Host Dollars plus I’ll send you the free gift!  This host code can be used by anyone, no commitment required.  Let me know if you have any questions.


If you need any stamping supplies, I’d be very happy to be your Demonstrator.  Just click on the Shop Now button on the right side of the screen to go directly to my online store or contact me if you have any questions.  Happy Stamping!

Thanks for taking the time to visit!

Akiko

  • Visit my online store here
  • See the current Stampin’ Up! clearance rack specials here
  • Earn FREE Stampin’ Up! products through my Wildflower Frequent Shopper Program – my way of saying thank you to my frequent shopper online customers.
  • Sign up for my weekly newsletter here
  • Have any questions? I’d be happy to help, click here to contact me.

Cardstock Cuts for this project:

  • Crumb Cake – 5 1/2″ x 8 1/2″, 1 1/2″ x 2″
  • Night of Navy – 3 7/8″ x 5 1/8″, 5/8″ x 3 1/2″
  • Mossy Meadow – 2 1/2″ x 3″
  • Very Vanilla – (2) 3 3/4″ x 5″, 1/2″ x 3″
  • Soft Suede – 1 1/2″ x 2″
  • Real Red Glimmer – 2″ x 2 1/2″

Stampin’ Up! products used in this project:


Stampin’ Up! Christmas Rose Celebrate the Season Card

Good Morning! Today I have another Christmas card made with the Stampin’ Up! Christmas Rose stamp set from the beautiful Christmastime is Here Suite. For today’s card, I used gold embossing for the outline and the photopolymer stamps to color each section in different colors. You can find the supplies used to create this card at the bottom of my post along with the sizes of cardstock used.

I stamped the outline image from the Christmas Rose stamp set in Versamark Ink on Shimmery White Paper. I sprinkled it with gold embossing powder and heat set. I then cut it out with the coordinating die. I was glad I used the shimmery white paper for two reasons. First after I stamped each section, I used my aqua painter to go over the sections and blend them (you can use the aqua painter on shimmery white card stock without pilling problems). This gave me a smoother look. The second reason is that the shimmer shows through the image nicely and makes it look special!

I stamped the flowers with Cherry Cobbler ink and then went over them with the aqua painter. Then I blotted it with a paper towel to clean the ink from the embossing. You need to blot it because the embossing resists the ink from being absorbed on the paper and so it has wet ink that can be smeared and spoil your project if you don’t blot it. I next stamped each leaf section with Mossy Meadow ink and repeated with the aqua painter on the broad leaves and paper towel after each. I then stamped the pinecones in Soft Suede and repeated with the aqua painter and paper towel. I finished it off by stamping the berries in Poppy Parade. I did not use the aqua painter on these, but I did blot the ink off the embossing with a paper towel. The Poppy Parade berries really brought the bouquet to life after they were stamped!

Next I cut a panel of the green paper from the Christmastime is Here specialty designer series paper and adhered it to a gold mat. I cut the lattice from gold foil with the large die and adhered it to the panel with liquid glue. I cut a strip of the shimmery gold ribbon and wrapped it around the panel, securing it in the back. I stamped the Celebrate the Season sentiment from the Itty Bitty Christmas stamp set in Versamark Ink on a strip of shimmery white card stock and sprinkled it with gold embossing powder and heat set. I then trimmed the ends and adhered it over the lattice with dimensionals. I adhered the floral bouquet on the panel with dimensionals and added a large bow made with the gold shimmer ribbon. I then popped the panel on a Mossy Meadow card base with dimensionals. I finished off the card front with three gold glitter enamel dots.

I stamped the sentiment from the Frosted Foliage stamp set in Mossy Meadow ink on a panel of Whisper White. I added a strip of the green paper from the Christmastime is Here DSO to the bottom and added a thin strip of gold foil. Then I adhered the panel to the inside of the card.

When I first got the stamp set I was surprised that it had both cling stamps and photopolymer stamps. But it makes sense that you have photopolymer for the solid images so you can see through the stamp to position it over the lined images. I was pleased at how easy this makes it to create the main focal image and how beautiful it came out with this technique. Stampin’ Up! did a great job of designing the pieces so you can use all the different colors on different sections of the bouquet. I definitely recommend trying it.


We hope you’re ready to make this holiday season magical, because the Christmastime Is Here Suite is, well . . . here! This exclusive, limited-time collection of festive, floral coordinating products has everything you need to share love, joy, and creativity this holiday season.

Products from the Christmastime Is Here Suite will be available while supplies last only.

Click on the image below to see the details of the products in the suite and the pricing or click here to shop the products in my online store.


November 16 – 30 Host Code: 462PVWKY

Use this host code when you order $50 or more and receive a free gift from me!  The gift is your choice of any item valued up to $10.00 in the 2019-20 Annual Catalog or in the 2019 Holiday Catalog!  That includes some of the Host Exclusive stamp sets!

If your order is over $150, please do not use the host code since you’ll receive your own Host Dollars plus I’ll send you the free gift!  This host code can be used by anyone, no commitment required.  Let me know if you have any questions.


If you need any stamping supplies, I’d be very happy to be your Demonstrator.  Just click on the Shop Now button on the right side of the screen to go directly to my online store or contact me if you have any questions.  Happy Stamping!

Thanks for stopping by and have a great week!

Akiko

  • Visit my online store here
  • See the current Stampin’ Up! clearance rack specials here
  • Earn FREE Stampin’ Up! products through my Wildflower Frequent Shopper Program – my way of saying thank you to my frequent shopper online customers.
  • Sign up for my weekly newsletter here
  • Have any questions? I’d be happy to help, click here to contact me.

Cardstock Cuts for this project:

  • Mossy Meadow – 4 1/4″ x 11″
  • Shimmery White – 4″ x 5″ (rose bouquet), 1/2″ x 3″ (label)
  • Gold foil – 3 3/4″ x 5″ (front mat), 1 1/2″ x 3″ (lattice), 1/8″ x 3 3/4″
  • Whisper White – 3 3/4″ x 5″
  • Christmastime Is Here DSP – 3 5/8″ x 4 7/8″, 1/2″ x 3 3/4″

Stampin’ Up! products used in this project:


Stampin’ Up! November Paper Pumpkin Kit – Winter Woods Tags and Cards

Good Morning! Today I am sharing a video that I did yesterday during my Sunday Facebook Live session. I received my November Paper Pumpkin Kit last week and I made the tags for the kit. But since I don’t use a lot of tags, I also made some cards using the elements in the kit along with elements from the October Paper Pumpkin card kit and some add on items from my stash. You can find the supplies used to create this card at the bottom of my post along with the sizes of cardstock used.

Here are the cards that I made. In the video, I show how to make the two on the left. The last one was inspired by all the cards I saw using last month’s kit with deer. I had a few card bases left over, so I added the beautiful silver deer. It’s a perfect fit!

Here are the tags that I made the day before. I pretty much followed the instructions in the video. These are pretty nice tags!

Here’s the Facebook Live video on making the deer tag card and the cardinal card. I also go through the contents of the kit and show the tags that I pre-made.

I also posted the video to my YouTube channel and you can view it here.

The first card that I made was the cardinal card. Beforehand, I stamped the Whisper White panel with the large snowflake stamp from the October Paper Pumpkin kit using Versamark Ink and sprinkled it with clear embossing powder. I heat set the snowflakes, giving a shiny but subtle texture to the white background. I adhered it to a Thick Whisper White card base with dimensionals. I adhered the Silver Foil panel in the upper center with dimensionals and adhered the cardinal with glue dots. That’s it! I used the Celebrate the Season sentiment from the Itty Bitty Christmas stamp set for the inside. I silver embossed it on a Whisper White panel and adhered it to the inside of the card.

This is the second card that I made in the video. I used the stamps from the October Paper Pumpkin kit to stamp the label and inside greetings in Shaded Spruce and the little cardinal in Poppy Parade. I started by embossing a Whisper White panel with the Pinewood Planks embossing folder. This picks up on the wood grain theme in the circle of the red tag. I adhered the embossed panel to a Pool Party card base with liquid glue. I added the Shaded Spruce ribbon and Silver cord to the top per the kit instructions. I adhered a small snowflake and two holly leaves and a sprig with the glue dots that came with the kit. I adhered the deer with dimensionals. I stamped the label with the Seasons Greetings sentiment in Shaded Spruce and adhered it with dimensionals.

I finished the tag with silver sequins from the kit and red rhinestones from my stash. Then I adhered the tag to the card front with dimensionals. On the inside, I trimmed a Whisper White panel on the bottom with one of the strips of wood grain paper from the October kit and stamped the sentiment and a little cardinal.

I love that Paper Pumpkin kits have everything you need. They even give you a stamp block when you first subscribe!


Paper Pumpkin Delivers Something for Everything in the December Paper Pumpkin Kit

When looking for the right sentiments to share with special friends, it’s nice to have choices. That’s why Paper Pumpkin is delivering Something for Everything in the month of December. This smartly designed, versatile kit includes a 13-sentiment stamp set—giving you tons of ways to let loved ones know they care! Plus, you’ll get supplies to create 12 beautiful, full-sized cards and coordinating envelopes. 

The three full-sized card designs (4 of each) are gorgeous but completely versatile, giving you the flexibility to use them for any occasion. Start the new year right with cute, fun, and easy cards for 2020.

  • Kit details: Makes 12 cards and envelopes
  • Card size: 4 1/4″ x 5-1/2″ (10.8 x 14 cm)
  • Envelope size: 4-1/2″ x 5-3/4″ (11.4 x 14.6 cm)
  • Coordinating colors: Crushed Curry, Grapefruit Grove, Old Olive, Shaded Spruce, Terracotta Tile

If you’re interested in subscribing to Paper Pumpkin, you can either sign up for a subscription where you are billed monthly for your kit or you can purchase a prepaid subscription in my online store. To see more information and to sign up for the monthly subscription click here. To see the options for prepaid subscriptions in my online store, click here.

Sign up deadline for the December kit is December 10.


Last Day for the Double Wildflower Points Ordering Bonus!

Today is the last day for the ordering bonus of DOUBLE the Wildflower Points in my Wildflower Frequent Shopper Program!

You’ll get DOUBLE Wildflower Reward Points for every order of $50 or greater before shipping and taxes (no matter what you order!) placed through my online store from now through, Monday, November 25!!

Don’t forget to add the Host Code below if your order is under $150 to get your free thank you gift (don’t apply the code to orders over $150 – they will automatically get the free thank you gift AND you get host rewards of your own!).  For more information about my WildflowerFrequent Shopper Program (my way of saying thanks to my returning buyers) and Wildflower Points, click here.  Let me know if you have any questions.  Happy Shopping!!


November 16 – 30 Host Code: 462PVWKY

Use this host code when you order $50+ and receive a free gift from me!  If your order is over $150, please do not use this code, but you’ll still get the free gift.  The free gift is your choice of any item valued up to $10.00 in the 2018-19 Annual Catalog or in the 2019 Occasions Catalog!  That includes some of the Host Exclusive stamp sets!

If your order is over $150, please do not use the host code since you’ll receive your own Host Dollars plus I’ll send you the free gift!  This host code can be used by anyone, no club or commitment required.  Let me know if you have any questions.


If you need any stamping supplies, I’d be very happy to be your Demonstrator.  Just click on the Shop Now button on the right side of the screen to go directly to my online store or contact me if you have any questions.  Happy Stamping!

Thanks for stopping by and have a great week!

Akiko

  • Visit my online store here
  • See the current Stampin’ Up! clearance rack specials here
  • Earn FREE Stampin’ Up! products through my Wildflower Frequent Shopper Program – my way of saying thank you to my frequent shopper online customers.
  • Have any questions? I’d be happy to help, click here to contact me.

Cardstock Cuts for this project:

  • Cardinal Card
    • Thick Whisper White – 4 1/4″ x 11″ (card base)
    • Whisper White – 4″ x 5 1/4″ (embossed front) , 3 3/4″ x 5″ (inside)
    • Silver Foil – 2 1/4″ x 2 1/2″
  • Deer Tag Card
    • Pool Party – 5 1/2″ x 8 1/2″ (card base)
    • Whisper White – (2) 3 3/4″ x 5″ (embossed panel and inside panel)

Stampin’ Up! products used in this project:


Stampin’ Up! Love What You Do with Pressed Petals Thank You Cards

Good Morning! Today I have a set four Thank You cards made with the Pressed Petals Specialty Designer Series Paper and stamped with the pretty Thank You sentiment from the Stampin’ Up! Love What You Do photopolymer stamp set. I feel that I can never have enough thank you cards. You can find the supplies used to create this card at the bottom of my post along with the sizes of cardstock used.

In the Pressed Petals Specialty DSP set, there is a sheet that has a bunch of different floral panels. I took the four largest and cut them down to 3 3/4″ x 5″ and adhered them to a mat in coordinating colors – Mossy Meadow, Night of Navy, Merry Merlot and Flirty Flamingo.

I attached each to a Sahara Sand card base with liquid glue.

I took a strip of the burlap paper and stamped the Thank You sentiment from the Stampin’ Up! Love What You Do stamp set in Soft Suede. I matted the sentiment in the same color as the main mat and adhered a strip of White Flax ribbon behind it with snail. I adhered the label to the card front with dimensionals.

For a little bling, I finished off each card with three crumb cake sequins.

I left the inside pretty simple, just added a coordinating mat to a Whisper White panel and adhering it to the inside of the card

Pretty Paper – check; Ribbon – check; Bling – check; Dimensionals – check. Basic elements for a fancy handmade card all accounted for in a simple easy to do project. I even included stamping! Taking advantage of the beautiful Pressed Petals specialty designer series paper gave me a quick way to replenish my stock of Thank You cards!

I’ll be doing my Facebook Live again this Sunday at 1:00. I missed it last weekend as I was returning from Stampin’ Up! On Stage. I received my November Paper Pumpkin this week – the Winter Wonders tags kit, and I will show you the tags and make some alternative design cards. Here’s my page.


This image has an empty alt attribute; its file name is 10-01-19_dheader_onlinex_na.jpg


Last Day for Stampin’ Up! Online Extravaganza Sale !

Today is the last day for the Stampin’ Up! Online Extravaganza!

DETAILS:

Ordering Deadline: November 22, 2019; 11:50 PM (MT)

  • Promotion includes items from the 2019–2020 annual catalog only.
  • Discounts apply to promotion items only. 
  • Ordering information can be found in the flyer below.
  • No limits apply. 
  • Discounted pricing for items featured in this promotion will be available ONLY during the sales period. No exceptions.
  • If you purchased a product offered in the promotion prior to the sale, we will not be offering exchanges or credits. 
  • In the event that we run out of any item offered, promotional pricing will be honored on items backordered, up to the point it reaches the backorder limit. If you try to order an item that is not available, you will receive a notification informing you it is currently unavailable. Once an item reaches the backorder limit and is not orderable, it will no longer be available during the promotion and will not be available to order until additional inventory arrives in your market.

Click on the image below to get the full details of the items on sale:

This image has an empty alt attribute; its file name is 10-01-19_th_sharable_flyer_onlinex_na.jpg

Go to my online store and stock up today!


Double Wildflower Points Ordering Bonus through November 25!

And in celebration of the sale and all the excitement this week, I’m offering an ordering bonus of DOUBLE the Wildflower Points in my Wildflower Frequent Shopper Program!

You’ll get DOUBLE Wildflower Reward Points for every order of $50 or greater before shipping and taxes (no matter what you order!) placed through my online store from now through, Monday, November 25!!

Don’t forget to add the Host Code below if your order is under $150 to get your free thank you gift (don’t apply the code to orders over $150 – they will automatically get the free thank you gift AND you get host rewards of your own!).  For more information about my WildflowerFrequent Shopper Program (my way of saying thanks to my returning buyers) and Wildflower Points, click here.  Let me know if you have any questions.  Happy Shopping!!


November 16 – 30 Host Code: 462PVWKY

Use this host code when you order $50 or more and receive a free gift from me!  The gift is your choice of any item valued up to $10.00 in the 2019-20 Annual Catalog or in the 2019 Holiday Catalog!  That includes some of the Host Exclusive stamp sets!

If your order is over $150, please do not use the host code since you’ll receive your own Host Dollars plus I’ll send you the free gift!  This host code can be used by anyone, no commitment required.  Let me know if you have any questions.


If you need any stamping supplies, I’d be very happy to be your Demonstrator.  Just click on the Shop Now button on the right side of the screen to go directly to my online store or contact me if you have any questions.  Happy Stamping!

Thanks for stopping by and have a great weekend!

Akiko

  • Visit my online store here
  • See the current Stampin’ Up! clearance rack specials here
  • Earn FREE Stampin’ Up! products through my Wildflower Frequent Shopper Program – my way of saying thank you to my frequent shopper online customers.
  • Sign up for my weekly newsletter here
  • Have any questions? I’d be happy to help, click here to contact me.

Cardstock Cuts for this project:

  • Sahara Sand – (4) 5 1/2″ x 8 1/2″ (card base)
  • Night of Navy – 3 7/8″ x 5 1/8″ (card front mat), 3 3/4″ x 5″ (inside mat), 1 1/8″ x 2 3/8″ (label mat)
  • Merry Merlot – 3 7/8″ x 5 1/8″ (card front mat), 3 3/4″ x 5″ (inside mat), 1 1/8″ x 2 3/8″ (label mat)
  • Mossy Meadow – 3 7/8″ x 5 1/8″ (card front mat), 3 3/4″ x 5″ (inside mat), 1 1/8″ x 2 3/8″ (label mat)
  • Flirty Flamingo – 3 7/8″ x 5 1/8″ (card front mat), 3 3/4″ x 5″ (inside mat), 1 1/8″ x 2 3/8″ (label mat)
  • Pressed Petals DSP – (4) 3 3/4″ x 5″ (floral arrangements), (4) 1″ x 2 1/4″ (burlap design for labels)
  • Whisper White – (4) 3 1/2″ x 4 3/4″

Stampin’ Up! products used in this project:


Stampin’ Up! Toile Christmas for the Happy Inkin’ Thursday Blog Hop

Good Morning! Welcome to another Happy Inkin’ Thursday Blog Hop! I used the beautiful Stampin’ Up! Toile Christmas cling stamp set along with the Toile Tidings designer series paper to make a nostalgic Christmas Card. Here is my card:

We have a sketch challenge this week, and here is the sketch we are using:

I used the second largest circle in the Layering Circles dies to cut a circle in a panel of Garden Green card stock and then ran it through the Subtle embossing folder. I used the largest scalloped circle in the Layering Circles dies to cut a scalloped circle from Real Red card stock. I cut a circle in the middle of the scalloped circle with the second largest circle die to create a scalloped frame. I adhered the frame to the embossed panel with liquid glue. I added a strip of the striped Toile Tidings DSP to the card front and added a length of the Garden Green ribbon on top, securing it on the back.

I stamped the double banner sentiment from the Stampin’ Up! Toile Christmas in Garden Green on a panel of Very Vanilla and cut it out with the coordinating die. I adhered it to the panel with dimensionals. I tied another strip of the ribbon in a knot and adhered it to the panel with glue dots.

I cut a circle of the countryside Toile Tidings DSP with the largest circle of the Layering circles dies and attached it to a Thick Very Vanilla Card base with liquid glue. I was careful to select a portion that had an interesting scene, such as this with the children playing in front of the barn. I then adhered the embossed Garden Green panel to the card base with dimensionals, so that the little scene would show through behind the frame. I finished off the card front with 3 red glitter enamel dots.

On the inside of the card, I stamped the sentiment from the Stampin’ Up! Toile Christmas stamp set using Garden Green ink on a panel of Very Vanilla. I added a strip of the countryside Toile Tidings DSP to the bottom of the panel and stamped the flourish in Real Red ink under the sentiment. I added a Garden Green mat and adhered it to the inside of the card. I adhered a panel of the countryside Toile Tidings DSP to the flap of a Very Vanilla medium envelope with liquid glue and trimmed it with paper snips.

The nostalgic images of the countryside Toile Tidings DSP bring back memories of winter fun and Christmases past. They are sure to make this Christmas Merry and Bright!

On with the Hop! Click the Next button below to visit Karen Ksenzakovic’s blog.

And just in case you get lost along the way, here’s a list of the team members participating in the hop today:


We are in the middle of Stampin’ Up! Online Extravaganza. See my Stampin’ Up! Promotions page for details.


November 16 – 30 Host Code: 462PVWKY

Use this host code when you order $50 or more and receive a free gift from me!  The gift is your choice of any item valued up to $10.00 in the 2019-20 Annual Catalog or in the 2019 Holiday Catalog!  That includes some of the Host Exclusive stamp sets!

If your order is over $150, please do not use the host code since you’ll receive your own Host Dollars plus I’ll send you the free gift!  This host code can be used by anyone, no commitment required.  Let me know if you have any questions.


If you need any stamping supplies, I’d be very happy to be your Demonstrator.  Just click on the Shop Now button on the right side of the screen to go directly to my online store or contact me if you have any questions.  Happy Stamping!

Thanks for visiting!

Akiko

  • Visit my online store here
  • See the current Stampin’ Up! clearance rack specials here
  • Earn FREE Stampin’ Up! products through my Wildflower Frequent Shopper Program – my way of saying thank you to my frequent shopper online customers.
  • Sign up for my weekly newsletter here
  • Have any questions? I’d be happy to help, click here to contact me.

Cardstock Cuts for this project:

  • Thick Very Vanilla – 4 1/4″ x 11″
  • Real Red – 3 1/2″ x 3 1/2″
  • Very Vanilla – 3 5/8″ x 4 7/8″ (inside), 2 1/4″ x 3 1/2″ (label)
  • Garden Green – 4″ x 5 1/4″ (front), 3 3/4″ x 5″ (inside mat)
  • Toile Tidings DSP – 3 1/2″ x 3 1/2″ (front), 1/2″ x 3 5/8″ (inside), 2 1/2″ x 6″ (envelope flap), 3/4″ x 3 3/4″ (red stripe)

Stampin’ Up! products used in this project:


Stampin’ Up! Frosted Foliage Seasons Greetings Card

Good Morning! Today I have a blue Seasons Greetings card made with the Stampin’ Up! Frosted Foliage stamp bundle. This beautiful set celebrates frosty cold nature in wintertime with leaves and snowflakes. The dies include a rectangular frame which can be decorated with other die cut elements. You can find the supplies used to create this card at the bottom of my post along with the sizes of cardstock used.

I started by stamping the scattered snowflakes from the Stampin’ Up! Frosted Foliage stamp set in Delicata Silvery Shimmer ink on a Night of Navy card base. I cut the Frosted Frames large fancy frame die from a panel of Seaside Spray and the small stitched frame die from a panel of the Feels Like Frost designer series paper. I adhered the small stitched frame to the larger Seaside Spray frame with liquid glue.

I used the Frosted Frames dies to decorate the frame. I cut two of the leaf sprays from vellum card stock and one from Seaside Spray. I cut two of the star pairs from Sparkle Glimmer paper. I cut two of the small sprays from silver foil. I arranged the die cuts around the frame on the front and the back and adhered them with liquid glue. I adhered the decorated frame to the card front with dimensionals and finished off the snowflakes with pearl gems.

I stamped the Seasons Greetings stamp from the Itty Bitty Christmas stamp set in Versamark Ink on a strip of Seaside Spray. I sprinkled it with silver embossing powder and heat set. I stamped the snowflakes from the Stampin’ Up! Frosted Foliage stamp set in Delicata Silvery Shimmer ink on the embossed label and trimmed the ends. I adhered it to the card front with liquid glue and decorated it with a Seaside Spray silvery bow.

I decorated the inside by stamping the snowflakes again in Delicata Silvery Shimmer ink and the sentiment in Night of Navy ink on a Whisper White panel. I adhered the panel to a Seaside spray mat and then to the inside of the card.

The Stampin’ Up! Frosted Foliage bundle is a great set to celebrate the natural beauty of winter for any winter celebration. This is the first time I’ve used this beautiful stamp bundle. I hope you like it and break it out if you have the set in your stash too!


Stampin’ Up! Online Extravaganza Sale is coming on November 20!

Get ready for three days of savings with the Stampin’ Up! Online Extravaganza! For three days only, you can get these deals.

DETAILS:

Ordering Deadline: November 22, 2019; 11:50 PM (MT)

  • Promotion includes items from the 2019–2020 annual catalog only.
  • Discounts apply to promotion items only. 
  • Ordering information can be found in the flyer below.
  • No limits apply. 
  • Discounted pricing for items featured in this promotion will be available ONLY during the sales period. No exceptions.
  • If you purchased a product offered in the promotion prior to the sale, we will not be offering exchanges or credits. 
  • In the event that we run out of any item offered, promotional pricing will be honored on items backordered, up to the point it reaches the backorder limit. If you try to order an item that is not available, you will receive a notification informing you it is currently unavailable. Once an item reaches the backorder limit and is not orderable, it will no longer be available during the promotion and will not be available to order until additional inventory arrives in your market.

Click on the image below to get the full details of the items on sale:

Sales this good do not come around very often and this is a great time to add to your collection. And even the new In Colors (except Purple Posy) are on sale! So now’s the time to snag them for less money and stock up on things you’ve been wanting for a while.


Double Wildflower Points Ordering Bonus through November 25!

And in celebration of the sale and all the excitement this week, I’m offering an ordering bonus of DOUBLE the Wildflower Points in my Wildflower Frequent Shopper Program!

You’ll get DOUBLE Wildflower Reward Points for every order of $50 or greater before shipping and taxes (no matter what you order!) placed through my online store from now through, Monday, November 25!! 

Don’t forget to add the Host Code below if your order is under $150 to get your free thank you gift (don’t apply the code to orders over $150 – they will automatically get the free thank you gift AND you get host rewards of your own!).  For more information about my Wildflower Frequent Shopper Program (my way of saying thanks to my returning buyers) and Wildflower Points, click here.  Let me know if you have any questions.  Happy Shopping!!


November 16 – 30 Host Code: 462PVWKY

Use this host code when you order $50 or more and receive a free gift from me!  The gift is your choice of any item valued up to $10.00 in the 2019-20 Annual Catalog or in the 2019 Holiday Catalog!  That includes some of the Host Exclusive stamp sets!

If your order is over $150, please do not use the host code since you’ll receive your own Host Dollars plus I’ll send you the free gift!  This host code can be used by anyone, no commitment required.  Let me know if you have any questions.


If you need any stamping supplies, I’d be very happy to be your Demonstrator.  Just click on the Shop Now button on the right side of the screen to go directly to my online store or contact me if you have any questions.  Happy Stamping!

Thanks for stopping by and have a great week!

Akiko

  • Visit my online store here
  • See the current Stampin’ Up! clearance rack specials here
  • Earn FREE Stampin’ Up! products through my Wildflower Frequent Shopper Program – my way of saying thank you to my frequent shopper online customers.
  • Sign up for my weekly newsletter here
  • Have any questions? I’d be happy to help, click here to contact me.

Cardstock Cuts for this project:

  • Night of Navy – 4 1/4″ x 11″
  • Seaside Spray – 3 7/8″ x 5 1/8″ (inside mat), 1/2″ x 3″ (banner), 5 1/4″ x 4 1/4″ (frame), 2 1/2″ x 2 1/2″ (leaf sprays)
  • Whisper White – 3 3/4″ x 5″ (inside panel)
  • Sparkle Glimmer paper – 2 1/4″ x 3″ (snowflakes)
  • Vellum card stock – 2 1/2″ x 5″
  • Silver Foil – 2″ x 2″
  • Feels Like Frost DSP – 3″ x 3 1/2″

Stampin’ Up! products used in this project:


Stampin’ Up! On Stage Local – Hartford Review

Good Morning! Today I don’t have a card to share but I do have some pictures of the Stampin’ Up! On Stage Local event we had in Hartford CT over the weekend.

And Hartford was ready for us with a warm welcome!

So what is Stampin’ Up! On Stage? On Stage is the event where Stampin’ Up! recognized the achievements of it’s demonstrators and premieres the products in the new catalog. It is a world wide event and this year’s main event was held in Germany. Since they don’t expect that everyone can afford to travel to Germany, they have local events throughout the country. The one closest to me was in Hartford CT, so that’s why I refer to it as Stampin’ Up! On Stage Local in Hartford.


And Stampin’ Up! had a warm welcome for us as well with some great goodies including a free stamp set. Timeless Tulips is one of the new photopolymer stamp sets that will be available in the new January – June Mini Catalog beginning January 3. It is a great tulip stamp set and it comes with some wonderful sentiments in a sweet font. And it comes bundled with a punch! (We got to use the punch, but it didn’t come with our welcome package).

We had an opportunity to get a group picture with some of our Inkin’ Krew Team Mates. These ladies are awesome! The hard work, positive energy, creativity and willingness to help and each other is amazing!

And Stampin’ Up! kept us busy all day with inspirational talks, stamping demonstrations of the new products and recognition of Demonstrators’s achievements. Here are a couple of pictures of my Inkin’ Krew Team Mates doing the Make and Takes – We got to make 4 cards using new stamp sets and other beautiful products from the upcoming catalog.

Oh, and they also had ‘Prize Patrols’ where they gave away new stamp sets in the catalog. Here’s a group of us who received the beautiful Painted Poppy cling stamp set – it’s another great set!

And here is the new catalog! It will be open for ordering on January 3, 2020. I will be placing an order for January – June 2020 Mini Catalogs on December 3, 2019, and if you have placed an order with me, I will send you one via priority mail as soon as my order arrives!

And of course January 3, 2020 is also the start of Sale-A-Bration! I will also be ordering Sale-A-Bration catalogs and they will be included in my catalog shipments.

And I have posted other pictures on my Facebook page so check it out. There are samples created with the new products, swaps made from current products and display boards with catalog sneak peeks. Here’s the link to my Facebook page. Go ahead and like it to get updates from me.

This is me at the end of a long day, excited about all the new products and exhausted from all the fun.

If you’re interested in joining us, drop me a note and I will let you tell you all I can about it. I will add a page to my website with all the details about joining Stampin’ Up! as a demonstrator within the next week or two.


November 16 – 30 Host Code: 462PVWKY

Use this host code when you order $50 or more and receive a free gift from me!  The gift is your choice of any item valued up to $10.00 in the 2019-20 Annual Catalog or in the 2019 Holiday Catalog!  That includes some of the Host Exclusive stamp sets!

If your order is over $150, please do not use the host code since you’ll receive your own Host Dollars plus I’ll send you the free gift!  This host code can be used by anyone, no commitment required.  Let me know if you have any questions.


If you need any stamping supplies, I’d be very happy to be your Demonstrator.  Just click on the Shop Now button on the right side of the screen to go directly to my online store or contact me if you have any questions.  Happy Stamping!

Thanks for stopping by and have a great week!

Akiko

  • Visit my online store here
  • See the current Stampin’ Up! clearance rack specials here
  • Earn FREE Stampin’ Up! products through my Wildflower Frequent Shopper Program – my way of saying thank you to my frequent shopper online customers.
  • Sign up for my weekly newsletter here
  • Have any questions? I’d be happy to help, click here to contact me.