Stampin’ Up! Ornate Style Friend Card

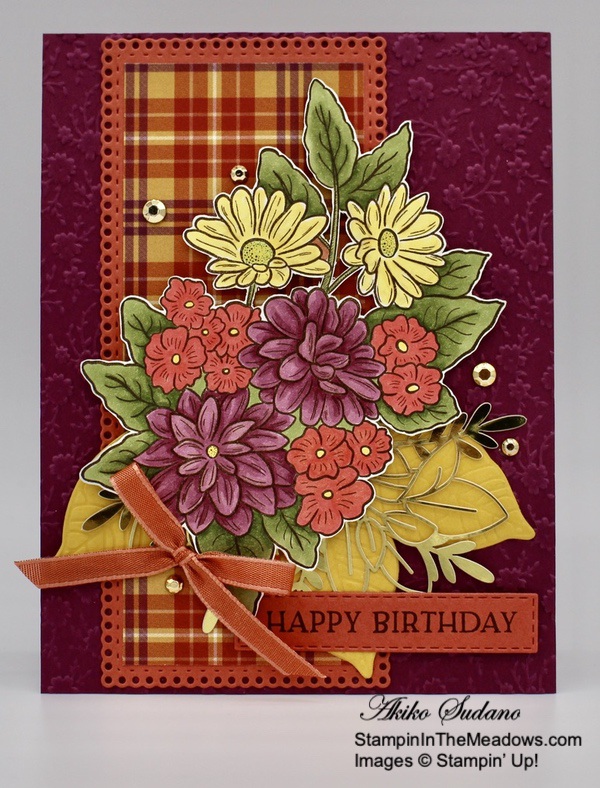
Good morning – I hope you’re having a great weekend! Today I am sharing a card with the Stampin’ Up! Ornate Style stamp set with the Ornate Garden specialty designer series paper. They are both on the retiring list, but have been among my favorites. You can find the supplies I used at the bottom of my post along with the sizes of cardstock used.

I adhered a panel of Ornate Style specialty designer series paper to an Old Olive mat and wrapped it with Old Olive ribbon and made a bow on the side. Then I adhered it to the front of a Bumblebee card base with dimensionals.

I stamped the flower from the Stampin’ Up! Ornate Style cling stamp set in Early Espresso ink on a Basic White panel and colored it with Old Olive and Mango Melody Stampin’ Blends. I cut the gorgeous frame from the Ornate Layers dies using Terracotta Tile card stock and adhered the flower on top. I adhered it to the card front with dimensionals and added a Terracotta Tile butterfly gem to the flower. I trimmed the bow.

I cut the friend sentiment with the Well Said dies from Mossy Meadow card stock after adhering an adhesive sheet to the back. I peeled off the backing and adhered the word to the card front – don’t forget the dot for the little i!


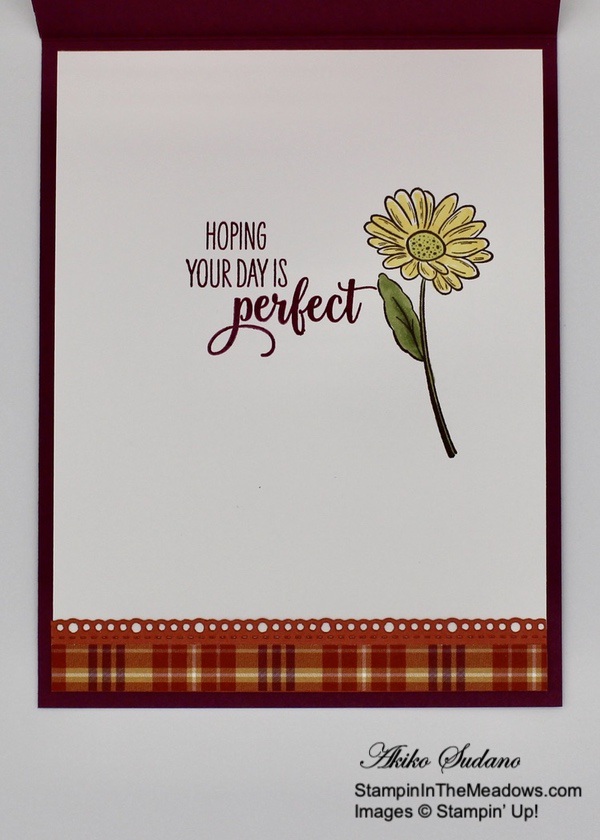
For the inside of the card, I stamped the flower from the Stampin’ Up! Ornate Style stamp set in Early Espresso ink in the corner of a Basic White panel and colored it with the Mango Melody and Old Olive Stampin’ Blends. I trimmed the bottom of the panel with a strip of Ornate Garden DSP and adhered the panel to the inside of the card.

The Stampin’ Up! Ornate Style stamp set is one of my many favorites from the current retiring catalog. I remember that the Ornate Garden Suite was an early release and I was awed by everything in the suite! Some of the products in the suite will be returning such as the beautiful Ornate Layers dies that I used here, but the beautiful Ornate Garden DSP will be retiring. So Sad…

But join me for a Facebook Live this afternoon for a sneak peek of something new! I’m planning to go live on my Facebook Page at 1:00 ET to make a card with the awesome new Pansy Patch bundle. Look forward to seeing you then!


Stampin’ Up! Last Chance Sale is going on NOW!

Stampin’ Up! has posted the list of items from the 2020-2021 Annual catalog that are retiring and some of the items are on sale! Retiring items will be available only white supplies last! If you love great deals, now is the perfect time to shop.

To download a PDF with the Retiring Items List, click here.

To download an excel file with the Retiring Items List, click here.

Head to my Online Store to get the retiring items you need before they sell out!

The new 2021-2022 Annual Catalog will open for orders on May 4, 2021 and by then it will be too late!


Current Host Code: ARFDXWP4

Use this host code when you order $50 or more and receive a free gift from me!  The free gift is your choice of any item valued up to $10.00 in the 2020 – 2021 Annual Catalog or in the Jan-Jun 2021 Mini Catalog!

If your order is over $150, please do not use the host code since you’ll receive your own Host Dollars plus I’ll still send you the free gift!  This host code can be used by anyone, no club or commitment required.  Let me know if you have any questions.


If you need any stamping supplies, I’d be very happy to be your Demonstrator.  Just click on the Shop Now button on the right side of the screen to go directly to my online store or contact me if you have any questions. 

Thanks for stopping by and Happy Stamping!

Akiko

  • Visit my online store here
  • See the current Stampin’ Up! clearance rack specials here
  • Earn FREE Stampin’ Up! products through my Wildflower Frequent Shopper Program – my way of saying thank you to my online frequent shopper customers.
  • Sign up for my weekly newsletter here
  • Have any questions? I’d be happy to help, click here to contact me.

Cardstock Cuts for this project:

  • Bumblebee – 4-1/4″ x 11″ card base scored at 5-1/2″
  • Old Olive – 3-3/4″ x 5″ (front mat)
  • Terracotta Tile – 2-1/4″ x 3-1/2″ (filigree frame)
  • Mossy Meadow – 1″ x 2-1/2″ (die cut friend)
  • Basic White – 4″ x 5-1/4″ (inside panel), 1-1/8″ x 2-1/2″ (flower panel)
  • Ornate Garden DSP – 3-5/8″ x 4-7/8″ (front background), 1/2″ x 4″ (inside trim)

Stampin’ Up! products used in this project:


Stampin’ Up! Ornate Style for the Happy Inkin’ Thursday Blog Hop

Good Morning! Welcome to another Happy Inkin’ Thursday Blog Hop! I just put out some purple mums by my front door and I wanted to pull out the Stampin’ Up! Ornate Style bundle so I could color it to match my mums. Then I saw that the our theme for this week is ‘Plaid’ and I thought that the plaid and flowers would be perfect together! This is what I came up with.

We have a theme challenge this week, and here is the theme we are using for our projects:

Emboss a Rich Razzleberry panel with the Ornate Floral 3D embossing folder and adhere it to the front of a Rich Razzleberry card base. Cut a Terracotta Tile panel with the Ornate Layers Die and adhere a panel of Plaid Tidings designer series paper to the front. Adhere the layered die cut to the front of the card. Cut and embossed three leaves from the Nature’s Roots dies in Bumblebee and adhere them to the bottom of the panel. Cut some branches from the Forever Gold Laser Cut specialty paper and adhere them to the top of the leaves.

Stamp the bouquet from the Stampin’ Up! Ornate Style cling stamp set in Early Espresso ink on a Whisper White panel. Color it with Rich Razzleberry, Mossy Meadow, Mango Melody, Granny Apple Green, Calypso Coral and Poppy Parade Stampin’ Blends. Fussy cut the image and brush clear Wink of Stella on the flowers.

Adhere the flowers to the card front with dimensionals. Stamp the Happy Birthday sentiment from the Blossoms in Bloom stamp set in Early Espresso ink on a strip of Terracotta Tile and cut it out with the long small die from the Stitched Rectangles Dies. Adhere it to the bottom of the card with liquid glue and dimensionals. Accent the card front with Gilded Gems and a Terracotta Tile bow.

Stamp the sentiment from the Sending Sunshine stamp set in Rich Razzleberry ink on a Whisper White panel. Stamp the flower from the Stampin’ Up! Ornate Style Stamp set in Early Espresso ink next to the sentiment and color it with Mango Melody, Granny Apple Green and Mossy Meadow Stampin’ Blends. Cut a strip of Terracotta Tile with the Ornate Borders die and adhere a strip of Plaid Tidings DSP to the bottom. Adhere it to the bottom of the Whisper White panel and adhere the panel to the inside of the card.

The rich fall colors and the plaid give a different look to the beautiful flowers from the Stampin’ Up! Ornate Style stamp set, that is perfect for this time of year. So if you’ve got this bundle, pull it out and have fun creating a fall card! Oh, and the pretty Plaid Tidings designer series paper is on sale for 15% off!

On with the Hop! Click the Next button below to visit Karen Ksenzakovic’s blog.

And just in case you get lost along the way, here’s a list of the team members participating in the hop today:


Stampin’ Up! Designer Series Paper Sale Going on Now!

Stampin’ Up! has beautiful Designer Series Paper and during the Month of October they’re putting a select list of those on sale with a 15% discount! This is a fantastic opportunity for you to stock up and save on paper. And the sale includes some of the designs from the August-December 2020 Mini Catalog too! Get the full details on my Promotion Page or click on the image above to download a printable PDF with all the selections.  Click Here to shop the Designer Series Paper Sale in My Online Store now!


October 1-15 Host Code: F4UK7V36

Use this host code when you order $50 or more and receive a free gift from me!  The gift is your choice of any item valued up to $10.00 in the 2019-20 Annual Catalog or in the 2020 January-June Mini Catalog!  That includes some of the Host Exclusive stamp sets!

If your order is over $150, please do not use the host code since you’ll receive your own Host Dollars plus I’ll still send you the free gift!  This host code can be used by anyone, no commitment required.  Let me know if you have any questions.


If you need any stamping supplies, I’d be very happy to be your Demonstrator.  Just click on the Shop Now Button on the right side of the screen to go directly to my online store or contact me if you have any questions.  Happy Stamping!

Thanks for visiting!

Akiko

  • Visit my online store here
  • See the current Stampin’ Up! clearance rack specials here
  • Earn FREE Stampin’ Up! products through my Wildflower Frequent Shopper Program – my way of saying thank you to my frequent shopper online customers.
  • Sign up for my weekly newsletter here
  • Have any questions? I’d be happy to help, click here to contact me.

Cardstock Cuts for this project:

  • Rich Razzleberry – 4-1/4″ x 11″ card base scored at 5-1/2″, 4-1/4″ x 5-1/2″ (embossed panel)
  • Terracotta Tile – 2-3/4″ x 5-3/4″ (DSP mat), 5/8″ x 4″ (inside trim), 1-1/4″ x 3-1/4″ (label)
  • Whisper White – 4″ x 5-1/4″ (inside panel), 3-1/2″ x 4-3/4″ (flower bouquet)
  • Bumblebee – 3″ x 4″ (die cut leaves)
  • Plaid Tidings DSP – 2″ x 5″ (front panel), 3/8″ x 4″ (inside trim)
  • Forever Gold – trim leaves from the hexagon label

Stampin’ Up! products used in this project:


Stampin’ Up! Ornate Style Happy Birthday Card

Good Morning! Today I have sweet, pastel birthday card made with the pretty Stampin’ Up! Ornate Style bundle along with other products from the Ornate Garden suite. You can find the supplies used to create this card at the bottom of my post along with the sizes of cardstock used.

I embossed a Whisper White panel with the Ornate Floral 3D embossing folder and adhered it to another Whisper White panel with multipurpose liquid glue. I adhered the embossed layered panel to a Thick Whisper White card base with dimensionals. I cut out the second largest fancy frame from the Ornate Layers Dies from a Whisper White panel. I colored a length of Whisper White crinkle ribbon with the Light Flirty Flamingo Stampin’ Blend and tied it around the panel and tied a bow to the side. I adhered the panel to the card front with multipurpose liquid glue.

I stamped the large floral bouquet from the Stampin’ Up! Ornate Style cling stamp set in Early Espresso ink on a Whisper White panel. I colored it with the Light Stampin’ Blends – Old Olive, So Saffron, Pool Party, Flirty Flamingo and Ivory. I fussy cut it out and brushed the flowers with Wink of Stella to give it some sparkle. I adhered the flowers to the panel with dimensionals.

I stamped the happy birthday sentiment from the Timeless Tulips photopolymer stamp set in Flirty Flamingo ink on a strip of Whisper White and cut it out with the long skinny die from the Stitched Rectangles Dies. I adhered it to the card front with dimensionals. I finished off the card front with 3 small faux pearls.

For the inside, I stamped the two small flowers from the Stampin’ Up! Ornate Style stamp set in Early Espresso ink on a Whisper White panel. I colored them with the Light So Saffron, Pool Party and Old Olive Stampin’ Blends like the flowers on the card front. I adhered the panel to the inside of the card with multipurpose liquid glue.

The Stampin’ Up! Ornate Garden Suite is so pretty and so versatile and it’s been great to be able to purchase the products as an early release before the rest of the new 2020-2021 Annual Catalog! It’s been very popular, selling out early, but all the stamps and dies are back in stock. Check them out in my Online Store. And don’t forget that the rest of the 2020-2021 Annual Catalog products will be available on June 3! I can’t wait – it’s a great catalog!


Stampin’ Up! Last Chance Products are Going Fast!

Stampin’ Up has posted the retirement lists for the 2019-2020 Annual Catalog and January-June 2020 Mini Catalog in preparation for the release of the new 2020-2021 Annual Catalog. The items on the lists are only available while supplies last from now through June 2!  And some of the items are available at a discount!!

Click on the picture below to head over to my Online Store to shop the retiring products:

Have fun shopping and let me know if you have any questions!


Ornate Garden Suite Early Release

The Stampin’ Up! Ornate Garden Suite is new for the 2020-2021 Annual Catalog and is being released early. It is available now for ordering. Click on the image below to see a PDF flyer of the items or head to the Ornate Garden page in my Online Store to shop now.


May 16 – 31 Host Code: Z6VYEYYK

Use this host code when you order $50 or more and receive a free gift from me!  The gift is your choice of any item valued up to $10.00 in the 2019-20 Annual Catalog or in the 2020 January-June Mini Catalog!  That includes some of the Host Exclusive stamp sets!

If your order is over $150, please do not use the host code since you’ll receive your own Host Dollars plus I’ll still send you the free gift!  This host code can be used by anyone, no commitment required.  Let me know if you have any questions.


If you need any stamping supplies, I’d be very happy to be your Demonstrator.  Just click on the Shop Now Button on the right side of the screen to go directly to my Online store or contact me if you have any questions.  Happy Stamping!

Thanks for stopping by and have a great day!

Akiko

  • Visit my Online store here
  • See the current Stampin’ Up! clearance rack specials here
  • Earn FREE Stampin’ Up! products through my Wildflower Frequent Shopper Program – my way of saying thank you to my frequent shopper online customers.
  • Sign up for my monthly newsletter here
  • Have any questions? I’d be happy to help, click here to contact me.

Cardstock Cuts for this project:

  • Thick Whisper White – 4-1/4″ x 11″ card base scored at 5-1/2″
  • Whisper White – (2) 4″ x 5-1/4″ (inside panel and front mat), 3-7/8″ x 5-1/8″ (embossed panel), 3-1/2″ x 5″ (fancy die cut frame), 3-3/4″ x 5″ (stamped bouquet), 1″ x 3″ (label)

Stampin’ Up! products used in this project:


Stampin’ Up! Ornate Style Note Tote

Good Morning! Today I have another project using products from the beautiful new Ornate Garden Suite in combination with the Dressed to Impress Suite. It’s a note tote! I made the sweet little tote bag from the All Dressed Up Dies out of Ornate Garden specialty designer series paper and stuffed it with four 3×3 note cards and envelopes from the Best Dressed Note Cards and Envelopes. The colors go well together and it is way too cute! You can find the supplies used to create this card at the bottom of my post along with the sizes of cardstock used.

I made the All Dressed Up tote in a Sunday afternoon Facebook Live video tutorial and you can see the post here. I made today’s tote in the same way using the Ornate Garden specialty designer series paper – and this sheet has gold foil flowers on the inside – but used Terracotta Tile buttons instead of buckles. I used Early Espresso for the handles and So Saffron for the pocket which I decorated with the small flower cluster from the Stampin’ Up! Ornate Style cling stamp set and a fussy cut single flower. The single flower is stamped in Early Espresso on Whisper White and colored with Calypso Coral, Flirty Flamingo and Old Olive Stampin’ Blends. It is finished with a Metallic Gold pearl to match the gold foil flowers inside the tote.

The Daffodil Delight note cards from the Best Dressed 3×3 Note Cards and Envelopes are perfect to go in the tote and they match the Ornate Garden DSP pretty well. I stamped the daisy flower from the Stampin’ Up! Ornate Style stamp set on four note cards in Early Espresso ink. I also stamped the daisy on the pretty coordinating printed envelopes in Early Espresso ink. I colored each note card flower center with Calypso Coral Stampin’ Write marker and the leaves with the Old Olive Stampin’ Write marker. I did not use Stampin’ Blends because they would have bled through the back and I wanted to keep the cards to a single layer. Do you like how the printed watercolor splash makes the petals look yellow?

I stamped the bottom of each note card with a different saying from the Ornate Thanks photopolymer stamp set in Early Espresso ink. This way you have a coordinating set of note cards that can be used for different occasions! Actually, I stamped the sentiments first so that I could position the flower appropriately relative to the sentiment.

This project really shows off the versatility of all the different sentiments in the Ornate Thanks stamp set and how well this suite can be combines with other Stampin’ Up! products. And I can think of at least one bag in my closet that looks like this one. Unfortunately, it doesn’t have gold foil in the lining.


Stampin’ Up! Ornate Garden Suite Early Release available for ordering NOW!

Stampin’ Up! has a beautiful new early release product suite from the upcoming Annual Catalog and it’s available to order now!! Click the image below to see a PDF brochure of all the products that are available with this beautiful suite or go to the Ornate Garden page in my Online Store to place your order now.


April 16 – 30 Host Code: SJ9ZJ46Z

Use this host code when you order $50 or more and receive a free gift from me!  The gift is your choice of any item valued up to $10.00 in the 2019-20 Annual Catalog or in the 2020 January-June Mini Catalog!  That includes some of the Host Exclusive stamp sets!

If your order is over $150, please do not use the host code since you’ll receive your own Host Dollars plus I’ll send you the free gift!  This host code can be used by anyone, no commitment required.  Let me know if you have any questions.


If you need any stamping supplies, I’d be very happy to be your Demonstrator.  Just click on the Shop Now button on the right side of the screen to go directly to my Online store or contact me if you have any questions.  Happy Stamping!

Thanks for stopping by and have a great day!

Akiko

  • Visit my Online store here
  • See the current Stampin’ Up! clearance rack specials here
  • Earn FREE Stampin’ Up! products through my Wildflower Frequent Shopper Program – my way of saying thank you to my frequent shopper online customers.
  • Sign up for my weekly newsletter here
  • Have any questions? I’d be happy to help, click here to contact me.

Cardstock Cuts for this project:

  • Early Espresso – 1-1/2″ x 6-1/2″ (tote straps)
  • Terracotta Tile – 1″ x 2-1/2″ (buttons)
  • So Saffron – 1-1/2″ x 2″ (tote pocket)
  • Whisper White – 1″ x 1-1/2″ (fussy cut flower)
  • Ornate Garden DSP – 5″ x 11″ (tote bag)

Stampin’ Up! products used in this project:


Stampin’ Up! Ornate Style Friendship Card Video Tutorial

Good Morning! On Saturday we had our Inkin’ Krew Ornate Garden Facebook Event where we shared lots of projects made with the new Stampin’ Up! Ornate Garden Suite. Did you get a chance to tune in? We had several Facebook Live video tutorials and I shared the tutorial for this card. I used the Stampin’ Up! Ornate Style bundle along with the Ornate Garden specialty designer series paper and the Grace’s Garden and Daisy Lane stamp sets. You can find the supplies used to create this card at the bottom of my post along with the sizes of cardstock used.

Unfortunately I can’t link to the Facebook video ☹️, but it is on my YouTube Channel and you can view it here.

I stamped the sentiment from the Grace’s Garden photopolymer stamp set in Early Espresso ink on a small panel of So Saffron vellum. Be careful because the ink will take longer to dry on the vellum and will be easy to smear if you handle it too early, so I put it aside to let it dry. Using the Leaf Punch, I punched a leaf cluster from Old Olive card stock. I stamped three of the small petal clusters from the Daisy Lane cling stamp set with So Saffron ink after stamping off. I cut them out with the Medium Daisy Punch. I gently curved the petals on the daisies with my fingers, curving the bottom layer up, the top layer down and the middle layer alternating up and down. I adhered the layers with a dot of multipurpose liquid in the center and topped it off with a large gold faceted gem.

I cut the fancy frame from the Ornate Layers Dies from Terracotta Tile card stock. After cleaning the gazillion little pieces that were cut out – this is such an ornate frame and I love it! – I aligned the 3rd smallest of the Stitched Rectangles Dies in the center and cut out the center. I love how these dies leave a stitched edge on both the inside and outside! With the frame ready, I began to assemble my card base.

I adhered a panel of the Ornate Garden specialty designer series paper to a Terracotta Tile card base with multipurpose liquid glue. I adhered the frame to the vellum with pieces of dimensionals. The dimensionals on the side will extend beyond the vellum to adhere it to the card base, but the top and bottom won’t, so I added a strip of multipurpose liquid glue to the back of the vellum that is hidden by the frame. I adhered it to the card base. I adhered the leaf with multipurpose liquid glue and the flower with glue dots. I finished it off with a Terracotta Tile bow.

For the inside of the card, I stamped the little flourish from the Stampin’ Up! Ornate Style cling stamp set in Early Espresso ink at the top of a Whisper White panel. I added a strip of the Ornate Garden specialty DSP to the bottom and adhered the panel to the inside of the card.

Now, I have to admit that I did some surgery to my card after the video ended. In realtime, I stamped the sentiment too hight and crooked as you can see in the picture here. So I snipped the dimensionals behind the frame and trimmed the vellum (luckily it was just stuck down behind the frame. I then re-stamped the sentiment properly and re-attached the frame to the vellum and then adhered it to the card base. It looks much better and from the pictures above, I don’t think you can tell that it needed to be fixed!

I hope that you enjoyed the Inkin’ Krew Ornate Garden event if you got a chance to join it Saturday afternoon. And I hope you got a lot of inspiration and ideas on how you will use the products in the Ornate Garden Suite. If you didn’t, the group will still be there and you can check out the postings and watch the videos on replay. Here is the link to the group where you can join and we will get you approved as soon as we can: https://www.facebook.com/groups/1833741716756137/. Now to end my post with a better picture…


Stampin’ Up! Ornate Garden Suite Early Release available for ordering NOW!

Stampin’ Up! has a beautiful new early release product suite from the upcoming Annual Catalog and it’s available to order now!! Click the image below to see a PDF brochure of all the products that are available with this beautiful suite or go to the Ornate Garden page in my Online Store to place your order now.


April 16 – 30 Host Code: SJ9ZJ46Z

Use this host code when you order $50+ and receive a free gift from me!  If your order is over $150, please do not use this code, but you’ll still get the free gift.  The free gift is your choice of any item valued up to $10.00 in the 2019 – 2020 Annual Catalog or in the 2020 Mini Catalog!  That includes some of the Host Exclusive stamp sets!

If your order is over $150, please do not use the host code since you’ll receive your own Host Dollars plus I’ll send you the free gift!  This host code can be used by anyone, no club or commitment required.  Let me know if you have any questions.


If you need any stamping supplies, I’d be very happy to be your Demonstrator.  Just click on the Shop Now button on the right side of the screen to go directly to my online store or contact me if you have any questions.  Happy Stamping!

Thanks for stopping by and have a great week!

Akiko

  • Visit my online store here
  • See the current Stampin’ Up! clearance rack specials here
  • Earn FREE Stampin’ Up! products through my Wildflower Frequent Shopper Program – my way of saying thank you to my online frequent shopper customers.
  • Sign up for my weekly newsletter here
  • Have any questions? I’d be happy to help, click here to contact me.

Cardstock Cuts for this project:

  • Terracotta Tile – 4-1/4″ x 11″ card base scored at 5-1/2″
  • Old Olive – 1-1/2″ x 3″ (leaf cluster punch)
  • Perennial Essence vellum card stock – 2-1/8″ x 3-5/8″ (So Saffron vellum panel)
  • Whisper White – 4″ x 5-1/4″ (inside panel), 2″ x 6″ (punched daisy petals)
  • Ornate Garden Designer Series Paper – 4-1/4″ x 5-1/2″ (card front background), 1/2″ x 4″ (inside trim)

Stampin’ Up! products used in this project:


Stampin’ Up! Ornate Style Get Well Card

Good Morning! In preparation for tomorrow’s Inkin Krew Ornate Garden Facebook Event, I have a card today using the Stampin’ Up! Ornate Style stamp bundle in combination with the get well sentiment from the Timeless Tulips stamp set. You can find the supplies used to create this card at the bottom of my post along with the sizes of cardstock used.

I cut an panel of the Mint Macaron background Ornate Garden specialty designer series paper with the large frame die from the Ornate Layers Dies and sponged the edge with Sahara Sand ink to give it a distressed look. I adhered it to a Mint Macaron card base with multipurpose liquid glue. I stamped the large floral bouquet from the Stampin’ Up! Ornate Style stamp set in Early Espresso ink on a Whisper White panel. I colored it with Rococo Rose, So Saffron, Old Olive, Dark Mango Melody and Bronze Stampin’ Blends. I colored the background with the light Mint Macaron Stampin’ Blend using a circular motion to give it a mottled look and cut out the panel with a Stitched Rectangle Die.

I adhered the floral panel to an Early Espresso mat with multipurpose liquid glue and then to the card front with dimensionals. I stamped the get well soon sentiment from the Timeless Tulips stamp set in VersaMark Ink on a strip of Early Espresso card stock. I sprinkled it with gold embossing powder and heat set until it was shiny. I trimmed the end and trimmed the end of a strip of the gold foil Mint Macaron paper from the Ornate Garden DSP. I adhered the two strips together with multipurpose liquid glue and adhered them to the card front.

I made a bow with the new Mint Macaron ribbon and adhered it with glue dots and finished the card front with three gold faceted gems.

I decorated the inside by stamping the little flower from the Stampin’ Up! Ornate Style stamp set in Early Espresso ink in the corner of a Whisper White panel. I colored it with So Saffron, Old Olive and Dark Mango Melody Stampin’ Blends. I added a strip of the Ornate Garden specialty designer series paper on the bottom and adhered the panel to the inside of the card.

The Stampin’ Up! Ornate Style cling stamp set comes bundled with the Ornate Layers Dies at a 10% discount. This bundle is one of the items in the Ornate Garden Early Release and will be in the new 2020-2021 Annual Catalog.


Inkin’ Krew Facebook Live Event Group is now open!

We are all excited about the Inkin’ Krew Ornate Garden Facebook Event tomorrow! Our Facebook page is all set up for the event and it’s open for joining!  Click this link to go to the group and then click the “join” button and we’ll get you approved ASAP: https://www.facebook.com/groups/1833741716756137/

Here is the schedule of events that we have planned:

Everyone is welcome to join us! Let me know if you have any questions.


April 16 – 30 Host Code: SJ9ZJ46Z

Use this host code when you order $50 or more and receive a free gift from me!  The gift is your choice of any item valued up to $10.00 in the 2019-20 Annual Catalog or in the 2020 January-June Mini Catalog!  That includes some of the Host Exclusive stamp sets!

If your order is over $150, please do not use the host code since you’ll receive your own Host Dollars plus I’ll send you the free gift!  This host code can be used by anyone, no commitment required.  Let me know if you have any questions.


If you need any stamping supplies, I’d be very happy to be your Demonstrator.  Just click on the Shop Now button on the right side of the screen to go directly to my online store or contact me if you have any questions.  Happy Stamping!

Thanks for stopping by and have a great day!

Akiko

  • Visit my online store here
  • See the current Stampin’ Up! clearance rack specials here
  • Earn FREE Stampin’ Up! products through my Wildflower Frequent Shopper Program – my way of saying thank you to my frequent shopper online customers.
  • Sign up for my weekly newsletter here
  • Have any questions? I’d be happy to help, click here to contact me.

Cardstock Cuts for this project:

  • Mint Macaron – 4-1/4″ x 11″ card base scored at 5-1/2″
  • Early Espresso – 3-1/8″ x 4-1/2″ (floral bouquet mat), 1/2″ x 3″ (banner label)
  • Whisper White – 4″ x 5-1/4″ (inside panel), 3-1/2″ x 5″ (floral panel)
  • DSP – 4-1/4″ x 5-1/2″ (die cut front background), 1/2″ x 4″ (inside trim), 1/2″ x 3″ (banner label accent)

Stampin’ Up! products used in this project:


Stampin’ Up! Ornate Garden with Love What You Do

Good Morning! Today I have a thank you card made with several products from the new Stampin’ Up! Ornate Garden Suite paired with the thank you sentiment from the Love What You Do photopolymer stamp set. You can find the supplies used to create this card at the bottom of my post along with the sizes of cardstock used.

Emboss a panel of Whisper White with the Ornate Floral 3D Embossing Folder and adhere the panel of the Stampin’ Up! Ornate Garden specialty designer series paper to the right side. Cut a strip of Old Olive card stock with the skinny eyelet border from the Ornate Borders Dies and adhere it to the seam with liquid glue. Adhere the layered embossed panel to an Old Olive mat with liquid glue and pop it on a Rococo Rose card base with dimensionals.

Cut a panel of Old Olive card stock with the large fancy label from the Stitched So Sweetly Dies. Stamp the thank you sentiment from the Love What You Do photopolymer stamp set in Rococo Rose ink on a Whisper White panel. Stamp the floral cluster from the Ornate Style cling stamp set in Old Olive ink a couple of times after stamping off twice. Cut out the sentiment with the die from the Stitched So Sweetly dies and adhere it to the larger Old Olive die cut label with liquid glue. Adhere the label to the card with dimensionals.

Cut out the two smallest flower dies from the Ornate Borders Dies using Blushing Bride card stock. Adhere the smaller flower on top of the larger flower with liquid glue, offsetting the petals to fill in the gaps. Add a Rococo Rose faceted gem to the center. Cut a leaf cluster out of Old Olive with the Leaf Punch. Adhere the leaf cluster to the label with a glue dot. Adhere the flower on top with a dimensional. Make a bow with the Whisper White crinkle ribbon and tuck it under the flower with a glue dot.

On a Whisper White panel, stamp the little flower from the Ornate Style stamp set in Early Espresso ink. Color it with the light Rococo Rose and Light Old Olive Stampin’ Blends. Trim the bottom of the panel with a strip of the Stampin’ Up! Ornate Garden specialty designer series paper and adhere the panel to the inside of the card with liquid glue.

All the florals in the Stampin’ Up! Ornate Garden suite of products are fresh and perfect for Springtime cards for all occasions. Click on the image below to see the products in this wonderful suite, or head over to the Ornate Garden section of my Online Store to order.


April 1 – 15 Host Code: N39D7TBK

Use this host code when you order $50 or more and receive a free gift from me!  The gift is your choice of any item valued up to $10.00 in the 2019-20 Annual Catalog or in the 2020 January-June Mini Catalog!  That includes some of the Host Exclusive stamp sets!

If your order is over $150, please do not use the host code since you’ll receive your own Host Dollars plus I’ll send you the free gift!  This host code can be used by anyone, no commitment required.  Let me know if you have any questions.


If you need any stamping supplies, I’d be very happy to be your Demonstrator.  Just click on the Shop Now button on the right side of the screen to go directly to my online store or contact me if you have any questions.  Happy Stamping!

Thanks for stopping by and have a great day!

Akiko

  • Visit my online store here
  • See the current Stampin’ Up! clearance rack specials here
  • Earn FREE Stampin’ Up! products through my Wildflower Frequent Shopper Program – my way of saying thank you to my frequent shopper online customers.
  • Sign up for my weekly newsletter here
  • Have any questions? I’d be happy to help, click here to contact me.

Cardstock Cuts for this project:

  • Rococo Rose – 4-1/4″ x 11″ card base scored at 5-1/2″
  • Old Olive – 4″ x 5-1/4″ (front mat), 1-1/2″ x 1-1/2″ (leaf cluster), 2-3/4″ x 4″ (label), 1/2″ x 5-1/8″ (die cut border)
  • Whisper White – 4″ x 5-1/2″ (inside panel), 3-7/8″ x 5-1/8″ (embossed front), 2-1/4″ x 2-13/4″ (label)
  • Blushing Bride – 1″ x 2″ (floral die cuts)
  • Ornate Garden Specialty DSP – 2″ x 5-1/8″ (front panel), 1/2″ x 4″ (inside trim)

Stampin’ Up! products used in this project:


Stampin’ Up! Ornate Style You’re Amazing Card

Good Morning! Today I have a sneak peek card made with the Stampin’ Up Ornate Style and Ornate Thanks stamp bundles. These bundles are part of the Ornate Garden Suite which are going to be in the 2020-2021 Annual Catalog, but are being be released early. Yay!! You can find the supplies used to create this card at the bottom of my post along with the sizes of cardstock used.

I cut a panel of the pretty yellow background Ornate Garden specialty designer series paper and adhered it to the bottom of a Terracotta Tile card base. I used the little circle border die from the Ornate Borders Dies to cut the bottom of a panel of Old Olive card stock and then ran it through the Ornate Floral embossing folder. I adhered it to the top of the card base, overlapping the floral DSP. I tied a length of Terracotta Tile ribbon around the card front and tied a faux bow just above the die cut border.

I stamped the you’re amazing sentiment from the Ornate Thanks photopolymer stamp set on a strip of Old Olive card stock using Old Olive ink. I cut it out with small long Stitched Rectangles dies. I cut the small frame from the Ornate Layers Dies from Terracotta Tile card stock.

I stamped the flower from the Stampin’ Up! Ornate Style cling stamp set in Memento Tuxedo Black ink on a small Whisper White panel. I colored it with the Dark So Saffron, Light Calypso Coral and Light Old Olive Stampin’ Blends. I adhered the flower to the Terracotta Tile frame and accented it with a Terracotta Tile faceted dot. I adhered it to the card front with dimensionals. I finally centered the Old Olive die cut label on the bottom of the card front.

The inside of the card is pretty simple – I trimmed a Whisper White panel with the yellow and Terracotta Tile floral paper from the Ornate Garden specialty designer series paper pack and adhered it to the inside of the card.

The Stampin’ Up! Ornate Garden Suite is really pretty with gorgeous die cut borders and frames, pretty floral images and sweet thank you sentiments for every occasion. The items in the suite are currently available to Stampin’ Up! Demonstrators during the pre-order period and will be available to everyone beginning April 1! That’s next week. Click on the image below to open a PDF file to see all of the items in the suite.

And note that if you are interested in joining Stampin’ Up! as a demonstrator now, you can add items from the suite to your starter kit. Contact me if you have any questions.


March 16 – 31 Host Code: RSAF3R27

Use this host code when you order $50 or more and receive a free gift from me!  The gift is your choice of any item valued up to $10.00 in the 2019-20 Annual Catalog or in the 2020 January-June Mini Catalog!  That includes some of the Host Exclusive stamp sets!

If your order is over $150, please do not use the host code since you’ll receive your own Host Dollars plus I’ll send you the free gift!  This host code can be used by anyone, no commitment required.  Let me know if you have any questions.


If you need any stamping supplies, I’d be very happy to be your Demonstrator.  Just click on the Shop Now button on the right side of the screen to go directly to my online store or contact me if you have any questions.  Happy Stamping!

Thanks for stopping by and have a great day!

Akiko

  • Visit my online store here
  • See the current Stampin’ Up! clearance rack specials here
  • Earn FREE Stampin’ Up! products through my Wildflower Frequent Shopper Program – my way of saying thank you to my frequent shopper online customers.
  • Sign up for my weekly newsletter here
  • Have any questions? I’d be happy to help, click here to contact me.

Cardstock Cuts for this project:

  • Terracotta Tile – 4-1/4″ x 11″ card base scored at 5-1/2″, 2-1/4″ x 4″ (die cut frame)
  • Old Olive – 3-1/2″ x 4″ (embossed panel)
  • Whisper White – 1-1/8″ x 2-1/2″ (flower panel), 4″ x 5-1/4″ (inside panel)
  • Ornate Gardens DSP – 2″ x 4″ (front panel), 1/2″ x 4″ (inside trim)

Stampin’ Up! products used in this project: