Stampin’ Up! Hello Ladybug Card

Good Morning and Happy Labor Day! I hope you’re having a wonderful, fun weekend to wind down Summer, although our weather certainly doesn’t feel like Fall. I was inspired by the pretty Masterfully Made designer series paper to make a card with torn edges, layering and texture, and I wanted to use the sweet Stampin’ Up! Hello Ladybug photopolymer stamp set and coordinating Ladybug Builder punch before Summer is gone. You can find the products I used at the bottom of my post along with the card stock sizes.

I adhered a panel of Delightfully Eclectic designer series paper to the front of a Petal Pink card base with liquid glue. I adhered a strip of Crushed Curry dots from the same DSP pack on top with liquid glue. I embossed an Old Olive panel with the Timber 3D embossing folder and a striped panel of Delightfully Eclectic DSP with the Timeworn Type 3D embossing folder. I tore the left edge of each, adhered them together and wrapped it with white baker’s twine, making a bow. I adhered it to the card front with dimensionals.

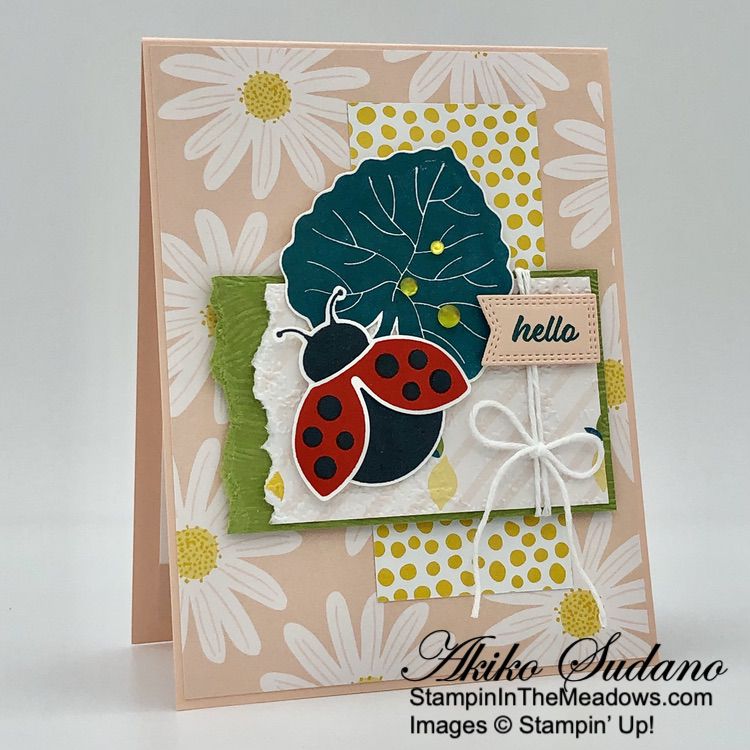
I stamped leaf from the Stampin’ Up! Hello Ladybug stamp set in Pretty Peacock ink on Basic White and fussy cut it with my paper snips. I adhered it to the card front with glue dots and dimensionals. I stamped the ladybug body in Memento Tuxedo Black and the wings in Poppy Parade and Memento Tuxedo Black on Basic White. I punched them out with the Ladybug Builder punch and adhered them together with glue dots. I popped them on the card with dimensionals.

I stamped the sentiment from the Stampin’ Up! Hello Ladybug stamp set in Pretty Peacock ink on Petal Pink and cut it out with the small banner from the Nested Essentials dies. I adhered it to the card front with dimensionals and finished the card by adhering yellow dots to the leaf with glue dots.

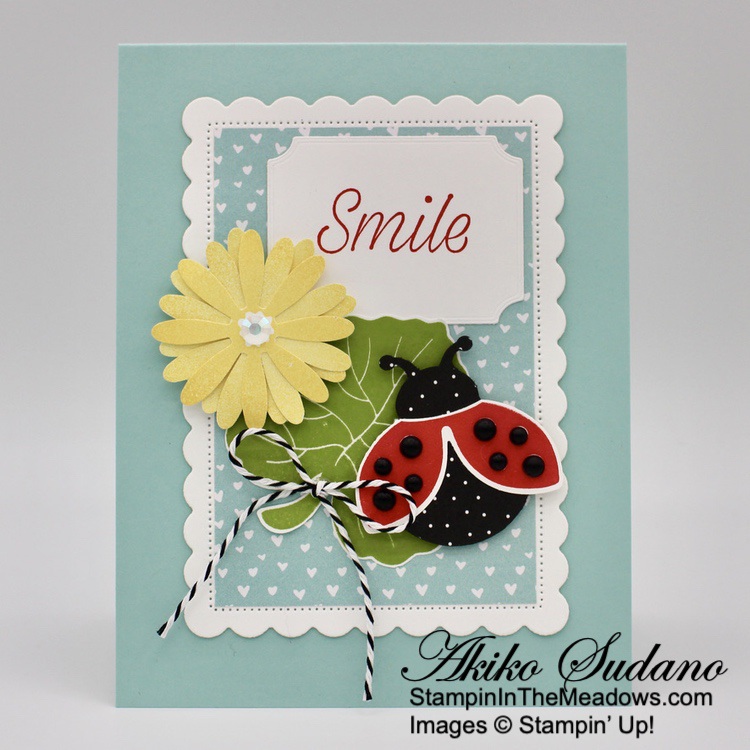
For the inside of the card, I stamped the flowers from the Stampin’ Up! Hello Ladybug stamp set in Daffodil Delight ink on a Basic White panel. I stamped the sentiment in Pretty Peacock and adhered a strip of Delighhtfully Eclectic DSP to the bottom. I adhered the panel to the inside of the card with Stampin’ Seal.

The ladybug from the Stampin’ Up! Hello Ladybug stamp set is simple and cute. I hope you like how the torn edges came out and give it a try. And I really like how the different bold graphic designs in the Delightfully Eclectic designer series paper go together so well – it’s a pretty versatile paper pack.


Designer Series Paper Special Release Starts September 6, 2023!

A special selection of Designer Series Papers will be available in the Online Exclusives section of the Online Store beginning September 6, 2023. These papers will be available only while supplies last, so shop early to bet yours before they’re gone. Click on the image below to download a PDF with all the details including item numbers and prices.

These papers are perfect for both holiday crafting and all occasion crafting.


The September Paper Pumpkin Kit is With Love & Gratitude!

Express your love and gratitude in elegant style with the September Paper Pumpkin Kit inspired by Shelli! This kit includes eight treat packages (you can also use for small gifts) and eight miniature note cards with matching envelopes and specialty gold foil embellishments. Whether you’re needing a hostess gift, a sweet surprise for dinner guests, or have another reason to give love and thanks, this kit has you covered.

The September Kit Includes:

  • All the supplies you need to create 8 treat packages and note cards
    • 8 treat packages – Finished Size: 3-1/2″ x 5″ x 2″
    • 8 note cards – Card Size: 3-1/2″ x 3-1/2″
    • 8 coordinating envelopes
  • 1 photopolymer stamp set
  • 1 Lost Lagoon Ink Spot
  • Specialty gold foil, precut embellishments
  • Adhesives

Coordinating Colors: Copper Clay, Crumb Cake, gold foil, Lost Lagoon, Mossy Meadow, Pebbled Path

Plus, don’t miss the Thoughts of Thanks Journal! It matches both the design and intent of the kit, giving you an even more personal way to document and express your gratitude. It’s available as an add-on, but only while supplies last!

Thoughts of Thanks Journal

  • 8” x 10” journal
  • 2 specialty gold foil sticker sheets
  • Item number 163270
  • $15.00

If you’re interested in subscribing to Paper Pumpkin, you can either sign up for a subscription where you are billed monthly for your kit or you can purchase a prepaid subscription in my Online Store. To see more information and to sign up for the monthly subscription click here. To see the options for prepaid subscriptions in my Online Store, click here.

Sign up deadline for the September 2023 kit is September 10, 2023. Note: Supplies may be limited toward the end of the subscription period.


Current Host Code: ATSGGVYD

Use this host code when you order $50 or more and receive a Thank You gift from me!  The free gift is your choice of any item currently available valued up to $10.00 .

If your order is over $150, please do not use the host code since you’ll receive your own Host Dollars plus I’ll still send you the Thank You gift!  This host code can be used by anyone, no club or commitment required. Let me know if you have any questions.


If you need any stamping supplies, I’d be very happy to be your Demonstrator.  Just click on the Shop Now button on the right side of the screen to go directly to my online store or contact me if you have any questions.  Happy Stamping!

Thanks for stopping by and have a great weekend!

Akiko

  • Visit my online store here
  • See the current Stampin’ Up! clearance rack specials here
  • Earn FREE Stampin’ Up! products through my Wildflower Frequent Shopper Program – my way of saying thank you to my online frequent shopper customers.
  • Have any questions? I’d be happy to help, click here to contact me.

Cardstock Cuts for this project:

  • Petal Pink – 4-1/4″ x 11″ card base, scored at 5-1/2″, 1″ x 1-1/2″ (label)
  • Old Olive – 2-1/8″ x 5″ (embossed panel)
  • Basic White – 3-3/4″ x 5″ (inside panel), 3″ x 5″ (leaf and ladybug stamps)
  • Delightfully Eclectic DSP – 4-1/8″ x 5-3/8″ (front background), 1-3/4″ x 4-1/4″ (front stripe), 2″ x 3-3/4″ (embossed panel), 1/2″ x 3-3/4″ (inside trim)

Stampin’ Up! products used in this project:


Stampin’ Up! Hello Ladybug Smile Card

Happy Friday! Last weekend I used the Stampin’ Up! Hello Ladybug bundle to make a fun fold card for my Facebook Live and I’m using it again for a friendship and encouragement card for today. The ladybug is so cute and the other stamps in the photopolymer stamp set give you lots of options for your card designs. You can find the supplies I used at the bottom of my post along with the sizes of cardstock used.

I started cutting out a panel of Basic White with the second largest Scalloped Contours die and adhering a panel of the pretty Sale-A-Bration Sunshine and Rainbows designer series paper to it with liquid glue. I adhered the panel to the front of a Pool Party card base. I stamped the large leaf from the Stampin’ Up! Hello Ladybug stamp set in Granny Apple Green on a Basic White panel and fussy cut it out with my paper snips. I adhered it to the card front.

I stamped 3 large flowers from the Stampin’ Up! Hello Ladybug stamp set in Daffodil Delight on Basic White and punched them out with the Medium Daisy Punch. I adhered them together with liquid glue and added an iridescent gemstone to the center before adhering them to the card front with a dimensional. I punched the ladybug body from Pattern Party DSP and Basic Black card stock and adhered them together. I stamped the wings in Real Red, punched them out with the Butterfly Builder punch and adhered them to the butterfly body. I added black matte dots to the wings and adhered the ladybug to the card front with dimensionals.

I stamped the sentiment from the Daisy Lane stamp set in Real Red on Basic White and cut it out with the Tasteful Labels die. I adhered the label to the card front with liquid glue, tucking it under the leaf. I finished the card with a black and white twine bow.

I stamped the small bunch of flowers from the Stampin’ Up! Hello Ladybug stamp set in Daffodil Delight ink in the corners of a Basic White panel and the sweet sentiment from the Daisy Lane stamp set in Real Red. I trimmed the bottom with a strip of Sunshine and Rainbows DSP and adhered the panel to the inside of the card.

The Stampin’ Up! Hello Ladybug bundle is so cute and versatile. It’s perfect for many occasions, so be sure to check it out! Thanks for stopping by and have a great weekend!


Sale-A-Bration is ending soon – Feb 28 2022!

Sale-A-Bration is one of Stampin’ Up!’s biggest promotions of the year with fun for everyone!  There are fantastic Sale-A-Bration specials for Shopping, Hosting and Joining! See my Promotions Page for more details or contact me and I’ll be happy to tell you more! But hurry because these specials are only available through February 28, 2022 or while supplies last!


Current Host Code: 3QYMGKQY

Use this host code when you order $50 or more and receive a free gift from me!  The free gift is your choice of any item valued up to $10.00 in the 2021-2022 Annual Catalog or the January – June 2022 Mini Catalog!

If your order is over $150, please do not use the host code since you’ll receive your own Host Dollars plus I’ll still send you the free gift!  This host code can be used by anyone, no club or commitment required. Let me know if you have any questions.


If you need any stamping supplies, I’d be very happy to be your Demonstrator.  Just click on the Shop Now button on the right side of the screen to go directly to my online store or contact me if you have any questions.  Happy Stamping!

Thanks for stopping by and have a great week!

Akiko

  • Visit my online store here
  • See the current Stampin’ Up! clearance rack specials here
  • Earn FREE Stampin’ Up! products through my Wildflower Frequent Shopper Program – my way of saying thank you to my online frequent shopper customers.
  • Have any questions? I’d be happy to help, click here to contact me.

Cardstock Cuts for this project:

  • Pool Party – 4-1/4″ x 11″ card base scored at 5-1/2″
  • Basic Black – 2″ x 2″ (ladybug)
  • Basic White – 4″ x 5-1/4″ (inside panel), 3-1/2″ x 4-3/4″ (scalloped rectangle), 2″ x 2-1/2″ (label), 2″ x 6″ (flower), 2-1/2″ x 2-1/2″ (leaf), 2″ x 2″ (ladybug wings)
  • Sunshine & Rainbows DSP – 2-5/8″ x 4″ (scalloped panel background), 1/2″ x 4″ (inside trim)
  • Pattern Party DSP – 2″ x 2″ (ladybug)

Stampin’ Up! products used in this project:


Stampin’ Up! Hello Ladybug Video Tutorial

Good Morning! The Stampin’ Up! Hello Ladybug bundle is so adorable. With the bold, graphic ladybug stamps and coordinating Ladybug Builder Punch, it is so easy to make a bunch of cute little bugs to decorate cards and tags. I made this cute little fun fold card during my Facebook Live yesterday afternoon. You can find the supplies I used at the bottom of my post along with the sizes of cardstock used.

Here is the video of my Facebook Live from yesterday afternoon. I also posted a copy of the video in my YouTube channel and you can view it here if you prefer.

I a panel of pretty multicolor Flowering Fields designer series paper to a So Saffron panel. I adhered another Mango Melody Flowering Fields Panel to the front of my mini card. I adhered my mini card to the DSP panel with Tear & Tape adhesive. I stamped the leaf from the Stampin’ Up! Hello Ladybug photopolymer stamp set in Pear Pizzazz on Basic White and fussy cut it with a small white border. I adhered the leaf to the mini card front with liquid glue.

I stamped the large flower from the Stampin’ Up! Hello Ladybug stamp set three times in Highland Heather ink and cut them out with the Medium Daisy Punch. I curved the petals and adhered the clusters together with liquid glue and adhered it to the card front with dimensionals, finishing the center with an iridescent rhinestone. I stamped two ladybug wings with Poppy Parade ink on Basic White and punched them out with the Ladybug Builder Punch. I punched out two ladybug bodies from Pattern Party DSP and Basic Black card stock. I inked the edges of the Pattern Party bodies with my black Stamp & Write marker and adhered them to the Basic Black cardstock bodies. I adhered the wings with liquid glue and adhered Black Matte Dots to the wing spots.

I adhered the ladybugs to the card front with dimensionals, letting them hang over the sides of the mini card. I stamped the hello sentiment from the Stampin’ Up! Hello Ladybug stamp set in Poppy Parade on Basic White and trimmed it with my paper snips. I adhered the label to the card front on top of the leaf.

For the inside of the card, I stamped the sentiment from the Stampin’ Up! Hello Ladybug stamp set in Poppy Parade on a basic White panel. I trimmed the bottom with a strip of the Flowering Fields DSP and adhered the panel to the inside of the card.

The Stampin’ Up! Hello Ladybug bundle is the cutest! You can punch out the ladybug from colored card stock, stamped card stock and designer series paper for a wide range of styles. The bold stamps compliment the punched bugs and the sentiments are perfect for expressions of friendship, support and good wishes.


Earn Free Products During Sale-A-Bration: Jan 4 – Feb 28 2022!

Sale-A-Bration is one of Stampin’ Up!’s biggest promotions of the year with fun for everyone!  There are fantastic Sale-A-Bration specials for Shopping, Hosting and Joining! See my Promotions Page for more details or contact me and I’ll be happy to tell you more! But hurry because these specials are only available through February 28, 2022 or while supplies last!


Current Host Code: 3QYMGKQY

Use this host code when you order $50 or more and receive a free gift from me!  The free gift is your choice of any item valued up to $10.00 in the 2021-2022 Annual Catalog or the January – June 2022 Mini Catalog!

If your order is over $150, please do not use the host code since you’ll receive your own Host Dollars plus I’ll still send you the free gift!  This host code can be used by anyone, no club or commitment required. Let me know if you have any questions.


If you need any stamping supplies, I’d be very happy to be your Demonstrator.  Just click on the Shop Now button on the right side of the screen to go directly to my online store or contact me if you have any questions.  Happy Stamping!

Thanks for stopping by and have a great week!

Akiko

  • Visit my online store here
  • See the current Stampin’ Up! clearance rack specials here
  • Earn FREE Stampin’ Up! products through my Wildflower Frequent Shopper Program – my way of saying thank you to my online frequent shopper customers.
  • Have any questions? I’d be happy to help, click here to contact me.

Cardstock Cuts for this project:

  • So Saffron – 3-1/4″ x 8-1/2″ mini card base scored at 4-1/4″, 4-1/4″ x 5-1/2″ card base panel
  • Basic Black – 2″ x 5″ (ladybugs)
  • Basic White – 3″ x 4″ (inside panel), 2″ x 4″ (ladybug wings), 2″ x 6″ (flower), 2-1/2″ x 2-1/2″ (leaf), 3/8″ x 1″ (label)
  • Flowering Fields DSP – 4″ x 5-1/4″ (floral background panel), 3″ x 4″ (front panel), 1/2″ x 3″ (floral inside trim)
  • Pattern Party DSP – 2″ x 5″ (ladybugs)

Stampin’ Up! products used in this project: