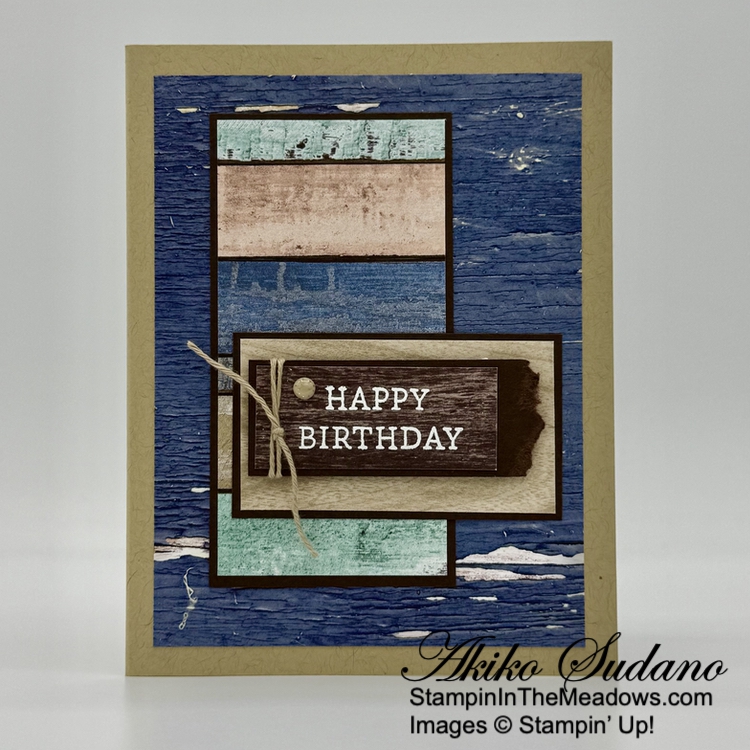
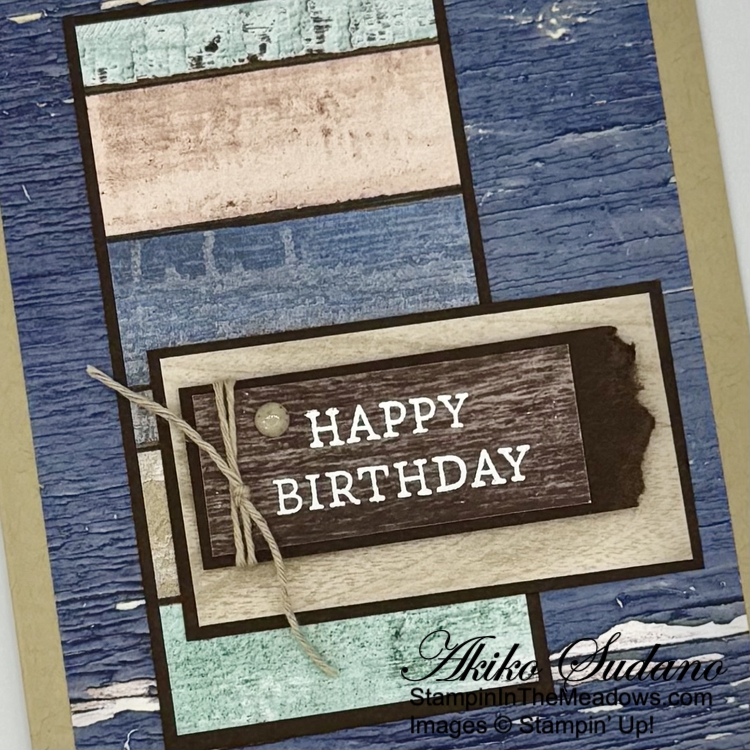
Good Morning! The Country Woods designer series paper has several different wood grain designs that are great for adding a rustic touch to your projects. I’ve used a few of the patterns to make a simple layered masculine birthday card and paired it with the Stampin’ Up! Simply Said sentiment stamp set. You can find the card stock cuts along with supplies at the bottom of my post.
Adhere a Misty Moonlight panel of Country Woods DSP to the front of a Crumb cake card base. Adhere two more panels of the DSP to Early Espresso mats and adhere them to the card front with liquid glue. This gives you a fairly flat card that can easily be mailed.
Stamp the birthday sentiment from the Stampin’ Up! Simply Said stamp set using Versamark ink on another panel of Country Woods DSP. Since I wanted the sentiment to be short and wide and the stamp is long and skinny, I had to do something different.
Ink up the ‘happy’ and stamp it
Sprinkle it with white embossing powder and shake off the excess so you can see it
Clean off the stamp and ink up the ‘birthday’ and stamp it under the ‘happy’
Sprinkle the ‘birthday’ with white embossing powder and shake off the excess
Heat set the whole sentiment until the powder is bright and shiny
Adhere the stamped DSP to the left side of an Early espresso mat and tear the right edge to make it more rustic. Wrap the right side with Crumb Cake baker’s twine and tie a knot. Adhere the sentiment to the card with dimensionals and finish with a Crumb Cake dot.
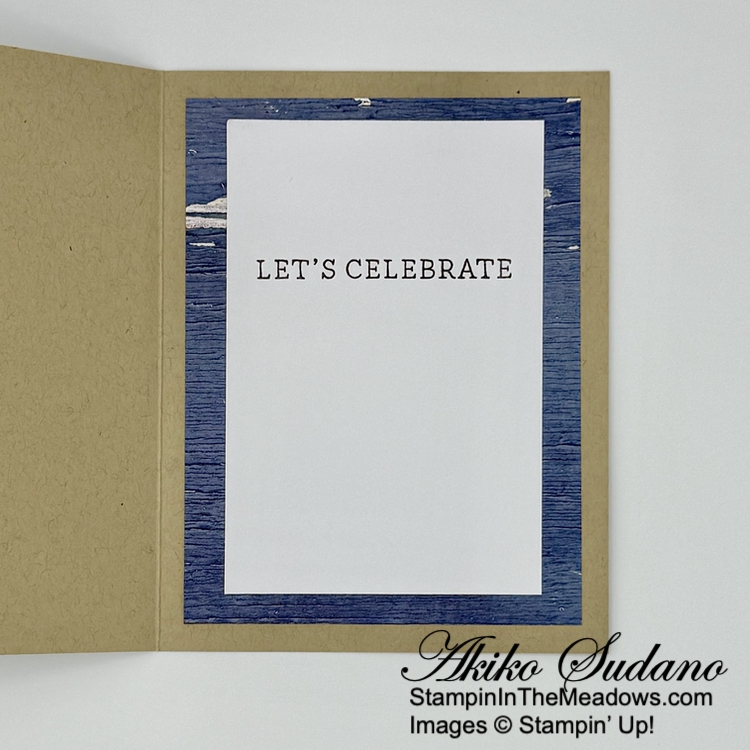
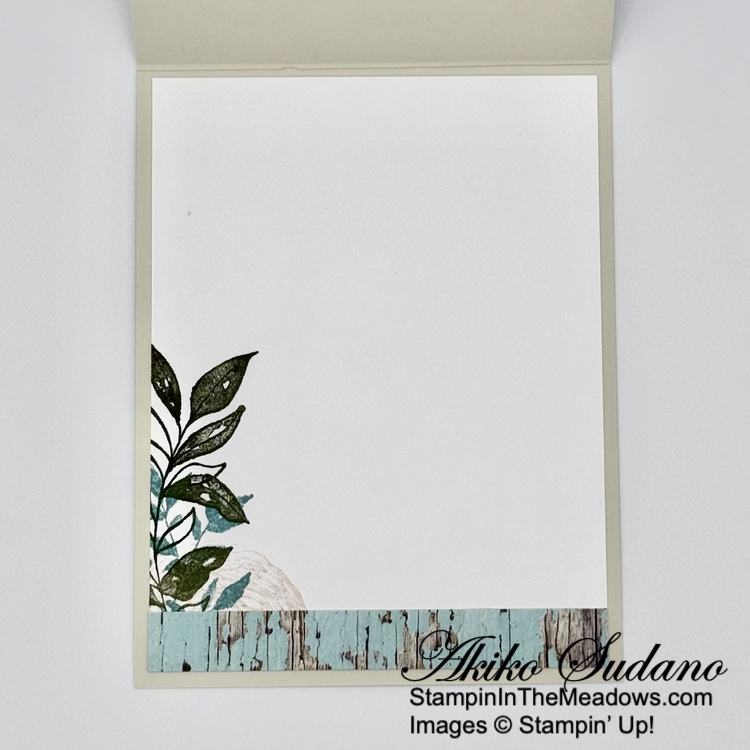
Adhere another Misty Moonlight pannel of the country Woods designer series paper to the inside of the card. Stamp the sentiment from the Stampin’ Up! Simply Said stamp set using early Espresso ink on a Basic White panel. Adhere the panel to the inside of the card with Stampin’ Seal.
Layering designer series paper on cards is easy when you use coordinating papers from the same designer series paper pack. And there are so many different card sketch ideas on the internet, Pinterest and even the Stampin’ Up! Catalogs to help you find the right layout.
Thanks so much for stopping by and Happy Stamping!!
Early Espresso – 2-1/8″ x 4-1/8″ (DSP mat), 1-5/8″ x 2-7/8″ (DSP mat), 1″ x 3″ (label mat)
Basic White – 3″ x 4-1/2″ (inside panel)
Country Woods DSP – two 3-3/4″ x 5″ panels (front background and inside mat), 2″ x 4″ (vertical panel), 1-1/2″ x 2-3/4″ (horizontal panel), 7/8″ x 2″ (label)
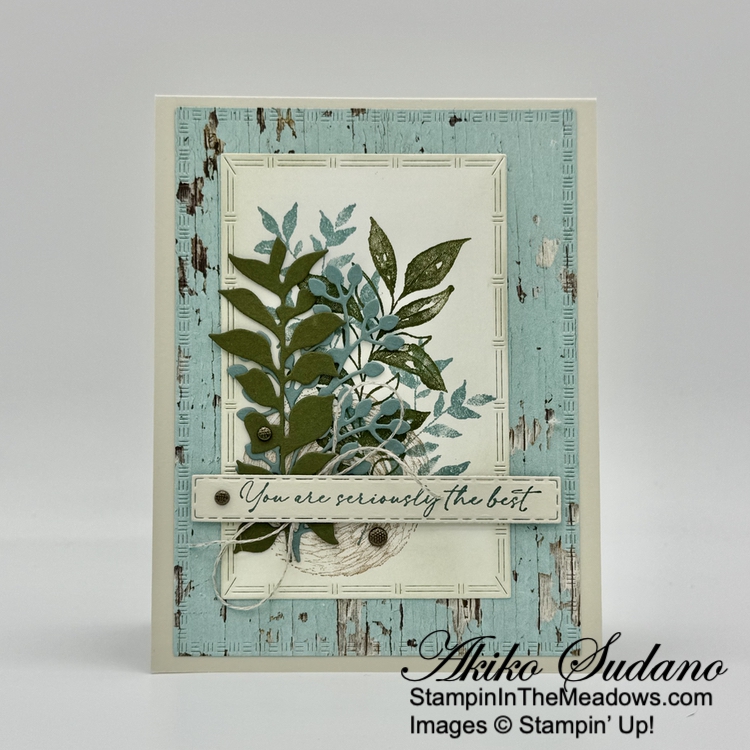
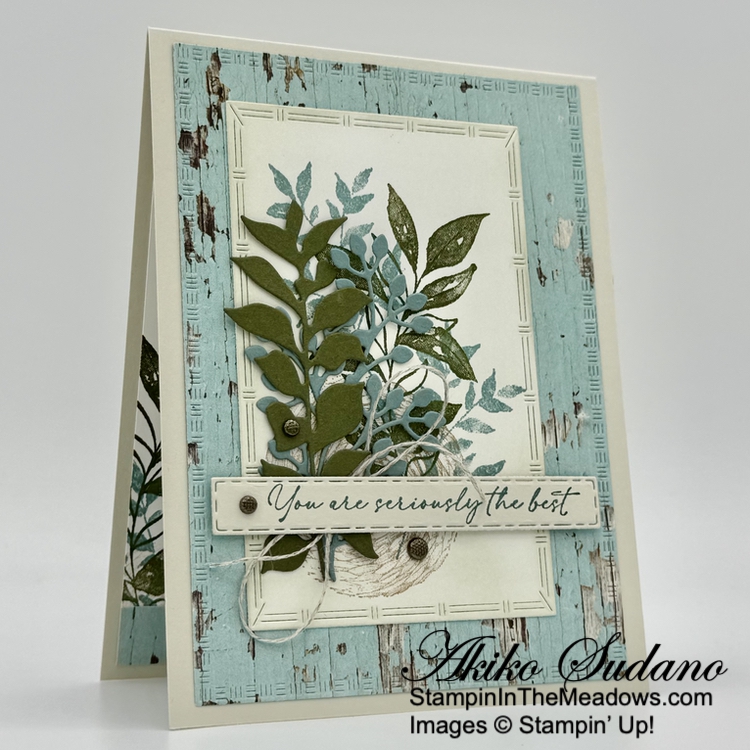
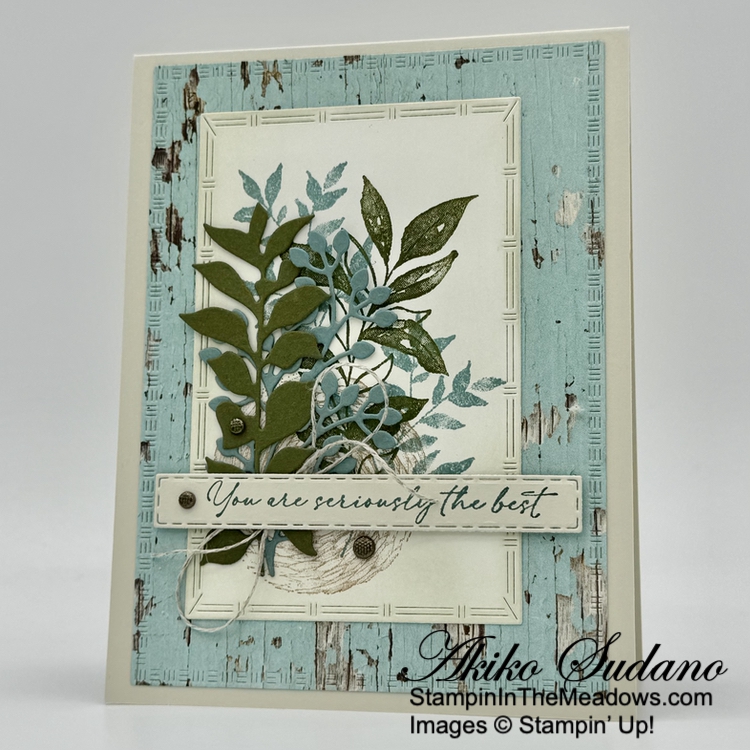
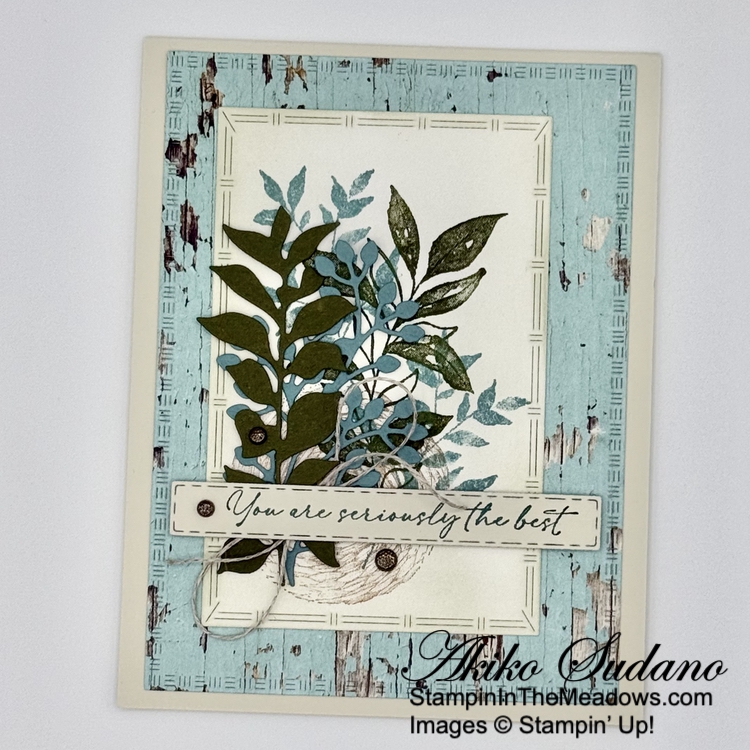
Good Morning! The Stampin’ Up! Textured Notes bundle is part of the new Online Exclusives release and has these wonderful bordered rectangle dies. I used the bundle with the pretty Country Woods designer series paper and the leaf sprig dies from the Textured Floral dies for today’s card. You can find the products I used at the bottom of my post along with the card stock sizes.
I used the large rectangle die from the Stampin’ Up! Textured Notes dies to cut a Pool Party panel of Country Woods designer series paper and adhered it to the front of a basic Beige card base with liquid glue.
I lightly applied Basic Beige ink to a Basic White panel with a blending brush to give it a little color and stamped the large leaf sprig from the Stampin’ Up! Textured Notes stamp set using Mossy Meadow ink. I stamped the round basket using Crumb Cake and I used Lost Lagoon to stamp the small leaf sprig twice. I cut the stamped image out with the third largest rectangle die and applied more Basic Beige ink to the edges. I adhered the panel to the card with liquid glue.
I cut the large leaf sprig die from the Textured Florals dies from Mossy Meadow and the small sprig from Lost Lagoon. I adhered the leaf sprigs to the card with glue dots. I stamped the sentiment from the Stampin’ Up! Textured Notes stamp set using Lost Lagoon ink on Basic Beige. I cut it out with the long skinny die and adhered a Linen Thread bow to the back before popping it on the card with dimensionals. I finished the card with textured metallic dots.
For the inside panel, I stamped the leaf sprigs and round basket from the Stampin’ Up! Textured Notes stamp set using the same colors as the card front on a Basic White panel. I trimmed the bottom with DSP and adhered it to the inside of the card with Stampin’ Seal.
The Stampin’ Up! Textured Notes bundle is wonderful for stamping textured collages and can be combined with images from other stamp sets, such as letters, graphic designs and naturals such as flowers and butterflies. I also think the leaves from the Textured Floral dies nicely coordinate with the stamped images in the stamp set. And I just love these new bordered rectangle dies!
If you need any stamping supplies, I’d be very happy to be your Demonstrator. Just click on the Shop Now Button on the right side of the screen to go directly to my Online store or contact me if you have any questions. Happy Stamping!
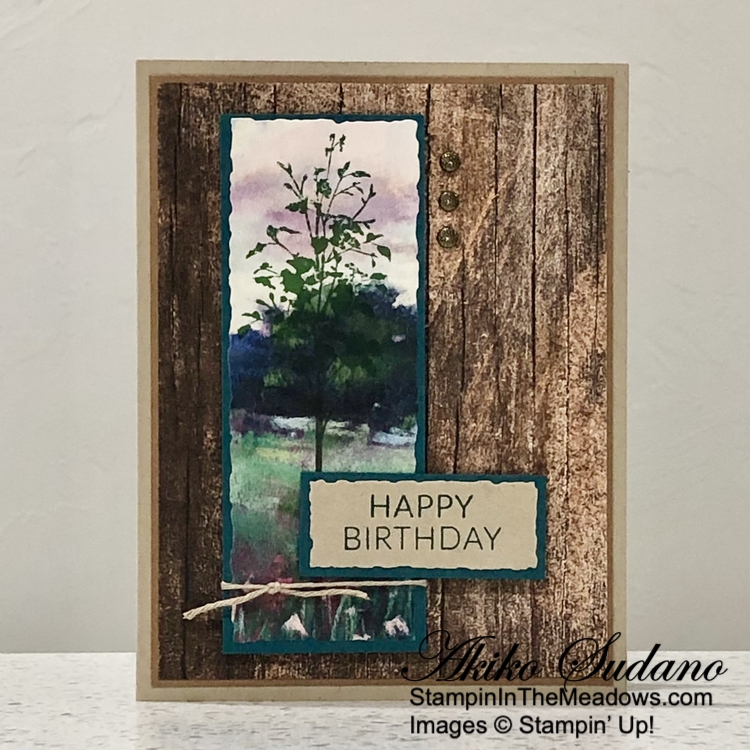
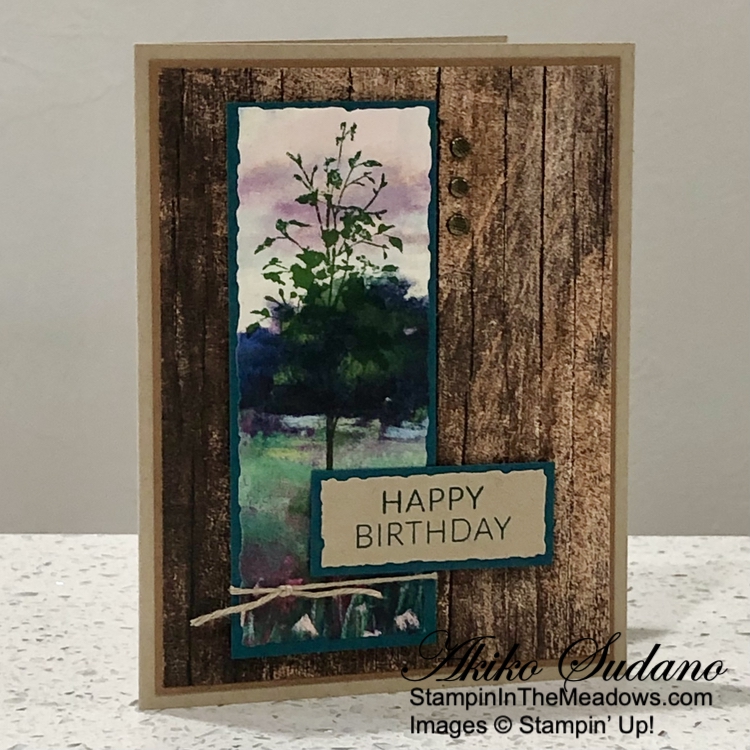
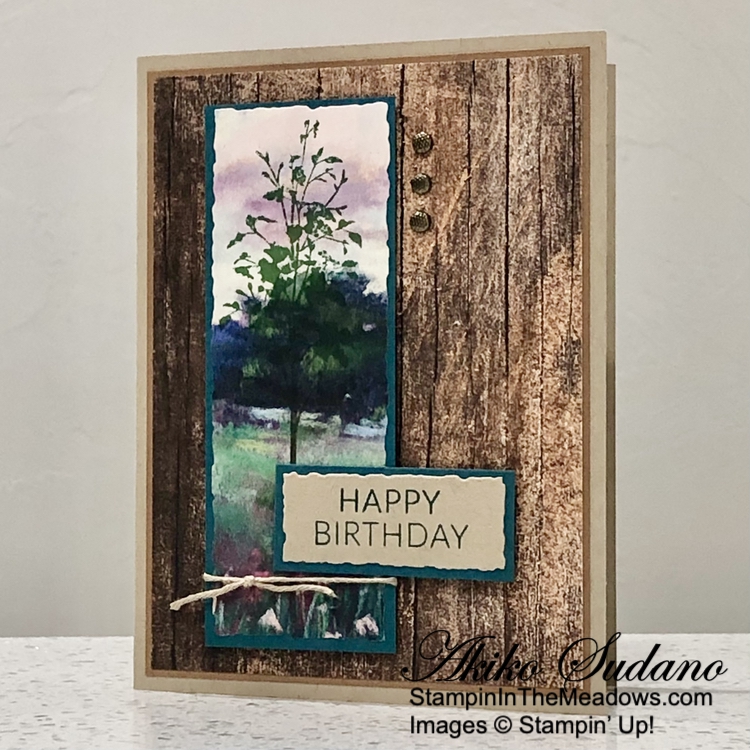
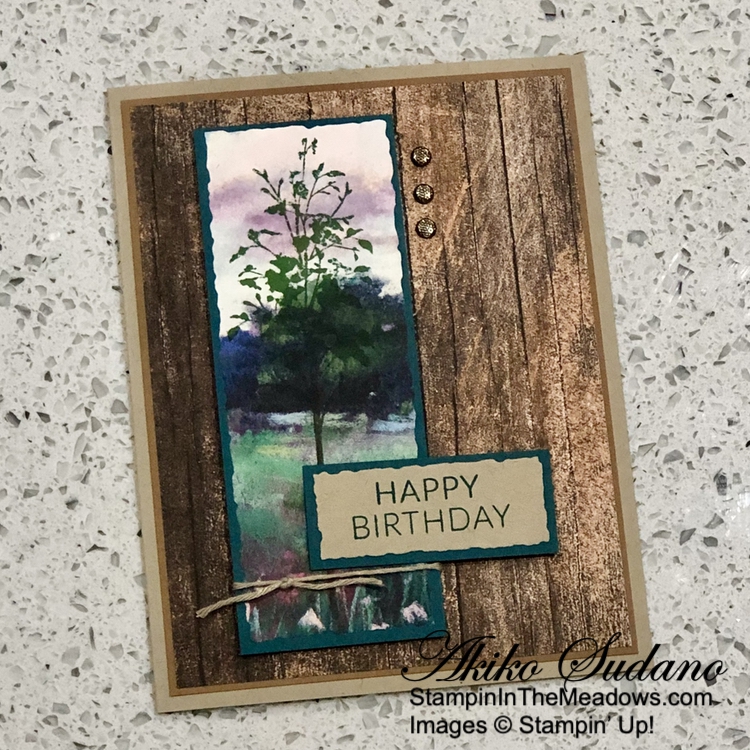
Good Morning! I used the Stampin’ Up! Delicate Forest stamp set with the Meandering Meadows and Country Woods designer series papers to make a masculine birthday card. The wood grain patterns look great with the watercolor woodland scenes! You can find the products I used at the bottom of my post along with the card stock sizes.
I adhered a panel of Country Woods designer series paper to a Pecan Pie mat and adhered them to the front of a Crumb Cake card base with liquid glue.
I stamped the tree from the Stampin’ Up! Delicate Forest stamp set in Garden Green and Early Espresso inks on a panel of Woodland Meadow 6″ x 6″ designer series paper. I cut it out with the Deckled Rectangle die using a two step method, so that it lets the stamped tree be the focal point. I adhered the die cut panel to a Pretty Peacock mat and wrapped it with Crumb Cake baker’s Twine and made a knot. I popped the panel on the card front with dimensionals.
I used the new Everyday Greetings and Greetings of the Season stamp sets to stamp the ‘Happy Birthday’ sentiment using Pretty Peacock ink on Crumb Cake card stock. I used the Deckled Rectangles dies to cut out the sentiment using a two step method and adhered it to a Pretty Peacock mat. I adhered the label to the card with dimensionals and glue dots. I finished the card with three textured metallic dots.
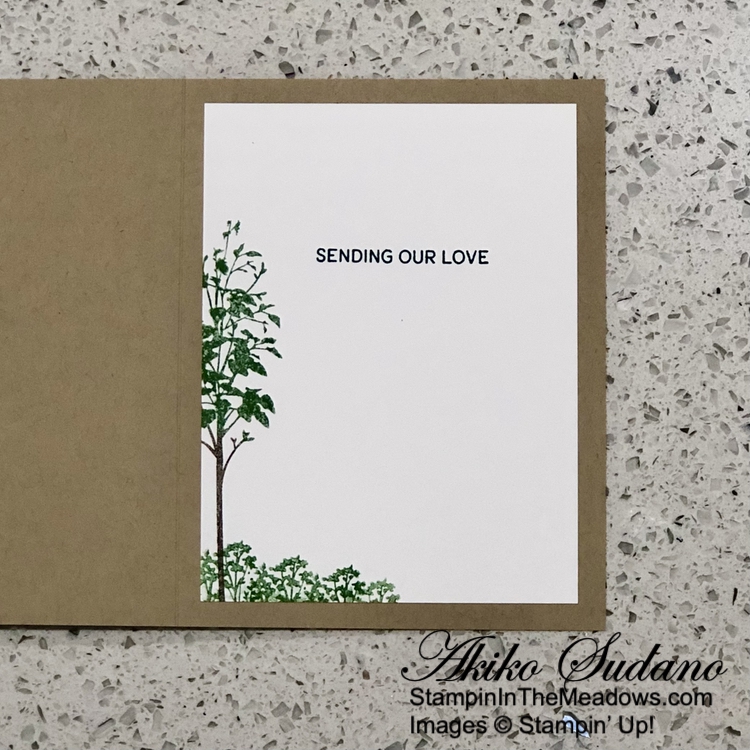
For the inside of the card I stamped the sentiment from the Stampin’ Up! Delicate Forest stamp set in Pretty Peacock ink on a Basic White panel. I inked up the tree stamp using Garden Green and Early Espresso inks and stamped it on the side. I used the small greenery stamp to stamp the brush on the bottom using Garden Green ink, both full strength and stamped off. I adhered the panel to the inside of the card with Stampin’ Seal.
Stamping on designer series paper is a fun technique and a great way to make it unique. The Stampin’ Up! Delicate Forest stamp set is pretty versatile and great for both Summer and Fall. And the coordinating dies are great as well!
Bonus Days Earning Period Ends Soon!
It’s time for one of our favorite promotions—BONUS DAYS! Because do you know what’s a great deal? Getting rewarded for all the crafting supplies you’re already going to buy! When you shop between July 3 and July 31, 2024 and spend $50 you will earn a $5 coupon! Make sure you save all your coupons because you can redeem them (and we mean ALL of them) between August 1 and August 31. There’s no limit to how many coupons you can earn!
Promotion Details:
Earning Period: July 3 – July 31 2024
Earn a $5 coupon for every $50 spent (before shipping and tax).
All coupon codes will be emailed right after a qualifying purchase has been made. Customers must have a customer account with a valid email address to earn coupons when they shop. If you don’t already have an account, you can easily create one in the Online store – contact me if you have any questions.
If you earn multiple codes from a single order, you will receive one email with multiple codes. If you earn multiple codes from multiple orders, you will receive separate emails for each code earned.
All order types qualify for this promotion. Phone and email orders still require an email address.
Orders started before the promotion begins will not count toward earning coupon codes. For example, if you add items to your cart before July 3 and wait to purchase until that date or later, then those items will not qualify towards earning coupons. You must add items to your cart and complete your purchase during the earning period.
There is no limit to the number of coupon codes participants can earn per order or throughout the duration of the earning period.
Customers must use a valid email address during checkout in order to receive their coupon code. If a customer places an order over the phone, they must still provide a valid email address to receive their coupon code.
Starter Kit orders are excluded from this offer.
Redemption Period: August 1 – August 31, 2024
There is no limit to the number of coupon codes you can redeem on an order during the redemption period. If using multiple codes, they must be separated by a space.
Coupon codes may be redeemed one time only. They cannot be redeemed after August 31, 2024.
Coupon codes may be redeemed for any product (excluding Starter Kits). They cannot be used on exchanges.
Bonus Days coupon codes can be applied to month-to-month Paper Pumpkin subscriptions and new prepaid subscriptions.
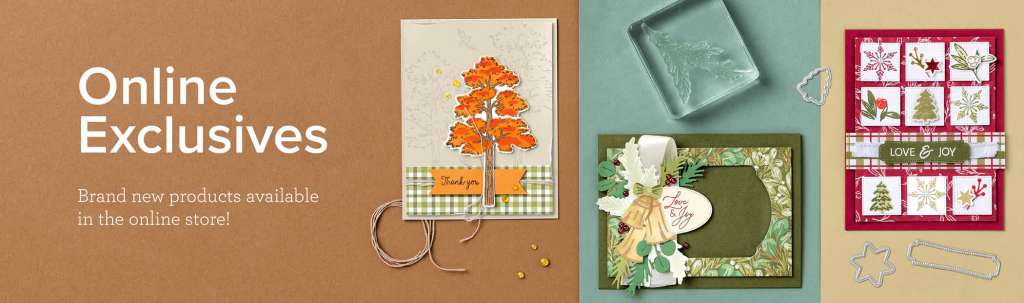
New Online Exclusives Available Now!
A new selection of Online Exclusive products was just introduced. Online Exclusives won’t appear in any catalog and are only available in the Online Store. There is no fixed end date for Online Exclusives! Some products will be reordered when inventory is low, and others will only be available while supplies last. This way Stampin’ Up! can offer even more new products throughout the year.
This release includes several items to get an early start on Fall and Christmas crafting. So check them out!
Current Host Code: DWUSFG7T
Use this host code when you order $50 or more and receive a Thank You gift from me! The free gift is your choice of any item currently available valued up to $10.00.
If your order is over $150, please do not use the host code since you’ll receive your own Host Dollars plus I’ll still send you the Thank You gift! This host code can be used by anyone, no club or commitment required. Let me know if you have any questions.
If you need any stamping supplies, I’d be very happy to be your Demonstrator. Just click on the Shop Now Button on the right side of the screen to go directly to my Online store or contact me if you have any questions. Happy Stamping!
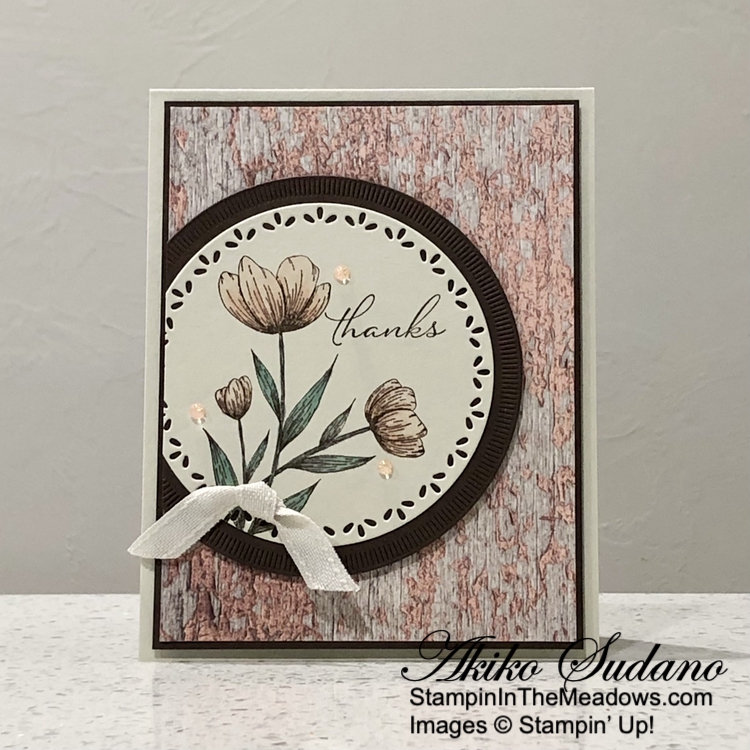
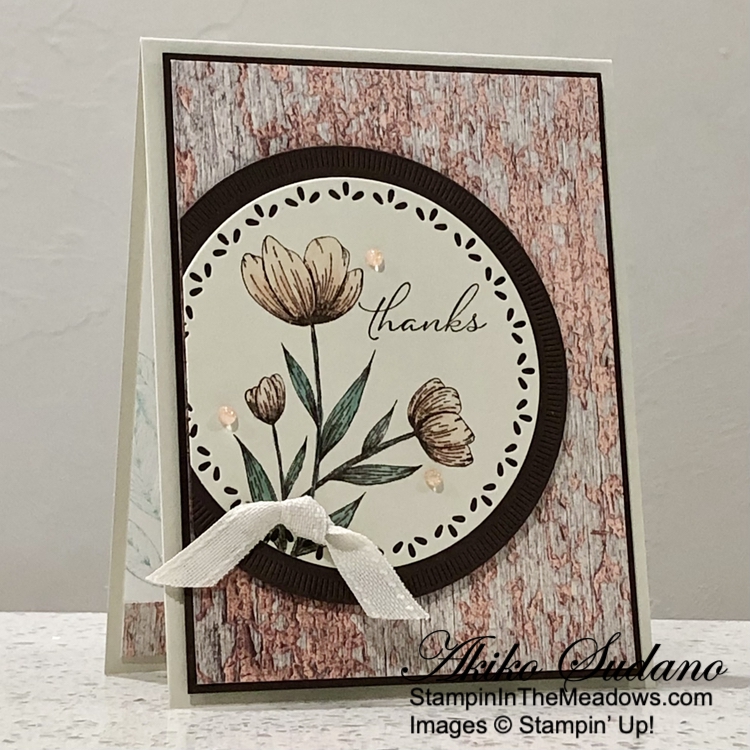
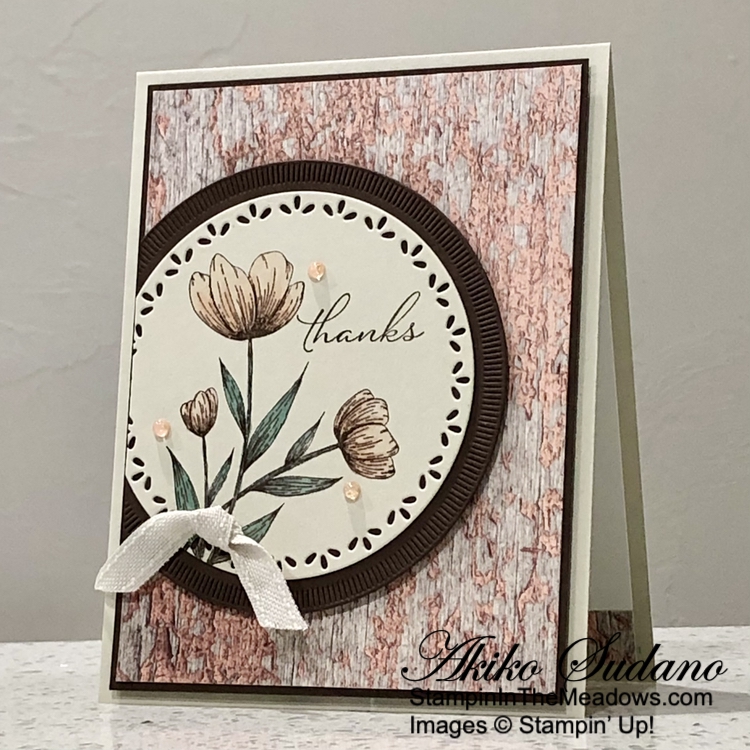
Good Morning! There are so many pretty bundles in the current Annual Catalog and one of my favorites is the Stampin’ Up! Spotlight On Nature bundle. With its simple and elegant images, beautiful sentiments and wonderful circle dies, it’s so easy to make pretty cards and I’ve paired it with the pretty Country Woods designer series paper for a thank you card. You can find the products I used at the bottom of my post along with the card stock sizes.
I adhered a panel of Country Woods designer series paper to an Early Espresso mat with liquid glue and popped it on the front of a Basic Beige card base.
I stamped the flowers from the Stampin’ Up! Spotlight On Nature stamp set in Early Espresso ink on Basic Beige. I stamped the sentiment in Early Espresso ink and cut it out with the eyelet circle die. I colored the flowers using Petal Pink Stampin’ Blends and the leaves with the Lost Lagoon Stampin’ Blends. I cut an Early Espresso panel with the radiating circle die and adhered the floral die cut to the Early Espresso die cut.
I trimmed the left side of the layered circles and popped them on the card with dimensionals. I tied a knot with a short length of Basic Beige ribbon and adhered it to the stems with a glue dot. I finished the card with three Petal Pink dots.
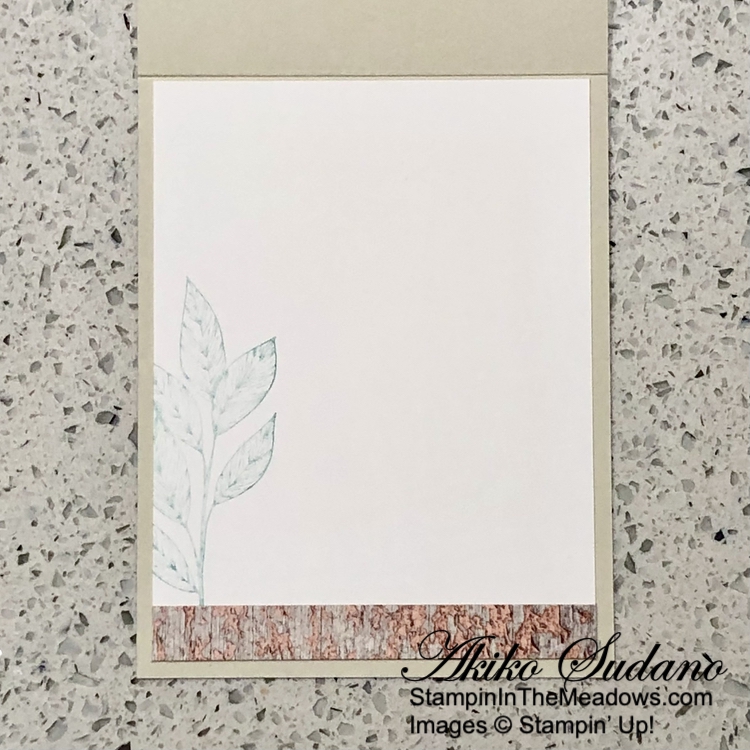
For the inside of the card I stamped the leaf cluster from the Stampin’ Up! Spotlight On Nature stamp set in stamped off Lost Lagoon ink on a Basic White panel. I trimmed the bottom with a strip of DSP and adhered the panel to the inside of the card with Stampin’ Seal.
The graceful flowers in the Stampin’ Up! Spotlight on Nature stamp set are really pretty and easy to color and the sentiments are wonderful. And the different styles of the circle dies are fabulous and perfect for layering.
Bonus Days Going On Now!
It’s time for one of our favorite promotions—BONUS DAYS! Because do you know what’s a great deal? Getting rewarded for all the crafting supplies you’re already going to buy! When you shop between 3–31 July and spend $50 you will earn a $5 coupon! Make sure you save all your coupons because you can redeem them (and we mean ALL of them) between August 1 and August 31. There’s no limit to how many coupons you can earn!
Promotion Details:
Earning Period: July 3 – July 31 2024
Earn a $5 coupon for every $50 spent (before shipping and tax).
All coupon codes will be emailed right after a qualifying purchase has been made. Customers must have a customer account with a valid email address to earn coupons when they shop. If you don’t already have an account, you can easily create one in the Online store – contact me if you have any questions.
If you earn multiple codes from a single order, you will receive one email with multiple codes. If you earn multiple codes from multiple orders, you will receive separate emails for each code earned.
All order types qualify for this promotion. Phone and email orders still require an email address.
Orders started before the promotion begins will not count toward earning coupon codes. For example, if you add items to your cart before July 3 and wait to purchase until that date or later, then those items will not qualify towards earning coupons. You must add items to your cart and complete your purchase during the earning period.
There is no limit to the number of coupon codes participants can earn per order or throughout the duration of the earning period.
Customers must use a valid email address during checkout in order to receive their coupon code. If a customer places an order over the phone, they must still provide a valid email address to receive their coupon code.
Starter Kit orders are excluded from this offer.
Redemption Period: August 1 – August 31, 2024
There is no limit to the number of coupon codes you can redeem on an order during the redemption period. If using multiple codes, they must be separated by a space.
Coupon codes may be redeemed one time only. They cannot be redeemed after August 31, 2024.
Coupon codes may be redeemed for any product (excluding Starter Kits). They cannot be used on exchanges.
Bonus Days coupon codes can be applied to month-to-month Paper Pumpkin subscriptions and new prepaid subscriptions.
Current Host Code: XQZKDQU9
Use this host code when you order $50 or more and receive a Thank You gift from me! The free gift is your choice of any item currently available valued up to $10.00.
If your order is over $150, please do not use the host code since you’ll receive your own Host Dollars plus I’ll still send you the Thank You gift! This host code can be used by anyone, no club or commitment required. Let me know if you have any questions.
If you need any stamping supplies, I’d be very happy to be your Demonstrator. Just click on the Shop Now Button on the right side of the screen to go directly to my Online store or contact me if you have any questions. Happy Stamping!
Good Morning and welcome to the Happy Inkin’ Thursday Blog Hop! I finally got to play with the pretty Stampin’ Up! Country Birdhouse bundle and made this sweet hello card. You can find the supplies I used along with card stock cuts at the bottom of my post.
We have a pretty color challenge this week and I think I used all the colors:
I embossed a strip of Country Lace designer series paper with the Eyelet 3D embossing folder and adhered it to another panel of Country Lace DSP. I adhered the layered panel to the front of a Basic Beige card base with liquid glue. I used the Stampin’ Up! Country Birdhouse dies to cut out different panels of Country Woods DSP to make the birdhouse. I used liquid glue to adhere the die cuts together and adhered the birdhouse to the card with dimensionals.
I stamped the bird and flowers from the Stampin’ Up! Country Birdhouse stamp set in Memento Tuxedo Black ink on Basic White. I colored the bird with light Boho Blue and light Petal Pink Stampin’ Blends and I used Flirty Flamingo, Peach Pie, dark Daffodil Delight and light Lemon Lime Twist Stampin’ Blends to color the flowers. I cut out the birds and floweers with the coordinating dies. I also die cut some leaves and a flower from Basic White and colored them with light Lemon Lime Twist and Light Boho Blue Stampin’ Blends.
I stamped the sentiment from the Stampin’ Up! Country Birdhouse stamp set. in Misty Moonlight ink on a Basic Beige panel. I used one of the new tag dies from the upcoming Greetings of the Season dies (available July 3) to cut it out. I colored a length of Linen Trhead with the light Misty Moonlight Stampin’ Blend and looped it through the hole, tying a knot. I adhered it to the card with glue dots and dimensionals. I adhered the bird to and flowers to the card with glue dots and dimensionals and finished with metallic textured dots.
For the inside of the card, I stamped the flower bouquet from the Stampin’ Up! Country Birdhouse stamp set across the bottom of a Basic White panel using Memento Tuxedo Black ink. I colored the flowers like the flowers on the front and adhered the panel to the inside of the card with Stampin’ Seal.
The die cut birdhouse from the Stampin’ Up! Country Birdhouse bundle is really wonderful and fun to make. And the sweet images and pretty sentiments make this a pretty versatile bundle.
On with the Hop! Click on the Next Blog button to move forward to see the beautiful project Karen Ksenzakovichas created.
If you get lost along the way, here are the participants for the hop:
![Simply Said Mix & Match Photopolymer Stamp Set (English) [ 163756 ]](https://assets1.tamsnetwork.com/images/EC042017NF/163756s.jpg "Simply Said Mix & Match Photopolymer Stamp Set (English) [ 163756 ]")
![Country Woods 12" X 12" (30.5 X 30.5 Cm) Designer Series Paper [ 163393 ]](https://assets1.tamsnetwork.com/images/EC042017NF/163393s.jpg "Country Woods 12\" X 12\" (30.5 X 30.5 Cm) Designer Series Paper [ 163393 ]")
![Crumb Cake 8-1/2" X 11" Cardstock [ 120953 ]](https://assets1.tamsnetwork.com/images/EC042017NF/120953s.jpg "Crumb Cake 8-1/2\" X 11\" Cardstock [ 120953 ]")
![Early Espresso 8-1/2" X 11" Cardstock [ 119686 ]](https://assets1.tamsnetwork.com/images/EC042017NF/119686s.jpg "Early Espresso 8-1/2\" X 11\" Cardstock [ 119686 ]")
![Basic White 8 1/2" X 11" Cardstock [ 166780 ]](https://assets1.tamsnetwork.com/images/EC042017NF/166780s.jpg "Basic White 8 1/2\" X 11\" Cardstock [ 166780 ]")
![Versamark Pad [ 102283 ]](https://assets1.tamsnetwork.com/images/EC042017NF/102283s.jpg "Versamark Pad [ 102283 ]")
![Early Espresso Classic Stampin' Pad [ 147114 ]](https://assets1.tamsnetwork.com/images/EC042017NF/147114s.jpg "Early Espresso Classic Stampin' Pad [ 147114 ]")
![Baker's Twine Essentials Pack [ 155475 ]](https://assets1.tamsnetwork.com/images/EC042017NF/155475s.jpg "Baker's Twine Essentials Pack [ 155475 ]")
![Basics Wow! Embossing Powder [ 165679 ]](https://assets1.tamsnetwork.com/images/EC042017NF/165679s.jpg "Basics Wow! Embossing Powder [ 165679 ]")
![Multipurpose Liquid Glue [ 110755 ]](https://assets1.tamsnetwork.com/images/EC042017NF/110755s.jpg "Multipurpose Liquid Glue [ 110755 ]")
![Stampin' Dimensionals [ 104430 ]](https://assets1.tamsnetwork.com/images/EC042017NF/104430s.jpg "Stampin' Dimensionals [ 104430 ]")
![Mini Glue Dots [ 103683 ]](https://assets1.tamsnetwork.com/images/EC042017NF/103683s.jpg "Mini Glue Dots [ 103683 ]")
![Stampin' Seal [ 152813 ]](https://assets1.tamsnetwork.com/images/EC042017NF/152813s.jpg "Stampin' Seal [ 152813 ]")
![Stampin' Cut & Emboss Machine [ 149653 ]](https://assets1.tamsnetwork.com/images/EC042017NF/149653s.jpg "Stampin' Cut & Emboss Machine [ 149653 ]")

")


")
")
")

 Designer Series Paper")


 Bordered Ribbon")


