Stampin’ Up! Flowers of Beauty Love Card

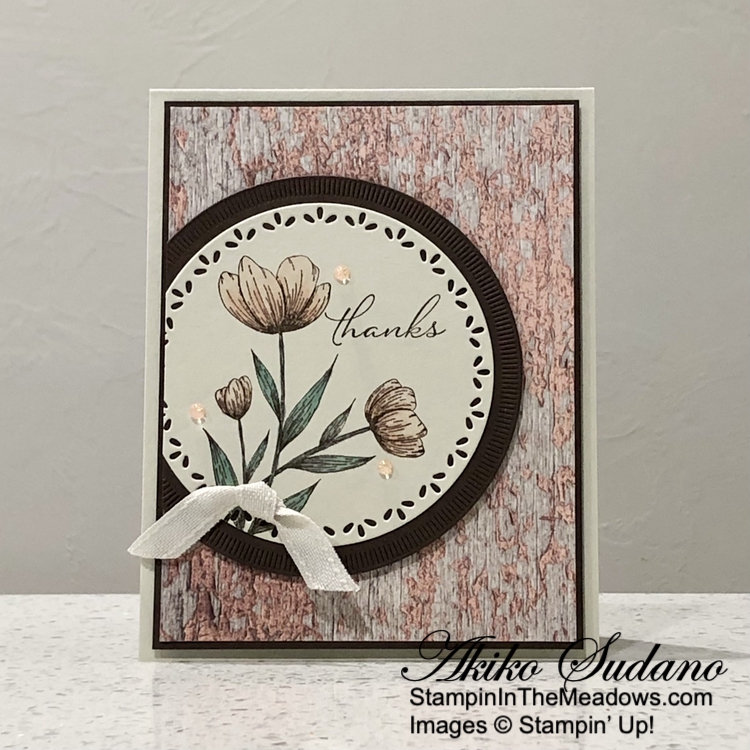
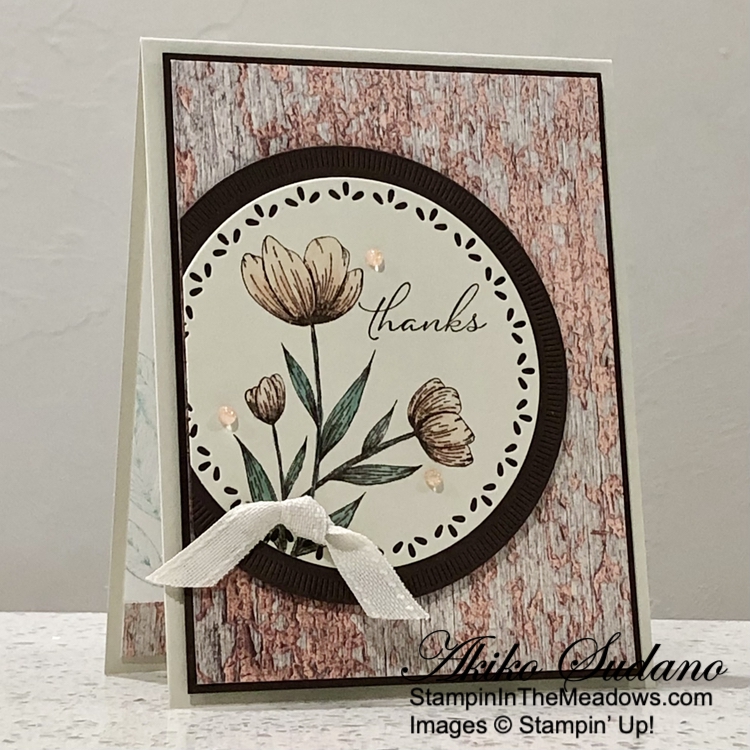
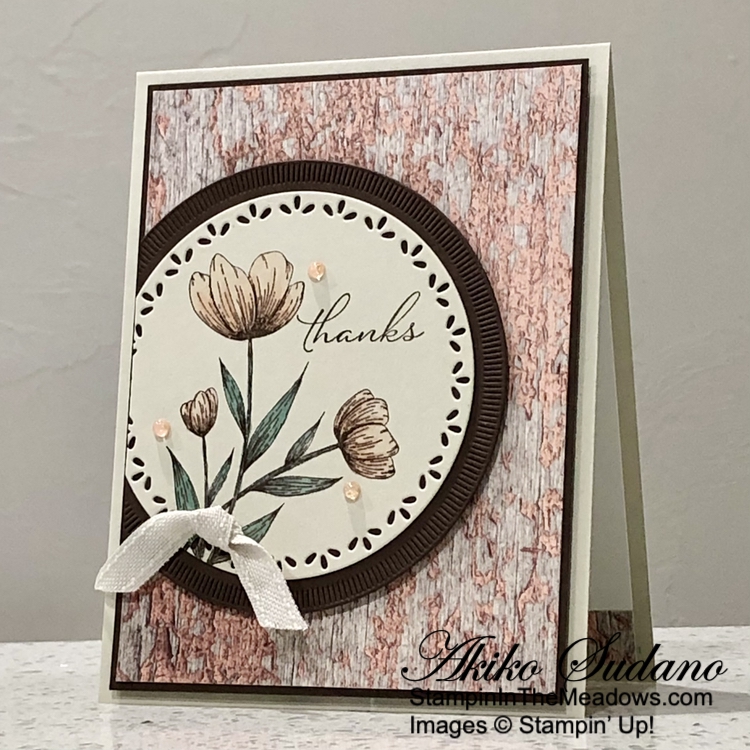
Good Morning! Here’s a simple fun fold Love card using the Stampin’ Up! Flowers Of Beauty bundle with the Wildly Flowering designer series paper. I also used the beautiful Unbounded Love bundle to make the pretty layered sentiment label. You can find the products I used at the bottom of my post along with the card stock sizes.

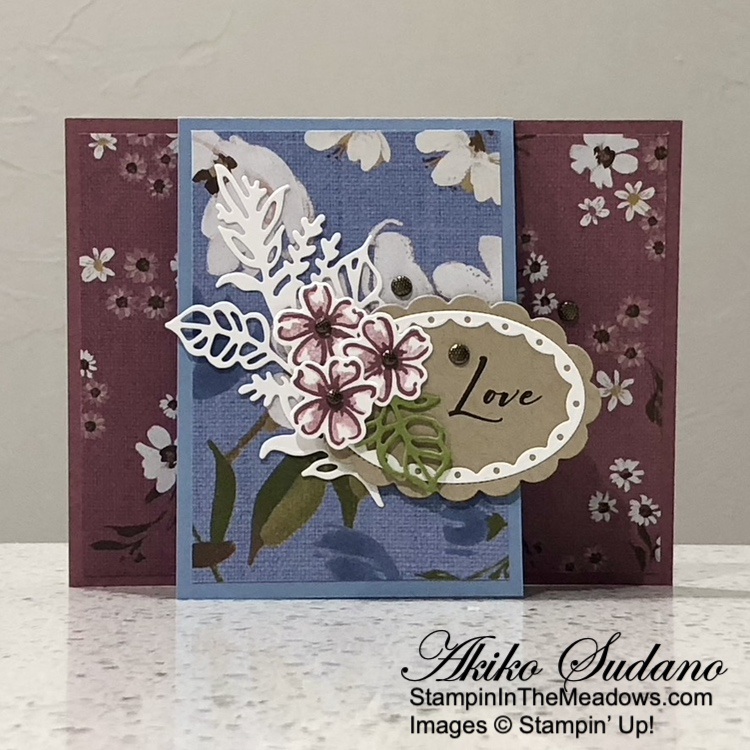
I adhered a panel of Wildly Flowering designer series paper to Moody Mauve card base and another panel to the front of the Boho Blue mini card base. I adhered the mini card to thelarger card base with Tear & Tape. I cut a Basic White panel with the foliage die from the Stampin’ Up! Flowers Of Beauty dies and adhered it to the mini card base with glue dots.

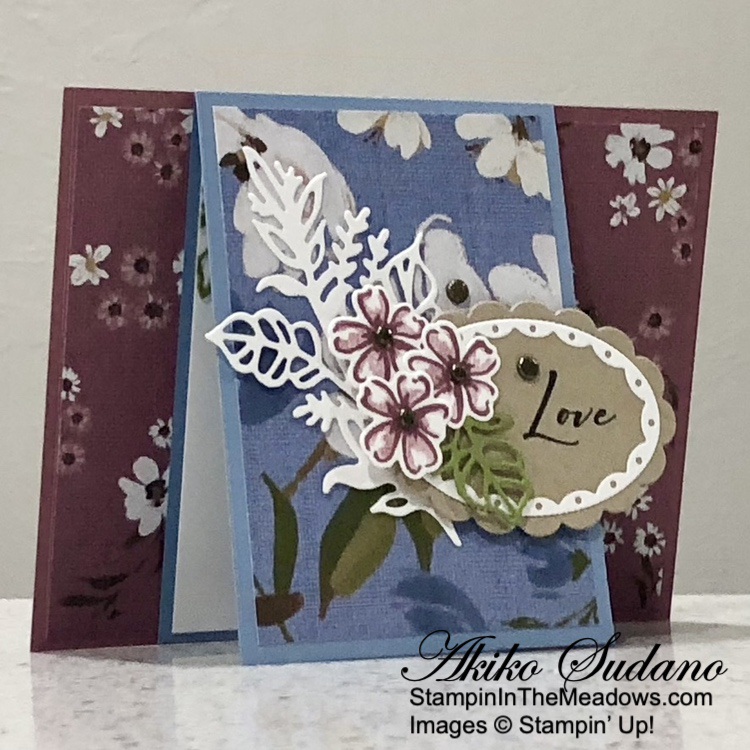
I stamped the sentiment from the Unbounded Love stamp set on the right side of the Crumb Cake panel using Early Espresso ink and cut it out with the scalloped oval die. I cut a Basic White panel with the small scalloped oval die and adhered it to the label with liquid glue. I adhered the layered oval die cuts to the right side of the mini card base with dimensionals.

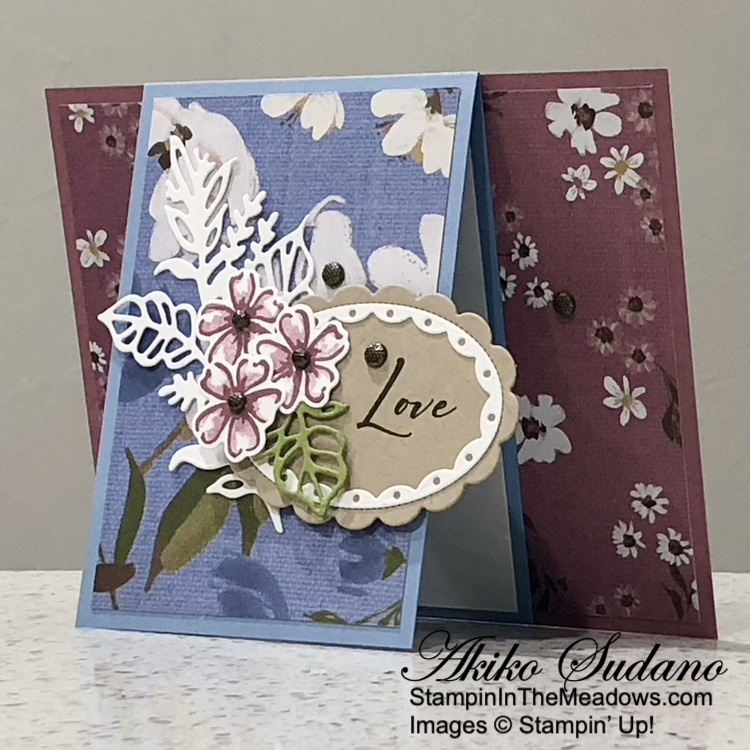
I stamped The small flower outline stamp from the Stampin’ Up! Flowers Of Beauty stamp set four times using Moody Mauve ink on Basic White.   I stamped the filler die on each flower using stamped off Moody Mauve ink and cut the flowers out with the coordinating die.  I used the small leaf die from the Unbounded Love dies to cut two leaves from Old Olive. I adhered one leaf to label with liquid glue and adhered three flowers with glue dots and dimensionals. I finished the cars with textured dots.

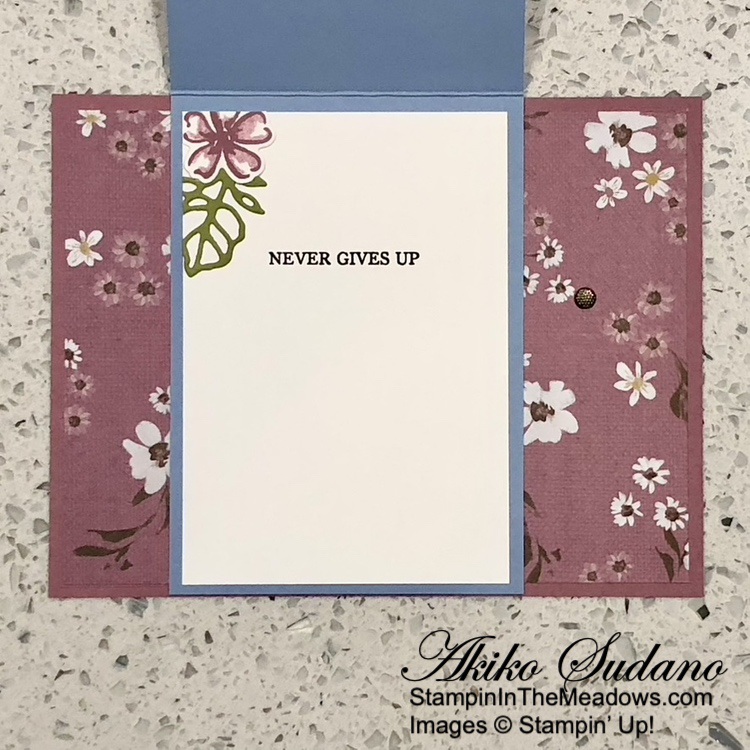
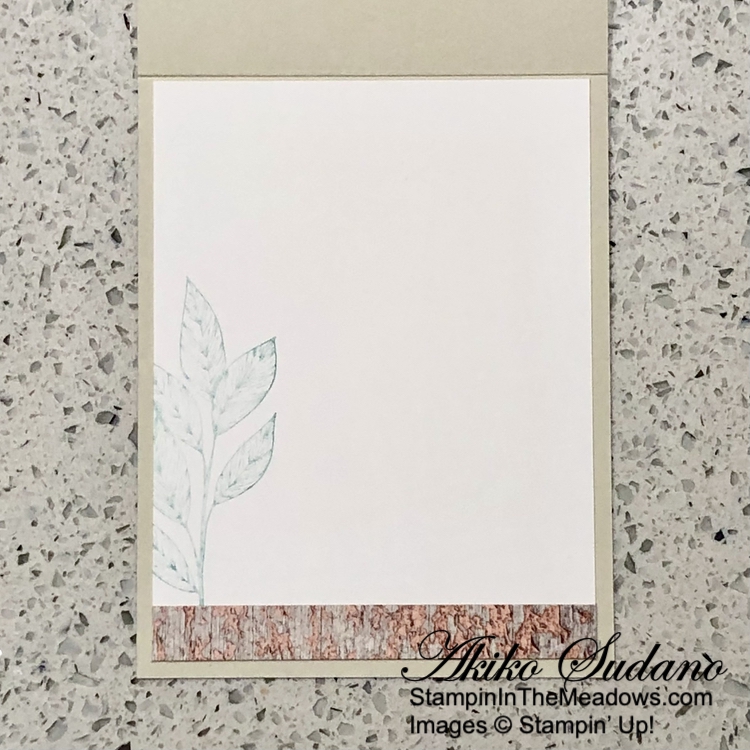
For the inside of the card I adhered the die cut flower and leaf to a Basic White panel. I stamped the sentiment from the Unbounded Love stamp set using Early Espresso ink and adhered the panel to the inside of the mini card with Stampin’ Seal.

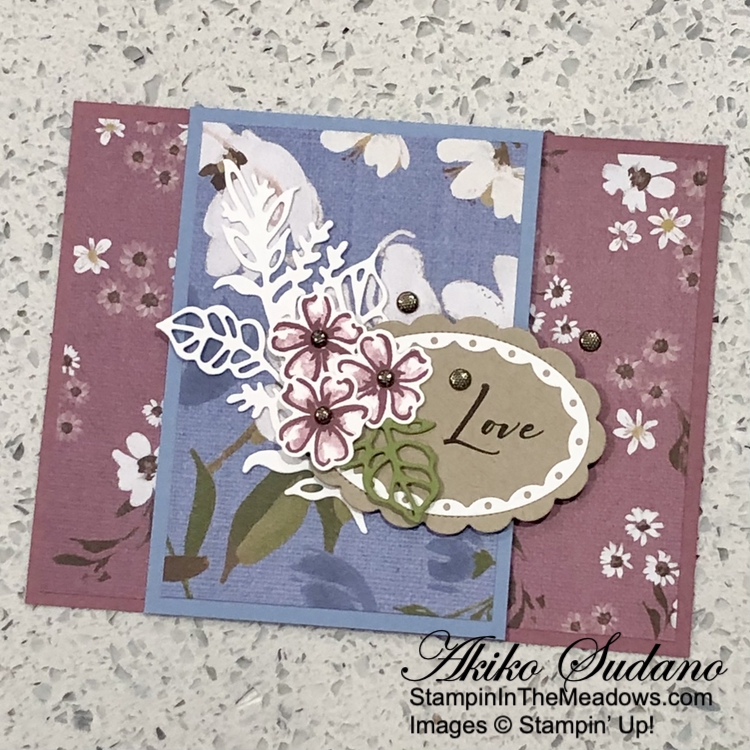
I love the vintage feel of the Wildly flowering DSP. So I wanted to use it with the Stampin’ Up! Flowers Of Beauty stamp set. And I love it with the pretty scalloped label from the Unbounded Love bundle!


Bonus Days Going On Now!

It’s time for one of our favorite promotions—BONUS DAYS! Because do you know what’s a great deal? Getting rewarded for all the crafting supplies you’re already going to buy! When you shop between 3–31 July and spend $50 you will earn a $5 coupon! Make sure you save all your coupons because you can redeem them (and we mean ALL of them) between August 1 and August 31. There’s no limit to how many coupons you can earn! 

Promotion Details:

Earning Period: July 3 – July 31 2024

  • Earn a $5 coupon for every $50 spent (before shipping and tax). 
  • All coupon codes will be emailed right after a qualifying purchase has been made. Customers must have a customer account with a valid email address to earn coupons when they shop. If you don’t already have an account, you can easily create one in the Online store – contact me if you have any questions. 
  • If you earn multiple codes from a single order, you will receive one email with multiple codes. If you earn multiple codes from multiple orders, you will receive separate emails for each code earned.
  • All order types qualify for this promotion. Phone and email orders still require an email address.
  • Orders started before the promotion begins will not count toward earning coupon codes. For example, if you add items to your cart before July 3 and wait to purchase until that date or later, then those items will not qualify towards earning coupons. You must add items to your cart and complete your purchase during the earning period. 
  • There is no limit to the number of coupon codes participants can earn per order or throughout the duration of the earning period. 
  • Customers must use a valid email address during checkout in order to receive their coupon code. If a customer places an order over the phone, they must still provide a valid email address to receive their coupon code.
  • Starter Kit orders are excluded from this offer.

Redemption Period: August 1 – August 31, 2024

  • There is no limit to the number of coupon codes you can redeem on an order during the redemption period. If using multiple codes, they must be separated by a space. 
  • Coupon codes may be redeemed one time only. They cannot be redeemed after August 31, 2024.
  • Coupon codes may be redeemed for any product (excluding Starter Kits). They cannot be used on exchanges.
  • Bonus Days coupon codes can be applied to month-to-month Paper Pumpkin subscriptions and new prepaid subscriptions.

Current Host Code: XQZKDQU9

Use this host code when you order $50 or more and receive a Thank You gift from me!  The free gift is your choice of any item currently available valued up to $10.00.

If your order is over $150, please do not use the host code since you’ll receive your own Host Dollars plus I’ll still send you the Thank You gift!  This host code can be used by anyone, no club or commitment required. Let me know if you have any questions.


If you need any stamping supplies, I’d be very happy to be your Demonstrator.  Just click on the Shop Now Button on the right side of the screen to go directly to my Online store or contact me if you have any questions.  Happy Stamping!

Thanks for stopping by and have a great day!

Akiko

  • Visit my online store here
  • See the current Stampin’ Up! clearance rack specials here
  • Earn FREE Stampin’ Up! products through my Wildflower Frequent Shopper Program – my way of saying thank you to my online frequent shopper customers.
  • Have any questions? I’d be happy to help, click here to contact me.

Cardstock Cuts for this project:

  • Moody Mauve – 4-1/4″ x 5-1/2″ card base
  • Boho Blue – 3″ x 8-1/2″ mini card base, scored at 4-1/4″
  • Crumb Cake – 2″ x 3 (label)
  • Old Olive – 1″ x 3″ (die cut leaves)
  • Basic White – 2-3/4″ x 4″ (inside panel), 2-1/4″ x 3-1/2″ (die cut foliage), 1-3/4″ x 2-1/2″ (scalloped oval trim), 1-1/4″ x 4-1/2″ (die cut flowers)
  • Wildly Flowering DSP – 4″ x 5-1/4″ (front background), 2-3/4″ x 4″ (mini card background)

Stampin’ Up! products used in this project:


Stampin’ Up! Simply Zinnia for the Inkin’ Krew Blog Hop

Good Morning! Welcome to the May Inkin’ Krew Team Blog Hop! The theme for this month’s hop is “Fun Fold” and I used the pretty Stampin’ Up! Simply Zinnia bundle and the Flowering Zinnias designer series paper to make an accordion Birthday Card with a belly band. You can find the supplies I used along with card stock cuts at the bottom of my post.

I adhered panels of Flowering Zinnias designer series paper to the front folds of the Melon Mambo accordion card base with liquid glue. This card base is 4″ wide (rather than 4-1/4″) and fits better in the standard envelope with the belly band.

For my belly band panel, I cut a circle from Old Olive using the Spotlight On Nature dies. I cut three sets of zinnia petals (two small and one large) from Real Red and centers from Pumpkin Pie and Daffodil Delight using the Stampin’ Up! Simply Zinnia dies. I assembled the zinnia, adhering it with liquid glue and adhered three leaves to the back – two Mossy Meadow and one Lemon Lime Twist.

I stamped the sentiment from the Unbounded Love stamp set in Old Olive on Basic White and cut it out with the small rectangle die. I used the large rectangle die to cut a mat from Melon Mambo and adhered it to the back of the sentiment. I adhered the label to the die cut circle and adhered the zinnia on top with glue dots. I adhered a panel of Flowering Zinnias DSP to a Melon Mambo strip to make the belly band. I loosely wrapped it around the card so it would slide and secured the ends with Tear-N-Tape. I used glue dots to adhere the decorated circle to the belly band.

I cut the two zinnia bud dies from the Stampin’ Up! Simply Zinnia dies from Real Red and the small stem and leaves from Old Olive. I adhered them with glue dots and adhered them to a die cut circle using the Spotlight on Nature dies. I adhered the decorated die cut circle to the first middle panel with liquid glue.

I stamped the sentiment from the Unbounded Love stamp set in Melon Mambo ink on Basic White and cut it out with the Spotlight on Nature die. I cut small flowers from scraps using the die from the Stampin’ Up! Simply Zinnia dies and adhered them with liquid glue. I adhered the panel to the second middle panel with liquid glue.

For the inside of the card, I stamped the sentiment from the Unbounded Love stamp set in Melon Mambo ink on the left side of a Basic White panel and adhered the last strip of Flowering Zinnias DSP to the right side. I adhered the layered panel to the back panel of the card.

Belly band cards are so fun and special, especially for a birthday. The beautiful die cut flowers from the Stampin’ Up! Simply Zinnia bundle are awesome for decorating a belly band. And it’s wonderful to see all the beautiful papers from the Flowering Zinnias designer series paper on a card!

On With The Hop! Click on the Next Blog button to move forward to Karen Ksenzakovic’s project or click the Previous Blog button to move back to see the project that Karen Finkle created.

If you get lost along the way, here are the participants for the hop:


Current Host Code: SSMUTY4A

Use this host code when you order $50 or more and receive a Thank You gift from me!  The free gift is your choice of any currently available item valued up to $10.00.

If your order is over $150, please do not use the host code since you’ll receive your own Host Dollars plus I’ll still send you the Thank You gift!  This host code can be used by anyone, no club or commitment required. Let me know if you have any questions.


If you need any stamping supplies, I’d be very happy to be your Demonstrator.  Just click on the Shop Now button on the right side of the screen to go directly to my online store or contact me if you have any questions.  Happy Stamping!

Thanks for stopping by and have a great week!

Akiko

  • Visit my online store here
  • See the current Stampin’ Up! clearance rack specials here
  • Earn FREE Stampin’ Up! products through my Wildflower Frequent Shopper Program – my way of saying thank you to my online frequent shopper customers.
  • Have any questions? I’d be happy to help, click here to contact me.

Cardstock Cuts for this project:

  • Melon Mambo – 5-1/2″ x 11″ card base, scored at 1-1/2″ (valley), 4-1/4″ (mountain), and 7″ (valley), 1-1/4″ x 10″ (belly band), 1-3/4″ x 2-1/2″ (label)
  • Mossy Meadow – 2″ x 4″ (die cut leaves)
  • Real Red – 2-1/4″ x ” (die cut zinnia), 1″ x 1-1/2″ (die cut small bud)
  • Daffodil Delight – 1″ x 1″ (flower center)
  • Pumpkin Pie – 1″ x 1″ (flower center)
  • Lemon Lime Twist – 1″ x 2″ (die cut leaf)
  • Old Olive – 3″ x 3″ (belly band circle)
  • Basic White – 3-3/4″ x 5-1/4″ (inside panel), 1-1/2″ x 2-1/4″ (label), 2-1/2″ x 5″ (die cut circles)
  • Flowering Zinnias DSP DSP – 1″ x 10″ (belly Band), three 1-1/4″ x 5-1/4″ panels two 2-3/4″ x 5-1/4″ panels

Stampin’ Up! products used in this project:

Stampin’ Up! Round We Go Celebrate Card

Good Morning! The Stampin’ Up! Round We Go bundle is such a fun set that includes a die to make a 3D rosette and other fun circle themed stamps and dies. And it also includes great sentiments in an energetic fun font that are perfect for any kind of celebration, including birthdays. I made a general purpose celebrate card that could be used for any fun occasion. You can find the products I used at the bottom of my post along with the card stock sizes.

I adhered a panel of Bright and Beautiful 6″ x 6″ designer series paper to the front of an Azure Afternoon card base with liquid glue. I cut another panel with the 3D rosette die from the Stampin’ Up! Round We Go dies twice, lining up the DSP design so it would be similar all around. I folded the rosettes on the score lines and adhered the end tabs of the rosette die cuts to the underside of the opposite rosette die cut using liquid glue. I flattened the rosette and used lots of liquid glue to adhere it to an Azure Afternoon die cut scalloped circle.

I used the curved edge petal die from the Stampin’ Up! Round We Go dies to cut two Azure Afternoon and one Bubble Bath petals. I used the angle edge petal die to cut a Berry Burst and Lemon Lime Twist petals. I adhered one of the Azure Afternoon petals to the rosette with liquid glue and the other to the Lemon Lime Twist petal. I adhered the Bubble Bath petal to the Berry Burst Petal. I finished the rosette with a medium circle cut from Pretty Peacock. I arranged the rosette and petal circles on the card and adhered them with glue dots.

I stamped the sentiment from the Stampin’ Up! Round We Go stamp set in Berry Burst ink on a Basic White strip and cut it out with the long skinny die from the Stylish Shapes dies. I adhered the label to the card with glue dots. I used Rainbow gems in each circle and scattered some more around the card front.

For the inside of the card I stamped the angle petal from the Stampin’ Up! Round We Go stamp set in Azure Afternoon on a Basic White panel. I rotated the stamp and stamped again between each petal. I cut a small Lemon Lime Twist circle for the center. I stamped the sentiment in Berry Burst and trimmed the bottom with DSP. I adhered the panel to the inside of the card with Stampin’ Seal.

The Stampin’ Up! Round We Go bundle is so fun and happy and perfect for lighthearted, whimsical cards for any occasion. There are so many different ways to combine the die cuts and stamped circle images, you could keep yourself (or your kids) busy for hours playing with different ideas and colors.


Bonus Days Coming July 3, 2024!

It’s time for one of our favorite promotions—BONUS DAYS! Because do you know what’s a great deal? Getting rewarded for all the crafting supplies you’re already going to buy! When you shop between 3–31 July and spend $50 you will earn a $5 coupon! Make sure you save all your coupons because you can redeem them (and we mean ALL of them) between August 1 and August 31. There’s no limit to how many coupons you can earn! 

Promotion Details:

Earning Period: July 3 – July 31 2024

  • Earn a $5 coupon for every $50 spent (before shipping and tax). 
  • All coupon codes will be emailed right after a qualifying purchase has been made. Customers must have a customer account with a valid email address to earn coupons when they shop. If you don’t already have an account, you can easily create one in the Online store – contact me if you have any questions. 
  • If you earn multiple codes from a single order, you will receive one email with multiple codes. If you earn multiple codes from multiple orders, you will receive separate emails for each code earned.
  • All order types qualify for this promotion. Phone and email orders still require an email address.
  • Orders started before the promotion begins will not count toward earning coupon codes. For example, if you add items to your cart before July 3 and wait to purchase until that date or later, then those items will not qualify towards earning coupons. You must add items to your cart and complete your purchase during the earning period. 
  • There is no limit to the number of coupon codes participants can earn per order or throughout the duration of the earning period. 
  • Customers must use a valid email address during checkout in order to receive their coupon code. If a customer places an order over the phone, they must still provide a valid email address to receive their coupon code.
  • Starter Kit orders are excluded from this offer.

Redemption Period: August 1 – August 31, 2024

  • There is no limit to the number of coupon codes you can redeem on an order during the redemption period. If using multiple codes, they must be separated by a space. 
  • Coupon codes may be redeemed one time only. They cannot be redeemed after August 31, 2024.
  • Coupon codes may be redeemed for any product (excluding Starter Kits). They cannot be used on exchanges.
  • Bonus Days coupon codes can be applied to month-to-month Paper Pumpkin subscriptions and new prepaid subscriptions.

New Online Exclusives Available Now!

A new selection of Online Exclusive products was just introduced. Online Exclusives won’t appear in any catalog and are only available in the Online Store. There is no fixed end date for Online Exclusives! Some products will be reordered when inventory is low, and others will only be available while supplies last. This way Stampin’ Up! can offer even more new products throughout the year.

This release includes several items to get an early start on Fall and Christmas crafting. So check them out!


Current Host Code: XQZKDQU9

Use this host code when you order $50 or more and receive a Thank You gift from me!  The free gift is your choice of any item currently available valued up to $10.00.

If your order is over $150, please do not use the host code since you’ll receive your own Host Dollars plus I’ll still send you the Thank You gift!  This host code can be used by anyone, no club or commitment required. Let me know if you have any questions.


If you need any stamping supplies, I’d be very happy to be your Demonstrator.  Just click on the Shop Now Button on the right side of the screen to go directly to my Online store or contact me if you have any questions.  Happy Stamping!

Thanks for stopping by and have a great day!

Akiko

  • Visit my online store here
  • See the current Stampin’ Up! clearance rack specials here
  • Earn FREE Stampin’ Up! products through my Wildflower Frequent Shopper Program – my way of saying thank you to my online frequent shopper customers.
  • Have any questions? I’d be happy to help, click here to contact me.

Cardstock Cuts for this project:

  • Azure Afternoon – 4-1/4″ x 11″ card base, scored at 5-1/2″, 1-3/4″ x 3-1/2″ (two curved edge petals), 2-3/4″ x 2-3/4″ (die cut scalloped circle for rosette back)
  • Lemon Lime Twist – 2″ x 2″ (angle edge petal), 1″ x 1″ (small circle for inside)
  • Pretty Peacock – 1″ x 1″ (medium circle for rosette)
  • Berry Burst – 2″ x 2″ (angle edge petal)
  • Bubble Bath – 1-3/4″ x 1-3/4″ (curve edge petal)
  • Basic White – 3-3/4″ x 5″ (inside panel)
  • Bright and Beautiful DSP – 3-3/4″ x 5″ (front background), two 1-3/4″ x 5-1/2″ panels (3D rosette), 1/2″ x 3-3/4″ (inside trim)

Stampin’ Up! products used in this project:


Stampin’ Up! Spotlight On Nature Thank You Card

Good Morning! There are so many pretty bundles in the current Annual Catalog and one of my favorites is the Stampin’ Up! Spotlight On Nature bundle. With its simple and elegant images, beautiful sentiments and wonderful circle dies, it’s so easy to make pretty cards and I’ve paired it with the pretty Country Woods designer series paper for a thank you card. You can find the products I used at the bottom of my post along with the card stock sizes.

I adhered a panel of Country Woods designer series paper to an Early Espresso mat with liquid glue and popped it on the front of a Basic Beige card base.

I stamped the flowers from the Stampin’ Up! Spotlight On Nature stamp set in Early Espresso ink on Basic Beige. I stamped the sentiment in Early Espresso ink and cut it out with the eyelet circle die. I colored the flowers using Petal Pink Stampin’ Blends and the leaves with the Lost Lagoon Stampin’ Blends. I cut an Early Espresso panel with the radiating circle die and adhered the floral die cut to the Early Espresso die cut.

I trimmed the left side of the layered circles and popped them on the card with dimensionals. I tied a knot with a short length of Basic Beige ribbon and adhered it to the stems with a glue dot. I finished the card with three Petal Pink dots.

For the inside of the card I stamped the leaf cluster from the Stampin’ Up! Spotlight On Nature stamp set in stamped off Lost Lagoon ink on a Basic White panel. I trimmed the bottom with a strip of DSP and adhered the panel to the inside of the card with Stampin’ Seal.

The graceful flowers in the Stampin’ Up! Spotlight on Nature stamp set are really pretty and easy to color and the sentiments are wonderful. And the different styles of the circle dies are fabulous and perfect for layering.


Bonus Days Going On Now!

It’s time for one of our favorite promotions—BONUS DAYS! Because do you know what’s a great deal? Getting rewarded for all the crafting supplies you’re already going to buy! When you shop between 3–31 July and spend $50 you will earn a $5 coupon! Make sure you save all your coupons because you can redeem them (and we mean ALL of them) between August 1 and August 31. There’s no limit to how many coupons you can earn! 

Promotion Details:

Earning Period: July 3 – July 31 2024

  • Earn a $5 coupon for every $50 spent (before shipping and tax). 
  • All coupon codes will be emailed right after a qualifying purchase has been made. Customers must have a customer account with a valid email address to earn coupons when they shop. If you don’t already have an account, you can easily create one in the Online store – contact me if you have any questions. 
  • If you earn multiple codes from a single order, you will receive one email with multiple codes. If you earn multiple codes from multiple orders, you will receive separate emails for each code earned.
  • All order types qualify for this promotion. Phone and email orders still require an email address.
  • Orders started before the promotion begins will not count toward earning coupon codes. For example, if you add items to your cart before July 3 and wait to purchase until that date or later, then those items will not qualify towards earning coupons. You must add items to your cart and complete your purchase during the earning period. 
  • There is no limit to the number of coupon codes participants can earn per order or throughout the duration of the earning period. 
  • Customers must use a valid email address during checkout in order to receive their coupon code. If a customer places an order over the phone, they must still provide a valid email address to receive their coupon code.
  • Starter Kit orders are excluded from this offer.

Redemption Period: August 1 – August 31, 2024

  • There is no limit to the number of coupon codes you can redeem on an order during the redemption period. If using multiple codes, they must be separated by a space. 
  • Coupon codes may be redeemed one time only. They cannot be redeemed after August 31, 2024.
  • Coupon codes may be redeemed for any product (excluding Starter Kits). They cannot be used on exchanges.
  • Bonus Days coupon codes can be applied to month-to-month Paper Pumpkin subscriptions and new prepaid subscriptions.

Current Host Code: XQZKDQU9

Use this host code when you order $50 or more and receive a Thank You gift from me!  The free gift is your choice of any item currently available valued up to $10.00.

If your order is over $150, please do not use the host code since you’ll receive your own Host Dollars plus I’ll still send you the Thank You gift!  This host code can be used by anyone, no club or commitment required. Let me know if you have any questions.


If you need any stamping supplies, I’d be very happy to be your Demonstrator.  Just click on the Shop Now Button on the right side of the screen to go directly to my Online store or contact me if you have any questions.  Happy Stamping!

Thanks for stopping by and have a great day!

Akiko

  • Visit my online store here
  • See the current Stampin’ Up! clearance rack specials here
  • Earn FREE Stampin’ Up! products through my Wildflower Frequent Shopper Program – my way of saying thank you to my online frequent shopper customers.
  • Have any questions? I’d be happy to help, click here to contact me.

Cardstock Cuts for this project:

  • Basic Beige – 4-1/4″ x 11″ card base, scored at 5-1/2″, 3-1/2″ x 3-1/2″ (floral panel)
  • Early Espresso – 4″ x 5-1/4″ (front mat), 4-1/4″ x 4-1/4″ (circle mat)
  • Basic White – 4″ x 5-1/4″ (inside panel)
  • Country Woods DSP – 3-7/8″ x 5-1/8″ (front background), 1/2″ x 4″ (inside trim)

Stampin’ Up! products used in this project:


Stampin’ Up! Beach Day for the Happy Inkin’ Thursday Blog Hop

Happy 4th of July!! Good Morning and welcome to the Happy Inkin’ Thursday Blog Hop! The Stampin’ Up! Beach Day stamp set and dies are a fun way to celebrate summer at the beach. It has a wonderful palm tree and beach chairs and clever dies to make waves crashing on the shoreline. You can find the supplies I used along with card stock cuts at the bottom of my post.

We have a fun sketch challenge this week – I turned it upside down:

Iused a blending brush to lightly apply some Balmy Blue ink to the top of a Basic White panel. I used the wave die from the stampin’ Up! Beach Day stamp set to cut a panel of Azure Afternoon, and I laid the die on an angle and I adhered it to the Basic White panel I used the wavy line die to cut the top off the Basic Beige panel so that it is at an angle just below the breaking waves.

I used the sea shell stamp from the Stampin’ Up! Beach Day stamp set and stamped off Crumb Cake ink to make sea shells along the shore line and adhered the panel Basic Beige panel to the waves and sky with liquid glue. I cut the palm tree from Garden Green and Pecan Pie card stock and adhered the tree to the panel with glue dots. I stamped three beach chairs using Memento Tuxedo Black ink on Basic White and colored them with Azure Afternoon, Poppy Parade and Daffodil Delight ink and cut them out with the coordinating die. I adhered the beach chairs to the panel with glue dots and stamped a sand castle on the bottom using Crumb Cake ink.

I adhered the panel to the front of an Azure Afternoon card base with dimensionals. I stamped the seagull and beach ball using Memento Tuxedo Black ink on Basic White and cut them out with the coordinating dies. I colored the beach ball with Azure Afternoon, Poppy Parade, Granny Apple Green Daffodil Delight and Summer Splash Stampin’ Blends and adhered the seagull and beach ball with glue dots. I stamped the sentiment from the Stampin’ Up! Beach Day stamp set using Azure Afternoon ink on Basic White and cut it out with the Stylish Shapes dies. I accented the label with an Azure Afternoon dot.

For the inside of the card, I stamped the sentiment from the Stampin’ Up! Beach Day stamp set using Azure Afternoon ink on Basic White. I stamped another seagull and beach ball along with an umbrella in Memento Tuxedo Black ink on Basic White and cut them out with the coordinating dies. I colored the umbrella and beach ball with Stampin’ Blends and adhered them all to the card with glue dots. I adhered the panel to the inside of the card with Stampin’ Seal.

The Stampin’ Up! Beach Day stamp set and dies are a fun way to celebrate the summer and the 4th of July. Have fun and stay safe if you’re lucky enough to spend time at the beach this summer. And thanks for taking time out from this special day to visit!!

On with the Hop! Click on the Next Blog button to move forward to see the beautiful project Karen Ksenzakovic has created.

If you get lost along the way, here are the participants for the hop:


Current Host Code: XQZKDQU9

Use this host code when you order $50 or more and receive a free gift from me!  The free gift is your choice of any item currently available valued up to $10.00!

If your order is over $150, please do not use the host code since you’ll receive your own Host Dollars plus I’ll still send you the free gift!  This host code can be used by anyone, no club or commitment required. Let me know if you have any questions.


If you need any stamping supplies, I’d be very happy to be your Demonstrator.  Just click on the Shop Now button on the right side of the screen to go directly to my online store or contact me if you have any questions. 

Thanks for stopping by and Happy Stamping!

Akiko

  • Visit my online store here
  • See the current Stampin’ Up! clearance rack specials here
  • Earn FREE Stampin’ Up! products through my Wildflower Frequent Shopper Program – my way of saying thank you to my online frequent shopper customers.
  • Have any questions? I’d be happy to help, click here to contact me.

Cardstock Cuts for this project:

  • Azure Afternoon – 4-1/4″ x 11″” card base, scored at 5-1/2″, 3-1/4″ x 3-1/4″ (die cut waves)
  • Basic Beige – 3-1/4″ x 4-1/2″ (sand)
  • Garden Green – 2″ x 3″ (palm fronds)
  • Pecan Pie – 1/2″ x 2-1/2″ (palm trunk)
  • Basic White – 4″ x 5-1/4″ (inside panel), 1″ x 3″ (label), 3-1/4″ x 4-1/2″ (sky), 3″ x 6″ (die cut chairs, birds, beach balls, umbrella)

Stampin’ Up! products used in this project:


Stampin’ Up! Country Birdhouse for the Happy Inkin’ Thursday Blog Hop

Good Morning and welcome to the Happy Inkin’ Thursday Blog Hop! I finally got to play with the pretty Stampin’ Up! Country Birdhouse bundle and made this sweet hello card. You can find the supplies I used along with card stock cuts at the bottom of my post.

We have a pretty color challenge this week and I think I used all the colors:

I embossed a strip of Country Lace designer series paper with the Eyelet 3D embossing folder and adhered it to another panel of Country Lace DSP. I adhered the layered panel to the front of a Basic Beige card base with liquid glue. I used the Stampin’ Up! Country Birdhouse dies to cut out different panels of Country Woods DSP to make the birdhouse. I used liquid glue to adhere the die cuts together and adhered the birdhouse to the card with dimensionals.

I stamped the bird and flowers from the Stampin’ Up! Country Birdhouse stamp set in Memento Tuxedo Black ink on Basic White. I colored the bird with light Boho Blue and light Petal Pink Stampin’ Blends and I used Flirty Flamingo, Peach Pie, dark Daffodil Delight and light Lemon Lime Twist Stampin’ Blends to color the flowers. I cut out the birds and floweers with the coordinating dies. I also die cut some leaves and a flower from Basic White and colored them with light Lemon Lime Twist and Light Boho Blue Stampin’ Blends.

I stamped the sentiment from the Stampin’ Up! Country Birdhouse stamp set. in Misty Moonlight ink on a Basic Beige panel. I used one of the new tag dies from the upcoming Greetings of the Season dies (available July 3) to cut it out. I colored a length of Linen Trhead with the light Misty Moonlight Stampin’ Blend and looped it through the hole, tying a knot. I adhered it to the card with glue dots and dimensionals. I adhered the bird to and flowers to the card with glue dots and dimensionals and finished with metallic textured dots.

For the inside of the card, I stamped the flower bouquet from the Stampin’ Up! Country Birdhouse stamp set across the bottom of a Basic White panel using Memento Tuxedo Black ink. I colored the flowers like the flowers on the front and adhered the panel to the inside of the card with Stampin’ Seal.

The die cut birdhouse from the Stampin’ Up! Country Birdhouse bundle is really wonderful and fun to make. And the sweet images and pretty sentiments make this a pretty versatile bundle.

On with the Hop! Click on the Next Blog button to move forward to see the beautiful project Karen Ksenzakovic has created.

If you get lost along the way, here are the participants for the hop:


Current Host Code: XQZKDQU9

Use this host code when you order $50 or more and receive a free gift from me!  The free gift is your choice of any item currently available valued up to $10.00!

If your order is over $150, please do not use the host code since you’ll receive your own Host Dollars plus I’ll still send you the free gift!  This host code can be used by anyone, no club or commitment required. Let me know if you have any questions.


If you need any stamping supplies, I’d be very happy to be your Demonstrator.  Just click on the Shop Now button on the right side of the screen to go directly to my online store or contact me if you have any questions. 

Thanks for stopping by and Happy Stamping!

Akiko

  • Visit my online store here
  • See the current Stampin’ Up! clearance rack specials here
  • Earn FREE Stampin’ Up! products through my Wildflower Frequent Shopper Program – my way of saying thank you to my online frequent shopper customers.
  • Have any questions? I’d be happy to help, click here to contact me.

Cardstock Cuts for this project:

  • Basic Beige – 5-1/2″ x 8-1/2″ card base, scored at 4-1/4″, 1-1/4″ x 2-1/2″ (label)
  • Pecan Pie – 2-1/4″ x 3-1/4″ (birdhouse trim)
  • Basic White – 4″ x 5-14″ (inside panel), 1-1/4″ x 4″ (die cut birds, flowers and leaves)
  • Country Woods DSP – 3-1/4″ x 4″ (die cut birdhouse), 2″ x 3-1/4″ (birdhouse roof), 3/4″ x 3-1/4″ (birdhouse ledge)
  • Country Lace DSP – 4″ x 5-1/4″ (front background), 2″ x 4″ (embossed strip)

Stampin’ Up! products used in this project:


Stampin’ Up! Wildflower Designs Card

Good Morning! The Stampin’ Up! Wildflower Designs bundle is a new cling stamp set with dies bundle from the new Annual Catalog with pretty wildflower images and wonderful sentiments. I didn’t use the dies on this project because I wanted to use the pretty circle dies from the Spotlight on Nature dies. You can find the products I used at the bottom of my post along with the card stock sizes.

I was inspired by the pretty sketch in the Freshly Made Sketches #641 Challenge:

I embossed a panel of Wildly Flowering designer series paper with the Dashing Designs 3D embossing folder and adhered it to the front of a Misty Moonlight card base with liquid glue. I stamped the large flower image from the Stampin’ Up! Wildflower Designs stamp set using Memento Tuxedo Black ink on a Basic White panel and colored it with light Boho Blue and dark Old Olive Stampin’ Blends. I used stamped off Crumb cake ink to stamp more wildflowers in the background and cut it out with the dashed circle die from the Spotlight on Nature dies.

I colored one of the butterfly cutouts from the Paper Butterfly Accents with the light Wild Wheat Stampin’ Blend and adhered it to the corner of the die cut circle with glue dots. I adhered the circle and butterfly to the card with dimensionals.

I stamped sentiment from the Stampin’ Up Wildflower Designs stamp set in Misty Moonlight ink on Basic White. I cut it out with the large Stylish Shapes Banner die using the two step method and adhered it to the card front with glue dots. I finished the card with pretty Boho Blue and Wild Wheat dots.

For the inside of the card I stamped another flower from the Stampin’ Up! Wildflower Designs stamp set in Memento Tuxedo Black ink on a Basic White panel. I colored it with light Boho Blue and dark Old Olive Stampin’ Blends. I embossed a strip of Wildly Flowering DSP and adhered it to the bottom of the panel and adhered the panel to the inside of the card with Stampin’ Seal.

The floral images in the Stampin’ Up! Wildflower Designs stamp set are simple and sweet. It’s nice that there are coordinating dies that cut them out, and I’ll have to do that on my next card. And I am loving the Wildly Flowering DSP, with all it’s different patterns and vintage feel.


Stampin’ Up! Bundle Sale Going On NOW!

Everyone loves a good deal, which is why Stampin’ Up! is offering an additional 10% off all stamp and die bundles! Between June 5, 2024 and June 30, 2024, take advantage of the sale and add some new bundles to your collection. Plus, save 10% on the Stampin’ Cut & Emboss Machine and the Mini Stampin’ Cut & Emboss Machine. These machines make the perfect crafting partner for stamp and die bundles.

Promotion Details:

  • Sales Period: June 5, 2024 – June 30, 2024
  • Get an additional 10% discount on stamp and die bundles only (that’s a total of 20% discount on stamp and die bundles!).
  • This excludes suite collections, stamp and punch bundles and any other bundles*.
  • Save 10% on Stampin’ Cut & Emboss Machine and Mini Stampin’ Cut & Emboss Machine (white and Boho Blue). 
  • The 10% discount applies automatically to stamp and die bundles in all orders including Starter Kit orders.

*Please note Close to My Heart products are not included in this promotion.


Current Host Code: XQZKDQU9

Use this host code when you order $50 or more and receive a Thank You gift from me!  The free gift is your choice of any item currently available valued up to $10.00.

If your order is over $150, please do not use the host code since you’ll receive your own Host Dollars plus I’ll still send you the Thank You gift!  This host code can be used by anyone, no club or commitment required. Let me know if you have any questions.


If you need any stamping supplies, I’d be very happy to be your Demonstrator.  Just click on the Shop Now Button on the right side of the screen to go directly to my Online store or contact me if you have any questions.  Happy Stamping!

Thanks for stopping by and have a great day!

Akiko

  • Visit my online store here
  • See the current Stampin’ Up! clearance rack specials here
  • Earn FREE Stampin’ Up! products through my Wildflower Frequent Shopper Program – my way of saying thank you to my online frequent shopper customers.
  • Have any questions? I’d be happy to help, click here to contact me.

Cardstock Cuts for this project:

  • Misty Moonlight – 4-1/4″ x 11″ card base, scored at 5-1/2″
  • Basic White – 4″ x 5-1/4″ (inside panel), 3″ x 3″ (die cut circle), 1-1/4″ x 4-1/4″ (label)
  • Wildly Flowering DSP – 4″ x 5-1/4″ (embossed background), 1/2″ x 4″ (inside trim)
  • Paper Butterfly Accents – small butterfly

Stampin’ Up! products used in this project:


Stampin’ Up! Thoughtful Wishes CAS Card

Good Morning! The Stampin’ Up! Thoughtful Wishes stamp set has pretty images and sentiments and so today I did something different and I made a single layer CAS (clean and simple) card. You can find the products I used at the bottom of my post along with the card stock sizes.

My card was inspired by the Paper Players PP694 Challenge – Clean-and-Simple.

I stamped the leaf sprig from the Stampin’ Up! Thoughtful Wishes stamp set using Wild Wheat ink on a Basic Beige card base. I used a blender pen to lightly color the leaves with Pretty Peacock and Old Olive inks.

I stamped the sentiment from the Stampin’ Up! Thoughtful Wishes stamp set using Pretty Peacock ink next to the leaves and finished the card with a single small Pretty Peacock iridescent pearl. Since the new Basic Beige color is so light, I didn’t even put an inside panel on the card – you can write your personal message directly on the card base!

I love the new Basic Beige color and I love how well the Wild Wheat, Old Olive and Pretty Peacock inks look with it. And this card was so different for me, single layer, no dies and no adhesives! Clean and Simple – give it a try!


Stampin’ Up! Bundle Sale Going On NOW!

Everyone loves a good deal, which is why Stampin’ Up! is offering an additional 10% off all stamp and die bundles! Between June 5, 2024 and June 30, 2024, take advantage of the sale and add some new bundles to your collection. Plus, save 10% on the Stampin’ Cut & Emboss Machine and the Mini Stampin’ Cut & Emboss Machine. These machines make the perfect crafting partner for stamp and die bundles.

Promotion Details:

  • Sales Period: June 5, 2024 – June 30, 2024
  • Get an additional 10% discount on stamp and die bundles only (that’s a total of 20% discount on stamp and die bundles!).
  • This excludes suite collections, stamp and punch bundles and any other bundles*.
  • Save 10% on Stampin’ Cut & Emboss Machine and Mini Stampin’ Cut & Emboss Machine (white and Boho Blue). 
  • The 10% discount applies automatically to stamp and die bundles in all orders including Starter Kit orders.

*Please note Close to My Heart products are not included in this promotion.


Current Host Code: XQZKDQU9

Use this host code when you order $50 or more and receive a Thank You gift from me!  The free gift is your choice of any item currently available valued up to $10.00.

If your order is over $150, please do not use the host code since you’ll receive your own Host Dollars plus I’ll still send you the Thank You gift!  This host code can be used by anyone, no club or commitment required. Let me know if you have any questions.


If you need any stamping supplies, I’d be very happy to be your Demonstrator.  Just click on the Shop Now Button on the right side of the screen to go directly to my Online store or contact me if you have any questions.  Happy Stamping!

Thanks for stopping by and have a great day!

Akiko

  • Visit my online store here
  • See the current Stampin’ Up! clearance rack specials here
  • Earn FREE Stampin’ Up! products through my Wildflower Frequent Shopper Program – my way of saying thank you to my online frequent shopper customers.
  • Have any questions? I’d be happy to help, click here to contact me.

Cardstock Cuts for this project:

  • Basic Beige – 5-1/2″ x 8-1/2″ card base, scored at 4-1/4″

Stampin’ Up! products used in this project:


Stampin’ Up! Simply Zinnia for the Happy Inkin’ Thursday Blog Hop

Good Morning and welcome to the Happy Inkin’ Thursday Blog Hop! The Stampin’ Up! Simply Zinnia bundle is one of my current favorites, and the pretty Flowering Zinnias designer series paper is so pretty. I’ve used them to make a pretty thinking of you card for today. You can find the supplies I used along with card stock cuts at the bottom of my post.

We have a pretty sketch challenge this week:

I adhered a panel of Flowering Zinnias designer series paper to the front of a Melon Mambo card base with liquid glue. I adhered another panel of leafy Flowering Zinnias DSP to the card with liquid glue.

I adhered a third panel to a Mossy Meadow mat and popped it on the card with dimensionals.

I stamped the sentiment from the Stampin’ Up! Simply Zinnia stamp set using Blackberry Bliss ink on a strip of Melon Mambo card stock and adhered it to the card with dimnesionals and glue dots. I finished the card with Shiny Sequins to add some bling.

For the inside of the card, I stamped the flower bouquet from the Stampin’ Up! Simply Zinnia stamp set using three times stamped off Melon Mambo ink on a Basic White panel. I adhered the panel to the inside of the card with Stampin’ Seal.

This week’s sketch is really simple and pretty and the wonderful colors of the Flowering Zinnias designer series paper make this card so easy, especially with the pretty sentiment from the Stampin’ Up! Simply Zinnia stamp set!

On with the Hop! Click on the Next Blog button to move forward to see the beautiful project Karen Ksenzakovic has created.

If you get lost along the way, here are the participants for the hop:


Current Host Code: XQZKDQU9

Use this host code when you order $50 or more and receive a free gift from me!  The free gift is your choice of any item currently available valued up to $10.00!

If your order is over $150, please do not use the host code since you’ll receive your own Host Dollars plus I’ll still send you the free gift!  This host code can be used by anyone, no club or commitment required. Let me know if you have any questions.


If you need any stamping supplies, I’d be very happy to be your Demonstrator.  Just click on the Shop Now button on the right side of the screen to go directly to my online store or contact me if you have any questions. 

Thanks for stopping by and Happy Stamping!

Akiko

  • Visit my online store here
  • See the current Stampin’ Up! clearance rack specials here
  • Earn FREE Stampin’ Up! products through my Wildflower Frequent Shopper Program – my way of saying thank you to my online frequent shopper customers.
  • Have any questions? I’d be happy to help, click here to contact me.

Cardstock Cuts for this project:

  • Melon Mambo – 5-1/2″ x 8-1/2″ card base, scored at 4-1/4″, 3/4″ x 3-1/2″ (label)
  • Mossy Meadow – 3″ x 3″ (front mat)
  • Basic White – 4″ x 5-1/4″ (inside panel)
  • Flowering Zinnias DSP – 4″ x 5-1/4″ (front background), 2-1/2″ x 3-1/2″ (leaf panel), 2-7/8″ x 2-7/8″ (floral panel)

Stampin’ Up! products used in this project:


Stampin’ Up! Frames & Flowers Thank You Card

Good Morning! The Stampin’ Up! Frames & Flowers specialty designer series paper is such a cool idea, full of pretty floral images and greenery frames. It has three sheets of double sided designer series paper and three sheets of lovely floral and greenery die cuts. You can find the products I used at the bottom of my post along with the card stock sizes.

I adhered one of the die cut panels from the Stampin’ Up! Frames & Flowers specialty designer series paper to a Lost Lagoon mat with liquid glue and popped it onto the front of a Petal Pink card base with dimensionals.

I adhered a floral bouquet die cut from the Stampin’ Up! Frames & Flowers specialty DSP to two greenery die cuts with glue dots and adhered them to the card with dimensionals. I popped a large flower die cut on the bouquet to give it some dimension.

I stamped the part of the sentiment from the Magnolia Mood stamp set in Lost Lagoon ink on a panel of Stampin’ Up! Frames & Flowers specialty DSP (I used the center of one of the large frames) and cut it out with the smallest Countryside Corners die. I adhered the label to the card with dimensionals and glue dots. I finished the card with Peach Pie shimmer gems.

For the inside of the card I adhered a small bouquet from the Stampin’ Up! Frames & Flowers specialty DSP to the corner of a Basic White panel with liquid glue and adhered the panel to the inside of the card with Stampin’ Seal.

The colors in the Stampin’ Up! Frames & Flowers specialty DSP are so soft and pretty and the die cuts are so fun to arrange! I hope you check it out.


Stampin’ Up! Bundle Sale Going On NOW!

Everyone loves a good deal, which is why Stampin’ Up! is offering an additional 10% off all stamp and die bundles! Between June 5, 2024 and June 30, 2024, take advantage of the sale and add some new bundles to your collection. Plus, save 10% on the Stampin’ Cut & Emboss Machine and the Mini Stampin’ Cut & Emboss Machine. These machines make the perfect crafting partner for stamp and die bundles.

Promotion Details:

  • Sales Period: June 5, 2024 – June 30, 2024
  • Get an additional 10% discount on stamp and die bundles only (that’s a total of 20% discount on stamp and die bundles!).
  • This excludes suite collections, stamp and punch bundles and any other bundles*.
  • Save 10% on Stampin’ Cut & Emboss Machine and Mini Stampin’ Cut & Emboss Machine (white and Boho Blue). 
  • The 10% discount applies automatically to stamp and die bundles in all orders including Starter Kit orders.

*Please note Close to My Heart products are not included in this promotion.


New Kits In Kits Collection!

The Kits Collection by Stampin’ Up! provides different options and a range of project types that allow you to choose the crafting experiences that best fits your style and needs. There’s a variety of kits to choose from and these all-inclusive project kits have everything you need in one box! You can Find these kits in the Online Store.

The new kits for June are the beautiful Expressions of Kindness Kit and the fun Scenic Route Travel Journal Kit. Check out the YouTube videos for these new kits to see the contents and learn how to make the cards and journal.

The Kits Collection offering changes frequently as new kits are released, and kit availability fluctuates. To check the availability of these new kits or past kits, visit my Online Store. 


Current Host Code: XQZKDQU9

Use this host code when you order $50 or more and receive a Thank You gift from me!  The free gift is your choice of any item currently available valued up to $10.00.

If your order is over $150, please do not use the host code since you’ll receive your own Host Dollars plus I’ll still send you the Thank You gift!  This host code can be used by anyone, no club or commitment required. Let me know if you have any questions.


If you need any stamping supplies, I’d be very happy to be your Demonstrator.  Just click on the Shop Now Button on the right side of the screen to go directly to my Online store or contact me if you have any questions.  Happy Stamping!

Thanks for stopping by and have a great day!

Akiko

  • Visit my online store here
  • See the current Stampin’ Up! clearance rack specials here
  • Earn FREE Stampin’ Up! products through my Wildflower Frequent Shopper Program – my way of saying thank you to my online frequent shopper customers.
  • Have any questions? I’d be happy to help, click here to contact me.

Cardstock Cuts for this project:

  • Petal Pink – 4-1/4″ x 11″ card base, scored at 5-1/2″
  • Lost Lagoon – 3-7/8″ x 5-1/8″ (front mat)
  • Basic White – 4″ x 5-1/4″ (inside panel)
  • Frames & Florals specialty DSP – large background panel, large bouquet, small bouquet, two greenery sprigs, large flower, frame center (label)

Stampin’ Up! products used in this project: